AXE100 SS/SSL Instruction Manual
|
|
|
- Gabriel Harrison
- 6 years ago
- Views:
Transcription

1 NOTICE AXE100 SS/SSL Instruction Manual The instruction manual, warranties and other associated documentation are subject to change without notice. Hobbico assumes no responsibility for inadvertent errors in this manual. Heli-Max products are to be used by ages 14 and over. Entire Contents 2013 Hobbico, Inc. HMXE0824 Axe 100 SS Brushless RTF HMXE0825 Axe 100 SS Brushless Tx-R HMXE0827 Axe 100 SSL W/LEDS RTF HMXE0828 Axe 100 SSL W/LEDS Tx-R
2 INTRODUCTION Thank you for purchasing the Heli-Max AXE100 SS or SSL Helicopter. We are certain you will get many hours of enjoyment out of this model. If you should have any questions or concerns, please feel free to contact us at: hobbico.com. For the latest technical updates or manual corrections to the AXE100 SS/SSL visit the Heli-Max web site at Open the Helicopters link, and then select the AXE100 SS or AXE 100SSL helicopter. If there is any new technical information, changes or important updates to this model a tech notice box will appear on the page. Click the tech notice box to learn more. When you see this symbol, please pay special attention and heed all warnings regarding the information within. SAFETY PRECAUTIONS Failure to follow these safety precautions may result in injury to yourself and others. Keep your face and body as well as all spectators away from the rotating plane of the blades whenever the battery is connected. Keep loose clothing, shirt sleeves, ties, scarfs, long hair or loose objects such as pencils or screwdrivers that may fall out of shirt or jacket pockets away from the rotors. The spinning blades of a model helicopter can cause serious injury. When choosing a flying site for your AXE100 SS/SSL, stay clear of buildings, trees and power lines. AVOID flying in or near crowded areas. DO NOT fly close to people or pets. Maintain a safe distance from the helicopter. Your AXE100 SS/SSL should not be considered a toy. Because of its performance capabilities, the AXE100 SS/SSL, if not operated correctly, could cause injury to you or spectators and damage to property. Do not alter or modify the model. Doing so may result in an unsafe or un-flyable model. When and if repairs are necessary you must correctly install all components so that the model operates properly on the ground and in the air. Please check the operation of the model before every flight to insure that all equipment is operating and that the model has remained structurally sound. Be sure to 2
3 check linkages or other connectors often and replace them if they show any signs of wear or fatigue. Battery warnings and usage guidelines: Please read and understand the following regarding the usage of LiPo batteries. Through the use of the included LiPo battery you have assumed all risk and responsibility regarding a LiPo battery and its use. BATTERY WARNINGS ALWAYS unplug your battery from either the charger or helicopter after use. NEVER store your helicopter with the battery plugged into the helicopter. Do not attempt to charge your battery if it becomes swollen or hot. It s best to store your batteries charged and at room temperature. Storing a fully discharged battery may cause irreversible damage to the battery. Never disassemble, puncture or modify the battery pack in anyway. Never allow the battery temperature to exceed 150 F [65 C]. If your battery begins to swell or puff during charge or discharge, or becomes damaged in any way, stop using it and contact Hobby Services at to learn the proper way to dispose of your battery. NOTE: Heli-Max AXE battery packs are NOT cross compatible with Heli-Max NOVUS brand products. CHARGE WARNINGS Only use the included charger with the included LiPo battery. Do not attempt to use the provided charger with NiCd, NiMH or batteries with other chemistries. Do not leave the charger unattended while in use and always charge your battery in a fi re-resistant location. Disconnect the battery and remove input power from the charger immediately if either becomes hot! Do not allow water or other foreign objects to enter the charger. Keep the charger away from moisture and do not submerge in water. Do not block the air intake holes of the charger; this could cause the charger to overheat. Please keep all electronic components out of the reach of children! 3

4 WARRANTY Heli-Max guarantees this kit to be free from defects in both material and workmanship at the date of purchase. This warranty does not cover any component parts damaged by use or modification. In no case shall Heli-Max s liability exceed the original cost of the purchased kit. Further, Heli-Max reserves the right to change or modify this warranty without notice. In that Heli-Max has no control over the final assembly or material used for final assembly, no liability shall be assumed nor accepted for any damage resulting from the use by the user of the final user-assembled product. By the act of using the user assembled product, the user accepts all resulting liability. If the buyer is not prepared to accept the liability associated with the use of this product, the buyer is advised to return this kit immediately in new and unused condition to the place of purchase. To make a warranty claim, Hobby Services send the defective part or 3002 N. Apollo Dr., Suite 1 item to Hobby Services Champaign, IL at this address. USA Include a letter stating your name, return shipping address, as much contact information as possible (daytime telephone number, fax number, address), a detailed description of the problem and a photocopy of the purchase receipt. Upon receipt of the package the problem will be evaluated as quickly as possible. CONTENTS Heli-Max TX 610 Transmitter and manual AXE100 SS/SSL Helicopter 400mAh LiPo Flight Battery Adjustable LiPo Battery Charger with wall adaptor Screw Driver Extra Blade Set Extra Rotor Linkage Set Required: 8 AA batteries 4
5 GENERAL HELICOPTER SPECIFICATIONS Management: Collective Pitch, 120 degree CCPM, TAGs control Motors: Brushless main motor, brushed tail motor Empty Weight: 47.8g (1.69oz) Weight RTF: 60.1g (2.12oz) Blade Length: 105mm (4.13 ) Tail Rotor Diameter: 38mm (1.5 ) Overall Length: 312mm (12.3 ) Height: 81mm (3.18 ) Width: 52mm (2.04 ) Gear Ratio: 8:1 MOTOR SPECIFICATIONS (1412 Brushless Motor) Diameter: 14.5mm Length: 13.6mm Weight: 6.9g Voltage: 3.7v No load Current:.7 amp KV: 14,750 CONTROLLER SPECIFICATIONS Max current (5min): 10 amp Thermal protection: 90 C~120 C Slow Start Function: Yes Soft cutoff: Yes OPERATIONAL WARNINGS Please allow a 10 minute cool down period after each flight so the motor controller and motor can cool down. Failure to do so may cause loss of control due to the controller overheating and shutting down. Inspect the main rotor blades and blade screws before each flight for nicks or loose components. If any damage is found or if the blades have been damaged, replace the blades before flying the model again. The motor controller has a soft cut function that will reduce the power output to protect the flight battery. Toward the end of a flight you will notice a slight power reduction. Land the model immediately. The flight time of the AXE100 SS/SSL can be as long as 6 minutes (Standard Hover) but this will vary depending on your flying style. After a crash you must inspect all plastic parts on the helicopter for damage before attempting to fly the model again. Always unplug your battery from the helicopter after use. 5
 is used to disable the power output of the motor but has no effect on the other controls.")

6 TRANSMITTER (RTF Model) Please fully read the transmitter manual included with your helicopter to learn more about how to use and adjust your TX610. IMPORTANT TRANSMITTER FUNCTIONS The Throttle Hold Switch (HOLD/ FLAP) is used to disable the power output of the motor but has no effect on the other controls. The throttle hold function is intended for autorotation landings off power descent to landing; this maneuver is really not realistic with a motor driven tail. In addition to autorotation the throttle hold function can be used as a safety switch while handling the model since it disables power to the motor. Turn the transmitter on and set the throttle hold switch to the on position. Now you can safely connect the flight battery without having to worry about inadvertently moving the throttle stick once you place the model on the ground. Verify that the idle up switch is off and the throttle stick has been moved to its lowest position. Then, simply turn the throttle hold off. The model is now ready to fly. Another use for the throttle hold function is to disable the motor before a crash without having to drop the collective stick, possibly forcing the model into the ground. The UP-1 function is enabled and ready to use. The UP-1 switch (UP-1/GEAR) function is used for aerobatics and 3D flight. If you are a beginner to aerobatics, remember this switch sets the motor speed (see your TX610 manual for details) while still allowing positive and negative pitch control. This means if you get confused flying, pulling the throttle stick back WILL NOT decrease the power to the motor but rather add power. Hence it s a good idea to learn to use the Throttle Hold Switch when you feel a crash is imminent! 6

 If you decide to do a system reset, the factory setup numbers to the Heli-Max AXE100 SS/SSL are listed")

 0 50 75 85 100 Normal Pitch Curve (N-PI) 45 50 55 62 68 UP-1 Throttle")
7 STICK CONTROLS Throttle/Collective Left and right cyclic Tail (rudder) Forward and back cyclic It s also important to know that your TX610 transmitter is capable of a system reset. (See how this is done in the TX610 Manual.) If you decide to do a system reset, the factory setup numbers to the Heli-Max AXE100 SS/SSL are listed here. Below are the factory default parameters (Model Memory 8) for your AXE100 SS/SSL Helicopter. AXE100 SS/SSL / TX610 1 AILE 2 ELEV 3 THRO 4 RUDD 5 GYRO 6 PITC Type HELI Swash Type 90 deg Servo Reverse (NOR/REV) N N N N N N Dual Rates (D/R) 80/100 80/100 80/100 Exponential (EXPO) Sub Trims (S-TRM) Normal Throttle Curve (N-TH) Normal Pitch Curve (N-PI) UP-1 Throttle Curve HOV/FLAP.T DIAL UP-1 PITCH Curve Gyro Rate (G-S) 75 (Switch Down) 24 (Switch Up) 7


8 GETTING THE MODEL READY TO FLY INSTALL BATTERIES IN THE TRANSMITTER Remove the battery cover from the back of the transmitter and install eight AA batteries into the transmitter. Double-check the polarity of each battery before replacing the battery cover. CHARGE THE FLIGHT BATTERY Plug the wall power supply into any 110V standard outlet. Plug the remaining 4mm plug into the side of the charger box. The center front panel LED will light letting you know the charger has power. Plug the helicopter s power battery into the open connector of the charger. The charger will beep twice letting you know the battery is connected. 8

. TURN THE TRANSMITTER ON Verify that the HOLD/FLAP and UP-1/GEAR functions are off and slide the power switch up to turn the transmitter on.")

9 At this point you can select a slower or faster charge rate by pressing the - or + buttons located on the face of the charger. While the LED is illuminated you will need to press the charge button. You will hear 3 beeps and the charge cycle will begin. When charging is complete, all the LEDs will flash and you will hear a steady set of beeps coming from the unit. Unplug the flight battery. It is now ready to use. NOTE: Your battery charger ranges from.3amps to.7amps in.1 amp increments. The higher this value, the faster the battery will charge. We recommend charging on the.5amp setting (Default). TURN THE TRANSMITTER ON Verify that the HOLD/FLAP and UP-1/GEAR functions are off and slide the power switch up to turn the transmitter on. If the transmitter is turned on with the HOLD/FLAP, UP-1/GEAR or throttle stick forward, the screen will show 3D or T-H and a warning will sound. Turn the HOLD/FLAP and UP-1/GEAR functions off and move the throttle stick to the low position to continue. Now is a good time to make sure the electronic trim buttons on the transmitter are centered. We do not need to use them as the Incredible Heli-Max TAGS system controls all flight center trims. INSTALL THE FLIGHT BATTERY Slide the battery into the helicopter. Make sure the battery is slid all the way to the front of the battery tray. Make sure the battery wires don t come in contact with any of the rotating parts. 9
10 Once the fl ight battery has been connected, always handle the helicopter as if it has full power available. The helicopter must remain still for the gyro to initialize properly. This process is instantaneous after the helicopter is held still. Turning off the HOLD/FLAP switch the helicopter is ready to go. Now is a good time to turn on the HOLD/FLAP switch until you are ready to start fl ying. Your AXE100 SS/SSL uses the Tactic SLT protocol. This means, with the simple addition of the Tactic Anylink to your favorite transmitter, you can enjoy your Heli-Max AXE100 SS/SSL with a familiar transmitter, YOURS. After the purchase of your Anylink, make sure to fully read the instructions so you understand how to properly and safely use the Anylink system. When using the Anylink you must make sure to follow the proper mapping procedure for your radio system. Failing to do so could cause an unsafe condition. How to map your transmitter, as well as a list of compatible transmitters, is included with your Anylink. You can fi nd this and more information on the Tactic website, LINKING Your AXE100 SS/SSL RTF comes with the transmitter pre-linked to the helicopter. The Tx-R version requires you to complete this using your transmitter and an Anylink. Also, if you need to link or re-link for any reason, here is the proper procedure to do so. To identify if your transmitter is linked to the helicopter, first turn your transmitter on, remove the canopy (see removing the canopy in the maintenance section of this manual), and view the LED closest to the link button. It should remain steady on. If it does not and is flashing your transmitter is not linked to the helicopter. To link the transmitter to the helicopter follow the below procedure. 1. Turn on the transmitter, making sure all the switches are in the back position and the throttle is down. 2. Remove the canopy from the helicopter and locate the small black button near the front of the PC board. Next to it will be an LED (flashing if not linked). 3. Place the transmitter in close proximity to the helicopter (1 to 2 feet away). 4. Press and hold the push button for 3 seconds or until the LED remains on. 10

11 5. Monitor the flashing LED. When it stays on without flashing, your transmitter is now linked to the helicopter. Note: there is a second LED in the center of the PCB. When your transmitter is linked and the helicopter held still this LED will flicker, letting you know your TAGS stabilization system is working and ready. TRANSMITTER SETUP GUIDELINES TO HELP YOU GET STARTED FUTABA: You will fi nd that regardless of the Futaba system you choose, the basic setup is the same. This includes the Futaba 6EX, 7C, T6J, TJ8 as well as others. We have listed the setup of a Futaba T6J transmitter. It s also worth noting that even though the AXE100 SS/SSL uses 120 degree CCPM (Cycliccollective-pitch-mixing), with the Heli-Max TAGS system you must select the 90 degree swash arrangement. In a Futaba system this is called H-1 or 1-S under swash type. The setups listed are will get you going and might suit your fl ying style. If not please feel free to make adjustments to suite your fl ying style. AXE 100SS/SSL Futaba TJ6 1 AILE 2 ELEV 3 THRO 4 RUDD 5 GYRO 6 PITCH Parameter (PARA) HELI Reverse (REVR) N N R N N N Dual Rates (D/R) 100/80 100/80 140/100 Exponential (EXPO) Normal Throttle (N-TH) Normal Pitch (N-PI) Idle Up Throttle (I-TH) Idle Up Pitch (I-PI) Throttle Hold (HOLD) ON 0% Gyro Mixing (GYRO) ON SW A Pos 55 Pos 55 Swashplate Type (SWSH) H-1 Timer (TIMR) 5min 11
12 We have also included a basic setup for Spektrum users as well. AXE 100 SS/SSL / Spek DX6i AILE ELEV THRO RUDD GYRO PITC Low High 6 Type HELI Reverse R R N R N N Dual Rates (D/R) 100/80 100/80 100/100 Exponential (EXPO) Pos 20 Pos 20 0 Travel Adjustment 100% 100% 100% 100% 100% 100% Norm Throttle Norm Pitch Stunt Throttle Stunt Pitch Throttle Hold ON 0% Hold Pitch NULL Gyro Mixing 70 switch up, 75 switch down Swashplate Type 90deg Timer 5min Th is is a good setup for the Tactic 650 AXE100SS/SSL / Tactic AILE 2 ELEV 3 THRO 4 RUDD 5 GYRO 6 PITC Type HELI Swash Type 1 Servo Servo Rev N N R N N N Servo Set Travel H Sub Trim Dual Rate 100/80 100/80 100/100 Expo -20/-20-20/-20 0/0 TH Cut Factory TH Hold Factory TH Curve Normal 0 NULL NULL NULL 100 TH Curve UP NULL NULL NULL 100 PI Curve Normal -30 NULL 0% NULL +68 PI Curve UP-1-68 NULL NULL NULL +68 Gyro +75 / +60 Throttle Mix NULL Rev Mix NULL Swash Ring 110 Program Mix NULL Timer 5:00 Min 12
13 FLYING YOUR AXE100 SS/SSL Takeoff: During your first flights it is important to have light winds. Also, if you are flying from grass, place a rubber mat or pad down on the grass so the small rotating parts don t get hung up. Turn off the hold switch and very slowly add power and observe the model. During spool up It is important to note that the torque of the main blades can cause the helicopter to rotate slightly clockwise. This is normal. Your AXE 100 SS/SSL has the incredible Heli-Max TAGS system. The TAGS system takes care of all center trim function the transmitter. Having said this you do not need, or want, to move or adjust the trim buttons during flight. If you notice any slight flight drifting give it some time. After the helicopter s swash and servo links break-in the drift will diminish. Hovering: Once the helicopter is in the air simply try to keep the helicopter in one spot. This will take some practice. Remember that even a light breeze will have an effect on the stability of the helicopter, so please take your time. Be patient and wait for a calm day. Landing: Level the helicopter into a steady hover and slowly decrease power until the helicopter settles onto the ground. You might notice as the helicopter is ready to touch down it moves around a little. This is normal as the helicopter enters ground effect. Remember to unplug the battery from the helicopter after your flight is complete. BASIC MANEUVERS Once you are comfortable with hovering in one place start working on orientations. By this we mean to say, hover the helicopter in all positions, nose to the right, nose to the left and the nose pointing at you (nose-in). Getting good at this fundamental discipline will allow you to progress much faster in some of the more advanced flying maneuvers. Slow Pirouettes: Add a small amount of tail rotor (left or right) and try rotating the helicopter slightly sideways and see if you can hold it there. If you become uncomfortable you will want to bring the tail back towards you. Once you are comfortable, try moving the helicopter to the side and turning back. Then fly back to the other side in straight lines. You can try rotating the helicopter around 360, which is called a pirouette. The helicopter can drift during this maneuver so make certain you have plenty of room when you first start practicing. Forward Flight: Now it s time to work into basic forward flight. Just take the basic hovering maneuvers listed above and slowly fly out farther and faster and always bring the helicopter back after one pass. Practice controlled slow flight in close as well. The more time you spend practicing here, the easier things will be later on. 13
14 AEROBATICS So you are getting comfortable in fast forward flight? Well, now it s time to slowly progress into aerobatics. Your AXE100 SS/SSL is more than capable of full aerobatic performance. Once you are in forward flight start using the idle up switch. This switch raises the rotor RPM and allows the blades to progress into negative pitch for aerobatics and inverted flight. Chandelles: Your first step is chandelles. Fly straight across in front of you and pull up to a 45 angle. Now at the top, when the helicopter slows down to a stop, apply left or right tail rotor to bring the nose around 180 and continue back down the 45 angle. As you progress with the maneuver you can pull a greater angle than 45, but 90 would be considered a stall turn. Loops: Once you become comfortable with the chandelles and stall turns it s time to move onto the loop. The key to the loop is to enter with plenty of speed. Start pulling aft cyclic to enter the loop and as the model transitions to inverted at the top of the loop pull back on the throttle (towards negative ( ) collective). This will help maintain altitude. As the model returns back to vertical add some positive (+) collective to maintain the speed. One of the most common mistakes made on loops is using too much negative ( ) collective at the top. Flips: Be certain to start with plenty of altitude. From an upright hover slowly add in full forward cyclic. As the model approaches vertical, bring the collective stick back to center. Now, as the model continues to inverted, you will need to start adding in negative ( ) collective (or pull the collective stick back towards yourself). As the model transitions back to vertical, again bring the collective stick back to the middle and start adding in positive (+) collective as the model returns back to upright. It s simply a matter of timing. The most important thing is, do not throw the sticks around. This can cause the head speed to drop and may cause the tail to drift. Inverted Hovering: Keep in mind flying a helicopter inverted is difficult but with practice it can be learned. One of the main problems is 3 out of 4 of the controls are reversed (forward/aft cyclic, collective and tail rotor). You have to mentally reverse these while flying. It will take some practice. Take the loop you learned above and just hold the inverted portion for short periods of time. As you become accustomed to the reversed controls, you will extend the time inverted. Also, make sure you have plenty of altitude for recovery if needed. 14


15 MAINTENANCE TOOLS NEEDED Small screwdriver (provided) Soldering iron We will describe a few simple repairs that you can do to your helicopter. We will list them as removing with the understanding that to reassemble one just follows each step again from the bottom up. NOTE: It s a good idea to keep a magnet handy to help secure the small screws. You can also use this magnet to magnetize your screwdriver; just rub the end of the screwdriver on the magnet for a few seconds. This works nicely to keep the screws in place on the tip of the screwdriver. TIP: we use a small piece of white paper over the magnet to help see the screws. REMOVING THE CANOPY Carefully pull the back edges of the canopy outward, sliding the rubber grommets off the pegs. Then side the canopy forward. 15


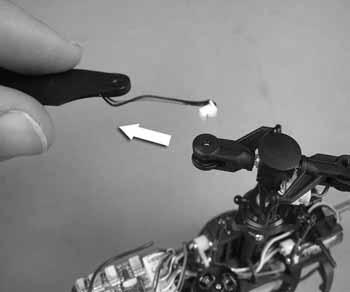
16 REMOVING THE MAIN BLADES AXE SS Using the provided screwdriver remove the main blade screw from the blade grip. Side the blade out of the grip. REMOVING THE MAIN BLADES AXE SSL Using the supplied screwdriver remove the main blade screw from the blade grip. Carefully side the blade from the grip and unplug the LED power wire. 16


17 REMOVING THE TAIL BLADE Hold the motor firmly and pry the tail blade off using your fingernail or small, flat blade screwdriver. Use your finger to press the new blade in place. NOTE: When reinstalling, do not force the blade tight against the motor. REMOVING THE LANDING GEAR A total of 6 screws hold the battery tray/ landing gear in place. Using the supplied screwdriver remove the 6 screws. REMOVING THE MAIN GEAR AXE SS After removing the landing gear, use the supplied screwdriver to remove the screw that holds the main gear in place. Slide the main gear away. 17


18 REMOVING THE MAIN GEAR AXE SSL After removing the landing gear, scrape away any adhesive holding the wires to the solder lugs. Unsolder the two wires from the gear contact posts. Using the supplied screwdriver, remove the screw that holds the main gear in place. Slide the main gear away, carefully snaking the two wires though the center hole. REMOVING THE MAIN SHAFT Remove the landing gear, and remove the main gear. Using the supplied screwdriver loosen the two screws on the lock collar. Remove the ball links that attach the servo pushrods to the swashplate. Remove the links from the blade grips. Slide the main shaft and head from the helicopter and remove the screw from the head block. Slide the main shaft away. NOTE: When reassembling, it s important to set the shaft lash using the lock collar so as not to be too loose or too tight. 18


19 REMOVING THE FEATHERING SHAFT NOTE: You will have to provide a second small phillips screwdriver for this step. Remove the blades from the blade grips as described above. Place a screw driver in the end of each blade grip and engage the screws. Unscrew the screws and one of the two will remove. Slide the blade grips off, being very careful to not lose any parts. Note the direction of the silver spacer washers. REPLACING AN AFT SERVO Remove the canopy. Remove the link from the swashplate. Unscrew the screw from the attachment bar. Carefully place pressure on the bar back, and then slide off the servo tabs. Snake the wire out of the loom and then unplug the servo. 19


20 REPLACING THE FORWARD SERVO Remove the canopy. Remove the link from the swashplate. Unscrew the two screws from each side of the servo mount. Snake the wire out of the loom and then unplug the servo. REMOVING THE TAIL BOOM Remove the canopy. Unplug the connector leading to the tail motor. Snake the wires away from the bundle. Grasp the tail boom and pull it away from the main frame. If you find the boom hard to remove, use a drop of CA debonder on the parts and allow that to work into the joint before you try to remove it again. 20
21 21
22 REPLACEMENT PARTS
23 HMXE2100 Feather Shaft (2) 1 29 HMXE2101 Head Block 2 HMXE2102 Rubber Dampers (6) 3 AXE100 CP/SS HMXE2103 Blade Grip Spacers (6) 4 HMXE2104 Blade Grip (2) HMXE2201 Main Blade (2) 6 AXE100 SS HMXE2116 Bearing Set (6) 7 HMXE2106 Head Linkage (4) 8 HMXE2107 Main Shaft 9 29 AXE100 FP/MD AXE100 CP/SS HMXE2190 Swashplate 10 HMXE2109 Main Shaft Collar HMXE2111 Servo Links (3) 12 AXE100 SS/SSL AXE100 FP/MD HMXE2117 Elevator Servo Mount HMXE2191 Main Frame 14 7 HMXE2120 Canopy Servo Mount AXE100 SS/SSL HMXG8031 Brushless Motor HMXE2185 Ball Link Stud (6) 17 HMXM g Servo W / Arm AXE100 SS/SSL 23
24
25 HMXE2118 Servo Arm W / Link (3) HMXM2042 TAGS Control Board HMXE2121 Double Stick Tape (4) 21 AXE100 SS HMXM A Control Board 22 HMXE2113 Main Gear HMXG8033 Tail Boom W / Motor 26 AXE100 SS/SSL AXE100 CP/SS AXE100 SS HMXE2192 Landing Skid W /Screws HMXP mAh Lipo Battery Pack 28 HMXE2189 Screw Set 29 AXE100 SS/SSL AXE100 SS/SSL AXE100 SS HMXE2124 Assembled Rotor Head HMXE2146 Canopy (Orange) HMXE2114 Canopy (Yellow) AXE100 CP/SS AXE100 FP AXE100 CP HMXE2187 Canopy (Green) HMXE2198 Canopy (Gold) HMXE2152 Tail Rotor (Black) AXE100 SS AXE100 SSL AXE100 FP HMXE2122 Tail Rotor (Yellow) HMXE2188 Tail Rotor (Green) HMXE2199 Tail Rotor (Gold) AXE100 CP AXE100 SS 25 AXE100 SSL
26 AXE100 SSL 26
27 HMXE2197 Main Gear W / Contact Plate 30 HMXG8032 Tail Boom W / Motor and LED 31 HMXM2044 TAGS Control Board 32 AXE100 SSL AXE100 SSL AXE100 SSL HMXE2196 LED Plate Contacts 33 HMXE2193 Rotor Blades W / LEDs 34 HMXE2200 Screw Set 35 AXE100 SSL AXE100 SSL AXE100 SSL HMXE2194 Main Shaft w/ Rotor Head and Board AXE100 SSL 27
28 HMXE2186 Bullet Rotor Blade (2) 41 AXE100 ALL HMXE2054 CNC Rotor Head (Assembled) HMXE2050 CNC Metal Head Block 39 HMXE2051 CNC Metal Blade Grips 40 HMXE2052 CNC Metal Swashplate 41 HMXE2053 Screw Set CNC Rotor Head 42 HMXE2123 Battery Plug Adaptor JST
Instruction Manual NOTICE
 Instruction Manual NOTICE The instruction manual, warranties and other associated documentation are subject to change without notice. Hobbico assumes no responsibility for inadvertent errors in this manual.
AXE100 CX Instruction Manual
 NOTICE AXE100 CX Instruction Manual The instruction manual, warranties and other associated documentation are subject to change without notice. Hobbico assumes no responsibility for inadvertent errors
Instruction Manual NOTICE
 OTICE Instruction Manual The instruction manual, warranties and other associated documentation are subject to change without notice. Hobbico assumes no responsibility for inadvertent errors to this manual.
INSTRUCTION MANUAL. Specifi cations. Length: 9.0 in [229mm] Width: 2.7 in [68mm] Height: 3.3 in [84mm] Rotor Span: 7.9 in [200mm]
![INSTRUCTION MANUAL. Specifi cations. Length: 9.0 in [229mm] Width: 2.7 in [68mm] Height: 3.3 in [84mm] Rotor Span: 7.9 in [200mm]](/thumbs/77/74699350.jpg "INSTRUCTION MANUAL. Specifi cations. Length: 9.0 in [229mm] Width: 2.7 in [68mm] Height: 3.3 in [84mm] Rotor Span: 7.9 in [200mm]") INSTRUCTION MANUAL Specifi cations Length: 9.0 in [229mm] Width: 2.7 in [68mm] Height: 3.3 in [84mm] Rotor Span: 7.9 in [200mm] Flying Weight: 2 oz [57.2g] with supplied fl ight battery IMPORTANT PRECAUTIONS
INSTRUCTION MANUAL Specifi cations Length: 9.0 in [229mm] Width: 2.7 in [68mm] Height: 3.3 in [84mm] Rotor Span: 7.9 in [200mm] Flying Weight: 2 oz [57.2g] with supplied fl ight battery IMPORTANT PRECAUTIONS
Novus CP Specifi cations
 Novus CP Specifi cations Length: 10.7 in [272mm] Width: 2 in [50mm] Height: 3.74 in [95mm] Rotor Span: 12 in [305mm] Flying Weight: 2.41 oz [68.4g] (with supplied fl ight battery) Entire Contents Copyright
MD GHz RTF/Tx-R Instruction Manual. Entire Contents 2012 Hobbico, Inc. HMXE0813 RTF HMXE0814 Tx-R
 MD50 2.4GHz RTF/Tx-R Instruction Manual Entire Contents 2012 Hobbico, Inc. HMXE081 RTF HMXE0814 Tx-R TABLE OF CONTENTS INTRODUCTION.............................................. 2 SAFETY PRECAUTIONS.......................................
IMPORTANT PRECAUTIONS
 Rotor Span: 10.6 in [270mm] Height: 5.9 in [150mm] Length: 10.8 in [275mm] Width: 2.5 in [65mm] Weight: 2.65 oz [75g] no battery Flying Weight: 4.26 oz [121g] with supplied fl ight battery INSTRUCTION
INSTRUCTION MANUAL SPECIFICATIONS
 INSTRUCTION MANUAL SPECIFICATIONS Span: 13.6 in [ 345 mm] Size: Height: 19.7 in [500 mm] diagonal span 9.25 in [ 235mm] Weight RTF: Flight Time: 3.91 lbs (1774 g) with 5000 mah LiPo Up to 15 minutes WARNING
INSTRUCTION MANUAL WARRANTY
 INSTRUCTION MANUAL Rotor Diameter: 23 in [588mm] Weight: 20.5 23 oz [580 650 g] Length: 25 in [630mm] Height: 9 in [225mm] Motor: 200W brushless, 28mm diameter Heli-Max guarantees this kit to be free from
Specifications ASSEMBLY INSTRUCTIONS
 ASSEMBLY INSTRUCTIONS Specifications Length : 6 mm Height : 218 mm Main Blade : 325 mm Main Rotor Diameter : 723 mm Tail Rotor Diameter : 150 mm Motor Pinion Gear : 16T (14T) Main Drive Gear : 150T Main
INSTRUCTION MANUAL WARRANTY
 INSTRUCTION MANUAL Rotor Span: 13.5 in [340mm] Height: 7 in [180mm] Length: 14.5 in [370mm] Weight: 7.5 oz [213g] Radio: Tactic 4-Channel FM Motor: 130 Brushed motor Heli-Max guarantees this kit to be
CHARGING INSTALL THE BATTERIES INTO THE CONTROLLER
 CHARGING 1. Plug charger into computer or USB charge adapter. The LED on the charger will turn on. 2. Make sure that the On/Off switch on the Nano Hexagon is off and connect charger. The LED on the charger
nano drone for beginners
 nano drone for beginners www.axisdrones.com By operating this device you acknowledge and accept all risks and responsibilities of the use, storage and proper disposal of any and all included lithium batteries.
ITEMS INCLUDED. 2.4GHz Controller
 READ THESE INSTRUCTIONS BEFORE FLYING! ITEMS INCLUDED.4GHz Controller Flight Battery Charger SKY Cruiser LiPo Flight Battery AA Batteries AC Power Supply WARNINGS FOR YOUR SAFETY PLEASE READ AND UNDERSTAND
Wing Loading: Length: Radio: 6 channel
 INSTRUCTION MANUAL SPECIFICATIONS Wingspan: 56.5 in [1435mm] Wing Area: 421 in 2 [27.2 dm 2 ] Weight: 61 oz [1729 g] Wing Loading: Length: Radio: 20.9 oz/ft 2 [63.7 g/dm 2 ] 44.5 in [1130mm] 6 channel
* Ql! ^0f. B-17 Flying Fortress. 3 axis stabilization
 G3&nw * Ql! ^0f B-17 Flying Fortress 3 axis stabilization (HK)EASYSKY ENTERPRISE LIMITED Website: www.easy-sky.net E-mail: rcmodel@easy-sky.net sales@easy-sky.net Tel: 86-755-27891 659 Fax:86-755-27372071
INSTRUCTION MANUAL WARRANTY
 INSTRUCTION MANUAL Rotor Diameter: 27.5 in [700mm] Weight: 19 22 oz [580 760g] Length: 25.4 in [645mm] Height: 9 in [225mm] Motor: ElectriFly Ammo 28-45-2700kV (GPMG5215) Heli-Max guarantees this kit to
1100MM P-51 Mustang ELECTRIC POWERED REMOTE CONTROL AIRPLANE ELEVENHOBBY.COM
 1100MM P-51 Mustang ELECTRIC POWERED REMOTE CONTROL AIRPLANE ELEVENHOBBY.COM WARNING: Read the ENTIRE instruction manual to become familiar with the features of the product before operating. Failure to
VERT 1 VERTICAL TAKE OFF / LANDING RC PLANE
 VERT 1 VERTICAL TAKE OFF / LANDING RC PLANE THANK YOU. Thank you for your purchase of Protocol s Vert I Vertical Take Off / Landing RC Plane. You are about to experience the best of what remote control
52 BACKYARDFLYER.COM FLY
 52 BACKYARDFLYER.COM FLY HELIS IN1O EASY STEPS by Klaus Ronge Photography by Hope McCall & Pete Hall Flying model helicopters is exciting and fun and looks very easy, that is, until you try it. Unlike
Flight Manual. Entire contents Megatech 2009 Rev
 Flight Manual www.megatech.com Entire contents Megatech 2009 Rev. 200909210830 If you have questions about operating or assembling your new Megatech product... Please Call Megatech First! DO NOT RETURN
9303 PROGRAM MIX EXAMPLES
 9303 PROGRAM MIX EXAMPLES Here are a few examples of some common program mixes. They are intended as a quick reference guide and may require modification to suit a particular installation. SMOKE SYSTEM
51in Aerobatic Series Sukhoi SU-26M Almost-Ready-to-Fly. Instruction Manual. Specifications
 51in Aerobatic Series Sukhoi SU-26M Almost-Ready-to-Fly Instruction Manual Specifications Wingspan: 51.2 in (1300mm) Length: 51.2 in (1300mm) Wing Area: 581 sq in (37.5sq dm) Flying Weight: 3.5 lb (1600g)
INSTRUCTION MANUAL WARNING
 INSTRUCTION MANUAL WARNING Please make sure you read the entire instruction manual to become familiar with the features of your aircraft before operating. Failure to operate this product correctly can
AVIATOR REMOTE CONTROL HELICOPTER
 AVIATOR REMOTE CONTROL HELICOPTER THANK YOU. Thank you for your purchase of Protocol s Aviator Remote Control Helicopter. You are about to experience the best of what remote control flight has to offer.
ASSEMBLE ONLY WITH ADULT SUPERVISION
 ASSEMBLE ONLY WITH ADULT SUPERVISION Please read through this instruction booklet to THOROUGHLY familiarize yourself with the assembly and flight characteristics of this airplane prior to assembly. Please
AVIATOR 25 ARF Almost Ready-to-Fly
 AVIATOR 25 ARF Almost Ready-to-Fly Instruction Manual Specifications Wingspan: 54.3 in (1380mm) Length: 45.2 in (1150mm) Wing Area: 438 sq in (34sq dm) Flying Weight: 3.8 b (1700g) Dear Customer, Congratulations
SAFETY WARNING Please read these before operating your Sky Vector
 www.megatech.com Entire contents Megatech 2002 Congratulations! You have just purchased the EASIEST plane to fly in the world! Learning to fly has never been so fun! Get ready to hand launch into gravity-defying
Caution Notes. Features. Specifications. Installation. A3 3-axis Gyro & Stabilizer User Manual V1.0
 Caution Notes Thank you for choosing our products. If any difficulties are encountered while setting up or operating it, please consult this manual first. For further help, please don t hesitate to contact
Special Features. Specifications Motor Types: Sensored Motor Limit: 2.5T (on 2S) Input Voltage: 2-3S LiPo Direction: Forward, Brake, Reverse
 Input Voltage: 2-3S LiPo Direction: Forward, Brake, Reverse") MS-1 ELECTRONIC SPEED CONTROL Thank you for choosing TrakPower as your source for brushless electronics. The MS-1 ESC was specifically developed for 1/10th competition. The MS-1 ESC features an aluminum
MS-1 ELECTRONIC SPEED CONTROL Thank you for choosing TrakPower as your source for brushless electronics. The MS-1 ESC was specifically developed for 1/10th competition. The MS-1 ESC features an aluminum
INCLUDED TOOLS REQUIRED TOOLS ITEMS REQUIRED FOR OPERATION. 6-Cell Battery DTXC2054. Onyx 200 Peak Charger DTXP4200. Charge Adapter DTXC2209
 Ready to Run 1/5-Scale Brushless EP Motorcycle INCLUDED TOOLS 2mm Wrench Cleaning Brush REQUIRED TOOLS Needle Nose Pliers DTXR0300 Phillips Screwdriver DTXR0124 Flat Blade Screwdriver DTXR0102 Threadlocker
44xx Estes-Cox Corp H Street, PO Box 227 Penrose, CO Made In Shantou, Guangdong, China
 Do not turn on the Proto-N unless controller has been turned on fi rst. Keep hands, hair and loose clothing away from spinning blades. Turn off controller and Proto-N when not in use. Parental guidance
 Introduction Thank you for purchasing a Redcat P-51 model R/C aircraft! Headquartered in Phoenix, AZ; Redcat Racing is proud to have become the premier source for quality Gas, Nitro and Electric powered
CCPM manager. A real alternative to expensive in-transmitter mixing
 Eliminates RC system latency errors. Exploits full resolution of the RC link. Corrects for CCPM geometry errors.!7!*-!) CCPM manager A real alternative to expensive in-transmitter mixing Optionally drives
Instruction Manual Bedienungsanleitung Manuel d utilisation Manuale di Istruzioni RTF
 Instruction Manual Bedienungsanleitung Manuel d utilisation Manuale di Istruzioni RTF NOTICE All instructions, warranties and other collateral documents are subject to change at the sole discretion of
TAROT ZYX 3 AXIS GYRO INSTRUCTION MANUAL
 TAROT ZYX 3 AXIS GYRO INSTRUCTION MANUAL The multi-functional flybarless ZYX high performance 3-axis gyro system made by TAROT is the lightest flybarless system. It is compatible with all 200-700 nitro
 Introduction Thank you for purchasing a Redcat JETiger Ducted-Fan Aircraft! Headquartered in Phoenix, AZ; Redcat Racing is proud to have become the premier source for quality Gas, Nitro and Electric powered
RECOMMENDED MOTOR AND BATTERY SET UP
 SPECIFICATION - Wingspan: 6000mm (236.2 in) - Length: 2873mm (113.1 in) - Flying weight: 14-18 kg - Wing area: 219.4 dm2 - Wing loading: 64g/dm2 - Wing type: HQ airfoils - Covering type: Genuine ORACOVER
ECHO. User Manual. Model: PFBD77
 ECHO User Manual Model: PFBD77 Thank you for choosing ProFlight. Please read this user manual before using this drone and keep it safe for future reference. CONTENTS Safety 3 Battery Charging 4 Transmitter
SPECTRE DRONE USER MANUAL
 SPECTRE DRONE USER MANUAL PRODUCT CODE: ZXSPT www.zero-x.com.au www.zero-x.co.nz v2 Thanks for purchasing a Zero-X Spectre Drone, get ready to have the time of your life! We re sure your Zero-X Spectre
Wing Area: 1050 in 2 [67.7 dm 2 ] Wing Loading: 10 oz/ft 2 [31 g/dm 2 ]
![Wing Area: 1050 in 2 [67.7 dm 2 ] Wing Loading: 10 oz/ft 2 [31 g/dm 2 ]](/thumbs/75/71828779.jpg "Wing Area: 1050 in 2 [67.7 dm 2 ] Wing Loading: 10 oz/ft 2 [31 g/dm 2 ]") MANUAL ADDENDUM This manual addendum provides additional instructions for assembling the power system onto the Bird of Time. Please read through this addendum before you start the assembly of the Bird
MANUAL ADDENDUM This manual addendum provides additional instructions for assembling the power system onto the Bird of Time. Please read through this addendum before you start the assembly of the Bird
ASSEMBLE ONLY WITH ADULT SUPERVISION WARRANTY. This product is suitable only for people of 14 years and older.
 ASSEMBLE ONLY WITH ADULT SUPERVISION Please read through this instruction booklet to THOROUGHLY familiarize yourself with the assembly and flight characteristics of this airplane prior to assembly. Please
the game company ENGLISH Manual JAHRE YEARS ANS V
 the game company Manual 4 14+ 14+ JAHRE YEARS ANS V1.05 2013 the game company! Read the entire user s manual to become familiar with the characteristics of the product before using it. Incorrect use of
Galileo with wifi RADIO CONTROLLED QUAD-COPTER
 Galileo with wifi TM RADIO CONTROLLED QUAD-COPTER FEATURING: 1. Four-Rotor design allows great speed and maneuverability for both Indoor and Outdoor use. 2. Built-in 6-axis Gyro ensures excellent stability.
It has taken a while to get
 HOVERING15 99 15 BASICS HOVERING Hovering It has taken a while to get here, but this is what all the building and planning were for to see light under those skids. But this is also the time when you have
FIRE PHOENIX RADIO CONTROLLED AIRPLANE
 FIRE PHOENIX RADIO CONTROLLED AIRPLANE ASSEMBLY AND OPERATION INSTRUCTIONS YIN YAN MODEL TECH. MFT. 1 SPECIFICATIONS Material EPO Plane Battery Li-Po 1300mAh 11.1V Radio 4 Channel Wing Span 1200mm Length
PHOENIX HV Features of the Phoenix HV-45 : 2.3 Connecting the Motor. 2.4 Reversing Rotation. 2.5 Connecting the Receiver
 PHOENIX HV -45 1.0 Features of the Phoenix HV-45 : Extremely Low Resistance (.003 ohms) High rate adjustable switching (PWM) Up to 45 Amps continuous current Dual Opto-Coupled (No BEC) Up to 36 cells or
Scorpion User guide for Commander Series ESC s
 Scorpion User guide for Commander Series ESC s. The Commander 6V SBEC series feature a inbuilt switching BEC that will convert the voltage from your battery pack to.7 volts to power your receiver and servos.
Instruction Manual Bedienungsanleitung Manuel d utilisation Manuale di Istruzioni RTF
 Instruction Manual Bedienungsanleitung Manuel d utilisation Manuale di Istruzioni RTF NOTICE All instructions, warranties and other collateral documents are subject to change at the sole discretion of
Welcome to VBar Express 5.3
 Bar Express Welcome to VBar Express 5.3 The VBar with V 5.3 Express software is an innovative product setting new standards for model helicopters in terms of flight performance and programming capacity.
INSTRUCTION MANUAL. explore-rise.com
 explore-rise.com INSTRUCTION MANUAL WARNING Please read and understand this manual, the operation and all safety aspects required for the safe operation of the product. Before use, if you feel that this
Instruction Manual Bedienungsanleitung Manuel d utilisation Manuale di Istruzioni RTF
 Instruction Manual Bedienungsanleitung Manuel d utilisation Manuale di Istruzioni RTF NOTICE All instructions, warranties and other collateral documents are subject to change at the sole discretion of
Flight Manual. Entire contents Megatech 2007 Rev
 Flight Manual www.megatech.com Entire contents Megatech 2007 Rev. 200711151451 If you have questions about operating or assembling your new Megatech product... Please Call Megatech First! DO NOT RETURN
64MM F-16 Fighting Falcon V2
 64MM F-16 Fighting Falcon V2 SIMPLE Simple assembly RIGID STRONG DURABLE EPO STABLE SMOOTH FLYING PERFORMANCE FMSMODEL.COM Table of Contents Introductions 3 Contents of Kit 4 Assemble the plane 5 Battery
Galileo RADIO CONTROLLED QUAD-COPTER
 Galileo TM RADIO CONTROLLED QUAD-COPTER FEATURING: 1. Four-Rotor design allows great speed and maneuverability for both Indoor and Outdoor use. 2. Built-in 6-axis Gyro ensures excellent stability. 3. Modular
USER GUIDE - SUPPLEMENTAL
 USER GUIDE - SUPPLEMENTAL CONTENTS 5 Instructions for RX2702V receiver... 2 5.3 Channel connection of receiver... 2 10 Walkera V450D01 Flybarless System Setting RX2702V... 3 10.5 Flybarless system setting...
CONFIGURATION(astro/blaze) REQUIRES #
 REQUIRES #") CONFIGURATION(astro/blaze) Length: 29.1in(740mm) Wing Span: 31.9in / 31.1in(810 / 790mm) Wing Area: 1.61 / 1.53ft²(15 / 14.2dm²) Flying Weight: 21oz(600g) REQUIRES Radio control system with 4 channels(delta-mix.)
CONFIGURATION(astro/blaze) Length: 29.1in(740mm) Wing Span: 31.9in / 31.1in(810 / 790mm) Wing Area: 1.61 / 1.53ft²(15 / 14.2dm²) Flying Weight: 21oz(600g) REQUIRES Radio control system with 4 channels(delta-mix.)
YAK-55M 1.8. Forget the rest - a YAK ist the best! Assembly instructions. Gernot
 YAK-55M 1.8 Assembly instructions Forget the rest - a YAK ist the best! Gernot Table of contents 1.Specifications (metric units)...2 2.Recommended Setups...2 3.Required tools and adhesives:...2 4.Warning...3
Very Fun & Easy NOTICE
 Very Fun & Easy NOTICE NOTICE All instructions, warranties and other collateral documents are subject to change at the sole discretion of our company. For up-to-date product literature, Visit our website
SebArt professional line
 SebArt professional line Miss UltimateS 50E ARF ASSEMBLY MANUAL The new Miss UltimateS 50E ARF was designed by the F3A aerobatic pilot Sebastiano Silvestri and it s a semi scale version of the real plane
INSTRUCTION MANUAL Hobbico, Inc. HMXR4854
 INSTRUCTION MANUAL 2013 Hobbico, Inc. HMXR4854 INTRODUCTION Thank you for purchasing the Heli-Max Digital Pitch Gauge. This product is intended to measure the angle on the helicopter s main and tail rotor
Power Meter with Balancing INSTRUCTION MANUAL
 Power Meter with Balancing INSTRUCTION MANUAL INSTRUCTIONS The PowerMatch meter is a perfect device for matching electronic components to optimize electric fl ight performance and satisfaction. An easy-to-read
Statement. 1.Please read this manual carefully and follow the instruction of the manual before you use this products;
 1 / 11 CONTENTS Statement-------------------------------------------------------------------------------------------------------------------------------------------------2 Brief introduction----------------------------------------------------------------------------------------------------------------------------------------3
Radio control glider
 Radio control glider Contents SPECIFICATIONS 01 STATEMENT 02 SAFETY PRECAUTIONS 02~03 CHARGING METHOD AND CAUTIONS 03~05 ASSEMBLY 06~07 2.4GHz RADIO SYSTEM 08~10 PRE-FLIGHT INSPECTION AND ADJUSTMENT 10~11
Operation Manual 3-Axis Stabilization System for Fixed Wing Model Aircraft
 Operation Manual -Axis Stabilization System for Fixed Wing Model Aircraft Table of Contents Introduction 2 Safety Instructions 2 Product Layout 2 HGXA Overview 2 LED Display Overview Specifications Features
I n s t r u c t i o n M a n u a l. Instruction Manual SPECIFICATION
 I n s t r u c t i o n M a n u a l Instruction Manual SPECIFICATION - Wingspan: 3200mm (125,9 in) - Length: 1650mm (64,9 in) - Flying weight: 3000gr 3200gr - Wing area: 64.5 dm2 - Wing loading: 46g/dm2
BOOMERANG. A Classic Trainer Goes Micro...
 BOOMERANG A Classic Trainer Goes Micro... Micro Wingspan: 457mm (18 ) Length: 343mm (13 1/2 ) Flying Weight: 34g (1.2 oz.) ERC3000 MICRO BOOMERANG RTF (Ready To Fly) Mode 1 ERC3000-2 MICRO BOOMERANG RTF
ASSEMBLE ONLY WITH ADULT SUPERVISION WARRANTY. This product is suitable only for people of 14 years and older.
 ASSEMBLE ONLY WITH ADULT SUPERVISION Please read through this instruction booklet to THOROUGHLY familiarize yourself with the assembly and flight characteristics of this airplane prior to assembly. Please
Please read all instructions carefully before assembly and flight!
 c c Please read all instructions carefully before assembly and flight! Thank you for purchasing the. This model is designed for the intermediate to advanced flyer. The model is receiver-ready and includes
Double Horse 9116 Technical Manual
 Double Horse 9116 Technical Manual Compiled from contributions by owners of the DH9116 RC helicopter and members of RC Groups Discussion Forums via the Double horse 9116 Heli Thread at http://www.rcgroups.com/forums/showthread.php?t=1540154
Items Included With Your Model: Transmitter AA batteries (4) Assembled aircraft Li-Po battery (2) Streamer
 Assembled aircraft Li-Po battery (2) Streamer") Items Included With Your Model: Transmitter AA batteries (4) Assembled aircraft Li-Po battery (2) Streamer Install the Transmitter Batteries Open the rear cover of the transmitter. Insert the four AA batteries
Items Included With Your Model: Transmitter AA batteries (4) Assembled aircraft Li-Po battery (2) Streamer Install the Transmitter Batteries Open the rear cover of the transmitter. Insert the four AA batteries
8-3 MAIN ROTOR BLADE ATTACHMENT (BLADES NOT INCLUDED)
") 8-3 MAIN ROTOR BLADE ATTACHMENT (BLADES NOT INCLUDED) Two sets required Socket Head Bolt, 4 x 35 mm...2 pcs Hold the 4 mm Lock Nut while tightening using a Wiha 7 mm Nut Driver or equivalent. Lock Nut,
8-3 MAIN ROTOR BLADE ATTACHMENT (BLADES NOT INCLUDED) Two sets required Socket Head Bolt, 4 x 35 mm...2 pcs Hold the 4 mm Lock Nut while tightening using a Wiha 7 mm Nut Driver or equivalent. Lock Nut,
PHOENIX Features of the Phoenix-25 : 2.3 Connecting the Motor. 2.4 Reversing Rotation. 2.5 Connecting the Receiver
 Warning! High power motor systems can be very dangerous! High currents can heat wires and batteries, causing fires and burning skin. Follow the wiring directions carefully! Model aircraft equipped with
Instruction Manual SPECIFICATIONS
 Instruction Manual Hummingbird CP Hummingbird FP SPECIFICATIONS Engineered for ultimate performance. Light weight, durable, powerful design featuring CNC machined anodized aluminum heat sink chassis plate,
Flight Manual. Entire contents Megatech 2007 Rev
 Flight Manual www.megatech.com Entire contents Megatech 2007 Rev. 200711151633 If you have questions about operating or assembling your new Megatech product... Please Call Megatech First! DO NOT RETURN
70MM YAK-130 STABLE SMOOTH FLYING PERFORMANCE FMSMODEL.COM
 70MM YAK-130 REALISTIC RETRACT & FLAPS INSTALLED RIGID STRONG DURABLE EPO STABLE SMOOTH FLYING PERFORMANCE FMSMODEL.COM Table of Contents Introductions 3 Contents of Kit 4 Assemble the plane 5 Battery
I/C FLIGHT GUIDELINES
 SPECIFICATION - Wingspan: 3500mm (137.8 in) - Length: 1650mm (64.96 in) - Flying weight: 3700-4000 gr - Wing area: 75 dm2 - Wing loading: 49g/dm2 - Wing type: HQ profile - Covering type: Genuine ORACOVER
Instruction Manual MODEL: AC TRACKTECH T Rev. C. World s First Portable, Remote-Control Aircraft Tugs
 Instruction Manual MODEL: AC TRACKTECH T1.5 95328 Rev. C World s First Portable, Remote-Control Aircraft Tugs Contents 1. Components 1-1. Components in the Box 1-2. Tug Components 1-3. Radio Components
WARNING: CHOKING HAZARD Small parts. Not for children under 3 years of age. Contents. Main Features
 www.revell.com Contents Proto CX EP 2.4GHz Transmitter 3.7V 110mAh LiPo Helicopter Battery Main Features Revell, Inc., a subsidiary of Hobbico, Inc., Champaign, IL 61826 Four AA Alkaline Batteries Spare
Brief introduction...1 Main specifications...1
 CONTENTS Brief introduction...1 Main specifications...1 Main configuration...1 Products constitution...2 Assemble processes...2 Adjustment steps...4 Safety precautions...6 Charging method and cautions...6
COMPLETE RTF R AIRPLANE
 COMPLETE RTF R AIRPLANE Quiet Electric Flight Radio-Controlled Model Requires 8 (AA) Alkaline Batteries (not included) ASSEMBLE ONLY WITH ADULT SUPERVISION Please read through this instruction booklet
RADIO CONTROLLED QUAD-COPTER WITH CAMERA
 Movie - DRONE TM RADIO CONTROLLED QUAD-COPTER WITH CAMERA FEATURING: 1. Four-Rotor design allows great speed and maneuverability for both Indoor and Outdoor use. 2. Built-in 6-axis Gyro ensures excellent
14 + INSTRUCTION MANUAL COX MODELS
 COX MODELS 14 + Assemble Only With Adult Supervision Please read through this instruction booklet to THOROUGHLY familiarize yourself with the assembly and flight characteristics of this airplane prior
Contents. Introduction. Warning. Cautions. Transmitter Features. Receiver Identification. Switch Between Left-Hand and Right-Hand Throttles
 RX-408 Contents Introduction Warning Cautions Transmitter Features Receiver Identification Switch Between Left-Hand and Right-Hand Throttles Flybar Set Assembly Battery Mounting and Adjustment Swashplate
AIRPLANE COMPLETE RTF R
 COMPLETE RTF R AIRPLANE Quiet Electric Flight Requires 8 C and 8 AA Alkaline Batteries (Not Included) ASSEMBLE ONLY WITH ADULT SUPERVISION Please read through this instruction booklet to THOROUGHLY familiarize
RAVEN DRONE USER MANUAL
 RAVEN DRONE USER MANUAL PRODUCT CODE: ZXRVN www.zero-x.com.au www.zero-x.co.nz v2 Thanks for purchasing a Zero-X Raven Drone, get ready to have the time of your life! We re sure your Zero-X Raven drone
PHOENIX Features of the Phoenix-10 : 2.3 Connecting the Motor. 2.4 Reversing Rotation. 2.5 Connecting the Receiver
 Warning! High power motor systems can be very dangerous! High currents can heat wires and batteries, causing fires and burning skin. Follow the wiring directions carefully! Model aircraft equipped with
Twister 3D Storm The Ultimate 3D Electric Helicopter
 The Ultimate 3D Electric Helicopter SPECIFICATIONS Main rotor diameter 720mm Tail rotor diameter..135mm Length..630mm Weight (without receiver & battery)....500g (17.5oz) CONTENTS 1...Assembled helicopter
40 EP Gee Bee Y Scale ARF V2 Instruction Manual Specs:
 40 EP Gee Bee Y Scale ARF V2 Instruction Manual Specs: Wing Span: 40" Overall length: 30" Wing area: 306 sq. in Ready to fly weight: 28~32 oz Motor/Engine: Electric: Uranus-28309 brushless outrunner motor,
TRACER. User Manual. Model: PFBD97
 TRACER User Manual Model: PFBD97 Thank you for choosing ProFlight. Please read this user manual before using this drone and keep it safe for future reference. CONTENTS Safety 3 Battery Charging 4 Fitting
F-22 PACKING LIST INSTRUCTION MANUAL. 4.5 Channel
 F- 4.5 Channel INSTRUCTION MANUAL 4 PARTS - SERVICE - REPAIRS Open Mon - Fri 9 am - 6 pm... Sat 0 am - 3 pm (EST) Distributed and serviced by: Extreme RC by RSI... Ferndale, MI 480 Phone: (586) 757-336
Warning! Before continuing further, please ensure that you have NOT mounted the propellers on the MultiRotor.
 Mission Planner Setup ( optional, do not use if you have already completed the Dashboard set-up ) Warning! Before continuing further, please ensure that you have NOT mounted the propellers on the MultiRotor.
Climber is 776B101101
 is Climber 776B101101 Introduction Product Introduction NE R/C 776B is a good-sized glider designed by Nine Eagles Company latest, whose wing span is up to 2008mm. You only need to assemble the aerofoil
JR XP9303 Programming Guide for the Hangar Size P-51
 By Danny Snyder JR XP9303 Programming Guide for the Hangar 9 1.50 Size P-51 This guide will assist in the programming necessary to set up the 1.50 Size Hangar 9 P-51 Mustang, though the information could
SKYARTEC MOSQUITO 3D PRO
 SKYARTEC MOSQUITO 3D PRO Instruction & assembly manual Specifications: This micro R/C helicopter has the most advanced capabilities. 120 degree CCPM control, collective main and tail rotors, belt tail
VENom night ranger 3D pilot s Handbook. Read Before Flight! VENF
 VENom night ranger 3D pilot s Handbook Read Before Flight! VENF-6225-1 I. Introduction The Venom Night Ranger 3D is a high performance Ready-to-Fly Collective Pitch (CP) Aerobatic Electric Helicopter for
COMPLETE RTF AIRPLANE
 COMPLETE RTF AIRPLANE REQUIRES: 8 AA Alkaline Batteries Please retain this information for future reference. ASSEMBLE ONLY WITH ADULT SUPERVISION Please read through this instruction booklet to THOROUGHLY
SebArt professional line
 SebArt professional line Mini L39 1,46m ARF 90mm EDF-6S or P20-K30 turbine ASSEMBLY MANUAL The all new L39 Jet ARF was designed by Italy aerobatic pilot Sebastiano Silvestri. This sport ARF jet-model design
H-King R/C scale model series. instruction manual
 H-King R/C scale model series instruction manual 1. Please read this manual carefully and follow the instructions of the manual before you use this products. SAFETY INSTRUCTIONS 2. Our airplane is not
SebArt professional line
 SebArt professional line PrometheuS 50E ARF ASSEMBLY MANUAL The new PrometheuS 50E ARF was designed by the F3A aerobatic pilot Sebastiano Silvestri and it s the replica of his 2 meter size F3A competition