INSTALLATION & OPERATION MANUAL
|
|
|
- Hillary Paul
- 6 years ago
- Views:
Transcription


1 MOHAWK INSTALLATION & OPERATION MANUAL MP-18-AF-SERIES ELECTRIC/HYDRAULIC PORTABLE LIFT 4 & 6 POST ARRANGEMENTS MOHAWK RESOURCES LTD. 65 VROOMAN AVENUE P. O. BOX 110 AMSTERDAM, NY TOLL FREE: FAX: LOCAL: READ MANUAL THOROUGHLYBEFORE INSTALLING, OPERATING OR MAINTAINING LIFT!! Mohawk File: MP-18-AF-Series.doc Rev: 5/20/03
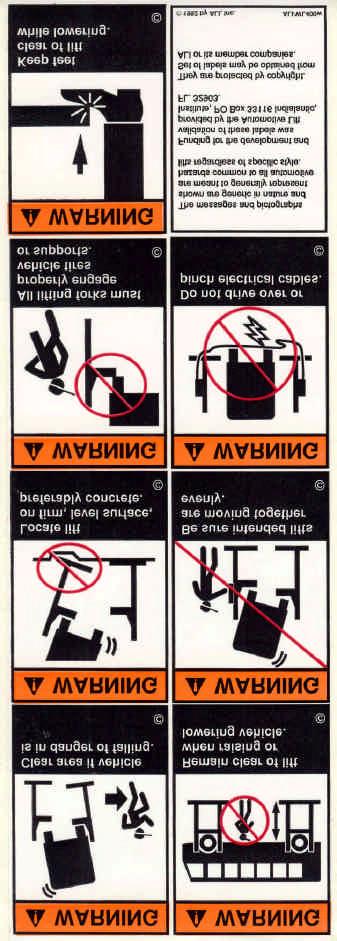
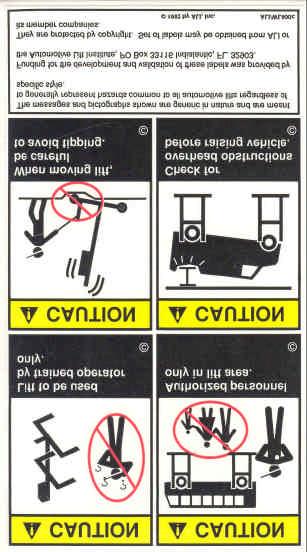
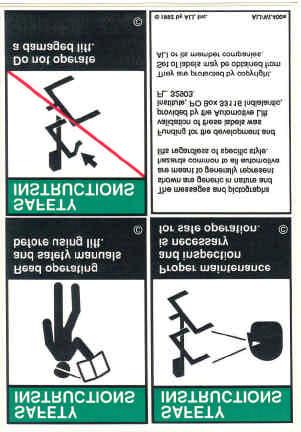
2 SAFETY INSTRUCTIONS 1. Read all instructions. 2. Inspect lift daily. Do not operate if it malfunctions or problems have been encountered. 3. Never attempt to overload the lift. The manufacturer s rated capacity is shown on the identification label on the power side column. Do not override the operating controls or the warranty will be void. 4. Only trained and authorized personnel should operate the lift. Do not allow customers or bystanders to operate the lift or be in the lift area. 5. Position the lift support forks to contact the vehicle tires. Raise the lift until the forks contact the tires. Check forks for secure contact with the vehicle tires, then raise the lift to the desired working height. 6. NOTE: Always use all 4 posts to raise and support vehicle. 7. Note that the removal or installation of some vehicle parts may cause a critical load shift in the center of gravity and may cause the vehicle to become unstable. Refer to the vehicle manufacturer s service manual for recommended procedures. 8. Always keep the lift area free of obstructions and debris. Grease and oil spills should always be cleaned up immediately. 9. Never raise vehicle with passengers inside. 10. Before lowering check area for any obstructions. 11. Before driving vehicle between the posts, position the lift forks to allow vehicle to freely enter lifting area. To not hit or run over forks as this could damage the lift and/or the vehicle. 12. Before removing the vehicle from the lift area, position the lift forks to allow vehicle to freely leave lifting area. To not hit or run over forks as this could damage the lift and/or the vehicle. 13. Care must be taken as burns can occur from touching hot parts. 14. Do not operate equipment with a damaged cord or if the equipment has been dropped or damaged until a qualified serviceman has examined it. 15. Do not let cords hang over tables, benches or counters or come in contact with hot manifolds or moving fan blades. 16. If an extension cord is necessary, a cord with a current rating of two or more than that of the equipment should be used. Cords rated for less current than the equipment may overheat. Care should be taken to arrange the cord so that it will not be tripped over or pulled. 17. Always unplug the equipment from electrical outlet when not in use. Never use the cord to pull the plug from the outlet. Grasp plug and pull to disconnect. 18. Let equipment cool completely before pulling away. Loop cord loosely around equipment when storing. 19. To reduce the risk of fire, do not operate equipment in the vicinity of open containers of flammable liquids (gasoline). 20. Adequate ventilation should be provided when working on operating internal combustion engines. 21. Keep hair, loose clothing, fingers, and all parts of body way from moving parts. 22. To reduce the risk of electrical shock, do not use on wet surfaces or expose to rain. 23. Use only as described in this manual. Use only manufacturer s recommended attachments. 24. ALWAYS WEAR SAFETY GLASSES. Everyday eyeglasses have only impact resistant lenses, and they are NOT safety glasses. SAVE THESE INSTRUCTIONS
 has continued to sponsor the national standard ANSI/ALI ALCTV-1998 \"Safety Requirements for")
3 The Automotive Lift Institute (ALI) is a trade association comprised of US and Canadian manufacturers and certain national distributors of automotive lifts. For almost 50 years, the ALI in cooperation with the American National Standards Institute (ANSI) has continued to sponsor the national standard ANSI/ALI ALCTV-1998 "Safety Requirements for Construction, Testing, and validation for Automotive Lifts. The new "ALI/ETL Automotive Lift Certification Program" is based on ALI developed methods and criteria for third party testing of automotive lifts to validate conformance with ANSI/ALI ALCTV For automotive lifts to be certified, manufacturers must execute an agreement with the ALI and ETL / Intertek Testing Services and must meet certain requirements: Must be structurally tested in accordance with the test requirements as outlined in ANSI/ALI ALCTV All motor operated units must be listed by a nationally recognized testing laboratory (NRTL) in accordance with ANSI/UL-201. The manufacturer's production facility must meet quality control requirements as set forth in the ANSI Z and the ALI/ETL Automotive Lift Certification Program Procedural Guide. All manufacturer-provided instructions, manuals, and operator safety documents, must meet the requirements of the ANSI/ALI ALCTV 1998 and ANSI/UL-201. Lifts meeting these rigid requirements may be listed in the directory of certified lifts and be labeled with the "ALI/ETL certification mark" (Above on right), and, if applicable, the ETL listing mark to ANSI/UL-201. Mohawk has been a long-standing member of ALI and most of Mohawk s popular models are currently listed and certified. Other Mohawk models are in various stages of testing. To obtain a complete and current certification listing, contact Mohawk Resources Ltd. To obtain a copy of the current automotive lift standard, contact ALI or ANSI. Some people purchase quality products and others do not. You are assured of quality when you purchase a Mohawk product in compliance with the certification program.
4 MOHAWK WARRANTIES EFFECTIVE DATE: 4/14/2003 GENERAL WARRANTY INFORMATION: MOHAWK S OBLIGATION UNDER THIS WARRANTY IS LIMITED TO REPAIRING OR REPLACING ANY PART OR PARTS RETURNED TO THIS FACTORY, TRANSPORTATION CHARGES PREPAID, WHICH PROVE UPON INSPECTION TO BE DEFECTIVE AND WHICH HAVE NOT BEEN MISUSED. DAMAGE OR FAILURE TO ANY PART DUE TO FREIGHT DAMAGE OR FAULTY MAINTENANCE IS NOT COVERED UNDER THIS WARRANTY. THIS WARRANTY DOES NOT COVER ANY CONSEQUENTIAL OR INCIDENTAL DAMAGES INCLUDING, BUT NOT LIMITED TO, LOST REVENUES OR BUSINESS HARM. THIS EQUIPMENT HAS BEEN DESIGNED FOR USE IN NORMAL COMMERCIAL VEHICLE MAINTENANCE APPLICATIONS. A SPECIFIC INDIVIDUAL WARRANTY MUST BE ISSUED FOR UNITS THAT DEVIATE FROM INTENDED USAGE, SUCH AS HIGH CYCLE USAGE IN INDUSTRIAL APPLICATIONS, OR USAGE IN EXTREMELY ABUSIVE ENVIRONMENTS, ETC.. MOHAWK RESERVES THE RIGHT TO DECLINE RESPONSIBILITY WHEN REPAIRS HAVE BEEN MADE OR ATTEMPTED BY OTHERS. THIS WARRANTY DOES NOT COVER DOWNTIME EXPENSES INCURRED WHEN UNIT IS IN REPAIR. THE MODEL NAME AND SERIAL NUMBER OF THE EQUIPMENT MUST BE FURNISHED WITH ALL WARRANTY CLAIMS. THIS WARRANTY STATEMENT CONTAINS THE ENTIRE AGREEMENT BETWEEN MOHAWK RESOURCES LTD. AND THE PURCHASER UNLESS OTHERWISE SPECIFICALLY EXPRESSED IN WRITING. THIS NON-TRANSFERABLE WARRANTY APPLIES TO THE ORIGINAL PURCHASER ONLY. THIS WARRANTY IS APPLICABLE TO UNITS LOCATED ONLY IN THE UNITED STATES OF AMERICA AND CANADA. CONTACT MOHAWK RESOURCES LTD. FOR SPECIFIC WARRANTY PROVISIONS FOR UNITS LOCATED OUTSIDE OF THESE COUNTRIES. 5-YEAR WARRANTY: THIS WARRANTY IS APPLICABLE TO THE FOLLOWING MOHAWK LIFTS ONLY: A-7, SYSTEM IA, SYSTEM IA-10, TOMAHAWK- 9000, LMF-12, TP-15, TP-18, TP-20, TP-26, TP-30 AND STANDARD OPTIONS. 3-YEAR WARRANTY: THIS WARRANTY IS APPLICABLE TO THE FOLLOWING MOHAWK LIFTS ONLY: TSL-7, PL-6000, TR-19, TR-25, FL-25, TR-33, TR- 35, TR-40, TR-50, TR-60, TR-75, TR-110, MP-SERIES AND RP-SERIES MOBILE COLUMN LIFTS, SL-SERIES SCISSOR LIFTS, FP- SERIES LIGHT DUTY FOUR POST LIFTS, TL-SERIES LIFTS AND STANDARD OPTIONS. 2-YEAR WARRANTY: THIS WARRANTY IS APPLICABLE TO THE FOLLOWING MOHAWK LIFTS ONLY: PARALLELOGRAM SERIES AND USL-6000 AND STANDARD OPTIONS. 1-YEAR WARRANTY: THIS WARRANTY IS APPLICABLE TO THE FOLLOWING MOHAWK LIFTS ONLY: HR-6, TD-1000, CT-1000 AND STANDARD OPTIONS. STRUCTURAL COMPONENTS: ALL STRUCTURAL AND MECHANICAL COMPONENTS OF THIS UNIT ARE GUARANTEED FOR THE ABOVE STATED TIME FRAME, SPECIFIC TO MODEL, FROM THE DATE OF INVOICE, AGAINST DEFECTS IN WORKMANSHIP AND/OR MATERIALS WHEN LIFT IS INSTALLED AND USED ACCORDING TO SPECIFICATIONS. SEE MOHAWK S EXTENDED LIFETIME CYLINDER WARRANTY FOR SPECIFIC WARRANTY PROVISIONS FOR HYDRAULIC CYLINDERS. THE EXTENDED LIFETIME CYLINDER WARRANTY IS APPLICABLE TO THE FOLLOWING MOHAWK LIFTS ONLY: A-7, SYSTEM I, LMF-12, TP-15, TP-18, TP-20, TP-26, TP-30, MP-SERIES AND TL-SERIES LIFTS. POWER UNIT: ALL POWER UNIT COMPONENTS (MOTOR, PUMP AND RESERVOIR) ARE GUARANTEED FOR THE ABOVE STATED TIME FRAME, SPECIFIC TO MODEL, FROM THE DATE OF INVOICE, AGAINST DEFECTS IN WORKMANSHIP AND/OR MATERIALS WHEN THE LIFT IS INSTALLED AND USED ACCORDING TO SPECIFICATIONS. ELECTRICAL COMPONENTS: ALL ELECTRICAL COMPONENTS (EXCLUDING MOTOR) ARE GUARANTEED FOR ONE YEAR FOR PARTS ONLY (EXCLUDING LABOR), FROM THE DATE OF INVOICE, AGAINST DEFECTS IN WORKMANSHIP AND/OR MATERIALS WHEN THE LIFT IS INSTALLED AND USED ACCORDING TO SPECIFICATIONS. PNEUMATIC (AIR) COMPONENTS: ALL PNEUMATIC (AIR) COMPONENTS (I.E. AIR CYLINDERS AND POPPET AIR VALVES) ARE GUARANTEED FOR ONE YEAR FOR PARTS ONLY (EXCLUDING LABOR), FROM THE DATE OF INVOICE, AGAINST DEFECTS IN WORKMANSHIP AND/OR MATERIALS WHEN THE LIFT IS INSTALLED AND USED ACCORDING TO SPECIFICATIONS. WARRANTY EXCEPTIONS: ALL SPECIAL LIFTS AND/OR CUSTOMIZED OPTIONS ON THIS UNIT ARE GUARANTEED FOR ONE YEAR FOR PARTS ONLY (EXCLUDING LABOR), FROM THE DATE OF INVOICE, AGAINST DEFECTS IN WORKMANSHIP AND/OR MATERIALS WHEN THE LIFT IS INSTALLED AND USED ACCORDING TO SPECIFICATIONS. THIS WARRANTY SUPERSEDES ALL OTHER WARRANTY POLICIES PREVIOUSLY STATED AND IN ALL OTHER MOHAWK PRODUCT SPECIFIC LITERATURE.
5 EXTENDED LIFETIME CYLINDER WARRANTY AS THE ORIGINAL PURCHASER OF A MOHAWK LIFT MANUFACTURED BY MOHAWK RESOURCES, LTD. YOU ARE ENTITLED TO AN EXTENDED CYLINDER SEAL KIT REPAIR WARRANTY. TO QUALIFY FOR THIS WARRANTY, THE FOLLOWING CONDITIONS MUST BE MET: ALL LIFTS MUST BE REGISTERED WITH MOHAWK RESOURCES, LTD., P.O. BOX 110, 65 VROOMAN AVENUE, AMSTERDAM, NY 12010, WITH THE ORIGINAL CUSTOMER NAME, ADDRESS AND PHONE NUMBER, WITHIN 30 DAYS OF INSTALLATION. (PLEASE USE THE POSTAGE PAID WARRANTY REGISTRATION CARD ATTACHED TO THE FRONT OF THIS MANUAL.) ANY CYLINDER THAT IS PAST ITS NORMAL 5-YEAR WARRANTY PERIOD MUST BE SHIPPED FREIGHT PRE-PAID TO THE MOHAWK PLANT. UPON COMPLETION OF INSTALLING A COMPLETE SEAL KIT, MOHAWK WILL SHIP THE CYLINDER TO YOU, FREIGHT COLLECT. MOHAWK S OBLIGATION UNDER THIS WARRANTY IS LIMITED TO REPAIRING ANY CYLINDER, WHICH UPON INSPECTION HAS NOT BEEN MISUSED. MOHAWK RESERVES THE RIGHT TO DECLINE RESPONSIBILITY WHEN THE REPAIRS HAVE BEEN MADE, OR ATTEMPTED BY OTHERS. THE FOREGOING CONTAINS THE ENTIRE AGREEMENT BETWEEN MOHAWK RESOURCES, LTD. AND THE PURCHASER, UNLESS SPECIFICALLY EXPRESSED IN WRITING. THIS WARRANTY IS NON-TRANSFERABLE AND RUNS TO THE ORIGINAL PURCHASER ONLY. THIS IS NOT A LEND A CYLINDER POLICY. AS STATED ABOVE, YOUR ORIGINAL CYLINDER (WHEN OUT OF ITS ORIGINAL 5-YEAR WARRANTY) WILL HAVE ITS SEALS REPLACED, WITH ALL FREIGHT CHARGES THE RESPONSIBILITY OF YOU, THE CUSTOMER.
6 POWER SUPPLY FEED REQUIREMENTS The power supply connection must comply with the following. Disconnectable Cable Power Feed to Lift: If using a plug with the flexible cable connection provided, a plug must be provided that is rated as shown in the table below for the particular model, voltage and phase of the equipment supplied. This plug must be of the NEMA locking type with a ground connection and must have UL, CSA or other equivalent listing. Consult the plug manufacturer s installation instructions for connecting the plug to the cable. Refer to the electrical schematics in this manual for the proper connection of the power supply to the lift. Refer below to wire color designations and proper selection of feed cable. Consult and adhere to all local and national codes applying to the installation and use of this product. Wire Color Designations: 3 Phase: 1 Phase: Black: L1 Black: L1 Red: L2 Red: L2 White: L3 White: Neutral Green: Ground Green: Ground Required Cable Specification: All power feed cable to this lift must be of Type SO, SOOW, or SOW, rated 600 V, 90 Degree C. The maximum length of the main power feed cable and interconnection means (plugs) must not exceed 30 feet from the main post to the power feed box.
7 OPTIONAL EQUIPMENT If it is desired to raise the vehicle by the frame, this can be done by using crossbeams. The crossbeam fits into the cradle where the tire would normally fit. Refer to the ANSI standard Vehicle Lift Points for Service Garage Lifting, ANSI/SAE J2184-Oct92 and the safety manual Lifting if Right, ALI/SM93-1, for proper positioning of vehicles on lift. Adaptors accommodate smaller wheel sizes, to prevent tires from slipping through the cradle. Jack Stands support the vehicle in the raised position for maintenance or to permit using the lift for other vehicles. Refer to the back of the manual for Crossbeams, Jack Stands, or Adaptors. Special items such as Runways, or Adaptors are available on request to suit the application. The standard mobile lift is suitable to lift wheeled vehicles by the tires. It can come in sets. NOTE: SPECIAL ADAPTERS ARE REQUIRED FOR LIFTING OF LIMOUSINES, RVs, And LONG WHEELBASE VEHICLES ETC. CONSULT WITH LIFT DEALER FOR AVAILABILITY.
8 DESIGN AND CONSTRUCTION Each column consists of a rigid frame of three-wheel design for maneuverability, lifting tire cradle, control panel, electro hydraulic power unit, and high-pressure cylinder. Two of the wheels are in fixed position on the column base. The third wheel is steerable and hydraulically operated, permitting movement of the unloaded columns, but allowing the column to sit firmly on the floor before a load is applied. The Master Column accepts the incoming electrical supply to the Master Column Panel and has electrical outlets for the remaining slave columns. When the cradle is raised or lowered in the synchronized mode the actual movement of each cradle is measured and recorded in the computer. If the movement of any cradle exceeds that of any other cradle by more than 1 1/2, the cradle is stopped until the others catch up. The main controls are housed at the Master Column, including the number of pairs of columns to be controlled in the synchronized mode. A hydraulic cylinder, powered by an electro hydraulic pump unit, controls the cradle movement. There is an internal relief valve on the pump unit, which prevents overloading of the cradle. A separate automatically engaging back up mechanical safety lock latch prevents lowering of the cradle in the event of failure of the hydraulic system. All movement controls are of the deadman type which are operable only as long as the operator is depressing the button. As soon as the button is released the motion will stop. All columns have controls for synchronized or individual column movement, plus an Emergency Stop. Depressing the Emergency Stop button will stop all columns immediately and will not permit any column movement until the depressed button is reset. A separate selector switch on the main panel permits synchronized lifting of all columns or appropriate paired columns.
9 OPERATING THE MOBILE LIFT THOROUGHLY READ THIS SECTION BEFORE OPERATING THE LIFT. IF YOU HAVE ANY QUESTIONS GET THEM ANSWERED BEFORE PROCEEDING. 1. Be sure that the floor is strong enough to support the lift before operating. Do not use the lift on asphalt surfaces, as the lift will sink if the vehicle is on the lift for any extended period of time. 2. Be sure that the surface of the floor is relatively flat. If there is a slope of more than 3 degrees (1 inch in 20 ) do not operate the lift. 3. Be sure that you have enough headroom to raise the vehicle without the top of the vehicle coming in contact with any obstruction. 4. Drive the vehicle to the working spot. 5. Push the cradle of the lift under each tire. Be sure to push it in as far as possible. The wheel rim should be larger than the opening in the cradle. 6. Connect the cables from the slave columns to the main column control box. Check to make sure that the rear right column is connected to the rear right outlet etc. for each column. 7. Connect the main column power. 8. Turn on the main switch to the lift. Turn power switch to #1 position on the Main Control Panel. The orange light must light up. If it doesn t, check that the red EMERGENCY STOP buttons are not depressed, by turning the button clockwise to release the catch. If the orange light still does not light, check to be sure that there is power to the lift, have trained personnel (electrician) inspect power supply panels. All controls are in the main panel and should be checked by trained personnel only. 9. RAISING ALL WHEELS In order to raise all columns together, check that the selector switch (E) on the master column is in the all position. Press the button with the up arrow (A) to raise the lift. Keep the pressure on the bottom until the vehicle is set to the desired position. If necessary, use a second person to observe the area not seen by the operator. 10. On each hydraulic pump solenoid dump valve override (hex key) which must be in lock position. 11. Manual override on solenoid lowering valve allows to lower the unit in case of power failure, by moving lock latch handle on the back of the column to off position and turning the hex key counter clockwise. Only designed personnel should perform the operation.
10 12. LOWERING ALL WHEELS To lower all wheels together check that the Master Column Selector Switch (E) is in the all position. Press the button with the down arrow (F). The cradle on all columns will rise slightly to ensure that the secondary lock latch is clear, and then all cradles will lower. Keep the pressure on the down button (F) until the vehicle is down to the desired position. 13. PAIR OPERATION To raise or lower a pair of wheels check that the selector switch (E) on the Master Column is set to the appropriate pair of wheels. Move to one of the columns of that pair, and proceed to raise or lower the wheels as outlined above. NOTE: Be sure that the set of wheels on the ground is free to move as the effective distance between the front and rear wheels becomes less as one pair of wheels is higher or lower than the other pair. Keep the height difference between pairs as low as practical. 14. SINGLE WHEEL OPERATION To raise or lower a single wheel move to the column Control Panel for that wheel. Press and hold the Manual button (B). Press the appropriate up (A) or down (F) button and hold it until the desired position is reached. BE VERY CAREFUL WHEN DOING THIS OPERATION THAT THE VEHICLE REMAINS STABLE AND THAT THE SIDE OF THE VEHICLE DOES NOT COME IN CONTACT WITH THE COLUMN. NOTE: If the Manual button (B) is released while the up (A) or down (F) button is still pressed the hoist will operate in the synchronized mode all or pairs as determined by the selector switch (E) on the main panel.
11 MAINTENANCE INSTRUCTIONS 1. There are no bearings or seals which require regular or frequent lubrication. The column sections where the cradle carriage slider blocks ride should be greased once a year using a high-pressure grease. 2. Daily, or whenever the hoist is used after any extended down time, the power supply and interconnecting cables should be checked to make sure that there are no nicks or cuts which may reduce the insulation. Also, check visually the hydraulic hose connections for leaks and tighten or repair as necessary. 3. The hydraulic fluid should be changed once every two years using a good quality ISO32 HYDRAULIC OIL. It is necessary only to drain the reservoir tank when the cradle is in the lowered position. Add 3US Gal. (12 litres). 4. Every three months check and re-tighten bolts on wheels, power unit and carriage lock rack attachment. Apply a light coating of grease to the column rails front and rear. 5. In case of electrical break down have qualified service personnel service the lift using provided electrical diagram as shown in the manual. 6. Always refer to Operation manual when operating lift. 7. Call your Distributor or Factory direct if you have any questions with regards to operating the lift. 8. The visual inspection of the latches on the master column can be done manually by using a small hand mirror. Note: ONLY TRAINED LIFT SERVICE PERSONNEL IS PERMITTED TO REPLACE WORN OR BROKEN PARTS.
12 Measure of Carriage Movement TROUBLE SHOOTING GUIDE There is a proximity sensor mounted on the back of the column, which senses the movement of the carriage. You can observe the lift flashes of the proximity sensor as the columns rise in the synchronized mode. Each flash is recorded as an electrical pulse in the computer. The proximity sensor detects holes in a metal disk drive driven by a timing belt. Operation of Synchronized Lifting or Lowering The height of the carriage above floor level is measured and compared to the other carriages by the computer located in the main control box. If any one-carriage movement is more than 1 1/2 greater than the slowest carriage, the fastest one stops to allow the slowest one to catch up. If you turn off the unit, or press the Emergency Stop button, the computer position for each column is reset to believe that all columns are the same height, and the columns are now synchronized from this new starting position. Problem: The height difference between carriages is greater than 1-1/2. Solution: If the difference in height of any column is more than 1-1/2 it may be that the proximity sensor is too far away from the disk to read properly. When the unit is in the Synchronized Raise mode, the blinking of the proximity sensor should be at the uniform rate unless the carriage is stopped. If this is not happening, the sensor needs to be moved closer to the metal strip. THIS IS A SENSITIVE ADJUSTMENT AND GREAT CARE SHOULD BE TAKEN TO ENSURE THAT THE SENSOR IS NOT MOVED TOO FAR FORWARD. Clearance between the disk and the sensor should be between.030 and.060. Do not advance the sensor more than ½ turn at a time. If you go too far, you will damage the sensor. Problem: Power is on, however lift will not Raise or Lower. Solution: If any one of the Emergency Stop Buttons is depressed, none of the units will operate. Check that all Buttons are out by rotating the knob clockwise, approximately 20 degrees. It should come out approximately ¼, if it was depressed. Problem: The power unit is operating; however, the carriage will not lift the road. Solution: Check the axle weight of the vehicle. If it is exceeds the capacity of the lift, the Hydraulic Relief Valve operates preventing lift overload. If the weight is within limits, there may be a need for a new Relief Valve. Contact the distributor for a new Relief Valve. Problem: Carriage is lowering on its own. Solution: Check that there are no oil leaks by checking around the column. If so, repair the leak condition.
13 The lowering valve, located on the Power Unit may have collected some dirt, preventing it from sealing properly. Make sure that the carriage is lowered to floor level in order that there is no pressure in the system. Disconnect the power so that no one can start the unit. You can now remove the lowering valve. Disconnect the electrical leads from the solenoid using a screwdriver to remove the screw holding the two mating connectors. Remove the lowering valve from the Power Unit and check to see that there is no foreign material in the valve end, which prevents the ball from sealing. Remove the foreign material. If you cannot find any problem, replace the valve. Problem: There is more than 1-1/2 height difference between carriages. Solution: This may be due to the fact that one column was operated on manual before operating the unit in the Synchronized mode. This may also be due to operating in the Pairs mode before operating in Synchronized mode. The Proximity sensor may be set too far back from the sensing strip. Lower the unit to floor level using individual column controls if necessary.
14 EXPLANATION OF OPERATION OF COMPUTER SYSTEM 1. NOTE FOR FIRST TIME USE OR IF THE LIFT HAS BEEN MOVED TO A DIFFERENT SHOP: Check that the Supply Voltage, Phase, and frequency (Hertz) are the same as listed on the nameplate of the lift. IF IT IS NOT THE SAME, DO NOT CONNECT THE LIFT. CONTACT THE DISTRIBUTOR TO DETERMINE THE APPROPRIATE ACTIONS. It is possible to accommodate a different Voltage through the use of a Three Phase Transformer. If the supply voltage is Single Phase and has sufficient capacity, it is possible to use a converter from Single Phase to Three Phase power. The unit will operate with either 50 or 60 Hertz, however there may be a difference in supply Voltage. Contact the distributor if there are any concerns. 2. Choose a hard lever surface, preferably concrete. Asphalt surfaces are not recommended because they may become unstable and allow the lift to sink if the vehicle is lifted for any extended period of time. It if is necessary to use the lift on an asphalt surface, it is recommended to use a steel plate, a minimum thickness of 3/8 (8mm) which extends a minimum of 6 on all sides beyond the support points of the base of the lift. This will minimize sinking effect if the vehicle is raised for an extended period of time. 3. Do not drive the vehicle over the cables of the lift. The cables should be arranged in a U shape or the cables should be disconnected before moving the vehicle. 4. Be sure that the lift is in the ALL mode, not PAIRS when lifting the vehicle. 5. Check that there is enough height and no overhead obstructions in the building area where you will be lifting the vehicle. If necessary, measure the lowest point to determine how high you can raise the vehicle. 6. Push the column forward such that the forks are as close to the tire as possible before lifting the vehicle.
15 ELECTRICAL CONNECTION IMPORTANT: It is user's responsibility to provide all wiring for electrical hook-up prior to installation and to insure that the electrical installation conforms to local building codes. Where required, it is the user responsibility to provide an electrical isolation switch located in close proximity to the lift that will enable emergency stop capability and isolate electrical power from the lift for any servicing requirements. IMPORTANT SAFETY INSTRUCTIONS When using your garage equipment, basic safety precautions should always be followed, including the following: 1. Read all instructions 2. Care must be taken as bums can occur from touching hot parts. 3. Do not operate equipment with a damaged cord or if the equipment has bee dropped or damaged - until it has been examined by a qualified serviceman. 4. Do not let cord hang, over edge of table, bench or counter or come in contact with hot manifolds or moving fan blades. 5. If an extension cord is necessary, a cord with a current rating equal to or more than that of the equipment should be used. Cords rated for less than the equipment may overheat. Care should be taken to arrange the cord so that it will not be tripped over or pulled. 6. Always unplug equipment from electrical outlet when not in use. Never use the cord to pull the plug from the outlet. Grasp plug and pull to disconnect.
16 AUTOMOTIVE LIFT SAFETY TIPS Post these safety tips where they will be constant reminder to your lift operator. For information specification to the lift, always refer to the lift manufacturer s manual 1. Inspects your lift daily. Never operates if it malfunctions or if it has broken or damaged parts. Repairs should be made with original equipment parts. 2. Operating controls are designed to close when released. Do not block open or override them. 3. Never overload your lift. Manufacturers rated capacity is shown on nameplate affixed to the lift. 4. Positioning of the vehicle and operation of the lift should be done only by trained and authorized personnel. 5. Never raise vehicle with anyone inside it. Customers or bystanders should not be in the lift. During operation. 6. Always keep lift area free of obstructions, grease, while, trash and other debris. 7. Before driving vehicle over lift, position arms and supports to provide unobstructed clearance. Do not hits or run over the lift arms, adapters, or axle supports. This could damage the lift or vehicle. 8. Load vehicle on lift carefully. Positioning lift supports to contact at the vehicle manufacturers recommended lifting points. Raise lift until supports contact the vehicle. Check supports for secure contact with vehicle. Raise lift the desired working heights. CAUTION: if you are working under the vehicle, lift should be raised high enough for locking device to be engaged. 9. Note that with some vehicles, the removal (or installation) of components may cause a critical shift in the centre of gravity and results in raised vehicle instability. Refer to the vehicle manufacturers service manual for recommended procedures when vehicle components are removed. 10. Before lowering lift, be sure cool trays, stands, etc. are removed from under the vehicle. Release locking devices before attempting to lower lift. 11. Before removing vehicle from lift area, position lift arms and supports to provide and unobstructed exit (refer back to No. 7) These Safety Tips along with Lifting it Right a general lift safety manual, are presented as an industry service by the Automotive Lift Institute. For more information on this topic, writes to ALI, P.O. Box 33116, Indialantic, FL
17 MOHAWK ILLUSTRATIONS MP-18-AF-SERIES ELECTRIC/HYDRAULIC PORTABLE LIFT 4 & 6 POST ARRANGEMENTS
18
19
20
21
22
23
24
25
26
27
28
29
30
31 MOHAWK ELECTRICAL SCHEMATICS, 3 PHASE MP-18-AF-SERIES ELECTRIC/HYDRAULIC PORTABLE LIFT 4 POST ARRANGEMENT
32
33
34
35
36
37 MOHAWK ELECTRICAL SCHEMATICS, 1 PHASE MP-18-AF-SERIES ELECTRIC/HYDRAULIC PORTABLE LIFT 4 POST ARRANGEMENT
38
39
40
41
42
43 MOHAWK ELECTRICAL SCHEMATICS, 3 PHASE MP-18-AF-SERIES ELECTRIC/HYDRAULIC PORTABLE LIFT 6 POST ARRANGEMENT
44
45
46
47
48
49
50
51 MOHAWK ELECTRICAL SCHEMATICS, 3 PHASE WITH DUAL SOLENOID DOWN MP-18-AF-SERIES ELECTRIC/HYDRAULIC PORTABLE LIFT 4&6 POST ARRANGEMENTS
52
53
54
55
56
57
58
59
INSTALLATION & OPERATION MANUAL
 MOHAWK INSTALLATION & OPERATION MANUAL MP-24 & MP-30 SERIES ELECTRIC/HYDRAULIC PORTABLE LIFT 2, 4, 6 & 8 POST ARRANGEMENTS MOHAWK RESOURCES LTD. 65 VROOMAN AVENUE P. O. BOX 110 AMSTERDAM, NY 12010 TOLL
INSTALLATION & OPERATION MANUAL
 MOHAWK INSTALLATION & OPERATION MANUAL MP-18-SERIES ELECTRIC/HYDRAULIC PORTABLE LIFT 2, 4, 6 & 8 POST ARRANGEMENTS MOHAWK RESOURCES LTD. 65 VROOMAN AVENUE P. O. BOX 110 AMSTERDAM, NY 12010 TOLL FREE: 1-800-833-2006
INSTALLATION & OPERATION MANUAL
 MOHAWK INSTALLATION & OPERATION MANUAL MP-18-24VDC-SERIES ELECTRIC/HYDRAULIC PORTABLE LIFT 2, 4, 6 & 8 POST ARRANGEMENTS MOHAWK RESOURCES LTD. 65 VROOMAN AVENUE P. O. BOX 110 AMSTERDAM, NY 12010 TOLL FREE:
MOHAWK MODEL HR-6 6,000 LB. MOBILE MIDRISE SCISSOR VEHICLE LIFT MANUAL. Thank you for Sending in your Warranty Registration Card.
 MOHAWK MADE IN THE USA MODEL HR-6 6,000 LB. MOBILE MIDRISE SCISSOR VEHICLE LIFT MANUAL Thank you for Sending in your Warranty Registration Card. MOHAWK RESOURCES LTD. 65 VROOMAN AVE. AMSTERDAM, NY 12010
Cargolift 85 Pv Repair. Cargolift 90 Sa Standard. Cargolift 120 Saav Jumbo. Cargolift 120 F Drive-on IMPORTANT
 Installation, Operation and Maintenance Manual For Cargolift 85 Pv Repair Cargolift 90 Sa Standard Cargolift 120 Saav Jumbo Cargolift 120 F Drive-on IMPORTANT Read this manual throughoutly before installing,
SCISSOR LIFT Model MR6K-38 /161108A 6,000lb Capacity Operation Manual
 SCISSOR LIFT Model MR6K-38 /161108A 6,000lb Capacity Operation Manual (Version A) 2009. Apr. CONTENT 1. Safety Note, Caution and Warning Important Information Safety Instructions 2. Technical Manual Product
Product Information Responsibilities of Owners Safety Instructions Warning Labels Installation Instructions...
 Table of Contents Product Information... 2 Responsibilities of Owners... 3 Safety Instructions... 4 Warning Labels... 5 Installation Instructions... 6 Electrical Installation... 7 Load Capacity... 8 Daily
MODEL QMR6 PORTABLE MID-RISE LIFT 6,000 lb Capacity 1500 lb Per Arm INSTALLATION, OPERATION AND MAINTENANCE MANUAL
 MODEL QMR6 PORTABLE MID-RISE LIFT 6,000 lb Capacity 1500 lb Per Arm INSTALLATION, OPERATION AND MAINTENANCE MANUAL IMPORTANT!!! READ THIS MANUAL COMPLETELY BEFORE INSTALLING OR OPERATING THE LIFT 200 CABEL
ASSEMBLY & OPERATION INSTRUCTION MANUAL
 Sliding Bridge Jack 3,500 lbs. Capacity ASSEMBLY & OPERATION INSTRUCTION MANUAL TABLE OF CONTENTS Specifications... 2 Description & Features... 3 Installation Instructions... 4 Safety Instructions... 4
2-Post Lift Operations and Maintenance Manual
 2-Post Lift Operations and Maintenance Manual Table Of Contents Safety Instructions... 2 Owner/Employer Responsibilities / Operating Conditions... 3 Operating Instructions... 4 Maintenance Instructions...
OWNERS MANUAL IMPORTANT: READ OWNERS MANUAL CAREFULLY MODEL # SQUARE CAT XT OSCILLATING FLOOR MACHINE
 OWNERS MANUAL IMPORTANT: READ OWNERS MANUAL CAREFULLY MODEL # SQUARE CAT XT OSCILLATING FLOOR MACHINE FOR YOUR CONVENIENCE, RECORD THE FOLLOWING IMPORTANT INFORMATION MODEL: SERIAL NUMBER: DATE PURCHASED:
LABORATORY ZERO AIR GENERATOR MODEL N-GC1500 USER S MANUAL
 LABORATORY ZERO AIR GENERATOR MODEL N-GC1500 USER S MANUAL Content 1. Introduction...2 2. Important safety instruction...3 3. System component...4 4. Engineering design overview...5 5. Installation...6
CRD610 Automatic Fitting Inserter
 CRD610 Automatic Fitting Inserter OPERATIONS MANUAL VERSION 1.2 LAST EDITED 12.12.2018 cleanroomdevices.com 1 Table of Contents Title Page. 1 Table of Contents...2 1.0 General Product & Safety Information....3
EV-2051-M Electric Motor. Operation and Maintenance Manual
 EV-2051-M Electric Motor Operation and Maintenance Manual Table of Contents Safety... 3 General...3 Safety Notices...6 Cautions, Warnings and Dangers...7 Cautions...8 Warnings...11 Dangers...13 Important
Product Information Responsibilities of Owners Safety Instructions Warning Labels Installation Instructions...
 Table of Contents Product Information... 2 Responsibilities of Owners... 3 Safety Instructions... 4 Warning Labels... 5 Installation Instructions... 6 Electrical Installation... 7 Load Capacity... 8 Daily
HYDRAULIC LEVELING SYSTEMS OPERATIONS MANUAL (For systems with touch pad part number , , , , or no number at all)
") HYDRAULIC LEVELING SYSTEMS OPERATIONS MANUAL (For systems with touch pad part number 500089, 500105, 500210, 500456, 500535 or no number at all) Visit us on the web at www.powergearus.com 82-L0040-01 Rev.
HYDRAULIC LEVELING SYSTEMS OPERATIONS MANUAL (For systems with touch pad part number 500089, 500105, 500210, 500456, 500535 or no number at all) Visit us on the web at www.powergearus.com 82-L0040-01 Rev.
EZ LINER EXPRESS USERS MANUAL
 EZ LINER EXPRESS 2013 Vehicle Service Group CHIEF'S LIMITED ONE-YEAR WARRANTY & LIABILITY Chief Automotive Technologies warrants for one year from date of installation and/or purchase any components of
HAWK. HAWK G2 Raptor Orbital Floor Machine Dry Stripping, Scrubbing, Stripping. Operation Care Service ENTERPRISES
 HAWK ENTERPRISES HAWK G2 Raptor Orbital Floor Machine Dry Stripping, Scrubbing, Stripping Operation Care Service Ÿ HAWK ENTERPRISES 2902 Park Six Court, Elkhart, IN 46514 (574) 294-1910 (888) 289-4295
MOHAWK MODELS TR-33/35/50/75. Because Quality Made Lifts Last a Lifetime HEAVY DUTY FOUR POST RAMP LIFTS. Americas Best Lift Investment...
 MODELS TR-33/35/50/75 HEAVY DUTY FOUR POST RAMP LIFTS Because Quality Made Lifts Last a Lifetime TO MEET THE ONE AND ONLY NATIONAL SAFETY STANDARD FOR VEHICLE LIFTS MOHAWK Americas Best Lift Investment...
Hawk Enterprises of Elkhart THE BRUTE Owner s Manual
 Hawk Enterprises of Elkhart THE BRUTE Owner s Manual Operation Care Service COMMERICAL/INDUSTRIAL DUTY STONE RESTORATION MACHINE 13, 15, 17, 20 165 RPM 1.5 HP 180 FRAME TOTALLY ENCLOSED FAN COVERED MOTOR
Read this entire manual before operation begins.
 Read this entire manual before operation begins. Record below the following information which is located on the serial number data plate. Serial No. Model No. Date of Installation Contents Specifications.............
SPECIFICATIONS CONTENTS: Specifications Warning Information. Operating Instructions Preventative Maintenance and Troubleshooting
 Model 3322 22 Ton Air/Hydraulic Truck Axle Jack OWNER'S MANUAL CONTENTS: Page 1 Page 2 Page 3-4 Page 4-5 Page 5 Page 6 Page 7 Page 8 Specifications Warning Information Assembly Operating Instructions Preventative
Owner s Manual, Operating Instructions Manual, and Replacement Parts Manual. Lift-Rite Titan Series Hand Pallet Trucks Model LCF55 - Freezer Special
 Owner s Manual, Operating Instructions Manual, and Replacement Parts Manual Lift-Rite Titan Series Hand Pallet Trucks Model LCF55 - Freezer Special Lift-Rite, 5975 Falbourne Street, Mississauga, Ontario
FLEETWOOD TRAVEL TRAILER SLIDEOUT SYSTEM OWNER S MANUAL
 FLEETWOOD TRAVEL TRAILER SLIDEOUT SYSTEM OWNER S MANUAL 82-S0150-01 REV. 1 April, 2002 TABLE OF CONTENTS PAGE # OPERATIONS MANUAL... 1 1. SYSTEM DESCRIPTION... 1 1.1 MAJOR COMPONENTS... 1 2. HOW TO OPERATE
Parallel Lift Rack MODEL RM
 Form 4401T, 09-03 Supersedes Form 4401T, 10-00 OPERATION INSTRUCTIONS Parallel Lift Rack MODEL RM Copyright 1998-2003 Hunter Engineering Company Contents 1. For Your Safety... 1 1.1 Warning/Instruction
CLEAN ROOM DEVICES, LLC "WHERE TUBING AND FITTINGS COME TOGETHER"
 CLEAN ROOM DEVICES, LLC "WHERE TUBING AND FITTINGS COME TOGETHER" CRD600AF Automatic Fitting Inserter With Auto Feed OPERATIONS MANUAL (Shown with optional alcohol dispenser) 1 VERSION 1.1 LAST EDITED
CRD600 Automatic Fitting Inserter
 CRD600 Automatic Fitting Inserter OPERATIONS MANUAL VERSION 2.3 LAST EDITED 12.07.2018 cleanroomdevices.com 1 Table of Contents Title Page.. 1 Table of Contents. 2 1.0 General Product & Safety Information...3
MIDRISE MODEL SM60F_1 // SM60F_A 6,500 LB. CAPACITY
 INSTALLATION and OPERATION MANUAL READ THIS INSTRUCTION MANUAL THOROUGHLY BEFORE INSTALLING, OPERATING, SERVICING OR MAINTAINING THE LIFT. SAVE THIS MANUAL. NOV 2007 REV.B MIDRISE MODEL SM60F_1 // SM60F_A
Hydraulic Transmission Jacks
 Hydraulic Transmission Jacks Operating Instructions & Parts Manual Model Number Atd-7435 Atd-7436 Atd-7437 Capacity 1100 Lb. 2000 Lb. 3000 Lb. Model Atd-7435 Model Atd-7436 Model Atd-7437 Atd Tools Inc.
Read this entire manual before operation begins.
 Read this entire manual before operation begins. Record below the following information which is located on the serial number data plate. Serial No. Model No. Date of Installation Contents Specifications.............
Heavy Duty Engine Cranes
 Heavy Duty Engine Cranes Operating Instructions & Parts Manual Model Number Atd-7484 Atd-7485 (Foldable Legs) Capacity 2 Ton 2 Ton Model Atd-7484 Model Atd-7485 Atd Tools Inc. 160 Enterprise Drive, Wentzville,
SPECIFICATIONS CONTENTS: Specifications Warning Information. Operating Instructions Preventative Maintenance Troubleshooting
 Model 3182 2,500 Lbs Power Train Table/Lift OWNER'S MANUAL CONTENTS: Page 1 Page 2-3 Page 3 Page 4 Page 5 Page 5 Page 6 Page 7 Page 8 Specifications Warning Information Setup Operating Instructions Preventative
ATO7 (100 Series Lifts)
") O PE ATO7 (100 Series Lifts) Capacity 7000 lbs. (3181 kg) 1750 lbs. (795.25 kg) per arm R A TI O N & M AI N TE N A N N CE Table Of Contents Safety Instructions... 2 Owner/Employer Responsibilities / Operating
O PE ATO7 (100 Series Lifts) Capacity 7000 lbs. (3181 kg) 1750 lbs. (795.25 kg) per arm R A TI O N & M AI N TE N A N N CE Table Of Contents Safety Instructions... 2 Owner/Employer Responsibilities / Operating
Operator s Manual. Automatic Electric Jack Leveling. The leveling system shall only be operated under the following conditions:
 Operator s Manual with Automatic Leveling Touchpad #140-1226 Control Box #140-1224 co Copyright PowerGear 1/07 #82-L0368 Rev. 0D Contents Before You Level Your Coach 1 Caution 1 Leveling System Operating
MR6K lb Capacity Portable Mid-Rise Scissor Lift. Operation Manual
 MR6K-38 6000 lb Capacity Portable Mid-Rise Scissor Lift Operation Manual 6,000 LB. PORTABLE MID-RISE FRAME LIFT A comfortable 38 working height, twin cylinders and double safety locks make this portable
MOHAWK MP-18 SERIES MOBILE COLUMN LIFT SPECIFICATIONS
 MOHAWK MP-18 SERIES MOBILE COLUMN LIFT SPECIFICATIONS 1. GENERAL DESCRIPTION 1.1 The purpose of these specifications is to define a mobile wheel contact lifting system to elevate large buses, trucks, passenger
CLEAN ROOM DEVICES, LLC "WHERE TUBING AND FITTINGS COME TOGETHER"
 CLEAN ROOM DEVICES, LLC "WHERE TUBING AND FITTINGS COME TOGETHER" CRD600 Automatic Fitting Inserter OPERATIONS MANUAL VERSION 2.1 LAST EDITED 7.25.14 DOCUMENT NUMBER 001 cleanroomdevices.com 1 Table of
1500 Series Roll Off Hoist. Owner s Manual (5-06)
") 1500 Series Roll Off Hoist Owner s Manual (5-06) Section 1: General Information Introduction Safety Information Warranty Information Table of Contents Section 2: Operation Operating the P.T.O. Operating
1500 Series Roll Off Hoist Owner s Manual (5-06) Section 1: General Information Introduction Safety Information Warranty Information Table of Contents Section 2: Operation Operating the P.T.O. Operating
Owner s Manual, Operating Instructions Manual, and Replacement Parts Manual. Lift-Rite Hand Pallet Trucks Model SS45
 Owner s Manual, Operating Instructions Manual, and Replacement Parts Manual Lift-Rite Hand Pallet Trucks Model SS45 This publication, 1188027A, applies to the Lift-Rite Hand Pallet Truck, Model SS45 and
Utility Distribution Systems Installation, Operation, and Maintenance Manual
 Utility Distribution Systems Installation, Operation, and Maintenance Manual RECEIVING AND INSPECTION Upon receiving unit, check for any interior and exterior damage, and if found, report it immediately
Model 289F. Operator s Manual for Morse Model 289F. MORStak TM Forklift-Mounted Drum Racker. The Specialist In Drum Handling Equipment
 Contents Page Receiving Procedures.................... 1 Warranty............................. 1 Safety Information..................... 1-2 Machine Description................... 3 Operating Instructions....................
500kg HYDRAULIC TABLE LIFT
 Product Code: 6007T OWNER S MANUAL PRODUCT CODE: 6007T 500kg HYDRAULIC TABLE LIFT Working Load Limit 500kg Maximum Height 1575mm Minimum Height 440mm Table Dimensions 1010x520mm Wheel Diameter 150mm Made
AUTOMATIC FOODSERVICE EQUIPMENT. AUTOMATIC ELECTRIC BROILER MODELS 824E & 850E and 624E & 650E. B-Series Broiler OWNER S MANUAL
 AUTOMATIC FOODSERVICE EQUIPMENT AUTOMATIC ELECTRIC BROILER MODELS 824E & 850E and 624E & 650E B-Series Broiler OWNER S MANUAL FOR YOUR SAFETY: Do not store or use gasoline or other flammable vapors or
Operation Care Service
 HAWK ENTERPRISES OF ELKHART, INC Standard Floor Machine Owner s Manual Operation Care Service 13 175 RPM 1.5 HP 15 175 RPM 1.5 HP 17 175 RPM 1.5 HP 20 175 RPM 1.5 HP 13 160 RPM 1.5 HP XHD 15 160 RPM 1.5
MV Series Motors Operation & Parts Manual
 MV Series Motors Operation & Parts Manual Models M3V, M5V, M5V-US For use with M3V s/n 101057 & below, M3V-UK s/n 103013 & below, M5V & M5V-US s/n 102972 & below. EU Declaration of Conformity Finish Thompson
MV Series Motors Operation & Parts Manual. Models M3V, M5V, M5V-US
 MV Series Motors Operation & Parts Manual Models M3V, M5V, M5V-US Introduction This manual pertains to drum pump motors MV Series. Finish Thompson, Inc. thanks you for choosing our products. We believe
Dayton Universal Plain Hoist Trolleys
 Operating Instructions & Parts Manual Please read and save these instructions. Read carefully before attempting to assemble, install, operate or maintain the product described. Protect yourself and others
Operation Care Service
 HAWK ENTERPRISES OF ELKHART, INC Glide Floor Machine Owner s Manual Operation Care Service Hawk Enterprises 52744 Park Six Court Elkhart, IN 46514 Phone: 574-294-1910 Toll Free: 888-289-4295 Fax: 574-970-0289
Read this entire manual before operation begins.
 Read this entire manual before operation begins. Record below the following information which is located on the serial number data plate. Serial No. Model No. Date of Installation Contents Specifications.............
VANGUARD A EZ INSTALL OPERATOR S MANUAL
 Parker Hannifin Corporation Porter Instrument Division 245 Township Line Rd. P.O. Box 907 Hatfield, PA 19440-0907 USA (215) 723-4000 / fax (215) 723-5106 VANGUARD A EZ INSTALL OPERATOR S MANUAL FM-1145
PRE-PLUMBED SEWAGE SYSTEM
 PRE-PLUMBED SEWAGE SYSTEM Zoeller is a registered trademark of Zoeller Co. All Rights Reserved. MODEL #1910-0009 Español p. 13 ATTACH YOUR RECEIPT HERE Serial Number Purchase Date Questions, problems,
6722 Rev. A CAPACITY: 22 TON TRUCK AXLE JACK WITH AIR RETURN
 CONTENTS: Page Specifications 2 Warning Information Setup Instructions and Operating Instructions 4 Preventative Maintenance, Inspection and Proper Storage 5 Troubleshooting, Owner/User Responsibility
POWER GEAR SLIDE-OUT MANUAL
 POWER GEAR SLIDE-OUT MANUAL Operation Guide FLUSH FLOOR SLIDE-OUT SYSTEM FOR AMERICAN COACH PRODUCTS 82-S0220-01 Rev. 1 AMERICAN COACH SLIDE-OUT MANUAL FLUSH FLOOR SYSTEM TABLE OF CONTENTS SECTION PAGE
MINI-EDGER POLISHER/SCRUBBER
 MINI-EDGER POLISHER/SCRUBBER INTRODUCTION OPERATING & MAINTENANCE INSTRUCTIONS READ THIS BOOK This operator s book has important information for the use and safe operation of this machine. Read this book
Heavy Duty Four Wheeled Walker
 Heavy Duty Four Wheeled Walker Weight Capacity: 500 lbs. ITEM # W1802 Made in China 2011 ESSENTIAL MEDICAL SUPPLY, INC. Manufactured for Orlando, FL 32822 -- SAVE THESE INSTRUCTIONS -- Do not attempt to
CENTURION USERS MANUAL HEAVY-DUTY TECHNOLOGIES April 2015 by Vehicle Service Group. All rights reserved. CO Rev.
 CENTURION USERS MANUAL HEAVY-DUTY TECHNOLOGIES 150012 April 2015 by Vehicle Service Group. All rights reserved. CO9383.2 Rev. - 4/30/15 HEAVY-DUTY TECHNOLOGIES Chief s Limited One-Year Warranty & Liability
Atlas PV-9WP Addendum
 Atlas PV-9WP Addendum 9,000 lb. Capacity Two-Post Overhead Lift The Atlas PV-9WP above ground hoist is 6 inches wider than the Atlas PV-9P, giving it an overall width of 141 (11 9 ) and a drive thru width
OBE, OBEXU, ON BOARD Battery Chargers
 C O R P O R A T IO N O P E R A T I N G I N S T R U C T I O N S OBE, OBEXU, ON BOARD Battery Chargers INTRODUCTION: These chargers are designed for the permanent installation on battery powered vehicles
READ THIS MANUAL BEFORE INSTALLATION AND/OR OPERATION! WARNING:
 1 READ THIS MANUAL BEFORE INSTALLATION AND/OR OPERATION! This is a vehicle lift operation manual and no attempt is made or implied herein to instruct the user in lifting methods particular to an individual
OWNER S MANUAL EVOLUTION 3500, 4500, 5500, & 8500 SERIES PUMPS
 OWNER S MANUAL EVOLUTION 3500, 4500, 5500, & 8500 SERIES PUMPS IMPORTANT SAFETY INSTRUCTIONS When installing and using this electrical equipment, basic safety precautions should always be followed, including
Read this entire manual before operation begins.
 Read this entire manual before operation begins. Record below the following information which is located on the serial number data plate. Serial No. Model No. Date of Installation Contents Specifications.............
Models PR-12F PR-12C PR-15C SURFACE MOUNTED TWO-POST LIFTS INSTALLATION AND OPERATION MANUAL
 Forward this manual to all operators. Failure to operate this equipment as directed may cause injury. INSTALLATION AND OPERATION MANUAL SURFACE MOUNTED TWO-POST LIFTS Models PR-12F PR-12C PR-15C Keep this
INSTALLATION, OPERATION AND MAINTENANCE MANUAL WALL EXHAUST FANS BELT DRIVE XBL FANS
 INSTALLATION, OPERATION AND MAINTENANCE MANUAL WALL EXHAUST FANS BELT DRIVE XBL FANS The purpose of this manual is to aid in the proper installation and operation of the fans. These instructions are intended
VESTIL MANUFACTURING CORP. OPERATION & SERVICE MANUAL PORTABLE DRUM JACK (DRUM-55-S) 2999 NORTH WAYNE STREET, P.O. BOX 507, ANGOLA, IN 46703
 2999 NORTH WAYNE STREET, P.O. BOX 507, ANGOLA, IN 46703") OPERATION & SERVICE MANUAL PORTABLE DRUM JACK (DRUM-55-S) VESTIL MANUFACTURING CORP. 2999 NORTH WAYNE STREET, P.O. BOX 507, ANGOLA, IN 46703 TELEPHONE: (260) 665-7586 -OR- TOLL FREE (800) 348-0868 FAX:
OPERATION & SERVICE MANUAL PORTABLE DRUM JACK (DRUM-55-S) VESTIL MANUFACTURING CORP. 2999 NORTH WAYNE STREET, P.O. BOX 507, ANGOLA, IN 46703 TELEPHONE: (260) 665-7586 -OR- TOLL FREE (800) 348-0868 FAX:
ARC 1850 LIST OF FIGURES
 PAGE 1.0 INTRODUCTION... 1 2.0 WARRANTY... 1 3.0 UNPACKING YOUR UNIT... 1 4.0 SUGGESTED SAFETY PRECAUTIONS...... 1 4.1 PERSONAL SAFETY PRECAUTIONS. 1 4.2 POWER SUPPLY SAFETY PRECAUTIONS.. 2 5.0 GENERAL
INSTRUCTION MANUAL TITAN 16K - Fifth Wheel Hitch Plymouth MI
 You can take it with you. INSTRUCTION MANUAL TITAN 16K - Fifth Wheel Hitch Plymouth MI Product No. 30866 DEALER/INSTALLER: END USER: (1) Provide this Manual to end user. (2) Physically demonstrate hitching
4400-Lb. Capacity Extra-Long Pallet Jack
 4400-Lb. Capacity Extra-Long Pallet Jack Owner s Manual WARNING: Read carefully and understand all ASSEMBLY AND OPERATION INSTRUCTIONS before operating. Failure to follow the safety rules and other basic
4400-Lb. Capacity Pallet Jack
 Read carefully and understand all ASSEMBLY AND OPERATION INSTRUCTIONS before operating. Failure to follow the safety rules and other basic safety precautions may result in serious personal injury. Item#
1000-LB. MOTORCYCLE LIFT TABLE OWNER S MANUAL
 1000-LB. MOTORCYCLE LIFT TABLE OWNER S MANUAL WARNING: Read carefully and understand all ASSEMBLY AND OPERATION INSTRUCTIONS before operating. Failure to follow the safety rules and other basic safety
(Equipped with Bottle Jack)
") Operating Instructions & Parts Manual Please read and save these instructions. Read carefully before attempting to assemble, install, operate or maintain the product described. Protect yourself and others
Operating Instructions & Parts Manual Please read and save these instructions. Read carefully before attempting to assemble, install, operate or maintain the product described. Protect yourself and others
StormPro BA Series Sump Pump
 Page 1 of 8 Marks & Meanings DANGER: Keep the pump equipment out of the reach of children! Warns that the failure to follow the directions given could cause serious risk to individuals or objects. WARNING:
Read this entire manual before operation begins.
 Read this entire manual before operation begins. Record below the following information which is located on the serial number data plate. Serial No. Model No. Date of Installation Contents Specifications.............
Operating Instructions and Parts Manual Long Chassis Service Jacks
 Operating Instructions and Parts Manual Long Chassis Service Jacks Models JSJ-3T/JSJ-5T/JSJ-10T WMH TOOL GROUP 2420 Vantage Drive Elgin, Illinois 60123 Part No. M-454430 Ph.: 800-274-6848 Revision A 8/05
AUTOMATIC FOODSERVICE EQUIPMENT. AUTOMATIC ELECTRIC BROILER MODELS 952E, 932E and 922E OWNER S MANUAL
 AUTOMATIC FOODSERVICE EQUIPMENT AUTOMATIC ELECTRIC BROILER MODELS 952E, 932E and 922E OWNER S MANUAL IMPORTANT: RETAIN THIS MANUAL IN A SAFE PLACE FOR FUTURE REFERENCE. FOR YOUR SAFETY: Do not store or
OPERATIONS MANUAL LEVER CHAIN HOIST
 OPERATIONS MANUAL LEVER CHAIN HOIST IMPORTANT SAFETY INFORMATION Please read, understand and follow all safety information contained in these instructions prior to the use of this hoist. Retain these instructions
before serial number 2214
 before serial number 2214 Contents Page Safety Rules... 3 Pre-operational & Safety Inspection... 4 Operating Instructions... 6 Transport... 12 Maintenance & Routine Service... 12 Specifications... 14 SAFETY
Hazardous Location Direct-Drive Exhaust Fans. Operating Instructions & Parts Manual
 Operating Instructions & Parts Manual EN Hazardous Location Direct-Drive Exhaust Fans Models 10D996 thru 10D999, 10E001 thru 10E007, 10E009 thru 10E020, 32ZN53 and 32ZN54 474904 PLEASE READ AND SAVE THESE
MICRO WELD MODEL AUF-8 HEAVY DUTY FERROUS BUTT WELDERS MICRO PRODUCTS COMPANY SERVICE MANUAL
 MICRO WELD MODEL AUF-8 HEAVY DUTY FERROUS BUTT WELDERS MICRO PRODUCTS COMPANY SERVICE MANUAL 1 TABLE OF CONTENTS 1.0 SPECIFICATIONS 2.0 GENERAL OPERATING INSTRUCTIONS 3.0 BASIC OPERATING PARTS 4.0 BASIC
AUTOMATIC SUBMERSIBLE UTILITY PUMP
 AUTOMATIC SUBMERSIBLE UTILITY PUMP Zoeller is a registered trademark of Zoeller Co. All Rights Reserved. MODEL #1043-0006 Español p. 9 ATTACH YOUR RECEIPT HERE Serial Number Purchase Date Questions, problems,
SL210i/SL212i/SL19i. Table Of Contents
 SL210i/SL212i/SL19i (700 Series) SL19i Capacity 9,000 lbs. SL210i Fixed Pad Capacity 9,000 lbs. SL210i Capacity 10,000 lbs. SL212i Capacity 12,000 lbs. Table Of Contents Owner/Employer Responsibilities...
ATTENTION. 1. Do not attempt to use the power unit to extend your cylinder. This must be done manually.
 NSS8XLT Installation Manual ATTENTION By following the instructions in this manual you can save yourself much time, frustration and money. The installation of your lift will take 4-5 hours. Do not rush.
Owner s Manual, Operating Instructions Manual, and Replacement Parts Manual
 Owner s Manual, Operating Instructions Manual, and Replacement Parts Manual Lift-Rite Titan Series Hand Pallet Trucks Models LCR55 and LCS55 Versions This publication, 1130442C, applies to the Lift-Rite
6602LP CAPACITY: 2 TON LOW RIDER SERVICE JACK
 CONTENTS: Page 1 Specifications 2 Warning Information 3 Setup Instructions 4 Operating Instructions, Preventative Maintenance, Inspection and Proper Storage 5 Hydraulic Jack Maintenance Guide and Regular
OBAE, OBAEXU, ON BOARD Battery Chargers
 C O R P O R A T IO N O P E R A T I N G I N S T R U C T I O N S OBAE, OBAEXU, ON BOARD Battery Chargers INTRODUCTION: The OBAE line of chargers are designed for the permanent installation on battery powered
OPTIMIZER TM OPERATOR MANUAL. Author: Labrie. Release Date: 1/31/07. Part #: 90320
 OPTIMIZER TM OPERATOR MANUAL Author: Labrie Release Date: 1/31/07 Part #: 90320 Table of Contents Introduction Introducing the Optimizer TM... 1 Product Overview... 1 Contacting Labrie Environmental Group...
Installation and Service Manual M² Sync Room Slideout System without Room Lock Connectors on Control Box
 Installation & Service Manual M² Sync Room Slideout System w/o Room Locks: for Slideout Control Box# 1510000143 and 1510000198 Figure 1 01/13 Power Gear #3010002088 Rev. 0C Installation and Service Manual
OPERATOR S MANUAL HWH COMPUTER-CONTROLLED LEVELING SYSTEM 610 SERIES
 HCORPORATIONH W R OPERATOR S MANUAL HWH COMPUTER-CONTROLLED LEVELING SYSTEM 610 SERIES FEATURING: TOUCH PANEL CONTROL HYDRAULIC LEVELING STRAIGHT-ACTING JACKS MULTIPLE ROOM EXTENSIONS HWH COMPUTERIZED
COOL DRAFT INSTRUCTIONS OWNER S MANUAL CONTENTS. Cool Draft MiniMister 14 Misting Fan CDMP1420BLU
 COOL DRAFT BY INSTRUCTIONS OWNER S MANUAL! Keep for future reference. Common problems and solutions are listed within this booklet. IMPORTANT INFORMATION INSIDE: Read, understand, and follow all safety
Before equipment use, please read this operation manual carefully. Serial Number: Date Purchased:
 Pushed & Geared Trolleys OPERATION MANUAL This operation manual is intended as an instruction manual for trained personnel who are in charge of installation, maintenance, repair etc. Before equipment use,
It is the shop owner's responsibility to train all operators in lift operation and safety.
 2 Your new lift will provide years of dependable service if installed, operated and maintained properly. Read and be prepared to follow all safety, installation, operation, and maintenance instructions
User s Manual and Operating Instructions
 User s Manual and Operating Instructions Model Numbers: CL-36-BDF-A, CL-42-BDF-A, CL-48-BDF-A E355088 READ AND SAVE THESE INSTRUCTIONS IMPORTANT: Read and understand all of the instructions in this manual
Transmission Jacks. 1ZKY1 and 1ZKY3. Description. Specifications. Assembly
 Operating Instructions & Parts Manual Please read and save these instructions. Read carefully before attempting to assemble, install, operate or maintain the product described. Protect yourself and others
QSSE, QSSEX INDUSTRIAL Battery Chargers
 C O R P O R A T IO N O P E R A T I N G I N S T R U C T I O N S QSSE, QSSEX INDUSTRIAL Battery Chargers INTRODUCTION The QSE line are electronically controlled float chargers. The batteries are brought
SEWAGE PUMP MODEL # Zoeller is a registered trademark of Zoeller Co. All Rights Reserved. Español p. 14
 SEWAGE PUMP Zoeller is a registered trademark of Zoeller Co. All Rights Reserved. MODEL #1261-0001 Español p. 14 ATTACH YOUR RECEIPT HERE Serial Number Purchase Date Questions, problems, missing parts?
Hydraulic Immediate Need Power Pack
 Safety, Operation, and Maintenance Manual WARNING Improper use of this tool can result in serious bodily injury This manual contains important information about product function and safety. Please read
INSTALLATION AND MAINTENANCE MANUAL FORM #PM-126 REV A 12/09
 HAND CRANK & MOTORIZED POWER CORD REELS: SERIES 1125PC SERIES: 1125PC HAND CRANK SERIES: 1125PC MOTORIZED COXREELS The technical data and images which appear in this manual are for informational purposes
12V DC MOTORISED OPENER FOR SWING GATES Section Table of Contents Page
 12V DC MOTORISED OPENER FOR SWING GATES Section Table of Contents Page 1 Introduction 2 2 Warnings 4 3 Technical Specifications 5 4 Positioning 6 5 Wiring Diagram 7 6 Standard Installation Kit 8 7 Installation
4" ENVIRONMENTAL E-SERIES PUMPS OWNER'S MANUAL. DANGER warns about hazards that will cause. WARNING warns about hazards that can cause
 4" ENVIRONMENTAL E-SERIES PUMPS OWNER'S MANUAL BEFORE INSTALLING PUMP, BE SURE TO READ THIS OWNER S MANUAL CAREFULLY. CAUTION Fill pump with water before starting or pump will be damaged. The motor on
GRINDER PUMP MODEL # Zoeller is a registered trademark of Zoeller Co. All Rights Reserved. Español p. 13
 GRINDER PUMP Zoeller is a registered trademark of Zoeller Co. All Rights Reserved. MODEL #2701-0005 Español p. 13 ATTACH YOUR RECEIPT HERE Serial Number Purchase Date Questions, problems, missing parts?
150-Lb. Drywall and Panel Hoist
 150-Lb. Drywall and Panel Hoist Owner s Manual WARNING: Read carefully and understand all ASSEMBLY AND OPERATION INSTRUCTIONS before operating. Failure to follow the safety rules and other basic safety