Introduction. Components. Do the following
|
|
|
- Leslie Bradford
- 6 years ago
- Views:
Transcription


1 User s Manual


2 1 2 3 C B
3 Item Numbers Product Description Bathmaster Sonaris2 Bath Lift only Bathmaster Sonaris2 Bath Lift with Turquoise Cover Turquoise Seat and Back Cover Turning Aid with Cover Turning Transfer Aid with Cover Premium Hand Controller/Battery Fast Battery Charger Suction Feet, Pack of 4 Introduction The Bathmaster Sonaris2 is a patient bathing device intended to assist a bather into and out of the bath. Designed to make the pleasure of taking a bath safer and easier, for both user and caregiver, the Bathmaster Sonaris2 is a fully battery-powered, self-contained bath seat, which requires no plumbing or electrical installation and is suitable for use in either domestic or institutional situations. The bath lift folds compactly, and separates into two parts, enabling it to be carried, transported and stored easily. The Bathmaster Sonaris2 is easily positioned in any standard bath (Note: There are a few extremely narrow or contoured designs of bath in which a powered bath seat is not suitable full details of compatible bath sizes can be found in the Technical Specifications section of these instructions). The frame stands on four suction feet that may be rotated to suit the curved floor of the bath. Integral pull- up tabs on the suction feet, plus a rear release system, enable the Bathmaster Sonaris2 to be easily removed from the bath. Replacement components and accessories are available. In this instruction manual you will find information and instructions on the safe and correct use of your bath lift. Keep all documents in a safe place. Components The Bathmaster Sonaris2 includes the following components: White plastic lower seat section with side transfer flaps and four suction feet White plastic backrest with motor and cable Two side flap protectors Hand controller containing battery pack with LED low-battery warning light and audible bleep Battery recharger with country specific lead and plug User instructions If any of the above components are missing or damaged, do not use the Bathmaster Sonaris2 and contact your distributor or Patterson Medical. Optional accessories are available for those requiring increased comfort or functionality. Do the following Check the contents to see that all components are included. In the rare event that product or components have been damaged, contact Patterson Medical immediately. Before using the Bathmaster Sonaris2 for the first time, read these instructions and familiarize yourself with the product and the lifting techniques. Become familiar with the operation of the unit before using it to lower or raise a person. Retain these instructions for future reference and keep them where people using the bath lift can have access to them. Ensure the suitability of the unit to lift the individual is assessed. Judging the suitability of any patient lifting device is the responsibility of the healthcare professional or the caregiver. Some circumstances that must be considered include the following: size and weight of the individual; his or her upper body strength, balance, coordination, cognition and hip flexibility; their potential to spasm. Only use the bath lift in baths which comply with the specifications outlined in the Technical Specifications section of these instructions. Inspect the unit before each use to be sure it is free from damage and excessive wear. Biannual inspections by trained technicians are strongly recommended (see Maintaining the Unit). Ensure both the bath surface and suction feet are clean, dry and free from soap and bath oil residue before fitting the Bathmaster Sonaris2 into the bath. If using bath oils or bath salts, do not use a strong solution. A high concentration may impair the slide function of the lifting scissors. While using the bath lift, the user should remain calmly seated. Excessive movement should be avoided. Use the Bathmaster Sonaris2 only with accessories, hand controllers and rechargers that are supplied by Patterson Medical. When the Bathmaster Sonaris2 is being used by a disabled person unaided, please ensure that an alarm system or telephone is available that could be used in the event of difficulty or emergency. 3
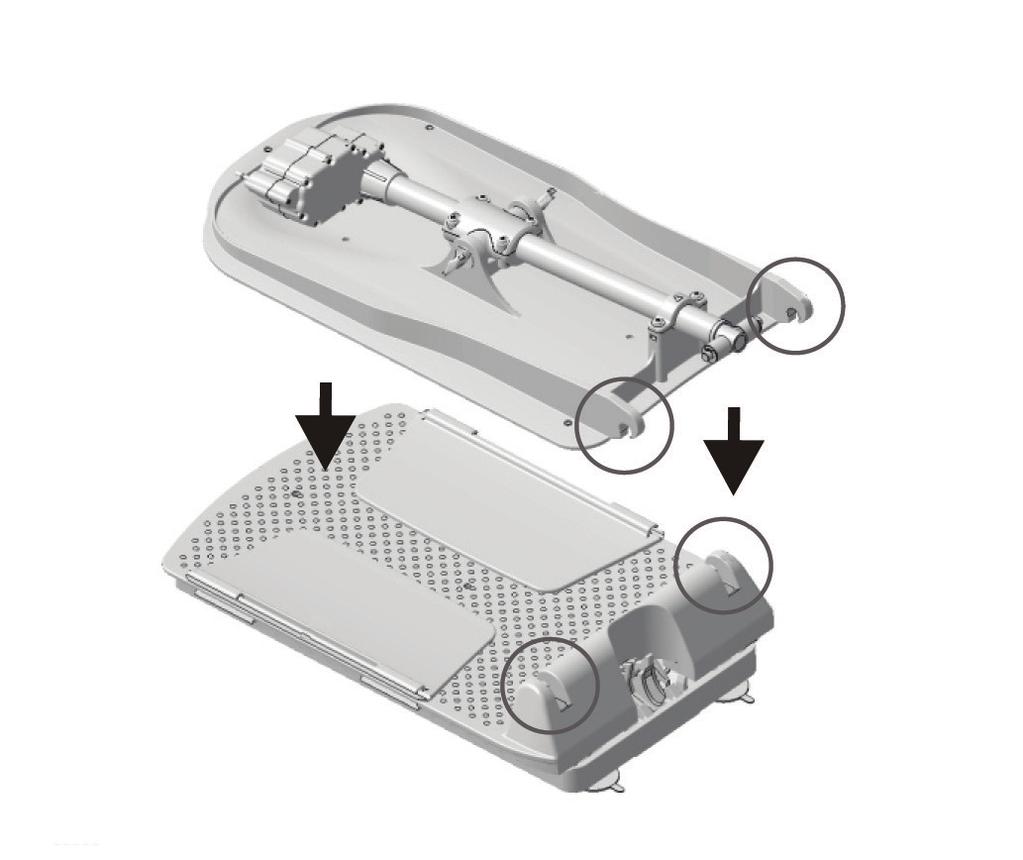
4 Do NOT do the following Do not exceed the maximum lifting capacity of the unit 375 lbs (170kg). Do not use the Bathmaster Sonaris2 as a support to help you stand or steady yourself. Do not use the unit on an incline greater than 5. Do not operate the hand controller while the unit is disassembled. Do not use the Bathmaster Sonaris2 if metal parts of the connectors or cables are exposed. Do not use the Bathmaster Sonaris2 for other uses than those for which it is designed as detailed in these instructions. Do not allow children to play with the Bathmaster Sonaris2, its parts or accessories. During assembly, use or cleaning, be careful not to put your fingers between any moving parts, especially around the backrest. Do not modify or reconstruct the device. Objects (such as hairbrushes, etc.) taken into the bath must not be allowed near the area of the lifting scissors. Do not store the hand controller near heat sources. Charging the battery The Bathmaster Sonaris2 is operated using a rechargeable, battery-powered hand controller. Each hand controller is completely waterproof to a depth of 1m. The batteries are charged using low voltage rechargers, designed for the appropriate countries electricity supply. The hand controller must be charged prior to first use and whenever it is low on power. New hand controllers should be charged for a 5 minimum of 1 hour prior to first use. Optimum battery capacity will be reached following a few charging cycles. Charging the battery should be done away from the bathroom and other sources of water. The light on the battery pack illuminates when the charge is low. If the light is permanently lit, enough power remains for one complete lift only. The unit will not lower into the bath. Do not use the unit after the low-battery light on the hand controller has permanently illuminated. Recharge it before use. The hand controller is designed so that it cannot be charged at the same time as being connected to the Bathmaster Sonaris2. The hand controller should be removed from the Bathmaster Sonaris2 if the unit is not going to be used for some time. All battery packs are sealed units and batteries are non-replaceable. The chargers are not designed for use with non-rechargeable batteries. Ensure that the connector (see Fig. 3) on the hand controller is completely dry before plugging it into the recharger or the bath lift. Inspect the charger and the power cord before each use to ensure they are free from damage. Do not open the handset as this will void the warranty. Recharging the hand controller (see Fig.3) To charge the battery, use the following procedure: 1. Disconnect the cable of the hand controller from the unit. 2. Ensure that the connector is dry. 3. Connect the jack plug on the cable of the hand controller with the socket on the cable of the charger unit. 4. Connect the charger to a suitable mains socket. Charging is in progress when the light on the hand controller is on. 5. Once charging is complete, the light in the hand controller will go out. Then disconnect the hand controller by reversing the sequence. Preparing the unit for use Before setting up, check parts for any damage in transit and that no parts are missing. Fitting the suction feet The suction pads must be free from dirt or grease. Take care to correctly orientate the straps on the suction pads (straps turned outwards) Fitting Side Flap Protectors (see Fig. 12) Screw the front suction pads and rear suction pads (see Fig. 1, component 6) with the threaded end into the threaded holes on the underside of the base plate. Fitting Side Flap Protectors (see Fig. 12) If the bath tub has handles, side flap protectors may be needed. Side flap protectors enable the side flaps to move smoothly up and down without catching beneath the handles on the bath. Clip the protectors into place on the handles with the short edges towards the outside of the bath. When fitted correctly, they should rest at the bottom of the edge of the bath. If necessary, they may be trimmed to length. Sharp edges of the trimmed end can be removed with abrasive paper or a file. Installing the bath lift Before use, ensure there are no obstructions or projections within the bath that may prevent the frame from standing securely and squarely on its suction feet. Also check that the lift can be raised and lowered freely without catching under or on, any part of the bath surface, the taps and adjacent fittings. Only set up the bath lift in baths which comply with the specifications found in the Technical Specifications section of these instructions. You will need to lift the Bathmaster Sonaris2 and place it into the bath. If you feel you may have difficulty or are unsure how to lift correctly, please ask someone for help. Take particular care to avoid back injury when lifting the unit into and out of the bath, by following safe moving and handling procedures and by separating the Bathmaster Sonaris2 into its individual parts. Make sure the bathroom floor is dry and free from obstructions to minimize the risk of stumbling, falling and dropping the frame. Placing the seat unit into the bath 1. Ensure that all four suction feet are fitted securely into the frame of the Bathmaster Sonaris2 before lowering it into the bath. 2. Position the seat unit close to the bath to minimize the carrying distance and the eventual lift into the bath. 3. Lift the seat unit into the bath and position it at the opposite end to the tap fixtures. Ensure the backrest hinges are towards the rear and allow room for the back of the unit to recline. 4. Ensure all four feet are in contact with the bath surface and are not resting on a bath mat or similar item. Push them securely onto the bottom of the bath. Fitting the backrest to the seat unit (see Fig. 7) 1. Lay the backrest (without hand controller), face down, against the seat unit so that the hooks on the backrest engage with the catches in the seat unit. 2. Press the backrest lightly at the rear end so that both hooks latch audibly and visibly into the catches. 3. Check that the drive mechanism is fully retracted into the column (as shown in Fig. 9). If not, this can be rectified by connecting the hand controller (see below) and pressing the down button. 4. Lift the front of the backrest and rotate until it is in the recline position. 5. Ensure that the backrest is securely attached to the seat unit and the actuator drive is located within the drive foot retainer before operating the unit. 4
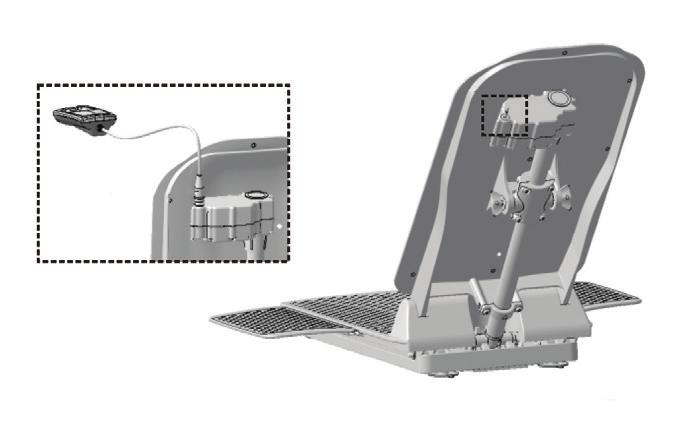
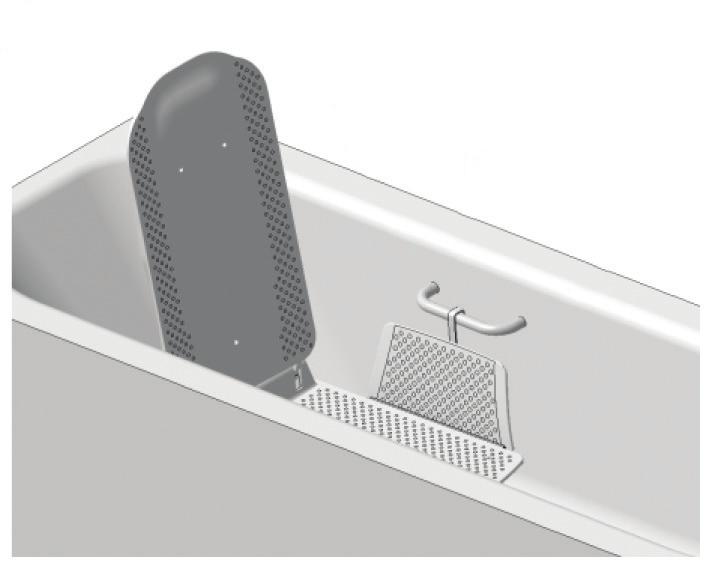
5 6. Ensure that once the backrest is upright, it does not touch the rim of the bath. 7. After assembling the backrest, flip up the side flaps to ensure that they will not catch under any handles fitted to the bath as the seat rises. If so, side protectors must be used. Connecting the hand controller 1. Ensure that the connector on the hand controller is completely dry before plugging it into the bath lift. 2. Attach the jack plug on the cable of the hand controller to the socket on the actuator so that it is fully located (see Fig. 8). 3. Ensure that connectors are fully mated before the bath lift is used. 4. Position the hand controller at the side of the bath, ensuring that the cable runs clear of the seat and the connector will not become disconnected as a result of the movement of the seat. 5. Operation and safety of the unit are not affected if the hand controller or connector falls into the water during use. The bath lift is now ready for use. Using the unit while bathing Ensure the Bathmaster Sonaris2 is in an upright position and is stable and secure before every use. Check that the warning light does not illuminate when the hand controller is used. If necessary, recharge the battery prior to use. Ensure the unit is tested first before being used by the bather. Check that the unit is able to move up and down and recline without obstructions by using the hand controller to raise and lower the unit. Ensure the water temperature is neither too hot nor too cold. Controlling the bath lift Control of the bath lift is achieved exclusively by the hand controller (see Fig 11). Press pad (C) to raise the unit and (D) to lower. The control pads have textured arrows to assist the visually impaired. When the down pad (D) is depressed and the light (A) flashes red, the rechargeable battery in the hand control is not sufficiently charged. The bath lift will not lower and will only rise. Once the lift is in the raised position, the battery in the hand controller must be charged immediately. The bath lift can be stopped and used in any position. At any time during the descent or ascent, the lifting mechanism can be stopped by releasing pressure on the switch pad and travel started in the opposite direction by depressing the other pad. When using the down pad (D), the bath lift travels downwards and then moves the backrest backwards to a maximum of 40. While using the up pad (C), the lowered backrest moves into the upright position and then the bath lift travels upwards. Emergency Stop (see Fig. 11) Only press the Emergency Stop pad (B) when the bath lift does not stop immediately after releasing the up or down pads (C or D). By pressing the Emergency Stop pad, all movements of the bath lift will stop immediately. If, during descent, the Emergency Stop pad is depressed, the down pad is blocked for approximately 15 seconds for safety purposes and the bath lift can only be operated with the up pad to travel upwards. Hands should be kept clear of the bath sides, bath floor and the sides of the seat when descending or ascending. Legs and feet should not be tucked under the seat. Ensure the bather s feet are situated beyond the front legs of the frame. When sitting on the seat of the Bathmaster Sonaris2, do not push against the bath, such that the front of the bath lift is raised off the floor of the bath, as this will make the bath lift unstable. Once the Bathmaster Sonaris2 is positioned correctly in the bath, it can be used as follows: Ensure the unit is tested first before being used by the bather. 1. Lift the seat unit with the up button on the hand controller (see Fig. 11) so that the side flaps are level with and resting evenly on the rim of the bath (see Fig. 4 & 5). 2. Run the bath water in and check the water temperature. 3. Stand with your back to the bath and sit down on the outer side flap with the seat directly behind you. 4. Slide back until your buttocks are central on the seat. 5. Swing round, raising each leg over the edge of the bath. 6. Once you are comfortably seated, use the hand controller down pad (D) to lower the lift into the bath, keeping the hands and feet away from the underneath of the seat. 7. The unit will stop at the lowest point of travel. To recline the backrest (to a maximum angle of 40 ) release the down pad and press again. 8. When you are in the desired recline position simply release pressure on the pad. When bathing is complete, exit the bath by following steps 9 to 12 below: 9. Use the hand controller to raise the seat to a height where the side flaps lie evenly on the bath rim (see Fig. 4 & 5), ensuring the flaps and the users hands do not become caught under any handles fitted into the bath. 10. Swing round, raising each leg over the edge of the bath. 11. Slide forward until your buttocks are on the outer side flap with the seat directly behind you. 12. Stand up with your back to the bath. Where possible, it is preferable that the hand controller is operated by the bather rather than an assistant, so the user has complete control and can stop movement in case of discomfort. The seat will only move while the controller buttons are pressed down. Removing the unit from the bath Disconnect the hand controller from the lifting mechanism by removing the jack plug from the socket on the drive (see Fig. 8). Recharge the hand controller if necessary (See Charging the Battery). The Bathmaster Sonaris2 may be stored in the bath if convenient. However, should you wish to remove it, follow the procedure below: 1. Check that the bathroom floor is dry and free from obstructions to minimize the risk of stumbling, falling or dropping the frame. 2. Allow any water to drain from the bath. 3. Using the down pad lower the bath lift, until the backrest stops in the lowered position (see Fig. 8). 4. Fold the side flaps onto the seat (see Fig. 6). 5. Pull the backrest at the upper end forward until it rests on the folded-up side flaps on the seat unit (see Fig. 7). 6. Give the backrest a small tug at the lower end so that both hooks unlatch; lift the backrest away from the seat and remove from the bath. 7. Hold on to the base plate (Fig. 1, component 9) at the grab handle by the front suction pads and pull up the suction pads by lifting the tabs. Release the rear and the front suction pairs at the same time. 8. Raise the seat unit by the grab handle gently and release the rear suction pads by lifting the tabs enabling the seat unit to be removed from the bath. 5
6 Important Do not hold by the drive foot retainer (Fig. 1, component 8) (BE CAREFUL OF THE SEAT LOCKING ARRANGEMENT) 9. Take particular care to avoid back injury when removing the Bathmaster Sonaris2 from the bath. Follow safe moving and handling procedures. Seek help if you are unsure about installing or removing the bath lift safely yourself. Important All components of the bath lift must be safely put away and stored. Care and cleaning Seat unit and backrest After bathing, rinse the bath lift (without covers) with warm water. If the bath lift is heavily soiled, wash it down with commercially available cleansing detergents and brushes. Remove the seat and backrest covers. Dry the product with a cloth. Use a mild disinfectant if required. Never clean the drive or hand controller with a high pressure washer. While cleaning the seat unit, be careful of the mobile lifting scissors. Do not use strong solutions of disinfectant. Ensure that the bath lift is completely dry before storing it. We recommend cleaning the Bathmaster Sonaris2 thoroughly when changing location or patient. Hand controller and battery charger Please read the hand controller instructions. Prior to cleaning, the charger must be removed from the power supply plug. Never dip the charger into water, spray wash or wash with water. Clean the charger with a cloth. Clean the hand controller with a damp cloth and then dry off. Ensure the bath lift is completely dry before storing it. Seat and backrest covers Once removed from the main unit, the seat and backrest covers can be washed at 40 C (max) in the washing machine. Do not dry the covers in a tumble dryer. Maintaining the unit The rechargeable battery in the hand control is not interchangeable and may only be opened by the manufacturer. The Bathmaster Sonaris2 should be inspected before each use to ensure it is free from damage and excess wear. The Bathmaster Sonaris2 is built to give long, reliable use without need for servicing. While being robust, the lift should be treated with care and in particular should not be dropped. If damage or deterioration is suspected, please contact Patterson Medical or the distributor for repair by an approved agent. For professionals issuing the Bathmaster Sonaris2, Patterson Medical recommends that the bath lift receives biannual inspections in line with requirements of the Lifting Operations and Lifting Equipment Regulations 1998 (LOLER). Inspections should only be carried out by trained and experienced personnel. We recommend giving the product a thorough inspection when changing location or patient. Recycling Bath lift, hand controllers and recharger must be disposed of correctly; if in doubt, contact your local refuse site. The bath seat is made from plastic; Hand controller contains electronic components and Lithium Ion batteries; Actuator and recharger contain electronic components; please separate and dispose of correctly. Technical specifications (See Fig. 2) Total weight without hand control: 24.5 lbs (11.1kg) Weight of seat unit: 16 lbs (7.4kg) Weight of backrest: 8 lbs (3.7kg) Weight of hand controller: 0.88 lbs (0.4kg) Seat depth (A): 20 (500mm) Max seat depth (B): 18 (455mm) Min seat height: 2.6 (65mm) Total depth (backrest upright) (C): 27 (690mm) Total depth (backrest lowered) (C): 35 (900mm) Total height (D): 43.5 (1105mm) Height of backrest (E): 26.8 (680mm) Width of backrest (F): 14 (350mm) Width of seat with side flaps (G) 28 (710mm) Width of seat without side flaps: 14.7 (375mm) Footprint of the base plate: 21 x 9 (530 x 220mm) Backrest reclines to: 40 Load capacity: 375 lbs (170kg) Actuator degree of protection against IP66 water ingress: Hand controller degree of protection IP67 against water ingress: Power on time: 10%/2 min - 90%/18 min Supply voltage: 11.1V 14.8V Operating voltage: 5A Rechargeable Battery: Li-ion Charge time when low voltage 1 hr indicated: Decibel Level: From / To 49db(A)/47db(A) Input: 230V AC/50Hz; 120V AC/60Hz Output: 20V DC/120mA/10VA; 20V DC/500mA/10VA 6
7 Specifications for baths/bath lifts (see Fig. 4 & 5) Descriptions A Bath underside length B Bath underside width (distance between suction cups) C Bath width at 3.1 (8cm) height (base plate) D Height of bath (with height adapter max 0.75 (2 cm) [accessories]) E Upper bath width (external) F Upper bath width (internal) Dimensions >31.5 (800mm) ( mm) > 16.5 (420mm) <18 /19 (455/475mm) <28 (710mm) <25 (630mm) Troubleshooting Guide Problem Possible Causes Remedy Lift does not move Connector in hand controller Check connector (see Fig 8) Battery is flat See charging battery instructions Actuator failure Repair by authorized service center Faulty spiral cable Replace hand controller Lift only travels upwards Battery is flat See charging battery instructions Red light on hand controller lights up Battery is flat See charging battery instructions Battery will not charge Faulty electronics Check / Repair by authorized service center Faulty battery Check / Repair by authorized service center Faulty power supply Check / Repair by authorized service center Limited Warranty Patterson Medical warrants that the Bathmaster Sonaris2 Bath Lift is free from defects in material and workmanship. This warranty shall remain in effect for four (4) years from the date of original consumer purchase. In the event that the unit needs inspection or repair, contact Patterson Medical, the distributor or an approved agent. This warranty does not cover the following: Replacement parts or labor furnished by anyone other than Patterson Medical, the distributor or an approved agent. Any failure of the unit during the warranty period if the failure is not caused by defect in material or workmanship or if the failure is caused by unreasonable use. Patterson Medical is not liable for incidental or consequential injury or damage to property. Should it be necessary to return the Bathmaster Sonaris2, it is essential it is adequately packed to protect it in transit, preferably in its own purpose made original box, otherwise Patterson Medical cannot accept any responsibility for transit damage to the unit. Any attempt at repair or maintenance by persons other than Patterson Medical-trained or approved personnel will void this warranty. 7
8 Notes 8

9 Icons on packaging and labeling Bath Lift Labeling and Packaging Hand Controller High-Power Pack 375 lbs Maximum User Weight Raise the seat. Contains dangerous voltages. Do not remove the cover. Type B electrical insulation Lower the seat. Double insulated Consult the user manual Emergency stop Electrical wiring Manufactured during (date) Warning read manual Direct Current Meets applicable European standards Meets applicable Canadian standards C +40 Max. & min. battery operating temperature Dispose of battery and motor correctly contains electronic components Li-ion Recycle battery contains Lithium-ion Li-ion Recycle battery contains Lithium-ion 25 lbs Total Product Weight Leave min 25mm gap when fully reclined Please retain these instructions for future reference 9
Introduction. Components. Do the following. Do not do the following
 Introduction The Bathmaster Sonaris is a patient bathing device intended to assist a bather into and out of a bath. Designed to make the pleasure of taking a bath safer and easier, for both user and carer,
AQUATEC R / AQUATEC F / AQUATEC XL. Bathlift Operating instructions
 AQUATEC R / AQUATEC F / AQUATEC XL Bathlift Operating instructions 1 2 3 4 5 6 7 8 9 10 11 Contents 1 General instructions................. 3 1.1 Introduction......................... 3 1.2 Proper use.........................
AquaLift Bath Lift System MODEL #8100
 AquaLift Bath Lift System MODEL #8100 Thank you for Choosing Columbia! Your AquaLift Bath Lift has been built to the highest standards of quality to ensure years of superior service. Please take the time
Marlin Bath Lift BLM-8200 WARNING! Read ALL instructions before using this product!
 Marlin Bath Lift BLM-8200 www.inspiredbydrive.com WARNING! Read ALL instructions before using this product! PRODUCT DESCRIPTIONS Your Marlin Bath Lift has been built to the highest standards of quality
User Manual. Code: BA01021
 User Manual Code: BA01021 1 TABLE OF CONTENTS Product description Components and parts Prior to use Safety warnings The charger and charging process Set-up Preparations before use Operation Emergency stop
Uplift Power Seat Users Guide
 Safety Precautions 1. Use the Uplift Power Seat only in armchairs or sofas with at least one armrest for optimum stability when sitting or rising. 2. Uplift Power Seat is not intended for use in rocking
Heavy Duty Engine Cranes
 Heavy Duty Engine Cranes Operating Instructions & Parts Manual Model Number Atd-7484 Atd-7485 (Foldable Legs) Capacity 2 Ton 2 Ton Model Atd-7484 Model Atd-7485 Atd Tools Inc. 160 Enterprise Drive, Wentzville,
RESTWELL RISE & RECLINE ARMCHAIRS OWNER S HANDBOOK PARTS DESCRIPTION
 RESTWELL RISE & RECLINE ARMCHAIRS OWNER S HANDBOOK CONTENTS 1. Introduction 2. Parts Description 3. Personal Safety 4. Installation Instructions 5. Backrest Removal 6. Operating Instructions and Guidelines
Uplift Premium Power Lifting Seat
 Uplift Premium Power Lifting Seat User Guide Read all instructions before using the Uplift Power Seat DANGER - To reduce the risk of electric shock: IMPORTANT SAFETY INSTRUCTIONS Always unplug the Uplift
EZ Way Shower Trolleys
 EZ Way Shower Trolleys 2000/3000 Operator s Instructions EZ Way, Inc. PO Box 89 Clarinda, IA 51632 1-800-627-8940 www.ezlifts.com Form 2-207 Rev. 12/14/11 The EZ Way Shower trolley is unique with its side-mounted
Archimedes. user instructions. Simple solutions for everyday independence
 rchimedes user instructions Simple solutions for everyday independence rchimedes The rchimedes by Mangar International, is a light weight battery powered actuator driven bathlift, designed to be easily
INVACARE CANADA. Bath Lifts
 INVACARE CANADA Bath Lifts Aquatec Series Bath Lifts Experience safety, comfort and independence with an Aquatec bath lift. The Aquatec family of bath lifts offer safe lowering and smooth rising into and
Heavy Duty Engine Cranes
 Heavy Duty Engine Cranes Operating Instructions & Parts Manual Model Number ATD-7484 ATD-7485 (Foldable Legs) Capacity 2 Ton 2 Ton Model ATD-7484 Model ATD-7485 WARNING: This product may contain chemicals,
Engine Crane Owner s Manual
 Engine Crane Owner s Manual Model Number ATD04 Capacity Ton WARNING: This product may contain chemicals, including lead, known to the State of California to cause cancer, birth defects or other reproductive
expandable booster Instruction Manual US Version
 expandable booster Instruction Manual US Version product: monterey XT expandable booster model series: 108000 mfg. by: Diono US 14810 Puyallup Street E Suite 200 Sumner, WA 98390 Customer Care Tel: 1 855
freedom through lightweight solutions
 freedom through lightweight solutions Mangar Inc. 3020 Legacy Dr. Suit 100-301 Plano, TX 75023 tel: 1-800-901-5269 www.mangarusa.com Mangar International Presteigne Powys LD8 2UF Wales, UK tel: +44(0)1544
Instruction Manual UK
 Instruction Manual UK Product: Monterey2 child booster seat Model: 15000 Mfg. by: DIONO Unit D Ventura House Ventura Park Road Tamworth Staffs B78 3LZ UK CUSTOMER SERVICE Tel: 0845.300.9071 Email: dionouk@diono.com
Aluminium 4-Wheeled Rollator/ Occassional Transport Chair VP184 Range Usage and Maintenance Instructions
 Aluminium 4-Wheeled Rollator/ Occassional Transport Chair VP184 Range Usage and Maintenance Instructions This file is available to view and download as a PDF at www.aidapt.co.uk. Sight impaired customers
Mangar Archimedes Instruction & Safety Manual
 Mangar Archimedes Instruction & Safety Manual Please read this manual before operation, for maintenance instructions and safe usage The enabling power of applied knowledge Mangar Archimedes, Instruction
USER MANUAL. EC+ Extra Care Bariatric Trauma Stretcher Model ConvaQuip Ind., Inc. P.O. Box 3417 Abilene, TX
 USER MANUAL EC+ Extra Care Bariatric Trauma Stretcher Model 1600 ConvaQuip Ind., Inc. P.O. Box 3417 Abilene, TX 79604 www.convaquip.com Table of Contents Parts Locator 3 Safety Notes 5 Weight Limit 6
RESTWELL RISE & RECLINE ARMCHAIRS OWNER S HANDBOOK PARTS DESCRIPTION
 RESTWELL RISE & RECLINE ARMCHAIRS OWNER S HANDBOOK CONTENTS 1. Introduction 2. Model Description 3. Parts Description 4. Personal Safety 5. Installation Instructions 6. Backrest Removal 7. Operating Instructions
INVACARE CANADA Bath Lifts
 INVACARE CANADA Bath Lifts Page 1 Page 2 Aquatec Series Bath Lifts Bathe comfortably and safely with the Aquatec series of bath lifts. The Aquatec family of bath lifts offers safe lowering and smooth rising
Medifab AU 1300 b NZ Page 1
 Medifab Ltd Australia: 26 Pardoe Street, Devonport, TAS 7310 New Zealand: 32 Detroit Drive, Rolleston 7675 Call 1300 543 343 (AU) Call 0800 543 343 (NZ) www.medifab.com solutions@medifab.com Medifab AU
freedom through lightweight solutions
 freedom through lightweight solutions Mangar International Presteigne Powys Wales, LD8 2UF tel: +44 (0)1544 267674 fax: +44 (0)1544 260287 e-mail (): customerservice@mangar.co.uk e-mail (Export): export@mangar.co.uk
TR 2000/3000. Operating manual. Shower Trolleys. Hygiene Equipment Designed for People
 Operating manual Always study this manual carefully before operating the Shower Trolley. Operating instructions and recommended maintenance procedures are explained in the following pages. Only qualified
Air Actuated Hydraulic Bottle Jacks
 Air Actuated Hydraulic Bottle Jacks Operating Instructions & Parts Manual Model Number Atd-7412 Atd-7420 Capacity 12 Ton 20 Ton Atd Tools Inc. 160 Enterprise Drive, Wentzville MO 63385 Printed in China
Hydraulic Long Jacks
 Operating Instructions & Parts Manual Hydraulic Long Jacks Model 44915 44930 44940 44980 44981C (Air option) Capacity 1-1/2 Ton 3 Ton 4 Ton 8 Ton 8 Ton Models 44915, 44930, 44940 & 44980 Model 44981C U.S.
Operator's Manual. Storage System. Ultrasound Probe Cabinet. Manufactured by:
 Storage System Ultrasound Probe Cabinet Operator's Manual Manufactured by: CIVCO Medical Solutions 102 First Street South Kalona, IA 52247 USA 319.248.6757 / 800.445.6741 WWW.CIVCO.COM Copyright 2018 All
Nimbo Lightweight Posterior Posture Walker
 Nimbo Lightweight Posterior Posture Walker Assembly & Operating Instructions with optional Forearm Platforms with optional Pelvic Stabiliser Please read these instructions carefully before assembling or
Operating Instructions & Parts Manual. Fuel Tank Adapter
 Operating Instructions & Parts Manual Fuel Tank Adapter Model Number 40080 Capacity 80 lb.! This is the safety alert symbol. It is used to alert you to potential personal injury hazards. Obey all safety
RESTWELL RISE & RECLINE ARMCHAIRS INTALIFT - OWNER S HANDBOOK PARTS DESCRIPTION
 RESTWELL RISE & RECLINE ARMCHAIRS INTALIFT - OWNER S HANDBOOK CONTENTS 1. Introduction 2. Model Description 3. Parts Description 4. Personal Safety 5. Installation Instructions 6. Backrest Removal 7. Operating
Operating and Service Manual For Amtech Wall Mount Tables.
 2016 Operating and Service Manual For Amtech Wall Mount Tables 0800 268 324 www.amtech.co.nz PRE-DELIVERY AND INITIAL SETUP 1. Ensure when product arrives that there has been no transit damage, taking
Table of contents 1 Introduction 2 Suitability 3 General safety instructions 4 Adjustments 24 5 Seat location selection and adjustment
 Table of contents...... 1 Introduction................................. 20 2 Suitability.................................. 20 3 General safety instructions....................... 21 4 Adjustments.................................
Patterson Medical. Bathmaster Deltis. For Prices please see price list on last page Forr Mobility rev 04/16
 Patterson Medical Bathmaster Deltis Difficulties getting into and out of the bath are quickly and easily overcome when using the Bathmaster Deltis. Simple to take in and out of the bath, it separates into
Advancement Chair. R901, R902, & R903 Product Manual
 Advancement Chair R901, R902, & R903 Product Manual Contents Warnings and Important Information 3 Recommended Use 4 User and Item Dimensions 4 Assembly and Adjustment Information 5 Maintenance 14 Cleaning
Hydraulic Truck Jack
 Operating Instructions & Parts Manual Hydraulic Truck Jack Model Capacity 23221C 22 Ton 23222C (Low Profile) 22 Ton 23301 30 Ton Models 23221C & 23222C Model 23301! U.S. Patent No's. 5,341,723 & 5,94,912
INSTRUCTION MANUAL STANDING WHEELCHAIR. KARMAN HEALTHCARE INC. City of Industry, CA
 INSTRUCTION MANUAL STANDING WHEELCHAIR KARMAN HEALTHCARE INC. City of Industry, CA 91748 www.karmanhealthcare.com **Karman Healthcare Inc. Recommends Patient Seek Physicians Counsel Before Purchase TABLE
Transit Wheelchair. user guide. Profiled grip attendant handles. Padded seat and backrest. Lift up, padded armrests. Park brakes
 Transit Wheelchair Profiled grip attendant handles Padded seat and backrest Lift up, padded armrests Park brakes Pneumatic 12 (305 mm) rear wheels Solid 7 (180 mm) front wheels Detachable, swing away footrests
QUICKIE 5 R Quick Guide. IMPORTANT! Read all Warnings and Instructions contained in the complete Owner s Manual prior to using this product.
 QUICKIE 5 R Quick Guide IMPORTANT! Read all Warnings and Instructions contained in the complete Owner s Manual prior to using this product. Backrest Upholstery Back Canes Tire Seat Sling Handrim Angle-Adjustable
Phoenix Buggy User Instructions
 Phoenix Buggy User Instructions Issued 1 st March 2015 Introduction Welcome to the Phoenix Buggy User Guide. The Phoenix Buggy has been designed to provide a robust, transportable mobility solution for
Instructions for use Shower stretcher Marina
 Instructions for use Shower stretcher Marina Important: Read these instructions carefully before using the Marina! Date of first use User Name Address Manufactured by: Lopital Nederland B.V. Laarakkerweg
PC-085 Use and Care Manual
 PC-085 Use and Care Manual w w w. i n t e r h e a l t h. c o m Interactive Health, 2006 The Perfect Chair is a registered trademark of Interactive Health, Inc. No medical claims warranted or implied by
expandable booster Instruction Manual US Version
 expandable booster Instruction Manual US Version product: monterey expandable booster model series: 15000 mfg. by: Diono LLC 14810 Puyallup Avenue Sumner, WA 98390 Customer Care Tel: 1 (855) 463-4666 us.diono.com
Cordless Sweeper. OWNER S MANUAL Model: CFT Volt DC. Made Exclusively for ALDI Inc. Batavia, IL.,
 Cordless Sweeper OWNER S MANUAL Model: CFT25 4.8 Volt DC Made Exclusively for ALDI Inc. Batavia, IL., 60510-1477 CFT25 ONE (1) YEAR LIMITED WARRANTY This product is warranted to be free from defects in
Hydraulic Transmission Jack, Telescopic
 Operating Instructions & Parts Manual Hydraulic Transmission Jack, Telescopic Model 4000 400 (Air Operated) Capacity 000 lbs. 000 lbs. Model 4000 Model 400 U.S. Patent No. 6,02,377! This is the safety
Make sure the rail is clamped square as shown. Start at the front, and place the first clamp approx 6 to 9 inches back.
 INSTALLATION SHEET Any damaged or missing parts? Parts will be shipped to you directly. Call 844-779-8986 Mon - Fri 5:30 am - 4 pm Pacific Time TOOLS RECOMMENDED 9/16 Wrench or socket 7/8 Drill bit & drill
1000-LB. MOTORCYCLE LIFT TABLE OWNER S MANUAL
 1000-LB. MOTORCYCLE LIFT TABLE OWNER S MANUAL WARNING: Read carefully and understand all ASSEMBLY AND OPERATION INSTRUCTIONS before operating. Failure to follow the safety rules and other basic safety
Hydraulic Transmission Jacks
 Hydraulic Transmission Jacks Operating Instructions & Parts Manual Model Number Atd-7435 Atd-7436 Atd-7437 Capacity 1100 Lb. 2000 Lb. 3000 Lb. Model Atd-7435 Model Atd-7436 Model Atd-7437 Atd Tools Inc.
Magician Comfy. Owner s Manual
 Magician Comfy Owner s Manual Table Of Contents Introduction...................................... 2 Safety Precautions................................ 3 Assembly........................................4-9
QUALITY TESTED PRODUCT OWNERS MANUAL
 TM Est. 1965 QUALITY TESTED PRODUCT OWNERS MANUAL TM Est. 1965 This product is made in Australia by TOPFORM FURNITURE Pty Ltd who are a member of the FIAA and a signatory to the Residential Furnishing
Low Profile Service Jack Jack Stand Combo
 Low Profile Service Jack Jack Stand Combo Jack Stands Low Profile Service Jack U.S. Patent No. 6,199,379! This is the safety alert symbol. It is used to alert you to potential personal injury hazards.
Large. Owner s Manual
 Large Owner s Manual 800-342-8968 www.easystand.com Table of Contents Introduction............................ 1 Safety Precautions....................... 2 Basic Unit Assembly-Evolv................. 3
Mighty Mack Wheeled Walker
 Mighty Mack Wheeled Walker Handle with lever brake Backrest Handle height adjustment knob Brake cable Extra wide padded seat Shopping basket Side brace 7 inch (180 mm) wheels user guide Prior to use please
Push Down Wheeled Walker
 Push Down Wheeled Walker Push down hand grip Handle height adjustment knob Backrest Padded seat with concealed pouch Side brace Bag with shopping basket inside Push down brake stopper 6 inch (150 mm) wheels
Condor Manual. Corporation
 Condor Manual Corporation PREFACE IMPORTANT, PLEASE READ CAREFULLY Thank you for your purchase with Amico Accessories Inc. This unit is designed for long lasting performance, providing the end user complies
INSTRUCTIONS FOR INSTRUCTIONS FOR USE USE Bambino panthera panthera
 INSTRUCTIONS FOR USE Bambino panthera Contents Intended use s 2 Adaptation s 3 Maintenance s 8 Safety s 9 Crash test s 11 Intended use The Panthera Bambino wheelchair is designed for children who need
2¼ TONNE TROLLEY JACK
 2¼ TONNE TROLLEY JACK Model No: CTJ2250LP PART NO: 7623070 OPERATING & MAINTENANCE INSTRUCTIONS GC01/12 INTRODUCTION Thank you for purchasing this CLARKE Trolley Jack. Before attempting to use this product,
TXJ0500/RR500 1,000-lbs. Truck Bed Roller Dolly
 OWNER S MANUAL TXJ0500/RR500 1,000-lbs. Truck Bed Roller Dolly WARNING: Questions, problems, missing parts? Before returning to your retailer, call our customer service department at 1-888-448-6746, 8
Hydraulic Clutch Jack
 Hydraulic Clutch Jack Operating Instructions & Parts Manual Model Number Atd-7404 Capacity 500 Lb. Atd Tools Inc. 160 Enterprise Drive, Wentzville MO 63385 Printed in China ATD7404-M0 05/07 Save these
Q20 5th wheel hitch WARNINGS. warning: never exceed your vehicle manufacturer's recommended towing capacity
 Installation instructions warning: never exceed your vehicle manufacturer's recommended towing capacity Q20 5th wheel hitch Table of contents Page# Description 1 Warnings & Precautions 2 Assembly & Installation
Operating instructions
 Operating instructions Please ensure both yourself and any helpers read these operating instructions carefully and in full before using your bath lift. These operating instructions should be retained for
RESTWELL RISE & RECLINE ARMCHAIRS LARS AND SVEN - OWNER S HANDBOOK MODEL DESCRIPTION
 RESTWELL RISE & RECLINE ARMCHAIRS LARS AND SVEN - OWNER S HANDBOOK CONTENTS 1. Introduction 2. Model Description 3. Parts Description 4. Personal Safety 5. Installation Instructions 6. Operating Instructions
REACH USER MANUAL USER: READ THIS MANUAL BEFORE USING THIS DEPENDENT MOBILITY BASE AND SAVE FOR FUTURE REFERENCE
 USER MANUAL CHAIR PROVIDER: THIS MANUAL MUST BE GIVEN TO THE USER OF THIS DEPENDENT MOBILITY BASE USER: READ THIS MANUAL BEFORE USING THIS DEPENDENT MOBILITY BASE AND SAVE FOR FUTURE REFERENCE Revision
INSTALLATION SHEET. PARTS INCLUDED IN YOUR KIT 1 Pair rails (L&R) Roll top assembly Bulkhead seals (1x 1/4 & 1x 3/4 thick) (1x 1/4 & 1x 1/4 thick)
 Roll top assembly Bulkhead seals (1x 1/4 & 1x 3/4 thick) (1x 1/4 & 1x 1/4 thick)") INSTALLATION SHEET Any damaged or missing parts? Parts will be shipped to you directly. Call 844-779-8986 Mon - Fri 8:30 am - 7 pm EST or email support@bakindustries.com TOOLS RECOMMENDED 9/16 Wrench or
INSTALLATION SHEET Any damaged or missing parts? Parts will be shipped to you directly. Call 844-779-8986 Mon - Fri 8:30 am - 7 pm EST or email support@bakindustries.com TOOLS RECOMMENDED 9/16 Wrench or
QA4 Surgery Trolley System Manual Function Operating Instructions
 QA4 Surgery Trolley System Manual Function Operating Instructions Catalogue No. 21310 Anetic Aid Ltd. Queensway Guiseley West Yorkshire, LS20 9JE United Kingdom T +44 (0) 1943 878647 F +44 (0) 1943 870455
Garaventa Power Evacu-Trac
 Garaventa Power Evacu-Trac Emergency Evacuation Chair Owner s Manual Item No. 21102-A-OM Power Evacu-Trac OWNER S MANUAL Table of Contents 1. Safety First Page 4 2. Terminology Page 5 3. Operating Instructions
Instruction Manual. Canada English Version
 Instruction Manual Canada English Version Product: Monterey child booster seat Model: 15000 Mfg. by: Diono Canada, ULC 50 Northland Road, Suite 400 Waterloo, Ontario N2V 1N3 Customer Service Tel: 519-725-1700
Operating Instructions & Parts Manual
 Hydraulic Air/Manual Bottle Jacks Operating Instructions & Parts Manual Model Number ATD-74 ATD-74 Capacity Ton 0 Ton! U.S. Patent No.'s. 5,34,73-5,946,9 This is the safety alert symbol. It is used to
Aluminum Plus Low Profile Service Jack
 Aluminum Plus Low Profile Service Jack Operating Instructions & Parts Manual Model Number ATD7344 ATD7345 Capacity 1.5 Ton 2.5 Ton Model ATD7344 Model ATD7345! This is the safety alert symbol. It is used
Users Manual. Ultra Care May 2003 GLO Pub. No
 Users Manual Ultra Care 4000 May 2003 GLO Pub. No. 234-2117-01 Ultra Care 4000 Disclaimer This manual contains general instructions for the use, operation and care of this product. The instructions are
OWNER S MANUAL. Sentry & Sentry CT THREE YEAR WARRANTY. Phone: ( ) Fax: (605) SAFETY INSTRUCTIONS
 Fax: (605) SAFETY INSTRUCTIONS") OWNER S MANUAL Sentry & Sentry CT HARD ROLL-UP TRUCK BED COVER SAFETY INSTRUCTIONS 1. Do not place objects on or against cover or framework. 2. Do not tie cargo to truck bed cover framework. 3. Never allow
OWNER S MANUAL Sentry & Sentry CT HARD ROLL-UP TRUCK BED COVER SAFETY INSTRUCTIONS 1. Do not place objects on or against cover or framework. 2. Do not tie cargo to truck bed cover framework. 3. Never allow
ELECTRIC FOLDING BIKE OWNERS MANUAL. e-power 36v. Go City-Lite
 P o w e r ELECTRIC FOLDING BIKE OWNERS MANUAL e-power 36v Go City-Lite Thank you for purchasing a Seago electric folding bike. In order to get the best out of your new bike you must read and fully understand
101 Stair Lift SR601 OWNER'S MANUAL. Dealer Name & Contact Information: Serial # of Your Lift: Install Date:
 101 Stair Lift SR601 OWNER'S MANUAL Read and understand this manual thoroughly before attempting to install or operate the lift. If you have any questions, please contact your 101 Mobility Dealer. Dealer
Use and Care Instructions: Youngman Telescopic Loft Ladder. Models: 2.6m and 2.9m. Safety
 Use and Care Instructions: Youngman Telescopic Loft Ladder Models: 2.6m and 2.9m Safety Please ensure you read the Safety section in this manual starting on page 4 before installing or using the equipment.
Booster Car Seat User Guide
 Booster Car Seat User Guide For future use, STORE USER GUIDE in location on bottom of base. IS0133.E 2015 Artsana USA, Inc. If you have any problems with your Chicco Booster Seat, or any questions regarding
Long Chassis Hydraulic Service Jacks
 Model BH6011 Long Chassis Hydraulic Service Jacks Operating Instructions and Parts Manual Capacity 10 Ton Model BH6011 U.S. Patent No's. 5,946,912 5,341,723! This is the safety alert symbol. It is used
Prime Engineering GRANSTAND II
 OWNER S MANUAL PRODUCT PHOTO PARTS LIST ASSEMBLY INSTRUCTIONS FITTING & ADJUSTING DAILY USAGE ACCESSORIES MAINTENANCE WARRANTY Prime Engineering GRANSTAND II Manufactured By Prime Engineering A Division
ASSIST & TRANSIT. osd USER MANUAL TABLE OF CONTENTS
 osd ASSIST & TRANSIT USER MANUAL TABLE OF CONTENTS 1. Key Specifications 2. List of Components 3. Assembly & Use 4. Troubleshooting 5. Care & Maintenance 6. Warnings 7. Warranty 8. Compliance. Service
Owner s Manual and Warranty Information
 SIERRA Incline Platform Lift Owner s Manual and Warranty Information IMPORTANT! YOU MUST READ AND UNDERSTAND THIS ENTIRE MANUAL BEFORE ATTEMPTING TO OPERATE THIS LIFT. IF THERE IS ANYTHING IN THIS MANUAL
SB2 TubBuddy Owners Manual. elimination through innovation
 SB2 TubBuddy Owners Manual elimination through innovation contents Exploded Parts... 3 Parts List... 4 Securing Clip Sizes... 4 TubBuddy Assembly... 5 TubBuddy Setup... 12 TubBuddy Operation... 17 Cleaning
Hydraulic Wheel Dolly
 Hydraulic Wheel Dolly Operating Instructions & Parts Manual Model Number HW93766 Capacity 3/4 Ton Made in the U.S.A. This is the safety alert symbol. It is used to alert you to potential personal injury
Model: SW02 Advanced OPERATING MANUAL
 Powerful Cordless Model: SW02 Advanced OPERATING MANUAL What is in the box 1 2 3 4 5 6 7 8 9 10 11 Main unit Brush Bar Front Visor Dust Tray Upper Handle Telescopic Handle Tubes Lower Handle Charger (inside
Operating Instructions & Parts Manual. Air/Manual Hydraulic Bottle Jacks
 J18124-M1_032015 Operating Instructions & Parts Manual Air/Manual Hydraulic Bottle Jacks Model J18124 J18204 Capacity 12 Ton 20 Ton U.S. Patent Nos. 6,012,377-5,946,912! This is the safety alert symbol.
Service Manual Air Tech Second Stage
 Service Manual Air Tech Second Stage Copyright 2002, Cressi-sub Revised 3/2002 2 Air Tech Second Stage Service Manual Contents BEFORE STARTING... 3 DISASSEMBLY... 3 PARTS CLEANING AND LUBRICATION... 9
Heavy Duty Bottle Jacks
 Heavy Duty Bottle Jacks Models: 10300 & 10500 10300 10500! This is the safety alert symbol. It is used to alert you to potential personal injury hazards. Obey all safety messages that follow this symbol
Oobr Instruction Manual
 0 000002 8 Oobr Instruction Manual This belt-positioning booster seat (booster seat) is designed for use in either full back mode or backless mode by children who meet all of the following requirements:
IL500 Sierra Inclined Platform Lift
 IL500 Sierra Inclined Platform Lift Owner's Manual and Warranty Information www.harmar.com 800-833-0478 IMPORTANT: Read and understand this manual thoroughly before attempting to operate the lift. If you
Telescopic Transmission Jacks
 Telescopic Transmission Jacks Operating Instructions & Parts Manual Model Number BH7051 BH7055 (Air/Manual) Capacity 1/2 Ton 1/2 Ton SFA Companies 2006 10939 N. Pomona Ave. Kansas City, MO 64153 816-891-6390
Hydraulic Wheel Dolly
 Hydraulic Wheel Dolly Operating Instructions & Parts Manual Model Number HW93765 Capacity 3/4 Ton Made in the U.S.A. This is the safety alert symbol. It is used to alert you to potential personal injury
3 TON JACK STANDS. Operator s Instruction Manual. Rated Capacity 6,000-lb MODEL# T43002T
 Operator s Instruction Manual 3 TON JACK STANDS Rated Capacity 6,000-lb MODEL# T43002T This is the Safety Alert Symbol. It is used to alert you to potential personal injury hazards. Obey all safety messages
PRISM BACKS (BASIC, ULTRA, TRUEFITT, AIR BACK AND SUPER BACK FOR KIDS) 850 REV04 REV DATE: 09/03/2014 Page 1 of 16
 850 REV04 REV DATE: 09/03/2014 Page 1 of 16") PRISM BACKS (BASIC, ULTRA, TRUEFITT, AIR BACK AND SUPER BACK FOR KIDS) 850 REV04 REV DATE: 09/03/2014 850 REV04 REV DATE: 09/03/2014 Page 1 of 16 Table of Contents Page 3 1.0 Hardware Kit Contents Page
PRISM BACKS (BASIC, ULTRA, TRUEFITT, AIR BACK AND SUPER BACK FOR KIDS) 850 REV04 REV DATE: 09/03/2014 850 REV04 REV DATE: 09/03/2014 Page 1 of 16 Table of Contents Page 3 1.0 Hardware Kit Contents Page
Sequoia 2 Post System
 Sequoia 2 Post System Owner s Manual Use and Care Fault Finding Warranty Information Table of Contents Sequoia 2 Post System Introduction... 3 Overview... 3 Placement of the Sequoia... 4 Components of
Air Actuated Hydraulic Bottle Jack on Wheels
 Operating Instructions & Parts Manual Air Actuated Hydraulic Bottle Jack on Wheels Model Number 18127 18207 Capacity 12 Ton 20 Ton Shinn Fu Co. of America, Inc. 2002 10939 N. Pomona Avenue Kansas City,
Pinnacle Stair Lift SL300 / SL300FR OWNER'S MANUAL. Dealer Name & Contact Information: Serial # of Your Lift: Install Date:
 Pinnacle Stair Lift SL300 / SL300FR OWNER'S MANUAL Read and understand this manual thoroughly before attempting to operate the lift. If you have any questions, please contact your Authorized Harmar Dealer.
Euro Lightweight Wheeled Walker
 Euro Lightweight Wheeled Walker Handle with lever brake Backrest Brake cable Handle height adjustment button Removable shopping bag 8 inch (200 mm) wheels Cane holder user guide Prior to use please read
Instruction Manual AVTM for. Strip Chart Recorder Catalog Nos and
 AVTM220003 Rev. B January 2003 Instruction Manual AVTM220003 for DC µa Strip Chart Recorder Catalog Nos. 220003 and 220003-47 PO Box 9007 Valley Forge, PA 19485-1007 U.S.A. 610-676-8500 Shipping Address:
Model: SL360R Lithium Ion 360 LED Cordless Work Light
 OWNERS MANUAL Model: SL360R Lithium Ion 360 LED Cordless Work Light PLEASE SAVE THIS OWNERS MANUAL AND READ BEFORE EACH USE. This manual will explain how to use the work light safely and effectively. Please
Heavy Duty Jack Stands
 Heavy Duty Jack Stands Operating Instructions & Parts Manual Made in the U.S.A. Model Number HW93511 Capacity per pair 10 Ton Model Number HW93512 Capacity per pair 10 Ton This is the safety alert symbol.
DOC /500/600 Series Patient Lift Owner's Manual REV 001
 Page1 BESTCARE MODELS COVERED 400 Series 500 Series 600 Series CONTENTS Product Features Assembly Operating Instructions Warranty BEFORE USE: Ensure the product has been assembled according to the instructions
Rehab Shower Commodes
 Rehab Shower Commodes Size Model Seat Width Front Rear Wheels Wheels Small 150 1 Small 22 150-22 1 22 Standard 180 Standard - 24 180-24 24 Large 185 20 Large 24 185-24 20 24 Extra Large 186 22 X Large