INSTRUCTION MANUAL. Terminator T-2100EI Battery Powered Floor Scraper
|
|
|
- Lynette Hilary Hancock
- 6 years ago
- Views:
Transcription
1 IF YOU SHOULD EXPERIENCE A PROBLEM WITH YOUR INNOVATECH PURCHASE, CALL IN MOST CASES AN INNOVATECH REPRESENATATIVE CAN RESOLVE YOUR PROBLEM OVER THE PHONE. IF YOU HAVE A SUGGESTION OR COMMENT, GIVE US A CALL. YOUR FEEDBACK IS VITAL TO THE SUC- CESS OF INNOVATECH S QUALITY IMPROVEMENT PROGRAM. INSTRUCTION MANUAL Terminator T-2100EI Battery Powered Floor Scraper Copyright 2012, Everett, Washington USA. All rights reserved. Pat. Num.: 5,641,206 SN: T IB forward Manual Version 1.1 Updated 03/5/14
2 Table of Contents Introduction... 4 About This Manual... 4 Important Safety Instructions... 5 Safety Instructions for All Tools...5 Additional Safety Rules for Riding Floor Scrapers...6 General Operating Instructions for the Terminator... 7 Safety Features... 7 Warning Light and Back-Up Alarm...7 Fire Extinguisher...7 Autostop...7 Emergency Battery Disconnect...7 Safety Instructions...7 Terminator Specifications... 8 Tools & Supplies...8 Ventilation Requirements... 9 Guards, Warning Notices & Signs... 9 Service Instructions & Personnel... 9 Replacement Parts & Materials... 9 Uncrating The Terminator And Preparing It For Operation Loading/Unloading Procedures: Operator Controls Drive And Blade Controls And Foot Pedal...11 Auto Stop...11 Emergency Brake...11 Power Limiter...11 Displays and Indicators Battery Display And Hour Meter...12 Hydraulic Oil Over Temperature Indicator...12 Hydraulic Filter Clog Indicator...12 Manual Disconnect And Lockout...12 Electric Motor and Batteries Blade Assembly Taking Up Floor Coverings...13 Page 2
3 Ballast Tricycle Or Caster Wheelbase And Tires Battery Safety Hazardous Elements...14 Sulfuric acid:...14 Explosive Gases:...14 Electricity:...14 Weight:...14 Lifting Batteries...15 Wearing Protective Clothing...15 Setting Up A Charging Area Connecting/Disconnecting Charger...16 Basic Charging Facts...16 The Charging Process...16 Specific Gravity...17 Temporary Storage Of Battery Pack...17 Check Battery Electrolyte Weekly...17 First Aid First Aid for Acid Splashes...18 Eye Wash And Emergency Shower Facilities...18 Maintenance Procedures Warranty Parts Diagrams Electrical Schematic...60 Material Safety Data Sheets (MSDS) Batteries...62 Hydraulic Oil...64 Terminator T-2100EI Manual Page 3
4 Introduction The Terminator Carpet and Tile Removal Machine is intended for use on large demolition and asbestos abatement projects as well as smaller floor covering removal jobs. Designed and built by experienced floor covering demolition and installation experts, the machine incorporates several design features that are essential for efficient operation: Tricycle wheelbase and short turning radius allows for better turning ability especially in narrow spaces. Blade vertical and tilt position adjustments allow for positioning the angle of the blade for each application. Ballast in front and rear provides extra traction needed for tile and glue removal. Built-in forklift transport slots allows for easy loading and unloading at job sites. Foot control for a very smooth start and stop. If operated and cared for as instructed in this Manual, the Terminator provides trouble-free, safe, and efficient performance. About This Manual This Manual contains the information and procedures to assist you to operate and maintain the Terminator machine safely and correctly. Read this Manual before you operate or service the equipment. If you need additional information or assistance, please get in touch with our Customer Service Department: th ST SW Everett, WA USA (425) or Fax (425) service@innovatechproducts.com NOTE: Throughout this Manual directional instructions (left, right, up, down, push, pull, etc.) are given from the point of view of the operator performing the action. Page 4
5 Important Safety Instructions WARNING: When using electric tools, basic safety precautions should always be followed to reduce the risk of fire, electric shock, and personal injury, including the following: READ ALL INSTRUCTIONS Safety Instructions for All Tools KEEP GUARDS IN PLACE and in working order. REMOVE ADJUSTING TOOLS AND WRENCHES. Form habit of checking to see that keys and adjusting wrenches are removed from the Terminator before turning tool on. KEEP WORK AREA CLEAN. Cluttered areas invite accidents. KEEP CHILDERN AWAY. All visitors should be kept a safe distance from the work area. WEAR PROPPER APPAREL. No loose clothing, gloves, neckties, rings, bracelets or other jewelry to get caught in moving parts. Non-slip footwear is recommended. Wear protective hair covering to contain long hair. ALWAYS WEAR SAFETY GLASSES. Also use a face or dust mask if operating in a dusty environment. All users and bystanders must wear eye protection that conforms to ANSI Z87.1. (CAN/CSA Z94.3) MAINTAIN EQUIPMENT WITH CARE. Keep equipment clean for best and safest performance. Follow instructions for lubrication and changing accessories. DISCONNECT BATTERY before servicing. REDUCE THE RISK OF UNINTENTIONAL STARTING. Make sure handles are centered and foot.pedal is not depressed before starting. USE RECCOMENDED ACCESSORIES. Consult the instruction manual for recommended accessories. The use of improper accessories may cause risk of injury to persons. NEVER STAND ON TOOL. Serious injury could occur if the machine is tipped or rocked. CHECK DAMAGED PARTS. Before further use of the tool, a guard or other part that is damaged should be carefully Terminator T-2100EI Manual checked to determine that it will operate properly and perform its intended function check for alignment of moving parts, binding of moving parts, breakage of parts, mounting and any other conditions that may affect its operation. A guard or other part that is damaged should be properly repaired or replaced. Do not use tool if switch does not turn it on and off. NEVER LEAVE EQUIPMENT RUNNING UNATTENDED. TURN POWER OFF. Don t leave equipment until it comes to a complete stop. DO NOT OPERATE ELECTRIC TOOLS NEAR FLAMABLE LIQUIDS OR GASSES OR EXPLOSIVE ATMOSPHERES. Motors in these tools may spark and ignite fumes. Page 5
6 Additional Safety Rules for Riding Floor Scrapers CAUTION: FAILURE TO HEED THESE WARNINGS MAY RESULT IN SERIOUS PERSONAL INJURY OR DEATH AND SERIOUS DAMAGE TO THE TERMINATOR. The Terminator is to be operated only by qualified, trained personnel. DON T attempt to operate the Terminator if you are not thorougly familiar with the operation of the Terminator. DON T operate the Terminator unless every guard, warning notice or sign is in place. DON T use the Terminator on roofs or floors not designed to carry the weight of the machine. The Terminator weighs 2,780 lbs. DON T attempt to operate on anything but the designated voltage. DON T operate unless all clamp handles are tight. DON T wedge anything against the motor fan to hold motor shaft. DON T operate equipment without guards in place. DON T operate the Terminator near an open flame or smoking materials DON T operate the the Terminator while under the influence of drugs, alcohol or medication. DON T engage in horseplay on or near the Terminator DON T stand directly behind or infront of the the Terminator when power is enabled. DON T lift the hood, inspect the blade, or otherwise service or maintain the Terminator while power is enabled. DON T operate the Terminator of the top cover is open. DON T overreach. Keep proper footing and balance at all times. DON T run the machine into piles of debris, as this may cause the machine to become unstable and tip over. DON T sit on or stand next to, under or around the Terminator when it is being transported in a moving vehicle, whether by itself or with other equipment. Page 6 DON T attempt to use the Terminator on a non-horizontal surface or turn the Terminator around on a ramp or hill. DON T put your hands or feet in the blade area when the Terminator is running. DO turn the power off when not in use. DO use personal safety equipment such as steel toe shoes, safety glasses, gloves, and ear plugs. DO use gloves when changing blades and removal tools. Tools may be hot and cause burns. DO familiarize yourself with all safety features and controls before each use. DO use the Terminator only for the purpose for which it was designed. Attempting to alter the Terminator will invalidate applicable warranties and possibly damage the machine. DO reduce speed next to walls, machinery and other objects. DO pre-survey the floor for cracks, ditches, trenches, electrical outlets or bolts, which could catch the blade of the machine. DO use the seat belt on the machine. DO operate the Terminator at a safe speed.
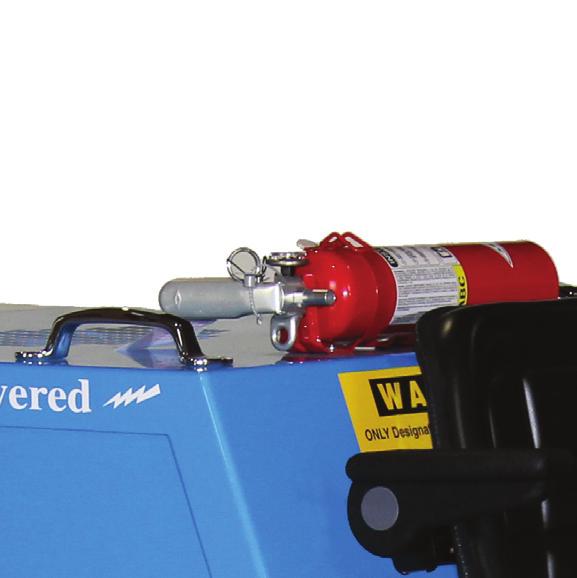
7 General Operating Instructions for the Terminator The Terminator is designed to remove carpet, tile and glue residue from floors. When removing product, position removed product so it rolls to the side of the machine or have someone on the side of the machine remove the product. NEVER WALK IN FRONT OF OR BEHIND THE TERMINATOR WHILE IT IS RUNNING. Sharpen blades or dice material into narrower widths if machine slows down or seems to be struggling. Do not use the Terminator within one foot of walls or stationary objects. Damage to objects may occur if the Terminator strikes them. Use safe, OSHA approved tools and methods for sharpening blades. Make sure the Terminator has a charged fire extinguisher, working back up beacon and strobe light before operating. Safety Features The Terminator is equipped with several features to help ensure your safety and the safety of workers around you. Warning Light and Back-Up Alarm An amber light is installed on the top rear section of the hood. When the Terminator s ignition is in the ON position, the warning light will flash. When the drive control is set in RE- VERSE, the back-up alarm sounds to warn people nearby that the machine is backing up. Fire Extinguisher A fire extinguisher with gauge is installed on the hood behind the operator s seat, within the operator s reach. As a safety measure, regularly inspect the gauge and recharge the fire extinguisher as needed to maintain full capacity. Always recharge the extinguisher after each use. Autostop The Terminator has two drive levers located to the right and left of the operator seat and a blade height lever to the left of the operator seat. The drive levers control the forward, reverse, left, and right directions of the machine; the blade height lever raises and lowers the blade. You must push (forward) or pull (reverse) and hold the levers in position to drive the machine or move the blade in the direction desired. When you release a lever, the Terminator or blade automatically STOPS and will not move again until you push/pull and hold the levers again. However, these levers are not meant as brakes. Block wheels with a floor block when stopping on a ramp and use the emergency brake. Without the emergency brake the machine may roll forward or backwards on any sloping surface. Emergency Battery Disconnect To the right side of the operator seat is a red disconnect switch with a key. This disconnect wil remove power from the motor and other electronic components. Warning! Removing power from the Terminator while on a hill or ramp can lead to a dangerous rollaway situation. Always engage the parking brake before disconnecting power. Safety Instructions The Terminator is designed for safe operation by trained, designated personnel. To help ensure your safety as a designated operator, read these safety instructions before you operate the equipment. Regardless of your experience with machinery, the Terminator has unique features and systems which you need to know about and understand before you operate or service the machine. Terminator T-2100EI Manual Page 7
8 Terminator Specifications Element English Metric Length mm Width mm Height mm Weight* 2830 Lbs Kg Tires 15 OD x 8 W 381 mm OD x 203 mm W Motor Voltage 48 VDC Motor Power 10 HP 7.5 KW Batteries 6 VDC 415AH Motor Operating Speed RPM Hydraulic Oil Type ISO 46 Hydraulic Oil Capacity 11 Gal 41.6 L Hydraulic Relief Valve Pressure 2200 PSI MPa *Weight includes the base machine and 1 Rear Weight, 3 Front Weights and 2 Wheel Weights. Tools & Supplies Maintenance tools and supplies are not provided with the machine. You are responsible for purchase of these items. The following are suggested items to have on the job site or 7 Grinder Crescent Wrench oz. Hammer 4. 3/8 or ½ Socket Set 5. Grease Gun 6. WD ¾ Open End and Box Wrench 8. Screw Driver Set 9. Safety Glasses 10. Ear Plugs Page 8
9 Ventilation Requirements Charge the batteries only in well-ventilated areas. (See Battery Safety section) Guards, Warning Notices & Signs The guards, warning notices and signs are placed on the Terminator for your protection. If one of them becomes damaged or is lost, contact our Customer Service Department to order a replacement. Service Instructions & Personnel Like other machinery, the Terminator requires regular inspection and maintenance of the batteries, motor, hydraulic system and other parts. To prolong the safe and efficient operating life of the machine, clean and service it as instructed in the Maintenance section of this manual. Never use equivalent or substitute parts, except as expressly authorized by Innovatech. If you fail to adhere to these instructions, you may cause injury to yourself and/or others, cause damage to the Terminator, and invalidate applicable warranties. If you are in doubt about any replacement parts or materials, call our Customer Service Department for assistance. Always use trained personnel to service the equipment. Never allow anyone to service the equipment that has not been specifically trained to do so. If you need help with a service or maintenance problem, contact our Customer Service Department. Replacement Parts & Materials The Terminator is designed and engineered to operate safely and efficiently with the parts and materials installed on it in our factory. To ensure the continued safe and efficient operation of the equipment, use replacement parts and materials that meet both of the following requirements: Innovatech must solely authorize replacement parts and materials. Replacement parts and materials must be identical to the items originally provided with the machine, except as authorized by Innovatech. Terminator T-2100EI Manual Page 9
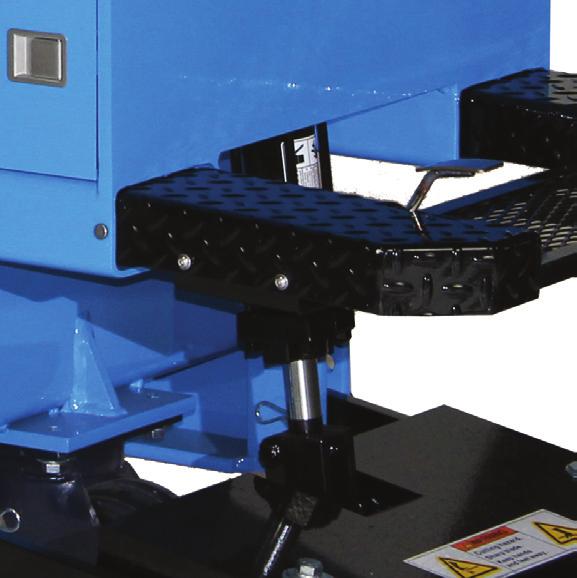
10 Uncrating The Terminator And Preparing It For Operation When you receive the Terminator, inspect the outside of the crate completely, to detect damage to the crate itself. If it is damaged, notify the carrier immediately and follow his/her instructions to file a claim. Carefully uncrate the machine and inspect it for damage that may have occurred during shipping. If the shipment is damaged, notify the carrier immediately and file a claim in the normal manner. Check packing slip for complete shipment. If shipment is incomplete, notify our Customer Service Department within 24 hours. Remove the crate debris, set aside the blades and other packages, and prepare the Terminator for operation: Raise the hood and prop it open with the hood brace. Be sure the tip of the brace is firmly secure under the latch. DO NOT MOVE THE TERMINATOR MACHINE WITH THE LID OPEN! Inspect batteries for spillage during shipment. Check battery water levels before starting the Terminator. CAUTION! Wear acid-resistant gloves and safety glasses and use extreme care when checking battery water levels. DO NOT WORK NEAR A FLAME OR SPARKS. To remove the TERMINATOR from crate with a forklift: 1) Remove footrest by pulling the clevis pins out, which are located on the right and left hand sides, then disconnect the throttle cable. Pull out footrest; this will then expose the forklift slots. To remove the TERMINATOR from crate without a forklift: 1) Plug the battery connecters together. 2) Take 2 x 4 s off the edge of the crate and between the wheels. 3) Place 2 x 4 s behind the crate of the rear of the machine. 4) Make a ramp with the 2 x 4 s and the crate material. 5) To enable power to the TERMINATOR, turn the key, pull up on red knob. 6) Depress foot pedal to start motor. Lift front wheel off of the crate 5 inches by pulling back on the valve handle. (Front blade holder will be on crate). 7) Pull back the left and right handles evenly and depress the foot pedal slowly. The machine will start moving slowly backwards. 8) Ensure that both rear wheels come off the crate evenly. Failure to back off evenly could result in the machine tipping over and harm to the operator. 9) As machine moves back, ensure that the center wheel clears the crate. If center wheel does not clear the crate, depress the center handle while pressing the foot pedal until the wheel clears the crate. 10) Once machine is on the ramp, slide all the way to the bottom, then lift jaw up and set center wheel down to the ground. 11) Whenever mounting or dismounting the TERMINATOR, ALWAYS disable the power by pressing down on the red power knob. Page 10
11 Loading/Unloading Procedures: Do not load or unload the Terminator on uneven ground. Ensure ramps into moving vehicles are stable and square to the ground. Always turn the Terminator OFF when you transport the Terminator by forklift or other vehicle. Load and unload the machine with a properly weighted forklift or lift-gate. Make sure all safety stops are installed on a lift-gate before loading or unloading. Never position yourself under or around the machine while moving it with other machinery. Park the machine with the blade completely down after loading. Properly secure the machine with chains, tire chocks, and other necessary tie downs. Never ride in a moving vehicle next to a Terminator. It may tip, causing severe injury. Operator Controls The operator controls consist of the drive and blade height levers, foot pedal, manual disconnect, and a power limiting. Drive And Blade Controls And Foot Pedal The drive and blade controls (three levers) are located to the left and right of the operator seat. The drive levers (left and right) control the direction of rotation of the rear wheels. The blade height lever controls the vertical position of the blade. The foot pedal controls the speed of the hydraulic pump. The levers only work when the foot pedal is partialy depressed and the pump is running. Operation of the drive levers is as follows. From the view of the seated operator: Push the left and right levers forward together and hold them Terminator T-2100EI Manual in position then slowly depress the foot pedal to move the machine forward. Pull the left and right levers back together and hold them in position then slowly depress the foot pedal to move the machine in reverse. (The alarm sounds.) Push only the left lever forward to turn the machine to the right. Push only the right lever forward to turn the machine to the left. To adjust the blade down, push and hold blade lever forward and press the foot pedal to move the blade down. To adjust the blade up, pull and hold the blade lever back and press the foot pedal to move the blade up. Auto Stop When you release the drive or blade lever, the motor continues to run (with foot control depressed) but the drive or blade motion automatically stops and will not start again until you push or pull the levers again. Emergency Brake The Terminator is supplied with an emergency brake to prevent un intended movement when left unattended. The brake handle is located to the left of the operator seat. Pull the handle up to engage the brake, push the handle down to release the brake. To increase tension on the brake you can rotate the end of the handle in a clockwise direction. Rotate the end of the handle counter clockwise to reduce the tension. Power Limiter The power limiter allows the top output speed to be set from 70% to 100%. This will allow you to conserve power durring normal operation when top speed is not required. (Increasing motor power will reduce the run time of the machine) Page 11
12 Manual Disconnect And Lockout The manual disconnect is located to the right side of the operator seat. To enable operation of the Terminator unlock the manual disconnect lock and pull up. In case of emergency push down to remove power from all electrical components. Always push down this switch to OFF when the Terminator is not in use. Electric Motor and Batteries The electric motor and batteries are located under the top cover. The electric motor provides the power to the hydraulic pump to drive the Terminator. The electric motor requires little maintenance, inspect wire connections and check for debris to maintain its efficiency and prolong its operating life. Battery life can be ensured by proper periodic maintenance. Ensure that battery water levels remain sufficiently high to cover the battery electrode plates. Distilled or de-ionized water can be used to replace lost water. Avoid using tap or well water as the minerals present can reduce the effectivenes of the batteries and shorten battery life. Batteries should be charged before placing the Terminator into long term storage. The stored battery should be charged montly when not in use to prolong battery life. A maintenance charge cycle should be performed every 5th charge to maintain optimum battery performance. Displays and Indicators Battery Display And Hour Meter The battery display shows pump use time, key power time and battery life. (When the last box starts to blink, you have about 15 minutes before battery power is exhausted.) Hydraulic Oil Over Temperature Indicator Normal temperatures are below 120 F. Do not allow the hydraulic fluid to exceed 200 F because it may damage the hydraulic system and in turn, damage the Terminator. If the indicator light is continually coming on, turn machine off and let it cool for minutes. If the light regularly turns on, call Innovatech Service Department. If you regularly work in a hot climate you may need a hydraulic cooler. Hydraulic Filter Clog Indicator The hydraulic oil filter is equiped with a clog indicator which will illuminate when the hydraulic oil filter is clogged. (Note: The indicator may also inadvertently come on in cases when the hydraulic oil is very cold, the light will stop illuminating once the hydraulic oils has warmed to normal operating temperature.) Page 12
13 Blade Assembly Blades are available in different configurations and thickness. An assortment of blades is included in the purchase price of the Terminator. Extra blades are available upon request from, Inc. Installing a Blade 1.) Raise the blade assembly to maximum up position, which is five inches off the floor. 2.) Unwrap the pre-sharpened blades and select the blade thickness and length you need for the job. 3.) Loosen the 7 holding bolts. 4.) Insert the sharpened blade. 5.) Tighten bolts firmly, starting from the center and working out. Bolts should be snug but not over tightened. Taking Up Floor Coverings 1.) Insert blade. (As explained above) 2.) Lower blade to floor. Lift caster wheel off the floor ¼ inch. Use previous procedures to drive forward. 3.) As the Terminator is removing flooring material, it is recommended to have another person at the side of the machine remove all debris. Tricycle Or Caster Wheelbase And Tires The tricycle wheelbase allows better turning ability. The wheel bearings on the front caster roller require lubrication with grease every 30 hours of machine operation. There are three fittings, two on the wheel and one on the housing. When running over debris such as carpet, the carpet yarn will get caught between the wheel and the housing. Clean out wheel and housing regularly. The rear tires are solid rubber, tubeless, and require no maintenance. Over time, they may wear out and need to be replaced. Before each job, inspect the rear tires and lug bolts. Tighten the lug bolts as needed to 70 foot-pounds torque. It is important to keep the lug bolts tight. Wheel hub should be tightened from 310 to 350 ft.-lbs. Inspect and re-torque every 60 hours of operation. Lift machine off of floor so no weight is on wheel when re-torquing pack nut. Ballast The Terminator is equipped with weights in front (75 pounds each) and rear (125 pounds each) to provide traction for tough jobs. These weights can be removed to reduce traction for certain jobs, and to transport the Terminator by forklift or truck or elevator. Wear gloves when handling these weights. Use caution to not smash toes and fingers. Use OSHA approved lifting technique. Terminator T-2100EI Manual Page 13
14 Battery Safety Specific Gravity Reading % Acid Content by Weight Receiving the Terminator After receiving the Terminator, examine the covers and battery catch tray for signs of damage. Attention should be given to the crate and pallet of the Terminator when it arrives for any damage that may have happened during shipment. If you see any dented or crushed housing parts contact Innovatech for procedures to repair shipping damage. If you see wet areas, the batteries may have been tipped during shipping. Every cell should be inspected to be sure that the electrolyte is above the battery plates. Only trained or authorized personnel should change, repair or charge batteries. When used properly, a lead-acid motive power battery is a safe, dependable source of electrical power. However, if proper care and safety precautions are not exercised when handling a battery, it can be an extremely dangerous piece of equipment. There are four hazardous elements in a lead-acid battery. 1. Sulfuric acid 2. Explosive gases 3. Electricity 4. Weight. Hazardous Elements Sulfuric acid: The electrolyte in a lead-acid storage battery is a diluted solution of water and sulfuric acid. Although the acid content in the solution is only about 37%, it is still a strong corrosive agent and can burn skin and eyes as well as devour many types of fabric. (See Wearing Protective Clothing.) Page Explosive Gases: When a lead-acid battery is being charged, it produces a small explosive mixture of hydrogen and oxygen gases. Make sure that all vent caps are unclogged and securely attached so that any gas is safely vented from the battery enclosure. Never smoke, use an open flame or create an arc or sparks on or near a battery without first eliminating explosive gases from the cells you are working on. (See Setting Up Charging Area Section Below) Electricity: An electrical shock hazard exists for any person who comes in contact with a battery over 50 volts, this is one of the reasons that the Terminator 2000ei battery pack has been limited to 48 volts for maximum power potential as well as maximum safety. In addition, metallic objects coming in contact with exposed cell connectors will cause a short circuit resulting in the metallic object heating up to a high temperature. Even shorts involving a single cell can become hot enough to cause severe burns. Any tools used on or around the Terminator 2000ei should be covered with a plastic coating or heat shrink. Weight: The Terminator 2100EI has a battery pack weighting up to 1000 pounds. It can cause serious injury if it is not handled carefully during installation, removal or transport. Use proper lifting equipment and techniques at all times.
15 Lifting Batteries Always use proper lifting equipment to reduce the risk of battery damage, shorting and possible injury. An insulated lifting device used with an overhead hoist is the safest way to move a battery. Chain hoists used to handle batteries should be equipped with a non-metallic container or bucket to prevent the chains from dangling and possibly causing a short by coming in contact with exposed cell connectors on the battery top. Never lift batteries by the inter-cell connecting cables. Connectors on these cables are designed for maximum current flow and not strength. The connectors will suddenly come apart while the battery is in midair. Connect lifting device to negative terminal only if there is not a lifting strap in place. Lifting by both terminals could cause the negative and positive terminals to be shorted together. Wearing Protective Clothing When working on or near batteries, always wear proper protective clothes including a face shield, safety glasses, long sleeved shirt, and acid-resistant gloves. Do not wear any metal jewelry including rings, as they can short circuit a battery and become extremely hot if it accidentally contacts exposed inter-cell connectors. Setting Up A Charging Area Terminator T-2100EI Manual All owners of the Terminator 2100EI need to designate a charging area, to charge the battery pack at the end of a workday or while storing the Terminator. This area should have all the proper battery handling equipment including the spill kit supplied with the Terminator 2100EI. The area needs to be well ventilated even when the battery is only being trickle charged. Ventilation is considered satisfactory if the hydrogen concentration does not exceed 1.5% - 2% in any one location. Concentrations of more than 4% are explosive and dangerous. A prominent NO SMOKING sign should be posted as a reminder. Factors for determining proper ventilation include the number of Terminator 2100EI machines or other battery operated machinery such as forklifts that are stored in the location, as well as the size, height and air-tightness of the storage location. A number of instruments, such as combustible gas indicators and flammable vapor indicators, are available for continuous and automatic analysis of hydrogen content in the air. A floor standing fan or box fan will help significantly to disperse off gassing. A source of running water nearby is desirable other then the distilled water used to top up battery cells. A water hose is recommended at the charging and filling station. The floor in the battery charging and filling area should have an acid resistant coating and able to be washed down with clean water after a spill. The spill should be neutralized with Baking Soda or Soda Ash before it is cleaned up. While Soda Ash is relatively safe to handle, being very similar to Bicarbonate of Soda, both of these chemicals will react with sulfuric acid to produce Carbon Dioxide, which is a gas that is heavier then air and tends to collect in low places if not ventilated properly. Carbon Dioxide is a non-toxic gas normally present in the air, which can reduce the oxygen content of the air from the normal 21% by dilution or displacement. Air containing 16% or less oxygen may cause injury or even death to a person breathing in such an environment. While good ventilation will control the carbon dioxide hazard in open spaces, extra special care must be taken when neutralizing significant quantities of sulfuric acid in closed areas with the above type of chemical. Lime, caustic soda and ammonia or ammonium hydroxide do not release carbon dioxide when neutralizing sulfuric acid but Page 15
16 are very strong chemicals themselves and should ONLY be used by qualified, chemically trained individuals. Connecting/Disconnecting Charger Always turn the charger off at the charging unit before connecting or disconnecting the battery charger leads. The Battery Connector below the seat is shipped in a disconnected state; this connector will have to be plugged in order to operate the Terminator 2100EI. It is also good practice to leave this main power connector unplugged during storage. Live leads can cause arcing and sparks which could cause an explosion if battery gases are present, please check that the main contactor/disconnector is not in the on condition when you connect or disconnect the battery terminal plug. In addition, the battery connector terminals will became pitted over time resulting in poor connections and increased heat generation in the battery leads and connectors. Basic Charging Facts Proper charging is essential for maximum battery life. In general, the proper charging rate is any rate that does not produce a battery temperature higher than 115F or 46C, and or does not produce excessive gassing. * The Terminator 2100EI is supplied with a CEN 48V 50 Amp charging unit, which has been sized to give optimum charging time without causing excessive heating or off gassing. * Do not use a 12v battery charger on the Terminator 2100EI battery pack this will cause damage to the charger as well as the battery pack. * When a discharged battery is initially placed on charge, it will draw a current equal to or close to the chargers maximum output. As the battery voltage rises back to its rated voltage the Page 16 chargers output will adjust down automatically to assure a safe, efficient charging rate during all stages of the charge * The CEN Charger is designed to start and stop so as not to under or over charge the battery pack. The smart charger has a computerized control unit, which can determine when the battery is fully charged and then automatically end the charge cycle. There are two important types of charge that are used for leadacid deep-cycle batteries, Standard Re-charge and an Equalizing Charge. Standard Re-charge: After a battery has undergone a normal full shift and has been fully or partially discharged, it must undergo a standard charge. Normally a standard recharge is based on an 8-hour charging cycle. Equalizing Charge: Due to a slight difference in the construction of each battery cell, some cells take less charge then others. An occasional equalizing charge will correct these cell-to-cell imbalances and bring all the cells to the same capacity. An equalizing charge is simply a 3-hour continuation after the standard re-charge at the chargers finish rate of 12 amps. (Minimum 3 amps per 100ah) The best way to determine if an equalizing charge is necessary is to check the specific gravity of the battery cells. If there is more then a specific unit variation between any two cells, the battery should be equalized. The Batteries need to be charged at least 8 hours before any use. Preferably hours before use will allow the battery chemistry to equalize properly before a drain is again applied to the battery A good rule of thumb is to equalize once every 5 re-charges. The Charging Process During the charging process, the sulfate (from the sulfuric acid)
17 in the battery lead plates, which is accumulated during the discharge and use process, is driven back into the electrolyte. This increases the specific gravity and brings the on-charge voltages up to V per cell depending on the battery age. Specific Gravity Specific gravity measurements are based on a cell temperature of 77 F (25 C) and lower. In order to obtain an accurate specific gravity measurement, the hydrometer reading must be adjusted based on the temperature of the electrolyte. (Battery Fluid) Subtract 4 points of specific gravity (.004) for each 10 degrees under 77 F. Care should at least be used to determine that each cell is close in specific gravity to each other, as an equalizing charge (See below) could be needed or a cell maybe failing. The hydrometer must be rinsed out with clean water after each use or else it will build up a layer of dried electrolyte and give false readings. Temporary Storage Of Battery Pack When the battery pack is fully charged and the electrolyte is at the proper level, the Terminator 2100EI can be stored for up to a year. It should be stored in a cool dry, well -ventilated area away from direct sunlight. If a battery pack needs to be stored for several months or longer, a refreshing charge should be performed prior to its stored as well as at any time the specific gravity falls below If the average storage temperature is below 68 F (20 C), check the specific gravity at least once every two months. If the average temperature is above 68 F (20 C) check it every month Temperature effect on Specific Gravity of new Batteries Stored on open circuit with no drain Terminator T-2100EI Manual Temperature (Degrees Fahrenheit) Max loss of specific Gravity (Per day) Check Battery Electrolyte Weekly Every cell should be inspected to be sure that the electrolyte level is above the moss guard (top of lead plates). If the electrolyte is slightly below the moss guard in any cell, transferring a small amount of electrolyte from another cell that has a higher level with a syringe or hydrometer can raise it. If a large amount of electrolyte is needed to raise the level, first check the catchments tray for any battery electrolyte. If some is found due to a leaking cell call a trained battery technician from an authorized repair facility. Call your Innovatech representative if no repair facility is available. Do not attempt to charge or use the Terminator 2100EI while there is a leak in the battery pack. If no leak is found simply add a little Distilled Water to the cell, being careful not to overfull the cell as it will spill out when the Terminator is raised on it s scrapper blade and moving. A little water is lost each time the battery pack is charged, water is given off as hydrogen (H 2 ) and oxygen (O 2 ). This is the source of the explosive gasses that are released during charging. Each time a battery is charged and then discharged this is called a cycle. An average battery will last from 1,500 to 1,800 cycles, or 5 to 6 years. Actual battery life will depend on type of battery, the severity of use, and how well the battery was maintained while in service. To obtain maximum service life from your battery pack, care should be taken to not operate the battery pack over 115 F (46 C) as well as not to run the battery pack below 80% of nominal voltage. (The controller onboard the Terminator 2100E Page 17
18 will shut the power down if this limit is reached). Frequent overcharging or equalizing will shorten the battery life. First Aid First Aid for Acid Splashes Eyes: Flush immediately with gently running water for at least 15 minutes, then see a doctor as quickly as possible. For contact lens wearers, remove the lens before the eyes are flushed. A buffering or neutralizing agent should not be used in the eyes without the approval of medical or safety personnel. Skin: Wash affected areas under running water and apply a chemical burn treatment. 1. A chemical burn station is the most commonly used type in small battery charging and repair areas. The station consists of a wall mounted plastic squeeze bottle that contains a buffering solution for treating acid burns on skin, eyes and clothing. This inexpensive equipment is practical for personnel protection while working on the Terminator 2100EI battery pack. The spill kit and a source of running water is needed for large spills on the floor. 2. A Deluge Shower should be used where high specific gravity acid (above 1.400) is handled. The Terminator 2100EI does not use this high of a specific gravity concentration. This type of wash station is only really needed at a battery repair center. An eye wash fountain is permanently hooked up to a water supply and is usually wall mounted. This is recommended equipment if possible. Severe burns require immediate medical attention. Clothing: If large areas of clothing have been splashed or soaked, the clothing must be removed and the acid must be neutralized with a baking soda or soda ash solution, and then rinsed under running water. If the clothing is rinsed quickly enough, the chances of damage to the material are lessened. Acid-resistant boots should always be checked before wearing, for any acid puddles that may have formed inside the boot. Eye Wash And Emergency Shower Facilities Emergency eyewash and acid neutralization facilities should be located in the immediate work area for easy access. The three most popular types of eyewash and acid neutralizing equipment are the chemical burn stations, deluge shower and eye wash fountains. Page 18
19 Maintenance Procedures 1.) Grease Caster Wheel at three fittings every 30 hours. 2.) Check Hydraulic Oil Once a month. Change every 18 months with NUTO H 46 or ISO 46 or if fluid is overheated 200 F or higher. 3.) Change hydraulic filter every 60 hours. 4.) Check water level once a week in batteries. 5.) Clean Caster Wheel and Back Tires with wire wheel when necessary. 6.) Look for leaks, find and tighten fittings do not over tighten fittings. 7.) Check all hoses and clamps once a week. 8.) Inspect rear tires and lug bolts. Tighten lug bolts as needed to 70-foot pounds torque. 9.) Check wheel hub every 60 hours of operation. Wheel hub pack nut should be torqued from 310 to 350 foot pounds (ft.- lbs). Terminator T-2100EI Manual Page 19
20 Warranty Innovatech warrants to the original buyer, for a period of one (1) year or 300 operating hours (whichever comes first) from the date of delivery, that Equipment is free from defects in materials and workmanship and that the Equipment conforms to the operating specifications supplied with the Equipment. The foregoing warranty is subject to proper operation and maintenance of the Equipment in accordance with the operating instruction and manual supplied to Buyer with the Equipment. Warranty claims shall be made by Buyer in writing. Innovatech s sole obligation under the foregoing warranty, where it appears to Innovatech s satisfaction that the defect was present at the time of delivery, is at Innovatech s sole option, to repair, replace or correct any such defect. EXCEPT AS STATED ABOVE THERE ARE NO WARRANTIES, EXPRESS OR IMPLIED. INNOVATECH EXPRESSLY DISCLAIMS ANY WARRAN- TY, EXPRESS OR IMPLIED, THAT EQUIPMENT SOLD HEREUNDER IS OF MERCHANTABLE QUALITY OR THAT IT CAN BE USED FOR OR IS FIT FOR ANY PARTICULAR PURPOSE. ANY DESCRIPTION OF THE EQUIPMENT IN THIS AGREEMENT OR IN MANUALS, BROCHURES OR LITERATURE AND ANY USE OF ANY SAMPLE, MODEL OR PROTOTYPE OF THE EQUIPMENT IS FOR THE SOLE PURPOSE OF IDENTIFY- ING OR ILLUSTRATING THE EQUIPMENT, IS NOT PART OF THE BASIS OF THE AGREEMENT BETWEEN INNOVATECH AND BUYER, AND DOES NOT CONSTITUTE A WARRANTY THAT THE EQUIPMENT, AS SUPPLIED, WILL CONFORM TO ANY DESCRIPTION OR TO ANY SAM- PLE, MODEL OR PROTOTYPE. INNOVATECH DISCLAIMS ANY WARRANTY RESPECTING OPERATING CAPACITY OR CAPABILITY OF THE EQUIPMENT OR THE ABILITY OF THE EQUIPMENT TO MEET ANY PARTICULAR NEEDS OF THE BUYER. THE EQUIPMENT IS POWERED TO OPERATE AS STATED IN THE OPERATING SPECIFICATIONS SUPPLIED WITH THE EQUIPMENT BUT IT IS UNDERSTOOD AND AGREED TO BUY BUYER THAT ACTUAL OPERATING CAPABILITIES VARY UNDER DIFFERENT OPERATING CONDITIONS FOR WHICH INNOVATECH CAN ASSUME NO RESPONSIBILITY. BUYER S EXCLUSIVE REMEDY FOR CLAIMS ARISING UNDER THIS AGREEMENT SHALL BE FOR REPAIR OR, AT INNOVATECH S SOLE OPTION, REPLACEMENT OF ANY ITEM OF DEFECTIVE EQUIPMENT. INNOVATECH S LIABILITY FOR ANY LOSSES OR DAMAGE, WHETH- ER ON ACCOUNT OF NEGLIGENCE, BREACH, WARRANTY OR OTHERWISE SHALL IN NO EVENT EXCEED THE PURCHASE PRICE OF THE PARTICULAR ITEM OF EQUIPMENT WITH RESPECT TO WHICH SUCH LOSSES OR DAMAGE OCCURRED. IN NO EVENT WILL IN- NOVATECH BE LIABLE FOR ANY DAMAGES CAUSED BY BUYER S FAILURE TO PERFORM BUYER S RESPONSIBILITIES, OR FOR ANY LOST PROFITS, LOST PRODUCTION, LOSS OF ANTICIPATED PROFITS OF OTHER INCIDENTAL OR CONSEQUENTIAL DAMAGES, EVEN IF INNOVATECH HAS BEEN ADVISED OF THE POSSIBILITY OF SUCH DAMAGES. IN NO EVENT WILL INNOVATECH BE LIABLE FOR ANY DAMAGES RESULTING FROM ANY CLAIM AGAINST BUYER BY ANY OTHER PARTY. FACTORY SERVICE A warranty will not be valid unless a written claim authorization comes with returned parts. Innovatech will not provide for any shipping costs for items returned for repair. To obtain warranty repairs, buyer must prepay shipment and return all warranty parts to Innovatech. Damage occurring during shipment is deemed the responsibility of the carrier and claims should be made directly with such carrier. It will be the customer s responsibility to pay for any non-warranty replacement parts plus the current hourly labor rates for any work done on any machine or part. Service is available upon request; call Innovatech for current labor rates. Page 20


21 Parts Diagrams Terminator T-2100EI Manual Page 21
22 Item No. Part Number Description Qty Foot Rest Assy Split Lock Washer, 1/2" Hex Head Cap Screw, 1/2"-13 x 1-1/2" Jaw Assembly Seat Support Panel Thumb Screw, 1/4"-20 x 5/ Clevis Pin, 5/8 dia. x 3 L Cotter Pin Seat Assy (w/ sliding tracks) Screw, Button Head Socket Cap, 5/16"-18 x 3/4" Nut (Nylon-insert), 5/16" Flat washer, 1/4" 4 Page 22
23 ? Terminator T-2100EI Manual Page 23
24 Item No. Part Number Description Qty Steel Split Lock Washer, 1/4" Steel Hex Head Cap Screw, 1/4"-20x3/4" Hydraulic Shield Panel Flat Washer, 1/4" 4 *These items not included on Serial Numbers T IB through T IB Page 24
25 Terminator T-2100EI Manual Page 25
26 Item No. Part Number Description Qty Door Assy - Left Door Assy - Right Split Lock Washer, 1/2" Steel USS Flat Washer, 5/16" Steel Hex Head Cap Screw, GR5: 5/16"-18x2" Hex Head Cap Screw, GR5: 5/16"-18x3/4" Steel Hex Head Cap Screw, GR5: 1/2"-13x2" Top Cover Assembly Rear Cover Steel USS Flat Washer, 5/16" Steel USS Flat Washer, 1/2" Rear Weight unit Battery Pack, T-2100EI Battery Tray Stop Flat Washer, 1/4" 4 Page 26
27 Terminator T-2100EI Manual Page 27
28 Item No. Part Number Description Qty Frame Assembly Wheel Motor, Left Side Wheel Motor, Right Side Caster Wheel Assembly Brake Mounting Bracket Left Brake Caliper w/welded Lever Right Brake Caliper w/welded Lever Wheel and Tire Assembly Wheel Hub with Brake Wheel Scraper Blade, 2 Slot, 7.5" x 4.5" Brake Linkage deg Hydraulic Fitting Brake Actuator Pin Steel USS Flat Washer, 3/8"ID, ZP Steel Flat Washer, 1/2" ZP Hex Bolt, 3/8"-16 x 1.5", ZP Hex Bolt, 1/2"-13 x 5", ZP Hex Bolt, 1/2"-13 x 3", ZP Hex Bolt, 3/8"-16 x 5", ZP Hex Bolt, 1/2"-13 x 1", ZP Steel Hex Head Cap Screw, Gr5, 1/4"-20 x 3/4"L, ZP Steel Nylon-Insert Lock Nut, 1/2"-20, ZP Steel Nylon-Insert Lock Nut, 3/8"-16 ZP Steel Nylon-Insert Lock Nut, 1/2"-13, ZP Double Ended Stud, 1/2"-13 x 2.5" Wheel Weights, 2" Steel Split Lock Washer, 1/2", ZP Steel Split Lock Washer, 3/8, ZP 4 Page 28
29 Terminator T-2100EI Manual Page 29
30 Item No. Part Number Description Qty Hydraulic Tank Strainer Hose Clamp Deg Street "L", 1" NPT Hydraulic Fitting, Hose Barb to 1"NPT Hose Assembly, Tank Suction Hose Assembly, Left Front Wheel Motor Fitting to Top Left Valve Fitting Hydraulic Hose Assembly, Left Front Wheel Motor Fitting to Bottom Left Valve Fitting Hydraulic Hose, Right Wheel Motor Front Fitting to Valve Right Bottom Hydraulic Hose, Right Wheel Motor Rear Fitting to Valve Top Right Fitting 1 Page 30
31 Terminator T-2100EI Manual Page 31
32 Item No. Part Number Description Qty. Page T-2100EI Wheel Assembly Steel Flat Washer, 5/16", ZP Steel Nylon-Insert Lock Nut, 5/16"-18 ZP Hydraulic Oil Filter* Pipe Adapter, 1" NPT x 6" L Hydraulic Tank Breather Cap Dip Stick Assembly Steel Split Lock Washer, 1/4", ZP Steel Hex Head Cap Screw, Gr5, 1/4"-20 x 3/4"L, ZP Hydraulic Fitting, #6JIC to #6SAE Hydraulic Fitting, 90 Deg, #10JIC to #12SAE Hydraulic Fitting, 90 Deg, #6JIC to #6SAE Hydraulic Fitting, #4JIC to #6SAE Hydraulic control valve (modified) Hydraulic Fitting, #8SAE to 1/4"NPTF Hydraulic Fitting #12JIC to 1/2" Male NPT Hydraulid Fitting, 90 Deg, #10 JIC to #8 SAE Hydraulic Fitting, 90 Deg, #12 JIC to #12 SAE Oil Temperature Switch Tank Diffuser Hydraulic Hose, Valve to Filter Hydraulic Hose, Filter to Tank Hydraulic Hose, Pump to Valve Flow Reducer Hydraulic Hose, Valve Top Center to Cylinder Bottom Hydraulic Hose, Valve Bottom Center to Cylinder Top Fitting Hex Bolt, 5/16"-18 x 3", ZP 3 *Serial Numbers T IB through T IB use oil filter replacement element
33 Terminator T-2100EI Manual Page 33
34 Item No. Part Number Description Qty Hydraulic Pump Electric Motor Steel Flat Washer, 5/16", ZP Steel Split Lock Washer, 3/8", ZP Steel Hex Head Cap Screw, 3/8"-24 x 1-1/4"L ZP Steel Hex Bolt, 5/16"-18 x 3-1/2", ZP Steel Nylon-Insert Lock Nut, 5/16"-18 ZP Hydraulic Fitting, 90 Deg, #10JIC to #10SAE Hydraulic Fitting, #16 JIC to #12 SAE 1 Page 34
35 Terminator T-2100EI Manual Page 35
36 Item No. Part Number Description Qty Hydraulic Cylinder, 2" Bore, 6" Stroke Hydraulic Fitting, 90 Deg, #4JIC to #8SAE Hydraulic Hose, Valve Top Center to Cylinder Bottom Hydraulic Hose, Valve Bottom Center to Cylinder Top Fitting 1 Page 36
37 Terminator T-2100EI Manual Page 37
38 Item No. Part Number Description Qty Heatsink Plate Power Control Module Fuse Block, 6 Gang, ATO Style Fuse (5 Amp) Screw, Pan Head Phillips, #10-24 x 1 L Screw, Hex Head, 1/4-20 x 3/4 L Steel Split Lock Washer, 1/4 4 Page 38
39 Notes: 1. Use Thermal Transfer compound (Chemplex 1381 or Equiv.) between Heat Sink Plate and Power Control Module Terminator T-2100EI Manual Page 39
40 Item No. Part Number Description Qty Battery Tray Battery, 6VDC Deep Cycle Battery Flip Cap Battery Pack Pig Tail Battery Pack Interconnect Wire, 5" Battery Pack Interconnect Wire, 10" Battery Pack Interconnect Wire, 10.5" Battery Pack Interconnect Wire, 10.75" Battery Interconnect Wire, 13.5" Black Battery Lug Cover Battery Lug Cap, Red Steel Hex Cap Screw, 1/4"-20 x 1.5" Steel Nylon-Insert Lock Nut, 1/4"-20 ZP Fuse Block, 300 Amp Max Fuse, 275A Steel Hex Head Cap Screw, Gr5, 1/4"-20 x 3/4"L, ZP Battery Pack to Fuse Interconnect Wire Steel Hex Head Cap Screw, Gr5: 5/16-18 x Steel Hex Nut, 5/16"-18, ZP 18 Page 40
41 Terminator T-2100EI Manual Page 41
42 Item No. Part Number Description Qty Front Jaw Assembly T-2000 Standard Front Weight Flat Washer, 7/16", ZP Hex Bolt, Gr5, 1/2"-13 x 4.5", ZP Hex Head Cap Screw, Gr 8, 7/16"-20 x 1.75", ZP Steel Flat Washer, 1/2" Steel Flat Washer, 5/8" Steel Split Lock Washer, 1/2", ZP Swivel Head Reciever 1 Page 42
43 Terminator T-2100EI Manual Page 43
44 Item No. Part Number Description Qty Joystick mechanism (wheels control) Joystick mechanism (jaw control) Screw, hex head, 5/16-18 x Nut (Nyloc insert), 5/ Screw, hex head, M x 30 (1.18"), Washer (Belleville) 3/8" / M Screw, 5/16" dia. x 1" L shoulder Nut (Nyloc insert), 1/ Screw, hex head, M x 30 (1.18"), Washer (lock), 5/ Screw, socket head shoulder, 5/16" dia. x 3/8" L shoulder 1 Page 44
45 Terminator T-2100EI Manual Page 45
46 Item No. Part Number Description Qty Screw, Button Head Socket Cap Screw, #10-24x1/2, ZP Steel Nylon-Insert Lock Nut, 3/8"-16 ZP Console (left side) Brake lever Brake cable Clevis Steel Hex Head Cap Screw, GR8: 3/8"-16x3-1/2" Screw, Button Head Socket Cap Screw, 1/4-20x1/2, 18-8 SS Split Lock Washer, # Steel Split Lock Washer, 1/4" Screw, socket head shoulder, 5/16" dia. x 3/8" L shoulder 1 Page 46
47 Terminator T-2100EI Manual Page 47
48 Item No. Part Number Description Qty Decal (Power limiter / oil filter / oil temp) Potentiometer Knob Potentiometer S.T.D. display Manual disconnect switch Console Red panel light 2 Page 48
49 Terminator T-2100EI Manual Page 49
50 Item No. Part Number Description Qty Main linkage Linkage Yoke anchor Joystick rod Linkage Hex Head Cap Screw, GR5: 5/16"-18 x 1.5"L Steel Hex Nut, 5/16"-18, ZP Nut (Nylon-insert), 1/ Steel Split Lock Washer, 5/16", ZP Lock washer, 1/ Steel USS Flat Washer, 5/16" ZP Steel Socket Head Cap Screw, 1/4"-20 x.5"l ZP Socket Head Shoulder Screw, 5/16"Dia x 5/8"L Shoulder, 1/4"-20 Thread Screw (shoulder), 5/16 dia. x 1 long shoulder Knob (1-7/8 dia.) 1 Page 50
51 Terminator T-2100EI Manual Page 51
52 Item No. Part Number Description Qty Nut (Nylon-insert), 5/ Nut (Nylon-insert), 1/ Linkage Linkage Screw, 5/16-18 x 3/ Screw, 1/4-20 x 3/ Knob (1-1/4" dia.) Washer (lock), 3/ Nut, 3/ Linkage Joystick rod (with welded washer) 1 Page 52
53 Terminator T-2100EI Manual Page 53
54 Item No. Part Number Description Qty Left door panel (painted) Door Latch Nut (Nylok), # Hinge (for left door panel) Screw, pan head, Phillips, #6-32 x 1/2" 6 Page 54
55 RIGHT SIDE DOOR PANEL ASSY ( ) IS A MIRRORED IMAGE OF THIS ASSY. Terminator T-2100EI Manual Page 55
56 Item No. Part Number Description Qty Top Cover, T-2000EI, Welded & Painted Backup Alarm Strobe Light Fire Extinguisher Handle, Chrome Screw, Flat Head Hex Socket, 1/4"-20x.75"L, ZP Steel Nylon-Insert Lock Nut, 1/4"-20 ZP Steel Nylon-Insert Lock Nut, 5/16"-18 ZP Steel Nylon-Insert Lock Nut,#8-32, ZP Steel Flat Washer, 5/16", ZP Steel Hex Cap Screw 5/16"-18 x 0.75"L Steel Hex Head Cap Screw, Gr5, 1/4"-20 x 3/4"L, ZP Screw, Pan Head Phillips Machine Screw, #8-32x5/8", ZP Steel Flat Washer, # /4" Wide Flat Washer, Steel, ZP Screw, Pan Head Phillips Machine Screw, #10-24x3/4", ZP Steel SAE Flat Washer, # Steel Nylon-Insert Lock Nut,#10-24, ZP 2 Page 56
57 Terminator T-2100EI Manual Page 57
58 Item No. Part Number Description Qty /4 SPLIT LOCK WASHER STEEL, BUTTON HEAD SOCKET CAP SCREW 1/4-20X FOOT REST FOOT PEDAL FOOT PEDAL MOUNT BRACKET /4-20 NYLOCK NUT 3 Page 58
59 Terminator T-2100EI Manual Page 59
60 Electrical Schematic Red 18ga Green 18ga Black 18 ga Red 18ga Foot Pedal Speed Adjustment Potentiometer Red 18ga Oil filter clog indicator Red 18ga Oil filter sensor Black 18 ga Foot pedal power supply Green 18ga Black 18 ga Display Green 18ga 1 5 Amp 5 Amp 5 Amp 5 Amp 5 Amp 5 Amp Red 18ga Fuse Block Red 18ga Red 18ga Red 16ga Yellow 16ga Chiller fan (optional) Hydraulic Temperature Switch Red 18ga Backup Alarm Switch Yellow 16ga Hydraulic Over Temperature Indicator Strobe Light Backup Alarm Black 18 ga Black 18 ga Black 18 ga Motor Red 2/0 Black 2/0 S R B+ Red 16ga Red 2/0 Power Contactor 175A Main Fuse Battery Pack Red 2/0 Red 2/0 Black 2/0 A B- Black 2/0 Electronic Control Unit Page 60
61 Terminator T-2100EI Manual Page 61
62 Page 62
63 SECTION V (continued) EMERGENCY AND FIRST AID PROCEDURES: EYES: WASH WITH COPIOUS QUANTITIES OF RUNNING WATER SEEK MEDICAL ATTENTION SKIN: WASH WITH SOAP AND WATER FOR ALL EXPOSURE EMERGENCIES INGESTION: INDUCE VOMITING SECTION VI REACTIVITY DATA STABILITY: H-3,F-0,S-W,R-0 STABLE UNDER NORMAL CONDITIONS CONDITIONS TO AVOID: AVOID DISMANTLING AND EXPOSURE TO INTERNAL COMPONENTS. INCOMPATIBILITY: NONE HAZARDOUS POLYMERIZATION: WILL NOT OCCUR SECTION VII SPILL OR LEAK PROCEDURES PRODUCT CONTAINS DRY PLATES. NO LEAKAGE IS EXPECTED UNDER NORMAL CONDITIONS AND TRANSPORTATION. IN CASE OF ACCIDENTAL SPILLAGE OF PLATES, DUST AND LEAD COMPOUNDS SHOULD BE CONTAINED. PARTICULATE MATTER SHOULD STORED IN A DRY CONTAINER AND DISPOSED IN ACCORDANCE WITH LOCAL, STATE AND FEDERAL REGULATIONS FOR LEAD PRODUCTS. DO NOT USE COMPRESSED AIR OR DRY SWEEPING AS A MEANS OF CLEANING. VACUUMING IS RECOMMENDED. SECTION VIII SPECIAL PROTECTION INFORMATION RESPIRATORY PROTECTION: USE HEPA RESPIRATORS WHEN LEAD DUST IS PRESENT. VENTILATION: N/A PROTECTIVE GLOVES: RUBBER GLOVES SHOULD BE WORN WHEN HANDLING. EYE PROTECTION: SAFETY GLASSES OTHER PROTECTIVE EQUIPMENT: N/A SECTION IX SPECIAL PRECAUTIONS NO SPECIAL HANDLING IS REQUIRED UNDER NORMAL CONDITIONS. TRANSPORTATION INFORMATION DOT SHIPPING NAME: BATTERIES, DRY - UNFORMED IDENTIFICATION NUMBER: N/A HAZARD CLASS: N/A SHIPPING LABELS: NONE REQUIRED PLACARD (when required) NONE REQUIRED PROPOSITION 65 WARNING: LEAD AND IT'S COMPOUNDS ARE CHEMICALS KNOW TO THE STATE OF CALIFORNIA TO CAUSE REPRODUCTIVE HARM TO BOTH MALES AND FEMALES AND TO CAUSE BIRTH DEFECTS. rev d-2a Terminator T-2100EI Manual Page 63
64 Material Safety Data Sheet SECTION 1 PRODUCT AND COMPANY IDENTIFICATION Chevron Rando HD Product Use: Hydraulic Oil Product Number(s): CPS273277, CPS273278, CPS Synonyms: Rando HD ISO 32, Rando HD ISO 46, Rando HD ISO 68 Company Identification Chevron Products Company a division of Chevron U.S.A. Inc Bollinger Canyon Rd. San Ramon, CA United States of America Transportation Emergency Response CHEMTREC: (800) or (703) Health Emergency Chevron Emergency Information Center: Located in the USA. International collect calls accepted. (800) or (510) Product Information lubemsds@chevron.com Product Information: (800) LUBE TEK SECTION 2 COMPOSITION/ INFORMATION ON INGREDIENTS COMPONENTS CAS NUMBER AMOUNT Highly refined mineral oil (C15 - C50) Mixture %wt/wt SECTION 3 HAZARDS IDENTIFICATION IMMEDIATE HEALTH EFFECTS Eye: Not expected to cause prolonged or significant eye irritation. Skin: Contact with the skin is not expected to cause prolonged or significant irritation. Contact with the skin is not expected to cause an allergic skin response. Not expected to be harmful to internal organs if absorbed through the skin. High-Pressure Equipment Information: Accidental high-velocity injection under the skin of materials of this type may result in serious injury. Seek medical attention at once should an accident like this occur. The initial wound at the injection site may not appear to be serious at first; but, if left untreated, could result in disfigurement or amputation of the affected part. Ingestion: Not expected to be harmful if swallowed. Inhalation: Not expected to be harmful if inhaled. Contains a petroleum-based mineral oil. May cause Revision Number: 2 Revision Date: FEBRUARY 16, of 7 Chevron Rando HD MSDS : Page 64
65 respiratory irritation or other pulmonary effects following prolonged or repeated inhalation of oil mist at airborne levels above the recommended mineral oil mist exposure limit. Symptoms of respiratory irritation may include coughing and difficulty breathing. SECTION 4 FIRST AID MEASURES Eye: No specific first aid measures are required. As a precaution, remove contact lenses, if worn, and flush eyes with water. Skin: No specific first aid measures are required. As a precaution, remove clothing and shoes if contaminated. To remove the material from skin, use soap and water. Discard contaminated clothing and shoes or thoroughly clean before reuse. Ingestion: No specific first aid measures are required. Do not induce vomiting. As a precaution, get medical advice. Inhalation: No specific first aid measures are required. If exposed to excessive levels of material in the air, move the exposed person to fresh air. Get medical attention if coughing or respiratory discomfort occurs. Note to Physicians: In an accident involving high-pressure equipment, this product may be injected under the skin. Such an accident may result in a small, sometimes bloodless, puncture wound. However, because of its driving force, material injected into a fingertip can be deposited into the palm of the hand. Within 24 hours, there is usually a great deal of swelling, discoloration, and intense throbbing pain. Immediate treatment at a surgical emergency center is recommended. SECTION 5 FIRE FIGHTING MEASURES Leaks/ruptures in high pressure system using materials of this type can create a fire hazard when in the vicinity of ignition sources (eg. open flame, pilot lights, sparks, or electric arcs). FIRE CLASSIFICATION: OSHA Classification (29 CFR ): Not classified by OSHA as flammable or combustible. NFPA RATINGS: Health: 0 Flammability: 1 Reactivity: 0 FLAMMABLE PROPERTIES: Flashpoint: (Cleveland Open Cup) 170 C (338 F) Minimum Autoignition: No data available Flammability (Explosive) Limits (% by volume in air): Lower: Not Applicable Upper: Not Applicable EXTINGUISHING MEDIA: Use water fog, foam, dry chemical or carbon dioxide (CO2) to extinguish flames. PROTECTION OF FIRE FIGHTERS: Fire Fighting Instructions: This material will burn although it is not easily ignited. For fires involving this material, do not enter any enclosed or confined fire space without proper protective equipment, including self-contained breathing apparatus. Combustion Products: Highly dependent on combustion conditions. A complex mixture of airborne solids, liquids, and gases including carbon monoxide, carbon dioxide, and unidentified organic compounds will be evolved when this material undergoes combustion. SECTION 6 ACCIDENTAL RELEASE MEASURES Revision Number: 2 Revision Date: FEBRUARY 16, of 7 Chevron Rando HD MSDS : Terminator T-2100EI Manual Page 65
66 Protective Measures: Eliminate all sources of ignition in vicinity of spilled material. Spill Management: Stop the source of the release if you can do it without risk. Contain release to prevent further contamination of soil, surface water or groundwater. Clean up spill as soon as possible, observing precautions in Exposure Controls/Personal Protection. Use appropriate techniques such as applying non-combustible absorbent materials or pumping. Where feasible and appropriate, remove contaminated soil. Place contaminated materials in disposable containers and dispose of in a manner consistent with applicable regulations. Reporting: Report spills to local authorities and/or the U.S. Coast Guard's National Response Center at (800) as appropriate or required. SECTION 7 HANDLING AND STORAGE Precautionary Measures: DO NOT USE IN HIGH PRESSURE SYSTEMS in the vicinity of flames, sparks and hot surfaces. Use only in well ventilated areas. Keep container closed. General Handling Information: Avoid contaminating soil or releasing this material into sewage and drainage systems and bodies of water. Static Hazard: Electrostatic charge may accumulate and create a hazardous condition when handling this material. To minimize this hazard, bonding and grounding may be necessary but may not, by themselves, be sufficient. Review all operations which have the potential of generating and accumulating an electrostatic charge and/or a flammable atmosphere (including tank and container filling, splash filling, tank cleaning, sampling, gauging, switch loading, filtering, mixing, agitation, and vacuum truck operations) and use appropriate mitigating procedures. For more information, refer to OSHA Standard 29 CFR , 'Flammable and Combustible Liquids', National Fire Protection Association (NFPA 77, 'Recommended Practice on Static Electricity', and/or the American Petroleum Institute (API) Recommended Practice 2003, 'Protection Against Ignitions Arising Out of Static, Lightning, and Stray Currents'. Container Warnings: Container is not designed to contain pressure. Do not use pressure to empty container or it may rupture with explosive force. Empty containers retain product residue (solid, liquid, and/or vapor) and can be dangerous. Do not pressurize, cut, weld, braze, solder, drill, grind, or expose such containers to heat, flame, sparks, static electricity, or other sources of ignition. They may explode and cause injury or death. Empty containers should be completely drained, properly closed, and promptly returned to a drum reconditioner or disposed of properly. SECTION 8 EXPOSURE CONTROLS/PERSONAL PROTECTION GENERAL CONSIDERATIONS: Consider the potential hazards of this material (see Section 3), applicable exposure limits, job activities, and other substances in the work place when designing engineering controls and selecting personal protective equipment. If engineering controls or work practices are not adequate to prevent exposure to harmful levels of this material, the personal protective equipment listed below is recommended. The user should read and understand all instructions and limitations supplied with the equipment since protection is usually provided for a limited time or under certain circumstances. ENGINEERING CONTROLS: Use in a well-ventilated area. PERSONAL PROTECTIVE EQUIPMENT Eye/Face Protection: No special eye protection is normally required. Where splashing is possible, wear safety glasses with side shields as a good safety practice. Skin Protection: No special protective clothing is normally required. Where splashing is possible, select protective clothing depending on operations conducted, physical requirements and other substances in the workplace. Suggested materials for protective gloves include: 4H (PE/EVAL), Nitrile Rubber, Silver Revision Number: 2 Revision Date: FEBRUARY 16, of 7 Chevron Rando HD MSDS : Page 66
67 Shield, Viton. Respiratory Protection: No respiratory protection is normally required. If user operations generate an oil mist, determine if airborne concentrations are below the occupational exposure limit for mineral oil mist. If not, wear an approved respirator that provides adequate protection from the measured concentrations of this material. For air-purifying respirators use a particulate cartridge. Use a positive pressure air-supplying respirator in circumstances where air-purifying respirators may not provide adequate protection. Occupational Exposure Limits: Component Agency TWA STEL Ceiling Notation Highly refined mineral oil (C15 - ACGIH 5 mg/m3 10 mg/m C50) Highly refined mineral oil (C15 - OSHA Z-1 5 mg/m C50) Consult local authorities for appropriate values. SECTION 9 PHYSICAL AND CHEMICAL PROPERTIES Attention: the data below are typical values and do not constitute a specification. Color: Yellow Physical State: Liquid Odor: Petroleum odor ph: Not Applicable Vapor Pressure: < C (100 F) Vapor Density (Air = 1): >1 Boiling Point: >315 C (599 F) Solubility: Soluble in hydrocarbon solvents; insoluble in water. Freezing Point: Not Applicable Density: C (59 F) (Typical) Viscosity: C (104 F) Minimum SECTION 10 STABILITY AND REACTIVITY Chemical Stability: This material is considered stable under normal ambient and anticipated storage and handling conditions of temperature and pressure. Incompatibility With Other Materials: May react with strong acids or strong oxidizing agents, such as chlorates, nitrates, peroxides, etc. Hazardous Decomposition Products: None known (None expected) Hazardous Polymerization: Hazardous polymerization will not occur. SECTION 11 TOXICOLOGICAL INFORMATION IMMEDIATE HEALTH EFFECTS Eye Irritation: The eye irritation hazard is based on evaluation of data for similar materials or product components. Skin Irritation: The skin irritation hazard is based on evaluation of data for similar materials or product components. Skin Sensitization: The skin sensitization hazard is based on evaluation of data for similar materials or product components. Acute Dermal Toxicity: The acute dermal toxicity hazard is based on evaluation of data for similar materials or product components. Revision Number: 2 Revision Date: FEBRUARY 16, of 7 Chevron Rando HD MSDS : Terminator T-2100EI Manual Page 67
68 Acute Oral Toxicity: The acute oral toxicity hazard is based on evaluation of data for similar materials or product components. Acute Inhalation Toxicity: The acute inhalation toxicity hazard is based on evaluation of data for similar materials or product components. ADDITIONAL TOXICOLOGY INFORMATION: This product contains petroleum base oils which may be refined by various processes including severe solvent extraction, severe hydrocracking, or severe hydrotreating. None of the oils requires a cancer warning under the OSHA Hazard Communication Standard (29 CFR ). These oils have not been listed in the National Toxicology Program (NTP) Annual Report nor have they been classified by the International Agency for Research on Cancer (IARC) as; carcinogenic to humans (Group 1), probably carcinogenic to humans (Group 2A), or possibly carcinogenic to humans (Group 2B). These oils have not been classified by the American Conference of Governmental Industrial Hygienists (ACGIH) as: confirmed human carcinogen (A1), suspected human carcinogen (A2), or confirmed animal carcinogen with unknown relevance to humans (A3). SECTION 12 ECOLOGICAL INFORMATION ECOTOXICITY This material is not expected to be harmful to aquatic organisms. The ecotoxicity hazard is based on an evaluation of data for the components or a similar material. ENVIRONMENTAL FATE Ready Biodegradability: This material is not expected to be readily biodegradable. The biodegradability of this material is based on an evaluation of data for the components or a similar material. SECTION 13 DISPOSAL CONSIDERATIONS Use material for its intended purpose or recycle if possible. Oil collection services are available for used oil recycling or disposal. Place contaminated materials in containers and dispose of in a manner consistent with applicable regulations. Contact your sales representative or local environmental or health authorities for approved disposal or recycling methods. SECTION 14 TRANSPORT INFORMATION The description shown may not apply to all shipping situations. Consult 49CFR, or appropriate Dangerous Goods Regulations, for additional description requirements (e.g., technical name) and mode-specific or quantity-specific shipping requirements. DOT Shipping Description: PETROLEUM LUBRICATING OIL, NOT REGULATED AS A HAZARDOUS MATERIAL FOR TRANSPORTATION UNDER 49 CFR IMO/IMDG Shipping Description: PETROLEUM LUBRICATING OIL; NOT REGULATED AS DANGEROUS GOODS FOR TRANSPORT UNDER THE IMDG CODE ICAO/IATA Shipping Description: PETROLEUM LUBRICATING OIL; NOT REGULATED AS DANGEROUS GOODS FOR TRANSPORT UNDER ICAO TI OR IATA DGR SECTION 15 REGULATORY INFORMATION Revision Number: 2 Revision Date: FEBRUARY 16, of 7 Chevron Rando HD MSDS : Page 68
69 EPCRA 311/312 CATEGORIES: 1. Immediate (Acute) Health Effects: NO 2. Delayed (Chronic) Health Effects: NO 3. Fire Hazard: NO 4. Sudden Release of Pressure Hazard: NO 5. Reactivity Hazard: NO REGULATORY LISTS SEARCHED: 01-1=IARC Group 1 03=EPCRA A=IARC Group 2A 04=CA Proposition B=IARC Group 2B 05=MA RTK 02=NTP Carcinogen 06=NJ RTK 07=PA RTK No components of this material were found on the regulatory lists above. CHEMICAL INVENTORIES: All components comply with the following chemical inventory requirements: AICS (Australia), DSL (Canada), EINECS (European Union), ENCS (Japan), IECSC (China), KECI (Korea), PICCS (Philippines), TSCA (United States). NEW JERSEY RTK CLASSIFICATION: Under the New Jersey Right-to-Know Act L Chapter 315 N.J.S.A. 34:5A-1 et. seq., the product is to be identified as follows: PETROLEUM OIL (Hydraulic oil) WHMIS CLASSIFICATION: This product is not considered a controlled product according to the criteria of the Canadian Controlled Products Regulations. SECTION 16 OTHER INFORMATION NFPA RATINGS: Health: 0 Flammability: 1 Reactivity: 0 HMIS RATINGS: Health: 1 Flammability: 1 Reactivity: 0 (0-Least, 1-Slight, 2-Moderate, 3-High, 4-Extreme, PPE:- Personal Protection Equipment Index recommendation, *- Chronic Effect Indicator). These values are obtained using the guidelines or published evaluations prepared by the National Fire Protection Association (NFPA) or the National Paint and Coating Association (for HMIS ratings). LABEL RECOMMENDATION: Label Category : INDUSTRIAL OIL 1 - IND1 REVISION STATEMENT: This revision updates the following sections of this Material Safety Data Sheet: 1,2,9,16 Revision Date: FEBRUARY 16, 2012 ABBREVIATIONS THAT MAY HAVE BEEN USED IN THIS DOCUMENT: TLV - Threshold Limit Value TWA - Time Weighted Average STEL - Short-term Exposure Limit PEL - Permissible Exposure Limit CAS - Chemical Abstract Service Number Revision Number: 2 Revision Date: FEBRUARY 16, of 7 Chevron Rando HD MSDS : Terminator T-2100EI Manual Page 69
70 ACGIH - American Conference of Governmental Industrial Hygienists IMO/IMDG - International Maritime Dangerous Goods Code API - American Petroleum Institute MSDS - Material Safety Data Sheet CVX - Chevron NFPA - National Fire Protection Association (USA) DOT - Department of Transportation (USA) NTP - National Toxicology Program (USA) IARC - International Agency for Research on OSHA - Occupational Safety and Health Cancer Administration Prepared according to the OSHA Hazard Communication Standard (29 CFR ) and the ANSI MSDS Standard (Z400.1) by the Chevron Energy Technology Company, 100 Chevron Way, Richmond, California The above information is based on the data of which we are aware and is believed to be correct as of the date hereof. Since this information may be applied under conditions beyond our control and with which we may be unfamiliar and since data made available subsequent to the date hereof may suggest modifications of the information, we do not assume any responsibility for the results of its use. This information is furnished upon condition that the person receiving it shall make his own determination of the suitability of the material for his particular purpose. Revision Number: 2 Revision Date: FEBRUARY 16, of 7 Chevron Rando HD MSDS : Page 70

71 To find more information about our other tools and products visit our website at: Contact us by at: Contact us by Phone at: Contact us by U.S. Mail at: th ST SW Everett, WA 98203, U.S.A. Terminator T-2100EI Manual Page 71
RIDE-ON TERMINATORS T3000 EI COMPLETE MANUAL
 RIDE-ON TERMINATORS T3000 EI COMPLETE MANUAL CONTEC Maschinenbau & Entwicklungstechnik GmbH Hauptstrasse 146 D-57518 Alsdorf Tel.: 02741 9344-0 Fax: 02741 9344-29 info@contecgmbh.com www.contecgmbh.com
INNOVATECH PRODUCTS & EQUIPMENT Allmond Ave, Louisville, KY 40209, USA Telephone: RIDE-ON TERMINATORS
 INNOVATECH PRODUCTS & EQUIPMENT. 4701 Allmond Ave, Louisville, KY 40209, USA Telephone: 1-425-405-9100 RIDE-ON TERMINATORS Terminator Infinity 2.0 COMPLETE MANUAL P a g e 2 Bartell Morrison Inc. 375 Annagem
Read this Manual before you operate or service the equipment
 Read this Manual before you operate or service the equipment Innovatech Products & Equipment Co. The Professional Carpet and Tile Removal Machinery 19722 144 th Ave NE Woodinville, WA 98072 USA Telephone
RIDE-ON TERMINATORS T-3000XME COMPLETE MANUAL
 INNOVATECH PRODUCTS & EQUIPMENT. 4701 Allmond Ave, Louisville, KY 40209, USA Telephone: 1-425-405-9100 RIDE-ON TERMINATORS T-3000XME COMPLETE MANUAL For machines with serial no. format: T3000XME-XXX P
RIDE-ON TERMINATORS T-3000EI COMPLETE MANUAL
 INNOVATECH PRODUCTS & EQUIPMENT. 4701 Allmond Ave, Louisville, KY 40209, USA Telephone: 1-425-405-9100 RIDE-ON TERMINATORS T-3000EI COMPLETE MANUAL For machines with serial no. format: T3000E-XXX-IB P
Innovatech User Manual. Predator 2400 T H E S U R F A C E P R E P A R A T I O N S P E C I A L I S T S
 Innovatech User Manual Predator 2400 T H E S U R F A C E P R E P A R A T I O N S P E C I A L I S T S CONTENTS Introduction... 3 Delivery... 3 Grinder Specifications... 4 Safety Warning... 4 Controls and
Air-Operated Waste Oil Drainer
 Air-Operated Waste Oil Drainer 20-Gallon Tank Owner s Manual WARNING: Read carefully and understand all ASSEMBLY AND OPERATION INSTRUCTIONS before operating. Failure to follow the safety rules and other
Deep Cycle Battery Safety. First. Battery Handling, Maintenance & Test Procedures
 Deep Cycle Battery Safety. First. Battery Handling, Maintenance & Test Procedures Crown deep cycle batteries employ a low-maintenance design. They do require periodic maintenance and effective charging
Angle Grinder Holder
 Angle Grinder Holder Owner s Manual WARNING: Read carefully and understand all ASSEMBLY AND OPERATION INSTRUCTIONS before operating. Failure to follow the safety rules and other basic safety precautions
Sawhorse with Chainsaw Holder
 Sawhorse with Chainsaw Holder Owner s Manual Chainsaw not included. WARNING: Read carefully and understand all ASSEMBLY AND OPERATION INSTRUCTIONS before operating. Failure to follow the safety rules and
3-Pt. Quick Hitch. Owner s Manual
 3-Pt. Quick Hitch Owner s Manual WARNING: Read carefully and understand all ASSEMBLY AND OPERATION INSTRUCTIONS before operating. Failure to follow the safety rules and other basic safety precautions may
4400-Lb. Capacity Pallet Jack
 Read carefully and understand all ASSEMBLY AND OPERATION INSTRUCTIONS before operating. Failure to follow the safety rules and other basic safety precautions may result in serious personal injury. Item#
Installation, Operation & Maintenance Manual. For Pro-Fill kits with part numbers beginning in BG
 Installation, Operation & Maintenance Manual For Pro-Fill kits with part numbers beginning in BG BL-175 6/26/2009 General Information & Precautions This publication provides detailed instructions for installing
110 Volt/12 Volt Portable Inflator
 110 Volt/12 Volt Portable Inflator Owner s Manual WARNING: Read carefully and understand all ASSEMBLY AND OPERATION INSTRUCTIONS before operating. Failure to follow the safety rules and other basic safety
Large Hydraulic Bead Breaker
 Large Hydraulic Bead Breaker Owner s Manual WARNING: Read carefully and understand all ASSEMBLY AND OPERATION INSTRUCTIONS before operating. Failure to follow the safety rules and other basic safety precautions
BATTERY & STARTER ANALYSER (BSA-12) User Manual
 User Manual") BATTERY & STARTER ANALYSER (BSA-12) User Manual Introduction BSA-12 Battery Starter Analyser does not carry internal batteries but is powered up from external DC source ranging from 9V to 15V DC. It is
BATTERY & STARTER ANALYSER (BSA-12) User Manual Introduction BSA-12 Battery Starter Analyser does not carry internal batteries but is powered up from external DC source ranging from 9V to 15V DC. It is
Manual Chain Hoist. Owner s Manual
 Manual Chain Hoist Owner s Manual WARNING: Read carefully and understand all ASSEMBLY AND OPERATION INSTRUCTIONS before operating. Failure to follow the safety rules and other basic safety precautions
150-Lb. Drywall and Panel Hoist
 150-Lb. Drywall and Panel Hoist Owner s Manual WARNING: Read carefully and understand all ASSEMBLY AND OPERATION INSTRUCTIONS before operating. Failure to follow the safety rules and other basic safety
Today, we re going to talk about battery safety. We ll discuss all the key issues associated with using batteries safely, including battery hazards,
 Today, we re going to talk about battery safety. We ll discuss all the key issues associated with using batteries safely, including battery hazards, battery charging, and battery maintenance. Although
Instruction Manual For Baldor Buffers
 No. 280F Replaces 280E LB7011 Instruction Manual For Baldor Buffers SAFETY NOTICE: WARNING statements describe conditions that may lead to personnel injury including potentially fatal injuries if the machine
Electric Chainsaw Sharpener With Bar Mount
 Electric Chainsaw Sharpener With Bar Mount Owner s Manual WARNING: Read carefully and understand all ASSEMBLY AND OPERATION INSTRUCTIONS before operating. Failure to follow the safety rules and other basic
Heavy-Duty Drywall Dolly Cart
 Heavy-Duty Drywall Dolly Cart Owner s Manual WARNING: Read carefully and understand all ASSEMBLY AND OPERATION INSTRUCTIONS before operating. Failure to follow the safety rules and other basic safety precautions
Heavy-Duty Welding Fabrication Table
 Heavy-Duty Welding Fabrication Table with Fix-Up Kit Owner s Manual WARNING: Read carefully and understand all ASSEMBLY AND OPERATION INSTRUCTIONS before operating. Failure to follow the safety rules and
Hydraulic Furniture Movers
 Hydraulic Furniture Movers Owner s Manual WARNING: Read carefully and understand all ASSEMBLY AND OPERATION INSTRUCTIONS before operating. Failure to follow the safety rules and other basic safety precautions
Drum Deheader. Owner s Manual
 Drum Deheader Owner s Manual WARNING: Read carefully and understand all ASSEMBLY AND OPERATION INSTRUCTIONS before operating. Failure to follow the safety rules and other basic safety precautions may result
Installation, Operation & Maintenance Manual
 Installation, Operation & Maintenance Manual Picture may differ from your specific application For Pro-Fill kits with part numbers beginning in BG BL-175 9-20-13 General Information & Precautions This
Adjustable Steel Welding Table
 Adjustable Steel Welding Table Owner s Manual WARNING: Read carefully and understand all ASSEMBLY AND OPERATION INSTRUCTIONS before operating. Failure to follow the safety rules and other basic safety
3000-Lb. Vehicle Positioning Jacks. Owner s Manual
 3000-Lb. Vehicle Positioning Jacks Owner s Manual WARNING: Read carefully and understand all ASSEMBLY AND OPERATION INSTRUCTIONS before operating. Failure to follow the safety rules and other basic safety
Hydraulic Bead Breaker Kit
 Hydraulic Bead Breaker Kit Owner s Manual WARNING: Read carefully and understand all ASSEMBLY AND OPERATION INSTRUCTIONS before operating. Failure to follow the safety rules and other basic safety precautions
PRODUCT MANUAL TILE CUTTING MACHINE. . Operation. Parts List and Diagram SPECIFICATIONS CAUTION:
 FLORCRAFTT TM PRODUCT MANUAL SKU NUMBER 709-4242 SERIAL NUMBER: CAUTION: FOR YOUR OWN SAFETY READ INSTRUCTION MANUAL COMPLETELY AND CAREFULLY BEFORE OPERATING THIS 7 TILECUTTING MACHINE SPECIFICATIONS
Push Trolley. Owner s Manual
 Push Trolley Owner s Manual WARNING: Read carefully and understand all ASSEMBLY AND OPERATION INSTRUCTIONS before operating. Failure to follow the safety rules and other basic safety precautions may result
16 Inch Surface Cleaner
 16 Inch Surface Cleaner Owner s Manual WARNING: Read and understand all instructions, warnings, and cautions before using this product. Failure to follow the instructions, warnings, and cautions may result
SBC12 H Operating instructions Mode d emploi Manual de instrucciones
 *254901* 254901 SBC12 H Operating instructions Mode d emploi Manual de instrucciones Safety Precautions Read all Instructions GENERAL SAFETY RULES FOR ALL BATTERY OPERATED TOOLS WARNING! Read and understand
2-in-1 Air Operated Waste Oil Drainer
 2-in-1 Air Operated Waste Oil Drainer 24-Gallon Tank Owner s Manual WARNING: Read carefully and understand all ASSEMBLY AND OPERATION INSTRUCTIONS before operating. Failure to follow the safety rules and
- Optional Audio warning when discharge test is complete or tester malfunction.
 INTRODUCTION Congratulations on acquiring your new LT360 battery discharge tester. The LT360 battery discharge tester has been designed to provide the operator with accurate battery discharge testing and
Basic Battery Safety. Lead Acid Storage Batteries
 Basic Battery Safety Lead Acid Storage Batteries Hazards of Lead Acid Batteries Chemical burns (sulfuric acid) Arc flash / burns Shock Explosive gas (hydrogen) Fire Weight Sulfuric Acid Safety PPE requirements
before serial number 2214
 before serial number 2214 Contents Page Safety Rules... 3 Pre-operational & Safety Inspection... 4 Operating Instructions... 6 Transport... 12 Maintenance & Routine Service... 12 Specifications... 14 SAFETY
Mini Manual Tire Changer
 Mini Manual Tire Changer Owner s Manual WARNING: Read carefully and understand all ASSEMBLY AND OPERATION INSTRUCTIONS before operating. Failure to follow the safety rules and other basic safety precautions
Telescoping Pressure Washer Wand 18'
 Telescoping Pressure Washer Wand 18' Owner s Manual WARNING: Read carefully and understand all ASSEMBLY AND OPERATION INSTRUCTIONS before operating. Failure to follow the safety rules and other basic safety
55-Gallon Drum Cradle
 55-Gallon Drum Cradle Owner s Manual WARNING: Read carefully and understand all ASSEMBLY AND OPERATION INSTRUCTIONS before operating. Failure to follow the safety rules and other basic safety precautions
12V Oil Extractor Pump
 12V Oil Extractor Pump Owner s Manual WARNING: Read carefully and understand all ASSEMBLY AND OPERATION INSTRUCTIONS before operating. Failure to follow the safety rules and other basic safety precautions
Innovatech User Manual. Predator 3200 T H E S U R F A C E P R E P A R A T I O N S P E C I A L I S T S
 Innovatech User Manual Predator 3200 T H E S U R F A C E P R E P A R A T I O N S P E C I A L I S T S CONTENTS Introduction... 3 Delivery... 3 Grinder Specifications... 4 Safety Warning... 4 Controls and
Mini Lever Hoist. Owner s Manual
 Mini Lever Hoist Owner s Manual WARNING: Read carefully and understand all ASSEMBLY AND OPERATION INSTRUCTIONS before operating. Failure to follow the safety rules and other basic safety precautions may
SAVE THESE INSTRUCTIONS
 12 Volt High-V Volume Air Inflator Owner s Manual WARNING: Read carefully and understand all ASSEMBLY AND A OPERATION INSTRUCTIONS before operating. Failure to follow the safety rules and other basic safety
Garden Hose Reel with 3/4In. x 100Ft. Hose. Owner s Manual
 Garden Hose Reel with 3/4In. x 100Ft. Hose Owner s Manual WARNING: Read carefully and understand all ASSEMBLY AND OPERATION INSTRUCTIONS before operating. Failure to follow the safety rules and other basic
1000-lb Hydraulic Truck Crane
 1000-lb Hydraulic Truck Crane Owner s Manual WARNING: Read carefully and understand all ASSEMBLY AND OPERATION INSTRUCTIONS before operating. Failure to follow the safety rules and other basic safety precautions
INSTRUCTION MANUAL. Terminator T-2200Pro Propane Powered Floor Scraper
 IF YOU SHOULD EXPERIENCE A PROBLEM WITH YOUR INNOVATECH PURCHASE, CALL 1-800-267-6682. IN MOST CASES AN INNOVATECH REPRESENTATIVE CAN RESOLVE YOUR PROBLEM OVER THE PHONE. IF YOU HAVE A SUGGESTION OR COMMENT,
Operator Manual. The most important component is you. This operator manual. has information for. all models of series. B plus some options and
 Operator Manual This operator manual has information for all models of series B plus some options and accessories. Some of the illustrations and information may not apply to your truck. The most important
AIR PAINT SHAKER OWNER'S MANUAL
 AIR PAINT SHAKER OWNER'S MANUAL WARNING: Read carefully and understand all INSTRUCTIONS before operating. Failure to follow the safety rules and other basic safety precautions may result in serious personal
2-Pack Indoor/Outdoor Simulated Security Cameras. Owner s Manual
 2-Pack Indoor/Outdoor Simulated Security Cameras Owner s Manual WARNING: Read carefully and understand all ASSEMBLY AND OPERATION INSTRUCTIONS before operating. Failure to follow the safety rules and other
2-1/4 Gallon Sprayer
 2-/4 Gallon Sprayer 94008 ASSEMBLY AND OPERATING INSTRUCTIONS 349 Mission Oaks Blvd., Camarillo, CA 930 Visit our Web site at http://www.harborfreight.com Copyright 2005 by Harbor Freight Tools. All rights
Adjustable Steel Drum Dolly
 Adjustable Steel Drum Dolly Owner s Manual WARNING: Read carefully and understand all ASSEMBLY AND OPERATION INSTRUCTIONS before operating. Failure to follow the safety rules and other basic safety precautions
1000 lb. Adjustable Gantry Crane
 1000 lb. Adjustable Gantry Crane Owner s Manual WARNING: Read carefully and understand all ASSEMBLY AND OPERATION INSTRUCTIONS before operating. Failure to follow the safety rules and other basic safety
Package Contents Part A (3) I-Beam (1) Base (2) Other parts
 I-Beam (1) Base (2) Other parts") Page 1 Installation Instructions for 81245 Adjustable Height Gantry Crane 1-Ton Capacity Table of Contents Important Safety Information pg. 2 Specific Operation Warnings pg. 2 Main Parts of Product pg.
Page 1 Installation Instructions for 81245 Adjustable Height Gantry Crane 1-Ton Capacity Table of Contents Important Safety Information pg. 2 Specific Operation Warnings pg. 2 Main Parts of Product pg.
2000 lb Adjustable Gantry Crane
 2000 lb Adjustable Gantry Crane Owner s Manual WARNING: Read carefully and understand all ASSEMBLY AND OPERATION INSTRUCTIONS before operating. Failure to follow the safety rules and other basic safety
EnergyCell FLA Series. Owner s Manual
 Series Owner s Manual About OutBack Power Technologies OutBack Power Technologies is a leader in advanced energy conversion technology. OutBack products include true sine wave inverter/chargers, maximum
A+ Battery Backup Power Supply For use with Hydromatic model B-A1/BV-A1
 Unit Installation and Service Manual A+ Battery Backup Power Supply For use with Hydromatic model B-A1/BV-A1 NOTE! To the installer: Please make sure you provide this manual to the owner of the pumping
ALUMINUM JACK. 3,000 lb. Jack Capacity & JACK STAND COMBO. Model ASSEMBLY AND OPERATING INSTRUCTIONS
 ALUMINUM JACK 3,000 lb. Jack Capacity & JACK STAND COMBO 6,000 lb. Jack Stand Capacity (when used in pairs) Model 91850 ASSEMBLY AND OPERATING INSTRUCTIONS 3491 Mission Oaks Blvd., Camarillo, CA 93011
Wheel Horse. 44 Snowthrower. for 5xi Lawn and Garden Tractors. Model No & Up. Operator s Manual
 FORM NO. 8 Rev A Wheel Horse Snowthrower for 5xi Lawn and Garden Tractors Model No. 7966 890050 & Up Operator s Manual IMPORTANT: Read this manual, and your tractor manual, carefully. They contain information
Pressure Roller with 24-inch Fixed Extension - For application of architectural paints and coatings -
 Instructions Important Safety Instructions Read all warnings and instructions in this manual. Save these instructions. 311082D Pressure Roller with 24-inch Fixed Extension - For application of architectural
Pressure Washer Hose Reel
 Pressure Washer Hose Reel Owner s Manual WARNING: Read carefully and understand all ASSEMBLY AND OPERATION INSTRUCTIONS before operating. Failure to follow the safety rules and other basic safety precautions
Lumina 28 Traction Drive Model: Battery Burnisher M28036TDQP OPERATION SERVICE PARTS CARE
 Lumina 28 Traction Drive Model: Battery Burnisher M28036TDQP OPERATION SERVICE PARTS CARE Table of Contents IMPORTANT SAFETY INSTRUCTIONS...1 OPERATING INSTRUCTIONS...2 INSPECTION...2 ELECTRICAL...2 BATTERIES...2
Heavy-Duty Sawhorse. Owner s Manual
 Heavy-Duty Sawhorse Owner s Manual WARNING: Read carefully and understand all ASSEMBLY AND OPERATION INSTRUCTIONS before operating. Failure to follow the safety rules and other basic safety precautions
4400-Lb. Capacity Extra-Long Pallet Jack
 4400-Lb. Capacity Extra-Long Pallet Jack Owner s Manual WARNING: Read carefully and understand all ASSEMBLY AND OPERATION INSTRUCTIONS before operating. Failure to follow the safety rules and other basic
DIAMOND CONCRETE SAW MODEL CC1800XL P R O D U C T S OPERATOR S MANUAL. February Part #
 DIAMOND P R O D U C T S OPERATOR S MANUAL CONCRETE SAW MODEL CC1800XL February 2007 Part #1801038 Intentionally Blank GENERAL SAFETY WARNINGS AND PRECAUTIONS PERSONAL SAFETY Read and understand all operating
2-Pack Indoor Simulated Dome Security Cameras
 2-Pack Indoor Simulated Dome Security Cameras Owner s Manual WARNING: Read carefully and understand all ASSEMBLY AND OPERATION INSTRUCTIONS before operating. Failure to follow the safety rules and other
4 in 1 POWER STATION Model: 7226
 Please carefully read and save these instructions before attempting to assemble, maintain, install, or operate this product. Observe all safety information to protect yourself and others. Failure to observe
SAFETY RULES SPECIFICATIONS READ ALL INSTRUCTIONS BEFORE OPERATING SAVE THESE INSTRUCTIONS
 READ ALL INSTRUCTIONS BEFORE OPERATING SAVE THESE INSTRUCTIONS Thank you for purchasing 7" Polisher. Before attempting to operate your new Polisher please read these instructions thoroughly. You will need
VICE MOUNTED BEAD ROLLER
 VICE MOUNTED BEAD ROLLER Owner s Manual WARNING: Read carefully and understand all ASSEMBLY AND OPERATION INSTRUCTIONS before operating. Failure to follow the safety rules and other basic safety precautions
12 Volt Heavy-Duty Air Inflator
 12 Volt Heavy-Duty Air Inflator Owner s Manual WARNING: Read carefully and understand all ASSEMBLY AND OPERATION INSTRUCTIONS before operating. Failure to follow the safety rules and other basic safety
24 Volt - 3/8" Cordless Impact Wrench
 24 Volt - 3/8" Cordless Impact Wrench INSTRUCTION MANUAL Item # 3994040 IMPORTANT SAFETY INSTRUCTIONS WARNING: When using electrical equipment such as this, basic safety precautions should always be followed
OPERATORS MANUAL/INSTRUCTIONS/PARTS & SERVICE FOR MANUAL & ELECTRIC
 OPERATORS MANUAL/INSTRUCTIONS/PARTS & SERVICE FOR MANUAL & ELECTRIC TABLE OF CONTENTS SAFETY DELIVERY INSPECTION OPERATION 4 MAINTENANCE 5 TROUBLE SHOOTING 5 PARTS 6-15 Frame Scissor Assembly 6-7 Thrust
3-Pt. Subsoiler. Owner s Manual
 3-Pt. Subsoiler Owner s Manual WARNING: Read carefully and understand all ASSEMBLY AND OPERATION INSTRUCTIONS before operating. Failure to follow the safety rules and other basic safety precautions may
Battery Tester. GxT Incorporated, Cheboygan MI, U.S.A. All Rights Reserved E040-01G. 40 & 42HD Operator s Manual
 Battery Tester GxT Incorporated, Cheboygan MI, U.S.A. All Rights Reserved E040-01G 40 & 42HD Operator s Manual SPECIFICATIONS Measurement Range...Ferret 40... Ferret 42HD Battery Volts... 4.0 to 19.99...
1500 Series Roll Off Hoist. Owner s Manual (5-06)
") 1500 Series Roll Off Hoist Owner s Manual (5-06) Section 1: General Information Introduction Safety Information Warranty Information Table of Contents Section 2: Operation Operating the P.T.O. Operating
1500 Series Roll Off Hoist Owner s Manual (5-06) Section 1: General Information Introduction Safety Information Warranty Information Table of Contents Section 2: Operation Operating the P.T.O. Operating
CRD610 Automatic Fitting Inserter
 CRD610 Automatic Fitting Inserter OPERATIONS MANUAL VERSION 1.2 LAST EDITED 12.12.2018 cleanroomdevices.com 1 Table of Contents Title Page. 1 Table of Contents...2 1.0 General Product & Safety Information....3
60 Watt Industrial LED Low Bay Light
 60 Watt Industrial LED Low Bay Light Owner s Manual WARNING: Read carefully and understand all ASSEMBLY AND OPERATION INSTRUCTIONS before operating. Failure to follow the safety rules and other basic safety
Quick-Install Push Trolley
 Quick-Install Push Trolley Owner s Manual WARNING: Read carefully and understand all ASSEMBLY AND OPERATION INSTRUCTIONS before operating. Failure to follow the safety rules and other basic safety precautions
4400-Lb. Cargo Trolley
 4400-Lb. Cargo Trolley Owner s Manual WARNING: Read carefully and understand all ASSEMBLY AND OPERATION INSTRUCTIONS before operating. Failure to follow the safety rules and other basic safety precautions
182-LED Solar-Powered Motion Security Light. Owner s Manual
 182-LED Solar-Powered Motion Security Light Owner s Manual WARNING: Read carefully and understand all ASSEMBLY AND OPERATION INSTRUCTIONS before operating. Failure to follow the safety rules and other
Manual Tire Changing Station
 Manual Tire Changing Station Owner s Manual WARNING: Read carefully and understand all ASSEMBLY AND OPERATION INSTRUCTIONS before operating. Failure to follow the safety rules and other basic safety precautions
Hydraulic Drum Transporter
 Hydraulic Drum Transporter Owner s Manual WARNING: Read carefully and understand all ASSEMBLY AND OPERATION INSTRUCTIONS before operating. Failure to follow the safety rules and other basic safety precautions
OPERATING INSTRUCTIONS. Note: 6V Charging. Requires Manual Shut Off.
 Requires Manual Shut Off. 6 / 2 AMP,, DUAL RATE BATTER TTERY CHARGER 45005 OPERATING INSTRUCTIONS E224783 E224783 Note: 6V Charging Due to continuing improvements, actual product may differ slightly from
Push Trolley. Owner s Manual
 Push Trolley Owner s Manual WARNING: Read carefully and understand all ASSEMBLY AND OPERATION INSTRUCTIONS before operating. Failure to follow the safety rules and other basic safety precautions may result
ATD Gallon Pressurized Oil Drain Owner s Manual
 ATD-5203 30 Gallon Pressurized Oil Drain Owner s Manual TECHNICAL SPECIFICATIONS Model: ATD-5203 Capacity: 30 Gallon Drain Funnel Working Height: 47.25 to 70.5 Drain Funnel Diameter: 15.75 Plastic Tray:
30 Inch x 18 Inch Service Cart
 30 Inch x 18 Inch Service Cart Owner s Manual WARNING: Read carefully and understand all ASSEMBLY AND OPERATION INSTRUCTIONS before operating. Failure to follow the safety rules and other basic safety
ATV Log Arch and Holder
 ATV Log Arch and Holder Owner s Manual WARNING: Read carefully and understand all ASSEMBLY AND OPERATION INSTRUCTIONS before operating. Failure to follow the safety rules and other basic safety precautions
50 Ft. Retractable Cord Reel
 50 Ft. Retractable Cord Reel with Triple Tap Owner s Manual WARNING: Read carefully and understand all ASSEMBLY AND OPERATION INSTRUCTIONS before operating. Failure to follow the safety rules and other
Model ET 5000W Operation and Service Manual
 Model ET 5000W Operation and Service Manual Patented 5/16 BALL Load Capacity: 5000 lbs The ET 5000W ESCALATE TRAILER offers ground level roll-on loading and roll-off unloading of equipment with non-tilting
Poly Strapping Tensioner & Cutter
 Poly Strapping Tensioner & Cutter Owner s Manual WARNING: Read carefully and understand all ASSEMBLY AND OPERATION INSTRUCTIONS before operating. Failure to follow the safety rules and other basic safety
Light condition and operation Windshield glass condition Wiper blade condition Paint condition and corrosion Fluid leaks Door and hood lock condition
 GENERAL CHECKS Engine Compartment The following should be checked regularly: Engine oil level and condition Transmission fluid level and condition Brake fluid level Clutch fluid level Engine coolant level
4-Claw Log Lifting Tongs
 4-Claw Log Lifting Tongs Owner s Manual WARNING: Read carefully and understand all ASSEMBLY AND OPERATION INSTRUCTIONS before operating. Failure to follow the safety rules and other basic safety precautions
INSTALLATION AND OPERATING INSTRUCTIONS FOR FLOODED TUBULAR-HP MOTIVE POWER BATTERIES
 PLEASE READ BEFORE PLACING BATTERIES IN SERVICE THESE INSTRUCTIONS TO BE SHIPPED WITH BATTERY AND TO BE DELIVERED TO USER INSTALLATION AND OPERATING INSTRUCTIONS FOR FLOODED TUBULAR-HP MOTIVE POWER BATTERIES
25 GALLON PORTABLE OIL LIFT
 25 GALLON PORTABLE OIL LIFT Model 92859 SET UP AND OPERATING INSTRUCTIONS Diagrams within this manual may not be drawn proportionally. Due to continuing improvements, actual product may differ slightly
ELECTRIC HYDRAULIC GEAR PUMP
 ELECTRIC HYDRAULIC GEAR PUMP 46169 ASSEMBLY AND OPERATING INSTRUCTIONS 3491 Mission Oaks Blvd., Camarillo, CA 93011 Visit our Web site at http://www.harborfreight.com Copyright 2001 by Harbor Freight Tools.
84in. Driveway Drag. Owner s Manual
 84in. Driveway Drag Owner s Manual WARNING: Read carefully and understand all ASSEMBLY AND OPERATION INSTRUCTIONS before operating. Failure to follow the safety rules and other basic safety precautions
Cordless High Speed Drill
 ENGLISH Cordless High Speed Drill MODEL 6503D 00039 I N S T R U C T I O N M A N U A L WARNING: For your personal safety, READ and UNDERSTAND before using. SAVE THESE INSTRUCTIONS FOR FUTURE REFERENCE.
42in. Sweeper. Owner s Manual
 42in. Sweeper Owner s Manual WARNING: Read carefully and understand all ASSEMBLY AND OPERATION INSTRUCTIONS before operating. Failure to follow the safety rules and other basic safety precautions may result
BusPro Series Instruction Manual
 Test Equipment Auto Meter Products Inc. 413 West Elm Street Sycamore, IL 60178 12 Toll Free (866) 883-TEST (8378) Fax (815)-895-6786 www.autometer.com 2650-505X-10 Rev. E Professional BusPro Series Instruction
16 Inch Hanging Pendant Barn Light
 16 Inch Hanging Pendant Barn Light Owner s Manual WARNING: Read carefully and understand all ASSEMBLY AND OPERATION INSTRUCTIONS before operating. Failure to follow the safety rules and other basic safety