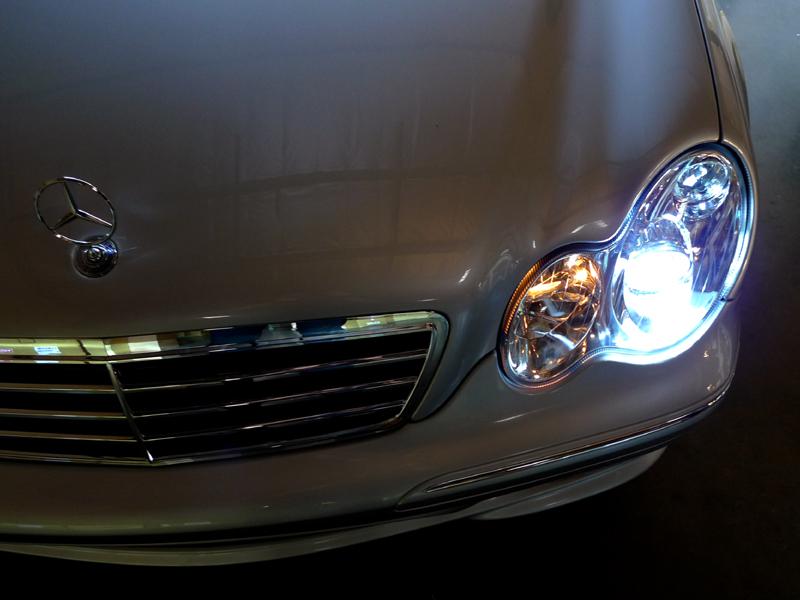
Headlight Removal & Installation: Mercedes W203 C Class
|
|
|
- Stephen Parsons
- 6 years ago
- Views:
Transcription
1 Headlight Removal & Installation: Mercedes W203 C Class Disclaimer: Buyer assumes any and all risk and liability from the installation and use of this product. Seller, author, or any of their affiliates assume no liability for injury, loss, incidental or consequential damages deriving from installation and/or use of this product. Tools Required: 8mm or 5/16 socket 10mm socket 3/8 or 1/4 drive socket wrench 3/8 or 1/4 socket extension Flathead Screwdriver Phillips Screwdriver Special Notes: If you are installing on a M class, please refer to the manufacturers guide to install resisters for DRL function.


2 1. You must remove two clips inside each front-side tire-well.


3 2. Unscrew and remove the 10mm screw inside the tire-well with a 10mm socket. Do this for each front-side tire-well. The location of the three screws can be seen below.


4 However, you do not need to remove the "Upper Mud-Guard" from the car for this installation. Only the Lower Mudguard needs to be removed. 3. There still is one more screw hidden behind the upper mud-guard in the tire-well. Fold the upper mud-guard back to reveal this 8mm screw that is in between the lining of your car s fender and bumper. *Turn the tire away from you, so that you can create an easier accessing and free up workable space.


5 4. Please note that this step can be accomplished without removing the upper mud guard. However, Photo B shows the upper mud guard removed in order to show a better view of removing the clip that is conjoining the bumper to the fender. After you have removed the screw from Step 4, you must pull the pins off of the metal clip first before attempting to remove it. There is one metal clip on each front-side tire-well. Photo B 5. Unplug/disconnect bulbs and adapters from front bumper side markers and fog lights on each side before removing the bumper. Photo below shows side marker bulb and fog light adapter already unplugged do this for both driver and passenger side.


6 Photo below shows the inward side of the bumper where the bulb and adapter will be disconnected from.


7 6. There will be a Gear/Bolt that you will need to loosen before attempting to remove the bumper. The Gear/Bolt is located behind the upper mud guard and below the fender & headlight. 7. Photo below shows the Gear/Bolt exposed with the bumper removed. However, this is just an example to show what you are looking for behind the upper mud guard. You must loosen this Gear/Bolt before attempting to remove the bumper.


8 8. Next, you will need to remove two clips underneath your car s bumper as shown below. Once you have done this, you should be able to remove your car s bumper. Slowly and carefully, from one fender-end of your bumper to the other, pull the bumper off of your car s frame. 9. Remove two 8mm screws on top of the Headlight by unscrewing them with an 8mm socket


9 10. With all the Headlight mounting screws removed from the photo above, you will be able to remove your Headlight from your car. When removing your Headlights, please be mindful of where the adapters are and unplug them as you pull your Headlights out of your car s frame (as shown in Photo I below).


10 11. Before plugging in the main adapter for your headlights (as shown in the photo below) please check to see if the pins on the "female" end of the adapter are upright and aligned. In the case they are not upright or aligned, please do not try to connect the adapter. Connecting the adapter in this instance will further damage the pins and will adversely affect the headlight's performance. After you have checked to see if the pins are straight, connect the adapter securely by hearing/feeling the clip on the male end of the adapter "click" when latching on to the headlight.

11 * Step 12 & 13 applies only for Xenon HID Headlights. These two steps only apply if you have bought the optional Xenon HID version. If you did not purchase the optional Xenon HID version then please skip to step 14. * 12. Once you have secured your newly purchased Headlights onto its mounting bracket, you must prep to secure your HID Ballast also (shown in the example to the right). You must locate the HID Ballast mounting bracket (as shown in the example below), which was originally found from your recently purchased Headlight box. After you have located the HID Ballast mounting bracket you must secure it by screwing in all the necessary screws on it. 13. After you secure by screwing in all the necessary screws on the HID Ballast mounting bracket, you must loop a Zip- Tie through the HID Ballast mounting bracket so that you may secure it to your car. The HID Ballast must be seated on a metal surface not plastic. This is because the HID Ballast will get hot whenever the Headlights are in use. The HID Ballast mounting bracket should be seated on the tire-well s inward metal frame. Once you have correctly seated the HID Ballast mounting bracket, you must Zip-Tie the HID Ballast mounting bracket to the nearest metal hinge (be careful not to zip-tie the mounting bracket to any wiring or hosing of the engine compartment). After you have completed securing your HID Ballast mounting bracket, you may cut any excess Zip-Tie that is protruding out of the engine compartment. Repeat Step 10 for both sets of HID Ballast mounting bracket on each side. =====================END of Xenon HID Part of Installation=====================


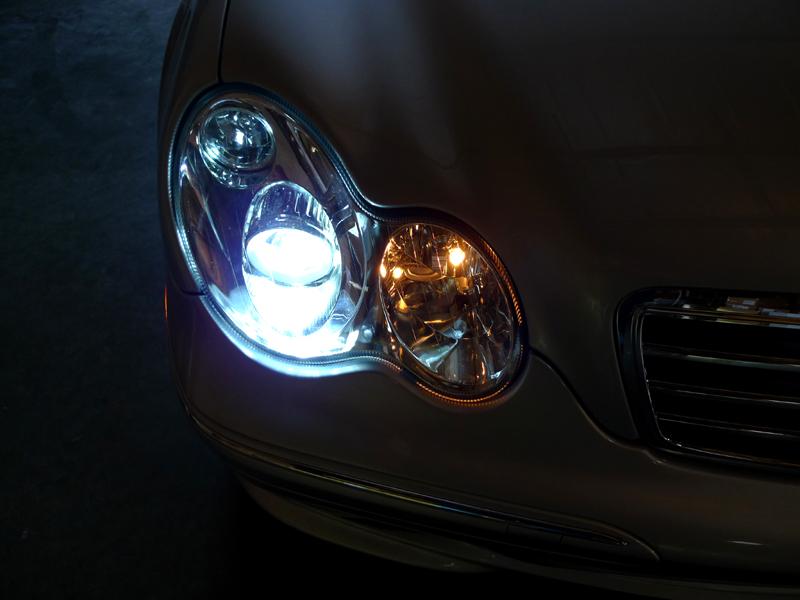
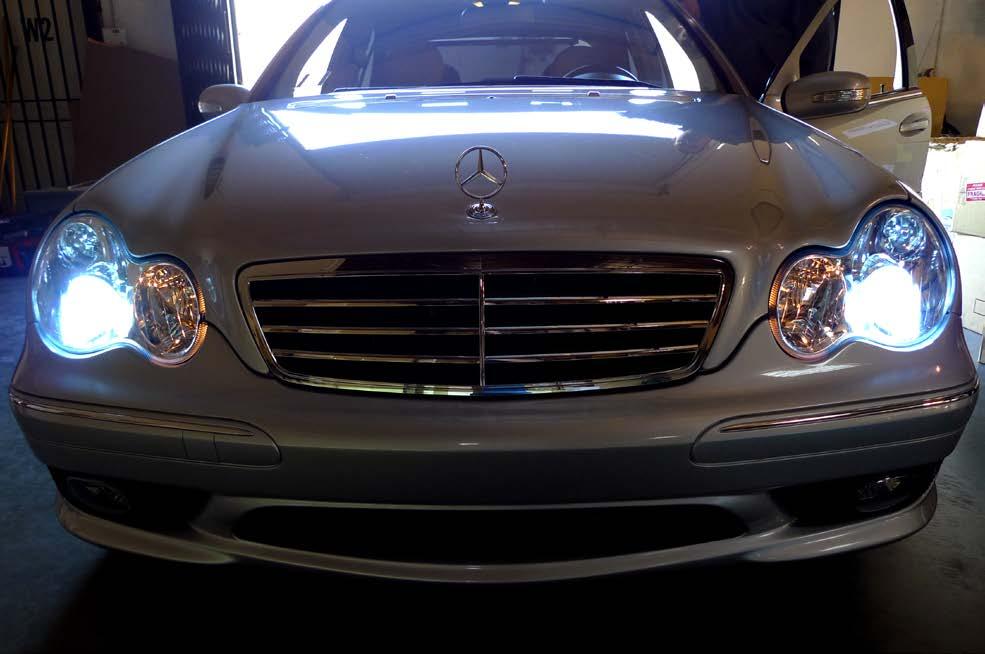
12 14. Once you have removed your Headlights, you may back-track Steps 10 to Step 1 for the reinstallation of your newly purchased Headlights. 15. Once you have properly secured your newly purchased Headlights & HID Ballast mounting bracket to your car, you may now test your Headlights. If you have set the Headlight dial to any other setting than Position 0 (between Auto & Parking lights), switch it to Position 0. Your headlights should be off. Next, switch it to Position 1, also known as Parking lights, to see if your day-time running lights should be visible (it is the light nearest to the car s grille). Lastly, switch the dial to Position 2 to see if your low beam light is functioning. 16. Enjoy your newly installed Headlights!
13
14
Headlight Removal & Installation: VW Jetta Mk.4 / Bora
 Headlight Removal & Installation: 99-04 VW Jetta Mk.4 / Bora Disclaimer: Buyer assumes any and all risk and liability from the installation and use of this product. Seller, author, or any of their affiliates
Headlight Removal & Installation: BMW E36
 Headlight Removal & Installation: BMW E36 Disclaimer: Buyer assumes any and all risk and liability from the installation and use of this product. Seller, author, or any of their affiliates assume no liability
Headlight Removal & Installation: BMW E39
 Headlight Removal & Installation: 97-03 BMW E39 Disclaimer: Buyer assumes any and all risk and liability from the installation and use of this product. Seller, author, or any of their affiliates assume
COLD AIR INTAKE INSTALLATION INSTRUCTIONS PART NUMBER D A. APPLICATION: E36/7 M-Roadster or M-Coupe 3.
 COLD AIR INTAKE INSTALLATION INSTRUCTIONS PART NUMBER D760-0323A APPLICATION: 1998-00 E36/7 M-Roadster or M-Coupe 3.2 Liter PARTS LIST Air Filter Assembly 3 1/2" Tube Intake Shield Silicone Hose Airflow
GROSS LOAD CAPACITY WHEN USED AS A WEIGHT CARRYING HITCH: 2,000 LBS. TRAILER WEIGHT & 200 LBS. TONGUE WEIGHT.
 PAGE 1 0F 6 GROSS LOAD CAPACITY WHEN USED AS A WEIGHT CARRYING HITCH: 2,000 LBS. TRAILER WEIGHT & 200 LBS. TONGUE WEIGHT. WARNING: ALL NON-TRAILER LOADS APPLIED TO THIS PRODUCT MUST BE SUPPORTED BY 18050
06-08 BMW Pre-LCI E90/E91 Angel Eye Halo Ring Install on OEM Headlight
 06-08 BMW Pre-LCI E90/E91 Angel Eye Halo Ring Install on OEM Headlight Disclaimer: Buyer assumes any and all risk and liability from the installation and use of this product. Seller, author, or any of
HAVING INSTALLATION QUESTIONS? CALL TECHNICAL SUPPORT AT
 9/23/2009 1 of 6 ITEM 1 QTY 8 Parts List PART NUMBER DESCRIPTION 3/8" CONICAL TOOTHED WASHER TOOLS REQUIRED #2 PHILLIPS SCREWDRIVER #2 STUBBY SCREWDRIVER 8mm SOCKET 13mm SOCKET RATCHET 12" EXTENSION TORQUE
T u n i n g. Professional Install
 DDM INSTALL GUIDE H1 HID Low Beams (35W or 55W) ddm T u n i n g TOOLS NEEDED: - Standard or metric socket set. Depending on the vehicle. - A drill and either a uni-bit or a 7/8 drill bit. - A Dremel with
Mustang HID Headlight Installation Guide (9007)
") Mustang HID Headlight Installation Guide 1994-2004 (9007) The below installation instructions work for the following products: 9007 Bulb HID Headlight Coversion Kit 1994-2004 The following are a set of
Mustang HID Headlight Installation Guide 1994-2004 (9007) The below installation instructions work for the following products: 9007 Bulb HID Headlight Coversion Kit 1994-2004 The following are a set of
Luminator Low-Rise Headlight. Designed and built by Radioflyer Innovations
 Luminator Low-Rise Headlight system for C5 Corvette Designed and built by Radioflyer Innovations 1 Tools Required Phillips head screwdriver Flathead screwdriver Torx 15 screwdriver Torx 20 screwdriver
Wood Grain Warrior Line Incognito hidden winch bumper installation instructions Lexus GX470
 Wood Grain Warrior Line Incognito hidden winch bumper installation instructions 2003-2009 Lexus GX470 Version 1.0-2016 Thank you for purchasing the Southern Style OffRoad Wood Grain Warrior Line Lexus
Lights TURN SIGNAL/SIDE MARKER LIGHT/ PARKING LIGHT HIGH BEAM HEADLIGHT LOW BEAM HEADLIGHT CONTINUED FOG LIGHT. Maintenance 257
 Check the operation of your car s exterior lights at least once a month. A burned out bulb can create an unsafe condition by reducing your car s visibility and the ability to signal your intentions to
INSTALLATION INSTRUCTIONS
 INSTALLATION INSTRUCTIONS Accessory Application Publications No. All 26124 CR-V Issue Date SEP 2003 P/N 08V31-S9A-112 PARTS LIST 4 Washer-bolts, 6 x 20 mm Left fog light 2 Small spring nuts Right fog light
HAVING INSTALLATION QUESTIONS? CALL TECHNICAL SUPPORT AT DESIGNED FOR USE WITH BALL MOUNT # 36053B
 2/20/2013 ITEM 1 QTY 8 Parts List PART NUMBER DESCRIPTION 3/8" CONICAL TOOTHED WASHER TOOLS REQUIRED RATCHET TORQUE WRENCH 12" EXTENSION 12mm SOCKET 8mm SOCKET OFFSET SCREWDRIVER FLAT BLADE SCREWDRIVER
INSTALLATION INSTRUCTIONS
 INSTALLATION INSTRUCTIONS Accessory S Application 2014 ODYSSEY Publications No. AII 49550 Issue Date JUNE 2013 PARTS LIST Fog Light Kit P/N 08V31-TK8-100A 16 Wire ties (Some may not be used) Left fog light
Remove 4 circled pins. Route wiring along dashed line. Remove the 2 9mm nuts and black retaining plate that secure extractor.
 2015 Ford Mustang Turn Signal Hood Kit Parts List: Quantity: Tool List: Bracket & pre-installed lamp 2 Flat head screwdriver Wiring harness 1 Phillips screwdriver PB-3660 Parts Bag 1 Ratchet & Socket set
HYUNDAI VELOSTER COLD AIR 1.6T INTAKE
 HYUNDAI VELOSTER COLD AIR 1.6T INTAKE INSTALLATION INSTRUCTIONS Tools needed: 1/4 or 3/8 drive ratchet 12 extension (shorter ones work, but will be difficult to reach some bolts) 10mm socket (deep well)
Fig A ADDICTIVE DESERT DESIGNS. Preparation: Removal: Release these clips
 Preparation: Disconnect the negative battery terminal. Park the vehicle on level ground and set the emergency brake. We recommend reading through the installation instructions in whole before performing
MINI COOPER HAVING INSTALLATION QUESTIONS? CALL TECHNICAL SUPPORT AT DESIGNED FOR USE WITH BALL MOUNT # D-19 / 45519
 10/8/2012 PAGE 1 of 6 ITEM 1 QTY 8 Parts List PART NUMBER DESCRIPTION 3/8" CONICAL TOOTHED WASHER TOOLS REQUIRED RATCHET TORQUE WRENCH 12" EXTENSION 12mm SOCKET 8mm SOCKET OFFSET SCREWDRIVER FLAT BLADE
2007 Current Jeep Wrangler JK Stealth Fighter Front Bumper Installation Instructions
 2007 Current Jeep Wrangler JK Stealth Fighter Front Bumper Installation Instructions PREPARATION 1. Disconnect the negative terminal on the battery. Park the vehicle on level ground and set the emergency
INSTALLATION INSTRUCTIONS Unitronic Intercooler Upgrade Kit for 2.0 TFSI (EA113) UH007-ICA
 UH007-ICA") Unitronic recommends that you read through the entire installation instructions prior to beginning the installation to familiarize yourself with the included components, tools required, and procedures
Unitronic recommends that you read through the entire installation instructions prior to beginning the installation to familiarize yourself with the included components, tools required, and procedures
Ford Mustang V6 OEM-Style Fog Light Kit Parts List: Quantity: Tool List:
 2015-2017 Ford Mustang V6 OEM-Style Fog Light Kit Parts List: Quantity: Tool List: LED Foglights/ Bezels 2 Flat head & Phillips screwdriver (if you ordered part#3600) Ratchet & Socket set OR Wiring harness
INSTALLATION INSTRUCTIONS
 INSTALLATION INSTRUCTIONS Accessory S Application 2011 ODYSSEY Publications No. AII 43917 Issue Date SEP 2010 PARTS LIST Fog Light Kit P/N 08V31-TK8-100 Left fog light 20A Fuse Relay Right fog light Light
SCION tc FOG LIGHT. Part Number: STC-312 / STC-812
 SCION tc 2011-2013 FOG LIGHT Part Number: STC-312 / STC-812 Kit Contents Item # Quantity Reqd. Description 1 2 Fog Lamps 2 2 Fog Light bezels 3 1 Switch Assembly 4 1 Fog Light Operation guide 5 1 Harness
Installation MKIV Headlight Housings with Fog Lamps (Procedures apply to both MKIV Jetta and Golf)
") Page 1 This tutorial is provided as a courtesy by ECS Tuning. Service Procedure Installation Proper service and repair procedures are vital to the safe, reliable operation of all motor vehicles as well
Page 1 This tutorial is provided as a courtesy by ECS Tuning. Service Procedure Installation Proper service and repair procedures are vital to the safe, reliable operation of all motor vehicles as well
2014+ FORD FIESTA ST DIRECT-FIT OIL COOLER KIT PARTS LIST AND INSTALLATION GUIDE CAUTION PARTS INCLUDED NOTE TOOLS NEEDED INSTALL PROCEDURE
 PARTS LIST AND PARTS INCLUDED 3PC APPLICATION-SPECIFIC MOUNTING BRACKETS & SPACER 1PC 19-ROW OIL COOLER 1PC 4 ', X 1'' BRAIDED HOSE W/90-10AN FITTINGS 1PC 3'' X 2.5 '' BRAIDED HOSE W/45 AND 90-10AN FITTINGS
HYUNDAI VELOSTER SHORT RAM 1.6T INTAKE INSTALLATION INSTRUCTIONS
 Installation: HYUNDAI VELOSTER SHORT RAM 1.6T INTAKE INSTALLATION INSTRUCTIONS Tools needed: 1/4 or 3/8 drive ratchet 12 extension (shorter ones work, but will be difficult to reach some bolts) 10mm socket
RS5mesh style Grille. Audi A5/S5. Installation Instructions. pre-facelift ES best viewed in Acrobat Reader
 Audi A5/S5 pre-facelift RS5mesh style Grille Installation Instructions ES2627648 This tutorial is provided as a courtesy by ECS Tuning. best viewed in Acrobat Reader Proper service and repair procedures
SAFETY THIS PRODUCT IS FOR OFFROAD USE ONLY. ALL LIABILITY FOR INSTALLATION AND USE RESTS WITH THE OWNER.
 SAFETY Your safety and the safety of others is very important. In order to help you make informed decisions about safety, we have provided installation instructions and other information. These instructions
11417 INSTALLATION INSTRUCTIONS
 11417 INSTALLATION INSTRUCTIONS Safety glasses should be worn at all times while installing this product. YEARS: 2015 MAKE: MINI MODEL: COOPER 2 DOOR STYLE: HATCHBACK WARNING: NEVER EXCEED YOUR VEHICLE
INSTALLATION INSTRUCTIONS
 INSTALLATION INSTRUCTIONS Accessory S P/N 08V31-SNA-100D Application 2010 CIVIC 4-DOOR Publications No. AII 42452 Issue Date SEP 2009 PARTS LIST Right fog light 6 Wire ties Left fog light Clip Switch harness
INSTALLATION INSTRUCTIONS
 COLD AIR INTAKE INSTALLATION INSTRUCTIONS PART NUMBER D760-0620 & D760-0621 PARTS LIST APPLICATION: 9/98-2003 E39 540i 4.4L 4" Intake Tube Air Filter w/ clamp Silicone Hose 80-100mm Hose Clamp 90-110mm
SAFETY THIS PRODUCT IS FOR OFFROAD USE ONLY. ALL LIABILITY FOR INSTALLATION AND USE RESTS WITH THE OWNER.
 SAFETY Your safety and the safety of others is very important. In order to help you make informed decisions about safety, we have provided installation instructions and other information. These instructions
A. Preparing the charge harness. Start by removing the plastic covers by the battery terminal.
 twist battery relocate kit and harness. Step 1 A. Remove battery. Start by removing the negative battery cable and then the positive. After removing the battery cables remove the battery hold down bracket.
AmTryke Adult Recumbent Model HP1000 #50-HC-1000
 AmTryke Adult Recumbent Model HP1000 #50-HC-1000 TOOLS Needed for Assembly 5 mm Allen Wrench 8 mm Socket or Wrench 10 mm Socket or Wrench 14 mm Socket or Wrench 15 mm Socket or Wrench 22 mm Socket or Adjustable
PRELIMINARY INSTALLATION INSTRUCTIONS PARTS LIST. Combination light switch Right fog light. 4 Self-tapping washer-screws.
 INSTALLATION INSTRUCTIONS Accessory S P/N 08V31-SCV-100D Application 2009 ELEMENT (SC) Publications No. AII 40515 Issue Date OCT 2008 PARTS LIST Combination light switch Right fog light Left fog light
INSTALLATION INSTRUCTIONS
 INSTALLATION INSTRUCTIONS Accessory Application Publications No. BII 33322-36889 UNDER 2007 TL Issue Date MAY 2007 PARTS LIST Front under spoiler Left bracket (Marked L ) Right bracket (Marked R ) 8 Self-tapping
Reference Guide for DEPO Lexus GS Tail Light Resistor Installation
 Reference Guide for DEPO Lexus GS Tail Light Resistor Installation Disclaimer: Buyer assumes any and all risk and liability from the installation and use of this product. Seller, author, or any of their
SAFETY THIS PRODUCT IS FOR OFFROAD USE ONLY. ALL LIABILITY FOR INSTALLATION AND USE RESTS WITH THE OWNER.
 SAFETY Your safety and the safety of others is very important. In order to help you make informed decisions about safety, we have provided installation instructions and other information. These instructions
LGT-312L E-Z-Go TXT Light Bar Bumper Kit Installation Instructions
 LGT-312L E-Z-Go TXT 2014+ Light Bar Bumper Kit Installation Instructions Caution: Please read through the instructions carefully. Before starting this project, remove the system s positive and negative
White / Amber LED Angel Eye DIY Guide Turn Signal Method
 White / Amber LED Angel Eye DIY Guide Turn Signal Method Remove rubber trim surrounding the headlight. Remove corner light. Usually 2000-2001 e46s will have a slide in style where you press in the tab
SCION tc 2014 FOG LIGHT KIT
 Part #: PT413-21140 Conflicts: P/N PTR11-21100 Lowering Springs (CA only) Kit Contents: Wire Ties Self-Tapping Screws Switch Relay Fog Light Bezel, Left and Right Side Wire Harness Fog Lamp, Left and Right
12114 INSTALLATION INSTRUCTIONS
 12114 INSTALLATION INSTRUCTIONS Safety glasses should be worn at all times while installing this product. YEARS: 2012-PRESENT MAKE: LEXUS MODEL: LS 460 STYLE: SEDAN WARNING: NEVER EXCEED YOUR VEHICLE MANUFACTURER'S
ADDICTIVE DESERT DESIGNS
 Preparation: Disconnect the negative battery terminal. Park the vehicle on level ground and set the emergency brake. We recommend reading through the installation instructions in whole before performing
TDR Cold Air Intake for the NC
 TDR Cold Air Intake for the NC Year: Models: TDR-CAI-NC Thank you for purchasing the Track Dog Racing Cold Air Intake for the NC. The Cold Air Intake is designed with and very efficient K&N Filter and
09-12 Dodge 4WD /4 Body Lift
 92RC80000 09-12 Dodge 4WD 1500 1 1/4 Body Lift Thank you for choosing Rough Country for all your suspension needs. Rough Country recommends a certified technician install this kit. Attempts to install
Fig A ADDICTIVE DESERT DESIGNS. Preparation: Removal:
 Preparation: Disconnect the negative battery terminal. Park the vehicle on level ground and set the emergency brake. We recommend reading through the installation instructions in whole before performing
V6 Mustang BBK Long Tube Headers and Shorty X-Pipe:
 2011-2012 V6 Mustang BBK Long Tube Headers and Shorty X-Pipe: Time Required: Approximately 9 hours w/ 3 installers (highly recommended having help during install); process will be much faster with a lift
ADDICTIVE DESERT DESIGNS
 Preparation: Disconnect the negative battery terminal. Park the vehicle on level ground and set the emergency brake. We recommend reading through the installation instructions in whole before performing
B5 A4 1.8t Front Mount Intercooler Install Instructions
 B5 A4 1.8t Front Mount Intercooler Install Instructions Only work underneath your vehicle after properly supporting it with adequate jack stands on a flat surface. NEVER work under a vehicle only supported
SAFETY THIS PRODUCT IS FOR OFFROAD USE ONLY. ALL LIABILITY FOR INSTALLATION AND USE RESTS WITH THE OWNER.
 SAFETY Your safety and the safety of others is very important. In order to help you make informed decisions about safety, we have provided installation instructions and other information. These instructions
Part# JL AIR IT UP 4 Tire On Board Air Delivery System. (Requires External Air Source)
") Part# 18-1819 JL AIR IT UP 4 Tire On Board Air Delivery System (Requires External Air Source) The most up-to-date instructions always visit www.updownair.com www.updownair.com 833-226-4863 I M P O R T
Part# 18-1819 JL AIR IT UP 4 Tire On Board Air Delivery System (Requires External Air Source) The most up-to-date instructions always visit www.updownair.com www.updownair.com 833-226-4863 I M P O R T
PARTS LIST INSTALLATION INSTRUCTIONS PARTS LIST AND INSTALLATION GUIDE INSTALL TIME: 2 HOURS INSTALL DIFFICULTY: 3/5
 PARTS LIST AND PARTS LIST 1PC MISHIMOTO INTERCOOLER 1PC M6 X 1.0 X 20MM FLANGE BOLT 1PC M4 X 0.7 X 12MM BUTTON-HEAD BOLT 1PC M4 LOCK WASHER 1PC MAP SENSOR O-RING 2. Remove the eight pop clips that hold
Installation instruction do88 Intercooler for SAAB 9-3SS/SC 2,8 V6 Turbo
 Installation instruction do88 Intercooler for SAAB 9-3SS/SC 2,8 V6 Turbo This instruction shows how to replace the OEM intercooler with this performance intercooler. At this type of installation we always
Installation of Barricade Flat Style Fender Flare Kit (97-06 Wrangler TJ)
") Installation of Barricade Flat Style Fender Flare Kit (97-06 Wrangler TJ) Installation Time: 3-4 Hours Tools Required: 8mm wrench 8mm socket drive #1 Phillips screw driver Pliers Pry bar Electric drill
Installation of Barricade Flat Style Fender Flare Kit (97-06 Wrangler TJ) Installation Time: 3-4 Hours Tools Required: 8mm wrench 8mm socket drive #1 Phillips screw driver Pliers Pry bar Electric drill
Ford 7.3L SuperDuty Cold Air Intake
 999.5-2003 Ford 7.3L SuperDuty Cold Air Intake ! DISCLAIMER ) By installing this product onto your vehicle, you assume all risk and liability associated with its use. 2) It is your responsibility to make
LOW, MID, HIGH RISE PRO-TAPER HANDLEBAR WITH HEATED GRIPS KIT
 LOW, MID, HIGH RISE PRO-TAPER HANDLEBAR WITH HEATED GRIPS KIT P/N 2881235; 2881236; 2881237 APPLICATION All AXYS and PRO RIDE chassis with stock Pro-Taper Bar BEFORE YOU BEGIN Read these instructions and
Seibon Carbon Fenders Installation Guide
 Seibon Carbon Fenders Installation Guide Important: professional installation by an experienced carbon fiber/fiberglass expert is STRONGLY recommended. Installation may require specialty tools and equipment.
MKVI Jetta Fog Light Kit
 MKVI Jetta Fog Light Kit Part Number VW Jetta Fog Light Installation This tutorial is provided as a courtesy by ECS Tuning. Proper service and repair procedures are vital to the safe, reliable operation
Depress each tab as you pull the bezel off. The bezels are tight. L.H. shown.
 2013-2014 Ford Mustang V6 & Boss 302 Lower Valance Fog Light Kit Parts List: Quantity: Tool List: Fog light & bulb with bracket 2 Flat head & Phillips screwdriver Black bezels 2 Ratchet & Socket set OR
Fig A. Addictive Desert Designs. Preparation: Removal:
 Preparation: Disconnect the negative battery terminal. Park the vehicle on level ground and set the emergency brake. We recommend reading through the installation instructions in whole before performing
INSTALLATION INSTRUCTIONS
 INSTALLATION INSTRUCTIONS Accessory S P/N 08V31-SZT-100 Application 2012 CR-Z Publications No. AII 46896 Issue Date OCT 2011 PARTS LIST Left fog light Relay Right fog light 20A Fuse Fuse label Left fog
APIKOL Ur-S4/S6 Gen. II Front Mount Intercooler INSTALLATION INSTRUCTIONS
 APIKOL Ur-S4/S6 Gen. II Front Mount Intercooler INSTALLATION INSTRUCTIONS Only work underneath your vehicle after properly supporting it with adequate jack stands on a flat surface. NEVER work under a
SAFETY THIS PRODUCT IS FOR OFFROAD USE ONLY. ALL LIABILITY FOR INSTALLATION AND USE RESTS WITH THE OWNER.
 SAFETY Your safety and the safety of others is very important. In order to help you make informed decisions about safety, we have provided installation instructions and other information. These instructions
INSTALLATION INSTRUCTIONS
 INSTALLATION INSTRUCTIONS Accessory Application Publications No. AII 26014 ODYSSEY Issue Date AUG 2003 PARTS LIST Hood Switch (sold separately) P/N 08E49-S0X-100G Illustration of the Hood Switch Installed
Please read BOTH these Installation Instructions and the General Towing Instructions before attempting to install or operate this equipment.
 Serial Number Please read BOTH these and the General Towing Instructions before attempting to install or operate this equipment. 1. Blue Ox towing products and accessories are intended to be installed
Installation Instructions MX-5 Dual Air Horns
 440 Rutherford St. P.O. Box 847 Goleta, CA 93117 1-800-667-7872 FAX 805-692-2525 www.mossmotors.com Tools required: Phillips screwdriver, 8mm, 10mm and 21mm sockets, 8mm and 10mm combination wrenches,
INSTALLATION INSTRUCTIONS
 INSTALLATION INSTRUCTIONS Accessory Application Publications No. SECURITY SYSTEM P/N 08E49-SDA-100 ACCORD 2- AND 4-DOOR AII 30666 Issue Date AUG 2005 PARTS LIST Hood switch harness Illustration of the
Part Number: S-H-BAG-8 & S-H-8-RFEN Description: Saddlebags & Rear Fender / Undertail Fitment: Suzuki GSX 1300-R Hayabusa Revision: 1
 Part Number: S-H-BAG-8 & S-H-8-RFEN Description: Saddlebags & Rear Fender / Undertail Fitment: 2008-2009 Suzuki GSX 1300-R Hayabusa Revision: 1 Tools Required Phillips head screwdriver Small screwdriver
SAFETY THIS PRODUCT IS FOR OFFROAD USE ONLY. ALL LIABILITY FOR INSTALLATION AND USE RESTS WITH THE OWNER.
 SAFETY Your safety and the safety of others is very important. In order to help you make informed decisions about safety, we have provided installation instructions and other information. These instructions
Adjustable Light Kits E-Z-Go TXT All Models Installation Instructions
 Adjustable Light Kits E-Z-Go TXT All Models 1996-2013 Installation Instructions Caution: Please read through the instructions carefully. Before starting this project, remove the system s positive and negative
Fig A ADDICTIVE DESERT DESIGNS. Preparation: Removal:
 Preparation: Disconnect the negative battery terminal. Park the vehicle on level ground and set the emergency brake. We recommend reading through the installation instructions in whole before performing
Installation Instructions
 2014-2015 C7 Corvette Blackheart 3 304SS Exhaust System w/ AFM Valves 70501345-RHKR w/ Mufflers, w/ Cats Race Only 70501346-RHKR w/o Mufflers, w/ Cats Race Only Installation Instructions Thank you for
INSTALLATION INSTRUCTIONS
 INSTALLATION INSTRUCTIONS Accessory Application Publications No. AII 24075 2003 ACCORD P/N 08V31-SDN-100 2-DOOR Issue Date AUG 2002 NOTE: The outside temperature gauge can not be installed in a vehicle
INSTALLATION & OWNER S MANUAL
 INSTALLATION & OWNER S MANUAL CAB INSTALLATION INSTRUCTIONS JOHN DEERE 3000 SERIES (4200/4300/4400) (4210/4310/4410) & (3120/3320/3520/3720) HARD SIDED CAB ENCLOSURE (p/n 1JD3520AS) SOFT SIDED CAB ENCLOSURE
Universal Tall HoneyBadger Chase Rack Installation Instructions
 PREPARATION Universal Tall HoneyBadger Chase Rack Installation Instructions 1. Disconnect the negative terminal on the battery. Park the vehicle on level ground and set the emergency brake. 2. We recommend
AWE/McNeil Competition Air/Air Intercooler Kit for Audi 2.7T
 AWE/McNeil Competition Air/Air Intercooler Kit for 2000-04 Audi 2.7T Congratulations on your purchase of the AWE/McNeil Competition Intercoolers for your 2.7T Audi. Hundreds of hours of design and operational
Audi A3 8P RS4-Style Grille
 Audi A3 8P RS4-Style Grille Installation Tutorial ES2717887 ES2717886 1 However you choose to lift the car into the air, always ensure the car is secured properly and that the parking brake is engaged.
INSTALLATION INSTRUCTIONS
 INSTALLATION INSTRUCTIONS Accessory S Application 2010 CR-V Publications No. AII 42602-42850 Issue Date OCT 2009 PARTS LIST Fog Light Kit (With Auto Lights) P/N 08V31-SWA-100A Fog Light Kit (Without Auto
INSTALLATION INSTRUCTIONS ELEVATION FRONT BUMPER DODGE RAM
 INSTALLATION INSTRUCTIONS PARTS LIST: 1 Elevation Bumper Assembly 24 12mm x 37mm OD x 3mm Flat Washers 2 Frame Mounting Brackets 12 12mm Nylon Lock Nuts 8 12-1.75mm x 50mm Hex Bolts 2 License Plate Mounting
TACTIK Factory Headlight Euro-Guards
 TACTIK Factory Headlight Euro-Guards Installation Manual: for 07- Current Jeep Wrangler JK # 1117.0110 and # 1117.000 PARTS LIST: Headlight Euro Guards - QTY REQUIRED TOOLS: Safety Glasses Phillips Head
LANCER FOG LAMP KIT MZ380479EX (for RHD) INSTALLATION AND HANDLING INSTRUCTIONS
 INSTALLATION AND HANDLING INSTRUCTIONS") LANCER FOG LAMP KIT MZ380479EX (for RHD) INSTALLATION AND HANDLING INSTRUCTIONS Fog lamp Thank you for purchasing the Mitsubishi Genuine Accessory. To install and use the product correctly with proper
LANCER FOG LAMP KIT MZ380479EX (for RHD) INSTALLATION AND HANDLING INSTRUCTIONS Fog lamp Thank you for purchasing the Mitsubishi Genuine Accessory. To install and use the product correctly with proper
IE Audi 3.0T Crank Pulley Upgrade Install Guide IEBAVJ3
 IE Audi 3.0T Crank Pulley Upgrade Install Guide IEBAVJ3 Thank you for purchasing your IE 3.0T crankshaft pulley upgrade! This instruction guide is used for installation of IE s lower overdrive pulley for
ADDICTIVE DESERT DESIGNS
 ADDICTIVE DESERT DESIGNS Preparation: Disconnect the negative battery terminal. Park the vehicle on level ground and set the emergency brake. We recommend reading through the installation instructions
54531/ FORD FUSION
 54531/51531 54531/51531 13-15 FORD FUSION 13-15 FORD FUSION FORD FUSION Upper Class Grille w/ Bars TOOLS REQUIRED: Socket Set Flat/Phillips Screw Drivers Torx Bits Plastic Pry Bar 3/16 Drill Bit and Drill
INSTALLATION INSTRUCTIONS
 Accessory Application Publications No. INSTALLATION INSTRUCTIONS ENGINE BLOCK (L4) P/N 08T44-TA0-100 2009 TSX BII 39057-39656 Issue Date MAY 2008 PARTS LIST Engine block heater Aluminum washer Heater harness
INSTALLATION INSTRUCTIONS: TOYOTA TACOMA APEX FRONT BUMPER FOR TRUCKS
 INSTALLATION INSTRUCTIONS: TOYOTA TACOMA APEX FRONT BUMPER FOR 00-04 TRUCKS INSTALLATION DIFFICULTY: MEDIUM (FRIEND IS RECOMMENDED) APPROX. TIME: 2-3 HOURS REQUIRED TOOLS: 10mm 17mm Sockets and Wrench,
INSTALLATION INSTRUCTIONS
 INSTALLATION INSTRUCTIONS Accessory S Application 2010 PILOT (LX ONLY) Publications No. AII 41642 Issue Date MAY 2009 PARTS LIST TOOLS AND SUPPLIES REQUIRED Fog Lights Kit P/N 08V31-SZA-100B Flat-tip screwdriver
20964/B 20964/B 2014 TOYOTA TUNDRA TUNDRA. Billet Grille. Fig 1. Fig 2
 Billet Grille TOOLS REQUIRED: PARTS LIST: Socket Set (6) U-Nuts Flat/Phillips Screw Drivers (8) #10 Screws Pliers (2) #8 Screws ¾ (2) 2 Flange Bracket (1) Top Plate Overlay Bracket - driver (1) Top Plate
Installation instruction do88 Intercooler for SAAB 9-3SS/SC 4-cyl Turbo
 Installation instruction do88 Intercooler for SAAB 9-3SS/SC 4-cyl Turbo This instruction shows how to replace the OEM intercooler with this performance intercooler. 1. 4. 5. At this type of installation
09-12 Dodge 4WD Leveling Kit
 9235900 09-12 Dodge 4WD 1500 2.5 Leveling Kit Thank you for choosing Rough Country for all your suspension needs. DOES NOT FIT TRX PACKAGE VEHICLES!! Rough Country recommends a certified technician install
TOYOTA PRIUS C FOG LIGHT
 TOYOTA PRIUS C 2012 - FOG LIGHT Part Number: 00016-47160 Accessory Code: LF10 Conflicts NONE Kit Contents Item # Quantity Reqd. Description 1 2 Fog Lamps 2 2 Fog Lamp s bezels 3 1 Switch Assembly 4 1 Fog
INSTALLATION INSTRUCTIONS
 INSTALLATION INSTRUCTIONS Accessory Application Publications No. S P/N 08V31-S0X-100 1999-2001 ODYSSEY AII 20677 Issue Date AUG 1999 PARTS LIST 2 Fog lights Switch Fuse label Right bracket Relay B, 4-pin
Mazdaspeed 3 Power Steering Cooler Kit Install Guide
 Mazdaspeed 3 Power Steering Cooler Kit Install Guide Copyright DD2, Inc. 1 WARNING: By installing this Product, you understand that: The buyer/user assumes all risk as to quality, performance and use of
PRESENT, FORD TRANSIT, FRONT TOW POINT Version 1.0
 4039 2013-PRESENT, FORD TRANSIT, FRONT TOW POINT Version 1.0 General Notes For the most up to date and current instructions, please visit our website at www.vancompass.com Please read all instructions
HID INSTALLATION ON RST1000 Futura
 HID INSTALLATION ON RST1000 Futura Disclaimer: This is a full description of what I have done to my motorcycle. I am in no way suggesting you do as I have done by following these instructions. I have not
INSTALLATION INSTRUCTIONS
 INSTALLATION INSTRUCTIONS Accessory S Application 2013 CIVIC 2-DOOR Publications No. AII 13060 Issue Date NOV 2012 PARTS LIST Fog Light Kit P/N 08V31-TS8-100C (with auto light) P/N 08V31-TS8-100D (without
M-9603-FST FOCUS ST COLD AIR INTAKE KIT INSTALLATION INSTRUCTIONS
 M-9603-FST Please visit www.fordracingparts.com for the most current instruction information.!!! PLEASE READ ALL OF THE FOLLOWING INSTRUCTIONS CAREFULLY PRIOR TO INSTALLATION. AT ANY TIME YOU DO NOT UNDERSTAND
INSTALLATION INSTRUCTIONS
 INSTALLATION INSTRUCTIONS Accessory Application Publications No. KIT 08V31-SEC-201 2004 TSX BII 24805 Issue Date APRIL 2003 PARTS LIST 16 Wire ties Left fog light Right fog light Relay Right fog light
 INSTALLATION INSTRUCTIONS Accessory S Application 2009 PILOT (LX ONLY) Publications No. AII 39396 Issue Date MAY 2008 PARTS LIST Fog Lights Kit P/N 08V31-SZA-100B Left fog light Ground bolt Relay Right