Automotive Air Conditioning Manifold Gauge Sets
|
|
|
- Ethan Cain
- 5 years ago
- Views:
Transcription


1 Automotive Air Conditioning Manifold Gauge Sets 1
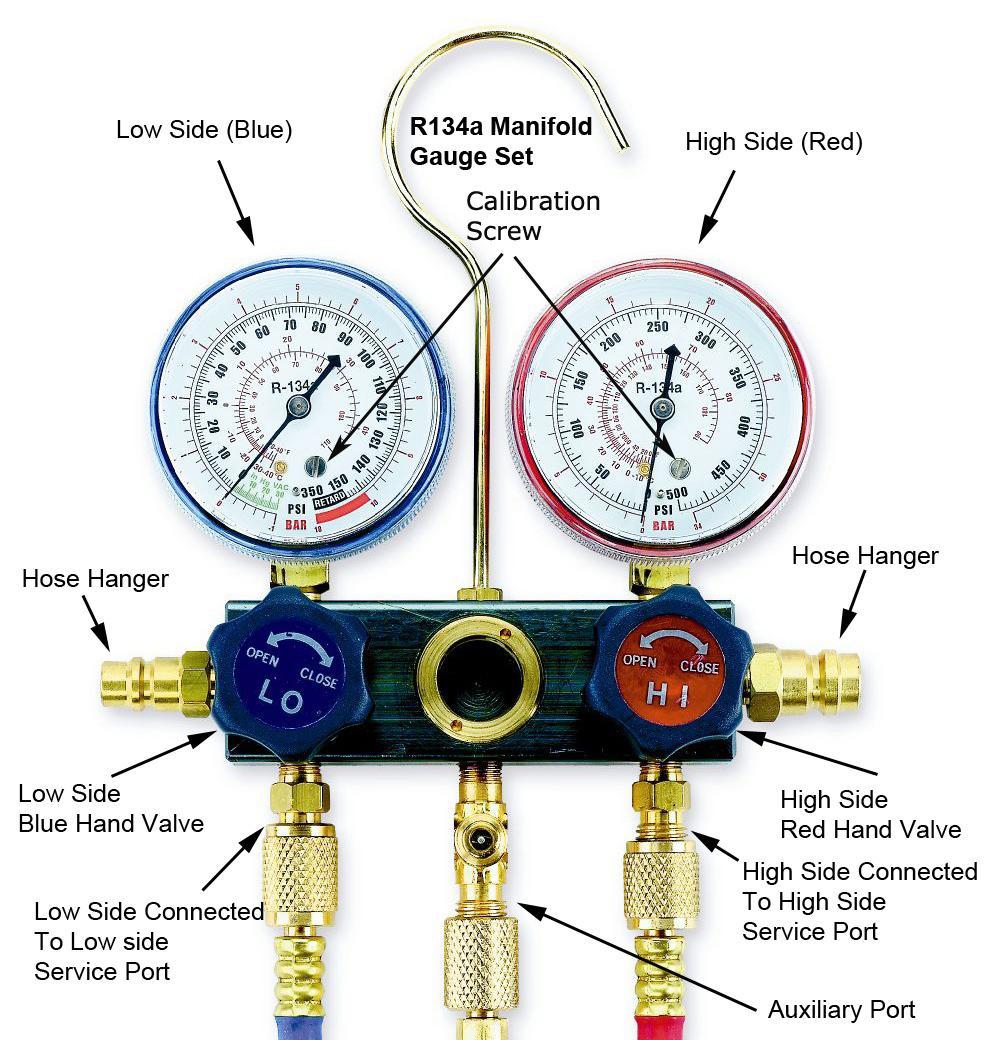
2 Caution: These instructions are not for use with Hybrid Vehicles. For instructions for servicing Hybrid Vehicles use Hybrid Vehicle manufacturer s service manual only. REREREA Confirm system refrigerant type before servicing vehicle. Cross contamination of refrigerants can cause damage to A/C system, service tools and equipment. Do not blend refrigerants in a system or in the same container. Do not breathe in A/C refrigerants, lubricant vapor or mist. Exposure may irritate eyes, nose, and throat. If accidental system discharge occurs, ventilate area before continuing service. Obtain health and safety information from refrigerant and lubricant manufacturers if required. GENERAL MANIFOLD INFORMATION: The right side of the manifold with the red hand valve is the high side; the red gauge is the high pressure gauge. The left side of the manifold with the blue hand valve is the low side; the blue gauge is the vacuum/pressure gauge. Separate passages from the low and high side fittings to their respective gauges allow the technician to check pressure and vacuum reading whether the hand wheels are in the closed or open position. The manifold body connects all three lower ½ ACME (R134a) or ¼ SAE (R12/22) fittings to each other by internal passages. The red (HIGH SIDE) opens or closes the flow through the 1/2 Acme (R134a) or 1/4 SAE (R12/22) fitting on the right side to the other two fittings, provided the blue (LOW SIDE) is in the open position. Note: If gauges do not read 0 psi, remove gauge face and adjust calibration screw to 0 psi. Note: Do not over tighten hoses on to manifold gauge set. Caution: Never open the high side valve on manifold gauge set when the A/C System is operating. ***R12 A/C Systems do not use R134a couplers to connect to the A/C system. On R12 systems disregard the references to R134a couplers below. R134A SYSTEM OPERATION: Connect the R134a service couplers to the proper color charging hoses. Note: You must use R134a quick couplers to connect to the manifold gauge set to the vehicle s R134a A/C service ports. For manual service couplers, the coupler must be in the closed position before connecting to the appropriate vehicle s service port. To close, turn the knob on the top of the coupler counterclockwise, until it stops, retract the coupler sleeve, then push it on the appropriate service fitting, then release the sleeve. If gauge set is supplied with automatic quick couplers, there is no knob present, just retract the coupler sleeve and push on the appropriate service fitting. Caution: All R134a service couplers must be connected to a refrigerant hose and the refrigerant hose must be connected to a manifold gauge set with both low and high side valves in the closed position before connecting the R134a service couplers to an A/C System. Connect to A/C System to Diagnose the A/C System: 1. Close all valves on the manual service couplers and manifold gauge set. Connect the high side coupler which is connected to the red hose to the vehicle s high side service port and connect the low side coupler which is connected to the blue hose to the vehicle s low side service port. 2. Start the vehicle, then turn on the A/C system, and let it run until the gauge readings stabilize. 3. If the gauge readings are within the manufacturer s specification, and the A/C system appears to be operating properly, stop the A/C system, turn off the vehicle, and disconnect the hoses from the system. 2
3 4. If the pressure shown on the gauges differ from the manufacturer s specifications, determine the problem and make the necessary repairs. EVACUATING AND CHARGING AN A/C SYSTEM Recover all refrigerant from the system using A/C recovery service equipment. DO NOT VENT REFRIGERANT TO THE ATMOSPHERE. USE APPROPRIATE RECOVERY EQUIPMENT. SYSTEM EVACUATION: Connect the BLUE LOW side service hose to the A/C system s LOW side service port. Connect the RED HIGH side service hose to the A/C system s HIGH side service port. Connect the CENTER YELLOW charging hose to a vacuum pump. If using manual R134a couplers, after connecting the couplers to the A/C system, open the manual couplers by turning the knob on the top of the coupler clockwise until it stops. 1. Open the HIGH and LOW manifold valves using the Red and Blue hand valves and start the vacuum pump. 2. After evacuating the system according to the manufacturer s specifications, close both the HIGH and LOW side hand valves and turn off the vacuum pump. 3. Disconnect the YELLOW charging hose from the vacuum pump and connect it to the appropriate refrigerant container. 4. You can now charge the A/C system according to the manufacturer s specifications. CAUTION: Always connect hoses to the manifold gauge set and R134a couplers before connecting R134a couplers to the R134a service ports on the A/C system to prevent refrigerant from escaping from open fittings and to prevent any from entering an evacuated system. Never open the RED high pressure hand valve when the A/C System is operating. Charge with gas only, never with liquid refrigerant. After all connections have been made, the refrigerant can be added through the low side on most systems. (Consult OEM capacity specifications) Charging an Empty System: 1. Vehicle engine must be not running and the A/C system must be turned off. 2. Make certain that the dispensing valve on the refrigerant source is in the closed position. 3. Make certain that both the high pressure and the low pressure valves are in their closed position. 4. Connect both high and low R134a couplers to the A/C system s service ports. If using manual R134a couplers, open the couplers by turning the knob on the top of the coupler clockwise until it stops. 5 Open valve on the refrigerant source. 6. Open the low side valve on the manifold gauge set. 7. Charge system until gauges read over 50 pounds of pressure. 8. Close low side valve on the manifold gauge set. 9. Both High Side and Low Side valves on the manifold gauge set must be turned off. 10. Go to step # 4 in Charging an A/C System that is low on Refrigerant below: 3
4 Charging an A/C System that is low on Refrigerant: 1. Make certain that the dispensing valve on the refrigerant source is in the closed position. 2. Make certain that both the high pressure and the low pressure valves are in their closed position. 3. Connect both high and low R134a couplers to the A/C system s service ports. If using manual R134a couplers, open the couplers by turning the knob on the top of the coupler clockwise until it stops. 4, Start the vehicle. Insure adequate air flow enters through the front of the vehicle to avoid overheating. 5. Turn on the air conditioner. Set controls for maximum cooling and high fan speed. 6. Open the dispensing valve on the refrigerant source. Keep the refrigerant source upright at all times so that refrigerant can only enter the hoses as a gas. Allow the gas to flow into the system until the desired amount has been added or until the source container is empty. USE OF AN ELECTRONIC SCALE (FJC part # 2845 and 2850) IS RECCOMMENDED FOR THIS OPERATION IF CHARGING WITH A 30 POUND CYLINDER. Refrigerant will continue to flow as a gas as long as the pressure in the can is greater than the pressure in the system. Getting the required refrigerant amount into the system may take several minutes. Note: If 12 ounce refrigerant cans are being used. When changing refrigerant cans, the BLUE SIDE, low pressure valve on the manifold gauge must be tightened to its closed position before changing cans. 7. To begin adding refrigerant (with system running) open the BLUE LOW side hand valve on the low pressure side of the manifold gauge set. 8. When you have charged the system to manufacturer s specifications, close the manifold s BLUE LOW side hand valve. Let the compressor run and check the gauge readings to be sure the system is operating properly. If not, repair the system as required by vehicle manufacturer service manual. 9. To disconnect the manifold when the system filled and operating properly, close the BLUE LOW side hand valve and close the RED HIGH side hand valve on the manifold. 10 To disconnect the manual R134a coupler, turn the knob on the R134a coupler counterclockwise until finger tight. Slide the coupler sleeve up, releasing the coupler from the vehicle s service port. Remove the R134a couplers carefully from the system. CAUTION: HIGH SIDE QUICK COUPLER MAY BE EXTREMELY HOT 11. Replace protective caps on vehicle s service fittings. Caution: FJC manifold gauge sets should only be used by technicians trained or experienced in servicing A/C systems. FJC offers an Automotive Heating and Air Conditioning Manual part # 2819 for information about servicing an Air Conditioning System. 4


5 Part # 6002 Part # 6001 Low Side Manual R134a Coupler High Side Manual R134a Coupler 5
 4.")
6 Instruction for changing Vacuum Pump Oil: 1. Operate vacuum pump until vacuum pump oil becomes warm. 2. Turn vacuum pump switch off and disconnect electrical cord plug from electrical outlet. 3. Place vacuum pump on a level surface. Unscrew and remove oil plug from bottom of pump housing and let oil drain from pump until all oil has drained. (see photo) 4. Reinstall drain plug back into pump housing. (see photo) 5. Remove oil fill plug in top of pump housing. (see photo) 6. Add oil as noted on specification chart or an amount of FJC vacuum pump oil, part # 2200, to raise the oil level to the full oil level marks on the front of the vacuum pump housing on each side of the oil sight glass. 7. Reinstall oil fill plug. (see photo) 8. Operate vacuum pump for a short period of time. 9. Check oil level through oil sight glass. (see photo) Troubleshooting: Pump will not run. 1. Check electrical outlet for low voltage or no voltage. 2. Check to ensure switch is turned on. Pump does not pull low vacuum. 1. Check oil level. 2. Check for contaminated oil. 3. Check manifold and system servicing for leaks. 4. Check for low voltage at electrical outlet. 5. Check type of oil. If incorrect type of oil is used vacuum pump will not operate properly. Warranty: This vacuum pump is warranted to perform as stated in FJC literature for a period of 1 year from date of purchase. As we cannot control the use of this vacuum pump, the warranty shall not exceed the purchase price. We make no other warranty of any kind expressed or implied. This vacuum pump is warranted to be free from defects in material and workmanship for a period of one year from date of purchase. A copy of the original invoice must be returned with the pump or warranty is void. FJC s sole obligation under this warranty shall be to repair or replace any defective part or parts thereof, which are returned to our factory. The warranty shall not apply to any vacuum pump, which has been subject to misuse, negligence or accident. This includes the failure to provide the proper maintenance. FJC, Inc shall not be responsible for any special or consequential damages and the warranty as set forth is in lieu of all other warranties either expressed or implied. Vacuum Pump Operating Instructions & Specification Manual FJC, Inc. Mail to: Ship to: P O Box Commercial Dr. Mt. Mourne, NC Mooresville, NC
 13. The vacuum pump will become hot during operation. 14. Remove electrical plug from outlet. Grasp plug and pull from outlet.")
7 Setup Instructions Cont Operate vacuum pump for a short period of time. 11. Vapor from exhaust port is normal during operation. This is the result of moisture in A/C system and humidity in shop. 12. Check oil level through oil sight glass. (see photo) 13. The vacuum pump will become hot during operation. 14. Remove electrical plug from outlet. Grasp plug and pull from outlet. Pulling wire to disconnect plug from outlet will damage electrical plug. Part # CFM Micron Rating /4" M.F. x /4" M.F. x /4" M.F. x /4" M.F. x stage stage 5 Fitting Size Voltage Motor Motor RPM 50 1/4" M.F. x 50 1/4" M.F. x Oil Cap. Oz Weight lbs. 1/6 HP /3 HP /3 HP /4 HP /3 HP /2 HP Set Up Instructions: 1. Read vacuum pump instructions. 2. Remove vacuum pump and vacuum pump oil from box. 3. Inspect vacuum pump and electrical cord for damage. 4. If damage is found, it should be immediately reported to the freight carrier. 5. VACUUM PUMP IS SHIPPED WITHOUT OIL DO NOT OPERATE UNTIL OIL IS ADDED. 6. WARRANTY IS VOID IF VACUUM PUMP IS OPERATED WITHOUT OIL. 7. Place vacuum pump on a level surface. Remove oil fill plug from top of pump housing and add vacuum pump oil until oil level is even with oil level full marks on front of vacuum pump housing on each side of the oil sight glass. 8. Use only FJC vacuum pump oil or equivalent. If the wrong type of oil is used, the vacuum pump will not operate properly. (see photo) 9. Reinstall oil fill plug. (see photo) Operating Instructions 1. Check oil level. Oil level in sight glass should be even with oil level full marks on each side of sight glass on front of vacuum pump. If oil level is low, add oil until oil level reaches full oil level marks. (see photo) 2. Make sure vacuum pump electrical switch is turned off. (see photo) 3. Plug electrical plug into a grounded 115 volt electrical outlet. 4. Connect yellow hose from manifold gauge set to inlet of vacuum pump. Make sure pressure in system is less than 5 psi. If pressure is over 5 psi vacuum pump may be damaged. 5. Turn switch to on. (see photo) 6. Vapor from exhaust port is normal during operation. This is the result of moisture in A/C system and humidity in shop. 7. Allow pump to operate until desired vacuum is reached. 8. Close manifold gauge set valves. 9. Turn switch to off position. (see photo) 10. Disconnect yellow hose from vacuum pump. 11. Remove electrical plug from outlet. Grasp plug and pull from outlet. Pulling wire to disconnect plug from outlet will damage electrical plug. Maintenance Check oil level through oil sight glass before each use. The main cause of vacuum pump failure is low oil levels and contaminated oil. (see photo) Always disconnect vacuum pump from electrical source before performing any maintenance. Replace vacuum pump oil every week during heavy usage periods or after every service of a system with excess moisture. Keep vacuum pump in a clean dry place. Use FJC vacuum pump oil Part # 2200 or equivalent. Check electrical cord and plug for wear or damage each week. If damage or excessive wear is found, have cord replaced by a licensed electrical technician.
VACUUM PUMP SERIES VP & VPC SINGLE - DUAL STAGE VACUUM PUMPS OPERATION MANUAL
 VACUUM PUMP SERIES VP & VPC SINGLE - DUAL STAGE VACUUM PUMPS OPERATION MANUAL GENERAL INFORMATION Table of Contents General Information 2-5 Introduction 2 General Safety Instructions 3 Specifications 4-5
VPC Series 18VDC CORDLESS VACUUM PUMP OPERATION MANUAL
 VPC Series 18VDC CORDLESS VACUUM PUMP OPERATION MANUAL GENERAL INFORMATION Table of Contents General Information 2-4 Introduction 2 General Safety Instructions 3 Specifications 4 Operation 5-8 VPC Single
High Performance Vacuum Pump Model 15120A/15121A Operating Manual...
 High Performance Vacuum Pump Model 15120A/15121A Operating Manual... Operating Manual Table of Contents Warnings...1 CoolTech high performance vacuum pumps...1 Pump components...2 Before using your vacuum
2 Speed Hydraulic Hand Pump
 Porto-Power Blackhawk Automotive is a licensed trademark 2 Speed Hydraulic Hand Pump Operating Instructions & Parts Manual B65122 B65421 SFA Companies 10939 N. Pomona Ave. Kansas City, MO 64153 816-891-6390
Operating Manual. High Performance Vacuum Pump Models and 15600
 Operating Manual High Performance Vacuum Pump Models 15400 and 15600 CoolTech High Performance Vacuum Pumps Congratulations on purchasing one of Robinair s top quality CoolTech vacuum pumps. Your pump
A/C Manifold Gauge Set
 A/C Manifold Gauge Set Stock Number W89730 OWNER'S MANUAL : USE ONLY R-134A REFRIGERANT WITH THE A/C MANIFOLD GAUGE SET TO PREVENT EXPLOSION, SERIOUS IN- JURY, AND DEATH: Service of air conditioning systems
Operators Manual. Recirculating Chiller /06/08
 Operators Manual Recirculating Chiller 110-197 11/06/08 Table of Contents Section 1. General Information 1.1 Warranty 1.2 Unpacking 1.3 Package Contents 1.4 Description of the Recirculating Chiller 1.5
T1-Titanium Non-HVLP Spray Gun
 T1-Titanium Non-HVLP Spray Gun THE SPRAY GUN PEOPLE FOR PRODUCT INFORMATION CALL: 1-800-742-7731 Important Safety Instructions Read all warnings and instructions in this manual. Save these instructions.
Getz Equipment Innovators 450 lb Portable / Wheeled Unit Dry Chemical Fill System Part No: 3G0061/3G0063
 Getz Equipment Innovators 450 lb Portable / Wheeled Unit Dry Chemical Fill System Part No: 3G0061/3G0063 1 Revised 4/12/17 2320 Lakecrest Drive, Pekin IL 61554 PH. (888) 747-4389 Fax (309) 495-0625 Website:
FJC, Inc. Part # V BATTERY Charger/Maintainer INSTRUCTION MANUAL SAFETY WARNINGS AND PRECAUTION
 FJC, Inc. Part # 52020 12V BATTERY Charger/Maintainer INPUT: 110V AC 60Hz OUTPUT: 6/12V DC 2A INSTRUCTION MANUAL SAFETY WARNINGS AND PRECAUTION CAUTION: TO PREVENT BATTERY DAMAGE: DO NOT USE on gel batteries
348002K/348012K Manifold Block Style Service Manual 12/2000
 348002K/348012K Manifold Block Style Service Manual 12/2000 Service Manual 348002K/348012K Manifold Block Style Recovery/Recycling/Recharging Unit For R-12 or R-134a Only TABLE OF CONTENTS: Theory of Operation
MGFHVLP. Instructions/Parts. Mini Gravity Feed System E. Part No Includes MGFHVLP Mini Gravity Feed Spray Gun and MGC 125 Gravity Cup.
 Instructions/Parts MGFHVLP Mini Gravity Feed System FOR PRODUCT INFORMATION CALL: 1-800-742-7731 309989E For gravity feed spraying of automotive colors and clears. Ideal for touch-up and detail work. Important
GBP784B INSTALLATION TOOL
 GBP784B INSTALLATION TOOL GAGE BILT MADE IN U.S.A. GAGE BILT PRODUCTS CORP. 14500 Barber Drive (586) 771-7664 Warren, Mi 48088 (586) 771-2665 Fax e-mail:solutions@gagebilt.com / www.gagebilt.com TABLE
Operators Manual. Model 3370 Air Cooled Recirculator rev.8/98
 Operators Manual Model 3370 Air Cooled Recirculator 110-080 rev.8/98 Table of contents Section 1. General Information 1.1 Warranty 1.2 Unpacking Section 2. Product Information 2.1 Description 2.2 Specification
D Instructions/Parts. Siphon Feed Detail Spray Gun D
 Instructions/Parts D-5-55 Siphon Feed Detail Spray Gun FOR PRODUCT INFORMATION CALL: 1-800-742-7731 309991D Important Safety Instructions Read all warnings and instructions in this manual. Save these instructions.
EBS PRODUCTS
 ! EBS PRODUCTS WWW.ebsproducts.com OPERATIONS MANUAL EDS-1 Dip Stick Fluid Exchange Equipment #1000-0075 1-1-16 TABLE OF CONTENTS I. SAFETY INFORMATION... 2 1.01 IMPORTANT SAFETY NOTICE... 2 1.02 IMPORTANT
EBS PRODUCTS
 EBS PRODUCTS WWW.ebsproducts.com OPERATIONS MANUAL EPG-1 Power Steering - Gear Oil Fluid Service Equipment #1000-0060 1-1-16 TABLE OF CONTENTS I. SAFETY INFORMATION... 2 1.01 IMPORTANT SAFETY NOTICE...
SERVICE & OWNER S MANUAL
 1 of 10 SERVICE & OWNER S MANUAL Product Specifications 25 x 36 x 7 Weight: 47 lbs. Air Flow: 260 CFM Air Conditioner p/n: 1ACUNIT-G1 Fits with Curtis Roof Kit: Contact Curtis for Details. Fits with Curtis
Models
 Models 15300 15301 15500 15501 SAFETY PRECAUTIONS WARNING! To prevent personal injury, Wear goggles when working with refrigerants. Contact with refrigerants may cause injury. Incorrect use or connections
M39075 ( IF- 1) Integra- Fuse Rivet Tool
 Integra- Fuse Rivet Tool") M39075 ( IF- 1) Integra- Fuse Rivet Tool Marson is making installation easier than ever with the new Marson Integra-Fuse (IF-1) It s the one-and-only tool needed for single-pull installations of open-end
M39075 ( IF- 1) Integra- Fuse Rivet Tool Marson is making installation easier than ever with the new Marson Integra-Fuse (IF-1) It s the one-and-only tool needed for single-pull installations of open-end
AUTO-PUMP 120 VAC AIR COMPRESSOR SYSTEM INSTRUCTION MANUAL. 170 Cherry Avenue West Sayville, NY
 INSTRUCTION MANUAL AUTO-PUMP 120 VAC AIR COMPRESSOR SYSTEM MODEL #: #:091-9B-1 091-9B-1 INPUT :120 volt, 50/60 Hz, 1.8 AMPS OUTPUT: 100 PSI MAXIMUM File: 091-9B-1_revA1_GEN3 Rev: A1 Revised By:PSS/JRN
Users Manual Certified Series Direct Drive Pump 1-7 LPM
 Users Manual Certified Series Direct Drive Pump 1-7 LPM Safety, Operating, Installation, and Maintenance Instructions 600 S 56 th Street #9 Chandler, AZ 85226 Phone: 480-507-6478 Fax: 480-838-2232 www.fogco.com
Hydraulic Transmission Jacks
 Hydraulic Transmission Jacks Operating Instructions & Parts Manual Model Number Atd-7435 Atd-7436 Atd-7437 Capacity 1100 Lb. 2000 Lb. 3000 Lb. Model Atd-7435 Model Atd-7436 Model Atd-7437 Atd Tools Inc.
Models
 Models 15115 15310 15510 SAFETY PRECAUTIONS WARNING! To prevent personal injury, Wear goggles when working with refrigerants. Contact with refrigerants may cause injury. Incorrect use or connections may
TALCO FIRE SYSTEMS. LSF Start-Up Instructions. 1) IMPORTANT: Inspect the unit for damage. Report any damage to the freight carrier immediately.
 IMPORTANT: Inspect the unit for damage. Report any damage to the freight carrier immediately.") LSF Start-Up Instructions 1) IMPORTANT: Inspect the unit for damage. Report any damage to the freight carrier immediately. 2) PRE-START-UP: Be sure there is water in the pump. Bleed air at all high points
LSF Start-Up Instructions 1) IMPORTANT: Inspect the unit for damage. Report any damage to the freight carrier immediately. 2) PRE-START-UP: Be sure there is water in the pump. Bleed air at all high points
SMOKE PRO AIR COMPLETE DIAGNOSTIC LEAK DETECTOR
 SMOKE PRO AIR COMPLETE DIAGNOSTIC LEAK DETECTOR OPERATION MANUAL REDLINE MODEL NO: 95-0051 Manufactured in California, USA * CONGRATULATIONS Thank you for purchasing the Air Complete Diagnostic Leak Detector.
SPECIFICATIONS CONTENTS: Specifications Warning Information. Operating Instructions Preventative Maintenance Troubleshooting
 Model 3182 2,500 Lbs Power Train Table/Lift OWNER'S MANUAL CONTENTS: Page 1 Page 2-3 Page 3 Page 4 Page 5 Page 5 Page 6 Page 7 Page 8 Specifications Warning Information Setup Operating Instructions Preventative
Air Actuated Hydraulic Treadle Pump
 Porto-Power Blackhawk Automotive is a licensed trademark Air Actuated Hydraulic Treadle Pump Operating Instructions & Parts Manual B65425 B65426 B65427 SFA Companies 2005 10939 N. Pomona Ave. Kansas City,
High Performance Vacuum Pump Model 15120A/15122A Operating Manual... 2
 High Performance Vacuum Pump Model 15120A/15122A Operating Manual... 2 Bombas de Vacío de Alto Rendimiento Modelo 15120A/15122A Manuel del Operador... 8 Pompe à Vide à Haut Rendement Modèle 15120A/15122A
OPERATION AND MAINTENANCE MANUAL WASP, Inc. 757 Towbar Model No. A01568D
 OPERATION AND MAINTENANCE MANUAL WASP, Inc. 757 Towbar Model No. A01568D WASP RECORD OF REVISIONS REV. ISSUE DATE BY REV. ISSUE DATE BY NO. DATE INSERTED NO. DATE INSERTED Original May 19/97 001 June 10/03
PPD-130 PERISTALTIC PUMP DISPENSER
 PPD130 Operating Manual Rev. D January 11 PPD130 PERISTALTIC PUMP DISPENSER OPERATING MANUAL 1 PPD130 Operating Manual Rev. D January 11 1.0 CAUTIONS AND WARNINGS CAUTION: EYE PROTECTION REQUIRED WARNINGS:
DUAL PURPOSE DIAGNOSTIC LEAK DETECTOR
 OPERATION MANUAL DUAL PURPOSE DIAGNOSTIC LEAK DETECTOR P/N 95-030 NIS -800-662-200 nissantechmate.com CONTENTS Specifications / Warranty... Functions...2-3 Accessories... 4 Set-Up... 5 Adaptor Installation...
AUTO-PUMP 12V HP-VER FOR VERTICAL MOUNT ONLY MODEL #: V-HP-VER 12VDC HIGH OUTPUT AIR COMPRESSOR SYSTEM INSTRUCTION MANUAL
 INSTRUCTION MANUAL AUTO-PUMP 12V HP-VER 12VDC HIGH OUTPUT AIR COMPRESSOR SYSTEM FOR VERTICAL MOUNT ONLY MODEL #: 091-9-12V-HP-VER INPUT :10-15 volt, 11 amp OUTPUT :125 PSI MAXIMUM File: 091-9-12V-HP-VER_revA
Air Actuated Hydraulic Bottle Jacks
 Air Actuated Hydraulic Bottle Jacks Operating Instructions & Parts Manual Model Number Atd-7412 Atd-7420 Capacity 12 Ton 20 Ton Atd Tools Inc. 160 Enterprise Drive, Wentzville MO 63385 Printed in China
Owner's Manual. Model RP Series Power-Vac
 Ryvac Engineering Company Owner's Manual Model RP Series Power-Vac WARNING This equipment must not be operated without complete observance of the safety rules and grounding and power hook-up instructions.
COMPRESSED AIR LOADER MODEL: AL-1
 COMPRESSED AIR LOADER MODEL: AL-1 Document: AL-1 IM 10-22-2011 TABLE OF CONTENTS Important Notices and Precautions 3 Quick Installation 4 Product Description 4 Principle of Operation 5 Unpacking and Inspection
11202 INSTALLATION INSTRUCTIONS
 11202 INSTALLATION INSTRUCTIONS WARNING! The fuel system may be under pressure. Do not open the fuel system until any pressure has been relieved. The enclosed Aeromotive fuel pump utilizes an o-ring sealed
High Performance Vacuum Pump Model 15401/15601/15605 Operating Manual... 2
 High Performance Vacuum Pump Model 15401/15601/15605 Operating Manual... 2 Bombas de Vacío de Alto Rendimiento Modelo 15401/15601 Manuel del Operador... 8 Pompe à Vide à Haut Rendement Modèle 15401/15601
INSTRUCTION MANUAL AUTO-PUMP 220/240 VAC MODEL #091-9B-220. INPUT :220/240 volt, 50/60 Hz, 1.9/2.2 AMPS OUTPUT: 100 PSI MAXIMUM 1 YEAR WARRANTY
 BOOK# 091-9B-220 4-18-2002 INSTRUCTION MANUAL AUTO-PUMP 220/240 VAC AIR COMPRESSOR SYSTEM MODEL #091-9B-220 INPUT :220/240 volt, 50/60 Hz, 1.9/2.2 AMPS OUTPUT: 100 PSI MAXIMUM 1 YEAR WARRANTY KUSSMAUL
Portable Electric/Gas Compressor Operating Instructions
 Portable Electric/Gas Compressor Operating Instructions NOTICE Carefully read this instruction manual before attempting to operate this compressor. MODEL # SERIAL # 1-800-551-2406 TABLE OF CONTENTS Safety
INSTALLATION INSTRUCTIONS
 Safety Notices... 1... 3 Specifications... 3 General... 3 Electrical... 3 Hydraulic Connections... 3 Components... 4 Assembly... 4 Implement Installation... 7 Hydraulic Connections... 9 Closed-Center Hydraulics...
Instruction Manual R134a DIGITAL MANIFOLD
 Instruction Manual R134a DIGITAL MANIFOLD Includes Automotive Refrigerant and Oil Capacity Readings Instruction Manual R134a DIGITAL MANIFOLD Includes Automotive Refrigerant and Oil Capacity Readings SPECIAL
Frekote Adjustable Spray Applicator 6 Extension Extension Extension EQUIPMENT Operation Manual
 Frekote Adjustable Spray Applicator 6 Extension 98183 12 Extension 98184 24 Extension 98185 EQUIPMENT Operation Manual 1 Please Observe The Following 1.1 Emphasized Sections Warning! Refers to safety regulations
PENBERTHY MODELS GL AND GH GAS OPERATED JET PUMPS INSTALLATION, OPERATION AND MAINTENANCE INSTRUCTIONS
 Before installation, these instructions must be read carefully and understood. PRODUCT WARRANTY Emerson warrants its Penberthy products as designed and manufactured to be free of defects in the material
VENTILATION SYSTEM SECTION VTL CONTENTS VENTILATION, HEATER & AIR CONDITIONER VTL-1 PRECAUTION... 2 PREPARATION... 4 FUNCTION DIAGNOSIS...
 VENTILATION, HEATER & AIR CONDITIONER SECTION VTL A VENTILATION SYSTEM B C D CONTENTS E PRECAUTION... 2 PRECAUTIONS... 2 Precaution for Supplemental Restraint System (SRS) "AIR BAG" and "SEAT BELT PRE-TEN-
GB910 GAGE BILT MADE IN U.S.A. HYDRAULIC POWERUNIT
 GB910 HYDRAULIC POWERUNIT GAGE BILT TOOLS ARE AVAILABLE WORLDWIDE E-MAIL US FOR A DISTRIBUTOR NEAR YOU. GAGE BILT MADE IN U.S.A. GAGE BILT Inc. 44766 Centre Court (586) 226-1500 Clinton Twp. MI 48038 (586)
TBHD1 CRIMPING TOOL FOR THOMAS & BETTS TS DIES
 TBHD1 CRIMPING TOOL FOR THOMAS & BETTS TS DIES DATASHEET SEE PAGE 6 FOR IMPORTANT INFORMATION CONCERNING LIMITED WARRANTY, AND LIMITATION OF LIABILITY Operating instructions for the TBHD1 crimping tool
DECADE 1021 SOLO CHAIR
 Owner's Guide DECADE 1021 SOLO CHAIR 85-2626-00 Warranty A-dec warrants its products against defects in material or workmanship for one year from time of delivery (except for handpieces which have a warranty
TABLE OF CONTENTS GEMINI DUAL PUMP KIT
 INSTRUCTION MANUAL TABLE OF CONTENTS GEMINI DUAL PUMP KIT WHAT IS THE GEMINI DUAL PUMP KIT? The kit allows the user to operate two Ace Pumps from one Selective Control Valve (SCV) or the Power Beyond hydraulic
Refrigerant Oil Calculation during Compressor Replacement
 Refrigerant Oil Calculation during Compressor Replacement Study Guide TMT: 100820 Dealer Education 2008 Navistar, Inc. 4201 Winfield Road, Warrenville, IL 60555. All rights reserved. No part of this publication
User s Manual. Table of Contents CAUTION. Model No. MTSC20000
 Model No. MTSC20000 Table of Contents Important Precautions..........2 Limited Warranty..............2 Before You Begin.............3 How to Set Up and Fold the Scooter...............4 How to Operate the
STOP CITY PRESSURE BOOSTER PUMP INSTRUCTION MANUAL
 CITY PRESSURE BOOSTER PUMP INSTRUCTION MANUAL MODEL #VP05, VP10 C US NSF/ANSI 372 255405 For loose, missing or damaged parts, or if the unit does not seem to be operating properly, please call before returning
WARNING: Do not use pumps for gasoline or highly flammable products! Do not use pumps for water based fluids, solvents or chemicals!
 50:1 Value Line Pneumatic Grease Pump Technical Brief 07/01/2010 No. 18710 201 Fits 35 lb. Pail Premium quality pneumatic pump used for 35 lb. Pail 1.Recommended Usage Grease pumps with a ratio of 50:1
QUALITY MISTING PUMPS
 DIRECT DRIVE TOTALLY ENCLOSED FAN COOLED 60200KH, 60201KH MISTING PUMP MANUAL INCLUDING: SPECIFICATION DATA, GENERAL SAFETY PRECAUTIONS, OPERATION, INSTALLATION, PARTS, MAINTENANCE & WARRANTY QUALITY MISTING
FTIR PG28 PURGE GAS GENERATOR OPERATIONS & MAINTENANCE
 FTIR PG28 PURGE GAS GENERATOR OPERATIONS & MAINTENANCE TABLE OF CONTENTS SECTION 1 General Information: Model Description Pg 2 Serial Numbers Description of Operation SECTION 2 Safety Instructions: Pg
YELLOW JACKET. SuperEvac Vacuum Pump for Ammonia and NH 3 Systems. Operation and Maintenance Manual. Models and Table of Contents Page
 YELLOW JACKET SuperEvac Vacuum for Ammonia and NH 3 Systems Table of Contents Page How to obtain service....... 2 Features of your new pump... 3 Warranty Information........3 The purpose of the SuperEvac
AUTO PUMP 12V MODEL #: V 12 VOLT DC AIR COMPRESSOR SYSTEM INSTRUCTION MANUAL. INPUT: Volts DC, 11 Amps OUTPUT: 100 PSI Max
 INSTRUCTION MANUAL AUTO PUMP 12V 12 VOLT DC AIR COMPRESSOR SYSTEM MODEL #: 091-9-12V INPUT: 10-15 Volts DC, 11 Amps OUTPUT: 100 PSI Max File: IM_091-9-12v_revC1.indd Rev: C1 Revised By: PSS/JRN Date: 08-16-2017
A/C MANIFOLD GAUGE SET
 A/C MANIFOLD GAUGE SET INSTRUCTIONS Item #31533 The Fairmount Air Conditioning Manifold Gauge Set is excellent for DIY and professional automotive air conditioning system pressure checks and recharging.
Raydot LLC 24 Actuator (115 VOLT)
") Installation, Operation & Parts Manual Read carefully the information provided. Retain manual for future reference. Raydot LLC 24 Actuator (115 VOLT) 145 Jackson Ave. S. Cokato, MN 55321-USA (320) 286-2103
Installation, Operation & Parts Manual Read carefully the information provided. Retain manual for future reference. Raydot LLC 24 Actuator (115 VOLT) 145 Jackson Ave. S. Cokato, MN 55321-USA (320) 286-2103
QUALITY MISTING PUMPS
 TOTALLY ENCLOSED DIRECT DRIVE 60030KH, 60031KH, 60050KH, 60051KH 60100KH, 60101KH, 60150KH, 60151KH MISTING PUMP MANUAL INCLUDING: SPECIFICATION DATA, GENERAL SAFETY PRECAUTIONS, OPERATION, INSTALLATION,
Dual Voltage Motor Power Conversion (if applicable)
") Oil Changes CHANGE OIL AFTER EACH USAGE to protect pump components from contaminants pulled into pump during service. Place used oil in a sealable container and dispose of properly in accordance with local
Oil Changes CHANGE OIL AFTER EACH USAGE to protect pump components from contaminants pulled into pump during service. Place used oil in a sealable container and dispose of properly in accordance with local
EBS PRODUCTS
 ! EBS Coolant Flush EBS PRODUCTS www.ebsproducts.com OPERATIONS MANUAL EC-1 Coolant Flush #1000-0070 1-1-16! 1 EBS Products Westminster, CA 92683 Phone: 877-955-0515 Fax: 714-896-6711 E-mail: sales@ebsproducts.com
CHAPTER 12 SERVICING. Section Title Page
 CHAPTER 12 SERVICING Section Title Page 12-10 Main Rotor Gearbox.................................. 12.1 12-11 Servicing................................. 12.1 12-12 Filter Replacement...........................
A/C PRESSURE MONITOR INSTALLATION INSTRUCTIONS SYSTEM OPERATION GREEN INDICATOR LIGHT
 A/C PRESSURE MONITOR INSTALLATION INSTRUCTIONS Do not attempt to clean or inspect anything while the engine is running. Cleaning and inspection must be done by a certified mechanic. All A/C service must
Owner s Manual. Model Air Conditioning Component Flusher
 Owner s Manual Model 17580 Air Conditioning Component Flusher Model 17580 Air Conditioning Component Flusher 80 150 psi Supply Air Pressure SAFETY DEFINITIONS: Follow all WARNING, CAUTION, IMPORTANT, and
Open Display Merchandiser Installation and Operation Manual Please read this manual completely before attempting to install or operate this equipment!
 Turbo Air Speed up the Pace of Innovation CAUTION! PLEASE KEEP POWER SWITCH ON BEFORE OPERATING THIS EQUIPMENT Open Display Merchandiser Installation and Operation Manual Please read this manual completely
SHOP PRO FXP 95 TECHNICAL MANUAL
 SHOP PRO FXP 95 TABLE OF CONTENTS Applications and Features... 1 Shop Pro FXP 95 Components... 2 Important Safety Precautions.... 3 Set-up and Maintenance... 4 Prevent Fuel Spillage... 5 Hoses and Adapters...
ATD-7384W 12-Ton Bottle Jack Owner s Manual
 ATD-7384W 12-Ton Bottle Jack Owner s Manual Features: Specifications Made in China to ATD Tools, Inc. Specifications Visit us at www.atdtools.com ATD7384W_rev_0118 Product Description NOT Safety Precautions
Dispenser & Warmer RIC-1909 RIC-1909EXP
 Dispenser & Warmer RIC-1909 RIC-1909EXP Safety Precautions CAUTION This equipment is designed and sold for commercial use only. This equipment is not to be used by the consumer in home use. Do not allow
Bottom Loading Water Dispenser
 Bottom Loading Water Dispenser Model # 601000 TO REDUCE THE RISK OF INJURY AND PROPERTY DAMAGE, USER MUST READ THIS MANUAL BEFORE ASSEMBLING, INSTALLING & OPERATING DISPENSER. SAVE THIS MANUAL FOR FUTURE
Nilfisk-CFM SS Vapor Vacuum Instructions for Use and Spare Parts Manual
 Nilfisk-CFM SS Vapor Vacuum Instructions for Use and Spare Parts Manual Caution: This Nilfisk-CFM vacuum cleaner is not to be used in explosion hazardous areas as serious injury could result. Your new
READ THIS MANUAL CAREFULLY BEFORE USING THE PUMP
 OWNER S MANUAL Pond Pump READ THIS MANUAL CAREFULLY BEFORE USING THE PUMP Important Notice: This manual contains important information about the installation, operation and safe use of this product. This
32 lbs / 38 lbs TROLLING MOTOR
 32 lbs / 38 lbs TROLLING MOTOR MODEL: 90000 / 90001 OPERATOR'S MANUAL TOLL-FREE HELPLINE: 1 866 523-5218 IMPORTANT: READ THIS MANUAL CAREFULLY BEFORE OPERATNG YOUR NEW TM DURAMAXX TROLLING MOTOR. RETAIN
User s Manual for Tennessee Chill Box System P/N CB8000
 User s Manual for Tennessee Chill Box System P/N CB8000 Read and understand all instructions before using this product. Open carton carefully and inspect product for damage caused by carrier. If any damage
24 Linear Actuator 115 Volts A.C. (Cat. # C430A)
") Installation, Operation & Parts Manual Read carefully the information provided. Retain manual for future reference. 24 Linear Actuator 115 Volts A.C. (Cat. # C430A) Page 1 of 8 IS10007.doc 11/15/06 IMPORTANT!
Installation, Operation & Parts Manual Read carefully the information provided. Retain manual for future reference. 24 Linear Actuator 115 Volts A.C. (Cat. # C430A) Page 1 of 8 IS10007.doc 11/15/06 IMPORTANT!
OPERATION and MAINTENANCE INSTRUCTION MANUAL. AA-98 AirPac II Compressor 110V
 OPERATION and MAINTENANCE INSTRUCTION MANUAL AA-98 AirPac II Compressor 110V TABLE OF CONTENTS: Rules For Safe Operation.........1 Introduction....................2 Package Contents...............2 Set
AEROMOTIVE Part # Mustang 5.0L Fuel System Kit INSTALLATION INSTRUCTIONS
 AEROMOTIVE Part # 17103 83-93 Mustang 5.0L Fuel System Kit INSTALLATION INSTRUCTIONS CAUTION: Installation of this product requires detailed knowledge of automotive systems and repair procedures. We recommend
BASIC SYSTEM ASSEMBLY INSTRUCTIONS
 SIH Muscle Tester www.wpiinc.com BASIC SYSTEM ASSEMBLY INSTRUCTIONS Serial No. 080912 World Precision Instruments SIH Muscle Tester CONTENTS ABOUT THIS MANUAL... 1 INTRODUCTION... 1 Parts List... 1 Unpacking...
HP190SL Series Slimline Radon Fans
 Installation and Operation Manual Item #: 412843 Rev Date: 070113 HP190SL Series Slimline Radon Fans United States 10048 Industrial Blvd., Lenexa, KS, 66215 Tel.: 800.747.1762 Fax: 800.487.9915 Canada
INSTRUCTIONS. Owner's Manual. Ionizing Air Nozzles Models AN-2 and AN-6
 2257 North Penn Road Hatfield, PA 19440 (215) 997-0590 (800) 538-0750 Fax: (215) 997-3450 Publication 5100935 June 2005 INSTRUCTIONS Owner's Manual Ionizing Air Nozzles Models AN-2 and AN-6 SIMCO Static
VACUUM PUMP. Please read the operating manual carefully before using.
 Operating Manual 231672 Please read the operating manual carefully before using. I. Pump components Oil Fill Cap Handle Inlet Fitting Exhaust Fitting Power Switch Sight Glass Fan Cover Die-Cast Aluminum
ALITA LINEAR AIR PUMP OPERATION & MAINTENANCE MANUAL. AL- Model Number Date Code / Serial Number Date of Purchase
 ALITA LINEAR AIR PUMP OPERATION & MAINTENANCE MANUAL AL- Model Number Date Code / Serial Number Date of Purchase LIMITED WARRANTY ALITA warrants to the original retail consumer purchaser ( Customer ) that
Jeep Wrangler TJ 4.0 LITER Installation instructions
 www.jeepair.com 2000-2001 Jeep Wrangler TJ 4.0 LITER Installation instructions Important information about your system, and warranty DO NOT ADD ANY OIL TO ANY PART OF THE SYSTEM. DO NOT USE THE SIGHT GLASS
HALLMARK INDUSTRIES INC
 Performance Part No. HP. CONVERTIBLE JET PUMP USER S MANUAL GPH of Water @ Total Discharge Pressure of 40 psi Max. Pressure Max suction (shallow well) Max Suction (deep well) Max GPM (@0 head) Max Discharge
DAVCO SHOP PRO FXP FOR MX ENGINES WITH REGULATOR TECHNICAL MANUAL
 TABLE OF CONTENTS Applications and Features.... 1 Shop Pro Components... 2 Set-up and Maintenance... 3 Important Safety Precautions... 4 Hoses and Adapters... 5 Priming the PACCAR MX 11 EPA 2013 & MX 13
ATD Gallon Pressurized Oil Drain Owner s Manual
 ATD-5203 30 Gallon Pressurized Oil Drain Owner s Manual TECHNICAL SPECIFICATIONS Model: ATD-5203 Capacity: 30 Gallon Drain Funnel Working Height: 47.25 to 70.5 Drain Funnel Diameter: 15.75 Plastic Tray:
High Velocity Series Air Curtains
 INSTALLATION & OPERATING INSTRUCTIONS & PARTS MANUAL FOR ALL 208-230/480 VOLT 3 PHASE. MOTOR MODELS High Velocity Series Air Curtains READ CAREFULLY BEFORE ATTEMPTING TO ASSEMBLE, INSTALL, OPERATE, OR
INSTRUCTION MANUAL. Smart Pressure. Variable Pressure Diagnostic Smoke Machine. with UltraTraceUV Non-Contaminant Dye Solution Model No.
 INSTRUCTION MANUAL Smart Pressure Variable Pressure Diagnostic Smoke Machine with UltraTraceUV Non-Contaminant Dye Solution Model No. WV711 Leak Detection Systems for the Professional Technician USA Canada
MACHINES / RECLAIMS WITH DUST BAG
 WARNING SET-UP INSTRUCTIONS MACHINES / RECLAIMS WITH DUST BAG *** READ BEFORE OPERATING EQUIPMENT *** 1. Remove plastic from machine. 2. Remove lag bolts from each of the four legs, then remove machine
40041 Heavy Duty ADA System with Booster Bracket for JK Heavy Duty ADA System with Booster Bracket for 2012 to Current JK
 40041 Heavy Duty ADA System with Booster Bracket for 2007-2011 JK 40044 Heavy Duty ADA System with Booster Bracket for 2012 to Current JK 40049 Heavy Duty ADA System Universal for all vehicles (booster
Air Actuated Hydraulic Bottle Jack on Wheels
 Operating Instructions & Parts Manual Air Actuated Hydraulic Bottle Jack on Wheels Model Number 18127 18207 Capacity 12 Ton 20 Ton Shinn Fu Co. of America, Inc. 2002 10939 N. Pomona Avenue Kansas City,
OWNERS MANUAL INSTALLATION AND OPERATING INSTRUCTIONS REPAIR PARTS LIST. Centrifugal Pump Primer MODEL 6D, HAN-DEE PRIMER
 OWNERS MANUAL INSTALLATION AND OPERATING INSTRUCTIONS REPAIR PARTS LIST Centrifugal Pump Primer 383 0893 MODEL 6D, HAN-DEE PRIMER IMPORTANT For best possible performance continuous, satisfactory operation,
H-10G Refrigerant. Leak Detector
 H-10G Refrigerant Leak Detector Congratulations! You have just purchased the most versatile, high performance service leak detector available in the industry today. It will detect refrigerants with a sensitivity
INSTRUCTION MANUAL. Leakfinder. Model No. 625-WV609. BMW Smoke Tester. Diagnostic Smoke Vapor. with UltraTraceUV Dye Solution
 INSTRUCTION MANUAL Leakfinder Model No. 625-WV609 BMW Smoke Tester Diagnostic Smoke Vapor with UltraTraceUV Dye Solution Leak Detection System for the Professional Technician USA Canada Patents 6,392,227
Manual Concentrate Management System
 Form 887 05/15 Manual Concentrate Management System with Automatic Flush INSTALLATION AND OPERATION MANUAL Unit Serial Number All quality FoamPro products are ruggedly designed, accurately machined, carefully
Spotlight 1,000,000 Power Series Cordless Rechargeable
 VEC156CFL_Manual_012405 1/24/05 4:29 PM Page iv VEC156 Spotlight 1,000,000 Power Series Cordless Rechargeable OWNER S MANUAL & WARRANTY INFORMATION 53SB E231887 IMPORTANT SAFETY INFORMATION, SAVE THESE
HYGRODYNAMICS DEW POINT MONITOR MODEL 8092P 8092P-230VAC TABLE OF CONTENTS DIAGRAMS
 HYGRODYNAMICS DEW POINT MONITOR MODEL 8092P 8092P-230VAC TABLE OF CONTENTS SPECIFICATIONS 1 PRINCIPLE OF OPERATION 1 INSTALLATION 2 Choosing a Sampling Location 2 Mounting the Enclosure 2 Remote Alarm
Power Float Manifold. Installation and Operations Manual Module 11A
 Power Float Manifold Installation and Operations Manual Module 11A 2/14 Table of Contents 1 Features 3 2 Functional Purpose 3 3 4 Specifications System Installation 3 4 4.1 Hydraulic Connection 4 4.2 Electric
Curved Glass Bakery Cases Installation and Operation Manual
 Turbo Air Speeds up the Pace of Innovation Curved Glass Bakery Cases Installation and Operation Manual Please read this manual completely before attempting to install or operate this equipment. TCGB-36-2
6 & 12 Volt Battery and Systems Tester with 100 Amp Load
 6 & 12 Volt Battery and Systems Tester with 100 Amp Load Form No. 841-731 -000 DESCRIPTION This Load Tester tests 6 or 12 volt automotive-size lead-acid batteries under load. It will also test 6 or 12