POWER PROGRAMMER III FOR GM VEHICLES WITH 6.6L DURAMAX ENGINE STEP-BY-STEP INSTALLATION INSTRUCTIONS
|
|
|
- Ethan Stokes
- 5 years ago
- Views:
Transcription

1 OnStar Equipped Vehicles See Pages 4-6 BEFORE Programming PP16 HYPERTECH POWER PROGRAMMER III FOR GM VEHICLES WITH 6.6L DURAMAX ENGINE STEP-BY-STEP INSTALLATION INSTRUCTIONS Part # Hypertech, Inc.
2 Table Of Contents Important Information Overview Section 1: OnStar Equipped Vehicles Section 2: Programming Instructions Diagnostic Trouble Code (DTC) Information. 8-9 Engine Tuning Tire Size Top-Speed Limiter Rear Gear Ratio Report Programming Section 3: Programming Back-To-Stock/Changing Options 15 Section 4: Troubleshooting Guide
3 IMPORTANT The Power Programmer for the 6.6L GM Duramax diesel trucks and SUVs is pending and legal for pollution-controlled motor vehicles according to the CARB Executive Order process. In the interest of improved air quality, the California Air Resources Board (CARB) requires new vehicle and manufacturers of aftermarket parts to develop engine and emissions equipment that either reduce or maintain specific air pollutants affected by vehicle use. Both the California Vehicle Code (section 27156) and Federal Clean Air Act (administered by the Environmental Protection Agency) prohibit modifications that increase vehicle emissions. Aftermarket parts manufacturers, particularly in the high-performance segment, are required to obtain CARB approval in the form of executive Orders (E.O.s) for any product not qualifying as a direct replacement for an original equipment part. Hypertech includes meeting all E.O. requirements in its product development process. This guarantees that users of Hypertech Power Tuning products will meet certification requirements when registering, selling, or needing to pass various emissions tests or Inspection and Maintenance (I&M) programs administered by state or local enforcement agencies. Make sure that any emissions-related product you buy and install carries an E.O. number or is pending an E.O. Without this verification you are at risk, in potential violation of regulations and may incur unnecessary financial obligations during vehicle inspections or emissions tests. Your vehicle s computer will not be programmed at the end of the programming menus until you select PRESS Y TO BEGIN PROGRAMMING on page 12. Feel free to experiment with the programming choices without the fear of accidentally programming the wrong information into your vehicle computer. You can make any choice that you want to, change it again and again, without programming it into your vehicle computer until you are absolutely ready. While the programmer is programming: * DO NOT leave the vehicle while programming is in process. * DO NOT program the vehicle without a fully charged battery. If after you have programmed the vehicle s computer with the Hypertech Power Programmer, you decide to change the tuning, it is recommended that you recharge the vehicle s battery. You can either drive the vehicle to charge the battery or use a battery charger. But either way, make sure the battery has a full charge. * DO NOT disturb the cable while programming. 2
4 * The ONLY time you may remove the programmer cable from the diagnostic port safely is PRIOR to pressing Y to program all entries. However, any programming choices that have been made WILL NOT be saved. NOTE: It is NOT safe to unplug the programmer cable any time AFTER pressing Y to program. * DO NOT turn the key off UNLESS instructed by the programmer. * DO NOT start the engine. Any of these actions will interrupt the programming process. The programmer is designed to recover from these conditions, but they should be avoided. HYPERTECH POWER PROGRAMMER III INSTALLATION INSTRUCTIONS OVERVIEW Congratulations! You are the owner of the Power Programmer III, the latest in high-performance technology. Now you can optimize your engine s tuning, read and clear Diagnostic Trouble Codes, as well as adjust other vehicle parameters (see table of contents), all at the touch of a button. Your vehicle has an onboard computer that controls the engine and transmission. Inside your vehicle s computer is a FLASH memory chip which contains the vehicle s programming. The programmer actually reprograms this FLASH computer chip, according to your specifications, with Hypertech s Power Tuning. To reprogram your vehicle s computer, simply plug the programmer cable into the vehicle s diagnostic connector located under the dash panel on the driver s side. Set the parking brake. Next, turn the ignition key to RUN but do not start the engine. Press the arrow on the programmer. It will then identify your vehicle and display a series of options on its screen. When completed, turn the key to OFF and disconnect the cable from the diagnostic connector. Now you re ready to Feel the Power! Hypertech s Power Tuning can be stored in only one (1) vehicle at a time. The Power Programmer can be reconnected to remove the Power Tuning and return the vehicle to the factory programming at any time. After you have performed this step, your vehicle will be in its stock configuration. You may also reconnect your programmer at any time to change the programming. For example, if you have replaced your factory tires with different diameter tires, you will want to correct your speedometer and odometer readings. Simply reconnect your programmer, answer the necessary option(s), and reprogram your vehicle. You do not have to return to stock first. 3
5 4 SECTION 1: ONSTAR EQUIPPED VEHICLES If your GM vehicle is equipped with the OnStar system, you MUST temporarily disable the system BEFORE programming your vehicle with the Power Programmer. Please follow the steps below to temporarily disable the OnStar system. General Precautions Many new vehicles are equipped with daytime running lights, or sensors that turn the headlights on in dim situations automatically when the ignition is on. For the purposes of programming the vehicle this presents an unnecessary extra drain on the vehicle battery. Many new vehicles have a procedure for turning off the lights. Often this is accomplished by pressing the Dome Override button two (2) to four (4) times in succession. We recommend that your headlights be off when programming your vehicle for added safety against corrupt programming due to battery failure. See your owner s manual for vehicle specific information regarding your headlights. Recommended Precautions The OnStar system by GM periodically communicates with the vehicle. This periodic communication with the vehicle has been known to disrupt the programming process. In order to prevent disruption of the programming process, it is recommended that the OnStar system be disabled while programming the vehicle. To temporarily disable your OnStar system in GM vehicles, remove the fuse(s) associated with OnStar. Please refer to the fuse section of your owner s manual for instructions and locations of fuse(s). The fuse panel will be under the hood of the vehicle on the driver s side behind the battery. In most cases there will be one (1) fuse in that fuse panel the OnStar system relies on. See page 5 for an example. When the OnStar system is successfully disabled, its indicator light on the dash or rearview mirror will be OFF. Be sure that this light is off when the key is in the ON position (engine not running) BEFORE programming the vehicle. This will ensure that there are no OnStar related problems. Recovery From OnStar Related Power Programmer Hang-up If the programmer stops programming for an extended period of time, perform the following steps to recover and/or continue programming (see next page):

6 ** Do Not Turn The Ignition Key Off ** 1. Disconnect the programmer from the vehicle. 2. Reconnect the programmer to the vehicle. 3. Press the START button on the programmer. The programmer will resume communications with the vehicle where it left off. If the programmer fails to re-establish communications with the vehicle, repeat the procedure. If the programmer still fails to resume, disconnect the programmer and turn the vehicle off. Attempt to start your vehicle. If your vehicle fails to start, the vehicle computer may have been corrupted, and you will need to send your vehicle computer and programmer to Hypertech for repair. If the vehicle starts, you will need to return your programmer to Hypertech for re-initialization, no harm was done to the vehicle computer. For GM 6.6L Duramax vehicles Fuse panel cover The fuse panel is located on the driver s side of the vehicle behind the vehicle battery. Lift off the cover to access the fuse block. You now can remove the fuse. To remove the fuse, hold the end of the fuse between your thumb and index finger and pull straight out. Make sure you remember to re-install the fuse in the proper location and re-install the fuse panel cover after programming your vehicle. For vehicles, the one (1) fuse that must be removed is as follows: (see highlighted fuse location below.) Location Description SEO1 Special Equipment Option, OnStar GM vehicle fuse diagram A/C AUX PWR DRL FOG LP A/C FOG LP BTSI SEO 2 RADIO HTD MIR SEO 1 CIGAR W/W PMP HORN HORN IGN C CTSY LP RDO AMP RR WPR HAZ LP TBC For vehicles, the one (1) fuse that must be removed is as follows: (see highlighted fuse location below.) Location INFO Description OnStar GM vehicle fuse diagram (Illustration does not represent entire fuse diagram) A/C COMP BTSI CRANK RR WPR RADIO SEO B1 W/S WASH W/S WASH INFO RADIO AMP EAP TREC SBA NOTE:Owner s manual fuse diagram may vary from examples shown. 5

7 NOTE for GM vehicles: If the previous step did not turn off the OnStar light on the dash, follow these steps to remove three (3) other OnStar related fuses: The three (3) fuses that must be removed are as follows: (see highlighted fuse locations to the right.) Location Description SEO IGN Special Equipment Option, Ignition, OnStar RDO 1 Audio System, OnStar RAP #2 Rear Power Windows, Sunroof, Radio, OnStar NOTE: Owner s manual fuse diagram may vary from example shown. What To Do After Programming Your Vehicle After the vehicle computer has been successfully programmed, reinstall the fuse(s) removed that are OnStar related to enable the system, making sure the proper amperage fuse is in each location and the fuse panel cover(s) are reinstalled. Please Read BEFORE Installing Hypertech Power Tuning Special Instructions For The Allison Automatic Transmission Chevrolet Silverado C/K 2500/ GMC Sierra C/K 2500/3500 After installing the Hypertech Power Tuning with your new Power Programmer, you may temporarily experience irregular shifting. The transmission shifting parameters for driving conditions will readjust quickly and proper shifting should be observed within approximately miles. If you have any questions regarding the use of your Hypertech Power Programmer, please call one of our Service Technicians at , Monday-Friday, from 8am - 5pm, Central Time. 6
 under the driver s side of the dash panel above the emergency brake.")
 and turn the ignition key to the RUN position but Do Not Start The Engine.")
8 SECTION 2: PROGRAMMING INSTRUCTIONS Connect one (1) end of the provided cable to the programmer as in Figure A and tighten the two (2) thumbscrews. Programmer Thumbscrew Thumbscrew Figure A See Figure B. Locate the Data Link Connector (DLC) under the driver s side of the dash panel above the emergency brake. Figure B Plug the programmer cable into the DLC. Make sure the cable is plugged in completely to ensure a good connection. Set the parking brake to turn off the DRLs (Day-Light Running Lamps) and turn the ignition key to the RUN position but Do Not Start The Engine. IMPORTANT: -DO NOT leave the vehicle while programming is in process. -Make sure the vehicle battery is fully charged before programming. -The key must remain in the RUN position, without the engine running, during the entire programming process. -DO NOT operate electrical accessories (radio, windows, wipers, etc.) while programming. - If the vehicle is equipped with an OnStar system, make sure the system is temporarily disabled (see Section 1 for details). - DO NOT attempt programming while the vehicle is connected to a battery charger. 7
9 Press the arrow on the programmer. The following displays should appear immediately on the LCD screen (where X.X.X.X is the version number): HYPERTECH POWER PROGRAMMER VERSION X.X.X.X FOR XXXX-XXXX DURAMAX TRUCKS If these screens do not appear, make sure that both ends of the cable are securely attached and press the arrow again. The programmer will show applications and copyright information. The programmer will then identify your vehicle and perform a self-test. A few seconds after the self-test is complete, the VIN number of the vehicle will be shown and a screen should appear with a description of your vehicle: YOUR VEHICLE IS: XXXX CHEVROLET TRUCK/SUV 6.6L TURBO DIESEL If this screen does not appear, make sure that the key is in the RUN position with the engine NOT running. The programmer will display a series of options. For each option press the Y button to make a change. Press the N button to make no change and proceed to the next option. For some options, you will use the and arrows to point to a particular option. Pressing the Y button will then lock in your selection. This screen will now appear: CHECKING FOR DIAGNOSTIC TROUBLE CODES (DTCS) The Power Programmer is checking the vehicle for any Diagnostic Trouble Codes (DTCs). If no DTCs are found, this screen will appear: NO DTCS REPORTED If no DTCs are found the Power Programmer will then go to Step A (Engine Tuning). If any DTCs are found, this screen will appear: X DTCS REPORTED 8
10 X represents the number of DTCs found in the vehicle. This screen will now appear: VIEW DTCS = Y CLEAR DTCS = N Press Y to view the DTC(s) found in the vehicle. Press N to clear the DTC(s) without viewing them. If you press Y, these screens will appear: WRITE DOWN THE FOLLOWING DTCS AND REFER TO FACTORY MANUALS FOR EXPLANATION DTC #1 --- PXXXX NEXT DTC = N IMPORTANT NOTE Hypertech, Inc. recommends proper diagnosis and repair of reported DTCs prior to programming. For Diagnostic Trouble Code (DTC) interpretations, refer to factory manuals, see your local parts dealer, or refer to internet sites that provide this type of information. An example of such a website is: Press the N button to view the next DTC (if any). Once you have viewed all the DTCs, this screen will appear: NO MORE DTCS, TO VIEW AGAIN, PRESS Y TO CONTINUE, PRESS N Press Y to view the DTC(s) again. Press N to continue. If you press N, this screen will appear: DTCS MUST BE CLEARED BEFORE CHANGING PROGRAM. TO CLEAR DTCS PRESS Y TO KEEP DTCS AND EXIT PROGRAM PRESS N Press N to exit the program. This screen will appear: TURNING POWER PROGRAMMER OFF Press Y for the Power Programmer to clear the DTCs. These screens will now appear: CLEARING DTCS ALL DTCS HAVE BEEN CLEARED 9
11 The Power Programmer has now successfully cleared the DTC(s) found in the vehicle computer. This screen will now appear: A. ENGINE TUNING Press the Y button to install Power Tuning. Press N to keep the factory engine tuning. The programmer will then allow you to select from 3 stages of tuning to match your individual driving/towing needs. Most people prefer Stage 3 for maximum power and performance. Use the and arrows to choose the stage of tuning and press Y when the desired tuning stage is selected. B. TIRE SIZE TO ENTER POWER PROGRAMMER MODE, PRESS Y TO EXIT PROGRAM, PRESS N TO INSTALL HYPERTECH POWER TUNING, PRESS Y TO KEEP FACTORY ENGINE TUNING, PRESS N USE UP/DOWN ARROWS TO CHOOSE PERFORMANCE TUNING. THEN PRESS Y TO SELECT OR N TO EXIT. STAGE X. IF TIRE HEIGHT HAS BEEN CHANGED FROM ORIGINAL, PRESS Y IF TIRE HEIGHT HAS NOT BEEN CHANGED, PRESS N Press N if the original size tires are being used. USE UP/DOWN ARROWS TO SELECT CORRECT TIRE HEIGHT. THEN PRESS Y TO SELECT N TO EXIT.. Press Y if you have installed tires with an overall height that is different than the original factory tires. This feature will allow you to adjust your speedometer and odometer readings for the new tire height. The and arrows will allow adjustments of 1/4 increments between 24 and 38 ( Duramax) and 26 and 36 ( Duramax). Press the Y button to lock in the desired value. At any time you may press N to exit and either try again or skip to the next option. 10
12 HOW TO DETERMINE TIRE HEIGHT If you do not know your tire height, ask your tire dealer or measure a tire as follows: 1. Place a chalk mark on the tire where it contacts the pavement and also mark the pavement. These marks should be at the center of the tire footprint pointing straight down to the pavement. 2. Roll the vehicle in a straight line until the chalk mark makes one revolution and is pointing straight down at the pavement again. Mark the pavement again at this new spot. 3. Measure (in inches) the distance between the two (2) marks on the pavement. Divide the measurement by This will give you the tire height in inches. C. TOP-SPEED LIMITER ( Duramax ONLY) TO ADJUST TOP SPEED LIMIT TO MATCH SPEED RATING OF HIGH-PERFORMANCE TIRES, PRESS Y TO KEEP STOCK TOP SPEED LIMIT, PRESS N Press the N button to keep your vehicle s stock top-speed limiter and skip to the next option. USE UP/DOWN ARROWS TO ADJUST TOP SPEED LIMIT, THEN PRESS Y TO SELECT OR N TO EXIT. _ _ MPH If you have installed factory-approved high-performance tires, press the Y button to change your vehicle s top-speed limiter to match the speed rating of those tires. The speed rating or speed symbol will be found on the sidewall of your tires. Here are the corresponding symbols and maximum top-speed limits that can be programmed into your vehicle: M - 81 MPH N - 87 MPH P - 93 MPH Q - 99 MPH R MPH S MPH T MPH U MPH H MPH V MPH W MPH Y MPH IMPORTANT NOTE: Changes to top-speed limiter is not recommended for load rated tires. Serious damage or injuries could occur. Also, for safety reasons, the actual top-speed limit set in the vehicle is two (2) miles-per-hour less than the selected tire s speed rating. 11
13 D. REAR GEAR RATIO ( Duramax ONLY) IF REAR AXLE RATIO HAS BEEN CHANGED FROM ORIGINAL, PRESS Y IF REAR AXLE RATIO HAS NOT BEEN CHANGED, PRESS N Press N if the rear gear ratio has not been changed from the factory installed gear. Making this choice will skip to the next option. USE UP/DOWN ARROWS TO SELECT CORRECT REAR AXLE RATIO, THEN PRESS Y TO SELECT OR N TO EXIT. _ _. :1 Press Y if you have installed a rear gear with a ratio that is different than the original factory gear. This feature will recalibrate your speedometer/odometer readings. Press the and arrows to see all of the gear ratios available for your vehicle. Press Y to lock in the gear ratio that you have installed. E. REPORT After your last choice has been made, this screen will appear and list all of your choices: YOU HAVE CHOSEN... Watch the screen as your choices scroll by on the bottom line. Now these two (2) alternating screens will appear: PRESS Y TO BEGIN PROGRAMMING PRESS N TO CHANGE OPTIONS If all choices are correct, press Y to start programming. If you want to make a change to your choices, press the N button to start over from the beginning. 12
14 F. PROGRAMMING IMPORTANT NOTE: On certain applications, the dash message center may display random code information such as REDUCED ENGINE POWER. This is a NORMAL step during the programming process for certain applications. First, the programmer will read out your vehicle s stock program. READING COMPUTER XX% When the programmer has finished this, it will wait a few seconds and then begin programming the changes into your vehicle. WRITING COMPUTER XX% This display will show percentage completion while the programming is taking place. While the unit is programming, the following is EXTREMELY IMPORTANT: * DO NOT leave the vehicle while programming is in process. * DO NOT disturb the cable. * DO NOT turn the key off. DO NOT start the engine. * If the unit stops programming or is interrupted, please make a note of any message(s) that appear on the programmer screen. This will be helpful to our technical department. Any one of these actions will disturb the programming process. The programmer is designed to recover from these conditions, but they should be avoided. IMPORTANT NOTE: If during the reading and/or programming stage, the Power Programmer does not show an increase in percentage for at least five (5) minutes, LEAVE THE KEY IN THE ON POSITION and unplug the Power Programmer from the diagnostic port. Then, reinsert the cable into the diagnostic port and press the button. This will allow the programming to continue. If the problem continues, call Hypertech at
15 Programming is complete when the unit reaches 100%. (Programming takes approximately 1.5 to 2 minutes) The following screens will appear: HYPERTECH POWER TUNING INSTALLED TURN KEY OFF FOR 30 SECONDS TO END, PRESS Y AND UNPLUG CABLE Turn the key off for thirty (30) seconds, press the Y button, and unplug the programmer cable from the DLC under the dash panel. Start the engine and make sure the Service Engine Soon light on your instrument cluster goes out (If it stays on or flashes, Call Hypertech at ). Warm up the engine and make sure it is running smoothly. If the vehicle is equipped with OnStar, reinstall the OnStar fuse(s) back into the fuse panel(s), making sure the proper amperage fuse is in each location and the fuse panel cover(s) are reinstalled (See Section 1 for details). 14
16 SECTION 3: PROGRAMMING BACK TO STOCK OR CHANGING OPTIONS You may return your vehicle s computer back to stock programming at any time after using your programmer. Follow these steps to return your vehicle back to the stock tuning or change your option settings. Reconnect the programmer to the DLC. Next, turn the ignition key to run but do not start the engine. Press the arrow and wait for the programmer to identify your vehicle, just as before. Since the programmer has programmed your vehicle s computer, this screen will appear: Then this screen will appear: HYPERTECH POWER TUNING INSTALLED PRESS Y TO RETURN VEHICLE TO FACTORY SETTINGS PRESS N TO ACCESS POWER PROGRAMMER FEATURES Press Y to return to the original factory program. Press N to allow you to see the options in Section 2. If the Y button is pressed, programming back to stock will begin. These screens will appear: WRITING COMPUTER XX% FACTORY PROGRAM IS NOW INSTALLED TURN KEY OFF FOR 30 SECONDS TO END, PRESS Y AND UNPLUG CABLE Turn the key off for thirty (30) seconds, press the Y button, and remove the cable as before. Your vehicle s computer will now be in a completely stock tuning configuration. 15
17 SECTION 4: TROUBLESHOOTING GUIDE The programmer will notify you of incidents that are out of the ordinary. Here are some of the screens that may be encountered. 1. LOSS OF COMMUNICATION CODE 91: PROGRAM YOUR VEHICLE BACK TO STOCK BEFORE PROGRAMMING ANOTHER VEHICLE This screen will appear if the programmer is unable to communicate with your vehicle s computer. If the problem is corrected, the programmer will automatically restart the programming process. Take these steps to correct the problem: 1. Make sure that the ignition key is in the RUN position and that the engine is not running. 2. Make sure that both ends of the cable are securely attached. 3. Wait at least five (5) minutes for the programmer to re-establish communication and program the vehicle. 4. If the three (3) steps above do not correct the problem, call Hypertech at CABLE REMOVED WHILE PROGRAMMING The programmer will lose power during programming if the cable is removed for any reason. If this happens, simply reconnect the cable and press the arrow. The programmer will identify your vehicle and then display: PROGRAMMING WAS INTERRUPTED... PROGRAMMING WILL CONTINUE NOW The programmer will then continue programming from where it was interrupted. NOTE: If the programmer was interrupted during the Reading stage, programming will NOT be considered interrupted, and the programmer will proceed to Section 2 on page 8. 16
18 3. ATTEMPTING TO PROGRAM A DIFFERENT VEHICLE If you attempt to program the computer in another vehicle without first programming the original vehicle back to stock, the following screen will appear: CODE 91: PROGRAM YOUR VEHICLE BACK TO STOCK BEFORE PROGRAMMING ANOTHER VEHICLE 4. CALIBRATION NOT FOUND If your vehicle has a factory program that is not recognized by the programmer, it cannot continue. This screen will appear: CODE 6D: CAL NOT FOUND Call Hypertech at the provided phone number on the programmer screen. Please have your vehicle VIN number ready. The Hypertech technical staff will instruct you what to do. 5. SOMEONE REPROGRAMS YOUR COMPUTER If a service facility reprograms your vehicle s computer with an update, your Hypertech Power Tuning will be erased. However, all you need to do is to reconnect the programmer and press the arrow. If the new vehicle computer calibration is identified by the programmer, the options in Section 2 will be shown. If the new vehicle computer calibration can not be identified by the programmer, this screen will appear: CODE 6D: CAL NOT FOUND Call Hypertech at the provided phone number on the programmer screen. Please have your vehicle VIN number ready. The Hypertech technical staff will instruct you what to do. 6. BLANK SCREEN If the programmer does not turn on when the arrow is pressed, make sure that both ends of the cable are fully inserted. Press the arrow again. If the programmer still does not turn on, check for a blown fuse in the vehicle fuse panel for either the cigarette lighter or the accessory circuit. Replace with the proper amperage fuse. Call Hypertech at , if this does not correct the problem. 17
19 IF YOU HAVE ANY PROBLEMS OR QUESTIONS, PLEASE CALL OUR TECHNICAL STAFF AT HOURS: 8AM - 5PM Central Time, Monday - Friday Hypertech, Inc Appling Road Bartlett, TN Visit our website at or us at sales@hypertech.com What To Do Before Taking Your Vehicle In For Service If you take your vehicle to a dealer or mechanic for service, you must first remove the Hypertech Power Tuning and restore the stock programming. This is because diagnostic devices expect to find stock calibrations and will often overwrite the program if the latest calibration is not found in the computer memory. This will result in the loss of your Hypertech Power Tuning data. The Hypertech Power Programmer has an internal security system that allows its Power Tuning program to be installed in only one vehicle at a time. In order to maintain the most current calibrations for your vehicle, the Power Programmer is designed to allow you to restore the stock tuning before you take your vehicle in for service so that the service technician can upgrade your stock calibrations. After the service is complete, you can reinstall your Hypertech Power Tuning. If you have any questions related to service issues, please call Hypertech at PRODUCT WARRANTY Factory Direct Limited Lifetime Warranty All HYPERTECH Power Tuning Products* are warranted against defects in materials or workmanship. Hypertech s liability under this warranty shall be limited to the prompt correction or replacement of any defective part of the product which HYPERTECH determines to be necessary. This Limited Lifetime Warranty is to the original purchaser for as long as he or she owns the vehicle on which the product is originally installed, providing all the information requested is furnished. You must retain a copy of your original sales invoice or receipt. Without proper documentation, a service fee will be applied. Resold units are NOT covered under this warranty. * Power Tuning products are Power Chips, Power Modules, Power Tuning Modules, HyperPACs, and Power Programmers.
20 SPECIALTY AUTO PARTS CONSUMER S BILL OF RIGHTS Your Rights To Personalize Your Vehicle Article 1: You have the Right to buy high-quality, reliable aftermarket performance and specialty parts, accessories, and styling options. Article 2: Article 3: Article 4: Article 5: You have the Right to use high-quality aftermarket parts and know that your new vehicle warranty claims will be honored. In fact, your vehicle dealer may not reject a warranty claim simply because an aftermarket product is present. A warranty denial under such circumstances may be proper only if an aftermarket part caused the failure being claimed. You have the Right to install and use emissions-legal aftermarket performance parts without incurring hassles and onerous procedures during state vehicle emissions inspections. You have the Right to actively oppose any proposed (or existing) laws or regulations that will reduce your freedom to use aftermarket automotive parts and service or will curtail your ability to take part in the automotive hobbies of your choice. You have the Right to patronize independent retail stores and shops for vehicle parts and service. The U.S. aftermarket offers the world s finest selection of performance and specialty parts, accessories, and styling options. These aftermarket products satisfy the most discriminating customers seeking personalized vehicles for today s lifestyle. The Consumer s Bill Of Rights courtesy of Specialty Equipment Market Association (SEMA)

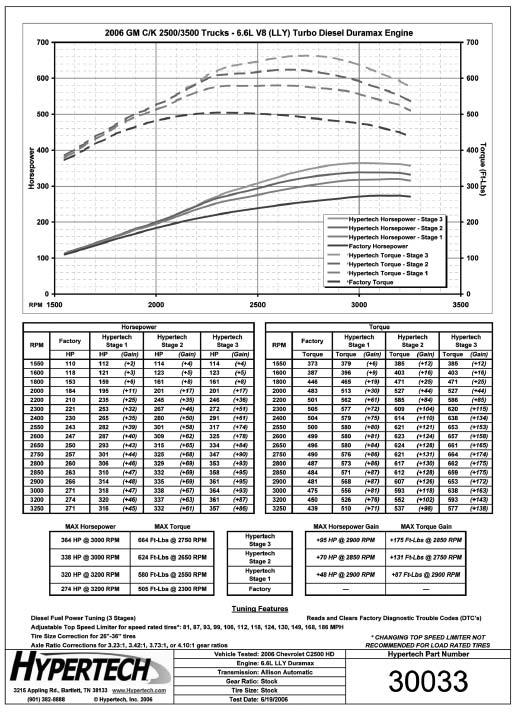
21 Typical Performance Gains NOTE: All dynamometer tests are performed under controlled conditions. Results may vary, depending on the specific vehicle, altitude, temperature, fuel used, and various other conditions that affect vehicle performance. Power gains shown are specific to the vehicle tested and representative of the average gains verified. For a color, printable power graph of your particular application, check out our website at
22
23
PPJ HYPERTECH POWER PROGRAMMER III STEP-BY-STEP INSTALLATION INSTRUCTIONS FOR JEEP WRANGLER/ CHEROKEE/GRAND CHEROKEE WITH 4.
 PPJ HYPERTECH POWER PROGRAMMER III FOR JEEP WRANGLER/ CHEROKEE/GRAND CHEROKEE WITH 4.0L I-6 ENGINE STEP-BY-STEP INSTALLATION INSTRUCTIONS 1.26.05 Part #580 2006 Hypertech, Inc. Table Of Contents Important
Reference Guide and Step-by-Step Installation Manual
 Reference Guide and Step-by-Step Installation Manual Some adjustable features listed on the following pages are NOT applicable for all applications. The year, make, and model of the vehicle will determine
PP3 HYPERTECH POWER PROGRAMMER III STEP-BY-STEP INSTALLATION INSTRUCTIONS FOR LS1 CAMARO/FIREBIRD & LS1/LS6 CORVETTE. Part # Hypertech, Inc.
 PP3 HYPERTECH POWER PROGRAMMER III FOR LS1 CAMARO/FIREBIRD & LS1/LS6 CORVETTE STEP-BY-STEP INSTALLATION INSTRUCTIONS 7.7.06 Part #739 2006 Hypertech, Inc. TABLE OF CONTENTS Important Information..............................
Power. Reprogram. JET Performance Products Apex Circle, Huntington Beach, CA (714) Fax: (714)
 Fax: (714)") Performance PROGRAMMER GM Truck 4.8L, 5.3L, 6.0L & 8.1L WARNING:Failure to read and follow instructions may result in damage to your vehicle. Please read and follow the instructions before attempting to
Performance PROGRAMMER GM Truck 4.8L, 5.3L, 6.0L & 8.1L WARNING:Failure to read and follow instructions may result in damage to your vehicle. Please read and follow the instructions before attempting to
GM Truck 4.8L, 5.3L, 6.0L & 8.1L. E-Z Tune Programmer. Reprogram
 GM Truck 4.8L, 5.3L, 6.0L & 8.1L E-Z Tune Programmer 4 Reprogram JET Performance Products 17491 Apex Circle, Huntington Beach, CA 92647 (714) 848-5515 Fax: (714) 847-6290 Power 2010 JET Performance Products
Power. Reprogram. GM Truck 4.3L, 5.0L, 5.7L, 7.4L
 Performance PROGRAMMER GM Truck 4.3L, 5.0L, 5.7L, 7.4L 4 Reprogram JET Performance Products 17491 Apex Circle, Huntington Beach, CA 92647 (714) 848-5515 Fax: (714) 847-6290 Power 2012 JET Performance Products
Ford Gasoline Speedo-Pro Programmer. Reprogram. Power
 Ford Gasoline Speedo-Pro Programmer 4 Reprogram Power INSTALLATION INSTRUCTIONS OVERVIEW Your vehicle has an onboard computer that controls the engine and transmission. The JET programmer reprograms your
Power. Reprogram. Ford Gasoline E-Z TUNE Programmer
 Ford Gasoline E-Z TUNE Programmer 4 Reprogram JET Performance Products 17491 Apex Circle, Huntington Beach, CA 92647 (714) 848-5515 Fax: (714) 847-6290 Power 2010 JET Performance Products JET P/N 16-300
GM Truck 4.8L, 5.3L, 6.OL & 8.1 L
 GM Truck 4.8L, 5.3L, 6.OL & 8.1 L JET Performance Products 17391 Apex Crcle. Hunt~ngton Beach, CA 92647 :714) 848-5515 FOX (71 -I) 847-6290 c 2006 JET Performance Products JET PIN 15-00.7 11/05 GENERAL
Superchips Model 2704 MAX MicroTuner GM Trucks with 6.6L Duramax Diesel Engines Vehicle Programming Instructions
 Page 1 of 12 Form 0137D 11/30/2004 Superchips Inc. Superchips Model 2704 MAX MicroTuner 2004-2005 GM Trucks with 6.6L Duramax Diesel Engines Vehicle Programming Instructions PLEASE READ THIS ENTIRE INSTRUCTION
Part # FORD F L EcoBoost Reference Guide and Step by Step Installation Manual
 Part #2000 2015-2016 FORD F-150 3.5L EcoBoost Reference Guide and Step by Step Installation Manual Table of Contents SECTION 1: PROGRAMMING INSTRUCTIONS... 3 1-1: MAIN MENU... 4 1-2: TUNING MENU... 5 Suggested
Owner smanual Banks OttoMind Programmer
 with Installation Instructions Owner smanual Banks OttoMind Programmer w/economind Features 01-07 GM 8.1L Workhorse Class-A Motor Home 99-07 4.8L, 5.3L, 6.0L, 8.1L Trucks THIS MANUAL IS FOR USE WITH P/N
USER GUIDE 1 USER GUIDE
 USER GUIDE 1 USER GUIDE 1 TABLE OF CONTENTS IN THE BOX...3 NAVIGATING THE MENUS...3 MENU LAYOUT...3 UPDATE YOUR PROGRAMMER...4 CONNECT WITH THE MOTORCYCLE...5 TUNE YOUR MOTORCYCLE...6 ADDITIONAL FEATURES...8
Superchips Model 1725 MAX MicroTuner 4.6L Ford Automobiles Vehicle Programming Instructions
 Page 1 of 16 Form 0130K 06/06/2004 Superchips Model 1725 MAX MicroTuner 4.6L Ford Automobiles Vehicle Programming Instructions PLEASE READ THIS ENTIRE INSTRUCTION SHEET BEFORE YOU PROCEED This product
Gas Downloader Ford F Dodge Ram 5.7L Hemi early 08 GM full sized pickup/suv 43590
 INSTALLATION Manual Gas Downloader Vehicle Application Power Pup Part# 04-08 Ford F-150 41590 03-08 Dodge Ram 5.7L Hemi 42590 99-early 08 GM full sized pickup/suv 43590 TABLE OF CONTENTS TROUBLESHOOTING:
FAST-FLASH Programmer Ford 6.0L Powerstroke Turbo Diesel (2003 and Newer)
") INSTRUCTIONS FAST-FLASH Programmer Ford 6.0L Powerstroke Turbo Diesel (2003 and Newer) Thank you for your purchase of electronic tuning products; we are proud to be your manufacturer of choice! The FAST-FLASH
INSTRUCTIONS FAST-FLASH Programmer Ford 6.0L Powerstroke Turbo Diesel (2003 and Newer) Thank you for your purchase of electronic tuning products; we are proud to be your manufacturer of choice! The FAST-FLASH
Table of Contents. Disclaimers Warranty... 5 Gas Tuner Instructions Diesel Tuner Instructions Fuse Removal...
 INSTALLATION Table of Contents Disclaimers... 3-4 Warranty... 5 Gas Tuner Instructions... 6-10 Diesel Tuner Instructions... 11-14 Fuse Removal... 15 2 Release The Beast Thanks for your purchase of a Quadzilla
Vehicle Programming Instructions
 Page 1 of 20 Form 0161A 2/24/2006 Superchips Model 2805 Tuner 2001-2006 GM Duramax 2500-3500 Diesel Trucks ming Instructions PLEASE READ THIS ENTIRE INSTRUCTION SHEET BEFORE YOU PROCEED Thank you for choosing
Part #2000/2100 Reference Guide and Step by Step Installation Manual Performance Chips & Programmers
 Part #2000/2100 Reference Guide and Step by Step Installation Manual Performance Chips & Programmers PLEASE READ BEFORE USING PROGRAMMER! The installation process is very easy and should not take long
Duramax GM 6.6L Duramax Diesel LB7/LLY/LBZ/LMM ( )
") PPEdiesel.com Duramax GM 6.6L Duramax Diesel 2001-2010 LB7/LLY/LBZ/LMM (111001800) User Guide Maximum performance designed for closed course racing applications. Technical Support (714) 985-4825 Rev: 06/06/18
PPEdiesel.com Duramax GM 6.6L Duramax Diesel 2001-2010 LB7/LLY/LBZ/LMM (111001800) User Guide Maximum performance designed for closed course racing applications. Technical Support (714) 985-4825 Rev: 06/06/18
UNLEASH THE POWER. See More at: bullydog.com WITH BULLY DOG PERFORMANCE PRODUCTS
 UNLEASH THE POWER WITH BULLY DOG PERFORMANCE PRODUCTS Monitor Intake Systems Exhaust Systems Fuel Reformulator See More at: bullydog.com Doc.# BD40502 v1.2.0 For a full listing of Diagnostic Trouble Codes
UNLEASH THE POWER INSTALLATION MANUAL. See More at: bullydog.com WITH BULLY DOG PERFORMANCE PRODUCTS
 T Shirts UNLEASH THE POWER WITH BULLY DOG PERFORMANCE PRODUCTS Intake Systems INSTALLATION MANUAL Exhaust Systems Fuel Reformulator See More at: bullydog.com Doc.# BD40505 v1.0.0 For a full listing of
Smart Power. Smarter Decision. GettinG Started
 Smart Power. Smarter Decision. TM GettinG Started TM Welcome Thank you for purchasing Superchips state-of-the-art Cortex hand held vehicle programmer and diagnostic tool. Superchips drive in the automotive
Vehicle Application Triple Dog Part # OutLook Combo# Dodge 5.9L Cummins Dodge 5.9L Cummins Ford 7.
 INSTALLATION Manual Vehicle Application Triple Dog Part # OutLook Combo# 03-05 Dodge 5.9L Cummins 40500 42500 06-07 Dodge 5.9L Cummins 40500 41500 99.5-03 Ford 7.3 L Power Stroke 40500 N/A 03-07 Ford 6.0
Update Programming Transmission Control Module (TCM) for Improved Upshifting. Condition. Production
 for Improved Upshifting. Condition. Production") Subject: Model(s): Update Programming Transmission ontrol Module (TM) for Improved Upshifting (OE) Touareg 3.2L V6 (eng. code BMX) 2005 2006 Group: Number: Date: 01 05 16 Dec. 20, 2005 Update Programming
Subject: Model(s): Update Programming Transmission ontrol Module (TM) for Improved Upshifting (OE) Touareg 3.2L V6 (eng. code BMX) 2005 2006 Group: Number: Date: 01 05 16 Dec. 20, 2005 Update Programming
Duramax LB7 / LLY / LBZ / LMM
 Pacific Performance Engineering, Inc. www.ppediesel.com 2001-2009 Duramax LB7 / LLY / LBZ / LMM Economy / Standard / Hot Installation Guide Made in the U.S.A ATTENTION: Please read instructions carefully
2001 Dodge Durango ACCESSORIES & EQUIPMENT' 'Anti-Theft Systems - Dakota & Durango 2001 ACCESSORIES & EQUIPMENT
 DESCRIPTION VEHICLE THEFT SECURITY SYSTEM 2001 ACCESSORIES & EQUIPMENT Anti-Theft Systems - Dakota & Durango Vehicle Theft Security System (VTSS) provides perimeter protection against unauthorized use
Drivetrain Binding/Tires Scrubbing During Low Speed Maneuvering, ESP Light in Instrument Cluster ON or Flashing
 Condition Drivetrain Binding/Tires Scrubbing During Low Speed Maneuvering, ESP Light in Instrument Cluster ON or Flashing During low speed turns/maneuvering, vehicle drivetrain feels as if it is binding
2002 Dodge Intrepid ES ACCESSORIES & EQUIPMENT Anti-Theft Systems - Concorde, Intrepid & 300M
 DESCRIPTION SENTRY KEY IMMOBILIZER SYSTEM 2002-03 ACCESSORIES & EQUIPMENT Anti-Theft Systems - Concorde, Intrepid & 300M CAUTION: Large metallic objects, or items such as magnetic pass-keys, may cause
MODEL MCL-3212 SPEEDOMETER/TACHOMETER for 2012 up Dyna and Softail with 4 gauge
 MODEL MCL-3212 SPEEDOMETER/TACHOMETER for 2012 up Dyna and Softail with 4 gauge IMPORTANT NOTE! This gauge has an odometer preset option that is only available one time in the first 100 miles (160km) of
Updating Online. USB Cable included
 INSTALLATION Manual Gas Downloader Vehicle Application Nissan 5.6L V8 Titan 05-09 Nissan 5.6L V8 Armada 05-09 Nissan 5.6L V8 Pathfinder 08-09 Nissan 4.0L V6 Pathfinder 05-09 Nissan 4.0L V6 Frontier 05-09
UNLEASH THE POWER INSTALLATION MANUAL. See More at: bullydog.com WITH BULLY DOG PERFORMANCE PRODUCTS
 T Shirts UNLEASH THE POWER WITH BULLY DOG PERFORMANCE PRODUCTS Intake Systems INSTALLATION MANUAL Exhaust Systems Fuel Reformulator See More at: bullydog.com Doc.# BD40506 v1.0.0 For a full listing of
Service Bulletin Immobilizer System (Type 6) (Supersedes , dated February 20, 2009; see REVISION SUMMARY) February 22, 2013
 (Supersedes , dated February 20, 2009; see REVISION SUMMARY) February 22, 2013") Service Bulletin 06-033 Applies To: 2007-09 MDX ALL 2007-12 RDX ALL February 22, 2013 Immobilizer System (Type 6) (Supersedes 06-033, dated February 20, 2009; see REVISION SUMMARY) REVISION SUMMARY This
Service Bulletin 06-033 Applies To: 2007-09 MDX ALL 2007-12 RDX ALL February 22, 2013 Immobilizer System (Type 6) (Supersedes 06-033, dated February 20, 2009; see REVISION SUMMARY) REVISION SUMMARY This
2001 Chevrolet Corvette ACCESSORIES & EQUIPMENT Remote Keyless Entry Systems - Corvette
 DESCRIPTION 2001 ACCESSORIES & EQUIPMENT Remote Keyless Entry Systems - Corvette Remote Keyless Entry (RKE) system is controlled by Remote Function Actuation (RFA) system. Transmitter allows remote control
Vehicle Programming Instructions
 Page 1 of 24 Form 0163G 2815 09/02/08 Superchips Inc. Superchips Model 2815 flashpaq Tuner 1996-2008 GM/GMC/Chevrolet/Cadillac/Hummer 1/2, 3/4 & 1 Ton Trucks & SUV Series V8 Gas Motors 2006 GM/GMC/Chevrolet
NO PART OF THIS DOCUMENT MAY BE REPRODUCED WITHOUT PRIOR AGREEMENT AND WRITTEN PERMISSION OF FORD PERFORMANCE PARTS.
 Table of Contents Table of Contents... 1 Getting Started... 2 ProCal Flash Tool... 2 Verify Package Contents... 2 Getting to Know the ProCal 3 Software... 3 Prepare Vehicle for Flashing... 7 Download Calibration
LIST OF COMPONENTS BUTTON FUNCTIONALITY DISPLAY DEVICE
 BEFORE YOU BEGIN CARB/EPA COMPLIANCE LIST OF COMPONENTS DISPLAY DEVICE USB CABLE PROTECTIVE BAG BUTTON FUNCTIONALITY Left Back Exit Up_Increase OK Down_Decrease Right Next Forward NAVIGATING TIPS: To move
MODEL MCL /8 SPEEDOMETER/TACHOMETER for 2004 up
 MODEL MCL-3204 3-3/8 SPEEDOMETER/TACHOMETER for 2004 up IMPORTANT NOTE! This gauge has an odometer preset option that is only available one time in the first 100 miles (160km) of operation. See Odometer
SAFETY PRECAUTIONS SAFETY FIRST!... 1 ABOUT THE CODE READER CONTROLS AND INDICATORS... 3 DISPLAY FUNCTIONS... 4
 Table of Contents SAFETY PRECAUTIONS SAFETY FIRST!... 1 ABOUT THE CODE READER CONTROLS AND INDICATORS... 3 DISPLAY FUNCTIONS... 4 USING THE CODE READER CODE RETRIEVAL PROCEDURE... 7 VIEWING ABS DTCs...
Table of Contents Getting Started Read Me 6 Installation 9 Controls Power Levels Tire Size Axle Ratio 19 FAQs
 Table of Contents 3 Getting Started 3 Materials 3 Required Tools 4 Read Me 4 Safety Warning & Caution 5 Safety Guidelines 6 Installation 6 PCM Removal 7 Pulsar Installation 9 Controls 9 Steering Wheel
Some of the menu options or features displayed in this manual are vehicle specific, and may not be available for your make and model.
 BASIC MENU LAYOUT Some of the menu options or features displayed in this manual are vehicle specific, and may not be available for your make and model. Quick Tunes Advanced Tunes See tuning sections WARNING:
INSTALLATION GUIDE Multi-Gauge Set with sending units Part Number: M 9999
 Made in America Lifetime Guarantee Thank you for purchasing this instrument set from Intellitronix. We value our customers! INSTALLATION GUIDE Multi-Gauge Set with sending units Part Number: M 9999 * Always
CHR-2. Relearn can be completed using a properly formatted scan tool and relearn magnet. * Relearn magnet not required for Prowler CHR-4
 CHR-1 1. Inflate all tires pressure to listed on tire placard 2. Turn the ignition switch to the ON position (engine off) displayed. 4. Press the STEP button to select YES. 5. Press the MENU button to
INSTALLATION GUIDE Chevrolet Digital Dash Panel Part Number: DP6002 Year Series:
 Made in America Lifetime Guarantee Thank you for purchasing this instrument panel from Intellitronix. We value our customers! INSTALLATION GUIDE Chevrolet Digital Dash Panel Part Number: DP6002 Year Series:
QUICK START GUIDE. (407) /
 /") QUICK START GUIDE (407) 774-2447 / www.sctflash.com SECTION 1: PARTS + CHECKLIST X4 DEVICE MICRO USB CABLE HDMI/OBD II CABLE TOOLS NEEDED: Fuse Puller Voltage Tester Battery Charger Pliers SECTION 2: PRE-INSTALL
QUICK START GUIDE (407) 774-2447 / www.sctflash.com SECTION 1: PARTS + CHECKLIST X4 DEVICE MICRO USB CABLE HDMI/OBD II CABLE TOOLS NEEDED: Fuse Puller Voltage Tester Battery Charger Pliers SECTION 2: PRE-INSTALL
Accessport. User Guide AP3-POR-001 AP3-POR-002 AP3-POR-003 AP3-POR-004 AP3-POR-005 AP3-POR-006
 Accessport User Guide AP3-POR-001 AP3-POR-002 AP3-POR-003 AP3-POR-004 AP3-POR-005 AP3-POR-006 Contents Product Introduction... 3 Supported Vehicle List... 3 In-Box Contents... 5 Accessport Installation...
Title: M.I.L. ON DTC P3191, P3190, AND/OR P0A0F Models:
 Technical Service BULLETIN October 18, 2004 Title: M.I.L. ON DTC P3191, P3190, AND/OR P0A0F Models: 04-05 Prius EG047-04 ENGINE TSB REVISION NOTICE: S February 22, 2005: Applicable Vehicles has been updated
Owner s Manual Ford Powerstroke 7.3 liter CAUTION: THIS IS A HIGH PERFORMANCE PRODUCT. USE AT YOUR OWN RISK.
 Owner s Manual 1994 2003 Ford Powerstroke 7.3 liter CAUTION: THIS IS A HIGH PERFORMANCE PRODUCT. USE AT YOUR OWN RISK. Edge Products Inc distributed by BD Power Evolution FORD Powerstroke 7.3 liter - 1
2007 (PM) Dodge Caliber
 Dodge Caliber") July 2006 Dealer Service Instructions for: Emissions Recall F29 Effective immediately, all repairs on involved vehicles are to be performed according to this notification. Service Bulletin (TSB) # 18-020-06
July 2006 Dealer Service Instructions for: Emissions Recall F29 Effective immediately, all repairs on involved vehicles are to be performed according to this notification. Service Bulletin (TSB) # 18-020-06
Installation Instructions For #64060 Striker I Power Module GMC/Chevrolet Duramax LB7 Diesel
 2501 Ludelle Street Fort Worth, Texas 76105 817-244-6212 Phone 817-244-4024 Fax 888-350-6588 Sales 800-423-9696 Tech E-mail: painless@painlessperformance.com Web: www.painlessperformance.com Installation
14801A Reprogram Engine Control Module
 14801A Reprogram Engine Control Module 2011-2013 Chevrolet Cruze Equipped with 1.4L Engine (RPO LUJ and LUV) and Automatic Transmission The Service Procedure section of this bulletin has been revised.
CUSTOMER SATISFACTION PROGRAM
 Program Bulletin Bulletin No.: Date: 35460 March 2016 SUBJECT: CUSTOMER SATISFACTION PROGRAM Intake Air Heater (IAH) Fires MODELS: 2015 Chevrolet Silverado HD 2015 GMC Sierra HD Equipped with Duramax Diesel
Vehicle Programming Instructions Ford Powerstroke 7.3 liter
 Vehicle Programming Instructions 1994 2003 FORD Powerstroke 7.3 liter 2003, Edge Products Incorporated All rights reserved. Edge Products Incorporated 1080 South Depot Dr. Ogden, UT 84404 (801) 476-3343
Director P. O. Box 1904 Service Engineering Operations Dearborn, Michigan Ford Customer Service Division
 Michael A. Berardi Ford Motor Company Director P. O. Box 1904 Service Engineering Operations Dearborn, Michigan 48121 Ford Customer Service Division TO: All U.S. Ford and Lincoln Dealers August 26, 2014
Getting Started HONDA
 Getting Started HONDA Product Introduction Congratulations on the purchase of your new AccessPORT handheld programmer. This quick start guide explains how to install the AP on your vehicle. Refer to the
RETAINS STEERING WHEEL CONTROLS, FACTORY SETTINGS AND MORE!
 Owner's Guide CH2 & Kenwood radio RETAINS STEERING WHEEL CONTROLS, FACTORY SETTINGS AND MORE! PRODUCTS REQUIRED idatalink Maestro RR Radio Replacement Interface CH2 Installation Harness OPTIONAL ACCESSORIES
User s Manual XOB15091 OBD II / EOBD CODE READER. All Rights Reserved. Warranty and Service
 5. Warranty and Service 5.1 Limited One Year Warranty The manufacturer/supplier warranty provided to customers for this product will be free from all defects in materials and workmanship for a period of
RETAINS STEERING WHEEL CONTROLS, FACTORY SETTINGS AND MORE!
 Owner's Guide CH3 & Kenwood radio RETAINS STEERING WHEEL CONTROLS, FACTORY SETTINGS AND MORE! PRODUCTS REQUIRED idatalink Maestro RR Radio Replacement Interface CH3 Installation Harness OPTIONAL ACCESSORIES
Technical Information
 Technical Service 2/14 ENU WE02 9 WE02 - Re-programming Instrument Cluster (Workshop Campaign) Important Note: CRITICAL WARNING - THIS CAMPAIGN INCLUDES STEPS WHERE SEVERAL CONTROL UNITS IN THE VEHICLE
IMPORTANT: A small number of the above vehicles have already been reprogrammed and, therefore, have been excluded from this recall.
 Dealer Service Instructions for: Safety Recall No. C33 Reprogram BCM Vehicle Lighting November 2003 Models 2003 (ZB) Dodge Viper IMPORTANT: A small number of the above vehicles have already been reprogrammed
INDEX. 1.Safety Precautions and Warnings...3
 INDEX 1.Safety Precautions and Warnings...3 2. General Information...5 2.1 On-Board Diagnostics (OBD) II... 5 2.2 Diagnostic Trouble Codes (DTCs)... 6 2.3 Location of the Data Link Connector (DLC)...7
INSTALLATION GUIDE Chevrolet Digital Dash Panel Part Number: DP6002 YEAR SERIES:
 Intelligent Electronics INSTALLATION GUIDE Chevrolet Digital Dash Panel Part Number: DP6002 YEAR SERIES: 1964-1966 * Disconnect the battery before attempting any electrical work on your vehicle. * KIT
VOLUNTARY SAFETY RECALL CAMPAIGN QUEST FUEL PUMP CONTROL MODULE
 Reference: NTB12-022a April 12, 2012 Date: VOLUNTARY SAFETY RECALL CAMPAIGN 2011-2012 QUEST FUEL PUMP CONTROL MODULE This bulletin has been amended. The NHTSA # and OWNER S LETTER have been added. Please
Charging System. Activity 11. Battery Drain Testing
 Charging System 812FJ Student Manual Charging System Activity 11 Battery Drain Testing Performance Objectives: Test for and measure battery drain using manufacturer s service procedures. Diagnose the cause
INSTALLATION GUIDE Chevrolet Digital Dash Panel Part Number: DP6004 Year Series:
 INSTALLATION GUIDE Chevrolet Digital Dash Panel Part Number: DP6004 Year Series: 1973-1987 * Disconnect the battery before attempting any electrical work on your vehicle. * KIT COMPONENTS Three (3) Digital
Components. Options Accessory Harness USB Charger. Quick Connector. Hook & Loop / Cable-ties. RFID Antenna. Module. Main Harness.
 SRX SERIES Table of Contents - Components - Planning The Install - Mounting - Switched Power - Attach Accessory Harness - Plug In Module - Back-Up Battery - Remote Encoding - 2-Way RFID Remote User Instructions
INSTALLATION GUIDE Chevrolet Impala/Caprice Digital Dash Panel Part Number: DP1208 Year Series: 1968
 Made in America Lifetime Guarantee Thank you for purchasing this instrument from Intellitronix. We value our customers! INSTALLATION GUIDE Chevrolet Impala/Caprice Digital Dash Panel Part Number: DP1208
Owner s guide. AVGM5 - Rear Seat Video Retention Harness SPGM5 - Optional Speaker for GM5 Vehicles
 Owner s guide GM5 & KENWOOD RADIO RETAINs Steering Wheel Controls, onstar TM, onstar TM bluetooth, XM TM SATELLITE and more! PRODUCTS REQUIRED idatalink Maestro RR Radio Replacement Interface GM5 Installation
DIAGNOSIS AND TESTING
 204-04-1 Wheels and Tires 204-04-1 DIAGNOSIS AND TESTING Tire Pressure Monitoring System Special Tool(s) Vehicle Communication Module (VCM) and Integrated Diagnostic System (IDS) software with appropriate
Underhood fuse block is located at the left side of the engine compartment to the rear of the battery. See Fig. 7.
 Page 1 of 5 UNDERHOOD FUSE BLOCK NOTE: Underhood fuse block is located at the left side of the engine compartment to the rear of the battery. See Fig. 7. Fig. 7: Locating Underhood Fuse Block Courtesy
MDX-300 Series. For 12-volt automotive starting batteries and starting/charging systems INSTRUCTION MANUAL
 For 12-volt automotive starting batteries and starting/charging systems INSTRUCTION MANUAL Blank page Contents Caution... 4 Capabilities... 4 Display and Keypad... 4 Preparations Before the Test... 6 Connecting
Director P. O. Box 1904 Service Engineering Operations Dearborn, Michigan Ford Customer Service Division
 Michael A. Berardi Ford Motor Company Director P. O. Box 1904 Service Engineering Operations Dearborn, Michigan 48121 Ford Customer Service Division TO: All U.S. Ford and Lincoln Dealers April 4, 2014
Battery Management Innovation. For 12-volt automotive starting batteries and starting/charging systems INSTRUCTION MANUAL
 Battery Management Innovation For 12-volt automotive starting batteries and starting/charging systems INSTRUCTION MANUAL ! CAUTION Because of the possibility of personal injury, always use extreme caution
 Page 1 of 29 Section 04-05: Suspension, Computer Controlled 1997 Town Car Workshop Manual DIAGNOSIS AND TESTING Procedure revision date: 05/16/2000 Suspension, Computer Controlled Inspection and Verification
SERVICE PROCEDURE. Vehicles Built Before May 19, Proceed to Page 2. Vehicles Built On or After May 19, Proceed to Page 9.
 PAGE 1 OF 12 Certain 2012 THROUGH 2014 Model Year focus electric vehicles high voltage wire harness inspection and powertrain Control Module reprogramming overview In some of the affected vehicles a "Stop
MURANO; AUTOMATIC BACK DOOR DOES NOT OPERATE AND RELATED DTCS
 Classification: Reference: Date: BT15-020b NTB15-073b March 22, 2016 2015-2016 MURANO; AUTOMATIC BACK DOOR DOES NOT OPERATE AND RELATED DTCS This bulletin has been amended. Changes have been made to all
Table of Contents 1. INTRODUCTION GENERAL INFORMATION-ABOUT OBDII/EOBD PRODUCT DESCRIPTIONS OPERATIONS...11
 Table of Contents 1. INTRODUCTION...1 2. GENERAL INFORMATION-ABOUT OBDII/EOBD...1 2.1 ON-BOARD DIAGNOSTICS (OBD) II...1 2.2 DIAGNOSTIC TROUBLE CODES (DTCS)...2 2.3 LOCATION OF THE DATA LINK CONNECTOR (DLC)...3
Alternative Fuel Engine Control Unit
 1999 Chevrolet/Geo Cavalier (CNG) Alternative Fuel Engine Control Unit Table 1: AF ECU Function Parameters The (AF ECU) controls alternative fuel engine operation. The control unit monitors various engine
SCHEMATIC AND ROUTING DIAGRAMS
 2004 ACCESSORIES & EQUIPMENT Keyless Entry - Corvette SCHEMATIC AND ROUTING DIAGRAMS KEYLESS ENTRY SCHEMATICS Fig. 1: Driver Door Schematic Courtesy of GENERAL MOTORS CORP. Fig. 2: Passenger Door Schematic
Revised October 2014 Dealer Service Instructions for: Customer Satisfaction Notification P56 Reprogram Transmission Control Module
 Revised October 2014 Dealer Service Instructions for: Customer Satisfaction Notification P56 NOTE: Labor operation numbers for the related operations have been revised. Models 2014-2015 (KL) Jeep Cherokee
INSTALLATION GUIDE Ford Mustang Digital Dash Panel Part Number: DP7009 Year Series:
 Made in America Lifetime Guarantee Thank you for purchasing this gauge panel from Intellitronix. We value our customers! INSTALLATION GUIDE Ford Mustang Digital Dash Panel Part Number: DP7009 Year Series:
Smart Sensor Pro+ User Guide
 Smart Sensor Pro+ User Guide Important Information FCC Notice This device complies with part 15 of the FCC Rules. Operation is subject to the following two conditions: 1. This device may not cause harmful
DESCRIPTION & OPERATION
 DESCRIPTION & OPERATION 1998-99 SUSPENSION Electronic - Real Time Damping - Corvette The Real Time Damping (RTD) system automatically controls vehicle ride by independently controlling a damper solenoid
SPD DEVICE USER MANUAL V1.2.
 USER MANUAL V1.2 contact@sedox.com www.sedox-performance.com 1. Introduction Congratulations! With your new Sedox SPD Device you can now easily reprogram your car in a few minutes. Sedox SPD Device is
MODEL MVX-2011 TANK MOUNT SPEEDOMETER/TACHOMETER
 MODEL MVX-2011 TANK MOUNT SPEEDOMETER/TACHOMETER Wiring Diagram The MVX-2011 gauges will work on 2011-up Softail models with 5 gauges or 2012-up Dyna models with 5 gauges. It is a direct plug in on these
advanced FLOW engineering Instruction Manual P/N:
 advanced FLOW engineering Instruction Manual P/N: 77-84010 Make: Chevrolet Model: Silverado HD Year: 2017-2018 Engine: V8-6.6L (td) Duramax (L5P) Make: GMC Model: Sierra HD Year: 2017-2018 Engine: V8-6.6L
Volkswagen Information System. Introduction
 Volkswagen Information System Introduction In this section you ll find information about: Using the instrument cluster menus: Basic version Using the instrument cluster menus: Premium version with multi-function
Holden VZ 3.6L ECU & Powertrain Interface Module Linking Instructions
 Holden VZ 3.6L 2004-2006 ECU & Powertrain Interface Module Linking Instructions Contents Page In Brief PIM Replacement, ECM Replacement 2 VZ 3.6L System Overview 3 PIM Functions 4 PIM Location 4 ECM Functions
1999 Mercury Cougar ACCESSORIES & EQUIPMENT' 'Passive Anti-Theft Systems - Cougar 1999 ACCESSORIES & EQUIPMENT
 DESCRIPTION 1999 ACCESSORIES & EQUIPMENT Passive Anti-Theft Systems - Cougar Passive Anti-Theft System (PATS) is available on some vehicles. The system is passive in that it does not require any activity
PROCAL MODULE USER MANUAL JK WRANGLER
 PROCAL MODULE USER MANUAL 2007+ JK WRANGLER AEV ProCal Module User MANUAL Please consult the Troubleshooting Guide if you experience any issues. INCLUDED PARTS QTY REQUIRED TOOLS ProCal Module 1 Fine
Side view. Fig. 1 Vehicle side overview.
 Side view Fig. 1 Vehicle side overview. Key to fig. 1: (1) Fuel filler flap (2) Roof antenna (3) Outside door handles (4) Outside mirror Additional turn signal light (5) Lift points for the jack Front
RECALL - ECM UPDATE FOR CARBON MONOXIDE EMISSIONS
 RECALL - ECM UPDATE FOR CARBON MONOXIDE EMISSIONS # 14535: Product Emission - Carbon Monoxide Emissions - (Mar 3, 2015) Subject: 14535 - Carbon Monoxide Emissions Models: 2010 Chevrolet Equinox 2010 GMC
Subject Underhood G System Error Codes and Symptoms System or Parts affected
 System or Parts affected Index Underhood70G (V90Gxxx) System or Parts affected... 1 Overview... 1 Identifying your System... 1 Retrieving Logged Error Messages... 1 Error Messages... 3 Error Message Table...
SCHEMATIC AND ROUTING DIAGRAMS
 2004 ACCESSORIES & EQUIPMENT Tire Pressure Monitoring - Corvette SCHEMATIC AND ROUTING DIAGRAMS TIRE PRESSURE MONITORING SYSTEM SCHEMATICS Fig. 1: Tire Pressure Monitoring System Schematics Courtesy of
Before You Begin. Contents. What s in the box: Button Functions
 Getting Started Contents Before You Begin...2 Dear Auto Enthusiast...3 Getting Started - Step 1...4 Getting Started - Step 2...5 Getting Started - Step 3...6 Tunes...8 Advanced Options...10 Jeep Features...12
(KL) Jeep Cherokee
 Jeep Cherokee") Dealer Service Instructions for: Customer Satisfaction Notification S78 Reprogram Engine Control Module October 2016 Effective immediately all repairs on involved vehicles are to be performed according
Dealer Service Instructions for: Customer Satisfaction Notification S78 Reprogram Engine Control Module October 2016 Effective immediately all repairs on involved vehicles are to be performed according
ATS Diesel Performance 5293 Ward Road Arvada, CO E-Power Programmer. Toll free
 ATS Diesel Performance 5293 Ward Road Arvada, CO. 80002 www.atsdiesel.com Dodge Ram 2003-2005 2003-2006 E-Power Programmer Toll free 800.949.6002 DISCLAIMER OF LIABILITY This is a performance product which
Technical Service Bulletin
 17 Oil pressure light on and/or rattle noise from engine at cold start 17 08 23 2015411/6 November 21, 2008. Supersedes Technical Service Bulletin Group 17 number 08-05 dated July 22, 2008 for reasons
October 2006 Dealer Service Instructions for: Safety Recall F43 Reprogram PCM Transmission Shift Logic
 October 2006 Dealer Service Instructions for: Safety Recall F43 Models 2007 (KA) Dodge Nitro (built through August 9, 2006 - MDH 080916). 2007 (KJ) Jeep Liberty (built through August 9, 2006 - MDH 080916).
INSTALLATION INSTRUCTIONS
 THANK YOU FOR CHOOSING KURYAKYN! Protect yourself and others from possible injury and property damage or loss. Pay close attention to all instructions, warnings, cautions, and notices regarding the installation,