BLACKBIRD INSTALLATION SUPPLEMENT
|
|
|
- Lydia Jenkins
- 5 years ago
- Views:
Transcription

1 BLACKBIRD INSTALLATION SUPPLEMENT 2008 GM 2500 AND DURAMAX DIESEL VERSION 5-08
2 Parts Included in Installation Kit Before beginning installation, check the parts kit thoroughly against the parts inventory list, and make sure that every necessary part is in hand. If parts are missing or you have questions regarding the parts and components, contact Raven Product Support ( ) before beginning installation. Parts Description Mounting Bracket Base bracket (1) M x 30mm w/ flatwasher (1) M x 25mm w/ flatwasher (3) M x 50mm w/ flatwashers Generator bracket (2) 5/8-11 x 1 ½ flange head (1) M10 x 25mm w/ flat washer Air Conditioning Compressor Bolts (4) M x 80mm w/ flatwashers Power steering pump bolts (2) M x 15mm w/ flatwashers Cooling fan spacer Chassis: male thread/female thread 06 Chassis :1 ¾ OD X 3/16 thick Crankshaft Pulley 6-groove X 7 ½ Replacement washer 56mm OD flatwasher Generator belt NAPA (or equivalent) Generator mounting bolts (4) 3/8-16 x ¾ flat head socket Generator Temporary alignment stud 3/8-16 x 1 ½ Replacement OEM belt GM# ECM relocation bracket Chassis Aluminum offset (2) 5/16-18 x ¾ hex with nuts and flatwashers ECM relocation bracket Chassis Triangular aluminum (3) ¼-20 x ¾ truss head w/ nuts and flatwashers (2) ¼-20 x ½ truss head w/ nuts and flatwashers PCM relocation bracket Chassis Aluminum T bracket (3) ¼-20 x 1 ½ hex with nuts and flatwashers Clutch 3 6-groove electric Air deflector remount spacer Chassis 1 Fastener (1) M8 x 40mm w/ flat washer Upper radiator hose replacement 06-08! ¾ hose el and coupling Chassis Clamps (2) XXXXXXX Clutch key 3/16 x 1 ¾ Clutch bolt (1) 7/16-20 x 2 1/4 Grade w/ lock washer Electrical: Mechanical Installers forward these parts to the Electrical Department Clutch harness 16 red/black w/ 2-conductor thermal sensor 116Hz Command Module page 1
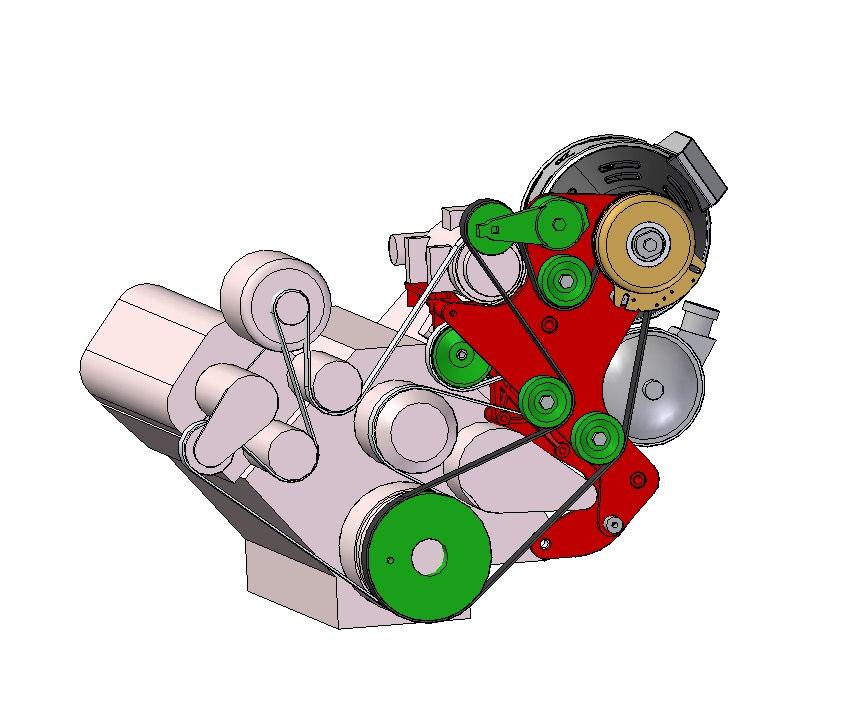
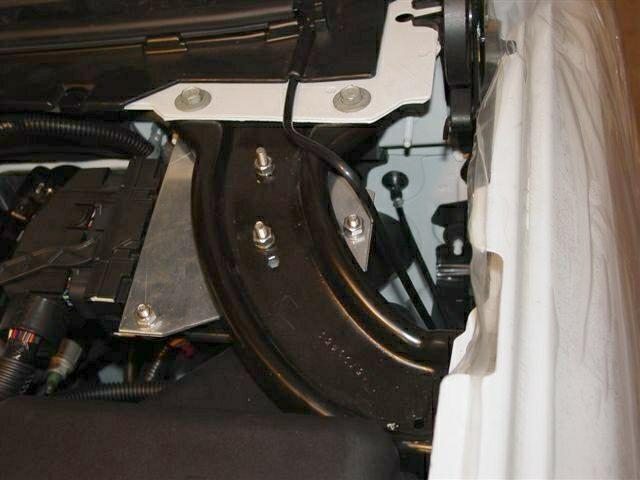
3 General Instructions This document supplements the Blackbird Wiring Manual with information specific to the 2008 General Motors 2500 and 3500 chassis with the 6.6 liter Duramax diesel engine. Installation cannot be completed without the Blackbird Wiring Manual. Contact Raven Product Support ( ) if more documentation is needed. This installation provides for full 5kW output of the system from elevated engine idle to 3400 rpm. Beyond 1200 RPM, the generator output will be unaffected by changes in engine speed. Blackbird Installation Supplement for GM 2500 and 3500 Duramax Diesel Torque- Ft-lbs. Grade Bolt Size 1/ / / / / / mm 19 10mm 41 12mm 69 14mm 104 All installation steps in this supplement and the Blackbird Wiring Manual must be completed before operating the system. Use Loctite 262 on all engine and bracket mounted bolts. All hoses and wires moved or relocated during installation must be secured to prevent chafing and exposure to hot surfaces. At no time should wiring be secured to fuel or exhaust system components. Tools required: Standard mechanic s tools 36 mm 12-point socket x ¾ drive Crankshaft holding tool (GM Part # J-44643) or substitute 1 7/8 open end wrench for fan removal Figures 1 and 2 show the Raven components to be installed and their mounting locations. We suggest you take a minute before proceeding to review the steps below to familiarize yourself with the parts and their mounting locations. Steps 1 through 30 will establish a hole on the driver s side of the engine for the generator and bracket. Steps 31 through 37 cover the installation of the base bracket, the generator bracket, and the generator. Steps 36 through 44 cover the final assembly of the engine compartment. The Blackbird Wiring Manual covers the DC and AC electrical wiring. Creating the Hole 1. Disconnect all battery negative terminals. 2. Remove upper radiator hose. 3. Unclip the ECM (Figure 5) from the upper fan shroud and set aside. Remove the air intake assembly as needed to gain access to the passenger side fan shroud clips and fan stator mounting bolts. 4. Remove the upper fan shroud. 5. Place protective cardboard over the face of the radiator. 6. Remove the fan (right hand thread) and set aside. Remove the 3 fan stator bolts and remove the stator with the fan. Mark the stator upper bolt ear for orientation during reinstallation. page 2
4 7. Remove and discard the OEM serpentine belt. 8. Unbolt the air conditioning compressor and swing it out of the way. Discard the bolts. 9. Unbolt the power steering pump and swing it out of the way. 10. Remove the power steering/air conditioning mounting casting from the front of the engine. 11. Locate and remove the driver s side fan stator bracket. (Low on engine, two bolts). 12. Using the supplied hardware, install the Raven base bracket in its place, leading with the hook end and rolling the bracket into position. (It will fit, this may be a two-person job. As you are rotating the bracket into place, adjust the routing of the power steering hoses as necessary). Fasten with (4) M10 bolts and (1) M14 bolt. See Figure Mount the air conditioning compressor on the Raven base bracket using the replacement 80mm bolts. 14. Mount the power steering pump on the Raven base bracket using the supplied replacement bolts 15. Install the supplied replacement serpentine belt (GM Part # ) on the OEM belt train. See belt routing in Figure Remove the driver s side diagonal fender brace and, if required, the cover and shroud from the underhood fuse center Chassis: 17. Using the supplied triangular ECM bracket, relocate the ECM under the driver s side fender-tofirewall brace. Locate and drill two 1/4' mounting holes in the brace and the bracket. Mount the bracket on the brace using the 2 supplied truss head bolts. Mount the ECM to the bracket. Figure 6. All Chassis: 18. Using GM tool #J or other crankshaft holding device, and a 36mm 12-point socket, remove the harmonic damper bolt and washer from the front of the crankshaft. Discard the OEM washer. 19. Assure that the front of the damper is clean and free of dings or imperfections. Using the OEM bolt and the supplied 54mm washer, install the Raven crankshaft pulley to the face of the damper. Assure that the mating ring on the pulley seats into the damper. 20. Before tightening, rotate the pulley counterclockwise until the drive pin contacts the counterweight on the damper. Torque the crank bolt to 260 ft. lbs. 21. Check that the area the generator will occupy is free of hose and wire interference. Installing the Generator, Clutch and Belt 22. Before mounting the Generator, bench-fit the clutch and key, to the shaft ensuring a slip-fit. Dress as necessary. 23. Ensure that the generator electrical junction box cover is securely in place. Insert the 3/8 temporary alignment stud finger tight in one threaded hole of the generator bearing plate (shaft end.) 24. Set the Generator, shaft forward, on top of the Raven base bracket, nestled between the power steering pump and the air conditioning compressor. It should sit temporarily without contacting the power steering reservoir cap. 25. Connect the generator bracket (Figure 3) to the base bracket using two 5/8-16 x 1 bolts and one M10 bolt. Loctite and tighten the 5/8 bolts and the M10 bolt. 26. Orient the electrical box to facilitate cable runs and allow clearance between engine and other components. Position the generator behind the bracket and slip the generator into the bracket, page 3
5 inserting the temporary alignment stud into a bracket hole. Assure that the large generator alignment ring machined into the bearing plate is seated fully in the large bracket hole. Install three 3/8 16 X ¾ flat head generator bolts, and replace the temporary alignment stud with the fourth bolt. 27. Install the electric clutch on the generator shaft, assuring that the 3/16 key engages the clutch and the shaft without binding. Align the clutch coil flange so that the coil retaining standoff on the bracket passes through the open slot on the flange. Fasten with the 7/16 clutch bolt and lockwasher. 28. Install the generator serpentine drive belt. Check the OEM and the Raven belt trains for interference and tensioner operation. See Figure 2. Final Assembly 29. Using a hacksaw or zip tool, trim the center from the fan air deflector. See Figure Place the supplied 3/16 fan spacer on the fan mounting threads. 31. Reinstall the fan and trimmed deflector. The lower driver s side deflector bolt now installs on the Raven bracket. 32. Remove the OEM mounting clip for the ECM from the upper fan shroud. 33. Reinstall the upper fan shroud. and the air intake assembly. 34. Trim approximately 6 from the upper radiator hose, radiator end, rotate it end-for-end, and reinstall it using the supplied elbow hose and coupling. 35. Check fluids, if necessary, and reconnect the battery. 36. Start the engine and allow it to run at normal idle. Observe the belt trains and check for proper tracking and alignment. This completes the vehicle-specific instructions. Refer to the Blackbird Wiring Manual for wiring, run up, and troubleshooting instructions. page 4


6 Figure 1 Figure 2 Figure 3 page 5


7 Figure 4 Figure 5 Figure 6 page 6
8 page 7
BLACKBIRD INSTALLATION SUPPLEMENT
 BLACKBIRD INSTALLATION SUPPLEMENT FOR5.3 AND 6 LITER VORTEC SUBURBAN/YUKON/SILVERADO VERSION 2-06 Blackbird Installation Supplement for GM 5.3 and 6 liter Vortec-Suburban/Silverado Parts Included in Installation
BLACKBIRD INSTALLATION SUPPLEMENT
 BLACKBIRD INSTALLATION SUPPLEMENT FOR 2003-7 FORD 6.0 LITER DIESEL SINGLE ALTERNATOR F-350, F-450, F-550, EXCURSION VERSION 7-07 Parts Description Blackbird Wiring Manual Installation Supplement 6.0 Liter
BLACKBIRD INSTALLATION SUPPLEMENT
 BLACKBIRD INSTALLATION SUPPLEMENT FOR 2003-7 FORD 6.0 LITER DIESEL F-SERIES DUAL ALTERNATOR VERSION 10/07 Blackbird Installation Supplement for Ford 6.0. Liter Dual Alternator Parts included in the 6.0
BLACKBIRD INSTALLATION SUPPLEMENT
 BLACKBIRD INSTALLATION SUPPLEMENT FOR 2008-105 FORD 6.4 LITER DIESEL F-SERIES VERSION 3/10 Parts Blackbird Wiring Manual Installation Supplement 6.4 liter Diesel Owner s Manual Includes Warrantee Registration
DewEze Clutch Pump Kit Ford 6.2L Gas, A Pump, Side Port, 2011+
 DewEze Clutch Pump Kit 700512 Ford 6.2L Gas, A Pump, Side Port, 2011+ INSTALLATION INSTRUCTIONS 1. The installation of this kit requires trained decisionmaking concerning clearances, tying components together,
FMK265SD F L DIESEL WITH DUAL ALTERNATORS
 WITH DUAL ALTERNATORS This kit will NOT work on trucks equipped with adaptive steering. INSTALLATION NOTES 1. Disconnect negative batteries cables. Remove the air duct from the passenger side and the black
DewEze Clutch Pump Kit Ford 6.2L Gas, A Pump, Side Port, INSTALLATION INSTRUCTIONS 1. The installation of this kit requires trained decis
 DewEze Clutch Pump Kit 700564 Ford 6.2L Gas, A Pump, Side Port, 2014+ INSTALLATION INSTRUCTIONS 1. The installation of this kit requires trained decisionmaking concerning clearances, tying components together,
1996 Aerostar/Ranger/Explorer
 Page 1 of 11 Section 03-01B: Engine, 3.0L V-6 IN-VEHICLE SERVICE 1996 Aerostar and Ranger Vehicles Workshop Manual Water Pump SPECIAL SERVICE TOOL(S) REQUIRED Description Tool Number Fan Clutch Holding
Installation Manual v1.2: LLY / LBZ/LMM Twin CP3 Kit GM Duramax. Please read all instructions before installation.
 03/24/09 701-900-4290 - INST Installation Manual v1.2: LLY / LBZ/LMM Twin CP3 Kit 04.5-07.5 GM Duramax Please read all instructions before installation. This kit is not emissions legal in California. Kit
2017+ L5P Duramax 3 ½ Down Pipe & EGR Fix Kit
 2017+ L5P Duramax 3 ½ Down Pipe & EGR Fix Kit Covers installation of PN s: WCF100630, WCF100829 Note: This Kit is for off road competition use only! Off Road Competition Use Tuning & Exhaust System is
BD Venom Dual Fuel F O R D 6. 7 L P O W E R S T R O K E Installation Instructions
 U 30 January 2017 (1050470) Venom Dual Fuel Kit (I-00390) 1 DOWNLOAD ENHANCED INSTALL MANUALS AT dieselperformance.com BD Venom Dual Fuel 2 0 1 1-2 0 1 4 F O R D 6. 7 L P O W E R S T R O K E Installation
P3066 INSTALLATION MANUAL
 P3066 INSTALLATION MANUAL Parts List 1 Grille guard 1 Driver / left frame bracket Level of Difficulty Moderate Scan for helpful install tips 1 Passenger / right frame bracket 1 Driver / left top bracket
Air Commander Late Model Ford F-150
 EASYSTREET Air Commander Late Model Ford F-150 www.airliftcompany.com MN-544 (02506) ECR 5206 Please read these instructions completely before proceeding with installation The oil level in the compressor
Toyota FJ40 Compressor/OEM Alternator Bracket Kit (158217)
") 968-83 Toyota FJ40 Compressor/OEM Alternator Bracket Kit (5827) 8865 Goll St. San Antonio, TX 78266 Phone: 800-862-6658 Sales: sales@vintageair.com Tech Support: tech@vintageair.com 90344 REV C 0/3/8,
968-83 Toyota FJ40 Compressor/OEM Alternator Bracket Kit (5827) 8865 Goll St. San Antonio, TX 78266 Phone: 800-862-6658 Sales: sales@vintageair.com Tech Support: tech@vintageair.com 90344 REV C 0/3/8,
Included parts: 1 - New Bosch CP3 Pump 1 - HSM Pulley 1 - Serpentine Belt 1 - Pump Brackets/Hardware
 TROUBLESHOOTING: Please read and understand all installation instructions before proceeding with the installation. If you have questions during the installation of this product, please email H&S Motorsports
BD Venom Dual Fuel F O R D 6. 7 L P O W E R S T R O K E Installation Instructions
 U 21 March 2017 (1050470) Venom Dual Fuel Kit (I-00390) 1 DOWNLOAD ENHANCED INSTALL MANUALS AT dieselperformance.com BD Venom Dual Fuel 2 0 1 1-2 0 1 6 F O R D 6. 7 L P O W E R S T R O K E Installation
Big Block Chevrolet Driver Side Compressor Bracket Kit Long Pump with & without Power Steering ( BCA)
") an ISO 900:205 Registered Company Big Block Chevrolet Driver Side Compressor Kit Long Pump with & without Power Steering (5370-BCA) 8865 Goll St. San Antonio, TX 78266 Phone: 800-862-6658 Sales: sales@vintageair.com
an ISO 900:205 Registered Company Big Block Chevrolet Driver Side Compressor Kit Long Pump with & without Power Steering (5370-BCA) 8865 Goll St. San Antonio, TX 78266 Phone: 800-862-6658 Sales: sales@vintageair.com
Installation Manual v1.0: Twin CP3 Fuel Injection Kit Dodge 6.7L
 04/05/2012 Dodge 2010-2011 6.7L Twin CP3 701-900-2356-INST Installation Manual v1.0: Twin CP3 Fuel Injection Kit 2010-2011 Dodge 6.7L Figure 1 - Full Kit Photo 29 Figure 2 - Hardware Kit (800) 949-60002
Studebaker Truck 289
 an ISO 900:2008 Registered Company Studebaker Truck 289 Compressor/Alternator Kit 5600 8865 Goll St. San Antonio, TX 78266 ph: 20-654-77 fax: 20-654-33 90600 REV A /2/2 INST. STUDEBAKER TRUCK 289 COMP/ALT
BLACKBIRD WIRING MANUAL
 BLACKBIRD WIRING MANUAL VERSION ZX120 5/09 TO BE USED IN CONJUNCTION WITH A VEHICLE-SPECIFIC INSTALLATION SUPPLEMENT System Capabilities The 5kW Blackbird will provide 42 amperes of 120 Volt alternating
INSTALLATION INSTRUCTIONS FORD F-150 2WD & 4WD RETAINS FACTORY TOW HOOKS PART #P3063
 INSTALLATION INSTRUCTIONS FORD F-150 2WD & 4WD RETAINS FACTORY TOW HOOKS PART #P3063 PARTS LIST: 1 Grille Guard 2 10-1.5mm Nylon Lock Nuts 1 Driver/Left Frame Mounting Bracket 4 12mm Plastic Washers 1
INSTALLATION NOTES. 6. Add the 3/4 hose extension to the power steering reservoir to help keep the P/S hose away from the pump belt.
 YEAR:2017/ CURRENT INSTALLATION NOTES 1. Be sure to read and understand all available information including but not limited to instructions, warnings, sale terms, and warranties for the vehicle and all
Steeda S197 Mustang Whipple Supercharger Drive
 Steeda S197 Mustang Whipple Supercharger Drive Parts List Qty. Description 1 Whipple supercharger snout 1 Whipple snout collar 1 10-rib supercharger pulley 1 10-rib crank pulley 1 10-rib belt tensioner
18SP680Rev3 EPA04 MBE 4000 Car Hauler Low Pressure Fuel Lines
 8SP680Rev3 EPA04 MBE 4000 Car Hauler Low Pressure Fuel Lines KIT DESCRIPTION These service kits include all necessary parts to replace the low pressure fuel lines between the fuel filter housing and fuel
System # V INTERNATIONAL , 4400 SERIES DT466
 System # V900068 INTERNATIONAL 2001-2003 4300, 4400 SERIES DT466 Installation Manual Document Number: 1930036 Document #1930036 VR70 Underhood Air Compressor System Number V900068 Application: INTERNATIONAL
Air Commander
 EASYSTREET Air Commander www.airliftcompany.com MN-507 (03206) ECN 3921 Please read these instructions completely before proceeding with installation. The oil level in the compressor must be checked BEFORE
INSTALLATION INSTRUCTIONS 97 FORD EXPEDITION
 INSTALLATION INSTRUCTIONS 97 FORD EXPEDITION 1. Read the instructions completely and carefully before you begin. Check the kit for proper contents (refer to the part s list and the picture diagrams). Before
ALL AMERICAN BILLET. Front Drive System - Small Block Ford Installation Instructions
 ALL AMERICAN BILLET Front Drive System - Small Block Ford Installation Instructions Small Block Ford with AC & PS All American Billet Store (800) 764-0926 www.allamericanbilletstore.com Items needed for
Cut zip ties and remove 2 plastic wiring harness brackets.
 TROUBLESHOOTING: Please read and understand all installation instructions before proceeding with the installation. Included parts: 1 - New Bosch Cp3 Pump 1 - HSM Pulley 1 - Serpentine Belt 1 - Pump Bracket/
Procharger Stage II Intercooled Supercharger System (11-14 GT)
") Procharger Stage II Intercooled Supercharger System (11-14 GT) Installation Time: Approximately one day. Installed on 2012 Mustang GT 5.0/Manual Required Tools 3/8 Socket Set (Standard and Metric) 1/2
Procharger Stage II Intercooled Supercharger System (11-14 GT) Installation Time: Approximately one day. Installed on 2012 Mustang GT 5.0/Manual Required Tools 3/8 Socket Set (Standard and Metric) 1/2
Installation Manual for VMAC System V General Motors Duramax Diesel
 Installation Manual for VMAC System V900069 General Motors 2003 2004 Duramax Diesel C4500-5500 General Information... 3 Before You Start... 3 Special Installation Notes... 4 Part 1: Preparing for Installation...
Small Block Chevrolet Compressor Bracket Kit Long Pump, Driver Side (15123-VCB)
") Small Block Chevrolet Compressor Kit Long Pump, Driver Side (523-VCB) 8865 Goll St. San Antonio, TX 78266 Phone: 20-654-77 Fax: 20-654-33 90523-SCA REV F 09/4/6, PG OF Systems Table of Contents Cover...
Small Block Chevrolet Compressor Kit Long Pump, Driver Side (523-VCB) 8865 Goll St. San Antonio, TX 78266 Phone: 20-654-77 Fax: 20-654-33 90523-SCA REV F 09/4/6, PG OF Systems Table of Contents Cover...
STEP 1 Disconnect the negative terminal from both batteries.
 TROUBLESHOOTING: Please read and understand all installation instructions before proceeding with the installation. If you have questions during the installation of this product, please email H&S Motorsports
Installation Manual v1.0: Twin CP3 Fuel Injection Kit Dodge 5.9L
 Installation Manual v1.0: Twin CP3 Fuel Injection Kit 2004.5-2007 Dodge 5.9L Figure 1 - Full Kit Photo 25 Figure 2 - Hardware Kit Please read all instructions before installation. This kit is not emissions
Models Affected: Visions with Propane Engines CORRECTIVE ACTION ---- PROCEDURE
 Propane Belt Squeal Models Affected: Visions with Propane Engines ISSUE Front End Accessory Drive (FEAD) Belt chirping/squealing caused by improper fore-aft crankshaft pulley positioning. CORRECTIVE ACTION
Performance Inlet Manifold
 Performance Inlet Manifold Tools needed (some tools not required on some models): 13mm Combination Wrench Flat Blade Screwdriver T30 Torx Driver T25 Torx Driver 10mm Combination Wrench and/or Socket with
INSTALLATION INSTRUCTIONS AIR/OIL SEPARATOR KIT
 INSTALLATION INSTRUCTIONS AIR/OIL SEPARATOR KIT 2015+ SUBARU WRX (LHD ONLY) Document: 19-0136 Support: info@radiumauto.com This document covers the installation of the Radium brake master cylinder brace
BEW engine timing belt replacement procedure from MOGolf (as demonstrated on a 2004 Jetta).
.") BEW engine timing belt replacement procedure from MOGolf (as demonstrated on a 2004 Jetta). Based on the procedure published by Volkswagen, but modified for the "average" shadetree mechanic. Some special
BEW engine timing belt replacement procedure from MOGolf (as demonstrated on a 2004 Jetta). Based on the procedure published by Volkswagen, but modified for the "average" shadetree mechanic. Some special
Air Commander Part No
 EASYSTEET Air Commander Part No. 26903 www.airliftcompany.com MN-510 (06506) EC 5206 Please read these instructions completely before proceeding with installation The oil level in the compressor must be
Ford E350, E450 Van LITER DIESEL ENGINE W/SINGLE OE ALTERNATOR TYPE B Uses TM-16, 4-3/4 Poly Groove Rear Port Compressor PARTS LIST
 2006-04 Ford E350, E450 Van 1784 6.0 LITER DIESEL ENGINE W/SINGLE OE ALTERNATOR TYPE B Uses TM-16, 4-3/4 Poly Groove Rear Port Compressor PARTS LIST 1 6m-1.0 x 15 Bolt 1 6m-1.0 x 45 Bolt 3 6m Flat Washer
INSTALLATION INSTRUCTIONS
 INSTALLATION INSTRUCTIONS Accessory Application Publications No. P/N 08E49-S2A-100 2004 S2000 AII 26325 Issue Date OCT 2003 PARTS LIST Hood switch harness TOOLS AND SUPPLIES REQUIRED #2 Phillips screwdriver
INSTALLATION INSTRUCTIONS AOS-R (Air Oil Separator-Return) Turbo Subaru and STi Document# Support:
 Turbo Subaru and STi Document# Support:") INSTALLATION INSTRUCTIONS AOS-R (Air Oil Separator-Return) 02-14 Turbo Subaru and 2015+ STi Document# 19-0102 Support: info@radiumauto.com These instructions are based on a vehicle with an OEM turbocharger
INSTALLATION INSTRUCTIONS AOS-R (Air Oil Separator-Return) 02-14 Turbo Subaru and 2015+ STi Document# 19-0102 Support: info@radiumauto.com These instructions are based on a vehicle with an OEM turbocharger
INSTALLATION INSTRUCTIONS FORD SUPER DUTY NOTE: (Vehicle Retains Tow Hook) PART # P3064
 PART # P3064") INSTALLATION INSTRUCTIONS 2011-14 FORD SUPER DUTY 250-550 NOTE: (Vehicle Retains Tow Hook) PART # P3064 PARTS LIST: Qty Description Qty Description 1 Grill Guard 2 10mm x mm Hex Bolts 1 Driver/Left Lower
INSTALLATION INSTRUCTIONS 2011-14 FORD SUPER DUTY 250-550 NOTE: (Vehicle Retains Tow Hook) PART # P3064 PARTS LIST: Qty Description Qty Description 1 Grill Guard 2 10mm x mm Hex Bolts 1 Driver/Left Lower
Muncie Power Products
 Muncie Power Products CMKF08-6400-P8-AC 2008-2010 Ford F-250-550 6.4L Diesel W-WO/AC, WO/Dual Alt. WO/Vacuum Pump INSTALLATION NOTES 1. Using a 8mm socket or wrench, disconnect the negative battery cables
Installation Manual for VMAC System V900095
 Installation Manual for VMAC System V900095 GMC/Chevrolet 1999 2002 6.0L Sierra and Silverado CK2500 and CK3500HD General Information... 3 Before You Start... 3 Additional Requirements... 4 Part 1: Preparing
Equipped with AEM Dryflow Filter No Oil Required! INSTALLATION INSTRUCTIONS PART NUMBER DS (GUN METAL GRAY FINISH)
") Equipped with AEM Dryflow Filter No Oil Required! INSTALLATION INSTRUCTIONS PART NUMBER 21-823DS (GUN METAL GRAY FINISH) 1 ITEM NO. PART NUMBER DESCRIPTION QTY. 1 21-202DOSK AIR FILTER; OFFSET 2.75" X
Equipped with AEM Dryflow Filter No Oil Required! INSTALLATION INSTRUCTIONS PART NUMBER 21-823DS (GUN METAL GRAY FINISH) 1 ITEM NO. PART NUMBER DESCRIPTION QTY. 1 21-202DOSK AIR FILTER; OFFSET 2.75" X
Small Block Chevrolet Serpentine Drive System with & without Power Steering
 an ISO 9001:2008 Registered Company Small Block Chevrolet Serpentine Drive System with & without Power Steering 18865 Goll St. San Antonio, TX 78266 Phone: 210-654-7171 Fax: 210-654-3113 www.vintageair.com
Installation Instructions for: TOYOTA 4.5L SUPERCHARGER SYSTEM
 Installation Instructions for: TOYOTA 4.5L SUPERCHARGER SYSTEM 1995-1997 Land Cruiser * PREMIUM FUEL REQUIRED * Magnuson Products LLC 1990 Knoll Drive, Bldg A, Ventura, CA 93003 (805) 642-8833 phone *
Always wear safety glasses when working on your vehicle.
 90-93 MAZDA MIATA SUPERCHARGER KIT The KraftWerks 90-93 Mazda Miata Supercharger Kit was designed for easy installation. Competent mechanics with the appropriate tools will find the process to be relatively
Installation Manual v2.2: Twin CP3 Fuel Injection Kit Dodge 5.9L
 12/13/11 ATS Twin CP3 Kit 701-900-2272-INST Installation Manual v2.2: Twin CP3 Fuel Injection Kit 2003-2004 Dodge 5.9L Figure 1 - Full Kit Photo 26 Figure 2 - Hardware Kit 1 Please read all instructions
INSTALLATION INSTRUCTIONS CATCH CAN KIT
 INSTALLATION INSTRUCTIONS CATCH CAN KIT FORD FOCUS Document: 19-0150 Support: info@radiumauto.com STEPS 1-19 COVER THE PCV SIDE CATCH CAN KIT (P/N: 20-0315) STEPS 20-32 COVER THE CRANKCASE CATCH CAN KIT
Installation Manual for VMAC System V900046
 Installation Manual for VMAC System V900046 GMC/Chevrolet 1999 2002 6.0L Sierra and Silverado CK2500 and CK3500HD General Information... 3 Before You Start... 3 Additional Requirements... 4 Part 1: Preparing
Scion FR-S ZN6. GTX2867R Gen2 (Internal Wastegate) Installation Instructions GPP P/N #
 Installation Instructions GPP P/N #") TURBO KIT Scion FR-S ZN6 Subaru BRZ ZC6 GTX2867R Gen2 (Internal Wastegate) Installation Instructions GPP P/N # 11518000 Vehicle Type Chassis Code Engine Code Transmission Model Year Scion FR-S DBA-ZN6
TURBO KIT Scion FR-S ZN6 Subaru BRZ ZC6 GTX2867R Gen2 (Internal Wastegate) Installation Instructions GPP P/N # 11518000 Vehicle Type Chassis Code Engine Code Transmission Model Year Scion FR-S DBA-ZN6
INSTALLATION & OWNER S MANUAL
 1 of 21 INSTALLATION & OWNER S MANUAL A/C Drive Kit for KUBOTA BX2670-1 and BX2680 p/n: 1ACBX2680DRK (Note: the alternator is supplied with a new pulley) Must be installed with one of the following three
INSTALLATION INSTRUCTIONS CATCH CAN KIT
 INSTALLATION INSTRUCTIONS CATCH CAN KIT FORD FOCUS Document: 19-0150 Support: info@radiumauto.com STEPS 1 TO 19 COVER THE PCV SIDE CATCH CAN KIT (P/N: 20-0315) STEPS 20-32 COVER THE CRANKCASE CATCH CAN
Porsche 928 with 16v LH-Jetronic Fuel System
 Porsche 928 with 16v LH-Jetronic Fuel System Toll-Free Tech Hot Line: 877-FOR-928M 877-367-9286 Please do not copy this manual and give copies to your friends. Our ability to bring you this supercharger
DODGE DAKOTA 3 BODY LIFT INSTALLATION INSTRUCTIONS KIT # 60153
 DODGE DAKOTA 3 BODY LIFT INSTALLATION INSTRUCTIONS 2003-04 KIT # 60153 Installation of a Performance Automotive Group body lift kit will change the vehicle s center of gravity and handling characteristics
CBEA/CJAA Timing belt procedure. Written by: greengeeker Photos by: DanG144, Kriesel, coalminer16. Required tools:
 CBEA/CJAA Timing belt procedure Written by: greengeeker Photos by: DanG144, Kriesel, coalminer16 Required tools: 1. Securing pin 3359 (you need two of them!) 2. Crankshaft stop T10050 3. Counter-hold tool
Included parts: 1 - New Bosch CP3 Pump 1 - HSM Pulley 1 - Serpentine Belt 1 - Pump Bracket/ Hardware STEP 1
 TROUBLESHOOTING: Please read and understand all installation instructions before proceeding with the installation. If you have questions during the installation of this product, please contact H&S Motorsports
2006 Honda Civic SI Supercharger Kit Installation Instruction Kit #
 2006 Honda Civic SI Supercharger Kit Installation Instruction Kit #350-091 3239 MONIER CIRCLE, STE.5 RANCHO CORDOVA, CA 95742 916.635.4550 FAX 916.635.4632 www.ct-engineering.com INS-157 VERSION: 3.25.2009
CBEA/CJAA Timing belt procedure. Written by: greengeeker Photos by: DanG144, Kriesel, coalminer16. Required tools:
 CBEA/CJAA Timing belt procedure Written by: greengeeker Photos by: DanG144, Kriesel, coalminer16 Required tools: Securing pin 3359 (need two of them!) Crankshaft stop T10050 Counter-hold tool T10172 Special
~~ " '" :.~ ~. -~ :: ø U) 6Â~ l\ '---_._ , " ~ -1rr-~.." fj PECULIAR HYDRAULICS. " f ',~, ...
 6Â~ l\ '---_._ , ~ -1rr-~.. fj PECULIAR HYDRAULICS. f ',~, ...") FORD V8-30, 35 W-W/O AC 988-99 PECULIAR HYDRAULICS BELT DRIVE, SLC UNDERHOOD VALVE ~. _ Ln c. " f 000000 HPS59 REV. E, ~ ~~ " '" --- -. ',~, ~ -rr-~.." fj..-:.~ ~.&I C/~.. ""Q ic ø ~. -~ :: ø U) c: ::
FORD V8-30, 35 W-W/O AC 988-99 PECULIAR HYDRAULICS BELT DRIVE, SLC UNDERHOOD VALVE ~. _ Ln c. " f 000000 HPS59 REV. E, ~ ~~ " '" --- -. ',~, ~ -rr-~.." fj..-:.~ ~.&I C/~.. ""Q ic ø ~. -~ :: ø U) c: ::
Installation Instructions for the F2B Pedal Bracket Kit
 Installation Instructions for the F2B Pedal Bracket Kit A. General Information 1. Before you begin, familiarize yourself with this installation procedure. It is assumed that the installer is an experienced
INSTALLATION INSTRUCTIONS AOS-R (Air Oil Separator-Return) Turbo Subaru and STi Document# Support:
 Turbo Subaru and STi Document# Support:") INSTALLATION INSTRUCTIONS AOS-R (Air Oil Separator-Return) 02-14 Turbo Subaru and 2015+ STi Document# 19-0102 Support: info@radiumauto.com These instructions are based on a vehicle with an OEM turbocharger
INSTALLATION INSTRUCTIONS AOS-R (Air Oil Separator-Return) 02-14 Turbo Subaru and 2015+ STi Document# 19-0102 Support: info@radiumauto.com These instructions are based on a vehicle with an OEM turbocharger
Cut zip ties and remove 2 plastic wiring harness brackets.
 TROUBLESHOOTING: Please read and understand all installation instructions before proceeding with the installation. If you have questions during the installation of this product, please email H&S Motorsports
Front Drive System - Big Block Chevy Installation Instructions Big Block Chevy with AC & with PS
 Front Drive System - Big Block Chevy Installation Instructions Big Block Chevy with AC & with PS All American Billet Store (800) 764-0926 www.allamericanbilletstore.com Items needed for install Jack Jack
HIGH FLOW COLD AIR INTAKE SYSTEM INSTALLATION INSTRUCTIONS D , D A
 HIGH FLOW COLD AIR INTAKE SYSTEM INSTALLATION INSTRUCTIONS D760-0320, D760-0320A 1992-95 325i, is 1995 M3 (3.0L) Parts List: 1 Intake Tube 1 Silicone Hose 1 Air Flow Meter Bracket 1 Hose Clamp (#36z) 1
GM LS Series Serpentine Drive System with & without Power Steering
 an ISO 9001:2015 Registered Company GM LS Series Serpentine Drive System with & without Power Steering 18865 Goll St. San Antonio, TX 78266 Phone: 800-862-6658 Sales: sales@vintageair.com Tech Support:
Timing Belt: Service and Repair Installation NOTE: Check the water pump for water leakage and the oil seal for oil leakage.
 1991 Daihatsu Truck Rocky L4-1589cc 1.6L SOHC Page 1 Timing Belt: Service and Repair Installation NOTE: Check the water pump for water leakage and the oil seal for oil leakage. Repair any water leakage
Ford 6.8L, w/spider, 2000+
 DewEze Aiir Compressor Kiit 700554 Ford 6.8L, w/spider, 2000+ INSTALLATION INSTRUCTIONS 1. Disconnect the battery. 2. Drain the radiator. 3. Remove the air cleaner assembly. 4. Remove the upper radiator
Air Commander Part No
 EASYSTREET Air Commander Part No. 26901 www.airliftcompany.com MN-508 (05504) NPR 5129 Please read these instructions completely before proceeding with installation Front View Side View Hardware Item P/N
Rear bumper cannot be used for towing after installation of the rear bumper relocation brackets.
 921RC7030 GM 88-98 4WD 1500 P/U 3 Body Lift Thank you for choosing Rough Country for all your suspension needs. *RC703BAG2* RC703BAG2 Rough Country recommends a certified technician install this kit. Attempts
INSTALLATION INSTRUCTIONS AOS-R (Air Oil Separator-Return) Turbo Subaru and STi
 Turbo Subaru and STi") INSTALLATION INSTRUCTIONS AOS-R (Air Oil Separator-Return) 02-14 Turbo Subaru and 2015+ STi These instructions are based on a vehicle with an OEM turbocharger and top-mount intercooler. If a front-mount
INSTALLATION INSTRUCTIONS AOS-R (Air Oil Separator-Return) 02-14 Turbo Subaru and 2015+ STi These instructions are based on a vehicle with an OEM turbocharger and top-mount intercooler. If a front-mount
Z1 Motorsports 370Z/G37 Oil Cooler Kit Installation Manual
 Z1 Motorsports 2877 Carrollton Villa Rica Hwy Carrollton GA 30116 770.838.7777 Z1 Motorsports 370Z/G37 Oil Cooler Kit Installation Manual For 19, 25 and 34 Row Oil Cooler Kits Parts Included: 1 SETRAB
Assembly Instructions
 Assembly Instructions Part Number Description Model Approx. Assembly Time 99994-0903 Windshield Wiper Kit Mule SX 1 Hour WARNING Improper installation of this accessory could result in an accident causing
INSTALLATION INSTRUCTIONS FOR THE TOMAHAWK ELECTRIC REVERSE
 INSTALLATION INSTRUCTIONS FOR THE TOMAHAWK ELECTRIC REVERSE LAST UPDATED: April 2018 Thank you for choosing the Motor Trike Electric Reverse. We ask that you read the directions before you start and follow
INSTALLATION INSTRUCTIONS DUAL OIL CATCH CAN KIT
 INSTALLATION INSTRUCTIONS DUAL OIL CATCH CAN KIT SUBARU WRX FA20F ENGINE Document: 19-0135 Support: info@radiumauto.com This dual catch can kit installs in the right-hand side of the engine bay and intercepts
System # V FREIGHTLINER , 7.2L 3126 CATERPILLAR DIESEL FL50, FL60, FL70, FL80
 System # V900022 FREIGHTLINER 1998-2002, 7.2L 3126 CATERPILLAR DIESEL FL50, FL60, FL70, FL80 Installation Manual Document Number: 1930028_a Document #1930028 VR70 Underhood Air Compressor System Number
TOYOTA TUNDRA 3 BODY LIFT INSTALLATION INSTRUCTIONS 2014 KIT# 5643
 3651 N Highway 89 Chino Valley, AZ 86323 (928) 636-7080 www.p-a-g.net TOYOTA TUNDRA 3 BODY LIFT INSTALLATION INSTRUCTIONS 2014 KIT# 5643 Installation of a Performance Automotive Group body lift kit will
INSTALLATION INSTRUCTIONS
 INSTALLATION INSTRUCTIONS Accessory Application Publications No. ELEMENT AII 24282 Issue Date DEC 2002 PARTS LIST 2 Screw-grommets CD Changer Attachment Kit: P/N 08B26-SCV-100 CD changer plate 2 Self-tapping
07-11 GM 4WD 1500 P/U 1 1/4 Body Lift
 92RC70100 07-11 GM 4WD 1500 P/U 1 1/4 Body Lift Thank you for choosing Rough Country for all your suspension needs. Rough Country recommends a certified technician install this kit. Attempts to install
Installation Instruction for '84-'89 Nissan 300ZX High Performance Intercooler System (Part No )
") Installation Instruction for '84-'89 Nissan 300ZX High Performance Intercooler System (Part No. 2-124) Page ii DCB (06/14/02 12:19 AM) Version 1.0 Page iii Table of Contents 1. TOOLS REQUIRED...1 2. INSTALLATION
Installation Instruction for '84-'89 Nissan 300ZX High Performance Intercooler System (Part No. 2-124) Page ii DCB (06/14/02 12:19 AM) Version 1.0 Page iii Table of Contents 1. TOOLS REQUIRED...1 2. INSTALLATION
Installation Instructions Camaro ZL1 ( Z) ( ZB)
 ( ZB)") Installation Instructions Camaro ZL1 (501-1099-10-Z) (501-1099-10-ZB) Parts List 1 Insulated Air Box \ Lid 1 Thermal Coated Intake Tube / MAF Housing with (2) M4 x.7 thread 8mm long Stainless Screws; 1
Installation Instructions Camaro ZL1 (501-1099-10-Z) (501-1099-10-ZB) Parts List 1 Insulated Air Box \ Lid 1 Thermal Coated Intake Tube / MAF Housing with (2) M4 x.7 thread 8mm long Stainless Screws; 1
Installation Manual. Model T675A Engine Brakes. For Mack 6 Cylinder, 2 valve Head ENDT-673, 675, 676 & E6 Series Engines.
 Engine Brakes Installation Manual Model T675A Engine Brakes For Mack 6 Cylinder, 2 valve Head ENDT-673, 675, 676 & E6 Series Engines TecBrake P.O. Box 27822 Houston, Texas 77227 INSTALLATION MANUAL TECBRAKE
Small Block Ford Serpentine Drive System with & without Power Steering
 an ISO 9001:2008 Registered Company Small Block Ford Serpentine Drive System with & without Power Steering 18865 Goll St. San Antonio, TX 78266 Phone: 210-654-7171 Fax: 210-654-3113 www.vintageair.com
MAZDASPEED3 Intercooler Instructions
 MAZDASPEED3 Intercooler Instructions Congratulations on your purchase of the COBB Tuning Front Mount Intercooler System for your 2007-2009 Mazdaspeed3. The following instructions should assist you through
INSTALLATION INSTRUCTIONS FOR MOUNTING
 INSTALLATION INSTRUCTIONS FOR MOUNTING FRONT PARKING SENSOR RELOCATION BRACKETS ON THE FOLLOWING PROWLER MAX MODEL NOS.: 320713/321610, 310713/321610, 320713/321512 & 310713/321512 ON: (NOTE: TWO 390210
Installation Instructions for C & R Heat Exchanger Removal of Factory Unit
 Installation Instructions for C & R Heat Exchanger Removal of Factory Unit Remove the 8 clips that retain the upper radiator shroud. Remove the shroud. Remove the coolant tank cap from the heat exchanger
CHEVY AVALANCHE 1/2-TON ONLY 3 BODY LIFT KIT INSTALLATION INSTRUCTIONS KIT# 10173
 3651 N Highway 89 Chino Valley, AZ 86323 (928) 636-7080 www.p-a-g.net CHEVY AVALANCHE 1/2-TON ONLY 3 BODY LIFT KIT INSTALLATION INSTRUCTIONS 2003-2005 KIT# 10173 Installation of a Performance Automotive
Single Barrel Shotgun HPFP Install Guide
 Single Barrel Shotgun HPFP Install Guide Thank you for purchasing the VTT Single Barrel Shotgun HPFP upgrade kit! PLEASE READ THE ENTIRE GUIDE BEFORE BEGINNING INSTALLATION! The first thing you should
Passenger/Right Side Frame Bracket. Driver/Left Side Frame Bracket. (4) Spacer Washers. (2) Bull Bar Mounting Brackets
 Spacer Washers. (2) Bull Bar Mounting Brackets") PARTS LIST: 1 Bull Bar 12 s 1 Driver/Left Frame Mounting Bracket 1 Passenger/Right Frame Mounting Bracket 6 10mm Lock Washers 2 Bull Bar Mounting Brackets 6 10mm Hex Nuts 4 Large Spacer Washers 4 8-1.25mm
PARTS LIST: 1 Bull Bar 12 s 1 Driver/Left Frame Mounting Bracket 1 Passenger/Right Frame Mounting Bracket 6 10mm Lock Washers 2 Bull Bar Mounting Brackets 6 10mm Hex Nuts 4 Large Spacer Washers 4 8-1.25mm
C FORD F250 / F L POWERSTROKE DIESEL WITH AUTOMATIC TRANSMISSIONS ONLY
 EXHAUST BRAKES C40019 1999-2003 FORD F250 / F350 7.3L POWERSTROKE DIESEL WITH AUTOMATIC TRANSMISSIONS ONLY Getting Started Thank you and congratulations on your purchase of a Pacbrake exhaust retarder.
INSTALLATION GUIDE PREMIUM FRONT BUMPER FOR RAM AEV30304AA Last Updated: 09/18/17
 AEV30304AA Last Updated: 09/18/17 PREMIUM FRONT BUMPER FOR RAM 1500 INSTALLATION GUIDE PLEASE READ BEFORE YOU START To guarantee a quality installation, we recommend reading these instructions thoroughly
G: OS/27/ R30, V30/ R3S/V3S W/3S0 FISHER ENGINEERING, ROCKLAD, ME SUBJECT TO CHAGE PECULIAR HYDRAULICS HPS4S71
 CHEV/GMC V8-30S,3S0 V6-4.3L W/O AC BLAZER, JIMMY, SUB W/3S0 R30, V30/ R3S/V3S W/3S0 986-87 986-87 988 988- PECULIAR HYDRAULICS HPS4S7 BELT DRIVE, SLC UNDERHOOD VALVE 3i -INSTALL THRU ENGINE LIFT HOOK ~
SHELBY GT500
 2007-2009 SHELBY GT500 Removal of Factory Unit WARNING: 1. Radiator fluid must be handled properly. Please observe local ordinances with regards to handling and disposal. 2. Allow vehicle and components
Installation Instruction for '84-'89 Nissan 300ZX High Performance Intercooler System (Part No )
") Installation Instruction for '84-'89 Nissan 300ZX High Performance Intercooler System (Part No. 2-124) Routing of the Intercooler Pipe It is necessary to follow the exact sequence of the installation
Installation Instruction for '84-'89 Nissan 300ZX High Performance Intercooler System (Part No. 2-124) Routing of the Intercooler Pipe It is necessary to follow the exact sequence of the installation
INSTALLATION MANUAL P2068. Level of Difficulty. Parts List. Product Image. Notes and Maintenance. Tools Required. Easy
 INSTALLATION MANUAL P2068 Parts List 1 Grille guard 1 Driver / left frame mounting bracket 1 Passenger / right frame mounting bracket 1 Driver / left top mounting bracket 1 Passenger / right top mounting
HASPORT PERFORMANCE EFH1
 HASPORT PERFORMANCE Installation Instructions For: Part Number EFH1 1988-1991 Honda Civic/CRX Hasport Performance mounts are the result of extensive research and engineering. All mounts are designed with
3 Turbo Downpipe Installation Audi A3 / Volkswagen GTI / Volkswagen Jetta 2.0L FSI/TSI Turbo CD100013
 Please take time to read and understand these installation instructions. APR recommends that installation of this system be performed by a qualified service center or professional muffler installer who
INSTALLATION INSTRUCTIONS PART NUMBER:21-729
 Equipped with AEM Dryflow Filter No Oil Required! INSTALLATION INSTRUCTIONS PART NUMBER:21-729 2010-2013 MAZDA MX-5 MIATA 2.0L I-4 PARTS LIST Description Qty. Part Number A Tube, Lower Intake, 2006-13