Audi 8L A3 and B5 A4 ColorMFA Install Guide ColorMFA from AutoPilot. Instructions from Clusters by Litke and pinout from Drive2
|
|
|
- Derrick Edwards
- 5 years ago
- Views:
Transcription


1 Audi 8L A3 and B5 A4 ClrMFA Install Guide ClrMFA frm AutPilt. Instructins frm Clusters by Litke and pinut frm Drive2 This is an verview guide n hw t install the v3.2/v3.4 ClrMFA units int Audi 8L and B5 A4 VDO clusters. Thugh the 2 types f clusters appear very different, the fundamentals fr ClrMFA peratin and install are the same. This is a general step by step guide n hw t fit the unit. This will nt cver basics such as sldering techniques, r hw t disassemble the cluster. By Litke LLC and Matthew Litke are nt respnsible fr any damages yu may cause t yurself, yur cluster, r yur vehicle during this prcess. ClrMFA Kit Cntents: -Main PCB, LCD, 0.12mm^2 wire, 0.35mm^2 wire, SMD resistrs, beeper, matte film screen prtectr. Audi A3 8L Audi A4 B5
 -Multimeter")
2 Tls/Parts Required: -Slder irn and slder. Slder wick is helpful but nt required. -Wire strippers and wire cutters -T10 Trx Driver -Needle nse pliers -Tweezers -Ruler/Tape measure -Knife/Razr blade -Dremel/Rtary tl -Duble Sided tape (3M s Red Very High Bnd wrks well) -Multimeter (t check wire cntinuity) -Drill (t twist the CANBus pairs) -Scissrs -Optinal: Glue t secure wires and PCB -Optinal: Heat Shrink Tubing


3 Install Steps Prepare ClrMFA PCB Cut the smaller gauge wire int 14 pieces in 100mm lengths each. Cut 11 mre pieces f the smaller gauge wire in 200mm lengths. Cut the larger gauge wire in 3 equal pieces f rughly 230mm lengths. Slder these cut wires t the ClrMFA PCB as shwn the diagram abve. Rute the wires thrugh the bttm f the PCB fr a cleaner lking install. The large gauge is fr Grund, 12V, and Ignitin. The 100mm pieces will be used the 2 beeper wires and all wires ging t the GRAY cnnectr. The 200mm pieces will be used fr wires ging t the GREEN and BLUE cnnectrs. Mark CAN High n bth Cmfrt and mtr with a marker than twist Mtr CAN H and L tgether with the drill and twist Cmfrt CAN H and L tgether. Attach duble sided tape t the backside f the PCB. Dubling up 2 pieces f 3M VHB prvides gd spacing between the cluster and ClrMFA PCBs and ensures the LCD wn t sit t high r t lw with regards t the face when installed. If yu dn t intend n glue the PCB later, use additinal duble sided tape at this step s the bard sits securely.
 and 8 clips")


4 Cluster Disassembly Remve the lens. It is attached with 2 T10 screws (ne near the green plug and 1 near the blue plug) and 8 clips (2 n bttm, 4 n tp). B5 has an additinal hk n the left and right side f the husing. Remve back plastic husing. This is held nt the PCB with 1 hk n the far left and 1 hk n the far right. Remve the needles by twisting cunter clckwise while pulling up then remve faces. Remve the clck and dmeter screen cage by bending the hks and lifting them ut. Remve the white plastic light shrud. There are hks that need t be pressed n the backside f the PCB t release it. The dmeter reset knb will als need t be pressed thrugh the PCB by pushing in the hks n it and feeding it thrugh. Prepare cluster PCB fr ClrMFA Start by remving the stck screen by remving the metal cage arund the screen (sme d nt have this) then un-sldering the ribbn cable. Make sure t clean up the slder pads after the screen is remved s that nne f them are shrting tgether.


5 The 2-wire sensr and the plastic husing/shrud needs remved. Remve the LCD husing (2 large metal pins. Heat with slder while pulling the husing ff the PCB) then lcated the 2 pads fr the sensr and heat thse up while pulling the sensr cable ff. Remve all the LED s riginally behind the LCD. These LEDs d nt require jumper resistrs. Leave them pen. Ensure slder is nt bridging any f the pads tgether.

.")

6 Cut the traces fr pin 17, 18, and 19 n the gray plug fr the factry menu cntrls. Fitting ClrMFA t cluster Remve the duble-sided tape backing and press the ClrMFA bard t the cluster. The large dide at the tp f the bard shuld be centered with the high beam LED(s). Leave abut a 3-4mm gap between the bttm f the bard and the cluster PCB. D nt have the edges f the tw be flush with ne anther f the screen will sit t lw and the bttm f the screen will be cvered up when the lens is installed.
.")


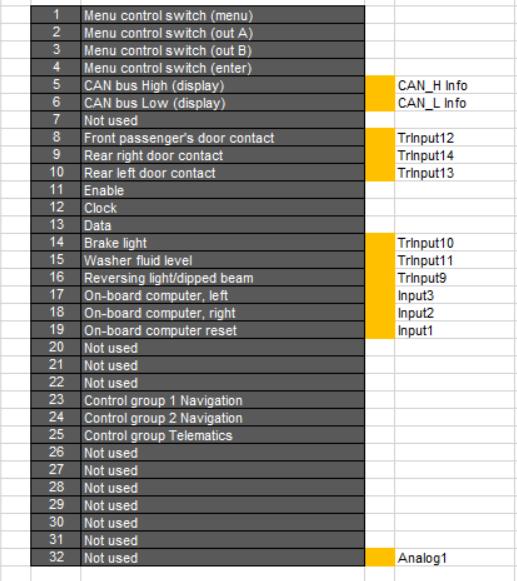
7 Begin identifying where each wire will g and rute it s that it runs alng the tp f the clck/dmeter screen area. Cut the wire t prper length (extra wire can be tucked under the ClrMFA PCB is yu want t errr n the side f cautin). Begin sldering each wire t it s crrespnding pin n the blue, green, and gray headers. Since the wires are expsed and easy t fllw, yu can g ne wire at a time and fllw the pinut chart n the abve r can use a multimeter t identify each wire t ensure everything is cnnected crrectly. Rute the 2 remaining wires fr the beeper thrugh the pening next t the stck LCD slder pads and slder them t the beeper. The lnger leg f the beeper is psitive. Add heat shrink t these slder jints. D 1 final check with the meter t ensure each wire frm the ClrMFA bard is in the crrect lcatin. The slder prtin is nw cmplete.


8 Reassembly Cut the clck and dmeter LCDs ut frm the rest f the light shruds and attach these t the cluster PCB. Secure all the wires with tape, epxy, ht glue, etc s that they d nt chaff and cause accidental shrts. Can als secure the ClrMFA PCB better at this time just ensure the bard is sitting straight and level.


9 Lcate where yu d like the USB B t g. Cutting a square hle next t the gray cnnectr is an ptin. Glue the prt s the lcatin yu chse. Use a rtary tl t trim an pening in the white plastic shrud t fit the ClrMFA screen. It is necessary t cut ut rughly half f the high beam icn area and flatten ut the rund psts n either side. Cut ff the high beam alignment pin.


10 Cut the matte screen prtectr film t the size f the LCD and apply it t the LCD. Additinally, it s nt a bad idea t apply a small piece f black electrical tape t the tp area where the screen cvers up the high beam icn. This will prevent any LCD light bleeding thrugh the high beam icn at night. Install the white plastic shruding and dmeter reset knb. Ensure it fully sits nt the PCB and isn t being lifted up by wires.


11 Install the ClrMFA screen nt the ClrMFA PCB. It s recmmended t add abut 3 layers f the duble sided tape t hld the screen and bard securely tgether. D nt stack t much tape thugh that it causes the screen t site abve the white plastic and thus wuld cause the faces t nt sit flush. Install faces and needles. When installing the needles be sure t nly turn cunter clckwise s the mtr zers ut then keep turning until yu reach 0. If yu pass 0, g all the way arund again and start ver. Never turn clckwise. Als leave abut a 2mm gap between the bttm f the needle and the face s that it des nt rub and catch. If VCDS is available, the needles can be checked with 17-Instruments and utput tests which will result in the needles sweeping and stpping at 3000 RPM, 190* (r 90* n metric), ½ tank, 62MPH and n B5 250* il temp and 12V. If the needle is ff during these tests t NOT mve them while still in the test, click next s the needle ges back t zer then mve it. Snap the lens back tgether and reinstall the 2 T10 screws. Install cmplete.

12 Ntes: Fr use f the bst gauge functin n the ClrMFA, the MAP sensr must be splice int and run t the Gray cluster plug cavity 32 (will be unppulated). If the car is nt factry turb, a 5V MAP sensr can still be used and return signal run t Gray cnnectr cavity 32. Cnnect t ECU T121/101 fr Gas, T121/71 fr TDI. Be sure t adjust the gear ratis in the calibratin settings s that the indicatr wrks crrectly. A step by step guide has been made fr that as well and can be prvided.
13
Mini H1 Twin Kit - Installation Instructions
 Intrductin: Thanks fr purchasing the Mini H twin kit! Yu are very clse t imprve yur lightning nw :) Please read this manual carefully. Feel free t cntact us r visit ur Facebk cmmunity; Eurpean Headlight
Tools Required. Installation. Step 1. Headlight lense removal (Driver's side shown, Passenger side similar)
") Tls Required Phillips Screw Driver (crner lamps) Flat Head Screw Driver (ptinal fr headlight cver) Pliers (handy t have) Electrical Tape Sturdy Cpper Wire (t use as a wire fish) 10mm Scket r Wrench (grund
Tls Required Phillips Screw Driver (crner lamps) Flat Head Screw Driver (ptinal fr headlight cver) Pliers (handy t have) Electrical Tape Sturdy Cpper Wire (t use as a wire fish) 10mm Scket r Wrench (grund
72 Mustang Mach 1 tachometer cluster and gauge conversion
 72 Mustang Mach 1 tachmeter cluster and gauge cnversin Dated: 02-17-2009 (drafted by a Chevy persn wrking n his first Frd -nt gd-) The fllwing infrmatin pertains t hw I went abut cnverting the standard
How to Sweat (Solder) Copper Pipe By See Jane DrillTM Copyright 2013, All Rights Reserved
 Copper Pipe By See Jane DrillTM Copyright 2013, All Rights Reserved") Hw t Sweat (Slder) Cpper Pipe By See Jane DrillTM Cpyright 2013, All Rights Reserved Objective T learn hw t attach pieces f cpper pipe by sweating r sldering the metal tgether. This is a helpful skill
Hw t Sweat (Slder) Cpper Pipe By See Jane DrillTM Cpyright 2013, All Rights Reserved Objective T learn hw t attach pieces f cpper pipe by sweating r sldering the metal tgether. This is a helpful skill
Installation Guide Contigo 6100
 Installatin Guide Cmmercial Vehicle Prductivity and Security The is a high-perfrmance beacn designed fr cmmercial prductivity and security. It is ideally suited t installatins in delivery and service fleets
INSTALLATION INSTRUCTIONS FOR PART #47002 WATER / METHANOL INJECTION SYSTEM UNIVERSAL TURBO DIESEL
 Kit Cntents INSTALLATION INSTRUCTIONS FOR PART #47002 WATER / METHANOL INJECTION SYSTEM UNIVERSAL TURBO DIESEL Parts UHO Pump (Ultra High Output) 3 Qt Reservir 10 ft High Pressure Tubing 3 ft Black Wire
DriveCam Unit Installation Instructions
 DriveCam Unit Installatin Instructins Installatin f the DriveCam Unit is nt cmplicated, thugh care must be taken t avid specific prblems. Sme vehicles require additinal cnsideratin t determine the ptimum
Model: TM-3 INSTALLATION AND OPERATION INSTRUCTIONS
 120 Mdel: TM-3 INSTALLATION AND OPERATION INSTRUCTIONS IF YOU CANNOT READ OR UNDERSTAND THESE INSTALLATION INSTRUCTIONS DO NOT ATTEMPT TO INSTALL OR OPERATE INTRODUCTION This Wired Wall Timer system was
INSTALLATION INSTRUCTIONS
 INSTALLATION INSTRUCTIONS Accessry Applicatin Publicatins N. All 24039 AIR CONDITIONER ACCORD (DX) 4-DOOR Issue Date SEP 2002 What s New The A/C kit and instructins fr the 2003 Accrd are all new. Fllw
EDBRO RIGID INCLINOMETER
 EDBRO RIGID INCLINOMETER RINC01 Installatin & Operating Instructins E5542 rev 1 (June 2010) Edbr PLC Nelsn Street, Bltn BL3 2JJ UK Tel: +44 (0) 120 4528888 Fax: +44 (0) 120 4531957 E-mail: pstmaster@edbr.cm
INSTALLATION INSTRUCTIONS FOR PART #20001 FORCED INDUCTION BOOST COOLER WATER / METHANOL INJECTION SYSTEMS
 INSTALLATION INSTRUCTIONS FOR PART #20001 FORCED INDUCTION BOOST COOLER WATER / METHANOL INJECTION SYSTEMS Parts UHO (Ultra High Output) Pump 3 Qt Reservir 10 ft High Pressure Tubing 3ft Wire Lm 18 1/8
Installation instructions: 13 Pin Electrical system for towing hitch
 General data Part number Westfalia Vehicle Manufacturer Vehicle 321 538 300 153 ZGB 1T0 055 204 Vlkswagen Turan MY 2003> 321 538 391 105-005 - 33/07 Imprtant ntes Read the installatin manual prir t starting
Installation Guide Contigo 6150 & 6151
 Installatin Guide Cntig 6150 & 6151 Cmmercial Vehicle Prductivity and Security The Cntig 6150 & 6151* (cllectively knwn as the Cntig 615X) are highperfrmance beacns designed fr cmmercial prductivity and
Parts Checklist: ZJ Front 3-Link Long Arm Upgrade Installation Instructions *BOX 1* *BOX 2* Jeep Grand Cherokee ZJ
 ZJ Frnt 3-Link Lng Arm Upgrade Installatin Instructins 93-98 Jeep Grand Cherkee ZJ Parts Checklist: *BOX 1* Instructins Invice Lg decal 10001 (Qty: 1) Rck-Link decal 13287 (2) Irnrckffrad.cm decal (1)
Parts Checklist: WJ Front 3-Link Long Arm Upgrade Installation Instructions *BOX 1* (1) *BOX 2* (1) Jeep Grand Cherokee WJ
 *BOX 2* (1) Jeep Grand Cherokee WJ") Parts Checklist: *BOX 1* 13319 (1) Instructins Lg decal 10001 (Qty: 1) Rck-Link Decal 13287 (2) Irnrckffrad.cm decal (1) Subframe center 92270 (1) Subframe left uter 92256 (1) Subframe right uter 92275
Parts Checklist: *BOX 1* 13319 (1) Instructins Lg decal 10001 (Qty: 1) Rck-Link Decal 13287 (2) Irnrckffrad.cm decal (1) Subframe center 92270 (1) Subframe left uter 92256 (1) Subframe right uter 92275
Trouble Shooting Guide for AFVK-SP Series Valve Kit (AF-4000 Series Gas Valves)
") Truble Shting Guide fr AFVK-SP Series Valve Kit (AF-4000 Series Gas Valves) AFVK-SP, AFVK-SP-H/L, AFVK-SP-MH/L AFVK-SP Series Valve Kit Truble Shting Guide (AF-4000 Series) TABLE OF CONTENTS General Infrmatin
Truble Shting Guide fr AFVK-SP Series Valve Kit (AF-4000 Series Gas Valves) AFVK-SP, AFVK-SP-H/L, AFVK-SP-MH/L AFVK-SP Series Valve Kit Truble Shting Guide (AF-4000 Series) TABLE OF CONTENTS General Infrmatin
XJ 4-Link Rear Long Arm Instructions
 Parts Checklist: Instructins Irn Rck Off Rad Decal - (2) Rck-Link Decal 13287 - (2) irnrckffrad.cm Decal - (1) Crssmember - 991162 - (1) Shck crssmember - 91173 - (1) Shck crssmember spacer - 91178 - (2)
General Faucet Installation Instructions
 General Faucet Installatin Instructins Step 1: Psitin the Faucet Begin installing yur faucet by placing the gasket and faucet in psitin n the sink. (Diagram A) Frm under the sink, thread the plastic munting
FIRST: Top battery (closest to the arm) SECOND: Middle battery. LAST: Top battery (furthest from arm)
 SECOND: Middle battery. LAST: Top battery (furthest from arm)") Hw t Install the Batteries Hw t Hld the Lamp: The InteliEnergy Lamp selectin switches utilize the same technlgy as cell phnes: Capacitive Tuch. This assures the ultimate in lngevity because there are n
Hw t Install the Batteries Hw t Hld the Lamp: The InteliEnergy Lamp selectin switches utilize the same technlgy as cell phnes: Capacitive Tuch. This assures the ultimate in lngevity because there are n
INSTALLATION INSTRUCTIONS FOR PART #20010 RT1/RT2/DOM WATER / METHANOL INJECTION SYSTEMS
 Kit Cntents INSTALLATION INSTRUCTIONS FOR PART #20010 RT1/RT2/DOM WATER / METHANOL INJECTION SYSTEMS Parts UHO Pump (Special High Output) 3 Qt Reservir 10 Ft High Pressure Tubing 3 Ft Wire Lm 18 1/8 Silicne
Appointment Plus User Instructions
 Appintment Plus User Instructins This dcument prvides the user with instructins fr the Appintment Plus System. Appintment Plus System Features This is a tl fr managing the fllwing: Technician Wrk Frce
INSTALLATION INSTRUCTIONS
 INSTALLATION INSTRUCTIONS Accessry Applicatin Publicatins N. All 24107 AIR CONDITIONER ELEMENT (DX) Issue Date DEC 2002 What s New INSTALLATION The A/C kit and instructins fr the 2003 Element are all new.
Advanced 3 Million Wireless USB Limousine Underbody Kit
 Advanced 3 Millin Wireless USB Limusine Underbdy Kit Warning: Please check yur state and lcal laws befre installing this LED underbdy kit. Every state has different plicies and prcedures in place regarding
GENUINE ACCESSORIES INSTALLATION INSTRUCTIONS SECURITY SYSTEM KIT CONTENTS SHOCK SENSOR F-D15 WINDOW DECAL (QTY 2) F-D16
 F-D16") GENUINE ACCESSRIES INSTALLATIN INSTRUCTINS PART NUMBER: 0000-8F-N03 NTE: NT CMPATIBLE WITH REMTE START SYSTEM, PART# 0000-8F-N02 SECURITY SYSTEM KIT CNTENTS APPLICABLE MDELS: 2007>MAZDA CX-9 WITHUT ADVANCED
GENUINE ACCESSRIES INSTALLATIN INSTRUCTINS PART NUMBER: 0000-8F-N03 NTE: NT CMPATIBLE WITH REMTE START SYSTEM, PART# 0000-8F-N02 SECURITY SYSTEM KIT CNTENTS APPLICABLE MDELS: 2007>MAZDA CX-9 WITHUT ADVANCED
CS369-R51I Thank you very much for purchasing our air conditioner.
 OWNER'S MANUAL CONDITIONER REMOTE CONTROLLER ILLUSTRATION The design and specificatins are subject t change withut prir ntice fr prduct imprvement. Cnsult with the sales agency r manufacturer fr details.
MT Pressure Switch INSTALLATION AND OPERATING INSTRUCTIONS. Kaustubha Udyog (Orion Instruments)
") PRESSURE SWITCHES PRESSURE DIFFERENCE SWITCHES VACUUM SWITCHES Frm 1.5 mbar t 600 bar INSTALLATION AND OPERATING INSTRUCTIONS MT Pressure Switch Cnstructin The pressure switch is hused in a tugh Aluminium
PRESSURE SWITCHES PRESSURE DIFFERENCE SWITCHES VACUUM SWITCHES Frm 1.5 mbar t 600 bar INSTALLATION AND OPERATING INSTRUCTIONS MT Pressure Switch Cnstructin The pressure switch is hused in a tugh Aluminium
PRAIRIE 360 4X4 (KVF360-A/C), PRAIRIE 360 2X4 (KVF360-B), PRAIRIE 650 4X4 (KVF650-A/B), PRAIRIE 700 4X4 (KVF700-A/B/D),
, PRAIRIE 360 2X4 (KVF360-B), PRAIRIE 650 4X4 (KVF650-A/B), PRAIRIE 700 4X4 (KVF700-A/B/D),") SERVICE REPLACES: Please discard ATV 07-02 dated 4/5/07 MODEL: PRAIRIE 360 4X4 (KVF360-A/C), PRAIRIE 360 2X4 (KVF360-B), PRAIRIE 650 4X4 (KVF650-A/B), PRAIRIE 700 4X4 (KVF700-A/B/D), KFX700 (KSV700-A/B/C),
SERVICE REPLACES: Please discard ATV 07-02 dated 4/5/07 MODEL: PRAIRIE 360 4X4 (KVF360-A/C), PRAIRIE 360 2X4 (KVF360-B), PRAIRIE 650 4X4 (KVF650-A/B), PRAIRIE 700 4X4 (KVF700-A/B/D), KFX700 (KSV700-A/B/C),
REMOTE GREASING KIT FOR MORGANS SERIES 2
 Fitting Instructins REMOTE GREASING KIT FOR MORGANS SERIES 2 Thank yu fr purchasing a Remte Greasing Kit fr yur Mrgan. These fitting instructins shuld enable yu t fit the kit t yur Mrgan. Depending n which
EDBRO TRAILER INCLINOMETER
 EDBRO TRAILER INCLINOMETER TINC01 (12V AND 24V VERSIONS) Installatin & Operating Instructins E5541 rev 5 (Sept 2015) Edbr PLC Nelsn Street, Bltn BL3 2JJ UK Tel: +44 (0) 120 4528888 Fax: +44 (0) 120 4531957
Parts Checklist: XJ Front 3-Link Long Arm Upgrade Installation Instructions *BOX 1* *BOX 2* Jeep Cherokee XJ
 XJ Frnt 3-Link Lng Arm Upgrade Installatin Instructins 84-01 Jeep Cherkee XJ Parts Checklist: *BOX 1* Instructins Invice Lg decal 10001 (1) Rck-Link decal 13287 (2) Irnrckffrad.cm decal (1) Subframe center
READ ALL INSTRUCTIONS THOROUGHLY FROM START TO FINISH BEFORE BEGINNING INSTALLATION!
 www.fabtechmtrsprts.cm 4331 EUCALYPTUS AVE ~~ CHINO, CA 91710 PHONE 909-597-7800 ** FAX 909-597-7185 1994-2001 DODGE RAM 1500 & 2500 4 WHEEL DRIVE FTS3400-50 FRONT DUAL SHOCK SYSTEM PARTS LIST: 1 EA. FT3400-50-100P
Introduction Specifications Structure & Performance Assembly Folding Operation Care & Maintenance...
 n Intrductin... 3 Specificatins... 4 Structure & Perfrmance... 5 Assembly... 6 Flding... 7 Operatin... 8-12 Care & Maintenance... 13-15 2 P a g e Read and fllw all instructins, warnings, and ntes in this
Adjusting the Pekar K68 for your Dnepr or Ural Adjustment section translated from Pekar K68 manual
 Adjusting the Pekar K68 fr yur Dnepr r Ural Adjustment sectin translated frm Pekar K68 manual Adjusting the Pekar K68 carburetrs n yur Dnepr r Ural. This dcument is intended t server as the primer fr prper
BioWave Hydro DI-9200 User Manual
 BiWave Hydr DI-9200 User Manual Assembling Hydr DI 9200: Assembling yur BiWave Hydr DI 9200, is a very shrt and simple prcess. All yu have t d is take the Hydr DI 9200 ut f the bx, make sure its standing
Tormach CNC Mill PCNC1100
 Trmach CNC Mill PCNC1100 Machine Purpse: CNC machine used fr precisin cutting, drilling & frming Safety: Must wear safety glasses while perating machine. Keep. Beware f bjects that dangle and culd get
;THI~~Sf\-FEJY _.:.. ;'..»...
 45 -CHAPTER......... j...,.. 8 ~\..- ;THI~~Sf\-FEJY _.:.. ;'..».......,. np;,llf I~~yeantlfreez~in ah'penc8ntaiil~rr spllledq.l,1thefi()r ~~erifit:p1ightbe acc;~ss:lblle.i t children r ariimals.antifreezeis'txic
HIGH POWER RGB LED SERIES. The HB Series Advantage! Architectural Illumination Systems!
 The HB Series Advantage SGS listed cnfirming t UL Standard 2108 & 8750 Certified t CSA Standard C22.2 N.9 LED Life f 50K+ hurs, under nrmal perating cnditins Lw wattage, lw heat, lw vltage (12DVC & 24VDC
03-06 TJ Long Arm Upgrade Instructions
 Parts List: Instructins Irn Rck Off Rad lg decal (2) Irnrckffrad.cm decal (1) Belly skid plate 85046 (1) Left lng arm frame munt 85121 (1) Right lng arm frame munt 85122 (1) Left LCA munt gusset plate
Signature Series Vehicles C6 A6 Installation Guidelines
 STāSIS Engineering Signature Series Vehicles C6 A6 Installatin Guidelines Table f Cntents Page Trque specs 3 Suspensin Frnt and Rear Suspensin, Turing 4 Braking Optinal Brake Kit 16 Bed-In Prcedure 21
{EMS Shock} Student Name: Period:
 {EMS Shck} Student Name: Perid: 5 th Grade Engineering Pulleys Unit Rubric Lab #0016 Pulley Frame Pulley Frame: Student cnstructed the Pulley Frame t lab specificatins. Pulley Frame was nt apprved 0 pints
Solvent Filter. What is a Solvent Trap, Solvent Recycler or Solvent Filter? Why use a solvent filter? Why is the HIT Solvent Filter better?
 Slvent Filter What is a Slvent Trap, Slvent Recycler r Slvent Filter? It is a device attached t the end f a threaded barrel that cllects all f the slvent and debris as it is cleaned frm the barrel and
Route Sheet Guidelines
 Fairfax VA H.O.G. Chapter Rute Sheet Guidelines THIS DOCUMENT IS A WORK IN PROGRESS AND IS NOT FOR GENERAL DISTRIBUTION. ANY INTERIM USE BY AN OFFICER OR VOLUNTEER OF FAIRFAX VA CHAPTER H.O.G. IS FOR THE
Stage 1: Starting with Births
 Mdule 2C Building the Mdel Presenter s Guide Stage 1: Starting with Births Presenter Ntes are in text bxes thrughut the dcument. File Mdel Hand Variable Bx Arrw Rate Pacman Y=x 2 Run Run AutSim Input/Output
Maintanence Instructions for Meade LXD55 / 75 Motor Gear Box
 WARPSCORP A publicatin frm the Yah Grup - WarpsCrp. Prviding slutins t prblems, answers t questins and ideas t share amng the amateur Astr cmmunity. We welcme yu at: http://grups.yah.cm/grup/warpscrp/
Thank you for purchasing a SledLites.com HID system for your snowmobile. Please read all warnings and complete manual prior to installing.
 Thank yu fr purchasing a SledLites.cm HID system fr yur snwmbile. Please read all warnings and cmplete manual prir t installing. OFF ROAD USE ONLY ALL SLEDLITES.COM EQUIPMENT IS FOR OFF ROAD USE ONLY ATTENTION
ALL components will be installed on the top of the board with the exception of the OPTIONAL dual battery holder.
 ASSEMBLING THE BOARD The cmpnent list can be fund n the last 2 pages f this dcument. Refer t it when installing cmpnents n the bard. All cmpnents lcatins are numbered and the cmpnent list shws the crrespnding
Open Street Cam User Manual
 Open Street Cam User Manual Table f cntent 1.Installing the app and setting it up fr the first time 1.1 Installing the app 1.2 Setting up the app fr the first time 2. Installing the smartphne in the car
JD F Conversion. Combine Manual a
 JD 9000-600F Cnversin Cmbine Manual 09040114a Abut Headsight Headsight Cntact Inf Headsight, Inc Bremen, IN 46506 Phne:574-546-5022 Fax: 574-546-5760 Email: inf@headsight.cm Web: www.headsight.cm Technical
PSS INSTALLATION INSTRUCTIONS
 PSS INSTALLATION INSTRUCTIONS Imprtant - Read Befre Starting! Befre starting yur installatin carefully read the fllwing warnings and instructins. Failure t prperly fllw the warnings and instructins culd
INSTALLATION & USER S GUIDE
 REKLUSE MOTOR SPORTS The Rekluse EXP Clutch OVERVIEW INSTALLATION & USER S GUIDE Dc ID: 191-6000 Manual Revisin: 050514 This kit will replace sme f the OEM frictins and drive plates with the EXP disk.
Volume 1.1 OPERATIONAL MANUAL MODEL: CG-211Y PIPE TORCH/BURNER MACHINE. by BLUEROCK Tools
 Vlume 1.1 OPERATIONAL MANUAL MODEL: CG-211Y PIPE TORCH/BURNER MACHINE by BLUEROCK Tls UNPACKING THE ITEM Cautin: This machine is packed tgether with items that may be sharp, ily and verly heavy bjects.
IDIN Build-it: Battery-powered wood block phone charger
 IDIN Build-it: Battery-pwered wd blck phne charger GOALS: TIME: Participants knw hw t build a cell phne charger pwered by a car/mtrcycle battery Participants feel mre cmfrtable with sawing, nailing, making
ANNEX A Descriptions and Photos
 ANNEX A Descriptins and Phts Cmpnent One: Hrizntal autclave with biler The autclave is designed t treat infectius waste by expsure t steam at temperature f up t 130ºC and abut 1.7 bars. The autclave has
INSTALLATION INSTRUCTIONS FOR PART #20140 STAGE 3 N54 BMW BOOST COOLER WATER/METHANOL INJECTION SYSTEM
 INSTALLATION INSTRUCTIONS FOR PART #20140 STAGE 3 N54 BMW BOOST COOLER WATER/METHANOL INJECTION SYSTEM Parts List UHO (Special High Output) Pump 2.5 gal Reservir 20 ft. 1/4 OD Tubing 3ft.Black Wire Lm
WELCOME. WEB LOCATION Los Angeles, CA
 WELCOME Thank yu fr chsing AC Infinity. We are cmmitted t prduct quality and friendly custmer service. If yu have any questins r suggestins, please dn t hesitate t cntact us. Visit www.acinfinity.cm and
Electric Bicycle Owner Manual
 X-Treme TM Electric Mped XB-610 Electric Bicycle Owner Manual Read this manual cmpletely befre riding yur electric bicycle 1 Cntents Table f Cntents.. 2-3 Riding Safety 4-6 Prduct Features 7 Package Cntents...
A very common arrangement for oil lubricated stern tube bearings. A simplex seal arrangement is fitted to both inner and outer ends.
 Simplex shaft seal A very cmmn arrangement fr il lubricated stern tube bearings. A simplex seal arrangement is fitted t bth inner and uter ends. The replaceable chrme liner prevents damage t the prp shaft
USER`s Manual. Swivelling semi-automatic press. Swivelling manual press TECHNICAL DATA. - works without compressor
 USER`s Manual Swivelling semi-autmatic press Swivelling manual press TECHNICAL DATA - wrks withut cmpressr - pens autmatically ( nly Swing S ) - swivels autmatically aside ( nly Swing S ) Dimensins in
Rejuvenation Instructions
 Rejuvenatin Instructins #521 200A Elbws UPR This NRI cvers the fllwing: Hw t prepare 200amp pre-mlded elbws fr injectin. Hw t install and re-infrce an injectin elbw. Hw t size an injectin elbw t match
Thank you for purchasing a SledLites.com HID system for your snowmobile. Please read all warnings and complete manual prior to installing.
 Thank yu fr purchasing a SledLites.cm HID system fr yur snwmbile. Please read all warnings and cmplete manual prir t installing. OFF ROAD USE ONLY ALL SLEDLITES.COM EQUIPMENT IS FOR OFF ROAD USE ONLY ATTENTION
Headsight HHC HH 14 series. Combine Manual
 Headsight HHC HH 14 series Cmbine Manual 09010204 Abut Headsight Headsight Cntact Inf Headsight, Inc Bremen, IN 46506 Phne:574-546-5022 Fax: 574-546-5760 Email: inf@headsight.cm Web: www.headsight.cm Technical
AMERICAN IRON HORSE IGNITER TEST BOX
 Gill Instruments AMERICAN IRON HORSE IGNITER TEST BOX L.E.D. ARRAY IGNITER TYPE SELECTOR SWITCH 12V BATIERY SUPPLY CONNECTORS IGNITER CONNECTOR COMPONENT IDENTIFICATION The Test Bx cnsists f the fllwing:
Cabo Cruiser. X-Treme TM Electric Bicycle. Electric Bicycle. Owner s Manual. (Photo may vary from actual bicycle)
") X-Treme TM Electric Bicycle Cab Cruiser Electric Bicycle Owner s Manual (Pht may vary frm actual bicycle) Read this manual cmpletely befre riding yur electric bicycle 1 Table f Cntents Table f Cntents.
X-Treme TM Electric Bicycle Cab Cruiser Electric Bicycle Owner s Manual (Pht may vary frm actual bicycle) Read this manual cmpletely befre riding yur electric bicycle 1 Table f Cntents Table f Cntents.
INSTALLATION INSTRUCTIONS FOR PART #50015 DIESEL MPG-MAX WATER / METHANOL INJECTION SYSTEM 6.0L/6.4L/6.7L POWERSTROKE DIESEL
 Kit Cntents INSTALLATION INSTRUCTIONS FOR PART #50015 DIESEL MPG-MAX WATER / METHANOL INJECTION SYSTEM 6.0L/6.4L/6.7L POWERSTROKE DIESEL Parts 7 Galln Reservir UHO Pump (Ultra High Output) 25 ft High Pressure
PV-70 Remotely Operated Cryogenic Globe Valve Installation, Operation, and Maintenance Manual
 PV-70 Remtely Operated Crygenic Glbe Valve Installatin, Operatin, and NOTIC: Printed cpies are uncntrlled. Page 1 f 12 TABL OF CONTNTS 1. INSTALLATION... 2 2. OPRATION... 4 3. MAINTNANC... 4 4. PRSSUR
EnergyBar 6. Setup Guide
 EnergyBar 6 Setup Guide WELCOME Cngratulatins n yur purchase f the Apex EnergyBar 6! The EnergyBar 6 allws the Apex system t cntrl up t six 230 vlt items such as lights, pumps, fans, heaters, chillers
Instruction Manual - Version 1.00 Span 26 in. / Length 23 in. / Area 152 Sq. In. / Weight 5.75 oz.
 SHAFT micr Instructin Manual - Versin 1.00 Span 26 in. / Length 23 in. / Area 152 Sq. In. / Weight 5.75 z. 2007 Stevens AerMdel. Page 1 f 34 WARRANTY Stevens AerMdel guarantees this kit t be free frm defects
Onboarding Class Details and Travel Guide. Onboarding Better. Together.
 Onbarding Class Details and Travel Guide Onbarding Better. Tgether. Onbarding Class Details and Travel Guide Table f Cntents Reference this guide fr the fllwing infrmatin: Class details by lcatin McLean
Instruction Manual - Version 1.01 Span 52 in. / Length 45 in. / Area 600 Sq. In. / Weight oz.
 SHAFT25e Instructin Manual - Versin 1.01 Span 52 in. / Length 45 in. / Area 600 Sq. In. / Weight 32-40 z. 2007 Stevens AerMdel. Page 1 f 35 ***Cautins*** 1. Pwer system. Overpwering this mdel with a heavier
INVERTER/CHARGERS EVOLUTION SERIES. Off-Grid Power Solutions. How an Inverter/ Charger. Works... ORDER NOW
 D yu yu need reliable AC pwer in a vehicle, remte lcatin r fr emergency back-up? Samlex s inverter/charger is THE chice fr a cmplete ff-grid pwer slutin. Off-Grid Pwer Slutins LUTION SERIES S Sine 1 Pure
XJ 4 Rock-Link Long Arm Lift Kit Instructions XJ Jeep Cherokee
 Parts Checklist: *BOX 1* 33x17x8 Instructins Rck-Link decal 13287 (2) Irn Rck Off Rad lg decal 10001 (2) Irnrckffrad.cm decal (1) XJ/ZJ Adjustable duble shear track bar 92185 (1) Track bar male threaded
XJ 4 Rock-Link Long Arm Lift Kit Instructions XJ Jeep Cherokee
 Parts Checklist: *BOX 1* 33x17x8 Instructins Rck-Link decal 13287 (2) Irn Rck Off Rad lg decal 10001 (2) Irnrckffrad.cm decal (1) XJ/ZJ Adjustable duble shear track bar 92185 (1) Track bar male threaded
Tips & Technology For Bosch business partners
 Tips & Technlgy Fr Bsch business partners Current tpics fr successful wrkshps N. 35/2011 Gasline injectin Invented fr life Lambda sensr Knw-hw frm the market leader Bsch, innvative cmpany and wrld's largest
HDS Carbon Software Upgrade (v Standard-1.upd)
") HDS Carbn Sftware Upgrade (v 1.5-56.6-45 Standard-1.upd) New sftware is available fr Lwrance HDS Carbn multifunctin displays. Fixes and Imprvements Dual Channel CHIRP / Dual Transducer cmpatibility - this
HDS Carbn Sftware Upgrade (v 1.5-56.6-45 Standard-1.upd) New sftware is available fr Lwrance HDS Carbn multifunctin displays. Fixes and Imprvements Dual Channel CHIRP / Dual Transducer cmpatibility - this
Fuel Meter Model FM 200
 Fuel Meter Mdel FM 200 WILLIAM C. KIELING, Assistant Prfessr f Mechanical Engineering, Cllege f Engineering, University f Washingtn The mtr benefits fuel meter is an Accurate, _. wide flw range fuel-measuring
INSTALLATION INSTRUCTIONS
 INSTALLATION INSTRUCTIONS Observer Zning Bard ZONE0101ZP6 These instructins must be read and understd cmpletely befre attempting installatin Safety Labeling and Signal Wrds DANGER, WARNING, CAUTION, and
BUTTON CELL CR2430 BSI M G T E D BRIEF SPECIFICATION
 BUTTON ELL R2430 BSI RE M G IS T E D RE IR F BRIEF SPEIFIATION Mdel: R2430 Nminal Vltage: V Nminal apacity: 270mAh Standard Discharge urrent: 0.4mA Weight: 4.0g Stainless steel cntainer ISO9002 ertified
Adobe Connect Web Conferencing
 Adbe Cnnect Web Cnferencing Befre yu begin Befre reading this dcument, please review the fllwing nline dems and dcuments: Review System Requirements http://www.adbe.cm/prducts/acrbatcnnectpr/systemreqs/
Installation Instructions AQ-5100, AQ-5200 & AQ-5300 Under Counter Water Filter Single Stage (5100), Two Stage (5200) and Three Stage (5300) systems
, Two Stage (5200) and Three Stage (5300) systems") Live Healthy s ' p V iv Installatin Instructins AQ-5100, AQ-5200 & AQ-5300 Under Cunter Water Filter Single Stage (5100), Tw Stage (5200) and Three Stage (5300) systems Welcme t the Aquasana experience.
Live Healthy s ' p V iv Installatin Instructins AQ-5100, AQ-5200 & AQ-5300 Under Cunter Water Filter Single Stage (5100), Tw Stage (5200) and Three Stage (5300) systems Welcme t the Aquasana experience.
TJ Long Arm Lift Kit Instructions
 Parts List: Instructins Irn Rck Off Rad lg decal (2) Irnrckffrad.cm decal (1) Belly skid plate 85046 (1) Left lng arm frame munt 85104 (1) Right lng arm frame munt 85105 (1) Left LCA munt gusset plate
Lithium Battery Shipping Overview
 Lithium batteries are used in many electrnic devices such as cameras, cell phnes, laptp cmputers, medical equipment and pwer tls. When shipping r imprting lithium batteries, including thse cntained in
ABTQ-103 rev 01 Last review:
 INSTALLATION, OPERATION & MAINTENANCE INSTRUCTIONS FOR ABTECH PCS Cntrl Statin Purpse f Instructins Wrking in hazardus areas, the safety f persnnel and plant depends n cmplying with all relevant safety
Instruction Manual. PHscan30 Pocket ph Tester
 Hazardus Substance Statement Bante is cmmitted t the reductin and eventual eliminatin f all hazardus substances in bth the manufacturing prcess and finished prducts we supply. We have an active manufacturing
WJ 6.5 Critical Path Lift Kit Installation Instructions
 WJ 6.5 Critical Path Lift Kit Installatin Instructins Parts Checklist: *BOX 1* 24x12x12 6.5 Frnt spring 96008 (2) 6.5 Rear spring 96009 (2) *BOX 2* 24x14x6 Literature (instructins, steering shimmy checklist,
Copyright 2015 Maxitrak ltd
 Cpyright 2015 Maxitrak ltd maxitrak.cm 1 CASE Driving and Maintenance. Sme tips n driving and lking after yur Maxitrak/Accucraft 1 Case tractin engine. Once yu have taken yur mdel frm the packaging it
TCS and TCS-200-1H Tension Controls
 TCS-200-1 and TCS-200-1H Tensin Cntrls P-2003-2-WE 819-0420 Service & Installatin Instructins An Altra Industrial Mtin Cmpany Cntents Intrductin...2 Thery f Operatin...3 Technical Specificatins...3 Installatin
WELCOME. WEB LOCATION Los Angeles, CA
 WELCOME Thank yu fr chsing AC Infinity. We are cmmitted t prduct quality and friendly custmer service. If yu have any questins r suggestins, please dn t hesitate t cntact us. Visit www.acinfinity.cm and
E+ Battery Care Guide
 Electric Mtin Systems, LLC 45150 Business Curt, Suite 300 Dulles, VA 20166 USA E+ Battery Care Guide Welcme! Yur E+ Hub Battery Pack is a pwerful, sphisticated, and imprtant part f yur E+ Electric Bicycle.
WJ 6.5 Premium Long Arm Kit Installation Instructions
 WJ 6.5 Premium Lng Arm Kit Installatin Instructins Parts Checklist: *BOX 1* 24x12x12 6.5 Frnt spring 96008 (2) 6.5 Rear spring 96009 (2) *BOX 2* 24x14x6 Literature (instructins, steering shimmy checklist)
VYLEATER DAILY HOUSEKEEPING & PREVENTATIVE MAINTENANCE PROCEDURES. Follow these procedures to keep your Vyleater running smoothly.
 VYLEATER DAILY HOUSEKEEPING & PREVENTATIVE MAINTENANCE PROCEDURES! WARNING! Failure t fllw these prcedures may cause an verlad cnditin that culd result in the Vyleater becming severely damaged. Fllw these
/2017. Flexline rapid clamping systems with drive chain clamping element, T-slot and adjustment track
 Traveling unit chain (adjustment track) in 3 lengths s in varius designs Mtr Advantages 8 different clamping elements 4 different T-slts 3 different adjustment tracks drive mtr and die mnitr attachable
SERVICE FACTORY DIRECTED MODIFICATION MC IMMEDIATE INSPECTION REPAIR ONLY AS REQUIRED ENGINE PULLEY WEAR
 SERVICE REPLACES: Please discard MC 06-07 dated June 27, 2006 MODEL: 2004-2005 VULCAN 2000 (VN2000-A1/L-A2/L) MC 06-07 Date: July 28, 2006 First Issued: June 27, 2006 Page 1 f 7 TITLE: ENGINE PULLEY WEAR
XX FORD F-150 REAR BUMPER INSTALLATION INSTRUCTIONS SAFETY
 2015-20XX FORD F-150 REAR BUMPER INSTALLATION INSTRUCTIONS SAFETY Knw safety, n injury. Knw injury, n safety. ~Authr Unknwn If there are any questins, call 1-855-HHTOUGH READ ALL SAFETY INSTRUCTIONS BEFORE
Technical Manual. eluma. Aluminum Frame LED Panels. patents pending. Technical Specifications Subject to Change
 Technical Manual eluma Aluminum Frame LED Panels patents pending TM Technical Specificatins Subject t Change TABLE OF CONTENTS General Specificatins.. Page 3 Prfile Specificatins EL001.. Page 4 Prfile
Headsight HHC JD xx20 series. Combine Manual
 Headsight HHC JD xx20 series Cmbine Manual 09010105 Abut Headsight Headsight Cntact Inf Headsight, Inc Bremen, IN 46506 Phne:574-546-5022 Fax: 574-546-5760 Email: inf@headsight.cm Web: www.headsight.cm
ADVISORY: General Motors Upfitter Integration Bulletin #108d P a g e 1 May 18, 2016
 Subject: Aftermarket ALDL r DLC Interface Devices Causing Multiple Issues Mdels All Passenger Cars and Trucks Affected: Mdel Years: 2006 and beynd Date: February 4, 2013 Revisin Date: May 18, 2016 ADVISORY:
Anemómetros digitales portátiles AN-100 extech manual ingles USER MANUAL. Model AN100. CFM/CMM Thermo Anemometer AN100
 USER MANUAL CFM/CMM Therm Anemmeter Mdel AN100 CFM/CMM Therm-Anemmeter AN100 Intrductin Cngratulatins n yur purchase f the Extech AN100 CFM/CMM Therm Anemmeter. This instrument measures Air Velcity, Air
FUELS SAFETY BRANCH INFORMATION BULLETIN July 1994
 FUELS SAFETY BRANCH INFORMATION BULLETIN July 1994 Guidelines fr Maintenance and Inspectin Prgrams fr Natural Gas and Prpane Appliances and their Fuel Features In Schls The Ontari Gas Utilizatin Cde states
IMPORTANT SAFETY INSTRUCTIONS
 PN: ISDUALSWG Rev: D OWNER S MANUAL INSTALLATION, OPERATION, & PARTS DUAL SUBMERGED SUCTION OUTLET SET [Cmmnly called main drains] Basic safety precautins shuld always be fllwed, including the fllwing:
INSTALLATION INSTRUCTIONS FOR PART #15021 WATER / METHANOL INJECTION SYSTEMS
 Cntact Us: Phne Office (940) 767-7694 Tech Supprt Line (Tll Free) (888) 463-2781 Web http://www.nitrusexpress.cm INSTALLATION INSTRUCTIONS FOR PART #15021 WATER / METHANOL INJECTION SYSTEMS Email Inf@nitrusexpress.cm