SAP Simulator Installation
|
|
|
- Jane Wiggins
- 5 years ago
- Views:
Transcription
1 SAP Simulator Installation Disclaimer The SAP Simulator is for off-road use only, not intended for highway vehicles. This modification is not a factory approved modification, and engine damage may occur. Any and all work completed must be in accordance with the manufacturers repair manual and all best practices adhered to. This modification may also violate federal, state, and, or local laws. You, the consumer, accept all liability for these modifications. Required Tools Ratchet 10mm socket 8mm socket and/or wrench Small flat-blade screwdriver Wire cutters/strippers/ crimpers Disassembly 1. Carefully remove the two fuel rail cover bolt caps by inserting a small flat-blade screwdriver in the slot on either side and prying them up. They break easily, if you happen to need replacements the part number is Remove the two fuel rail cover bolts with 10mm socket. 3. Remove the fuel rail cover by pulling it up and towards the front of the car. Mounting 1. Remove the rear screw from the under-hood positive battery terminal bracket using an 8mm socket or wrench. 2. Mount the SAP Simulator using the screw from the under-hood positive battery terminal bracket.

2 Wire routing 1. Run the SAP Simulator wire loom alongside of the existing engine harness wiring under the cowl vent towards the fuel rail. 2. Secure SAP Simulator wire loom to existing engine harness with the provided wire ties.

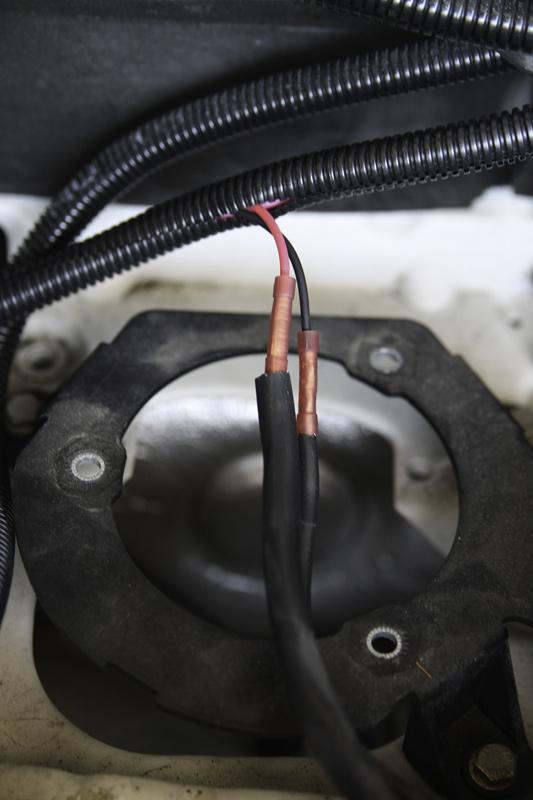
3 Wire connections 1. Locate the two pre-cat oxygen sensor connectors alongside the fuel rail. The side of the connector that has the larger diameter corrugated rubber boot is part of the engine harness. The other side of the connector with the smaller smooth black sleeve is the part that runs to the oxygen sensor. 2. Pull back on the small black sleeve of the first oxygen sensor leads to expose the wires and cut the yellow wire about 1.5 inches back from the plug. It may be helpful to cut a slit in the black sleeve so that it can be pulled back from the wires. 3. Use one of the supplied butt connectors to connect the yellow SAP Simulator wire to the yellow wire that leads towards the oxygen sensor plug & engine harness. 4. Use one of the supplied butt connectors to connect the pink SAP Simulator wire to the yellow wire that leads towards the oxygen sensor. 5. Pull back on the small black sleeve of the second oxygen sensor leads to expose the wires and cut the yellow wire about 1.5 inches back from the plug. It may be helpful to cut a slit in the black sleeve so that it can be pulled back from the wires.

4 6. Use one of the supplied butt connectors to connect the green SAP Simulator wire to the yellow wire that leads towards the oxygen sensor plug & engine harness. 7. Use one of the supplied butt connectors to connect the blue SAP Simulator wire to the yellow wire that leads towards the oxygen sensor. 8. Secure the SAP Simulator harness to the fuel rail using the supplied wire ties 9. Cut off the secondary air pump power connector wires about an inch back from the connector. 10. Use one of the supplied butt connectors to connect the red SAP Simulator wire to the red w/yellow stripe secondary air pump power wire. 11. Use one of the supplied butt connectors to connect the black SAP Simulator wire to the brown secondary air pump power wire.
5
6 Assembly 1. Replace the fuel rail cover making sure the wiring underneath is not pinched. 2. Tighten the two fuel rail cover bolts with 10mm socket. 3. Carefully replace the two fuel rail cover bolt caps. Remember they break easily. Wiring Quick-Reference Yellow first oxygen sensor yellow wire towards engine harness/dme Pink first oxygen sensor yellow wire towards sensor Green second oxygen sensor yellow wire towards engine harness/dme Blue second oxygen sensor yellow wire towards sensor Red secondary air pump power red w/yellow stripe wire Brown secondary air pump power red w/yellow stripe wire
SAP Simulator Installation
 SAP Simulator Installation Disclaimer The SAP Simulator is for off-road use only, not intended for highway vehicles. This modification is not a factory approved modification, and engine damage may occur.
Accessory Fuse Block. Please read this entire manual before proceeding with installation.
 Accessory Fuse Block Please read this entire manual before proceeding with installation. Kit Components: (1) Fuse Block Assembly (1) Harness (1) Positive power cable (1) Negative power cable (5) Pigtails
Alfa Romeo Giulia BMS JB4 Beta Install Guide Last updated 10/9/2018
 Alfa Romeo Giulia 2017+ BMS JB4 Beta Install Guide Last updated 10/9/2018 Use subject to terms and conditions posted at http://www.burgertuning.com/terms.html THIS PART IS LEGAL FOR USE ONLY IN COMPETITION
= Experienced
 I N S T A L L A T I O N G U I D E APPLICATION LENGTH MODEL YR PART # Ford F-250 / F-350 / F-450 Regular Cab * (48 ) 2002-2003, 2008-2012 75134-01A Ford F-250 / F-350 / F-450 Super Cab * (60 ) 2002-2003,
BMS F1X M5/M6 S63TU Stage1 Install Guide
 BMS F1X M5/M6 S63TU Stage1 Install Guide Last updated 10/22/2018 Use subject to terms and conditions posted at http://www.burgertuning.com/terms.htm THIS PART IS LEGAL FOR USE ONLY IN COMPETITION RACING
Ford F-150 Series Rock Slider Side Steps Installation Instructions
 2004-2014 Ford F-150 Series Rock Slider Side Steps Installation Instructions PREPARATION 1. Disconnect the negative terminal on the battery. Park the vehicle on level ground and set the emergency brake.
INSTALLATION INSTRUCTIONS
 INSTALLATION INSTRUCTIONS Accessory Application Publication No. MII 15249 WINCH MOUNT KIT P/N 08L70-HL3-A41 SXS700/M4/M2 Issue Date September 2015 PARTS LIST No. Description Qty (1) Winch bracket 1 (2)
Backside License Plate Mount for Jeep JK Wrangler
 REQUIRED TOOLS 10mm SOCKET 13mm SOCKET 4mm HEX KEY WIRE CRIMPS WIRE STRIPPERS ELECTICAL TAPE SCREW DRIVER KIT CONTAINS BACKSIDE MOUNT LICENSE PLATE BRACKET WITH LEDS PLASTIC PASS-THROUGH GROMMET STAINLESS
Hush-O-Matic MRS Control Package
 Hush-O-Matic MRS Control Package 06-49192 Congratulations on your purchase! The Hush-O-Matic MRS Control package allows you to choose a few different modes including always quiet and always loud. Controlling
INSTALLATION INSTRUCTIONS
 Accessory Application Publication No. INSTALLATION INSTRUCTIONS WINCH MOUNT KIT P/N 08L77-HL3-A00 SXS700M4/M2 Honda Dealer: Please give a copy of these instructions to your customer. MII 14607 Issue Date
VELAR HITCH INSTALLATION INSTRUCTIONS TOW RANGE ROVER MODEL/ TRIM YEARS: WEIGHT CAPACITY to Present PARTS & SUPPLIES: TOOLS REQUIRES:
 HITCH INSTALLATION INSTRUCTIONS MAKE: RANGE ROVER YEARS: 2018 to Present MODEL/ TRIM VELAR PACKAGE: TOW WEIGHT CAPACITY TRAILER TONGUE 5300 LBS. 300 LBS. INSTALLATION TIME: 2 HOURS NO YES YES PARTS & SUPPLIES:
80703 & Backside License Plate Mount for Jeep JK Wrangler (80707) & 10+ (80703)
 & 10+ (80703)") 80703 Backside Mount 80707 Backside Mount REQUIRED TOOLS 10mm SOCKET 13mm SOCKET 4mm HEX KEY WIRE CRIMPS WIRE STRIPPERS ELECTICAL TAPE SCREW DRIVER KIT CONTAINS BACKSIDE MOUNT LICENSE PLATE BRACKET WITH
80703 Backside Mount 80707 Backside Mount REQUIRED TOOLS 10mm SOCKET 13mm SOCKET 4mm HEX KEY WIRE CRIMPS WIRE STRIPPERS ELECTICAL TAPE SCREW DRIVER KIT CONTAINS BACKSIDE MOUNT LICENSE PLATE BRACKET WITH
EXPANSION TANK PARTS LIST AND INSTALLATION GUIDE
 PARTS LIST AND INSTALLATION GUIDE PARTS LIST 2 PC APPLICATION-SPECIFIC MOUNTING BRACKETS 2 PC BLACK, ANODIZED 6061 ALUMINUM CATCH CANS 4 PC SILICONE HOSES 4 PC PLASTIC BARBED FITTINGS 4 PC WORM-GEAR CLAMPS
Quadratec Automatic Power Mirror Movers for Jeep Wrangler JK Current
 Quadratec Automatic Power Mirror Movers for Jeep Wrangler JK 2011- Current US PATENT 9573526 Installation and Instruction Manual: Item # 13125.023X 2011-2013 JK 2014-Current JK REQUIRED TOOLS: Safety Glasses
STREET SCENE EQUIPMENT,INC.
 STREET SCENE EQUIPMENT,INC. 950-76570 BLACK CHROME 365 McCormick Avenue 950-77570 SATIN FINISH Costa Mesa, Ca. 92626 950-78570 CHROME FINISH Phone (714) 426-0590 Fax (714) 426-0591 2007-2008 TOYOTA TUNDRA
45-60 minutes. Intermediate
 800-643-7332 AmericanLandMaster.com ACCESSORY DISTRIBUTION BLOCK 17233 SPECIAL REQUIREMENTS: FOR USE WITH THE LS48V PLEASE CONTACT AMERICAN LANDMASTER FOR SPECIAL INSTRUCTIONS TOOLS REQUIRED 1/2 in wrench
Audi Mk1 TT Vent Boost Gauge Kit
 2000-05 Audi Mk1 TT Vent Boost Gauge Kit Congratulations on your purchase of the A.W.E. Tuning Center Vent Boost Gauge for your Audi TT. While the install is fairly straight forward, please review these
Jeep Wrangler Unlimited (JK) 2007 up A 2-Door. 3-5 Hours INSTALLATION GUIDE INSTALLATION TIME SKILL LEVEL. 4= Experienced TOOLS REQUIRED
 2007 up A 2-Door. 3-5 Hours INSTALLATION GUIDE INSTALLATION TIME SKILL LEVEL. 4= Experienced TOOLS REQUIRED") INSTALLATION GUIDE APPLICATION AMP Part # Jeep Wrangler Unlimited (JK) 2007 up 751-01A 2-Door INSTALLATION TIME 3-5 Hours Professional installation recommended SKILL LEVEL 1 2 3 = Experienced TOOLS REQUIRED
INSTALLATION GUIDE APPLICATION AMP Part # Jeep Wrangler Unlimited (JK) 2007 up 751-01A 2-Door INSTALLATION TIME 3-5 Hours Professional installation recommended SKILL LEVEL 1 2 3 = Experienced TOOLS REQUIRED
HITCH INSTALLATION INSTRUCTIONS TOW XC 40 VOLVO MODEL/ TRIM YEARS: 2 1/2 HOURS to Present PARTS & SUPPLIES: TOOLS REQUIRES: INSTALLATION TIME:
 HITCH INSTALLATION INSTRUCTIONS MAKE: VOLVO YEARS: 2018 to Present MODEL/ TRIM XC 40 PACKAGE: TOW INSTALLATION TIME: 2 1/2 HOURS WEIGHT CAPACITY TRAILER 3500 LBS. TONGUE 300 LBS. DO NOT EXCEED VEHICLE
Ford 7.3L SuperDuty Cold Air Intake
 999.5-2003 Ford 7.3L SuperDuty Cold Air Intake ! DISCLAIMER ) By installing this product onto your vehicle, you assume all risk and liability associated with its use. 2) It is your responsibility to make
INSTALLATION GUIDE. AMP RESEARCH TECH SUPPORT (Press 2) Monday - Friday, 6:00 AM - 5:00 PM PST
 Monday - Friday, 6:00 AM - 5:00 PM PST") INSTALLATION GUIDE APPLICATION AMP Part # Chevrolet Silverado / GMC Sierra - Ext. Cab 2007 - up 75123-01A Chevrolet Silverado / GMC Sierra - Crew Cab 2007 - up 75126-01A Chevrolet Silverado / GMC Sierra
INSTALLATION GUIDE APPLICATION AMP Part # Chevrolet Silverado / GMC Sierra - Ext. Cab 2007 - up 75123-01A Chevrolet Silverado / GMC Sierra - Crew Cab 2007 - up 75126-01A Chevrolet Silverado / GMC Sierra
PN CHEVY TRI-FIVE. Kit Contents: Four panel Sequential LED Taillight kit installation guide
 Four panel Sequential LED Taillight kit installation guide Kit Contents: 2 tail light LED panels 2 tail light turn signal LED panels 1 rubber boot/sleeve kit 1 power wire with t-tap 1 driver side LED harness,
Wiring Harness Update Kit Assembly Instructions Treker 4200/4400 NT & ST Series Manual No M
 Wiring Harness Update Kit Assembly Instructions Treker 4200/4400 NT & ST Series Manual No. 700-364M Before You Start! When you see this symbol, the subsequent instructions and warnings are serious - follow
D-4D Injector Install procedure
 D-4D Injector Install procedure 2011 Diesel Toyz llc About this manual Disclaimer This manual is intended to serve as an overall guide to perform the procedure outlined within. Diesel Toyz llc accepts
Installation Instructions for Key Switch SNOWRATOR
 2017 Installation Instructions for Key Switch SNOWRATOR We appreciate your purchase of L.T. Rich s Product. Please read carefully before Operating or detaching. AES L.T.RICH 6/15/2017 SHIPPING CONTENTS...
INSTALLATION GUIDE. AMP RESEARCH TECH SUPPORT (Press 2) Monday - Friday, 6:00 AM - 5:00 PM PST
 Monday - Friday, 6:00 AM - 5:00 PM PST") INSTALLATION GUIDE APPLICATION AMP Part # Chevrolet Silverado / GMC Sierra - Ext. Cab 2007 - up 75123-01A Chevrolet Silverado / GMC Sierra - Crew Cab 2007 - up 75126-01A Chevrolet Silverado / GMC Sierra
INSTALLATION GUIDE APPLICATION AMP Part # Chevrolet Silverado / GMC Sierra - Ext. Cab 2007 - up 75123-01A Chevrolet Silverado / GMC Sierra - Crew Cab 2007 - up 75126-01A Chevrolet Silverado / GMC Sierra
POWERED RUNNING BOARDS INSTALLATION MANUAL
 POWE RUNNING BOARDS INSTALLATION MANUAL Level of Difficulty Moderate Parts List 1 Driver / left running board* 1 Passenger / right running board* 4 Mounting bracket, standard 2 Mounting bracket, middle
STREET SCENE EQUIPMENT,INC. CONNECTING STREET SCENE SIGNAL MIRRORS
 STREET SCENE EQUIPMENT,INC. CONNECTING 365 McCormick Avenue STREET SCENE SIGNAL MIRRORS Phone (714) 426-0590 Fax (714) 426-0591 1993-2001 CONNECTING STREET SCENE SIGNAL MIRRORS INSTRUCTIONS FOR PART NUMBERS
L CUMMINS COOLANT FILTER KIT
 07.5-12 6.7L CUMMINS COOLANT FILTER KIT ! DISCLAIMER 1) By installing this product onto your vehicle, you assume all risk and liability associated with its use. 2) It is your responsibility to make sure
Installing a Cool On-Column Inlet
 Agilent 6850 Series II Network GC System Accessory G3344B This kit contains: Description Quantity Machine screws, M4 x 0.7 12 mm 6 Cable ties,.062.625 diameter 6 Ship kit* 1 T-20 Torx screw, M4 x 8 mm
INSTALLATION MANUAL
 INSTALLATION MANUAL 2563000 Parts List 1 Carrier weldment 2 Support arm assembly 1 Third brake light assembly 1 Light extension bracket 1 Spare tire adjustment plate 1 Spare tire mount plate 1 Female spade
TOYOTA im INTERIOR LIGHT KIT Preparation
 Preparation Part Number: PT922-12170 Kit Contents Item # Quantity Reqd. Description 1 1 Main Wire Harness 2 1 Switch 3 1 Switch Header 4 1 ECU 5 1 ECU Bracket 6 1 Hardware Kit 7 1 Instruction Card 8 1
INSTALLATION INSTRUCTIONS
 INSTALLATION INSTRUCTIONS Accessory Application Publications No. AII 23642 P/N 08L91-S9V-100 2003 PILOT Issue Date MAY 2002 PARTS LIST Trailer hitch harness 2 Short wire ties 2 Long wire ties Clip Bolt
TOYOTA COROLLA ILLUMINATED DOOR SILLS Preparation
 Preparation Part Number: PT942-02140 Kit Contents Item # Quantity Reqd. Description 1 1 Illuminated Scuff plate, Front Right Hand 2 1 Illuminated Scuff plate, Front Left Hand 3 1 Door Scuff plate, Rear
Fitting Instructions
 Tow-Pro Wiring Kit Fitting Instructions Suitable for: Toyota Hilux / Fortuner Accessory Kit Estimated Fitting Time: 90 Minutes FI807 Page 0 of Issue: Date: /08/08 08 General Notes Safety Notes Suitable
Accessory Kit Estimated Fitting Time: 120 Minutes (Prado) Estimated Fitting Time: 140 Minutes (Kluger)
 Estimated Fitting Time: 140 Minutes (Kluger)") Tow-Pro Wiring Kit - Toyota Kluger / Prado Accessory Kit Estimated Fitting Time: 0 Minutes (Prado) Estimated Fitting Time: 0 Minutes (Kluger) FI99 Page 0 of Issue: Date: 0/0/0 0 General Notes Read through
Tow-Pro Wiring Kit - Toyota Kluger / Prado Accessory Kit Estimated Fitting Time: 0 Minutes (Prado) Estimated Fitting Time: 0 Minutes (Kluger) FI99 Page 0 of Issue: Date: 0/0/0 0 General Notes Read through
Installation MKIV Headlight Housings with Fog Lamps (Procedures apply to both MKIV Jetta and Golf)
") Page 1 This tutorial is provided as a courtesy by ECS Tuning. Service Procedure Installation Proper service and repair procedures are vital to the safe, reliable operation of all motor vehicles as well
Page 1 This tutorial is provided as a courtesy by ECS Tuning. Service Procedure Installation Proper service and repair procedures are vital to the safe, reliable operation of all motor vehicles as well
INSTALLATION INSTRUCTIONS
 INSTALLATION INSTRUCTIONS Accessory Application Publications No. P/N 08V31-SDA-102 2007 ACCORD 4-DOOR AII 32672 Issue Date JULY 2006 NOTE: Fog lights can be installed in a vehicle equipped with a factory
INSTALLATION INSTRUCTIONS
 PART NO. 23100T PRODUCT DESCRIPTION: Front Winch Bumper, Center Section PRODUCT SAFETY & LEGAL DISCLAIMER IMPORTANT READ ALL INSTRUCTIONS CAREFULLY BEFORE INSTALLING, FAILURE TO DO SO MAY CAUSE PERSONAL
Essentials. Simple and Easy to Follow Installation Manual % Free Call! Expert Advice.
 Essentials Simple and Easy to Follow Installation Manual % Free Call! %800-745-5337 Expert Advice DVD Headrest JK Wrangler Installation Instructions Note: Be sure to read this entire instruction sheet
Chevrolet Camaro (Gen6) Installation Guide Long Tube Header PN 17293*
 Installation Guide Long Tube Header PN 17293*") BORLA PERFORMANCE INDUSTRIES Chevrolet Camaro (Gen6) Installation Guide Long Tube Header PN 17293* ***** Please compare the parts in the box with the bill of materials provided ***** (view the following
BORLA PERFORMANCE INDUSTRIES Chevrolet Camaro (Gen6) Installation Guide Long Tube Header PN 17293* ***** Please compare the parts in the box with the bill of materials provided ***** (view the following
TOYOTA VENZA 2009 TRAILER WIRE HARNESS Procedure
 Part Number: PT791-0T099 Kit Contents Item # Quantity Reqd. Description 1 1 Trailer Wire Harness Module 2 1 4-Flat Harness 3 1 Battery Power Wire Harness 4 1 Mounting Bracket, 4-Flat 5 2 Screw #10-24 6
CONTENTS TOOLS REQUIRED:
 CONTENTS 1EA. SUBWOOFER ASSEMBLY P/N 77KICK13SUBASSEMBLY 1EA. SUB BRACKET P/N 05030060AA 1EA. 200 WATT AMP P/N REBTL200 1EA. AMP BRACKET P/N RMDR 1EA. POWER HARNESS P/N RHRAMP 1EA. OVERLAY HARNESS P/N
Chevrolet Cobalt Short Shifter Installation Manual
 Chevrolet Cobalt Short Shifter Installation Manual Pull shift boot down on the shifter shaft. Pull up on the shift knob to remove it. It requires some force. Remove the ebrake console, shifter console
GMC Duramax (LBZ) High Idle Kit Note: Only for automatic transmissions with cruise control
 High Idle Kit Note: Only for automatic transmissions with cruise control") U 17 December 2014 (1036606) 2006-07 GMC Duramax (LBZ) High Idle Kit (I-00318) 1 GMC Duramax (LBZ) High Idle Kit Note: Only for automatic transmissions with cruise control 1036606 2006-2007 GMC Duramax
U 17 December 2014 (1036606) 2006-07 GMC Duramax (LBZ) High Idle Kit (I-00318) 1 GMC Duramax (LBZ) High Idle Kit Note: Only for automatic transmissions with cruise control 1036606 2006-2007 GMC Duramax
INSTALLATION INSTRUCTIONS
 INSTALLATION INSTRUCTIONS Accessory Application Publications No. P/N 08V31-SDA-102 2007 ACCORD HYBRID AII 32762 Issue Date JULY 2006 NOTE: The outside temperature gauge cannot be installed in a vehicle
Push Start Ignition (05-10 All) Installation
 Installation") Tools Required: Phillips head screwdriver Flat head screwdriver Ratchet 7mm Socket Torx T20 bit Wire strippers/cutters Hand file Needle nose pliers Installation Instructions: Push Start Ignition (05-10
Tools Required: Phillips head screwdriver Flat head screwdriver Ratchet 7mm Socket Torx T20 bit Wire strippers/cutters Hand file Needle nose pliers Installation Instructions: Push Start Ignition (05-10
3-5 Hours Professional installation recommended
 I N S T A L L A T I O N G U I D E APPLICATION AMP Part # Chevrolet Silverado 2500/3500 / GMC Sierra 2500/3500 - Ext. Cab * 2007-201 75126-01A Chevrolet Silverado 2500/3500 / GMC Sierra 2500/3500 - Crew
INSTALLATION INSTRUCTIONS
 INSTALLATION INSTRUCTIONS Accessory Application Publications No. KIT 08V31-SEC-201 2004 TSX BII 24805 Issue Date APRIL 2003 PARTS LIST 16 Wire ties Left fog light Right fog light Relay Right fog light
Remove 4 circled pins. Route wiring along dashed line. Remove the 2 9mm nuts and black retaining plate that secure extractor.
 2015 Ford Mustang Turn Signal Hood Kit Parts List: Quantity: Tool List: Bracket & pre-installed lamp 2 Flat head screwdriver Wiring harness 1 Phillips screwdriver PB-3660 Parts Bag 1 Ratchet & Socket set
= Experienced
 I N S T A L L A T I O N G U I D E APPLICATION LENGTH MODEL YR PART # Ford F-250 / F-350 / F-450 Regular Cab * (48 ) 2002-2003, 2008-2016 75134-01A Ford F-250 / F-350 / F-450 Super Cab * (60 ) 2002-2003,
INSTALLATION GUIDE: CAT Fuel Filter Adapter Dodge 5.9L Cummins
 INSTALLATION GUIDE: CAT Fuel Filter Adapter 004.5 007 Dodge 5.9L Cummins ! DISCLAIMER ) By installing this product onto your vehicle, you assume all risk and liability associated with its use. ) It is
MPX (Sealed Relays) Light harness installation instructions
 Light harness installation instructions") 800089-MPX (Sealed Relays) Light harness installation instructions (module installed in the front on the plow) - W2500/3500 RAM (2015 and above) Page 1 Light Adapter Harness 800089-MPX Sealed relays Snowplow
800089-MPX (Sealed Relays) Light harness installation instructions (module installed in the front on the plow) - W2500/3500 RAM (2015 and above) Page 1 Light Adapter Harness 800089-MPX Sealed relays Snowplow
INSTALLATION INSTRUCTIONS
 INSTALLATION INSTRUCTIONS Accessory Application Publications No. S P/N 08V31-SCV-100B 2008 ELEMENT (SC) AII 36532 Issue Date MAY 2007 PARTS LIST Relay bracket Right fog light Relay Left fog light Fuse
INSTALLATION INSTRUCTIONS
 INSTALLATION INSTRUCTIONS Accessory Application Publications No. All 27176-28932 2005 CR-V Issue Date S P/N 08V31-S9A-115 FEB 2005 PARTS LIST 6 Washer-bolts Left fog light 6 Spring nuts Harness bracket
2015 Current F150/Raptor Venom Side Steps Installation Instructions
 2015 Current F150/Raptor Venom Side Steps Installation Instructions PREPARATION STEPS 1. Disconnect the negative terminal on the battery. Park the vehicle on level ground and set the emergency brake. 2.
STEP 1 STEP 2. Disconnect the negative terminal from both batteries.
 TROUBLESHOOTING: Please read and understand all installation instructions before proceeding with the installation. If you have questions during the installation of this product, please email H&S Motorsports
Signal Mirror Installation Instructions Toyota Sequoia Limited, 2004 Toyota Tundra D-Cab
 Signal Mirror Installation Instructions 2001 2006 Toyota Sequoia Limited, 2004 Toyota Tundra D-Cab Toyota Sequoia Limited 2004 Toyota Tundra D-Cab THE safety accessory of the 21 st Century. P/N 210-0064-0
Trail Rocker Installation Instructions
 Trail Rocker Installation Instructions Manual #90581 For Installing Painless Part Numbers: 57002 Painless Performance Products recommends you, the installer, read this installation manual from front to
DISCLAIMER 1) By installing this product onto your vehicle, you assume all risk and liability associated with its use.
 By installing this product onto your vehicle, you assume all risk and liability associated with its use.") WARNING REGARDING EMISSIONS LAWS Not legal for sale or use on pollution-controlled motor vehicles anywhere in the United States. Legal ONLY for off-road competition racing vehicles and cannot be used on
WARNING REGARDING EMISSIONS LAWS Not legal for sale or use on pollution-controlled motor vehicles anywhere in the United States. Legal ONLY for off-road competition racing vehicles and cannot be used on
TOYOTA VENZA 2009 TRAILER WIRE HARNESS Procedure
 Part Number: PT791-0T099 Kit Contents Item # Quantity Reqd. Description 1 1 Trailer Wire Harness Module 2 1 4-Flat Harness 3 1 Battery Power Wire Harness 4 1 Mounting Bracket, 4-Flat 5 2 Screw #10-24 6
JB N20/N26 Stage 1 & JB4 Install Guide Last Updated: 10/31/2017
 JB N20/N26 Stage 1 & JB4 Install Guide Last Updated: 10/31/2017 Use subject to terms and conditions posted at http://www.burgertuning.com/terms.html THIS PART IS LEGAL FOR USE ONLY IN COMPETITION RACING
Remove black panel shown. Save 6 retaining pins for re-install later. Pry up on center part of pin first. Then pry out entire retaining pin.
 2005-2009 Ford Mustang V6 Fog Light Wiring Kit Parts List: Quantity: Tools Required: Wiring harness 1 Flat head screwdriver Supplemental wire leads 2 Ratchet & Socket set OR Wire tap red 2 Adjustable Wrench
Installation Instructions for Swing Mount System
 Table of Contents Page Unit Installation Notes 2 Swing Arm Assembly to Chair Installation 3 Delivery System Installation 4 Utility Center Installation 5 Page 1 of 5 Unit Installation Notes Before You Begin
Trail Rocker Installation Instructions
 Trail Rocker Installation Instructions Manual #90580 For Installing Painless Part Numbers: 57000 and 57001 Painless Performance Products recommends you, the installer, read this installation manual from
INSTALLATION INSTRUCTIONS
 INSTALLATION INSTRUCTIONS Accessory Application Publications No. AII 22903-22963 ODYSSEY Issue Date MAY 2002 PARTS LIST Subwoofer Kit: P/N 08A39-EP7-100 Subwoofer 2 Cushion tapes 8 Wire ties (1 not used)
INSTALLATION INSTRUCTIONS
 INSTALLATION INSTRUCTIONS Accessory Application Publications No. SYSTEM S2000 AII 26324 Issue Date OCT 2004 PARTS LIST Headrest Speaker System P/N 08A54-S2A-100 3 Small wire ties 2 Headrest speakers 9
3/8 Universal Joint Phillips Head Screwdriver
 Magnetic retrieval tool Pliers 1/4 Ratchet Drive T-35 Torx Socket 3/8 Ratchet Drive 5mm Allen Head Socket Torque Wrench 7-3/8 Drive Extension Flat Head Screwdriver 10mm Socket 8mm Socket 3/8 Universal
9F1760/9F1761 COBB Sport Springs Ford Focus ST
 9F1760/9F1761 COBB Sport Springs 2013+ Ford Focus ST Installation Instructions Congratulations on your purchase of the COBB Sport Springs for your 2013+ Ford Focus ST. These instructions should only be
Terms and conditions of use:
 Terms and conditions of use: Berk Technology or any of its affiliates will not be held liable for any and all of the costs involved with use, installation, removal, inconvenience, or any other such associated
Signal Mirror Installation Instructions
 Signal Mirror Installation Instructions Ford F-250/F-350 Pick-Up, Super-Duty 1998-2006 Ford Excursion XLT/Limited 2000-2002 Ford Excursion (all models) 2003-2006 THE safety accessory of the 21st Century.
TOYOTA CAMRY HANDS FREE BLU LOGIC Preparation
 TOYOTA CAMRY 2008- HANDS FREE BLU LOGIC Preparation Part #: PT923-00111 Conflicts: JBL Audio, Factory Navigation NOTE: Part number of this accessory may not be the same as the part number shown. Kit Contents:
TOOLS REQUIRED: Panel Removal Tool Phillips Screwdriver 10mm Nut Driver Ratchet 10mm Socket 7mm Wrench 7mm Nut Driver Straight Screwdriver
 CONTENTS: 1EA. FIVE CHANNEL AMPLIFIER/BRACKET ASSEMBLY P/N MPDSP039AA 1EA. OVERLAY HARNESS P/N RH41LX10 3EA. 7MM SCREWS P/N RF7MM 6EA. WIRE TIE P/N RFZIP6 1EA. 30 AMP FUSE P/N RFUSE30 1EA. INSTRUCTIONS
Hummer H up A Hummer H3T up A. 3-5 Hours INSTALLATION GUIDE INSTALLATION TIME SKILL LEVEL.
 INSTALLATION GUIDE APPLICATION MODEL YR PART # Hummer H3 2006 - up 5116-01A Hummer H3T 2009 - up 5116-01A INSTALLATION TIME 3-5 Hours Professional installation recommended SKILL LEVEL 1 2 3 = Experienced
Addictive Desert Designs
 Preparation: Disconnect the negative battery terminal. Park the vehicle on level ground and set the emergency brake. We recommend reading through the installation instructions in whole before performing
PONTIAC FIREBIRD
 1974-78 PONTIAC FIREBIRD Two Panel Sequential LED Tail Light Kit Installation Guide Kit Contents: 2 LED panels 2 LED panel mount kits 6 rubber grommets 1 power wire 1 pigtail harness Kit 1 crimp terminal
INSTALLATION INSTRUCTIONS
 INSTALLATION INSTRUCTIONS Accessory Application Publications No. ACCORD AII 24050 4-DOOR P/N 08V31-SDA-100 Issue Date AUG 2002 NOTE: The outside temperature gauge cannot be installed in a vehicle with
Contents. TCS/ Driver Mod Installation Manual
 Contents Introduction... 1 TCS Packing List... 3 Tools Needed for Installation... 4 How to Properly Solder... 5 Soldering Standard Butt Connection... 5 Soldering T Connection... 6 How to Properly Crimp...
Fog Lamp Instructions
 Fog Lamp Instructions 2011+ Ford Super Duty Congratulations on your purchase of a high quality PUTCO product. Should you need any application or technical assistance feel free to call us at: 1-800-247-3974
Installation Instructions for Chevrolet Colorado, GMC Canyon, LT, Z71, With Factory Fog Lights
 Installation Instructions for 2015-2018 Chevrolet Colorado, GMC Canyon, LT, Z71, With Factory Fog Lights This kit is designed to allow use of your factory fog light operation along with an addition auxiliary
INSTALLATION INSTRUCTIONS
 INSTALLATION INSTRUCTIONS Accessory Application Publications No. All 27176 2005 CR-V Issue Date P/N 08V31-S9A-114 SEP 2004 PARTS LIST 25 Wire ties Left fog light 6 Washer-bolts Right fog light 6 Spring
Dfuser T/C Lock-Un Lock
 Dfuser T/C Lock-Un Lock Performance Diesel and more! For more information visit our website at: http://www.dfuser.com Page 1 of 6 User Guide This harness overrides and monitors Torque Converter (T/C) lockup
CorkSport Mazdaspeed 3 ECU Relocation Box Mazdaspeed 3
 CorkSport Mazdaspeed 3 ECU Relocation Box 2007-2013 Mazdaspeed 3 Thank you for purchasing the CorkSport ECU Relocation Battery Box for the Mazdaspeed 3. With the install of this battery box, you now have
JB1 for VAG EA888 Gen 3 engines Install Guide Last Updated: /201
 JB1 for VAG EA888 Gen 3 engines Install Guide Last Updated: /201 Use subject to terms and conditions posted at http://www.burgertuning.com/terms.htm THIS PART IS LEGAL FOR USE ONLY IN COMPETITION RACING
INSTALLATION INSTRUCTIONS
 INSTALLATION INSTRUCTIONS Accessory Application Publications No. AII 24075 2003 ACCORD P/N 08V31-SDN-100 2-DOOR Issue Date AUG 2002 NOTE: The outside temperature gauge can not be installed in a vehicle
INSTALLATION INSTRUCTIONS
 INSTALLATION INSTRUCTIONS Accessory Application Publications No. All 28632 TRAILER HITCH 2006 RIDGELINE Issue Date FEB 2005 PARTS LIST Receiver cover Trailer Hitch Kit: P/N 08L92-SJC-100 Trailer hitch
Jeep TJ 6 Switch Panel
 921709560 1997-06 Jeep TJ 6 Switch Panel Thank you for choosing Rough Country for all your lighting needs. Please read instructions before beginning installation. Check the kit hardware against the kit
Applicable to the Following Part Numbers. Notes and Maintenance. Torque Specifications. Metric SAE. Use above torque setting unless otherwise noted
 INSTALLATION MANUAL Level of Difficulty Moderate This is the second first of two of two manuals required to complete this installation. The first second manual manual is is included with with your mounting
INSTALLATION INSTRUCTIONS
 REV 1 05/04/2017 INSTALLATION INSTRUCTIONS PART NO. 24388T PRODUCT DESCRIPTION: FRONT BUMPER REPLACEMENT APPLICATION: TOYOTA TACOMA PRODUCT SAFETY & LEGAL DISCLAIMER IMPORTANT READ ALL INSTRUCTIONS CAREFULLY
TOYOTA CAMRY FOG LIGHT (Halogen and LED) Part Number: TCA-312 / TCA-812
 Part Number: TCA-312 / TCA-812") Part Number: TCA-312 / TCA-812 Kit Contents Item # Quantity Reqd. Description 1 2 Light Housings 2 2 Fog Light Bezels 3 1 Switch Assembly 4 1 Fog Light Operation Guide 5 1 Harness Bag Hardware Bag Contents
Part Number: TCA-312 / TCA-812 Kit Contents Item # Quantity Reqd. Description 1 2 Light Housings 2 2 Fog Light Bezels 3 1 Switch Assembly 4 1 Fog Light Operation Guide 5 1 Harness Bag Hardware Bag Contents
INSTALLATION INSTRUCTIONS
 INSTALLATION INSTRUCTIONS Models: 7105 & 7105TK Dodge Ram 1500 ('02 Current) Ram 2500 & 3500 '03 - Current with stock manual mirrors. IF YOU DO NOT CURRENTLY HAVE MANUAL MIRRORS, THE WRONG SET HAS BEEN
JB N55 E Series Stage 1 and JB4 Install Guide Last Updated: 6/8/2017
 JB N55 E Series Stage 1 and JB4 Install Guide Last Updated: 6/8/2017 Use subject to terms and conditions posted at http://www.burgertuning.com/terms.html THIS PART IS LEGAL FOR USE ONLY IN COMPETITION
TOYOTA SIENNA TRAILER WIRE HARNESS Preparation
 Preparation Part Number: PT791-08150 (non-se) PT791-08102 (SE only) Kit Contents Item # Quantity Reqd. Description 1 1 Trailer Module Harness 2 1 4-Flat Harness 3 1 Battery Power Wire Harness 4 1 Mounting
Nautilus Commercial T914 And T916 Hardwired Power Cord Conversion Instructions
 Nautilus Commercial T914 And T916 Hardwired Power Cord Conversion Instructions Notice: These instructions describe the procedure to be followed for converting the T914 and T916 TreadMills to the hardwired
Dfuser T/C Lock Override with LED
 Dfuser T/C Lock Override with LED the bug that has no cure For more information visit our website at: http://www.dfuser.com Page 1 of 7 User Guide This harness overrides and monitors Torque Converter (T/C)
Depress each tab as you pull the bezel off. The bezels are tight. L.H. shown.
 2013-2014 Ford Mustang V6 & Boss 302 Lower Valance Fog Light Kit Parts List: Quantity: Tool List: Fog light & bulb with bracket 2 Flat head & Phillips screwdriver Black bezels 2 Ratchet & Socket set OR
SP Switch Programmable Switch Panel Power System. Parts Included
 SP8100 8-Switch Programmable Switch Panel Power System Parts Included 1 Switch Panel 1 100 amp Power Module 1 Power Module Harness 1 Power Module Mounting Plate 1 Battery Cable w/100a MIDI fuse (Littlefuse
3-5 Hours Professional installation recommended
 I N S T A L L A T I O N G U I D E APPLICATION AMP Part # Chevrolet Silverado500 / GMC Sierra 500 - Double Cab * 04-7 7554-0A Chevrolet Silverado500 / GMC Sierra 500- Crew Cab 04-7 7554-0A Chevrolet Silverado
INSTALLATION INSTRUCTIONS
 INSTALLATION INSTRUCTIONS Accessory Application Publications No. P/N 08V31-SNA-100 2008 CIVIC 4-DOOR AII 37730 Issue Date AUG 2007 PARTS LIST Fog light harness Right fog light Left fog light Sub harness