INSTALLATION INSTRUCTIONS Single Compartment Overhead Console #103
|
|
|
- Luke Doyle
- 5 years ago
- Views:
Transcription


6-32 Unslotted Screws (2)10-32")
10-32 Button head Screws (2)1/4-20x3/8")
5/16 Washers (2)5/16 Barrel Nuts")
1 INSTALLATION INSTRUCTIONS Single Compartment Overhead Console #103 Please read and fill out the enclosed warranty registration card to activate your warranty. Shipment Contents 103 Loop Bracket Footman Loop Bracket Electronics Support Frame Adjustable Support Bracket Lower Adjustment Piece Upper Adjustment Piece Main Console Body Shipping Package (4)6-32 Flathead Phillips (2)6-32 Unslotted Screws (2)10-32 Pinhead Phillips (2)10-32 Flat Phillips (3)10-32 Button head Screws (2)1/4-20x3/8 SocketHead Screws (3)3/16 Washers (2)1/4 Washers (4)5/16 Washers (2)5/16 Barrel Nuts Page 1 of 5-1/23/2007 Rev122006
 T-20 Torx Driver (Wranglers Pre 2001 only) Small Phillips Screw Driver 5mm Allen Wrench ½ Socket and")


2 Shipping Package (Continued) (2)10-32 Lock Nuts (4) 5/16 Lock Nuts (2) 1 Diaphragm Grommets (2) 5/16 U-Bolts (2)5/16-18x3 Carriage Bolts Rubber Seal TOOLS NEEDED 1/8 Allen Wrench 3/16 Allen Wrench (Wranglers Pre 2003 without full roll cage only) T-20 Torx Driver (Wranglers Pre 2001 only) Small Phillips Screw Driver 5mm Allen Wrench ½ Socket and Ratchet Extensions and Swivels are helpful (Vehicles with Roll Cage only) PLEASE READ ALL INSTRUCTIONS THOROUGHLY BEFORE STARTING INSTALLATION. These instructions will guide you through the installation of your new overhead console in the following vehicles: Stock Jeep Wranglers 2000 or earlier Stock Jeep Wranglers (With Footman loop riveted to windshield) Stock Jeep Wranglers and Rubicons (With Large Oval Roll bar Pad) Vehicles with a full roll cage and distance from front to rear bar between 28 to 36-1/2 If your vehicle does not fall into one of these categories you may have to make modifications to mounting brackets, and/or purchase additional hardware. Page 2 of 5-1/23/2007 Rev122006
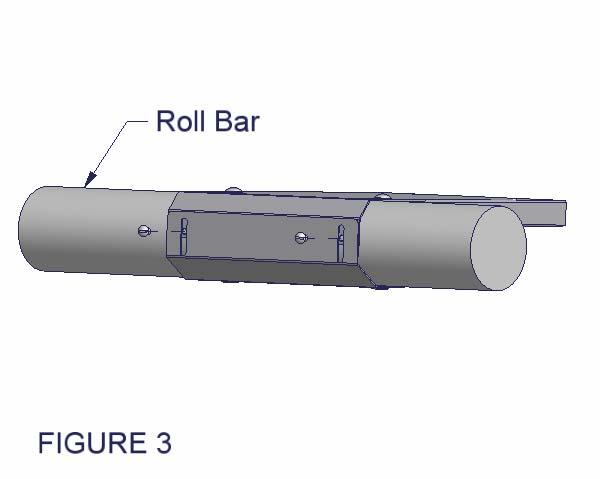
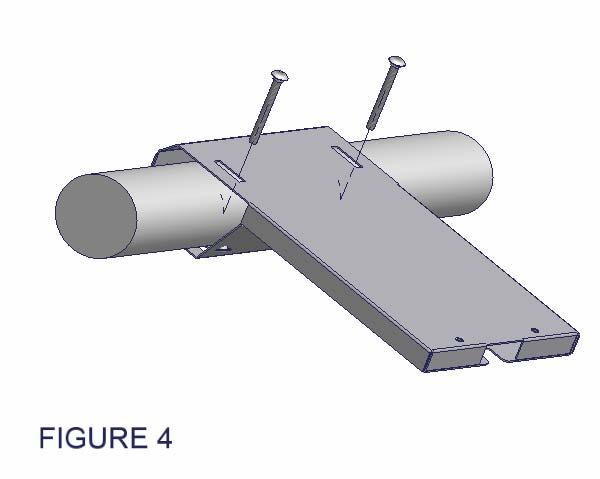
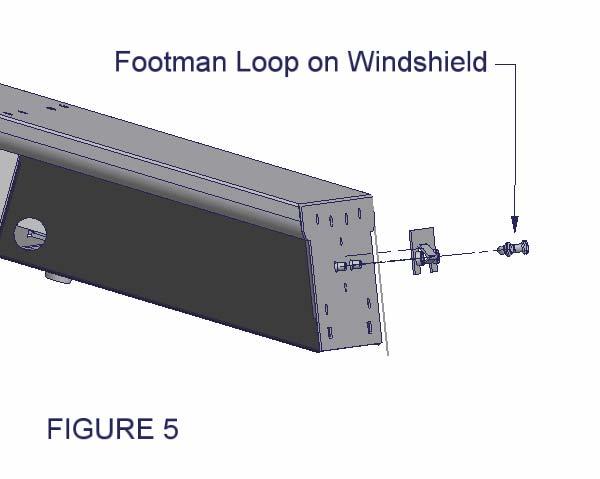
3 1. Apply the Rubber Seal provided to the lid so that it will seal up against the console when closed. Check the lock operation. 2. Route the wires for your stereo, CB, or speaker up along the roll bar and leave plenty of extra wire. Stock Jeep Wranglers 2000 or earlier 3. Remove the footman loop from the top center of the windshield frame using a T-20 torx wrench. Save all hardware. 4. Using (2)10-32x1/2 Flat Phillips machine screws and (2)10-32 Locknuts bolt the footman loop to the Lower Adjustment Piece as shown in Figure 1. Stock Jeep Wranglers , Stock Jeep Wranglers and Rubicons 2003+, Vehicles with a full roll cage 5. If you have a bikini top or if you plan to get a bikini top, you will need to purchase a footman loop. Most large hardware stores have footman loops in stock- You will need one with hole spacing of 2-1/4 center to center. 6. Using (2)10-32x1/2 Flat Phillips machine screws and (2)10-32 Locknuts bolt the footman loop to the Lower Adjustment Piece as shown in Figure Refer to Figure 2 and place the Upper and Lower Adjustment pieces around the rear roll bar. Route the previously run electrical wires from the roll bar through them. Notice that the upper piece wraps outside of the lower piece on the top and sides. Also notice that that upper piece has nuts inserted, make sure that at the back of the two pieces that the upper piece is inside the lower piece, See Figure Using the (2) 10-32x3/8 Panhead Phillips Machine Screws, loosely screw the two pieces together as shown in Figure 3. Stock Jeep Wranglers 2000 or earlier, Stock Jeep Wranglers , Vehicles with a full roll cage 9. Insert the 3 Carriage bolts through the Upper Adjustment Piece as shown in Figure 4. These will be tightened later in the installation. 10. Route the wires through either of the side passageways on the console body to where the electronic equipment will be mounted. Angle the rear portion, previously mounted to the roll bar, toward the floor at about 45 degrees. Carefully slide the console body over the previously mounted rear portion. Stock Jeep Wranglers 2000 or earlier 11. Carefully rotate the console up until the holes in the front of the console line up with the holes in the windshield frame where the footman loop was. Use the original footman loop hardware to bolt the console to the windshield frame. BE CAREFUL NOT TO TEAR THE ROLL BAR PADDING! Stock Jeep Wranglers Slip the footman loop bracket around the existing footman loop by inserting the bent flange on the bracket behind the footman loop from the top down. Carefully rotate the console up until the holes in the front of the console line up with the holes in the footman loop bracket. BE CAREFUL NOT TO TEAR THE ROLL BAR PADDING! Use the (2)1/4-20x3/8 Socket Head Cap Screws and (2)1/4 Washers to fasten the console to the bracket. See Figure 5. Stock Jeep Wranglers and Rubicons Place the 103 Loop Bracket over the hook at the top center of the windshield frame. Carefully rotate the console up until the holes in the front of the console line up with the holes in the Loop Bracket. BE CAREFUL NOT TO TEAR THE ROLL BAR PADDING! Using the (2)1/4-20x3/8 Socket Head Cap Screws and (2)1/4 Washers bolt the console to the bracket. Using (1)10-32x1 Button Head Screw and (1) 3/16 Washer bolt the console through the hook to the Loop Bracket. Tighten until snug. See Figure 6. Page 3 of 5-1/23/2007 Rev122006
10-32x1 Button Head Screws and (2)3/16 Washers to bolt the rear assembly to the main console. There are nuts in the top of the console that these screws will go into. Do not over tighten.")
 5/16 Barrel Nuts tighten down the rear assembly around the roll bar. Be sure to slide the bolts as far back as possible up against the roll bar. 17.")
4 Vehicles with a full roll cage 14. Carefully rotate the console up until you can use the (2)5/16 U-Bolts, (4)5/16 Washers, and (4) 5/16 Locknuts to bolt the console to the front roll bar. 15. Use (2)10-32x1 Button Head Screws and (2)3/16 Washers to bolt the rear assembly to the main console. There are nuts in the top of the console that these screws will go into. Do not over tighten. Over tightening will cause the top of the console to warp down. See Figure 7. Stock Jeep Wranglers Pre 2000, Stock Jeep Wranglers , Vehicles with a full roll cage 16. Using the (2) 5/16 Barrel Nuts tighten down the rear assembly around the roll bar. Be sure to slide the bolts as far back as possible up against the roll bar. 17. Tighten the screws that you inserted in Step Mount the Stereo, CB, or speaker to the removable electronics support frame if desired or your electronic equipment can be fastened directly to the console. Notice that there are holes on the back flange of the bracket for securing a stereo support strap or similar support device. 19. Follow the manufacturer s directions for connecting the supply wires to your electronic equipment. 20. Slide the Support Frame up into the lockable compartment (you will have to rotate the cam lock while inserting the bracket) and fasten in place using (2)6-32 Flat head Phillips Machine Screws on the face of the bracket and (2)6-32 Unslotted Hex washer Screws up through the bottom of the console into the bracket. Do not over tighten, these small diameter screws cannot withstand a lot of torque and will break if over-tightened. See Figure Use the Adjustable Stereo/CB Support Bracket and (2)6-32 Flat Head Phillips Machine Screws to secure the top of your electronic equipment. 22. Install the 1 Grommets in the holes on both sides of the console. If you need to route a CB microphone or other cables through the hole simply slice the middle of the grommet. 23. Lock it up!! Call (970) for Technical Support Page 4 of 5-1/23/2007 Rev122006


5 Page 5 of 5-1/23/2007 Rev122006
INSTALLATION INSTRUCTIONS DRAWERS #240
 INSTALLATION INSTRUCTIONS DRAWERS #240 Please read and fill out the enclosed warranty registration card to activate your warranty. SHIPMENT CONTENTS #1 Lid #2 Rear #3 Left side panel #4 Right side panel
(2) #10 Washers (6) 5/16 Narrow Washers (2) Locknuts (2) 5/16 Locknuts
 #10 Washers (6) 5/16 Narrow Washers (2) Locknuts (2) 5/16 Locknuts") INSTALLATION INSTRUCTIONS TJ Speaker / Storage Security Console #066 Please read and fill out the enclosed warranty registration card to activate your warranty. SHIPMENT CONTENTS Console Front Shift Lever
INSTALLATION INSTRUCTIONS TJ Speaker / Storage Security Console #066 Please read and fill out the enclosed warranty registration card to activate your warranty. SHIPMENT CONTENTS Console Front Shift Lever
INSTALLATION INSTRUCTIONS JK DECK ENCLOSURE #326 (2 & 4 Door)
") SHIPMENT CONTENTS INSTALLATION INSTRUCTIONS JK 2011+ DECK ENCLOSURE #326 (2 & 4 Door) Please read and fill out the enclosed warranty registration card to activate your warranty. #3 Lid #7 Front Panel #4
SHIPMENT CONTENTS INSTALLATION INSTRUCTIONS JK 2011+ DECK ENCLOSURE #326 (2 & 4 Door) Please read and fill out the enclosed warranty registration card to activate your warranty. #3 Lid #7 Front Panel #4
INSTALLATION INSTRUCTIONS JEEP 2011-UP JK SECURITY FULL CONSOLE #274
 INSTALLATION INSTRUCTIONS JEEP 2011-UP JK SECURITY FULL CONSOLE #274 PARTS CHECKLIST Tuffy Console #9 Left Front Mounting Bracket #10 Right Front Mounting Bracket #11 Electronics mounting bracket #12 Divider
(2) #10 Washers (1) ¼ Washers (6) 5/16 Washers (2) Locknuts (2) 5/16 Locknuts
 #10 Washers (1) ¼ Washers (6) 5/16 Washers (2) Locknuts (2) 5/16 Locknuts") INSTALLATION INSTRUCTIONS TJ Speaker / Storage Security Console #066 Please read and fill out the enclosed warranty registration card to activate your warranty. SHIPMENT CONTENTS Console Front Shift Lever
INSTALLATION INSTRUCTIONS TJ Speaker / Storage Security Console #066 Please read and fill out the enclosed warranty registration card to activate your warranty. SHIPMENT CONTENTS Console Front Shift Lever
RT1 SLIP-ON EXHAUST HONDA CBR600RR REV. A
 08-50-43733 REV. A PARTS INCLUDED Ref. Part Number Description Qty 1) 00-200-00064 Slip-on S-bend Assembly 1 2) 00-200-00088 RT1 Aluminum Muffler Assembly 1 3) 03-46-43058 Muffler Mounting Strap 1 4) 07-27-42566
RT1 DUAL OUTLET SLIP-ON EXHAUST HONDA CBR600RR Rev B
 18-1022-723-02 08 50 44541 Rev B PARTS INCLUDED Ref. Part Number Description Qty 1) 00-200-00042 Slip-on S-bend Assembly 1 2) 00-200-01197 Stainless Steel Dual Outlet Muffler 1 3) 03-46-42766 Muffler Mounting
Installation Instructions I - Sheet Number I-TVR-01 Rev. A
 Installation Instructions I - Sheet Number I-TVR-01 Rev. A TrailView Soft Top For proper installation and best possible fit, please read all instructions BEFORE you begin. For technical assistance or to
Installation Instructions
 Installation Instructions TrailView Soft Top Important Safety Information For proper installation and best possible fit, please read all instructions BEFORE you begin. Periodically check all components
8759 Lion Street Rancho Cucamonga, CA (909) TECH SUPPORT (909) FAX RECOMMENDED SERVICE PART NUMBERS
 TECH SUPPORT (909) FAX RECOMMENDED SERVICE PART NUMBERS") 8759 Lion Street Rancho Cucamonga, CA 91730 (909) 476-7225 TECH SUPPORT (909) 476-1491 FAX www.volantperformance.com INSTALLATION INTRUCTIONS PART NO. 37640 TOOLS NEEDED FOR INSTALL: 1. FLATHEAD SCREWDRIVER
8759 Lion Street Rancho Cucamonga, CA 91730 (909) 476-7225 TECH SUPPORT (909) 476-1491 FAX www.volantperformance.com INSTALLATION INTRUCTIONS PART NO. 37640 TOOLS NEEDED FOR INSTALL: 1. FLATHEAD SCREWDRIVER
Jeep JK 6 Switch Panel
 921709590 2007-17 Jeep JK 6 Switch Panel Thank you for choosing Rough Country for all your lighting needs. Please read instructions before beginning installation. Check the kit hardware against the kit
TJ 231/241 CABLE SHIFTER
 KIT CONSISTS OF: # Qty Part No. Description P.O. Box 247, 4320 Aerotech Center Way PAGE 1 OF 10 Page Rev. Date: 08-29-16 1 1 300474 WASHER-RUBBER YOKE SEAL 32 SPLINE 2 1 300476 NUT- 7/8"-20 FLANGE LOCKNUT
GP1-R FULL EXHAUST SUZUKI GSX-R600 / GSX-R
 THIS EXHAUST SYSTEM IS DESIGNED FOR USE IN CLOSED COURSE RACING ONLY, AND IS NOT INTENDED FOR PUBLIC HIGHWAY USE. IN THE STATE OF CALIFORNIA, IT IS ILLEGAL TO MODIFY THE EMISSION CONTROL SYSTEM ON ANY
IMPORTANT WARRANTY & INSTALLATION INSTRUCTIONS ATTACHED
 IMPORTANT WARRANTY & INSTALLATION INSTRUCTIONS ATTACHED Please Forward All Attached Information to Consumer Warranty Not Valid Unless Returned to VOLANT Performance STOP For Full-Color, Please Visit: VOLANT.COM
Header Bikini Installation Instructions
 Header Bikini Installation Instructions For: Jeep Wrangler 2003 Part Number: 52528 with or without Door Surround DO NOT INSTALL THIS PRODUCT ON ANY VEHICLE OTHER THAN THOSE LISTED ABOVE. This product is
P/N Rev 01 04/14-1- NOTE: If you are ordering hinges for your rear doors, order and/or
 REAR CANVAS DOOR KIT 900 XP RANGER CREW P/N 2879899 Application RANGER 900 XP CREW Before you begin, read these instructions twice and check to be sure all parts and tools are accounted for. Please retain
INSTALLATION MANUAL
 INSTALLATION MANUAL 2563000 Parts List 1 Carrier weldment 2 Support arm assembly 1 Third brake light assembly 1 Light extension bracket 1 Spare tire adjustment plate 1 Spare tire mount plate 1 Female spade
*Patent Pending Design*
 *Shown with optional Angled Tire Mount Part # 94202 *Patent Pending Design* Components 1) Rear Bumper 1) Swingarm 1) Swingarm Stop Bracket 1) Assembly 1) Rear Door Plate 1) Lower 3rd Brakelight Bracket
Technical Data Sheet
 Technical Data Sheet Clydesdale Model 8491 Blower Replacement Assembly 94-57910 Publish Date: 01/20/2010 ASSEMBLY CONTENTS: TOOLS REQUIRED: (1) Right Fan Blower with Mounting Bracket Phillips Screwdriver
Jeep Wrangler Unlimited (JK) 2007 up A 2-Door. 3-5 Hours INSTALLATION GUIDE INSTALLATION TIME SKILL LEVEL. 4= Experienced TOOLS REQUIRED
 2007 up A 2-Door. 3-5 Hours INSTALLATION GUIDE INSTALLATION TIME SKILL LEVEL. 4= Experienced TOOLS REQUIRED") INSTALLATION GUIDE APPLICATION AMP Part # Jeep Wrangler Unlimited (JK) 2007 up 751-01A 2-Door INSTALLATION TIME 3-5 Hours Professional installation recommended SKILL LEVEL 1 2 3 = Experienced TOOLS REQUIRED
INSTALLATION GUIDE APPLICATION AMP Part # Jeep Wrangler Unlimited (JK) 2007 up 751-01A 2-Door INSTALLATION TIME 3-5 Hours Professional installation recommended SKILL LEVEL 1 2 3 = Experienced TOOLS REQUIRED
Factory Five Racing, Inc. 818 Kit Assembly manual revision 1i update
 Factory Five Racing, Inc. 818 Kit Assembly manual revision 1i update Pedal box...1 Cable Accelerator Pedal (2002-2005)...2 OEM seats...7 Windshield... 13 Center console... 19 Pedal box Attach the pedal
To safely lift and install this hardtop, you will need the assistance of at least one other person.! WARNING
 1987-1995 Jeep Wrangler YJ Hardtop with Half Doors Installation Instructions PLEASE READ CAREFULLY BEFORE STARTING INSTALLATION To safely lift and install this hardtop, you will need the assistance of
YZ-PSSB10 Yamaha YXZ 1000 R Behind Seat 10 Subwoofer Enclosure
 SSV WORKS, 201 N. Rice Ave Unit A, Oxnard, CA 93030 www.ssvworks.com Phone: 818-991-1778 Fax: 866-293-6751 Yamaha YXZ 1000 R Behind Seat 10 Subwoofer Enclosure WARRANTY INFORMATION: All SSV Works enclosures
FRONT FENDERS WITH FACTORY INNER FENDERS JEEP WRANGLER TJ/LJ/YJ/CJ7 INSTALLATION INSTRUCTIONS
 FRONT FENDERS WITH FACTORY INNER FENDERS JEEP WRANGLER TJ/LJ/YJ/CJ7 INSTALLATION INSTRUCTIONS TOOLS NEEDED 13mm socket 5/32 Allen head 5/16 wrench or socket 7/16 wrench or socket 7/32 Allen head 5/8 wrench
ADVANCE ADAPTERS INC. P/N: TJ 231/241 CABLE SHIFTER
 Paso Robles, CA 93447 PAGE 1 of 10 Telephone: (800) 350-2223 Fax: (805) 238-4201 Page Rev. Date: 09-25-15 KIT CONSISTS OF: # Qty Part No. Description 1 1 300474 WASHER-RUBBER YOKE SEAL 32 SPLINE 2 1 300476
HP BladeSystem c7000 Carrier-Grade Options Installation Guide
 HP BladeSystem c7000 Carrier-Grade Options Installation Guide Part Number 5991-8062 September 2009 (Second Edition) Copyright 2009 Hewlett-Packard Development Company, L.P. The information contained herein
Ref Qty Part Description Part Number -1- Kit ( ) Contents:
 Contents:") REAR CANVAS DOOR KIT 900 XP RANGER CREW P/N 2879899 Application RANGER 900 XP CREW Before you begin, read these instructions twice and check to be sure all parts and tools are accounted for. Please retain
REAR CANVAS DOOR KIT 900 XP RANGER CREW P/N 2879899 Application RANGER 900 XP CREW Before you begin, read these instructions twice and check to be sure all parts and tools are accounted for. Please retain
Installation Instructions
 Installation Instructions For: Jeep 97 TJ Wrangler Header Safari Bikini Part Number 52531 To be used with or without Soundbar To be used with or without Door Side Rails WARNING Note: Must be used with
PRP Seats 570/800/900 RZR 4 Doors
 Install Instructions PRP Seats 570/800/900 RZR 4 Doors Remove all parts from the box and unwrap completely using the packaging to lay out the pieces. Tools Needed: (not included) 7/16 Open end wrench and
Prepare to install kit
 4. Park the vehicle on a clean, dry, flat, level surface and block the tires so the vehicle cannot roll in either direction. Prepare to install kit 2011-2012 JEEP WRANGLER (JK) SPORT CAGE INSTALLATION
INSTALLATION MANUAL FOR PILOT WORKSTATION
 INSTALLATION MANUAL FOR PILOT WORKSTATION Weight Capacity: 5-25 lbs. Monitor Weight: 5-20 lbs. 6011180 Rev. B Contents Tools Required / Supplied Part Kits / Warnings/Disclaimer...2 Possible Base Mounting
RZR WINCH KIT KIT P/N
 RZR WINCH KIT KIT P/N 2878787; 2879334 Application All RZR Models except RZR XP Before you begin, read these instructions twice and check to be sure all parts and tools are accounted for. Please retain
I-Sheet Number Rev.B 3-1/2 OVAL BULL BAR DODGE RAM 1500
 PARTS LIST: 1 Bull Bar 2 10-1.5mm x 35mm Hex Bolts 2 Tube Brackets (Bull Bar) passenger or driver side 2 10mm Lock Washers 2 Upper Frame Brackets (models w/o tow hooks only) 4 10mm x 27mm OD x 3mm Flat
Installation Instructions Supertop NX Twill
 Installation Instructions Supertop NX Twill Vehicle Application: Jeep Wrangler Unlimited 2007-current Part Number 54823 Installation Tips Before you begin installing your new Supertop NX Twill, please
RMK HANDLEBAR KIT P/N ; ; APPLICATION BEFORE YOU BEGIN KIT CONTENTS. Verify accessory fitment at Polaris.com.
 RMK HANDLEBAR KIT P/N 2883835; 2883836; 2883837 APPLICATION Verify accessory fitment at Polaris.com. BEFORE YOU BEGIN Read these instructions and check to be sure all parts and tools are accounted for.
INSTALLATION INSTRUCTIONS WINCH MOUNTING KIT Part Number: Application: Honda Rancher TRX420
 INSTALLATION INSTRUCTIONS WINCH MOUNTING KIT Part Number: 75660 Application: Honda Rancher TRX420 Your safety, and the safety of others, is very important. To help you make informed decisions about safety,
Driver Side Support Bracket pictured in "no-tow hook" direction. Reverse direction for tow hook equipped vehicles
 PARTS LIST: 1 Bull Bar 2 10-1.5mm x 35mm Hex Bolts 2 Tube Brackets (Bull Bar) passenger or driver side 2 10mm Lock Washers 2 Upper Frame Brackets (models w/o tow hooks only) 4 10mm x 27mm OD x 3mm Flat
INSTALLATION & OWNER S MANUAL
 Rev. L p. 1 of 16 INSTALLATION & OWNER S MANUAL V4262 CAMO (SOFT SIDED) CAB KIT INSTALLATION & OWNER S MANUAL The contents of this envelope are the property of the owner. Be sure to leave with the owner
2014+ FORD FIESTA ST DIRECT-FIT OIL COOLER KIT PARTS LIST AND INSTALLATION GUIDE CAUTION PARTS INCLUDED NOTE TOOLS NEEDED INSTALL PROCEDURE
 PARTS LIST AND PARTS INCLUDED 3PC APPLICATION-SPECIFIC MOUNTING BRACKETS & SPACER 1PC 19-ROW OIL COOLER 1PC 4 ', X 1'' BRAIDED HOSE W/90-10AN FITTINGS 1PC 3'' X 2.5 '' BRAIDED HOSE W/45 AND 90-10AN FITTINGS
INSTALLATION & OWNER S MANUAL
 Rev. R p. 1 of 16 INSTALLATION & OWNER S MANUAL V4211 HARD SIDED CAB KIT and/or V4275 CAMO HARD SIDED CAB KIT INSTALLATION & OWNER S MANUAL The contents of this envelope are the property of the owner.
INSTALLATION MANUAL
 INSTALLATION MANUAL 1500350 Parts List 1 Driver / left inner fender liner 1 Passenger / right inner fender liner 4 Z-hanger brackets 1 Thread-set bolt, M6 1 Thread-set washer 1 Thread-set spacer 22 Hex
Focus ST Carbon Fiber Intake
 791400 - Focus ST Carbon Fiber Intake 791400 COBB Focus ST Carbon Fiber Intake Congratulations on your purchase of the COBB Tuning Carbon Fiber Intake System! The following instructions will assist you
FREEDOM3 Portable Restroom Assembly Instructions
 FREEDOM3 Portable Restroom Assembly Instructions PN 21337 REV M - 1-1-19-17 FREEDOM 3 ASSEMBLY INSTRUCTIONS PN 21337 REV M -2-1-19-17 PARTS LIST: PN 21337 REV M - 3-1-19-17 INTRODUCTION Satellite portable
Factory safe air/fuel ratio s for Optimum performance Patent# 7,359,795
 Part Number SP1125 2007-09 BMW 335i 2008-09 BMW135i 3.0L Twin Turbo L6 This kit is equipped with the Injen/AMSOIL Ea nanofiber dry filters, Ea nanofiber filters do not require oil. 1-2 piece air intake
LOW, MID, HIGH RISE PRO-TAPER HANDLEBAR WITH HEATED GRIPS KIT
 LOW, MID, HIGH RISE PRO-TAPER HANDLEBAR WITH HEATED GRIPS KIT P/N 2881235; 2881236; 2881237 APPLICATION All AXYS and PRO RIDE chassis with stock Pro-Taper Bar BEFORE YOU BEGIN Read these instructions and
Ford F-150 Supercrew A (2004 Heritage) Ford F-150 Super Cab A
 Ford F-150 Super Cab A") INSTALLATION GUIDE APPLICATION LENGTH MODEL YR PART # Ford F-150 Supercrew 79 1999-2004 75111-01A (2004 Heritage) Ford F-150 Super Cab 72 1999-2003 75111-01A INSTALLATION TIME 3:00 hrs SKILL LEVEL 1 2
INSTALLATION GUIDE APPLICATION LENGTH MODEL YR PART # Ford F-150 Supercrew 79 1999-2004 75111-01A (2004 Heritage) Ford F-150 Super Cab 72 1999-2003 75111-01A INSTALLATION TIME 3:00 hrs SKILL LEVEL 1 2
ADDICTIVE DESERT DESIGNS
 Preparation: Disconnect the negative battery terminal. Park the vehicle on level ground and set the emergency brake. We recommend reading through the installation instructions in whole before performing
OIL COOLER KIT INSTALLATION INSTRUCTIONS PART NUMBER D E92 335i/xi (N55 engine) with M-Technic bumper and without stock oil cooler
 with M-Technic bumper and without stock oil cooler") OIL COOLER KIT INSTALLATION INSTRUCTIONS PART NUMBER D570-0925 APPLICATION 2011-12 E92 335i/xi (N55 engine) with M-Technic bumper and without stock oil cooler Congratulations for being selective enough
OIL COOLER KIT INSTALLATION INSTRUCTIONS PART NUMBER D570-0925 APPLICATION 2011-12 E92 335i/xi (N55 engine) with M-Technic bumper and without stock oil cooler Congratulations for being selective enough
Jeep Wrangler (TJ)
") INSTALLATION GUIDE APPLICATION MODEL YR PART # Bestop PART # Jeep Wrangler (TJ) 2003 2006 10-03315-10 751-01 INSTALLATION TIME 3:00 hrs SKILL LEVEL 1 2 3 4 4= Experienced TOOLS REQUIRED Safety goggles
INSTALLATION GUIDE APPLICATION MODEL YR PART # Bestop PART # Jeep Wrangler (TJ) 2003 2006 10-03315-10 751-01 INSTALLATION TIME 3:00 hrs SKILL LEVEL 1 2 3 4 4= Experienced TOOLS REQUIRED Safety goggles
Rear Bumper Installation Instructions
 KEY TO COMPONETS A. 1 ea. Rear bumper B. 2 ea. Mounting L bracket C. 11 ea. M12x1.75 hex head bolt D. 4 ea. M12x1.75 hex head bolt E. 6 ea. M12 Hex head lock nut F. 9 ea. Pressure washer G. 19 ea. M12
99-03 V6 "Shaker" System Instructions. *03 Model requires new hood Contents w/ Kit. Tool List For Appliqué:
 99-03 V6 "Shaker" System Instructions *03 Model requires new hood Contents w/ Kit 1 - Hood Appliqué 1 - Aluminum Shaker Scoop 1 - Lower Air Box w/drain tube fittings (2) 1 - Upper Air Box w/cdc nameplate
DVD REAR SEAT VIDEO SYSTEM
 Read entire instructions thoroughly before starting. TOOLS REQUIRED: DVD REAR SEAT VIDEO SYSTEM MINIVANS WITH ROOF RAILS INSTALLATION INSTRUCTIONS Non-metal trim stick Phillips screwdriver T15, T20, T25
INSTALLATION INSTRUCTIONS C-VS-2000-DUR-1 20 VEHICLE SPECIFIC CONSOLE for 2018 Dodge Durango with Standard Shifter
 INSTALLATION INSTRUCTIONS C-VS-2000-DUR-1 20 VEHICLE SPECIFIC CONSOLE for 2018 Dodge Durango with Standard Shifter TOOLS REQUIRED: Phillips Screw Driver T-20 Torx bit Standard Socket set 9/64 Allen wrench
InstalL Instructions. rock defense jeep yj roll cage kit. kit contents ins
 InstalL Instructions rock defense jeep yj roll cage 300152-2-kit kit contents tube identification 300102-2 Passenger Roof Tube (Qty: 1) 300103-2 Driver Roof Tube (Qty: 1) 300104-2 Windshield Tube (Qty:
Part Number SP BMW 335i BMW135i 3.0L Twin Turbo L6
 This kit is equipped with the Injen/AMSOIL Ea nanofiber dry filters, Ea nanofiber filters do not require oil. Part Number SP1125 2007-09 BMW 335i 2008-09 BMW 3.0L Twin Turbo L6 1-2 piece air intake system
Remove the rear tire and the (8) 13mm bolts holding the tire carrier to the tailgate. Remove the 3rd brake light wiring harness.
 13mm bolts holding the tire carrier to the tailgate. Remove the 3rd brake light wiring harness.") J108781 2 4 Rear Bumper & Tire Carrier & Optional Flood Lights Jeep Wrangler JK (2007-2017) Tools Required: Basic Hand Tools 35mm Socket Tape Measure Grease Gun Straight Edge Remove the rear tire and the
J108781 2 4 Rear Bumper & Tire Carrier & Optional Flood Lights Jeep Wrangler JK (2007-2017) Tools Required: Basic Hand Tools 35mm Socket Tape Measure Grease Gun Straight Edge Remove the rear tire and the
INSTALLATION & OWNER S MANUAL
 Rev. B, p. 1 of 25 INSTALLATION & OWNER S MANUAL POLARIS RANGER RCS (for models XP or HD) (for model years 2009-) cab without doors kit (p/n 1POLRCWD) cab with doors kit (p/n 1POLRC) doors only kit (p/n
NETBOOK CART DIVIDER WIRING INSTRUCTIONS Extra cord
 NETBOOK CART DIVIDER WIRING INSTRUCTIONS Extra cord Ensure there is slack here Lay divider flat on work surface. Lay laptop and power brick on top of divider, with the computer end of the power wire towards
2007 Current Jeep Wrangler JK Stealth Fighter Rear Bumper With Tire Gate Installation Instructions
 2007 Current Jeep Wrangler JK Stealth Fighter Rear Bumper With Tire Gate Installation Instructions PREPARATION 1. Disconnect the negative terminal on the battery. Park the vehicle on level ground and set
INSTALLATION GUIDE. AMP RESEARCH TECH SUPPORT (Press 2) Monday - Friday, 6:00 AM - 5:00 PM PST
 Monday - Friday, 6:00 AM - 5:00 PM PST") INSTALLATION GUIDE APPLICATION AMP Part # Jeep Wrangler Unlimited (JK) 2007 up 75121-01A 2-Door INSTALLATION TIME 3-5 Hours Professional installation recommended SKILL LEVEL 1 2 3 = Experienced TOOLS REQUIRED
INSTALLATION GUIDE APPLICATION AMP Part # Jeep Wrangler Unlimited (JK) 2007 up 75121-01A 2-Door INSTALLATION TIME 3-5 Hours Professional installation recommended SKILL LEVEL 1 2 3 = Experienced TOOLS REQUIRED
DOOR KIT P/N , APPLICATION BEFORE YOU BEGIN KIT CONTENTS. Verify accessory fitment at Polaris.com.
 DOOR KIT P/N 2882561, 2882562 APPLICATION Verify accessory fitment at Polaris.com. BEFORE YOU BEGIN Read these instructions and check to be sure all parts and tools are accounted for. Please retain these
INSTALLATION INSTRUCTIONS
 INSTALLATION INSTRUCTIONS APPLICATION: WINCH TRAY, SPORTSMAN GG WINCH TRAY KITS, & HDX GG WINCH TRAY KITS AUTOMOTIVE PRODUCTS, INC. 2015 & UP FORD F-150 APP PART #40-93835, 45-93830, 46-23835, 57-93830,
TJ/LJ Metal Cloak Front Fender Flare Install Instructions Rev. A Page 1 of 16
 TJ/LJ Metal Cloak Front Fender Flare Install Rev. A Page 1 of 16 READ FITTING INSTRUCTIONS IN FULL BEFORE INSTALLATION This article is sold without warranty expressed or implied. No warranty or representation
INSTALLATION MANUAL P2068. Level of Difficulty. Parts List. Product Image. Notes and Maintenance. Tools Required. Easy
 INSTALLATION MANUAL P2068 Parts List 1 Grille guard 1 Driver / left frame mounting bracket 1 Passenger / right frame mounting bracket 1 Driver / left top mounting bracket 1 Passenger / right top mounting
JEEP WRANGLER. Front Door/Hardtop Storage System* * Storage Caddy Holds two (2) Front Doors Only with two (2) Sun Top Panels and No Rear Doors
 Front Doors Only with two (2) Sun Top Panels and No Rear Doors") JEEP WRNGLER Front Door/Hardtop Storage System* 5X * Storage addy Holds two (2) Front Doors Only with two (2) Sun Top Panels and No Rear Doors 05-18-06 65038 1 of 11 K6860080 K6860080 Top art Door art
JEEP WRNGLER Front Door/Hardtop Storage System* 5X * Storage addy Holds two (2) Front Doors Only with two (2) Sun Top Panels and No Rear Doors 05-18-06 65038 1 of 11 K6860080 K6860080 Top art Door art
Deuce/Ace Installation Instructions
 HARDWARE KIT: Upper Mounting Plate: 2-7/16" (11mm) X 3.5" bolts 2-7/16" flange nuts 2-2" spacers 2-7/16" trim cap mounting washers 2 - plastic trim caps TOOLS NEEDED: safety glasses wrenches 16mm or 5/8"
Installation Guide 50342/ Kargo Master Safari Rancho Cordova, CA
 Installation Guide 50342/50352 Kargo Master Safari Rancho Cordova, CA 95742 800-343-7486 CustomerService@Safari.com *PLEASE READ ALL INSTRUCTIONS AND WARNINGS PRIOR TO ASSEMBLING, INSTALLING AND USING
INSTALLATION & OWNER S MANUAL
 INSTALLATION & OWNER S MANUAL CAB INSTALLATION INSTRUCTIONS JOHN DEERE 3000 SERIES (4200/4300/4400) (4210/4310/4410) & (3120/3320/3520/3720) HARD SIDED CAB ENCLOSURE (p/n 1JD3520AS) SOFT SIDED CAB ENCLOSURE
INSTALLATION & OWNER S MANUAL
 INSTALLATION & OWNER S MANUAL CAB INSTALLATION INSTRUCTIONS MASSEY FERGUSON THX FOR MASSEY FERGUSON 528, 53, AGCO ST28A, ST33A, CHALLENGER MT255B SOFT SIDED CAB ENCLOSURE (p/n MFTHXSS) This Curtis Cab
INSTALLATION INSTRUCTIONS
 INSTALLATION INSTRUCTIONS WJ2 FULL-WIDTH FRONT BUMPER APPLICATION: 2018 Jeep Wrangler JL PART NUMBER: 59-80105, 59-80115, 59-80125 CONTENT ITEM QUANTITY DESCRIPTION TOOLS NEEDED 1 1 FRONT BUMPER ASSEMBLY
INSTALLATION INSTRUCTIONS PART NUMBER: DC (GUN METAL GRAY)
") Equipped with AEM Dryflow Filter No Oil Required! INSTALLATION INSTRUCTIONS PART NUMBER: 21-8033DC (GUN METAL GRAY) 2014-15 Chevrolet Silverado 1500 5.3L/6.2L V8 2014-15 GMC Sierra 1500 5.3L/6.2L V8 2015
Equipped with AEM Dryflow Filter No Oil Required! INSTALLATION INSTRUCTIONS PART NUMBER: 21-8033DC (GUN METAL GRAY) 2014-15 Chevrolet Silverado 1500 5.3L/6.2L V8 2014-15 GMC Sierra 1500 5.3L/6.2L V8 2015
Ram 1500 Crew Cab A Ram 2500/3500 Crew Cab A
 I N S T A L L A T I O N G U I D E APPLICATION AMP Part # Ram 1500 Crew Cab 2013-2015 77138-01A Ram 2500/3500 Crew Cab 2013-2015 77138-01A Note:The application works only on the Crew Cab model Vehicles.
Owner smanual. Banks torquetube System. Jeep 4.0L I-6 models including: Wrangler Cherokee Grand Cherokee Comanche
 Owner smanual with Installation Instructions Banks torquetube System Jeep 4.0L I-6 models including: 91-99 Wrangler 91-99 Cherokee 93-98 Grand Cherokee 91-92 Comanche THIS MANUAL IS FOR USE WITH SYSTEM
SPEED CONTROL 4 AND 6 CYL. JEEP WRANGLER. Read entire instructions thoroughly before starting. INSTALLATION INSTRUCTIONS TOOLS REQUIRED:
 Read entire instructions thoroughly before starting. TOOLS REQUIRED: SPEED CONTROL 4 AND 6 CYL. JEEP WRANGLER INSTALLATION INSTRUCTIONS Complete socket set Phillips screwdriver Torx drivers Wire strippers/cutters
GP1-R FULL EXHAUST SUZUKI GSX-R600 / GSX-R
 THIS EXHAUST SYSTEM IS DESIGNED FOR USE IN CLOSED COURSE RACING ONLY, AND IS NOT INTENDED FOR PUBLIC HIGHWAY USE. IN THE STATE OF CALIFORNIA, IT IS ILLEGAL TO MODIFY THE EMISSION CONTROL SYSTEM ON ANY
AMP RESEARCH TECH SUPPORT (Press 2) Monday - Friday, 6:00 AM - 5:00 PM PST
 Monday - Friday, 6:00 AM - 5:00 PM PST") APPLICATION AMP Part # Jeep Wrangler Unlimited (JK) 2007 2017 78122-01A (-Door Only) INSTALLATION TIME 3-5 Hours Professional installation recommended SKILL LEVEL 1 2 3 = Experienced TOOLS REQUIRED q 13
APPLICATION AMP Part # Jeep Wrangler Unlimited (JK) 2007 2017 78122-01A (-Door Only) INSTALLATION TIME 3-5 Hours Professional installation recommended SKILL LEVEL 1 2 3 = Experienced TOOLS REQUIRED q 13
INSTALLATION & OWNER S MANUAL
 1 of 18 INSTALLATION & OWNER S MANUAL (*Not including cab & other accessories) A/C Alternator Kit: Yamaha Drive & Drive2 P/N: 1ACYDR2DRK Recommended it be installed with Curtis Cab: Sandstone (p/n 1GCYD1-A,
3500 WINCH KIT P/N APPLICATION BEFORE YOU BEGIN KIT CONTENTS. P/N Rev 01 06/15 Page 1 of 11
 3500 WINCH KIT P/N 2881671 APPLICATION RZR XP 1000 ALL MODEL YEARS, 900 MY15 AND NEWER BEFORE YOU BEGIN Before you begin, read these instructions twice and check to be sure all parts and tools are accounted
I N S T A L L A T I O N G U I D E
 I N S T A L L A T I O N G U I D E APPLICATION AMP Part # Jeep Wrangler Unlimited (JK) 2007 2017 78122-01A (4-Door Only) INSTALLATION TIME 3-5 Hours Professional installation recommended SKILL LEVEL 1 2
INSTALLATION & OWNER S MANUAL
 INSTALLATION & OWNER S MANUAL CAB INSTALLATION INSTRUCTIONS FOR E-Z-GO MPT BALL CAGE (p/n 72685-G01) The contents of this envelope are the property of the owner. Be sure to leave with the owner when installation
INSTALLATION & OWNER S MANUAL
 Rev. C p. 1 of 21 INSTALLATION & OWNER S MANUAL F5205 HARD SIDED CAB KIT INSTALLATION & OWNER S MANUAL The contents of this envelope are the property of the owner. Be sure to leave with the owner when
Jeep JK Wrangler XHD Rear Tire Carrier
 Contents: 1. Frame (1) 2. Pivot Mount (1) 3. Latch Mount (1) 4. Lug Nuts (3) 5. Catch Pin (1) 6. M12 Washer (18) 7. M12 x 30 Hex Bolt (14) 8. Brake Light Mount (1) 9. Snap Ring (1) 10. Rub Strip (1) 11.
Owner smanual. Banks TorqueTube System With Optional Headpipe Assembly
 Owner smanual with Installation Instructions Banks TorqueTube System With Optional Headpipe Assembly Jeep 4.0L I-6 models including: 91-99 Wrangler 91-99 Cherokee 93-98 Grand Cherokee 91-92 Comanche THIS
InstalL Instructions. jeep yj roll cage kit. kit contents
 InstalL Instructions jeep yj roll cage 300152-2-kit kit contents tube identification 300102-2 300103-2 300104-2 300105-2 300106-2 300107-2 Driver A to B pillar (Qty: 1) Passenger A to B pillar (Qty: 1)
Required Tools: Phillips screw driver to remove original soft top. Torx sockets are required to completely remove the original soft top hardware.
 RAMPAGE P R O D U C T S Installation Instructions Part number 1099XX, Frameless Soft Top for 2 door Jeep Wrangler JK 2007- NOTE: Installation of the top in warm weather is optimal for ease of installation.
OIL COOLER KIT INSTALLATION INSTRUCTIONS PART NUMBER D
 OIL COOLER KIT INSTALLATION INSTRUCTIONS PART NUMBER D570-0907 APPLICATION: 2011-12 E90 335i/xi (N55 engine) with BMW M-Technic bumper and without stock oil cooler Congratulations for being selective enough
MORE POWER : LESS NOISE
 HARLEY-DAVIDSON DYNA SWITCHBACK MONSTER DUALS INSTALLATION INSTRUCTIONS PART# 16855 STOCK EXHAUST SYSTEM REMOVAL 1. Remove both left and right saddlebags and set them aside. 2. Remove seat to access and
EVO-1148AL/EVO-1149AL EVO Hood Breach
 EVO-1148AL/EVO-1149AL EVO Hood Breach Bill of Materials EVO-1148AL EVO Hood Breach Single Sprayer Part number Description Quantity EVO-12135AL EVO Hood Breach Single Sprayer 1 EVO-12136AL EVO Hood Breach
SPEED CONTROL 4 AND 6 CYL. JEEP WRANGLER. Read entire instructions thoroughly before starting. INSTALLATION INSTRUCTIONS TOOLS REQUIRED:
 Read entire instructions thoroughly before starting. TOOLS REQUIRED: SPEED CONTROL 4 AND 6 CYL. JEEP WRANGLER INSTALLATION INSTRUCTIONS Complete socket set Phillips screwdriver Torx drivers Wire strippers/cutters
WINDSHIELD WIPER KIT P/N APPLICATION BEFORE YOU BEGIN KIT CONTENTS NOTE. Instr Rev 02 06/15 Page 1 of 7
 WINDSHIELD WIPER KIT P/N 2879968 APPLICATION RANGER 570, RANGER ETX AND RANGER EV Polaris does not recommend use of this kit with Tip-Out Windshield PN 2880442. BEFORE YOU BEGIN Read these instructions
WJ AUTO TRANS. ATLAS SHIFTER
 KIT CONSISTS OF: No. Qty Part No. Description 4320 Aerotech Center Way, Page 1 of 8 1 1 302051 BASE- ATLAS TWIN STICK MOUNT 2 1 302080 STUD BOLT 1/2-13 X 7 B7 3 1 303120 Serrated-Flange Hex Locknut 1/2-13
INSTALLATION INSTRUCTIONS 88029
 INSTALLATION INSTRUCTIONS 88029 FOR SUSPENSION SYSTEMS RS6503: JEEP WRANGLER (TJ) READ ALL INSTRUCTIONS THOROUGHLY FROM START TO FINISH BEFORE BEGINNING INSTALLATION REV F IMPORTANT NOTES! WARNING: This
The world's first Bolt in Only stress bar for VW Mk 4 Chassis. Installation Manual V1.0.
 The world's first Bolt in Only stress bar for VW Mk 4 Chassis Installation Manual V1.0 www.yarrowsport.com Tools Needed: 1. 17mm, 10mm sockets and ratchet with 3inch extension 2. 10mm box end wrench 3.
Air Conditioner for M915 A0/A1 Truck
 RD-2-4530-0 Air Conditioner for M915 A0/A1 Truck INSTALLATION INSTRUCTIONS Install refrigerant compressor per instructions provided with compressor mount kit. CAUTION: Edges of sheet metal can be sharp!
Equipped with AEM Dryflow Filter No Oil Required! INSTALLATION INSTRUCTIONS PART NUMBER: DS (Plastic tube)
") Equipped with AEM Dryflow Filter No Oil Required! INSTALLATION INSTRUCTIONS PART NUMBER: 21-8316DS (Plastic tube) 2012-2016 Jeep Wrangler V6 3.6L C.A.R.B E.O. # D-670-24 Not legal for sale or use on any
Equipped with AEM Dryflow Filter No Oil Required! INSTALLATION INSTRUCTIONS PART NUMBER: 21-8316DS (Plastic tube) 2012-2016 Jeep Wrangler V6 3.6L C.A.R.B E.O. # D-670-24 Not legal for sale or use on any
Owner smanual. Banks TorqueTube System. Jeep 4.0L I-6 Models including: '00-06 Wrangler '00-01 Cherokee '99-01 Grand Cherokee
 with Installation Instructions Owner smanual Banks TorqueTube System Jeep 4.0L I-6 Models including: '00-06 Wrangler '00-01 Cherokee '99-01 Grand Cherokee THIS MANUAL IS FOR USE WITH SYSTEM 51306 Gale
INSTALLATION INSTRUCTIONS
 INSTALLATION INSTRUCTIONS Accessory Application Publications No. SYSTEM S2000 AII 26324 Issue Date OCT 2004 PARTS LIST Headrest Speaker System P/N 08A54-S2A-100 3 Small wire ties 2 Headrest speakers 9
DYNA OIL COOLER AND THERMOSTAT KIT
 INSTRUCTIONS -J000 REV. 07-5-00 Kit Numbers 6985-0 (Chrome) and 6989-0 (Silver) General DYNA OIL COOLER AND THERMOSTAT KIT These oil cooler kits feature a thermostat built-in to the oil filter mount. These
INSTALLATION INSTRUCTIONS
 AUTOMOTIVE PRODUCTS, INSTALLATION INSTRUCTIONS SPORTSMAN WINCH MOUNT GRILLE GUARD / MAX WINCH TRAY HDX WINCH MOUNT GRILLE GUARD APPLICATION: 2017 Ford F250/350 Super Duty PART NUMBER: 40-93905, 45-93900,
INSTRUCTIONS FLHT 1998 AND LATER MODELS RADIO/CD KIT 1WARNING -J02911 REV General. Installation. Outer Fairing Removal
 MPH CERTIFIED HARLEY-DAVIDSON UNLOCK RPMx00 HARLEY-DAVIDSON INSTRUCTIONS REV. 5--0 Kit Numbers 760-0A (Domestic) and 769-0A (HDI) General FLHT 998 AND LATER MODELS RADIO/CD KIT This radio kit fits 998