LTR; Wiring The Bars, Ditch The Black Blob! By NormalZ
|
|
|
- Brittney Scott
- 5 years ago
- Views:
Transcription
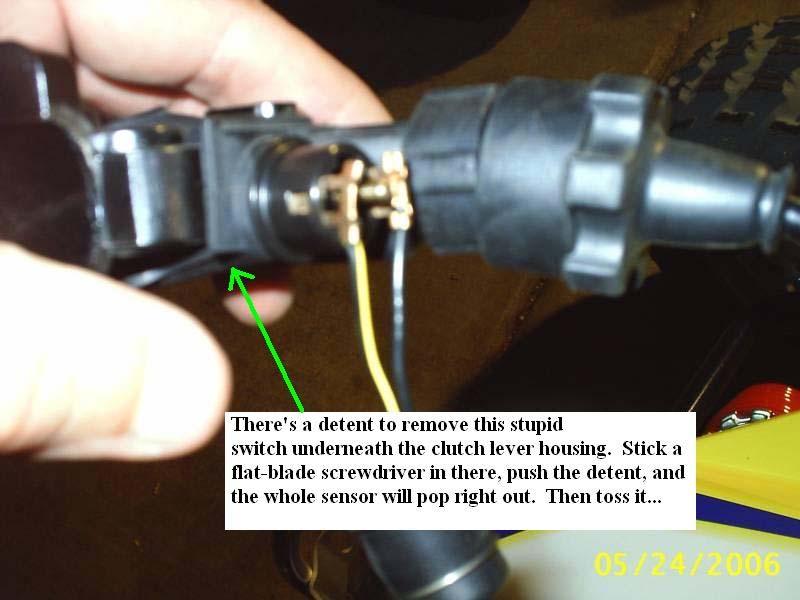
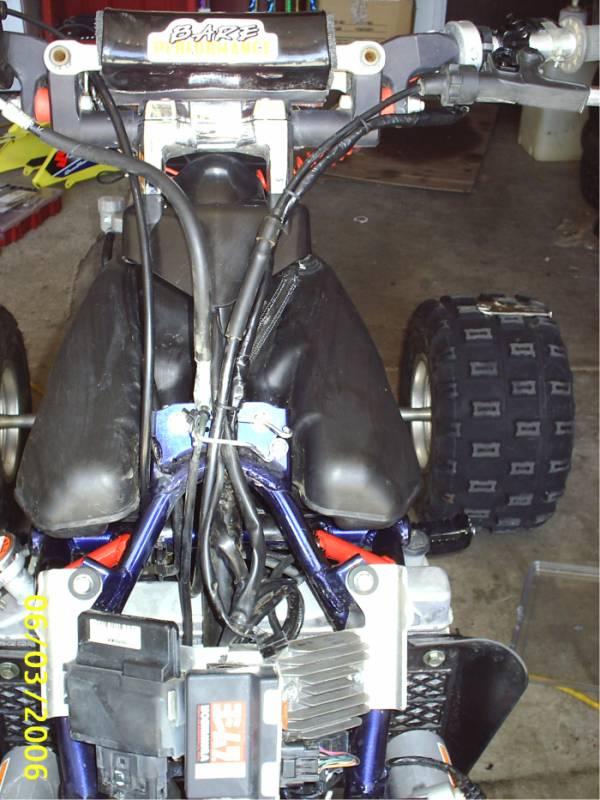
1 LTR; Wiring The Bars, Ditch The Black Blob! By NormalZ First off, I have to offer advice: There s no way in hell I d use a Normally-Open circuit kill tether on this bike I m not grounding anything into the CDI/ECU, or into any other electronic part on this thing. There s way too much going on with the computer, and it s not like frying other CDIs from other bikes. With that said, I ll only run Normally-Closed circuit kill tethers on this thing, like a Pingel Part #640. Offrant now. Okay, here's how to ditch the blob. Thankfully, Suzuki made the wiring colors the exact same as the Z- 400, so many of us are familiar with this procedure. Doing it this way makes it completely idiot-proof, except for those hardcore idiots that could mess anything up. There are only seven (7) wires going into the Blob. There's a shortcut you can take, but I'll explain that later. To wire the system the way I'm showing you, you first have to disable the Clutch Position Sensor. The two wires going to that piece of poo are the BLACK wire, and the BLACK/yellow wire. Connect them, and we'll continue. Okay, here we go. First thing you need to do is unbolt all the stuff on the left side of your bars. All the bolts that hold items onto the bars are 8mm (the parking brake, mounted to the clutch lever; the clutch lever; thumb throttle, front brake...). It's easier to do these mods if you remove the clutch lever. When you take out the Clutch Position Sensor, you can pop it right out if the lever is off the bars. The Black Blob is the 8mm-exception, and is held on with two SS Phillips screws, and they go in from the bottom. You'll have to literally pull the idle-advance ring off the Blob before you can separate the two halves. Don't be shy - force that bastage right off there. Once you get it off, you can separate the Blob halves, remove the cable from the ring, and cut that sucker off the bars with a Dremel. Stuff that cable anywhere you want. If you remove the cable from the throttle body, make sure you use some RTV silicone to seal the hole. After you have the Blob off the bars, cut the wiring harness just like this:
2

3 Pay attention close, folks... If you want to totally bypass the wiring for the Clutch Position Sensor, you have to locate, and wire, the following wires exactly like this... This will eliminate the need to connect the Clutch Position Sensor leads, and completely bypass that junk in it's entirety...
4 Unlike the Z, with it's direct wiring of the Clutch Position Sensor (CPS), the LTR has a plug connection for this switch. Previously, when I was working on the bar wiring, I simply unplugged this connection, hoping the motor would fire. No Go. Instead of making the connection as short as I could, and eliminating the plugin connection, I decided to keep it, and connect the wires after the plugin (I left about 4" of wire). I didn't know if the CPS would have a play in the PIM wiring, so I wanted it around - hence the extra 4" of wire.

5 I finalized the wiring later, and got everything cleaned up and soldered right. Here's the stock Clutch Position Sensor connection, about a foot down from the bars, in the wiring harness. I originally saved it because I didn't know if it tied into the Yoshi EMS - it didn t, so I removed. I saved the plug, in case I want to use it on a two-wire connection later, like the start button. You can see the pic above of what it looked like, and here's the real deal, all chopped out and cleaned up:
, connected into the ORANGE and ORANGE/white wires - doesn't matter which one you connect to; it'll kill the")
6 Here's a shot of the wiring connections, just like the wiring diagram posted above - these are the true wires. The BLUE and RED wires are the stock wires from the Pingel Kill Tether (Pingel Part # 640), connected into the ORANGE and ORANGE/white wires - doesn't matter which one you connect to; it'll kill the bike when pulled. The others ones are for the dirtbike kill button for a starter button. Tap one into the BLACK, and the other one into the YELLOW/black - again, it doesn't matter what goes to what; when they connect, the bike starts. WHITE, YELLOW, and GRAY, are for the lights. Connect YELLOW and GRAY for high beams, or WHITE and GRAY for low beams. I permanently wired the high beams, and capped off the WHITE wire. When I want to toss my lights on for the dunes, all I do is hit the key, and the highs will always be on.

7 Doesn't really matter for me, because everybody you see in the dunes are running HIDs, which are bright as hell. I don't think anyone will biotch at me about it... Z-400/KFX/DVX people - you can wire your bikes exactly like this, because we have the same wiring harness colors in those, and the LTR. Sweet, eh? Enough of the delay - here's the pic: Here it is, all dressed up and taped/tied:
8 Go Ride!
Disconnect the negative battery cable!
 Understanding Mod-3 on a C90 With Wiring Diagrams By DrJones18LC I do not have a C90 at my disposal (or audio/video equipment for that matter) so I can't make a live step by step how-to on doing Mod-3.
Lincoln Mark VII T5 Swap Version submitted by 5.0 bird
 Lincoln Mark VII 1984-1989 T5 Swap Version 20070611 submitted by 5.0 bird I've decided to make an article to assist with the T5 swap for the 84-89 Mark VIIs, since I was just in there because my DOA didn't
Installing LED lights in a Hypercharger By Keith Edwards Joker s Wild! (Wildjokr)
") Installing LED lights in a Hypercharger By Keith Edwards Joker s Wild! (Wildjokr) THINGS YOU WILL NEED: A Hypercharger (duh!) LEDs (The ones I got were from Benny Bryant at Fantasies on Wheels in Sylacauga,
Installing LED lights in a Hypercharger By Keith Edwards Joker s Wild! (Wildjokr) THINGS YOU WILL NEED: A Hypercharger (duh!) LEDs (The ones I got were from Benny Bryant at Fantasies on Wheels in Sylacauga,
*Some speedometers have these additional electronic connections. If yours does, then remove the smaller slotted screws shown.
 www.odometergears.com 1981-1985 240 Cable-Driven Speedometers (NOT for 1986 and later electronic units) http://www.davebarton.com/240-odometer-repair.html For this set of instructions below, I will not
Rear Wheel Removal (by BassCliff)
") Rear Wheel Removal (by BassCliff) Hello to my GS riding friends! After picking up a nail in my rear tire (while on the freeway at 75mph!) I thought I would take a few pictures to help illustrate the rear
Rear Wheel Removal (by BassCliff) Hello to my GS riding friends! After picking up a nail in my rear tire (while on the freeway at 75mph!) I thought I would take a few pictures to help illustrate the rear
There is hence three things you can do - add oil, adjust the temp that the clutch begins to engage, or do both.
 As most of you may be aware, I have been doing a lot of research lately on our cooling system in the 80's including the fact that we have a dead spot on the OEM temp gauge which prompted me to not rely
The Basics. What goes wrong?
 The Basics Let's cover some basic information on AH, TC, and ABS. In simple terms, these three systems combine data from wheel speed sensors, yaw rate sensors, steering wheel position sensors, along with
2007 Crown Victoria Police Interceptor (P71) Blend Door Actuator Replacement (If I did it, you can too.)
 Blend Door Actuator Replacement (If I did it, you can too.)") 2007 Crown Victoria Police Interceptor (P71) Blend Door Actuator Replacement (If I did it, you can too.) I'm not saying this is the only way, or even the right way, but it worked for me. First time I've
2007 Crown Victoria Police Interceptor (P71) Blend Door Actuator Replacement (If I did it, you can too.) I'm not saying this is the only way, or even the right way, but it worked for me. First time I've
Installing the Dan-Marc and Pingel setup.
 Installing the Dan-Marc and Pingel setup. This is an alternative to the OEM vacuum petcock. It's the setup I use and feel more comfortable with it. Many still like the OEM vacuum petcock and they can continue
Tailgate Light Bar Installation by Flopster Feb 2015
 Tailgate Light Bar Installation by Flopster843 23 Feb 2015 If you ever looked at the rear of a 3rd generation Dodge Ram dually pickup truck, you'll notice that there is a light bar with 3 red marker lights
Tools & Parts I Used. Here's everything that comes with the kit.
 Ford Super Duty Power Tailgate Lock Install 2004 F250 4x4 XLT Sport Crew Cab Back to 2004 F250 Main Page This page describes the steps to install the Pop & Lock PL8250 power tailgate lock kit. This kit
U-Score U-Score AAC Rank AAC Rank Vocabulary Vocabulary
 go 1 927 you 2 7600 i 3 4443 more 4 2160 help 5 659 it 6 9386 want 7 586 in 8 19004 that 9 10184 like 10 1810 what 11 2560 make 12 1264 is 13 10257 on 14 6674 out 15 2350 do 16 2102 here 17 655 eat 18
Here's the difference (externally) in the and 04+ bumper and headlights: (00-03 on top, 04 on bottom)
 in the and 04+ bumper and headlights: (00-03 on top, 04 on bottom)") OK guys, I've been meaning to post this for awhile.. well here it goes. I did the '04 front end conversion on my '01 about 4-5 months ago, but then the dealer had to buy the car back for legal reasons.
OK guys, I've been meaning to post this for awhile.. well here it goes. I did the '04 front end conversion on my '01 about 4-5 months ago, but then the dealer had to buy the car back for legal reasons.
The following information is gathered from pages of the Honda Aero Shop Manual.
 Original write-up by W. Boyter The following information is gathered from pages 3.10-3.12 of the Honda Aero Shop Manual. First of all, pull all your spark plugs, make sure your transmission is in neutral.
Connecting the rear fog light on the A4 Jetta, while keeping the 5 Light Mod
 Connecting the rear fog light on the A4 Jetta, while keeping the 5 Light Mod DISCLAIMER: I'm human and make mistakes. If you spot one in this how to, tell me and I'll fix it This was done on my 99.5 Jetta.
Improving the gearshift feel in an SW20.
 Improving the gearshift feel in an SW20. Part one In 3 parts. The SW20 gearshift can be often be greatly improved by eliminating play in the shift linkages, and this article covers three areas that need
This is a hobby website dedicated to the Kawasaki KLR650 motorcycle. I make no claim concerning the
 KLR650 Homepage Contact Me You must remove the "REMOVE-THIS" in my email address for it to work. This is a hobby website dedicated to the Kawasaki KLR650 motorcycle. I make no claim concerning the accuracy
Installing the Audiovox CCS-100 Cruise Control.
 Installing the Audiovox CCS-100 Cruise Control. This article was written by: Lon Lawrence w650kawasaki@leaco.net Cruise Control : Audiovox CCS-100 ($89) Webpage : www.summitracing.com Message: I've installed
Ford Super Duty Dash Lighting LED Upgrade F250 4x4 XLT Sport Crew Cab
 Page 1 of 32 Ford Super Duty Dash Lighting LED Upgrade 2004 F250 4x4 XLT Sport Crew Cab Back to 2004 F250 Main Page Click Here for a PDF version of this article ** Updated 12/15/09 ** New version of the
Aamir_bt The legend..
 Aamir_bt The legend.. How to do timing on a 4XE1-W (DOHC) engine. well i decided to to a write up for DOHC timing since there was only the SOHC written up, and i had to do a timing belt on my stylus anyways,
Ghetto Turbo Install Manual
 Ghetto Turbo Install Manual 1 Installing the Ghetto Kit for the Suzuki Hayabusa Parts in included in Kit Polish alum intake/silicon hose Air cleaner Stainless header 38mmTial Waste Gate FMU BEGI 3 Billet
K T M E X C / M X C D U A L S P O R T K I T I N S T A L L A T I O N
 K T M E X C / M X C D U A L S P O R T K I T I N S T A L L A T I O N K T M D U A L S P O R T K I T I N S T A L L A T I O N KIT CONTENTS Inspect Your Kit Your kit will include the following items A. KTM
Air Compressor/Water Pump IV - Pilot Valve Stem, Test & Installation
 Page 1 of 8 Air Compressor/Water Pump Part IV Pilot Valve Stem, Test & Installation Nelson Riedel Nelson@NelsonsLocomotive.com Initial: 1/13/04 Last Revised: 0 Valve Test: I decided to test the steam valves
This guide will explain how to remove the old springs from the car and replace them with lowering springs.
 fubar Guide: Fitting lowering springs to the Mk2 Clio The method described below worked for me. I am not saying it is the only method to complete the task. I will not accept any responsibility for damage
Timing belt change. Timing belt change
 Timing belt change Put 2 new Gates T275 timing belts on today. Tensioner drilled smooth and tight with less than 16,000 miles on her decided not to change the tensioners just the belts. You'll need some
B&W Turnover Ball Installation
 B&W Turnover Ball Installation by Flopster843 02 Jan 2012 I wanted to start this article out by stating one very important thing. Installing a gooseneck hitch is not a task to be taken lightly. If you
Brake Caliper Rebuild - Part Numbers & Tips Per Jim Millet, 3/15/2005
 Per Jim Millet, 3/15/2005 Not too difficult a job. Rears are easier than fronts to access. You ll need the following gasket sets: Front caliper gasket set, P/N 34 11 1 157 037, MSRP $13.58 Rear caliper
1978 Puch Magnum XK Wiring Diagram
 CEV Headlamp assy with plastic bucket Chassis grounding studs (Forward one is also airfilter bracket mounting stud) Head Light Circuit RH Brake Light Switch Switch is a NO type (normally on ) in it's relaxed
How Long Does It Take To Get Used To Driving A Manual Car
 How Long Does It Take To Get Used To Driving A Manual Car I am currently learning to drive in a manual car. My dad used to be a driving instructor before I was born, but by the time I was a take you off
Converting an A to 12v and Adding Turn Signals Bill Lee
 Converting an A to 12v and Adding Turn Signals Bill Lee Bill@WRLee.com When I bought my 1929 Tudor, it had been restored about 20 years earlier. It had halogens and had been converted to 12v negative ground,
Installation Tips for your GM Plug and Play Remote Start Kit EVOGM1 STAND ALONE v1.0 11/27/2013
 Installation Tips for your GM Plug and Play Remote Start Kit EVOGM1 STAND ALONE v1.0 11/27/2013 Thank you for purchasing your remote start from MyPushcart.com - an industry leader in providing remote starts
1980 Suzuki GS850GT Stator Replacement by BassCliff (a.k.a.bikecliff)
") 1980 Suzuki GS850GT Stator Replacement by BassCliff (a.k.a.bikecliff) Greetings to those of you who ride the classic GS series motorcycles from Suzuki. This documents my first experience replacing my stator.
1980 Suzuki GS850GT Stator Replacement by BassCliff (a.k.a.bikecliff) Greetings to those of you who ride the classic GS series motorcycles from Suzuki. This documents my first experience replacing my stator.
Boost by Smith s Dual Purpose Shift Light
 Boost by Smith s Dual Purpose Shift Light Greg Smith SMITHABUSA greg@boostbysmith.com 517.743.3666 ****WARNING**** This Dual-Purpose Launch-Shift Light can cause damage to both you and your motorcycle
Installation of the AdMore Premium Light Bar on an Indian Motorcycle
 Installation of the AdMore Premium Light Bar on an Indian Motorcycle Feb. 182017 by Ken the Mucker Sexton Ref: AdMore Lighting, LED8020-SB, Premium LED Light Bar with Smart Brake Technology, https://www.admorelighting.com/product/admore-smt-light-bar-with-smart-brake-technology-new/
ESS INSTALL. The donor car /6 Cosmos Black/Sand UUC Short Shifter Brembo cross drilled rotors Phillips Nav System 16:9
 ESS INSTALL The donor car.. 1997 540/6 Cosmos Black/Sand UUC Short Shifter Brembo cross drilled rotors Phillips Nav System 16:9 The install went in several stages. Disconnect the battery Stage 1 Remove
 Page 1 of 14 This install requires work on your supplemental restraint system and could cause injury or damage to your car. If you are not comfortable performing the steps detailed here then do not attempt
Attached Images. Attached Images
 Results from May 9 th : I'm sorry to say... I should have stayed home!.. Well, actually I'm glad I went, but the day was NOT a success from a competitive standpoint. It's always risky to take an untested
Adding a factory trip computer Page 1
 Adding a factory trip computer Page 1 This is what's required to add a factory trip computer to a 1993-1995 Audi 90 quattro. (This procedure might work for FWD 90s as well as '88-'92 80/90s as well, I
Installation Tips for your RS-1 + Honda-SL3 (1.b) Remote starter Honda: ( FIT), ( Pilot), ( Ridgeline) Acura: ( MDX)
 Remote starter Honda: ( FIT), ( Pilot), ( Ridgeline) Acura: ( MDX)") Installation Tips for your RS-1 + Honda-SL3 (1.b) Remote starter Honda: ( 06-08 FIT), ( 05-08 Pilot), ( 06-13 Ridgeline) Acura: ( 03-06 MDX) TIP SHEET T0777 Thank you for purchasing your remote start from
Installation Tips for your RS-1 + Honda-SL3 (1.b) Remote starter Honda: ( 06-08 FIT), ( 05-08 Pilot), ( 06-13 Ridgeline) Acura: ( 03-06 MDX) TIP SHEET T0777 Thank you for purchasing your remote start from
Corrado Club of Canada. VR6 Engine FAQ. By: Dennis
 Corrado Club of Canada VR6 Engine FAQ By: Dennis I thought I would snap a few pics of the engine compartment on my 1994 VR6 Corrado. First, this is the updated engine management system so it does have
LAMBO VERTICAL DOOR HOW TO GUIDE
 -1 LAMBO VERTICAL DOOR HOW TO GUIDE Despite what you may believe, scissor doors are not that difficult to install. There are plenty of body shops out there that will charge you $2,000 - $10,000 for this
As stated, these are solely based off of how I like to do the Pre-Trip. I give my personal opinions as well as some helpful tips.
 Here are our sections: Engine Compartment Drivers Door Fuel Area Coupling System Trailer (Please note in the type of suspension your trailer has) Light Check In-Cab Inspection and Brake Tests You will
Starter One-Way Clutch Replacement
 Starter One-Way Clutch Replacement by Joe Conway YOU NEED THE RIGHT TOOLS TO DO THIS JOB!! IF YOU HAVE ANY HESITATIONS TAKE IT TO A SHOP. I CLAIM NO RESPONSIBILITY FOR DAMAGE DUE TO MISTAKES MADE DURING
Simple DIY Rev Switch Switch on or off anything at an adjustable engine rpm!
 Simple DIY Rev Switch Switch on or off anything at an adjustable engine rpm! By Julian Edgar So what about making it a general-purpose rev switch, able to switch pretty well any electrical loads? That
Plaque de bridage. Rubber Airbox Inlet Derestricted ( )
") Plaque de bridage Rubber Airbox Inlet Derestricted (8138555) 1 Replace the stock restrictive rubber airbox inlet found on the '02-'03 Mille, '02-'04 Tuono and all Futuras. 2 This item was a standard OEM
Plaque de bridage Rubber Airbox Inlet Derestricted (8138555) 1 Replace the stock restrictive rubber airbox inlet found on the '02-'03 Mille, '02-'04 Tuono and all Futuras. 2 This item was a standard OEM
Hasse Mods for the Ampeg J20 Guitar Amp
 Hasse Mods for the Ampeg J20 Guitar Amp The following is adapted from a post I put up on The Gear Page, in the Amp Techincal forum. It shows the mods I did to my Ampeg J20. Okay, here s my mods for this
JRSC + BBK Install on SVTF. Neil A. Shah medicnas on focaljet September 2006
 JRSC + BBK Install on SVTF Neil A. Shah medicnas on focaljet September 2006 ECU up here. When removing make sure the smaller bundles of wires don t get wrapped around the bottom edge and break - this almost
W123 Transmission Vacuum Modulator Adjustment DIY - measure it the 'right' way
 W123 Transmission Vacuum Modulator Adjustment DIY - measure it the 'right' way Why do you need to do this?: You need to do this to properly check the internal hydraulic pressure of the transmission, either
4TH GEN SEATS IN A 3RD GEN TRUCK
 4TH GEN SEATS IN A 3RD GEN TRUCK by Flopster843 02 Oct 2016 If you drive a 3rd generation Dodge Ram truck, I am sure you have discovered that the OEM seats are not the greatest (Figure 1.) They are extremely
Shay - Painting The Trucks & Frames
 Shay - Painting The Trucks & Frames Nelson Riedel Nelson@NelsonsLocomotive.com Initial:2/23/04 Last Revised: 06/06/2004 Painting of the locomotive trucks and frame are described in this page. The tender
Installing Ignition Coil relay
 Installing Ignition Coil relay Above is a schematic diagram of the coil relay modification. All it really does is, it uses the existing 12 Volt positive that normally powers the coils, to power a relay,
Optional Wiring. This section deals with some of the optional wiring that may be needed depending on how you choose to construct your car.
 CHAPTER 23 Optional Wiring This section deals with some of the optional wiring that may be needed depending on how you choose to construct your car. OEM Tail light connections to Fiero harness The following
Installation Tips - (Crimestopper RS1/RS2) & (Fortin EVO-ALL 5): *regular key & automatic transmission only*
 & (Fortin EVO-ALL 5): *regular key & automatic transmission only*") Installation Tips - (Crimestopper RS1/RS2) & (Fortin EVO-ALL 5): TIP SHEET T3385f, T3413f *regular key & automatic transmission only* Thank you for purchasing your remote start from MyPushcart.com - an
Installation Tips - (Crimestopper RS1/RS2) & (Fortin EVO-ALL 5): TIP SHEET T3385f, T3413f *regular key & automatic transmission only* Thank you for purchasing your remote start from MyPushcart.com - an
RAFIG IDLE TUNING PROCESS
 RAFIG IDLE TUNING PROCESS I decided to PDF this process and bring everything I found into one document as when I went to idle tune it was in bits and pieces so I have gathered SSpdmon s info and put it
Thanks for Ordering The Kawasaki KLX Adjustable Lowering Kit From
 www.scootworks.com Thanks for Ordering The Kawasaki KLX Adjustable Lowering Kit From READ THIS BEFORE UNPACKING YOUR KIT! This instruction booklet contains detailed steps for installing the rear suspension
Rostra Electronic Cruise Control Install On a Stratoliner or Roadliner
 Rostra Electronic Cruise Control Install On a Stratoliner or Roadliner MATERIALS LIST: 1 - Rostra Part # 250-1223 (www.brandondist.com/products/cruise1223.htm) 1 - Signal Splitter part # 250-4369 1 - Engagement
PLEASE READ ALL DIRECTIONS BEFORE STARTING INSTALLATION
 FUEL AND IGNITION 2011-2013 Suzuki Kingquad 400 Installation Instructions PARTS LIST 1 Power Commander 1 USB Cable 1 CD-ROM 1 Installation Guide 2 Power Commander Decals 2 Dynojet Decals 2 Velcro Strips
RANDY Then it basically leaves and moves over into the paint shop.
 KIA Motors Manufacturing Georgia Today on Fast Forward, we re visiting the west side of the state, West Point to be exact, looking for another great Georgia company for this episode. So we uh oh great.
TTR225/250 DUAL S PORT K IT I NSTALLATION I NSTRUCTIONS
 TTR225/250 DUAL S PORT K IT I NSTALLATION I NSTRUCTIONS KIT CONTENTS Inspect Your Kit Your kit will include the following items A. TTR225/250 Instructions and Wiring Diagrams Read through the entire instruction
PLEASE READ ALL DIRECTIONS BEFORE STARTING INSTALLATION
 2001-2003 Suzuki GSXR600 2000-2003 Suzuki GSXR750 2001-2002 Suzuki GSXR1000 Installation Instructions PARTS LIST 1 Ignition Module 1 CD-ROM 1 Installation Guide 2 Velcro 1 Alcohol swab 1 CAN cable 1 CAN
Ford Racing 4.6L 3V Crate Engine Control Pack
 Ford Racing 4.6L 3V Crate Engine Control Pack Installation Time: 3-6 hours on a Foxbody Mustang Tools Required: Basic English and Metric Socket and Wrench Set Flat and Phillips Screwdrivers Torx bits Hammer
Installation Tips for RS4/RS7 + EVO-ALL (NIS 3.c) + 2 diodes
 + 2 diodes") Installation Tips for RS4/RS7 + EVO-ALL (NIS 3.c) + 2 diodes TIP SHEET T3093 + T3103 FOR: NISSAN ( 09-14 Cube), ( 11-14 Juke), & ( 07-11 Versa) automatic, regular key vehicles Thank you for purchasing
Installation Tips for RS4/RS7 + EVO-ALL (NIS 3.c) + 2 diodes TIP SHEET T3093 + T3103 FOR: NISSAN ( 09-14 Cube), ( 11-14 Juke), & ( 07-11 Versa) automatic, regular key vehicles Thank you for purchasing
Retro it Steering Column
 Retro it Steering Column INSTALLATION INSTRUCTIONS for 1976-86 CJ5 & CJ7 FOR PART NUMBER S: 1520800010, 1520800020, 1520800051, 1526800010, 1526800020, 1526800051 S I NCE 1986 Instruction # 8000000010
PLEASE READ ALL DIRECTIONS BEFORE STARTING INSTALLATION
 2002-2007 Suzuki Hayabusa Installation Instructions PARTS LIST 1 Ignition Module 1 Installation Guide 2 Velcro strips 1 Alcohol swab 1 CAN link cable 1 USB cable 1 Posi-tap THE VEHICLE S IGNITION MUST
Triumph Street Triple VSM Grip Heater Install
 Triumph Street Triple VSM Grip Heater Install Introduction: With winter fast approaching and with painful memories of last winter riding with the club it was time to do something about getting some grip
My Hawk build Part 8 by Stuart Clarke
 My Hawk build Part 8 by Stuart Clarke Front hubs, brakes and brake lines. There was still no news on my rear springs so I thought I d find something else to get on with. I had the front hubs, brake calipers
TIP SHEET (EVO-FORT1) 80-bit Add-On Stand-Alone Remote Starter
 80-bit Add-On Stand-Alone Remote Starter") TIP SHEET (EVO-FORT1) 80-bit Add-On Stand-Alone Remote Starter T2380 *AUTOMATIC TRANSMISSION VEHICLES ONLY* CLICK TO WATCH THE PREPPING HARNESS VIDEO -The EVO-ALL interface module eliminates the need for
TIP SHEET (EVO-FORT1) 80-bit Add-On Stand-Alone Remote Starter T2380 *AUTOMATIC TRANSMISSION VEHICLES ONLY* CLICK TO WATCH THE PREPPING HARNESS VIDEO -The EVO-ALL interface module eliminates the need for
RS4 / RS7 + (4) + SPDT
 + SPDT") TIP SHEET Installation Tips for RS4 / RS7 + Honda-SL3 (4) + SPDT + Diode x2 T0776, T0731 Honda: ( 08-12 Accord), ( 12-13 Civic), 12-13 CRV), ( 11-13 Odyssey), ( 09-13 Pilot) Acura: ( 09-13 TSX) Thank you
TIP SHEET Installation Tips for RS4 / RS7 + Honda-SL3 (4) + SPDT + Diode x2 T0776, T0731 Honda: ( 08-12 Accord), ( 12-13 Civic), 12-13 CRV), ( 11-13 Odyssey), ( 09-13 Pilot) Acura: ( 09-13 TSX) Thank you
Ford Super Duty 5.4L Spark Plug Change F250 4x4 XLT Sport Crew Cab
 1 of 32 Ford Super Duty 5.4L Spark Plug Change 2004 F250 4x4 XLT Sport Crew Cab Back to 2004 F250 Main Page Click Here for a PDF version of this article At close to 100k miles, I figured it was time for
How To: Add xenon white angel eyes
 How To: Add xenon white angel eyes Courtesy of 130girl You need the OEM xenon lights to do this change Have been running these in my 1er for about a month now with no problems. During the day they aren't
Installation Tips for your Remote Start system (for RS4LX>GMBP for GM vehicles)
") Installation Tips for your Remote Start system (for RS4LX>GMBP for GM vehicles) Thank you for purchasing your remote start from MyPushcart.com - an industry leader in providing remote starts to doit-yourself
Installation Tips for your Remote Start system (for RS4LX>GMBP for GM vehicles) Thank you for purchasing your remote start from MyPushcart.com - an industry leader in providing remote starts to doit-yourself
HOW-TO: Pimp your glowplug wiring
 HOW-TO: Pimp your glowplug wiring Contributed by Vince Waldon Tuesday, 30 September 2008 Last Updated Friday, 27 November 2009 vincewaldon.com var gajshost = (("https:" == document.location.protocol)?
PLEASE READ THROUGH THE WHOLE WRITE UP BEFORE ACTUALLY USING IT!!!!
 JDM power folding mirror switch install into stock USDM harness. By: Greg L., Zeke21 on twinturbo.net PLEASE READ THROUGH THE WHOLE WRITE UP BEFORE ACTUALLY USING IT!!!! This is how I was able to get the
RS4/RS7 + + SPDT T0776,T0731
 TIP SHEET Installation Tips for your RS4/RS7 + Honda-SL3 (1.a) + SPDT T0776,T0731 Honda: ( 03-07 Accord),( 01-05 Civic),( 02-06 CRV),( 03-10 Element),( 05-10 Odyssey) Acura: ( 01-03 EL),( 02-06 RSX),(
Днепр) Russian Motorcycle Carburetors Part 2B: PZ-24 and PZ-28 Carburetor Assembly and Jet Drilling
 Russian Motorcycle Carburetors Part 2B: PZ-24 and PZ-28 Carburetor Assembly and Jet Drilling") Ural (Урал( Урал) - Dnepr (Днепр( Днепр) Russian Motorcycle Carburetors Part 2B: PZ-24 and PZ-28 Carburetor Assembly and Jet Drilling (applies also to K-37 K and K-38 K carbs) Ernie Franke eafranke@tampabay.rr.com
Ural (Урал( Урал) - Dnepr (Днепр( Днепр) Russian Motorcycle Carburetors Part 2B: PZ-24 and PZ-28 Carburetor Assembly and Jet Drilling (applies also to K-37 K and K-38 K carbs) Ernie Franke eafranke@tampabay.rr.com
2k2GT Registered User
 1 of 44 7/22/2009 01:17 Corral Forums > Modular Tech Forums > GT & SOHC My J.R. Granatelli K-member install story...56k death Welcome, xomp. You last visited: Today at 12:07 AM Private Messages: Unread
PLEASE READ ALL DIRECTIONS BEFORE STARTING INSTALLATION
 2014-2016 Yamaha Viper 2014-2016 Arctic Cat 7000 Installation Instructions PARTS LIST 1 Ignition Module 1 Installation Guide 2 Velcro strips 1 Alcohol swab 1 CAN link cable 1 USB cable THE VEHICLE S IGNITION
TONY S TECH REPORT. Basic Training
 TONY S TECH REPORT (Great Articles! Collect Them All! Trade them with your friends!) Basic Training OK YOU MAGGOTS!! Line up, shut up, and listen good. I don t want any of you gettin killed because you
 Super how to Mod your Vr6 intake manifold/polish and paint. - Dubnet Volkswagen Enth... Page 1 of 33 www.bluenile.com Feedback - Ads by Google Dubnet Volkswagen Enthusiast Forum > Volkswagen And Audi >
RS4-7/PS4-7 + (2) + SPDT T3015, T3053
 + SPDT T3015, T3053") TIP SHEET Installation Tips for your RS4-7/PS4-7 + Honda-SL3 (2) + SPDT T3015, T3053 v1.3 4/25/14 Honda: ( 98-02 Accord), ( 98-01 CRV), ( 98-04 Odyssey), ( 03-04 Pilot) Acura: ( 98-99 EL), ( 98-03 CL),
TIP SHEET Installation Tips for your RS4-7/PS4-7 + Honda-SL3 (2) + SPDT T3015, T3053 v1.3 4/25/14 Honda: ( 98-02 Accord), ( 98-01 CRV), ( 98-04 Odyssey), ( 03-04 Pilot) Acura: ( 98-99 EL), ( 98-03 CL),
BMW 3 Series Oxygen Sensor
 1984-1991 BMW 3 Series Oxygen Sensor Replacement Replace an old oxygen sensor on your E30 for better gas mileage. Written By: Andrew Bookholt ifixit CC BY-NC-SA www.ifixit.com Page 1 of 10 INTRODUCTION
X R D U A L S P O R T K I T I N S T A L L A T I O N I N S T R U C T I O N S
 X R 4 0 0 D U A L S P O R T K I T I N S T A L L A T I O N I N S T R U C T I O N S KIT CONTENTS Inspect Your Kit Your kit will include the following items A. XR400 Instructions and Wiring Diagrams Read
JDM B16 & OBD0 HONDA DISTRIBUTOR REPAIR
 PDF Built By: tonyguns Source: Honda Tech JDM B16 & OBD0 HONDA DISTRIBUTOR REPAIR There are two things you should be checking before you begin. First, check the condition of the wiring harness. Pay close
Installation of the AdMore Premium Light Bar on an Indian Motorcycle
 Installation of the AdMore Premium Light Bar on an Indian Motorcycle May 16, 2017 by Ken the Mucker Sexton Ref: AdMore Lighting, LED8020-SB, Premium LED Light Bar with Smart Brake Technology, https://www.admorelighting.com/product/admore-smt-light-bar-with-smart-brake-technology-new/
We will be upgrading from the factory, paper-cone disgrace to an Infinity Kappa 62.9i:
 In order to fully round out your stereo upgrade, the factory rear speakers must go. This is another easy job to tackle, but the fitment of the package tray and being hunched over in the rear glass area
How to install the Barnett clutch and the stronger Oil Pump Drive Gear
 How to install the Barnett clutch and the stronger Oil Pump Drive Gear Written by WildFred I m from Germany so please excuse my English and the spelling. The following procedure is a combination of the
This article, written by forum member Paulages in September 2008, is from the SOHC/4 Tips and Tricks Forum.
 This article, written by forum member Paulages in September 2008, is from the SOHC/4 Tips and Tricks Forum. When Honda produced the SOHC CB650, it was immediately following the end of the CB550 production,
RS4/RS7 + ADS-DL (GM2)
") Installation tips for RS4/RS7 + ADS-DL (GM2) Tip Sheet T2390, T3632 (Chevy Cobalt 2007-2010), (Chevy HHR 2007-2011), (Chevy Malibu 2007-2012), (Chevy Malibu Hybrid 2008-2012), (Chevy Malibu Maxx 2007-2009),
Installation tips for RS4/RS7 + ADS-DL (GM2) Tip Sheet T2390, T3632 (Chevy Cobalt 2007-2010), (Chevy HHR 2007-2011), (Chevy Malibu 2007-2012), (Chevy Malibu Hybrid 2008-2012), (Chevy Malibu Maxx 2007-2009),
There was some debate whether or not there was a write up, with Pictures, for replacing the ignition switch.
 Replacing the Ignition Switch - Step by Step with Pictures. http://forums.audiworld.com/showthread.php?p=18927576 (Corey 02ALMSTT) (With updates/corrections by Dave F.) February 1, 2013 (I = Corey, mostly)
KAWASAKI 1500 VULCAN CLASSIC INSTALLATION INSTRUCTIONS
 2000-2007 KAWASAKI 1500 VULCAN CLASSIC INSTALLATION INSTRUCTIONS PARTS LIST quantity description 1 power commander EX 1 USB cable 1 cd-rom 1 installation guide 1 power adapter 1 wire tap 1 ground wire
Installation Instructions Jeep CJ-7
 Retrofit Steering Column Installation Instructions 1976-86 Jeep CJ-7 For Part # s 1520800010, 152800020, 1520800051 www.ididitinc.com 610 S. Maumee St., Tecumseh, MI 49286 (517) 424-0577 (517) 424-7293
AREA 51 - Project Deep Water Foreman!
 AREA 51 - Project Deep Water Foreman! Submitted By: Mike Smith of www.shed-headz.com This year marks a very important mile stone for me, that my 1998 Honda Foreman 450s turns 10 years old. Its important
Modeling Ideas and techniques, by Bob Rohwer What is the right DCC Decoder for my Locomotive?
 Modeling Ideas and techniques, by Bob Rohwer What is the right DCC Decoder for my Locomotive? I hear this question a lot. Fortunately there are a lot of resources to answer the question. The best I have
Installation Instructions for the Plug & Play Remote Start Package (EVOCHR5)
") T6018 v1.1 02/2013 Installation Instructions for the Plug & Play Remote Start Package (EVOCHR5) For DODGE Nitro 2007-2011 Review the remote start installation manual for safety instructions! Overview Your
T6018 v1.1 02/2013 Installation Instructions for the Plug & Play Remote Start Package (EVOCHR5) For DODGE Nitro 2007-2011 Review the remote start installation manual for safety instructions! Overview Your
Installation Instructions for the Plug & Play Chrysler/Dodge/Jeep Remote Start Package w/mux T5
 v1.01 12/14/2102 Installation Instructions for the Plug & Play Chrysler/Dodge/Jeep Remote Start Package w/mux T5 Review the remote start installation manual for safety instructions! Overview Your kit consists
 Page 1 of 7 www.ducati.com/ MODIFICATIONS >> Kuryakyn Grips Installation Feedback - Ads by Google Here is the pictoral on the Kury grips installation By CeeAre Parts required: - Kuryakyn KU 6240 Universal
Wiring Harness Relocation by Flopster Mar 2012
 Wiring Harness Relocation by Flopster843 21 Mar 2012 On my 2008 Ram, there is a gigantic blob of electrical wiring that Dodge decided to put between the engine and the brake master cylinder, just behind
What Does A Sway Bar Do?
 What Does A Sway Bar Do? I get a lot of questions about sway bars and what they will actually do for the Spyder. Here is my feeble attempt at giving a reasonable and, I hope, simple explanation. To understand
Installation Tips for RS4/RS7 + EVO-ALL (NIS 3.b)
") Installation Tips for RS4/RS7 + EVO-ALL (NIS 3.b) TIP SHEET T3092 + T3102 FOR: NISSAN ( 08-14 Frontier), ( 08-12 Pathfinder), & ( 08-12 Xterra) Thank you for purchasing your remote start from MyPushcart.com
Installation Tips for RS4/RS7 + EVO-ALL (NIS 3.b) TIP SHEET T3092 + T3102 FOR: NISSAN ( 08-14 Frontier), ( 08-12 Pathfinder), & ( 08-12 Xterra) Thank you for purchasing your remote start from MyPushcart.com
Why I like the IRC GP110 Tire on a KLR
 Why I like the IRC GP110 Tire on a KLR I know, I know, discussing tires is like discussing oil or chain lube. It always fires up the crowd. We all have opinions and here are the reasons that I like the