INSTRUCTIONS FOR M.O.R.E STEERING CORRECTION KIT PLEASE READ TERMS AND POLICIES ON PAGE 3 OF THESE INSTRUCTIONS
|
|
|
- Arlene Morgan
- 5 years ago
- Views:
Transcription

 Please note: Some of the photos in these instructions are of proto-type parts and the parts that you have may differ in appearance.")
1 MOUNTAIN OFF ROAD ENTERPRISES LLC. P.O. BOX 690, DELTA, COLORADO, Fax INSTRUCTIONS FOR M.O.R.E STEERING CORRECTION KIT PLEASE READ TERMS AND POLICIES ON 3 OF THESE INSTRUCTIONS CONTENTS OF KIT 9930: Tie Rod-Long, Drag Link-Short Heim Joints & Jam Nuts 5/8 (Left & Right threads) Bracket-passenger side knuckle # (9923) Hardware # (9925) Please note: Some of the photos in these instructions are of proto-type parts and the parts that you have may differ in appearance. General Information: This Steering Correction Kit is designed to fit Jeep YJ Wrangler vehicles built from that have had the leaf springs installed on top of the axle housings, known as a spring over axle (S.O.A.) conversion. The stock YJ Dana model 30 front axle must be utilized. Most S.O.A. conversions are performed on a custom basis, which means that there is not a standard kit available. This makes it difficult for M.O.R.E. to be certain that this steering correction kit will fit perfectly on every vehicle. We have spent countless hours designing and test fitting this system to several different vehicles and have found that it works well with most all, however, we cannot guarantee that it will install perfectly on your Jeep. It may require a bit of customizing on your part to be installed properly. Since you have purchased this part number and not the kit that contains the dropped pitman arm, M.O.R.E. assumes that you already have one installed. It is mandatory for proper fit of this system. If you do not have the dropped pitman arm, do not attempt to install this kit, because it will not work with out one! M.O.R.E. highly recommends the use of a trac bar with S.O.A. conversions. If you need one, M.O.R.E. offers two different styles that are far better then the stock unit. The SlipLoc or DoubleJointed trac bar, along with our special riser bracket (# 9921) will work great with your S.O.A. conversion. Read through all of the instructions before you begin installation, and familiarize yourself with all steps and components in the kit. Features: This M.O.R.E. Steering Correction Kit replaces the stock tie rod and drag link with new units. The main design feature is it moves the drag link to above the leaf spring and keeps it as parallel to the tie rod as possible. Also the tie rod moves to on top of the knuckle arms for increased ground clearance*. This kit is designed to be a bolt on, with only minor drilling required, no welding. You will have to do some minor grinding and tapping of holes. *In some cases, a 1/2 thick spacer (lift block) must be installed under the spring stack in order to gain clearance for the tie rod. This is included in this kit along with a new spring center bolt. Please call if you have any questions. Tools Required: In addition to basic hand tools, the following tools which may not be in every work shop will be needed: Drill press or milling machine (hand power drill can be used) with 1/2 chuck, drill bits in the following sizes: 5/8 (.625), 27/64 (.422), 21/64 (.328). End tap 3/8 24 thread (fine), box end wrench (15/16 ), open end wrench (1-1/8 ), socket (15/16 ) -1/2 drive, torque wrench - 1/2 drive, 13MM-12 point (metric) socket, pitman arm puller, two 1/2 x 3-1/2 bolts and nuts, hand grinder. 1 of 5
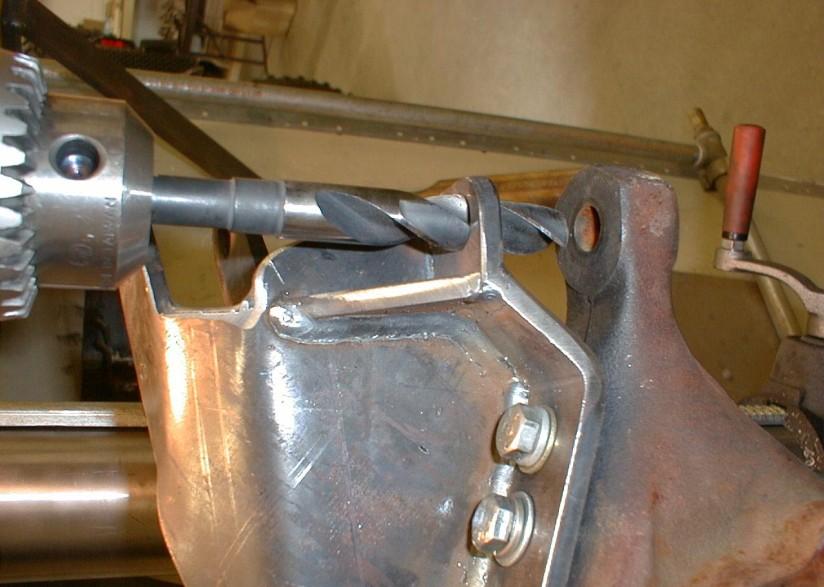
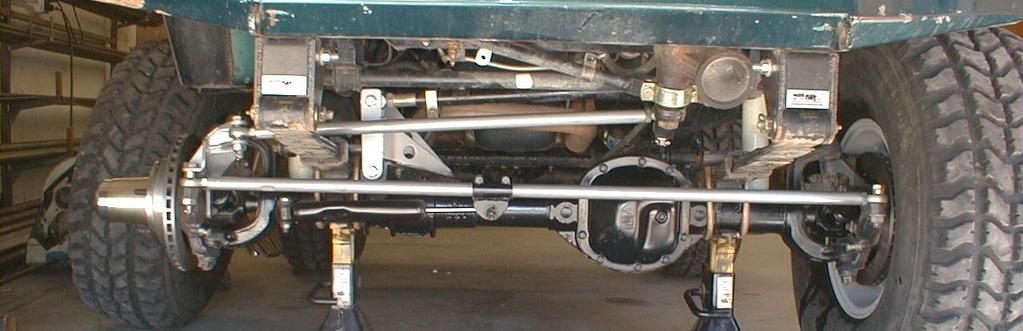
2 STEP 1: With the Jeep on flat level ground (concrete), jack up the front axle and place it on jack stands. Remove the front tires/wheels. Remove the stock steering linkage (tie rod and drag link). STEP 2: The pitman arm has a tapered hole that the drag link attached to. This hole must be drilled to 5/8. M.O.R.E. has found it best to remove it from the steering box (this requires a pitman arm puller). Place it in a drill press or milling machine for this step. See figure 1. This can be done with a hand power drill with the pitman arm on the vehicle, if you can drill the hole very accurately. You be the judge. STEP 3: The drivers side knuckle has a tapered hole that the tie rod attached to. This hole must be drilled to 5/8. M.O.R.E. has found it best to remove it from the axle housing and place it in a drill press or milling machine for this step. See figure 2. This can be done with a hand power drill and the steering knuckle on the axle housing, if you can drill the hole very accurately. You be the judge. STEP 4: The passenger side knuckle requires several modifications that require grinding, drilling, and tapping. M.O.R.E. has found it best to remove it from the axle housing so that you can grind on it using a bench vise. The other modifications are best performed using a drill press or milling machine. Please read through these instructions and you be the judge as to whether or not you remove it to perform these tasks. The first modification that needs to be performed is grinding. There is a ridge called flashing that is on the section of the knuckle between the upper ball joint and arm where the tie rod attaches. This flashing must be ground to flat. See figure 3A & B. The next area that needs to be ground on is the inside of the arm. See figure 4 A & B. The triangle area needs to have the upper section ground slightly so the M.O.R.E. steering bracket (9923) fits flat against the inside mounting surface. Use the two 1/2 holes and 1/2 x 3-1/2 bolts to locate the bracket. Imagine the 9923 bracket is bolted down tightly to the knuckle, the inside area that you are grinding on cannot let the 9923 bracket rock back and forth. So grind just enough of the arm to allow the bracket to fit without rocking. Now, go ahead and bolt the 9923 bracket to the knuckle tightly using the 1/2 x 3-1/2 bolts and nuts. Locate the three holes in the 9923 bracket that are above the area on the knuckle that you ground the flashing from in figures 3A & 3B. With a 27/64 bit in your drill, slightly dimple the knuckle using the 9923 bracket as a guide. See figure 5. DO NOT DRILL all the way through!!! All you are doing is finding center of these holes. Remove the 9923 bracket from the knuckle. Clamp the knuckle in the table vice of your drill press or milling machine and level the surface to be drilled. With a 21/64 drill bit in the chuck, drill the three dimpled holes all the way through. Now, tap the 21/64 holes with a 3/8-24 fine thread tap. Reattach the 9923 bracket to the knuckle with the 1/2 x 3-1/2 bolts and nuts, and the 3/8 x 1 bolts supplied. Tighten all five bolts with hand wrenches. With the 9923 bracket now attached tightly to the knuckle, clamp the assembly in the vice of your drill press or milling machine with the 9923 bracket up. The 5/8 hole in the 9923 bracket will locate where you drill the knuckle. (In some cases the 5/8 hole in the 9923 bracket will not be centered directly over the top of the tapered tie rod hole in the knuckle. This is due to the wide tolerances the factory had in producing the knuckles.) Level the arm of the knuckle (it must be 90 to the drill bit) that the tie rod attaches to. See figure 6. Drill the knuckle to 5/8. See figure 7. STEP 5: Remove the assembly from the vice and remove the 1/2 x 3-1/2 bolts and nuts. Remove the 3/8 x 1 bolts and remove the 9923 bracket. Paint the knuckle to keep it from rusting. Install the knuckle on the front axle housing. Place a lock washer, flat washer and a dab of your favorite thread locking compound on the 3/8 bolts. Place the 9923 bracket on the knuckle and start the 3/8 bolts in the tapped holes. Place a dab of thread locking compound on the three factory 13MM-12 point bolts, and start them through the 9923 bracket and knuckle and into the wheel bearing hub. Do not tighten any of the bolts at this time. Snug tighten only. Coat the threads of the Heim joints with anti-seize compound to keep them lubed and install the jam nuts on the Heim joints. Install the Heim joints in the tie rod and drag link. Remember, there are left and right threads in each, so don t force fit the left Heims in the right threads! Place a spacer on top of the knuckles and then place the tie rod on top of the spacers. Place one more spacer on top of the Heim joints. On the passenger side you will sandwich these between the knuckle and bracket. The 5/8 x 3 bolt is for the drivers side and the 5/8 x 3-1/2 is for the passenger side. (It may be necessary for you to install the 1/2 thick spacers or lift blocks under your spring packs to allow the tie rod to clear the leaf springs. These are included with this kit). Install the crimp lock nuts on the 5/8 bolts and snug tighten the crimp lock nuts. 2 of 5
3 STEP 6: Place a spacer on a 5/8 x 3 bolt, and insert the bolt through the Heim on ether end of the drag link. Place one more spacer on the bolt sandwiching the Heim and place this assembly on top of the pitman arm. Install a crimp lock nut on the bottom. See figure 8. On the bracket end of the drag link you will again sandwich the Heim joint with spacers and then insert this assembly into the upper pocket on the bracket. Then drop the last 5/8 x 2-3/4 bolt down through the bracket and install the crimp lock nut on the bottom. STEP 7: Set your torque wrench to 125 Lb. Ft. torque. Tighten all 5/8 bolts and crimp lock nuts to that setting. Tighten the factory 12 point 13MM knuckle to hub bolts to 60 Lb. Ft. torque. Tighten the three 3/8 bolts on the outside of the 9923 bracket to 35 Lb. Ft. torque. Install cotter pins in the 5/8 bolts. STEP 8: If you have any interference between your tie rod and leaf springs you can install the (provided) 1/2 x2.5 spacer block between your spring perch and leaf spring. This is not needed on most applications. STEP 9: Install the tires/wheels. Set the toe-in to 1/8 with a tape measure by adjusting the tie rod. Tighten the tie rod jam nuts hand tight, keeping the Heims in alignment with each other. Center the steering wheel with the drag link and tighten the jam nuts hand tight, keeping the Heims in alignment with each other. Remove the jack stands, and torque the lug nuts to factory specs. Put the Jeep on a trailer and take it to an alignment shop and have the alignment set on a rack. Test drive the Jeep off road. It may be necessary to re-center the steering wheel after having the toe-in set. Re-check all of the hardware for proper torque specs and re-check it often! TERMS-POLICIES: FIT and TOLERANCES: All parts in this system are the results of countless hours of research, testing, fitting and refining. Jeeps have a wide tolerance on bolt hole centers from frame to frame. We have spent countless hours designing and test fitting this system to several different vehicles and have found that it works well with most all, however, we cannot guarantee that it will install perfectly on your Jeep. It may require a bit of customizing on your part to be installed properly. You may find it necessary to grind, elongate, bend, or force the parts in this system to fit on your rig. Please use common sense when installing these parts and understand that once you modify them in any way, shape or form, they are not returnable! DAMAGE CLAIMS: All orders are carefully packed, however, mishandling by the carrier can result in damage. The carrier has the responsibility for the shipment from the time it leaves our warehouse until it is delivered to you. All claims for lost or damaged goods should be reported to the carrier, not to M.O.R.E. LLC. RETURNS: No returns will be accepted without prior permission from M.O.R.E. LLC. After you receive a Return Goods Authorization (RGA) number, merchandise must be returned prepaid and insured. A claim must be made with in 30 days from receipt of merchandise. The original invoice or a copy with the RGA number written on must accompany all returns. A 20% restocking fee will be charged on all parts returned for credit or refund unless merchandise is proven to be defective or was shipped wrong by M.O.R.E. LLC. No merchandise will be issued credit or refund if it has been installed, modified, used in any way or is in unsalable condition. WARRANTY: All merchandise is warranted to be free from defects in materials and workmanship prior to installation. Any alteration or improper use will void this warranty. Because all parts we sell are intended for use in heavy-duty applications it is not possible to warrantee or guarantee the performance of any items. M.O.R.E. LLC. products and the products manufactured by others, which we sell may be subject to an infinite variety of conditions due to the manner in which they are used, serviced and/or installed. Purchasers and users of such products rely upon their own judgment as to the suitable use selection, service and installation of such products. PRODUCT DISCLAIMER: Modification of your vehicle to enhance performance with parts sold by M.O.R.E. LLC. may create a dangerous condition which could cause serious bodily injury, and the buyer hereby expressly assumes all risks associated with any such modifications. All parts sold by M.O.R.E. LLC. are for racing or off road use only. Mountain Off Road Enterprises LLC. will not accept responsibility for personal injury or property damage arising from the failure of any parts manufactured or sold by M.O.R.E. LLC. Specifications are subject to change without notice. Jeep, AMC, CJ,YJ, Wrangler, are registered trademarks of the DaimlerChrysler. M.O.R.E. is not associated with DaimlerChryler. M.0.R.E, BombProof, S.R.S., SlipLoc, DoubleJointed, RockProof, are trademarks used by Mountain Off Road Enterprises, LLC. The M.O.R.E. logo is and this instruction sheet is copyright, of 5


4 Figure 1 Figure 2 Remove the flashing from the knuckle by grinding it to flat in the areas between the arrows. Figure 3A Figure 3B Figure 4A Grind the upper section of the arm, slightly, until the bracket fits on the knuckle with out interference in this area. Test fit the bracket using the two mounting holes and 1/2 x 3-1/2 bolts as a guide. 4 of 5 Figure 4B


5 Figure 5 Figure 6 Figure 7 Figure 8 5 of 5
INSTALLATION INSTRUCTIONS FOR M.O.R.E. SHACKLE REVERSAL SYSTEM (S.R.S. ) PART # THIS SYSTEM FITS Jeep CJ-5, CJ-7, CJ-8 VEHICLES.
 PART # THIS SYSTEM FITS Jeep CJ-5, CJ-7, CJ-8 VEHICLES.") MOUNTAIN OFF ROAD ENTERPRISES LLC. P O BOX 690, DELTA, COLORADO 81416 970-625-0500 www.mountainoffroad.com INSTALLATION INSTRUCTIONS FOR M.O.R.E. SHACKLE REVERSAL SYSTEM (S.R.S. ) PART # 7686-5 THIS SYSTEM
MOUNTAIN OFF ROAD ENTERPRISES LLC. P O BOX 690, DELTA, COLORADO 81416 970-625-0500 www.mountainoffroad.com INSTALLATION INSTRUCTIONS FOR M.O.R.E. SHACKLE REVERSAL SYSTEM (S.R.S. ) PART # 7686-5 THIS SYSTEM
INSTALLATION INSTRUCTIONS FOR PLEASE READ AND UNDERSTAND TERMS/POLICIES BEFORE YOU INSTALL THIS SYSTEM
 MOUNTAIN OFF ROAD ENTERPRISES. LLC. P.O. BOX 690 DELTA, COLORADO 81416 970-625-0500 E-mail: info@mountainoffroad.com www.mountainoffroad.com INSTALLATION INSTRUCTIONS FOR 8795-2 PLEASE READ AND UNDERSTAND
INSTALLATION INSTRUCTIONS FOR PLEASE READ AND UNDERSTAND TERMS/POLICIES BEFORE YOU INSTALL THIS SYSTEM
 MOUNTAIN OFF ROAD ENTERPRISES. INC. P.O. BOX 690 DELTA, COLORADO 81416 970-625-0500 E-mail: info@mountainoffroad.com www.mountainoffroad.com INSTALLATION INSTRUCTIONS FOR 8795-3 PLEASE READ AND UNDERSTAND
INSTALLATION INSTRUCTIONS FOR M.O.R.E. SHACKLE REVERSAL SYSTEM (S.R.S. ) PART # THIS SYSTEM FITS Jeep CJ-5, CJ-7, CJ-8 VEHICLES.
 PART # THIS SYSTEM FITS Jeep CJ-5, CJ-7, CJ-8 VEHICLES.") INSTALLATION INSTRUCTIONS FOR M.O.R.E. SHACKLE REVERSAL SYSTEM (S.R.S. ) PART # 7686-6 THIS SYSTEM FITS 1976-1986 Jeep CJ-5, CJ-7, CJ-8 VEHICLES. Please read all instructions carefully (including terms-policies)
INSTALLATION INSTRUCTIONS FOR M.O.R.E. SHACKLE REVERSAL SYSTEM (S.R.S. ) PART # 7686-6 THIS SYSTEM FITS 1976-1986 Jeep CJ-5, CJ-7, CJ-8 VEHICLES. Please read all instructions carefully (including terms-policies)
Remove Air filter box by loosening hose clamp, pull intake tube off of box,remove vent hose from side of box and pull straight up.
 MOUNTAIN OFF ROAD ENTERPRISES, LLC. P.O. BOX 690 DELTA COLORADO 81416 970-625-0500 970-625-3747 FAX E-mail: info@mountainoffroad.com www.mountainoffroad.com INSTALLATION INSTRUCTIONS for JKDBT0709 DUAL
INSTALLATION INSTRUCTIONS FOR M.OR.E. SHACKLE SYSTEM (S.R.S. ) Please read terms and Policies page 5.
 Please read terms and Policies page 5.") MOUNTAIN OFF ROAD ENTERPRISES INC. P.O. BOX 690, DELTA CO. 81416 970-625-0500 970-625-3747 fax E-mail: info@mountainoffroad.com www.mountainoffroad.com INSTALLATION INSTRUCTIONS FOR M.OR.E. SHACKLE SYSTEM
MOUNTAIN OFF ROAD ENTERPRISES INC. P.O. BOX 690, DELTA CO. 81416 970-625-0500 970-625-3747 fax E-mail: info@mountainoffroad.com www.mountainoffroad.com INSTALLATION INSTRUCTIONS FOR M.OR.E. SHACKLE SYSTEM
Feb 22, 2018 '67-69 Camaro & '68-74 Nova Bumpsteer Adjustment Kit
 Feb 22, 2018 '67-69 Camaro & '68-74 Nova Bumpsteer Adjustment Kit 10552 The following instructions are intended for professional installers. Speedtech Performance assumes NO responsibility for the installation
INSTALLATION INSTRUCTIONS QA1 P/N R , R , R R , R , R F100 Rear Coil-over Conversion System
 INSTALLATION INSTRUCTIONS QA1 P/N R120-170, R120-200, R120-250 R220-170, R220-200, R220-250 65-72 F100 Rear Coil-over Conversion System TOOLS AND SUPPLIES REQUIRED Floor Jack Two (2) Jack Stands Drill
OVER THE KNUCKLE 1-TON STEERING INSTALLATION INSTRUCTIONS
 OVER THE KNUCKLE 1-TON STEERING INSTALLATION INSTRUCTIONS TOOLS NEEDED Grinder with cutoff wheel, sawzall, cutting torches, or a plasma cutter Welder (for optional sway bar mounts) Hand drill with a ½
Installation Manual Clayton Off Road Suspension: XJ 6.5 Coil Conversion Long Arm Lift Kit Jeep Cherokee Last Revision No.: 3/1/11 PN
 Thank you for purchasing a Clayton Off Road suspension. Please check to make sure you have all necessary parts before you start your install. XJ 8.0 Coil 1100107 3 Link Bridge W/mount 1100108 Front Spring
DODGE OFF ROAD T-STYLE STEERING KIT INSTALLATION INSTRUCTIONS
 Dodge Off Road, LLC Specializing in Dodge Ram Solid-Axle 4x4 Suspension and Steering for Off Road Applications 855.9009.DOR sales@dodgeoffroad.com dodgeoffroad.com DODGE OFF ROAD T-STYLE STEERING KIT INSTALLATION
Cognito Motorsports, Inc. Upper Control Arm Kit for 2011-Present GM 8-Lug #UCAK100051
 Cognito Motorsports, Inc. Upper Control Arm Kit for 2011-Present GM 8-Lug #UCAK100051 Introduction - Installation requires a qualified mechanic. - Read instructions carefully and study the pictures (if
XJ CHEROKEE LIFT KIT
 92169600 84-01 6.5 XJ CHEROKEE LIFT KIT Thank you for choosing Rough Country for your suspension needs. Rough Country recommends a certified technician installs this system. In addition to these instructions,
FRONT DRIVELINE MODIFICATION MAY BE NECESSARY!!!!
 INSTALLATION INSTRUCTIONS FOR 2009 DODGE 2500/3500 4WD & 1500 Mega Cab 6 SUSPENSION SYSTEM PART NUMBER 7206 Requires the following parts (sold separately) for a complete installation: Front Coil Spring
Technical Support Line: (952) Hanover Ave. Lakeville, MN
 Hanover Ave. Lakeville, MN") Technical Support Line: (952) 985-5675 Email: Sales@QA1.net 21730 Hanover Ave. Lakeville, MN 55044 www.qa1.net INSTALLATION INSTRUCTIONS QA1 1967-1979 Mopar A-Body Rear 6 link Conversion System QA1 p/n
Technical Support Line: (952) 985-5675 Email: Sales@QA1.net 21730 Hanover Ave. Lakeville, MN 55044 www.qa1.net INSTALLATION INSTRUCTIONS QA1 1967-1979 Mopar A-Body Rear 6 link Conversion System QA1 p/n
Front Axle Assembly: Hairpin Radius Rods
 INSTRUCTIONS 916-395 *916-395* August 2011, Speedway Motors, Inc. Front Axle Assembly: Hairpin Radius Rods This radius rod front end kit is used with OEM or aftermarket tube or I-beam axles that use a
Universal Mud Flaps PRODUCT INSTALLATION GUIDE. Part # Important Notes: These instructions are for two methods of installation.
 PRODUCT INSTALLATION GUIDE Universal Mud Flaps Important Notes: These instructions are for two methods of installation. Prior to beginning this or any installation read these instructions to familiarize
NOTICE TO DEALER AND VECHICLE OWNER
 84-01 4.5 & 6 XJ CHEROKEE LONG ARM KIT Thank you for choosing Rough Country for your suspension needs. Rough Country recommends a certified technician installs this system. In addition to these instructions,
AEV-Nth JK High Steer Kit Installation Instructions
 AEV-Nth JK High Steer Kit Installation Instructions designed for: 2007-current Jeep JK Wrangler and Unlimited models in all trim levels including Rubicon with at least 3.0 of suspension lift. Vehicle Applications
TJ Rear Trail Bar Part # Part #
 PRODUCT INSTALLATION GUIDE TeraFlex, Inc. TeraFlex, Inc. 5680 W Dannon Way Dr. 5241 South Commerce West Jordan, UT84107 84081 Murray, Utah Phone/801.288.2585 Phone/801.288.2585 Fax/801.713.2313 Fax/801.713.2313
INSTALLATION GUIDE. High Steer Kit
 AEV30212AE Last Updated: 12/09/16 High Steer Kit Designed for 2007 current Jeep JK Wrangler and Wrangler Unlimited models in all trim levels, including Rubicon, with at least 3.0 of suspension lift. INSTALLATION
Instruction set # 7068 Cognito Motorsports, Inc. Upper Control Arm Leveling Kit for GM 8-Lug #UCAK (Boxed Style)
") Cognito Motorsports, Inc. Upper Control Arm Leveling Kit for 2001-2010 GM 8-Lug #UCAK100010 (Boxed Style) Introduction - These control arms will not affect the height of the truck, the height is determined
Cognito Motorsports, Inc. Upper Control Arm Leveling Kit for 2001-2010 GM 8-Lug #UCAK100010 (Boxed Style) Introduction - These control arms will not affect the height of the truck, the height is determined
Installation Instructions
 Installation Instructions Jeep TJ Long Arm Suspension System 1997-2002 JEEP TJ 4WD 6 1997-2002 JEEP TJ 4WD FTS24002 & BK / FTS24003 & BK / FTS44002 & BK PARTS LIST FTS24002BK Jeep TJ 6' Box Kit 1 FTS24003BK
Installation Manual ZJ Long Arm Upgrade kit Jeep Grand Cherokee Last Revision No.: 1/30/12 PN
 Thank you for purchasing a Clayton Off Road suspension. Please check to make sure you have all necessary parts before you start your install. 4804010 ZJ 93-95 Long Arm Upgrade Kit 1200010 4 Link Axle Truss
PRODUCT INSTALLATION GUIDE. Mud Flap Kit W/Flaps
 PRODUCT INSTALLATION GUIDE TeraFlex, Inc. Inc. TeraFlex, 541 South Commerce 560 W Dannon Way Dr. Murray, Utah West Jordan, UT4107 401 Phone/01..55 Phone/01..55 Fax/01.713.313 Fax/01.713.313 www.teraflex.com
'64-72 Chevelle/ A Body Rear Coilover Conversion Kit
 Nov 3, 2017 '64-72 Chevelle/ A Body Rear Coilover Conversion Kit Includes instructions for Currie Brand Axles The following instructions are intended for professional installers and are guidelines only.
XJ CHEROKEE LIFT KIT
 921633XN200 Thank you for choosing Rough Country for your suspension needs. 84-01 4.5 XJ CHEROKEE LIFT KIT Rough Country recommends a certified technician installs this system. In addition to these instructions,
TJ SPEED BUMPS Part # Part #
 PRODUCT INSTALLATION GUIDE TeraFlex, Inc. Inc. TeraFlex, 5241 South Commerce 5680 W Dannon Way Dr. West Jordan, UT84107 84081 Murray, Utah Phone/801.288.2585 Phone/801.288.2585 Fax/801.713.2313 Fax/801.713.2313
JK AXLE SLEEVE KIT Part #
 PRODUCT INSTALLATION GUIDE TeraFlex, Inc. 5241 South Commerce Dr. Murray, Utah 84107 Phone/801.288.2585 Fax/801.713.2313 www.teraflex.biz JK AXLE SLEEVE KIT Part # 4990700 Important Notes: Make sure your
2. Remove front wheels.
 1 PARTS DIAGRAM 2 Installation Instructions: (PASSENGER SIDE) 1. Place jack under center of RUV front end and lift until front wheels clear the ground. Be careful to support the RUV properly so that it
A. Tools Needed:
 92723200A 2014 GM 2 FRONT & 4 REAR LOWERING KIT Thank you for choosing Rough Country for all your suspension needs. Rough Country recommends a certified technician install this system. In addition to these
Rusty's WJ Steering and Brake Conversion
 Rusty's Off-Road Products 7161 Steele Station Rd. Rainbow City, AL 35906 techline: 256-442-0607 www.rustysoffroad.com Rusty's WJ Steering and Brake Conversion PART #: RS-BC999-UV APPLICATION: XJ,TJ,ZJ
2007 AND UP GM 4 LIFT 2WD/4WD TRUCK/SUV
 IF your ReadyLIFT product has a damaged or missing part, please contact customer service directly. For warranty issues please return to the place of installation and contact ReadyLIFT. A NEW REPLACEMENT
Installation Manual WJ Long Arm Upgrade kit Jeep Grand Cherokee Last Revision No.: 1/30/12 PN
 Thank you for purchasing a Clayton Off Road suspension. Please check to make sure you have all necessary parts before you start your install. 4806010 WJ 99-04 Long Arm Upgrade Kit 1206100 WJ Rear 4 Link
/3500 Dodge 5 Long Arm Kit
 92137900A 11-12 2500/3500 Dodge 5 Long Arm Kit Thank you for choosing Rough Country Suspension for your Off Road needs. Rough Country recommends a certified technician installs this system. In addition
For all Ram x4 Trucks, and all Ram x4 trucks.
 Dodge Off Road, LLC Specializing in Dodge Ram Solid-Axle 4x4 Suspension and Steering for Off Road Applications 855.9009.DOR sales@dodgeoffroad.com dodgeoffroad.com DODGE OFF ROAD 5 th GEN STEERING KIT
KIT # CSS-C SUSPENSION LIFT KIT
 14385 Veterans Way Moreno Valley, CA 92553 Phone: (951) 571-0212 Fax: (951) 571-0215 2001-2010 CHEVROLET SILVERADO 1500 AND 2500 HD 4WD AND 2WD PICK-UP 1999-2010 CHEVY 2500 4WD PICK-UPS 2001-2010 2500
*1234BAG1 1234BAG WD CHEVY/GM LIFT N200
 *1234BAG1 1234BAG1 921234N200 99-06 2WD CHEVY/GM 1500 6 LIFT Thank you for choosing Rough Country for all of your suspension needs. Rough Country recommends a certified technician installs this system.
This suspension system was developed using a Maximum tire size of 33 X 12.5 with a 17 x 9 aftermarket wheel with 4 1/2-5 backspacing..
 92174700 Thank you for choosing Rough Country for your suspension needs. 2005-15 TACOMA 6 Kit Rough Country recommends a certified technician install this system. In addition to these instructions, professional
(877) MON-FRI 7AM-5PM PST OR WEBSITE: ReadyLIFT.COM **Please retain this document in your vehicle at all times**
 MON-FRI 7AM-5PM PST OR WEBSITE: ReadyLIFT.COM **Please retain this document in your vehicle at all times**") IF YOUR ReadyLIFT PRODUCT IS MISSING A OR HAS A DAM- AGED PART, PLEASE CONTACT CUSTOMER SERVICE DIRECTLY. For warranty issues please return to the place of installation and contact ReadyLIFT. A NEW REPLACEMENT
IF YOUR ReadyLIFT PRODUCT IS MISSING A OR HAS A DAM- AGED PART, PLEASE CONTACT CUSTOMER SERVICE DIRECTLY. For warranty issues please return to the place of installation and contact ReadyLIFT. A NEW REPLACEMENT
4331 EUCALYPTUS AVE. ~~ CHINO, CA Fax FORD F-250/350 SUPER DUTY 4WD FTS RADIUS ARM BOX KIT
 4331 EUCALYPTUS AVE. ~~ CHINO, CA 91710 909-597-7800 Fax 909-597-7185 2005-2007 FORD F-250/350 SUPER DUTY 4WD FTS22099 10 RADIUS ARM BOX KIT 4331 EUCALYPTUS AVE. ~~ CHINO, CA 91710 909-597-7800 Fax 909-597-7185
97-06 JEEP TJ/LJ LONG ARM UPGRADE KIT
 921663U00 97-06 JEEP TJ/LJ LONG ARM UPGRADE KIT Thank you for choosing Rough Country for your suspension needs. This kit is an upgrade kit only. This kit includes frame mounting points and adjustable long
JK HD Skid Plate for Rear Falcon Shocks
 1 JK HD Skid Plate for Rear Falcon Shocks Kit # 36-07-01-300 Important Notes: Prior to beginning this or any installation read these instructions to familiarize yourself with the required steps and evaluate
Installation Instructions
 Instructions Created by an: 2007-Present Toyota Tundra LRT Leveling Lift Kit - 4WD by Low Range Off-Road (SKU# LR-LRTundra) Instructions also apply to 2WD Kits. Installation Instructions Revised 7-11-17
Installation manual. 2 Suspension System. Ford F150 4WD and 2WD. Part # Part # Ford F150 4WD and 2WD
 Installation manual 2 Suspension System 2009-2018 Ford F150 4WD and 2WD Part # 22929 sj12112013rev.03 Part # 22929 2009-2018 Ford F150 4WD and 2WD 2 Suspension System Part # Description Qty. 22909-01 Front
TeraFlex JK Complete HD Steering Instructions
 KIT: TeraFlex JK Complete HD Steering Instructions #1853900 JK Premium HD Complete Steering Kit #1853905 JK Premium HD Complete Steering with Flipped Drag Link Kit 1 IMPORTANT NOTES: Prior to beginning
97-06 Jeep TJ Wrangler 2. 5 " & 4 " S u s p e n s i o n L i f t Installation Instructions
 97-06 Jeep TJ Wrangler 2. 5 " & 4 " S u s p e n s i o n L i f t Installation Instructions Safety Glasses Metric / Standard Wrenches & Sockets Drill / Assorted Drill Bits Floor Jack Jack Stands Measuring
/3500 Dodge 5 Long Arm Kit
 92138800A 03-07 2500/3500 Dodge 5 Long Arm Kit Thank you for choosing Rough Country Suspension for your Off Road needs. Rough Country recommends a certified technician installs this system. In addition
TeraFlex JK Complete HD Steering Kit
 1 Kit: 1853900 1853905 TeraFlex JK Complete HD Steering Kit www.teraflex.com Important Notes: Prior to beginning this or any installation read these instructions to familiarize yourself with the required
2017-Present Can-Am Maverick X3 XRS Front Upper A-Arm Kit *Installation Instructions*
 2017-Present Can-Am Maverick X3 XRS Front Upper A-Arm Kit *Installation Instructions* PART# 370-90350 Introduction - Installation requires a qualified mechanic. - Read instructions carefully and study
(877) MON-FRI 7AM-5PM PST OR WEBSITE: ReadyLIFT.COM **Please retain this document in your vehicle at all times**
 MON-FRI 7AM-5PM PST OR WEBSITE: ReadyLIFT.COM **Please retain this document in your vehicle at all times**") IF your ReadyLIFT product has a damaged or missing part, please contact customer service directly. For warranty issues please return to the place of installation and contact ReadyLIFT. A NEW REPLACEMENT
IF your ReadyLIFT product has a damaged or missing part, please contact customer service directly. For warranty issues please return to the place of installation and contact ReadyLIFT. A NEW REPLACEMENT
Installation instructions for IPS parking Brake Kit for 1996 to 2002 Viper
 Installation instructions for IPS parking Brake Kit for 1996 to 2002 Viper WARNING Modification of your vehicle with the parts identified above may alter its stock performance; the buyer hereby expressly
& 6 XJ CHEROKEE LONG ARM KIT
 92PERF1689 84-01 4.5 & 6 XJ CHEROKEE LONG ARM KIT Thank you for choosing Rough Country for your suspension needs. Rough Country recommends a certified technician installs this system. In addition to these
Installation Manual Ram x4 5 Lift w/ radius arm drop brackets Part # 35120
 Part # 35120 2014-2018 Ram 3500 4x4 5 Lift w/ radius arm drop brackets Part # Description Qty. 35130-01 driver side radius arm bracket 1 35130-02 passenger side radius arm bracket 1 35130-03 driver side
INSTALLATION INSTRUCTIONS QA1 P/N x400, x500, x600, x400, x500, x F100 Front Coil-over Suspension System
 INSTALLATION INSTRUCTIONS QA1 P/N 52620-x400, 52620-x500, 52620-x600, 52621-x400, 52621-x500, 52621-x600 65-72 F100 Front Coil-over Suspension System TOOLS AND SUPPLIES REQUIRED Floor Jack Two (2) Jack
(800) MON-FRI 7AM-5PM PST OR WEBSITE: ReadyLIFT.COM **Please retain this document in your vehicle at all times**
 MON-FRI 7AM-5PM PST OR WEBSITE: ReadyLIFT.COM **Please retain this document in your vehicle at all times**") IF your ReadyLIFT product has a damaged or missing part, please contact customer service directly. For warranty issues please return to the place of installation and contact ReadyLIFT. A NEW REPLACEMENT
IF your ReadyLIFT product has a damaged or missing part, please contact customer service directly. For warranty issues please return to the place of installation and contact ReadyLIFT. A NEW REPLACEMENT
(877) MON-FRI 7AM-5PM PST OR WEBSITE: ReadyLIFT.COM **Please retain this document in your vehicle at all times**
 MON-FRI 7AM-5PM PST OR WEBSITE: ReadyLIFT.COM **Please retain this document in your vehicle at all times**") IF your ReadyLIFT product has a damaged or missing part, please contact customer service directly. For warranty issues please return to the place of installation and contact ReadyLIFT. A NEW REPLACEMENT
IF your ReadyLIFT product has a damaged or missing part, please contact customer service directly. For warranty issues please return to the place of installation and contact ReadyLIFT. A NEW REPLACEMENT
Cognito Motorsports LLC, GM 2001-Present 8- Lug Truck and SUV Pitman/Idler Arm Support Kit Introduction
 Cognito Motorsports LLC, GM 2001-Present 8- Lug Truck and SUV Pitman/Idler Arm Support Kit Introduction - This application is for stock and lifted applications that use the factory steering center link
4. Remove the cotter pin that secures the castle nut to the axle. Once you have done this remove the castle nut and pull off the hub/rotor assembly.
 780 Professional Drive N. Shreveport, LA 71105 Phone (318)-524-2270 Fax (318)-524-2297 Max Clearance Honda Pioneer 1000 Front Forward Arched Control Arm Kit Read before Installation This product is designed
INSTALLATION INSTRUCTIONS
 REV 3 05/13/2016 INSTALLATION INSTRUCTIONS PART NO. 702002T PRODUCT DESCRIPTION: REAR INNER FENDER LINER APPLICATION: JEEP WRANGLER / WRANGLER UNLIMITED PRODUCT SAFETY & LEGAL DISCLAIMER IMPORTANT READ
*1663BAG7* 1663BAG JEEP TJ/LJ LONG ARM KIT 92PERF166300B
 92PERF166300B *1663BAG7* 1663BAG7 97-06 JEEP TJ/LJ LONG ARM KIT Thank you for choosing Rough Country for your suspension needs. Rough Country recommends a certified technician installs this system. In
7.3L POWERSTROKE BANJO BOLT KIT Fits L Powerstroke Diesel. Installation Guide
 7.3L POWERSTROKE BANJO BOLT KIT Fits 94-03 7.3L Powerstroke Diesel Installation Guide INSPECT CONTENTS OF THIS KIT THOROUGHLY BEFORE STARTING THE INSTALLATION PROCESS! IF YOU FIND A PROBLEM WITH YOUR PACKAGE:
JK 2.5 Spring Lift Part # # #
 PRODUCT INSTALLATION GUIDE TeraFlex, Inc. TeraFlex, Inc. 5680 W Dannon Way Dr. 5241 South Commerce West Jordan, UT84107 84081 Murray, Utah Phone/801.288.2585 Phone/801.288.2585 Fax/801.713.2313 Fax/801.713.2313
PRODUCT: JK Full RockSport Steering System READ INSTRUCTIONS IN FULL BEFORE INSTALLATION. QUESTIONS? CALL M-F 7:00 AM 5:00 PM PST
 PRODUCT: JK Full RockSport Steering System READ INSTRUCTIONS IN FULL BEFORE INSTALLATION. QUESTIONS? CALL 916-631-8071 M-F 7:00 AM 5:00 PM PST REV: A 07-15-2016 II-7134 The MetalCloak experience includes
Dodge 5 Lift Kit Thank you for choosing Rough Country Suspension for your Off Road needs.
 *1368BAG4* 1368BAG4 921368200 2014-16 2500 Dodge 5 Lift Kit Thank you for choosing Rough Country Suspension for your Off Road needs. Rough Country recommends a certified technician installs this system.
Cognito Motorsports, Inc., GM 2011-present 8-Lug truck Pitman/Idler Arm Support Kit SKU# PISK3008 **UTILITY PATENT US 7,475,891 B2**
 Cognito Motorsports, Inc., GM 2011-present 8-Lug truck Pitman/Idler Arm Support Kit SKU# PISK3008 **UTILITY PATENT US 7,475,891 B2** Introduction - This application is for stock and lifted applications
(800) MON-FRI 7AM-5PM PST OR WEBSITE: ReadyLIFT.COM **Please retain this document in your vehicle at all times**
 MON-FRI 7AM-5PM PST OR WEBSITE: ReadyLIFT.COM **Please retain this document in your vehicle at all times**") IF YOUR ReadyLIFT PRODUCT IS MISSING A OR HAS A DAMAGED PART, PLEASE CONTACT CUSTOMER SERVICE DIRECTLY. For warranty issues please return to the place of installation and contact ReadyLIFT. A NEW REPLACEMENT
IF YOUR ReadyLIFT PRODUCT IS MISSING A OR HAS A DAMAGED PART, PLEASE CONTACT CUSTOMER SERVICE DIRECTLY. For warranty issues please return to the place of installation and contact ReadyLIFT. A NEW REPLACEMENT
Installation Instructions and Warranty Information
 Installation Instructions and Warranty Information 1625S 96-98 Mustang 4.6L 2v 1-1/2 1625S-8 96-98 Mustang 4.6L 2v 1-5/8 1625S-1 99-04 Mustang 4.6L 2v 1-1/2 1625S-9 99-04 Mustang 4.6L 2v 1-5/8 1625S-5JT
DODGE DIESEL KIT DODGE DIESEL KIT
 69120 2009-2013 DODGE 2500 8 DIESEL KIT 2009-2012 DODGE 3500 8 DIESEL KIT Heavy Duty Long Arm Construction For Superior Ride Quality And Travel Lower Arms Constructed Of 1.75 DOM Tubing W/ Urethane Bushing
TJ SPEED BUMPS Part # Part #
 PRODUCT INSTALLATION GUIDE THIS KIT IS DESIGNED TO WORK ON A TJ WITH 4+ OF LIFT Important Notes: TJ SPEED BUMPS Part # 1958700 Part # 1958720 Prior to beginning this or any installation read these instructions
INSTALLATION INSTRUCTIONS FOR: RE7121 & RE JEEP WRANGLER JK COIL SPRING LIFT KIT
 RUBICON EXPRESS 3290 MONIER CIR., RANCHO CORDOVA, CA. 95742 866-533-7706, www.rubiconexpress.com INSTALLATION INSTRUCTIONS FOR: RE7121 & RE7141 2007-2013 2.5 JEEP WRANGLER JK COIL SPRING LIFT KIT Safety
Installation Instructions
 Instructions Created by an: Suzuki Samurai Roof Rack Kit for Hard Top, Tin Top by Low Range Off Road (SKU# SEB-RRTT) Installation Instructions CAUTION: Safety glasses should be worn at all times when working
TeraFlex Premium TJ/YJ/XJ/ZJ Dana 30/44 Ball Joints Install Instructions
 #1355100 #1355300 (Knurled) TeraFlex Premium TJ/YJ/XJ/ZJ Dana 30/44 Ball Joints Install Instructions 1 www.teraflex.com Important Notes: Prior to beginning this or any installation read these instructions
DODGE RADIUS ARM KIT FITS GAS OR DIESEL
 66866 2013-2014 DODGE 3500 8 RADIUS ARM KIT FITS GAS OR DIESEL 66866-4 Component Box 1 2) 8 Coil Spacers 1) 8 Left Radius Arm 1) 8 Right Radius Arm 1) Track Bar Drop Bracket 1) Left Sway Bar Drops 1) Right
FORM # PRINTED IN U.S.A. PAGE 1 OF 5
 FORM #5070.04-021209 PRINTED IN U.S.A. PAGE 1 OF 5 SUPERLIFT SUSPENSION SYSTEMS 300 Huey Lenard Loop Rd. West Monroe, Louisiana 71292 Phone: (318) 397-3000 Sales / Tech: 1-800-551-4955 FAX: (318) 397-3040
PARTS LIST FOR SKU: (UCAK100051)
") INSTALL INSTRUCTIONS: Cognito Upper Control Arm Kit for 2011-2018 GM 2500HD / 3500HD 2WD / 4WD trucks. (Ball Joint Style Boxed) New SKU: 110-90298 PARTS LIST FOR SKU: 110-90298 (UCAK100051) QUANTITY PART
INSTALL INSTRUCTIONS: Cognito Upper Control Arm Kit for 2011-2018 GM 2500HD / 3500HD 2WD / 4WD trucks. (Ball Joint Style Boxed) New SKU: 110-90298 PARTS LIST FOR SKU: 110-90298 (UCAK100051) QUANTITY PART
Installation Instructions
 Installation Instructions 4 Basic Suspension System 1997-2006 JEEP TJ 4WD Fabtech Motorsports 4331 Eucalyptus Ave. Chino, CA 91710 Tech Line 909-597-7800 Fax 909-597-7185 Web www.fabtechmotorsports.com
DROPPED PITMAN ARM INSTALLATION INSTRUCTIONS
 FORM #1109.02-092502 PRINTED IN U.S.A. PAGE 1 OF 5 INTRODUCTION DROPPED PITMAN ARM INSTALLATION INSTRUCTIONS Installation requires a professional mechanic. Prior to beginning, inspect the vehicles steering,
INSTRUCTIONS TUBULAR CONTROL ARMS & COIL-OVER CONVERSION FOR AMC MUSCLE CARS: 1970 AMX JAVELIN SPIRIT, HORNET, GREMLIN, CONCORD
 AMC TUBULAR CONTROL ARMS & COIL OVER KIT INSTRUCTIONS TUBULAR CONTROL ARMS & COIL-OVER CONVERSION FOR AMC MUSCLE CARS: 1970 AMX 1970-74 JAVELIN SPIRIT, HORNET, GREMLIN, CONCORD Revised 6/1/2012 www.freakride.com
(800) MON-FRI 7AM-5PM PST OR WEBSITE: ReadyLIFT.COM **Please retain this document in your vehicle at all times**
 MON-FRI 7AM-5PM PST OR WEBSITE: ReadyLIFT.COM **Please retain this document in your vehicle at all times**") IF YOUR ReadyLIFT PRODUCT IS MISSING A OR HAS A DAM- AGED PART, PLEASE CONTACT CUSTOMER SERVICE DIRECTLY. For warranty issues please return to the place of installation and contact ReadyLIFT. A NEW REPLACEMENT
IF YOUR ReadyLIFT PRODUCT IS MISSING A OR HAS A DAM- AGED PART, PLEASE CONTACT CUSTOMER SERVICE DIRECTLY. For warranty issues please return to the place of installation and contact ReadyLIFT. A NEW REPLACEMENT
/3500 Dodge 5 Lift Kit Drop Brackets
 923913000A 2003-07 2500/3500 Dodge 5 Lift Kit Drop Brackets Thank you for choosing Rough Country Suspension for your Off Road needs. Rough Country recommends a certified technician installs this system.
Assembly Instructions
 TOOLS REQUIRED: _(2) 3/4 wrenches _7/16 wrench _3/8 wrench _5/16 allen wrench Display/work stand is for assembly procedure only. May be purchased separately. CONTENTS (PARTS & HARDWARE) _(1) Receiver tube
99-04 Ford F250 Super Duty 4-6 Suspension Kit
 92758200 99-04 Ford F250 Super Duty 4-6 Suspension Kit Thank you for choosing Rough Country for your suspension needs. Rough Country recommends a certified technician installs this system. In addition
JL 2 Bumpstop Kit. Important Notes:
 1 JL 2 Bumpstop Kit Important Notes: Prior to beginning this install, or any installation, read the instructions thoroughly to familiarize yourself with the required steps. Evaluate if you are experienced
TeraFlex Premium JK Dana 30/44 Ball Joints Install Instructions
 #3442002 #3442022 (Knurled) TeraFlex Premium JK Dana 30/44 Ball Joints Install Instructions 1 www.teraflex.com Important Notes: Prior to beginning this or any installation read these instructions to familiarize
Installation Instructions
 IF YOUR ReadyLIFT OFF ROAD SUSPENSION PRODUCT IS MISSING A PART OR HAS A DAMAGED PART, PLEASE CONTACT CUSTOMER SERVICE DIRECTLY. A NEW REPLACEMENT PART WILL BE SENT TO YOU IMMEDIATELY (800)549-4620 MON-FRI
WARNING!!! READ AND UNDERSTAND ALL INSTRUCTIONS BEFORE PROCEEDING. MAKE SURE THAT YOU HAVE ALL TOOLS AND PARTS BEFORE BEGINNING THE INSTALLATION.
 INSTALLATION INSTRUCTIONS FOR 2007-2015 JEEP JK 3 SUSPENSION LIFT SYSTEM PART NUMBER 587 WARNING!!! READ AND UNDERSTAND ALL INSTRUCTIONS BEFORE PROCEEDING. MAKE SURE THAT YOU HAVE ALL TOOLS AND PARTS BEFORE
2236 Sway Bar Installation Instructions
 2236 Sway Bar Installation Instructions Thank you for your purchase of this Hotchkis Performance product. Your stabilizer bar set was designed with the performance and durability you ve come to expect
Installation Instructions
 Instructions Created by an: Revised 7-11-17 LRT 2005-2017 3/1 Leveling/ Lift Kit for Toyota Tacoma by Low Range Off-Road (SKU# LR-LRTACO) Installation Instructions Suggested Tools: CAUTION: Safety glasses
JK Rear Trail Bar Part # Part #
 PRODUCT INSTALLATION GUIDE TeraFlex, Inc. TeraFlex, Inc. 5680 W Dannon Way 5241 South Commerce Dr. West Jordan, UT 84081 Murray, Utah 84107 Phone/801.288.2585 Phone/801.288.2585 Fax/801.713.2313 Fax/801.713.2313
Installation manual 2 Front and 1 Rear Lift w/rear shock extension brackets
 Installation manual 2 Front and 1 Rear Lift w/rear shock extension brackets 2016 Nissan Titan XD Part # 52050 SS06072016 Part # 52050 2016 Nissan Titan XD 2 front and 1 rear lift w/rear shock extensions
(877) MON-FRI 7AM-5PM PST OR WEBSITE: ReadyLIFT.COM **Please retain this document in your vehicle at all times**
 MON-FRI 7AM-5PM PST OR WEBSITE: ReadyLIFT.COM **Please retain this document in your vehicle at all times**") IF YOUR ReadyLIFT PRODUCT IS MISSING A OR HAS A DAMAGED PART, PLEASE CONTACT CUSTOMER SERVICE DIRECTLY. For warranty issues please return to the place of installation and contact ReadyLIFT. A NEW REPLACEMENT
IF YOUR ReadyLIFT PRODUCT IS MISSING A OR HAS A DAMAGED PART, PLEASE CONTACT CUSTOMER SERVICE DIRECTLY. For warranty issues please return to the place of installation and contact ReadyLIFT. A NEW REPLACEMENT
Yamaha YXZ1000R HD +4.5 Tie Rod Kit *Installation Instructions*
 2016-2017 Yamaha YXZ1000R HD +4.5 Tie Rod Kit *Installation Instructions* PART# 365-90080 Introduction - Installation requires a qualified mechanic. - Read instructions carefully and study the pictures
(800) MON-FRI 7AM-5PM PST OR WEBSITE: ReadyLIFT.COM **Please retain this document in your vehicle at all times**
 MON-FRI 7AM-5PM PST OR WEBSITE: ReadyLIFT.COM **Please retain this document in your vehicle at all times**") IF YOUR ReadyLIFT PRODUCT IS MISSING A PART OR HAS A DAMAGED PART, PLEASE CONTACT CUSTOMER SERVICE DIRECTLY. A NEW REPLACEMENT PART WILL BE SENT TO YOU IMMEDIATELY (800)549-4620 MON-FRI 7AM-5PM PST OR
IF YOUR ReadyLIFT PRODUCT IS MISSING A PART OR HAS A DAMAGED PART, PLEASE CONTACT CUSTOMER SERVICE DIRECTLY. A NEW REPLACEMENT PART WILL BE SENT TO YOU IMMEDIATELY (800)549-4620 MON-FRI 7AM-5PM PST OR
Renegade Budget Boost Instructions
 1 Renegade Budget Boost Instructions www.teraflex.com #1351200 Important Notes: Prior to beginning this or any installation read these instructions to familiarize yourself with the required steps and evaluate
4331 EUCALYPTUS AVE. ~~ CHINO, CA Fax FORD F-250/350 SUPER DUTY 4WD FTS & 8 4 LINK
 4331 EUCALYPTUS AVE. ~~ CHINO, CA 91710 909-597-7800 Fax 909-597-7185 2005 2007 FORD F-250/350 SUPER DUTY 4WD FTS22027 6 & 8 4 LINK 4331 EUCALYPTUS AVE. ~~ CHINO, CA 91710 909-597-7800 Fax 909-597-7185
JK 2-Door 2 Stretch Kit Instructions
 1 JK 2-Door 2 Stretch Kit Instructions www.teraflex.com Kit #1257100 Important Notes: Prior to beginning this or any installation read these instructions to familiarize yourself with the required steps
Installation manual. 3 suspension system Toyota Tacoma. Part # Part # Important customer information: Toyota Tacoma
 Installation manual 3 suspension system 2005 2008 Toyota Tacoma Part # 52907 sj111607rev.02 Part # 52907 2005-2008 Toyota Tacoma 3 suspension system Part # Description Qty. 52907-01 Pre-load spacer 2 52907-02
08-10 F OR 6 SUSPENSION KIT
 92159400 Thank you for choosing Rough Country for your suspension needs. 08-10 F250 4.5 OR 6 SUSPENSION KIT Rough Country recommends a certified technician installs this system. In addition to these instructions,
*1274BAG9* 1274BAG GM 4-6 SUSPENSION KIT N2.0. Thank you for choosing Rough Country for your suspension needs A
 92127400A 88-98 GM 4-6 SUSPENSION KIT N2.0 Thank you for choosing Rough Country for your suspension needs. *1274BAG9* 1274BAG9 Rough Country recommends a certified technician installs this system. In addition