C A B E. Part No Description Item
|
|
|
- Angel Beasley
- 5 years ago
- Views:
Transcription


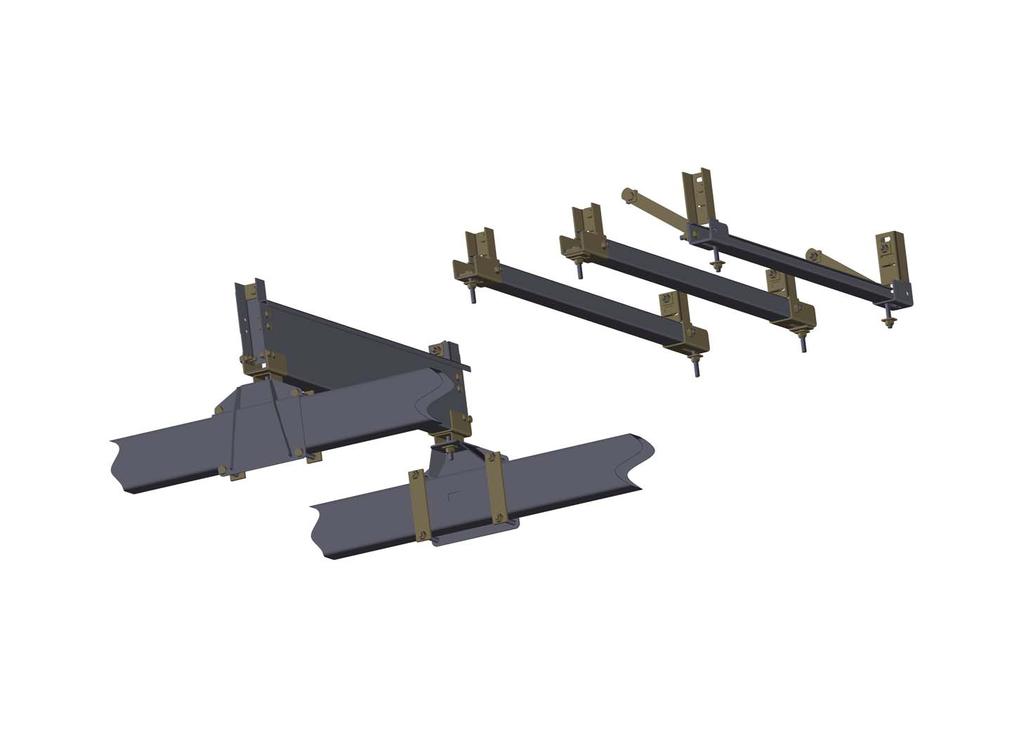
1 Installation Time: 1hr 30 mins (approx) Important: Unpack each of the 4 kits to ensure all components are available. Read instructions carefully and fully before fitting. Check that all tail lights are working before commencing work. C A B E D F Part No Description Item 9PATZ. Tray Body A 9PAH. Headboard B 9PAD. Dropside set C 9PBKH30 Body Kit D 9PMKH30 Mount Kit E 9PRRK01 Rope Rail Kit F 9PMF Mudflaps Please open all packs before commencing work and check off components against the bills list attached to the packaging material. Please advise if any shortages by calling You require all packages as listed to complete the tray installation. After checking dispose of packaging material 1 2 E clip 3 Latch Hinge pin 6 Mudguard Washer 7 Saddle Clamp 5 9 Fuel Filler Bracket 4 Mudguard Mudguard Brackets Tools Required Electric drill with 6mm bit Air or electric impact wrench with impact sockets 10, 12, 13, 14, 15, 19mm Spanners: 10mm to 19mm Screwdrivers: 8mm blade and No 2 Phillips Hammer, side cutters / pliers, clamp / vice grips and builders square. Issue Version 1: 1.0 1/11/ /02/2003 Rodeo SC Al Page 1 of 5
 1.")
2 Main Bearer Connecting Panel Front Floor Plank Diagram (1): Headboard Assembly and Connecting panel (side view) 2nd Rear mount 2nd Front mount Square Washer Spacer Washer Diagram 2a. Mount washer position for middle mounts Diagram 2b. 105/130 int with RH mains brace with mount rail fitted 1 Fitting Headboard 1.1 Remove connecting panel (taped to headboard) 1.2 Place the connecting panel into the track on the first floor plank of tray as shown in diagram Place headboard into position by tilting top of headboard to rear of tray permitting interlock with connecting panel, then return to the upright position. 1.4 Place washers on M10 bolts and secure headboard. Important: Ensure Headboard is square before tightening. 2 Preparing Vehicle (If removing styleside refer Supplement A section S1) 2.1 Remove Tail Light assemblies from the chassis. Wrap in a clean cloth and put aside 2.2 Remove The Number Plate lights from the assembly on the rear of the chassis. 2.3 Remove light bracket assembly and discard. 2.4 Remove Fuel Filler Neck Support Bracket and discard. 3 Assembling Mounts 3.1 Assemble the second mount using the longer (1218) mount rail and two 105/130 ext mount bases as shown in diagram 2a. Secure using two M12 x 25 bolts and nyloc nuts. 3.2 Assemble the second last mount using the shorter mount rail, 105/130 int mount bases as shown in diagram 2a. Secure using two M12 x 25 bolts and nyloc nuts. 3.3 Assemble the rear mount using the shorter mount rail, 105/130 int mount bases and two mains braces as per diagram 2b. 3.4 Loosely secure with two M12 x 40 bolts and nyloc nuts with a square washer between the nut and the mains braces. Refer diagram 2b for correct assembly. 4 Fitting Mounts and Body 4.1 See diagram 2a to see the difference between spacers and washers. 4.2 Secure mounts to chassis using M12 x 40 bolts with square washers under bolt head and square washers under the nyloc nut. 4.3 Hammer mount washers into the upper slot on the two rear mounts and the lower slot on the two forward mounts as seen in diagram 3a. Diagram (3a): Mount Assembly and mount washer position Version /02/2003 Rodeo SC Al Page 2 of 5
3 Diagram (3b): Mount Layout 5 Mounting Tray 5.1 Place tray body on the transverse mounts so main bearers are sitting on the lugs of the mount washers. Leave a 40mm gap between headboard uprights and cabin at closest point. 5.2 Place front leg mounts onto chassis mount pads using three 3mm packers under each mount as seen in diagram 3b. 5.3 Important: Ensure leg mounts are sitting flush against the main bearer. 5.4 Secure leg mounts to chassis using M12 x 50 bolts with square washers under bolt head and nyloc nut. 5.5 Secure mounts to main bearers. Place M12 x 40 bolts through the mount washers and fit a square washer and M12 nyloc nut on the inside of the main bearer. The mount washers can move side to side to align with the pre-punched holes in the main bearers. 5.6 Secure the two main braces top and bottom as seen in diagram 3a and 3b using M12 x 40 bolts and nyloc nuts with square washers under bolt heads and nyloc nuts. Hinge pin Rope rail 6 Fitting Hinge Pins and Rope Rails 6.1 Attach hinge pins to the side coamings using M6 x 20 bolts and nyloc nuts. 6.2 Attach hinge pins to the rear starter panel using M6 x 25 bolts and nyloc nuts. Important: The dropside and tailgate can be used as a guide for hinge pin positioning. The short roperail is to be fitted at the right hand side front of the tray for fuel filler access. Diagram (4): Hinge Pin and Rope Rail 6.3 Place rope rails up under the side of the tray so that the tongue locks into the channel in the extrusion. 6.4 Secure using M6 x 20 bolts and nyloc nuts. Guard Rails Guard Bracket 7 Fitting Mudflaps 7.1 Place mudflap on the inside of the 2 pre-punched mudguards as seen in diagram Secure using M6 x 20 bolts from the outside of mudguard through guard and mudflap. 7.3 Important: Ensure the mudguard washers are positioned between the mudflap and nut before tightening. Diagram (5): Mudflap and Mudguard Assembly. Important: Note left and right guard brackets as shown in diagram 5 Version /02/2003 Rodeo SC Al Page 3 of 5
4 Roperail 30mm Deck Guard rail Guard bracket Main bearer 8 Assembling Mudguards 8.1 Attach the guard bracket to the guards using M6 x 20 bolts and nyloc nuts as seen in diagram Attach guard rails to body so the 1st rail hole is positioned on the 6th floor plank as seen in diagram 6b. Note direction of guard rails in diagram 6a. Secure using M6 x 20 bolts and nyloc nuts. Guard Diagram (6a): Mudguard Assembly from front of tray Important: Bolt must be inserted up through the Add text further explaining rail and floor to allow clearance for the guard installation method brackets. 8.3 Fix front guard assembly between the guard rails under tray using M6 x 20 bolts and nyloc nuts. Position front guard bracket approximately 90 to 130 mm from tyre. 8.4 Fix rear guard bracket between the guard rails under tray using M6 x 20 bolts and nyloc nuts. Position rear guard bracket approximately 90 to 130 mm from tyre. Warning: Mudguards must not touch the chassis or the exhaust pipe and should be approximately mm away from the tyre. Diagram (6b): Guard and Rail Positioning 9 Fuel Filler 9.1 Using a 6mm drill bit drill out the top hole in the fuel filler neck flange. 9.2 Secure the bracket to the underside of the tray using a M6 x 20 bolt and nyloc nut. 9.3 Secure fuel filler to the bracket using M6 x 20 bolt and nyloc nut. Warning: Ensure fuel filler pipe is not kinked. Diagram (7): Fuel Filler Assembly 10 Fitting Number Plate Light (If vehicle was fitted with styleside body refer Supplement A section S2) 10.1 Fit number plate lights to bracket supplied using original screws Secure number plate light assembly using prepunched holes in the underside of the rear extrusion with M6 x 20 bolts and nyloc nuts. Refer diagram 8. Diagram (8): Numberplate light assembly Version /02/2003 Rodeo SC Al Page 4 of 5
: Right Hand side Tail Light and Numberplate light positioning (rear view) 11.3 Attach assembly to rear extrusion using M6 x 20 bolts and nyloc nuts as seen in diagram 9. 11.4 The harness from the tail lights is to be secured to the underside of the main bearers of the tray.")
5 11 Fitting Tail Lights 11.1 Fit tail lights to new galvanised brackets as seen in diagram 9. Important: Drain holes to be at the bottom of the light assembly when fitted. Diagram (9): Right Hand side Tail Light and Numberplate light positioning (rear view) 11.3 Attach assembly to rear extrusion using M6 x 20 bolts and nyloc nuts as seen in diagram The harness from the tail lights is to be secured to the underside of the main bearers of the tray. Warning: Ensure that the harness cannot chafe through on any sharp edges. There must be a small amount of slack in the harness between all light assemblies and their first retainer. All other places should be free of slack. 12 Front Latches 12.1 Insert front latches into headboard corner T s. See diagram Assemble using two 3/8 flat washers, one 3/8 spring washer and one 3/8 conelock nut to secure. 13 Dropsides and Tailgate 13.1 Attach hinge straps to dropsides using M6 x 20 bolts and nyloc nuts. (refer to tailgate for correct assembly). Important: Observe assembly of rear latches in dropsides for guide to correct assembly Diagram (11): Fitting front latches into headboard T 13.2 Slide dropsides and tailgate onto hinge pins and close latches Adjust the 3/8 conelock nuts on the handles to ensure catches do not rattle. The spring washer only needs to be compressed by 1-2mm Place E clips on the hinge pins, one on each dropside and two on the tailgate. BUSH PLAIN WASHERS NUT SPRING WASHER HEADBOARD NYLON WASHER LATCH 14 Completion Important: Do not over tighten latches. Hinges may need adjusting backward or forward slightly to make dropsides close Check that all nuts and bolts are secure, that all components are fitted correctly and that all lights work Clean tray and work area. Diagram (12): Drivers side dropside latch assembly looking through headboard infill. Version /02/2003 Rodeo SC Al Page 5 of 5
6
ASSEMBLY INSTRUCTION Colorado / Canyon 1950 QL GPA-HDA Tray
 PART NO. PUSG1SHQ DESCRIPTION B6GM-A 1950x1842 HDA Ang HB QL Tray Installation Time: 2 Hours *Note: Mount Kit not included in tray code Important Please read these instructions carefully before installation,
SUT-250-S (These instructions are used for SUT-250-SCLC also)
") SUT-250-S (These instructions are used for SUT-250-SCLC also) Torque wrench, carpenters square, wire cutters, Phillips screwdriver, 7/16, 9/16, and 3/4 combination wrenches, ratchet, 9/16, 3/4, 13/16,
SUT-250-S (These instructions are used for SUT-250-SCLC also) Torque wrench, carpenters square, wire cutters, Phillips screwdriver, 7/16, 9/16, and 3/4 combination wrenches, ratchet, 9/16, 3/4, 13/16,
Introduction Date: October 2007 Pt No INSTRUCTION KIT JOINER RF 1 KIT COMPONENTS
 KIT COMPONENTS Part Illustration Rear Bracket Description Front Lower Bracket KIT APPLICATION This kit is designed for use on 1595mm / 62 & 1695mm / 66 high cabinet models, incorporating the B, C, D &
H15P. Toyota Hilux A-DECK Dual Cab
 Toyota Hilux A-DECK Dual Cab Page 1 of 14 Fitting Instructions Part Number H15 Toyota Hilux A-DECK Dual Cab 2015+ To suit Sports Bars Check contents of kit before commencing fitment and report any discrepancies
C15C C15C. Page 1 of 20
 2 x Lid Front Hinge 1135 8 x M8 Bolt 8 x M8 Washer (3mm Thick) 4 x M6 Large washers 4 x M6 Spring washers 4 x M6 x 40mm Bolts 6 x M6 20mm Bolts 6 x M6 Washers 20 x Screws 2 x Lid mount gas strut bracket
Ref Qty Part Description Part Number -1- Kit ( ) Contents:
 Contents:") REAR CANVAS DOOR KIT 900 XP RANGER CREW P/N 2879899 Application RANGER 900 XP CREW Before you begin, read these instructions twice and check to be sure all parts and tools are accounted for. Please retain
REAR CANVAS DOOR KIT 900 XP RANGER CREW P/N 2879899 Application RANGER 900 XP CREW Before you begin, read these instructions twice and check to be sure all parts and tools are accounted for. Please retain
P/N Rev 01 04/14-1- NOTE: If you are ordering hinges for your rear doors, order and/or
 REAR CANVAS DOOR KIT 900 XP RANGER CREW P/N 2879899 Application RANGER 900 XP CREW Before you begin, read these instructions twice and check to be sure all parts and tools are accounted for. Please retain
FITTING KIT No s : BULL BAR WINCH ( P/No ) BULL BAR NON WINCH ( P/No )
 BULL BAR NON WINCH ( P/No )") ARB WINCH / NON WINCH BULL BAR TO SUIT LANDROVER DISCOVERY 2003 ONWARD. FITTING KIT No s :- 617 1793 BULL BAR WINCH ( P/No 343 2120 ) 617 1794 BULL BAR NON WINCH ( P/No 323 2120 ) WARNING FOR VEHICLES
ARB WINCH / NON WINCH BULL BAR TO SUIT LANDROVER DISCOVERY 2003 ONWARD. FITTING KIT No s :- 617 1793 BULL BAR WINCH ( P/No 343 2120 ) 617 1794 BULL BAR NON WINCH ( P/No 323 2120 ) WARNING FOR VEHICLES
UNPACK AND IDENTIFY THE FOLLOWING PARTS.
 SUT-500-S ASSEMBLY REQUIREMENTS *Torque all T-bolt nuts to 35-40 foot pounds. *Check all lights before towing. *Tire pressure not to exceed recommendation on serial tag. *Re-torque wheel nuts after first
Installation Guide. Stowe Cargo Management System. Table of Contents
 Installation Guide Stowe Cargo Management System Table of Contents 1. Pre-Installation (Page 2) a. Notes, Installation Kit contents & Tools needed 2. How to Install the Stowe Cargo Management System (Pages
Installation Instructions. Attention Dealers: Please give this owners manual to the customer when the product is delivered.
 Serving the Truck & Trailer Industry Since 1944 Attention Dealers: Please give this owners manual to the customer when the product is delivered. Call 800-535-9545 www.aeroindustries.com Indianapolis, IN
ELECTRIC START KIT KIT P/N
 ELECTRIC START KIT KIT P/N 2873876 Application 2002 Polaris EDGE Models with 500-600 Domestic Engines Before you begin, read these instructions and check to be sure all parts and tools are accounted for.
Z-Gate Universal Shifter
 Installation Instructions Z-Gate Universal Shifter Fits: GM, Ford, Lincoln and Chrysler Transmissions See Application Guide for Specific Applications Part #80681 Rev 06/01/2018 WORK SAFELY! For maximum
ARB TOYOTA 100 SERIES IFS REAR STEP TOW BAR
 ARB TOYOTA 100 SERIES IFS REAR STEP TOW BAR Product number: 5613210 Optional Jerry Can Carrier Optional Wheel Carrier Left Hand Side of vehicle (LHS) Rear Step Tow Bar Right Hand Side of vehicle (RHS)
Q15P. Mitsubishi MQ Triton Dual Cab
 Mitsubishi MQ Triton Dual Cab Page 1 of 12 Fitting Instructions Part Number Mitsubishi MQ Triton Dual Cab 2015+ To suit Sports Bars Check contents of kit before commencing fitment and report any discrepancies
IPSCO STS (Short Throw Shifter) Installation Instructions (GEN II) Dodge Viper WARNING
 Installation Instructions (GEN II) Dodge Viper WARNING") WARNING Modification of your vehicle with the parts identified above may alter its stock performance; the buyer hereby expressly assumes all risks associated with any such modification. DISCLAIMER OF WARRANTY
WARNING Modification of your vehicle with the parts identified above may alter its stock performance; the buyer hereby expressly assumes all risks associated with any such modification. DISCLAIMER OF WARRANTY
Stowe Cargo Management System
 Installation Guide Stowe Cargo Management System Table of Contents 1. Pre-Installation (Page 2) a. Notes, Installation Kit contents & Tools needed 2. How to Install the Stowe Cargo Management System (Pages
06-15 ECU, Battery and Washer Bottle Relocation
 06-15 ECU, Battery and Washer Bottle Relocation On the 2006-2015 MX-5, there is a very narrow middle section between the battery box and the air filter box to remove heat. For the most part, this design
A B C D E F. Tools Required (supplied by others)
") Page 1 of 17 Parts List Below Deck Automatic Retractable Security Cover Kit (1) Tube End Bearing Plate (A) (1) Rope Reel and Cover Drum Motor Assembly (B) (1) Cover Drum (1) Pulley Support Channel (2)
Page 1 of 17 Parts List Below Deck Automatic Retractable Security Cover Kit (1) Tube End Bearing Plate (A) (1) Rope Reel and Cover Drum Motor Assembly (B) (1) Cover Drum (1) Pulley Support Channel (2)
SUT-450-I ASSEMBLY REQUIREMENTS
 SUT-450-I Torque wrench, carpenters square, wire cutters, Phillips screwdriver, 7/16, 9/16, and 3/4 combination wrenches, ratchet, 9/16,3/4,13/16, and 7/8 sockets. ASSEMBLY REQUIREMENTS *Torque all T-bolt
Installation Instructions Z-Gate Shifter
 Installation Instructions Z-Gate Shifter Part Number 80681 1998, 2001 by B&M Racing and Performance Products The B&M Z-Gate shifter can be used in vehicles equipped with most popular three speed automatic
2014+ FORD FIESTA ST DIRECT-FIT OIL COOLER KIT PARTS LIST AND INSTALLATION GUIDE CAUTION PARTS INCLUDED NOTE TOOLS NEEDED INSTALL PROCEDURE
 PARTS LIST AND PARTS INCLUDED 3PC APPLICATION-SPECIFIC MOUNTING BRACKETS & SPACER 1PC 19-ROW OIL COOLER 1PC 4 ', X 1'' BRAIDED HOSE W/90-10AN FITTINGS 1PC 3'' X 2.5 '' BRAIDED HOSE W/45 AND 90-10AN FITTINGS
Installation Instructions Supertop NX Twill
 Installation Instructions Supertop NX Twill Vehicle Application: Jeep Wrangler Unlimited 2007-current Part Number 54823 Installation Tips Before you begin installing your new Supertop NX Twill, please
BLACKBIRD INSTALLATION SUPPLEMENT
 BLACKBIRD INSTALLATION SUPPLEMENT FOR 2003-7 FORD 6.0 LITER DIESEL SINGLE ALTERNATOR F-350, F-450, F-550, EXCURSION VERSION 7-07 Parts Description Blackbird Wiring Manual Installation Supplement 6.0 Liter
ASSEMBLY INSTRUCTIONS FOR CHARGER AND THE BOSS QUICK ATTACH GRASS BAGGER
 ASSEMBLY INSTRUCTIONS FOR CHARGER AND THE BOSS QUICK ATTACH GRASS BAGGER \ \ \ \ ~\ P P-12102 (7/2005) TABLE OF CONTENTS SECTION PAGE WARNING 1 BLOWER PULLEY INSTALLATION 2 ENGINE GUARD REMOVAL BOSS 3
2005+ Roll Bar (Mm5RB-20.1 to -20.6) Recommended Center punch 1/8" pilot drill 1-3/4" Hole saw 2" Hole saw
 Recommended Center punch 1/8 pilot drill 1-3/4 Hole saw 2 Hole saw") 3430 Sacramento Dr., Unit D San Luis Obispo, CA 93401 Telephone: 805/544-8748 Fax: 805/544-8645 www.maximummotorsports.com 2005+ Roll Bar (Mm5RB-20.1 to -20.6) Recommended Center punch 1/8" pilot drill
3430 Sacramento Dr., Unit D San Luis Obispo, CA 93401 Telephone: 805/544-8748 Fax: 805/544-8645 www.maximummotorsports.com 2005+ Roll Bar (Mm5RB-20.1 to -20.6) Recommended Center punch 1/8" pilot drill
WARNING TAKE NOTE OF THE FOLLOWING: THIS PRODUCT MUST BE INSTALLED EXACTLY AS PER THESE INSTRUCTIONS USING ONLY THE HARDWARE SUPPLIED.
 ARB WINCH/NONWINCH BUMPER TO SUIT TOYOTA HJ100 IFS PRODUCT No. 3913140 5100050 Top Tube Kit 5100160 Buffer Kit With hole (required when fitting Top Tube) 5100170 Buffer Kit With no hole Fitting Kit No.
Installation Instructions Vanishing Lid Bracket
 -800-447-88 www.coverpools.com Installation Instructions Vanishing Lid WARNING FOR YOUR SAFETY This product must be installed and serviced by a contractor who is licensed and qualified in pool equipment
M-9603-FST FOCUS ST COLD AIR INTAKE KIT INSTALLATION INSTRUCTIONS
 M-9603-FST Please visit www.fordracingparts.com for the most current instruction information.!!! PLEASE READ ALL OF THE FOLLOWING INSTRUCTIONS CAREFULLY PRIOR TO INSTALLATION. AT ANY TIME YOU DO NOT UNDERSTAND
Mahindra Pikup (2009 Production Onwards)
") Mahindra Pikup (009 Production Onwards) Steel Bull Bar INSTALLATION INSTRUCTIONS Accessory Part No. BBAR07 Installation Time: 60min Approx Bull Bar Weight: 60KG! Important: Please read each step of these
Mahindra Pikup (009 Production Onwards) Steel Bull Bar INSTALLATION INSTRUCTIONS Accessory Part No. BBAR07 Installation Time: 60min Approx Bull Bar Weight: 60KG! Important: Please read each step of these
COMBAR G/BAR CHEROKEE KJ SRS NFO
 Part Number: 3450170 F/KIT: 6173661 & 6173668 Product Description: Suited to vehicle/s: Optional Fitting Kit: WARNING REGARDING VEHICLES EQUIPPED WITH SRS AIRBAG; When installed in accordance with these
Times-2 Speed Files INSTALLATION INSTRUCTIONS
 Times-2 Speed Files INSTALLATION INSTRUCTIONS AURORA from RICHARDS-WILCOX, INC. 600 South Lake Street Aurora, Illinois 60506 Phone: 630-897-6951 Fax: 630-897-6994 Toll Free: 800-277-1699 TIMES-2 SPEED
WARNING. When installed in accordance with these instructions, the front protection bar does not affect operation of the SRS airbag.
 Part Number: 36030 Product Description: BULL BAR WINCH TYPE Suited to vehicle/s: CHEVROLET C/K 500-3500 988-998 YEAR MODEL RANGE AND Warn 9,500-5,000lb WINCHES WARNING REGARDING VEHICLES EQUIPPED WITH
Installation Instructions
 Installation Instructions TrailView Soft Top Important Safety Information For proper installation and best possible fit, please read all instructions BEFORE you begin. Periodically check all components
EVO-1162 EVO Tailgate Tire Carrier
 EVO-1162 EVO Tailgate Tire Carrier Bill of Materials EVO-1162 Tailgate Tire Carrier Part number Description Quantity EVO-12161 EVO Tailgate Tire Carrier 1 EVO-12162 Bolt Plate 1 EVO-12163 Wheel Mount 1
INFINITY MULTA SERIES
 ASSEMBLY ASSEMBLY INSTRUCTIONS INSTRUCTIONS ASSEMBLY INSTRUCTIONS INFINITY MULTA SERIES Workstations, WORKSTATIONS, desks, DESKS, and AND tables TABLES with WITH powered POWERED ADJUSTMENT adjustment PARTS
D40C HINGE # x Support Plate x M8 Bolt 8 x M8 Washer 6 x M6 20mm Bolts 6 x M6 Washers 19 x Screws
 HINGE # 1017 2 x Support Plate 1018 8 x M8 Bolt 8 x M8 Washer 6 x M6 20mm Bolts 6 x M6 Washers 19 x Screws 2 x Lid mount gas strut bracket 1041 2 x Self tap strut mount 1040 1 x Central Lock bracket 1510
FORD TERRITORY TOWBAR FITTING INSTRUCTION Part # VEHICLE YEARS OF MANUFACTURE - From May
 The installation kit contains sufficient components for fitment*. Do not substitute any components. A high degree of technical competence is necessary to correctly install this product. We recommend this
Assembly Manual. Assembly Instructions Read Carefully 2.1. Parts included: Tools suggested: Electric Drill
 2.1 Assembly Manual Tools suggested: Parts included: Electric Drill 3/8ths bit 5/16ths bit Phillips screw driver Cutting pliers 1/2 inch socket wrench 1/2 inch wrench or crescent wrench 8 mm socket wrench
<THESE INSTRUCTIONS MUST BE GIVEN TO THE END USER> B&W
 B&W Trailer Hitches 6 Hawaii Rd / PO Box 86 Humboldt, KS 66748 P:60.473664 F:60.869.903 Turnoverball Gooseneck Hitch Installation Instructions MODEL 08
L/6.7L DODGE CUMMINS
 6/15/2016 #1050310D 2005-09 5.9/6.7 Dodge Cummins FlowMAX Lift Pump Kit (I-00170) - 1-2005-09 5.9L/6.7L DODGE CUMMINS BD FLOWMAX LIFT PUMP KIT Installation Instructions P/N # 1050310D PLEASE READ ALL INSTRUCTIONS
INSTALLATION INSTRUCTIONS FORD F-150 2WD & 4WD RETAINS FACTORY TOW HOOKS PART #P3063
 INSTALLATION INSTRUCTIONS FORD F-150 2WD & 4WD RETAINS FACTORY TOW HOOKS PART #P3063 PARTS LIST: 1 Grille Guard 2 10-1.5mm Nylon Lock Nuts 1 Driver/Left Frame Mounting Bracket 4 12mm Plastic Washers 1
Tonneau Cover Fitting Instructions Ford PX Ranger XL Dual Cab With HeadBoard June Current
 Tonneau Cover Fitting Instructions Ford PX Ranger XL Dual Cab With HeadBoard June 2013 - Current Part Number: 10129 Package includes 1 x Tonneau Cover 1 x Warranty Card 2 x Bar Bracket (300474) 23 x 4
Installation Instructions I - Sheet Number I-TVR-01 Rev. A
 Installation Instructions I - Sheet Number I-TVR-01 Rev. A TrailView Soft Top For proper installation and best possible fit, please read all instructions BEFORE you begin. For technical assistance or to
BBK LONG TUBE HEADERS (99-04 GT, Mach 1, Bullitt)
") BBK LONG TUBE HEADERS (99-04 GT, Mach 1, Bullitt) Install Time: Approx. 8-10 hrs Parts Needed: BBK Long Tube Headers Shorty mid pipe X/H O2 wiring harness extensions Hi-temp thread locker Tools Required:
BBK LONG TUBE HEADERS (99-04 GT, Mach 1, Bullitt) Install Time: Approx. 8-10 hrs Parts Needed: BBK Long Tube Headers Shorty mid pipe X/H O2 wiring harness extensions Hi-temp thread locker Tools Required:
Product Deluxe Combination Winch and Non Winch Bull Bar, Flare and Non Flare Description: Suited to Nissan D40T Navara XC DC SC 2008 ON WARNING
 Part Number: 343840 & 343850 F/Kit 617501 Product Deluxe Combination Winch and Non Winch Bull Bar, Flare and Non Flare Description: Suited to Nissan D40T Navara XC DC SC 008 ON vehicle/s: WARNING REGARDING
Marlon Xplore II / Xplore Pro II Deck Installation & Assembly Instructions
 Marlon Xplore II / Xplore Pro II Deck Installation & Assembly Instructions Marlon Recreational Products www.marlonproducts.com 1-800-663-7367 INSTALLATION INSTRUCTIONS: 1. Remove the ramp from underneath
Ground Effects, P/N: (V6), (V8)
, (V8)") , P/N: 92248596 (V6), 92248560 (V8) 3. Open trunk and remove 3 scrivets per side. Retain. Remove LH and RH tail lamp access cover. Retain. Refer to Figure 1. NOTE: Installation is made easier with the
, P/N: 92248596 (V6), 92248560 (V8) 3. Open trunk and remove 3 scrivets per side. Retain. Remove LH and RH tail lamp access cover. Retain. Refer to Figure 1. NOTE: Installation is made easier with the
PLEASE READ THIS INSTRUCTIONS CAREFULLY, BEFORE YOU START INSTALLATION
 INSTALLATION INSTRUCTIONS PART NUMBER: L0SXC000 DESCRIPTION: 09 ASCENT TRAILER HITCH PLEASE READ THIS INSTRUCTIONS CAREFULLY, BEFORE YOU START INSTALLATION SAFETY PRECAUTION: When installing Trailer Hitch,
Assembly & Installation Instructions
 TM P R O D U C T S Assembly & Installation Instructions FOR 28 SERIES SNOWPLOW PIVOT ASSEMBLY AND FLOAT LIMITER 99103000 FOR SERIAL NUMBERS 28D100000 TO 28D100770 97100552A 1. THINK SAFETY, ALWAYS WEAR
MODEL 2604 WARNING <THESE INSTRUCTIONS MUST BE GIVEN TO THE END USER> Custom 5th Wheel Hitch Mounting Rail Installation Instructions
 B&W Trailer Hitches 1216 Hawaii Rd / PO Box 186 Humboldt, KS 66748 P:620.473.3664 F:620.869.9031 Custom 5th Wheel Hitch Mounting Rail Installation Instructions
LANCER EVOLUTION (2008 ) MUD FLAP MZ531356EX (Black with aluminum plate) MZ531357EX (Black standard) INSTALLATION AND HANDLING INSTRUCTIONS
 MUD FLAP MZ531356EX (Black with aluminum plate) MZ531357EX (Black standard) INSTALLATION AND HANDLING INSTRUCTIONS") LANCER EVOLUTION (2008 ) MUD FLAP MZ531356EX (Black with aluminum plate) MZ531357EX (Black standard) INSTALLATION AND HANDLING INSTRUCTIONS Black with aluminum plate -MZ531356EX Black standard -MZ531357EX
LANCER EVOLUTION (2008 ) MUD FLAP MZ531356EX (Black with aluminum plate) MZ531357EX (Black standard) INSTALLATION AND HANDLING INSTRUCTIONS Black with aluminum plate -MZ531356EX Black standard -MZ531357EX
Air Conditioner for M915 A0/A1 Truck
 RD-2-4530-0 Air Conditioner for M915 A0/A1 Truck INSTALLATION INSTRUCTIONS Install refrigerant compressor per instructions provided with compressor mount kit. CAUTION: Edges of sheet metal can be sharp!
L DODGE CUMMINS BD FLOWMAX LIFT PUMP KIT
 6/15/2016 #1050311D 2010-12 6.7 Dodge Cummins FlowMAX Lift Pump Kit (I-00329) - 1-2010-12 6.7L DODGE CUMMINS BD FLOWMAX LIFT PUMP KIT Installation Instructions P/N # 1050311D PLEASE READ ALL INSTRUCTIONS
LAND ROVER DISCOVERY 3 ARB BULL BAR AND WINCH BAR WARNING
 LAND ROVER DISCOVERY 3 ARB BULL BAR AND WINCH BAR PART No 3432150 DISCOVERY 3 WINCH BAR PART No 3232150 DISCOVERY 3 BULL BAR WARNING FOR VEHICLES EQUIPPED WITH SRS AIRBAG WHEN INSTALLED IN ACCORDANCE WITH
INSTALLATION INSTRUCTIONS FORD F-150 2WD & 4WD RETAINS FACTORY TOW HOOKS PART #P3063
 INSTALLATION INSTRUCTIONS FORD F-150 2WD & 4WD RETAINS FACTORY TOW HOOKS PART #P3063 PARTS LIST: 1 Grille Guard 2 10-1.5mm Nylon Lock Nuts 1 Driver/Left Frame Mounting Bracket 4 12mm Plastic Washers 1
Easy Cover. Installation Instructions. Attention Dealers: Please give this owners manual to the customer when the product is delivered.
 Serving the Truck & Trailer Industry Since 944 Easy Cover Attention Dealers: Please give this owners manual to the customer when the product is delivered. Call 00-3-94 www.aeroindustries.com Indianapolis,
HAYMAN REESE PART No: 03099RW BMW X4 F26 Series May 2014 Onwards INSTALLATION INSTRUCTIONS
 PART No: 03099RW BMW X4 F26 Series May 2014 Onwards PLEASE ENSURE THAT ALL INSTRUCTIONS ARE UNDERSTOOD PRIOR TO FITMENT PLACE THESE INSTRUCTIONS IN THE VEHICLE S GLOVEBOX AFTER INSTALLATION IS COMPLETED
RMK HANDLEBAR KIT P/N ; ; APPLICATION BEFORE YOU BEGIN KIT CONTENTS. Verify accessory fitment at Polaris.com.
 RMK HANDLEBAR KIT P/N 2883835; 2883836; 2883837 APPLICATION Verify accessory fitment at Polaris.com. BEFORE YOU BEGIN Read these instructions and check to be sure all parts and tools are accounted for.
Assembly Instructions
 Assembly Instructions Part Number Description Model Approx. Assembly Time 99994-0903 Windshield Wiper Kit Mule SX 1 Hour WARNING Improper installation of this accessory could result in an accident causing
COMBAR G/BAR CHEROKEE KJ SRS 8/9 NFO
 Part Number: 3450160. F/KIT: 6173660 & 6173667 Product Description: Suited to vehicle/s: Optional Fitting Kit: WARNING REGARDING VEHICLES EQUIPPED WITH SRS AIRBAG; When installed in accordance with these
Type 2 Push-Through 37 Ton Log Splitter. Assembly Manual
 Type 2 Push-Through 37 Ton Log Splitter Assembly Manual Refer to this manual for the following models: RS37PT-LF09PC-16-1 RS37PT-LF09EC-16-1 RS37PT-LF09EC-16-2 RS37PT-LF13EC-22-1 RS37PT-LF13EC-22-2 RS37PT-LF15EC-22-1
NIS NAV AM (MY15 >) - Aluminium Tonneau Cover ATC0051 (silver) ATC0052 (Black) Installation Time: Approx. 60 Minutes WARNING!
 - Aluminium Tonneau Cover ATC0051 (silver) ATC0052 (Black) Installation Time: Approx. 60 Minutes WARNING!") Installation Time: Approx. 60 Minutes WARNING! When in the closed position, Aluminium Tonneau Cover must be latched and tailgate must be closed. Failure to do so could result in unexpected opening of the
Installation Time: Approx. 60 Minutes WARNING! When in the closed position, Aluminium Tonneau Cover must be latched and tailgate must be closed. Failure to do so could result in unexpected opening of the
Factory Five Racing, Inc. 818 Kit Assembly manual revision 1J update
 Factory Five Racing, Inc. 818 Kit Assembly manual revision 1J update Turbo coolant overflow tank...1 Shifter handle...4 Install...4 Door skin...7 Door Liner... 10 Side mirrors... 14 Door handles and pulls...
Jeep JK Wrangler XHD Rear Tire Carrier
 Contents: 1. Frame (1) 2. Pivot Mount (1) 3. Latch Mount (1) 4. Lug Nuts (3) 5. Catch Pin (1) 6. M12 Washer (18) 7. M12 x 30 Hex Bolt (14) 8. Brake Light Mount (1) 9. Snap Ring (1) 10. Rub Strip (1) 11.
AutoDeploy with Radar. Installation Manual
 AutoDeploy with Radar Installation Manual Revision 1.1; Updated: December 11, 2017 Table of Contents 03 Tool List 04 AutoDeploy Installation 04 Pre-Installation 05 Velocity Sensing Control Unit 06 Warning
WESTWOOD GARDEN TRACTORS PARTS CATALOGUE CONTENTS
 WESTWOOD GARDEN TRACTORS 1984-1986 PARTS CATALOGUE CONTENTS PAGE No. S600R, S600E, S800E AND S1000 UPPER FRAME, BONNET & GRILLE, CONSOLE, ELECTRICAL, SEAT, STEERING WHEEL, ROAD WHEELS 2 3 T800 AND T1100
MAZDA BT-50 (October 2011 Production Onwards) 1 & 3 PIECE HARD TONNEAU REMOTE LOCKING KIT INSTALLATION INSTRUCTIONS
 1 & 3 PIECE HARD TONNEAU REMOTE LOCKING KIT INSTALLATION INSTRUCTIONS") MAZDA BT-50 (October 0 Production Onwards) & 3 PIECE HARD TONNEAU REMOTE LOCKING KIT INSTALLATION INSTRUCTIONS Installation Time: Approx. 0 Minutes Care Instructions: Clean Tonneau Cover with a mild detergent
MAZDA BT-50 (October 0 Production Onwards) & 3 PIECE HARD TONNEAU REMOTE LOCKING KIT INSTALLATION INSTRUCTIONS Installation Time: Approx. 0 Minutes Care Instructions: Clean Tonneau Cover with a mild detergent
MOUNT BRACKET PARTS and HARDWARE: Installation parts with * come loose in hardware kit bag. Other parts are preassembled
 INSTALL INSTRUCTIONS C-DMM-2006 Dash Monitor Mount 2017-2019 F-250, 350, 450 Pickup, F-450 and 550 Cab Chassis, 2015-2019 Ford F-150 and 2018-2019 Expedition Notes: 1. The C-DMM-2000 series Dash Monitor
XRT300 AND XRT350 BA XR6 TURBO UPGRADE KIT FITTING INSTRUCTIONS
 XRT300 AND XRT350 BA XR6 TURBO UPGRADE KIT FITTING INSTRUCTIONS The use of NFU (No Further use) and REUSE (Re Use) relates to the individual parts storage when performing the upgrade. Also note that all
Factory Five Racing, Inc. Roadster Complete Kit Assembly manual revision 3p update
 Factory Five Racing, Inc. Roadster Complete Kit Assembly manual revision 3p update Kit Parts Prep...3 Body Removal...3 Aluminum Removal...5 Front upper control arm...7 Adjusting the upper control Arm...10
TRAYS FOR THE ULTIMATE IN PRACTICALITY.
 GENUINE TRAYS TRAYS FOR THE ULTIMATE IN PRACTICALITY. Make your Triton even more useful with our range of Genuine Trays and Tray Accessories. Designed, engineered and constructed from durable aluminium
CARGO DIGGER PLANT TOUGH AND DURABLE INTELLIGENT AND USEFUL
 60 61 CARGO DIGGER PLANT TOUGH AND DURABLE INTELLIGENT AND USEFUL The innovative CarGO Digger Plant provides a solution for diggers and plant machinery. Transporting machines, requires a reliable, capable
Contact Us Best Bars Limited Phone: Fax: Web: ALUMINIUM UTE TRAYS
 ALUMINIUM UTE TRAYS Introduction Why choose an Advantage Alloy Ute Tray... Ford Ranger 2011 - on T6 Space Cab If you carry heavier loads on a regular basis on the back of a ute it makes sense to fit a
Installation Guide Current Ford F-250 & Ford F-350 Super Duty. Product Code: 109 & 119
 Installation Guide 2008 - Current Ford F-250 & Ford F-350 Super Duty Product Code: 109 & 119 September 1, 2012 Tools Needed Components Included 3/8" Drill P2 Tip #2 Philips Screwdriver 1/2" Drill Bit Hinged
Automatic Roof Hatch Opener
 Automatic Roof Hatch Opener Installation Guide REQUIRED TOOLS (These tools are required to complete the installation) Cordless Drill 1/8 1/4 Drill Bits 1/8 Pin Punch #2 Philips Bit Rachet Sharpie Hammer
Hayes TrailTrac Kit Installation Guidelines Polaris Rush / Pro-R / Indy
 Models: 2010-2014 Polaris Rush / Pro-R / Indy Packing List 1 Electronic Control Unit (ECU) 1 ECU Velcro, 3 inch 1 Switch face plate 1 Switch face plate adhesive 1 Switch 1 Wiring harness 1 Fully pre-filled
TABLE OF CONTENTS. Ram Assembly
 TABLE OF CONTENTS DUC Cover------------------------------------------------------------------------------------ 00 Table of Contents----------------------------------------------------------------------------
Parts Manual Rev. A
 115 96 28-27 Rev. A Parts Manual Z 242F / 967 271802-00 Please read the operator manual carefully and make sure you understand the instructions before using the machine. Gasoline containing a maximum of
Technical Support (707)
") Installation Instructions UNIMATIC SHIFTER Fits: GM, Powerglide, Ford and Chrysler Transmissions See Application Guide for Specific Vehicles Catalog # 80775 WORK SAFELY! For maximum safety, perform this
Installation Instructions UNIMATIC SHIFTER Fits: GM, Powerglide, Ford and Chrysler Transmissions See Application Guide for Specific Vehicles Catalog # 80775 WORK SAFELY! For maximum safety, perform this
INSTALLATION & OWNER S MANUAL
 INSTALLATION & OWNER S MANUAL CAB INSTALLATION INSTRUCTIONS JOHN DEERE GATOR HPX and/or XUV HARD SIDED CAB ENCLOSURE (p/n: 1GTR44AS) SOFT SIDED CAB ENCLOSURE (p/n: 1GTR44SS) 111 HIGGINS STREET, WORCESTER,
Thompson Automotive Products
 Installation instructions for Quick-Change Oil Filter relocator for NB (1999+) Miatas (MX-5) Before beginning, get your car up where you have access to the undercarriage (Rhino Ramps work well). Tools
ITEM PART NO. DESCRIPTION QTY BODY - SNORKEL (SS1410HP) " AIR RAM ASSEMBLY BRACKET - UPPER MOUNTING 1
 AIR RAM ASSEMBLY BRACKET - UPPER MOUNTING 1") L; SS1410HP SAFARI ARMAX SNORKEL VOLKSWAGEN AMAROK V6 TDI550 3.0L TDI V6 Engine Parts List 10/04/2018 ITEM PART NO. DESCRIPTION QTY 1 910-133-600 BODY - SNORKEL (SS1410HP) 1 2 000-135-960 4" AIR RAM ASSEMBLY
L; SS1410HP SAFARI ARMAX SNORKEL VOLKSWAGEN AMAROK V6 TDI550 3.0L TDI V6 Engine Parts List 10/04/2018 ITEM PART NO. DESCRIPTION QTY 1 910-133-600 BODY - SNORKEL (SS1410HP) 1 2 000-135-960 4" AIR RAM ASSEMBLY
HYUNDAI IX35 / TUCSON. (2010 Production Onwards) INTEGRATED SIDE STEP INSTALLATION INSTRUCTION. 60 Minutes
 INTEGRATED SIDE STEP INSTALLATION INSTRUCTION. 60 Minutes") HYUNDAI IX35 / TUCSON (2010 Production Onwards) INTEGRATED SIDE STEP INSTALLATION INSTRUCTION Accessory Part No. STEP0001 60 Minutes Approx Product Weight: 15kg/33 lb IMPORTANT - PLEASE READ INSTRUCTIONS
HYUNDAI IX35 / TUCSON (2010 Production Onwards) INTEGRATED SIDE STEP INSTALLATION INSTRUCTION Accessory Part No. STEP0001 60 Minutes Approx Product Weight: 15kg/33 lb IMPORTANT - PLEASE READ INSTRUCTIONS
CARGO ALL PLANT TILTBED A SPECIALIST WITH A LOW APPROACH
 52 53 TILTBED CARGO ALL PLANT TILTBED A SPECIALIST WITH A LOW APPROACH The CarGO All Plant Tiltbed extends the capabilities of the outstanding All Plant range, offering the same carefully designed commercial
Do not have any open flame or heat sources close to the installation
 March 6, 2017 IS# 791 Page 1 of 16 Thank you for purchasing a Transfer Flow, Inc. 50-gallon replacement fuel system for your 2011-16 Ford diesel short bed pickup. This system will fit any 2x4 or 4x4 crew
KUBOTA BX-1500/1800/2200 HARD SIDED CAB (p/n 1KBXAS) SOFT SIDED CAB (p/n 1KBXSS)
 SOFT SIDED CAB (p/n 1KBXSS)") TRACTOR CAB INC. 111 HIGGINS STREET, WORCESTER, MA 01606 KUBOTA BX-1500/1800/2200 HARD SIDED CAB (p/n 1KBXAS) SOFT SIDED CAB (p/n 1KBXSS) INSTALLATION AND OWNER S MANUAL The contents of this envelope are
TRACTOR CAB INC. 111 HIGGINS STREET, WORCESTER, MA 01606 KUBOTA BX-1500/1800/2200 HARD SIDED CAB (p/n 1KBXAS) SOFT SIDED CAB (p/n 1KBXSS) INSTALLATION AND OWNER S MANUAL The contents of this envelope are
VOLKSWAGEN AMAROK 1 & 3 PIECE HARD TONNEAU REMOTE LOCKING KIT INSTALLATION INSTRUCTIONS
 VOLKSWAGEN AMAROK & PIECE HARD REMOTE LOCKING KIT INSTALLATION INSTRUCTIONS Care Instructions: Clean Tonneau Cover with a mild detergent and water solution. Do not use abrasive cleaners or solvents. Place
Super Duty Front Air Bag Installation Instructions
 2005-2010 Super Duty Front Air Bag Installation Instructions Congratulations! You have just purchased the best engineered, highest quality front air suspension kit available on the market for your 2005-2010
For Kioti Mechron Caution: Before using this product, read this manual and follow all safety instruction. Defender Cab Owner s Manual.
 ` Defender Cab Owner s Manual Model: Kioti Mechron 2200 Caution: Before using this product, read this manual and follow all safety instruction For Kioti Mechron 2200 Safety Instructions Kit Contents Tool
Additional Instructions for 6" Drop
 Serving the Truck & Trailer Industry Since 1944 Additional Instructions for 6" Drop Attention Dealers: Please give this manual to the customer when product is delivered. Call 800-535-9545 www.aeroindustries.com
INSTALLATION & OWNER S MANUAL
 INSTALLATION & OWNER S MANUAL INSTALLATION INSTRUCTIONS KAWASAKI MULE 4000 CAB KIT (p/n: KAF40-005WA and KAF40-005BA) NOTE: Hard sided doors are sold separately. This manual is the property of the owner.
WARNING. When installed in accordance with these instructions, the front protection bar does not affect operation of the SRS airbag.
 Part Number: 343870 F/Kit 17557 Product Deluxe Combination Winch and Non Winch Bull Bar Description: Suited to Nissan XTERRA 05ON USA Only vehicle/s: WARNING REGARDING VEHICLES EQUIPPED WITH SRS AIRBAG;
RSA FJ CRUISER LONG RANGE TANK GET ORGANIZED. INSTALL TIME: 1.5 hours
 FJ CRUISER LONG RANGE TANK RSA FTTJ001 INSTALL TIME: 1.5 hours 1 GET ORGANIZED you will need: a 1 and 15 wrench a 10, 1, 15 and 7 socket, and ratchet with an extension a craft/stanley knife a hack saw
K9-F17 INSTALLATION INSTRUCTIONS K9 Kit for FORD INTERCEPTOR SEDAN
 K9-F17 INSTALLATION INSTRUCTIONS K9 Kit for 2013-2018 FORD INTERCEPTOR SEDAN TOOLS Needed: Phillips Screw Driver Trim panel removal tools Caulk Gun Standard Socket set Metric Socket set Wire Cutters /Crimpers
INSTRUCTIONS, (FORD) SUPER DUTY INSTALLATION KIT (C2 PICKUP LIFTGATES)
 SUPER DUTY INSTALLATION KIT (C2 PICKUP LIFTGATES)") LIFT CORPORATION Sht. 1 of 22 DSG# M-16-32 Rev. - Date: 12/13/16 INSTRUCTIONS, (FORD) SUPER DUTY INSTALLATION KIT (C2 PICKUP LIFTGATES) FORD SUPER DUTY F-250, F-350 & F-450 PICKUP TRUCKS, 2017 MODEL KIT
LIFT CORPORATION Sht. 1 of 22 DSG# M-16-32 Rev. - Date: 12/13/16 INSTRUCTIONS, (FORD) SUPER DUTY INSTALLATION KIT (C2 PICKUP LIFTGATES) FORD SUPER DUTY F-250, F-350 & F-450 PICKUP TRUCKS, 2017 MODEL KIT
Marlon Xplore / Xplore Pro Deck Installation & Assembly Instructions
 Marlon Xplore / Xplore Pro Deck Installation & Assembly Instructions Marlon Recreational Products www.marlonproducts.com 1-800-663-7367 INSTALLATION INSTRUCTIONS: 1. Remove the ramp from underneath the
Installation instructions, accessories - Rear Seat Entertainment
 XC90 Section Group Weight(Kg/Pounds) Year Month 3 39 2004 10 XC90 2003, XC90 2004, XC90 2005, XC90 2006, XC90 2007, XC90 2008 Replaces issue: 2003 12 J3904620 Page 1 of 18 Required tools A0000162 A0000163
INSTALLATION INSTRUCTIONS
 INSTALLATION INSTRUCTIONS Accessory HITCH Application 2009 CR-V Publications No. AII 40373 Issue Date AUG 2008 PARTS LIST Plain washer, 12 mm Trailer Hitch Kit P/N 08L92-SWA-100 Trailer hitch 6 Spring
2005+ Drag Race Roll Bar (Mm5RB-20)
") 3430 Sacramento Dr., Unit D San Luis Obispo, CA 93401 Telephone: 805/544-8748 Fax: 805/544-8645 www.maximummotorsports.com 2005+ Drag Race Roll Bar (Mm5RB-20) Note that the NHRA DOES allow the door bars
3430 Sacramento Dr., Unit D San Luis Obispo, CA 93401 Telephone: 805/544-8748 Fax: 805/544-8645 www.maximummotorsports.com 2005+ Drag Race Roll Bar (Mm5RB-20) Note that the NHRA DOES allow the door bars