GT-R Alpha 10/12 Turbo Kit
|
|
|
- Myrtle Roberts
- 5 years ago
- Views:
Transcription
1 GT-R Alpha 10/12 Turbo Kit Instructions V6
2 The goal of AMS is to provide the highest quality, best performing products available. By utilizing research and development, and rigorous testing programs AMS will never compromise the quality or performance of our products. In addition, AMS will only provide the finest customer service offering only parts and advice that are in the best interests of the customer. AMS was built on a foundation of integrity. This is who we are; this is what you can count on. A vehicle modified by the use of performance parts may not meet the legal requirements for use on public roads. Federal and state laws prohibit the removal, modification, or rendering inoperative of any part or element of design affecting emissions or safety on motor vehicles used for transporting persons or property on public streets or highways. Use or installation of performance parts may adversely affect the drivability and reliability of your vehicle, and may also affect or eliminate your insurance coverage, factory warranty, and/or new OEM part warranty. Performance parts are sold as-is without any warranty of any type. There is no warranty stated or implied due to the stresses placed on your vehicle by performance parts and our inability to monitor their use, tuning, or modification. These instructions are provided as a guide only as there are many variables that cannot be accounted for concerning your particular vehicle, including but not limited to model year differences, model differences, the presence of non- OEM parts, and modifications that may already be or were previously installed. A basic knowledge of automotive parts and systems is helpful but a better understanding of the parts and systems on your particular vehicle may be required. If you have any questions or issues at any time during the installation of your AMS product(s) please call us for technical assistance. The AMS tech line can be reached during business hours at for AMS products only.
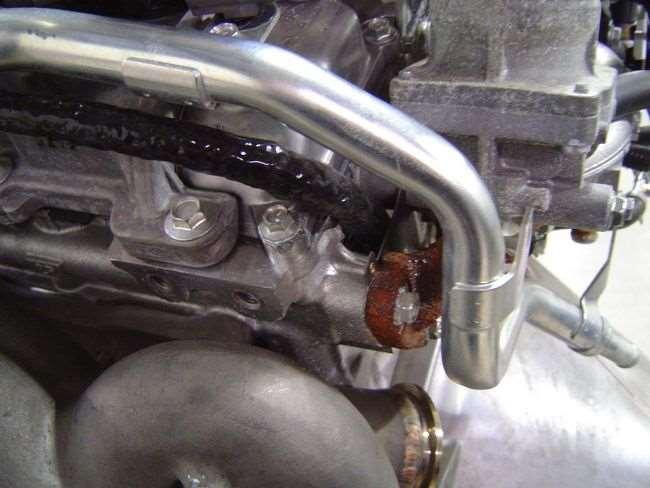
3 Oil and Coolant Line Identification: Coolant Line # long with 45 and straight ends Coolant Line # long with 90 and barbed ends Coolant Line # long with straight ends Coolant Line # long with 90 and straight ends Oil Line #1 (Driver s side) 47.0 long -4 AN Oil Line #2 (Passenger s side) 55.5 long -4 AN 1. Follow the Nissan Factory Service Manual s engine removal instructions and then lower the motor/subframe assembly down from the chassis onto a strong table that can safely support the weight AND remain throughout the installation of the turbo kit. 2. Remove the factory turbos/exhaust manifolds and turbo fluid lines. The driver s side rubber section of the oil return line can be left loose on the motor as it will be re-used. 3. Begin by installing all of the fluid fittings that go on the engine. The black M12 banjo to -6 AN male coolant fittings go onto the sides of the block as shown below using the factory bolts marked with a W and the supplied copper washers (one on each side of the fitting). Next install the silver M12 banjo to -4 AN male oil feed fittings onto the back of the engine using the factory bolts marked with an R and the supplied copper washers (again, one on each side of the fitting). Lastly install the Y-shaped coolant fitting assembly as shown and connect the factory coolant lines. Use the supplied hose clamps

4 rather than the OEM spring clamps on the Y-shaped coolant fitting.
5


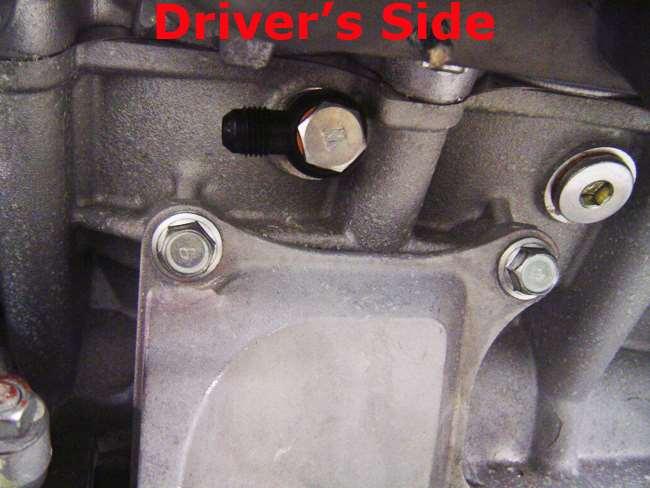
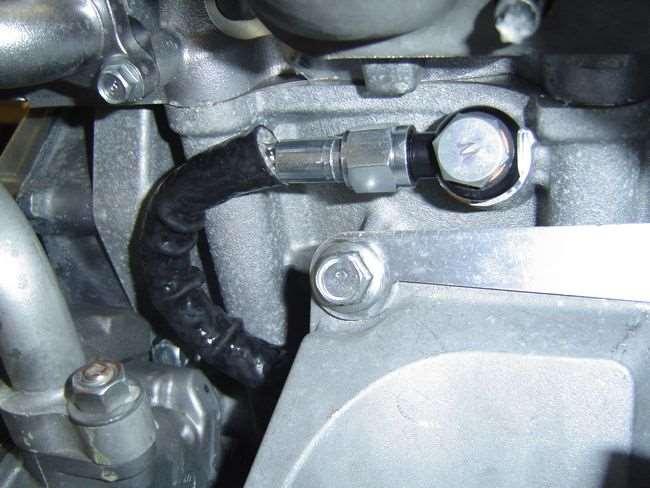
6 Passenger s side oil feed fitting

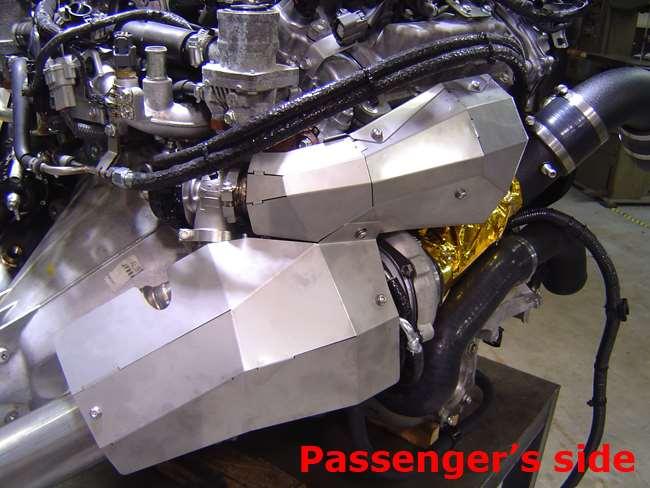
7 Coolant fitting 4. Next install the turbo exhaust manifolds using the supplied gaskets with high-temp copper sealing spray; they will not be removed for the rest of the installation. In some cases a runner may interfere with the flange on the OEM nut which will not allow it to seat properly. If that is the case use one of the supplied heat treated nuts that doesn t have the large flange. 5. Install the supplied formed heat shield on the passenger s side of the motor as shown below.

8 6. Next we will begin the installation of the turbos starting with the driver s side. The turbine housings have been pre-clocked by us as close to their final positions as possible and in some cases these can be left alone, but due to variances in engines and motor mounts the compressor covers must be clocked by you. Mount the driver s side turbo in place using the two motor mount bolts and connect it to the manifold with one of the 3.00 v-band clamps. Tighten both bolts and the v-band clamp and rotate the compressor cover until there is a ¼ gap between the outlet and the motor mount. NOTE: These instructions were made with the previous version compressor covers that were retained with clamps and bolts, the current Alpha
 instead of the typical clamps and bolts retained to a")
9 compressor covers are retained with a C-clip as shown below. Your AMS GT-R Alpha 10/12 Turbo Kit has turbocharger compressor covers that are retained to the CHRA with a large C-clip (partially shown above) instead of the typical clamps and bolts retained to a backplate. The covers have been clocked as close to their final position as possible though they may still require some adjustment. The eyelets (circled in yellow) have been placed for easy access, and you will need a pair of heavy-duty 90 snapring pliers to bring the ends together which takes tension off the cover and allows it to be rotated. You may not need to remove the turbo from the manifold to make these adjustments, and even if you don t have to

10 adjust the compressor cover(s) you must doublecheck to make sure the C-clip is fully seated.

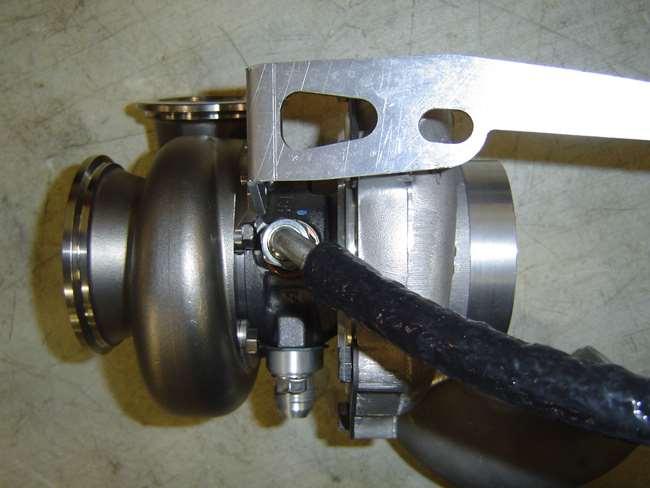
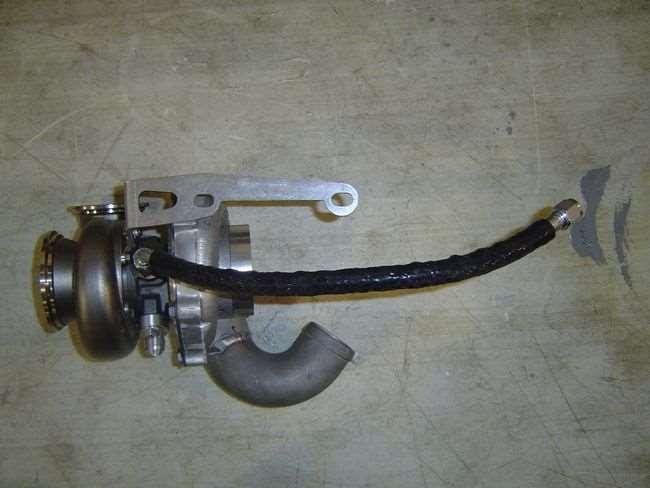
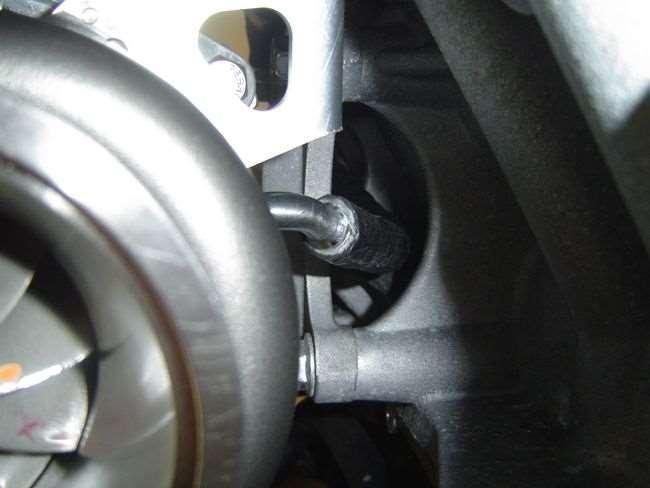
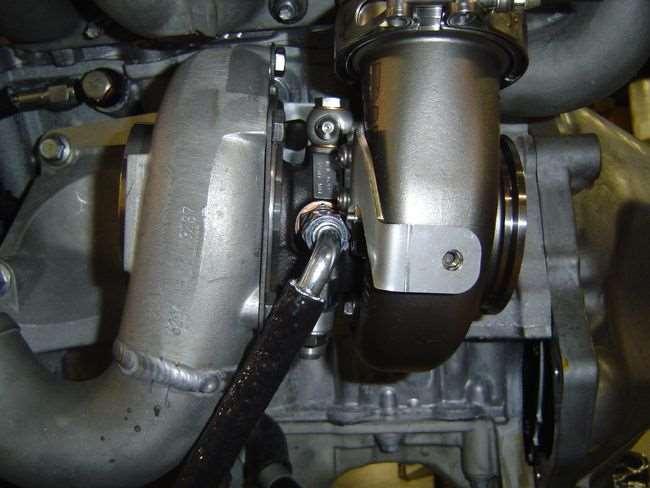
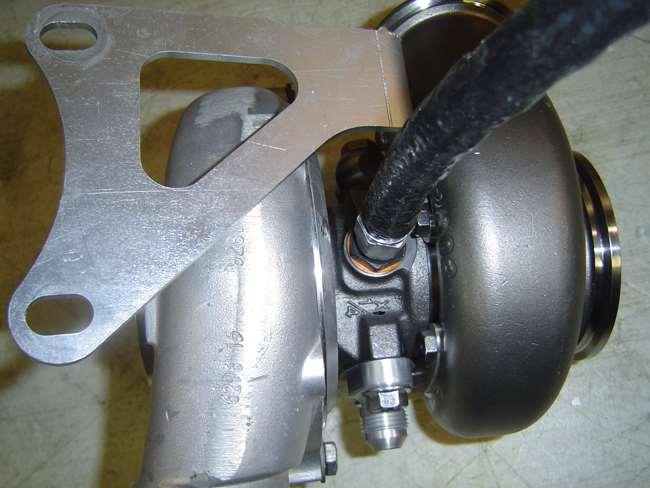
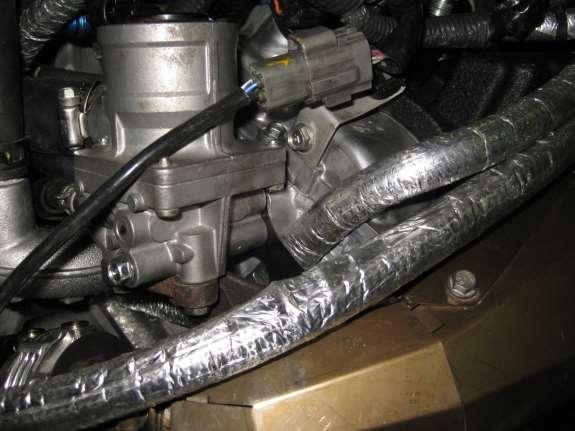
11 7. Install coolant line #1 as shown below; it faces downward at about a 45 angle towards the front of the engine. Final tighten this line and then the turbo can be final installed on the motor. Make sure to clock the manifold to turbo v-band clamp in a way that won t get in the way of the heat shields; there is a picture below of how this can be done. The line is routed between the motor mount and the engine block and is connected to the water port above the motor mount.
12
13

14 \

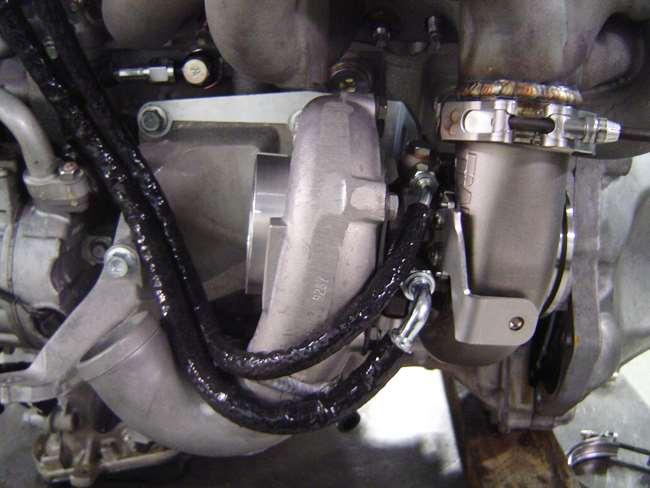
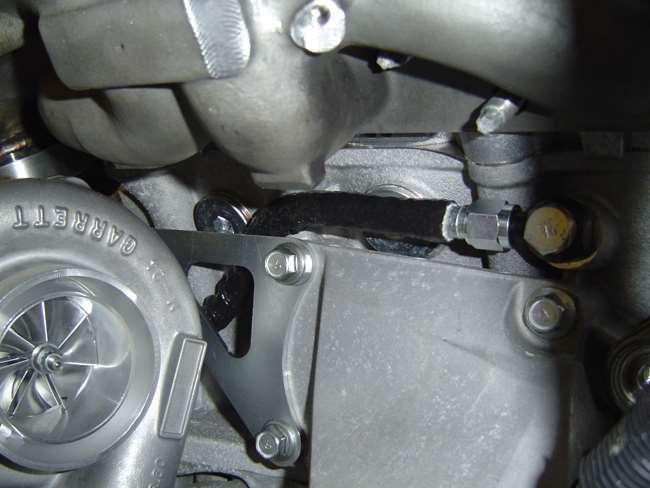
15 8. The next fluid line to connect is the oil return line; this is done by pushing the supplied -8 AN 90 barbed fitting into the factory oil return hose and securing it with the factory spring clamp. Make sure the hose isn t kinked or pinched in any way and then tighten the black fitting onto the silver oil return fitting attached to the turbo. 9. Install coolant line #2 as shown below; rotate it as far forward as possible without rubbing on the edge of the compressor cover. This line can be difficult to install because space around the fitting is very tight. We have found that using a variety of wrenches helps out and in this case a ¾, 11/16, and 18mm work well. This line connects to the factory hard coolant line using the factory hose, spring clamps, and heat shielding.
16

17 10. Next connect oil feed line #1 to the banjo fitting on top of the turbo and route as shown. This line connects to the previously installed driver s side banjo fitting on the rear of the motor.
18
19

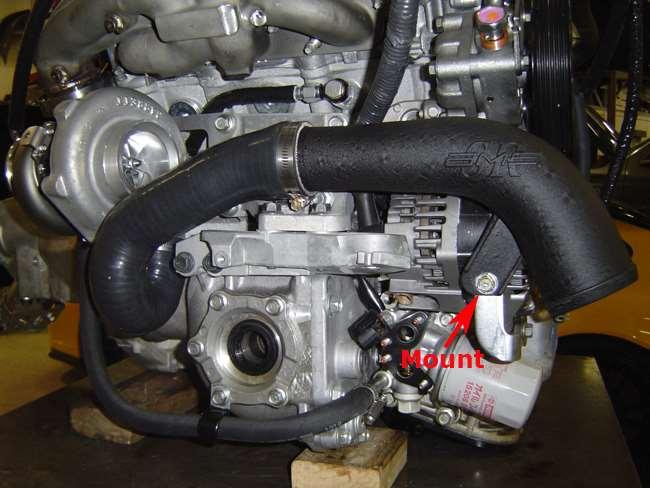
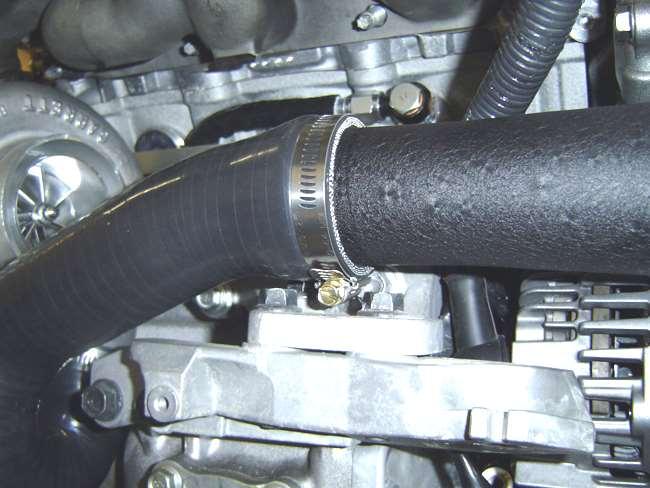
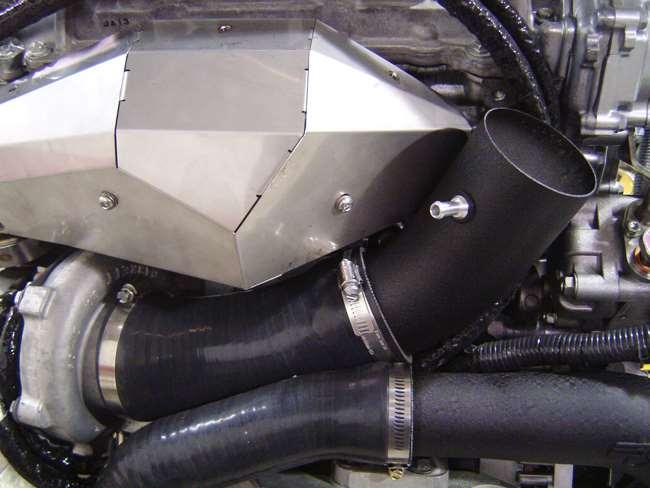
20 11. Install the intake silicone and tube along with the compressor outlet silicone and tube. The outlet tube bolts to the bracket below the A/C compressor using the factory bolt. The idea here is to keep all parts as close to the engine as possible as there isn t much clearance between the engine and car s frame rail. Trimming of the motor mount stud may be required for clearance of the outlet tube.

21 12. Once the intake and outlet tubes are in place wrap the areas closest to the exhaust manifold with the supplied gold heat protectant wrap and steel straps. Finally, connect the PCV fitting to the valve cover using the supplied 2-ply hose with factory clamps. The rest of the intake will be installed when the engine is in the car.

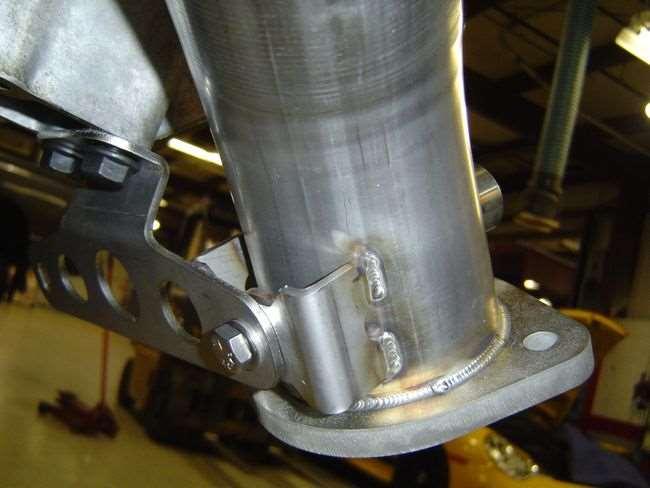
22 13. Install the rear downpipe bracket onto the tail shaft using the supplied black bolts as shown below. Leave it loose for adjustment during the downpipe installation.

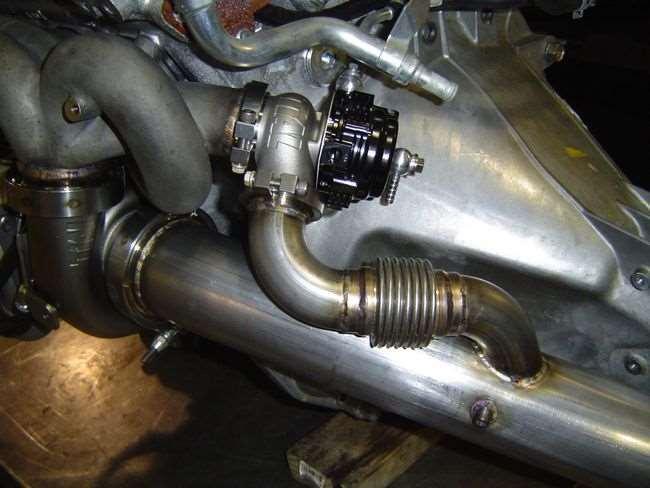
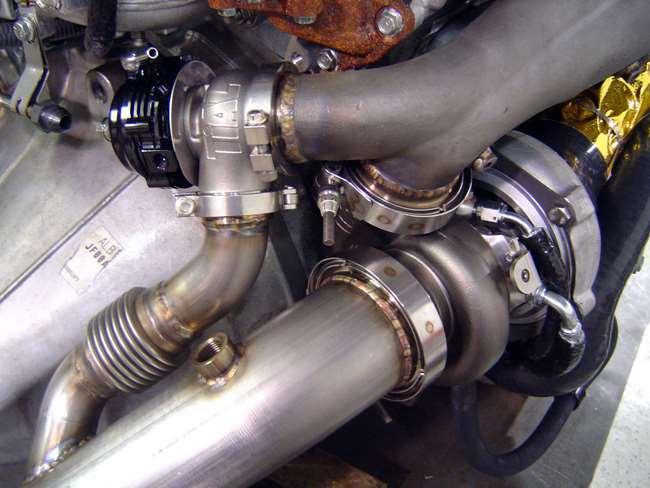
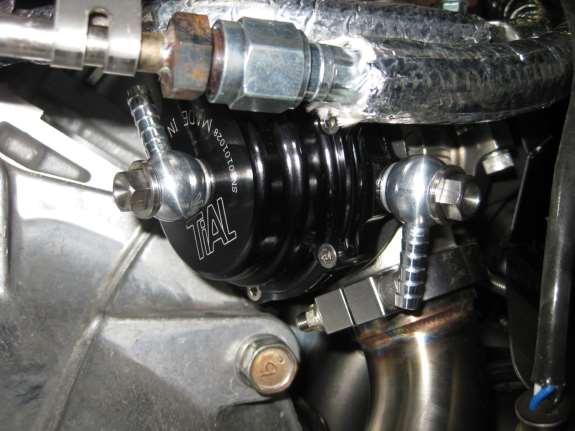
23 14. Install the driver s side downpipe and wastegate but leave the v-band clamps and support bracket bolt loose until both downpipes are installed. Orient the wastegate air fittings as shown using Loctite 2422 high-temperature thread locking compound.
24 \
25

26 15. Now we will begin the passenger s side of the engine. Like the driver s side the turbine housing has already been clocked and tightened but may need to be adjusted, and the compressor cover must still be clocked and tightened. Mount the turbo in place using the two motor mount bolts and connect it to the manifold with the other 3.00 v-band clamp. Temporarily tighten both bolts and the v-band clamp and rotate the compressor cover until there is a ¼ gap between the outlet and the top of the bolt as shown.

27 16. After making sure the compressor cover is secure install coolant line #3 onto the back of the turbo and then re-install the turbo. The fasteners can be tightened at this time. Connect the coolant line to the banjo fitting on the block and tighten.
28

29 17. Install the oil return line as shown below, it is held in place by the supplied coated tube clamp mounted to the differential flange bolt. It connects to where the factory oil return connects to in front of the differential. 18. Install the compressor outlet silicone and tube. The tube has a bracket to mount it to the alternator bracket. Adjust until it fits well and clears the 2 engine mount bolts that sit right by where the tube and silicone meet.
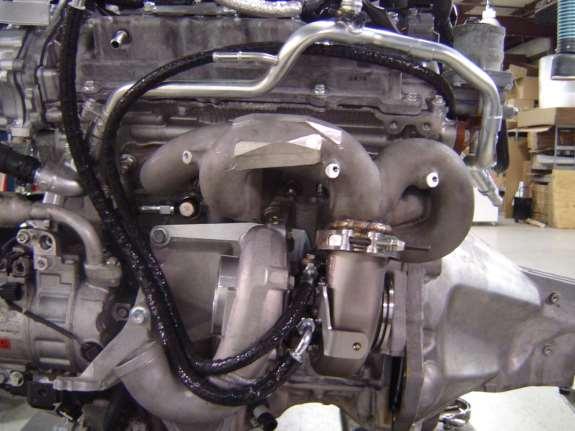
30

31 19. Install oil line #2 and coolant line #4 and route as shown below. The oil line tucks behind the coolant line and the coolant line must be rotated as far counterclockwise as possible without rubbing on the compressor cover; this is done to prevent it from rubbing on the heat shield later. Route lines behind compressor outlet silicone as shown below.

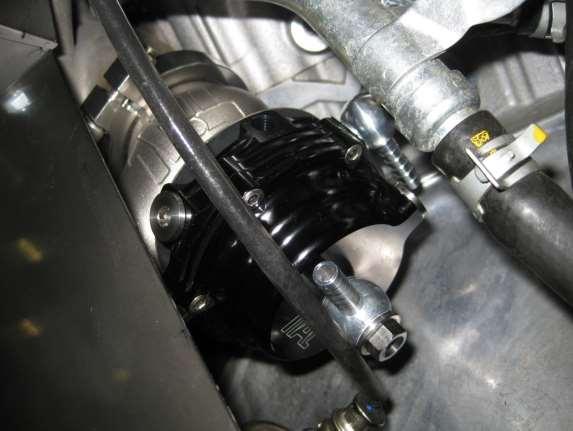
32 20. Install the manifold heat shield but don t final tighten yet since it is a 2-piece design, only the bottom portion needs to be installed at the moment. 21. Install the intake silicone and tube. Keep them tucked as close to the engine as possibly but still keep them clear of the exhaust manifold heat shield. At this time you can further route the oil and coolant lines towards the front of the engine. Tighten the intake into place.

33

34 22. Once the intake is in place and tight remove the exhaust manifold heat shield and the bolt holding the compressor outlet tube onto the alternator bracket to clear room around the intake. Wrap the intake using the supplied gold heat protectant wrap and steel straps. Once done you can re-mount the compressor outlet tube and connect the PCV fitting to the valve cover using the supplied 2-ply hose with factory clamps. NOTE: You must transfer the restrictor from the factory hose!

35 23. Install the downpipe and wastegate at this time. If needed loosen the turbo to manifold v-band clamp just enough to allow slight movement. Don t tighten all clamps yet, just fit everything together and put clamps in place. Orient the wastegate air fittings as shown using Loctite 2422 high-temperature thread locking compound.
36

37 24. Install the mid-pipe and tighten to both downpipes to line them up. Confirm all v-band connections are aligned correctly and tighten ALL clamps on both sides of the motor. At this time also tighten all bolts on the lower downpipe bracket. When done remove mid-pipe.

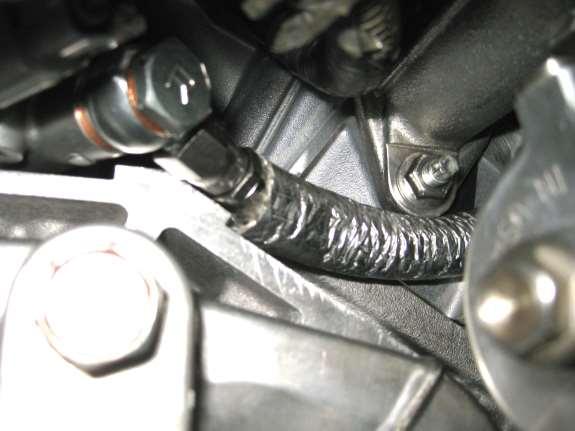
38 25. Finish routing oil feed line #2 behind the EGR valve as shown (yellow line) and coolant line #4 and connect to the remaining port on the back of the motor and the Y coolant fitting that was installed earlier.
39

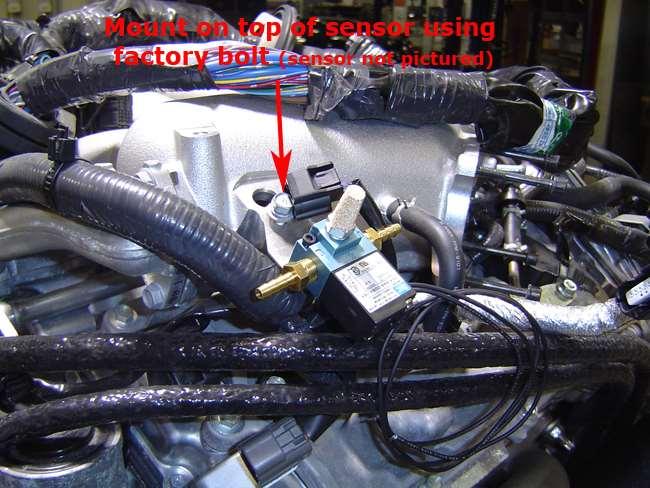
40 26. Install the boost control solenoid and lines making sure to use the green spring clamps on the wastegate air fittings (4) and any other connections that are near sources of high heat. The installation is the same as any 2-port style install but is just tee d to accommodate both wastegates, see diagram below. The solenoid comes with a universal mounting kit and can be mounted however you would like though we typically mount them on the intake manifold as shown below. The solenoid is wired to the factory boost control solenoid connector using the supplied pigtail harness (polarity doesn t matter).
41

42 27. Confirm all lines, fittings, bolts and v-band connections are tight and install the heat shields using the supplied bolts and Nord-Lock washers. At this time you can also use the remaining steel straps to organize and mount the oil and coolant lines that run along the motor. The passenger side line also utilizes a tube clamp for mounting.

43

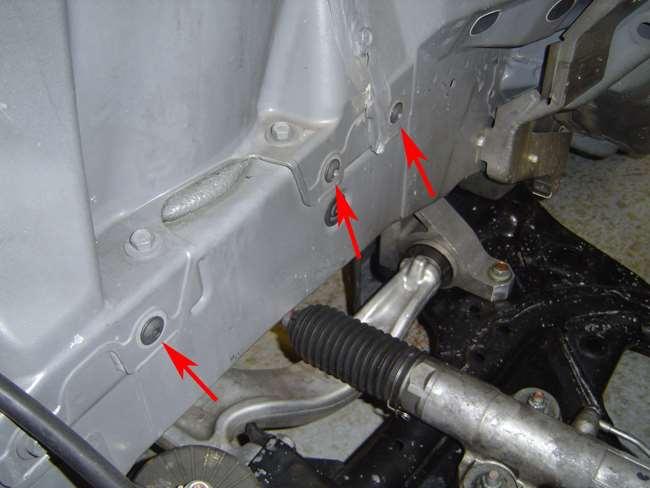
44 28. Clearance between the engine and body of the car is very tight so we have included 6 button head bolts to replace bolts currently in engine bay. Refer to picture below for which ones to replace.

45

46 29. DOUBLE-CHECK EVERYTHING! Make sure oil and coolant line connections are secure, wires and lines are protected from extreme heat sources and abrasion, hose clamps, exhaust and wastegate v- band clamps, fittings, and bolts are tight, etc. At this point you can re-install the motor. The subframe can be shifted slightly side to side, check clearance on both sides and shift if needed and once the motor is in you can install the rest of the intake tubes. Removal of the front bumper is required to gain access to this area, and you must remove the factory intake box and air guides for clearance for the new filters.

47 30. Replace oil filter, engine oil, and coolant. Load startup map for your particular car and setup into the ECU, start vehicle, and CHECK FOR LEAKS! Let the car warm up, bleed the cooling system, and check the oil level. 31. Follow your engine builder s recommended break-in procedure and GET TUNED!!!
Alpha Intercooler Install Instructions w/stock turbo
 Alpha 997.1 Intercooler Install Instructions w/stock turbo The goal of Alpha Performance is to provide the highest quality, best performing products available. By utilizing research and development, and
AMS EVO X Fuel Pressure Regulator Kit
 AMS EVO X Fuel Pressure Regulator Kit The goal of AMS is to provide the highest quality, best performing products available. By utilizing research and development, and rigorous testing programs AMS will
R35 GTR ALPHA X TURBO KIT INSTALLATION INSTRUCTIONS
 R35 GTR ALPHA X TURBO KIT INSTALLATION INSTRUCTIONS 04 06 09 10 14 21 30 31 34 Turbo Kit Packaging Information Engine Mount Installation Exhaust Manifold Installation Heat Shield Exhaust Manifold Shield
Nissan GTR Alpha Fuel System
 Nissan GTR Alpha Fuel System Instructions V5 The goal of AMS is to provide the highest quality, best performing products available. By utilizing research and development, and rigorous testing programs
AMS F1-I INTAKE MANIFOLD
 AMS F1-I INTAKE MANIFOLD The goal of AMS is to provide the highest quality, best performing products available. By utilizing research and development, and rigorous testing programs AMS will never compromise
Alpha Performance Air/Oil Separator Installation Instructions
 Alpha Performance Air/Oil Separator Installation Instructions 5-1-15 The goal of Alpha Performance is to provide the highest quality, best performing products available. By utilizing research and development,
INFINITI Q50/Q60 LOWER DOWNPIPE
 INFINITI Q50/Q60 LOWER DOWNPIPE The Alpha Performance Q60 Red Alpha lower downpipes offer a more pronounced, throaty exhaust note under wide open throttle yet are subdued at idle and while cruising. 2
Mercedes E63/CLS AMG Carbon Turbo Intake System Instructions
 Mercedes E63/CLS AMG Carbon Turbo Intake System Instructions The goal of Alpha Performance is to provide the highest quality, best performing products available. By utilizing research and development,
Nissan GT-R Intercooler Pipe Kit
 Nissan GT-R Intercooler Pipe Kit The goal of AMS is to provide the highest quality, best performing products available. By utilizing research and development, and rigorous testing programs AMS will never
RED ALPHA COOLANT EXPANSION TANK
 RED ALPHA COOLANT EXPANSION TANK Our Q60 and Q50 VR30 Red Alpha Expansion Tank increases the Red Alpha Heat Exchanger coolant capacity by an astounding 70% and the radiator coolant capacity by 28%! Our
RACE X INTERCOOLER INSTALLATION INSTRUCTIONS
 RACE X INTERCOOLER INSTALLATION INSTRUCTIONS The goal of AMS Performance is to provide the highest quality, best performing products available. By utilizing research and development, and rigorous testing
MERCEDES AMG45 HPFP UPGRADE
 MERCEDES AMG45 HPFP UPGRADE WARNING/DANGER: SERIOUS RISK OF FIRE, EXPLOSION, BODILY INJURY INCLUDING RESULTING DEATH, AND ENGINE, VEHICLE, AND OTHER PROPERTY DAMAGE. THIS FUEL PUMP MUST BE INSTALLED AND
Alpha GTR Transmission Pan/Spacer Kit
 Alpha GTR Transmission Pan/Spacer Kit 12-2-15 The goal of Alpha Performance is to provide the highest quality, best performing products available. By utilizing research and development, and rigorous testing
Difficulty Level: 3-4. This is very intensive for an intercooler installation. Experienced mechanical skills recommended. Wrenches Sockets Specialty
 Nissan GT-R FMIC The goal of AMS is to provide the highest quality, best performing products available. By utilizing research and development, and rigorous testing programs AMS will never compromise the
INFINITI Q50/Q60 Red Alpha Heat Exchanger
 INFINITI Q50/Q60 Red Alpha Heat Exchanger Whether you live in a hot climate region, enjoy racing, or long high speed pulls the INFINITI Q60/Q50 Red Alpha Heat Exchanger will help keep your intake temps
Rotated Tuner Kit for Garrett GT Turbos
 Rotated Tuner Kit for Garrett GT Turbos 031411 Thank you for purchasing the PERRIN performance rotated turbo kit. Installation of this turbo should only be performed by persons experienced in the installation
Instant Chat off the main page of Or simply call our tech team at
 08+ Rotated Tuner Kit for Garrett GT Turbos 2016-11-03 Thank you for purchasing this PERRIN product for your car! Installation of this product should only be performed by persons experienced with installation
INSTALLATION INSTRUCTIONS AIR/OIL SEPARATOR KIT
 INSTALLATION INSTRUCTIONS AIR/OIL SEPARATOR KIT 2015+ SUBARU WRX (LHD ONLY) Document: 19-0136 Support: info@radiumauto.com This document covers the installation of the Radium brake master cylinder brace
INSTALLATION INSTRUCTIONS AOS-R (Air Oil Separator-Return) Turbo Subaru and STi Document# Support:
 Turbo Subaru and STi Document# Support:") INSTALLATION INSTRUCTIONS AOS-R (Air Oil Separator-Return) 02-14 Turbo Subaru and 2015+ STi Document# 19-0102 Support: info@radiumauto.com These instructions are based on a vehicle with an OEM turbocharger
INSTALLATION INSTRUCTIONS AOS-R (Air Oil Separator-Return) 02-14 Turbo Subaru and 2015+ STi Document# 19-0102 Support: info@radiumauto.com These instructions are based on a vehicle with an OEM turbocharger
4. Remove (4) 10mm and (1) 7mm bolt that holds fascia at front corners, on each side
 10mm and (1) 7mm bolt that holds fascia at front corners, on each side") 2010 Camaro LS3 1. Disconnect battery ground 2. Remove front wheels 3. Remove (5) push pins and (5) #20 torx screws on inner front wheel well liners and remove liners on each side 4. Remove (4) 10mm and
2010 Camaro LS3 1. Disconnect battery ground 2. Remove front wheels 3. Remove (5) push pins and (5) #20 torx screws on inner front wheel well liners and remove liners on each side 4. Remove (4) 10mm and
INSTALLATION INSTRUCTIONS AOS-R (Air Oil Separator-Return) Turbo Subaru and STi Document# Support:
 Turbo Subaru and STi Document# Support:") INSTALLATION INSTRUCTIONS AOS-R (Air Oil Separator-Return) 02-14 Turbo Subaru and 2015+ STi Document# 19-0102 Support: info@radiumauto.com These instructions are based on a vehicle with an OEM turbocharger
INSTALLATION INSTRUCTIONS AOS-R (Air Oil Separator-Return) 02-14 Turbo Subaru and 2015+ STi Document# 19-0102 Support: info@radiumauto.com These instructions are based on a vehicle with an OEM turbocharger
TiAL R770 & S605. Installation notes. TIAL Sport!! TiALsport.com!! Revision 2
 TiAL R770 & S605 Installation notes TIAL Sport!! TiALsport.com!! Revision 2 Caution! The components in this package may require additional parts to be sourced or fabricated for the installation. Due to
Installation Instructions
 Installation Instructions Transverse K04 Tools Required Jack and jack stands Drain pan for coolant and oil 3" and 6" extensions Channel locks 7mm, 8mm, 10mm, 11mm, 12mm, 13mm, and 16mm sockets Oxygen sensor
INSTALLATION INSTRUCTIONS Dual Catch Can Kit Subaru Turbo and STi Document# Support:
 INSTALLATION INSTRUCTIONS Dual Catch Can Kit 02-14 Subaru Turbo and 2015+ STi Document# 19-0099 Support: info@radiumauto.com This document covers the installation of a Radium dual catch can kit for the
TABLE OF CONTENTS PARTS LIST
 TROUBLESHOOTING: Note: You will have a check engine light and/or other problems unless using this product with a compatible ECM calibration. H&S Motorsports provides compatible calibrations for H&S Performance
Air Oil Separator for WRX
 Air Oil Separator for 2015+ WRX 2018-06-05 Thank you for purchasing this PERRIN product for your car! Installation of this product should only be performed by persons experienced with installation of aftermarket
INSTALLATION INSTRUCTIONS AOS-R (Air Oil Separator-Return) Turbo Subaru and STi
 Turbo Subaru and STi") INSTALLATION INSTRUCTIONS AOS-R (Air Oil Separator-Return) 02-14 Turbo Subaru and 2015+ STi These instructions are based on a vehicle with an OEM turbocharger and top-mount intercooler. If a front-mount
INSTALLATION INSTRUCTIONS AOS-R (Air Oil Separator-Return) 02-14 Turbo Subaru and 2015+ STi These instructions are based on a vehicle with an OEM turbocharger and top-mount intercooler. If a front-mount
Instant Chat off the main page of Or simply call our tech team at
 Subaru WRX/STI Air Oil Separator for Front Mounted Intercooler Setups 2013-02- 22 Thank you for purchasing this PERRIN product for your car! Installation of this product should only be performed by persons
8 Zip Tie Zip Tie 1 Union Fitting 1 ½ ½ Union Reducer Fitting Union 1 5/8 ½ (For Plastic Intake Manifold Vehicles)
") P IAG Street Series Air / Oil Separator (AOS) For 2017 STI Part# IAG-ENG-7151 Tools Required: Ratchet, torque wrench, extensions, needle nose pliers, hose cutter, snips/scissors, flat head screw driver,
P IAG Street Series Air / Oil Separator (AOS) For 2017 STI Part# IAG-ENG-7151 Tools Required: Ratchet, torque wrench, extensions, needle nose pliers, hose cutter, snips/scissors, flat head screw driver,
IAG Competition Series Air / Oil Separator (AOS) For 2017 STI
 For 2017 STI") P IAG Competition Series Air / Oil Separator (AOS) For 2017 STI Part# IAG-ENG-7251 Tools Required: Ratchet, torque wrench, extensions, needle nose pliers, hose cutter, snips/scissors, flat head screw driver,
P IAG Competition Series Air / Oil Separator (AOS) For 2017 STI Part# IAG-ENG-7251 Tools Required: Ratchet, torque wrench, extensions, needle nose pliers, hose cutter, snips/scissors, flat head screw driver,
IAG Street Series Air / Oil Separator (AOS) For WRX
 For WRX") P IAG Street Series Air / Oil Separator (AOS) For 2015-16 WRX Part# IAG-ENG-7152 Tools Required: Ratchet, torque wrench, extensions, needle nose pliers, hose cutter, snips/scissors, flat head screw driver,
P IAG Street Series Air / Oil Separator (AOS) For 2015-16 WRX Part# IAG-ENG-7152 Tools Required: Ratchet, torque wrench, extensions, needle nose pliers, hose cutter, snips/scissors, flat head screw driver,
18SP680Rev3 EPA04 MBE 4000 Car Hauler Low Pressure Fuel Lines
 8SP680Rev3 EPA04 MBE 4000 Car Hauler Low Pressure Fuel Lines KIT DESCRIPTION These service kits include all necessary parts to replace the low pressure fuel lines between the fuel filter housing and fuel
V1 Truck Manifold Turbo Kit for F-body
 V1 Truck Manifold Turbo Kit for 98-02 F-body Prep: -Remove all A/C Components, Alternator and brackets, tensioner, front bumper, front bumper foam, and front bumper support. Remove radiator and cooling
Instant Chat off the main page of Or simply call our tech team at
 02-07 WRX/STI Air Oil Separator for Top Mounted Intercooler Setups 2013-02- 27 Thank you for purchasing this PERRIN product for your car! Installation of this product should only be performed by persons
Trackspeed Engineering, LLC 1289 Reamwood Ave #A, Sunnyvale, CA
 Trackspeed Engineering, LLC 1289 Reamwood Ave #A, Sunnyvale, CA 94089 650-701-7223 info@trackspeedengineering.com Trackspeed DIY Turbocharger System Installation Instructions v1.00 (10/12/16) Thanks for
2017+ L5P Duramax 3 ½ Down Pipe & EGR Fix Kit
 2017+ L5P Duramax 3 ½ Down Pipe & EGR Fix Kit Covers installation of PN s: WCF100630, WCF100829 Note: This Kit is for off road competition use only! Off Road Competition Use Tuning & Exhaust System is
BD Twin Turbo Cobra Kit
 14 September 2017 1045780-94 Dodge Cobra Kit (I-00377) 1 BD Twin Turbo Cobra Kit 2003-2012 Dodge HPCR Machined BD turbochargers only BUILDERS KIT Installation reccomendations to aid asssembly Does not
3 October 2016 PN# V Dodge Twin Turbo Kit (I-00274) ½ D o d g e 2 4 v I S B
 ½ D o d g e 2 4 v I S B") 3 October 2016 PN#1045320 24V Dodge Twin Turbo Kit (I-00274) 1 DOWNLOAD ENHANCED INSTALL MANUALS AT dieselperformance.com BD Twin Turbo Kit 1998½- 2 0 0 2 D o d g e 2 4 v I S B Part# 1045320 PLEASE READ
3 October 2016 PN#1045320 24V Dodge Twin Turbo Kit (I-00274) 1 DOWNLOAD ENHANCED INSTALL MANUALS AT dieselperformance.com BD Twin Turbo Kit 1998½- 2 0 0 2 D o d g e 2 4 v I S B Part# 1045320 PLEASE READ
Instant Chat off the main page of Or simply call our tech team at
 FRONT MOUNT INTERCOOLER 2015+ WRX 2017-07-07 Thank you for purchasing this PERRIN product for your car! Installation of this product should only be performed by persons experienced with installation of
IAG Street Series Air / Oil Separator (AOS) For WRX
 For WRX") IAG Street Series Air / Oil Separator (AOS) For 2008-14 WRX Part# IAG-ENG-7100 Tools Required: Ratchet, extensions, needle nose pliers, hose cutter, snips/scissors, flat head screw driver, hose clamping
IAG Street Series Air / Oil Separator (AOS) For 2008-14 WRX Part# IAG-ENG-7100 Tools Required: Ratchet, extensions, needle nose pliers, hose cutter, snips/scissors, flat head screw driver, hose clamping
05-08 GT. Hellion Power Systems Mustang Kit Instructions
 Hellion Power Systems 05-08 Mustang Kit Instructions 1. Disconnect Battery 2. Drain Radiator, keep fluid for re-installation. 3. Remove air box and inlethoses. 6. Next, underneath, punch oil pan for turbo
IAG Competition Series Air / Oil Separator (AOS) For WRX
 For WRX") P IAG Competition Series Air / Oil Separator (AOS) For 2015-16 WRX Part# IAG-ENG-7252 Tools Required: Ratchet, torque wrench, extensions, needle nose pliers, hose cutter, snips/scissors, flat head screw
P IAG Competition Series Air / Oil Separator (AOS) For 2015-16 WRX Part# IAG-ENG-7252 Tools Required: Ratchet, torque wrench, extensions, needle nose pliers, hose cutter, snips/scissors, flat head screw
Included parts: 1 - BorgWarner SX-E Turbocharger 1 - SX-E 90-Degree Compressor Outlet Elbow 1 - HSM Cast Exhaust Manifold 1 - HSM Downpipe
 TROUBLESHOOTING: Please read and understand all installation instructions before proceeding with the installation. If you have questions during the installation of this product, please email H&S Motorsports
Wrenches: ⅞, 8mm, 10mm, 13mm, 19mm P. allen, Other: Electrical Tape
 IAG Street Series Air / Oil Separator (AOS) For 2008-14 STI Part# IAG-ENG-7100 Tools Required: Ratchet, torque wrench, extensions, needle nose pliers, hose cutter, snips/scissors, flat head screw driver,
INSTALL MANUAL D o d g e 1 2 v 6 B T A PLEASE READ ALL INSTRUCTIONS BEFORE INSTALLATION.
 PN#1045310 12V Dodge Twin Turbo Kit (I-00273) 1 INSTALL MANUAL BD Twin Turbo Kit 1994-1 9 9 8 D o d g e 1 2 v 6 B T A Part# 1045310 PLEASE READ ALL INSTRUCTIONS BEFORE INSTALLATION. * Picture as shown
IAG Street Series Air / Oil Separator (AOS) For WRX & WRX STI
 For WRX & WRX STI") IAG Street Series Air / Oil Separator (AOS) For 2006-07 WRX & 2004-07 WRX STI Part# IAG-ENG-7100 Tools Required: Ratchet, torque wrench, extensions, needle nose pliers, hose cutter, snips/scissors, flat
IAG Street Series Air / Oil Separator (AOS) For 2006-07 WRX & 2004-07 WRX STI Part# IAG-ENG-7100 Tools Required: Ratchet, torque wrench, extensions, needle nose pliers, hose cutter, snips/scissors, flat
Parts List See cover Page
 Thank you for purchasing the CorkSport Front Mount Intercooler Kit for the 2010-2013 Mazdaspeed 3. Keep your BAT s under check with the CorkSport FMIC Kit with the small or large intercooler. Please let
P/N# Application Description Ford 6.0L Turbo Kit Only w/sct Tuner Ford 6.0L Turbo Kit Only (No drivability guarantee)
") 1 Low stall convertors are not recommended for this turbocharger kit. BD FORD 6.0L TURBOCHARGER KIT P/N# Application Description 1047070 2003-07 Ford 6.0L Turbo Kit Only w/sct Tuner 1047071 2003-07 Ford
1 Low stall convertors are not recommended for this turbocharger kit. BD FORD 6.0L TURBOCHARGER KIT P/N# Application Description 1047070 2003-07 Ford 6.0L Turbo Kit Only w/sct Tuner 1047071 2003-07 Ford
Installation Manual v1.0: P/N 202-A Aurora 3000/5000 Compound Turbo Kit Dodge Cummins 5.9
 Installation Manual v1.0: P/N 202-A35-2272 Aurora 3000/5000 Compound Turbo Kit 2003-2007 Dodge Cummins 5.9 Please read all instructions before installation. Figure 1. Figure 2. Figure 3. Figure 4. 1. Install
03-04 Cobra. Hellion Power Systems Mustang Cobra Kit Instructions
 Hellion Power Systems 03-04 Mustang Cobra Kit Instructions NECESSARY PARTS REQUIRED FOR INSTALLATION Necessary: 03-04 Cobra hellion Kit ONLY 99-01 Alternator #YR3210346AA Alternator Bracket #XR3Z-10153-AB
N55 Turbo upgrade install guide
 N55 Turbo upgrade install guide Thank you for your purchase of the VTT BMW N55 Stage 2 turbo charger upgrade! First thing to do when you open your box is to make sure all parts are in their respective
Installation Manual v1.0: Aurora Plus Turbo Kit ( ) 5.9L Dodge. Please read all instructions before installation.
 5.9L Dodge. Please read all instructions before installation.") Installation Manual v1.0: Aurora Plus - 4000 Turbo Kit (2003-2007) 5.9L Dodge Please read all instructions before installation. Figure 1: Aurora Plus - 4000 Kit Contents 1 Figure 2: Aurora Plus Hardware
Installation Manual v1.0: Aurora Plus - 4000 Turbo Kit (2003-2007) 5.9L Dodge Please read all instructions before installation. Figure 1: Aurora Plus - 4000 Kit Contents 1 Figure 2: Aurora Plus Hardware
INSTALLATION INSTRUCTIONS DUAL OIL CATCH CAN KIT
 INSTALLATION INSTRUCTIONS DUAL OIL CATCH CAN KIT SUBARU WRX FA20F ENGINE Document: 19-0135 Support: info@radiumauto.com This dual catch can kit installs in the right-hand side of the engine bay and intercepts
Included parts: 1 - BorgWarner SX-E Turbocharger 1 - SX-E 90-Degree Compressor Outlet Elbow 1 - HSM Cast Exhaust Manifold 1 - HSM Downpipe
 TROUBLESHOOTING: Please read and understand all installation instructions before proceeding with the installation. If you have questions during the installation of this product, please email H&S Motorsports
4 December 2017 PN# , , Dodge 6.7L Rumble B SXE (I-00400) 1. BD Rumble B SXE. D o d g e 6. 7 L H P C R Installation Instructions
 1. BD Rumble B SXE. D o d g e 6. 7 L H P C R Installation Instructions") 4 December 2017 PN#1045705, 1045706, 1045708 Dodge 6.7L Rumble B SXE (I-00400) 1 DOWNLOAD ENHANCED INSTALL MANUALS AT dieselperformance.com BD Rumble B SXE D o d g e 6. 7 L H P C R Installation Instructions
4 December 2017 PN#1045705, 1045706, 1045708 Dodge 6.7L Rumble B SXE (I-00400) 1 DOWNLOAD ENHANCED INSTALL MANUALS AT dieselperformance.com BD Rumble B SXE D o d g e 6. 7 L H P C R Installation Instructions
Installation Manual v1.0: MST Turbo Kit ( ) 5.9L Dodge. Please read all instructions before installation.
 5.9L Dodge. Please read all instructions before installation.") Installation Manual v1.0: MST Turbo Kit (2003-2007) 5.9L Dodge Please read all instructions before installation. Figure 1: MST Kit Contents Figure 2: MST Hardware Kit Please make sure all of the components
Installation Manual v1.0: MST Turbo Kit (2003-2007) 5.9L Dodge Please read all instructions before installation. Figure 1: MST Kit Contents Figure 2: MST Hardware Kit Please make sure all of the components
96-04 tt. Hellion Power Systems Mustang Twin Turbo Kit Instructions
 96-04 tt Hellion Power Systems 1996-2004 Mustang Twin Turbo Kit Instructions 1. Disconnect battery and elevate front end of car on either Jack stands or a lift if available 2.Lock steering wheel and remove
PowerMax Diesel Upgrade For Cummins Engines
 PowerMax Diesel Upgrade For Cummins Engines 00.5-007.5 Dodge Ram With Cummins 5.9L Item 3 4 5 6 7 8 9 0 3 4 5 6 7 8 Parts List Description Turbocharger Ancillary kit 773069- (includes) Installation Instructions
IAG Street Series Air / Oil Separator (AOS) For 2017 WRX
 For 2017 WRX") P IAG Street Series Air / Oil Separator (AOS) For 2017 WRX Part# IAG-ENG-7152 Tools Required: Ratchet, torque wrench, extensions, needle nose pliers, hose cutter, snips/scissors, flathead screwdriver,
P IAG Street Series Air / Oil Separator (AOS) For 2017 WRX Part# IAG-ENG-7152 Tools Required: Ratchet, torque wrench, extensions, needle nose pliers, hose cutter, snips/scissors, flathead screwdriver,
CHALLENGER TWIN TURBO SYSTEM INSTALLATION INSTRUCTIONS
 CHALLENGER TWIN TURBO SYSTEM INSTALLATION INSTRUCTIONS 1 Verify contents of kits with supplied packing list 1) Unhook the battery. 2) Remove wheel wells & front fascia of vehicle. 3) Remove the catalytic
IAG Street Series Air / Oil Separator (AOS) For WRX & WRX STI
 For WRX & WRX STI") IAG Street Series Air / Oil Separator (AOS) For 2006-07 WRX & 2004-07 WRX STI Part# IAG-ENG-7150 Tools Required: Ratchet, torque wrench, extensions, needle nose pliers, hose cutter, snips/scissors, flat
IAG Street Series Air / Oil Separator (AOS) For 2006-07 WRX & 2004-07 WRX STI Part# IAG-ENG-7150 Tools Required: Ratchet, torque wrench, extensions, needle nose pliers, hose cutter, snips/scissors, flat
03-04 Mach 1. Hellion Power Systems Mach 1 Kit Instructions
 Hellion Power Systems 03-04 Mach 1 Kit Instructions Part 1 Hellion recommends that the front suspension system be installed either by trained professionals or by 5.Remove rack bolts K-Member Installation
Includes: 1. J-hook Block Off / Coolant Reroute 1. Coolant Hose 1. Turbocharger Up Pipe Block Off Disc 2. Hose clamps
 Includes: 1. J-hook Block Off / Coolant Reroute 1. Coolant Hose 1. Turbocharger Up Pipe Block Off Disc 2. Hose clamps WARNING: This product is not legal for sale or use on pollution controlled vehicles
MAZDASPEED3 Intercooler Instructions
 MAZDASPEED3 Intercooler Instructions Congratulations on your purchase of the COBB Tuning Front Mount Intercooler System for your 2007-2009 Mazdaspeed3. The following instructions should assist you through
IAG Street Series Air / Oil Separator (AOS) For WRX & WRX STI
 For WRX & WRX STI") IAG Street Series Air / Oil Separator (AOS) For 2006-07 WRX & 2004-07 WRX STI Part# IAG-ENG-7150 Tools Required: Ratchet, torque wrench, extensions, needle nose pliers, hose cutter, snips/scissors, flat
IAG Street Series Air / Oil Separator (AOS) For 2006-07 WRX & 2004-07 WRX STI Part# IAG-ENG-7150 Tools Required: Ratchet, torque wrench, extensions, needle nose pliers, hose cutter, snips/scissors, flat
Instant Chat off the main page of Or simply call our tech team at
 FRONT MOUNT INTERCOOLER 2008-13 STI 2014-04- 08 Thank you for purchasing this PERRIN product for your car! Installation of this product should only be performed by persons experienced with installation
All cores due 30 days after invoice date - no credit after 60 days.
 NO WARRANTY STATEMENT High performance parts & products no warranty policy: The purchaser understands and recognizes that high performance diesel products and services sold by INDUSTRIAL INJECTION SERVICE.
INSTALLATION INSTRUCTIONS FUEL RAIL
 INSTALLATION INSTRUCTIONS FUEL RAIL MITSUBISHI EVO X Document# 19-0067 Support: info@radiumauto.com WARNING: DON'T SMOKE OR WORK WITH OPEN SPARKS WHILE WORKING ON THE FUEL SYSTEM PREPARING THE VEHICLE:
Subaru Front Mount Intercooler Kit STI Subaru Front Mount Intercooler Kit STI
 Subaru Front Mount Intercooler Kit STI 2008-2014 715500 Subaru Front Mount Intercooler Kit STI 2008-2014 Congratulations on your purchase of the Subaru Front Mount Intercooler Kit STI 2008-2014. The following
Installation Instructions
 2011-2013 LML DURAMAX COMPOUND-ADD 2011-2015 LML A Duramax TURBO KIT Add INSTALL A Turbo INSTRUCTIONS Compound Kit Installation Instructions 1-800-955-0476 - www.industrialinjection.com - info@industrialinjection.com
Skidoo XM Etec Installation Instructions
 Thank you for purchasing your Silber Turbo kit. This product was designed to give you endless amounts of power and satisfaction. During the installation feel free to call us with any question or concerns
BD 6.7L Super B Special Turbo Kit For L Dodge -- I n s t a l l a t i o n I n s t r u c t i o n s -- PN#
 26 September 2012 1045140 6.7L Super B Special Turbo Installation 1 BD 6.7L Super B Special Turbo Kit For 2007.5-2012 6.7L Dodge -- I n s t a l l a t i o n I n s t r u c t i o n s -- PN# 1045140 PLEASE
IAG Air / Oil Separator (AOS) For STi
 For STi") IAG Air / Oil Separator (AOS) For 2008-14 STi Part# IAG-ENG-7000 Tools Required: Ratchet, torque wrench, extensions, needle nose pliers, hose cutter, snips/scissors Sockets: 10mm, 12mm 13mm Wrenches: 10mm,
IAG Air / Oil Separator (AOS) For 2008-14 STi Part# IAG-ENG-7000 Tools Required: Ratchet, torque wrench, extensions, needle nose pliers, hose cutter, snips/scissors Sockets: 10mm, 12mm 13mm Wrenches: 10mm,
Polaris Axys Sidekick Installation Instructions
 2016-2017 Polaris Axys Sidekick Installation Instructions 1. Remove hood and side panels. 2. Remove fasteners and slide console back. 3. Remove belt and driven clutch. 4. Remove clutch cover/ oil-tank
Air Oil Separator for WRX/STI Top Mounted Intercooler Setups
 Air Oil Separator for 02-07 WRX/STI Top Mounted Intercooler Setups Thank you for purchasing this PERRIN product for your car! Installation of this product should only be performed by persons experienced
INSTALLATION INSTRUCTIONS CATCH CAN KIT
 INSTALLATION INSTRUCTIONS CATCH CAN KIT FORD FOCUS Document: 19-0150 Support: info@radiumauto.com STEPS 1-19 COVER THE PCV SIDE CATCH CAN KIT (P/N: 20-0315) STEPS 20-32 COVER THE CRANKCASE CATCH CAN KIT
BD Twin Turbo Cobra Kit
 17 March 2017 1045780-94 Dodge Cobra Kit (I-00377) 1 BD Twin Turbo Cobra Kit 2003-2012 Dodge HPCR Machined BD turbochargers only BUILDERS KIT Installation reccomendations to aid asssembly Does not include
** Remove the radiator, fan, and then pad the AC condensor to avoid puncture during install!
 Basic Installation Instructions - Status: *Preliminary* Control Doc#: Unassigned Product: Stock Location GT/GTX Ball Bearing 30R and 35R Series Twinscroll (Internally Wastegated) Pre-installation Notes:
M-TUNED COOLANT RE-ROUTE KIT
 M-TUNED COOLANT RE-ROUTE KIT Part # MC-RR-216, MC-RR-218 Applications: 90-93 Miata 1.6L B6 94-97 Miata 1.8L BP More detailed instructions: http://www.etdracing.com/m-tuned/reroute.pdf 1) Disconnect Negative
ZZP LNF Cobalt Turbo Upgrade
 ZZP LNF Cobalt Turbo Upgrade Note: These instructions are intended for installers with previous turbo installation experience. Some procedures will not be described in full detail. If you run into any
BD 6.7L Super B Special Turbo Kit For L Dodge -- I n s t a l l a t i o n I n s t r u c t i o n s -- PN#
 28 January 2014 1045140 6.7L Super B Special Turbo Installation (I-00266) 1 BD 6.7L Super B Special Turbo Kit For 2007.5-2012 6.7L Dodge -- I n s t a l l a t i o n I n s t r u c t i o n s -- PN# 1045140
2014+ Ram 3.0 EcoDiesel EGR Delete
 2014+ Ram 3.0 EcoDiesel EGR Delete Installation Guide WARNING: This product is for competition use only in a sanctioned racing event. NOT FOR USE ON VEHICLES USED OR REGISTERED FOR USE ON A PUBLIC ROAD
3 WRX/STI TURBO INLET HOSE
 3 WRX/STI TURBO INLET HOSE Thank you for purchasing this PERRIN product for your car! Installation of this product should only be performed by persons experienced with installation of aftermarket performance
Installation Instructions
 Description Contents Revo Test Pipe or Optional Catalytic Converter Pipe Revo Mid Pipe Revo FWD Reducer Pipe Recommended Tools Quantity Tool Size 1 Hex Key / Socket 6 1 Sockets 13 (deep well) 1 Ratchet
Industrial Injections Compound Turbo Installation For 6.7L Scorpion
 Industrial Injections Compound Turbo Installation For 6.7L Scorpion Step 1: Whenever you are doing an installation the first thing you should do is unhook the batteries to avoid arcing. You will need an
Turbo Upgrade Kit Installation for Ford Mustang Ecoboost PN *
 Turbo Upgrade Kit Installation for Ford Mustang Ecoboost PN - 251010* BORLA PERFORMANCE INDUSTRIES ***** Please compare the parts in the box with the bill of materials provided ***** to assure that you
Scion FR-S ZN6. GTX2867R Gen2 (Internal Wastegate) Installation Instructions GPP P/N #
 Installation Instructions GPP P/N #") TURBO KIT Scion FR-S ZN6 Subaru BRZ ZC6 GTX2867R Gen2 (Internal Wastegate) Installation Instructions GPP P/N # 11518000 Vehicle Type Chassis Code Engine Code Transmission Model Year Scion FR-S DBA-ZN6
TURBO KIT Scion FR-S ZN6 Subaru BRZ ZC6 GTX2867R Gen2 (Internal Wastegate) Installation Instructions GPP P/N # 11518000 Vehicle Type Chassis Code Engine Code Transmission Model Year Scion FR-S DBA-ZN6
BD Cobra Compound Turbo
 3 July 2018 1045780-98 Dodge Cobra Turbo Kit (I-00377) 1 DOWNLOAD COLOR INSTALL MANUALS AT www.dieselperformance.com BD Cobra Compound Turbo 2003-2018 Dodge Cummins Cobra 76 Cobra 80 Cobra 86 Cobra 88
CORKSPORT Power Series Cat Back Exhaust I N S T A L L A T I O N I N S T R U C T I O N S Mazda 6 2.5T PART #: ATK
 I N S T A L L A T I O N I N S T R U C T I O N S CORKSPORT Power Series Cat Back Exhaust 2018+ Mazda 6 2.5T PART #: ATK-6-101-12 Need Help With Your Installation? Call (360) 260-CORK PAGE 1 CORKSPORT Power
R35 GT-R GT1000 FULL TURBINE KIT INSTALLATION MANUAL
 R35 GT-R GT1000 FULL TURBINE KIT INSTALLATION MANUAL Installation must be done by a professional. Read this manual prior to the installation. Always have access to this manual as well as a factory service
99-04 GT. Hellion Power Systems Mustang GT Kit Instructions
 Hellion Power Systems 99-04 Mustang GT Kit Instructions Part 1 Hellion recommends that the front suspension system be installed either by trained professionals or by 5.Remove rack bolts K-Member Installation
* PLEASE READ INSTRUCTIONS PRIOR TO INSTALLATION *
 XDP Duramax LBZ EGR Race Track Kit Item Number: XD165 PACKING LIST: 1 LBZ EGR Plate for Up Pipe 5 M8x1.25-20mm Bolt 2 M10x1.5 Flange Hex Nut 1 LBZ EGR Plate for Intake 1 M8x1.25-45mm Bolt 1 M8x1.25 Flange
Air Oil Separator for Subaru WRX/STI Front Mounted Intercooler Setups
 Air Oil Separator for Subaru WRX/STI Front Mounted Intercooler Setups 2015-01-05 Thank you for purchasing this PERRIN product for your car! Installation of this product should only be performed by persons
Tools Required. Metric Wrench Set Screwdriver Set Metric Socket Set Pliers Heavy duty hydraulic Jack and Car Stands Box knife or similar Hacksaw WD40
 Subaru 2004+ Legacy GT & Outback XT For JDM 2.0 twinscroll turbo and USDM 2.5 turbo models Front Mount Intercooler Fitting Instructions PN# LEG-1348-000 You are now the proud owner of a highly tested and
BD TrackMaster S D o d g e H P C R Installation Instructions
 7 July 2016 PN#1045701, 1045702, 1045704 Dodge 6.7L TMS400 (I-00361) 1 BD TrackMaster S400 2008-2012 D o d g e H P C R Installation Instructions 1045701 2008-2009 Dodge 6.7L TMS400 1045702 2010-2012 Dodge
INSTALLATION INSTRUCTIONS CATCH CAN KIT
 INSTALLATION INSTRUCTIONS CATCH CAN KIT FORD FIESTA ST Document: 19-0175 Support: info@radiumauto.com STEPS 1-14 COVER THE PCV SIDE CATCH CAN KIT (P/N: 20-0377) STEPS 15-31 COVER THE CRANKCASE CATCH CAN
(905)
") (905)953-9260 Marc@M-Tuned.com Coolant Reroute Kit *Professional Installation Recommended but not required 1) Disconnect Negative Terminal from Battery in trunk. 2) Drain Coolant from your cooling system.
(905)953-9260 Marc@M-Tuned.com Coolant Reroute Kit *Professional Installation Recommended but not required 1) Disconnect Negative Terminal from Battery in trunk. 2) Drain Coolant from your cooling system.
Pump Gas Instructions for Polaris And 800 Models. Important Information before Installing This System:
 Pump Gas Instructions for Polaris 600 700 And 800 Models Important Information before Installing This System: Before you begin your turbo install, read through these instructions to determine if you are
COBB 3-Port Electronic Boost Control Solenoid
 COBB 3-Port Electronic Boost Control Solenoid Mitsubishi Evolution X / Ralliart Congratulations on your purchase of the COBB Tuning 3-Port Electronic Boost Control Solenoid. The following instructions
Shotgun Single Barrel HPFP install guide
 Shotgun Single Barrel HPFP install guide Thank you for your purchase of the VTT Shotgun Single Barrel HPFP upgrade! First thing to do when you open your box is to make sure all parts are in their respective