Bimmerboard How-Tos. E32 E34 E38 5HP30 Valve body restoration by Jeff Chia April 2008
|
|
|
- Marianna Ellis
- 5 years ago
- Views:
Transcription
1 Bimmerboard How-Tos E32 E34 E38 5HP30 Valve body restoration by Jeff Chia April 2008 Updated Aug 2009 If this article has helped you, please donate to This doc is possible because of everyone else who have done this before me and posted on Bimmerboard. I ve added more pics and my input to help others as they have helped me. Reasons to do this: Prevent damage to transmission. Symptoms: Reverse takes second to engage. Feels like the handbrake is engaged when reversing. Whining when changing gears with a cold car or when the weather is cold. What can happen if this is not done. Damaged clutch packs in the transmission which require it to be rebuild. A check ball which had worn past its limit causes high pressure in the valve body which damages clutch and other components in the transmission (or so I read) Tools/equipment required - Torx 27 bit - 13mm socket - 14 mm hex key (cut) or 5/8 coupling nut - 17mm hex key or ¾ coupling nut - Impact screwdriver (optional) - electric screwdriver (optional) - Torque wrench - Oil pump - O-ring removal tool or smart pick (optional) - Plastic pan that is as long and wide as the trans oil pan Parts in Canadian dollars - 1xZF Valve body kit Pn: 5HP30VBK $200 Local ZF Distributor - 2xcheck balls are part of the kit - Oil filter and Oil pan gasket $40-22xStainless steel M6x25 bolts, and washers $10 your neighbor hardware store - 12xLitres of QuakerState Multi vehicle Transmission Oil $72-2 cans of Brake cleaner $10 Optional - 2xwire harness O rings $14-4xValvebody riser O-rings $? Steps summary - Drain transmission oil - Remove oil pan
2 - Disconnect wiring harness and speed sensor - Remove filter - Remove valve body - Replace valve body parts - Replace O-rings - Install valve body - Install filter - Install oil pan - Fill with engine off, start engine and fill with engine on - Testdrive for whine - Check for leaks - Wait for transmission to cool down to below 20C - Top up when transmission is below 20C Torque settings Oil drain screw 50 NM Fill screw 100NM Oil pan 71 in/lbs Rear speed sensor - 71 in/lbs VB to trans screws 71 in/lbs Housing screws 53 in/lbs Oil filter 53 in/lbs


3 Drain transmission To start, get you vehicle high enough to get underneath it and out easily. My excuse to get a lift. If possible, make the front a bit lower than the rear so that the trans oil can drain better. Very first step, make sure that you loosen the fill screw in the middle of the trans with a 17mm hex key before proceeding. If you cannot do this step then STOP. No point of doing everything and not be able to fill the transmission with new oil. To remove the oil, the drain plug requires a 14mm hex key. Unfortunately, standard L-shaped hex keys will not fit as there is not enough room to insert it between the exhaust and the drain plug, unless you cut them. Alternately I use a 5/8 coupling nut to loosen the drain plug. Get this from HomeDepot or your local hardware store.

")

4 I've done some prework and replaced all the rusting torx screws with stainless steel hex ones. I had 5 that were stripped as I tried to remove them by hand. I had to use my impact screwdriver (in the blue metal case) to remove them. Glad I had the lift as it gave me enough room to swing the hammer. This was the color of the 180K km transmission oil. Capucinno, anyone?


5 All the rest of it. Here's a shot of the new and old oil
 on the oil pan hand tight. This is where the electric screwdriver come in handy.")


6 Once the dripping stopped, clean and re-install the oil drain plug with the washer. Mine had a bit of iron filing in it. Leave two screws (one front, one rear) on the oil pan hand tight. This is where the electric screwdriver come in handy. Remove all the others. Lay a couple of sheet of newspaper on the floor for the oil pan and the plastic pan on the floor below the oil pan to catch the drips. While holding the oil pan up with one hand, remove the last two screws. A buddy is also helpful here. Since there is some oil left in the pan, holding the oil pan level, and lower it onto the newspaper. If you stripped the torx screw, which I did for about 5 of them, I dremeled a slot into the head and use a normal slotted tip to turn it. A friend said that he used steel chisel and tap the edge of the screw to force it to turn. Dirty pan


7 Mmmmm Cleaned pan The oil carrier just sits on top of the magnet in 3 holes. Take care not to dislodge it when you install the oil pan. Here is what the magnet looks like with a lot of fine iron stuff on it. Look at what it goes in the previous pic


8 And here it is cleaned. Now loosen the oil filter screws.


9 Lower in the rear so that the oil in it drains. Mine is branded by Zeller the departmental store. Never knew they stock trans filters. Once the dripping stops. Remove it. Another view of the old filter


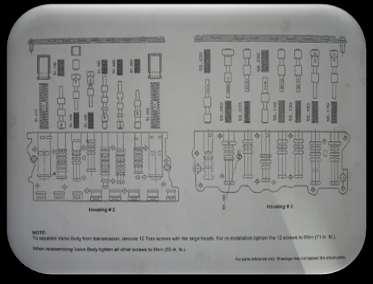
10 This is what an original FILTRAN filter and O ring looks like from the 750. This has no whine. It should say FILTRAN. Dealer has them at a good price too. Loosen all 12 bigger flat screws that hold the VB up. Remove 10 if you wish, but leave one in front and one in the rear. I left all 12 in with a couple of turns into the housing. Make sure these two do not come off but out enough to lower the VB to have most of the oil in it and the torque converter to drain. Lowering the VB means clearing the two risers at the front. Note the two o-rings that is holding it up which is what you need to lower enough before the oil in the torque converter will drain.


11 Here is a pic of the other side of the valvebody with the two risers that you need to lower enough to drain more oil. While waiting for it to drip, it is a good time to remove the wire harness and rear speed sensor (13mm socket). Spin canon connector anti clockwise. It will push out and back. Remove metal clip on the canon plug by sliding it off.


12 Push the plug into the transmission Here is a shot of the inside view Notice the two white o-rings that you will want to replace as the 5HP30 will always leak here over time. Pay me now or pay me later.


13 Note the notch in the connector, in the upper right of this pic, that you will need to align to a bump on the trans housing when you reinstall it. Remove the rear speed sensor screw and clip Another view with the sensor removed


14 Note how the shift valve on the VB is connected by the slot to the shift lever which connects to the shifter up in the cabin. You ll need to re-align it in the same slot when you install it later. The dripping should have slowed a lot by now. Remove all the flat screws and lower the VB into the plastic tray. It is heavy and will have a bit of oil dripping from it. You will need to jiggle it a bit more before it actually drops as it might still be held up by the riser o- rings. A buddy to hold it up, at this point will be ideal. Trans without VB. The will still be some dripping so keep a tray here to keep the floor clean as you might be laying down on it later on. In my case, my shoes stay clean and not bring into the house, oil underneath my shoes. I hate cleaning floors.


15 A big plastic tray is going to make things easier and cleaner than newspaper or plastic sheets. Mine is 3 times longer than the VB so that I can move stuff around, clean parts on the left, leaving space to work on any housing on the right without having any screw and springs fall under my table. I got mine at WalMart. It is a clothing tray. There s probably 300 ml of oil left in the VB at this point in time. Get a roll of paper towels, or cloth. Start with paper towels then once cleaned, only use cloth. Paper towels tend to shed a lot of particles that you do not want blocking the passages in the valve body. It is also a good time to identify your VB version. Mine is 312. You ll need this to figure out which paper gasket to use or just eyeball the old to figure it out.


16 Also a good time to change out the harness o rings A view of the other side of the VB Remove the screws holding the speed sensor on the VB.


17 Remove all the screws in housing 1 to free it from the VB. All screws off The underside of Housing 1


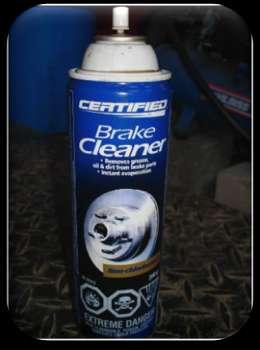
18 Gunk that has deposited on the metal plate that had flowed through the channels in Housing 1 over time. Opening housing 1 up to replace the springs. I ve found that this might not be necessary if you car forward gear shifts fine. You should open it up and clean the deposited gunk off with brake cleaner whichever route you pick. Be forewarned that when opening the lids for the springs, they are under a good bit of pressure. Remove all springs and valves, clean it with the brake cleaner, replace with new parts and close it up. I use a clamp to help me compress the springs. The middle spring and valves are held by a key that you push out. There is another key lower down, but I found that you do not need to remove it as there was nothing to change there.


19 Housing 1 with everything removed Clamping it to help reinstall


20 Now do the same for housing 2 I ve loosen all the screws first, then use an electric screwdriver to make the job easier. Zip, zip.


21 Other side of housing 2 Removing and replacing all springs from Housing 2 Closing Housing 2 up


22 Cleaned and closed. Now remove Housing 3. Housing 3 is held by the screws on housing 2. One checkball is located here. See if you can find it. Hopefully it has not worn out small enough to cause pressure problems and break something. Where is it? You say. Check here.


23 Now for the channel plate. We will need to remove the two metal bars on the other side which is held by 4 and 3 screws each. Loosen them all and remove 3 and 2 screws each. I had loosened the screws to the 2 bars first then perched it on the edge of the tray and removed the screws from below. This prevented the checkball and orifices from falling out and allowed me to take pictures of where all of them should be. This is the same technique I used to re- install it.

 allowing it to pass through the metal gasket to housing 3.")

24 Flipping the metal and paper gasket over. Actually the gasket is almost always suck on the housing, so slide a very thin metal in between them and work the edges slowly so not to crack the gasket. You can use a flat 1/2mm cake scoop, drywall taping knife, trowels to slide in between them. Note where everything is. Where is the checkball! My check ball is missing. It should be in the upper right oval channel. Im my case, it has worn out enough (1/16 in) allowing it to pass through the metal gasket to housing 3. This is probably what is causing my reverse issues. Luckily I caught this in time by opening up the VB, as the worn out checkball was in housing 3 but has not gone anywhere else and case more damage yet. I was later told that it not being in its position to block some pressure going the Housing 3 could have cause major damage. Phew, did not. I took some measurements of the checkballs. The one in the channel plate is the most worn. Strangely enough I did the same to my iL with 140,000km which has almost no wear(1/64) on the balls. I think the material is also different-brown(new) vs green(old)


25 Here s a shot of the new and old channel plate filter Incredible how much grime get collected in the channels. Here s the old gasket


26 And the new All the new parts are in place Cleaned with all new orifices in place


27 Here s where the checkball is supposed to be New paper gasket in place


28 Metal gasket in place Whatever you do, DO NOT flip the channel plate over Place the two metal bar on top of the metal gasket and attach the 7 screws from below. This will ensure that the check balls or orifice do not fall out of their position. Now, you can flip them over and torque the 7 screws. Insert the new filter.


29 Here s a view of the metal gasket for housing 3. Reinstall time. Here is another tricky step, make sure that the check ball in housing 3 does not fall out. Before adding Housing 1, make sure that the shift valve is in it first and in the slot as show below ( see the pics further down) Place housing 2 with the channels facing up, align screw holes with the channel plate, put the metal gasket over housing 3 (ensuring that the check ball does not fall out), flip housing 3 over and slide both the metal gasket and housing 3 together into position over the channel plate. Remember housing 3 has a check ball that can fall out. I balanced all 3 at the edge of my tray and screwed them together with a couple of screws, then turned them over to finish the job. This is the new grey shift valve. This triangle tip must be in the notch


30 Old vs new shift valve This is the correct position. Ask me how I knew. Almost there. Last VB step, screw in all the screws and torque them up.


31 Now is your last chance to align the shift lever to the vb shift valve. Failing to do this means you will have to do this again. The trans will lock the shift gate and disable the transmission. Make sure your hands/gloves are very clean as any dirt will definitely plug up the small orifices and the channel plate filter. Have a buddy to hold up the VB, align the shift, seat the risers, and screw in two screws. Then the last 10 screws. Check the torque of the round housing screws (51 in/lb), vb to trans flat screws (71 in/lb. Then you seat the riser of the filter into the VB, buddy hold it up while you put the last 2 screws in (51 in/lb) Nice and clean pan ready to go back.


32 Once the first screw was in, I left it quite loose so that I can ensure that the other screws went through the holes in the gasket. If you can use this as, it will save you a lot of time, it saved me a ton of grief. I bought a few of the other pumps from auto parts store but they were quite lame. It is a garden chemical pressure pump/sprayer.


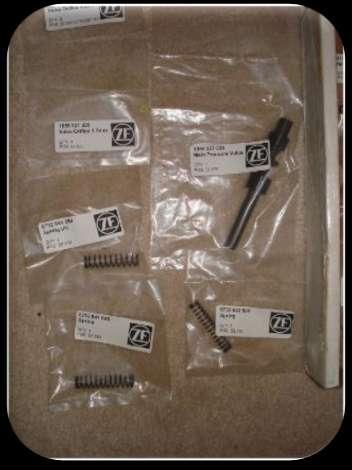
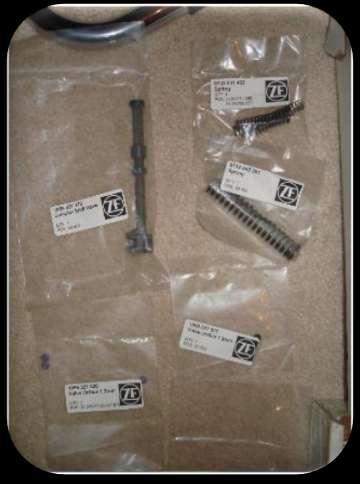
33 I used this to pump the last 1 liter a morning, two days later. I drove the car for a couple of days and found that there was no whine even though I was low a litre. Looks like a soap pump. It is actually an outboard motor or small engine oil pump I think. Parts in the kit And docs that came with it

34
35
36
Tools needed: Here is a pic of the shift kit I used. It is a Transgo brand and as you can see, it just a bag full of springs and one valve.
 Before installing a shift kit, be sure the transmission is in good operating order. If your transmission is making noises, slipping, shifting bad or the fluid looks brown or smells burnt, take the transmission
Changing the Struts on a WK Jeep CRD
 Changing the Struts on a WK Jeep CRD Step by Step By Chirpz Disclaimer: I do not claim that this procedure is the right way or even the best way to change your struts. This is what I did after reading
Some tips and tricks I learned from getting clutch out of vehicle Skoda Octavia year 2000
 Some tips and tricks I learned from getting clutch out of vehicle Skoda Octavia year 2000 Last change 2013-Oct-11 I bought Haynes manual for a starter. That s something well worth it s cost I believe.
List of parts needed below. Tools needed
 1 BMW 645 Coolant leak repair (Cap with Seal Repair and Expanding Coolant Pipe Installation w Pics) By Michael R. Brown (Estimated time to complete the job is 6-8 hrs) List of parts needed below. BMW PART
2007 Crown Victoria Police Interceptor (P71) Blend Door Actuator Replacement (If I did it, you can too.)
 Blend Door Actuator Replacement (If I did it, you can too.)") 2007 Crown Victoria Police Interceptor (P71) Blend Door Actuator Replacement (If I did it, you can too.) I'm not saying this is the only way, or even the right way, but it worked for me. First time I've
2007 Crown Victoria Police Interceptor (P71) Blend Door Actuator Replacement (If I did it, you can too.) I'm not saying this is the only way, or even the right way, but it worked for me. First time I've
How I installed new brake pads on my i with Sport Package (should be fine for other E39 s) By Robert B.
 By Robert B.") How I installed new brake pads on my 1999 528i with Sport Package (should be fine for other E39 s) How I installed new brake pads on my 1999 528i with Sport Package (should be fine for other E39 s) By
How I installed new brake pads on my 1999 528i with Sport Package (should be fine for other E39 s) How I installed new brake pads on my 1999 528i with Sport Package (should be fine for other E39 s) By
There is hence three things you can do - add oil, adjust the temp that the clutch begins to engage, or do both.
 As most of you may be aware, I have been doing a lot of research lately on our cooling system in the 80's including the fact that we have a dead spot on the OEM temp gauge which prompted me to not rely
Replacing MK4 Golf/Jetta radiator mounts in-car
 Replacing MK4 Golf/Jetta radiator mounts in-car This is a guide to replacing the radiator mounts in a MK4 Golf/Jetta. This involves moving the core support to the service position which allows you to do
Sunroof Repair. Sunroof Repair TSB. The sunroof repair kit available for the J30 is part number Y20. See images at bottom of document.
 Sunroof Repair This document is the text/images from the TSB (technical service bulletin) issued by Infiniti concerning the repair procedure for sunroof issues. Be advised that this is a LARGE, TIME-CONSUMING
Ford Racing BOSS 302 Engine Oil Cooler (11-14 GT)
") Tools needed: 14mm hex socket 7mm socket/wrench 8mm socket/wrench Ford Racing BOSS 302 Engine Oil Cooler (11-14 GT) 10mm socket (for airbox removal) ¾ inch or 19mm wrench Torque wrench Appropriate ratchets
Tools needed: 14mm hex socket 7mm socket/wrench 8mm socket/wrench Ford Racing BOSS 302 Engine Oil Cooler (11-14 GT) 10mm socket (for airbox removal) ¾ inch or 19mm wrench Torque wrench Appropriate ratchets
ACURA NSX ABS/ALB Modulator Rebuild Procedure
 Version 03 ACURA NSX ABS/ALB Modulator Rebuild Procedure I rebuilt my 1991 ABS/ALB modulator using this procedure. Please note that this will not guarantee that your ABS/ALB system issues will be resolved
We recommend installing the TRS Racebars first as we have done
 Thanks for purchasing the 2 Front Lowering Kit for the Honda Grom (MSX125). This is a basic installation guide, and we tried to cover everything, but use your best judgment along the process. It is recommended
Front Suspension Redo
 Front Suspension Redo Message: First, thanks to all the previous posters for guidance in my doing the suspension. As thanks, here s the updated document for doing the front suspension. Procedure: While
Volvo 1800 Dash Pad Replacement
 Volvo 1800 Dash Pad Replacement (courtesy of John Garden State Chapter Volvo Club America) Reupholstering the dash Well it has been some time since I have been online in the forum. Winter is a quite time
Mark had the car on the lift when I got there. The dog was friendly, but not much help.
 Mark s 2015 Jetta. Changed oil and 10k service on 11 October 2015. Updated with 20k service on 28 February 2016. Mark had the car on the lift when I got there. The dog was friendly, but not much help.
Connecting the rear fog light on the A4 Jetta, while keeping the 5 Light Mod
 Connecting the rear fog light on the A4 Jetta, while keeping the 5 Light Mod DISCLAIMER: I'm human and make mistakes. If you spot one in this how to, tell me and I'll fix it This was done on my 99.5 Jetta.
HOW TO REPLACE THE SPOILER ON YOUR GEN 3 PRIUS
 HOW TO REPLACE THE SPOILER ON YOUR GEN 3 PRIUS Yup, it happened. The spoiler on your beloved Prius has departed this earth and now is in the great junkyard in the sky. This is how you make it all better
Door Panel Removal & Window Stop Adjustment
 Door Panel Removal & Window Stop Adjustment By: Jeff Wolford Disclaimer: This is simply an article of how I fixed my car. I m not responsible if you break, scratch, or mess up anything following my example.
TCI Trans-Scat
 Page 1 of 5 Return to Instruction Sheet index TCI 350000 Trans-Scat Installation Instructions For TURBO HYDRAMATIC 350 This kit will allow you to reprogram your transmission to meet your driving needs
Installation Directions for FINGER STICK and Blocker Plate
 Installation Directions for FINGER STICK and Blocker Plate What is a Finger Stick? A Finger Stick is a simple circuit that modifies the MAF signal on LLY and LBZ engines (not LB7 engines) to expected levels
Figure 1 Factory G50 update and old Shift Fork Shaft
 911 Clutch Job So you have one of the best 911s there is, a 87-89 G50 Porsche. However, after many years of service, it is time for a clutch. Maybe, the rubber clutch disc has failed, or the clutch is
Audi A8 Transmission Service By Barry Lenoble and Paul Waterloo
 Page 1 of 18 Technical & Maintenance Upgrades & Style Used A8 Buyer's Checklist Marketplace On Track Gallery Links Contact Home Audi A8 Transmission Service By Barry Lenoble and Paul Waterloo Background
W123 Transmission Vacuum Modulator Adjustment DIY - measure it the 'right' way
 W123 Transmission Vacuum Modulator Adjustment DIY - measure it the 'right' way Why do you need to do this?: You need to do this to properly check the internal hydraulic pressure of the transmission, either
Brake master cylinder replacement
 Brake master cylinder replacement 8-25-2010 I had replaced the front brake master cylinder a few years ago when it developed a bad leak, at that time, I ordered a new master cylinder from Spartan, very
*Some speedometers have these additional electronic connections. If yours does, then remove the smaller slotted screws shown.
 www.odometergears.com 1981-1985 240 Cable-Driven Speedometers (NOT for 1986 and later electronic units) http://www.davebarton.com/240-odometer-repair.html For this set of instructions below, I will not
Prerequisites: Shop Manual (recommended) pages 3-9 through 3-13.
 pages 3-9 through 3-13.") Prerequisites: Order your gaskets average about $25.00 bucks X 2 so $50.00 4NK-11193-00-00 Obtain a shim kit (Should have several 265 and 270s) (Some dealers will exchange) Obtain a Valve Bucket Tool YM-33961
Prerequisites: Order your gaskets average about $25.00 bucks X 2 so $50.00 4NK-11193-00-00 Obtain a shim kit (Should have several 265 and 270s) (Some dealers will exchange) Obtain a Valve Bucket Tool YM-33961
H31 BOOSTER REBUILD & MASTER CYLINDER
 2010 1991 BMW 750iL George Fontes gajfontes@yahoo.com H31 BOOSTER REBUILD & MASTER CYLINDER Rebuild hydraulic booster and replace Master Cylinder. Page 1 of 16 Master Cylinder Removal & Brake Booster Rebuild
Kodak 750H Carousel Projector Repair
 Kodak 750H Carousel Projector Repair An AT YOUR OWN RISK PROJECT by Klaus Wolter, Rev B, 3-26-2016 Here I documen the repair of my 750H carousel. A common problem with this projector, and all of the projectors
Brake Caliper Rebuild - Part Numbers & Tips Per Jim Millet, 3/15/2005
 Per Jim Millet, 3/15/2005 Not too difficult a job. Rears are easier than fronts to access. You ll need the following gasket sets: Front caliper gasket set, P/N 34 11 1 157 037, MSRP $13.58 Rear caliper
Aamir_bt The legend..
 Aamir_bt The legend.. How to do timing on a 4XE1-W (DOHC) engine. well i decided to to a write up for DOHC timing since there was only the SOHC written up, and i had to do a timing belt on my stylus anyways,
SV Ignition Key Install 1
 SV Ignition Key Install 1 Instruction Text and Photos by: Pat (Reddog99, socalsvriders.com) Originally posted http://www.socalsvriders.com/forums/showthread.php?s=&threadid=2305 First, a disclaimer and
Once again, another four weeks have gone by and I am quite sure everyone is tired of me wondering where the time has gone. To say that everything
 Once again, another four weeks have gone by and I am quite sure everyone is tired of me wondering where the time has gone. To say that everything around the shop has been a little chaotic during this time,
Installing the Wireless Charging upgrade kit in a 2018 XT5 (Platinum version)
") Installing the Wireless Charging upgrade kit in a 2018 XT5 (Platinum version) September 2, 2018 Tools needed: Wireless charger upgrade kit Plastic trim tools 7 mm nut driver Background: I purchased the
Installing the Wireless Charging upgrade kit in a 2018 XT5 (Platinum version) September 2, 2018 Tools needed: Wireless charger upgrade kit Plastic trim tools 7 mm nut driver Background: I purchased the
How to Change Front Brake Pads on a Toyota Corolla
 How to Change Front Brake Pads on a Toyota Corolla Link to this article on (All other links in this document are disabled) Follow this picture guide to change the front brake pads on a 2003-2008 Toyota
W C-230 Kompressor Sports Sedan 1.8l Thermostat Replacement & Antifreeze flush
 W203 2003 C-230 Kompressor Sports Sedan 1.8l Thermostat Replacement & Antifreeze flush First, I have to thank everyone who has contributed to the MBworld.org forums without you; I would not have gotten
1972 Sportster exhaust
 1 of 10 7/6/2015 10:51 PM 1 of 10 1972 Sportster exhaust Mount an old stylish factory exhaust to make the bike quiet. Harley made a one-piece muffler exhaust system for the 1972-1976 model years. It will
How To: Thermostat change - D8 V6 194bhp
 How To: Thermostat change - D8 V6 194bhp Firstly, take off the Air Filter hoses and connectors and lift off. This leaves you with this workable space... I started with taking the two bolts out of the cable
Looking up the front of the engine from under the radiator. (Picture taken with belt under tension.)
") 8. If you re replacing the AC compressor drive belt as well, it s time to loosen its belt tensioner. The AC compressor belt tensioner is very obvious under the front of the car. Loosen the 13mm bolt, then
8. If you re replacing the AC compressor drive belt as well, it s time to loosen its belt tensioner. The AC compressor belt tensioner is very obvious under the front of the car. Loosen the 13mm bolt, then
Installation Instructions Shifter Improver Kit Fits:1988 and Later TurboHydramatic 400, TH-400/TH-475 (3L80/3L80-HD) Catalog # 20261
 Catalog # 20261") Installation Instructions Shifter Improver Kit Fits:1988 and Later TurboHydramatic 400, TH-400/TH-475 (3L80/3L80-HD) Catalog # 20261 WORK SAFELY! For maximum safety, perform this installation on a clean,
Installation Instructions Shifter Improver Kit Fits:1988 and Later TurboHydramatic 400, TH-400/TH-475 (3L80/3L80-HD) Catalog # 20261 WORK SAFELY! For maximum safety, perform this installation on a clean,
Mike and Barb s 1953 MG TD
 Mike and Barb s 1953 MG TD The first time I remember seeing an MG was in about 1959. I was like in 2 nd grade. I remember my dad bringing home a remote car for me. Not the remote you think of now, it had
Replace clutch and flywheel * (Volkswagen Sharan 2010-Present)
") Replace clutch and flywheel * (Volkswagen Sharan 2010-Present) *Caution! This instructions are created by random users and must be used as a reference only! Please, take all safety precautions, and if
Replace clutch and flywheel * (Volkswagen Sharan 2010-Present) *Caution! This instructions are created by random users and must be used as a reference only! Please, take all safety precautions, and if
5X Racing Mazda Miata Aluminum Shifter Bushing Installation Instructions
 5X Racing Mazda Miata Aluminum Shifter Bushing Installation Instructions Thank you for your purchase! These instructions will explain how to properly install a 5X Racing Aluminum Shifter Bushing in your
2000 Mr2 Spyder Seat Cover Replacement Project
 2000 Mr2 Spyder Seat Cover Replacement Project Tool List: Plastic Trim Tool, Hog Ring Pliers, Medium or Heavy Duty Wire Cutters, 12mm socket, 14mm Socket, Ratchet, Extension, Flat Head Screwdriver & Gloves
2001 V70 T5 ETM Removal and Cleaning Directions
 2001 V70 T5 ETM Removal and Cleaning Directions Howard Cheng howardc64@gmail.com 10/24/05 Version 1.4 Read this before you start I performed this ETM cleaning because I had gotten 2 reduced performance
TCI Trans-Scat
 Page 1 of 5 Return to Instruction Sheet index TCI 400000 Trans-Scat Turbo Hydramatic 400-1965-Up This kit will allow you to re-program your transmission valve body. This kit will give you firm positive
How to install the Barnett clutch and the stronger Oil Pump Drive Gear
 How to install the Barnett clutch and the stronger Oil Pump Drive Gear Written by WildFred I m from Germany so please excuse my English and the spelling. The following procedure is a combination of the
In summary, the procedures includes removal of the belly pans, draining of the engine block, draining of the radiator, coolant mixing and refilling.
 COOLANT DRAIN AND CHANGE PROCEDURE Recently, there was a request for a picture guide for draining/changing coolant (Robot808 and James-man) and since I was going to do this operation on Idaho (88), I took
Part No amatic 350
 Watch our installation video on YouTube Installation Instructions Shift Improver Kit Part No. 30262 1968-1981 TurboHy urbohydr drama amatic 350 B&M Racing and Performance Products 2002 Congratulations!
DIY: Shiver Valve Check, Illustrated
 DIY: Shiver Valve Check, Illustrated By Petemoss, AF1 Forum Tools needed: 4mm allen wrench to remove all the fairing pieces 2.5mm allen wrench to remove battery holder 5mm allen wrench for valve cover
REPLACEMENT OF TRANSMISSION EXTENSION-CASE GASKET AND OUTPUT-SHAFT SEAL ON 95 XJ6
 D. Jensen 2006 Distribution: www.jag-lovers.com REPLACEMENT OF TRANSMISSION EXTENSION-CASE GASKET AND OUTPUT-SHAFT SEAL ON 95 XJ6 V. 1.0 June 2006 The Fine Print: The following is a summary of my experience
This is what we are trying to create in the steps below
 You will need: (1) Some 3/4 aluminium or steel flat bar (+/- 1 foot) (2) About 12 of 3 Aluminium or steel tubing. (2) Piece of 3X3 silicone hose and 2 hose clamps (3) 1 K&N (or similar) high flow filter
Replacing a Brake Line by UCLA-Vstar, April 2007
 Replacing a Brake Line by UCLA-Vstar, April 2007 Replacing a brake line may seem intimidating if you ve never bled brakes before, and especially if you cannot find a stepby-step how-to. Here s a crude
Another CJ picture guide to replacing the key cylinder in a non-tilt steering column
 Another CJ picture guide to replacing the key cylinder in a non-tilt steering column by John Strenk Well I'm sure it's happened to all of us one time or another. You park your jeep and go to turn off your
How to Replace the B2 Piston Bore Seal
 Page 1 Home Cars for sale Trucks for sale Where we are Links to other diesel sites About us Why diesel? Diesel Videos How they work How they sound FAQ Dodge Diesel Maintenance tips, parts and DIY DVD's
YOU MAY WANT TO FIRST TRY TO LOOSEN THE FILTER HOUSING
 2005 XC90 Tune-up (5-cyl) Including: Oil Change - Spark Plugs - Fuel Filter - Cabin Filter First off - let me say that I am an amateur (at best) mechanic, and I claim no responsibility for whatever you
BMW E61 Hydraulic Pump replacement instructions
 BMW E61 Hydraulic Pump replacement instructions This DIY will guide you through the tasks needed to successfully replace your defective tailgate hydraulic pump Difficulty 3 of 10. The most difficult part
U-Score U-Score AAC Rank AAC Rank Vocabulary Vocabulary
 go 1 927 you 2 7600 i 3 4443 more 4 2160 help 5 659 it 6 9386 want 7 586 in 8 19004 that 9 10184 like 10 1810 what 11 2560 make 12 1264 is 13 10257 on 14 6674 out 15 2350 do 16 2102 here 17 655 eat 18
Barnett Spring Conversion for Liner
 Barnett Spring Conversion for Liner I installed Barnett s spring conversion on my last bike, a 2003 Warrior, and the difference was very noticeable. The Warrior always launched well, but the Barnett springs
Another CJ picture guide to
 Another CJ picture guide to replacing the key cylinder in a non-tilt steering column by John Strenk Well I'm sure it's happened to all of us one time or another. You park your jeep and go to turn off your
1 Green Pressure Regulator Spring Automatic transmissions operate at temperatures between 150ºF and
 Installation Instructions for 603107 Valve Body Kit C-4 1970 & Later Tools Required Speed Handle or Ratchet 3/8 Drive 1/2 Socket 3/8 Drive 7/16 Socket 3/8 Drive 5/16 Socket 3/8 Drive Small Screwdriver
BEW engine timing belt replacement procedure from MOGolf (as demonstrated on a 2004 Jetta).
.") BEW engine timing belt replacement procedure from MOGolf (as demonstrated on a 2004 Jetta). Based on the procedure published by Volkswagen, but modified for the "average" shadetree mechanic. Some special
BEW engine timing belt replacement procedure from MOGolf (as demonstrated on a 2004 Jetta). Based on the procedure published by Volkswagen, but modified for the "average" shadetree mechanic. Some special
1 of 2 9/4/ :27 AM
 Ford Mustang IAC IAB - Solving your idle problems http://www.muscularmustangs.com/iac.php 1 of 2 9/4/2010 10:27 AM Solving idle problems part 1 - Cleaning your IAC Does your idle rise and fall over and
Fitting the Bell Auto Services (B-A-S) TDV6 EGR Blanking Kit to a 2006 model Discovery 3 TDV6 HSE
 TDV6 EGR Blanking Kit to a 2006 model Discovery 3 TDV6 HSE") Fitting the Bell Auto Services (B-A-S) TDV6 EGR Blanking Kit to a 2006 model Discovery 3 TDV6 HSE Before I describe how I did this, I must first thank other members of the Disco3.co.uk forum (namely J,moore
Fitting the Bell Auto Services (B-A-S) TDV6 EGR Blanking Kit to a 2006 model Discovery 3 TDV6 HSE Before I describe how I did this, I must first thank other members of the Disco3.co.uk forum (namely J,moore
Two bolts at. Two each side where studs pass through. rear. Two bolts at. front. Front-most bolt for diagonal brace. Rear jacking point
 The following describes the process of changing the transmission s gear oil in my own 2008 CS 6sp. I have no relationship with any of the products mentioned, other than being a satisfied consumer. Exercise
Manual Transmission Hard To Get Into Gear. When Cold >>>CLICK HERE<<<
 Manual Transmission Hard To Get Into Gear When Cold For the last month or so, it has been difficult to shift into gear (manually, not when the car is I can get it into reverse and to neutral with some
Door panel removal F07 5 GT
 Things needed Decent plastic trim removal tools Torx 30 Spare door clips 07147145753 I got away with a set of 5 but if I did it again I d be cautious and get 10. From prior experience if they are damaged
Water-Gauge, Water Level Test Valve and Boiler Blow Down Valve
 Water-Gauge, Water Level Test Valve and Boiler Blow Down Valve Troubles from the get go on the water gauge. While modeling the upper fitting for the water gauge I encountered a problem with the side hole
Detroit Tuned R56 Oil Service How-To
 Detroit Tuned R56 Oil Service How-To Welcome to Detroit Tuned s how-to guide for an oil service for an R56 MINI Cooper. It s always best to do an oil change on a hot engine as the hot oil will drain better
Днепр) Russian Motorcycle Carburetors Part 2B: PZ-24 and PZ-28 Carburetor Assembly and Jet Drilling
 Russian Motorcycle Carburetors Part 2B: PZ-24 and PZ-28 Carburetor Assembly and Jet Drilling") Ural (Урал( Урал) - Dnepr (Днепр( Днепр) Russian Motorcycle Carburetors Part 2B: PZ-24 and PZ-28 Carburetor Assembly and Jet Drilling (applies also to K-37 K and K-38 K carbs) Ernie Franke eafranke@tampabay.rr.com
Ural (Урал( Урал) - Dnepr (Днепр( Днепр) Russian Motorcycle Carburetors Part 2B: PZ-24 and PZ-28 Carburetor Assembly and Jet Drilling (applies also to K-37 K and K-38 K carbs) Ernie Franke eafranke@tampabay.rr.com
Rear End Installation and Bearing Kit - 8.8in (86-12 V8; V6)
") Rear End Installation and Bearing Kit - 8.8in (86-12 V8; 11-13 V6) Tools Required: Jack Stands 5 Floor Jack 2 Oil Pans 1 Wheel Blocks 2 Differential Oil 3 qts Friction Modifier 3 bottles Tube of Black
Rear End Installation and Bearing Kit - 8.8in (86-12 V8; 11-13 V6) Tools Required: Jack Stands 5 Floor Jack 2 Oil Pans 1 Wheel Blocks 2 Differential Oil 3 qts Friction Modifier 3 bottles Tube of Black
Rear Wheel Removal (by BassCliff)
") Rear Wheel Removal (by BassCliff) Hello to my GS riding friends! After picking up a nail in my rear tire (while on the freeway at 75mph!) I thought I would take a few pictures to help illustrate the rear
Rear Wheel Removal (by BassCliff) Hello to my GS riding friends! After picking up a nail in my rear tire (while on the freeway at 75mph!) I thought I would take a few pictures to help illustrate the rear
Return to Instruction Sheet index TCI Installation Instructions for Turbo Hydramatic 350C & 250C
 Page 1 of 6 Return to Instruction Sheet index TCI 326300 Installation Instructions for Turbo Hydramatic 350C & 250C NOTE: This kit was not intended for installation in transmissions that are in poor general
JRSC + BBK Install on SVTF. Neil A. Shah medicnas on focaljet September 2006
 JRSC + BBK Install on SVTF Neil A. Shah medicnas on focaljet September 2006 ECU up here. When removing make sure the smaller bundles of wires don t get wrapped around the bottom edge and break - this almost
84-86 Ford SVO Mustang AC Installation Guide
 84-86 Ford SVO Mustang AC Installation Guide This installation guide is for the AC installation kit from Late Model Restoration. The Vendor is Hose Wizards that manufactures this great kit that provides
TRANS-SCAT Installation Instructions for Ford AOD
 TCI 436000 TRANS-SCAT Installation Instructions for Ford AOD 1980-1993 TCI 436000 Kit Contains: Qty. Description Five (5) Gaskets: Three (3) Valve Body One (1) Filter One (1) Duraprene Pan Two (2) Springs:
Installation Instructions
 Approx. Install Time 3Hrs 00Min Installation Instructions Vehicle Application Year: 2013-2017 Make: Ram Model: 2500/3500 Diesel Engine: 6.7L Cummins Tools Required 7mm, 8mm, 10mm,& 13mm Wrench & Socket
This is a guide to assist you adjust the valve clearance on a 2l V6 MIVEC engine found in a Mitsubishi FTO GPX
 Adjusting the valve clearance on a 2L V6 FTO engine This is a guide to assist you adjust the valve clearance on a 2l V6 MIVEC engine found in a Mitsubishi FTO GPX Disclaimer: This guide is to assist you
Mustang Radiator Conversion DIY. By GearHeadPeter. January 27, 2011
 1964-1966 Mustang Radiator Conversion DIY By GearHeadPeter January 27, 2011 We all know that the radiators in our cars are not the best, especially if you have done any customization to the engine, which
How to change Swirl Flaps, on Diesel BMW
 How to change Swirl Flaps, on Diesel BMW I am now going to show you how i did it on my car. May'sedition of Total BMW (still in WHSmiths) did a cover on how to change and modify Swirl flaps on a 330d engine,
ESS INSTALL. The donor car /6 Cosmos Black/Sand UUC Short Shifter Brembo cross drilled rotors Phillips Nav System 16:9
 ESS INSTALL The donor car.. 1997 540/6 Cosmos Black/Sand UUC Short Shifter Brembo cross drilled rotors Phillips Nav System 16:9 The install went in several stages. Disconnect the battery Stage 1 Remove
Our goal is to make the install a breeze. Please read the entire guide before beginning.
 www.airkewld.com Page 1 of 6 IRS Axle Kit Install IRS Axle Kit Install Our goal is to make the install a breeze. Please read the entire guide before beginning. KITS SHOULD INCLUDE 2 - Control-arm mounting
upper and lower ball joints ( I went with Moog from rockauto.com): two K80026 and two K8607T
: two K80026 and two K8607T") Parts required: two 5C3Z*4A322*AA = hub / steering knuckle o-ring two AC3Z*1S175*A = updated axle shaft "dust seal" two 5C3Z*3254*A = steering knuckle / axle shaft seal upper and lower ball joints ( I
Parts required: two 5C3Z*4A322*AA = hub / steering knuckle o-ring two AC3Z*1S175*A = updated axle shaft "dust seal" two 5C3Z*3254*A = steering knuckle / axle shaft seal upper and lower ball joints ( I
SW20 Coolant System Maintenance.
 SW20 Coolant System Maintenance. This article contains information on how to change and bleed the coolant, as well as flushing the system. It is based on information in the service manual, tips gathered
OEM Cruise Control Installation in GMC/Chevy NBS trucks
 OEM Cruise Control Installation in 99-02 GMC/Chevy NBS trucks May 2008 ~ Rampage_Rick Having just installed factory cruise control in my 00 Sierra, I thought I d share the fun. I followed the steps outlined
Fanatec GT3RS V1 to GT3RS V2 Tutorial
 Fanatec GT3RS V1 to GT3RS V2 Tutorial by Roy Visser 1 How to update your Fanatec GT3RS V1 wheel to a GT3RS V2 wheel Welcome to this guided and detailed tutorial for upgrading your Fanatec GT3RS V1 wheel
BMW 2002 M42 Swap Notes-THIS IS NOT FINISHED
 BMW 2002 M42 Swap Notes-THIS IS NOT FINISHED This document is to help those that want to install an m42 into a BMW 2002. It is based around an e30 engine, trans, and wiring. You can use the e36 block/head/wiring
Disco 3 Clock Spring / Rotary Coupler replacement
 Disco 3 Clock Spring / Rotary Coupler replacement I recently had to change my Clock spring and thought some folks may find it helpful to see what it entailed. I did lots of reading around but couldn t
Installing AMP-wiring in a New Beetle
 Installing AMP-wiring in a New Beetle Vehicle used: New Beetle 2.0i Type 9C (1999) Used set of cables: Dietz 35mm² power cable, double shielded Dietz chinch cable ( 35mm² Professional Line ) First of all:
Air Compressor/Water Pump IV - Pilot Valve Stem, Test & Installation
 Page 1 of 8 Air Compressor/Water Pump Part IV Pilot Valve Stem, Test & Installation Nelson Riedel Nelson@NelsonsLocomotive.com Initial: 1/13/04 Last Revised: 0 Valve Test: I decided to test the steam valves
Mark McDermott, Tom Di Nucci, and Doug Bailey Next we put Tom Di Nucci s 61 convertible up in the air.
 CADILLAC CLINIC On Saturday, March 12th we met at Cadillac of Lake Lanier in Gainesville for another of our famous Cadillac Clinics. Marty Pecora not only hosted and supplied his technical expert Lawrence,
Okay! In starters sorry about my bad english hope you understand at least some of this stuff what i m writing about!
 ------------------------------------------------------------------- Okay! In starters sorry about my bad english hope you understand at least some of this stuff what i m writing about! This guides meaning
Figure 1: Valve housing smooth vs. o-ring groove
 If you are driving an older Corvette, and by that I mean a C2 or C3, it will eventually get to a point where the Power Steering Control Valve (PSCV) will leak and require attention. In 2002, I had to repair
Retro it Steering Column
 Retro it Steering Column INSTALLATION INSTRUCTIONS for 1976-86 CJ5 & CJ7 FOR PART NUMBER S: 1520800010, 1520800020, 1520800051, 1526800010, 1526800020, 1526800051 S I NCE 1986 Instruction # 8000000010
Mustang Clutch Cable Installation Guide 96-04
 Mustang Clutch Cable Installation Guide 96-04 The below installation instructions work for the following products: Steeda Adjustable Clutch Cable 96-04 Maximum Motorsports Clutch Cable 82-04 Steeda Clutch
Rear Shock Replacement 2007 Honda Accord
 P a g e 1 Rear Shock Replacement 2007 Honda Accord This is step-by-step documentation for replacing the rear shock absorbers in a 2007 Honda Accord. Hopefully it will be of use to you if you are about
Procharger Stage II Intercooled Supercharger System (11-14 GT)
") Procharger Stage II Intercooled Supercharger System (11-14 GT) Installation Time: Approximately one day. Installed on 2012 Mustang GT 5.0/Manual Required Tools 3/8 Socket Set (Standard and Metric) 1/2
Procharger Stage II Intercooled Supercharger System (11-14 GT) Installation Time: Approximately one day. Installed on 2012 Mustang GT 5.0/Manual Required Tools 3/8 Socket Set (Standard and Metric) 1/2
Honda Super Cub Etc. Frame & Forks
 Honda Super Cub Etc. Frame & Forks Introduction This section is all about how to strip, servioce and rebuild the frame and forks of the Honda Super Cub and other bikes using the same frames, plus all the
MGB V8 Roadster restoration project Report 105
 30th December 2016. Just in case somebody does the same as me and bolts the catch for the boot lock round the wrong way, I have included a photo that I found on the internet of the correct way to fit it.
Lincoln Mark VII T5 Swap Version submitted by 5.0 bird
 Lincoln Mark VII 1984-1989 T5 Swap Version 20070611 submitted by 5.0 bird I've decided to make an article to assist with the T5 swap for the 84-89 Mark VIIs, since I was just in there because my DOA didn't
At Mark's suggestion I thought I'd write this up so future Coupe lovers can have as much fun* as I did with this job.
 At Mark's suggestion I thought I'd write this up so future Coupe lovers can have as much fun* as I did with this job. My enormous thanks to forum members, particularly glorfindel, for their advice when