Smittybilt Gen2 XRC 9,500,lb. Winch Manufacturer Part Number Model Number J106786
|
|
|
- Lizbeth Stevens
- 5 years ago
- Views:
Transcription

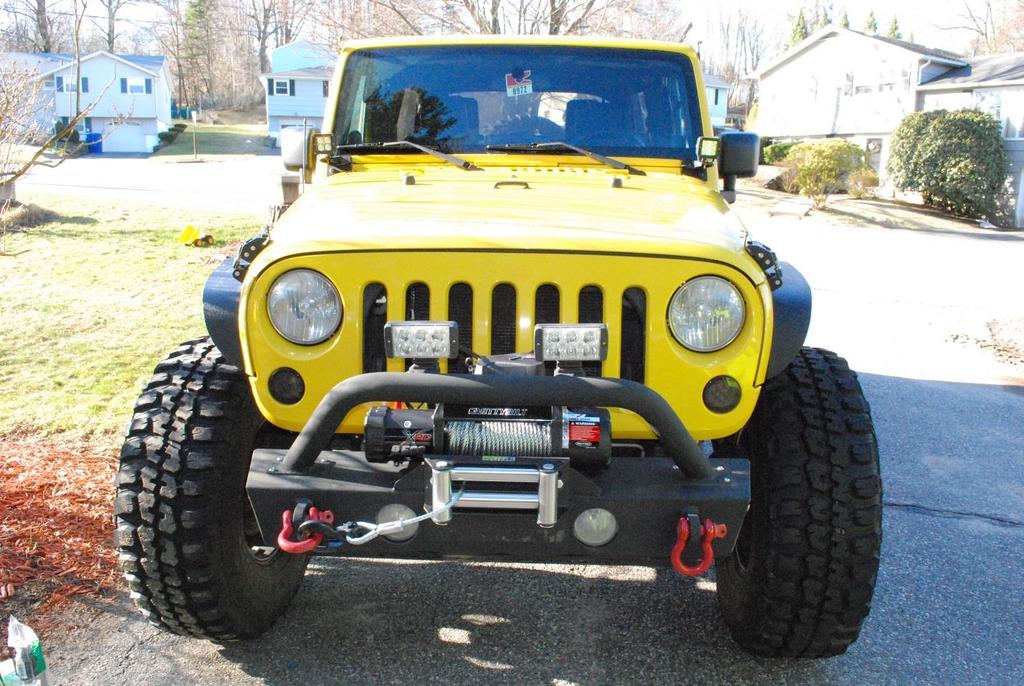
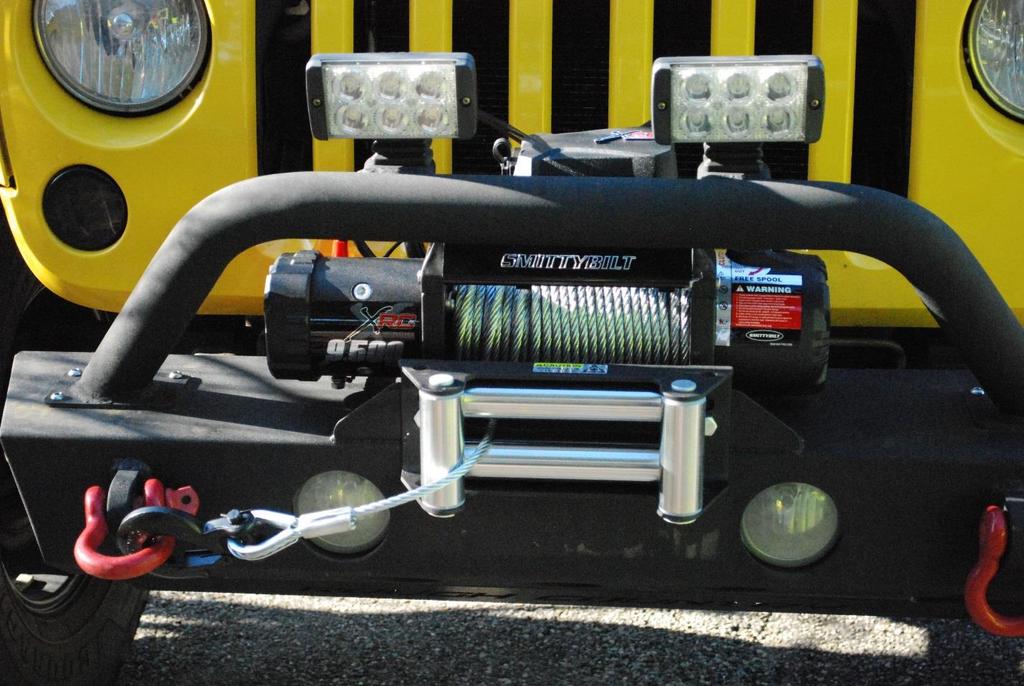
1 Smittybilt Gen2 XRC 9,500,lb. Winch Manufacturer Part Number Model Number J Installation Time: 1 hour Tools Required: Work Light Box Cutter 10mm Open End Wrench 13mm Open End Wrench 14mm Open End Wrench 18mm Open End Wrench Dielectric Grease Ratchet Socket Extension 18mm Socket 10 Zip Ties This guide is for installing the Smittybilt Gen2 XRC 9,500 ib. Winch (J106786) on a Jeep Wrangler. The images show an aftermarket bumper with the winch mounting plate built in. If you do not have a bumper with an appropriate winch mount, you will also need a winch mounting plate which should be installed before starting the winch installation. Read all instructions carefully before starting. Before After
2


3 Installation Instructions: 1. Using the 10mm Open End Wrench, loosen and remove the negative battery cable from the battery. 2. Using the box knife, cut the outer portion of the winch box open and lay it flat to use as a work area while pre-assembling the winch. You want to be working on a clean, dry surface. 3. Remove the winch and all of the accessories from the box and lay them on the cardboard from the previous step. Verify that all of the parts are there by checking it against the parts list in the included instructions. This is a good time to verify that the finish on the winch has not been damaged during shipping. 4. Using the long allen bolts and allen key included with the winch, bolt the control unit brackets to the bottom of the control unit. Use the included plastic spacers between the bracket and the control unit. These spacers have a slight taper, put the larger end up (toward the control unit). Tighten by hand firmly, but do not over-tighten.


.")
4 5. Clip the front of the control unit brackets onto the front top bar of the winch and lower the rear of the control unit until the brackets are sitting on the rear bar of the winch unit. You will have to pull the wiring out of the way. Secure the back of the brackets with the two supplied allen screws and lock washers using the included allen wrench. These screws do not thread into anything except the control unit bracket, they will just be hooked under the rear bar of the winch unit 6. Each wire from the control unit is labeled and each terminal on the winch motor is labeled. Attach the wiring per the included wiring diagram matching wire A to terminal A and wire B to Terminal B, etc. Terminal A uses a 13mm open end wrench, Terminal B, C, and D use a 14mm Wrench. Terminal A will have the small black ground wire from the control unit running to it and will also have the long black ground wire connected to it (labeled Wire A). Connect both of these wires at this time as the terminal will be difficult to reach once the winch is mounted. 7. Before pushing the boot from the wire over each terminal, fill each boot with dielectric grease. This will help prevent water from infiltrating and corroding the electrical connections. There is no boot for the ground (Terminal A), I recommend coating this with dielectric grease as well.

5 8. With the help of a friend, lift up the winch unit and set it into your winch plate or winch bumper. Line up the holes in the mounting plate to the holes in the base of the winch. 9. Place the 4 square nuts included with the winch in the base of the winch and from the bottom of the bumper, install the included winch mounting bolts and lock washers using the 16mm socket, ratchet, and socket extension. Tighten to 80 foot pounds. 10. Carefully run the long black and long red wires under the grille and up to the battery. Using the zip ties, carefully tie the wires away from any moving parts in the suspension, belt-driven engine accessories, and the exhaust. There is a factory wiring harness running down from the battery in this area and you should be able to zip tie the cables to this existing harness. 11. Using the 10mm open end wrench, loosen the terminal nut on the positive battery cable end and attach the red wire to this terminal. Reinstall the nut with the 10mm wrench. 12. Using the 10mm open end wrench, connect the black wire to the disconnected negative battery cable end. 13. Reconnect the negative battery cable to the battery and tighten the cable end with the 10mm open end wrench. 14. Install the included winch fairlead on the front of the winch plate or winch bumper using the included bolts, nuts, and lock washers. Tighten with the 18mm open end wrench and 18mm socket and ratchet. Tighten to 90 foot pounds.

6 15. Remove the rubber band holding the end of the winch cable on the winch. Carefully pull the end of the winch cable through the fairlead and attach the included hook using the clevis pin. If you have to unwind the winch cable a little to get slack, you can do so by turning the transmission lever on the winch to free spool and turning the winch by hand. Before the cable is through the fairlead, it is unsafe to power the winch out to unwind any cable.

7 16. Re-check all electrical connections and bolts to make sure they are tight. 17. Follow all included instructions when using the winch. Installation Instructions Written by ExtremeTerrain Customer Michael E. 4/6/2017
Installation of Smittybilt XRC Gen2 Front Bumper
 Installation of Smittybilt XRC Gen2 Front Bumper Installation Time: 2 hours, not including preparing a winch for the first time Tools Required: Ratchet Various length extensions 16mm deep well socket 19mm
Installation Guide for Rough Country 30 in. Chrome Series LED Light Bar w/ Hood Mounting Brackets
 Installation Guide for Rough Country 30 in. Chrome Series LED Light Bar w/ Hood Mounting Brackets Installation Time: 1 Hour Tools Required Trim removal tool (plastic or wood to prevent scratches on the
Engo 10,000lb. 12 Volt Electric Winch Install
 Engo 10,000lb. 12 Volt Electric Winch Install Note: This installation was completed on a 2016 JK with Rough Country Modular Winch Plate Bumper. A bumper with winch mount, or a winch plate is required for
INSTALLATION MANUAL P2068. Level of Difficulty. Parts List. Product Image. Notes and Maintenance. Tools Required. Easy
 INSTALLATION MANUAL P2068 Parts List 1 Grille guard 1 Driver / left frame mounting bracket 1 Passenger / right frame mounting bracket 1 Driver / left top mounting bracket 1 Passenger / right top mounting
INSTALLATION INSTRUCTIONS
 INSTALLATION INSTRUCTIONS PARTS LIST Accessory Application Publications No. TRX420 (All) MII 13032 WINCH KIT P/N 08L94-HP5-100 Accessory Weight 35 lbs (16 kg) Honda Dealer: Please give a copy of these
INSTALLATION INSTRUCTIONS
 Accessory Application Publication No. INSTALLATION INSTRUCTIONS WINCH MOUNT P/N 08L73-HL4-F01 After 16 SXS1000M3/M3P/M3LE SXS1000M5P/M5D/M5LE MII 16083 Issue Date February 2017 PARTS LIST No. Description
Anti-Sway Bars Installation Instructions For Mazda MX-5 PART #
 Anti-Sway Bars Installation Instructions For 2006+ Mazda MX-5 PART # 920-330 Tools required: A jack and jack stands, 5mm Allen wrench, ratchet, 10mm, 12mm and 14mm, combination wrenches and sockets, 21mm
INSTALLATION INSTRUCTIONS FORD F-150 2WD & 4WD RETAINS FACTORY TOW HOOKS PART #P3063
 INSTALLATION INSTRUCTIONS FORD F-150 2WD & 4WD RETAINS FACTORY TOW HOOKS PART #P3063 PARTS LIST: 1 Grille Guard 2 10-1.5mm Nylon Lock Nuts 1 Driver/Left Frame Mounting Bracket 4 12mm Plastic Washers 1
INSTALLATION INSTRUCTIONS
 INSTALLATION INSTRUCTIONS Accessory Application Publication No. WINCH MOUNT P/N 08L74-HR3-A20 After 13 TRX420 (All except TRX420FA/FPA) After 13 TRX500 (All except TRX500FA/FPA) MII 15067 Issue Date Revised:
2007 Current Jeep Wrangler JK Stealth Fighter Front Bumper Installation Instructions
 2007 Current Jeep Wrangler JK Stealth Fighter Front Bumper Installation Instructions PREPARATION 1. Disconnect the negative terminal on the battery. Park the vehicle on level ground and set the emergency
INSTALLATION INSTRUCTIONS FORD SUPER DUTY NOTE: (Vehicle Retains Tow Hook) PART # P3064
 PART # P3064") INSTALLATION INSTRUCTIONS 2011-14 FORD SUPER DUTY 250-550 NOTE: (Vehicle Retains Tow Hook) PART # P3064 PARTS LIST: Qty Description Qty Description 1 Grill Guard 2 10mm x mm Hex Bolts 1 Driver/Left Lower
INSTALLATION INSTRUCTIONS 2011-14 FORD SUPER DUTY 250-550 NOTE: (Vehicle Retains Tow Hook) PART # P3064 PARTS LIST: Qty Description Qty Description 1 Grill Guard 2 10mm x mm Hex Bolts 1 Driver/Left Lower
INSTALLATION INSTRUCTIONS Dodge Ram Crew / Mega 2500/3500 2/4WD NOTE: (tow hooks will not be re-attached) PART # P5056
 PART # P5056") INSTALLATION INSTRUCTIONS 2010-14 Dodge Ram Crew / Mega 2500/3500 2/4WD NOTE: (tow hooks will not be re-attached) PART # P5056 PARTS LIST: Qty Description Qty Description 1 Grill Guard Bar 6 12mm x 30mm
INSTALLATION INSTRUCTIONS 2010-14 Dodge Ram Crew / Mega 2500/3500 2/4WD NOTE: (tow hooks will not be re-attached) PART # P5056 PARTS LIST: Qty Description Qty Description 1 Grill Guard Bar 6 12mm x 30mm
Installation Instructions for Teraflex 2.5 Inch Lift Kit with Shocks (2010 Jeep Wrangler Unlimited)
") Installation Instructions for Teraflex 2.5 Inch Lift Kit with Shocks (2010 Jeep Wrangler Unlimited) Installation Time: 6 Hours Tools Required: Floor Jack Jack Stands Ratchet Torque Wrench 15mm Socket 15mm
Installation Instructions for Teraflex 2.5 Inch Lift Kit with Shocks (2010 Jeep Wrangler Unlimited) Installation Time: 6 Hours Tools Required: Floor Jack Jack Stands Ratchet Torque Wrench 15mm Socket 15mm
INSTALLATION INSTRUCTIONS
 INSTALLATION INSTRUCTIONS Accessory Application Publication No. MII 15249 WINCH MOUNT KIT P/N 08L70-HL3-A41 SXS700/M4/M2 Issue Date September 2015 PARTS LIST No. Description Qty (1) Winch bracket 1 (2)
Installation Guide for Rough Country 2.5 inch Lift Kit w/o Shocks (07-15 Wrangler JK) Item # J10212
 Item # J10212") Installation Guide for Rough Country 2.5 inch Lift Kit w/o Shocks (07-15 Wrangler JK) Item # J10212 Installation Time: 3 Hours Tools Required: Jack (2 helps, but not needed) Jack stands(2 3-ton, 2 2-ton)
Installation Guide for Rough Country 2.5 inch Lift Kit w/o Shocks (07-15 Wrangler JK) Item # J10212 Installation Time: 3 Hours Tools Required: Jack (2 helps, but not needed) Jack stands(2 3-ton, 2 2-ton)
INSTALLATION INSTRUCTIONS
 Accessory Application Publication No. INSTALLATION INSTRUCTIONS WINCH MOUNT KIT P/N 08L77-HL3-A00 SXS700M4/M2 Honda Dealer: Please give a copy of these instructions to your customer. MII 14607 Issue Date
Fig A. Addictive Desert Designs. Preparation: Removal:
 Preparation: Disconnect the negative battery terminal. Park the vehicle on level ground and set the emergency brake. We recommend reading through the installation instructions in whole before performing
2017 Current Ford SuperDuty Adaptive Cruise Control Relocation Bracket Installation Instructions
 2017 Current Ford SuperDuty Adaptive Cruise Control Relocation Bracket Installation Instructions PREPARATION 1. Disconnect the negative terminal on the battery. Park the vehicle on level ground and set
Remove the rear tire and the (8) 13mm bolts holding the tire carrier to the tailgate. Remove the 3rd brake light wiring harness.
 13mm bolts holding the tire carrier to the tailgate. Remove the 3rd brake light wiring harness.") J108781 2 4 Rear Bumper & Tire Carrier & Optional Flood Lights Jeep Wrangler JK (2007-2017) Tools Required: Basic Hand Tools 35mm Socket Tape Measure Grease Gun Straight Edge Remove the rear tire and the
J108781 2 4 Rear Bumper & Tire Carrier & Optional Flood Lights Jeep Wrangler JK (2007-2017) Tools Required: Basic Hand Tools 35mm Socket Tape Measure Grease Gun Straight Edge Remove the rear tire and the
Thank you for your purchase! Please read all instructions carefully prior to beginning installation of your Rock Hard 4x4 product.
 ROCK HARD 4X4 JEEP WRANGLER JK 2/4-DOOR 2007-2017 FRONT BUMPER (ALL) PART #: RH-5001-B / 5002 / 5003 / 5004 / 5005 / 5006 / 5007 / 5008 / 5009 / 5041 / 5042 / 5045 / 5046 Installation Manual PACKING LIST:
ADDICTIVE DESERT DESIGNS
 Preparation: Disconnect the negative battery terminal. Park the vehicle on level ground and set the emergency brake. We recommend reading through the installation instructions in whole before performing
P3066 INSTALLATION MANUAL
 P3066 INSTALLATION MANUAL Parts List 1 Grille guard 1 Driver / left frame bracket Level of Difficulty Moderate Scan for helpful install tips 1 Passenger / right frame bracket 1 Driver / left top bracket
INSTALLATION INSTRUCTIONS
 Accessory Application Publication No. INSTALLATION INSTRUCTIONS HORN MOUNT P/N 08Z77-HL4-A00 SXS1000M3/M3P/M5D/M5P Honda Dealer: Please give a copy of these instructions to your customer. MII 15262 Issue
CAUTION. INSTALLATION INSTRUCTIONS Part Number Hidden Winch Kit with special XD 9000 Short Drum Winch For Ford F-150 Truck
 INSTALLATION INSTRUCTIONS Part Number 69110 Hidden Winch Kit with special XD 9000 Short Drum Winch For Ford F-150 Truck As you read these instructions, you will see NOTES, CAUTIONS and WARNINGS. Each message
Ford F-150 Series Rock Slider Side Steps Installation Instructions
 2004-2014 Ford F-150 Series Rock Slider Side Steps Installation Instructions PREPARATION 1. Disconnect the negative terminal on the battery. Park the vehicle on level ground and set the emergency brake.
INSTALLATION INSTRUCTIONS ELEVATION FRONT BUMPER DODGE RAM
 INSTALLATION INSTRUCTIONS PARTS LIST: 1 Elevation Bumper Assembly 24 12mm x 37mm OD x 3mm Flat Washers 2 Frame Mounting Brackets 12 12mm Nylon Lock Nuts 8 12-1.75mm x 50mm Hex Bolts 2 License Plate Mounting
Front Bumper Installation Instructions
 Front Bumper Installation Instructions 1) Remove the factory bumper, air dam, and frame cover (optional). A) Remove the air dam by pulling on the plastic clips holding it in place with a set of pliers.
Raxiom Factory GPS Rear Back-up Camera Kit (07-17 Wrangler)
") Raxiom Factory GPS Rear Back-up Camera Kit (07-17 Wrangler) Installation Time: 2.5-3Hrs Tools Required: 7mm Socket & Driver 10mm Socket 10mm Open end wrench Knife / Razor blade Zip-ties Wire Cutters Needle
Raxiom Factory GPS Rear Back-up Camera Kit (07-17 Wrangler) Installation Time: 2.5-3Hrs Tools Required: 7mm Socket & Driver 10mm Socket 10mm Open end wrench Knife / Razor blade Zip-ties Wire Cutters Needle
INSTALLATION MANUAL. Level of Difficulty. Parts List. Product Image. Tools Required. Notes and Maintenance. Torque Specifications.
 INSTALLATION MANUAL Parts List 1 Bull bar 2 Upper frame mounting bracket 1 Driver / left lower frame mounting bracket 1 Passenger / right lower frame mounting bracket 2 Button head bolt, 6mm 4 Flat washer,
INSTALLATION INSTRUCTIONS
 INSTALLATION INSTRUCTIONS Honda Dealer: Please give a copy of these instructions to your customer. PARTS LIST (15) (8) (12) (14) (13) (10) (11) (18) (17) (1) Accessory Application Publications No. TRX500FA/FGA
2007 Current Jeep Wrangler JK Stealth Fighter Rear Bumper With Tire Gate Installation Instructions
 2007 Current Jeep Wrangler JK Stealth Fighter Rear Bumper With Tire Gate Installation Instructions PREPARATION 1. Disconnect the negative terminal on the battery. Park the vehicle on level ground and set
ADDICTIVE DESERT DESIGNS
 Preparation: Disconnect the negative battery terminal. Park the vehicle on level ground and set the emergency brake. We recommend reading through the installation instructions in whole before performing
RS-2 SINGLE ACTION REAR BUMPER WITH TIRE CARRIER INSTALL MANUAL FOR JEEP WRANGLER ALL MODELS.
 RS-2 SINGLE ACTION REAR BUMPER WITH TIRE CARRIER INSTALL MANUAL FOR 2007-2016 JEEP WRANGLER ALL MODELS. Rear Bumper Installation Instructions 1) Remove factory rear bumper, (this includes all tow hitch
2014 Current Chevy/GMC 1500 HoneyBadger Rear Bumper Installation Instructions
 2014 Current Chevy/GMC 1500 HoneyBadger Rear Bumper Installation Instructions PREPARATION 1. Disconnect the negative terminal on the battery. Park the vehicle on level ground and set the emergency brake.
DV8 Tire Carrier Manufacturer Part Number TCSTTB-01 Model Number J104640
 DV8 Tire Carrier Manufacturer Part Number TCSTTB-01 Model Number J104640 Installation Time: 30 Minutes Tools Required: 19mm Socket 13mm Socket Ratchet T15 Torx Driver T50 Torx Driver Painters Tape Dremel
2017 Current Ford Raptor HoneyBadger Rear Bumper Installation Instructions
 2017 Current Ford Raptor HoneyBadger Rear Bumper Installation Instructions PREPARATION 1. Disconnect the negative terminal on the battery. Park the vehicle on level ground and set the emergency brake.
Fig A ADDICTIVE DESERT DESIGNS. Preparation: Removal: Release these clips
 Preparation: Disconnect the negative battery terminal. Park the vehicle on level ground and set the emergency brake. We recommend reading through the installation instructions in whole before performing
# ) THERE ARE 2 DIFFERENT HEIGHT BRACKETS. MAKE SURE THAT THIS IS THE CORRECT ONE FOR YOUR FAIRLEAD!
 THERE ARE 2 DIFFERENT HEIGHT BRACKETS. MAKE SURE THAT THIS IS THE CORRECT ONE FOR YOUR FAIRLEAD!") SummitView Winch Mount Front Camera (SHORT) (Kit # 9002-8850) THERE ARE 2 DIFFERENT HEIGHT BRACKETS. MAKE SURE THAT THIS IS THE CORRECT ONE FOR YOUR FAIRLEAD! Please read thoroughly before starting installation
SummitView Winch Mount Front Camera (SHORT) (Kit # 9002-8850) THERE ARE 2 DIFFERENT HEIGHT BRACKETS. MAKE SURE THAT THIS IS THE CORRECT ONE FOR YOUR FAIRLEAD! Please read thoroughly before starting installation
ADDICTIVE DESERT DESIGNS
 Preparation: Disconnect the negative battery terminal. Park the vehicle on level ground and set the emergency brake. We recommend reading through the installation instructions in whole before performing
Smittybilt XRC Rear Bumper Installation Guide Part # 76856
 Installation Difficulty: Easy Installation Duration: 2 Hours Tools Needed: Smittybilt XRC Rear Bumper Installation Guide Part # 76856-13, 16, 17, 18, 19mm wrenches and/or sockets - Socket extension - Torque
ADDICTIVE DESERT DESIGNS
 ADDICTIVE DESERT DESIGNS Preparation: Disconnect the negative battery terminal. Park the vehicle on level ground and set the emergency brake. We recommend reading through the installation instructions
(2) License Plate Plugs
 License Plate Plugs") PARTS LIST: 1 HD Bull Nose Bumper Assembly 12 12-1.75mm x 50mm 1 Driver/left Frame Mounting Bracket 40 12mm x 37mm OD x 3mm Flat Washers 1 Passenger/right Frame Mounting Bracket 20 12mm Lock Washers 1
PARTS LIST: 1 HD Bull Nose Bumper Assembly 12 12-1.75mm x 50mm 1 Driver/left Frame Mounting Bracket 40 12mm x 37mm OD x 3mm Flat Washers 1 Passenger/right Frame Mounting Bracket 20 12mm Lock Washers 1
I. Before starting installation
 5. Park the vehicle on a clean, dry, flat, level surface and block the tires so the vehicle cannot roll in either direction. A. Disconnect battery cables 1. Disconnect the negative cable first, then the
MOTOALLIANCE WINCH MOUNT
 , / 1-866-527-7637 www.motoalliance.com MOTOALLIANCE WINCH MOUNT Polaris RZR Thank you for purchasing our MotoAlliance winch mount(s). You now own a premium custom winch mount to allow you to use your
Winch Mounting Plate for Wrangler
 Winch Mounting Plate for 87-06 Wrangler Installation Manual # 92122.2900 Winch Plate is designed to accommodate standard winch mounting footprint. Should it become necessary to drill into plate, do so
INSTALLATION INSTRUCTIONS
 INSTALLATION INSTRUCTIONS Accessory ENGINE BLOCK (L4) P/N 08T44-TA0-100 Application 2008 ACCORD 2-AND 4-DOOR Publications No. AII 35355 Issue Date AUG 2007 PARTS LIST Engine block heater Coolant concentration
INSTALLATION INSTRUCTIONS
 INSTALLATION INSTRUCTIONS APPLICATION: WINCH TRAY, SPORTSMAN GG WINCH TRAY KITS, & HDX GG WINCH TRAY KITS AUTOMOTIVE PRODUCTS, INC. 2015 & UP FORD F-150 APP PART #40-93835, 45-93830, 46-23835, 57-93830,
PREMIUM FRONT BUMPER FOR RAM 2500/3500. AEV30239AJ Last Updated: 09/05/17 INSTALLATION GUIDE
 PREMIUM FRONT BUMPER FOR RAM 2500/3500 AEV30239AJ Last Updated: 09/05/17 INSTALLATION GUIDE PLEASE READ BEFORE YOU START TO GUARANTEE A QUALITY INSTALLATION, WE RECOMMEND READING THESE INSTRUCTIONS THOROUGHLY
2016+ NISSAN TITAN XD
 PARTS LIST AND PARTS INCLUDED 1PC MISHIMOTO INTERCOOLER 2PC SILICONE BOOTS WITH DURACORE TECHNOLOGY 4PC CONSTANT-TENSION T-BOLT CLAMPS 2PC ALUMINUM SPACERS MOUNTING HARDWARE CAUTION Never work on the cooling
MOTOALLIANCE WINCH MOUNT
 , / 1-866-527-7637 www.motoalliance.com MOTOALLIANCE WINCH MOUNT Polaris Sportsman 600 & 700 Thank you for purchasing our MotoAlliance winch mount(s). You now own a premium custom winch mount to allow
2017 Current Ford Raptor HoneyBadger Front Bumper Installation Instructions
 2017 Current Ford Raptor HoneyBadger Front Bumper Installation Instructions PREPARATION 1. Disconnect the negative terminal on the battery. Park the vehicle on level ground and set the emergency brake.
Hurst Billet Competition Plus Shifter - TR-3650 (05-10 GT) Installed in: 2010 Ford Mustang GT
 Installed in: 2010 Ford Mustang GT") Tools Required: Socket Ratchet 10 mm Wrench/Socket 10 mm Deep Socket 13 mm Wrench/Socket Socket Extension Flat Head Screw Driver WD-40 Hurst Billet Competition Plus Shifter - TR-3650 (05-10 GT) Installed
Tools Required: Socket Ratchet 10 mm Wrench/Socket 10 mm Deep Socket 13 mm Wrench/Socket Socket Extension Flat Head Screw Driver WD-40 Hurst Billet Competition Plus Shifter - TR-3650 (05-10 GT) Installed
Installation Instructions Table of Contents
 Installation Instructions Table of Contents Pre- Installation of Garage Storage Lift 2 Layout the Garage Storage Lift 3 Installing the strut Channels 3 Install the Drive Assembly 5 Install the Drive Shaft
INSTALLATION INSTRUCTIONS HIDDEN WINCH MOUNTING KIT No for Chevrolet & GMC Trucks (for Warn Winches M6000, M8000, XD9000 & HS9500 only)
") INSTALLATION INSTRUCTIONS HIDDEN WINCH MOUNTING KIT No. 61770 for Chevrolet & GMC Trucks (for Warn Winches M6000, M8000, XD9000 & HS9500 only) Warn Light Bar 61090 and many other grille guards can be mounted
INSTALLATION INSTRUCTIONS HIDDEN WINCH MOUNTING KIT No. 61770 for Chevrolet & GMC Trucks (for Warn Winches M6000, M8000, XD9000 & HS9500 only) Warn Light Bar 61090 and many other grille guards can be mounted
Maximum Motorsports Caster/Camber Plates Installation Guide (94-04)
") Maximum Motorsports Caster/Camber Plates Installation Guide (94-04) The below installation instructions work for the following products: Maximum Motorsports Caster/Camber Plates (94-04) Please read through
Maximum Motorsports Caster/Camber Plates Installation Guide (94-04) The below installation instructions work for the following products: Maximum Motorsports Caster/Camber Plates (94-04) Please read through
Fig A ADDICTIVE DESERT DESIGNS. Preparation: Removal:
 Preparation: Disconnect the negative battery terminal. Park the vehicle on level ground and set the emergency brake. We recommend reading through the installation instructions in whole before performing
WINCH MOUNT KIT FOR HONDA RANCHER P/N ASSEMBLY / OWNERS MANUAL. Application WINCH KIT NO. 25-9xxx
 WINCH MOUNT KIT FOR HONDA RANCHER P/N 25-1081 ASSEMBLY / OWNERS MANUAL Application WINCH KIT NO. 25-9xxx Before you begin, please read these instructions and check to be sure all parts and tools are accounted
ADDICTIVE DESERT DESIGNS
 ADDICTIVE DESERT DESIGNS Preparation: Disconnect the negative battery terminal. Park the vehicle on level ground and set the emergency brake. We recommend reading through the installation instructions
This harness kit includes: Civic harness (2003 to 2005) Installing the Hybrid ReVolt Universal grid charger in a First Gen Civic ( )
 Installing the Hybrid ReVolt Universal grid charger in a First Gen Civic ( )") Installing the Hybrid ReVolt Universal grid charger in a First Gen Civic (2003-2005) This harness kit includes: Civic harness (2003 to 2005) (a) 1 HV warning label (c) 1 charger connector cover (e) 4 #6
Installing the Hybrid ReVolt Universal grid charger in a First Gen Civic (2003-2005) This harness kit includes: Civic harness (2003 to 2005) (a) 1 HV warning label (c) 1 charger connector cover (e) 4 #6
2015 Ford F150 Rear Bumper w/ LED
 2015 Ford F150 Bumper w/ LED T527990 T527991 PARTS LIST: 1 Bumper Assembly 4 12mm Lock Washers 2 Mounting Brackets 6 12 mm Nylon Lock Nuts 4 Sensor Hole Plugs 8 4mm x 10mm Button Head Bolts 2 Plastic Plugs
Installation Instructions
 Installation Instructions Jeep JK Unlimited (2007 Present) Mounting Bracket and Air Line System Kit for ARB On-Board Twin Air Compressor (CKMTA12) Made in the USA Kit Contents: 1 Bracket for ARB Compressor
License Plate Bracket (4) Rubber Plugs. (2) Retaining Rings (2) Foam Spacers
 Rubber Plugs. (2) Retaining Rings (2) Foam Spacers") LDB-NTIT62-FB PARTS LIST: 1 LD1 Bumper Assembly 2 8mm Hex Nuts 1 Driver/left L Bracket (center LED light) 2 6mm x 20mm Button Head Bolts 1 Passenger/right L Bracket (center LED light) 4 6mm x 18mm x 1.6mm
LDB-NTIT62-FB PARTS LIST: 1 LD1 Bumper Assembly 2 8mm Hex Nuts 1 Driver/left L Bracket (center LED light) 2 6mm x 20mm Button Head Bolts 1 Passenger/right L Bracket (center LED light) 4 6mm x 18mm x 1.6mm
INSTALLATION INSTRUCTIONS
 INSTALLATION INSTRUCTIONS Accessory Application Publications No. BII 25830 2004 MDX Issue Date SEP 2003 PARTS LIST 2 Clips Trailer Hitch Kit: P/N 08L92-S3V-200A Receiver cover Trailer hitch Harness Kit:
(31 ) ZEON CONTROL PACK RELOCATION KIT
 ZEON CONTROL PACK RELOCATION KIT") ORIGINAL INSTRUCTIONS SYMBOL INDEX (31 ) ZEON CONTROL PACK RELOCATION KIT SYMBOL EXPLANATION Read All Product Literature SYMBOL EXPLANATION Always Wear Leather Gloves INSTALLATION GUIDE Always Wear Hearing
ORIGINAL INSTRUCTIONS SYMBOL INDEX (31 ) ZEON CONTROL PACK RELOCATION KIT SYMBOL EXPLANATION Read All Product Literature SYMBOL EXPLANATION Always Wear Leather Gloves INSTALLATION GUIDE Always Wear Hearing
INSTALLATION INSTRUCTIONS
 INSTALLATION INSTRUCTIONS Accessory P/N 08E10-TA0-100 Application 2008 ACCORD 2-AND 4-DOOR Publications No. AII 35358 Issue Date AUG 2007 PARTS LIST Ambient Light Kit 2 Ambient lights Fuse label Washer
Toyota Tacoma Winch Mount Bumper Installation Instructions Tools Required: Transmission cooler relocation brackets Torque Wrench
 2016-2017 Toyota Tacoma Winch Mount Bumper Installation Instructions Tools Required: Items Included: Small flat head screw driver Winch Mount Ratchet, 10mm, 12mm, 14mm, 17mm & Skid Plate 19mm sockets Transmission
2017 Current Ford Raptor ADD Pro Rear Bumper Installation Instructions
 2017 Current Ford Raptor ADD Pro Rear Bumper Installation Instructions PREPARATION 1. Disconnect the negative terminal on the battery. Park the vehicle on level ground and set the emergency brake. 2. We
INSTALLATION INSTRUCTIONS
 AUTOMOTIVE PRODUCTS, INSTALLATION INSTRUCTIONS ULTIMATE BULL BAR APPLICATION: 2009-2018 Dodge Ram 1500 (Excl. Rebel Model) 2019 Dodge Ram 1500 Classic PART NUMBER: 32-1960, 32-1965, 32-1960L, 32-1965L
INSTALLATION INSTRUCTIONS
 INSTALLATION INSTRUCTIONS Accessory Application Publications No. AII 25877 PILOT Issue Date AUG 2003 Optional ATF and power steering coolers are required when installing the trailer hitch. 2 Spacers PARTS
INSTALLATION INSTRUCTIONS
 INSTALLATION INSTRUCTIONS Accessory Application Publications No. 2003 ELEMENT AII 24318 Issue Date DEC 2002 PARTS LIST Trailer Hitch Kit P/N 08L92-SCV-100 4 Bolts, 12 x 35 mm Trailer hitch U-bolt 2 Nuts,
»Product» Safety Warning
 #J9210 Installation Instructions 2007-13 Jeep Wrangler JK 2" Body Lift Kit Read and understand all instructions and warnings prior to installation of product and operation of vehicle. Zone Offroad Products
20 Rigid Industries LED Light Bar Installation into a 2002 Ford Super Duty
 20 Rigid Industries LED Light Bar Installation into a 2002 Ford Super Duty This write-up is how I installed the Rigid Industries 20" E-Series LED Light Bar into the grill area behind the license plate
INSTALLATION INSTRUCTIONS
 AUTOMOTIVE PRODUCTS, INSTALLATION INSTRUCTIONS SPORTSMAN WINCH MOUNT GRILLE GUARD / HDX WINCH MOUNT GRILLE GUARD / MAX WINCH MOUNTING SYSTEM APPLICATION: 2016 Chevrolet Silverado 1500 PART NUMBER: 40-93875,
SDHQ F-150 Winch Mount System Installation
 SDHQ 2015+ F-150 Winch Mount System Installation Recommended Tools: Door panel removal tool Needle Nose Pliers 10mm Socket or Wrench 13 mm or ½ Socket (⅜ Drive) 14 mm or 9/16 Socket (⅜ Drive) 21 mm or
TNT Customs JK Guardian Front Bumper
 Master Your Terrain (307) 775 9565 www.tntcustoms.com TNT Customs JK Guardian Front Bumper Please observe proper shop safety procedures when performing this install. Use proper eye and hearing protection
PLEASE READ THIS INSTRUCTIONS CAREFULLY, BEFORE YOU START INSTALLATION
 INSTALLATION INSTRUCTIONS PART NUMBER: L0SXC000 DESCRIPTION: 09 ASCENT TRAILER HITCH PLEASE READ THIS INSTRUCTIONS CAREFULLY, BEFORE YOU START INSTALLATION SAFETY PRECAUTION: When installing Trailer Hitch,
Lingenfelter Camaro SS Shift Knob Boot Adapter Kit Installation Instructions
 Lingenfelter 2010-2013 Camaro SS Shift Knob Boot Adapter Kit Installation Instructions PN: L350191410 Revision - 1.1 Lingenfelter Performance Engineering 1557 Winchester Road Decatur, IN 46733 (260) 724-2552
INTEGRATED1500LB WINCH KIT
 INTEGRATED1500LB WINCH KIT P/N 2882798 APPLICATION Verify accessory fitment at Polaris.com. BEFORE YOU BEGIN Read these instructions and check to be sure all parts and tools are accounted for. Please retain
INSTALLATION INSTRUCTIONS
 INSTALLATION INSTRUCTIONS Accessory Application Publications No. S 1998 CIVIC 2/3/4-DOOR All 18767 Issue Date SEP 1997 PARTS LIST Fog Light Kit: P/N 08V31-S01-100 Right fog light (marked R ) Fuse label
4 th Gen 4 Runner Front Bumper - Installation Instructions:
 www.shrockworks.com info@shrockworks.com 877-474-7625 4 th Gen 4 Runner Front Bumper - Installation Instructions: Thank you for purchasing a ShrockWorks product. We are confident you will enjoy it for
Zeon Control Pack Relocation Kit 78 Cable Length
 ORIGINAL INSTRUCTIONS SYMBOL INDEX SYMBOL EXPLANATION SYMBOL EXPLANATION Read All Product Literature Always Wear Leather Gloves Always Wear Hearing and Eye Protection Do Not Move People Zeon Control Pack
INSTALLATION INSTRUCTIONS
 INSTALLATION INSTRUCTIONS Accessory P/N 08E50-TK6-100 Application 2010 FIT (BASE MODEL) Publications No. AII 42212 Issue Date AUG 2009 The security system will only work if the vehicle is equipped with
INSTALLATION & OWNER S MANUAL
 Rev. A, p. 1 of 13 INSTALLATION & OWNER S MANUAL Polaris Ranger (2009-) Straight UTV Steel Plow with Vehicle Mount Kit 6 Wide Snow Plow (p/n: 1POLSP) (fits the 500 H.O., 700 & 800 HD & XP) The contents
FITTING KIT No s : BULL BAR WINCH ( P/No ) BULL BAR NON WINCH ( P/No )
 BULL BAR NON WINCH ( P/No )") ARB WINCH / NON WINCH BULL BAR TO SUIT LANDROVER DISCOVERY 2003 ONWARD. FITTING KIT No s :- 617 1793 BULL BAR WINCH ( P/No 343 2120 ) 617 1794 BULL BAR NON WINCH ( P/No 323 2120 ) WARNING FOR VEHICLES
ARB WINCH / NON WINCH BULL BAR TO SUIT LANDROVER DISCOVERY 2003 ONWARD. FITTING KIT No s :- 617 1793 BULL BAR WINCH ( P/No 343 2120 ) 617 1794 BULL BAR NON WINCH ( P/No 323 2120 ) WARNING FOR VEHICLES
AEV30308AA Last Updated: 05/31/18. 4 DUALSPORT sc SUSPENSION system for RAM 1500 air ride standard and rebel INSTALLATION GUIDE
 AEV30308AA Last Updated: 05/31/18 4 DUALSPORT sc SUSPENSION system for RAM 1500 air ride standard and rebel INSTALLATION GUIDE PLEASE READ BEFORE YOU START TO GUARANTEE A QUALITY INSTALLATION, WE RECOMMEND
KJ JEEP COMBINATION BULL BAR WARNING
 KJ JEEP COMBINATION BULL BAR PRODUCT NUMBER FITTING KIT NUMBER 3450120 6171962 WARNING FOR VEHICLES EQUIPPED WITH SRS AIRBAG WHEN INSTALLED IN ACCORDANCE WITH THESE INSTRUCTIONS, THE FRONT PROTECTION BAR
RANGER MIDSIZE WINCH KIT
 RANGER MIDSIZE WINCH KIT P/N 2881669 APPLICATION ALL MY RANGER 400; MY11 AND NEWER RANGER 500 EXCEPT CREW BEFORE YOU BEGIN Read these instructions thoroughly and make sure all parts and tools are accounted
INSTALLATION INSTRUCTIONS
 INSTALLATION INSTRUCTIONS WJ2 FULL-WIDTH FRONT BUMPER APPLICATION: 2018 Jeep Wrangler JL PART NUMBER: 59-80105, 59-80115, 59-80125 CONTENT ITEM QUANTITY DESCRIPTION TOOLS NEEDED 1 1 FRONT BUMPER ASSEMBLY
INSTALLATION INSTRUCTIONS
 INSTALLATION INSTRUCTIONS Accessory Application Publications No. P/N 08E49-S2A-100 2004 S2000 AII 26325 Issue Date OCT 2003 PARTS LIST Hood switch harness TOOLS AND SUPPLIES REQUIRED #2 Phillips screwdriver
Procharger Stage II Intercooled Supercharger System (11-14 GT)
") Procharger Stage II Intercooled Supercharger System (11-14 GT) Installation Time: Approximately one day. Installed on 2012 Mustang GT 5.0/Manual Required Tools 3/8 Socket Set (Standard and Metric) 1/2
Procharger Stage II Intercooled Supercharger System (11-14 GT) Installation Time: Approximately one day. Installed on 2012 Mustang GT 5.0/Manual Required Tools 3/8 Socket Set (Standard and Metric) 1/2
INSTALLATION INSTRUCTIONS
 INSTALLATION INSTRUCTIONS Accessory Application Publications No. AII 30518 KIT 2006 PILOT Issue Date NOV 2005 NOTE: Accessory ATF and power steering coolers are required when installing the trailer hitch.
INSTALLATION INSTRUCTIONS FORD F-150 2WD & 4WD RETAINS FACTORY TOW HOOKS PART #P3063
 INSTALLATION INSTRUCTIONS FORD F-150 2WD & 4WD RETAINS FACTORY TOW HOOKS PART #P3063 PARTS LIST: 1 Grille Guard 2 10-1.5mm Nylon Lock Nuts 1 Driver/Left Frame Mounting Bracket 4 12mm Plastic Washers 1
Rear Bumper Installation Instructions
 KEY TO COMPONETS A. 1 ea. Rear bumper B. 2 ea. Mounting L bracket C. 11 ea. M12x1.75 hex head bolt D. 4 ea. M12x1.75 hex head bolt E. 6 ea. M12 Hex head lock nut F. 9 ea. Pressure washer G. 19 ea. M12
ADDICTIVE DESERT DESIGNS
 Preparation: Disconnect the negative battery terminal. Park the vehicle on level ground and set the emergency brake. We recommend reading through the installation instructions in whole before performing
AEV30213AH Last Updated: 04/28/17. jk wrangler dualsport sc suspension INSTALLATION GUIDE
 AEV30213AH Last Updated: 04/28/17 jk wrangler 3.5 4.5 dualsport sc suspension INSTALLATION GUIDE PLEASE READ BEFORE YOU START TO GUARANTEE A QUALITY INSTALLATION, WE RECOMMEND READING THESE INSTRUCTIONS
PLOW MOUNT GLACIER PRO KIT
 PLOW MOUNT GLACIER PRO KIT P/N 2880262 APPLICATION FOR USE WITH THE GLACIER PRO MID-SIZE PLOW SYSTEM (P/N 2880260) ON 2015 AND NEWER RZR 00 MODELS BEFORE YOU BEGIN Read these instructions thoroughly and
Deegan 38 HD Rock Sliders w/ LED Rock Lights (07-18 Wrangler JKU)
") Installation Time: 2-3 Hours Deegan 38 HD Rock Sliders w/ LED Rock Lights (07-18 Wrangler JKU) Note: This kit comes with everything you need to wire the lights with a switch in the cab. However, I recommend
Installation Time: 2-3 Hours Deegan 38 HD Rock Sliders w/ LED Rock Lights (07-18 Wrangler JKU) Note: This kit comes with everything you need to wire the lights with a switch in the cab. However, I recommend
INSTALLATION INSTRUCTIONS
 AUTOMOTIVE PRODUCTS, INSTALLATION INSTRUCTIONS POLICE PUSH BUMPER ELITE XD APPLICATION: 2016 Chevrolet Silverado 1500 PART NUMBER: 36-53875 ITEM QUANTITY DESCRIPTION TOOLS NEEDED 1 1 PUSH BUMPER ASSEMBLY
JK BFH II Front Bumpers
 INSTALLATION INSTRUCTIONS INST-17-16-021_A JK BFH II Front Bumpers IMPORTANT: Thank you for purchasing this Poison Spyder product. Please read through this entire document before proceeding with installation.
TJ/LJ Metal Cloak Front Fender Flare Install Instructions Rev. A Page 1 of 16
 TJ/LJ Metal Cloak Front Fender Flare Install Rev. A Page 1 of 16 READ FITTING INSTRUCTIONS IN FULL BEFORE INSTALLATION This article is sold without warranty expressed or implied. No warranty or representation