AMERICAN MOTORS CORPORATION AUTOMOTIVE TECHNICAL SERVICE 3280 South Clement Avenue Milwaukee 7, Wisconsin
|
|
|
- Zoe Ross
- 5 years ago
- Views:
Transcription
1
2
3 1 FOREWORD The following product information will provide Hudson Service Information for the "Hornet" V-8 Series when used in conjunction with the 1955 and 1956 Technical Service Manuals and the 1956 "Hornet" Special V-8 Supplement. This product information should be kept in a convenient location together with the Service Manuals so that complete information will be available for prompt model and series reference. AMERICAN MOTORS CORPORATION AUTOMOTIVE TECHNICAL SERVICE 3280 South Clement Avenue Milwaukee 7, Wisconsin NAP LITHOGRAPHED IN U.S.A.
4 2
5 3 ENGINE (V-8) For service procedures and general description of the V-8 engine, refer to the 1956 Special V-8 Technical. Service Manual Supplement. The engines are similar in design varying only dimensionally effecting increase in horsepower ENGINE SPECIFICATIONS Type Bore Stroke Displacement Compression Ratio Carburetor Brake Horsepower Torque Taxable Horsepower Fuel 90 V-8 O.H.V. 4" 314" 327 Cu. In- 9.00:1 WCFB-Four Barrel 4700 R.P-M. 345 Lbs R-P.M Premium (95.9 Octane Research) VALVES Intake Valve Lift Intake Valve Stem Standard Diameter Intake Valve Face Angle Intake Valve Seat Angle Intake Valve Seat Width Intake Valve Spring Tension Valve Closed Valve Open Intake Valve Stem to Guide Clearance Valve Guide I.D. Exhaust Valve Lift Exhaust Valve Stem Standard Diameter Exhaust Valve Face Angle Exhaust Valve Seat Angle Exhaust Valve Seat Width Exhaust Valve Spring Tension Valve Closed Valve Open.375".3412"-.3417" "-.093" /16" /16" -0013"-.0028".3430"--3440".375".3407"--3412" "--104" Lbs- ((4 1-13/16" Lbs. (a) 1-7/16"
6 4 ENGINE (V-8) Exhaust Valve Stem to Guide Clearance Exhaust Guide I.D. Valve Timing Intake Opens Closes.0018"-.0033" " 12 30' B.T.D.C ' A.B.D.C. Duration PISTONS AND RINGS Piston to Bore Clearance Top Land Skirt Top Skirt Bottom.028"-.032".0009"-.0025".0009"-.0015" Piston Ring Gap Clearance Top Center Bottom (Steel Rail I.010"-.020".010"-.020".015"-.055" Piston Ring Side Clearance Top Center Bottom.002"-.006".002"-.006".0001"-.0079" Piston Pin to Connecting Rod Press Fit Piston Pin to Piston Palm Press Fit in Piston at Room Temperature CRANKSHAFT AND BEARINGS Main Bearing Diameter Main Bearing Clearance Main Bearing Cap Torque (Except Rear) Main Bearing Cap Torque (Rear Only) Crankshaft End Play Crankshaft End Thrust Connecting Rod Bearing Diameter Connecting Rod Bearing Clearance Connecting Rod Cap Torque Connecting Rod Side Clearance " ".0006"-.0032" Ft. Lbs Ft. Lbs..003"-.007" Front Main Bearing " ".0007"-.0028" Ft. Lbs.(oiled).004"-.012" CAMSHAFT Camshaft End Play Camshaft Bearing Clearance.003"-.006".001"-.003"
7 ENGINE (V-8) 5 OIL SYSTEM Oil Pump Type Normal Oil Pressure Oil Pressure Release Engine Oil Refill Capacity Gear 10 Lbs. Min. Vii; 600 R.P.M Lbs. 5 Qts. TUNE-UP DATA Compression Pressure Cranking Speed (Throttle Wide Open) 140 P.S.I. Min. 0) 315 R.P.M. Engine Idle R.P.M. Standard and Overdrive Hydra-Matic In Neutral With Air Conditioning NOTE: When equipped with air conditioning, adjust idle with air conditioning unit "ON". Ignition Timing (Vibration Damped 1 5 B.T.D.C. (10 B.T.D.C. optional with Automatic Transmission or where local fuel octane permits) Distributor Point Gap Dwell or Cam Angle Breaker Point Tension Rotor Rotation Spark Plugs Auto-Lite Champion Gap Torque Cylinder Head Torque Firing Order.016" 28º-32º Ozs. Left Hand AL-7 H " 30 Ft. Lbs Ft. Lbs. 1, 8, 4, 3, 6, 5, 7, 2


8 6 DISTRIBUTOR (DELCO-REMY) Model (External Adjustment Type) The external adjustment type distributor illustrated in Figure 1 is a 12 volt, 8 cylinder unit. The cap has a window for adjusting dwell angle while the cap is in amounted position. The circuit breaker plate is located below the centrifugal advance mechanism and uses the outer diameter of the main shaft bushing for its bearing surface. The movable plate is held into position by a retainer clip in the upper shaft bushing. The molded rotor serves as a cover for the centrifugal advance mechanism. The vacuum control unit is mounted under the movable breaker plate to the distributor housing. The contact set is attached to the movable breaker plate. The service replacement contact set has the BREAKER LEVER SPRING TENSION AND POINT ALIGNMENT prefactory adjusted and is serviced as one complete assembly. Only the point opening ( dwell angle I requires adjusting after replacement. ELECTRICAL Under part throttle operation, the intake manifold vacuum is sufficient to actuate the vacuum control diaphragm and cause the movable plate to move, thus advancing the spark and increasing fuel economy. During acceleration or when the engine is pulling heavy, the vacuum is not sufficient to actuate the diaphragm and the movable plate is held in the retarded position by a calibrated return spring which bears against the vacuum diaphragm. The centrifugal advance mechanism consists of an automatic cam actuated by two centrifugal weights controlled by springs. As the speed of the distributor shaft increases with engine speed, the weights are thrown outward against the pull of the springs. This advances the cam causing the contact points to open earlier and thus advancing the spark. Lubrication The hinge cap oiler should be filled with SAE 20 oil at each vehicle lubrication period. When replacing the contact set assembly, add a trace of Ball Bearing Lubricant to the breaker cam. No other lubrication is required. The movable breaker plate is lubricated by oil from the upper shaft bushing. In addition to lubrication, the distributor requires periodic inspection of the cap and rotor, wiring, breaker points, and timing. Adjustment of Dwell Angle on the Car With the engine running at idle, the dwell is adjusted by first raising the window provided in the cap and inserting a "Hex" type wrench into the head of the adjusting screw as shown in Figure 2. FIGURE 1 Distributor Assembly Figure 2 Adjusting Point Spacing (Dwell)
 Alternate Method: Turn the adjusting screw in (clockwise) until the engine begins to misfire, then give the wrench one-half turn in the opposite direction (counterclockwise) thus giving the")
.")
9 ELECTRICAL 7 Preferred Method: Turn the adjusting screw until the specified dwell is obtained as measured by a dwell meter. (See specifications.) Alternate Method: Turn the adjusting screw in (clockwise) until the engine begins to misfire, then give the wrench one-half turn in the opposite direction (counterclockwise) thus giving the approximate dwell angle required. Insulation Resistance (or Leakage, Series Resistance, Breakdown Test, and Capacity (mfd.). Replacing Distributor Contact Set The contact point set is replaced as one complete assembly (Fig. 4). The BREAKER LEVER SPRING TENSION and POINT ALIGNMENT on the service replacement contact set are factory adjusted. Only the POINT OPENING requires adjusting after replacement. Removal of Distributor Cap The cap is removed as shown in Figure 3. Place screw driver in slot head of the hatch, press down and turn 1/4 of a turn in either direction. FIGURE 4 Removing Distributor Contact Set FIGURE 3 Distributor Cap Removal Distributor Inspection and Checking With the distributor removed from the vehicle, it is advisable to place the distributor in a distributor testing machine or synchroscope. When mounting distributor in tester, first secure the gear in the drive mechanism, then push distributor housing down toward the gear to take up end play between the gear and housing, and finally secure the housing in the tester. Test the distributor for variation of spark, correct centrifugal and vacuum advance, and condition of contacts. This test will give valuable information on the distributor condition and indicate parts replacement which may be necessary. When checking the distributor condenser, it should be checked with a reliable make of condenser tester. The condenser should be checked for the following properties. Replacement of contact set is as follows: Remove the two attaching screws (Fig. 4) which hold the base of contact set assembly in place. Remove the condenser lead and primary lead from the nylon insulated connection by turning screw (Fig. 4) in contact set. Replacement is the reverse of removal. CAUTION: At time of assembly, make sure the condenser lead and primary lead are located as in, Figure 5. Leads must be properly located to eliminate lead interference between cap, weight base, and breaker advance plate. Add a trace of Ball Bearing Lubricant to the breaker cam. Adjusting Distributor Dwell Angle Either of the following methods can be used to adjust the dwell angle to the proper setting off the vehicle: Screw Adjustment Method Distributor Mounted in Distributor testing Machine Connect the dwell meter to the distributor primary lead.
 Screw Adjustment Method Distributor Mounted in a Vise Connect a testing lamp to the primary lead.")
10 8 ELECTRICAL Turn the adjusting screw to set the dwell angle to the proper setting of degrees (Fig. 2). (See Test Specifications.) Screw Adjustment Method Distributor Mounted in a Vise Connect a testing lamp to the primary lead. Rotate the shaft until one of the circuit breaker cam lobes is under the center of the rubbing block of the breaker lever. Turn the adjusting screw (clockwise) as shown in Figure 2 until the lamp lights, then give the wrench one-half turn in the opposite direction (counterclockwise) giving the proper dwell angle. Figure 5 Correct Routing and Attachment of Primary Ignition and Condeser Leads BATTERY SPECIFICTIONS Make Model Rating Auto-lite 11-HS Ampere Hours No. of Plates (Each Cell) 11 GENERATOR SPECIFICATIONS With Air Conditioning Withoout Air Conditioning Make \Delco-Remy \Delco-Remy Model Type Shunt Shunt Rotation Drive End Drive End Brush Spring Tension 28 Oz. 28 Oz. Field Current Volts, 80 F Volts, 80 F. Cold Output Volts, 2510 R.P.M Volts, 2210 R.P.M.
11 ELECTRICAL 9 VOLTAGE AND CURRENT REGULATION With Air Conditioning Without Air Conditioning Make Delco-Remy Delco-Remy Model Cutout Relay Closing Voltage Air Gap.020".020" Point Gap.020".020" Voltage Regulator Volts Air Gap.075".075" Current Regulator Amperes Air Gap.075".075" STARTING MOTOR SPECIFICATIONS Make Delco-Remy Model Brush Spring Tension No Load Test Amperage Draw 35 Oz. Min. 75 Maximum Volts 10.3 R.P.M SOLENOID SWITCH Model Hold-in Winding Both Windings Amperes at 10 Volts Amperes at 10 Volts
12 10 ELECTRICAL DISTRIBUTOR SPECIFICATIONS Make Delco-Remy Model Rotation L.H. CCW. Point Opening.016" Cam Angle (Set to 30 ) Breaker Lever Tension Condenser Capacity Centrifugal Advance (Engine Degrees and R.P.M.) Start Intermediate Intermediate Maximum Vacuum Control (Engine Degrees and Inches Mercury) Start Full Advance Maximum Engine Degrees Ozs Mfd. 700 R.P.M R.P.M R.P.M R.P.M Delco-Remy 5"-7" SPARK PLUG SPECIFICAITONS Make Auto-lite Champion Model AL-7 H-10 Thread 14 M.M. 14 M.M. Gap.035".035" Torque 30 Ft. Lbs. 30 Ft. Lbs.
13 ELECTRICAL 11 BULB CHART Trade Number and Candle Power 57 2 C.P C.P C.P C.P C.P & 4 C.P C.P & 40W American Motors Part Number Location Glove Box and Hood Ornament Emblem Instrument Illumination Clock Head Lamp Beam Indicator Directional Signal Indicator Generator Charge Indicator Oil Pressure Signal Selector Lever Indicator Light License Dome and Courtesy Light Tail, Stop, and Direction Part and Direction Back-Up Head Light
 conventional circuits.")

14 12 FUEL CARBURETION CARTER MODEL WCFB-2593-S FOUR-BAR- REL CARBURETOR The Carter Model WCFB carburetor is basically two (2) dual carburetors contained in one assembly. The section containing the metering rods, accelerating pump and choke is termed the primary side of the carburetor, the other section, the secondary side. It has five (5) conventional circuits. They are: 2 Float Circuits 1 Low Speed Circuit 2 High Speed Circuits 1 Pump Circuit 1 Climatic Control (Choke) Circuit FLOAT CIRCUITS The purpose of the float circuits is to maintain an adequate supply of fuel at the proper level in the bowls for use by the low speed, high speed, pump and choke circuits. Primary and secondary bowls are separated by a partition. The fuel line connection is on the primary side. Fuel is supplied to the primary and secondary intake needles and seats through a passage in the bowl cover. There are two fine mesh strainer screens in the bowl cover. They are located at the fuel inlet and at the secondary intake needle seat. The bowls are vented to the inside of the air horn by vertical vent tubes and to atmosphere by drilled passages in the air horn. Bowl vents are calibrated to provide proper air pressure above the fuel at all times. The bowl cover gasket seals the fuel bowl, idle and vacuum passages. To assure a positive seal, always Use a new bowl cover gasket when reassembling. An air leak at this point can result in a performance or economy complaint. A connecting passage along the outside of the body effects a balance of the fuel levels and air pressures between the two bowls. FIGURE 1 Float Circuit LOW SPEED CIRCUITS Fuel for idle and early part throttle operation is metered through the low speed circuit. Fuel enters the idle wells through the metering rod jets on the primary side of the carburetor. No idle system is used in the secondary side of the carburetor. The low speed jets measure the amount of fuel for idle and early part throttle operation. The air by-pass, economizers, and idle air bleeds are carefully calibrated and serve to break up the liquid fuel and mix it with air as it moves through the passages to the idle ports and idle adjustment screw ports. Turning the idle adjustment screws toward their seats reduces the quantity of fuel mixture supplied by the idle circuit. The idle ports are slot shaped. As the throttle valves are opened more of the idle ports are uncovered allowing a greater quantity of the fuel and air mixture to enter the carburetor bores. The secondary throttle valves remain seated at idle. FIGURE 2 Low Speed Circuit Throttle Bore Vapor Vent Passages Under certain conditions of high, under-hood temperature, fuel vapor forms in the throttle bores when the engine is not operating. This vapor accumulation may retard hot engine starting until sufficient air is drawn into the carburetor to mix with the vapor to form a combustile mixture. The throttle bore vapor vent passages vent the bores above the throttle valves to cavities in the underside of the carburetor flange. Air is admitted to these cavities through openings in the flange gasket. The air supplied by these vent passages, when mixed with the accumulated vapor, forms a more combustible mixture. This improves hot engine starting. HIGH SPEED CIRCUITS Fuel for part throttle and full throttle operation is


15 FUEL CARBURETION 13 supplied through the high speed circuits. Main discharge nozzles are permanently installed and must not be removed in service. Primary Side The position of the metering rods in the metering rod jets control the amount of fuel flowing in the high speed circuit of the primary side of the carburetor. The position of the metering rods is dual controlled; mechanically by movement of the throttle, and by manifold vacuum applied to the vacuum piston on the vacumeter link. Mechanical Metering Rod Action During part throttle operation, manifold vacuum pulls the vacumeter piston, link and metering rod assembly down, holding the vacumeter link against the metering rod countershaft arm. Movement of the metering rods will then be controlled by the metering rod countershaft arm which is connected to the throttle shaft. This is true at all times that the vacuum under the piston is strong enough to overcome the tension of the vacumeter spring. Vacuum Metering Rod Action Under any operating conditions (acceleration, hill climbing, etc.), when the tension of the vacumeter spring overcomes the pull of vacuum under the piston, the metering rods will move toward their wide-open throttle or power position. Secondary Side Fuel for the high speed circuit of the secondary side is metered at the main metering jets (no metering rods used). Throttle valves in the secondary side of the carburetor remain closed until the primary throttle valves have been opened a predetermined amount. They arrive at wide open throttle position at the same time as the primary throttle. This is accomplished by linkage between the throttle levers. The second set of counterweighted off-set throttle valves mounted above the secondary throttle valves are called "auxiliary throttle valves." Air velocity through the carburetor controls the position of the auxiliary throttle valves. When the accelerator is fully depressed, only the primary high-speed circuit will function until there is sufficient air velocity to overcome the weight of the counterweight on the auxiliary throttle lever and open the auxiliary throttle valves. When this occurs, fuel will also be supplied through the secondary highspeed circuit. The secondary throttle valves are locked closed during choke operation, to insure faster cold engine starting and good "warm-up" performance. Anti-Percolator To prevent vapor bubbles in the nozzle passages and low speed wells from forcing fuel out of the nozzles, antipercolator passages and calibrated plugs and bushings are used. Their purpose is to vent the vapors and relieve the pressure before it is sufficient to push the fuel out of the nozzles and into the intake manifold. Anti-percolator plugs and bushings are permanently installed and must not be removed in service. FIGURE 4 High Speed and Anti-Percolator Circuits PUMP CIRCUIT FIGURE 3 High Speed Circuit Metering Rods The pump circuit is located only in the primary side of the carburetor.


16 14 FUEL CARBURETION The accelerating pump circuit provides the measured amount of fuel necessary to insure smooth engine operation during acceleration at speeds below approximately 30 MPH. When the throttle is closed, the pump plunger moves upward in its cylinder and fuel is drawn into the pump cylinder through the inlet passage. The discharge needle is seated at this time to prevent air being drawn into the cylinder. When the throttle is opened, the pump plunger moves downward forcing fuel out through the discharge passage, past the discharge needle, and out of the pump jets. When the plunger moves downward, the inlet valve is closed preventing fuel from being forced back into the bowl. If the throttle is opened suddenly, the pump spring will be compressed by the plunger shaft telescoping, resulting in a smoother pump discharge of longer duration. At speeds above approximately 30 MPH, pump discharge is no longer necessary to insure smooth acceleration. When the throttle valves are opened a predetermined amount, the pump plunger bottoms in the pump cylinder eliminating pump discharge. tends to pull the choke valve open. The choke valve assumes a position where tension of the thermostatic coil is balanced by the pull of vacuum on the piston and air velocity on the off-set choke valve. FIGURE 6 Choke Circuit FIGURE 5 Accelerating Pump Circuit CHOKE CIRCUIT The Climatic control circuit provides a correct mixture necessary for quick cold engine starting and warm-up. When the engine is cold, tension of the thermostatic coil holds the choke valve closed. When the engine is started, air velocity against the off-set choke valve causes the valve to open slightly against the thermostatic coil tension. Intake manifold vacuum applied to the choke piston also FIGURE 7 Choke Housing Assembly When the engine starts, slots located in the sides of the choke piston cylinder are uncovered allowing intake manifold vacuum to draw air heated by the exhaust manifold, through the Climatic control housing. The flow of warm air heats the thermostatic coil and causes it to lose some of its tension. The thermostatic coil loses its tension gradually until the choke valve reaches wide open position. When the engine is accelerated during the warm- up period, the corresponding drop in manifold vacuum allows the thermostatic coil to momentarily close the


17 FUEL CARBURETION 15 choke, providing a richer mixture. During the warm-up period, it is necessary to provide a fast idle speed to prevent engine stalling. This is accomplished by a fast idle cam which is rotated by a connector rod attached to the choke shaft. The fast idle cam prevents the primary throttle valves from returning to a normal warm engine idle position while the Climatic control is in operation. During the starting period if the engine becomes flooded, the choke valve can be partially opened manually. This can be accomplished by depressing the accelerator pedal to the floor and engaging the starter. The projection on the throttle lever (unloader) will rotate the fast idle cam and in turn partially open the choke valve. OVERHAUL AND ADJUSTING Flooding, stumbling on acceleration, and other performance complaints in many cases are attributable to dirt, water, or other contaminants in the carburetor. Therefore, when removing a carburetor for inspection, do not drain the fuel bowl. The contents of the carburetor may be examined for evidence of contamination. Whenever the carburetor is removed, use care when handling to prevent damage to the throttle valves. The lower edge of the throttle valves extend beyond the base of the carburetor when in the open position. Figure 8 illustrates the locations and relative lengths of the air horn attaching screws. The float needles and seats must not be interchanged, therefore, group the needles and seats with their respective float assemblies. The accelerator pump discharge check needle is located in the passage below the pump jet cluster and may be removed by inverting the carburetor. The primary metering rod jets have larger openings than the secondary jets. Therefore, do not mix. the jets. When cleaning the carburetor, follow the instructions for the cleaning solution being used. Do not use drills or wire to clean jets or ports, this may result in inadvertent enlarging the openings or ports, affecting carburetor performance. ASSEMBLY PROCEDURE Assembling Throttle Flange Install primary and secondary throttle shafts. Assemble throttle valves on shafts with trade mark (C) toward idle ports on primary valves and away from center of carburetor on secondary valves when viewed from the bottom. (Use Oval head screws on secondary valves.) Install idle mixture adjusting screws and springs finger tight, then loosen one turn. NOTE: Do not tighten mixture screws tighter than finger tight. Assemble secondary throttle return spring and throttle lever on secondary throttle shaft. Install and tighten retaining washer and screw. Wind the return spring 11/2 turns and hook over secondary throttle lever. FIGURE 9 Assembling Secondary Throttle Lever and Spring FIGURE 8 Location and Lengths of Air Horn Attaching Screws Carefully remove the air horn assembly with the gasket and attaching parts. If the gasket sticks to the body casting, the floats may become bent. Install primary shaft wave washer, inner throttle shaft arm, and throttle shaft dog. Hook flex spring on outer throttle lever and throttle shaft dog and install outer lever on primary shaft. Install washer and screw. Install primary to secondary connector rod using a flat washer on each side of the levers and retain with pin springs.


 in the accelerator pump side of the carburetor. Then install the secondary main jets.")


18 16 FUEL CARBURETION Install auxiliary throttle shaft and auxiliary throttle valves. Using a new gasket, assemble the throttle flange on the carburetor body. Assemble while holding auxiliary throttle valves closed. CAUTION: Tighten the screws indicated in Figure 13 securely to prevent leakage between the body and throttle flange. FIGURE 10 Primary Throttle Shaft Arm and Lever Assembly Assemble fast idle cam and spring assembly and lower choke lever placing the assembly on the attaching screw. FIGURE 13 Location of Body to Flange Screws- Assembling Carburetor Body FIGURE 11 Fast Idle Cam and Spring Assembly Place the secondary lockout lever against boss and install the fast idle cam assembly in position on the boss. The levers must operate freely. Install the primary metering rod jets, (jets with the large holes) in the accelerator pump side of the carburetor. Then install the secondary main jets. Install the two low speed jets in the primary side of the body. The steel pump inlet ball check and retainer is installed in the bottom of the accelerator pump cylinder. A 5A6" six point socket assists pressing into place. Install pump passage screw plug and gasket. The brass pump discharge check needle is installed point down in the passage below the pump discharge jet cluster. Install the accelerator pump discharge cluster gasket and cluster assembly. Inspect vacumeter spring. The vacumeter spring affects both economy and performance. If it appears damaged or distorted, replace. If there is any doubt, compare it with a new one. Place the spring in vacumeter bore. Install lower pump spring in pump cylinder. Assembling Air Horn FIGURE 12 Secondary Lockout and Fast Idle Cam Assembled Using a new gasket, install the primary needle and seat; then install secondary needle and seat assembly.

 and laterally (sides of floats should")
19 FUEL CARBURETION 17 NOTE: Intake needles and seats are carefully matched during manufacture. Do not use the primary needle in the secondary seat or vice versa. To avoid unnecessary bending, both floats should be reinstalled in their original positions and then adjusted. Setting the floats to, specifications assures an adequate supply of fuel in the bowls for all operating conditions. Float adjustments must be made with the bowl cover gaskets removed and should be checked vertically (specified distance between bowl cover and bottom of floats) and laterally (sides of floats should just clear the arms of gauge). Correct lateral adjustment is important. If the floats are misaligned, they may bind or drag against the inner walls of the bowl. LATERAL ADJUSTMENT Place primary float gauge T and secondary float gauge T under center of float with notched end of gauge fitted over edges of casting. Sides of floats must just clear vertical uprights of gauge. Adjust by bending arms. FIGURE 14 Float Gauge in Position VERTICAL ADJUSTMENT Check with gauge in position. Floats must just clear the horizontal part of the gauge. There must be 1/8" between top of floats and air horn for.primary and 3/16" for secondary floats. Adjust by bending at center section of float arms. FLOAT DROP ADJUSTMENT Hold air horn assembly in normal upright position and measure between the top center of floats to air horn. It must be /8" for primary and 11/16" for secondary floats. Adjust by bending tabs on float brackets. Remove float assemblies and install new air horn gasket. Assemble vacumeter link and vacumeter piston with lip on link toward air horn. Insert accelerator pump plunger shaft in air horn and FIGURE 15 Checking Float Drop retain with link and pump arm assembly. Reassemble floats. Install air horn assembly on carburetor body. Be sure vacumeter piston and pump plunger are properly aligned. Do not bend float arms while assembling. Refer to Figure 8 for correct location of different length screws. Insert metering rods, catching spring loop with lower end before inserting. Start rods in jets; then twist eye of rod to engage vacumeter link assembly. Install countershaft return spring on countershaft. The pump countershaft is inserted into the pump operating arm and metering rod arm. Be sure metering rod arm is in slot of vacumeter link. Install idle vapor vent lever and screw; then tighten pump arm screw. Place washer on lower end of throttle connector rod. Install rod into throttle lever while holding lever in closed position and retain with spring and retainer. Wind countershaft return spring one-half turn. Install throttle connector rod in pump countershaft lever and retain with pin spring. Install choke housing onto air horn using a new gasket. Assemble choke piston on link and install shaft and piston, assembly through air horn while guiding piston in cylinder. Place choke valve in position on choke shaft in air horn so that (C) is visible from the top. Center the valve and tighten screws. Be sure valve or shaft does not bind and valve opens freely of its own weight. Position baffle plate on choke housing. Install choke coil housing gasket on piston housing with index mark on plastic housing at the bottom and retain with three screws and retainers. Leave coil housing in this position while making other adjustments. Install choke operating levers on shaft. Tighten screw only enough to permit lever to be moved. The choke connector rod is installed in operating lever and choke lower lever. Retain lower end with pin spring. Install strainer plug, gasket, and strainer in primary side and strainer plug and gasket on secondary side.


20 18 FUEL CARBURETION ADJUSTMENTS Float Adjustment Float adjustment is performed during assembly. "Refer to Assembling Air Horn." Pump Adjustment Back out idle speed screw, hold choke in wide open position, then close throttle valves tight in bores of carburetor. Flat on top of pump arm must be parallel with dust cover gasket surface. Bend throttle connector rod at lower angle to obtain adjustment. FIGURE 16 Accelerator Pump Adjustment Figure 17 Meteromg Rpd Adkist,em Metering Rod Adjustment With throttle valves seated, press down on vacumeter link until metering rods are bottomed. Holding rods down with throttle valves seated, rotate metering rod arm until it contacts lip on vacumeter link. Tighten metering rod arm clamp screw. Vapor Vent Adjustment Lubricate countershaft with oil and install dust cover and gasket. With choke valve held in wide open position and throttle valves seated, there should be I/32" between lower edge of bowl vapor vent valve and dust cover. To adjust, remove dust cover and bend vapor vent arm. Rotate choke coil housing in direction opposite arrow until index mark on coil housing is aligned with center index on piston housing. Tighten retaining screws. With choke lever clamp screw loose, hold choke valve closed. Figure 18 Vapor Vent Adjustment Place wire gauge T " on boss. Rotate choke lever on shaft until tang on fast idle cam contacts wire gauge
 opening between the edge of the throttle valve and the bore of the carburetor (side opposite idle port).")
21 FUEL CARBURETION 19 FIGURE 19 Fast Idle Cam Clearance Adjustment Hold choke valve tightly closed. Adjust fast idle screw on primary throttle shaft arm to obtain.023" (T ) opening between the edge of the throttle valve and the bore of the carburetor (side opposite idle port). The fast idle speed lug must be on high step of cam while making this adjustment. Unloader Adjustment With throttle wide open, there should be %2" (T ) clearance between upper edge of choke valve and side of air horn. Adjust by bending unloader projection on throttle lever. Secondary Throttle Lever Adjustment Block choke valve open to unlock secondary throttle valves. Place 11/;4" gauge (T ) between upper edge of primary throttle valve and bore (next to idle port) and adjust secondary operating rod (use bending tool T ) until secondary throttle valves just start to open.
.")

 drill hole in needle seat.")
22 20 FUEL CARBURETION There should be.008" to.013" clearance (Gauge T ) between the primary and secondary throttle positive closing shoes with throttle valves closed. Adjust by bending primary shoe (Figs. 22 and 23). Lockout Adjustment FIGURE 23 Secondary Throttle Lever (Second) Adjustment FIGURE 22 Secondary Throttle Lever (First) Adjustment With choke wide open, hold throttle closed. Close choke slowly ; the lockout step on secondary lockout-lever should freely engage tang on secondary throttle lever. Adjust by bending tang Figure 24 Secondary Throttle Lockout Adjusstment CARBURETOR SPECIFICATIONS DIMENSIONS: VENTS: GASOLINE INTAKE Flange Four Bore-4 bolt type. Throttle bore 17A 6". Primary venturi size, l%2" I.D. Main venturi size, 1-3/16" I.D. Outside, 4. Inside, 5. Size No. 42 (.0935") drill hole in needle seat. :LOW SPEED JET TUBE: (Primary side only). Jet, size No. 68 (.031") drill. By-Pass, in body, size No. 54 (.055") drill. Economizer, in screw plug, size.0492" diameter. Idle Bleed, in body, size.065" diameter.
23 IDLE PORT: FUEL CARBURETION 21 (Upper) slot type. Primary, length.185"; width.030". Secondary, none. IDLE PORT OPENING: LOWER PORT: SET IDLE ADJUSTMENT SCREW: MAIN NOZZLE: METERING ROD: METERING ROD JET: ACCELERATING PUMP: CHOKE: VACUUM SPARK PORT: Primary,.130" to.136" above top edge of valve with valve tightly closed. Secondary, none. Primary (for idle adjustment screw), size No. 53 (.0595") drill. Secondary, none. 3/4 to 13/4 turns open. For richer mixture, turn screw out. Do not idle engine below 425 RPM Automatic Trans. in Neutral (With Air Conditioning "ON" 475 RPM) ; 550 RPM for Standard and Overdrive Trans. Installed permanently. NO NOT REMOVE. Antipercolating jet, primary size No. 70 (.028") drill, Secondary size No. 72 (.025") drill. Primary economy step.074" diameter. Middle step tapers to.050" diameter. Power step,.044" diameter. Secondary, none. Primary size.098"; secondary size.070" diameter. Discharge jet (Twin) primary side only, size No. 72 (.025") drill. Intake ball check seat, size.115" to.120" diameter. Discharge needle seat, size.070" diameter. Carter Climatic Control set on index. Choke heat suction hole in piston housing, No. 43 drill. Horizontal slot.130" x.040". Top of port.040" to.046" above top edge of tightly closed throttle valve.
24 22 CLUTCH A 10-1/2 clutch plate assembly is used with standard or overdrive transmissions. Refer to the 1955 Techncial Service Manual for service procedures. CLUTCH SPRING SPECIFICATIONS Stamdard Number of Springs (12) 6 6 Pressure 148 ± 5 Lbs. 167 ± 5 Lbs. 1-23/32" 1-23/32" Compressed Length No Paint Identification Light Green Location Adjacent to Clutch Release Levers Two Springs Centrally Located Between Clutch Release Levers Heavy Number of Springs (12) 3 Pressure 182 ± 5 Lbs. Compressed Length 1-23/32" Identification Dark Blue Location In a Clockwise Direction the Springs Should Be in the #3 Position from Each Clutch Release Lever ± 5 Lbs. 1-23/32" Light Green Three Springs Located Between Clutch Release Levers CLUTCH LEVER ADJUSTMENT Clutch levers are adjusted to 1/8" below the hub of gauge plate J-1507 or J CLUTCH PEDAL LINKAGE ADJUSTMENT Adjustment for free pedal play is made by varying the length of the beam to the throwout lever rod. Lengthening this rod reduces the free pedal play. Shortening the rod increases the pedal play. In order to provide sufficient free movement of the clutch throwout bearing when the clutch is engaged and the clutch pedal fully released, free pedal play should be 1/2" to 3/4" at all times. The clutch pedal to beam rod adjustment (adjusted in production)is made to provide proper leverage. The outer end of the lever projects 5A6" from the beam, toward the rear, with the clutch pedal against the floor board. The pedal to beam rod should never be disturbed in service. LUBRICATION To lubricate the linkage, disconnect the throwout lever spring and apply lubriplate to the ends of the pedal rod and lever rod. The clutch beam lever pivot pin is pressure lubricated; the lubricating fitting is located at the bottom of the pin. Lubricate at 1,000 mile intervals.


25 TRANSMISSION OVERDRIVE 23 \TABLE OF CONTENTS SUBJECT Operation of Overdrive Electrical Circuits Diagnosing Overdrive Troubles Transmission Removal Disassembly PAGE SUBJECT Inspecting Overdrive Parts Inspecting Transmission Parts Reassembly Lubrication PAGE Figure 1 Standard Transmission The standard transmission is supplied with or without the overdrive unit as optional equipment). The standard transmission without overdrive utilizes a overdrive adapter housing, case, and torque tube and oil seal adapter for attachment to the torque tube. The transmission main shaft on the standard transmission is longer to compensate for the overdrive main shaft and overdrive operating parts which are not installed. Figure 1 Standard Transmission Figure 1 Overdrive Transmission

26 24 TRANSMISSION OVERDRIVE Due to the similarity between the two units, service procedures will only be outlined on overdrive equipped units. OPERATION OF OVERDRIVE The overdrive unit, when in operation above the governor cut-in speed, automatically reduces the engine to rear axle ratio approximately 30%. When overdrive operation is desired, the control button is pushed to the forward position. The car speed is then increased to a point higher than the cut- in speed, which is determined by the point setting of the overdrive governor. As the governor points close, at approximately 26 miles per hour, the solenoid is energized. This allows the locking pawl to engage the sun gear hub and balk ring assembly when the accelerator is momentarily released. When the accelerator is again depressed the overdrive is in operation. As this takes place, free wheeling becomes inoperative, since free wheeling is possible only below the cut-in speed determined by the overdrive governor. To lock out the overdrive the control button must be pulled all the way out. This can be done either when the car is in motion or when it is parked. Locking. out the overdrive while the car is in motion can he done while the car is in the free wheeling stage. The accelerator is depressed slightly so that the engine is driving the car. The control button can then be pulled out without depressing the clutch. While still applying pressure to the control button, the accelerator should be momentarily released to complete the shift. An alternate method permits pulling the control button back into conventional position during the time the accelerator pedal is fully depressed in the overtake position. THE ELECTRICAL CIRCUITS The electrical system consists of the three following circuits: Governor Circuit Light Line Solenoid Circuit-Heavy Line Kickdown Circuit Dotted Line The governor, solenoid, and kickdown circuits are basically outlined in Figure 3. Governor Circuit The governor circuit starts from the armature terminal of the voltage regulator. It continues to terminal No. "2" (Ignition) on the overdrive relay. The current passes through the relay coil which magnetically controls the contact points of the solenoid circuit. It continues through terminal "C" (KD) of the relay through the normally closed contacts of the kickdown switch on to the governor terminal and its open contact points. Solenoid Circuit FIGURE 3 Schematic Drawing Overdrive Electrical Circuits The solenoid circuit starts at the positive terminal of the battery and continues to the "B" terminal of the voltage regulator. At this point, it continues to the "Battery" terminal on the overdrive relay, through a 30 ampere fuse, and to the relay contacts. The circuit is resumed at the "Solenoid" terminal of the overdrive relay and continues to the No. "4" terminal of the solenoid and closed contacts to ground. Kickdown Circuit The kickdown circuit starts from the ( ) or distributor side of the ignition coil. It continues to the applied side of the kickdown switch and resumes at the opposite terminal on to the No. "6" terminal of the solenoid. The Circuits in Action When the car attains a speed of approximately 26 miles per hour, the centrifugal action of the weights in the governor closes the contact points, thus completing the circuit from the ignition switch to the ground. The relay coil, being energized, closes the relay contacts of the solenoid circuit now being completed and immediately energizes the actuating and holding coils of the solenoid moving the pawl into the balk ring and lock plate. As soon as the solenoid plunger has been permitted to enter the lock plate, the pull-in winding contacts in the solenoid actuating circuit are opened, permitting a decreased flow of.current through the holding coil to retain the plunger in position during the time when the overdrive is in operation. The inward movement of the solenoid plunger, in addition to operating the pull-in winding contacts in the solenoid actuating circuit. also closes the ground-out contacts
27 TRANSMISSION OVERDRIVE 25 in the kickdown circuit through the release of the spring lever on the outer end of the solenoid. The circuits are now in normal condition for continuing the overdrive operation. In order to understand the overdrive control system, the first thing to remember is that any time there is an open switch in a circuit, that entire circuit is open and inactive. When all three switches in the governor circuit are closed. the relay coil is energized, closing the relay points. This completes the solenoid circuit and energizes the solenoid, which through the locking pawl, locks the sun gear and places the overdrive in cruising gear. Also, any time any one of the three governor circuit switches is open, the relay coil is de-energized, the points open, and the solenoid circuit is broken. At Speeds Below 26 Miles Per Hour With the cruising gear control forward at speeds below 26 miles per hour, every switch in the governor circuit is closed except the governor switch. But this one open switch is enough to keep the entire governor circuit and the solenoid circuit open, and the solenoid remains de- energized. At Speeds Above 26 Miles Per Hour As the speed of car passes 26 miles per hour, the governor points automatically close. This completes the governor circuit, energizes the relay, and closes the relay points, thus energizing the solenoid. Then, with the momentary release of the accelerator pedal, engine torque is released just long enough for the solenoid pawl to move off the step of the balk ring and engage the notch of the lock plate locking the sun gear. This places the car in cruising gear. Kickdown Operation With the car in cruising gear at speeds above 26 miles per hour, depressing the foot accelerator all the way to the floor places the overdrive in overtake position. The accelerator pedal now in the wide open position breaks the governor circuit and completes the kickdown circuit. The break in the governor circuit de- energizes the solenoid. The closing of the kickdown circuit momentarily "shorts out" the distributor (for approximately two crankshaft revolutions) releasing engine torque just long enough for the solenoid pawl to disengage. The instant the solenoid disengages, the solenoid ground-out points automatically open, restoring the distributor circuit. The car then remains in direct gear as long as the engine is kept under a pulling load. DIAGNOSING OVERDRIVE TROUBLES Since overdrive troubles may originate not only in the mechanical operation of the unit but also in the electrical circuit which controls that unit, the service man should always check the control system before disassembling the overdrive. If the trouble is not found after a thorough inspection of the control system, then the transmission and overdrive should be removed for examination. Unsatisfactory Overdrive Operation. Look for: Burnt relay fuse in solenoid circuit. Loose terminals on any of the connecting wires. Incorrect terminal locations of connecting wires. Circuits grounded by water, dirt, or deformation. Defective solenoid points. Dirty or sticking relay contacts. Insufficient travel or unsatisfactory contacts in the kickdown switch. (Adjust or replace.) Excessive end play in the governor shaft. Improper adjustment of governor control springs. Burnt contact points in governor. Damage to cap and contacts. Absence of rubber cover to exclude water and dirt. Insufficient travel of shift rod. (Adjust control cable to operating lever.) CHECKING INOPERATIVE OVERDRIVE Mechanical Checks Determine if the overdrive control button is pushed forward to the limit of travel. Check to insure that the overdrive cable is adjusted to move the overdrive lever firmly against the stop on the overdrive housing in the engaged position. Electrical Checks With the ignition switch on, and the overdrive button pushed forward, use a test wire or a 12-volt test light as follows: Check the 30 ampere fuse in the overdrive relay for live circuits and clean contacts. Connect test lead directly from the "B" terminal on the voltage regulator to the terminal "SOL" on the overdrive relay mounted on the front of the cowl. This will supply current to the solenoid which should operate. If it does not, check for a possible defective connecting wire or connection at the solenoid terminal before condemning the solenoid. Ground the relay terminal "KD" or "C". If the relay is functioning properly, the points of the relay will close and the solenoid will operate. Ground the overdrive relay terminal on the kickdown switch. If all circuits are correct to this point, the solenoid should operate. With the kickdown switch governor terminal grounded, push the plunger in. This breaks the circuit and the solenoid should release. If the solenoid operates in the above tests, all circuits up to this point are correct and further investigation must be conducted underneath the car.

28 26 TRANSMISSION OVERDRIVE Ground the terminal on the governor. The solenoid should operate. Governor Operation Inspection: Suspend the axle and operate the engine at low speed in high gear. Apply a test lamp across the governor contact from the live terminal to the ground strap. The test lamp should light. Now increase engine speed. The governor cut-in speed will be indicated when the light goes out. Summary By following the above procedure in the proper sequence, the defective portion of the electrical circuit can be readily located. If all the preceding items are functioning correctly, the trouble may lie in the solenoid itself, such as burned points, or the connecting wires may be grounded to the case. The kickdown switch should be carefully inspected to see that none of its four terminals are touching each other. If the governor circuit is grounded at the kickdown switch, the grounded circuit will supply current to the relay, operating the solenoid without the possibility of disengagement. This is usually the case when the car will not free wheel or shift into reverse. If the kickdown circuit is internally shunting to the governor circuit, the engine will not run upon reaching governor cut-in speed, as the ignition will obtain a shunt ground through the governor contact points. A rubber boot has been provided to exclude water and dirt from the governor. Moisture or an accumulation of foreign matter may ground the line terminal on the governor and cause the solenoid to operate as soon as the ignition is turned on. If the mechanical and operating checks do not reveal the difficulty, internal trouble should be suspected and the transmission and overdrive removed for examination. TRANSMISSION AND OVERDRIVE DISAS- SEMBLY Secure the transmission assembly into a stand and completely drain its lubricant. Removing the Torque Tube and Rear Oil Seal Adapter Detach the adapter from the overdrive case by removing the four attaching cap screws. Note that the rear face of this adapter has a vent groove located on the bottom side. Separate the adapter and gasket from the overdrive case; discard the gasket. Remove the rear oil seal from the adapter with Tool J-2626 (Fig. 4). TRANSMISSION REMOVAL To remove the transmission, disconnect the hydraulic brake tube bracket that is fastened to the underside of the body; then disconnect the torque tube at the rear of the transmission. Disconnect the hand brake cable at the bellcrank and the brake cable housing at the bellcrank bracket. Move the rear axle to the rear to separate the universal joint from the overdrive main shaft. Disconnect the speedometer cable, shifter rods, overdrive control cable, and electrical control wires from the solenoid and governor. When removing the transmission from the car, care must be taken not to damage the transmission clutch shaft. Always use two guide pins (Tool J-1434) in place of the two upper attaching cap screws so the transmission clutch shaft will slide out far enough to clear the clutch pilot bearing and clutch disc. FIGURE 4 Removing Rear Oil Seal Disengaging the Shift Shaft Drive out the tapered lock pin which retains the overdrive shift shaft assembly in the overdrive case I Fig. 5. After the lock pin has been removed, work the shaft assembly outward to disengage it from the shift rail. Do not remove the shaft assembly from the overdrive case unless the oil seal requires replacement. Pulling the shaft through the seal may damage the sealing lip. Removing Governor and Solenoid With a 1-3/8" open end wrench, remove the governor from the overdrive case.
.")
.")


29 TRANSMISSION OVERDRIVE 27 Remove the four cap screws that hold the overdrive case to the transmission case. Separate the overdrive case from the transmission case at the rear of the overdrive bearing adapter housing (Fig. 7). FIGURE 7 Removing Overdrive Case FIGURE 5 Drive Out Tapered Lock Pin Detach the two solenoid attaching screws and turn the solenoid one-quarter turn clockwise to release the solenoid plunger from the overdrive locking pawl. Removing the Overdrive Case Remove the rear bearing snap ring and spacer washer from the overdrive main shaft (Fig. 6). NOTE: On the standard transmission, the rear bearing is a press fit between the overdrive case and torque tube and oil seal adapter. As the overdrive case is being removed, keep tapping the end of the overdrive main shaft with a plastic hammer. This will keep the shaft from coming out and will prevent the free wheeling rollers from dropping out of position. NOTE: If the transmission does not require complete disassembly, insert a holding bolt through the adapter and thread it into the transmission case to retain the transmission main shaft and its components in position. The rear bearing which remained in the overdrive case can now be removed, using a brass drift. Removing Speedometer and Governor Drive Gears The speedometer and governor drive gears which remained on the overdrive main shaft are retained by a Woodruff Key (Fig. 8). Removal only involves sliding them off the main shaft. 1. Spacer Washer 2. Snap Ring FIGURE 6 Removing Rear Bearing Snap Ring and Spacer Washer 1. Governor Gear 3. Speedometer Gear 2. Woodruff Key FIGURE 8 Removal of Governor and Speedometer Drive Gears

.")
.")

30 28 TRANSMISSION OVERDRIVE NOTE: On a standard transmission, the speedometer drive gear is retained in position by two lock rings in addition to the Woodruff Key. The Woodruff Key is a pressed fit into the main shaft. It may be tapped out of position if necessary. Removing the Cam and Pinion Cage To remove the cam from the transmission main shaft, remove the cam snap ring with snap ring pliers (Fig. 11). Removing the Main Shaft and Ring Gear As the main shaft and ring gear is moved to the rear, the free wheeling rollers will drop out. Keep one hand underneath to catch them (Fig. 9). FIGURE 11 Removing Cam Snap Ring The pinion cage at that time can also be removed from the transmission main shaft. With snap ring pliers, remove the remaining lock ring on the transmission main shaft (Fig. 12). FIGURE 9 Removing Main Shaft and Ring Gear To remove the ring gear from the main shaft, remove the large ring gear snap ring. The gear may then be separated from the main shaft (Fig. 10). FIGURE 12 Removing Pinion Cage Lock Ring Removing the Sun Gear and Shifter Rail Assembly Remove the overdrive shifter rail and sun gear and collar from the main shaft as a unit. When the sun gear is free of the sun gear hub, the shifter rail assembly can be separated from the sun gear shifting collar (Fig. 13). Removing the Cover Plate, Sun Gear Hub and Balk Ring Assembly, and Locking Pawl FIGURE 10 Remove the Snap Ring to Separate the Ring Gear from the Main Shaft Using a pair of pliers,- remove the large snap ring that holds the sun gear cover plate, hub, and overdrive balk ring in place (Fig. 14). Remove the cover plate and trough assembly and the sun gear hub assembly. Then the overdrive locking pawl can be lifted out (Fig. 15).


31 TRANSMISSION OVERDRIVE 29 Removing the Lockout Spring and Control Lever If necessary, the control lever and shaft assembly may be removed from the overdrive case. Discard the oil seal; a new one will be used on reassembly. Remove the retracting spring from the overdrive case. INSPECTING PARTS There are no internal adjustments to be made in the overdrive. However, for assurance of good operation, every part should be inspected carefully to be sure it is in good condition. If all parts are up to standard and correctly assembled, the unit will operate properly. Pinion Cage and Gears FIGURE 13 The Overdrive Shifter Rail Assembly and the Sun Gear and Collar are Removed Together Examine the pinion gears in the planetary pinion cage for worn, cracked, or chipped teeth. Rotate each gear to see that it does not bind on the pinion shaft. Then examine the oil slinger which is a part of the pinion cage. This slinger supplies lubrication to the pinion gears. H it is bent or otherwise damaged, it will not operate efficiently. Sun Gear Hub and Balk Ring Test the fit and tension of the balk ring on the sun gear hub. When pressure is applied in a direction that tends to close the ring, it should bind against the hub so that it will not turn. When pressure is applied on the end of the ring in a direction that tends to spread or open the ring, it should slide around the hub (Fig 16). A spring scale may be used to measure balk ring tension-3-1/2 to 5-1/2 pounds pull required (Fig. 17). FIGURE 14 Removing Cover Plate Snap Ring FIGURE 16 Testing Balk Ring Tension. Left: When You Push One End Toward the Other, the Ring Should Grab and Hold. Right: When You Push One End of the Ring Away from the Other, the Ring Should Slide Around the Hub 1. Locking Pawl 3. Cover Plate 2. Sun Gear Hub and Balk Ring Assembly FIGURE 15 Removing the Cover Plate Allows the Sun Gear Hub Assembly and the Locking Pawl to be Removed Free Wheeling Rollers, Housing, and Cam Examine each of the free wheeling rollers and the overdrive main shaft housing in which they turn for wear, scoring, rough surfaces, or any indications that the rollers may be slipping in the housing. Inspect the roller cams on the free wheel hub for wear or grooving (Fig. 18).


32 30 TRANSMISSION OVERDRIVE FIGURE 17 Measuring Balk Ring Tension with Spring Scale-3-1/2# to 5-1/2# Pull FIGURE 19 When You Twist the Cam Roller Retainer Counter-clockwise, the Two Springs Should Snap it Back Quickly Interlock Sleeve End Clearance Place one shift shaft in gear and with the other in the neutral position measure the clearance between the interlock sleeve and cam of the shift shaft at the in-gear side (Fig. 20). FIGURE 18 Inspection of Overdrive Parts is Important. The Free Wheeling Rollers Will Slip if these Parts Are Worn Test the action of the two cam retaining springs. These springs are designed to twist the cam in a clockwise direction, thus holding the rollers up on the cam. If this spring action is slow or retarded, it will result in a loud thump whenever the free wheeling unit engages on acceleration. To test it, grasp the cam roller retainer and turn it counterclockwise. Then release it suddenly. If the retainer springs quickly back in a clockwise direction, the springs are all right. If the action is sluggish, replace the springs (Fig. 19). Transmission Cover and Shift Fork Assembly To remove the transmission cover and shift fork assembly, simply remove the nine attaching cap screws and slide the assembly including the shift forks away from the transmission case. Remove the gasket and discard. FIGURE 20 Measuring Interlock Sleeve End Clearance This clearance should be maintained at.002" to.008". Four different length sleeves are serviced in.005" variations. Disassembly of the cover and shift fork assembly
. Grasp the main shaft and its components and separate the main shaft from the clutch shaft (Fig. 23).")

 together with a thrust yoke (J-6652) to prevent damage to the synchronizer clutch (Fig. 22).")
. 1. Bearing Puller (J-6654) 2.")
33 TRANSMISSION OVERDRIVE 31 involves removal of the shift levers and forks and tapping out the shift shafts from the cover. Care should be taken to prevent, loss of interlock sleeve, balls, spring or pin (Fig. 21). Grasp the main shaft and its components and separate the main shaft from the clutch shaft (Fig. 23). When separated, slide the main shaft and its components out the rear of the transmission case (Fig. 24). FIGURE 21 Transmission Cover and Shift Lock Assembly Removing Clutch Shaft Bearing FIGURE 23 Separate Clutch Shaft and Main Shaft Assembly After removing the bearing cap and gasket, remove the clutch shaft snap ring, spacer washer, and the bearing lock ring. The front bearing can be removed from the clutch shaft by using bearing puller (J-6654) together with a thrust yoke (J-6652) to prevent damage to the synchronizer clutch (Fig. 22). FIGURE 24 Removing Main Shaft Assembly from the Transmission Case Disassembly of Transmission Main Shaft Set the main shaft assembly on a bench and remove the synchro-clutch spacer washer and lock ring. The synchroclutch, second speed, and first and reverse sliding gears may then be removed from the transmission main shaft (Fig. 25 ). 1. Bearing Puller (J-6654) 2. Thrust Yoke (J-6652) FIGURE 22 Use Bearing Puller and Thrust Yoke to Pull the Front Bearing to Prevent Damage to the Synchro Clutch Removing Transmission Main Shaft With the front bearing removed from the clutch shaft, pull the shaft as far forward as possible. NOTE: The clutch shaft cannot be removed from the front of the transmission case. FIGURE 25 Transmission Main Shaft Assembly

34 32 TRANSMISSION OVERDRIVE Where the ball bearing in the adapter requires replacement, remove the large snap ring in the bearing adapter. Tap out the main shaft and bearing from the adapter. Remove the oil baffle from the adapter. Then remove the main shaft snap ring and press the bearing from the main shaft. Removing the Clutch Shaft Remove the clutch shaft from the rear of the transmission case and remove the 14 needle bearings and oil baffle. Removing Countershaft and Reverse Idler Gears The countershaft and reverse idler gear shaft are a press fit into the case. They are also locked into position at the rear by Woodruff Keys. To maintain the position of the 80 needle bearings in the countershaft gear, drive the countershaft out of the rear of the case using a dummy shaft machined to.870" x 81/B" (Fig. 26). Bearings 1. Woodruff Key FIGURE 27 Removing Reverse Idler Gear Bearings must be handled with great care. Wrap them in a clean cloth or paper until they can be washed. To wash a bearing, submerge it in a cleaning solution that is absolutely free of dirt and rotate it to flush away all oil and dirt. Dry the bearing with care. Carefully examine each bearing for cracked races, worn, or scored balls. Main Shaft 1. Dummy Shaft 2. Woodruff Key FIGURE 26 Removing Countershaft With the countershaft removed, the countershaft gear will drop to the bottom of the case. The countershaft gear with needle bearings, spacer, washers, and thrust washers may then be removed through the rear of the transmission case as an assembly. If necessary, disassemble for inspection and parts replacement. With the use of a brass drift, knock out the reverse idler gear shaft through the rear of case (Fig. 27). CLEANING AND INSPECTING PARTS With the transmission completely disassembled, all parts should be carefully cleaned so that they can be thoroughly examined. Gears Wash all gears in a cleaning solution. Inspect for worn or chipped teeth. Slide each gear onto a new shaft. If it appears to be loose, it must be replaced. NOTE: Whenever any transmission gear requires replacement, the gear with which it meshes should be replaced also. Install the gears onto the main shaft to be sure they slide on and off easily. The should fit smoothly without excessive play between the splines. If the fit is tight, look for burred edges on the splines. Synchro-Clutch and Friction Rings Carefully inspect the synchro-clutch and friction rings. Slide the rings on the cones of the second speed gear and the clutch shaft. Replace rings if there is excessive wear on the taper. Transmission Case Examine the surfaces of the bearing recesses in the transmission case for wear or scoring which indicates that the bearing has been revolving in its housing. Examine the case for cracks or other defects. Be certain that all parts of the case are thoroughly clean before and during assembly. Clutch Housing. Examine the housing for cracks or other defects. Check the rear face of the clutch housing with a dial indicator. The total run-out should not exceed.005". The total run-out of the clutch housing bore should not exceed.003".


35 TRANSMISSION OVERDRIVE 33 REASSEMBLY When reassembling the transmission, always use new gaskets and oil seals. Reinstalling the Countershaft Gear and Shaft To hold the countershaft needle bearings, spacer, and washers in place while installing the countershaft gear, use a dummy shaft machined to.870" x 8-1/16" (Fig. 28). the transmission case, therefore, care must be taken to prevent damage to the shaft. Install and align the Woodruff Key prior to driving the shaft flush to the rear face of the case. Assembling Main Shaft Assembly Install the transmission center bearing on the main shaft using Tool J-2995 (Fig. 29). 1. Needle Bearings 2. Dummy Shaft FIGURE 28 Reassembly Countershaft Gear Needle Bearings After installing the bearings in the countershaft gear and holding it in such a manner so as not to drop the dummy shaft, install the thrust washers. The two small projections on the face of the bronze rear thrust washer must index with the grooves in the countershaft gear. The front bronze thrust washer must index with the transmission case. Position the large thrust washer and install the assembly in the bottom of the case. Reinstalling the Reverse Idler Gear Install the reverse idler gear with the chamfered side of the teeth to the front of the ease. Align the gear and install the reverse idler gear shaft from the rear of the case. The shaft is a press fit into the case, therefore, care must be taken to prevent damage to the shaft. Install and align the Woodruff Key into the shaft prior to driving the shaft flush to the rear face of the case. Lift and properly align the countershaft gear. Prior to installing the shaft, check the front and rear thrust washers for proper alignment. The countershaft is a press fit into the transmission case, FIGURE 29 Installing Center Bearing on Transmission Main Shaft Install the main shaft snap ring. This snap ring is serviced in four different sizes.087",.090",.093", and.096". Select the thickest ring which will fit into the retaining groove. Proper snap ring selection will reduce end play to a minimum. Place the oil baffle into the overdrive adapter housing with concave side facing forward. Tap the main shaft and center bearing assembly into the housing. Install the large snap ring into the retaining groove of the adapter housing. This snap ring is serviced in five different sizes,.088",.091",.094",.097", and.100". Select the thickest ring which will fit into the retaining groove. Proper snap ring selection will reduce end play to a minimum.

36 34 TRANSMISSION OVERDRIVE Install the first and reverse sliding gear on the main shaft with the shifting collar to the front. Install the second speed gear on the main shaft with the tapered cone to the front. If the synchro-clutch was disassembled, check for proper assembly. The hub section and the outer ring of the synchro-clutch assembly are matched and lapped when fabricated by the manufacturer and are marked accordingly. The etching marks will correspond when properly assembled (Fig. 30). This will insure smooth sliding action when shifting into second and third speeds. FIGURE 31 Installing Main Shaft Assembly Check the synchro-clutch friction rings for proper location and freeness. REASSEMBLING THE OVERDRIVE When all parts have been carefully inspected the unit is ready for reassembly. As each part is assembled, be sure it is absolutely clean and lubricated with light engine oil. Always use new gaskets, oil seals and snap rings in reassembly. Reinstalling the Hub and Balk Ring, Locking Pawl, and Cover Plate FIGURE 30 Transmission Synchro-Clutch Unit Etching Marks Install the synchro-clutch including friction rings onto the main shaft. Install the lock ring and spacer washer on the main shaft. Refer to Figure 25 for proper parts sequence. Installing Clutch Shaft Assembly Insert the fourteen clutch shaft needle bearings in the rear of the clutch shaft. A coating of heavy lubricant will retain them in proper position. Insert the clutch shaft into the transmission case from the rear. Position the shaft as shown in Figure 31. Installing Main Shaft Assembly Insert the main shaft assembly from the.rear of the transmission case. It will be necessary to tilt the rear portion of the assembly downward to provide the necessary clearance to allow the synchro-clutch and second speed gear to pass over the countershaft gear (Fig 31). When the synchro-clutch just clears the countershaft gear, place the clutch shaft in a horizontal position and slide it onto the main shaft. Care must be taken to prevent mislocation of the clutch shaft roller bearings. At that time, place the clutch shaft and main shaft assembly in its proper position in the transmission case. Install the hub and balk ring assembly with the chamfered side of the ring against the sun gear hub. Install the locking pawl, positioning the pawl and balk ring in the "locked-out" position, with the pawl on the step of the ring for correct installation of the solenoid. Install the cover plate and trough in position and lock it in place with the large snap ring. This snap ring is serviced in three different sizes.0625",.0665", and.0705". Select the thickest ring which will fit into the retaining groove. Proper selection of the snap ring will reduce end play to a minimum. Reinstalling the Sun Gear and Shifter Rod Assembly Install the fork of the shifter rod in the sun gear shift collar. Then hold them together as you slide the sun gear onto the main (spline) shaft and the shifter rod into the opening in the bearing adapter (Fig. 13). Reinstalling the Pinion Cage and Cam Install the pinion cage lock ring on the main shaft (Fig. 12). Install the pinion cage assembly on the main shaft being careful not to distort the oil slinger. The pinion cage pinions mesh with the sun gear and the cage will butt up against the lock ring previously installed. Position the free wheeling cam on the main shaft so that the counter bore of cam slides over the machined surface of the pinion cage.
. Proper selection of the snap ring will reduce end play to a minimum.")

37 TRANSMISSION OVERDRIVE 35 Install the free wheeling cam snap ring on the main shaft. This snap ring is serviced in three different sizes.063",.068", and.073". Select the thickest ring which will fit into the retaining groove (Fig. 11). Proper selection of the snap ring will reduce end play to a minimum. Reinstalling the Ring Gear and Main Shaft Replace the ring gear on the overdrive main shaft and lock it in place with a snap ring (Fig. 10). This ring is serviced in three different sizes.055",.057", and.059". Select the thickest ring which will fit into the retaining groove. Proper selection of the snap ring will reduce end play to a minimum. The Free Wheeling Rollers Replace the free wheeling rollers in the free wheeling cam retainer. A rubber band placed around the rollers will help to keep the rollers from dropping out while the main shaft and ring gear is being installed (Fig. 32). NOTE: On a standard transmission, the speedometer drive gear is retained in position by two lock rings in addition to the Woodruff Key. Reinstalling the Overdrive Case, Control Lever, and Shift Shaft Assembly Install the shift shaft oil seal and retractor spring in the overdrive case. Holding the bearing adapter to the transmission case work the overdrive case onto the overdrive assembly. Secure the assembly with the four attaching cap screws. Push the shift shaft into the case so that the operating cam will engage with the slot in the shift rod. Then install the lock pin to hold the shaft in position. NOTE: Inspect the operation of the shift lever as follows: With the lever against the machined stop on the boss of the case, a slight free movement with no tension should be evident. Excessive movement with no tension indicates that the shift rod is binding in the case. Installing Solenoid and Governor Insert the solenoid plunger in the opening in the bearing adapter and engage it with the notch in the locking pawl. Turn the solenoid one-quarter turn counterclockwise to lock the pawl and plunger together. Pull the solenoid to be sure the plunger is locked with the pawl. Then tighten the two cap screws. Thread the governor unit into the overdrive case. Tighten sufficiently to prevent oil leakage. Reinstalling Rear Bearing, Oil Seal, and Adapter Install the rear bearing on the overdrive main shaft using Tool J-2995 (Fig. 33). FIGURE 32 A Rubber Band Serves to Hold the Free Wheeling Rollers in Position until the Ring Gear and Main Shaft can be Installed Now rotate the cage and roller assembly counterclockwise so that the rollers will be at the bottom of the cams. This will permit the installation of the overdrive main shaft and ring gear assembly. Installing Speedometer and Governor Drive Gears Insert the Woodruff Key into the main shaft. Then the governor and speedometer drive gears. The governor drive gear which is smaller in diameter is installed against the shoulder on the main shaft. FIGURE 33 Installing Rear Bearing Install the rear spacer washer and snap ring (Fig 6). NOTE: On the standard transmission, the rear bearing is a press fit between the overdrive case and torque tube and oil seal adapter.
. Attach the adapter to the overdrive case with the four cap screws.")

38 36 TRANSMISSION OVERDRIVE This snap ring is serviced in six different sizes.087",.090",.093",.096",.099", and.102". Select the thickest ring which will fit into the retaining groove. Proper selection of the snap ring will reduce end play to a minimum. Install a new oil seal in the torque tube adapter ( Fig. 4). Attach the adapter to the overdrive case with the four cap screws. Reinstalling Clutch Shaft Bearing Place the oil slinger on the clutch shaft with the concave side toward the rear. Install the large bearing lock ring on the bearing and place the bearing on the clutch shaft. With the use of Tool J-2995 and thrust yoke J-6652, install the bearing on the clutch shaft and into the transmission case (Fig. 34). FIGURE 35 Measuring Clutch Shaft End Play Transmission Cover and Shift Fork Assembly 1. J J-6652 FIGURE 34 Installing Clutch Shaft Bearing When the bearing is properly seated, place the spacer washer against the hearing race. Install the clutch shaft bearing snap ring. This snap ring is furnished in six different sizes.087",.090",.093",.096",.099", and.102". Select the thickest ring which fits into the retaining groove. Proper selection of the snap ring will reduce end play to a minimum. Checking Clutch Shaft End Play Install the clutch shaft bearing cap without a gasket. Check the clearance between the bearing cap and case with a feeler gauge (Fig. 35I. The desired clutch shaft end play is.000". Therefore, the clearance between the bearing cap and case must be compensated by the thickness of the gasket or gaskets to be installed. This gasket is serviced in two sizes.010" and.015". Install the bearing cap and attach with four cap screws. Remove thrust yoke J-6652 from the synchro-clutch. Place the synchro-clutch and first and reverse sliding gears in neutral. Place the shift shafts and forks in neutral and install the assembly to transmission case. Secure in position with the attaching cap screws. The transmission requires a final check by shifting in all gears; check the operation carefully. LUBRICATION OF THE TRANSMISSION AND OVERDRIVE Check the lubricant level of the transmission and overdrive every 1,000 miles. Transmission and overdrive units should be filled to the drain plug level on the right side of both units. Drain and clean twice a year, or every 10,000 miles, using only flushing oils. Do not use gasoline, kerosene, steam, etc. For atmospheric temperatures above 32 Fahrenheit, use Mineral Oil Gear Lubricant SAE No. 90 in the transmission and overdrive. Below 32 Fahrenheit, use SAE No. 80. Where difficulty in shifting is experienced in subzero temperatures, dilute the transmission and overdrive oil as required, using light engine oil. Transmission Capacity Standard and/or overdrive 4 Pints.
39 SHIFTING 37 STANDARD AND OVERDRIVE TRANSMISSION Refer to the 1955 Technical Service Manual for service procedures. FLASHAWAY HYDRA-MATIC TRANSMISSION Refer to the 1955 Technical Service Manual for disassembly instructions. Selector Lever Linkage Adjustment Place selector lever in the D-3 position and set the operating lever against the stop on the starter switch bracket. Remove clevis pin from the gear shift control rod at side of transmission case and remove clevis from shift lever. Place the transmission outer shift lever in the D-3 range position. Adjust clevis so that clevis pin passes freely through hole in lever with the operating lever against the stop on the starter switch bracket. Then remove clevis and lengthen the control rod two full turns and replace clevis and clevis pin. NOTE: This adjustment will insure proper detent location in the transmission with a full reverse engagement. BRAKES AND WHEELS BRAKE SPECIFICATIONS Type of Mechanism Make Total Foot Braking Area Lining Size Width x Primary Front Rear Secondary Front Rear Pedal Free Play, Without Power Brakes Drum Diameter, Inches Front Wheel Cylinder Bore, Diameter Rear Wheel Cylinder Bore, Diameter Master Cylinder Bore, Diameter Piston Clearance, Inches Wheel and Master Cylinder Master Cylinder Piston Rod Diameter, Inches (Power Brake Treadle-Vac) Lockheed Hydraulic Bendix Servo 197 Sq. In. 2-1/2" x 10-9/16" 2" x 9-5/16" 2-1/2" x 12" 2" x 12" 1/4" to 1/2" 11" 1-1/8" 7/8" 1".001" to.003" 21/32" WHEELS AND TIRES Wheel Sze Tire Size Tire Pressure Front Rear x Lbs. 20 Lbs.
40 38 PINION DEPTH ADJUSTMENT REAR AXLE-PROPELLER SHAFT The pinion depth adjustment procedure as outlined in the Rear Axle and Propeller Shaft Section of the 1956 Special V-8 Series Technical Service Manual Supplement is used to adjust pinion depth. The distance of the rear axle center line to the rear machined face of the pinion gear is 2.547". This measurement is to be used to check for the correct pinion depth. REAR SPRING SPECIFICATIONS Free Height Loaded Height Rate Lbs. Per Inch After Loaded Less Wheel Carrier With Wheel Carrier Heavy 17-7'8" 17-1/2" 16-3/4" Minimum 10-9/16" at 870 Lbs. ± 25 Lbs. 10-9/16" at 940 Lbs. ± 25 Lbs. 11-1/4" at 870 Lbs. ± 25 Lbs. 125 Lbs. 135 Lbs. ± 5 Lbs. 170 Lbs. ± 5 Lbs. Type Drive Gear Type Ring Gear and Pinion Backlash Axle Shaft End Play Pinion Shaft Bearing Tension Pinion Bearing Adjustment Differential Side Bearing Preload Lubrication Capacity Type of Lubricant Rear Axle Ratio (Standard or Overdrive) Rear Axle Ratio (Automatic) REAR AXLE SPECIFICATIONS Semi-Floating Hypoid.002"-.006".002"-.004" 15" Lbs.-18" Lbs. Shims.004"-.008" 4 Pts. SAE 90 HYPOID* 4.1:1 (10-41) 3.2:1 (13-41) *NOTE: Rear Axles are filled at the factory with SAE 90 Hypoid Gear Lubricant. Lubricant change at regular drain and refill periods is not recommended. The container of factory Hypoid Lubricant furnished with service axle housings and gear sets should be used at time of replacement service. SAE 90 Hypoid Gear Lubricant is preferred when the addition of lubricant is necessary to bring it to the proper level. However, a SAE 90 Multi-purpose lubricant may be used after a break-in period (several thousand miles) as long as it is suitable for Hypoid Rear Axle Service. Naturally, the results of such use is the responsibility of the lubricant supplier or servicing dealer..


41 FRONT SUSPENSION STEERING 39 FRONT SPRING REMOVAL The front spring seats, upper and lower, have been designed with an ear to accept a hook tool for removal. The tool kit is available for use in service through the Field Parts Warehouse. The spring is removed by raising the rear end of the car opposite from the side from which the front spring is to be removed. Additional compression may be gained by leaning on the fender over the spring. Install hooks, Kit Number , in the holes on the ears of the spring seats. The hooks will hold the spring in a compressed position to enable removal from the car (Fig. 1). transmission equipped cars have the steering gear stops located on the lower control arms (Fig. 2). 1. Steering Gear Stop 2. Shims FIGURE 2 Steering Gear Stops FIGURE 1 Spring Hooks Installed on Spring Seat A service spring replacement may be installed by using the following procedure. Install upper and lower cushions, upper and lower spring seats on the spring. Align the holes in the ears of upper and lower spring seats. Compress the spring by suitable means, arbor press or hydraulic jack and install hooks on spring seats. The spring can then be installed on the front coil spring support. The hooks are released from the spring seat by raising the opposite rear end of the car. STEERING GEAR STOPS All Automatic transmission equipped cars WITHOUT POWER STEERING and all Standard and Overdrive Transmission Production location of the steering gear stops is provided by installation of three 1/ 6" washer shims. In service, the amount of shims may be varied to provide adequate wheel turning radius and to prevent tires rubbing at any point when wheels are in full turn, full bump position. All Automatic transmission equipped cars WITH POWER STEERING have adjustable steering stop screws located on the pitman arm. Tool J-1374 or J-5566 is used to remove the pitman arm. It will be necessary to increase the depth of the opening 1/2" to adapt the tool for use on cars equipped with power steering. Figure 4 illustrates the revision required. STEERING KNUCKLE PIN AND SPINDLE The upper control arm trunnion is provided with needle bearings and a thrust bearing is retained by a castellated nut. The steering knuckle pin is threaded into the lower control arm trunnion. At time of assembly; screw the steering knuckle pin into the lower trunnion until it is bottomed; then unscrew it one turn. This will provide approximately 1/4" clearance between the shoulder on the knuckle pin and the trunnion. The knuckle pin installed in this manner will prevent "bottoming" on extreme turns and insure maximum bearing on the thread area.

42 40 FRONT SUSPENSION STEERING Figure 3 Revision to Tool J-1374 or J-5566 FRONT WHEEL ALIGNMENT SPECIFICATIONS Turning Angle Inside Wheel Outside Wheel /4 L/PS 21-3/4 W/PS Kingpin Angle 61/2 Caster Angle Without Power Steering 0 to 1/2 1/2 Desired Caster Angle With Power Steering 1/2 to 1 1 Desired Camber 1/4 Neg. to 1/4 Pos. 0 Desired Figure 3 Steering Knuckle Pin and Spindle Assembly Sequence Toe-in 1/6" to 3/16"
43 FRONT SUSPENSION STEERING 41 FRONT SPRING SPECIFICATIONS Free Height Loaded Height Rate Lbs. Per Inch After Loaded Weight With Air Conditioning 21-5/6" 9-5/8" at 1125# ± 25# 96# ± 2# Without Air Conditioning Left Side Right Side 20-9/16" 21-5/6" 9-5/8" at 1050# ± 25# 9-5/8" at 1125# ± 25# 96# ± 2# 96# ± 2#
44 42 BODY

45 BODY 43 PAINT CODE NUMBERS AND CORRESPONDING COLORS Exterior Colors Code No. Paint Name Code No. Paint Name Code No. Paint Name Code No. Paint Name * 1 Classic Black * 67 Bermuda Green Light * 72 Frost White * 82 Pacific Blue Dark # 84 Glacier Blue Light #85 Lagoon Blue Medium #86 Plum Metallic #87 Berkshire Green Medium #88 Oregon Green Dark #89 Avocado Metallic #90 Mardi Gras Red #92 Mojave Yellow #93 Sierra Peach * Same as 1956 # New Color Added for 1957 #94 Cinnamon Bronze Metallic #95 Gotham Gray Metallic Interior Colors Instrument Panel and Finish Mouldings Satin Black Green Metallic Blue Metallic
46
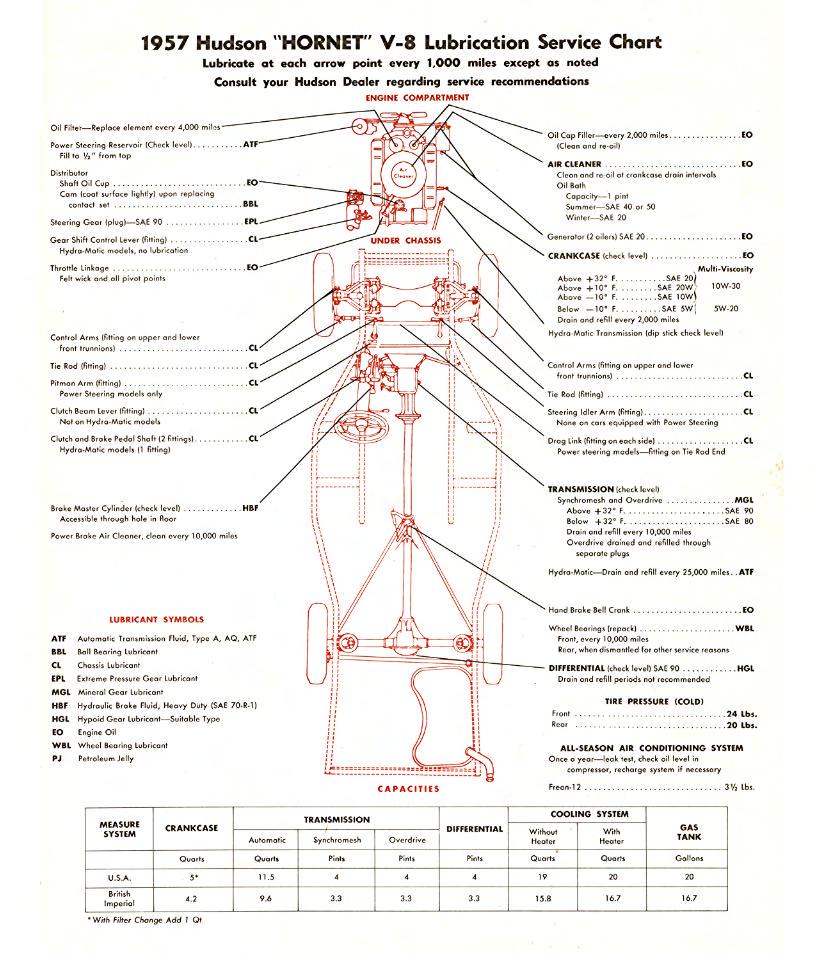
47
AN EXPLANATION OF CIRCUITS CARTER YH HORIZONTAL CLIMATIC CONTROL CARBURETER
 AN EXPLANATION OF CIRCUITS CARTER YH HORIZONTAL CLIMATIC CONTROL CARBURETER The Carter Model YH carbureter may be compared with a Carter YF downdraft carbureter with the circuits rearranged to operate
CARTER DOWNDRAFT CARBURETOR Terraplane All Models. Technical Information
 CARTER DOWNDRAFT CARBURETOR 1934 Terraplane All Models Technical Information . Carter W-1 Downdraft Carburetors 1934 Terraplane Challenger, Model KS NOTE: Terraplane Models. Carburetor fitted with Anti-
Performer Series Carburetor Rebuild Kit Catalog #1477 Models
 Please read these instructions carefully before attempting to rebuild your carburetor. Make sure to refer to your carburetor Owner s Manual for further information if need be. If you have any questions
HUDSON MOTOR CAR COMPANY
 HUDSON MOTOR CAR COMPANY 1935-1942 Carburetor Tune-up Manual ( for Hudson and Terraplane Models) Index Carter W-1 Downdraft 1935-1942 1 Carter W-1 Vacumeter Type 1938 Hudson 4 Carter WA-1 Vacumeter Type
1950 Pacemaker. Specifications & Adjustments
 Specifications & Adjustments Specifications & Adjustments ENGINE: Valve Arrangement Bore and Stroke Piston Displacement Maximum Torque Horsepower Actual Taxable Compression Ratio: Cast Iron Head (Std.)
SECTION 4 - FUEL SYSTEMS AND CARBURETION
 SECTION - FUEL SYSTEMS AND CARBURETION FUEL SYSTEMS - - - - - - - - - - - - - - - - - - - - - - - - - - - - - - - - - - - - - - - - - - - - - - - - - - - - - - - - - - - - - -62 FUEL PUMP - - - - - - -
GENERAL DESCRIPTION ROCHESTER 4GC 4-JET CARBURETOR 6B PONTIAC SHOP MANUAL
 6B-56 1955 PONTIAC SHOP MANUAL GENERAL DESCRIPTION ROCHESTER 4GC 4-JET CARBURETOR The Rochester 4GC Carburetor for the 1955 Pontiac V -8 is essentially two 2 -J et carburetors in a single casting. The
WEBER CARBURETOR TROUBLESHOOTING GUIDE
 This guide is to help pinpoint problems by diagnosing engine symptoms associated with specific vehicle operating conditions. The chart will guide you step by step to help correct these problems. For successful
DESCRIPTION FUEL AND VACUUM PUMP REMOVE AND REPLACE FUEL PUMP-OVERHAUL 6B PONTIAC SHOP MANUAL. S. Install battery and connect cables.
 6B-74 1955 PONTIAC SHOP MANUAL DESCRIPTION FUEL AND VACUUM PUMP All models are equipped with a combination fueland double acting vacuum pump operated by an eccentric bolted to the front end of the engine
CARBURETOR - HITACHI 2-BBL
 CARBURETOR - HITACHI 2-BBL 1986 Isuzu Trooper II 1986 Hitachi Carburetors HITACHI DCH340, DCR384, DFP340, DFP384 & DHP340 2-BARREL P UP & Trooper II DESCRIPTION Carburetor is a 2-barrel downdraft type
Carburetor Instructions
 Carburetor Instructions for HUDSON SUPER SIX ESSEX SIX CYLINDER Hudson Motor Car Co. DETROIT, U.S.A. Carburetor The carburetor is a device for metering correct amounts of fuel and air for the various
TILLOTSON LTD., CLASH INDUSTRIAL ESTATE, TRALEE, CO. KERRY, IRELAND PHONE: FAX:
 TILLOTSON LTD., CLASH INDUSTRIAL ESTATE, TRALEE, CO. KERRY, IRELAND PHONE: +353 66 7121911 FAX: +353 66 7124503 e-mail: sales@tillotson.ie HR SERIES SERVICE MANUAL INTRODUCTION Tillotson has developed
AUTOMATIC TRANSMISSIONS Mitsubishi F3A20 Series TRANSMISSION APPLICATION TABLE
 Article Text ARTICLE BEGINNING AUTOMATIC TRANSMISSIONS Mitsubishi F3A20 Series APPLICATION TRANSMISSION APPLICATION TABLE Vehicle Application Transmission Model Colt 3-Speed (1990-94)... F3A21 Colt Vista
A/C COMPRESSOR SERVICING Article Text 1991 Saab 9000 For Copyright 1997 Mitchell International Friday, October 15, :22PM
 Article Text ARTICLE BEGINNING 1991 GENERAL SERVICING Compressor Service * PLEASE READ THIS FIRST * CAUTION: When discharging air conditioning system, use only approved refrigerant recovery/recycling equipment.
This file is available for free download at
 This file is available for free download at http://www.iluvmyrx7.com This file is fully text-searchable select Edit and Find and type in what you re looking for. This file is intended more for online viewing
66 CHAPTER FOUR. Spark Plug Removal Refer to Figure 28 for spark plug wive routing according to engine.
 66 CHAPTER FOUR IGNITION SYSTEM A mechanical contact breaker point ignition system is used on all engines covered in this manual. The ignition system may use a Delco-Remy, Autolite, Mallory or Prestolite
CARBURETION. Carburetor Identification. Models , , , , , , , , , , ,
 Carburetor Identification Models 110400, 110600, 111400, 111600, 113400, 120400, 120600, 121400, 121600, 122600, 123400, 123600 Models 28S700, 311700 Service Carburetor Briggs & Stratton/Walbro LMS Models
QUICK FUEL TECHNOLOGY HOT ROD SERIES CARBURETORS SLAYER SERIES CARBURETORS SUPER STREET SERIES CARBURETORS
 QUICK FUEL TECHNOLOGY Installation Instructions HOT ROD SERIES CARBURETORS SLAYER SERIES CARBURETORS SUPER STREET SERIES CARBURETORS HR-580-VS 580 CFM Vac. Secondary!!! SS-680-VS 680 CFM Vac. Secondary
TILLOTSON LTD., CLASH INDUSTRIAL ESTATE, TRALEE, CO. KERRY, IRELAND PHONE: FAX:
 TILLOTSON LTD., CLASH INDUSTRIAL ESTATE, TRALEE, CO. KERRY, IRELAND PHONE: +353 66 7121911 FAX: +353 66 7124503 e-mail: sales@tillotson.ie SERIES SERVICE MANUAL INTRODUCTION The gasoline engine industry
Transmission Overhaul Procedures-Bench Service
 How to Assemble the Lower Reverse Idler Gear Assembly Special Instructions In 1996 Eaton changed the reverse idler system design. In the nut design, the reverse idler bearing was lubricated through a hole
BRAKE SYSTEM Return To Main Table of Contents
 BRAKE SYSTEM Return To Main Table of Contents GENERAL... 2 BRAKE PEDAL... 10 MASTER CYLINDER... 13 BRAKE BOOSTER... 16 BRAKE LINE... 18 PROPORTIONING VALVE... 19 FRONT DISC BRAKE... 20 REAR DRUM BRAKE...
235/245400, , 28N
 Models 235/245400, 287000, 28N thru W, 310/312/313700 These carburetors have a fixed high speed main jet with adjustable idle, Fig 183. The different carburetors are identified as LMT 1 and up. The letters
Hudson-Essex. Service Manual Supplement. Hudson Cars 750,001 up
 1 9 2 6 Hudson-Essex Service Manual 1927 Supplement Hudson Cars 750,001 up Hudson Rear Axle (Cars numbered 750,001 and upward) Brakes (Cars numbered 750,001 and upward) See page 18 Transmission Group
FUEL SYSTEM. Table of Contents. Specifications. Section 3A Fuel Delivery System. Models 6/8/9.9/10/15 CARBURETOR SPECIFICATIONS
 FUEL SYSTEM Section 3A Fuel Delivery System Table of Contents Specifications............................. 3A-1 WMC Carburetor Specifications............. 3A-2 WMC Carburetor Specifications.............
INSTRUCTION SHEET Rochester Carburetor Models 4G 4GC
 INSTRUCTION SHEET Rochester Carburetor Models 4G 4GC General Exploded View The general design and parts shown will vary to individual units covered on this instruction sheet. Disassembly Use the exploded
1.6L 4-CYL - VIN [E]
![1.6L 4-CYL - VIN [E]](/thumbs/81/84172348.jpg "1.6L 4-CYL - VIN [E]") 1.6L 4-CYL - VIN [E] 1993 Nissan Sentra 1993 NISSAN ENGINES 1.6L 4-Cylinder NX, Sentra * PLEASE READ THIS FIRST * NOTE: For engine repair procedures not covered in this article, see ENGINE OVERHAUL PROCEDURES
1.6L 4-CYL - VIN [E] 1993 Nissan Sentra 1993 NISSAN ENGINES 1.6L 4-Cylinder NX, Sentra * PLEASE READ THIS FIRST * NOTE: For engine repair procedures not covered in this article, see ENGINE OVERHAUL PROCEDURES
1.8L & 2.2L 4-CYL Article Text 1998 Subaru Impreza
 1.8L & 2.2L 4-CYL Article Text 1998 Subaru Impreza ARTICLE BEGINNING 1995-98 ENGINES Subaru - 1.8L & 2.2L 4-Cylinder 1995-97: Impreza (1.8L) 1995-98: Impreza (2.2L), Legacy (2.2L) * PLEASE READ THIS FIRST
BRAWLER SERIES CARBURETORS
 BRAWLER SERIES CARBURETORS Installation Instructions Please Stop and Read these Instructions before proceeding. If you do not fully understand the installation and tuning instructions you should seek professional
Geo Prizm ( LSi) Toyota Celica 1.8L (1994)
 Toyota Celica 1.8L (1994)") Page 1 of 140 ARTICLE BEGINNING APPLICATION TRANSMISSION APPLICATIONS Application Geo Prizm (1993-94 LSi) Toyota Celica 1.6L (1993) Celica 1.8L (1994) Celica 2.2L (1993) Corolla 1.8L MR2 Paseo Transaxle
Page 1 of 140 ARTICLE BEGINNING APPLICATION TRANSMISSION APPLICATIONS Application Geo Prizm (1993-94 LSi) Toyota Celica 1.6L (1993) Celica 1.8L (1994) Celica 2.2L (1993) Corolla 1.8L MR2 Paseo Transaxle
TILLOTSON LTD., CLASH INDUSTRIAL ESTATE, TRALEE, CO. KERRY, IRELAND PHONE: FAX:
 TILLOTSON LTD., CLASH INDUSTRIAL ESTATE, TRALEE, CO. KERRY, IRELAND PHONE: +353 66 7121911 FAX: +353 66 7124503 e-mail: sales@tillotson.ie HU SERIES SERVICE MANUAL INTRODUCTION To keep apace of new market
TILLOTSON LTD., CLASH INDUSTRIAL ESTATE, TRALEE, CO. KERRY, IRELAND PHONE: FAX:
 TILLOTSON LTD., CLASH INDUSTRIAL ESTATE, TRALEE, CO. KERRY, IRELAND PHONE: +353 66 7121911 FAX: +353 66 7124503 e-mail: sales@tillotson.ie HS SERIES SERVICE MANUAL INTRODUCTION The demand for a miniature
Typical Install Instructions
 Typical Install Instructions Read & understand all steps of these instructions before beginning this installation. WEBER Conversion Kit, VW T-1/2, up to 1835cc 32 / 36 DFEV Weber Carburetor These instructions
SECTION 6Y ENGINE ELECTRICAL. CONTENTS OF THlS SECTION. Page Ignition System " 6Y-1 Specifications 6Y Passenger Shop Manual IGNITION SYSTEM
 SECTION 6Y ENGINE ELECTRICAL CONTENTS OF THlS SECTION Page Ignition System " 6Y-1 Specifications 6Y-5 Charging System 1961 Passenger Shop Manual Starting System 1961 Passenger Shop Manual IGNITION SYSTEM
SPECIFICATIONS TEST AND ADJUSTMENT SPECIFICATIONS SPECIFICATIONS ENGINE FD620D, K SERIES
 TEST AND ADJUSTMENT Engine Oil Pressure Sensor Activates............................... 98 kpa (14.2 psi) Oil Pressure While Cranking (Minimum).......................... 28 kpa (4 psi) Oil Pressure.....................................
RELEASING PRESSURE IN THE HYDRAULIC SYSTEM,
 Testing And Adjusting Introduction NOTE: For Specifications with illustrations, make reference to SPECIFICATIONS for 225 EXCAVATOR HYDRAULIC SYSTEM, Form No. SENR7734. If the Specifications are not the
SPECIFICATIONS TEST AND ADJUSTMENT SPECIFICATIONS SPECIFICATIONS ENGINE FD620D, K SERIES
 ENGINE FD620D, K SERIES SPECIFICATIONS SPECIFICATIONS TEST AND ADJUSTMENT SPECIFICATIONS Engine Oil Pressure Sensor Activates............................... 98 kpa (14.2 psi) Oil Pressure While Cranking
DRIVE AXLE Volvo 960 DESCRIPTION & OPERATION AXLE IDENTIFICATION DRIVE AXLES Volvo Differentials & Axle Shafts
 DRIVE AXLE 1994 Volvo 960 1994 DRIVE AXLES Volvo Differentials & Axle Shafts 960 DESCRIPTION & OPERATION All 960 station wagon models use type 1041 rear axle assembly. All 960 4-door models use type 1045
1989 Jeep Cherokee. STEERING COLUMN' '1989 STEERING Jeep Steering Columns STEERING COLUMN STEERING Jeep Steering Columns
 STEERING COLUMN 1989 STEERING Jeep Steering Columns DESCRIPTION All models use collapsible steering columns. All columns have integral ignition switch and locking device. Optional tilt wheel is available
DESCRIPTION & OPERATION
 2004 BRAKES Disc - TSX DESCRIPTION & OPERATION WARNING: DO NOT use air pressure or a dry brush to clean brake assemblies. Avoid breathing brake dust. Use OSHA-approved vacuum cleaner for cleaning and collecting
Tillotson Tc3A Carburator
 Tillotson Tc3A Carburator 176 FUEL SYSTEMS - 5B-11 CENTER BOWL TYPE CARBURETOR Removal 1. Remove front cowl cover and wrap-around cowl. 2. Remove swivel link from lower carburetor. (Figure 2) 3. Loosen
MANUAL TRANS OVERHAUL - BORG-WARNER - T56 6-SPEED MANUAL TRANSMISSIONS Borg-Warner T56 (MM6) 6-Speed
 6-Speed") IDENTIFICATION MANUAL TRANS OVERHAUL - BORG-WARNER - T56 6-SPEED 1998 MANUAL TRANSMISSIONS Borg-Warner T56 (MM6) 6-Speed Transmission has 2 identification labels, located on lower left side of case. One
IDENTIFICATION MANUAL TRANS OVERHAUL - BORG-WARNER - T56 6-SPEED 1998 MANUAL TRANSMISSIONS Borg-Warner T56 (MM6) 6-Speed Transmission has 2 identification labels, located on lower left side of case. One
SD Bendix E-10PR Retarder Control Brake Valve DESCRIPTION. OPERATION - Refer to Figure 2
 SD-03-832 Bendix E-10PR Retarder Control Brake Valve MOUNTING PLATE SUPPLY 4 PORTS ELECTRICAL AUXILIARY DESCRIPTION TREADLE RETARDER CONTROL SECTION EXHAUST DELIVERY 4 PORTS FIGURE 1 - E-10PR RETARDER
SECTION 4 - FUEL/LUBRICATION/COOLING
 For Arctic Cat Discount Parts Call 606-678-9623 or 606-561-4983 SECTION 4 - FUEL/LUBRICATION/COOLING 4 TABLE OF CONTENTS Carburetor Specifications... 4-2 Carburetor Schematic... 4-2 Carburetor... 4-3 Cleaning
McCULLOCH. Stroke. 30 mm (1.2 in.) 30 mm (1.2 in.) 30 mm (1.2 in.) 30 mm (1.2 in.)
 30 mm (1.2 in.) 30 mm (1.2 in.) 30 mm (1.2 in.)") SERVICE MANUAL Model Eager Beaver 2010, Mac 3210 Silver Eagle 2012 Eager Beaver 2014, Mac 3214, Silver Eagle 2014 Eager Beaver 2016, Mac 3216, Silver Eagle 2016 Bore Stroke DispL (2.1 cu. in.) (2.1CU.
SERVICE MANUAL Model Eager Beaver 2010, Mac 3210 Silver Eagle 2012 Eager Beaver 2014, Mac 3214, Silver Eagle 2014 Eager Beaver 2016, Mac 3216, Silver Eagle 2016 Bore Stroke DispL (2.1 cu. in.) (2.1CU.
Troubleshooting the Transmission Hydraulic System
 Testing and Adjusting IT28F INTEGRATED TOOLCARRIER POWER TRAIN Testing And Adjusting Introduction Reference: For Specifications with illustrations, refer to SENR5974, IT28F Integrated Toolcarrier Power
Page 1 of HP B&S Vanguard Engine
 1405 Page 1 of 41 14 HP B&S Vanguard Engine 1405 Page 2 of 41 14 HP B&S Vanguard Engine Ref # Part Number Qty S/P/F Description BS-28Q777-0647-E1 1 14 HP B&S Vanguard Engine 1 BS-496412 1 Cylinder Assembly
WARNING: ALWAYS relieve fuel pressure before disconnecting any fuel related component. DO NOT allow fuel to contact engine or electrical components.
 4.0L V8 - VINS [K,U] Selected Block 1990 Lexus LS 400 For Lextreme Powertrain 2020 S. Hacienda Blvd. # D Hacienda Heights California 91745 Copyright 1998 Mitchell Repair Information Company, LLC Friday,
2003 E-Series Workshop Manual
 Page 1 of 20 SECTION 307-01B: Automatic Transmission 4R70W 2003 E-Series Workshop Manual ASSEMBLY Procedure revision date: 04/27/2006 Transmission Printable View (1828 KB) Special Tool(s) Dial Indicator
BRAKE SYSTEM Toyota Celica DESCRIPTION DRUM BRAKES ADJUSTMENTS BRAKE PEDAL HEIGHT ADJUSTMENTS BRAKE PEDAL FREE PLAY ADJUSTMENTS
 BRAKE SYSTEM 1988 Toyota Celica 1988-89 BRAKES Toyota Celica, Corolla, MR2, Tercel DESCRIPTION The hydraulic brake system uses a tandem master cylinder with a vacuum power assist servo. MR2 and some Celica
Service Manual. D, DD Motor Grader
 Allis Chalmers Service Manual D, DD Motor Grader Service Manual THIS IS A MANUAL PRODUCED BY JENSALES INC. WITHOUT THE AUTHORIZATION OF ALLIS CHALMERS OR IT S SUCCESSORS. ALLIS CHALMERS AND IT S SUCCESSORS
Return to Instruction Sheet index. Installation Instructions For C-4 70 and Later, Except 70 Falcon
 Page 1 of 8 Return to Instruction Sheet index TCI 260100 Trans-Scat Automatic Transmission Installation Instructions For C-4 70 and Later, Except 70 Falcon TCI 260100 Kit Contains: Qty. Description One
Section VIII FUEL AND EXHAUST SYSTEM CONTENTS
 FUEL AND EXHAUST SYSTEM 1 Section VIII FUEL AND EXHAUST SYSTEM CONTENTS Page Fuel Pump 3 Servicing the Fuel Pump 4 The Vapor Separator 5 Service Diagnosis 6 Carburetor BBD-2685S Disassembly 7 Carburetor
2.2L 4-CYL - VIN [S]
![2.2L 4-CYL - VIN [S]](/thumbs/72/67564355.jpg "2.2L 4-CYL - VIN [S]") 2.2L 4-CYL - VIN [S] 1994 Toyota Celica 1994 ENGINES Toyota 2.2L 4-Cylinder Celica NOTE: For repair procedures not covered in this article, see ENGINE OVERHAUL PROCEDURES - GENERAL INFORMATION article
2.2L 4-CYL - VIN [S] 1994 Toyota Celica 1994 ENGINES Toyota 2.2L 4-Cylinder Celica NOTE: For repair procedures not covered in this article, see ENGINE OVERHAUL PROCEDURES - GENERAL INFORMATION article
ENGINE TUNE-UP INSPECTION OF ENGINE COOLANT INSPECTION OF ENGINE OIL INSPECTION OF BATTERY. INSPECTION OF AIR FILTER (Paper Filter Type)
") ENGINE MECHANICAL - Engine Tune-Up EM-17 ENGINE TUNE-UP INSPECTION OF ENGINE COOLANT (See steps 1 and 2 on page CO-4) INSPECTION OF ENGINE OIL (See steps 1 and 2 on page LU-5) INSPECTION OF BATTERY (See
ENGINE MECHANICAL - Engine Tune-Up EM-17 ENGINE TUNE-UP INSPECTION OF ENGINE COOLANT (See steps 1 and 2 on page CO-4) INSPECTION OF ENGINE OIL (See steps 1 and 2 on page LU-5) INSPECTION OF BATTERY (See
INFORMATION. covering use of Ammeter and Voltmeter ON and 1915 Model Six-54 Electrical System
 INFORMATION covering use of Ammeter and Voltmeter ON- 1914 and 1915 Model Six-54 Electrical System Hudson Motor Car Company Detroit, Michigan, IX S. A USE OF AMMETER ON 1914 AND 1915 MODEL SIX-54 With
service bulletin MCM 4.3L, 4.3LX Alpha GM Generation II Engine Specifications No
 service bulletin TO: SERVICE MANAGER MECHANICS PARTS MANAGER No. 91-17 MCM 4.3L, 4.3LX Alpha GM Generation II Engine Specifications NOTE: These engines have an electric fuel pump because there is no pad
NHRA RACING Ford Stock Replacement 735 CFM Class Legal Carburetor P/N
 NHRA RACING Ford Stock Replacement 735 CFM Class Legal Carburetor P/N 0-4609-1 Primary Venturi: 1.375 Secondary Venturi: 1.437 Throttle Bore: 1.750 Service Carburetor Installation and Adjustment Instructions
INSIDE YOUR HOLLEY CARBURETOR FUEL INLET SYSTEM
 INSIDE YOUR HOLLEY CARBURETOR The carburetor is quite simply a fuel metering device that operates under the logical and straightforward laws of physics. It has evolved over the years from a very simple
Chapter 5 Part B: Ignition system - transistorised type
 5B 1 Chapter 5 Part B: Ignition system - transistorised type Contents Coil - testing........................................... 9 Distributor - overhaul..................................... 7 Distributor
AUTOMOTIVE ENGINEERING SECTION
 PURPOSE OF IGNITION SYSTEM The ignition system supplies high-voltage surges as high as 47,000 volts (in some electronic systems) to the spark plugs in the engine cylinders. These surges produce electric
EDELBROCK THUNDER SERIES AVS CARBURETORS Part #1801, 1802, 1803, 1804, 1805, 1806, 1812, 1813, 1825, 1826 INSTALLATION INSTRUCTIONS
 EDELBROCK THUNDER SERIES AVS CARBURETORS Part #1801, 1802, 1803, 1804, 1805, 1806, 1812, 1813, 1825, 1826 INSTALLATION INSTRUCTIONS IMPORTANT NOTE: Proper installation is the responsibility of the installer.
TUNE-UP - 6-CYL Jeep Cherokee IDENTIFICATION ENGINE IDENTIFICATION TUNE-UP NOTES TESTING ENGINE COMPRESSION HIGH TENSION WIRE RESISTANCE
 TUNE-UP - 6-CYL 1988 Jeep Cherokee 1987-88 TUNE-UP Jeep 6 Cylinder Tune-Up Cherokee, Comanche, Wagoneer, Wrangler IDENTIFICATION ENGINE IDENTIFICATION Engine can be identified by the fourth character of
FUEL SYSTEM (PUMP, CARBURETOR, TANK)
") FUEL SYSTEM 14-1 GROUP 14 FUEL SYSTEM (PUMP, CARBURETOR, TANK) CONTENTS PART 1 WWC3 Series Carbureter Page Disassembling the Carburetor 5 Inspection and Reassembly 7 Page Carburetor Adjustments. 10 Automatic
FUEL SYSTEM 14-1 GROUP 14 FUEL SYSTEM (PUMP, CARBURETOR, TANK) CONTENTS PART 1 WWC3 Series Carbureter Page Disassembling the Carburetor 5 Inspection and Reassembly 7 Page Carburetor Adjustments. 10 Automatic
1999 Toyota RAV BRAKES Disc & Drum - Trucks & Vans
 DESCRIPTION & OPERATION 1999-2000 BRAKES Disc & Drum - Trucks & Vans WARNING: For warnings and procedures regarding vehicles equipped with Anti-Lock Brake Systems (ABS), see appropriate ANTI-LOCK article.
FU-1 FUEL SYSTEM. Page PRECAUTIONS... TROUBLESHOOTING... ON-VEHICLE INSPECTION...
 FU-1 FUEL SYSTEM PRECAUTIONS... TROUBLESHOOTING... ON-VEHICLE INSPECTION... CARBURETOR FUEL PUMP... Page FU-2 FU-2 FU-3 FU-4 FU-28 FU-2 FUEL SYSTEM - Precautions, Troubleshooting PRECAUTIONS 1. Before
John Deere. MODEL: 8430 & 8630 Volume 1 of 2 JD-S-TM1143
 John Deere MODEL: 8430 & 8630 Volume 1 of 2 THIS IS A MANUAL PRODUCED BY JENSALES INC. WITHOUT THE AUTHORIZATION OF JOHN DEERE OR IT'S SUCCESSORS. JOHN DEERE AND IT'S SUCCESSORS ARE NOT RESPONSIBLE FOR
Items Vehicles with 4G63 engine Vehicles with 4D56 engine. Type 4-speed full automatic 4-speed full automatic. 2nd rd
 23-2 AUTOMATIC TRANSMISSION General Information/ Service Specifications GENERAL INFORMATION 23100010141 Items Vehicles with 4G63 engine Vehicles with 4D56 engine Transmission model R4AW2-6 V4AW2-6 Type
7. FUEL SYSTEM ('04 - '05)
") 7. FUEL SYSTEM ('04 - '05) SYSTEM COMPONENTS 7-2 CARBURETOR DISASSEMBLY 7-81 SERVICE INFORMATION 7-3 CARBURETOR ASSEMBLY 7-14 TROUBLESHOOTING 7-4 CARBURETOR INSTALLATION 7-21 AIR CLEANER HOUSING 7-5 PILOT
7. FUEL SYSTEM ('04 - '05) SYSTEM COMPONENTS 7-2 CARBURETOR DISASSEMBLY 7-81 SERVICE INFORMATION 7-3 CARBURETOR ASSEMBLY 7-14 TROUBLESHOOTING 7-4 CARBURETOR INSTALLATION 7-21 AIR CLEANER HOUSING 7-5 PILOT
Craftsman Snow Thrower Model PARTS LIST
 Craftsman Snow Thrower Model 24.881900 PARTS LIST 11 13 3 2 24 9 1 18 4 2 1 20 23 1 14 1 9 2 4 4 4 3 28 8 3 4 3 39 0 3 43 38 2 48 2 42 1 41 40 49 4 44 31 4 31 21 29 34 9 19 10 32 22 2 Craftsman Snow Thrower
Maintenance Information
 80234313 Edition 1 June 2006 Air Grinder, Die Grinder, Sander and Belt Sander Series G1 (Angle) Maintenance Information Save These Instructions WARNING Always wear eye protection when operating or performing
The steering column is of a modular construction and features easy to service electrical switches.
 file://c:\tso\tsocache\vdtom_5368\svk~us~en~file=svkb4a01.htm~gen~ref.htm Page 1 of 3 Section 11-04A: Steering Column, Ranger DESCRIPTION AND OPERATION 1997 Ranger Workshop Manual Steering Column NOTE:
HYDRAULICS. TX420 & & lower. Hydraulic Tandem Pump Removal. 4. Remove the LH side panel (Fig. 0388).
.") TX420 & 425 240000299 & lower 4. Remove the LH side panel (Fig. 0388). Hydraulic Tandem Pump Removal Note: Cleanliness is a key factor in a successful repair of any hydraulic system. Thoroughly clean all
TX420 & 425 240000299 & lower 4. Remove the LH side panel (Fig. 0388). Hydraulic Tandem Pump Removal Note: Cleanliness is a key factor in a successful repair of any hydraulic system. Thoroughly clean all
INSTRUCTION SHEET ROCHESTER CARBURETOR MODELS 4MC 4MV
 INSTRUCTION SHEET ROCHESTER CARBURETOR MODELS 4MC 4MV GENERAL EXPLODED VIEW THE GENERAL DESIGN AND PARTS SHOWN WILL VARY TO INDIVIDUAL UNITS COVERED ON THIS INSTRUCTION SHEET DISASSEMBLY Use exploded view
AUTOMATIC CLUTCH Models
 AUTOMATIC CLUTCH 1940 Models Source of this material is from 1940 Series, Issue 4, January 1940 Hudson Service Magazine AUTOMATIC CLUTCH 1940 MODELS The automatic clutch installation and adjustment procedure
Maintenance Information
 80234313 Edition 2 May 2014 Air Grinder, Die Grinder, Sander and Belt Sander Series G1 (Angle) Maintenance Information Save These Instructions Product Safety Information WARNING Failure to observe the
Remove Air Cleaner Cover and. Filter
 Remove Air Cleaner Cover and Inspect paper filter for tears Foam pre-cleaner is washable if equipped Replace if necessary Filter Remove Trim Panel Pull throttle lever knob off Remove 3, 8mm screws Remove
400 4x4 Euro MODEL NUMBER A2008IDG4BEUR (RED) MODEL NUMBER A2008IDG4BEUG (GREEN) MODEL NUMBER A2008IDG4BEUZ (CAT GREEN) MORE TO GO ON.
 MODEL NUMBER A2008IDG4BEUG (GREEN) MODEL NUMBER A2008IDG4BEUZ (CAT GREEN) MORE TO GO ON.") 2008 400 4x4 Euro Illustrated Parts Manual MODEL NUMBER A2008IDG4BEUR (RED) MODEL NUMBER A2008IDG4BEUG (GREEN) MODEL NUMBER A2008IDG4BEUZ (CAT GREEN) MORE TO GO ON. TM TABLE OF CONTENTS 2008 ATV 400 4x4
2008 400 4x4 Euro Illustrated Parts Manual MODEL NUMBER A2008IDG4BEUR (RED) MODEL NUMBER A2008IDG4BEUG (GREEN) MODEL NUMBER A2008IDG4BEUZ (CAT GREEN) MORE TO GO ON. TM TABLE OF CONTENTS 2008 ATV 400 4x4
service bulletin MCM 7.4L Bravo, MIE 7.4L Inboard GM Generation V Engine Specifications No. 91-6
 service bulletin TO: SERVICE MANAGER MECHANICS PARTS MANAGER No. 91-6 MCM 7.4L Bravo, MIE 7.4L Inboard GM Generation V Engine Specifications NOTE: Generation V Engines Have the Fuel Pump Mounted on the
MODEL: 4640 & 4840 Chassis Only Volume 1 of 3
 John Deere MODEL: 4640 & 4840 Chassis Only Volume 1 of 3 THIS IS A MANUAL PRODUCED BY JENSALES INC. WITHOUT THE AUTHORIZATION OF JOHN DEERE OR IT'S SUCCESSORS. JOHN DEERE AND IT'S SUCCESSORS ARE NOT RESPONSIBLE
1 Green Pressure Regulator Spring Automatic transmissions operate at temperatures between 150ºF and
 Installation Instructions for 603107 Valve Body Kit C-4 1970 & Later Tools Required Speed Handle or Ratchet 3/8 Drive 1/2 Socket 3/8 Drive 7/16 Socket 3/8 Drive 5/16 Socket 3/8 Drive Small Screwdriver
GH-BETTIS OPERATING & MAINTENANCE INSTRUCTIONS DISASSEMBLY & ASSEMBLY FOR THE T80X-M4-S DOUBLE ACTING SERIES HYDRAULIC ACTUATORS
 GH-BETTIS OPERATING & MAINTENANCE INSTRUCTIONS DISASSEMBLY & ASSEMBLY FOR THE T80X-M4-S DOUBLE ACTING SERIES HYDRAULIC ACTUATORS -S INDICATES CYLINDERS ARE IN TANDEM PART NUMBER: 100121 REVISION "A" ECN
GOLF, TURF AND SPECIALTY PRODUCTS SERVICE MANUAL CARBURETED SUZUKI 970 CC ENGINE. Part No
 GOLF, TURF AND SPECIALTY PRODUCTS SERVICE MANUAL CARBURETED SUZUKI 970 CC ENGINE Part No. 4115757 250 10 99 CU 20001Textron Inc. Lincoln, Nebraska All Rights Reserved. Printed in U.S.A. SECTION TABLE OF
SPECIFICATIONS ITEM TORQUE NOTES. Air cleaner backplate screw 7-9 ft-lbs Nm LOCTITE THREADLOCKER 242 (blue), page 4-19
, page 4-19") 4 SPECIFICATIONS CARBURETOR JET SIZES CARBURETOR ADJUSTMENTS Main jet 195 Slow jet 42 FUEL TANK CAPACITY GALLONS LITERS Total (including reserve) 4.0 15.14 Reserve 0.6 2.27 Engine fast idle speed (using
4 SPECIFICATIONS CARBURETOR JET SIZES CARBURETOR ADJUSTMENTS Main jet 195 Slow jet 42 FUEL TANK CAPACITY GALLONS LITERS Total (including reserve) 4.0 15.14 Reserve 0.6 2.27 Engine fast idle speed (using
1992 Clutch. Eclipse, Expo/Expo LRV, Galant, Mirage, Precis, 3000GT
 Article Text ARTICLE BEGINNING 1992 Clutch Eclipse, Expo/Expo LRV, Galant, Mirage, Precis, 3000GT DESCRIPTION All clutches are single disc type. Pressure plate assembly uses a diaphragm spring to engage
Rochester Quadrajet Dodge
 Rochester Quadrajet Dodge ADJUSTMENTS Float Level EXTERNAL CHECK See Figure 1 Fig. 1: Float level external check for the Rochester Quadrajet 1. With the engine idling at normal operating temperature and
SPECIFICATIONS 4.1 ITEM TORQUE NOTES. Air Cleaner Cover Screws in-lbs Nm LOCTITE THREADLOCKER 222 (purple), page 4-21
, page 4-21") 4 SPECIFICATIONS 4.1 CARBURETOR JET SIZES CARBURETOR ADJUSTMENTS Main Jet 195 Slow Jet 42 FUEL TANK CAPACITY GALLONS LITERS Total (including reserve) 5.0 18.93 Reserve 0.6 2.2 Engine Fast Idle Speed (using
4 SPECIFICATIONS 4.1 CARBURETOR JET SIZES CARBURETOR ADJUSTMENTS Main Jet 195 Slow Jet 42 FUEL TANK CAPACITY GALLONS LITERS Total (including reserve) 5.0 18.93 Reserve 0.6 2.2 Engine Fast Idle Speed (using
9.7 Replacement of the compressed air distributor
 9.6.6 9.6.7 screw in the bolt and to increase unscrew the bolt. For a complete rotation of the bolt, the variation is of 1mm. After measuring the pointer position and the compensatory adjustment screw
Nikki Carburetor Vertical Models , ,
 Nikki Carburetor Vertical Models 280000, 310000, 330000 Disassemble Carburetor 1. Remove fuel bowl screws (A, Figure 56). Remove the fuel bowl (B) from the carburetor body. WARNING Before servicing the
 Page 1 of 75 303-01D Engine - 5.2L 32V Ti-VCT 2016 Mustang Assembly Procedure revision date: 12/15/2016 Special Tool(s) / General Equipment Engine Base Part Number: 6L084 205-142 (T80T-4000-J) Installer,
5. FUEL SYSTEM FUEL SYSTEM 5-0
 5 FUEL SYSTEM 5-0 SERVICE INFORMATION GENERAL INSTRUCTIONS SERVICE INFORMATION...5-1 CARBURETOR INSTALLATION...5-9 TROUBLESHOOTING...5-1 PILOT SCREW ADJUSTMENT...5-10 CARBURETOR REMOVAL...5-2 AUTO BYSTARTER...5-3
BRAKE E
 8-1 GENERAL...8-2 SPECIFICATIONS...8-6 COMPONENTS...8-7 FRONT BRAKE...8-12 DISASSEMBLY INSPECTION REASSEMBLY (Pn1, Cu2 3 TON SERIES)...8-12 DISASSEMBLY INSPECTION REASSEMBLY (Pn2 3 TON SERIES)...8-17 BRAKE
Maintenance Information
 04581245 Edition 2 May 2014 Air Grinder, Die Grinder and Sander Series G2 (Angle) Maintenance Information Save These Instructions Product Safety Information WARNING Failure to observe the following warnings,
Section 4 GOV. CONTROLS & GOVERNOR
 Section 4 GOV. CONTROLS & Page GENERAL INFORMATION................................................................ 1 REMOTE CONTROLS Section Contents Speed Regulation.................................................................
BRAKE SYSTEM Nissan 240SX DESCRIPTION BRAKE BLEEDING * PLEASE READ FIRST * BLEEDING PROCEDURES ADJUSTMENTS BRAKE PEDAL HEIGHT SPECS TABLE
 BRAKE SYSTEM 1990 Nissan 240SX 1990 BRAKE SYSTEMS Nissan Disc & Drum Axxess, Maxima, Pathfinder, Pickup, Pulsar NX, Sentra, Stanza, 240SX, 300ZX DESCRIPTION All brake systems are hydraulically operated
980 B Wheel Loader S/n 89P1 & Up Volume 1 of 2
 Caterpillar Service Manual 980 B Wheel Loader S/n 89P1 & Up Volume 1 of 2 Service Manual THIS IS A MANUAL PRODUCED BY JENSALES INC. WITHOUT THE AUTHORIZATION OF CATERPILLAR OR IT S SUCCESSORS. CATERPILLAR
CHAPTER 4 GOVERNORS AND LINKAGE
 CHAPTER 4 S AND LINKAGE Main Menu GENERAL INFORMATION Tecumseh 4 cycle engines are equipped with mechanical type governors. The governor s function is to maintain a R.P.M. setting when engine loads are
S/N 1H019H - 1H310H Page 1 of 33 46" Cutting Deck Assembly
 1180 S/N 1H019H - 1H310H Page 1 of 33 46" Cutting Deck Assembly 1180 S/N 1H019H - 1H310H Page 2 of 33 46" Cutting Deck Assembly 1 17982 1 S Reinforcement Spindle Plate 2 618-0430 1 S Spindle Assembly w/
400 2x4/4x4 EFT SHARE OUR PASSION ṬM
 SHARE OUR PASSION ṬM 400 2x4/4x4 EFT Model Number A2009IDG2BETR (Red - 2x4) Model Number A2009IDG2BETZ (Cat Green - 2x4) Model Number A2009IDG4BETR (Red - 4x4) Model Number A2009IDG4BETG (Green - 4x4)
STEERING SYSTEM 6 A POWER STEERING
 STEERING SYSTEM 6 A 22147 POWER STEERING Table of Contents Page Specifications............................ 6A-1 Torque Specification................... 6A-1 Special Tools............................ 6A-1
SECTION 4A BRAKE SYSTEM TABLE OF CONTENTS
 SECTION 4A BRAKE SYSTEM TABLE OF CONTENTS Description and Operation... 4A-2 Braking System Testing... 4A-2 Hydraulic Brake System... 4A-2 Brake Pedal... 4A-2 Master Cylinder... 4A-2 Brake Booster... 4A-3