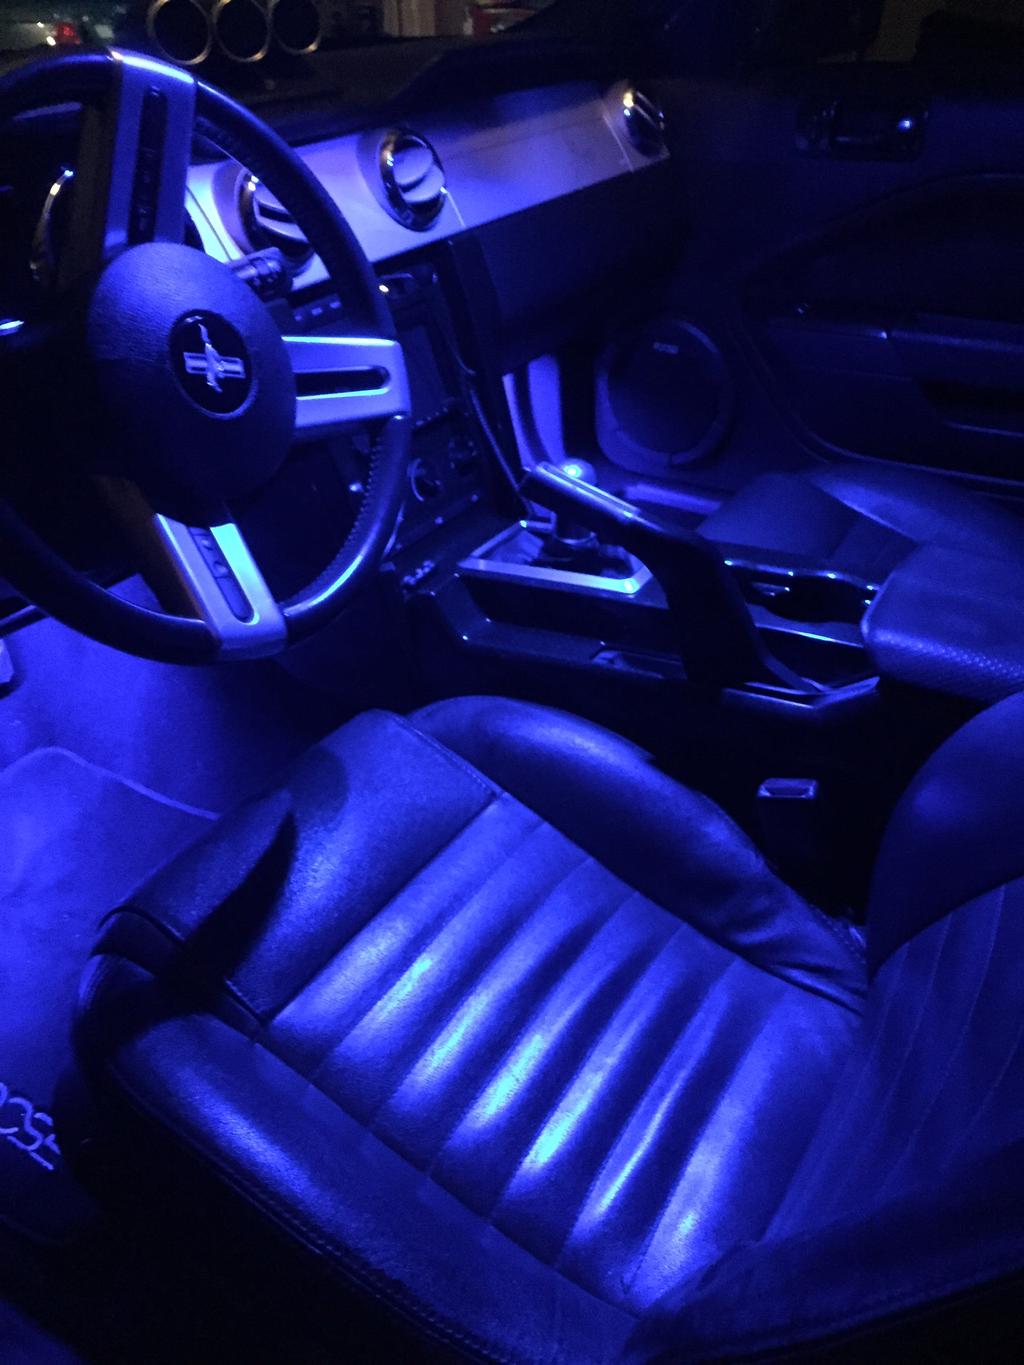
Installing LED courtesy lights in Mustang.
|
|
|
- Della McCarthy
- 5 years ago
- Views:
Transcription
1 Installing LED courtesy lights in Mustang. This procedure is to provide you with the basics for installing LED strips under the dash and changing the map or courtesy lights to LED. Use the Ford Racing Illuminated Sill Plate instruction sheet to get to the wiring in the A Pillar (passenger side). Excerpts below.
2 Locate the Black with Light Blue stripe wire. This will be the Positive side where you will splice in your positive wire to your LED strips. For LED strips found at Advance or Auto Zone, the wires are usually a black and a black with a white stripe. The Black with a White stripe is the positive and is the wire that you will run to the Black with Light Blue stripe. The solid Black wire from the LED strip is the negative. Locate the Light Green with a Yellow stripe wire. This is the ground side and where you will splice in the negative wire to your LED strips. If you are going to replace your Map or overhead Courtesy Light bulbs with LED, you should add in a resistor to keep the LEDs from glowing dim when not on. This is a common problem others have reported when changing the bulbs to LEDs. I ordered my LEDs and Resistor from SuperBrightLEDs.com. I ordered super bright blue P/N: WLED-BHP5 Blue at $5.95 each. I also ordered qty 1, Resistor which was a 68 Ohm 10 Watt load resistor P/N: RL-2525 Marker Lamp Load Resistor at $3.95. It came with leads already soldered on which made installation a snap. To add in the resistor, splice the wires that will go to the LED strips into the wires in the A Pillar (Passenger side) as shown. Run the wires down the pillar and behind the top edge of the right side kick panel and up under the dash. Spice the resistor across the two wires where on resistor lead wire will connect to the positive wire and one resistor lead wire will connect to the negative. This simulates a

3 bulb in the circuit and puts the correct load in the circuit. This is needed when you change out the Map or Courtesy bulbs with LEDs and will prevent the LEDs from staying dim even when off. Mount the LED strips under the dash in a position where someone s feet will not hit them. I mounted them along the existing wiring harness and used zip ties to secure in addition to the adhesive back. The adhesive works great but in the heat of the summer, it can come lose, so the zip ties are just added protection. Run the wires across to the right passenger side of the car and splice into the wires from the A Pillar. Remember the positive wire must go to the positive on the LED strips, usually a red wire or a black with a white stripe. The negative wire must go to the negative on the LED strips. I used spade quick connect terminals so I could disconnect later if I needed. Tuck the wires under the dash to protect them and secure. Again, I used zip ties. Put the resistor somewhere that it is not touching anything. I zip tied the leads to the wiring harness and let the resistor hang in an area it will not get hit. The resistor will get slightly hot if the lights are left on for an extended period of time. This is normal. Turn the ignition key on then off and the LED strips should come on and then go off with the normal time delay matching the Map lights. This also confirms that you still have power running to the Map bulb sockets and your wiring is correct. To replace the Map or Courtesy bulbs, use a small flat head (precision) screw driver to pop out the clear Map light covers. There are three tabs on each light cover. The tabs are roughly spaced at 10:00, 2:00, and 6:00 positions with the 6:00 being towards the hood of the car. When you remove the covers, you will notice the bulbs are set back in such a manner that it is very difficult to remove them. Again, Zip Ties to the rescue. Secure a zip tie around the bulb as close to the base as possible and then use the zip tie lead to help you work the bulb out of the socket.

4 Once you remove the bulbs, carefully and barely insert an LED bulb into the socket. The LED bulbs are polarized meaning that there is a positive and a negative side and they will only work if plugged in with the right polarity. You may need to turn the key on to get the lights to cycle back on. Note that the LED strips under the dash should be working at this time also. If the LED turns on, then the polarity is correct and you may insert the LED fully into the socket. If it does not light, gently pull it out and rotate it 180 degrees and plug it in again. It should turn on. Replace the Map light covers. Tuck remaining wire behind the edge of the kick panel and replace all panels paying close attention to not pinch any wires. Wires should also be placed so that they do not rub on any sharp surfaces which may later cut through the insulation and cause a short circuit.
5
Installation of Auto Meter Cobalt Boost/Vacuum Gauge:
 Installation of Auto Meter Cobalt Boost/Vacuum Gauge: Fitment: All 79-14 models. This installation was completed on a 2004 Mustang GT, and should be identical for all 1999-2004 model Mustangs. Time needed:
Tusk UTV Horn & Signal Kit Installation Instructions
 Tusk UTV Horn & Signal Kit Installation Instructions The Tusk UTV signal kit is designed to be a simple way to provide front and rear turn signals, license plate mount with light, horn, and rearview mirrors
Connecting the rear fog light on the A4 Jetta, while keeping the 5 Light Mod
 Connecting the rear fog light on the A4 Jetta, while keeping the 5 Light Mod DISCLAIMER: I'm human and make mistakes. If you spot one in this how to, tell me and I'll fix it This was done on my 99.5 Jetta.
INSTALLATION INSTRUCTIONS
 Rear Vision System Tailgate Emblem Camera Mirror Display 2009-Current Ford F-150 and 2010-Current Super Duty (Kit part number 1008-9527) Kit Contents: Mirror Tailgate Emblem Mount with Camera Interior
MUSTANG PROJECT. INSTALLING THE Mustang Project LED SEQUENTIAL TAILLIGHT KIT P/N MP-2004-LED AND MP-2004-LED-QK. Price:$9.
 WWW.MUSTANGPROJECT.COM VOLUME 6 Price:$9.95 A SafeCode Inc. Publication INSTALLING THE Mustang Project 1996-2004 LED SEQUENTIAL TAILLIGHT KIT P/N MP-2004-LED AND MP-2004-LED-QK Page 2 Read these instructions
INSTALLATION INSTRUCTIONS
 Rear Vision System Tailgate Handle Camera Mirror Display 2004-2014 Ford F-150 and 2008-2015 Ford Super Duty (Kit part numbers 9002-9521) Kit Contents: Mirror Tailgate Handle with camera and harness Interior
 Page 1 of 14 This install requires work on your supplemental restraint system and could cause injury or damage to your car. If you are not comfortable performing the steps detailed here then do not attempt
Installation Instructions for the Plug & Play Remote Start Package (EVOCHR4)
") T6002 v1.1 02/2013 Installation Instructions for the Plug & Play Remote Start Package (EVOCHR4) For CHRYSLER Town & Country 2008-2012 Review the remote start installation manual for safety instructions!
T6002 v1.1 02/2013 Installation Instructions for the Plug & Play Remote Start Package (EVOCHR4) For CHRYSLER Town & Country 2008-2012 Review the remote start installation manual for safety instructions!
Raxiom Factory GPS Rear Back-up Camera Kit (07-17 Wrangler)
") Raxiom Factory GPS Rear Back-up Camera Kit (07-17 Wrangler) Installation Time: 2.5-3Hrs Tools Required: 7mm Socket & Driver 10mm Socket 10mm Open end wrench Knife / Razor blade Zip-ties Wire Cutters Needle
Raxiom Factory GPS Rear Back-up Camera Kit (07-17 Wrangler) Installation Time: 2.5-3Hrs Tools Required: 7mm Socket & Driver 10mm Socket 10mm Open end wrench Knife / Razor blade Zip-ties Wire Cutters Needle
Installation Instructions for the Plug & Play Chrysler/Dodge/Jeep Remote Start Package w/mux T5
 v1.01 12/14/2102 Installation Instructions for the Plug & Play Chrysler/Dodge/Jeep Remote Start Package w/mux T5 Review the remote start installation manual for safety instructions! Overview Your kit consists
Installation Tips Crimestopper/ProStart Remote Start system + PLJX + DLRM + SPDT (for GM vehicles) T0760 v1.1 updated 2/5/14
 T0760 v1.1 updated 2/5/14") Installation Tips Crimestopper/ProStart Remote Start system + PLJX + DLRM + SPDT (for GM vehicles) T0760 v1.1 updated 2/5/14 Thank you for purchasing your remote start from MyPushcart.com - an industry
Installation Tips Crimestopper/ProStart Remote Start system + PLJX + DLRM + SPDT (for GM vehicles) T0760 v1.1 updated 2/5/14 Thank you for purchasing your remote start from MyPushcart.com - an industry
GENUINE ACCESSORIES INSTALLATION INSTRUCTIONS
 GENUINE ACCESSORIES INSTALLATION INSTRUCTIONS PART NUMBERS: APPLICABLE MODELS: 0000-89-G14A (PORT) Electrochromic Mirror Kit w/ Compass/Temp/HomeLink 2004 Mazda 3 0000-8C-G14A (PDC) KIT CONTENTS: ITEM
INSTALLATION INSTRUCTIONS
 Rear Vision System Liftgate Emblem Camera Mirror Display 2009-2012 Ford Flex (Kit part number 1008-9527) Kit Contents: Mirror Liftgate Emblem Mount with Camera Interior (shorter) Harness Chassis (longer)
In This DIY We Will Show You How To Install Recon Backup Lamps (part # To Run On A Separate Switch & In Reverse.
 In This DIY We Will Show You How To Install Recon Backup Lamps (part # 264150 To Run On A Separate Switch & In Reverse. Please Note, There Are Many Ways of Installing These Lights, Including Wiring Methods,
Depress each tab as you pull the bezel off. The bezels are tight. L.H. shown.
 2013-2014 Ford Mustang V6 & Boss 302 Lower Valance Fog Light Kit Parts List: Quantity: Tool List: Fog light & bulb with bracket 2 Flat head & Phillips screwdriver Black bezels 2 Ratchet & Socket set OR
Mustang HID Headlight Installation Guide (9007)
") Mustang HID Headlight Installation Guide 1994-2004 (9007) The below installation instructions work for the following products: 9007 Bulb HID Headlight Coversion Kit 1994-2004 The following are a set of
Mustang HID Headlight Installation Guide 1994-2004 (9007) The below installation instructions work for the following products: 9007 Bulb HID Headlight Coversion Kit 1994-2004 The following are a set of
CONTENTS TOOLS REQUIRED: *Ratchet*13mm Socket*10mm Socket*Phillips Screwdriver*Pliers*Panel Removal Tool. Subwoofer Installation
 CONTENTS 1EA. SUBWOOFER ASSEMBLY P/N 77KICK40SUBASSEMBLY 1EA. 200 WATT AMP P/N RE08BTL2000R 1EA. POWER HARNESS P/N RHWRANGLERPWR 1EA. OVERLAY HARNESS P/N RHWRANGLER 2EA. T-TAP P/N RFTTAPB 1EA. FUSE 30
CONTENTS TOOLS REQUIRED: *Ratchet*13mm Socket*10mm Socket*Phillips Screwdriver*Pliers*Panel Removal Tool. Subwoofer Installation
 CONTENTS 1EA. SUBWOOFER ASSEMBLY P/N 77KICK24SUBASSEMBLY 1EA. 200 WATT AMP P/N RE08BTL200R 1EA. POWER HARNESS P/N RHWRANGLERPWR 1EA. OVERLAY HARNESS P/N RHWRANGLER 2EA. T-TAP P/N RFTTAPB 1EA. FUSE 30 AMP
Mustang One-Touch Convertible Top Module (2005+) - Installation Instructions
 - Installation Instructions") Mustang One-Touch Convertible Top Module (2005+) - Installation Instructions The below installation instructions work for the following products: Mustang One-Touch Convertible Top Module (2005+) Please
Mustang One-Touch Convertible Top Module (2005+) - Installation Instructions The below installation instructions work for the following products: Mustang One-Touch Convertible Top Module (2005+) Please
Installation Tips for your Remote Start/Keyless Entry (for Ford Vehicles) v3.3 Updated 1/13/2013
 v3.3 Updated 1/13/2013") Installation Tips for your Remote Start/Keyless Entry (for Ford Vehicles) v3.3 Updated 1/13/2013 Thank you for purchasing your remote start from MyPushcart.com - an industry leader in providing remote
Installation Tips for your Remote Start/Keyless Entry (for Ford Vehicles) v3.3 Updated 1/13/2013 Thank you for purchasing your remote start from MyPushcart.com - an industry leader in providing remote
Please read thoroughly before starting installation and check that kit contents are complete.
 Rear Vision System Mirror Display 2013-Current Ram (Kit part number 1009-9518) Please read thoroughly before starting installation and check that kit contents are complete. Items Included in the Kit: Rear
Remove black panel shown. Save 6 retaining pins for re-install later. Pry up on center part of pin first. Then pry out entire retaining pin.
 2005-2009 Ford Mustang V6 Fog Light Wiring Kit Parts List: Quantity: Tools Required: Wiring harness 1 Flat head screwdriver Supplemental wire leads 2 Ratchet & Socket set OR Wire tap red 2 Adjustable Wrench
INSTALLATION INSTRUCTIONS
 Rear Vision System Mirror Display 2004 onwards Ford F-150 and 2008 onwards Ford Super Duty (Kit part numbers 1008-9520 and 1008-9525) Kit Contents: RVS Interior (shorter) Harness RVS Chassis (longer) Harness
- MK7 Mirror Integration Kit - Installation Instructions
 - MK7 Mirror Integration Kit - Thank you for choosing the Double Apex Gentex Mirror Integration kit for your Volkswagen MK7. If you have any questions about the installation please email us at support@dblapex.com.
Here I Will Explain How To Install Recon Cab Lights In A 3rd Gen Dodge Ram.
 1 P age Here I Will Explain How To Install Recon Cab Lights In A 3rd Gen Dodge Ram. *Now, There Are Many Ways of Installing Them, Including Wiring Methods, Wiring Connectors, And Other Variables - In This
72 Mustang Mach 1 tachometer cluster and gauge conversion
 72 Mustang Mach 1 tachometer cluster and gauge conversion Dated: 02-17-2009 (drafted by a Chevy person working on his first Ford -not good-) Revised: 11-05-2010 The following information pertains to how
Remote Start Kit for GM Installation RS1/3/4/7 + ADS-DL Tip Sheet
 Remote Start Kit for GM Installation RS1/3/4/7 + ADS-DL Tip Sheet rev 1.4 12/16/2013 Thank you for purchasing your remote start from MyPushcart.com - an industry leader in providing remote starts to do-it-yourself
*(reglar key vehicles ONLY)* Read the entire installation manual. There are several safety tips in there to know before you start
* Read the entire installation manual. There are several safety tips in there to know before you start") Installation Tips for RS4 + EVO-RIDE + SPDT TIP SHEET T2519 2009-2011 Ford Crown Victoria 2009-2012 Ford E-150 2009 Ford E-150 Econoline Club Wagon 2008-2010 Ford E-250 2010 Ford E-250 Econoline 2010 Ford
Installation Tips for RS4 + EVO-RIDE + SPDT TIP SHEET T2519 2009-2011 Ford Crown Victoria 2009-2012 Ford E-150 2009 Ford E-150 Econoline Club Wagon 2008-2010 Ford E-250 2010 Ford E-250 Econoline 2010 Ford
LiteDOT Installation Document
 LiteDOT Installation Document This document designed to aid in installation of LiteDOT s on Jeep TJ models, other models are similar. NOTE: Installing LiteDOT s on a Jeep where the 2 necessary mounting
Cross Hare Installation Guide
 Cross Hare Installation Guide Introduction: The Cross Hare is designed to provide all of the functions you need to control a one or two track grade crossing in a prototypical manner. The Cross Hare uses
Remove the 3-11mm nuts holding mirror on. Don t drop the nuts!
 2005-2012 Ford Mustang Puddle Lamp Kit Parts List: Quantity: Tool List: LED Lamps 2 Flat head screwdriver Seals 2 Ratchet & Socket set OR Nuts 2 Adjustable Wrench Wiring harness 1 Drill & 11/16 th bit
Installation Instructions for the Plug & Play Remote Start Package (EVOCHR5)
") T6018 v1.1 02/2013 Installation Instructions for the Plug & Play Remote Start Package (EVOCHR5) For DODGE Nitro 2007-2011 Review the remote start installation manual for safety instructions! Overview Your
T6018 v1.1 02/2013 Installation Instructions for the Plug & Play Remote Start Package (EVOCHR5) For DODGE Nitro 2007-2011 Review the remote start installation manual for safety instructions! Overview Your
CONTENTS TOOLS REQUIRED:
 CONTENTS 1EA. SUBWOOFER ASSEMBLY P/N 77KICK13SUBASSEMBLY 1EA. SUB BRACKET P/N 05030060AA 1EA. 200 WATT AMP P/N REBTL200 1EA. AMP BRACKET P/N RMDR 1EA. POWER HARNESS P/N RHRAMP 1EA. OVERLAY HARNESS P/N
Installation Tips for your Remote Start/Keyless Entry (for Mazda Vehicles) v3.1 Updated 9/22/2012
 v3.1 Updated 9/22/2012") Installation Tips for your Remote Start/Keyless Entry (for Mazda Vehicles) v3.1 Updated 9/22/2012 Thank you for purchasing your remote start from MyPushcart.com - an industry leader in providing remote
Installation Tips for your Remote Start/Keyless Entry (for Mazda Vehicles) v3.1 Updated 9/22/2012 Thank you for purchasing your remote start from MyPushcart.com - an industry leader in providing remote
V8 Gen. V Ford Mustang 2010 Update
 V8 Gen. V Ford Mustang 2010 Update There were several updates to the Ford Mustang in the 2010 model year. This document outlines the differences between the installation steps necessary for the 2010 Mustang
THE safety accessory of the 21 st Century.
 00 006 Chevrolet SSR Signal Mirror Installation Instructions THE safety accessory of the st Century. Note: Professional Installation Recommended Warranty does not cover damage to the vehicle or mirror
Installation Tips for RS1 + EVO-RIDE + SPDT. *(reglar key, automatic transmission vehicles ONLY)*
*") Installation Tips for RS1 + EVO-RIDE + SPDT TIP SHEET T1235 *(reglar key, automatic transmission vehicles ONLY)* Thank you for purchasing your remote start from MyPushcart.com - an industry leader in providing
Installation Tips for RS1 + EVO-RIDE + SPDT TIP SHEET T1235 *(reglar key, automatic transmission vehicles ONLY)* Thank you for purchasing your remote start from MyPushcart.com - an industry leader in providing
Installation Tips for your Crimestopper/ProStart Remote Start system (for GM vehicles) v1.01 updated 2/27/2012
 v1.01 updated 2/27/2012") Installation Tips for your Crimestopper/ProStart Remote Start system (for GM vehicles) v1.01 updated 2/27/2012 Thank you for purchasing your remote start from MyPushcart.com - an industry leader in providing
Installation Tips for your Crimestopper/ProStart Remote Start system (for GM vehicles) v1.01 updated 2/27/2012 Thank you for purchasing your remote start from MyPushcart.com - an industry leader in providing
INSTALLATION INSTRUCTIONS
 Rear Vision System Tailgate Emblem Camera Aftermarket Display 2009-Current Ford F-150 and 2010-Current Super Duty (Kit part number 1008-6509) Kit Contents: Tailgate Emblem Mount with Camera Chassis Harness
Rear Vision System Liftgate Emblem Camera for Aftermarket Display Ford Flex (Kit part number )
") Rear Vision System Liftgate Emblem Camera for Aftermarket Display 2009-2012 Ford Flex (Kit part number 1008-6509) Kit Contents: Liftgate Emblem Mount with Camera Chassis Harness with RCA (Note: In some
Rear Vision System Liftgate Emblem Camera for Aftermarket Display 2009-2012 Ford Flex (Kit part number 1008-6509) Kit Contents: Liftgate Emblem Mount with Camera Chassis Harness with RCA (Note: In some
Accel 300+ Ignition Control System (84-95) - Installation Instructions
 - Installation Instructions") Accel 300+ Ignition Control System (84-95) - Installation Instructions The below installation instructions work for the following products: Accel 300+ Ignition Control System (84-95) Please read through
Accel 300+ Ignition Control System (84-95) - Installation Instructions The below installation instructions work for the following products: Accel 300+ Ignition Control System (84-95) Please read through
LEXUS RC 350/RC-F ILLUMINATED DOOR SILLS Preparation
 Preparation Part Number: PT944-24150 Kit Contents Item # Quantity Reqd. Description 1 2 Inner LED Scuff 2 2 Outer Scuff 3 1 Hardware Bag Hardware Bag Contents Item # Quantity Reqd. Description 1 15 20
TIP SHEET (EVO-FORT1) 80-bit Add-On Stand-Alone Remote Starter
 80-bit Add-On Stand-Alone Remote Starter") TIP SHEET (EVO-FORT1) 80-bit Add-On Stand-Alone Remote Starter T2380 *AUTOMATIC TRANSMISSION VEHICLES ONLY* CLICK TO WATCH THE PREPPING HARNESS VIDEO -The EVO-ALL interface module eliminates the need for
TIP SHEET (EVO-FORT1) 80-bit Add-On Stand-Alone Remote Starter T2380 *AUTOMATIC TRANSMISSION VEHICLES ONLY* CLICK TO WATCH THE PREPPING HARNESS VIDEO -The EVO-ALL interface module eliminates the need for
Installation Tips for your Add-on Remote Start (for GM vehicles with INTSL Install 2) v3.2 Updated 11/12/2012
 v3.2 Updated 11/12/2012") Installation Tips for your Add-on Remote Start (for GM vehicles with INTSL Install 2) v3.2 Updated 11/12/2012 Thank you for purchasing your remote start from MyPushcart.com - an industry leader in providing
Installation Tips for your Add-on Remote Start (for GM vehicles with INTSL Install 2) v3.2 Updated 11/12/2012 Thank you for purchasing your remote start from MyPushcart.com - an industry leader in providing
Read the entire installation manual. There are several safety tips there that you need to know before you start
 Installation Tips for RS4 + INTSL (2) TIP SHEET T0749 Buick Century: 2000-2005 Buick LeSabre: 2000-2005 Buick Park Avenue: 1999-2005 Buick Ranier: 2004-2007 Cadillac Escalade: 2003-2007 Chevrolet Avalanche:
Step 1 : Starting the installation
 Installation Instructions for GM Remote Start w/ INTSL Interface Pre-wired Review the remote start installation manual for safety instructions! Overview Your kit consists of two modules a remote start
TIP SHEET Installation instructions for EVO-NIST1 + LC1
 TIP SHEET Installation instructions for EVO-NIST1 + LC1 T3108 NISSAN INFINITY CUBE 2009-2014 M37 2010-2013 JUKE 2011-2016 M56 2011-2013 QUEST 2011-2016 Q70 2014-2015 SENTRA 2013-2016 Q70L 2015 VERSA SEDAN
Be sure to read item #4 or you will very likely damage something.
 Installation Instructions for 82513 Reverse Lock Out Module Magnum, TR6060 or T56 6-Speed Be sure to read item #4 or you will very likely damage something. How It Works The electronic module contains a
Important! The subwoofer system is designed to be used only with the rear seat in the up position only.
 Important! The subwoofer system is designed to be used only with the rear seat in the up position only. CONTENTS 1EA. SUBWOOFER ASSEMBLY 2EA. BRACKET LOWER 2EA. BRACKET UPPER 1EA. OVERLAY HARNESS 2EA.
RS4 / RS7 + (4) + SPDT
 + SPDT") TIP SHEET Installation Tips for RS4 / RS7 + Honda-SL3 (4) + SPDT + Diode x2 T0776, T0731 Honda: ( 08-12 Accord), ( 12-13 Civic), 12-13 CRV), ( 11-13 Odyssey), ( 09-13 Pilot) Acura: ( 09-13 TSX) Thank you
TIP SHEET Installation Tips for RS4 / RS7 + Honda-SL3 (4) + SPDT + Diode x2 T0776, T0731 Honda: ( 08-12 Accord), ( 12-13 Civic), 12-13 CRV), ( 11-13 Odyssey), ( 09-13 Pilot) Acura: ( 09-13 TSX) Thank you
Installation Tips for your Remote Start system (for RS4LX>GMBP for GM vehicles)
") Installation Tips for your Remote Start system (for RS4LX>GMBP for GM vehicles) Thank you for purchasing your remote start from MyPushcart.com - an industry leader in providing remote starts to doit-yourself
Installation Tips for your Remote Start system (for RS4LX>GMBP for GM vehicles) Thank you for purchasing your remote start from MyPushcart.com - an industry leader in providing remote starts to doit-yourself
TIP SHEET T0491. Installation Tips for your Excalibur RS Passlock-sl2(4) + DLRC + SPDT
 + DLRC + SPDT") TIP SHEET T0491 Installation Tips for your Excalibur RS-360 + Passlock-sl2(4) + DLRC + SPDT For Chevrolet: Astro 1998-2005, Avalanche 2002, Blazer 1998-2005, Cavalier 2000-2003, Express Van 1998-2005,
TIP SHEET T0491 Installation Tips for your Excalibur RS-360 + Passlock-sl2(4) + DLRC + SPDT For Chevrolet: Astro 1998-2005, Avalanche 2002, Blazer 1998-2005, Cavalier 2000-2003, Express Van 1998-2005,
TIP SHEET EVO-CHRT6(d) STAND-ALONE ADD-ON REMOTE STARTER
 STAND-ALONE ADD-ON REMOTE STARTER") TIP SHEET EVO-CHRT6(d) STAND-ALONE ADD-ON REMOTE STARTER Txxxx -The EVO-ALL data and bypass interface module eliminates the need for many wiring connections associated with traditional remote starter installations
TIP SHEET EVO-CHRT6(d) STAND-ALONE ADD-ON REMOTE STARTER Txxxx -The EVO-ALL data and bypass interface module eliminates the need for many wiring connections associated with traditional remote starter installations
Installation Tips for your Remote Start/Keyless Entry (for Honda/Acura Vehicles) [EVO-ALL] v1.02 updated 9/13/2013
![Installation Tips for your Remote Start/Keyless Entry (for Honda/Acura Vehicles) [EVO-ALL] v1.02 updated 9/13/2013](/thumbs/87/96035180.jpg "Installation Tips for your Remote Start/Keyless Entry (for Honda/Acura Vehicles) [EVO-ALL] v1.02 updated 9/13/2013") Installation Tips for your Remote Start/Keyless Entry (for Honda/Acura Vehicles) [EVO-ALL] v1.02 updated 9/13/2013 Thank you for purchasing your remote start from MyPushcart.com - an industry leader in
Installation Tips for your Remote Start/Keyless Entry (for Honda/Acura Vehicles) [EVO-ALL] v1.02 updated 9/13/2013 Thank you for purchasing your remote start from MyPushcart.com - an industry leader in
INSTALLATION INSTRUCTIONS
 INSTALLATION INSTRUCTIONS Contents Description: Auto-Dimming Rearview Mirror with Compass Part Number: 990B0-35007 Applications: SX4 Hatchback, 2007- SX4 Sedan, 2008- Installation Time:.5 HRS Ref. Part
 INSTALLATION INSTRUCTIONS Accessory Application Publications No. All 38163 XM SATELLITE RADIO SYSTEM 2008 ODYSSEY Issue Date OCT 2007 PARTS LIST XM Radio Attachment (sold separately): P/N 08B15-SHJ-100A
INSTALLATION INSTRUCTIONS
 Rear Vision System Mirror Display Dodge Ram Kit Contents: Instruction Sheets Template Chassis Harness Endgate Handle with Camera Wire Ties (Qty: 17) Bottle of ZTech Plug for Non-Locking Endgates (Optional)
INSTALLATION GUIDE OWNER S GUIDE
 INSTALLATION GUIDE OWNER S GUIDE SECURITY SYSTEM PRO-SERIES 6002 CONTENTS System Features... 1-2 System Components... 2 Technical Assistance... 2 Before You Begin... 2 Precautions... 2-3 Making Connections...
TIP SHEET. Installation Tips for SP-404/SP EVO-ALL + SPDT Remote Start/Alarm T1642
 TIP SHEET Installation Tips for SP-404/SP-502 + EVO-ALL + SPDT Remote Start/Alarm T1642 Nissan Armada: 2008-2012 Nissan Cube: 2009-2012 Nissan Frontier: 2008-2012 Nissan Pathfinder: 2009-2012 Nissan Quest:
Ford Mustang V6 OEM-Style Fog Light Kit Parts List: Quantity: Tool List:
 2015-2017 Ford Mustang V6 OEM-Style Fog Light Kit Parts List: Quantity: Tool List: LED Foglights/ Bezels 2 Flat head & Phillips screwdriver (if you ordered part#3600) Ratchet & Socket set OR Wiring harness
Superlift TruSpeed Speed Sensor Calibrator For Most Ford Trucks and SUVs 1992-Present INSTALLATION INSTRUCTIONS
 FORM #33001.06-121703 PRINTED IN U.S.A. PAGE 1 OF 11 INTRODUCTION Superlift TruSpeed Speed Sensor Calibrator For Most Ford Trucks and SUVs 1992-Present INSTALLATION INSTRUCTIONS SUPERLIFT SUSPENSION SYSTEMS
Owner s Manual Electronic Harness Controller P/N ASM4250
 Owner s Manual Electronic Harness Controller P/N ASM4250 Thunder Heart Performance Corporation MANUAL P/N EI4250 120 Industrial Drive Revision 6/3/04 White House, TN 37188 www.thunder-heart.com TABLE
Rear Vision System Tailgate Emblem Camera Aftermarket Display 2009-Current Ford F-150 and 2010-Current Super Duty (Kit part number )
") Rear Vision System Tailgate Emblem Camera Aftermarket Display 2009-Current Ford F-150 and 2010-Current Super Duty (Kit part number 1008-6509) Kit Contents: Tailgate Emblem Mount with Camera Chassis Harness
Rear Vision System Tailgate Emblem Camera Aftermarket Display 2009-Current Ford F-150 and 2010-Current Super Duty (Kit part number 1008-6509) Kit Contents: Tailgate Emblem Mount with Camera Chassis Harness
INSTALLATION GUIDE OWNER S GUIDE
 INSTALLATION GUIDE OWNER S GUIDE SECURITY SYSTEM PRO-SERIES 7002 CONTENTS System Features... 1-2 System Components... 2 Technical Assistance... 2 Before You Begin... 2 Precautions... 3 Making Connections...
Fog Light setup for a 2003 XL F250 Super Duty using the OEM kit.
 Fog Light setup for a 2003 XL F250 Super Duty using the 2005-2007 OEM kit. Since the kit (1C3Z15200BB) for the 2001-2004 series truck was not available anymore, I explored options to put a set of OEM fog
Installation Tips for your Remote Start w/ Keyless Entry (Toyota Vehicles) v3.2 Updated 3/14/13
 v3.2 Updated 3/14/13") Installation Tips for your Remote Start w/ Keyless Entry (Toyota Vehicles) v3.2 Updated 3/14/13 Thank you for purchasing your remote start from MyPushcart.com an industry leader in providing remote starts
Installation Tips for your Remote Start w/ Keyless Entry (Toyota Vehicles) v3.2 Updated 3/14/13 Thank you for purchasing your remote start from MyPushcart.com an industry leader in providing remote starts
MKVI Jetta Fog Light Kit
 MKVI Jetta Fog Light Kit Part Number VW Jetta Fog Light Installation This tutorial is provided as a courtesy by ECS Tuning. Proper service and repair procedures are vital to the safe, reliable operation
(1) Remote Control with (2) AAA Batteries
 Remote Control with (2) AAA Batteries") TOOLS REQUIRED: KIT CONTENTS: E14 Torx (1) Remote Control with (2) AAA Batteries (2) Wireless Headphones with (4) AAA Batteries (2) DVD Headrest Units Owner s Manual (1) Owner s Manual (1) Power / Audio
TOOLS REQUIRED: KIT CONTENTS: E14 Torx (1) Remote Control with (2) AAA Batteries (2) Wireless Headphones with (4) AAA Batteries (2) DVD Headrest Units Owner s Manual (1) Owner s Manual (1) Power / Audio
Speed For Sale LLC Website: Telephone: Location: 3100 Engineering
 Speed For Sale LLC Website: www.speedforsale.com/nissangtrparts Email: Sales@SpeedForSale.com Telephone: 770-777-4774 Location: 3100 Engineering Parkway Alpharetta, GA 30004 SpeedForSale.com s Installation
SCT Mustang 4-Bank Eliminator Chip w/ Free Custom Tunes (88-04) - Installation Instructions
 - Installation Instructions") SCT Mustang 4-Bank Eliminator Chip w/ Free Custom Tunes (88-04) - Installation Instructions The below installation instructions work for the following products: SCT Mustang 4-Bank Eliminator Chip w/ Free
SCT Mustang 4-Bank Eliminator Chip w/ Free Custom Tunes (88-04) - Installation Instructions The below installation instructions work for the following products: SCT Mustang 4-Bank Eliminator Chip w/ Free
Installation Tips for your Crimestopper/ProStart Remote Start system (add-on for GM vehicles) v1.02 updated 1/16/2013
 v1.02 updated 1/16/2013") Installation Tips for your Crimestopper/ProStart Remote Start system (add-on for GM vehicles) v1.02 updated 1/16/2013 Thank you for purchasing your remote start from MyPushcart.com - an industry leader
Installation Tips for your Crimestopper/ProStart Remote Start system (add-on for GM vehicles) v1.02 updated 1/16/2013 Thank you for purchasing your remote start from MyPushcart.com - an industry leader
Ford Super Duty Dash Lighting LED Upgrade F250 4x4 XLT Sport Crew Cab
 Page 1 of 32 Ford Super Duty Dash Lighting LED Upgrade 2004 F250 4x4 XLT Sport Crew Cab Back to 2004 F250 Main Page Click Here for a PDF version of this article ** Updated 12/15/09 ** New version of the
Ford Mustang GT-Style Fog Light Kit Parts List: Quantity: Tool List:
 2013-2014 Ford Mustang GT-Style Fog Light Kit Parts List: Quantity: Tool List: Fog light (Left& Right) 2 Flat head & Phillips screwdriver Upper grille with surround 1 Ratchet & Socket set OR Lower grille
Installation Tips for your Remote Start system (for Toyota Camry & Prius C, ) Crimestopper RS0+ EVO-ALL T3468 rev#1.
 Crimestopper RS0+ EVO-ALL T3468 rev#1.") Installation Tips for your Remote Start system (for Toyota Camry & Prius C, 2012-2014) Crimestopper RS0+ EVO-ALL T3468 rev#1.1 1/22/2015 Thank you for purchasing your remote start from MyPushcart.com -
Installation Tips for your Remote Start system (for Toyota Camry & Prius C, 2012-2014) Crimestopper RS0+ EVO-ALL T3468 rev#1.1 1/22/2015 Thank you for purchasing your remote start from MyPushcart.com -
Model-GS109 Brake Light Controller Module Installation & Users Guide
 Thank you for purchasing the GS109 brake module. Please review this manual before starting installation. Quick Installation Guide: 1. Make sure the brake lights are working properly before module installation.
Gentex Homelink Installation Instructions
 Gentex Homelink Installation Instructions Kit Contents: Item Qty Part Description 1 Number GENK-41 NVS Homelink Mirror GENK-42 NVS Homelink w/mood lights 1 of the GENK-45 NVS Homelink w/compass following
REAR ROOF SPEAKER KIT
 REAR ROOF SPEAKER KIT P/N 2882876 APPLICATION Verify accessory fitment at Polaris.com. BEFORE YOU BEGIN Read these instructions and check to be sure all parts and tools are accounted for. Please retain
Installation Tips for your Excalibur Remote Start (for Honda and Acura Vehicles) rev 11/28/2012
 rev 11/28/2012") Installation Tips for your Excalibur Remote Start (for Honda and Acura Vehicles) rev 11/28/2012 Thank you for purchasing your remote start from MyPushcart.com - an industry leader in providing remote starts
Installation Tips for your Excalibur Remote Start (for Honda and Acura Vehicles) rev 11/28/2012 Thank you for purchasing your remote start from MyPushcart.com - an industry leader in providing remote starts
= Experienced
 I N S T A L L A T I O N G U I D E APPLICATION LENGTH MODEL YR PART # Ford F-250 / F-350 / F-450 Regular Cab * (48 ) 2002-2003, 2008-2012 75134-01A Ford F-250 / F-350 / F-450 Super Cab * (60 ) 2002-2003,
ED COPYRIGHT PROTECTE
 Tremec T56 / Magnum / TR-6060 Reverse Lockout Control Module Installation Instructions ***Make sure you read item #4 on next page (page 2) or you will very likely damage something. How It Works The electronic
Toyota Prius C 2015 Frameless EC Mirror w/ Compass & HomeLink
 Toyota Prius C 2015 Frameless EC Mirror w/ Compass & HomeLink Part Number: 00016-05463 Accessory Code: ME4000 Note: This accessory requires replacement A-Pillar clip 62217-52120 to complete the installation
Installation Tips for RS4/RS7 + EVO-ALL (NIS 3.c) + 2 diodes
 + 2 diodes") Installation Tips for RS4/RS7 + EVO-ALL (NIS 3.c) + 2 diodes TIP SHEET T3093 + T3103 FOR: NISSAN ( 09-14 Cube), ( 11-14 Juke), & ( 07-11 Versa) automatic, regular key vehicles Thank you for purchasing
Installation Tips for RS4/RS7 + EVO-ALL (NIS 3.c) + 2 diodes TIP SHEET T3093 + T3103 FOR: NISSAN ( 09-14 Cube), ( 11-14 Juke), & ( 07-11 Versa) automatic, regular key vehicles Thank you for purchasing
TIP SHEET. Installation Tips for your RS OL-MDB-CH6 (1) (for Jeep vehicles) T1227 v1.0 3/19/14
 (for Jeep vehicles) T1227 v1.0 3/19/14") TIP SHEET Installation Tips for your RS-360 + OL-MDB-CH6 (1) (for Jeep vehicles) T1227 v1.0 3/19/14 Thank you for purchasing your remote start from MyPushcart.com - an industry leader in providing remote
TIP SHEET Installation Tips for your RS-360 + OL-MDB-CH6 (1) (for Jeep vehicles) T1227 v1.0 3/19/14 Thank you for purchasing your remote start from MyPushcart.com - an industry leader in providing remote
Gentex by VOXX Corporation Installation Instructions
 KIT CONTENTS: Item Qty Part Number Description 1 1: ADVGEN20A 7 Pin Auto-Dimming Mirror with Compass and Temperature 2 1 Gentex by VOXX Corporation Installation Instructions Contact VOXX Customer Service
INSTALLATION AND OWNER S MANUAL Side Illumination Lights Z5150 for use with K 1200 LT
 INSTALLATION AND OWNER S MANUAL Side Illumination Lights Z5150 for use with K 1200 LT Read these instructions carefully and thoroughly before beginning work. Before installing the accessory, carefully
INSTALLATION INSTRUCTIONS
 Jeep Wrangler Rear Vision Camera, 2007 Current (Kit # 9002-8838) Items Included in the Kit Camera Chassis Harness Zip lock bag with 15 Wire Ties & 3 Push Nuts These Instructions Required Tools & Supplies
Installation Tips For Crimestopper RS7 + Passlock-sl2(4) + DLRM + SPDT
 + DLRM + SPDT") TIP SHEET T3628 Installation Tips For Crimestopper RS7 + Passlock-sl2(4) + DLRM + SPDT For Chevrolet: Astro 1998-2005, Avalanche 2002, Blazer 1998-2005, Cavalier 2000-2003, Express Van 1998-2005, S10 Pickup
TIP SHEET T3628 Installation Tips For Crimestopper RS7 + Passlock-sl2(4) + DLRM + SPDT For Chevrolet: Astro 1998-2005, Avalanche 2002, Blazer 1998-2005, Cavalier 2000-2003, Express Van 1998-2005, S10 Pickup
Sunbeam Alpine Series V Four-Way Flasher by Michael Hartman Version 1.0 October 9, 2018
 Sunbeam Alpine Series V Four-Way Flasher by Michael Hartman Version 1.0 October 9, 2018 Background My Sunbeam Alpine Series V has the original wiring harness, which does not have a four-way flasher circuit.
TOYOTA VENZA HANDS FREE BLU LOGIC Preparation
 TOYOTA VENZA 2009- HANDS FREE BLU LOGIC Preparation Part #: PT923-00111 Conflicts: JBL Audio NOTE: Part number of this accessory may not be the same as the part number shown. Kit Contents: For kits manufactured
2015+ S550 MUSTANG Battery Relocation Kit WR-BTRYRELOKIT-LH WR-BTRYRELOKIT-RH
 2015+ S550 MUSTANG Battery Relocation Kit WR-BTRYRELOKIT-LH WR-BTRYRELOKIT-RH The Watson Racing Battery Relocation Kit is NOT designed to protect you in the case of an accident, and therefore is INTENDED
Installation Tips for your RS-1 + Honda-SL3 (1.b) Remote starter Honda: ( FIT), ( Pilot), ( Ridgeline) Acura: ( MDX)
 Remote starter Honda: ( FIT), ( Pilot), ( Ridgeline) Acura: ( MDX)") Installation Tips for your RS-1 + Honda-SL3 (1.b) Remote starter Honda: ( 06-08 FIT), ( 05-08 Pilot), ( 06-13 Ridgeline) Acura: ( 03-06 MDX) TIP SHEET T0777 Thank you for purchasing your remote start from
Installation Tips for your RS-1 + Honda-SL3 (1.b) Remote starter Honda: ( 06-08 FIT), ( 05-08 Pilot), ( 06-13 Ridgeline) Acura: ( 03-06 MDX) TIP SHEET T0777 Thank you for purchasing your remote start from
Stand Alone Kit Installation Instructions
 Before installation: Stand Alone Kit Installation Instructions Read all information in this manual carefully Check the product for all components before starting the installation Remove the negative battery
Installation Instructions - ECS Tuning Vent Pod Vacuum/Boost Gauge Kit
 Installation Instructions - ECS Tuning Vent Pod Vacuum/Boost Gauge Kit This tutorial is provided as a courtesy by ECS Tuning. Part Number for (2005-2008) Proper service and repair procedures are vital
Small knife. Remove black panel shown. Save 6 retaining pins for re-install later.
 2005-2009 Ford Mustang V6 Fog Light Wiring Kit Parts List: Quantity: Tools Required: Wiring harness 1 Flat head screwdriver PB-3425 Parts Bag 1 Ratchet & Socket set OR Ford OEM Switch (if you 1 Adjustable
T u n i n g. Professional Install
 DDM INSTALL GUIDE H1 HID Low Beams (35W or 55W) ddm T u n i n g TOOLS NEEDED: - Standard or metric socket set. Depending on the vehicle. - A drill and either a uni-bit or a 7/8 drill bit. - A Dremel with
White / Amber LED Angel Eye DIY Guide Turn Signal Method
 White / Amber LED Angel Eye DIY Guide Turn Signal Method Remove rubber trim surrounding the headlight. Remove corner light. Usually 2000-2001 e46s will have a slide in style where you press in the tab
Signal Mirror Installation Instructions Toyota Sequoia Limited, 2004 Toyota Tundra D-Cab
 Signal Mirror Installation Instructions 2001 2006 Toyota Sequoia Limited, 2004 Toyota Tundra D-Cab Toyota Sequoia Limited 2004 Toyota Tundra D-Cab THE safety accessory of the 21 st Century. P/N 210-0064-0
INSTALLATION GUIDE OWNER S GUIDE
 INSTALLATION GUIDE OWNER S GUIDE REMOTE STARTER MODELS RS202/RS202E CONTENTS System Features...1 System Components...1 Required Tools...1 Technical Assistance...1 Before You Begin...2 Precautions...2 Testing
Installation MKIV Headlight Housings with Fog Lamps (Procedures apply to both MKIV Jetta and Golf)
") Page 1 This tutorial is provided as a courtesy by ECS Tuning. Service Procedure Installation Proper service and repair procedures are vital to the safe, reliable operation of all motor vehicles as well
Page 1 This tutorial is provided as a courtesy by ECS Tuning. Service Procedure Installation Proper service and repair procedures are vital to the safe, reliable operation of all motor vehicles as well
Please pay attention to all Cautions and Notes within these instructions.
 Mustang Cluster Kit - INSTALLATION INSTRUCTIONS - For use with Ford Mustang (1994-1998) and Simco Kit Part # s 2034-7XX Revised: Dec 30, 2008 Rev. C Please read and understand all instructions before attempting