BLACKBIRD INSTALLATION SUPPLEMENT
|
|
|
- Andrew Armstrong
- 5 years ago
- Views:
Transcription

1 BLACKBIRD INSTALLATION SUPPLEMENT FOR5.3 AND 6 LITER VORTEC SUBURBAN/YUKON/SILVERADO VERSION 2-06
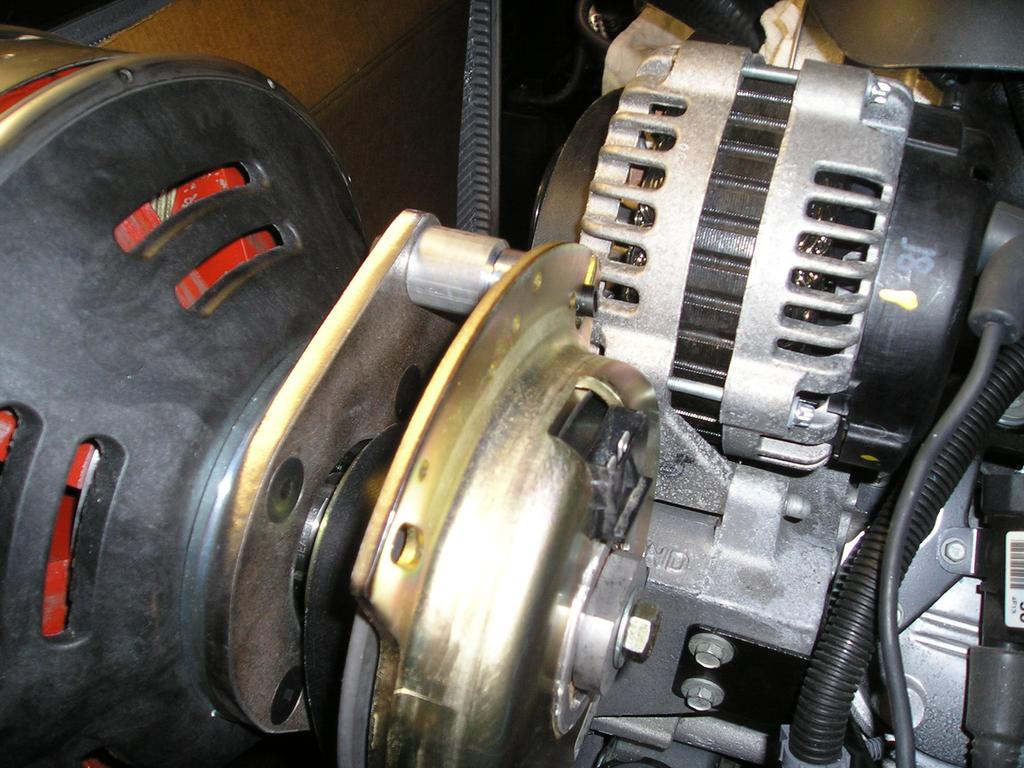
2 Blackbird Installation Supplement for GM 5.3 and 6 liter Vortec-Suburban/Silverado Parts Included in Installation Kit Before beginning installation, check the parts kit thoroughly against the parts inventory list, and make sure that every necessary part is in hand. If parts are missing or you have questions regarding the parts and components, contact Raven Product Support ( ) before beginning installation. Parts Description Blackbird Installation Manual Electrical Manual Blackbird Installation Supplement 5.3 and 6 Liter Vortec Blackbird Owners Manual Includes Warrantee Registration Mounting Bracket Bracket studs (3) M x 200mm with nuts and flatwashers Lower Bracket Standoff 2 ¼ Fastener M x 180mm Socket head with flatwasher Tripod Standoff Upper radiator hose bracket Serpentine belt Generator mounting bolts (4) Generator temporary alignment stud (1) 3/8-16 x 11/2 Alternator bracket drilling jig Fan shroud trim template Fan shroud edge guard 2 ½ Fan shroud mating bolts (2)¼-20 fang bolts NAPA (or equivalent) Replaces OEM belt 3/8-16X ¾ flat head Radiator hose extension 1 ¼ x 90 degree Hose clamps (2) Hose coupling 11/4 tube Clutch 3 6-groove electric Clutch key 3/16 x 1 ¾ Clutch bolt (1) 7/16-20 x 2 1/4 Grade w/ lock washer 6.0 Liter Only Transmission cooler extension 5/8 high temp hose X 1 foot Fitting Clamp Electrical: Mechanical Installers forward these parts to the Electrical Department Clutch harness Engine speed sensor harness 116Hz Command Module Engine high-idle device (2) ½ compression x ½ fe NPT (2) ½ male NPT x 5/8 hose (2) 6510E hose clamp 16 red/black with 2 conductor thermal sensor 10 single conductor white Some kits page 1
3 I NSTAL L AT I O N General Instructions This document supplements the Blackbird General Installation Manual with information specific to the 2005 General Motors Suburban/Yukon chassis with the 5.3 and 6 liter Vortec engines. Installation cannot be completed without the General Installation Manual. Contact Raven Product Support ( ) if more documentation is needed. This installation provides for full 5kW output of the system from elevated engine idle to engine redline. Beyond engine RPM of 1200, the generator will provide full output and be unaffected by changes in engine speed. Blackbird Installation Supplement for GM 5.3 and 6 liter Vortec-Suburban/Silverado Torque- Ft-lbs. Grade Bolt Size 1/ / / / / / mm 19 10mm 41 12mm 69 14mm 104 ENGINE IDLE MUST BE ELEVATED TO 1200 RPM FOR 5KW OUTPUT. CONTACT RAVENPRODUCT SUPPORT FOR INFORMATION ON GM OR AFTER-MARKET IDLE CONTROL CIRCUITRY All installation steps in this supplement and the General Installation Manual must be completed before operating the system. Use Loctite 262 on all engine and bracket mounted bolts and refer to torque chart for tightening. All hoses and wires moved or relocated during installation must be secured to prevent chafing and exposure to hot surfaces. At no time should wiring be secured to fuel or exhaust system components. Special Tools Required for Installation: 2 Hole Saw Raven Drill Template (supplied) Installing the Raven Bracket Steps 1 through 8 will establish a hole on the passenger side of the engine for the generator and bracketry. Steps 9 through 16 cover the bracket and generator installation, and steps 17 through 25 cover the final assembly of the engine compartment. Figures 1 and 2 provide an overview of the Raven components to be installed and their mounting locations. We suggest you take a minute before proceeding to review the steps below to familiarize yourself with the parts and their mounting locations. 1. Disconnect all battery negative terminals. 2. Remove the plastic engine air intake assembly. 3. Drain the radiator sufficiently to remove the upper radiator hose from the radiator.. 4. Remove the upper fan shroud. 5. Remove the fan and cover the radiator with protective cardboard. 6. Remove the lower fan shroud and remove and discard the OEM serpentine belt. page 2

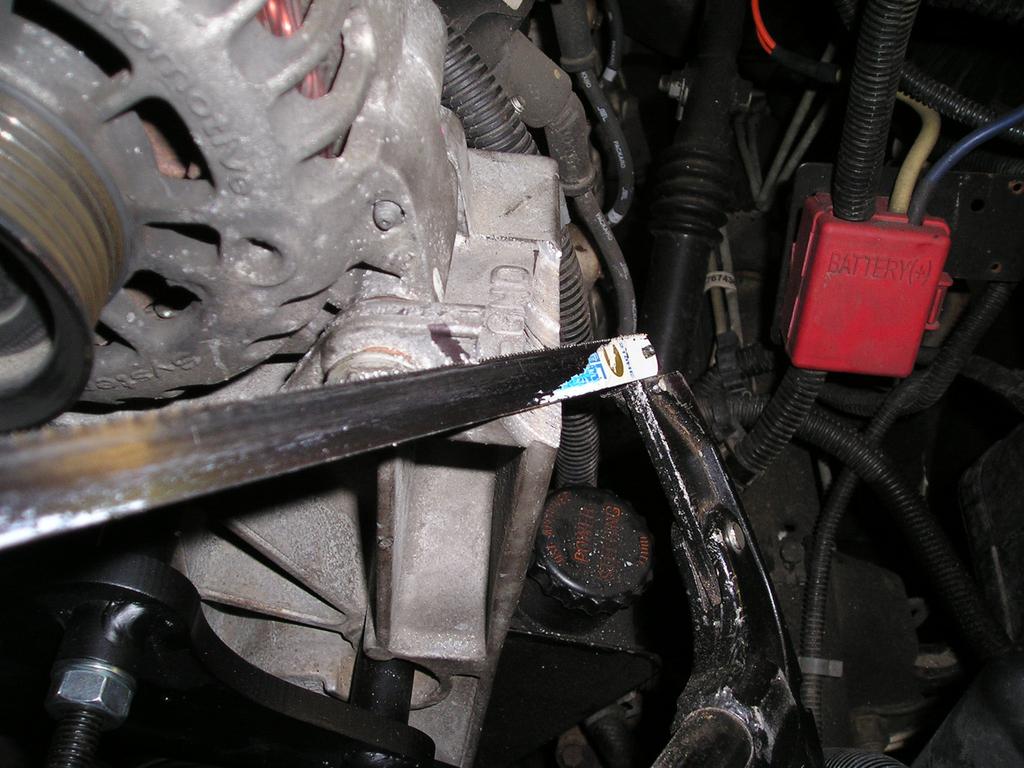
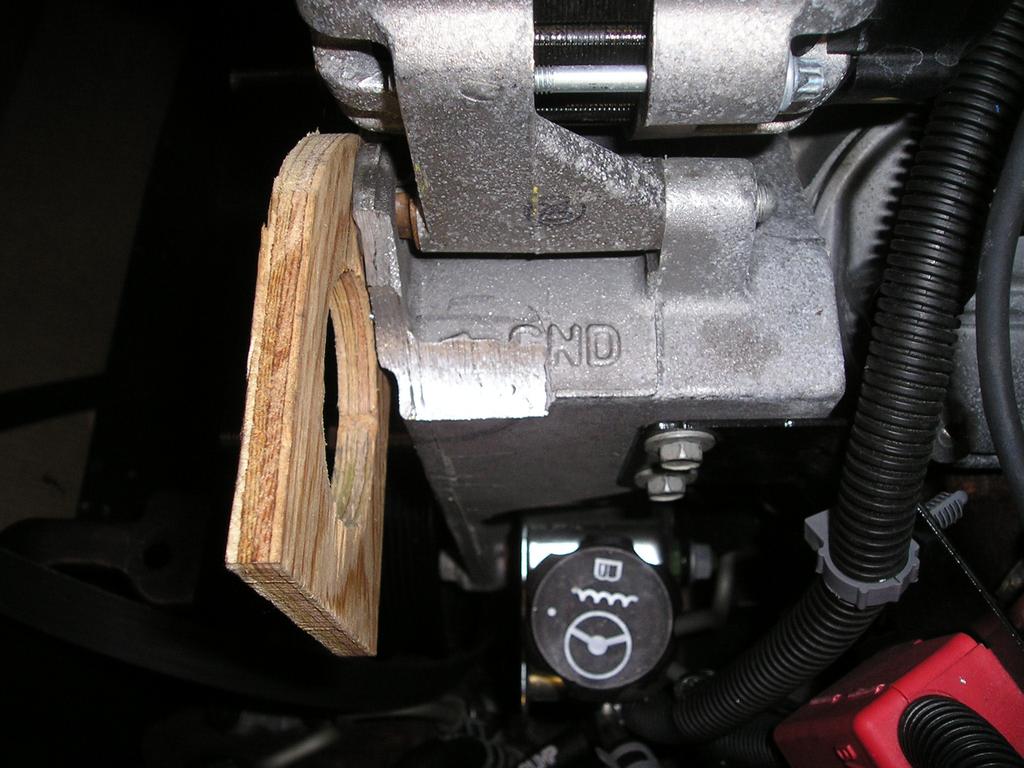
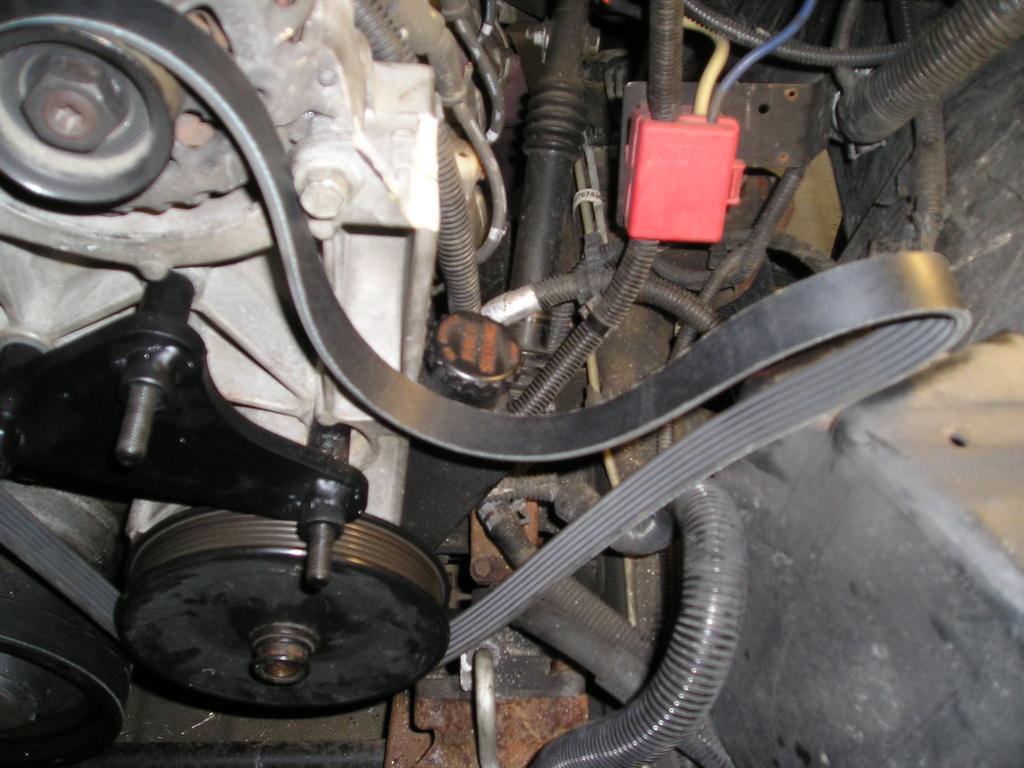
4 Blackbird Installation Supplement for GM 5.3 and 6 liter Vortec-Suburban/Silverado 7. Using the supplied drilling jig and a 2 holesaw, remove the ground tab from the OEM alternator mounting point. Cut back in to the bracket two inches and remove the surplus metal. Trim the remaining tab corner with a hacksaw blade. Figures 3, 4, and 5. Removing and replacing 8. Remove and discard the upper three alternator/power steering the bolts with studs one bracket bolts from the front of the engine. (Note that there is a at a time assures that the fourth bolt at the bottom. This will be removed in step 10.) Loctite bracket stays in position. one end of the three supplied M x 200 bracket studs and thread into the three holes. Studs should project approximately 3 3/8 See Figure Fit the supplied three-hole bracket spacer over the three bracket studs. Assure that the fit to the engine is clean and true Remove the lower OEM alternator/power steering bracket bolt from the front of the engine. 11. Thread the replacement serpentine belt loosely over the OEM alternator, power steering pump, water pump and crank pulley. Figure 1. Hold the belt out of the way toward the passenger s side of the engine. Figure Fit the Generator bracket over the remaining studs. Loctite and install the three M10 nuts and washers finger tight. 13. Loctite and install the M10 x 180mm lower bracket bolt and bracket spacer in the lower bracket hole with the spacer between the Raven bracket and the engine. 14. Tighten the three stud nuts. At this point the upper transmission cooler line (if present) on the 6 liter engine is adapted to flexible hose to accommodate the mounting of the generator: some 6 liter engines only: Pre-assemble the supplied hose adapters to the two compression fittings. Using a tubing cutter, cut the upper transmission cooler line between the first and second bends. Be sure to leave sufficient straight tube for a compression fitting. See picture. Install the upper compression fitting and hose adapter loosely to the stub of cooler line at the radiator. Measure the length of hose necessary to route around the generator (approximately 8-9 ) Trim the lower end of the original cooler line to match this hose length and install the other compression fitting. Before cutting the hose or Upper cut line tightening the fittings completely, assure that you have room for the generator and that the tubes align properly. When satisfied, install the hose and tighten the compression fittings. 15. All Engines: Replace the lower fan shroud Mounting the Generator 1. Before mounting the Generator, bench-fit the clutch and key to the Generator shaft. Dress as necessary for a slip fit. 2. Ensure that the Generator electrical junction box cover is securely in place. page 3
5 Blackbird Installation Supplement for GM 5.3 and 6 liter Vortec-Suburban/Silverado 3. Insert the 3/8 temporary alignment stud in one mounting hole on the face of the generator. 4. Position the generator behind the bracket and slip the generator through the bracket hole. a) Assure that the large Generator alignment ring machined into the bearing plate is seated fully in the large bracket hole. Thread the serpentine belt over the generator shaft. Mount the clutch on the Generator shaft (you will need to relieve belt tension) insuring that the belt is seated properly and the 3/16 key in the clutch is lined up with the keyway in the shaft. Rotate the clutch flange so that the coil retaining standoff (Figure 9) passes through the slot in the clutch coil flange. Assure that the clutch hub with the two wrench pads engages with the shaft and seats flush with the clutch bearing. b) Install the 7/16 Clutch bolt and lockwasher. DO NOT LOCKTITE! c) Install the clutch wiring harness in the black plug on the clutch coil. Engine Speed Signal hookup: Locate the Powertrain Control Module connector C2 (red retainer housing). Pin 10 of this connector is the engine speed signal (white wire, circuit 121). The supplied engine speed wire (white, in black loom) taps into this wire and runs to the Raven Command Module terminal C3. Soldering this tap connection is recommended. Final Reassembly 16. Cut the upper radiator shroud according to Figure 10. Place the supplied template over the driver s side of the shroud and trim to match. Figure Slide the shroud half into place. Check and trim to provide a finger s width gap around the generator. 18. Install the provided edge guard between the shroud and the generator. Figure Remove the cardboard from the radiator and reinstall the fan. 20. Install the passenger s side upper shroud and fasten to the other half with the two fang bolts supplied. Figure Install the upper radiator hose retaining bracket on the driver s side of the engine sistering over the two battery cable enclosure bolts. Figure Reinstall the upper radiator hose allowing Extend the upper radiator hose using the supplied coupling and hose elbow, trimming as needed for fit. Figure 14. The hose will curve across the fan shroud and between the generator and the alternator. Secure the hose to the supplied bracket using a Wire-Tie. 23. Install the engine air intake assembly. 24. When electrical installation is complete, Reconnect the battery cables. This completes the vehicle specific instructions. Refer to the Blackbird Wiring Manual for wiring, run up, and troubleshooting instructions. page 4


6 Blackbird Installation Supplement for GM 5.3 and 6 liter Vortec-Suburban/Silverado Figure 1 Figure 2 page 5


7 Blackbird Installation Supplement for GM 5.3 and 6 liter Vortec-Suburban/Silverado Figure 3 Figure 5 Figure 4 Figure 6 Figure 7 page 6


8 Blackbird Installation Supplement for GM 5.3 and 6 liter Vortec-Suburban/Silverado Figure 9 Figure 10 Figure 11 Figure 12 Figure 13 Figure 14 page 7
BLACKBIRD INSTALLATION SUPPLEMENT
 BLACKBIRD INSTALLATION SUPPLEMENT 2008 GM 2500 AND 3500 6.6 DURAMAX DIESEL VERSION 5-08 Parts Included in Installation Kit Before beginning installation, check the parts kit thoroughly against the parts
BLACKBIRD INSTALLATION SUPPLEMENT
 BLACKBIRD INSTALLATION SUPPLEMENT FOR 2003-7 FORD 6.0 LITER DIESEL SINGLE ALTERNATOR F-350, F-450, F-550, EXCURSION VERSION 7-07 Parts Description Blackbird Wiring Manual Installation Supplement 6.0 Liter
BLACKBIRD INSTALLATION SUPPLEMENT
 BLACKBIRD INSTALLATION SUPPLEMENT FOR 2003-7 FORD 6.0 LITER DIESEL F-SERIES DUAL ALTERNATOR VERSION 10/07 Blackbird Installation Supplement for Ford 6.0. Liter Dual Alternator Parts included in the 6.0
BLACKBIRD INSTALLATION SUPPLEMENT
 BLACKBIRD INSTALLATION SUPPLEMENT FOR 2008-105 FORD 6.4 LITER DIESEL F-SERIES VERSION 3/10 Parts Blackbird Wiring Manual Installation Supplement 6.4 liter Diesel Owner s Manual Includes Warrantee Registration
FMK265SD F L DIESEL WITH DUAL ALTERNATORS
 WITH DUAL ALTERNATORS This kit will NOT work on trucks equipped with adaptive steering. INSTALLATION NOTES 1. Disconnect negative batteries cables. Remove the air duct from the passenger side and the black
1996 Aerostar/Ranger/Explorer
 Page 1 of 11 Section 03-01B: Engine, 3.0L V-6 IN-VEHICLE SERVICE 1996 Aerostar and Ranger Vehicles Workshop Manual Water Pump SPECIAL SERVICE TOOL(S) REQUIRED Description Tool Number Fan Clutch Holding
Included parts: 1 - New Bosch CP3 Pump 1 - HSM Pulley 1 - Serpentine Belt 1 - Pump Brackets/Hardware
 TROUBLESHOOTING: Please read and understand all installation instructions before proceeding with the installation. If you have questions during the installation of this product, please email H&S Motorsports
6. Remove OEM bolts from engine at locations A, B, and C. Lay the wiring off to the side.
 700359 DewEze Clutch Pump Kit #700359 Ford 5.4L, 6.8L w/ and w/o A/C AA mount 1999- INSTALLATION INSTRUCTIONS 1. Disconnect the battery. 2. Drain the radiator. 3. Remove the air cleaner assembly. 4. Remove
STEP 1 Disconnect the negative terminal from both batteries.
 TROUBLESHOOTING: Please read and understand all installation instructions before proceeding with the installation. If you have questions during the installation of this product, please email H&S Motorsports
BD Venom Dual Fuel F O R D 6. 7 L P O W E R S T R O K E Installation Instructions
 U 21 March 2017 (1050470) Venom Dual Fuel Kit (I-00390) 1 DOWNLOAD ENHANCED INSTALL MANUALS AT dieselperformance.com BD Venom Dual Fuel 2 0 1 1-2 0 1 6 F O R D 6. 7 L P O W E R S T R O K E Installation
BD Venom Dual Fuel F O R D 6. 7 L P O W E R S T R O K E Installation Instructions
 U 30 January 2017 (1050470) Venom Dual Fuel Kit (I-00390) 1 DOWNLOAD ENHANCED INSTALL MANUALS AT dieselperformance.com BD Venom Dual Fuel 2 0 1 1-2 0 1 4 F O R D 6. 7 L P O W E R S T R O K E Installation
INSTALLATION INSTRUCTIONS 97 FORD EXPEDITION
 INSTALLATION INSTRUCTIONS 97 FORD EXPEDITION 1. Read the instructions completely and carefully before you begin. Check the kit for proper contents (refer to the part s list and the picture diagrams). Before
BLACKBIRD WIRING MANUAL
 BLACKBIRD WIRING MANUAL VERSION ZX120 5/09 TO BE USED IN CONJUNCTION WITH A VEHICLE-SPECIFIC INSTALLATION SUPPLEMENT System Capabilities The 5kW Blackbird will provide 42 amperes of 120 Volt alternating
DewEze Clutch Pump Kit Ford 6.2L Gas, A Pump, Side Port, 2011+
 DewEze Clutch Pump Kit 700512 Ford 6.2L Gas, A Pump, Side Port, 2011+ INSTALLATION INSTRUCTIONS 1. The installation of this kit requires trained decisionmaking concerning clearances, tying components together,
DewEze Clutch Pump Kit Ford 6.2L Gas, A Pump, Side Port, INSTALLATION INSTRUCTIONS 1. The installation of this kit requires trained decis
 DewEze Clutch Pump Kit 700564 Ford 6.2L Gas, A Pump, Side Port, 2014+ INSTALLATION INSTRUCTIONS 1. The installation of this kit requires trained decisionmaking concerning clearances, tying components together,
Air Commander Part No
 EASYSTEET Air Commander Part No. 26903 www.airliftcompany.com MN-510 (06506) EC 5206 Please read these instructions completely before proceeding with installation The oil level in the compressor must be
Air Commander Late Model Ford F-150
 EASYSTREET Air Commander Late Model Ford F-150 www.airliftcompany.com MN-544 (02506) ECR 5206 Please read these instructions completely before proceeding with installation The oil level in the compressor
DewEze I N S T A L L A T I O N I N S T R U C T I O N S. Clutch Pump Kit # Ford 6.8L Van with A/C AA mount Disconnect the battery.
 DewEze Clutch Pump Kit #700442 Ford 6.8L Van with A/C AA mount 2 0 0 6 + I N S T A L L A T I O N I N S T R U C T I O N S 1. Disconnect the battery. 2. Remove the OEM belt. Remove the fan shroud and fan.
2017+ L5P Duramax 3 ½ Down Pipe & EGR Fix Kit
 2017+ L5P Duramax 3 ½ Down Pipe & EGR Fix Kit Covers installation of PN s: WCF100630, WCF100829 Note: This Kit is for off road competition use only! Off Road Competition Use Tuning & Exhaust System is
62 Deck Idler Kit High Speed
 Part No. 00 FORM NO. -899 6 Deck Idler Kit High Speed For Model 70 Serial No. 99000 to 99000 For Model 7 Serial No. 9900 to 99000 INSTALLATION INSTRUCTIONS Loose Parts Note: Use the chart below to identify
Installation Manual v1.0: Twin CP3 Fuel Injection Kit Dodge 5.9L
 Installation Manual v1.0: Twin CP3 Fuel Injection Kit 2004.5-2007 Dodge 5.9L Figure 1 - Full Kit Photo 25 Figure 2 - Hardware Kit Please read all instructions before installation. This kit is not emissions
Cut zip ties and remove 2 plastic wiring harness brackets.
 TROUBLESHOOTING: Please read and understand all installation instructions before proceeding with the installation. Included parts: 1 - New Bosch Cp3 Pump 1 - HSM Pulley 1 - Serpentine Belt 1 - Pump Bracket/
Included parts: 1 - New Bosch CP3 Pump 1 - HSM Pulley 1 - Serpentine Belt 1 - Pump Bracket/ Hardware STEP 1
 TROUBLESHOOTING: Please read and understand all installation instructions before proceeding with the installation. If you have questions during the installation of this product, please contact H&S Motorsports
Special Note About The JDM High Performance Water Pump:
 Page 1 of 30 JDM Engineering, Inc. home Call Us! 732-780- 0770 back to Installation Instructions Electric Fan Upgrade Kit Electric Fan Wiring Diagram Thank you for your purchase of the JDM Engineering
This LED flashtube kit covers models 400, 404, 500, 504, 600, 680 & 506.
 L.E.D. INSTRUCTIONS I D T S O T U B I R M O C R Y N A P Kit contains: This LED flashtube kit covers models 400, 404, 500, 504, 600, 680 & 506. For the power supply: 1-LED power supply circuit board, 2
This information covers procedures for replacing the sealant for the crankshaft cover on the Volvo D16F engine.
 Volvo Trucks North America Greensboro, NC USA DService Bulletin Trucks Date Group No. Page 1.2008 216 50 1(17) Sealant Crankshaft Cover, Replacement D16F Sealant Crankshaft Cover, Replacement W2005773
ALL AMERICAN BILLET. Front Drive System - Small Block Ford Installation Instructions
 ALL AMERICAN BILLET Front Drive System - Small Block Ford Installation Instructions Small Block Ford with AC & PS All American Billet Store (800) 764-0926 www.allamericanbilletstore.com Items needed for
Installation Instructions for: TOYOTA 4.5L SUPERCHARGER SYSTEM
 Installation Instructions for: TOYOTA 4.5L SUPERCHARGER SYSTEM 1995-1997 Land Cruiser * PREMIUM FUEL REQUIRED * Magnuson Products LLC 1990 Knoll Drive, Bldg A, Ventura, CA 93003 (805) 642-8833 phone *
8436, 8437, 8438, 8439, 8442, 27480, 27780, 28028, & ISOLATION MODULE ELECTRICAL SYSTEM
 September 11, 2003 Lit. No. 27808 8436, 8437, 8438, 8439, 8442, 27480, 27780, 28028, & 28400 ISOLATION MODULE ELECTRICAL SYSTEM Installation Instructions Read this document before installing the snowplow.
B. B. 4. Remove the bed bolts A.) Using a 1/2 socket, remove the four inner bed bolts. B.) Using a T-25 Torx driver, remove the four outer bed bolts
 Using a 1/2 socket, remove the four inner bed bolts. B.) Using a T-25 Torx driver, remove the four outer bed bolts") Installation Instructions Part Number 883-275 Scoop and Snorkel Kit 2008-11 Polaris Ranger RZR 800 800 E.F.I. Thank you for purchasing the iraid Intake System. Contact iraid @ (800) 498-6951 8:00 M - 5:00
Installation Instructions Part Number 883-275 Scoop and Snorkel Kit 2008-11 Polaris Ranger RZR 800 800 E.F.I. Thank you for purchasing the iraid Intake System. Contact iraid @ (800) 498-6951 8:00 M - 5:00
All cores due 30 days after invoice date - no credit after 60 days.
 NO WARRANTY STATEMENT High performance parts & products no warranty policy: The purchaser understands and recognizes that high performance diesel products and services sold by INDUSTRIAL INJECTION SERVICE.
INSTALLATION NOTES. 6. Add the 3/4 hose extension to the power steering reservoir to help keep the P/S hose away from the pump belt.
 YEAR:2017/ CURRENT INSTALLATION NOTES 1. Be sure to read and understand all available information including but not limited to instructions, warnings, sale terms, and warranties for the vehicle and all
INSTALLATION INSTRUCTIONS
 INSTALLATION INSTRUCTIONS Accessory Application Publications No. AII 30518 KIT 2006 PILOT Issue Date NOV 2005 NOTE: Accessory ATF and power steering coolers are required when installing the trailer hitch.
Installation Manual v1.0: Twin CP3 Fuel Injection Kit Dodge 6.7L
 04/05/2012 Dodge 2010-2011 6.7L Twin CP3 701-900-2356-INST Installation Manual v1.0: Twin CP3 Fuel Injection Kit 2010-2011 Dodge 6.7L Figure 1 - Full Kit Photo 29 Figure 2 - Hardware Kit (800) 949-60002
Front Drive System - Big Block Chevy Installation Instructions Big Block Chevy with AC & with PS
 Front Drive System - Big Block Chevy Installation Instructions Big Block Chevy with AC & with PS All American Billet Store (800) 764-0926 www.allamericanbilletstore.com Items needed for install Jack Jack
Installation Instructions For Part Number: Scoop and Snorkel Kit
 Installation Instructions For Part Number: 883-275 Scoop and Snorkel Kit 2008-14 Polaris Ranger RZR 800 800 E.F.I. Tools Required For Installation: 7/16 and 1/2 Wrenches. 10mm, 7/16, and 1/2 Sockets. T-25
Installation Manual v2.2: Twin CP3 Fuel Injection Kit Dodge 5.9L
 12/13/11 ATS Twin CP3 Kit 701-900-2272-INST Installation Manual v2.2: Twin CP3 Fuel Injection Kit 2003-2004 Dodge 5.9L Figure 1 - Full Kit Photo 26 Figure 2 - Hardware Kit 1 Please read all instructions
Air Commander Part No
 EASYSTREET Air Commander Part No. 26901 www.airliftcompany.com MN-508 (05504) NPR 5129 Please read these instructions completely before proceeding with installation Front View Side View Hardware Item P/N
Slingshot Rotrex Supercharger Kit
 Slingshot Rotrex Supercharger Kit This supercharger kit improves on the Slingshot by forcing more dense air into the engine and creating more power. Installation time of the supercharger depends on you
1333 KIPP ROAD NANAIMO B.C. V9X 1R3
 UNDERHOOD AIR COMPRESSORS UNDERHOOD AIR COMPRESSORS Installation Manual UNDERHOOD AIR COMPRESSORS UNDERHOOD AIR COMPRESSORS UNDERHOOD AIR COMPRESSORS System # V910002 2001 2002 Ford F650 - F750 CAT 3126
2001 Chevrolet CORVETTE
 riveline Support Assembly Replacement (Automatic Transmission) 1 of 21 10/24/2012 8:58 PM 2001 Chevrolet CORVETTE Submodel: Engine Type: V8 Liters: 5.7 Fuel Delivery: FI Fuel: GAS Driveline Support Assembly
Installation Manual for VMAC System V General Motors Duramax Diesel
 Installation Manual for VMAC System V900069 General Motors 2003 2004 Duramax Diesel C4500-5500 General Information... 3 Before You Start... 3 Special Installation Notes... 4 Part 1: Preparing for Installation...
Ford 6.8L, w/spider, 2000+
 DewEze Aiir Compressor Kiit 700554 Ford 6.8L, w/spider, 2000+ INSTALLATION INSTRUCTIONS 1. Disconnect the battery. 2. Drain the radiator. 3. Remove the air cleaner assembly. 4. Remove the upper radiator
Step 6: Remove and save the MAP sensor for later use. Step 7: Remove the passenger side intercooler pipe and the EGR intake manifold.
 LBZ Twin kit Install Step 1: Disconnect both batteries. Step 2: Drain coolant and oil also remove passenger side inner fender. Step 3: Remove intake box and piping. (Remove and save the MAF sensor in the
This information covers the proper procedure for replacing the Volvo D16F engine in a VT or VNL chassis.
 Volvo Trucks North America Greensboro, NC USA Engine, Replacement DService Bulletin Trucks Date Group No. Page 10.2007 210 139 1(47) Engine, Replacement Volvo D16F VNL, VT W2005773 This information covers
2006 Honda Civic SI Supercharger Kit Installation Instruction Kit #
 2006 Honda Civic SI Supercharger Kit Installation Instruction Kit #350-091 3239 MONIER CIRCLE, STE.5 RANCHO CORDOVA, CA 95742 916.635.4550 FAX 916.635.4632 www.ct-engineering.com INS-157 VERSION: 3.25.2009
Installation Instructions For Part Number: Scoop and Snorkel Kit
 Installation Instructions For Part Number: 883-275 Scoop and Snorkel Kit 2008-14 Polaris Ranger RZR 800 800 E.F.I. Thank you for purchasing the iraid Intake System. Contact iraid @ (800) 498-6951 8:00
Fuel Tank Fitment Instructions Tusk/Rally Raid Products/Seat Concepts kit Husqvarna 701 Enduro
 Fuel Tank Fitment Instructions Tusk/Rally Raid Products/Seat Concepts kit Husqvarna 701 Enduro Part #1849120001, 1849120002, 1849110001, 1849110002 Thank you for purchasing the Tusk/Rally Raid Products
INSTALLATION INSTRUCTIONS DODGE DAKOTA 2 KIT # 682 (2WD), 692 (4WD) 3 KIT # 683 (2WD), 693 (4WD)
, 692 (4WD) 3 KIT # 683 (2WD), 693 (4WD)") INSTALLATION INSTRUCTIONS 1997-1999 DODGE DAKOTA 2 KIT # 682 (2WD), 692 (4WD) 3 KIT # 683 (2WD), 693 (4WD) Installation of a Performance Accessories body lift kit will change the vehicle s center of gravity
INSTALLATION INSTRUCTIONS 1997-1999 DODGE DAKOTA 2 KIT # 682 (2WD), 692 (4WD) 3 KIT # 683 (2WD), 693 (4WD) Installation of a Performance Accessories body lift kit will change the vehicle s center of gravity
CHEVY AVALANCHE 1/2-TON ONLY 3 BODY LIFT KIT INSTALLATION INSTRUCTIONS KIT# 10173
 3651 N Highway 89 Chino Valley, AZ 86323 (928) 636-7080 www.p-a-g.net CHEVY AVALANCHE 1/2-TON ONLY 3 BODY LIFT KIT INSTALLATION INSTRUCTIONS 2003-2005 KIT# 10173 Installation of a Performance Automotive
Cut zip ties and remove 2 plastic wiring harness brackets.
 TROUBLESHOOTING: Please read and understand all installation instructions before proceeding with the installation. If you have questions during the installation of this product, please email H&S Motorsports
AIR INDUCTION SYSTEM
 Page 1 PART NUMBER: APPLICATION: 203.51.2500 HONKER C5 1997 2000 CORVETTE AIR INDUCTION SYSTEM (without supercharger) INSTRUCTION SHEET NUMBER: 903.51.9850G PACKAGE CONTENTS: Air Box Cover Air Box Base
INSTALLATION INSTRUCTIONS FORD F-150 2WD & 4WD RETAINS FACTORY TOW HOOKS PART #P3063
 INSTALLATION INSTRUCTIONS FORD F-150 2WD & 4WD RETAINS FACTORY TOW HOOKS PART #P3063 PARTS LIST: 1 Grille Guard 2 10-1.5mm Nylon Lock Nuts 1 Driver/Left Frame Mounting Bracket 4 12mm Plastic Washers 1
Models Affected: Visions with Propane Engines CORRECTIVE ACTION ---- PROCEDURE
 Propane Belt Squeal Models Affected: Visions with Propane Engines ISSUE Front End Accessory Drive (FEAD) Belt chirping/squealing caused by improper fore-aft crankshaft pulley positioning. CORRECTIVE ACTION
18SP680Rev3 EPA04 MBE 4000 Car Hauler Low Pressure Fuel Lines
 8SP680Rev3 EPA04 MBE 4000 Car Hauler Low Pressure Fuel Lines KIT DESCRIPTION These service kits include all necessary parts to replace the low pressure fuel lines between the fuel filter housing and fuel
INSTALLATION INSTRUCTIONS
 INSTALLATION INSTRUCTIONS Accessory HITCH Application 2009 CR-V Publications No. AII 40373 Issue Date AUG 2008 PARTS LIST Plain washer, 12 mm Trailer Hitch Kit P/N 08L92-SWA-100 Trailer hitch 6 Spring
4. Remove the bed bolts A.) Using a 1/2 socket, remove the four inner bed bolts. B.) Using a T-25 Torx driver, remove the four outer bed bolts.
 Using a 1/2 socket, remove the four inner bed bolts. B.) Using a T-25 Torx driver, remove the four outer bed bolts.") Installation Instructions Part Number 883-282 Intake kit with scoop 2008-14 Polaris Ranger RZR 800 Tools Required For Installation: 7/16 and 1/2 Wrenches. 10mm, 7/16, and 1/2 Sockets. T-25 Torx driver.
Installation Instructions Part Number 883-282 Intake kit with scoop 2008-14 Polaris Ranger RZR 800 Tools Required For Installation: 7/16 and 1/2 Wrenches. 10mm, 7/16, and 1/2 Sockets. T-25 Torx driver.
INSTALLATION INSTRUCTIONS
 INSTALLATION INSTRUCTIONS Accessory Application Publications No. 2003 ELEMENT AII 24318 Issue Date DEC 2002 PARTS LIST Trailer Hitch Kit P/N 08L92-SCV-100 4 Bolts, 12 x 35 mm Trailer hitch U-bolt 2 Nuts,
Air Commander
 EASYSTREET Air Commander www.airliftcompany.com MN-507 (03206) ECN 3921 Please read these instructions completely before proceeding with installation. The oil level in the compressor must be checked BEFORE
ADM Performance 6079 Mapleshade Lane Dallas, Texas (214)
") 1) Disconnect Battery Ground 2) Raise front end of Vehicle FAN INSTALL INSTRUCTIONS 3) Remove lower Radiator hose and drain coolant into a pan. (you will reuse coolant later) 4) Remove Air Intake piping
1) Disconnect Battery Ground 2) Raise front end of Vehicle FAN INSTALL INSTRUCTIONS 3) Remove lower Radiator hose and drain coolant into a pan. (you will reuse coolant later) 4) Remove Air Intake piping
Powerstroke 6.4L EGR Block Kit
 Read instructions thoroughly before proceeding! ***This kit may void factory warranty please check with manufacturer.*** You will need the following tools for this installation: 10mm wrench 13mm wrench
GM 6.6L (LML) Duramax Positive Air Shutoff 2.5 CAC TUBES
 Duramax Positive Air Shutoff 2.5 CAC TUBES") 8 April 2013 1036713 GM/Chevy Duramax 2011-2013 (LML) Positive Air Shutoff 1 2011-2013 GM 6.6L (LML) Duramax Positive Air Shutoff 2.5 CAC TUBES P/N# 1036713 P/N# 1036713-M UPLEASE READ ALL INSTRUCTIONS
8 April 2013 1036713 GM/Chevy Duramax 2011-2013 (LML) Positive Air Shutoff 1 2011-2013 GM 6.6L (LML) Duramax Positive Air Shutoff 2.5 CAC TUBES P/N# 1036713 P/N# 1036713-M UPLEASE READ ALL INSTRUCTIONS
Section 27. Altitude Compensation Induction System (ACIS) RotorWay International Exec 162F Construction Manual. Section 27. Page A Rev.
 RotorWay International Exec 162F Construction Manual. Section 27. Page A Rev.") RotorWay International Page A Rev. 2 5/05 Altitude Compensation Induction System (ACIS) Procedures covered in this section: Install stepper motor controller; install man/baro sensors and hoses; install
RotorWay International Page A Rev. 2 5/05 Altitude Compensation Induction System (ACIS) Procedures covered in this section: Install stepper motor controller; install man/baro sensors and hoses; install
INSTALLATION INSTRUCTIONS
 INSTALLATION INSTRUCTIONS Accessory Application Publications No. SECURITY SYSTEM P/N 08E49-SDA-100 ACCORD 2- AND 4-DOOR AII 30666 Issue Date AUG 2005 PARTS LIST Hood switch harness Illustration of the
Kysor On/Off Rear Air Fan Drive
 . Proper precautions must be taken to prevent personal injury from contact with moving parts, unintended engine start, or other hazards present when working with powered equipment. Refer to the vehicle
2015 Mustang Lightbar (All Models) CDC#
 CDC#") 2015 Mustang Lightbar (All Models) CDC# 1511-7000-01 Components: 1 CDC Lightbar Note: READ instructions before starting installation!!! CDC Part# Driver side bracket 0511-6001-05 Passenger side bracket
2015 Mustang Lightbar (All Models) CDC# 1511-7000-01 Components: 1 CDC Lightbar Note: READ instructions before starting installation!!! CDC Part# Driver side bracket 0511-6001-05 Passenger side bracket
All cores due 30 days after invoice date - no credit after 60 days.
 NO WARRANTY STATEMENT High performance parts & products no warranty policy: The purchaser understands and recognizes that high performance diesel products and services sold by INDUSTRIAL INJECTION SERVICE.
# V GMC C6500 C8500
 UNDERHOOD AIR COMPRESSORS UNDERHOOD AIR COMPRESSORS Installation Manual UNDERHOOD AIR COMPRESSORS UNDERHOOD AIR COMPRESSORS UNDERHOOD AIR COMPRESSORS System # V910001 2001 2002 GMC C6500 C8500 CAT 3126
INSTALLATION INSTRUCTIONS DUAL OIL CATCH CAN KIT
 INSTALLATION INSTRUCTIONS DUAL OIL CATCH CAN KIT SUBARU WRX FA20F ENGINE Document: 19-0135 Support: info@radiumauto.com This dual catch can kit installs in the right-hand side of the engine bay and intercepts
Installation instruction do88 Intercooler for SAAB 9-3 1,9 TTiD
 Installation instruction do88 Intercooler for SAAB 9-3 1,9 TTiD This instruction shows how to replace the OEM intercooler with this performance intercooler. At this type of installation we always recommend
Subaru Front Mount Intercooler Kit STI Subaru Front Mount Intercooler Kit STI
 Subaru Front Mount Intercooler Kit STI 2008-2014 715500 Subaru Front Mount Intercooler Kit STI 2008-2014 Congratulations on your purchase of the Subaru Front Mount Intercooler Kit STI 2008-2014. The following
»Product» Safety Warning
 #C9315 Installation Instructions 2000-2005 Suburban/Tahoe/Yukon 1500 2/4wd 3" Body Lift Read and understand all instructions and warnings prior to installation of product and operation of vehicle. Zone
Installation Instructions for: TOYOTA 3.4L SUPERCHARGER SYSTEM
 Installation Instructions for: TOYOTA 3.4L SUPERCHARGER SYSTEM 1996-2002 4Runner 1997-1998 T100 1997-2004 Tacoma 2000-2003 Tundra * PREMIUM FUEL REQUIRED * Magnuson Products LLC 1990 Knoll Drive, Bldg
Disconnect the APP sensor harness connector. See Fig. 4. Remove the accelerator pedal mounting nuts. Remove the APP assembly.
 ENGINE CONTROLS - REMOVAL, OVERHAUL & INSTALLATION - 6.6L DIESEL... Page 1 of 41 FUEL SYSTEMS ACCELERATOR PEDAL POSITION SENSOR Removal & Installation Disconnect the APP sensor harness connector. See Fig.
»Product» Safety Warning
 #C1354 Installation Instructions 1999-2002 Chevy/GM 1500 4wd 3.5" Combo Lift Kit Read and understand all instructions and warnings prior to installation of product and operation of vehicle. Zone Offroad
Installation Instructions. QuickSilver Shifter. Fits: GM, Ford, Chrysler Transmissions See Application Guide for Specific Applications Part # 80683
 Installation Instructions QuickSilver Shifter Fits: GM, Ford, Chrysler Transmissions See Application Guide for Specific Applications Part # 80683 WORK SAFELY! For maximum safety, perform this installation
OIL COOLER KIT INSTALLATION INSTRUCTIONS D Application: , E89 Z4 sdrive 35i without stock oil cooler* PARTS LIST
 OIL COOLER KIT INSTALLATION INSTRUCTIONS D570-0891 Application: 2009-11, E89 Z4 sdrive 35i without stock oil cooler* PARTS LIST Qty Part No. Description 1 D573-0050 Oil Cooler + Frame Assy 1 D573-0044
Performance Inlet Manifold
 Performance Inlet Manifold Tools needed (some tools not required on some models): 13mm Combination Wrench Flat Blade Screwdriver T30 Torx Driver T25 Torx Driver 10mm Combination Wrench and/or Socket with
XDP Complete EGR Race Track Kit w/up-pipe. Item Number: XD144
 XDP Complete EGR Race Track Kit w/up-pipe Item Number: XD144 PACKING LIST: 2 - Lined 3/4" SS Hose Clamp 1-3/4 Silicone Hose 1 - XDP Engraved EGR Valve Block-Off Plate with O-ring 1 - EGR Cooler Block-Off
SERVICE PROGRAM SP NOVEMBER 2007 SERVICE MANAGERS / PARTS MANAGERS NOTE:
 ATTENTION: SUBJECT: SERVICE MANAGERS / PARTS MANAGERS INCORRECT SPACING AND ALIGNMENT BETWEEN THE FAN, FAN RING, AND RADIATOR SHROUD; INCORRECT FAN RING SEAL INSTALLED To determine whether a particular
Installation Instructions General Motors 8.1 Sequential Vapor Injection (S.V.I.) System 7500/6500 Series Trucks model year.
 System 7500/6500 Series Trucks model year.") Installation Instructions General Motors 8.1 Sequential Vapor Injection (S.V.I.) System 7500/6500 Series Trucks 2003-2005 model year. Technocarb Equipment (2004) Ltd. 4-30435 Progressive Way Abbotsford,
Installation Instructions General Motors 8.1 Sequential Vapor Injection (S.V.I.) System 7500/6500 Series Trucks 2003-2005 model year. Technocarb Equipment (2004) Ltd. 4-30435 Progressive Way Abbotsford,
Single Barrel Shotgun HPFP Install Guide
 Single Barrel Shotgun HPFP Install Guide Thank you for purchasing the VTT Single Barrel Shotgun HPFP upgrade kit! PLEASE READ THE ENTIRE GUIDE BEFORE BEGINNING INSTALLATION! The first thing you should
System # V INTERNATIONAL , 4400 SERIES DT466
 System # V900068 INTERNATIONAL 2001-2003 4300, 4400 SERIES DT466 Installation Manual Document Number: 1930036 Document #1930036 VR70 Underhood Air Compressor System Number V900068 Application: INTERNATIONAL
YAMAHA VIPER SX SRX SXR V-MAX XTC CUSTOM LONG TRACK INSTALLATION
 YAMAHA VIPER SX SRX SXR V-MAX XTC CUSTOM LONG TRACK INSTALLATION REMOVAL OF OLD TUNNEL EXTENSION AND COOLER 1. Remove plastic bumper covers. 2. Drain coolant by removing left or right rear cooler hose.
Installation Instructions. Lightning Force Performance. Mont Belvieu, texas H Phone: Fax:
 ,/ -.. ifp Electric Fan Installation Instructions,,'i ", ->- ~f~:';, ~';; ~.'7'" Lightning Force Performance PO Box 497\3207 KatWeen ṙ I Mont Belvieu, texas 77580.,. H Phone:281-38 5-5339 Fax:281-5 76-5650
INSTALLATION INSTRUCTIONS AIR/OIL SEPARATOR KIT
 INSTALLATION INSTRUCTIONS AIR/OIL SEPARATOR KIT 2015+ SUBARU WRX (LHD ONLY) Document: 19-0136 Support: info@radiumauto.com This document covers the installation of the Radium brake master cylinder brace
PFadvantage Metalfor Araus 1360
 Metalfor Araus 1360 Note: Indented items indicate parts included in an assembly listed above Part Name/Description Part Number Quantity Instruction Kit Metalfor Araus 2005300-14 1 Display Bracket 4000134
INSTALLATION INSTRUCTIONS
 INSTALLATION INSTRUCTIONS Accessory Application Publications No. AII 25877 PILOT Issue Date AUG 2003 Optional ATF and power steering coolers are required when installing the trailer hitch. 2 Spacers PARTS
Installation Instructions Camaro ZL1 ( Z) ( ZB)
 ( ZB)") Installation Instructions Camaro ZL1 (501-1099-10-Z) (501-1099-10-ZB) Parts List 1 Insulated Air Box \ Lid 1 Thermal Coated Intake Tube / MAF Housing with (2) M4 x.7 thread 8mm long Stainless Screws; 1
Installation Instructions Camaro ZL1 (501-1099-10-Z) (501-1099-10-ZB) Parts List 1 Insulated Air Box \ Lid 1 Thermal Coated Intake Tube / MAF Housing with (2) M4 x.7 thread 8mm long Stainless Screws; 1
V1 Truck Manifold Turbo Kit for F-body
 V1 Truck Manifold Turbo Kit for 98-02 F-body Prep: -Remove all A/C Components, Alternator and brackets, tensioner, front bumper, front bumper foam, and front bumper support. Remove radiator and cooling
Please read thoroughly before starting installation and check that kit contents are complete.
 Rear Vision System Mirror Display 2013-Current Ram (Kit part number 1009-9518) Please read thoroughly before starting installation and check that kit contents are complete. Items Included in the Kit: Rear
GM LS Series Serpentine Drive System with & without Power Steering
 an ISO 9001:2015 Registered Company GM LS Series Serpentine Drive System with & without Power Steering 18865 Goll St. San Antonio, TX 78266 Phone: 800-862-6658 Sales: sales@vintageair.com Tech Support:
Ford E350, E450 Van LITER DIESEL ENGINE W/SINGLE OE ALTERNATOR TYPE B Uses TM-16, 4-3/4 Poly Groove Rear Port Compressor PARTS LIST
 2006-04 Ford E350, E450 Van 1784 6.0 LITER DIESEL ENGINE W/SINGLE OE ALTERNATOR TYPE B Uses TM-16, 4-3/4 Poly Groove Rear Port Compressor PARTS LIST 1 6m-1.0 x 15 Bolt 1 6m-1.0 x 45 Bolt 3 6m Flat Washer
System # V FREIGHTLINER , 7.2L 3126 CATERPILLAR DIESEL FL50, FL60, FL70, FL80
 System # V900022 FREIGHTLINER 1998-2002, 7.2L 3126 CATERPILLAR DIESEL FL50, FL60, FL70, FL80 Installation Manual Document Number: 1930028_a Document #1930028 VR70 Underhood Air Compressor System Number
Installation Manual v1.2: LLY / LBZ/LMM Twin CP3 Kit GM Duramax. Please read all instructions before installation.
 03/24/09 701-900-4290 - INST Installation Manual v1.2: LLY / LBZ/LMM Twin CP3 Kit 04.5-07.5 GM Duramax Please read all instructions before installation. This kit is not emissions legal in California. Kit
2010 Mustang V6 Shaker CDC #
 - - Incomplete 2010 Mustang V6 Shaker CDC # 1011-7002-01 Component Check List: Quantity/Description Part # Engine Cover Assembly 1011-6000-01 1 Engine Cover w/ Upper Air Tube 0511-2100-01 1 Aluminum Shaker
Page 1. File: Motolight caliper one-piece Date: 8/14/2006
 Page 1 Caliper Mount Installation One-piece mounting brackets You should allow about two to three hours for installation. We suggest you use a well-lighted space for installation. PLEASE READ ALL THE INSTRUCTIONS.
Kysor On/Off Rear Air Fan Drive
 . Proper precautions must be taken to prevent personal injury from contact with moving parts, unintended engine start or other hazards present when working with powered equipment. Refer to the vehicle
~-- (I, G & H 4.9L W/O AC BELT DRIVE, SLC REV. D. c u ~~~~ SERIES FORD 6 CYL 300 CID PECULIAR HYDRAULICS HPS458Ò
 SERIES FORD 6 CYL 300 CID 987-99 PECULIAR HYDRAULICS HPS458Ò G & H 4.9L W/O AC BELT DRIVE, SLC REV. D UNDERHOOD VALVE ~ ~-- (I, ~ a. c u A- I ~~~~ SERIES G & H HPS4580 REV D ~i, ---f~-~ i JJ ~~~( '*~..
Volvo P1 Air Intake. ELEVATE Turbo Intake Pipe. MAF Sensor. Inlet Manifold. Air Filter Housing. ECU Cover
 Volvo P1 Air Intake Tools needed: 13mm Combination Wrench Flat Blade Screwdriver T30 Torx Driver T25 Torx Driver 8mm Combination Wrench and/or Socket with Ratchet 10mm Combination Wrench and/or Socket