THROWOUT / RELEASE BEARING & PILOT SHAFT ISSUES
|
|
|
- Cornelius Jacobs
- 5 years ago
- Views:
Transcription

1 THROWOUT / RELEASE BEARING & PILOT SHAFT ISSUES
2 Recent Toyota Tacomas and FJ Cruisers with Manual Transmissions have had identical problems. It is unclear whether the damage is caused by faulty Throwout / Release Bearings whose inner rings crack then damage the Pilot Shaft, or soft (Aluminum) Pilot Shafts wearing down then causing the Throwout / Release Bearing to wobble, vibrate, and then crack (vice versa). Oftentimes damage to the Pilot Shaft occurs without cracks on the bearing s inner ring. The issue has occurred on FJ Cruisers which have and haven t been subjected to strenuous off roading and / or modifications. The Release Bearing is designed to maintain contact with the pressure plate at all times; the outer ring is supposed to spin constantly, while the inner ring maintains a nice tight fit sliding back and forth about an inch or so on the Pilot Shaft. Once the inner ring of the Throwout / Release Bearing cracks or wears and begins to wobble, the Pilot Shaft wears down (or vice versa) resulting in the chirping. Depressing the clutch pedal slightly allows the fingers of the Fork to stabilize the bearing wobble. The wobble is the cause of the chirping. Neither Grease nor a replacement Throwout / Release Bearing will fix the problem long term; the grease will extrude eventually, leaving the loose fit. Tensing the clutch pedal (see below) is likewise not addressing the true problem at hand. To visualize the problem, lift the truck with the engine running, remove the Bell Housing Cover Plate and point a flashlight up to look at the Release Bearing (driver s side). You will see the outer ring of the Release Bearing spinning (normal). When it chirps, you should be able to see the Throwout / Release Bearing wobbling (abnormal). To confirm the problem, applying a small amount of pressure on the Slave Cylinder (a small cylinder with a rubber boot just below the opening you are looking in to) with a screw driver should cause the chirping to stop. This is identical in principle to depressing the clutch pedal 1/2 inch or so (which stops the chirping). The only proper repair entails replacing the Bell Housing because the Pilot Shaft (unlike in earlier Tacomas with 5 speed Manual Transmissions) is a non serviceable or replaceable component. If you can get a new transmission, you'll be better off and the dealers will usually prefer to replace the transmission based on the time and difficulty of a rebuild. Theoretically, if Toyota made replacement Throwout / Release Bearings with different inner rings or replaceable Pilot Shafts, the repair would be far less costly. Many times, a technician will go through all the effort to give you a new Throwout / Release Bearing, Pressure Plate and Clutch Disc, Slave Cylinder, or various combinations of those components only to find you back in the shop within a couple of weeks or less. Worse, they might replace the Flywheel the second time around, which results from misdiagnosis of the chirp. Knowing that the Throwout / Release Bearing is steel and the Pilot Shaft is Aluminum, the issue of damage to that Pilot Shaft becomes clear. Since the Pilot Shaft is press fit in to the Transmission Bell Housing, replacing the Pilot Shaft requires replacing the entire Bell Housing (a $400 part and a massive amount of labor); dealers will often choose to replace the transmission.


3 Cracked Throwout / Release Bearing, Pilot Shaft + Toyota spray on Lithium Grease on a Toyota Tacoma; not an appropriate fix done by many dealers, which may even contaminate the Clutch Disk surface and Flywheel. Throwout / Release Bearing positioned on the Pilot Shaft:

4 2 views through the cover plate:


 had a superior design because the Pilot Shaft was a replaceable bolt on component to the Bell Housing.")
5 When viewing the operation of the Throwout / Release Bearing with the engine running and the cover removed (using a flashlight), the technician should be able to visualize a degree of Throwout / Release Bearing wobble. Applying a small amount of pressure to the Slave Cylinder shaft moves the Fork, and stabilizes the Throwout / Release Bearing enough to stop the chirp. It is this observation that leads some technicians to simply tense the Clutch Pedal as a fix (inappropriate). The next step is to drop the transmission and do a detailed inspection of the Pilot Shaft. Measure the Pilot Shaft with some calipers and note the discrepancy in diameter along the length of travel of the Release Bearing. The earlier Toyota Tacomas with 5 speed Manual Transmissions (R155 and R155F) had a superior design because the Pilot Shaft was a replaceable bolt on component to the Bell Housing. The FJ Cruisers with 6 speed Manual Transmissions (RA61 and RA61F) are of similar design to Toyota Tacomas with 6 speed Manual Transmissions (RA60 and RA60F). Damaged Parts from FJ Cruiser (Pressure Plate, Pilot Shaft, Throwout / Release Bearing inner ring):


6 More Parts from FJ Cruiser Undamaged Throwout / Release Bearing Old Quill (note scoring on shaft) and Housing

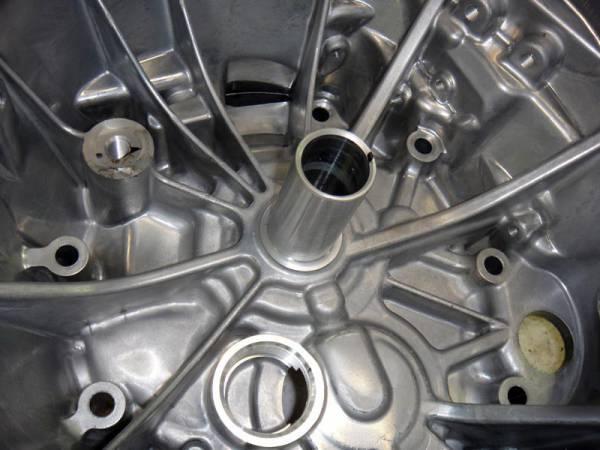
7 New Quill and Housing


8 Even More Parts from FJ Cruiser Resealing the Bell Housing requires a replacement Crush Ring / Gasket with the assembly torqued together at around 400 ft lbs.

9 Typical Repairs:


10 Performance Development & Manufacturing s ( TranQuil Sleeve Kit Solution for Subarus with Manual Transmission, since made available for the Toyota Tacoma and FJ Cruiser (for the latter, TranQuil Sleeve Kit TSK44 replaces Part # ; replacement bearing is Part # TSK 44B from PDM):
6-Speed Manual Clutch Release Bearing Squeak or Rattle Noise
 T-SB-0365-10 December 22, 2010 6-Speed Manual Clutch Release Bearing Squeak or Rattle Noise Service Category Drivetrain Section Manual Transmission/Transaxle Market USA Applicability YEAR(S) MODEL(S) ADDITIONAL
Diagnostic Procedures
 Section 6 Diagnostic Procedures Learning Objectives: 1. Describe manual transmission, transaxle and transfer case component inspection and diagnostic procedures 2. Identify clutch component inspection
InstalL Instructions. fj40 knuckle conversion kit. kit contents
 InstalL Instructions fj40 knuckle conversion kit 1960-1983 toyota fj40 1960-1983 toyota fj45 304149-1-kit 304150-1-kit 304151-1-kit 304152-1-kit 304153-1-kit 304154-1-kit 304155-1-kit 304156-1-kit 304157-1-kit
Clutch Installation Guide
 Clutch Installation Guide 0 STOP! READ CAREFULLY BEFORE INSTALLING CLUTCH This clutch must be installed by a qualified installer. Improper installation or failure to replace or resurface the flywheel,
Clutch Kit Install Guide
 Jack up and support the car on jack stands Remove the exhaust system (some models) Remove the driveshaft (rear wheel drive) Remove CV axle (front wheel drive) Manual transmission removal Clutch Kit Install
SERVICE INFORMATION 11-1 FRONT WHEEL/SUSPENSION/ STEERING XL FRONT WHEEL 11 7 FORK STEERING STEM 11 18
 XL200 11. FRONT WHEEL/SUSPENSION/ STEERING SERVICE INFORMATION 11 1 TROUBLESHOOTING 11 2 HANDLEBAR 11 3 FRONT WHEEL 11 7 FORK 11 11 STEERING STEM 11 18 SERVICE INFORMATION GENERAL A contaminated brake
Self-Adjust Clutch Installation Guide
 Self-Adjust Clutch Installation Guide 0 STOP! READ CAREFULLY BEFORE INSTALLING CLUTCH This clutch must be installed by a qualified installer. Improper installation or failure to replace or resurface the
Installation Instructions
 Preparing your vehicle to install your brake system upgrade 1. Rack the vehicle. 2. If you don t have a rack, then you must take extra safety precautions. 3. Choose a firmly packed and level ground to
1969 Camaro. Concourse Style Disc Brake Conversion Kit Instllation Instructions
 Concourse Style Disc Brake Conversion Kit Instllation Instructions 1969 Camaro (1970 Chevelle Kit Shown) This document contains our regular disc brake conversion instructions with the addition of GM assembly
ENGINE CLUTCH CONTENTS OF THIS SECTION
 ENGINE CLUTCH 6C-l ENGINE CLUTCH CONTENTS OF THIS SECTION SUBJECT General Description Periodic Service Adjustments on Car Removal of Clutch Inspection of Clutch Parts Installation of Clutch Specifications
Porsche 928 with 16v LH-Jetronic Fuel System
 Porsche 928 with 16v LH-Jetronic Fuel System Toll-Free Tech Hot Line: 877-FOR-928M 877-367-9286 Please do not copy this manual and give copies to your friends. Our ability to bring you this supercharger
Clutches for Automobiles and Light Trucks
 Clutches for Automobiles and Light Trucks What does the Clutch do? Connects the engine torque to transmission when ENGAGED Unhooks engine from transmission when DISENGAGED Where is the driver s foot when
Nissan Pathfinder (R50) Automatic to Manual Transmission Conversion Manual
 Automatic to Manual Transmission Conversion Manual") 1996 1999 Nissan Pathfinder (R50) Automatic to Manual Transmission Conversion Manual 1 1996 1999 Nissan Pathfinder (R50) Automatic to Manual Transmission Conversion Manual Conversion performed and Manual
1996 1999 Nissan Pathfinder (R50) Automatic to Manual Transmission Conversion Manual 1 1996 1999 Nissan Pathfinder (R50) Automatic to Manual Transmission Conversion Manual Conversion performed and Manual
1999 Toyota RAV BRAKES Disc & Drum - Trucks & Vans
 DESCRIPTION & OPERATION 1999-2000 BRAKES Disc & Drum - Trucks & Vans WARNING: For warnings and procedures regarding vehicles equipped with Anti-Lock Brake Systems (ABS), see appropriate ANTI-LOCK article.
Clutch Installation Guidelines Follow Service Manual Instructions For Step-By- Step Procedures
 9700063 Revision 12/20/10 Clutch Installation Guidelines Follow Service Manual Instructions For Step-By- Step Procedures FAILURE TO FOLLOW PROPER INSTALLATION OR BREAK-IN PROCEDURES WILL VOID ANY WARRANTY
ATS metal clutch (twin / triple) instruction manual for Nissan 350Z w/ HR motor 12 pages
 instruction manual for Nissan 350Z w/ HR motor 12 pages") ATS metal clutch (twin / triple) instruction manual for Nissan 350Z w/ HR motor 12 pages This instruction is provided by Performance Partners Intl 1 ATS Clutch operating instructions Thank you very much
ATS metal clutch (twin / triple) instruction manual for Nissan 350Z w/ HR motor 12 pages This instruction is provided by Performance Partners Intl 1 ATS Clutch operating instructions Thank you very much
11. FRONT WHEEL/SUSPENSION/
 11 FRONT WHEEL/SUSPENSION/ SERVICE INFORMATION------------------------------------------------ 11-2 TROUBLESHOOTING----------------------------------------------------- 11-3 HANDLEBAR ---------------------------------------------------------------
CL - Clutch Replacement
 2003 3.2CL - Clutch Replacement Special Tools Required Pressure plate compressor 07AAE-P8EA000 Clutch alignment shaft 07AAF-P8EA000 Pressure plate compressor adapter 07AAK-P8EA000 Ring gear holder 07LAB-PV00100
AUTOMATIC CLUTCH Models
 AUTOMATIC CLUTCH 1940 Models Source of this material is from 1940 Series, Issue 4, January 1940 Hudson Service Magazine AUTOMATIC CLUTCH 1940 MODELS The automatic clutch installation and adjustment procedure
SACHS Clutches The Intelligent Choice for the Long Haul
 SACHS Clutches The Intelligent Choice for the Long Haul Twin XTend Clutch Installation Objectives: Identification Operation Tools Installation Troubleshooting Identification 15.5 Self Adjusting Clutch
1. General GENERAL CL-2
 SYSTEM GENERAL 1. General The clutch is of a dry, single plate type with a diaphragm spring. The clutch is a push type clutch. When the pedal is depressed, the release bearing will press the center of
A/F/X Body GM Installation Instructions
 A/F/X Body GM Installation Instructions Power Disc Conversion 64-72 A Body / 67-69 F Body / 68-74 X Body 9 slimline booster pictured Your new disc brake conversion kit can be bolted up with standard hand
Clutch cover Type Diaphragm spring strap. Clutch pedal Type Suspended type. Maximum operating travel
 000000 043 1. SPECIFICATION Operating type Description Hydraulic type Specification Clutch cover Type Diaphragm spring strap Adjusting type Clutch pedal Type Suspended type Max. operating travel Pedal
New tool for installing clutch driven plate and pressure plate.
 1(5) New tool for installing clutch driven plate and pressure plate. Special tools: 999 5662-5, 999 5663-3 It is very important to center the clutch driven plate and pressure plate is very important when
SERVICE PROCEDURES FOR CLUTCH HYDRAULIC UNITS
 SERVICE PROCEDURES FOR CLUTCH HYDRAULIC UNITS SAFETY PROCEDURES Always follow the vehicle manufacturer's recommended safety procedures in your Shop and Owners Manual. REQUIRED TOOLS Flat blade screwdriver,
Toyota Truck Park Brake Bellcrank Repair
 Toyota Truck Park Brake Bellcrank Repair Toyota trucks including Tacoma, T100 and Tundra with rear drum brakes use a bellcrank apparatus through the brake backing plate as part of the parking brake system.
Advanced Auto Tech. ASE A 3 Test Preparation Clutch & Drive Line Service
 Advanced Auto Tech ASE A 3 Test Preparation Clutch & Drive Line Service The clutch and the drive line both have their own unique symptoms and noises, separate from the transmissions used to change torque
Clutch, Pressure Plate, And Pilot Bearing Replacement
 Page 1 of 6 2008 Chevrolet Aveo : Transmissions > Clutch > Repair Instructions > Clutch, Pressure Plate, And Pilot Bearing Replacement Clutch, Pressure Plate, And Pilot Bearing Replacement CLUTCH, PRESSURE
DRAGON CLAW SHELBY 26 SPLINE
 DRAGON CLAW 13-14 5.4 SHELBY 26 SPLINE *This Kit Requires a Min. 1 ⅝ in. Working Input Shaft Splines. *Professional Installation recommended *Power/Air tools NOT advised 1. Remove transmission assembly
RED LINE LANDCRUISERS LLC. FJ40-70 series BIG BRAKE KIT INSTRUCTIONS
 RED LINE LANDCRUISERS LLC. FJ40-70 series BIG BRAKE KIT INSTRUCTIONS Tired of not have the brake performance on your land cruiser? Have you upgraded to 35,37" Tires, a V8? Well, This brake kit is for you.
21A-1 CLUTCH CONTENTS CLUTCH... CLUTCH OVERHAUL
 21A-1 CLUTCH CONTENTS CLUTCH... 21A CLUTCH OVERHAUL... 21B 21A-2 CLUTCH CONTENTS GENERAL INFORMATION... 3 SERVICE SPECIFICATIONS... 3 LUBRICANTS... 3 ON-VEHICLE SERVICE... 3 Clutch Pedal Inspection and
Installation Instructions
 Instructions Created by an: Inchworm Tacoma Dual Case Adapter Installation Instructions Suggested Tools: CAUTION: Safety glasses should be worn at all times when working with vehicles and related tools
HAYS HYDRAULIC RELEASE BEARING INSTALLATION INSTRUCTIONS
 HAYS HYDRAULIC RELEASE BEARING INSTALLATION INSTRUCTIONS PRELIMINARY INSTALLATION NOTES IMPORTANT! DO NOT RETURN THIS PRODUCT TO YOUR DISTRIBUTOR. If you have questions, please review additional information
DISC BRAKES. Section 4. Components and Operation of Disc Brakes. Disc Brake Assembly
 DISC BRAKES Components and Operation of Disc Brakes A disc brake assembly consists of a: cast iron disc (disc rotor) that rotates with the wheel. caliper assembly attached to the steering knuckle. friction
CROWERGLIDE AUTOMATIC CLUTCH Instruction Manual
 CROWERGLIDE AUTOMATIC CLUTCH Instruction Manual Crower Cams & Equipment Co., Inc 6180 Business Center Court San Diego, CA. 92154 Phone: 619.661.6477 ext. 148 Fax: 619.690.7846 www.crower.com TABLE OF CONTENTS
Transmission Overhaul Procedures-Bench Service
 How to Assemble the Lower Reverse Idler Gear Assembly Special Instructions In 1996 Eaton changed the reverse idler system design. In the nut design, the reverse idler bearing was lubricated through a hole
A/F/X Body GM Installation Instructions Manual Disc Conversion
 A/F/X Body GM Installation Instructions Manual Disc Conversion 64-72 A Body / 67-69 F Body / 62-74 X Body DBMC09 & PVK71 pictured above (Booster, master & valve setups may vary by upgrades selected) Your
CARBONETIC Carbon Clutch operating instructions
 ACROSS USA INC www.carbonetic.net TEL:310-635-3555 CARBONETIC Carbon Clutch operating instructions Thank you very much for your purchase of the CARBONETIC carbon clutch. Please read these instructions
INSTALLATION MANUAL TOYOTA TACOMA 5 SUSPENSION SYSTEM PART # 54900
 PART NUMBER : 54900 1996 2004 TOYOTA TACOMA 5 SUSPENSION SYSTEM PARTS LIST: Part # Description Qty. 55900-01 Driver Side Spindle 1 55900-02 Passenger Side Spindle 1 54900-01 Rear brake proportioning valve
CLUTCH PREPARATION Union Nut Wrench 10 mm Clutch Guide Tool Input Shaft Front Bearing Puller
 CLUTCH CL1 CL2 PREPARATION SST (SPECIAL SERVICE TOOLS) CLUTCH PREPARATION 0902300100 Union Nut Wrench 10 mm Clutch line 0930100110 Clutch Guide Tool 0930335011 Input Shaft Front Bearing Puller 0930430012
CLUTCH COMPONENT LOCATION INDEX
 2005 TRANSMISSION Clutch - MX-5 Miata CLUTCH COMPONENT LOCATION INDEX Fig. 1: Identifying Clutch Components GENERAL PROCEDURES (CLUTCH) PRECAUTION Clutch pipe If any clutch pipe has been disconnected anytime
Performance Brake Caliper Guide Bushing Set Installation Guide
 Performance Brake Caliper Guide Bushing Set Installation Guide Proper service and repair procedures are vital to the safe, reliable operation of all motor vehicles as well as the personal safety of those
Installation Instructions
 Instructions Created by an: Inchworm Gear Clockable Toyota Dual Transfer Case Adapter Kit, 21 or 23 Spline SKU# TCASE-IW-300-000 Installation Instructions CAUTION: Safety glasses should be worn at all
Throttling Pendulum Gate O-ring Replacement Procedure Rev. A, May 2012
 Throttling Pendulum Gate O-ring Replacement Procedure Rev. A, May 2012 This procedure covers the replacement of the gate O-ring of the Nor-Cal Pendulum Gate Valve, with the gate valve housing installed
CLUTCH 6-1 CLUTCH CONTENTS
 Z CLUTCH 6-1 CLUTCH CONTENTS page page CLUTCH DIAGNOSIS... 2 CLUTCH SERVICE... 9 CLUTCH COMPONENTS MECHANICAL COMPONENTS The clutch mechanism in Grand Cherokee models with manual transmission consists
12. FRONT WHEEL/FRONT BRAKE/
 12 4.5kgm 0.9kg-m 4.5kg-m 12-0 SERVICE INFORMATION... 12-1 HYDRAULIC BRAKE... 12-10 TROUBLESHOOTING... 12-2 FRONT SHOCK ABSORBER... 12-16 FRONT WHEEL... 12-3 STEERING HANDLEBAR... 12-19 FRONT BRAKE...
Giant Hydraulic Disc Brake System
 Giant Hydraulic Disc Brake System INSTALLATION INSTRUCTI IMPORTANT NOTICE Contact the place of purchase or Authorized Giant Retailer for information on detail of installation and maintenance. Read this
South Bend Ford/Dodge DD
 South Bend Ford/Dodge DD Installation Instructions Torque specifications: Flywheel to crank 90-100 ft. lbs. Pressure plate to flywheel is 45 ft. lbs. Unbolt pressure plate from flywheel in a star pattern
CLUTCH 6-1 CLUTCH CONTENTS
 TJ CLUTCH 6-1 CLUTCH CONTENTS page GENERAL INFORMATION CLUTCH COMPONENTS... 1 INSTALLATION METHODS AND PARTS USAGE... 1 DESCRIPTION AND OPERATION CLUTCH OPERATION... 1 DIAGNOSIS AND TESTING DIAGNOSTIC
What is it that makes that. LET S PLAY BALL Time to Shift Gears. by Lance Wiggins. Typical 4 Speed Mitsubishi
 LET S PLAY BALL Time to Shift Gears Typical 4 Speed Mitsubishi by Lance Wiggins What is it that makes that grinding noise in my transmission? I just had it serviced and that noise started shortly after
Clutch Slave. Page 1 of cylinder V8. 4-cylinder The muck and gunge both inside and outside
 Page 1 of 28 4-cylinder V8 Clutch Slave 4-cylinder The muck and gunge both inside and outside Cleaned, seal positioning disc separated from the spring, and the external boot turned inside-out and its clamping
A/F/X Body GM Installation Instructions Manual Disc Conversion
 A/F/X Body GM Installation Instructions Manual Disc Conversion 64-72 A Body / 67-69 F Body / 62-74 X Body DBMC09 & PVK71 pictured above (Booster, master & valve setups may vary by upgrades selected) Your
Manual Transmission/Driveline. Final Review
 Manual Transmission/Driveline Final Review 1. The Pressure Plate is a spring-loaded device that presses the clutch disc against the flywheel. 2. The clutch Release Mechanism allows the driver to disengage
1992 Clutch. Eclipse, Expo/Expo LRV, Galant, Mirage, Precis, 3000GT
 Article Text ARTICLE BEGINNING 1992 Clutch Eclipse, Expo/Expo LRV, Galant, Mirage, Precis, 3000GT DESCRIPTION All clutches are single disc type. Pressure plate assembly uses a diaphragm spring to engage
CONCEPT 10.5 DUAL DISC INSTALLATION INSTRUCTIONS
 CONCEPT 10.5 DUAL DISC INSTALLATION INSTRUCTIONS Congratulations on your purchase of the RAM Concept 10.5 Dual disc clutch system. Please completely read and carefully follow the setup instructions, and
FRONT BRAKE COMPONENTS
 BR18 COMPONENTS BRAKE PADS REPLACEMENT HINT: If a squealing noise occurs from the brakes while driving, check the pad wear indicator plate. If the pad wear indicator plate contacts the disc, the brake
ATASA 5 th Study Guide Chapter 36 Pages Clutches 74 Points. Clutches. Be Certain to Read the Summary
 ATASA 5 th Study Guide Chapter 36 Pages 1071 1091 74 Points Be Certain to Read the Summary 1. The provides a mechanical coupling between the engine s & the transmission s shaft. The clutch allows the engine
INSTALLATION INSTRUCTIONS: LONG TRAVEL KIT 07+ FJ CRUISER and 05+ TACOMA
 INSTALLATION INSTRUCTIONS: LONG TRAVEL KIT 07+ FJ CRUISER and 05+ TACOMA ISNTALLATION DIFFICULTY: Advanced APPROX TIME: 6-8 Hours REQUIRED TOOLS: 14mm-35mm sockets, wrenches, and ratchet 9/16 and 5/8 12
Inspect the truck and, if necessary, use the following service procedure to install a reinforcement kit.
 1990 Ford Truck F 350 4WD Pickup V8-7.3L DSL Copyright 2007, ALLDATA 9.90 Page 1 Technical Service Bulletin # 90167 Date: 900801 M/T - Clutch Fluid Leaks/Incomplete Release Article No. 90-16-7 ^ CRACKS
FD Transmission Rebuild: Parts Inspection
 FD Transmission Rebuild: Parts Inspection Now that everything is disassembled, cleaned, and bagged in labeled Zip-Locs, it s time to decide what to replace. Warning: I m not a transmission specialist I
AUT 231 (A3) MANUAL TRANSMISSION/TRANSAXLE AND DRIVETRAIN
 MANUAL TRANSMISSION/TRANSAXLE AND DRIVETRAIN") AUT 231 (A3) MANUAL TRANSMISSION/TRANSAXLE AND DRIVETRAIN COURSE DESCRIPTION: Prerequisites: TRN 120 Corequisites: None This course covers the operation, diagnosis, and repair of manual transmissions/transaxles,
AUT 231 (A3) MANUAL TRANSMISSION/TRANSAXLE AND DRIVETRAIN COURSE DESCRIPTION: Prerequisites: TRN 120 Corequisites: None This course covers the operation, diagnosis, and repair of manual transmissions/transaxles,
VALVE ADJUSTMENT. To perform a valve adjustment, the engine must be cold: minimum of 4 hours after shutoff, overnight is preferable.
 VALVE ADJUSTMENT The following instructions cover valve adjustment on nonhydraulic (solid lifter) engines. Check the specification sheet on your vehicle to establish your specific engine. If not available,
Eliminator Vented Disc Brakes Owners Manual
 Eliminator Vented Disc Brakes Owners Manual TIE DOWN ENGINEERING 255 Villanova Drive SW, Atlanta, GA 30336 www.tiedown.com (404) 344-0000 Fax (404) 349-0401 Instruction Sheet #08075 101310,C752 Eliminator
Rebuilding the HE-120 Redrive
 Rebuilding the HE-120 Redrive Rick Cavallaro Disclaimer: I am NOT an expert mechanic. If something looks or sounds wrong in these directions, it probably is. I d be happy to receive any tips or feedback
12. FRONT WHEEL/FRONT BRAKE/
 12 12 12-0 SERVICE INFORMATION... 12-1 FRONT BRAKE... 12-7 TROUBLESHOOTING... 12-2 FRONT SHOCK ABSORBER... 12-18 STEERING HANDLEBAR... 12-3 FRONT FORK... 12-21 FRONT WHEEL... 12-4 SERVICE INFORMATION GENERAL
Model year 2014 USER MANUAL
 Model year 2014 USER MANUAL WARRANTY Terms and conditions BOS MTB offers warranty on its products on the following terms: BOS MTB guarantees to the original purchaser that the BOS product for which they
INSTRUCTIONS FOR CONTINUED AIRWORTHINESS
 INSTRUCTIONS FOR CONTINUED AIRWORTHINESS for GROVE MODEL 40-108 & 40-208 MAIN WHEELS DOCUMENT 12012-12 REV IR January 16, 2012 TABLE OF CONTENTS SECTION PAGE Title Page...1 Table of Contents...2 Record
CLUTCH Nissan 240SX DESCRIPTION PEDAL HEIGHT & FREE PLAY ADJUST CLUTCH ASSEMBLY R & I Clutch. Pathfinder, Pickup, 240SX, 300ZX
 CLUTCH 1990 Nissan 240SX 1990 Clutch Pathfinder, Pickup, 240SX, 300ZX DESCRIPTION Clutch is of dry, single disc type, with a diaphragm spring type pressure plate. Clutch release bearing is prelubricated.
55-64 Full Size Chevy Installation Instructions Standard Disc Conversion
 55-64 Full Size Chevy Installation Instructions Standard Disc Conversion DBMC09, PV71 & PVB71 Pictured (Booster, master cylinder & valve setups may vary by upgrades selected) Your new disc brake conversion
1994 Mazda MX-5 Miata. CLUTCH 1994 Clutch
 CLUTCH 1994 Clutch DESCRIPTION Miata uses a hydraulically operated clutch. HYDRAULIC SYSTEM BLEEDING 1. Remove bleeder screw cap, located at clutch release cylinder. Install vinyl hose onto bleeder screw.
16. BRAKE SYSTEM 16-0 BRAKE SYSTEM UXV 500
 16 BRAKE SYSTEM 16 SERVICE INFORMATION------------------------------------------------ 16-1 TROUBLESHOOTING----------------------------------------------------- 16-2 BRAKE PADS REPLACEMENT-----------------------------------------
10. ALTERNATOR/STARTER CLUTCH
 10. ALTERNATOR/STARTER CLUTCH SYSTEM COMPONENTS 10-2 SERVICE INFORMATION 10-3 TROUBLESHOOTING 10-3 LEFT CRANKCASE COVER REMOVAL 10-4 STATOR/IGNITION PULSE GENERATOR 10-5 FLYWHEEL/STARTER CLUTCH 10-6 LEFT
9000 Clutch Replacement By Jack Ashcraft
 9000 Clutch Replacement By Jack Ashcraft The most usual reason for clutch (and associated parts) replacement in a Saab is clutch slippage. The clutches for the 9000 are very strong and usually will withstand
RUN-FLAT FEATURE. As testament to how integrated today's BMW models are, you can actually get data on clutch operation from a GT1.
 RUN-FLAT FEATURE As testament to how integrated today's BMW models are, you can actually get data on clutch operation from a GT1. BMW Clutch Since BMW vehicles are made for people who enjoy sporty driving,
 .1..2..3..4..5..6..7..8..9..10. MANITOU SUSPENSION FORKS CONGRATULATIONS ON CHOOSING A 2003 MANITOU SIX FORK. This Manitou SIX fork is fully assembled and ready to be installed onto your bicycle. It comes
Tech Note Truck 14 & 15.5 Twin Plate Cast Iron Type Installation Guidelines
 1. (14 & 15.5 ) Check condition of the flywheel. Grind to resurface or replace flywheel. Surface MUST BE machined or premature clutch failure can occur. Flywheel depth must be 2.938 (74.62mm) for 14 (350mm)
WEVO Superlite 915 Hydraulic MAY 2009
 WEVO Superlite 915 Hydraulic MAY 2009 34 35 24 14 26 12 29 6 11 10 7 5 22 18 31 21 3 19 4 15 30 28 20 8 1 2 16 9 33 32 WEVO Superlite 915 Hydraulic ITEM PART # PART NAME QTY. IN KIT? 1 67-002 HG TILTON
CLUTCH Toyota Celica DESCRIPTION ADJUSTMENTS CLUTCH PEDAL HEIGHT Clutch. Celica
 CLUTCH 1993 Toyota Celica 1993 Clutch Celica DESCRIPTION The single, dry disc type clutch uses a hydraulically operated master cylinder and a release cylinder mounted on clutch housing. Clutch release
This chapter covers the location and servicing of the front brake components for the KYMCO MXU 700i and MXU 500i models.
 KYMCO MXU 500i/700i Repair Manual Brake System 9.Brake System This chapter covers the location and servicing of the front brake components for the KYMCO MXU 700i and MXU 500i models. 1.Brake Discs... 9-3
55-64 Full Size Chevy
 55-64 Full Size Chevy Installation Instructions Power Disc Conversion 9 slimline booster pictured Your new disc brake conversion kit can be bolted up with standard hand tools. The only tools you may not
INSTALLATION MANUAL TOYOTA TUNDRA 5 SUSPENSION SYSTEM PART # 55905
 PART NUMBER : 55905 1999 2003 TOYOTA TUNDRA 5 SUSPENSION SYSTEM PARTS LIST: Part # Description Qty. 55900-01 Driver Side Spindle 1 55900-02 Passenger Side Spindle 1 55905-03 Rear brake proportioning valve
SUZUKI SQ 416/420/625 M.Y TRANSMISSION SERVICE MANUAL - MANUAL - AUTOMATIC - TRANSFER - DIFFERENTIALS
 SUZUKI SQ 416/420/625 M.Y 1998-2005 TRANSMISSION SERVICE MANUAL - MANUAL - AUTOMATIC - TRANSFER - DIFFERENTIALS WARNING/CAUTION/NOTE IMPORTANT Please read this manual and follow its instructions carefully.
1989 Ford Truck F 250 4WD Pickup V L DSL
 1989 Ford Truck F 250 4WD Pickup V8-445 7.3L DSL - M/T - Clutch Fluid Leaks/Incomplete Release Page 1 1989 Ford Truck F 250 4WD Pickup V8-445 7.3L DSL Top - Vehicle Transmission and Drivetrain. Clutch..
CHASSIS CONTENTS EXTERIOR PARTS 6-1 FRAME COVER 6-2 REAR FRAME COVER 6-4 FRONT WHEEL 6-6 FRONT BRAKE 6-10 HANDLEBARS 6-17 FRONT FORK 6-19
 CHASSIS CONTENTS EXTERIOR PARTS 6- FRAME COVER 6- REAR FRAME COVER 6-4 FRONT WHEEL 6-6 FRONT BRAKE 6-0 HANDLEBARS 6-7 FRONT FORK 6-9 STEERING 6-6 REAR WHEEL 6-3 REAR BRAKE 6-39 6 REAR SHOCK ABSORBER 6-43
SECTION 4A HYDRAULIC BRAKES
 SECTION 4A HYDRAULIC BRAKES CAUTION: Disconnect the negative battery cable before removing or installing any electrical unit or when a tool or equipment could easily come in contact with exposed electrical
Subaru 5-Speed Double Adjustable Short Throw Shifter
 Subaru 5-Speed Double Adjustable Short Throw Shifter 1999+ Subaru Impreza 5-Speed 2004-2005 Subaru Forester XT 5-Speed Congratulations on your purchase of the COBB Tuning Double Adjustable Short Throw
or the Shaft? The Joint Certain jobs you do one way when the shop is
 The Joint or the Shaft? Certain jobs you do one way when the shop is busy and another when time runs a bit slack, shifting the percents between parts and labor to keep everyone working while still providing
p.t.o. Slip clutch Read this material before using this product. Failure to do so can result in serious injury. Save this manual.
 p.t.o. Slip clutch 65517 Installation Instructions Distributed exclusively by Harbor Freight Tools. 3491 Mission Oaks Blvd., Camarillo, CA 93011 Visit our website at: http://www.harborfreight.com Read
 DRUM BRAKE RIMS Periodic inspection of drum brake rims is necessary to determine indications of uneven or excessive wear. In general, brake rim failures other that regular wear are caused by brake linings
Clutch System Troubleshooting Guide-Service Tips
 DESCRIPTION AND OPERATION Clutch System The purpose of the clutch is to connect and disconnect a manually operated transmission and the remainder of the powertrain system from the engine. This permits
1967 (Late) CORVETTE STANDARD (NON-ADJUSTABLE) STEERING COLUMN DISASSEMBLY & REPAIR INSTRUCTIONS PAPER #2
 CORVETTE STANDARD (NON-ADJUSTABLE) STEERING COLUMN DISASSEMBLY & REPAIR INSTRUCTIONS PAPER #2") Last Revision: 03SE2012 1967 (Late) - 1968 CORVETTE STANDARD (NON-ADJUSTABLE) STEERING COLUMN DISASSEMBLY & REPAIR INSTRUCTIONS PAPER #2 Disassembly and Repair Instructions Addressed in this Paper Degree
Last Revision: 03SE2012 1967 (Late) - 1968 CORVETTE STANDARD (NON-ADJUSTABLE) STEERING COLUMN DISASSEMBLY & REPAIR INSTRUCTIONS PAPER #2 Disassembly and Repair Instructions Addressed in this Paper Degree
SECTION 4A BRAKE SYSTEM TABLE OF CONTENTS
 SECTION 4A BRAKE SYSTEM TABLE OF CONTENTS Description and Operation... 4A-2 Braking System Testing... 4A-2 Hydraulic Brake System... 4A-2 Brake Pedal... 4A-2 Master Cylinder... 4A-2 Brake Booster... 4A-3
Starter Removal and Installation Instructions
 er Removal and Installation Instructions CAUTION: Always use care when working on your vehicle! Do NOT disconnect any electrical cables or wiring while the engine is running! WARNING: Before starting work,
OVERHAUL. Using SST, disconnect the 2 brake tubes from the master cylinder. SST
 3215 320J001 OVERHAUL 1. DRAIN BRAKE FLUID Wash the brake fluid off immediately if it comes into contact with any painted surface. 2. REMOVE AIR CLEANER CAP SUBASSY 3. REMOVE (a) Disconnect the brake fluid
DRAGON CLAW PRE 86 BIG BLOCK CHEVY 10 SPLINE
 DRAGON CLAW PRE 86 BIG BLOCK CHEVY 10 SPLINE *This Kit Requires a Min. 1 ⅝ in. Working Input Shaft Splines. *Professional Installation recommended *Power/Air tools NOT advised 1. Inspect input shaft splines
60 76 A Body Mopar Power Disc Conversion Installation Instructions
 62-72 B & E BodyMopar 60 76 A Body Mopar Power Disc Conversion Installation Instructions Special A-Body only parts shown below (In addition to parts above for A-Body cars, part # MDC66DC & MDC46DC) Your
STaSIS Engineering MkV Mono4 Front Brakes
 STaSIS Engineering MkV Mono4 Front Brakes 370mm Brake Kit KB04.1002 Parts List: Qty Description Part Number 1 Rotor Alcon 370x28 RH BR01.1020.00 1 Rotor Alcon 370x28 LH BR01.1021.00 2 MkV 370 Brake Hat
Brake Fluid Exchange
 Brake Fluid Exchange OJT / Practice DTOG Proficiency Exam Date: Trainee: Trainer: Service Center: Brake Fluid Exchange 1. Prepare for service Wear proper Personal Protective Equipment Recommended PPE:
Complete Front End Suspension Rebuild, Ñ Part 1, Tear Down
 Complete Front End Suspension Rebuild, 1955-57Ñ Part 1, Tear Down by Randy Irwin There is much more to performance than pure horsepower. Great performance comes from control and Classic Chevy InternationalÕs
 www.clubsuprafrance.com CLUTCH 1996 Toyota Supra 1995-96 Clutch Supra DESCRIPTION The single, dry-type disc clutch uses a hydraulicallyoperated master cylinder with a clutch release cylinder mounted on