Volkswagen Cabriolet DIY Guide Engine & Transmission Mounts
|
|
|
- Emma Owens
- 5 years ago
- Views:
Transcription

 Part")


1 Volkswagen Cabriolet DIY Guide Engine & Transmission Mounts Component Front carrier (bracket) Part Numbers F Transmission/ Engine All (Automatic version is NLA) Photo Front carrier flange A All Front mount All Rear carrier All Rear mount A B All Left carrier F 4-speed 020


2 Left carrier H 5-speed 020 Left carrier G 3-speed 010 Left mount C D H 64.4mm Right G 1.6L, 1.7L, 1.8L Right G F 74.6mm
. Ah! Engine mounts.")

 and my car (84 Scirocco 8v) this weekend. My car has a 1.")
3 Replacing The Mounts Vintage Watercooled's original write-up is here: Vintage Watercooled's guide has finally been painstakingly PDF'd by yours truly using photos found in the Wayback Machine (thank you for the link, Damon!). Ah! Engine mounts. This fixes vibration, rocking engine, and lost power from the engine torqueing around in the engine bay. Really broken mounts can even cause axle failure! You need to find a way to get the new mounts pressed into the brackets. You can use a huge press or you can go to a shop with the bracket and the mount and have them do it. In my case, I had a local NAPA store that has a strange machine shop right inside (must be a big NAPA store only thing). They charged me $20.00 to do the work. Special thanks to forum member Southcross for helping me on this technote. We are doing this to his car (81 Rabbit S) and my car (84 Scirocco 8v) this weekend. My car has a 1.8 8v (JH) and Southcross s car has a 1.7 8v (EN). My car is stock non-a/c, and Southcross s has been converted to non-a/c. The Mounts I ordered the mounts from GermanAutoParts.com I got heavy-duty front and side mounts, and a regular Transmission mount. These guys shipped quick. The large one is used on the passenger side mount, while the smaller one is used for


4 the transmission mount on the other side. My car is going to stay a daily driver so I didn t get any polyurethane mounts. I will tell you when to install them, if you are using them, later in this Technote. Here s a few pictures showing the differences between the OEM and HD mounts. You can tell especially with the front mount that they are thicker and will last longer under higher power. Cleaning up the brackets, prepping the mounts
 was very, VERY greasy So I just got a jug of engine degreaser and threw all of the mounts in, let them soak for a while.")


5 By far, the easiest way to do this is to get the engine mounts from a junkyard car, or in my case, a parts car. My parts car (my old 'rocco) was very, VERY greasy So I just got a jug of engine degreaser and threw all of the mounts in, let them soak for a while. After they soaked for about two hours, I got them out of the bucket, and wiped them off with a shop rag. Even the paint came off of them which scares me just a bit but I was going to repaint them anyway so that was actually good. I went over the mounts with a wire brush on a drill to prepare them for the paint. I would suggest getting the mounts pressed in before painting them the press scratches the paint right off the brackets. The paint will just chip off the new mounts after a few months so you can just paint everything. I used some black exhaust manifold paint which is not as good an idea it takes forever to dry! Engine paint will do as well. Give them a few coats the first one a very light coat. Let them dry before handling them. After you get the mounts painted you are ready to go. The Rear Transmission Mount Easiest way to go is to jack up the car, and put it on two jack stands. Then you can work under the car. Here s some Pics


6 One would think that this is a hard mount to do but it is actually extremely easy. You can tell you need a new mount here when your old one is twisted and doesn t line up right. One large 19mm bolt holds the mount to the bottom bracket. Two 17mm bolts hold the bottom bracket to the car. Two 13mm nuts hold the mount to the transmission s bracket. All you have to do is remove the two top nuts, remove the bottom nut, and loosen the two 17mm nuts so you can get the mount out. You don t even need to jack the transmission up for this!


7 Comparing the mounts the old mounts on both of our cars actually weren t that bad but they felt soft and mushy and therefore useless. Here is a comparison shot. So all you have to do now is throw the new mount in, bolt it up, and call it done! Remember the two 13mm nuts on top. You can t use a ratchet here so you just have to suffer with a wrench. We were able to screw the passenger side 13mm nut from above the engine with two 10 inch extensions on the ratchet. It was weird, but it works. If you are just doing this mount only you just need to make sure it aligns straight. If it does not you may have to loosen and re-align your other engine mounts as well. This mount can transmit a lot of vibration to the car (it s right below the driver s feet) so it is important that it is mounted correctly.


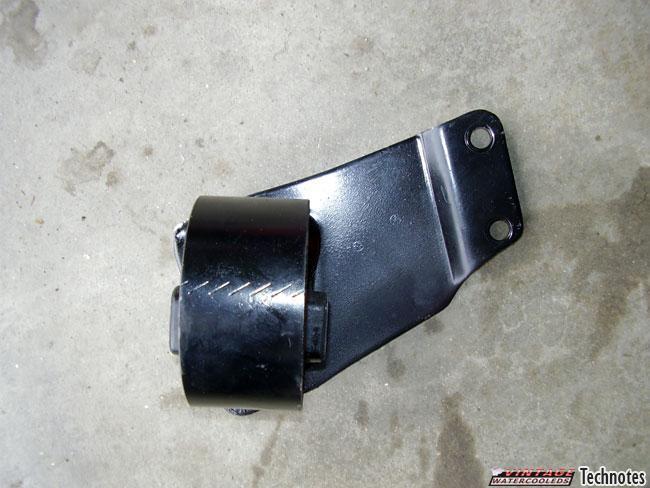
8 Driver Side: Transmission Side Mount This mount is a lot more evil but still nothing compared to the passenger mount. You will have to loosen both the transmission and the front mounts to make getting this thing out easier. There is the one bolt holding the mount in that is 17mm. There are also two bolts holding the bracket to the transmission. These are a little hard to get to. We removed the air hose, and lifted the air box up to access the mount easier.


9 If you have a car with an upshift light your car has the huge transmission switch. It s held on with two 9mm nuts. Remove it and put a rag in the hole, so as not to drop anything into the transmission. Put the switch aside and clean it out so it keeps on working nicely. Put the jack under the transmission, and lift it up just a bit. Loosen the main bolt in the mount and remove it. Crack the two bracket screws with a breaker bar. Now remove the front and transmission mounts, and lower the engine/transmission assembly a bit. The mount will come out of the bracket on the body. Finish removing the bracket from the transmission.


10 On my car (the Scirocco) one of the bolts could come almost all the way out, but it hit the body. We wrestled with this thing for a while. We couldn t lower the engine much more because we feared we would break the clutch cable or kink the exhaust. We ended up putting the engine as low as possible, and bending the fender just a bit to get it out. After it was out, we bent the body back. After you get those bolts out you can go ahead and remove the bracket. Get your new mount and bracket, and put it in the old location. We switched the bolts around a bit to make sure this fender bending problem does not happen ever again. After you get the bracket mounted back up, you can jack the transmission back up to make the mount go into the body. Put the 17mm bolt back through the mount. After that, re-attach your ground, and you can re-assemble the right side engine stuff.


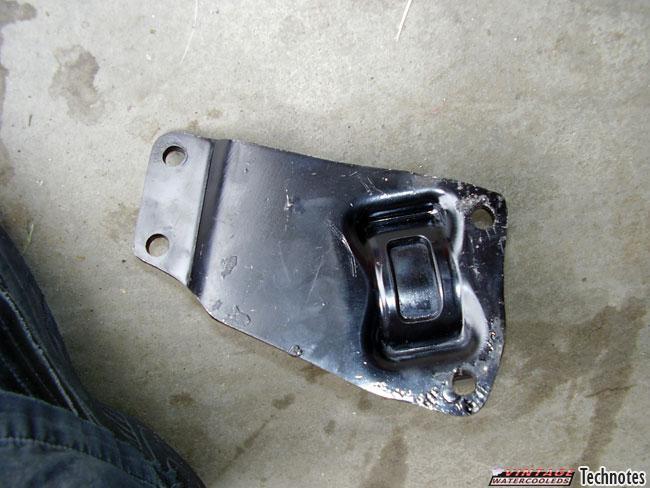
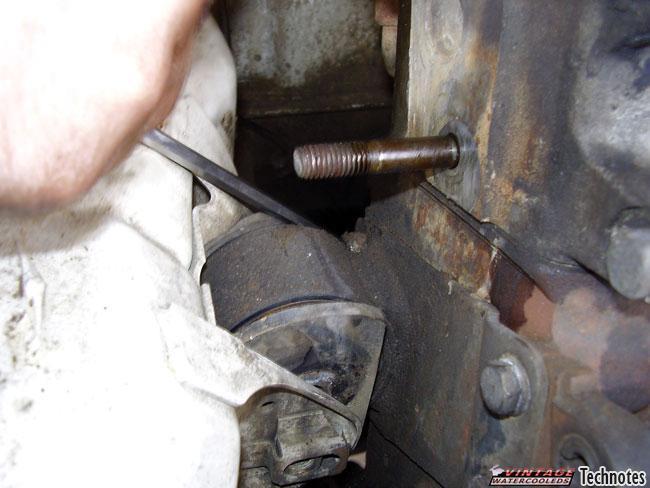
11 Front Engine Mount The front mount is laughable! It s the easy one. All you have to do is loosen the two 17mm bolts that hold the bracket to the front cross member. Tilt the engine down, twist the old mount off the bracket there. Stuff the new one on, and bolt it back up. Couldn t be easier! If you have problems getting the mount off You have a couple of options You can cut the old mount off it s just rubber. You can also remove both of the starter bolts, this will release the inner bracket from the engine so you can take it out of the car.


12 Clean off your old bracket! We used the same degreaser from above to clean the bracket up. This mount doesn t bear any weight it is just used to take the torque when you accelerate. You don t need to jack the engine for doing this mount. Passenger Side Mount Time for the hard and evil one!! This one is so hard because of the timing belt cover. This is why there is no engine mounts in this location on any generation after the A1! I just happen to keep no timing covers at all in my car but Southcross isn t so lucky (or stupid).


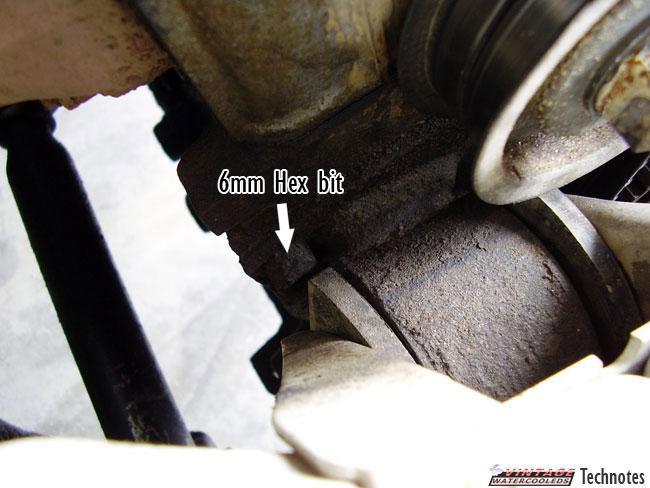
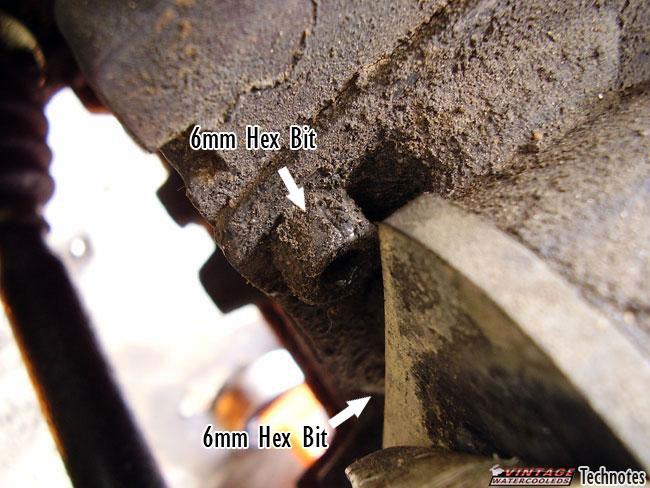
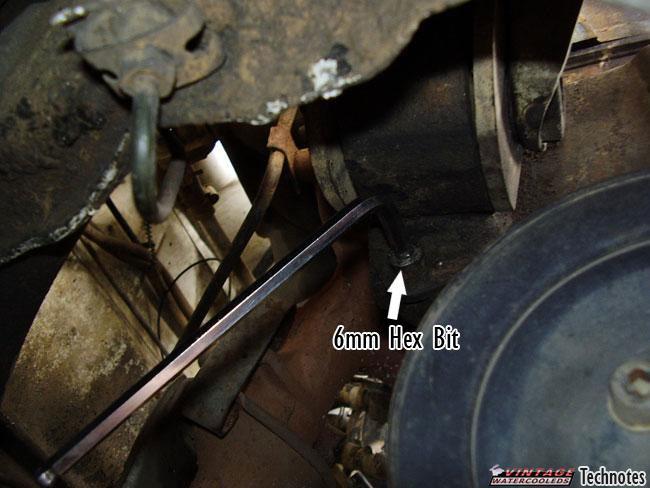
13 Alright first thing is to get the upper timing cover off You have to remove the 3 bolts that hold it on two 10mm nuts at the top hold it to the valve cover. A 6mm Hex bit Alan thing holds the bottom to the lower cover. It may be covered with a plastic cap in your car just pop that off with a screwdriver. It is about an inch across you might have to dig mud or oil out of the hex area to get it out. After that is off you can remove the top cover from the car. Next is to remove the bottom cover. This isn t easy. You have to remove both the crankshaft pulley and the water pump pulley. Pulleys The crankshaft pulley is held on by four 6mm hex bit screws. If you have an air conditioner, you will have four 13mm hex bolts on the outside holding all this together. Cars with old A/C have lots and lots of metal shims that provide tension for the A/C belt. If you have A/C and you want to abandon it now is a great time to ditch the pulleys and extra weight and get non-a/c pulleys from a junk car, a seller, or the VW dealer. You can find out more about that in the alternator Techtip in the no- A/C section. The water pump pulley is held on by three 6mm hex bolts. You may be able to jam a cloth in between the pulley and the timing cover to prevent it from moving. I don t suggest vise-gripping it that will bend and warp the pulley. There also is a special tool to hold the pulley if you really want to get fancy. Lower timing cover The lower timing cover is held on by 2 more bolts both are 10mm. One is on the water pump near the top. The other is right under and behind the crankshaft sprocket kind of hard to see You can look at this picture of the timing cover off the car to see where it attaches. Get at this one from under the car. Remove the lower timing cover from the car. Put it aside and save all the bolts and nuts. Removing the Timing Belt Now it s time to remove the timing belt. If you have a 16v turn your engine to TDC now. NEVER TURN THE CRANK AND THE CAM ON THE 16V WITH THE TIMING BELT REMOVED! YOUR ENGINE WILL IMPACT THE VALVES! This is an excellent time to replace the timing belt If you can t remember the last time you did it do it now! Get a new tensioner too!


14 To remove the timing belt you loosen the tensioner it usually has a 15mm nut. Turn the center section to relieve the tension. The old-style tensioner has a large hex section you can grab with an adjustable wrench or vise grips but the new style one requires a special spanner. Both of our cars have the old style tensioner. After you relieve the tension you can remove the belt. If you are re-using it put it in a safe spot. Remove the tensioner from the car by taking off the 15mm center nut, and sliding it off the Stud it is on. If your tensioner hits the frame rail and won't let you get it off you can jack the engine up a bit, and lean on the bumper to make the mount flex a bit. If it still won t come off wait until you remove the engine mount s center 17mm bolt, and jack the engine up. Getting the mount off Alright. Now get your jack and put it under the oil pan use a block of wood so that the weight of the engine is spread out you don t want to crush the oil pan. Take the center bolt out of this mount I found it easier to get at if from under the car, in front of the wheel on the passenger side. Jack the engine up just a little bit to make loosening the mount bolt a little easier.


15 Time to take out the inner timing cover. There is a 10mm nut on top. On the bottom it is held in by strange evil forces behind the intermediate shaft sprocket. So we loosened the intermediate shaft sprocket and pulled it off a bit to get the cover leaning forward. That bolt in the middle of the sprocket is 19mm. In the middle of the timing cover, you need to take off the two 13mm bolts from the front part of the bracket (they also hold on part of the alternator Bracket or a/c bracket). These bolts are also what holds on the front part of the mount bracket itself. Loosen the rear transmission mount (two 17mm nuts at the body) and the front mount (two 17mm bolts on the front cross-member). This will allow the engine to swing on the transmission side mount so you can raise and lower the engine. Loosen the 17mm main mount screw from the engine mount. I found this easier to do from the underside of the car with the car on the ground. The bolt faces the rear. Alright. Now you can see the engine mount and the two remaining mounting bolts to the engine block.
16


17 Remove the two 6mm hex bit screws on the back. Get at these with an Alan wrench I had a cheap, short one it worked just fine. I jacked the engine up a bit to get at the top one, and let it down a bit to get at the bottom one from under the car. I included two pictures of the bracket so that you can see the location of the bolts.after the bracket is loose lower the engine some more with your jack. You can remove the bracket. Watch that you don t hit the hard metal brake line with it. Press the mount Now Take it to the machine shop to have the new mount pressed into it. My engine mount was so bad that it was broken all over, and the bracket was twisted and bent. Here s a comparison shot. Evil stuff there. I ended up using the bracket from my parts car which was in perfect shape. TAKE A BREAK!! You deserve it after all that dang work!! After the mount is pressed


18 After you get the new mount in you can slap it back on the engine and put the bolts back in.jack the engine up to raise the mount up into the bracket. Put the center bolt back in. Don t smash your exhaust! It s fun to say that in only two sentences. It s actually very hard. You ll be jacking the engine up and down and screaming and cursing at your engine by the time you are done. If you have no sway bar, you can lower the engine down a lot more, but if you have one, you might bent the exhaust if the engine is too low. Aligning the Engine Mounts


19 When you get it in get a pry bar. You need to center the engine in all the mounts. Make sure there is an even amount of distance on the sides of the side mounts. Re-attach the rear transmission mount and bolt it down loosely. The key here is to check the rear transmission mount and make sure it is straight. Make sure the side mounts are centered in their brackets. Bolt them down when you are completely satisfied with the centering of the engine. Put the bolts back in the front mount and tighten them. Timing the Engine Now comes the fun part. Time to re-time the engine. Yay. Make sure your engine and crankshaft are at TDC. If you have an 8v you also need to align the intermediate shaft with a mark on the crankshaft pulley. There s a dot on the outside of the intermediate shaft sprocket, and a notch in the crank pulley. so install the crank pulley temporally so you can line stuff up. Put these right at each other. Sometimes you don t get a mark on A/C cars. HA HA!!! Actually just remove the distributor cap and turn the shaft until the rotor aims at the mark in the distributor body at the top. If you have a dust cap there you have to push it aside to see that mark. The camshaft mark is on the INSIDE of the pulley for 8v cars. Align it with the flat if the cylinder head.


20 The best way to ensure that the engine is at true TDC is to take out the #1 sparkplug, and put a screw driver in. Turn the engine until the screwdriver is at its highest point. Now that you have the engine all timed, put the timing belt back on. Make sure it goes right from the crank to the intermediate shaft sprocket. Then up to the cam, and down around the tensioner. Once you get it all toothed up, tighten the tensioner. If you have an 8v tighten it until you can turn the belt a half turn from how it is supposed to be. If you have a 16v it s a quarter turn. Putting the rest back together Fun. Now remove the crank sprocket again. Put the lower timing cover back on. Remember the bottom and front nuts there. Put the pulleys back on. Put the upper timing cover on. The two 10mm nuts and the 6mm hex bit thingy hold it on. Put your alternator back where it was, and install the V-belt. Re-tension it. Sounds easy, huh!? Well it took us 5 hours. So have fun! Notes/Comments: 1. West Peterson (Jan 2, 2008 at 8:01 pm) You have given some great and detailed information. I have one question in regards to installing the passenger side engine mount. I do not see the reason for having to re-time the engine. All we have done is take the tensioner pulley off. Nothing else has moved. We are changing the mount on a 1983 Scirocco w/1.8-liter, fourspeed, a/c. We re almost ready to start re-installing everything, but I want to make sure that there is a reason for re-timing. Thank you very much. 2. West Peterson (Jan 2, 2008 at 8:10 pm) I see now why you have deemed it necessary to re-time. You have loosened the intermediate shaft sprocket. However, we did not do that. In fact, we did not have to take off the inner timing cover. We took off the top nut, and the two bolts in the center (which also hold in the motor mount). That loosened it up the timing cover enough so that the motor mount just slide out from behind.
Aamir_bt The legend..
 Aamir_bt The legend.. How to do timing on a 4XE1-W (DOHC) engine. well i decided to to a write up for DOHC timing since there was only the SOHC written up, and i had to do a timing belt on my stylus anyways,
PORSCHE V r Valve Timing Instructions. Copyright 2009 Written by Mike Frye Edited my Adam G.
 PORSCHE 928 32V r Valve Timing Instructions Copyright 2009 Written by Mike Frye Edited my Adam G. Sections: Overview.3 Disclaimer/warnings/things to watch for 4 Terms and naming conventions used in this
Troubleshooting Guide for Limoss Systems
 Troubleshooting Guide for Limoss Systems NOTE: Limoss is a manufacturer and importer of linear actuators (motors) hand controls, power supplies, and cables for motion furniture. They are quickly becoming
How to Change Front Brake Pads on a Toyota Corolla
 How to Change Front Brake Pads on a Toyota Corolla Link to this article on (All other links in this document are disabled) Follow this picture guide to change the front brake pads on a 2003-2008 Toyota
Troubleshooting Guide for Okin Systems
 Troubleshooting Guide for Okin Systems More lift chair manufacturers use the Okin electronics system than any other system today, mainly because they re quiet running and usually very dependable. There
How I installed new brake pads on my i with Sport Package (should be fine for other E39 s) By Robert B.
 By Robert B.") How I installed new brake pads on my 1999 528i with Sport Package (should be fine for other E39 s) How I installed new brake pads on my 1999 528i with Sport Package (should be fine for other E39 s) By
How I installed new brake pads on my 1999 528i with Sport Package (should be fine for other E39 s) How I installed new brake pads on my 1999 528i with Sport Package (should be fine for other E39 s) By
Slave Cylinder Weep Hole Drilling Procedure
 Slave Cylinder Weep Hole Drilling Procedure Tools Required: T20 Torx Driver T25 Torx Driver T25 Torx Bit with ¼ Ratchet Wrench 4mm Hex Key (Allen wrench) 5mm Hex Key 6mm Hex Key 8mm Hex Key 12mm Hex Key
Replacing MK4 Golf/Jetta radiator mounts in-car
 Replacing MK4 Golf/Jetta radiator mounts in-car This is a guide to replacing the radiator mounts in a MK4 Golf/Jetta. This involves moving the core support to the service position which allows you to do
Changing the Struts on a WK Jeep CRD
 Changing the Struts on a WK Jeep CRD Step by Step By Chirpz Disclaimer: I do not claim that this procedure is the right way or even the best way to change your struts. This is what I did after reading
I hope this guide helps you as much as Boomer Bob helped me. We re just sharing what we know to help out other folks. Best of luck! Phil C.
 A brief tutorial on swapping cams for the Victory Cross Roads and Cross Country on the Victory Freedom 106 inch V-Twin Engine with 6 speed over drive transmission Disclaimer: Swapping cams on a Victory
Our goal is to make the install a breeze. Please read the entire guide before beginning.
 www.airkewld.com Page 1 of 6 IRS Axle Kit Install IRS Axle Kit Install Our goal is to make the install a breeze. Please read the entire guide before beginning. KITS SHOULD INCLUDE 2 - Control-arm mounting
At Mark's suggestion I thought I'd write this up so future Coupe lovers can have as much fun* as I did with this job.
 At Mark's suggestion I thought I'd write this up so future Coupe lovers can have as much fun* as I did with this job. My enormous thanks to forum members, particularly glorfindel, for their advice when
HOW TO REPLACE THE SPOILER ON YOUR GEN 3 PRIUS
 HOW TO REPLACE THE SPOILER ON YOUR GEN 3 PRIUS Yup, it happened. The spoiler on your beloved Prius has departed this earth and now is in the great junkyard in the sky. This is how you make it all better
Fitting the Bell Auto Services (B-A-S) TDV6 EGR Blanking Kit to a 2006 model Discovery 3 TDV6 HSE
 TDV6 EGR Blanking Kit to a 2006 model Discovery 3 TDV6 HSE") Fitting the Bell Auto Services (B-A-S) TDV6 EGR Blanking Kit to a 2006 model Discovery 3 TDV6 HSE Before I describe how I did this, I must first thank other members of the Disco3.co.uk forum (namely J,moore
Fitting the Bell Auto Services (B-A-S) TDV6 EGR Blanking Kit to a 2006 model Discovery 3 TDV6 HSE Before I describe how I did this, I must first thank other members of the Disco3.co.uk forum (namely J,moore
M1A1 Thompson Upgrade
 M1A1 Thompson Upgrade If you are mechanically inclined at all. This should be no problem. I'll start off with a list of things you will need. Thompson M1A1 Whisky Cigarettes Tools: Flat screwdriver No.
Prerequisites: Shop Manual (recommended) pages 3-9 through 3-13.
 pages 3-9 through 3-13.") Prerequisites: Order your gaskets average about $25.00 bucks X 2 so $50.00 4NK-11193-00-00 Obtain a shim kit (Should have several 265 and 270s) (Some dealers will exchange) Obtain a Valve Bucket Tool YM-33961
Prerequisites: Order your gaskets average about $25.00 bucks X 2 so $50.00 4NK-11193-00-00 Obtain a shim kit (Should have several 265 and 270s) (Some dealers will exchange) Obtain a Valve Bucket Tool YM-33961
Connecting the rear fog light on the A4 Jetta, while keeping the 5 Light Mod
 Connecting the rear fog light on the A4 Jetta, while keeping the 5 Light Mod DISCLAIMER: I'm human and make mistakes. If you spot one in this how to, tell me and I'll fix it This was done on my 99.5 Jetta.
Porsche 928 with 16v LH-Jetronic Fuel System
 Porsche 928 with 16v LH-Jetronic Fuel System Toll-Free Tech Hot Line: 877-FOR-928M 877-367-9286 Please do not copy this manual and give copies to your friends. Our ability to bring you this supercharger
Now we re ready to install our new mounts. The picture on the right shows our old and new for comparison.
 Well I didn t have a chance to write last week so we have a little catching up to do. Last Sunday I started out with setting up a jig to weld in the mounts. The jig is made out of a old fork tube that
Tools needed: Here is a pic of the shift kit I used. It is a Transgo brand and as you can see, it just a bag full of springs and one valve.
 Before installing a shift kit, be sure the transmission is in good operating order. If your transmission is making noises, slipping, shifting bad or the fluid looks brown or smells burnt, take the transmission
Installation Instructions Jeep CJ-7
 Retrofit Steering Column Installation Instructions 1976-86 Jeep CJ-7 For Part # s 1520800010, 152800020, 1520800051 www.ididitinc.com 610 S. Maumee St., Tecumseh, MI 49286 (517) 424-0577 (517) 424-7293
Retro it Steering Column
 Retro it Steering Column INSTALLATION INSTRUCTIONS for 1976-86 CJ5 & CJ7 FOR PART NUMBER S: 1520800010, 1520800020, 1520800051, 1526800010, 1526800020, 1526800051 S I NCE 1986 Instruction # 8000000010
2007 Crown Victoria Police Interceptor (P71) Blend Door Actuator Replacement (If I did it, you can too.)
 Blend Door Actuator Replacement (If I did it, you can too.)") 2007 Crown Victoria Police Interceptor (P71) Blend Door Actuator Replacement (If I did it, you can too.) I'm not saying this is the only way, or even the right way, but it worked for me. First time I've
2007 Crown Victoria Police Interceptor (P71) Blend Door Actuator Replacement (If I did it, you can too.) I'm not saying this is the only way, or even the right way, but it worked for me. First time I've
This is a guide to assist you adjust the valve clearance on a 2l V6 MIVEC engine found in a Mitsubishi FTO GPX
 Adjusting the valve clearance on a 2L V6 FTO engine This is a guide to assist you adjust the valve clearance on a 2l V6 MIVEC engine found in a Mitsubishi FTO GPX Disclaimer: This guide is to assist you
Appendix B A Step-by-Step Guide to Changing the Front Oil Seals on the Volvo B-230 Engine
 Appendix B A Step-by-Step Guide to Changing the Front Oil Seals on the Volvo B-230 Engine When replacing the timing belt, check to see that there are no oil leaks around any of the pulleys. If no leaks,
The spacers can be made out of.750 round aluminum bar with a.3125 to.318 hole drilled in center.
 SECTION I : FRONT COVER INSTALLATION With Crankshaft, Camshaft and oil Galley plugs installed in engine, you need to verify that the front cover clears the oil galley plugs and fits on engine block. The
BBK Ceramic Long Tube Headers (99-04 Cobra and Mach 1) - Installation Instructions
 - Installation Instructions") BBK Ceramic Long Tube Headers (99-04 Cobra and 03-04 Mach 1) - Installation Instructions The below installation instructions work for the following products: BBK Ceramic Long Tube Headers (99-04 Cobra
BBK Ceramic Long Tube Headers (99-04 Cobra and 03-04 Mach 1) - Installation Instructions The below installation instructions work for the following products: BBK Ceramic Long Tube Headers (99-04 Cobra
VWvortex Forums > Golf IV & Jetta IV > DIY: Timing Belt And Coolant Pump Replacement on 2.0 AEG! Pics Inside! (Printable Version)
") VWvortex Forums > Golf IV & Jetta IV > DIY: Timing Belt And Coolant Pump Replacement on 2.0 AEG! Pics Inside! (Printable Version) Click here to print this topic. Post Title: DIY: Timing Belt And Coolant
VWvortex Forums > Golf IV & Jetta IV > DIY: Timing Belt And Coolant Pump Replacement on 2.0 AEG! Pics Inside! (Printable Version) Click here to print this topic. Post Title: DIY: Timing Belt And Coolant
Trouble Shooting Guide for Hubbell Systems
 Trouble Shooting Guide for Hubbell Systems NOTE: Hubbell Special Products discontinued operations in 2008, so there is a very limited number of repair parts available for motor repair. In some ways, this
Rebuilding the Power Steering Pump for a 2007 Honda Accord 4CYL
 Rebuilding the Power Steering Pump for a 2007 Honda Accord 4CYL Disclaimer: I have benefited greatly from others who have taken the time to post auto repair videos/tutorials online. To try and return the
Slinky Long Travel Suspension. Toyota Land Cruiser. 80 Series Installation Instructions
 Slinky Long Travel Suspension Toyota Land Cruiser 80 Series Installation Instructions 1991-1997 www.facebook.com/redlinelandcruisers www.twitter.com/redlinecruisers www.instagram.com/redlinelandcruisers
Door Panel Removal & Window Stop Adjustment
 Door Panel Removal & Window Stop Adjustment By: Jeff Wolford Disclaimer: This is simply an article of how I fixed my car. I m not responsible if you break, scratch, or mess up anything following my example.
4 pieces of silicone hose Unless you have AEM then you have 2 2.5, 1 3, and 1 3.5
 The parts in your kit: 3 pieces of Mandrel-Bent Aluminized Tubing: 1 Straight 1 45 degree bend with straight section 1 curved section 4 pieces of silicone hose 1 2.5 1 3.5 2 3 Unless you have AEM then
Timing belt change. Timing belt change
 Timing belt change Put 2 new Gates T275 timing belts on today. Tensioner drilled smooth and tight with less than 16,000 miles on her decided not to change the tensioners just the belts. You'll need some
Ford Racing BOSS 302 Engine Oil Cooler (11-14 GT)
") Tools needed: 14mm hex socket 7mm socket/wrench 8mm socket/wrench Ford Racing BOSS 302 Engine Oil Cooler (11-14 GT) 10mm socket (for airbox removal) ¾ inch or 19mm wrench Torque wrench Appropriate ratchets
Tools needed: 14mm hex socket 7mm socket/wrench 8mm socket/wrench Ford Racing BOSS 302 Engine Oil Cooler (11-14 GT) 10mm socket (for airbox removal) ¾ inch or 19mm wrench Torque wrench Appropriate ratchets
Moddit. How to Install Stance Coilovers on a Subaru
 Moddit How to Install Stance Coilovers on a Subaru BRZ Let's get LOW (and maybe lighter and stiffer suspension)! In this article, we will install Stance ST- ZN6-XS Coilovers on the FRSport Subaru BRZ.
Installation Instructions for BMR Lowering Springs Performance ( Mustang GT)
") Installation Instructions for BMR Lowering Springs Performance (2015-2017 Mustang GT) Time Required: 3+ hours Notes: This install was done with the performance springs from BMR, but install should be the
Installation Instructions for BMR Lowering Springs Performance (2015-2017 Mustang GT) Time Required: 3+ hours Notes: This install was done with the performance springs from BMR, but install should be the
Improving the gearshift feel in an SW20.
 Improving the gearshift feel in an SW20. Part one In 3 parts. The SW20 gearshift can be often be greatly improved by eliminating play in the shift linkages, and this article covers three areas that need
BBK Caster/Camber Kit (87-93)
") BBK Caster/Camber Kit (87-93) Materials in the box 2 Polished Aluminum Plates 2 Steel Strut Mounts 4 Polyurethane Bushings 2 Stud Plates 2 Bushing Sleeves 2 5/8 Flat Washers 2 5/16 Allen Head Bolts 4 5/16
BBK Caster/Camber Kit (87-93) Materials in the box 2 Polished Aluminum Plates 2 Steel Strut Mounts 4 Polyurethane Bushings 2 Stud Plates 2 Bushing Sleeves 2 5/8 Flat Washers 2 5/16 Allen Head Bolts 4 5/16
UNDERDOG RACING DEVELOPMENT URD Traction Bar Installation
 URD Traction Bar Installation Introduction: UNDERDOG RACING DEVELOPMENT Thank you for choosing the URD Traction Bar for two wheel drive street trucks. More models coming soon! This bar is a true bolt on
Traditional method Oil Change Instructions For VW 1.9 TDI
 Traditional method Oil Change Instructions For VW 1.9 TDI Created by DeafBug This document provides instructions on changing the oil and filter on a VW 1.9 TDI engines. All the pictures here are taken
Rear Wheel Removal (by BassCliff)
") Rear Wheel Removal (by BassCliff) Hello to my GS riding friends! After picking up a nail in my rear tire (while on the freeway at 75mph!) I thought I would take a few pictures to help illustrate the rear
Rear Wheel Removal (by BassCliff) Hello to my GS riding friends! After picking up a nail in my rear tire (while on the freeway at 75mph!) I thought I would take a few pictures to help illustrate the rear
Required tools are: Parts list:
 BEW cam and lifters replacement procedure by zanzabar Jay Roberts, Petaluma, CA. (modified from engine timing belt replacement procedure from MOGolf as demonstrated on a 2004 Jetta). Required tools are:
DrVanos.com Stage II Installation Instructions. Tool rental is available with the purchase of a vanos kit *See website for more info*
 DrVanos.com Stage II Installation Instructions Special Tools Needed: Camshaft locking tool TDC Crank pin Sprocket turning tool Tool rental is available with the purchase of a vanos kit *See website for
928 Motorsports Supercharger Installation Copyright 2007, 928 Motorsports, LLC All Rights Reserved
 For Porsche 928 equipped with K-Jetronic (CIS) Fuel System Toll-Free Tech Hot Line: 877-FOR-928M 877-367-9286 Please do not copy this manual and give copies to your friends. Our ability to bring you this
 This document provides instructions for removing and installing a Front Wheel / Rotor on a Ducati Superbike. The torque values used are for the 748/916/996 from 1994 to 2001 and may be applicable for later
RoR Step-by-Step Review * 1977 Jeep CJ-7 Renegade 1-24 Revell Kit Review
 RoR Step-by-Step Review 20130120* 1977 Jeep CJ-7 Renegade 1-24 Revell 85-2180 Kit Review Being a Jeep owner, you tend to get a little fanatical about them. I ve been an avid off-roader for about 15 years;
what you need to do is hit the taper housing as hard as you can with your hammers AT THE SAME TIME and at a slight angle, what will happen is you
 first things first, get the car on axle stands and the wheels off. Open the bonnet to let more light through to the area in which you'll be working. The following guide shows the passenger side being done
Hard Bar Sport, M1/M2 Hard Core Hardtop, M2 Sport, and Xtreme Installation Instructions
 HARDWARE KIT: Hard Bar Sport, M1/M2 Hard Core Shoulder Harness Guide Relocation Assemblies: 2-3/8" X 1" grade 8 bolts 4-3/8" flat washers 2-3/8" lock nuts 2 - brass bushings 2 - plastic trim caps 2-3/8"
Eurocompulsion Camshaft Installation
 Eurocompulsion Camshaft Installation Introduction, please read. The purpose of this article is too assist our customers with installation of a performance camshaft in the Fiat Multiair 1.4 Turbo. The operation
ACURA NSX ABS/ALB Modulator Rebuild Procedure
 Version 03 ACURA NSX ABS/ALB Modulator Rebuild Procedure I rebuilt my 1991 ABS/ALB modulator using this procedure. Please note that this will not guarantee that your ABS/ALB system issues will be resolved
U-Score U-Score AAC Rank AAC Rank Vocabulary Vocabulary
 go 1 927 you 2 7600 i 3 4443 more 4 2160 help 5 659 it 6 9386 want 7 586 in 8 19004 that 9 10184 like 10 1810 what 11 2560 make 12 1264 is 13 10257 on 14 6674 out 15 2350 do 16 2102 here 17 655 eat 18
JRSC + BBK Install on SVTF. Neil A. Shah medicnas on focaljet September 2006
 JRSC + BBK Install on SVTF Neil A. Shah medicnas on focaljet September 2006 ECU up here. When removing make sure the smaller bundles of wires don t get wrapped around the bottom edge and break - this almost
 Special Tools Needed: DrVanos.com Stage I Installation Instructions Camshaft locking tool TDC Crank pin Sprocket turning tool Tool rental is available with the purchase of a vanos kit *See website for
How to install the Barnett clutch and the stronger Oil Pump Drive Gear
 How to install the Barnett clutch and the stronger Oil Pump Drive Gear Written by WildFred I m from Germany so please excuse my English and the spelling. The following procedure is a combination of the
For all Ram x4 Trucks, and all Ram x4 trucks.
 Dodge Off Road, LLC Specializing in Dodge Ram Solid-Axle 4x4 Suspension and Steering for Off Road Applications 855.9009.DOR sales@dodgeoffroad.com dodgeoffroad.com DODGE OFF ROAD 5 th GEN STEERING KIT
Steeda Sport Mustang Lowering Springs (2005+) - Installation Instructions
 - Installation Instructions") Steeda Sport Mustang Lowering Springs (2005+) - Installation Instructions The below installation instructions work for the following products: Steeda Sport Mustang Lowering Springs (2005+) Please read
Steeda Sport Mustang Lowering Springs (2005+) - Installation Instructions The below installation instructions work for the following products: Steeda Sport Mustang Lowering Springs (2005+) Please read
YAMAHA VIPER SX SRX SXR V-MAX XTC CUSTOM LONG TRACK INSTALLATION
 YAMAHA VIPER SX SRX SXR V-MAX XTC CUSTOM LONG TRACK INSTALLATION REMOVAL OF OLD TUNNEL EXTENSION AND COOLER 1. Remove plastic bumper covers. 2. Drain coolant by removing left or right rear cooler hose.
v Porsche 928
 1985-86 32v Porsche 928 Toll-Free Tech Hot Line: 877-FOR-928M 877-367-9286 Please do not copy this manual and give copies to your friends. Our ability to bring you this supercharger kit at this price relies
Some tips and tricks I learned from getting clutch out of vehicle Skoda Octavia year 2000
 Some tips and tricks I learned from getting clutch out of vehicle Skoda Octavia year 2000 Last change 2013-Oct-11 I bought Haynes manual for a starter. That s something well worth it s cost I believe.
PLEASE READ THROUGH THE WHOLE WRITE UP BEFORE ACTUALLY USING IT!!!!
 JDM power folding mirror switch install into stock USDM harness. By: Greg L., Zeke21 on twinturbo.net PLEASE READ THROUGH THE WHOLE WRITE UP BEFORE ACTUALLY USING IT!!!! This is how I was able to get the
Front Suspension Redo
 Front Suspension Redo Message: First, thanks to all the previous posters for guidance in my doing the suspension. As thanks, here s the updated document for doing the front suspension. Procedure: While
M62 Alternator Removal / Replacement (Water Cooled)
") M62 Alternator Removal / Replacement (Water Cooled) Pre-Steps 1. Disconnect Battery Positive lead 2. Charge Your Battery with battery charger to full charge (So you new alternator wont have to work as
M62 Alternator Removal / Replacement (Water Cooled) Pre-Steps 1. Disconnect Battery Positive lead 2. Charge Your Battery with battery charger to full charge (So you new alternator wont have to work as
Sunroof Repair. Sunroof Repair TSB. The sunroof repair kit available for the J30 is part number Y20. See images at bottom of document.
 Sunroof Repair This document is the text/images from the TSB (technical service bulletin) issued by Infiniti concerning the repair procedure for sunroof issues. Be advised that this is a LARGE, TIME-CONSUMING
M52tu-M54 VANOS Assembly & Timing Using G.A.S. Professional Cam Tool Kit
 Home BMW Solutions Porsche Solutions DIY Tech Engine Services Dyno Services Machining About Contact Store Tool Rental M52tu-M54 VANOS Assembly & Timing Using G.A.S. Professional Cam Tool Kit This procedure
Mustang 7.5 Limited Slip Differential (28 Spline) V8; V6:
 V8; V6:") Mustang 7.5 Limited Slip Differential (28 Spline) 79-85 V8; 86-10 V6: Required Tools: Ratchet Wrench Torque Wrench 1/2", 5/16, 3/4", 12mm and 15mm Sockets Lug nut Wrench Dial Indicator Digital Measuring
Mustang 7.5 Limited Slip Differential (28 Spline) 79-85 V8; 86-10 V6: Required Tools: Ratchet Wrench Torque Wrench 1/2", 5/16, 3/4", 12mm and 15mm Sockets Lug nut Wrench Dial Indicator Digital Measuring
Procharger Stage II Intercooled Supercharger System (11-14 GT)
") Procharger Stage II Intercooled Supercharger System (11-14 GT) Installation Time: Approximately one day. Installed on 2012 Mustang GT 5.0/Manual Required Tools 3/8 Socket Set (Standard and Metric) 1/2
Procharger Stage II Intercooled Supercharger System (11-14 GT) Installation Time: Approximately one day. Installed on 2012 Mustang GT 5.0/Manual Required Tools 3/8 Socket Set (Standard and Metric) 1/2
ESS INSTALL. The donor car /6 Cosmos Black/Sand UUC Short Shifter Brembo cross drilled rotors Phillips Nav System 16:9
 ESS INSTALL The donor car.. 1997 540/6 Cosmos Black/Sand UUC Short Shifter Brembo cross drilled rotors Phillips Nav System 16:9 The install went in several stages. Disconnect the battery Stage 1 Remove
BBK LONG TUBE HEADERS (99-04 GT, Mach 1, Bullitt)
") BBK LONG TUBE HEADERS (99-04 GT, Mach 1, Bullitt) Install Time: Approx. 8-10 hrs Parts Needed: BBK Long Tube Headers Shorty mid pipe X/H O2 wiring harness extensions Hi-temp thread locker Tools Required:
BBK LONG TUBE HEADERS (99-04 GT, Mach 1, Bullitt) Install Time: Approx. 8-10 hrs Parts Needed: BBK Long Tube Headers Shorty mid pipe X/H O2 wiring harness extensions Hi-temp thread locker Tools Required:
Lincoln Mark VII T5 Swap Version submitted by 5.0 bird
 Lincoln Mark VII 1984-1989 T5 Swap Version 20070611 submitted by 5.0 bird I've decided to make an article to assist with the T5 swap for the 84-89 Mark VIIs, since I was just in there because my DOA didn't
BEW engine timing belt replacement procedure from MOGolf (as demonstrated on a 2004 Jetta).
.") BEW engine timing belt replacement procedure from MOGolf (as demonstrated on a 2004 Jetta). Based on the procedure published by Volkswagen, but modified for the "average" shadetree mechanic. Some special
BEW engine timing belt replacement procedure from MOGolf (as demonstrated on a 2004 Jetta). Based on the procedure published by Volkswagen, but modified for the "average" shadetree mechanic. Some special
Mustang Radiator Conversion DIY. By GearHeadPeter. January 27, 2011
 1964-1966 Mustang Radiator Conversion DIY By GearHeadPeter January 27, 2011 We all know that the radiators in our cars are not the best, especially if you have done any customization to the engine, which
BeetleBot. The Simple Zippy Screw-Together Robot Kit! SKU: K JB. jb/
 BeetleBot The Simple Zippy Screw-Together Robot Kit! www.solarbotics.com 1-866-276-2687 SKU: K JB http://www.solarbotics.com/products/k_ jb/ Document Revision: January 05 2016 Shell Board 2 x Sensor Wires
YOU MAY WANT TO FIRST TRY TO LOOSEN THE FILTER HOUSING
 2005 XC90 Tune-up (5-cyl) Including: Oil Change - Spark Plugs - Fuel Filter - Cabin Filter First off - let me say that I am an amateur (at best) mechanic, and I claim no responsibility for whatever you
The following information is gathered from pages of the Honda Aero Shop Manual.
 Original write-up by W. Boyter The following information is gathered from pages 3.10-3.12 of the Honda Aero Shop Manual. First of all, pull all your spark plugs, make sure your transmission is in neutral.
Balancing the Wheels on a Bench Grinder, version 2
 Balancing the Wheels on a Bench Grinder, version 2 By R. G. Sparber Copyleft protects this document. 1 I recently replaced the wheels on my bench grinder and the vibration was horrible. With a lot of help
DUAL REMOTE OIL FILTER MODIFICATION 4 TH GENERATION FIREBIRDS
 Written by Dave Dorey (lonetechie) Copyright FirebirdNation.com The following article details how I installed a dual remote oil filter system on my 2001 Formula Firebird. If you decide to tackle this project,
DODGE OFF ROAD T-STYLE STEERING KIT INSTALLATION INSTRUCTIONS
 Dodge Off Road, LLC Specializing in Dodge Ram Solid-Axle 4x4 Suspension and Steering for Off Road Applications 855.9009.DOR sales@dodgeoffroad.com dodgeoffroad.com DODGE OFF ROAD T-STYLE STEERING KIT INSTALLATION
2008 Toyota Tundra 4WD Brake Job: A Quick Job and Even Quicker Write-Up.
 FRONT BRAKES: 2008 Toyota Tundra 4WD Brake Job: A Quick Job and Even Quicker Write-Up. 1. Remove this bolt holding brake line bracket to the suspension. 2. I had to replace all 4 rotors at 60K miles, so
Roehrig Engineering, Inc.
 Roehrig Engineering, Inc. Home Contact Us Roehrig News New Products Products Software Downloads Technical Info Forums What Is a Shock Dynamometer? by Paul Haney, Sept. 9, 2004 Racers are beginning to realize
Installing AMP-wiring in a New Beetle
 Installing AMP-wiring in a New Beetle Vehicle used: New Beetle 2.0i Type 9C (1999) Used set of cables: Dietz 35mm² power cable, double shielded Dietz chinch cable ( 35mm² Professional Line ) First of all:
We all put our heads together to try and determine what the facts were. They were as follows:
 VWvortex Forums > Eos > How to solve (or prevent) Eos Roof leaks As many of you know, I don t own an Eos. This makes it difficult to provide practical advice based on my own experience with the car, as
13 October, 2014 Page 1
 13 October, 2014 In my second and last Helicycle I want to make everything better than the first one. That includes not only a transmission chip detector, but one for the tail rotor as well. The transmission
Volvo 850 Radiator Replacement Jason Reed 29 March 2013
 This write up covers removing and replacing the radiator on a 97 855 GLT wagon with light pressure turbo and automatic transmission. This car has 162K miles. The radiator, which was original, developed
Go-ped ESR750 / ESR750EX Rear Brake Installation Instructions
 Go-ped ESR750 / ESR750EX Rear Brake Installation Instructions This kit provides all the parts you need to install a rear brake on your ESR750 or ESR750EX. It will not work on an ESR Sport, or other Go-ped
 www.odometergears.com Mercedes-Benz Mechanical Odometer Repair This how to can be used for all mechanical repairs as the only difference will be the removal of the instrument cluster. http://www.dieselgiant.com/repairyourodometer.htm
Detroit Tuned R56 Oil Service How-To
 Detroit Tuned R56 Oil Service How-To Welcome to Detroit Tuned s how-to guide for an oil service for an R56 MINI Cooper. It s always best to do an oil change on a hot engine as the hot oil will drain better
Pontoon Assembly Instructions and manual. Read before using hoist.
 Page 1 Pontoon Assembly Instructions and manual. Read before using hoist. For Models 32BL18, 32BL22, 32BL25 and 42BL28 R Model 32BL22 Shown Proudly Made in Michigan By NuCraft Metal Products 402 Southline
Rear Speaker replacement.
 Rear Speaker replacement. First off you need the right rear speakers. The easy bit is 6x9 and better than a 15W paper cone, the difficult bit is getting a mounting depth under 74mm. Or to be more precise,
Mike and Barb s 1953 MG TD
 Mike and Barb s 1953 MG TD The first time I remember seeing an MG was in about 1959. I was like in 2 nd grade. I remember my dad bringing home a remote car for me. Not the remote you think of now, it had
Installation Directions for FINGER STICK and Blocker Plate
 Installation Directions for FINGER STICK and Blocker Plate What is a Finger Stick? A Finger Stick is a simple circuit that modifies the MAF signal on LLY and LBZ engines (not LB7 engines) to expected levels
Perfect Park 7000 Installation & Unloading Instructions Operating Manual
 Perfect Park 7000 Installation & Unloading Instructions Operating Manual 1) Always file a claim with the truck line if the lift has been damaged! (If you don t originally notice the damage, but find some
Fanatec GT3RS V1 to GT3RS V2 Tutorial
 Fanatec GT3RS V1 to GT3RS V2 Tutorial by Roy Visser 1 How to update your Fanatec GT3RS V1 wheel to a GT3RS V2 wheel Welcome to this guided and detailed tutorial for upgrading your Fanatec GT3RS V1 wheel
Tempted by the Fruit of Another (A Little Red Diversion)
") Part 4 Tempted by the Fruit of Another (A Little Red Diversion) Last month saw the Green n Mean s back end problems remedied; it also saw the purchase of another V12 XJS by the lost soul writing this article.
Part 4 Tempted by the Fruit of Another (A Little Red Diversion) Last month saw the Green n Mean s back end problems remedied; it also saw the purchase of another V12 XJS by the lost soul writing this article.
No Drill Modern Gas Shock Installation on a 1931 Ford Model A Coupe
 No Drill Modern Gas Shock Installation on a 1931 Ford Model A Coupe Today we are not going to cover something new but just a little insider info in to what we do during our time off at Apex Tool Company.
Volvo 1800 Dash Pad Replacement
 Volvo 1800 Dash Pad Replacement (courtesy of John Garden State Chapter Volvo Club America) Reupholstering the dash Well it has been some time since I have been online in the forum. Winter is a quite time
Mustang Clutch Cable Installation Guide 96-04
 Mustang Clutch Cable Installation Guide 96-04 The below installation instructions work for the following products: Steeda Adjustable Clutch Cable 96-04 Maximum Motorsports Clutch Cable 82-04 Steeda Clutch
How to Replace the B2 Piston Bore Seal
 Page 1 Home Cars for sale Trucks for sale Where we are Links to other diesel sites About us Why diesel? Diesel Videos How they work How they sound FAQ Dodge Diesel Maintenance tips, parts and DIY DVD's
K04 Install on a 2000 Audi TT Coupe Quattro 180
 K04 Install on a 2000 Audi TT Coupe Quattro 180 I drive a 2000 Audi TT Coupe Quattro with the 180hp version of the transverse 1.8turbo motor from VAG, engine code ATC. This is of course a very standard
Kodak 750H Carousel Projector Repair
 Kodak 750H Carousel Projector Repair An AT YOUR OWN RISK PROJECT by Klaus Wolter, Rev B, 3-26-2016 Here I documen the repair of my 750H carousel. A common problem with this projector, and all of the projectors