TOYOTA SCION XB 2005 LSD INSTALLATION
|
|
|
- Kellie Fitzgerald
- 5 years ago
- Views:
Transcription


1 TOYOTA SCION XB 2005 LSD INSTALLATION TOYOTA SCION XB 07/07 1 Date 07/24/2007
2 TOYOTA SCION XB 07/07 2
3 INSTALLATION INTRODUCTION 1. REMOVING THE FENDER AND DOORS FROM THE A-PILLAR AND DISCONNECTING THE WIRE THE DOOR JAM 2. REMOVING THE EXISTING DOOR HINGES FROM THE DOORS; TOP AND BOTTOM. 3. MODIFYING THE INTERNAL FENDER AREAS FOR THE HINGE CLEARANCE. 4. MODIFYING THE ELECTRICAL HARNESS. 5. HANGING AND ALIGNING THE VEHICLE DOORS. 6. INSTALLING THE FENDER AND CHECKING FOR CLEARANCE. 7. REMOVE FENDER AND ROUTING THE WIRING. 8. RE-INSTALL FENDER AND CHECK FOR CLEARANCE. 9. JOB COMPLETE! TOYOTA SCION XB 07/07 3
4 Installation Instructions LamboStyleDoors (The instructions are to be used as a reference only. Please repeat steps for both doors.) Pre-installation check list: Battery disconnected Front bumper removal Front fender removal Vehicle must be accident free Vehicle must have inner fender cover Disassemble the door stopper Preparations: (Disassemble parts according to the vehicle manufacturers specifications) Disconnect the wire harness between the chassis and the door (remove the harness from the door interior when necessary) Disassemble the door. For this procedure, un-bolt the from the A-Pillar. Un-bolt the hinges located on the door. Extend the factory door wire harness with the enclosed wire harness extension kit. (See enclosed wire harness extension, page ) Modify the fender (See enclosed modifying the fender, page 14) Relocate the door lock vacuum case (when necessary). (e.g. from the passenger s side inner fender to the engine compartment) Modify the windshield washer reservoir (when necessary) TOYOTA SCION XB 07/07 4
5 DANGER WARNINGS LSD Doors must be installed according to the provided vehicle specific instructions from LSD Doors and installation should be performed by an authorized dealer. Always follow the latest accident prevention regulations (not applicable for North America) for each step to prevent any serious bodily harm or injury. Extending the factory wire harness must be completed according to the vehicle manufacturer s guidelines for cable repairs. When working with Share-data bus systems please take special care to correctly rerouting the wires and not to damage the wire insulation/shielding, twisting of the cables or interruption of any other systems (check with the specifications of the vehicle manufacturer). When modifying vehicles equipped with door side air bag systems, the functionality of the air bag system must be re-inspected through the vehicles authorized dealer. During final door adjustments please make sure that the door closes and locks correctly as O.E.M. specifications (see original door close angles, lock and gapping positions etc.) Please pay special attention while working in the operation area of the hinge system (especially when working directly with the pivot mechanism or in the overall door operation zone). All vehicle doors must be securely closed before setting vehicle into motion. Operating a vehicle with the doors open is strictly prohibited. Supplied vertical lifting door warning decals must be placed on the vehicles front side windows, clearly visible from both inside and outside. Not placing decals on your vehicle might void your vehicle operating license (not applicable for North America). Do not install heavier speaker systems without first raising the pressure of the gas spring. Please adjust the horizontal opening angle of the doors for maximum entrance space. Please pay attention to your gas springs and make sure they open and maintain your door at the maximum opening angle under all operation vehicle conditions. Make sure you empty the door pockets/storage compartments, so objects will not fall out once the door is raised and also not to offset the correct balance of the gas spring. WARNING: The gas spring is under extreme pressure! Please make sure the snap rings are installed correctly and are snapped their respective guides TOYOTA SCION XB 07/07 5
6 ! Attention notice: An additional inside support handle must be installed to solve the issue of possible difficulty of griping the door, when raising and lowering your door from your seated position. If there are white lights on your door, these must be made ineffective, e. g. taking of the bulb and bulb holder according to fig ECE-law no. 48. After mounting the LSD hinge system you must reinstall your OEM inner fender covers to keep your LSD hinges free from debris and corrosion. You must have an authorized workshop check that the central locking system (if equipped) is working properly. You must have an authorized workshop check the functionality of all systems, switches and components (including: loudspeakers, alarm system, CAN data bus systems, window lifts, crash-sensor, memory seat adjustment, mirror adjustment and heating, etc. if equipped). While adjusting the door please take special care to position it in the matching door frame as not to cause any damages to paint etc. In case any chassis modifications were performed, please use the supplied chassis glue (if required for specific application) to seal any openings on the A-pillar or doors (make sure panels are free from grease and dust before applying chassis glue for a superior water tight seal). NOTE: please be aware your car might have different factory installed equipment from our tested R&D vehicle, in this case please contact your LSD dealer to order higher or lower power gas damper units (an additional cost may apply). Please note that the power of the gas dampers may fluctuate due to ambient temperature variations, the opening and closing forces may also differ according to damper manufacturers specifications (warranty claims will only be honored if there s an internal defect or an error in production). All LSD hinges come with a protective oil coating, please remove coating and then apply the included PSK spray for superior sealing of the finish. If any body work is performed use Corrosion prevention methods according to the vehicle manufactures specifications. Updated installation instructions can be found on (guide notes subject to change without notice). General installation instructions: A second person makes the work much easier. Please instruct the second person before start working. It is recommended to keep your LSD door hinges maintained on a regular basis for a lifetime of trouble free operation TOYOTA SCION XB 07/07 6
7 General Lubrication Information In order for the LSD Door System to function properly, adequate lubrication is essential at all pivot points on the system. Periodic lubricating of all pivot points is highly recommended on a consistent basis. This helps in the life of all bearings involved and provides for a smooth operating LSD Door System. Listed below are helpful hints of when to lubricate: - After washing the vehicle, open the doors and check to see that all pivot points are properly greased - Every three months, open doors and check to see that all pivot points are properly greased - If the vehicle is subject to a harsh environment, such as salt or sand, it is critical that all pivot points stay lubricated, especially if the doors are being used frequently. Open the doors and check to see that all pivot points are greased properly TOYOTA SCION XB 07/07 7
 1x A 8X B")


8 HARDWARE LIST ( per vehicle side) 1x A 8X B C 1x D Snap ring Serrated bolt Hexagon bolt E F 3x G 3x H Spacer 5x I 1x J 1x K 1x L Tie wraps LSD Door System LSD Swing Arm LSD Ground Plate 1x M 1x N 1x O 1x P 2600 N Gas damper Fender bracket Mounting screw M6 Nut TOYOTA SCION XB 07/07 8

9 2 B 4 B 5 A B B TOYOTA SCION XB 07/07 9
10 STEP 1 REMOVING THE O.E.M. DOOR AND O.E.M. HINGES 1a. Open the door and locate the door hinges (Photo 1). 1b. Un-bolt the four bolts that mount the O.E.M. hinges (with the doors attached) and remove them completely off the A-Pillar. 1c. Remove the four bolts mounting the hinges to the door frame, removing the hinges completely. HINGE DOOR A-PILLAR PHOTO TOYOTA SCION XB 07/07 10

11 STEP 2 DIS-ASSEMBLING THE SWING ARM FROM THE GROUND PLATE 2a. Your new LSD Door Hinges have come assembled. 2b. As identified in (Photo 2), disassemble the swing arm from the ground plate. Un-bolt all four mounting bolts or allen-heads and remove completely, detaching the swing arm from the ground plate. 2c. Place the four mounting bolts in an area where they will not be lost. SWING ARM GROUND PLATE PHOTO 2 PHOTO FOR REFERENCE ONLY TOYOTA SCION XB 07/07 11
 from the previous cut wire.")


 back approximately 1/4. Twist the end tight. 3e.")
12 STEP 3 MODIFYING THE CHASSIS WIRING HARNESS IMPORTANT NOTE: Prior to beginning extending the wiring harness from the A-pillar, each individual wire needs to be cut one at a time. Each wire that is cut, has to be staggered (See 4g) from the previous cut wire. By doing this, you will eliminate, when wrapping all the wires, one large taped ball. 3a. If the wiring harness comes equipped with an insulation cover, this will need to be removed. STEPS 3b thru 3f are for REFERENCE ONLY (using the white wire as reference) 3b. Isolate a single wire (Photo 3). Start the first cut on the white wire approximately 3 from the door frame. 3c. Cut the wire sheath (coming from door frame) back approximately 1/4 (Photo 4). Twist the end tight. 3d. Cut the wire sheath (from kit supplied white wire) back approximately 1/4. Twist the end tight. 3e. Using the kit supplied heat shrink connector ends, insert the wire ends into the connector, one from each end (Photo 5). 3f. Using the heat gun, shrink wrap the connector ends to securely mate with the wire ends (Photo 6). PHOTO 3 PHOTO 4 PHOTO 5 PHOTO TOYOTA SCION XB 07/07 12
 version is shown.")
, you eliminate creating a large taped ball, thus making it easier to install back in the chassis. 4k.")
.")
13 STEP 4 MODIFYING THE CHASSIS WIRING HARNESS cont d- 4g. VERY IMPORTANT: 4h. Remember to stagger the cuts for each individual wire. This will eliminate having a large wrap and will allow for minimal size and maximum flexibility. 4i. In the photo below an (INCORRECT) version is shown. By cutting it this way, wrapping the wire at the end, will create a large ball in the middle of the newly extended wire harness. 4j. By staggering the cuts, (CORRECT), you eliminate creating a large taped ball, thus making it easier to install back in the chassis. 4k. Prior to soldering on the A-Pillar wire connector end, its important to remember to in stall the original equipment rubber grommet (Photo 7). 4m. Once the rubber grommet has been fed onto the new extension wire harness, you are able to attach the wire connector end of the A-Pillar (Photo 8). INCORRECT CUTS CORRECT CUTS RUBBER GROMMET PHOTO 7 PHOTO TOYOTA SCION XB 07/07 13
14 STEP 5 MODIFYING THE FENDER 5a. Mark the areas on the fender that are going to be modified (Photo 11). For detailed dimensions, see Page 15. 5b. Using a pneumatic air saw, cut the areas that you have designated to remove. 5c. (Photo 12) shows what the final cut should look like. 5d. (Photo 12a) shows the pieces that were removed. BEFORE PHOTO 11 AFTER PHOTO 12 PHOTO 12a TOYOTA SCION XB 07/07 14
, the area has been marked for removal.")
, using the tab mount as a reference point, cuts will be made on both")


15 STEP 5 MODIFYING THE FENDER cont d- 5d. In (Photo 13), the area has been marked for removal. A minimum lip is required along the edge indicated, no less than 3mm. 5e. In (Photo 14), using the tab mount as a reference point, cuts will be made on both sides of the tab mount. DO NOT REMOVE the tab mount. In this view, mark your line on the right side of the tab mount vertically, down to the 3mm marked line (as shown in Photo 15). In this same view, mark your line vertically on the left side of the tab mount, but here, stop at the crease in the fender. 5f. Spray paint all raw cut edges to avoid rusting TAB MOUNT PHOTO 13 PHOTO 14 PHOTO 15 CREASE 3mm 90mm TOYOTA SCION XB 07/07 15
16 STEP 6 A-PILLAR MOUNTS MODIFICATION 6a.. The mount areas on the A-Pillar, both top and bottom need to be flush. As shown in (Photo 16), once the door has been removed from the A-Pillar, there are some areas within the mounting holes that sit above the surface of the A-Pillar. These will need to be smoothed out so the new LSD Ground Plate hinge sits flush to the A-Pillar. This can be done with the use of a hammer, gently tapping each of these ribs smooth. PHOTO TOYOTA SCION XB 07/07 16


17 STEP 7 MOUNTING THE LSD GROUND PLATE 7a. Using the existing O.E.M. tapped mounting holes, mount the LSD ground plate, matching up each respective mount hole. Two mount holes at the top and two at the bottom (Photo 17). Locate the mounting bolts at the center of their respective slotted mount holes. 7b. Using the kit supplied mounting bolts (L), insert the bolts and finger tight only. 7c. Using a wrench, torque the bolts to 20ft-lb. L TOP MOUNT L BOT MOUNT PHOTO TOYOTA SCION XB 07/07 17
.")


18 STEP 8 MOUNTING THE LSD SWING ARM 8a. Using the existing O.E.M. tapped mounting holes, mount the LSD swing arm, matching up each respective mount hole. Two mount holes at the top and two at the bottom (Photo 18). Locate the mounting bolts at the center of their respective slotted mount holes. THIS IS DONE ON THE DOOR ONLY! 8b. Using the O.E.M. mounting bolts from the A-Pillar, use them to mount the Swing Arm to the door, finger tight only. 8c. Using a wrench, torque the bolts to 20ft-lb. TOP MOUNT BOLTS OEM A-Pillar bolts BOTTOM MOUNT BOLTS OEM A-Pillar Bolts PHOTO TOYOTA SCION XB 07/07 18
 Initially, this is done for mounting purposes only, using the MAGICSTIK as a guide.")
19 STEP 9 MOUNTING THE DOOR TO THE A-FRAME IMPORTANT NOTE: THIS STEP SHOULD BE DONE WITHOUT THE GAS SPRING IN STALLED 9a. Place the door back on the vehicle and close the door completely. 9a. Install the MAGICSTIK into position (Photo 19) Initially, this is done for mounting purposes only, using the MAGICSTIK as a guide. 9b. Lifting the door into position, guide the MAGICSTIK into its mating block (Photo 20), manually holding the door there, as close to the closed position as possible. 9c. Attach the swing arm to the ground plate with the four (4) kit supplied bolts and adjust the door via moving the swing arm adjustable plate connection mount with the horizontal door gap adjuster in the right or left direction until the gap measurement is like the original (Photo 21). PHOTO 19 PHOTO 21 IMPORTANT NOTE: Torque mounting bolt to 10ft-lb. PHOTO 20 ADJUSTING THE DOOR HEIGHT 9d. Adjustment height of the door is by moving the chassis plate (Q) vertically. Make sure the mounting hardware (L,K) is loosened to perform this function. 9e. Adjustment depth of the door is by moving the door horizontal. Make sure the mounting hardware (L) is loosened to perform this function TOYOTA SCION XB 07/07 19
 as a point to guide the front door into the")
 four(4) kit")

. 8h.")
.")
20 ADJUSTING THE DOOR HEIGHT cont d 9f. Use the adjustment screw (Photo 22) as a point to guide the front door into the correct position. 9g. Attach the Swing Arm to the chassis plate with the (Photo 23) four(4) kit supplied bolts or allen-head bolts, and adjust the door by moving the Swing Arm to the chassis plate adjustable connection mount with the horizontal door gap adjuster (2) in the left or right direction until the gap dimension is the same O.E.M dimension (prior to disassembling the door). 8h. Adjust the height of the door by moving the chassis plate vertically (up or down) (Photo 24). Loosen the four mount bolts prior to adjusting, but not removing them completely. The use of a rubber mallet would be useful in moving the chassis plate. B PHOTO 22 B PHOTO 23 PHOTO TOYOTA SCION XB 07/07 20
 (lower adjustment screw)(1) is not in the correct position when the door is closed, a spacer (Photo 26) (D)")
21 IF REQUIRED 9k. If the Magic Stick (Photo 25) (lower adjustment screw)(1) is not in the correct position when the door is closed, a spacer (Photo 26) (D) has to be installed under the M.A.R.A (2) as shown in the pictures below. PHOTO 25 PHOTO TOYOTA SCION XB 07/07 21
22 STEP 10 MOUNTING THE GAS DAMPER (after correct gap distance has been established) IMPORTANT NOTE: PRIOR TO MOUNTING THE GAS DAMPER AT ITS RESPECTIVE MOUNTING POINTS, WE HIGHLY RECOMMEND USING AN ANTI-RUST LUBRICANT, WIPING DOWN THE MOUNT POINTS TO PRE- VENT RUSTING. KEEPING THE MOUTNING POINTS LUBRICATED, ENHANCES THE LONGEVITY OF THE LSD DOOR SYSTEM TO WORKING PROPERLY GAS DAMPER TOP PIVOT POINT ON LSD SWING ARM GAS DAMPER BOTTOM PIVOT POINT ON LSD GROUND PLATE TOYOTA SCION XB 07/07 22

. PHOTO 27 PHOTO 28 DANGER: The gas damper is under extreme pressure!")
23 STEP 10 MOUNTING THE GAS DAMPER 10a. Hang (mount) the gas damper(m) on the mount point of the swing arm (Photo 27). Secure it with the kit supplied security ring, by using needle-nose pliers. 10b. NOTE: Use care when installing the security ring. 10c. Carefully pivot the door up and hang in the gas damper at the fitting point of the chassis plate (Ground Plate). Secure it with the kit supplied security ring (Photo 28). PHOTO 27 PHOTO 28 DANGER: The gas damper is under extreme pressure! Please make sure the security rings are installed correctly and are snapped their respective guides TOYOTA SCION XB 07/07 23
. 11b.")
24 STEP 11 ROLLER ADJUSTMENT IMPORTANT NOTE: The door needs to be in the closed position for this adjustment to be properly done. NOTE: This adjustment also needs to be done with the gas damper installed. 11a. Install the kit supplied slide roller (as shown in the picture). 11b. Adjust the slide roller (4) so the LSD swing arm has the initial contact and preload while opening and closing of the door. (Photo 29). 11c There may be times when you have exhausted the adjustment. If this happens use the kit supplied shims to give an additional adjustment length.. 11d. Periodically lubricate the slide roller to insure a constant smooth open/close sequence. HORIZONTAL ADJUSTMENT 4 VERTICAL ADJUSTMENT SWING ARM PLATE PHOTO TOYOTA SCION XB 07/07 24
25 12. SUPPORTING THE CHASSIS PLATE (IF REQUIRED) 12a. On this particular application, use the kit supplied angle support. This gives the Chassis Plate rigidity, stabilizing the Chassis plate to the A-Pillar. In (Photo 30), the angle bracket is shown attached. 12b. First attach the bracket angle to the top of the Ground Plate. Once this has been done, trans fer the mount hole on the opposite leg of the bracket to the frame of the vehicle. Use the kit supplied mount bolt and mount nut to secure to the frame of the vehicle. MOUNT NUT MOUNT NUT ANGLE BRACKET VEHICLE FRAME PHOTO TOYOTA SCION XB 07/07 25
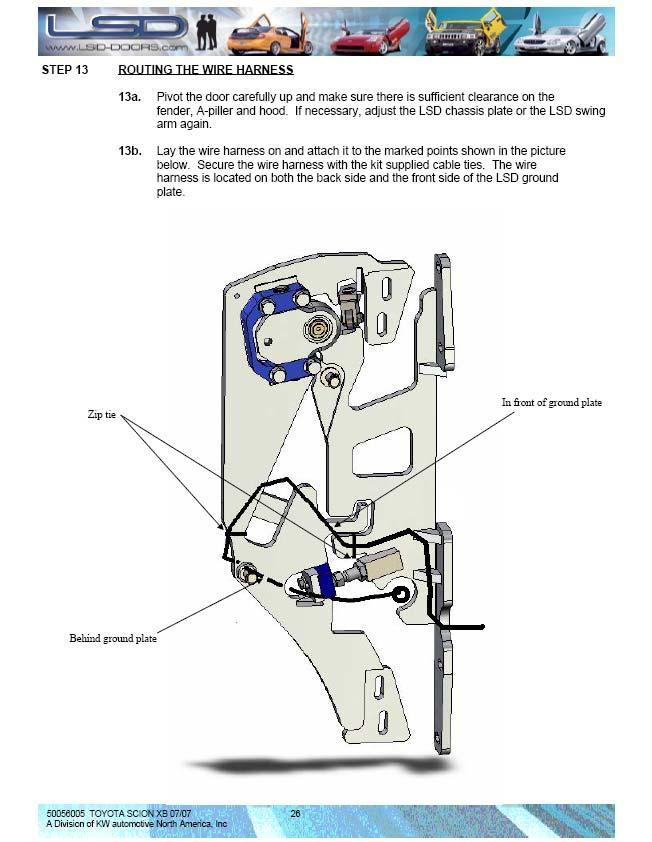
26
27 COMMON TROUBLESHOOTING QUESTIONS and ANSWERS Q1: WHY DOES THE BOTTOM OF THE DOOR NOT SIT FLUSH, AT THE FRONT OR REAR?: A1: LSD door hinges are engineered and designed to compensate for this issue. They are designed to be installed in the center location of all mounting slots. Some vehicles are different however; adjusting the location of the swing arm mounts on the door will fix this problem. Mounting the swing arm to wards the interior of the door, top or bottom will move the door out; mounting the swing arm towards the exterior of the door will move the door in. In some cases, the mounting will be slightly different between top and bottom mounts. Q2: WHY DO THE DOORS SPRING A-JAR WHEN OPENING THE DOOR?: A2: LSD door hinges are engineered and designed to compensate for this issue. It is common on vehicles that the left and the right sides are not quite the same. When a door springs open there is a misalign ment between the swing arm and the ground plate. This can be remedied by increasing the distance of the third point on the ground plate. The third point is usually located towards the front of the vehicle. Increasing the distance and angle of the ground plate to the vehicle will release any pressure and/or contact between the swing arm and the ground plate. Q3: WHY DOES THE DOOR HITS/RUBS AGAINST THE FENDER WHEN OPENING?: A3: LSD door hinges are engineered and designed to compensate for this issue. Attaching the LSD hinge in the center location of the slots and adjusting the magic stick such that the tuff lock is centered is the optimum desired installation. Making minor adjustments to the MARA / C profile, the third point, and/or the Magic stick should alleviate this problem. Q4: WHY IS THE WIRING HARNESS TOO LARGE FOR THE ROUTE SHOWN IN THE INSTRUC- TIONS?: A4: LSD door hinges are engineered and designed to compensate for this issue. LSD wiring kits are designed for the MAXIMUM wires installed on vehicles. If additional wires are added or modified that are larger than original, wiring routing might have to be modified. Vehicle owners are responsible for this modified routing. Q5: WHY DOESN T THE GAS SPRING HOLD THE DOOR UP?: A5: LSD door hinges are engineered and designed to compensate for original door weight, i.e. speakers and electronics. NOTE: As temperature fluctuates, the gas pressure in each shock increases or decreases. Example; in the heat, the gas pressure will expand, in the cold; it has a tendency to contract. Any modifications to the speakers or electronics may require a larger gas spring. Vehicle owners are required to purchase these larger gas springs from their local dealer. If you have not modified your door, your gas spring may be faulty. Vehicle owners are required to contact their local dealer for replacement(s) TOYOTA SCION XB 07/07 27
28 TOYOTA SCION XB 07/07 28


29 TOYOTA SCION XB 29
30 TOYOTA SCION XB 07/07 30
31 TOYOTA SCION XB 07/07 31
GM G-BODY LSD INSTALLATION
 GM G-BODY 1979-1987 LSD INSTALLATION INSTALLATION INTRODUCTION 1. REMOVING THE FENDER AND DOORS FROM THE A-PILLAR AND DISCONNECTING THE WIRE HARNESS @ THE DOOR JAM 2. REMOVING THE EXISTING DOOR HINGES
CHEVROLET TAHOE/DENALI/AVALANCHE/YUKON/ SILVERADO/SIERRA 2007+
 CHEVROLET TAHOE/DENALI/AVALANCHE/YUKON/ SILVERADO/SIERRA 2007+ INSTALLATION INTRODUCTION 1. REMOVING THE FENDER AND DOORS FROM THE A-PILLAR AND DISCONNECTING THE WIRE HARNESS @ THE DOOR JAM 2. REMOVING
Installation Instructions LamboStyleDoors (The instruction are to be used as a reference. Please repeat for both doors)
") Installation Instructions LamboStyleDoors (The instruction are to be used as a reference. Please repeat for both doors) Hyundai enesis Coupé type BK38 Part number 500 66 002 Pre installation check list:
Installation Instructions LamboStyleDoors (The instruction are to be used as a reference. Please repeat for both doors) Hyundai enesis Coupé type BK38 Part number 500 66 002 Pre installation check list:
Installation Instructions LamboStyleDoors (The instruction are to be used as a reference. Please repeat for both doors)
") Installation Instructions LamboStyleDoors (The instruction are to be used as a reference. Please repeat for both doors) Mercedes C-Class Sport coupé type W203 Part number 500 25 009 Pre installation check
Installation Instructions LamboStyleDoors (The instruction are to be used as a reference. Please repeat for both doors) Mercedes C-Class Sport coupé type W203 Part number 500 25 009 Pre installation check
Installation Instructions LamboStyleDoors (The instruction are to be used as a reference. Please repeat for both doors)
") Installation Instructions LamboStyleDoors (The instruction are to be used as a reference. Please repeat for both doors) Pre installation check list: - Double check vehicles data with TUV certificate -
Installation Instructions LamboStyleDoors (The instruction are to be used as a reference. Please repeat for both doors) Pre installation check list: - Double check vehicles data with TUV certificate -
Installation Instructions LamboStyleDoors
 Installation Instructions LamboStyleDoors (The instruction refers only to one side of the car, but is valid for both sides) Preparations: (Dismantling according to the regulation of the car manufacturer)
Installation Instructions LamboStyleDoors
 Installation Instructions LamboStyleDoors (The instruction refers only to one side of the car, but is valid for both sides) Preparations: (Dismantling according to the regulation of the car manufacturer)
Installation Instructions LamboStyleDoors
 Installation Instructions LamboStyleDoors (The instruction refers only to one side of the car, but is valid for both sides) Preparations: (Dismantling according to the regulation of the car manufacturer)
Installation Instructions LamboStyleDoors (The instruction are to be used as a reference. Please repeat for both doors)
") Installation Instructions LamboStyleDoors (The instruction are to be used as a reference. Please repeat for both doors) Ford Mustang type LAE Part number 500 80 30 016 Pre installation check list: - Vehicle
Installation Instructions LamboStyleDoors (The instruction are to be used as a reference. Please repeat for both doors) Ford Mustang type LAE Part number 500 80 30 016 Pre installation check list: - Vehicle
RHINO SUSPENSION SYSTEM INSTALLATION INSTRUCTIONS
 PARTS INCLUDED: 2 FRONT UPPER A-ARMS 2 FRONT LOWER A-ARMS 2 UNI-BALL JOINTS 2 UNI-BALL JOINT STUDS 2 UNI-BALL JOINT CAPS 2 RETAINING RINGS 1 FRONT SHOCK ASSEM. 2 DELRON STEERING STOPS 2 SHOCK MOUNT SPACERS
INSTALLATION & OWNER S MANUAL
 Rev. B, p. 1 of 25 INSTALLATION & OWNER S MANUAL POLARIS RANGER RCS (for models XP or HD) (for model years 2009-) cab without doors kit (p/n 1POLRCWD) cab with doors kit (p/n 1POLRC) doors only kit (p/n
TOYOTA TUNDRA BIG BRAKE KIT Section I - Installation Preparation
 TOYOTA TUNDRA 2007- BIG BRAKE KIT Section I - Installation Preparation Part Number: PTR09-34070 Kit Contents Item # Quantity Reqd. Description 1 1 Brake Rotor, LH Front 2 1 Brake Rotor, RH Front 3 1 Brake
NOTICE TO DEALER AND VEHICLE OWNER
 921751200 *1751BAG1* 1751BAG1 Thank you for choosing Rough Country for all your suspension needs. This kit will fit both 4WD and 2WD models, all brackets will be used for 4WD models. On 2WD models the
SCION tc STRUT TIE BAR Preparation
 SCION tc 2005 - STRUT TIE BAR Preparation Part Number: 00016-80440 Code: YY1 Kit Contents 1 1 DS Mount Plate 2 1 PS Mount Plate 3 1 Cross Bar 4 1 Hardware Bag Hardware Bag Contents 1 4 8mm Screws 2 4 8mm
Installation Manual TWM Performance 2010 Mazda 3 short shifter 5 and 6 speed non-mazdaspeed
 Installation Manual TWM Performance 2010 Mazda 3 short shifter 5 and 6 speed non-mazdaspeed Begin the installation by parking on a flat surface, as you will have to engage and disengage the hand brake
SCION xb AUTO-DIMMING MIRROR Preparation
 Preparation Part Number: PT374-02090 Kit Contents Item # Quantity Reqd. Description 1 1 AD Mirror Assembly w/ PRNDL 2 1 Hardware bag Hardware Bag Contents Item # Quantity Reqd. Description 1 2 T-tap Connectors,
EVO-1162 EVO Tailgate Tire Carrier
 EVO-1162 EVO Tailgate Tire Carrier Bill of Materials EVO-1162 Tailgate Tire Carrier Part number Description Quantity EVO-12161 EVO Tailgate Tire Carrier 1 EVO-12162 Bolt Plate 1 EVO-12163 Wheel Mount 1
Installation Notes: #86000-R Race Series +3.5 L/T Kit
 159 North Maple St. Unit J, CORONA CA 92880 P. 951-737-9682 F. 951-737-9006 WWW.CHAOSFAB.COM Installation Notes: #86000-R Race Series +3.5 L/T Kit Factory manual is recommended for removal and re-installation
LPE C5 Battery Relocation Kit
 LPE C5 Battery Relocation Kit The LPE C5 Corvette battery relocation kit improves vehicle weight distribution by moving weight to the rear of the vehicle. The improved weight distribution increases traction
TOYOTA FJ CRUISER / 4RUNNER COLD AIR INTAKE Section I Installation Preparation. 4.0L V6 (1GR) Roller Rocker Part Number(s): PTR
 Roller Rocker Part Number(s): PTR") Section I Installation Preparation Part Number(s): PTR03-89100 Kit Contents Item # Quantity Reqd. Description 1 1 Air Filter (P/N: PTR43-00083) 2 1 Upper Air Box 3 1 Lower Air Box 4 1 Hump Coupler 5 1
Section I Installation Preparation Part Number(s): PTR03-89100 Kit Contents Item # Quantity Reqd. Description 1 1 Air Filter (P/N: PTR43-00083) 2 1 Upper Air Box 3 1 Lower Air Box 4 1 Hump Coupler 5 1
Installation Manual TWM Performance Short Shifter Subaru STi 2008+
 - 1 - Installation Manual TWM Performance Short Shifter Subaru STi 2008+ Please Note: It is preferable to park on a flat surface, as you will have to engage and disengage the hand brake and shift from
*Enclosed pictures and devices are for reference only. Individual vehicles and devices may vary.
 Dash Strap Mount Product Number AS5.S500.001 *Enclosed pictures and devices are for reference only. Individual vehicles and devices may vary. The Dash Strap Mount is held tight against the vehicle dash
TOYOTA FJ CRUISER 6 SUSPENSION KIT
 92177000 TOYOTA FJ CRUISER 6 SUSPENSION KIT Thank you for choosing Rough Country for your suspension needs. Rough Country recommends a certified technician installs this system. In addition to these instructions,
OIL COOLER KIT INSTALLATION INSTRUCTIONS PART NUMBER D
 OIL COOLER KIT INSTALLATION INSTRUCTIONS PART NUMBER D570-0904 APPLICATION: 2011-2012 E90 335i/xi (N55 engine) with BMW standard bumper and with stock oil cooler Congratulations for being selective enough
Made in USA with U.S. PATENT #6,808,223; #6,845,547; #7,140,075; #7,059,655 and other patents pending.
 Made in USA with U.S. PATENT #6,808,223; #6,845,547; #7,140,075; #7,059,655 and other patents pending. Page 1 of 12 CHEVROLET CAMARO 1993-2002 Vertical Doors Canada, Inc / Lambo Doors Canada, Inc. 1 888
Installation Manual TWM Performance Short Shifter Cobalt SS/SC, SS/TC, HHR SS, Ion Redline and Saab 9-3
 Page 1 Installation Manual TWM Performance Short Shifter Cobalt SS/SC, SS/TC, HHR SS, Ion Redline and Saab 9-3 Please Note: It is preferable to park on a flat surface, as you will have to engage and disengage
INSTALLATION INSTRUCTIONS
 INSTALLATION INSTRUCTIONS [1] Description: Tow Hitch Wire Harness Kit [2] Application: Nissan Rogue Note: Tow Harness application is limited to specific vehicle option packages that include tow harness
*1557BAG12* 1557BAG F /5 /6 LIFT KIT G THANK YOU FOR CHOOSING ROUGH COUNTRY FOR YOUR SUSPENSION NEEDS.
 2015-18 F-150 4 /5 /6 LIFT KIT THANK YOU FOR CHOOSING ROUGH COUNTRY FOR YOUR SUSPENSION NEEDS. 92155700G *1557BAG12* 1557BAG12 Rough Country recommends a certified technician install this system. In addition
Ford Mustang GT-Style Fog Light Kit Parts List: Quantity: Tool List:
 2013-2014 Ford Mustang GT-Style Fog Light Kit Parts List: Quantity: Tool List: Fog light (Left& Right) 2 Flat head & Phillips screwdriver Upper grille with surround 1 Ratchet & Socket set OR Lower grille
Installation Instructions QUICKSILVER CONSOLE SHIFTER Fits: Chevelle / El Camino
 WORK SAFELY! For maximum safety, perform this installation on a clean, level surface and with the engine turned off. Place blocks or wedges in front of and behind both rear wheels to prevent movement in
Installation Instructions Pro Bandit Shifter Fits: GM Powerglide Automatic Transmissions
 Installation Instructions Pro Bandit Shifter Fits: 1962-1973 GM Powerglide Automatic Transmissions Part # 80793 WORK SAFELY! For maximum safety, perform this installation on a clean, level surface and
Thank you for choosing Rough Country for all your suspension needs.
 Nissan 2016 Titan XD 6 Suspension Kit Thank you for choosing Rough Country for all your suspension needs. 921877200F *1877BAG11* 1877BAG11 Rough Country recommends a certified technician install this system.
6 S-10 Pickup/Jimmy/Blazer Torsion Bar Drop Kit
 92124300 6 S-10 Pickup/Jimmy/Blazer Torsion Bar Drop Kit Thank you for choosing Rough Country for all your suspension needs. Rough Country recommends a certified technician install this system. In addition
TOYOTA HIGHLANDER RUNNING BOARD HIGHLANDER HV Preparation
 Preparation Part Number: PT738-48080 Kit Contents Item # Quantity Reqd. Description 1 1 Driver Side Running Board 2 1 Passenger Side Running Board 3 4 /Middle Mount Bracket 4 2 Rear Mount Bracket 5 2 Rear
*1553BAG3* F-150 2WD 4 /5 /6 LIFT KIT 1553BAG3
 *1553BAG3* 1553BAG3 921553220 2015-16 F-150 2WD 4 /5 /6 LIFT KIT THANK YOU FOR CHOOSING ROUGH COUNTRY FOR YOUR SUSPENSION NEEDS. Rough Country recommends a certified technician install this system. In
TOYOTA 4RUNNER COLD AIR INTAKE FJ CRUISER Preparation
 Preparation Part Number: PTR03-89100 Kit Contents Item # Quantity Reqd. Description 1 1 Air Filter (P/N: PTR43-00083) 2 1 Upper Air Box 3 1 Lower Air Box 4 1 Hump Coupler 5 1 Throttle Body Coupler 6 1
07-UP AVALANCHE 7.5 KIT
 92120900R1 07-UP AVALANCHE 7.5 KIT Thank you for choosing Rough Country for your suspension needs. We appreciate your business!! This kit will not fit vehicles equipped with electric steering or trucks
INSTALLATION INSTRUCTIONS
 INSTALLATION INSTRUCTIONS Document# 19-0038 2004+ Lotus Elise (Series 2) Rear Clamshell Removal Kit Safely support the vehicle. This is a two-person job. Allow 1 to 2 hours for initial disassembly. Have
Part Number: TTU-BGB14-DRL TTU-BGP14-DRL
 11/15/16 TOYOTA TUNDRA 2014-17 Billet Grille w/led DRL Part Number: TTU-BGB14-DRL TTU-BGP14-DRL Kit Contents Item # Quantity Reqd. Description 1 2 LED DRL 2 1 Driver Box 3 1 Switch 4 1 User Card 5 2 Hardware
2015 F /5 /6 LIFT KIT
 92155700 2015 F-150 4 /5 /6 LIFT KIT THANK YOU FOR CHOOSING ROUGH COUNTRY FOR YOUR SUSPENSION NEEDS. Rough Country recommends a certified technician install this system. In addition to these instructions,
INSTALLATION INSTRUCTIONS
 INSTALLATION INSTRUCTIONS 2102 LOWERING SPINDLE ASSEMBLY 1998-UP CHEVROLET / GMC BLAZER / X-TREME / JIMMY / ENVOY 2 Wheel Drive Congratulations! You were selective enough to choose a BELLTECH PRODUCT.
FRONT & 4 REAR GM WD LOWERING KIT
 92725200 88-98 2 FRONT & 4 REAR GM 1500 2WD LOWERING KIT Thank you for choosing Rough Country for all your suspension needs. Rough Country recommends a certified technician install this system. In addition
Toyota Celica Short Throw Shift Kit Installation Manual (Metal Assembly)
") 1992-1993 Toyota Celica Short Throw Shift Kit Installation Manual (Metal Assembly) Page 1 1. Remove shift knob and plastic cover from shift assembly. 2. Remove the three nuts holding the top part of the
1992-1993 Toyota Celica Short Throw Shift Kit Installation Manual (Metal Assembly) Page 1 1. Remove shift knob and plastic cover from shift assembly. 2. Remove the three nuts holding the top part of the
Installation Instructions
 Preparing your vehicle to install your brake system upgrade 1. Rack the vehicle. 2. If you don t have a rack, then you must take extra safety precautions. 3. Choose a firmly packed and level ground to
LiteDOT Installation Document
 LiteDOT Installation Document This document designed to aid in installation of LiteDOT s on Jeep TJ models, other models are similar. NOTE: Installing LiteDOT s on a Jeep where the 2 necessary mounting
Tools Needed: Class 8.8 Class MM 55ft/lbs 75ft/lbs 14MM 85ft/lbs 120ft/lbs 16MM 130ft/lbs 165ft/lbs 18MM 170ft/lbs 240ft/lbs
 921788000 JEEP JK 6 LONGARM Rough Country recommends a certified technician install this system. In addition to these instructions, professional knowledge of disassemble/reassembly procedures as well as
Ram 1500 Crew Cab A Ram 2500/3500 Crew Cab A
 I N S T A L L A T I O N G U I D E APPLICATION AMP Part # Ram 1500 Crew Cab 2013-2015 77138-01A Ram 2500/3500 Crew Cab 2013-2015 77138-01A Note:The application works only on the Crew Cab model Vehicles.
POWER STEERING TO INDEX POWER STEERING SYSTEM PRECAUTIONS... OPERATION CHECK... PROBLEM SYMPTOMS TABLE... VANE PUMP ASSEMBLY COMPONENTS...
 TO INDEX STEERING POWER STEERING POWER STEERING SYSTEM PRECAUTIONS.............................................. OPERATION CHECK......................................... PROBLEM SYMPTOMS TABLE.................................
Installation Instructions. QuickSilver Shifter. Fits: GM, Ford, Chrysler Transmissions See Application Guide for Specific Applications Part # 80683
 Installation Instructions QuickSilver Shifter Fits: GM, Ford, Chrysler Transmissions See Application Guide for Specific Applications Part # 80683 WORK SAFELY! For maximum safety, perform this installation
FRONT DROP SPINDLES
 92725000 88-98 2 FRONT DROP SPINDLES Thank you for choosing Rough Country for all your suspension needs. Rough Country recommends a certified technician install this system. In addition to these instructions,
Assembly Instructions
 Assembly Instructions Part Number Description Model Approx. Assembly Time 99994-0903 Windshield Wiper Kit Mule SX 1 Hour WARNING Improper installation of this accessory could result in an accident causing
Remove the 3-11mm nuts holding mirror on. Don t drop the nuts!
 2005-2012 Ford Mustang Puddle Lamp Kit Parts List: Quantity: Tool List: LED Lamps 2 Flat head screwdriver Seals 2 Ratchet & Socket set OR Nuts 2 Adjustable Wrench Wiring harness 1 Drill & 11/16 th bit
2015 Mustang Lightbar (All Models) CDC#
 CDC#") 2015 Mustang Lightbar (All Models) CDC# 1511-7000-01 Components: 1 CDC Lightbar Note: READ instructions before starting installation!!! CDC Part# Driver side bracket 0511-6001-05 Passenger side bracket
2015 Mustang Lightbar (All Models) CDC# 1511-7000-01 Components: 1 CDC Lightbar Note: READ instructions before starting installation!!! CDC Part# Driver side bracket 0511-6001-05 Passenger side bracket
SAFETY SAFETY CABLE INSTALLATION /00 1 of 6
 SAFETY DO NOT INSTALL, OPERATE OR USE THIS EQUIPMENT UNTIL THE FOLLOWING OPERATING AND SAFETY INSTRUCTIONS HAVE BEEN READ AND UNDERSTOOD. This symbol is used to bring attention to safety precautions and
<THESE INSTRUCTIONS MUST BE GIVEN TO THE END USER> B&W
 B&W Trailer Hitches 6 Hawaii Rd / PO Box 86 Humboldt, KS 66748 P:60.473664 F:60.869.903 Turnoverball Gooseneck Hitch Installation Instructions MODEL 08
97-06 JEEP TJ/LJ LONG ARM UPGRADE KIT
 921663U00 97-06 JEEP TJ/LJ LONG ARM UPGRADE KIT Thank you for choosing Rough Country for your suspension needs. This kit is an upgrade kit only. This kit includes frame mounting points and adjustable long
Installation Guide CLAAS Lexion Combines with 9 inch Elevators
 Installation Guide CLAAS Lexion Combines with 9 inch Elevators 955614_01 4/17 1 Table of Contents System Overview 3 Quick Start Guide 4 Flow Sensor Installation 5 Hydraulic Elevator Adjustment Kit Installation
TOYOTA Yaris Hatchback EC REARVIEW MIRROR Preparation
 Preparation Part Number: PT374-02090 Kit Contents Item # Quantity Reqd. Description 1 1 Auto Dimming Mirror Assembly w/ shift area light 2 1 Hardware bag Hardware Bag Contents Item # Quantity Reqd. Description
TOYOTA COROLLA EC REARVIEW MIRROR Preparation
 Preparation Part Number: PT374-02090 Kit Contents Item # Quantity Reqd. Description 1 1 AD Mirror Assembly w/ PRNDL 2 1 Hardware bag Hardware Bag Contents Item # Quantity Reqd. Description 1 2 T-tap Connectors,
650 Series Cargo Van Lift Mounting Instructions Ford Transit (Standard Roof) 2015-Present
 2015-Present") TOMMY GATE OWNER'S / OPERATOR'S MANUAL 650 Series 650 LB Capacity 650 Series Cargo Van Lift Mounting Instructions Ford Transit (Standard Roof) 2015-Present Installing the Base Plate 1. Examine the interior
TOMMY GATE OWNER'S / OPERATOR'S MANUAL 650 Series 650 LB Capacity 650 Series Cargo Van Lift Mounting Instructions Ford Transit (Standard Roof) 2015-Present Installing the Base Plate 1. Examine the interior
Stowe Cargo Management System
 Installation Guide Stowe Cargo Management System Table of Contents 1. Pre-Installation (Page 2) a. Notes, Installation Kit contents & Tools needed 2. How to Install the Stowe Cargo Management System (Pages
2014 F /6 LIFT KIT
 92157500 2014 F-150 4 /6 LIFT KIT THANK YOU FOR CHOOSING ROUGH COUNTRY FOR YOUR SUSPENSION NEEDS. Rough Country recommends a certified technician install this system. In addition to these instructions,
Safety - Installation and Operation:
 4x4 or 4x2 Instructions EZGO Electric Cars Thank you for purchasing your 4x4 or 4x2 conversion kit. Safety at all times whether during installation or operation is utmost importance. Before After!!!!!!!!!!!!!!
Z8004. KDT916 S197 Performance Watts Linkage
 Z8004 KDT916 S197 Performance Watts Linkage Kit Includes: Differential Cover o Magnetic Plug o Standard Plug o Main Brace o Center Pivot o Swivel Foot Bolts 2 o Swivel Foot Retaining nuts 2 o M12x30 Bolt
I N S TA L L AT I O N
 I N S TA L L AT I O N 5008 fits: H-D: '80-Up Electra glide, tour glide, road king, road glide or street glide PartS Included 1 Right Fork Mount Assembly 1 Left Fork Mount Assembly 2 H3 Driving Light Assemblies
Assembly Manual. 1/10th Formula 1 Car
 Assembly Manual 1/10th Formula 1 Car Center Pivot Bag 1 3374 - Center Pivot Socket 40194 - Hard Anodized Alum Pivot ball 3254-2-56 *Note - Sometimes it is helpful to slightly over-tighten the top clamp
Part Number: PT
 Preparation Part Number: PT374-02090 Kit Contents Item # Quantity Reqd. Description 1 1 Auto Dimming Mirror Assembly w/ shift area light 2 1 Hardware bag Hardware Bag Contents Item # Quantity Reqd. Description
Scion xb EC Rearview Mirror Preparation
 Scion xb 2010 - EC Rearview Mirror Preparation Part Number: 00016-09101 Code: CM9 Kit Contents Item # Quantity Reqd. Description 1 1 AD Mirror Assembly w/ Compass and Homelink 2 1 Hardware bag Hardware
BX7460P Allure Tow Bar Operator Manual & Installation Instructions. ALLURE Tow Bar (10,000 lb) Pintle Coupler
 Pintle Coupler") Operator Manual & Installation Instructions ALLURE Tow Bar (10,000 lb) Pintle Coupler Hooking Up to Towed Vehicle 1. Position the towing vehicle on a level surface with a straight driveway ahead and engage
Operator Manual & Installation Instructions ALLURE Tow Bar (10,000 lb) Pintle Coupler Hooking Up to Towed Vehicle 1. Position the towing vehicle on a level surface with a straight driveway ahead and engage
RS-2 SINGLE ACTION REAR BUMPER WITH TIRE CARRIER INSTALL MANUAL FOR JEEP WRANGLER ALL MODELS.
 RS-2 SINGLE ACTION REAR BUMPER WITH TIRE CARRIER INSTALL MANUAL FOR 2007-2016 JEEP WRANGLER ALL MODELS. Rear Bumper Installation Instructions 1) Remove factory rear bumper, (this includes all tow hitch
INSTALLATION & OWNER S MANUAL
 p. 1 of 15 INSTALLATION & OWNER S MANUAL Polaris Ranger 500-800 PathPro SS Cab (fits 2010 - current) (p/n: 1POLRFS1) The contents of this envelope are the property of the owner. Be sure to leave with the
LEXUS IS 250 Front Performance Brake Kit Section I - Installation Preparation
 LEXUS IS 250 Front 2006- Performance Brake Kit Section I - Installation Preparation Part Number: PTR09-53080 Kit Contents Item # Quantity Reqd. Description 1 1 Brake Rotor, LH Front 2 1 Brake Rotor, RH
OIL COOLER KIT INSTALLATION INSTRUCTIONS PART NUMBER D E92 335i/xi (N55 engine) with BMW Standard bumper and with stock oil cooler
 with BMW Standard bumper and with stock oil cooler") OIL COOLER KIT INSTALLATION INSTRUCTIONS PART NUMBER D570-0924 APPLICATION: 2011-12 E92 335i/xi (N55 engine) with BMW Standard bumper and with stock oil cooler Congratulations for being selective enough
OIL COOLER KIT INSTALLATION INSTRUCTIONS PART NUMBER D570-0924 APPLICATION: 2011-12 E92 335i/xi (N55 engine) with BMW Standard bumper and with stock oil cooler Congratulations for being selective enough
INSTALLATION INSTRUCTIONS FOR THE MOTOR TRIKE GL1500 RAKE KIT
 INSTALLATION INSTRUCTIONS FOR THE MOTOR TRIKE GL1500 RAKE KIT Thank you for choosing the Motor Trike GL1500 Rake Kit. We ask that you read the directions before you start and follow them very closely.
2014 F /6 LIFT KIT
 92157500 2014 F-150 4 /6 LIFT KIT THANK YOU FOR CHOOSING ROUGH COUNTRY FOR YOUR SUSPENSION NEEDS. Rough Country recommends a certified technician install this system. In addition to these instructions,
TeraFlex TJ Dual Rate S/T Sway Bar
 1 Kit #1743620 (0-3 Lift) #1743625 (4-6 Lift) TeraFlex TJ Dual Rate S/T Sway Bar Important Notes: Prior to beginning this or any installation read these instructions to familiarize yourself with the required
I N S T A L L A T I O N G U I D E
 I N S T A L L A T I O N G U I D E APPLICATION AMP Part # Chevrolet Silverado1500 / GMC Sierra 1500 - Crew Cab 2014-2015 77154-01A Chevrolet Silverado 2500/3500 - Crew Cab 2015 77154-01A (Gas Only) GMC
R O A D S M I T H TRIKE CONVERSIONS BY THE TRIKE SHOP
 R O A D S M I T H TRIKE CONVERSIONS BY THE TRIKE SHOP Please thoroughly review the instructions before and during installation. Keep in mind that this product was designed to be installed by trained dealer
BX4330 Acclaim Tow Bar Operator Manual & Installation Instructions
 Operator Manual & Installation Instructions (5,000 lb) 2 Inch Coupler General Information DO NOT INSTALL, OPERATE OR USE THIS EQUIPMENT UNTIL THE FOLLOWING OPERATING AND SAFETY INSTRUCTIONS HAVE BEEN READ
INSTALLATION INSTRUCTIONS
 HIGH FLOW AIRFLOW METER INSTALLATION INSTRUCTIONS PART NUMBER D763-1600A APPLICATION: 2001-06 E46 M3 Parts List: Hose clamp 64Z (7) Plastic Rivets Air Filter Temp Sensor & Harness (2) Button Head Screws
PRODUCT USE INFORMATION
 921878200E *1878BAG11* 1878BAG11 Nissan 2017 Titan 6 Suspension Kit Thank you for choosing Rough Country for all your suspension needs. Rough Country recommends a certified technician install this system.
Installation instructions for Camaro/Firebird and Nova* Windshield Wiper Systems
 Installation instructions for 1967-69 Camaro/Firebird and 1968-74 Nova* Windshield Wiper Systems The Raingear 1967-69 Camaro/Firebird and 1964-74 Nova wiper system is designed for ease of installation
SwayPro. NOTE: A minimum tongue weight of 200 lbs. is required THANK YOU
 SwayPro Owner s Manual & Installation Instructions Serial Number Standard Hitch Head w/ Clamp-On Rotating Latches BXW0350 350 lbs. maximum tongue weight capacity BXW0550 550 lbs. maximum tongue weight
Installation Instructions Z-Gate Shifter
 Installation Instructions Z-Gate Shifter Part Number 80681 1998, 2001 by B&M Racing and Performance Products The B&M Z-Gate shifter can be used in vehicles equipped with most popular three speed automatic
R O A D S M I T H TRIKE CONVERSIONS BY THE TRIKE SHOP
 R O A D S M I T H TRIKE CONVERSIONS BY THE TRIKE SHOP Please thoroughly review the instructions before and during installation. Keep in mind that this product was designed to be installed by trained dealer
UNPACK AND IDENTIFY THE FOLLOWING PARTS.
 SUT-250-M2 ASSEMBLY REQUIREMENTS *Torque all T-bolt nuts to 35-40 foot pounds. *Check all lights before towing. *Tire pressure not to exceed recommendation on serial tag. *Re-torque wheel nuts after first
OIL COOLER KIT INSTALLATION INSTRUCTIONS PART NUMBER D E92 335is (N54 engine) with BMW M-Technic bumper and with stock oil cooler
 with BMW M-Technic bumper and with stock oil cooler") OIL COOLER KIT INSTALLATION INSTRUCTIONS PART NUMBER D570-0923 APPLICATION: 2011 E92 335is (N54 engine) with BMW M-Technic bumper and with stock oil cooler Congratulations for being selective enough to
OIL COOLER KIT INSTALLATION INSTRUCTIONS PART NUMBER D570-0923 APPLICATION: 2011 E92 335is (N54 engine) with BMW M-Technic bumper and with stock oil cooler Congratulations for being selective enough to
INSTALLATION INSTRUCTION 89400
 INSTALLATION INSTRUCTION 89400 FOR RANCHO SUSPENSION SYSTEM RS66400B: 2012 RAM 1500 4WD. READ ALL INSTRUCTIONS THOROUGHLY FROM START TO FINISH BEFORE BEGINNING INSTALLATION Rev B IMPORTANT NOTES! WARNING:
SCION xb EC REARVIEW MIRROR Preparation
 Preparation Part Number: PT374-02090 Kit Contents Item # Quantity Reqd. Description 1 1 AD Mirror Assembly w/ PRNDL 2 1 Hardware bag Hardware Bag Contents Item # Quantity Reqd. Description 1 2 T-tap Connectors,
Installation Instructions QUICKSILVER SHIFTER Fits: Chevrolet Camaro Pontiac Firebird Catalog # 80688
 Installation Instructions QUICKSILVER SHIFTER Fits: 1973-1981 Chevrolet Camaro 1970-1981 Pontiac Firebird Catalog # 80688 WORK SAFELY! For maximum safety, perform this installation on a clean, level surface
Scion xd EC Rearview Mirror Preparation
 Scion xd 2010 - EC Rearview Mirror Preparation Part Number: 00016-09101 Code: CM9 Kit Contents Item # Quantity Reqd. Description 1 1 Mirror Assembly w/ Compass and Homelink 2 1 Hardware bag Hardware Bag
Please visit for the latest version of these installation instructions.
 Please visit www.blueox.com for the latest version of these installation instructions. BX1726 (All Models) (No Active Shutters or E-Assist) Attachment Tab Height: 12 Serial Number Attachment Tab Width:
SCION xb LOWERING SPRINGS Preparation
 Preparation Part Number: PTR07-52080 Kit Contents Item # Quantity Reqd. Description 1 2 Front Springs 2 2 Rear Springs 3 1 Instruction Form Hardware Bag Contents Item # Quantity Reqd. Description 1 2 3
SCION xb OVERHEAD CONSOLE Preparation. Part Number:
 SCION xb 2008 - OVERHEAD CONSOLE Preparation Part Number: 08253-12800 Kit Contents Item # Quantity Reqd. Description 1 1 Overhead Console 2 1 Bracket 3 1 Plastic cover 4 1 Photo Mount Sheet 5 1 Installation
INSTALLATION & OWNER S MANUAL
 Pg. 1 of 14 INSTALLATION & OWNER S MANUAL John Deere Gator XUV 825i S4 Cab (p/n: 1GTRXUV4 Steel Cab with Doors) The contents of this envelope are the property of the owner. Be sure to leave with the owner
In area - A -, a proper seal must be made against the top of the window glass.
 Door window, adjusting Page 1 of 3 Audi > B3 > 1994-1998 Body Exterior, Interior 61 - Convertible top, checking and adjusting Door window, adjusting Sections C-C and D-D. Adjust door window so that window
Factory safe air/fuel ratio s for Optimum performance Patent# 7,359,795 Now equipped with Air Fusion Patent pending
 Part number SP1997 2007-08 Infiniti G35 3.5L V6 Sedan 2008-09 Infiniti G37 3.7 V6 Coupe 2009 Infiniti G37 3.7 V6 Sedan cold air intake equipped with MR Tech and Air Fusion 1- primary air intake 1- primary
JEEP JK 4 LONGARM. Tools Needed: Thank you for choosing Rough Country for your suspension needs.
 921786000 Thank you for choosing Rough Country for your suspension needs. JEEP JK 4 LONGARM Rough Country recommends a certified technician install this system. In addition to these instructions, professional
Installation Manual TWM Performance Short Shift Kit 2003 And Up Saturn Ion
 Installation Manual TWM Performance Short Shift Kit 2003 And Up Saturn Ion It s preferable to park on a flat surface, as you may have to engage and disengage the hand brake and shift from gears to neutral.
BX4330 Acclaim Tow Bar Operator Manual & Installation Instructions
 Operator Manual & Installation Instructions Serial Number (5,000 lb) 2 Inch Coupler 292-2205 Rev J Page 1 of 7 4/23/13 DO NOT INSTALL, OPERATE OR USE THIS EQUIPMENT UNTIL THE FOLLOWING OPERATING AND SAFETY