W C-230 Kompressor Sports Sedan 1.8l Thermostat Replacement & Antifreeze flush
|
|
|
- Gerald Chase
- 5 years ago
- Views:
Transcription
1 W C-230 Kompressor Sports Sedan 1.8l Thermostat Replacement & Antifreeze flush First, I have to thank everyone who has contributed to the MBworld.org forums without you; I would not have gotten the courage to do this work myself. OK, here s my situation: Last month (December) in Austin, TX, I was getting a check engine light on my 2003 C230. I drove over to my local AutoZone and had my car scanned (it s free). It showed P0128 (Coolant Temperature Below Thermostat Regulating Temperature). This means the thermostat has failed. The thermostat stays open when it fails. So, during startup the coolant temperature cannot reach 90 C as it keeps circulating to radiator. After some predetermined time, the computer generates the Check Engine code P0128. Normally, the closed thermostat blocks the coolant in the engine block and lets it heat up to 90 C. When the coolant temperature reaches above 90 C, it opens the thermostat and the coolant circulates through radiator to maintain temp around 90 C. You can drive your car with a failed open thermostat for few days. I drove mine for a couple of weeks, but only around town, nothing beyond 30 miles a day. What you ll need: 1. Thermostat and O-ring a. Ordered mine from b. My cost was: i. ~ $28.00 for the T-Stat ii. ~$1.88 for the O-ring iii. Shipping was ~$6.50 iv. PLEASE NOTE: This website is a dealership in Atlanta, GA which sells MB genuine parts. Call them if you have questions. They were very helpful with me. They ll ask for your VIN # to make sure you have the right parts for your particular car. 2. Zerex G-05 Antifreeze a. I ordered mine from O reilly Auto Parts they were no help. I had to find the part myself. Luckily, they were able to order some and had it overnight! b. * NOTE * Be sure to get the pre-mix. The O reilly people didn t bother to offer me the 50-50, so I had to mix mine with Distilled water (see picture) c. My cost: i. ~$17.00 Antifreeze 1 Gallon ii. ~$1.00 Distilled water 1 Gallon 3. Tools a. 8mm socket wrench or manual wrench b. Small flathead screwdriver c. Plastic bendable hose ½ inch in diameter and about 4-5 inches long (see orange hose in my picture). Got mine at Wal-Mart for $.50 cents 4. Time a. Give yourself about 1-2 hours for complete job and don t forget a cheap beer or two ;0)

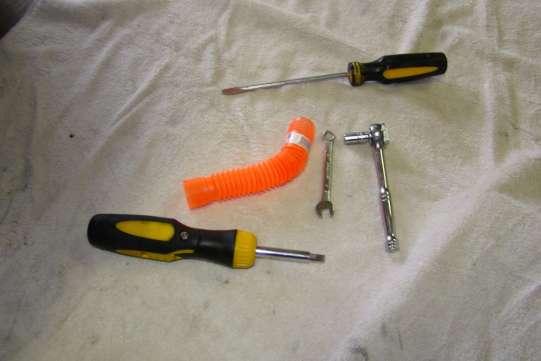
2 Parts: Tools:
 I had to roll my car into lifts because I am too big to get underneath my car.")
3 STEP ONE: REMOVE ENGINE COVER (UNDERNEATH CAR) Use your 8mm ratchet wrench and remove the 6 bolts holding your engine cover. My car only had 4 (no more trips to the dealer ) I had to roll my car into lifts because I am too big to get underneath my car. Once I removed the engine cover, I rolled the car back to a flat surface. Remember to keep track of your bolts. I use a plastic cup or a sandwich bag.

4 STEP TWO: DRAIN COOLANT First, unscrew coolant reservoir cap and remove. (The air will push coolant down faster). You can find the coolant reservoir cap in the picture below (left side red circle). Next; at the front, right side, underneath the engine you will find a RED plastic bolt and black plate. Affix your plastic /rubber hose to a nipple behind the black plate. See arrow below. Please note, you can just feel for the nipple and place hose as shown in the second photo.

 Notice the coolant flow (total should be about 1+ gallon). Also, keep the tray nearby.")
5 The picture below shows the placed hose. Now use a flathead screwdriver to turn the red plastic bolt and release the coolant. Be gentle with this red bolt! (Brake it and you ll have coolant everywhere!) Notice the coolant flow (total should be about 1+ gallon). Also, keep the tray nearby. When you remove the Thermostat housing (later) more coolant will come out! (Some splashed next to the tray).

6 STEP THREE: REMOVE THERMOSTAT Here you can see the Thermostat housing (circled). In order to get to it, we will remove a front top engine cover. Pop each side by placing you hand underneath it and pull towards you. This should easily come out.


7 Now using a small flathead screw driver remove the hose clamp. If you accidentally remove the metal clamp, don t worry, you can place it back later. Also be aware that when you pull out the hose from the T-Stat housing, coolant will flow below and also through here, so be gentle and know that you will need to let the coolant empty out. Give yourself about 5-10 minutes for coolant to empty completely. Now we can begin removing the T-stat housing by unscrewing these two bolts. You can use either a ratchet wrench or the manual I am using here 8mm. These two bolts are long so, be patient.


8 OK, time to remove the T-stat housing. After having removed the hose from the front, be careful in pulling the T-stat housing off from the engine block. I used a flathead screwdriver to help me pop it open (pictured below). Take your time and be careful. It took me a good 5-8 minutes to jar it loose. Remember this piece has dried coolant and may stick. Again, mine took a while to pull out.


9 The pictures below show the T-stat housing with the old T-Stat in place and the engine block and connecting hose.


10 STEP FOUR: REPLACE THERMOSTAT Hopefully you are feeling pretty good now. The rest should be quite easy. OK, let s keep going. Remove the old T-Stat and O-ring (seen on the top of the picture here). Place the new O-ring on the t-stat housing.


11 When placing the new T-stat, be careful as it only goes in one way. There are a couple of tabs inside the housing. * DON T FORCE IT IN! * Again, it only goes in one way. Remember to place back the hose clamp we removed in the beginning. Don t force it close. Leave it like the photo. You will force it close once you have inserted the radiator hose from where you removed it earlier.


12 Insert the T-Stat housing back on the engine block and re-screw the bolts.


13 Also remember to reconnect the radiator hose and press down on the medal clamp, as shown below: Your work should look like this! We are almost done.
, FINGER SCREW TIGHT AND THEN ONLY USE SLIGHT")
14 STEP FIVE: PUT CAR BACK TOGETHER AND REPLACE ANTIFREEZE Place back the front engine cover. Remember to remove plastic hose and tighten the red bolt underneath the engine (BE CAREFUL), FINGER SCREW TIGHT AND THEN ONLY USE SLIGHT STRENGHT TO TIGHTEN WITH FLATHEAD SCREWDRIVER.


15 Replace coolant through coolant reservoir. After filling up coolant, be sure to run your engine and check underneath engine to make sure you have no leaks. You will see Check Coolant Level in your dash when you first start-up the engine. Coolant will need to travel throughout the engine. Give it several minutes. Continue to check coolant level reservoir. Let the engine sit, (shut off for another 10 minutes), or enough to where you feel comfortable placing back the engine cover underneath.
.")
16 Now, remember to run your engine and keep an eye on the coolant level in the tank. Fill as required. Also, please note because I did my work in January (middle of winter in TX with temps in the 40s-50s). I had to drive my car through normal operation, for about 3 days before my Check Engine light turned off in the console. The car has to run at 85-90C for a while before the Check Engine light will turn off this is normal, so don t be alarmed if your Check Engine light stays on for a couple of days. Also, please discard your old coolant through your local auto-parts store; do not discard in storm drains! Enjoy your beer! :o)
Ford Racing BOSS 302 Engine Oil Cooler (11-14 GT)
") Tools needed: 14mm hex socket 7mm socket/wrench 8mm socket/wrench Ford Racing BOSS 302 Engine Oil Cooler (11-14 GT) 10mm socket (for airbox removal) ¾ inch or 19mm wrench Torque wrench Appropriate ratchets
Tools needed: 14mm hex socket 7mm socket/wrench 8mm socket/wrench Ford Racing BOSS 302 Engine Oil Cooler (11-14 GT) 10mm socket (for airbox removal) ¾ inch or 19mm wrench Torque wrench Appropriate ratchets
DIY: Shiver Valve Check, Illustrated
 DIY: Shiver Valve Check, Illustrated By Petemoss, AF1 Forum Tools needed: 4mm allen wrench to remove all the fairing pieces 2.5mm allen wrench to remove battery holder 5mm allen wrench for valve cover
Replacing MK4 Golf/Jetta radiator mounts in-car
 Replacing MK4 Golf/Jetta radiator mounts in-car This is a guide to replacing the radiator mounts in a MK4 Golf/Jetta. This involves moving the core support to the service position which allows you to do
2007 Crown Victoria Police Interceptor (P71) Blend Door Actuator Replacement (If I did it, you can too.)
 Blend Door Actuator Replacement (If I did it, you can too.)") 2007 Crown Victoria Police Interceptor (P71) Blend Door Actuator Replacement (If I did it, you can too.) I'm not saying this is the only way, or even the right way, but it worked for me. First time I've
2007 Crown Victoria Police Interceptor (P71) Blend Door Actuator Replacement (If I did it, you can too.) I'm not saying this is the only way, or even the right way, but it worked for me. First time I've
In summary, the procedures includes removal of the belly pans, draining of the engine block, draining of the radiator, coolant mixing and refilling.
 COOLANT DRAIN AND CHANGE PROCEDURE Recently, there was a request for a picture guide for draining/changing coolant (Robot808 and James-man) and since I was going to do this operation on Idaho (88), I took
Ford Mustang V6 OEM-Style Fog Light Kit Parts List: Quantity: Tool List:
 2015-2017 Ford Mustang V6 OEM-Style Fog Light Kit Parts List: Quantity: Tool List: LED Foglights/ Bezels 2 Flat head & Phillips screwdriver (if you ordered part#3600) Ratchet & Socket set OR Wiring harness
Changing the Power Steering Belt
 Changing the Power Steering Belt Brett Dukes (Maverick) from the BigJimny Forum has contributed this article to the Website. Many thanks. Whilst off-roading on Sunday, my alternator Fan Belt snapped -
How I installed new brake pads on my i with Sport Package (should be fine for other E39 s) By Robert B.
 By Robert B.") How I installed new brake pads on my 1999 528i with Sport Package (should be fine for other E39 s) How I installed new brake pads on my 1999 528i with Sport Package (should be fine for other E39 s) By
How I installed new brake pads on my 1999 528i with Sport Package (should be fine for other E39 s) How I installed new brake pads on my 1999 528i with Sport Package (should be fine for other E39 s) By
Thermo-Bob 1 Installation Manual: Kawasaki Concours
 Thermo-Bob 1 Installation Manual: 1986-2006 Kawasaki Concours This is a basic guide for installing the Thermo-Bob 1 on a Kawasaki ZG-1000 Concours. The bike used in the following photos was a 1995 year
Volvo 850 Radiator Replacement Jason Reed 29 March 2013
 This write up covers removing and replacing the radiator on a 97 855 GLT wagon with light pressure turbo and automatic transmission. This car has 162K miles. The radiator, which was original, developed
HOW TO REPLACE THE SPOILER ON YOUR GEN 3 PRIUS
 HOW TO REPLACE THE SPOILER ON YOUR GEN 3 PRIUS Yup, it happened. The spoiler on your beloved Prius has departed this earth and now is in the great junkyard in the sky. This is how you make it all better
Thermo-Bob 3 Installation on a 2015-and-newer Versys 650
 Thermo-Bob 3 Installation on a 2015-and-newer Versys 650 Thank you for purchasing the Thermo-Bob 3 radiator bypass system for the Kawasaki Versys 650. Proper installation is critical: if you are not familiar
Porsche 928 with 16v LH-Jetronic Fuel System
 Porsche 928 with 16v LH-Jetronic Fuel System Toll-Free Tech Hot Line: 877-FOR-928M 877-367-9286 Please do not copy this manual and give copies to your friends. Our ability to bring you this supercharger
How to install the Barnett clutch and the stronger Oil Pump Drive Gear
 How to install the Barnett clutch and the stronger Oil Pump Drive Gear Written by WildFred I m from Germany so please excuse my English and the spelling. The following procedure is a combination of the
List of parts needed below. Tools needed
 1 BMW 645 Coolant leak repair (Cap with Seal Repair and Expanding Coolant Pipe Installation w Pics) By Michael R. Brown (Estimated time to complete the job is 6-8 hrs) List of parts needed below. BMW PART
Thermo-Bob 3 Installation Manual: KLR650E (2008 and newer)
") Thermo-Bob 3 Installation Manual: KLR650E (2008 and newer) Thank you for purchasing the Thermo-Bob 3 radiator bypass system for the KLR650. Since the KLR already has a doohickey, it seemed that this thingamabob
Thermo-Bob 3 Installation Manual: KLR650E (2008 and newer) Thank you for purchasing the Thermo-Bob 3 radiator bypass system for the KLR650. Since the KLR already has a doohickey, it seemed that this thingamabob
SW20 Coolant System Maintenance.
 SW20 Coolant System Maintenance. This article contains information on how to change and bleed the coolant, as well as flushing the system. It is based on information in the service manual, tips gathered
Volvo 1800 Dash Pad Replacement
 Volvo 1800 Dash Pad Replacement (courtesy of John Garden State Chapter Volvo Club America) Reupholstering the dash Well it has been some time since I have been online in the forum. Winter is a quite time
There is hence three things you can do - add oil, adjust the temp that the clutch begins to engage, or do both.
 As most of you may be aware, I have been doing a lot of research lately on our cooling system in the 80's including the fact that we have a dead spot on the OEM temp gauge which prompted me to not rely
How To: Thermostat change - D8 V6 194bhp
 How To: Thermostat change - D8 V6 194bhp Firstly, take off the Air Filter hoses and connectors and lift off. This leaves you with this workable space... I started with taking the two bolts out of the cable
X-Type w/ non-premium sound amplifier installation instructions
 X-Type w/ non-premium sound amplifier installation instructions 1. Pull radio from dash (see Radio Removal Instructions ) 2. Disconnect wiring harness from back of radio by pushing in tab on plug and pulling
Thank you for purchasing the Craven Speed FlexPod Complete Gauge Pod Kit
 Thank you for purchasing the Craven Speed FlexPod Complete Gauge Pod Kit Before You Start Please read instructions completely before installing. These instructions contain the information required to install
1997 Buick Skylark Custom: heater core replacement.
 1997 Buick Skylark Custom: heater core replacement. I couldn t find a whole lot of info on replacing the heater core in my 1997 Buick Skylark. So, I just got the jack and tools and went at it. Here is
Tools needed: Here is a pic of the shift kit I used. It is a Transgo brand and as you can see, it just a bag full of springs and one valve.
 Before installing a shift kit, be sure the transmission is in good operating order. If your transmission is making noises, slipping, shifting bad or the fluid looks brown or smells burnt, take the transmission
How to change Mercedes W123 coolant
 How to change Mercedes W123 coolant The coolant in your W123 only lasts so long. Don't let it go too long and risk excess corrosion and damage to sensitive climate control parts, like your heater servo
Thank you for purchasing the Craven Speed FlexPod Complete Gauge Pod Kit For R56, R58, R59, R60 with Refresh Engines (2011+)
") Thank you for purchasing the Craven Speed FlexPod Complete Gauge Pod Kit For R56, R58, R59, R60 with Refresh Engines (2011+) Before You Start Please read instructions completely before installing. These
Thank you for purchasing the Craven Speed FlexPod Complete Gauge Pod Kit For R56, R58, R59, R60 with Refresh Engines (2011+) Before You Start Please read instructions completely before installing. These
M-Tuned reroute kit XX
 M-Tuned reroute kit 14-161XX Manufactured and designed by: *Professional Installation Recommended but not required 1) Disconnect the negative terminal from the battery in the trunk. 2) Drain the coolant
CALDERA 10E Spur Gear Change
 CALDERA 10E Spur Gear Change www.thirdcoastrc.com ebay handle - little*oak Click Below to Visit our Ebay Store EBAY STORE (Please take a moment and bookmark my website, ebay store, and save me as an ebay
Legacy 3.6R CVT Cooler Installation
 2015-2017 Legacy 3.6R CVT Cooler Installation WARNING!! - Modification and working on your car involves some dangers and risks and may cause injury to you or damage to your vehicle if not done properly
Thermo-Bob Installation Manual: KLR650A ( )
") Thermo-Bob Installation Manual: KLR650A (1987-2007) Thank you for purchasing the Thermo-Bob radiator bypass system for the KLR650. Since the KLR already has a doohickey, it seemed that this thingamabob
Thermo-Bob Installation Manual: KLR650A (1987-2007) Thank you for purchasing the Thermo-Bob radiator bypass system for the KLR650. Since the KLR already has a doohickey, it seemed that this thingamabob
Mustang Radiator Conversion DIY. By GearHeadPeter. January 27, 2011
 1964-1966 Mustang Radiator Conversion DIY By GearHeadPeter January 27, 2011 We all know that the radiators in our cars are not the best, especially if you have done any customization to the engine, which
MAX FLOW FUEL KIT KIA FORTE SX HYUNDAI VELOSTER TURBO INSTALLATION INSTRUCTIONS
 MAX FLOW FUEL KIT KIA FORTE SX 2014+ HYUNDAI VELOSTER TURBO INSTALLATION INSTRUCTIONS Installation: Tools needed: 1/4 or 3/8 drive ratchet Different length extensions 8mm socket / 10mm socket / 12mm socket
R129 Tonneau Cover Lock Cylinders
 R129 Tonneau Cover Lock Cylinders Level of difficulty: Quite easy very rewarding! Tools needed: - M10 socket and ratchet - Flat screwdriver or needle nose pliers or small hooked tool for removal of hydraulic
OIL COOLER KIT INSTALLATION INSTRUCTIONS PART NUMBER D E92 335is (N54 engine) with BMW M-Technic bumper and with stock oil cooler
 with BMW M-Technic bumper and with stock oil cooler") OIL COOLER KIT INSTALLATION INSTRUCTIONS PART NUMBER D570-0923 APPLICATION: 2011 E92 335is (N54 engine) with BMW M-Technic bumper and with stock oil cooler Congratulations for being selective enough to
OIL COOLER KIT INSTALLATION INSTRUCTIONS PART NUMBER D570-0923 APPLICATION: 2011 E92 335is (N54 engine) with BMW M-Technic bumper and with stock oil cooler Congratulations for being selective enough to
COLD AIR INTAKE INSTALLATION INSTRUCTIONS PART NUMBER D A. APPLICATION: E36/7 M-Roadster or M-Coupe 3.
 COLD AIR INTAKE INSTALLATION INSTRUCTIONS PART NUMBER D760-0323A APPLICATION: 1998-00 E36/7 M-Roadster or M-Coupe 3.2 Liter PARTS LIST Air Filter Assembly 3 1/2" Tube Intake Shield Silicone Hose Airflow
Ford Racing Performance Improvement Intake Manifold (96-04 GT) Time Necessary: Approximately 4 hours
 Time Necessary: Approximately 4 hours") Ford Racing Performance Improvement Intake Manifold (96-04 GT) Time Necessary: Approximately 4 hours Tools Required: Ratchet and socket set Torque wrench Large adjustable wrench Needle nose pliers A dozen
Ford Racing Performance Improvement Intake Manifold (96-04 GT) Time Necessary: Approximately 4 hours Tools Required: Ratchet and socket set Torque wrench Large adjustable wrench Needle nose pliers A dozen
Brake master cylinder replacement
 Brake master cylinder replacement 8-25-2010 I had replaced the front brake master cylinder a few years ago when it developed a bad leak, at that time, I ordered a new master cylinder from Spartan, very
Door Panel Removal & Window Stop Adjustment
 Door Panel Removal & Window Stop Adjustment By: Jeff Wolford Disclaimer: This is simply an article of how I fixed my car. I m not responsible if you break, scratch, or mess up anything following my example.
How to replace your Turbo Actuator Step by Step
 How to replace your Turbo Actuator Step by Step Special thanks to other forum members who have previously dealt with this problem! Old By Chirpz New Your Turbo is a lot tougher than the electric actuator
SR Performance Aluminum Radiator - Manual (96 4.6L)
") SR Performance Aluminum Radiator - Manual (96 4.6L) Tools needed 1. Large and small pair of pliers 2. 8mm and 10mm deep socket and extensions 3. Spare Rags 4. Large Drain Pan 5. Funnel with small opening
SR Performance Aluminum Radiator - Manual (96 4.6L) Tools needed 1. Large and small pair of pliers 2. 8mm and 10mm deep socket and extensions 3. Spare Rags 4. Large Drain Pan 5. Funnel with small opening
FITTING OIL TEMP AND PRESSURE GUAGES
 FITTING OIL TEMP AND PRESSURE GUAGES this guide is of reference to fitting an oil temp and pressure sender/ sensor into a sandwich plate- not the sump plug temp sensor (although it wouldn't be much different
There was some debate whether or not there was a write up, with Pictures, for replacing the ignition switch.
 Replacing the Ignition Switch - Step by Step with Pictures. http://forums.audiworld.com/showthread.php?p=18927576 (Corey 02ALMSTT) (With updates/corrections by Dave F.) February 1, 2013 (I = Corey, mostly)
Installation Instructions Borla Stinger S-Type Cat-Back Exhaust (05-09 GT)
") Installation Instructions Borla Stinger S-Type Cat-Back Exhaust (05-09 GT) Overview: This installation guide will cover installation of the Borla Stinger S-Type Catback Exhaust for all Mustang GTs from
Installation Instructions Borla Stinger S-Type Cat-Back Exhaust (05-09 GT) Overview: This installation guide will cover installation of the Borla Stinger S-Type Catback Exhaust for all Mustang GTs from
Fitting the Bell Auto Services (B-A-S) TDV6 EGR Blanking Kit to a 2006 model Discovery 3 TDV6 HSE
 TDV6 EGR Blanking Kit to a 2006 model Discovery 3 TDV6 HSE") Fitting the Bell Auto Services (B-A-S) TDV6 EGR Blanking Kit to a 2006 model Discovery 3 TDV6 HSE Before I describe how I did this, I must first thank other members of the Disco3.co.uk forum (namely J,moore
Fitting the Bell Auto Services (B-A-S) TDV6 EGR Blanking Kit to a 2006 model Discovery 3 TDV6 HSE Before I describe how I did this, I must first thank other members of the Disco3.co.uk forum (namely J,moore
JHP 04 GTO SPORTS BINNACLE KIT INSTALL GUIDE
 JHP 04 GTO SPORTS BINNACLE KIT INSTALL GUIDE NOTE: If you don't feel comfortable with any of the following steps, you should find a professional to do the installation. 1) Use a piece of tape as shown
2000 Mr2 Spyder Seat Cover Replacement Project
 2000 Mr2 Spyder Seat Cover Replacement Project Tool List: Plastic Trim Tool, Hog Ring Pliers, Medium or Heavy Duty Wire Cutters, 12mm socket, 14mm Socket, Ratchet, Extension, Flat Head Screwdriver & Gloves
Seadoo Supercharger Removal Guide RXP
 Seadoo Supercharger Removal Guide RXP RXT, RXT X, RXP X and GTX models are very similar and Removal and Installation is similar. The Ceramic washers installed by the OE manufacturer do not completely disintegrate
2008 Toyota Tundra 4WD Brake Job: A Quick Job and Even Quicker Write-Up.
 FRONT BRAKES: 2008 Toyota Tundra 4WD Brake Job: A Quick Job and Even Quicker Write-Up. 1. Remove this bolt holding brake line bracket to the suspension. 2. I had to replace all 4 rotors at 60K miles, so
Mishimoto Performance Aluminum Radiator w/ Stabilizer - Manual (97-04 GT, Mach 1; Cobra)
") Mishimoto Performance Aluminum Radiator w/ Stabilizer - Manual (97-04 GT, Mach 1; 97-01 Cobra) Installed on: 2000 Mustang GT (manual transmission) Tools: 8mm socket 10mm socket 13mm socket 3/4" wrench
Mishimoto Performance Aluminum Radiator w/ Stabilizer - Manual (97-04 GT, Mach 1; 97-01 Cobra) Installed on: 2000 Mustang GT (manual transmission) Tools: 8mm socket 10mm socket 13mm socket 3/4" wrench
C-6 Snake charmer installation instructions
 C-6 Snake charmer installation instructions ( READ CAREFULLY BEFORE BEGINNING INSTALLATION!!!!!) Tools needed for basic install: 1. Flathead screwdriver 2. # 6 Allen wrench or set of Allen wrenches 3.
Mercedes Diesel Valve Adjustment Procedure
 1 of 30 5/30/2008 12:58 PM Home Cars for sale Trucks for sale Where we are Links to other diesel sites About us Why diesel? Diesel Videos How they work How they sound FAQ Dodge Diesel Maintenance tips,
Detroit Tuned R56 Oil Service How-To
 Detroit Tuned R56 Oil Service How-To Welcome to Detroit Tuned s how-to guide for an oil service for an R56 MINI Cooper. It s always best to do an oil change on a hot engine as the hot oil will drain better
Rear End Installation and Bearing Kit - 8.8in (86-12 V8; V6)
") Rear End Installation and Bearing Kit - 8.8in (86-12 V8; 11-13 V6) Tools Required: Jack Stands 5 Floor Jack 2 Oil Pans 1 Wheel Blocks 2 Differential Oil 3 qts Friction Modifier 3 bottles Tube of Black
Rear End Installation and Bearing Kit - 8.8in (86-12 V8; 11-13 V6) Tools Required: Jack Stands 5 Floor Jack 2 Oil Pans 1 Wheel Blocks 2 Differential Oil 3 qts Friction Modifier 3 bottles Tube of Black
Remove the 3-11mm nuts holding mirror on. Don t drop the nuts!
 2005-2012 Ford Mustang Puddle Lamp Kit Parts List: Quantity: Tool List: LED Lamps 2 Flat head screwdriver Seals 2 Ratchet & Socket set OR Nuts 2 Adjustable Wrench Wiring harness 1 Drill & 11/16 th bit
H31 BOOSTER REBUILD & MASTER CYLINDER
 2010 1991 BMW 750iL George Fontes gajfontes@yahoo.com H31 BOOSTER REBUILD & MASTER CYLINDER Rebuild hydraulic booster and replace Master Cylinder. Page 1 of 16 Master Cylinder Removal & Brake Booster Rebuild
M62 Alternator Removal / Replacement (Water Cooled)
") M62 Alternator Removal / Replacement (Water Cooled) Pre-Steps 1. Disconnect Battery Positive lead 2. Charge Your Battery with battery charger to full charge (So you new alternator wont have to work as
M62 Alternator Removal / Replacement (Water Cooled) Pre-Steps 1. Disconnect Battery Positive lead 2. Charge Your Battery with battery charger to full charge (So you new alternator wont have to work as
Fanatec GT3RS V1 to GT3RS V2 Tutorial
 Fanatec GT3RS V1 to GT3RS V2 Tutorial by Roy Visser 1 How to update your Fanatec GT3RS V1 wheel to a GT3RS V2 wheel Welcome to this guided and detailed tutorial for upgrading your Fanatec GT3RS V1 wheel
We recommend installing the TRS Racebars first as we have done
 Thanks for purchasing the 2 Front Lowering Kit for the Honda Grom (MSX125). This is a basic installation guide, and we tried to cover everything, but use your best judgment along the process. It is recommended
Turner M50 Manifold Adapter Install. April 26, 2012
 April 26, 2012 Models: 1996-99 E36 328i/M3; 1997-98 E39 528i, 1997-98 Z3 2.8, 1998-2000 MZ3 S52 Product(s): Turner M50 Manifold Adapter Kit Subject: Installation Guidelines and Tips This guide will aid
IMPORTANT INSTALLATION NOTE
 IMPORTANT INSTALL NOTE IMPORTANT INSTALLATION NOTE IMPORTANT INSTALL NOTE MISHIMOTO-SUPPLIED HARDWARE (8) PC M6 X 1.0 X 16MM FLANGE HEAD BOLT NOTE: DO NOT USE IMPACT GUN TO INSTALL SUPPLIED M6 HARDWARE
Disco 3 Clock Spring / Rotary Coupler replacement
 Disco 3 Clock Spring / Rotary Coupler replacement I recently had to change my Clock spring and thought some folks may find it helpful to see what it entailed. I did lots of reading around but couldn t
GrimmSpeed Install Guide Series Installing the GrimmSpeed WRX Boost Control Solenoid Updated 4/14/15
 GrimmSpeed Install Guide Series Installing the GrimmSpeed 2015+ WRX Boost Control Solenoid Updated 4/14/15 Introduction: This guide will illustrate the installation of the GrimmSpeed 2015+ WRX Boost Control
Door panel removal F07 5 GT
 Things needed Decent plastic trim removal tools Torx 30 Spare door clips 07147145753 I got away with a set of 5 but if I did it again I d be cautious and get 10. From prior experience if they are damaged
Changing the Struts on a WK Jeep CRD
 Changing the Struts on a WK Jeep CRD Step by Step By Chirpz Disclaimer: I do not claim that this procedure is the right way or even the best way to change your struts. This is what I did after reading
Stand Alone Fog Lights Installation Instructions
 Tools Required: 1. Trim Removal tool or protected flat screwdriver 2. #2 Phillips Screwdriver 3. 10mm socket 4. 10mm wrench 5. 8mm or 5/16 socket 6. Adjustable Pliers 7. Electrical Tape WARNING!!! Disconnect
Sunroof Repair. Sunroof Repair TSB. The sunroof repair kit available for the J30 is part number Y20. See images at bottom of document.
 Sunroof Repair This document is the text/images from the TSB (technical service bulletin) issued by Infiniti concerning the repair procedure for sunroof issues. Be advised that this is a LARGE, TIME-CONSUMING
Anglefire s Guide to Radiator Replacement
 Land Rover Discovery 3 Anglefire s Guide to Radiator Replacement Mark Colston WWW.DISCO3CLUB.CO.UK August 2011 Version 1.0 Copyright Mark Colston Change Record. DATE Revision Update Notes Made By August
4 pieces of silicone hose Unless you have AEM then you have 2 2.5, 1 3, and 1 3.5
 The parts in your kit: 3 pieces of Mandrel-Bent Aluminized Tubing: 1 Straight 1 45 degree bend with straight section 1 curved section 4 pieces of silicone hose 1 2.5 1 3.5 2 3 Unless you have AEM then
Good AC company sites: Great Forum sites: Miscellaneous:
 I purchased my AC guage set at Advance Auto. I originally had a Harbor Freight gauge, but it always leaked. This one is a Interdynamics P/N BRY-134HD. This page at: http://www.idusa.com/pdf/inst/bry-134.pdf
The Sands Mechanical Museum
 The Sands Mechanical Museum How to Change Your Oil It is more difficult to change the oil in a Lotus Elise because the oil plug and filter are difficult to access. They are located behind an access panel.
OIL COOLER KIT INSTALLATION INSTRUCTIONS PART NUMBER D
 OIL COOLER KIT INSTALLATION INSTRUCTIONS PART NUMBER D570-0904 APPLICATION: 2011-2012 E90 335i/xi (N55 engine) with BMW standard bumper and with stock oil cooler Congratulations for being selective enough
How to change Swirl Flaps, on Diesel BMW
 How to change Swirl Flaps, on Diesel BMW I am now going to show you how i did it on my car. May'sedition of Total BMW (still in WHSmiths) did a cover on how to change and modify Swirl flaps on a 330d engine,
AREA 51 - Project Deep Water Foreman!
 AREA 51 - Project Deep Water Foreman! Submitted By: Mike Smith of www.shed-headz.com This year marks a very important mile stone for me, that my 1998 Honda Foreman 450s turns 10 years old. Its important
2010 Toyota Prius model II Head Unit Upgrade
 2010 Toyota Prius model II Head Unit Upgrade Monday, December 21, 2009 Disclaimer: Use this document and its contents at your own risk. Forward: Huge thanks to those members on Priuschat.com that forged
EXPANSION TANK MUSTANG GT FORD FIESTA ST PARTS LIST AND INSTALLATION GUIDE PARTS LIST AND INSTALLATION GUIDE
 PARTS LIST MMHOSE-MUS8-15L: 4 PC SILICONE HOSES 8 PC CLAMPS 1 PC STAINLESS STEEL ADAPTER MMHOSE-MUS8-15U: 1 PC SILICONE HOSE 1 PC QUICK-DISCONNECT FITTING 1 PC CLAMP MMHOSE-MUS8-15ANC: INSTALLATION INSTRUCTIONS
Corrado Club of Canada. VR6 Engine FAQ. By: Dennis
 Corrado Club of Canada VR6 Engine FAQ By: Dennis I thought I would snap a few pics of the engine compartment on my 1994 VR6 Corrado. First, this is the updated engine management system so it does have
How to stick a 3.4L engine into your Boxster.
 How to stick a 3.4L engine into your Boxster. When I purchased my 99 Boxster in January, it was already equipped with a TPC supercharger setup. While fun and a great improvement over the rather anemic
J&M Stainless Steel Teflon Brake Lines - Front (94-98 Cobra)
") J&M Stainless Steel Teflon Brake Lines - Front (94-98 Cobra) Time Required: 30min-1 hour. Tools and Supplies Required: Jack Jack Stands Lug Wrench or 13/16 Socket 10mm Socket Socket Wrench Torque Wrench
J&M Stainless Steel Teflon Brake Lines - Front (94-98 Cobra) Time Required: 30min-1 hour. Tools and Supplies Required: Jack Jack Stands Lug Wrench or 13/16 Socket 10mm Socket Socket Wrench Torque Wrench
Some tips and tricks I learned from getting clutch out of vehicle Skoda Octavia year 2000
 Some tips and tricks I learned from getting clutch out of vehicle Skoda Octavia year 2000 Last change 2013-Oct-11 I bought Haynes manual for a starter. That s something well worth it s cost I believe.
2014+ FORD FIESTA ST DIRECT-FIT OIL COOLER KIT PARTS LIST AND INSTALLATION GUIDE CAUTION PARTS INCLUDED NOTE TOOLS NEEDED INSTALL PROCEDURE
 PARTS LIST AND PARTS INCLUDED 3PC APPLICATION-SPECIFIC MOUNTING BRACKETS & SPACER 1PC 19-ROW OIL COOLER 1PC 4 ', X 1'' BRAIDED HOSE W/90-10AN FITTINGS 1PC 3'' X 2.5 '' BRAIDED HOSE W/45 AND 90-10AN FITTINGS
DrVanos.com Stage II Installation Instructions. Tool rental is available with the purchase of a vanos kit *See website for more info*
 DrVanos.com Stage II Installation Instructions Special Tools Needed: Camshaft locking tool TDC Crank pin Sprocket turning tool Tool rental is available with the purchase of a vanos kit *See website for
YOUR CAR's COOLANT MUST BE COLD TO DO THIS. DON'T BE STUPID AND SCALD YOURSELF.
 I just read through the service manual, checked out Billman's recommendations, and tackled the coolant change on my 2003 s2000. I'm not a mechanic by trade but have done valve adjustments, head gaskets,
HYUNDAI VELOSTER SHORT RAM 1.6T INTAKE INSTALLATION INSTRUCTIONS
 Installation: HYUNDAI VELOSTER SHORT RAM 1.6T INTAKE INSTALLATION INSTRUCTIONS Tools needed: 1/4 or 3/8 drive ratchet 12 extension (shorter ones work, but will be difficult to reach some bolts) 10mm socket
Troubleshooting Guide for Okin Systems
 Troubleshooting Guide for Okin Systems More lift chair manufacturers use the Okin electronics system than any other system today, mainly because they re quiet running and usually very dependable. There
v Porsche 928
 1985-86 32v Porsche 928 Toll-Free Tech Hot Line: 877-FOR-928M 877-367-9286 Please do not copy this manual and give copies to your friends. Our ability to bring you this supercharger kit at this price relies
Installing the Wireless Charging upgrade kit in a 2018 XT5 (Platinum version)
") Installing the Wireless Charging upgrade kit in a 2018 XT5 (Platinum version) September 2, 2018 Tools needed: Wireless charger upgrade kit Plastic trim tools 7 mm nut driver Background: I purchased the
Installing the Wireless Charging upgrade kit in a 2018 XT5 (Platinum version) September 2, 2018 Tools needed: Wireless charger upgrade kit Plastic trim tools 7 mm nut driver Background: I purchased the
Prerequisites: Shop Manual (recommended) pages 3-9 through 3-13.
 pages 3-9 through 3-13.") Prerequisites: Order your gaskets average about $25.00 bucks X 2 so $50.00 4NK-11193-00-00 Obtain a shim kit (Should have several 265 and 270s) (Some dealers will exchange) Obtain a Valve Bucket Tool YM-33961
Prerequisites: Order your gaskets average about $25.00 bucks X 2 so $50.00 4NK-11193-00-00 Obtain a shim kit (Should have several 265 and 270s) (Some dealers will exchange) Obtain a Valve Bucket Tool YM-33961
2001 BMW X5 4.4i. Fuel Filter Replacement
 P P 2001 BMW X5 4.4i Fuel Filter Replacement Symptoms for Replacement: OBDII code P0171, Lean Bank1, which could be a bad or dirty MAF sensor Sluggish engine performance including hesitation with Wide
Cost - 41 ($68 approx) Time 2.5 hours approx
 Time 2.5 hours approx") Cost - 41 ($68 approx) Time 2.5 hours approx The early X3 (E83) from the first build to September 2004 was fitted with nasty black plastic door opener handles which were quickly superseded by a matt chrome
Cost - 41 ($68 approx) Time 2.5 hours approx The early X3 (E83) from the first build to September 2004 was fitted with nasty black plastic door opener handles which were quickly superseded by a matt chrome
PCV System Repair on a Volvo 5-cylinder
 PCV System Repair on a Volvo 5-cylinder by jblackburn» Tue Apr 06, 2010 12:28 am As any engine runs, there are gases from the top of the cylinders that escape past the piston rings and into the crankcase
Re-building a Caliper
 Re-building a Caliper by Leslie Henson The pistons in the calipers on the 90 are in very poor condition, and although the brakes work ok, it plays on our mind that the pistons are badly corroded, and it
Pontoon Assembly Instructions and manual. Read before using hoist.
 Page 1 Pontoon Assembly Instructions and manual. Read before using hoist. For Models 32BL18, 32BL22, 32BL25 and 42BL28 R Model 32BL22 Shown Proudly Made in Michigan By NuCraft Metal Products 402 Southline
PLEASE READ THROUGH THE WHOLE WRITE UP BEFORE ACTUALLY USING IT!!!!
 JDM power folding mirror switch install into stock USDM harness. By: Greg L., Zeke21 on twinturbo.net PLEASE READ THROUGH THE WHOLE WRITE UP BEFORE ACTUALLY USING IT!!!! This is how I was able to get the
Vehicle Specific Instruction Notes
 Vehicle Specific Instruction Notes Most later model vehicles use a plastic and felt anchoring strip in place of the older metal rods. We have provided rod pouches on all of our new seat skins that will
2010 Prius Maintenance
 2010 Prius Maintenance Changing Oil Disclaimer: All the information stated in this document was provided by Prius owners. None were affiliated with Toyota Motor Corporation, except as customers. This document
Highlander Hybrid Engine Block Heater Installation
 Highlander Hybrid Engine Block Heater Installation By Evan E. Fusco, MD *Disclaimer: I am not a certified mechanic nor am I an expert on working on cars. I am a hobbiest and tinkerer. I post these instructions
2016+ NISSAN TITAN XD
 PARTS LIST AND PARTS INCLUDED 1PC MISHIMOTO INTERCOOLER 2PC SILICONE BOOTS WITH DURACORE TECHNOLOGY 4PC CONSTANT-TENSION T-BOLT CLAMPS 2PC ALUMINUM SPACERS MOUNTING HARDWARE CAUTION Never work on the cooling
YOU MAY WANT TO FIRST TRY TO LOOSEN THE FILTER HOUSING
 2005 XC90 Tune-up (5-cyl) Including: Oil Change - Spark Plugs - Fuel Filter - Cabin Filter First off - let me say that I am an amateur (at best) mechanic, and I claim no responsibility for whatever you
Rzr Heater System Part #
 Rzr Heater System Part # 2878135 NOTE: This heater unit installs below the center of the dash. If you have a radio mount kit (Polaris Part # 2876897) you may need to cut the top front corner off the mount
PA Performance Mustang Alternator Amp (03-04 Cobra) - Installation Instructions
 - Installation Instructions") PA Performance Mustang Alternator - 130 Amp (03-04 Cobra) - Installation Instructions The below installation instructions work for the following products: PA Performance Mustang Alternator - 130 Amp (03-04
PA Performance Mustang Alternator - 130 Amp (03-04 Cobra) - Installation Instructions The below installation instructions work for the following products: PA Performance Mustang Alternator - 130 Amp (03-04