All Bluefin Led lights are water tested so please be aware there may be moisture present on the light.
|
|
|
- Jack Watts
- 5 years ago
- Views:
Transcription
1 Bluefin LED Underwater lights. GW16IFM/GW20IFM/GW48CCIFM Installation manual. Thank you for choosing Bluefin LED underwater lights, our products have been designed and tested to ensure optimum performance and longevity is maintained. All Bluefin Led lights are water tested so please be aware there may be moisture present on the light. Please ensure that your product is installed as per our instructions below, failure to do so may invalidate your warranty. If you are installing a GW48CCIFM please refer to the Driver instructions for electrical installation. Specification: electrical/fuse ratings Voltage Current Fuse rating Great White 24V only (Absolute min of 24v-5.1 8amp GW20IFM 19V under light). Great White 12/24V only (Absolute min 12V V amp GW16IFM of 10V under light). Warnings: Do not attempt to install the lights whilst the boat is in the water. Ensure that the correct voltage is used for the light. Ensure that an in line fuse is installed with the correct fuse rating per the light installed. Ensure all connections are made water tight or your warranty will be Void. Do not remove the inline Moisture Guard. Do not hold the light by the cable. Do not use abrasives on the lenses. Do not stare into the LED light at close proximity Tools required for installation: 101mm(4 ) hole saw Drill Marine sealant 3M 4200 or equivalent Installation: For optimum affect effect the light should be positioned between 8-12 ( mm) below the water line and at a 90 deg angle. Recommended spacing from 3-3 (1mtr) to 5-11 (1.8mtrs) between the lights. Drill a 101mm (4 ) hole for the light access through the hull, ensuring that there are no obstructions internally in the hull. Key the area to where the light is to be mounted with abrasive sand paper to ensure there is a clean area for the marine sealant to bond too. Apply marine sealant to the rear of the light on the circumference of the light and around the base of the tube to ensure a complete continuous bead of sealant is applied in both areas. (See fig 2) Feed the light through the hole and clamp internally in the hull using the clamping ring and washer supplied ensuring a tight fit using nuts and bolts supplied. (See fig 3 and 4) 1
 Electrical connection: It is advised that if installing GW16 models no")
 It is advised that if installing GW20 or GW48CC")
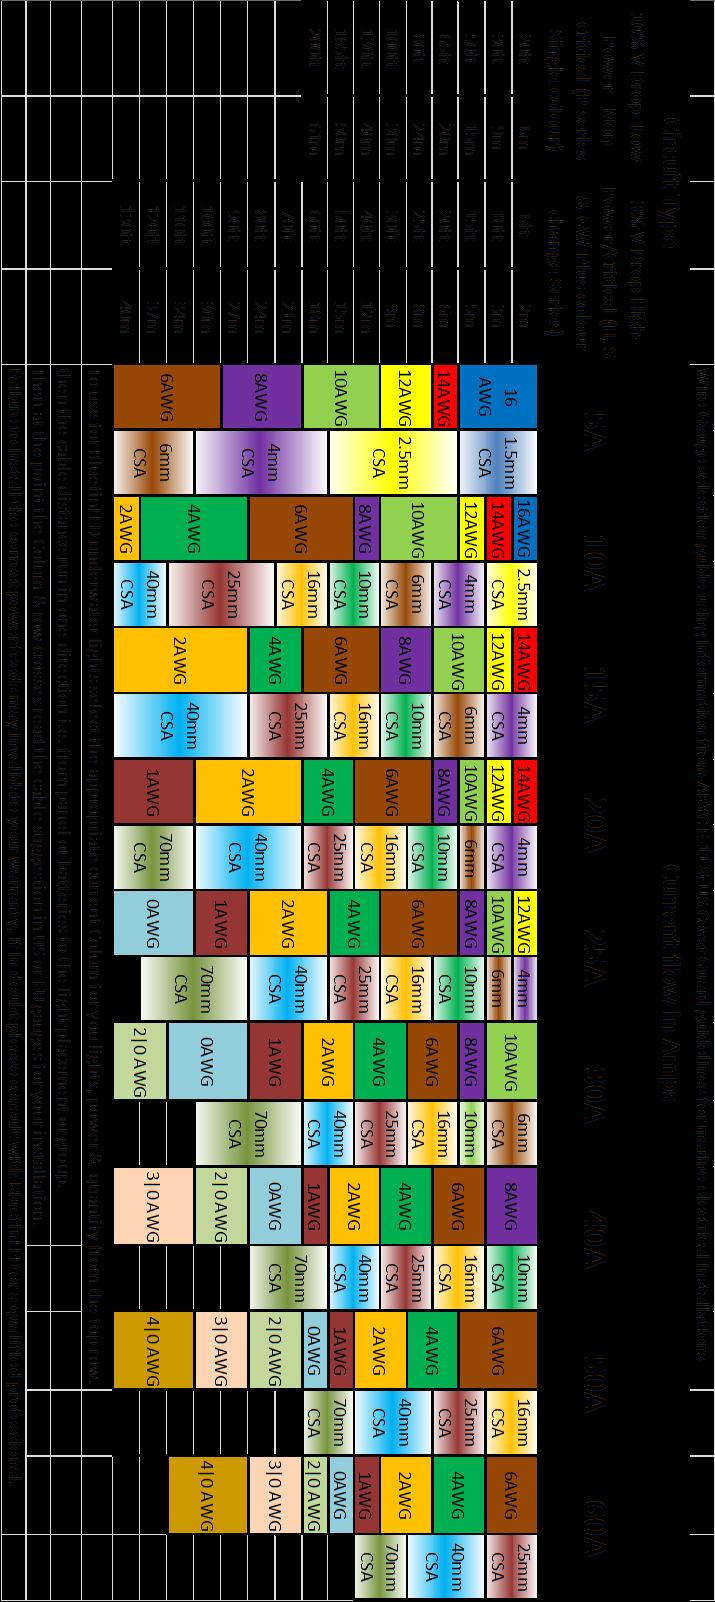
2 Wipe off any excess sealant and ensure the light is seated correctly without any gaps in the sealant. (It is good practice to have excess marine sealant to clean off as this can ensure that there is a water tight seal to the hull) Electrical connection: It is advised that if installing GW16 models no more than 8 lights should be installed on your low voltage system. If installing more than 8 GW16 models we suggest using our Mains Upgrade Power Supply (contact your local Bluefin Led dealer for further information) It is advised that if installing GW20 or GW48CC Models no more than 6 lights should be installed on your low voltage system. If installing more than 6 GW20 or GW48CC models we suggest using our Mains Upgrade Power Supply (contact your local Bluefin Led dealer for further information) Only attach the light cable to a waterproof connection or junction box, the cable must have a watertight connection otherwise your warranty will be void. Care should be taken when planning your electrical feeds/cables to the lights so as to ensure voltage drop between the batteries or power supply is minimised, on 12V systems this is especially important as the lower system voltage means a high current requirement which in turn means the potential for more voltage drop in the cable runs & connections. If the cable gauge & connections are not sufficient for the lighting load attached you may experience incorrect operation of the lights & intermittent illumination as the supply dips below specification. Please see the wire gauge guide attached to the instruction manual. For help with calculations always consult with a qualified professional or contact Bluefin LED directly. You will notice an inline moisture guard attached to your cable (Fig 1). If this guard is removed you warranty will be void Only attach the light cable to a waterproof connection or junction box, the cable must have a watertight connection otherwise your warranty will be void. Fig 1 Attach the light cable to the VDC power on the boat ensuring that you use the in line fuse supplied connected to the positive(red) wire, ensure that you use the heat shrink provided to create a water tight fit into the fuse holder. (See fig 5) Ensure that an earth bond cable is attached to the earth bolt on the locking ring and is attached to the earth bonding system on the boat. (See fig 3) Fig 2 Apply Sealant around these grooves and around the tube 2

 Bluefin LED Underwater lights.")


3 Fig 3 Locking ring showing nuts and bolts assembled Fig 4 Earth bond nut and Picture showing example of clamping ring and washer assembled Positive wire from Light Heat shrink for water tight seal to the fuse holder Fig 5 Fuse holder Crimps for positive wires (ensure that these are mounted into the holder before they are crimped) Bluefin LED Underwater lights. YOU MUST INSTALL THIS GEL CONNECTOR OR YOUR WARRANTY WILL BE VOID!!! Please ensure that your product is installed as per our instructions below, failure to do so WILL INVALIDATE YOUR WARRANTY. Use these instructions in conjunction with the light instructions to ensure that all is fitted correctly. Warnings: Do not attempt to install the lights whilst the boat is in the water. Installation: Fig 1 showing how the Gel connector is wired up. Fig 2 showing how the finished Gel connector should look when finished. Ensure that the black outer sheath is inside the gel connector. The IP68 GEL CONNECTOR MUST BE INSTALLED CORRECTLY OR YOU WARRANTY WILL BE VOID. Fig 1 Power In from boat power Negative wire to boat power Light cable 3 Please use fuse instructions within the manual to wire the fuse Heatshrink Image showing how to wire the Gel Connector to the light and Fuse holder

 Under voltage will show a constant red.")
4 Fig 2 Testing: Test the light before installation ensuring that you use the correct voltage and the light is illuminated correctly. After installation ensure again that the light is illuminated correctly before the boat goes back into the water and you remove the lens label. After you boat goes back into the water check internally for water tightness around where the light is installed. The light has internal indicator Led s for fault finding, these are as follows: Over voltage will flash red.(check the voltage to the light) Under voltage will show a constant red. (check the voltage to the light) Over temperature will show amber.(allow the light to cool down and check if submerged) Maintenance: Regularly check the installation for water tightness Only clean the light with a soft bristle brush Warranty: Your product has a 2 year limited warranty for manufacturing defects. For any warranty issues please contact your point of sale retailer or go to for further advice. Do not attempt to disassemble the light without Bluefin LED advice. Installer please ensure that the SERIAL NUMBERS of the lights are written below and the manual is handed over to the end user. Please make a note of the serial numbers of the lights here. SERIAL NUMBERS Bluefin LED Cottage Farm, Cottage Lane, Norton Juxta Twycross, Atherstone. CV9 3QH Sales - Tel: simon.steadman@bluefinled.com Service - Tel: mark.branson@bluefinled.com Administration - Tel: samantha.barrie@bluefinled.com Registered Address: Square Rig Limited, t/a Bluefin LED, Cottage Farm, Cottage Lane, Norton Juxta Twycross, Atherstone, CV9 3QH Company Registration Number: VAT Number: Bluefin Led Underwater lights. LM48CC Driver Installation manual. Thank you for choosing Bluefin LED underwater lights, our products have been designed and tested rigorously to ensure the optimum performance and longevity. Please ensure that your product is installed as per our instructions below, failure to do so may invalidate your warranty. 4


5 Specs: electrical/fuse ratings Voltage Current Fuse rating LM48CC Drivers 24V only 24V-6.5 8amp Warnings: Do not attempt to install the lights whilst the boat is in the water. Ensure that the correct voltage is used for the light and Driver. Ensure that an in line fuse is installed with the correct fuse rating per the Driver installed. Ensure all connections are made water tight. If you wish to connect your Colour change lights and drivers to your own DMX Controller please contact BluefinLED beforehand for further advise. Installation: Electrical connection: Only attach the driver power cable to a waterproof connection or junction box, the cable must have a watertight connection otherwise your warranty could be void. Attach the Driver power cable to the VDC power on the boat ensuring that you use the in line fuse supplied connected to the positive(red) wire, ensure that you use the heatshrink provided to create a water tight fit into the fuse holder. (see fig 2) Plug the Light cable connector to driver as per Fig 1 aligning the white lines on the connectors to ensure the connector pushes home correctly. Plug the DMX controller cable (if supplied fig 3) into the first driver DMX IN connector as per Fig 1. Plug the DMX Interlink cable (Fig 4) into the DMX OUT connector on the first driver Fig 1. You can now daisy chain the drivers using the DMX Interlink cables going from the OUT DMX to the IN DMX on the next driver. When completing a circuit you must plug the DMX Terminator plug (Fig 5) into the last drivers DMX OUT to complete the circuit. Fig 1 (Driver) Light cable connector 24VDC Power cable DMX IN Connector DMX OUT Connector Fig 2 (Fuse connection) Fuse holder 5
 Fig 3 (DMX Controller cable) Fig 4 (DMX Interlink cable) Fig 5 (DMX Terminator) Bluefin LED")


6 Positive wire from Driver Heatshrink for water tight seal to the fuse holder Crimps for positive wires (ensure that these are mounted into the holder before they are crimped) Fig 3 (DMX Controller cable) Fig 4 (DMX Interlink cable) Fig 5 (DMX Terminator) Bluefin LED Underwater lights. YOU MUST INSTALL THIS GEL CONNECTOR OR YOUR WARRANTY WILL BE VOID!!! Mako/Hammerhead/Stingray/Great White Gel Connector Instruction Manual. Thank you for choosing Bluefin LED underwater lights, our products have been designed and tested rigorously to ensure the optimum performance and longevity. Please ensure that your product is installed as per our instructions below, failure to do so WILL INVALIDATE YOUR WARRANTY. Use these instructions in conjunction with the light instructions to ensure that all is fitted correctly. 6
7 Warnings: Do not attempt to install the lights whilst the boat is in the water. Installation: Fig 1 showing how the Gel connector is wired up. Fig 2 showing how the finished Gel connector should look when finished. Ensure that the black outer sheath is inside the gel connector. The IP68 GEL CONNECTOR MUST BE INSTALLED CORRECTLY OR YOU WARRANTY WILL BE VOID. Fig 1 Power In from boat power Negative wire to boat power Driver cable Please use fuse instructions within the manual to wire the fuse Heatshrink Fig 2 Image showing how to wire the Gel Connector to the light and Fuse holder Testing: Test the light before installation ensuring that you use the correct voltage and the light is illuminated correctly. After installation ensure again that the light is illuminated correctly before the boat goes back into the water and the lens label is removed. After your boat goes back into the water check internally for water tightness around where the light is installed. Maintenance: Regularly check the installation for water tightness. Only clean the light with a soft bristle brush. Warranty: Your product has a 2 year limited warranty for defects. For any warranty issues please contact your point of sale retailer or go to for further advice. Bluefin LED Cottage Farm, Cottage Lane, Norton Juxta Twycross, Atherstone. CV9 3QH Sales - Tel: simon.steadman@bluefinled.com Service - Tel: mark.branson@bluefinled.com Administration - Tel: samantha.barrie@bluefinled.com Registered Address: Square Rig Limited, t/a Bluefin Led, Cottage Farm, Cottage Lane, Norton Juxta Twycross, Atherstone, CV9 3QH Company Registration Number: VAT Number:
8 8
Bluefin Led Underwater lights.
 Bluefin Led Underwater lights. V12/V24CC Installation manual. Thank you for choosing Bluefin LED underwater lights, our products have been designed and tested rigorously to ensure the optimum performance
Bluefin Led Underwater lights.
 Bluefin Led Underwater lights. P3 Installation manual. Thank you for choosing Bluefin LED underwater lights, our products have been designed and tested rigorously to ensure optimum performance and longevity.
Bluefin Led Underwater lights.
 Bluefin Led Underwater lights. P6N/P6CC Installation manual. Thank you for choosing Bluefin LED underwater lights, our products have been designed and tested rigorously to ensure optimum performance and
Bluefin Led Underwater lights.
 Bluefin Led Underwater lights. P24 Single/Dual and Colourchange Installation manual. Thank you for choosing Bluefin LED underwater lights, our products have been designed and tested rigorously to ensure
Bluefin Led Underwater lights.
 Bluefin Led Underwater lights. Domestic DL6 Installation manual. Thank you for choosing Bluefin LED underwater lights, our products have been designed and tested rigorously to ensure the optimum performance
Wireless Remote System RC-12v & 24v Standard RF Remote Control System INSTALLATION MANUAL AND OWNERS GUIDE Table of Contents:
 Wireless Remote System RC-12v & 24v Standard RF Remote Control System INSTALLATION MANUAL AND OWNERS GUIDE Table of Contents: Page: 1 Important Safety Instructions/Overview. Pages: 2 Quick Reference Specifications.
TIX402 EOS Installation and Operating Guide
 TIX402 EOS Integrated System TIX402 EOS Installation and Operating Guide Congratulations! You have purchased a LUMISHORE advanced LED technology underwater lighting system. Every care has been taken to
TIX 402, TIX 802 & TIX 1602 Thru-Hull Light Lumishore SUPRA (dual colour) light Installation and Operating Guide
 light Installation and Operating Guide") SUPRA Thru-Hull Integrated System TIX, TIX & TIX Thru-Hull Light Lumishore SUPRA (dual colour) light Installation and Operating Guide Congratulations! You have purchased a LUMISHORE advanced technology
SUPRA Thru-Hull Integrated System TIX, TIX & TIX Thru-Hull Light Lumishore SUPRA (dual colour) light Installation and Operating Guide Congratulations! You have purchased a LUMISHORE advanced technology
Single Colour Light. TIX202 Interchangeable Flush Fit Thru-Hull Light. Installation and Operation Guide. Rev
 Single Colour Light TIX202 Interchangeable Flush Fit Thru-Hull Light Installation and Operation Guide Rev 3 45-0038 Congratulations! You have purchased a LUMISHORE advanced technology LED underwater light.
TIX 802 & TIX 1602 Thru-Hull Light Lumishore EOS Full Colour Change light Installation and Operating Guide
 EOS Thru-Hull Integrated System TIX & TIX Thru-Hull Light Lumishore EOS Full Colour Change light Installation and Operating Guide Congratulations! You have purchased a LUMISHORE advanced technology underwater
Surface Mount e-lites
 Surface Mount e-lites SMX90-CS Colour-SELECT Lights Installation and Operating Guide SMX90-CCP-2 Congratulations! You have purchased a LUMISHORE advanced LED technology underwater lighting system. Every
Single Colour Light. TIX301 Interchangeable Flush Fit Thru-Hull Light. Installation and Operation Guide
 Single Colour Light TIX301 Interchangeable Flush Fit Thru-Hull Light Installation and Operation Guide Congratulations! You have purchased a LUMISHORE advanced technology LED underwater light. Every care
THX 402, THX 802 & THX 1602 Thru-Hull Light Lumishore SUPRA (dual colour) light Installation and Operating Guide
 light Installation and Operating Guide") SUPRA Thru-Hull Integrated System THX, THX & THX Thru-Hull Light Lumishore SUPRA (dual colour) light Installation and Operating Guide Congratulations! You have purchased a LUMISHORE advanced technology
SUPRA Thru-Hull Integrated System THX, THX & THX Thru-Hull Light Lumishore SUPRA (dual colour) light Installation and Operating Guide Congratulations! You have purchased a LUMISHORE advanced technology
SMX 22, SMX52 & SMX 102 Installation and Operating Guide
 SUPRA Surface Mount Integrated System SMX, SMX5 & SMX Installation and Operating Guide Congratulations! You have purchased a LUMISHORE advanced LED technology underwater lighting system. Every care has
SMX 92 & SMX 152 Installation and Operating Guide
 EOS Surface Mount Integrated System SMX 92 & SMX 152 Installation and Operating Guide Congratulations! You have purchased a LUMISHORE advanced LED technology underwater lighting system. Every care has
THX120-CCP. Colour-CHANGE Lights THX120-CCP Thru-Hull Installation and Operation Guide
 THX120-CCP Colour-CHANGE Lights THX120-CCP Thru-Hull Installation and Operation Guide Congratulations! You have purchased a LUMISHORE advanced technology LED underwater light. Every care has been taken
Colour-CHANGE Lights THX72-CCP Thru-Hull and THX72-CCP-FF Flush Fit Installation and Operation Guide
 Colour-CHANGE Lights THX72-CCP Thru-Hull and THX72-CCP-FF Flush Fit Installation and Operation Guide THX72-CCP THX72-CCP-FF Congratulations! You have purchased a LUMISHORE advanced technology LED underwater
EMF INSTALLATION & OWNER S MANUAL ULTRA COMPACT NICHE LIGHT FOR FIBREGLASS POOLS STORE THIS MANUAL IN A SAFE PLACE FOR FUTURE REFERENCE
 INSTALLATION & OWNER S MANUAL ULTRA COMPACT NICHE LIGHT SPA ELECTRICS PTY LTD w w w. s p a e l e c t r i c s. c o m. a u EMF FOR FIBREGLASS POOLS STORE THIS MANUAL IN A SAFE PLACE FOR FUTURE REFERENCE
Measurements are expressed in millimeters.
 T-Rex user manual Measurements are expressed in millimeters. 1 Lamp access 2 Focus adjustment 3 Mounting bracket 4 Swivel locks 5 Clamp hole 6 Air vent 190 285 7 AC input & main fuse 8 Microphone 490 164
Digital Intelligent Battery Charger OPERARATOR S MANUAL
 Digital Intelligent Battery Charger OPERARATOR S MANUAL WARNING! Before you install and use your Nitro Battery Charger, be sure to read and save these safety instructions. INTRODUCTION The Sinergex Nitro
UltraSystem Series II INSTALLATION MANUAL PARTNERED WITH
 UltraSystem Series II INSTALLATION MANUAL PARTNERED WITH CONTENTS Important information. page 1 Planning the installation. page 2 Transducer positioning. page 3-7 Transducer installation. page 8-10 Control
SV10 LED. The US manufactured SV10 LED is. SV10 LED technical specifications
 The US manufactured SV10 LED is the brightest thru hull LED underwater light available to owners of GRP and wood boats. The industry leading SV10 combines the unique qualities of the latest high density
TYPE 4 BEARING INSTALLATION IN COMPOSITE HULLS.
 TYPE 4 BEARING INSTALLATION IN COMPOSITE HULLS. Our tapered Type 4 bearings designed to be installed with our GRP housings These bearings and housings are available in two mounting styles, designed to
Neptune X6 12/24V SAE 316L Stainless Steel Low Profile Through-Hull Mounted Underwater LED Light Manual
 Neptune X6 12/24V SAE 316L Stainless Steel Low Profile Through-Hull Mounted Underwater LED Light Manual Thank you for purchasing Dr. LED s Neptune X6 underwater LED light. This 1500+ lumen Neptune X6 underwater
STL Ceptor Series Running Board Light Stick
 2809 Business Park Dr Buda TX 78610 Phone 800.757.2581 Fax 844.894.2652 Email customerservice@speedtechlights.com STL Ceptor Series Running Board Light Stick Operation Manual and Instructions Congratulations,
Installation Service INSTRUCTIONS
 Installation Service INSTRUCTIONS type 4 rudder bearings Aluminium hull : p2 Composite hull : p3 Instructions for both versions : p4to 13 TYPE 4 BEARING INSTALLATION IN METAL HULLS For a new installation
STL K-Force 18 and Micro 14 LED Mini Light Bar
 2809 Business Park Dr Buda TX 78610 Phone 800.757.2581 Fax 844.894.2652 Email customerservice@speedtechlights.com STL K-Force 18 and Micro 14 LED Mini Light Bar Operation Manual and Instructions Congratulations,
OceanLED This installation manual covers the following products:
 OceanLED Marine Product Support OceanLED This installation manual covers the following products: PRO SERIES HD Gen2 INSTALLATION MANUAL PRO SERIES HD Gen2 Thru-Hull Thru-Hull Thru-Hull 2010TH HD Gen2 3010TH
Event Spot WW Triac. User Manual. Order codes: LEDJ237 - Black Housing LEDJ237A - White Housing
 Event Spot WW Triac User Manual Order codes: LEDJ237 - Black Housing LEDJ237A - White Housing Safety advice WARNING FOR YOUR OWN SAFETY, PLEASE READ THIS USER MANUAL CAREFULLY BEFORE YOUR INITIAL START-UP!
Installation Instructions
 Installation Instructions These instructions cover the following kits: 64-66 Mustang Sequential Turn Signal LED kit 67-68 Mustang Sequential Turn Signal LED kit Kit Contents 2 x LED Tail Light Panels 2
DC Master 24/ A
 USERS MANUAL DC Master 24/12 50-60A DC-DC converter MASTERVOLT Snijdersbergweg 93, 1105 AN Amsterdam The Netherlands Tel.: +31-20-3422100 Fax.: +31-20-6971006 www.mastervolt.com ENGLISH Copyright 2015
UL Ti MATE Range of underwater lights. (click on document required)
") UL Ti MATE Range of underwater lights (click on document required) Technical UL Ti MATE 75 SA (S.S) UL Ti MATE 75 SA (ALU) UL Ti MATE 75 Fixed (S.S) UL Ti MATE 75 Fixed (ALU) Brochure Info UL Ti MATE 75
UL Ti MATE Range of underwater lights (click on document required) Technical UL Ti MATE 75 SA (S.S) UL Ti MATE 75 SA (ALU) UL Ti MATE 75 Fixed (S.S) UL Ti MATE 75 Fixed (ALU) Brochure Info UL Ti MATE 75
P/N Wheeler. user manual
 P/N 35000068 Wheeler user manual 1998, 1999 Martin Professional A/S, Denmark. All rights reserved. No part of this manual may be reproduced, in any form or by any means, without permission in writing from
130-RGB+W. underwater lights limited TM. IPX8 Underwater RATED. CUTE on size BIG on light. GRP and WOOD. 20 meter + N.
 Manufacturer of the original underwater lights marine lighting products since 1991. 130-RGB+W cute on size big on light GRP and WOOD 20 meter + N.A *The QT-130 RGB+W LED underwater light uses a four channel
OceanLED This installation manual covers the following products:
 OceanLED Marine Product Support OceanLED This installation manual covers the following products: PRO SERIES HD Gen2 INSTALLATION MANUAL PRO SERIES HD Gen2 Thru-Hull Thru-Hull Thru-Hull 2010TH HD Gen2 3010TH
HALOGEN FLOODLIGHTS Models CHL1260C & 1260T Part Nos: &
 HALOGEN FLOODLIGHTS Models CHL1260C & 1260T Part Nos: 5460600 & 5460595 OPERATING & MAINTENANCE INSTRUCTIONS GC0610 INTRODUCTION Thank you for purchasing this CLARKE Halogen Floodlight. Before attempting
STL Mounting Brackets
 2809 Business Park Dr Buda TX 78610 Phone 800.757.2581 Fax 844.894.2652 Email customerservice@speedtechlights.com STL Mounting Brackets Operation Manual and Instructions Congratulations, you are the owner
STL Striker /Virtue Interior LED Traffic Series
 2809 Business Park Dr Buda TX 78610 Phone 800.757.2581 Fax 844.894.2652 Email customerservice@speedtechlights.com STL Striker /Virtue Interior LED Traffic Series Operation Manual and Instructions Congratulations,
LED Twister II. User manual UK Version 1.0
 LED Twister II User manual 152.624UK Version 1.0 LED DUOPLEX: For indoor use only CAUTION! Please read this manual carefully before operating! Pay special attention to Sections 3 & 5 of this document.
PRODUCT INSTALLATION GUIDE
 PRODUCT INSTALLATION GUIDE MODEL: PRODUCT CODE: PRODUCT DESCRIPTION: 4COMM 4COMMSFK CouplerTec Commercial Heavy Duty Electronic Rustproofing System 12V / 24V Four Capacitive Couplers KIT CONTENTS: ITEM
75- Retro. IPX8 Underwater RATED. underwater lights limited TM. CUTE on size BIG on light. Aluminium / Steel.
 underwater lights limited TM Manufacturer of the original underwater lights TM Brand marine lighting products since 1991. 75- Retro cute on size big on light Aluminium / Steel 30 meter + Max 20,000 *The
STL Raptor Series Interior LED Visor Light Bar
 2809 Business Park Dr Buda TX 78610 Phone 800.757.2581 Fax 844.894.2652 Email customerservice@speedtechlights.com STL Raptor Series Interior LED Visor Light Bar Operation Manual and Instructions Congratulations,
OWNERS GUIDE 12V / 24V DC ELECTRIC WINCH. 12,000lb (6124kg) TWO SPEED VERY IMPORTANT
 TWO SPEED VERY IMPORTANT") OWNERS GUIDE 12V / 24V DC ELECTRIC WINCH. 12,000lb (6124kg) TWO SPEED VERY IMPORTANT IT IS ESSENTIAL THAT YOU READ AND UNDERSTAND THIS GUIDE BEFORE INSTALLING AND OPERATING YOUR WINCH WINCHMAX UK WWW.WINCHMAX.CO.UK
OWNERS GUIDE 12V / 24V DC ELECTRIC WINCH. 12,000lb (6124kg) TWO SPEED VERY IMPORTANT IT IS ESSENTIAL THAT YOU READ AND UNDERSTAND THIS GUIDE BEFORE INSTALLING AND OPERATING YOUR WINCH WINCHMAX UK WWW.WINCHMAX.CO.UK
STL Raptor - X TIR Interior LED Visor Light Bar
 2809 Business Park Dr Buda TX 78610 Phone 800.757.2581 Fax 844.894.2652 Email customerservice@speedtechlights.com STL Raptor - X TIR Interior LED Visor Light Bar Operation Manual and Instructions Congratulations,
instructions for roadstart units
 instructions for roadstart units model no: RS1.V5, RS102.V4, RS103.V3 Thank you for purchasing a Sealey product. Manufactured to a high standard, this product will, if used according to these instructions,
Mini Aquatic ORDERCODE 30844
 Mini Aquatic ORDERCODE 30844 Congratulations! You have bought a great, innovative product from Showtec. The Showtec Mini Aquatic brings excitement to any venue. Whether you want simple plug-&-play action
Light Source User Guide
 Light Source User Guide Compact Light Source Range Models covered by this manual: UFO 70/150 CG Glass, White Light - 240V UFO 70/150 CP Plastic, White Light - 240V UFO 70/150 CGC Glass, Colour Wheel (continuous)
8-STAGE AUTOMATIC BATTERY CHARGER MCU CONTROLLED - HIGH FREQUENCY SWITCHMODE MODELS: KACHG1207, KACHG1212, KACHG1220, KACHG2410. Instruction Manual
 8-STAGE AUTOMATIC BATTERY CHARGER MCU CONTROLLED - HIGH FREQUENCY SWITCHMODE MODELS: KACHG1207, KACHG1212, KACHG1220, KACHG2410 Instruction Manual Please read user manual carefully before use. WARNING
STL Dart TIR Exterior LED Traffic Advisor Arrow Stick
 2809 Business Park Dr Buda TX 78610 Phone 800.757.2581 Fax 844.894.2652 Email customerservice@speedtechlights.com STL Dart TIR Exterior LED Traffic Advisor Arrow Stick Operation Manual and Instructions
TSB #52-99 Supplement Replaces Service Campaign 2008 Supplement for the 99 Dash Electrical Wiring Revision
 TSB #52-99 Supplement Replaces Service Campaign 2008 Supplement for the 99 Dash Electrical Wiring Revision 07-2002 All Epic X22 and any soft ballast system with Jabsco Brass Fill pump in the bilge. Follow
SWING ARM MAGNIFYING LAMP MODEL NO: SAM170
 SWING ARM MAGNIFYING LAMP MODEL NO: SAM170 PART NO: 54605338 ASSEMBLY & OPERATING INSTRUCTIONS ORIGINAL INSTRUCTIONS GC0217 INTRODUCTION Thank you for purchasing your CLARKE swing arm magnifying lamp,
AeroVironment Universal Solar Pump Controllers
 AeroVironment Universal Solar Pump Controllers (Installer s business information to be affixed here.) User Manual Models: USPC-2000 (AV Part Number 03747-001 Rev. D) USPC-5000 (AV Part Number 03747-002
Accessory Kit Estimated Fitting Time: 120 Minutes
 Landcruiser LC00 Tow-Pro Wiring Kit - Landcruiser LC00 Kit Part No: TPWKIT - 005 Accessory Kit Estimated Fitting Time: 0 Minutes FI88 Page 0 of Issue: Date: 7/09/07 07 General Notes Safety Notes Parts
PROFESSIONAL CORDLESS IMPACT SCREWDRIVER
 PROFESSIONAL CORDLESS IMPACT SCREWDRIVER Model CIS00 Part No 4500625 OPERATING & MAINTENANCE INSTRUCTIONS GC0309 INTRODUCTION Thank you for purchasing this CLARKE Impact Screwdriver. Before attempting
Solid-State Compass with GPS Receiver
 Owner s Guide & Installation Instructions Solid-State Compass with GPS Receiver Model GH2183 Record the serial number found on the sensor. Serial No. Date of Purchase 17-489-01 rev. 01 04/22/08 1 WARNING
KENSUN HID AUTOMOTIVE HEAD LAMP CONVERSION KIT INSTALLATION MANUAL
 1 KENSUN HID AUTOMOTIVE HEAD LAMP CONVERSION KIT INSTALLATION MANUAL 2 CONTENTS A. Before Installing B. Installing the Bulbs C. Installing the Ballasts D. For Bi Xenon Only: Installing the Relay Harness
Boat drive assembly manual
 Boat drive assembly manual Bluefin Dual configuration Design and Manufacture of bespoke electric drive solutions Parts list 1. Boat drive Master controller assembly 2. Boat drive Slave controller assembly
Underwater Lights Technical Bulletin No. 7
 Page 1 of 7 7.1 Parts List a. Lights Kit b. Additional Parts Included (2) Underwater pool lights (for UK and other countries with same electrical requirements) (1) 3 1 / 2 hole saw w/ 1/4 drill bit (1)
Upper Class Grille Main grille INSERT - #54127 / #54131 / #54133 / #51127 / #51131 / 51133
 Parts included (1) - Main Full Opening - Polished - Part #54127 OR 1 Bar - Polished - Part #54131 OR 2 Bar - Polished - Part #54133 OR Full Opening - Black - Part #51127 OR 1 Bar - Black - Part #51131
In-Line Linear Actuator
 In-Line Linear Actuator Operating Instructions 12 Volt DC Input Australian Gas Springs - LiftEasy Actuators Address: 29 Tower Court Noble Park Victoria 3174 Australia Telephone: +61 3 9769 0288 Fax: +61
SDS SERIES DC SUBMERISIBLE PUMPS
 SDS SERIES DC SUBMERISIBLE PUMPS INSTALLATION MANUAL Kyocera Solar, Inc. / SOLARJACK, 7812 E. Acoma Drive, Scottsdale, AZ 85260 Telephone (800) 223-9580 FAX (480) 483-6431 E-mail info@kyocerasolar.com
SECTION M. ELECTRICAL. Section Description Page No.
 SECTION M. ELECTRICAL. Section Description Page No. M.1 General Page 2 M.2 Alternator Page 2 M.3 Battery Page 7 M.4 Hazard Warning System Page 7 M.5 Brake Fail Warning System Page 8 M.6 Seat Belt Warning
TORCH Main Grille Main grille INSERT - # / # Chevrolet Silverado
 Parts included (1) TORCH Grille - Main (1) 40 LED - Part #6311271 OR Stealth - Part #6311271-BR OR (1) 30 LED - Part #6311281 OR Stealth - Part #6311281-BR Hardware included (1) - Large Bottom Mounting
Rescue Pac. Please read and fully understand the instructions in this manual before operation. Keep this manual safe for future reference
 Please dispose of Packaging for the product in a responsible manner. It is suitable for recycling. Help to protect the environment, take the packaging to the local amenity tip and place into the appropriate
Navigator ORDERCODE 40410
 Navigator ORDERCODE 40410 Congratulations! You have bought a great, innovative product from Showtec. The Showtec Navigator brings excitement to any venue. Whether you want simple plug-&-play action or
SP904/3/4/5/7/8/10/11/13 Integrated Wireless Side Warning System
 Fig 1 Operation Guide & Recommended Fitting Instructions. SP904/3/4/5/7/8/10/11/13 Integrated Wireless Side Warning System The SP904 integrated is a fully flexible, easily expandable vehicle blind spot
Spectra C3 Light Bar Installation Instructions
 Light Bar Hardware Tools Required Universal Clamp Inserts 1.9, 2 3/8 - OD 5 Amp Fuse 1.25 Hole Saw Philips Screw Driver 7/64 Drill Bit Fish Tape Countersink Pencil Pigtail Wiring Harness Clamp Washer Wire
LED Pinspot 2. Snapshot. User Manual
 LED Pinspot 2 Snapshot Use on Dimmer Outdoor Use Sound-Activated DMX Master/Slave Auto-ranging Power Supply Replaceable Fuse User-Serviceable User Manual 5200 NW 108th Avenue, Sunrise, FL 33351 U.S.A.
Models: EP EP EP EP EP EP USER MANUAL ENGLISH
 P R O F E S S I O N A L P O W E R A M P L I F I E R Models: EP - 300 EP - 500 EP - 800 EP - 1000 EP - 1300 EP - 1800 USER MANUAL ENGLISH WARNING FOR YOUR OWN SAFETY, PLEASE READ THIS USER MANUAL CAREFULLY
LED NEUTRON 4 x QUAD COLOUR LED LIGHT EFFECT
 TECHNICAL SPECIFICATION: Voltage : 230Vac, 50Hz Power Consumption: 60W LED Type : 4 x 4-in-1 Quad LED Fuse: F3A RGBW LED Power: 4 x 10W Quad LED LED Lifespan: 10,000hrs DMX Channels: 6 or 21 Dimensions
LED Pinspot 2. Snapshot. User Manual
 LED Pinspot 2 Snapshot Use on Dimmer Outdoor Use Sound Activated DMX Master/Slave Auto-ranging Power Supply Replaceable Fuse User Serviceable Duty Cycle User Manual 3000 N 29 th Ct, Hollywood, FL 33020
Installation Guide The RSi brief overview:
 Electronic Rust Protection Installation Guide The RSi brief overview: The RustStop RSi Industrial uses a 6 channel output system to drive up to 18 anodes (Rust Magnets ) Each channel has its own output
Snapshot LX10 USER MANUAL. OK on Dimmer Outdoor OK Sound Activated DMX512 Master/Slave 115V/230V Switch Replaceable Fuse User Serviceable Duty Cycle
 LX10 Snapshot OK on Dimmer Outdoor OK Sound Activated DMX512 Master/Slave 115V/230V Switch Replaceable Fuse User Serviceable Duty Cycle USER MANUAL Chauvet, 3000 N 29 th Ct, Hollywood, FL 33020 U.S.A.
Installation Example and Guide
 Installation Example and Guide Author: Road Angel Group Date: May 2016 Version: 1.00 Version 1.00 Page 1 of 12 Contents CONTENTS... 2 INTRODUCTION... 3 SCOPE... 3 ITEMS REQUIRED FOR HARDWIRE INSTALLATION...
ENSURE THAT THE TEMP PROBE FITS YOUR OUTDRIVE BEFORE BEGINNING INSTALLATION.
 715 Center Street Grayslake IL 60030 P: 847-752-2700 F: 847-752-2415 E: info@livorsi.com Drive temp gauge installation instructions Model Number: DCSDT (color) The Livorsi drive temp gauge kit easily installs
HOME CHARGER MODE 2. Series to /32A single phase CONTENTS. Manual IMPORTANT SAFETY INSTRUCTIONS 3 SAFETY INFORMATION 4 INSTALLATION 5
 CONTENTS IMPORTANT SAFETY INSTRUCTIONS 3 SAFETY INFORMATION 4 INSTALLATION 5 OPERATION 8 SPECIFICATIONS 8 MAINTENANCE 9 HOME CHARGER MODE 2 Series 31328 to 31340 16/32A single phase FCC INFORMATION 9 WARRANTY
Intelligent Charging FOR LEVCA MODELS DESIGNED TO CHARGE LI-ION / LIPO TWO-WAY RADIO BATTERIES. User Manual
 Intelligent Charging FOR LEVCA MODELS DESIGNED TO CHARGE LI-ION / LIPO TWO-WAY RADIO BATTERIES User Manual Introduction Thank you for purchasing a Logic in-vehicle charger (LEVCA). This ultra-rugged product
User Manual. Solar Charge Controller 3KW
 User Manual Solar Charge Controller 3KW 1 CONTENTS 1 ABOUT THIS MANUAL... 3 1.1 Purpose... 3 1.2 Scope... 3 1.3 SAFETY INSTRUCTIONS... 3 2 INTRODUCTION... 4 2.1 Features... 4 2.2 Product Overview... 5
Installation Guide Galvanic Isolator Gi50/32/S/SA - 120a Surge Current
 Installation Guide Galvanic Isolator Gi50/32/S/SA - 120a Surge Current The Gi50/32/SA withstands fault surges of up to 120a, and is designed for installations connected to shore supplies protected by an
OPERATING & MAINTENANCE INSTRUCTIONS
 8 WETSTONE BENCH GRINDER OPERATING & MAINTENANCE INSTRUCTIONS 0805 Thank you for purchasing this Clarke Bench Grinder. Before attempting to operate this bench grinder please read this instruction manual
Snapshot LX5 USER MANUAL. OK on Dimmer Outdoor OK Sound Activated DMX512 Master/Slave 115V/230V Switch Replaceable Fuse User Serviceable Duty Cycle
 LX5 Snapshot OK on Dimmer Outdoor OK Sound Activated DMX512 Master/Slave 115V/230V Switch Replaceable Fuse User Serviceable Duty Cycle USER MANUAL Chauvet, 5200 NW 108th Avenue, Sunrise, FL 33351 U.S.A.
INSTRUCTION MANUAL. BatteryMINDer. Model SCC515 Maintenance Charger- Solar Controller for use with 5 Watt and 15 Watt Solar Panels
 INSTRUCTION MANUAL Model Maintenance Charger- Solar Controller for use with 5 Watt and 15 Watt Solar Panels OVERVIEW... 2 MOUNTING INSTRUCTIONS... 3 BATTERY CONDITION INDICATOR (BCI)... 5 TESTING BATTERY...
Exhaust Alert Installation & Operating Instructions THE SCIENCE OF SILENCE. Exhaust Alert Operating & Fitting Instructions 1
 Exhaust Alert Installation & Operating Instructions THE SCIENCE OF SILENCE Exhaust Alert Operating & Fitting Instructions 1 Contents Exhaust Alert Fitting Instructions Section Page 1 Introduction 2 1.1
Warning: Electricity. Wear Protective Gloves
 instructions for roadstart emergency jump starter 12/24V 3200/1600 peak amps model no: RS105.V4 Thank you for purchasing a Sealey product. Manufactured to a high standard, this product will, if used according
MODUL-CONNECT 1.2. Owner s Manual. Modular, digital wiring and control system. Document Part Number MSMC Rev 9 (04/18)
") MODUL-CONNECT 1.2 Modular, digital wiring and control system Owner s Manual Document Part Number MSMC Rev 9 (04/18) Service Contact Information E-mail: info@modul-system.com Phone: +46 31 746 87 00 Web:
MODUL-CONNECT 1.2 Modular, digital wiring and control system Owner s Manual Document Part Number MSMC Rev 9 (04/18) Service Contact Information E-mail: info@modul-system.com Phone: +46 31 746 87 00 Web:
INSTALLATION AND OWNER S MANUAL MODEL ASW Actuator Swing Gate Operator
 INSTALLATION AND OWNER S MANUAL MODEL ASW Actuator Swing Gate Operator Serial #: Date Installed: Your Dealer: READ THIS MANUAL CAREFULLY BEFORE INSTALLATION OR USE. SAVE THESE INSTRUCTIONS. Introduction
USER MANUAL QUICK INSTALLATION GUIDE MRGB65B
 USER MANUAL QUICK INSTALLATION GUIDE MRGB65B MARINE GRADE RGB 6.5 COAX SPEAKERS USER MANUAL QUICK INSTALLATION GUIDE MRGB65B MARINE GRADE 6.5 COAX SPEAKERS BOSS Audio Systems 3451 Lunar Court Oxnard, CA
100 Watt Hand Lamp - Inline Transformer - Vapor Proof - VAC to VDC - 100' Foot SOOW Cord
 100 Watt Hand Lamp - Inline Transformer - Vapor Proof - VAC to VDC - 100' Foot SOOW Cord Part #: VPL-120X12-100 Page: 1 Marine grade construction, an industrial 100 cord, and a stainless steel hook ensure
Sight Addvantage by Rostra License Plate Backup Camera
 80.00 mm Customer Name Installing Dealer Date Purchased Date Installed VIN# Vehicle Mileage 2016 Rostra Precision Controls 2519 Dana Dr. Laurinburg, NC 28352 300-81LPB-M Sight Addvantage by Rostra License
SunLink PV System Disconnect with Arc Fault Detection Installation and Operations Manual
 Combiner Box Installation & Operations Manual SunLink PV System Disconnect with Arc Fault Detection Installation and Operations Manual TABLE OF CONTENTS Notices and Safety Precautions Pages 1-2 Combiner
SUBMERSIBLE PUMP. Model No: HIPPO 2 OPERATING & MAINTENANCE INSTRUCTIONS
 SUBMERSIBLE PUMP Model No: HIPPO 2 OPERATING & MAINTENANCE INSTRUCTIONS 0107 1 HIPPO 2 240 Volt and 110 Volt models Thank you for purchasing this Clarke Hippo 2 Pump. Before attempting to operate this
* * 30 meter + Max 2,000 6, degrees. Underwater
 * * * * * 30 meter + Max 2,000 6,500 90 degrees Underwater - Technical QT- QT- RGB W Lumens,000 Kelvin 6,500 Typical LED Life Expectancy 40,000 hrs 40,000 hrs Min-Max Operating Voltage 110-240V AC 110-240V
Car Battery Charger Instructions for Use
 BATTERY CHARGER 12Volt 4Amp FOR INDOOR USE ONLY Power Details: Input: 230-240Vac; 50Hz; 52W Output: 12V DC; 2.8A Maximum Charge Rate: 4A RMS Read these instructions before operating this car battery charger
Installation & Operation Instructions. Deluxe LED Spot Light
 Installation & Operation Instructions Deluxe LED Spot Light 405626-3 To avoid the risk of accidents or damage to this product, it is essential to read these instructions thoroughly SDG Edition before this
EWP 110 INSTALLATION INSTRUCTIONS
 PTY. DAVIES, CRAIG LTD. A.B.N. 71 004 918 825 A.C.N. 004 918 825 MELBOURNE AUSTRALIA EWP 110 INSTALLATION INSTRUCTIONS DAVIES, CRAIG EWP (ELECTRIC WATER PUMP) AND OPTIONS FOR PUMP CONTROL Congratulations
STL Z - 3 TIR LED Surface Mount
 2809 Business Park Dr Buda TX 78610 Phone 800.757.2581 Fax 844.894.2652 Email customerservice@speedtechlights.com STL Z - 3 TIR LED Surface Mount Operation Manual and Instructions Congratulations, you
Installation and Operating Instructions (for chargers shown below)
") Installation and Operating Instructions (for chargers shown below) For additional information please call our Technical Support Group 800.742.2740 PRO CHARGING SYSTEMS, LLC 1551 Heil Quaker Boulevard,
Installation and Operating Instructions (for chargers shown below) For additional information please call our Technical Support Group 800.742.2740 PRO CHARGING SYSTEMS, LLC 1551 Heil Quaker Boulevard,
MODEL NUMBER: MEDIUM DUTY ONBOARD AIR SYSTEM
 MODEL NUMBER: 10003 MEDIUM DUTY ONBOARD AIR SYSTEM IMPORTANT: It is essential that you and any other operator of this product read and understand the contents of this manual before installing and using
START HERE FRONT BUMPER REMOVAL. 1) Turn off engine and chalk tires with stop block. Open Hood. Disconnect Battery.
 Turn off engine and chalk tires with stop block. Open Hood. Disconnect Battery.") BILLET Main Grille Parts included (1) Billet Grille - Main Overlay Polished - Part #6211270 OR Black - Part #6211271 DOES NOT FIT Z71 Models Hardware included (1) #8 x 2.5 (6) #8 x 2 (7) #8 U Nut (7) Bracket
BILLET Main Grille Parts included (1) Billet Grille - Main Overlay Polished - Part #6211270 OR Black - Part #6211271 DOES NOT FIT Z71 Models Hardware included (1) #8 x 2.5 (6) #8 x 2 (7) #8 U Nut (7) Bracket