Club Car 1510 to Curtis 1268 Conversion
|
|
|
- Rodger Jordan
- 5 years ago
- Views:
Transcription

1 Club Car 1510 to Curtis 1268 Conversion Installation Instructions CKI Rev. 05 7/18/14 Page 1 of 7


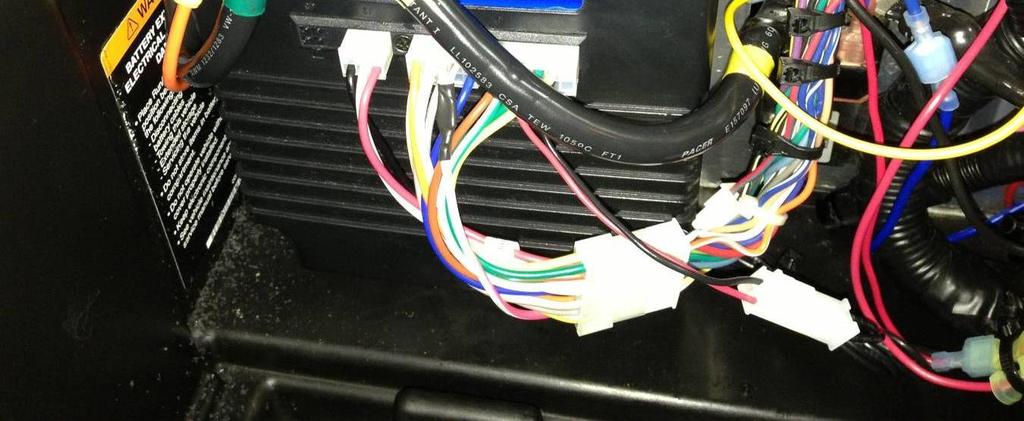
2 1510 to Curtis 1268 Conversion Installation Instructions Before you start turn Tow/Run switch to Tow and disconnect the + side of the battery. Parts List Qty Description FSIP Part Number 1 Motor Control CK 1 Wire Harness CKW 1 Walkaway Harness 62-FRPL-WH 1 FSIP Hardware Kit CKH 1 Installation Instructions CKI Recommended Tools: 1. 1/4 drive wrench with 6 extension 2. 10, 11 and 14mm sockets 3. 13mm (two may be necessary) and 16mm combination wrench 4. 5/32 Allen wrench A. Removing 1510: 1. Jack up rear end of car, making sure that both wheels are off the ground. 2. Make sure the key switch is off and the Tow/Run switch is in the Tow position. 3. Disconnect the battery positive cable at the terminal. 4. Remove the back cover and any other hardware obstructing access to the back cover (Figure 1). 5. Remove the screws holding the controller cover in place, including the bracket to the left of the controller. The cover and mounting bolts will not be needed again. 6. Label the wires going to the controller with F1, B-, M-, B+ and F2. Remove the wires and connectors from the original controller as shown in (Figure 2). 7. Remove the three screws from the controller and remove it from the mounting plate. Figure 1 B- M- B+ F1 Orng F2 Blue Figure CKI Rev. 05 7/18/14 Page 2 of 7
. 2. Drill a 6mm hole in an unused location on the frame for the Walkaway relay (Figure 20-B). 3.")


3 B. Installing the 1268 control: 1. Drill a 4mm hole in an unused location on the frame for the Walkaway fuse (Figure 20-A). 2. Drill a 6mm hole in an unused location on the frame for the Walkaway relay (Figure 20-B). 3. Install the Walkaway relay using the 6MMx20 bolt, lock washer, Walkaway relay, lock washer 2 and nut. 4. Install the Walkaway fuse using the 4MMx20 bolt, Walkaway fuse, lock washer and nut. 5. Use tape to fasten the drill pattern, found on the last page of these instructions, to the mounting panel. Make sure the battery + from the contactor and the other cables will be able to reach the controller after installation (Figure 21). A B Figure Use a punch and hammer to indent the center of each hole. 7. Carefully drill 6mm mounting holes through the back plate. Use a 1mm pilot hole if needed. 8. Remove the drill pattern and tape. 9. Place a washer on the four 6MMx30 bolts and place each bolt in a mounting hole of the 1268 controller. Work the bolts through the new holes in the back plate. 10. On the backside of each bolt place a nut, lock washer and flat washer. After all four nuts are on incrementally tighten them in a Z pattern until the controller is firmly fastened to the back plate (Figure 22). 11. Use electrical pliers to cut the female spade terminal (Figure 23-A) off of both of the Field wires. Strip 5mm of sheath off of the end of both wires and slide the ring terminal supplied on to the end of the wires. Crimp the ring terminal on to both wires (Figure 23-B). 12. Mount the Field wires to the controller using the Phillips head screws. * Note: The controller and motor field designators may be opposites. If the cart direction is reversed switch F1 and F2.* A B Figure 22 Figure 23 Figure CKI Rev. 05 7/18/14 Page 3 of 7
 1 Motor F1 or other Battery (B-) 2 Battery & Charge Motor (M-) 1 Motor Ground Battery + (B+) 2 Contactor & Motor + Field")


4 13. Use the screws and lock washers provided to mount the motor and battery wires to the controller (Figure 24). From top to bottom the wires should be: Description # Where From Field 1 (F1) 1 Motor F1 or other Battery (B-) 2 Battery & Charge Motor (M-) 1 Motor Ground Battery + (B+) 2 Contactor & Motor + Field 2 (F2) 1 Motor F2 or other 14. Remove the pre-charge resistor Figure 24 from the contactor. Connect the yellow wire with a ring terminal coming from the Walkaway relay, to the contactor on the controller side where the yellow wire is already connected. Connect the red wire with a ring terminal coming from the Walkaway relay, to the contactor on the battery side where the red wire is already connected. (Figure 25). 15. Zip-tie the Walkaway harnesses loose wires. 16. Plug the 24pin connector and 6pin connector of the harness provided in to the controller. Plug the 16pin connector in to the vehicle and the 2pin connector in to the Walkaway harness connector as shown below (Figure 26). For instillation in the Precedent use the image on Figure 25 the following page (Figure 27). 17. Reconnect the positive battery cable from the contactor to the battery. Reinstall the back cover. Figure CKI Rev. 05 7/18/14 Page 4 of 7

5 Figure CKI Rev. 05 7/18/14 Page 5 of 7
6 CKI Rev. 05 7/18/14 Page 6 of 7
7 CKI Rev. 05 7/18/14 Page 7 of 7
Club Car 1515 to Curtis 1268 Conversion
 Club Car 1515 to Curtis 1268 Conversion Installation Instructions 62-12685501CKXI Rev. 03 4/17/14 Page 1 of 7 1515 to Curtis 1268 Conversion Installation Instructions Before you start turn Tow/Run switch
Installing the FX302 into the E-Z-GO DCS Golf Car
 Installing the FX302 into the E-Z-GO DCS Golf Car 1015 Harrisburg Pike Carlisle, PA 17013 Phone: (717) 254-3747, Fax: (717) 254-3777 Website: www.fsip.biz Note: To prevent draining the batteries prematurely,
LGT-306L / LB Club Car Precedent LED Light Bar Bumper Kit Installation Instructions
 LGT-306L / LB Club Car Precedent LED Light Bar Bumper Kit Installation Instructions Caution: Please read through the instructions carefully. Before starting this project, remove the system s positive and
LGT-312L E-Z-Go TXT Light Bar Bumper Kit Installation Instructions
 LGT-312L E-Z-Go TXT 2014+ Light Bar Bumper Kit Installation Instructions Caution: Please read through the instructions carefully. Before starting this project, remove the system s positive and negative
LIFT Standard A-Arm Lift Kit Club Car Precedent Installation Instructions
 LIFT-563 6 Standard A-Arm Lift Kit Club Car Precedent Installation Instructions Contents of LIFT-563 Club Car Precedent Lift Kit: a (1 ea.) Front Suspension b (1 ea.) Driver Side Upper A-Arm c (1 ea.)
6945 (12v) 6944 (24V) installation instructions
 6944 (24V) installation instructions") 6945 (12v) 6944 (24V) installation instructions included: tools needed: Cordless drill Breezeeasy Fan Mounting brackets 1/4 Drill Bit 10mm Socket Hardware Pack 10mm Wrench Fuse Assembly Wire Stripper Crimper
6945 (12v) 6944 (24V) installation instructions included: tools needed: Cordless drill Breezeeasy Fan Mounting brackets 1/4 Drill Bit 10mm Socket Hardware Pack 10mm Wrench Fuse Assembly Wire Stripper Crimper
INSTALLATION INSTRUCTION
 1551 S. Vineyard Avenue Ontario, CA 91761 (909) 923-1973 INSTALLATION INSTRUCTION Club Car Precedent Installation Notes CURTIS 1234, 1236 OR 1238 AC INDUCTION MOTOR/ CONTROLLER REVISION: B This kit is
INSTALLATION MANUAL P2068. Level of Difficulty. Parts List. Product Image. Notes and Maintenance. Tools Required. Easy
 INSTALLATION MANUAL P2068 Parts List 1 Grille guard 1 Driver / left frame mounting bracket 1 Passenger / right frame mounting bracket 1 Driver / left top mounting bracket 1 Passenger / right top mounting
Adjustable Light Kits E-Z-Go TXT All Models Installation Instructions
 Adjustable Light Kits E-Z-Go TXT All Models 1996-2013 Installation Instructions Caution: Please read through the instructions carefully. Before starting this project, remove the system s positive and negative
INSTALLATION MANUAL. Level of Difficulty. Parts List. Product Image. Tools Required. Notes and Maintenance. Torque Specifications.
 INSTALLATION MANUAL Parts List 1 Bull bar 2 Upper frame mounting bracket 1 Driver / left lower frame mounting bracket 1 Passenger / right lower frame mounting bracket 2 Button head bolt, 6mm 4 Flat washer,
PRODUCT SAFETY NOTICE
 PRODUCT SAFETY NOTICE Congratulations. This vehicle has been equipped with a Firestone air suspension system. This suspension will enhance the vehicle s handling when loaded, however, the vehicle s performance
LIFT Drop Spindle Lift Kit E-Z-Go RXV Gas or Electric Installation Instructions
 LIFT-107 6 Drop Spindle Lift Kit E-Z-Go RXV Gas or Electric Installation Instructions Contents of LIFT-107 E-Z-Go RXV Drop Spindle Lift Kit: a (1 ea.) Driver Side Spindle b (1 ea.) Passenger Side Spindle
Installation Instructions for Lingenfelter GM 2500 Suburban & Yukon XL Auxiliary Fan System (with AC clutch controlled fan output)
") Installation Instructions for Lingenfelter 2007-2013 GM 2500 Suburban & Yukon XL Auxiliary Fan System (with AC clutch controlled fan output) PN L300080607 Revision - 1.1 Lingenfelter Performance Engineering
Installation Instructions for Lingenfelter 2007-2013 GM 2500 Suburban & Yukon XL Auxiliary Fan System (with AC clutch controlled fan output) PN L300080607 Revision - 1.1 Lingenfelter Performance Engineering
LIFT-304 (3 ) and LIFT-104 (6 ) Drop Spindle Lift Kits Yamaha G22, Gas or Electric Installation Instructions
 and LIFT-104 (6 ) Drop Spindle Lift Kits Yamaha G22, Gas or Electric Installation Instructions") LIFT-304 (3 ) and LIFT-104 (6 ) Drop Spindle Lift Kits Yamaha G22, Gas or Electric Installation Instructions LIFT-304 LIFT-104 Contents of LIFT-304/104 Yamaha G22 Lift Kit: a (1 ea.) Passenger Side Spindle
LIFT-304 (3 ) and LIFT-104 (6 ) Drop Spindle Lift Kits Yamaha G22, Gas or Electric Installation Instructions LIFT-304 LIFT-104 Contents of LIFT-304/104 Yamaha G22 Lift Kit: a (1 ea.) Passenger Side Spindle
INSTALLATION INSTRUCTIONS FORD SUPER DUTY NOTE: (Vehicle Retains Tow Hook) PART # P3064
 PART # P3064") INSTALLATION INSTRUCTIONS 2011-14 FORD SUPER DUTY 250-550 NOTE: (Vehicle Retains Tow Hook) PART # P3064 PARTS LIST: Qty Description Qty Description 1 Grill Guard 2 10mm x mm Hex Bolts 1 Driver/Left Lower
INSTALLATION INSTRUCTIONS 2011-14 FORD SUPER DUTY 250-550 NOTE: (Vehicle Retains Tow Hook) PART # P3064 PARTS LIST: Qty Description Qty Description 1 Grill Guard 2 10mm x mm Hex Bolts 1 Driver/Left Lower
P3066 INSTALLATION MANUAL
 P3066 INSTALLATION MANUAL Parts List 1 Grille guard 1 Driver / left frame bracket Level of Difficulty Moderate Scan for helpful install tips 1 Passenger / right frame bracket 1 Driver / left top bracket
2015 Mustang Lightbar (All Models) CDC#
 CDC#") 2015 Mustang Lightbar (All Models) CDC# 1511-7000-01 Components: 1 CDC Lightbar Note: READ instructions before starting installation!!! CDC Part# Driver side bracket 0511-6001-05 Passenger side bracket
2015 Mustang Lightbar (All Models) CDC# 1511-7000-01 Components: 1 CDC Lightbar Note: READ instructions before starting installation!!! CDC Part# Driver side bracket 0511-6001-05 Passenger side bracket
PRODUCT SAFETY NOTICE DEALER/INSTALLER NOTICE
 PRODUCT SAFETY NOTICE Congratulations. This vehicle has been equipped with a Firestone air suspension system. This suspension will enhance the vehicle s handling when loaded, however, the vehicle s performance
Classic Light Bar Mustang
 Classic Light Bar 2005-2012 Mustang Note: Read installation instructions before starting. Component List: 1 Light Bar Part #110000 1 Driver Side Bracket w/set Screw Part #115003 1 Passenger Side Bracket
LIFT-507 BMF Lift Kit E-Z-Go RXV Gas or Electric Installation Instructions
 LIFT-507 BMF Lift Kit E-Z-Go RXV Gas or Electric Installation Instructions Contents of LIFT-507 E-Z-Go RXV BMF Lift Kit: a (1 ea.) BMF A-Arm Assembly b (1 ea.) Driver Side Shock Tower c (1 ea.) Passenger
TOYOTA RAV4/HV INTERIOR LIGHT KIT Preparation
 Preparation Part Number: PT413-42130 Kit Contents Item # Quantity Reqd. Description 1 1 Wire Harness 2 3 Hardware Bag Contents Item # Quantity Reqd. Description 1 20 Cable Tie 2 2 Scotchlok 3 2 Foam Pad
SCION xd INTERIOR LIGHTING UPGRADE Preparation
 Preparation Part Number: PTS21-52085 Light Guide Kit Contents Item # Quantity Reqd. Description 1 1 Controller Board, 4 color programmed w/ Bracket 2 1 RGB, LED Engine wire harness 3 2 14mm Light Rod,
Installation Instructions
 Installation Instructions Jeep JK Unlimited (2007 Present) Mounting Bracket and Air Line System Kit for ARB On-Board Twin Air Compressor (CKMTA12) Made in the USA Kit Contents: 1 Bracket for ARB Compressor
LIFT-504. BMF Lift Kit. Yamaha G22 Gas or Electric. Installation Instructions
 LIFT-504 BMF Lift Kit Yamaha G22 Gas or Electric Installation Instructions Contents of LIFT-504 Yamaha G22 BMF Lift Kit: a (1 ea.) BMF A-Arm Assembly b (1 ea.) Driver Side Shock Tower c (1 ea.) Passenger
LI-ION BATTERY UPFIT KIT
 LI-ION BATTERY UPFIT KIT P/N 2881852 APPLICATION E2, E4, E6, and el XD BEFORE YOU BEGIN Read these instructions and check to be sure all parts and tools are accounted for. Please retain these installation
Part Name/Description Part No. PF3000 PF 3000 Pro U-Bracket Short Bracket PF3000 Pro
 Note: Indented items indicate parts included in an assembly listed above Part Name/Description Part No. PF3000 PF 3000 Pro U-Bracket Short 2000105-2 1 PFadvantage Bracket PF3000 Pro 2000773 1 Cable Kit
INSTALLATION INSTRUCTIONS
 INSTALLATION INSTRUCTIONS Accessory Application Publications No. AII 24664-25319 SYSTEM 2003 CR-V Issue Date MAY 2003 PARTS LIST Security System (sold separately) P/N 08E51-EP4-100 Security System Attachment
This harness kit includes: Installing the Hybrid ReVolt Universal grid charger in an Insight
 Installing the Hybrid ReVolt Universal grid charger in an Insight This harness kit includes: Insight harness (2000 to 2006) (a) 4 #6 mounting screws for bulkhead (c) 2 sheet metal screws for fan board
L DODGE CUMMINS BD FLOWMAX LIFT PUMP KIT
 6/15/2016 #1050311D 2010-12 6.7 Dodge Cummins FlowMAX Lift Pump Kit (I-00329) - 1-2010-12 6.7L DODGE CUMMINS BD FLOWMAX LIFT PUMP KIT Installation Instructions P/N # 1050311D PLEASE READ ALL INSTRUCTIONS
Wolverine Turn Signal / Horn Kit 2102
 All years Yamaha Wolverine STOP - THIS KIT IS DESIGNED SPECIFICALLY FOR ALL YEAR AND MODELS YAMAHA WOLVERINE. IF YOUR MACHINE IS NOT ONE OF THESE MODELS DO NOT PROCEED. Contact Ryco Motorsports or your
INSTALLATION INSTRUCTIONS
 INSTALLATION INSTRUCTIONS Accessory Application Publication No. WINCH MOUNT P/N 08L74-HR3-A20 After 13 TRX420 (All except TRX420FA/FPA) After 13 TRX500 (All except TRX500FA/FPA) MII 15067 Issue Date Revised:
INSTALLATION INSTRUCTIONS
 INSTALLATION INSTRUCTIONS HDX LED GRILLE APPLICATION: 06-07 Toyota Tacoma PART NUMBER: 34-065 ITEM QUANTITY DESCRIPTION TOOLS NEEDED HDX GRILLE 0MM SOCKET 8 M6 HEX NUT (YELLOW ZINC) 3 8 M6 SPLIT LOCK WASHER
INSTALLATION INSTRUCTIONS Dodge Ram Crew / Mega 2500/3500 2/4WD NOTE: (tow hooks will not be re-attached) PART # P5056
 PART # P5056") INSTALLATION INSTRUCTIONS 2010-14 Dodge Ram Crew / Mega 2500/3500 2/4WD NOTE: (tow hooks will not be re-attached) PART # P5056 PARTS LIST: Qty Description Qty Description 1 Grill Guard Bar 6 12mm x 30mm
INSTALLATION INSTRUCTIONS 2010-14 Dodge Ram Crew / Mega 2500/3500 2/4WD NOTE: (tow hooks will not be re-attached) PART # P5056 PARTS LIST: Qty Description Qty Description 1 Grill Guard Bar 6 12mm x 30mm
Installation Instructions
 Installation Instructions AMP RESEARCH Power Step by Bestop Automatic Retracting Running Board Vehicle Application Nissan Titan King Cab 2004 and newer (5 ft.) Part Number: 75106-01 Nissan Titan Crew Cab
INSTALLATION INSTRUCTIONS
 INSTALLATION INSTRUCTIONS Accessory Application Publications No. AII 23086 SYSTEM CR-V Issue Date NOV 2001 PARTS LIST Security System P/N 08E51-EP4-100 Security System Attachment P/N 08E55-S9A-100 Security
INSTALLATION INSTRUCTIONS
 INSTALLATION INSTRUCTIONS OUTLAW REAR BUMPER APPLICATION: 2013-2018 Dodge Ram 1500 PART NUMBER: 58-81025 CONTENT ITEM QUANTITY DESCRIPTION TOOLS NEEDED 1 1 REAR BUMPER 18MM WRENCH 2 4 SENSOR L-TAB 5MM
99-03 V6 "Shaker" System Instructions. *03 Model requires new hood Contents w/ Kit. Tool List For Appliqué:
 99-03 V6 "Shaker" System Instructions *03 Model requires new hood Contents w/ Kit 1 - Hood Appliqué 1 - Aluminum Shaker Scoop 1 - Lower Air Box w/drain tube fittings (2) 1 - Upper Air Box w/cdc nameplate
INSTALLATION INSTRUCTIONS
 Accessory Application Publication No. INSTALLATION INSTRUCTIONS WINCH MOUNT KIT P/N 08L77-HL3-A00 SXS700M4/M2 Honda Dealer: Please give a copy of these instructions to your customer. MII 14607 Issue Date
Zeon Control Pack Relocation Kit 78 Cable Length
 ORIGINAL INSTRUCTIONS SYMBOL INDEX SYMBOL EXPLANATION SYMBOL EXPLANATION Read All Product Literature Always Wear Leather Gloves Always Wear Hearing and Eye Protection Do Not Move People Zeon Control Pack
MINI COOPER HAVING INSTALLATION QUESTIONS? CALL TECHNICAL SUPPORT AT DESIGNED FOR USE WITH BALL MOUNT # D-19 / 45519
 10/8/2012 PAGE 1 of 6 ITEM 1 QTY 8 Parts List PART NUMBER DESCRIPTION 3/8" CONICAL TOOTHED WASHER TOOLS REQUIRED RATCHET TORQUE WRENCH 12" EXTENSION 12mm SOCKET 8mm SOCKET OFFSET SCREWDRIVER FLAT BLADE
VRSC-DX Truck-Lite LED Headlight Installation Instructions
 VRSC-DX Truck-Lite LED Headlight Installation Instructions The following Instructions are for installing a 7 Truck-Lite LED headlight into a Harley Davidson VRSC-DX Night Rod Special fairing. Other 7 headlights
Mounting brackets may vary depending on kit for vehicle year/model.
 Wiring Instructions ATTE: Before beginning any installation procedure, read all instructions carefully. Before drilling any holes make sure there is sufficient clearance on both sides. Retractable Running
INSTALLATION INSTRUCTIONS
 INSTALLATION INSTRUCTIONS ULTIMATE BULL BAR APPLICATION: 2016-2018 Chevrolet Silverado 1500 2016-2018 GMC Sierra 1500 PART NUMBER: 32-3870, 32-3875, 32-3870L, 32-3875L, 32-3920, 32-3925. ITEM QUANTITY
Bucket Harness. Installation Instructions. for Electric Club Car Precedent
 Bucket Harness for Electric Club Car Precedent Installation Instructions Electric Club Car Precedents manufactured after January 1, 2008 require an additional harness to allow the installation of light
INSTALLATION INSTRUCTIONS
 AUTOMOTIVE PRODUCTS, INC. INSTALLATION INSTRUCTIONS ULTIMATE BULL BAR APPLICATION: 2017 Ford F-250/350 PART NUMBER: 32-3900, 32-3905, 32-3900L, 32-3905L ITEM QUANTITY DESCRIPTION TOOLS NEEDED 1 1 ULTIMATE
Installation Instructions
 Installation Instructions Jeep JK 2-Door (2011 Present) Mounting Bracket and Air Line System Kit for ARB On-Board Twin Air Compressor (CKMTA12) Made in the USA Kit Contents: 1 Flat Bracket 1 Formed Bracket
GN-3A Polaris General SSV Works 3 Speaker Audio Kit
 GN-3A Polaris General SSV Works 3 Speaker Audio Kit pg 2 Disassembly, Wire and Amplifier Plate Installation pg 9 Glovebox Subwoofer Installation pg 17 Kick Panel Speakers Installation pg 21 MRB3 and Dash
PHASE 3 POWERSPORTS AUDIO KIT RZR POLARIS. pg 2 Disassembly, Wire and Amplifier Plate Installation. pg 9 Glovebox Subwoofer Installation
 POLARIS RZR PHASE 3 POWERSPORTS AUDIO KIT pg 2 Disassembly, Wire and Amplifier Plate Installation pg 9 Glovebox Subwoofer Installation pg 13 Kick Panel Speakers Installation pg 25 MRB3 and Dash Kit Installation
INSTALLATION INSTRUCTIONS
 INSTALLATION INSTRUCTIONS OUTLAW REAR BUMPER APPLICATION: 2016-2018 Chevrolet Silverado 1500 PART NUMBER: 58-81005 CONTENT ITEM QUANTITY DESCRIPTION TOOLS NEEDED 1 1 REAR BUMPER 18MM WRENCH 2 4 SENSOR
SALEEN SPEEDLAB BOOST AND WATER TEMPERATURE GAUGE POD KIT
 = SALEEN SPEEDLAB BOOST AND WATER TEMPERATURE GAUGE POD KIT INSTALLATION MANUAL: 2005-09 Mustang 4.6L 3V P/N: 10-8002-C12000B KIT P/N: 10-2903-B11511* Saleen Performance, Inc. 1225 East Maple Rd. Troy,
AEV30207AA Last Updated: 2/14/ Dualsport xt suspension INSTALLATION GUIDE
 AEV30207AA Last Updated: 2/14/12 2.5 Dualsport xt suspension INSTALLATION GUIDE PLEASE READ BEFORE YOU START TO GUARANTEE A QUALITY INSTALLATION, WE RECOMMEND READING THESE INSTRUCTIONS THOROUGHLY BEFORE
INTERIOR LED LIGHTING KIT
 INTERIOR LED LIGHTING KIT P/N 2880549 APPLICATION SLINGSHOT BEFORE YOU BEGIN Read these instructions thoroughly and make sure all parts and tools are accounted for. Please retain these installation instructions
LIFT-506 BMF Lift Kit Club Car DS Gas & Electric Installation Instructions
 LIFT-506 BMF Lift Kit Club Car DS Gas & Electric 2003.5-09 Installation Instructions Contents of LIFT-506 Club Car DS BMF Lift Kit: a (1 ea.) BMF Front Suspension b (1 ea.) Driver Side Upper A-Arm c (1
L/6.7L DODGE CUMMINS
 10/19/2012 2005-08 5.9/6.7 Dodge Cummins FlowMAX Lift Pump Kit # 1050310B - 1-2005-09 5.9L/6.7L DODGE CUMMINS BD FLOWMax V2 LIFT PUMP KIT Installation Instructions P/N # 1050310B PLEASE READ ALL INSTRUCTIONS
AC 110V POWER OUTLET INSTALLATION INSTRUCTIONS. Part No. Application 1. PRE INSTALLATION / INSTALLATION OVERVIEW 2. KIT CONTENTS H7110AJ100
 Part. Application H70AJ00 LEGACY / OUTBACK 0MY w/ HK audio LEGACY / OUTBACK 0MY w/o HK audio AC 0V POWER OUTLET INSTALLATION INSTRUCTIONS Page. -6,9-5 Page. -4,7-5. PRE INSTALLATION / INSTALLATION OVERVIEW
INSTALLATION MANUAL
 INSTALLATION MANUAL 2563000 Parts List 1 Carrier weldment 2 Support arm assembly 1 Third brake light assembly 1 Light extension bracket 1 Spare tire adjustment plate 1 Spare tire mount plate 1 Female spade
INSTALLATION INSTRUCTIONS FUEL SURGE TANK KIT
 INSTALLATION INSTRUCTIONS FUEL SURGE TANK KIT BMW E46 3-Series, Excl Convertible Document: 19-0056 Support: info@radiumauto.com Relieve fuel pressure in vehicle before beginingthe installation. Disconnect
Installation Instructions
 Installation Instructions DODGE RAM (1/2 TON AND 3/4 TON) 2002 2008 1500 PICK UP TRUCK 2003 2012 2500 PICK UP TRUCK (Except Megacab) Part Numbers: 50040 Parts List Qty A 1 B 1 C 2 D 2 E 2 F 2 Description
Assembly Manual. Assembly Instructions Read Carefully 2.1. Parts included: Tools suggested: Electric Drill
 2.1 Assembly Manual Tools suggested: Parts included: Electric Drill 3/8ths bit 5/16ths bit Phillips screw driver Cutting pliers 1/2 inch socket wrench 1/2 inch wrench or crescent wrench 8 mm socket wrench
TOYOTA YARIS HATCHBACK INTERIOR LIGHT UPGRADE Preparation
 Preparation Part Number PTS21-52062-08 NOTE: Part number of this accessory may not be the same as the part number show Kit Contents Item # Quantity Reqd. Description 1 1 12 Light Guide 2 1 7 Light Guide
MOTOALLIANCE WINCH MOUNT
 , / 1-866-527-7637 www.motoalliance.com MOTOALLIANCE WINCH MOUNT Polaris RZR Thank you for purchasing our MotoAlliance winch mount(s). You now own a premium custom winch mount to allow you to use your
Conflicts: Highlander without sunroof
 Toyota Highlander (Sunroof) 2011-8.5 Overhead Video Part Number: 00016-00125; Fit Kit-00016-00125-02 Accessory Code: ED9 Conflicts: Highlander without sunroof Kit Contents: Item # Qty. Component Description
RZR WINCH KIT KIT P/N
 RZR WINCH KIT KIT P/N 2878787; 2879334 Application All RZR Models except RZR XP Before you begin, read these instructions twice and check to be sure all parts and tools are accounted for. Please retain
LGT-311L Bumper LED Light Kit EZ-Go RXV Installation Instructions
 LGT-311L Bumper LED Light Kit EZ-Go RXV Installation Instructions Caution: Please read through the instructions carefully. Before starting this project, remove the system s positive and negative connections
YARIS 4-DOOR 2007 INTERIOR LIGHT UPGRADE
 Document # 3999 4/26/06 4-DOOR 2007 INTERIOR LIGHT UPGRADE Preparation Part Number: 00016-52060 Code: IL1 Kit Contents Item # Quantity Reqd. Description 1 1 12 Light Guide 2 1 7 Light Guide 3 1 Hardware
INSTALLATION INSTRUCTIONS
 INSTALLATION INSTRUCTIONS Accessory Application Publication No. MII 15249 WINCH MOUNT KIT P/N 08L70-HL3-A41 SXS700/M4/M2 Issue Date September 2015 PARTS LIST No. Description Qty (1) Winch bracket 1 (2)
INSTALLATION INSTRUCTIONS
 INSTALLATION INSTRUCTIONS Accessory Application Publications No. AII 24637 INSIGHT Issue Date OCT 2002 PARTS LIST Security System: P/N 08E51-S84-100 Attachment Kit: P/N 08E55-S3Y-100 Security system harness
(4) 1/4" Plastic Plugs 12-1/16" 1/4" Ø (4X) 2-5/8" (2X) 4-1/16" 7-1/8" 7-1/8"
 1/4 Plastic Plugs 12-1/16 1/4 Ø (4X) 2-5/8 (2X) 4-1/16 7-1/8 7-1/8") T-67 G2 Light Kit Mounting Instructions Step 1. Lower the liftgate to the ground. To avoid a risk of an electrical short, disconnect the power cable from the positive side of the battery or manually trip
T-67 G2 Light Kit Mounting Instructions Step 1. Lower the liftgate to the ground. To avoid a risk of an electrical short, disconnect the power cable from the positive side of the battery or manually trip
INSTALLATION INSTRUCTIONS WINCH MOUNTING KIT Part Number: Application: Honda Rubicon/Foreman 500
 INSTALLATION INSTRUCTIONS WINCH MOUNTING KIT Part Number: 70830 Application: Honda Rubicon/Foreman 500 Your safety, and the safety of others, is very important. To help you make informed decisions about
Detroit Speed, Inc. Rear Coilover Tower Brace Kit Camaro P/N:
 Detroit Speed, Inc. Rear Coilover Tower Brace Kit 2016+ Camaro P/N: 042433 The Detroit Speed, Inc. 2016+ Camaro Rear Coilover Tower Brace Kit is a bolt-in design that increases overall vehicle stiffness.
SAFETY THIS PRODUCT IS FOR OFFROAD USE ONLY. ALL LIABILITY FOR INSTALLATION AND USE RESTS WITH THE OWNER.
 SAFETY Your safety and the safety of others is very important. In order to help you make informed decisions about safety, we have provided installation instructions and other information. These instructions
SUT-250-S (These instructions are used for SUT-250-SCLC also)
") SUT-250-S (These instructions are used for SUT-250-SCLC also) Torque wrench, carpenters square, wire cutters, Phillips screwdriver, 7/16, 9/16, and 3/4 combination wrenches, ratchet, 9/16, 3/4, 13/16,
SUT-250-S (These instructions are used for SUT-250-SCLC also) Torque wrench, carpenters square, wire cutters, Phillips screwdriver, 7/16, 9/16, and 3/4 combination wrenches, ratchet, 9/16, 3/4, 13/16,
INSTALLATION INSTRUCTIONS
 INSTALLATION INSTRUCTIONS Accessory Application 2009 PILOT Publications No. AII 39422 Issue Date MAY 2008 PARTS LIST Trailer Harness Kit P/N 08L91-SZA-100 Sold Separately Trailer socket harness Control
INSTALLATION INSTRUCTIONS
 INSTALLATION INSTRUCTIONS HDX LED GRILLE APPLICATION: 013-017 Dodge Ram 1500 PART NUMBER: 34-1035 ITEM QUANTITY DESCRIPTION TOOLS NEEDED 1 1 HDX LED GRILLE 10MM SOCKET,3 UPPER BRACKET A, DRIVER () AND
D&D Motor Systems, Inc.
 D&D Motor Systems, Inc. Programmable Regen Controller Manual & Schematics BE ADVISED, D&D Motor Systems, Inc. does not design and manufacture controllers. We provide them as an extension to our existing
MachoMan Moped Assembly Instructions. If you have no mechanical experience, please have the unit professionally assembled.
 MachoMan Moped Assembly Instructions If you have no mechanical experience, please have the unit professionally assembled. Tools needed: #2 Phillips Screwdriver, 14mm Socket, 12mm Socket, 10mm Socket, 14mm
INSTALLATION INSTRUCTIONS
 Toyota 24-pin Dual Camera Blind Spot Monitoring System (Kit # 9002-2911) Please read thoroughly before starting installation and check that kit contents are complete. Items Included in the Kit: 2 Adjustable
REAR ROOF SPEAKER KIT
 REAR ROOF SPEAKER KIT P/N 2882876 APPLICATION Verify accessory fitment at Polaris.com. BEFORE YOU BEGIN Read these instructions and check to be sure all parts and tools are accounted for. Please retain
WirelessONE. Kit INSTALLATION GUIDE. Key Fob Activated Compressor System
 Kit 25870 Key Fob Activated Compressor System MN-751 (041202) ECR 7260 INSTALLATION GUIDE For maximum effectiveness and safety, please read these instructions completely before proceeding with installation.
INSTALLATION INSTRUCTIONS
 INSTALLATION INSTRUCTIONS Accessory Application Publications No. SYSTEM 2005 ACCORD All 27511 (DX, LX) 2-AND 4-DOOR Issue Date AUG 2004 PARTS LIST Security System Attachment (LX): P/N 08E55-SDA-100A Unit
Installation Instructions for Lingenfelter GM 2500 Suburban & Yukon XL Auxiliary Fan System (with ECM controlled fan output)
") Installation Instructions for Lingenfelter 2007-2013 GM 2500 Suburban & Yukon XL Auxiliary Fan System (with ECM controlled fan output) PN L300090607 Revision - 1.1 Lingenfelter Performance Engineering
Installation Instructions for Lingenfelter 2007-2013 GM 2500 Suburban & Yukon XL Auxiliary Fan System (with ECM controlled fan output) PN L300090607 Revision - 1.1 Lingenfelter Performance Engineering
Aux. Battery and Isolator
 Aux. Battery and Isolator ISOLATOR MOUNTING ALL YEAR VANAGONS Fig.1 1. Disconnect ground from main battery under passenger seat 2. Remove driver seat 3. Remove driver seat belt buckle from seat pedestal
20 Rigid Industries LED Light Bar Installation into a 2002 Ford Super Duty
 20 Rigid Industries LED Light Bar Installation into a 2002 Ford Super Duty This write-up is how I installed the Rigid Industries 20" E-Series LED Light Bar into the grill area behind the license plate
TOYOTA HIGHLANDER RUNNING BOARD HIGHLANDER HV Preparation
 Preparation Part Number: PT738-48080 Kit Contents Item # Quantity Reqd. Description 1 1 Driver Side Running Board 2 1 Passenger Side Running Board 3 4 /Middle Mount Bracket 4 2 Rear Mount Bracket 5 2 Rear
RZ3-3A Polaris RZR XP 1000 & 900 SSV Works 3 Speaker Audio Kit
 RZ3-3A Polaris RZR XP 1000 & 900 SSV Works 3 Speaker Audio Kit pg 2 Disassembly, Wire and Amplifier Plate Installation pg 9 Glovebox Subwoofer Installation pg 13 Kick Panel Speakers Installation pg 25
WOC & WOC Top & Back Installation Instructions
 Shown with optional Sun Roof WOC-900500-2 & WOC-900501-2 Top & Back Installation Instructions Install Order! Heater Door System Wiper on to Windshield Windshield Rear Panel Top Panel Tools needed: 5/16
PREMIUM FRONT BUMPER FOR RAM 2500/3500. AEV30239AJ Last Updated: 09/05/17 INSTALLATION GUIDE
 PREMIUM FRONT BUMPER FOR RAM 2500/3500 AEV30239AJ Last Updated: 09/05/17 INSTALLATION GUIDE PLEASE READ BEFORE YOU START TO GUARANTEE A QUALITY INSTALLATION, WE RECOMMEND READING THESE INSTRUCTIONS THOROUGHLY
INSTALLATION INSTRUCTIONS
 AUTOMOTIVE PRODUCTS, INSTALLATION INSTRUCTIONS ULTIMATE BULL BAR APPLICATION: 2009-2018 Dodge Ram 1500 (Excl. Rebel Model) 2019 Dodge Ram 1500 Classic PART NUMBER: 32-1960, 32-1965, 32-1960L, 32-1965L
INSTALLATION INSTRUCTIONS Mitsubishi Lancer Evolution VIII / IX Fuel Surge Tank Kit Document#
 d INSTALLATION INSTRUCTIONS Mitsubishi Lancer Evolution VIII / IX Fuel Surge Tank Kit Document# 19-0077 Brie Tech Support: info@radiumauto.com CAUTION: Exercise extreme caution when working with the fuel
LOW, MID, HIGH RISE PRO-TAPER HANDLEBAR WITH HEATED GRIPS KIT
 LOW, MID, HIGH RISE PRO-TAPER HANDLEBAR WITH HEATED GRIPS KIT P/N 2881235; 2881236; 2881237 APPLICATION All AXYS and PRO RIDE chassis with stock Pro-Taper Bar BEFORE YOU BEGIN Read these instructions and
INSTALLATION INSTRUCTIONS
 INSTALLATION INSTRUCTIONS Accessory Application Publications No. AII 24307 SYSTEM 2003 ELEMENT Issue Date DEC 2002 NOTE: An optional keyless entry system (sold seperately) must be installed before you
INSTALLATION INSTRUCTIONS
 INSTALLATION INSTRUCTIONS Accessory Application Publications No. SECURITY SYSTEM P/N 08E49-SDA-100 ACCORD 2- AND 4-DOOR AII 30666 Issue Date AUG 2005 PARTS LIST Hood switch harness Illustration of the
RZ3-5K Polaris RZR XP 1000 & 900 Kicker 5 Speaker Audio Kit
 PO H PWER PO 5 O KIT I E D U A S A TS S I R LA R Z R R O SP pg 2 pg 9 pg 13 pg 25 pg 29 Disassembly, Wire and Amplifier Plate Installation Glovebox Subwoofer Installation Kick Panel Speakers Installation
2016 HONDA 1000 Pioneer PN 3102 Turn signal / horn kit rev nc
 2016 Honda 1000 Pioneer STOP - THIS KIT IS DESIGNED SPECIFICALLY FOR 2016 HONDA 1000 PIONEER IF YOUR MACHINE IS NOT THIS MODEL DO NOT PROCEED. THIS KIT DOES NOT WORK ON THE PIONEER 500 nor 700 S. Contact
INSTALLATION INSTRUCTIONS
 INSTALLATION INSTRUCTIONS Accessory Application 2011 PILOT Publications No. AII 43339-47543 Issue Date JAN 2012 PARTS LIST Trailer Harness Kit P/N 08L91-SZA-100 Towing Kit P/N 08L92-SZA-100 Ball mount
SCION FRS FOG LIGHTS. Part Number: SFR-313
 Part Number: SFR-313 Kit Contents Item # Quantity Reqd. Description 1 2 Light Housings 2 2 Fog Light bezels 3 1 Harness bag 4 1 User s card 5 1 Switch 6 1 Fuse jumper Hardware Bag Contents Item # Quantity
INSTALLATION INSTRUCTIONS TRAILER HITCH MAIN HARNESS KIT
 PART NUMBER: 0000-89-N30 GENUINE ACCESSORIES INSTALLATION INSTRUCTIONS TRAILER HITCH MAIN HARNESS KIT APPLICABLE MODELS: 2016 > CX-9 PACKAGE CONTENTS: INSTALLATION INSTRUCTIONS QTY 1 CABLE TIE MOUNT QTY
Installation of Raxiom Switchback Turn Signal Conversion Kit w/resistors
 Installation of Raxiom Switchback Turn Signal Conversion Kit w/resistors Overview: Below are the steps involved in the installation of the Raxiom Switchback Turn Signal LED lights in the 1987 1993 Ford
PRELIMINARY INSTALLATION INSTRUCTIONS. PARTS LIST Security System Kit (sold separately) P/N 08E51-EP4-101
 P/N 08E51-EP4-101") INSTALLATION INSTRUCTIONS Accessory Application Publications No. All 30510 (LX) 2006 PILOT Issue Date SEP 2005 PARTS LIST Security System Kit (sold separately) P/N 08E51-EP4-101 Security system control
INSTALLATION INSTRUCTIONS Accessory Application Publications No. All 30510 (LX) 2006 PILOT Issue Date SEP 2005 PARTS LIST Security System Kit (sold separately) P/N 08E51-EP4-101 Security system control
07-11 GM 1500 Pickup, Avalanche, Yukon, Tahoe, Suburban Front 2.5 Kit
 92130500 07-11 GM 1500 Pickup, Avalanche, Yukon, Tahoe, Suburban Front 2.5 Kit Thank you for choosing Rough Country for all your suspension needs. Rough Country recommends a certified technician install