Oil Cooler Upgrade Install Guide
|
|
|
- Walter Flowers
- 5 years ago
- Views:
Transcription
1 Oil Cooler Upgrade Install Guide CAUTION: Before beginning please make sure that the engine is completely cold. Hot engine will have extremely hot oil and components leading to the danger of being burned. Install at your own risk. Not recommended for novice installers.

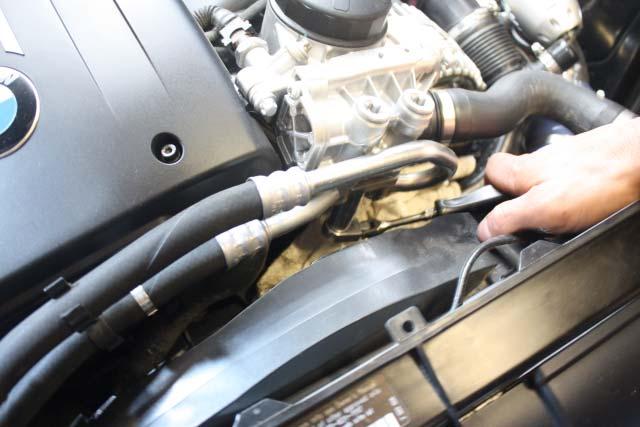
2 Tools needed for install: 13mm, 8mm, and 6mm socket wrenches with extension T20H Torx wrench 7/8 th stubby wrench 17/64 drill bit Ruler Dremel or similar cutting tool STEP 1: Remove air duct screws and disconnect air intake piping so that you can have room to access the oil cooler thermostat housing.


3 . STEP 2: Using a 13mm socket wrench remove the bolt that holds the oil cooler lines into the thermostat housing. Please place a container under the thermostat as it contains oil.
4


5 STEP 3: Using a 13mm socket wrench with extension, remove the screw on the other end of the oil lines. Note: Place a funnel under the oil fitting because the lines may contain oil. STEP 4: Locate the thermostat housing adaptor provided in your V K Motorwerks oil cooler upgrade kit. It will look like the part shown below:


6 Step 5: Using the bolt that you previously removed from the thermostat, re-attach the V K Motorwerks adaptor to the thermostat housing. You may use some grease to help lubricate the adaptor. Step 6: Lift up your car and remove your right wheel to access the wheel liner bolts.
 sensor attached to the")

7 Step 7: With the 8mm wrench remove all the bolts holding the wheel well cover in place. Caution: pull off the wheel well liner SLOWLY there is a Tire Pressure Monitoring (TPM) sensor attached to the rear of the liner. Simply push the tabs together and the plug should slide out. Do not use excessive force. Step 8: Remove the screws and bolts on both sides of the cooler. Please keep the cooler straight when you remove it since it will be filled with oil.


8 Step 9: Remove the air vent that is behind the OEM oil cooler by loosening the tab inside the oil cooler air vent and pulling up.


9 Step 10: Now you must remove the brake duct vent. You can do this by removing the 8mm bolt located on the bottom left and side of the air vent. Step11: Using a T20H Torx socket remove the metal bracket attached to the top of the OEM oil cooler.


10 Step 12: Reinstall the bracket, you just removed to the top of the V K Motorwerks oil cooler with the two 6mm hex head bolts that came in your kit. Step 13: Remove the rubber rings from the OEM oil cooler and install on your new oil cooler.


11 Step 14: Place your brake duct vent as shown below: Step 15: From the left edge, measure 1 inch in and draw a line going perpendicular to the duct. From the same left edge, measure 4 inch in and draw a perpendicular line at this spot. It should look like this:


12 Step 16: Cut out the area in between the lines. Step 17: After completing step 16, your brake duct vent should look like the picture shown below. Reinstall the vent.


13 Step 18: By hand, attach the hose with two 90 degree fittings to the inlet on the top of the V K Motorwerks oil cooler. Attach the straight fitting to the bottom of the oil cooler. Do not tighten the hoses yet.


14 Step 19: Mount the bracket and install the oil cooler to the car. Once the oil cooler is mounted use a 7/8 th stubby wrench and tighten both of the hose fittings. This is probably the toughest part of the install because of the tight space. Now just for kicks compare your OEM oil cooler to the new one you just installed.


15 Step 20: Run the lines to the thermostat adaptor and connect them. Make sure that they are not rubbing up against any thing that can make them rip. Also make sure not to over-tighten the hoses. Step 21: Now you will have to relocate your TPM sensor. To do this you will have to poke out the pins in your wheel well liner.


16 Step 22: Place the TPMS as shown in the picture below and use a 17/64 drill bit to make holes to install the locking tabs.


17 Step 23: Take the OEM oil cooler vent wiith the side of the vent that faces into the wheel well count to the third vent fin from the left. Measure up 5.25inches from the bottom. Now mark this spot and cut as shown in the pictures below.


18 Step 24: Now you will need to cut the backing of that vent: Mark the top of the vent as shown and cut. Step 25: Now you have to cut the wheel well liner. Mark and cut as shown below. Use the left and bolt screw as a reference point to figure out how far to cut down.


19 Step 26: Now install the wheel liner and vent and you should end up with this: Step 27: Put on the wheel and air intake hose that you took out. Check your oil level, add a quart if needed. Step 28: Enjoy your car!
OIL COOLER KIT INSTALLATION INSTRUCTIONS PART NUMBER D E92 335is (N54 engine) with BMW M-Technic bumper and with stock oil cooler
 with BMW M-Technic bumper and with stock oil cooler") OIL COOLER KIT INSTALLATION INSTRUCTIONS PART NUMBER D570-0923 APPLICATION: 2011 E92 335is (N54 engine) with BMW M-Technic bumper and with stock oil cooler Congratulations for being selective enough to
OIL COOLER KIT INSTALLATION INSTRUCTIONS PART NUMBER D570-0923 APPLICATION: 2011 E92 335is (N54 engine) with BMW M-Technic bumper and with stock oil cooler Congratulations for being selective enough to
OIL COOLER KIT INSTALLATION INSTRUCTIONS PART NUMBER D E92 335i/xi (N55 engine) with BMW Standard bumper and with stock oil cooler
 with BMW Standard bumper and with stock oil cooler") OIL COOLER KIT INSTALLATION INSTRUCTIONS PART NUMBER D570-0924 APPLICATION: 2011-12 E92 335i/xi (N55 engine) with BMW Standard bumper and with stock oil cooler Congratulations for being selective enough
OIL COOLER KIT INSTALLATION INSTRUCTIONS PART NUMBER D570-0924 APPLICATION: 2011-12 E92 335i/xi (N55 engine) with BMW Standard bumper and with stock oil cooler Congratulations for being selective enough
OIL COOLER KIT INSTALLATION INSTRUCTIONS PART NUMBER D
 OIL COOLER KIT INSTALLATION INSTRUCTIONS PART NUMBER D570-0904 APPLICATION: 2011-2012 E90 335i/xi (N55 engine) with BMW standard bumper and with stock oil cooler Congratulations for being selective enough
OIL COOLER KIT INSTALLATION INSTRUCTIONS PART NUMBER D E92 335i/xi (N55 engine) with M-Technic bumper and without stock oil cooler
 with M-Technic bumper and without stock oil cooler") OIL COOLER KIT INSTALLATION INSTRUCTIONS PART NUMBER D570-0925 APPLICATION 2011-12 E92 335i/xi (N55 engine) with M-Technic bumper and without stock oil cooler Congratulations for being selective enough
OIL COOLER KIT INSTALLATION INSTRUCTIONS PART NUMBER D570-0925 APPLICATION 2011-12 E92 335i/xi (N55 engine) with M-Technic bumper and without stock oil cooler Congratulations for being selective enough
OIL COOLER KIT INSTALLATION INSTRUCTIONS PART NUMBER D
 OIL COOLER KIT INSTALLATION INSTRUCTIONS PART NUMBER D570-0907 APPLICATION: 2011-12 E90 335i/xi (N55 engine) with BMW M-Technic bumper and without stock oil cooler Congratulations for being selective enough
2017 Current Ford Raptor Stealth Fighter Rear Bumper Installation Instructions
 2017 Current Ford Raptor Stealth Fighter Rear Bumper Installation Instructions PREPARATION 1. Disconnect the negative terminal on the battery. Park the vehicle on level ground and set the emergency brake.
2017 Current Ford Raptor HoneyBadger Rear Bumper Installation Instructions
 2017 Current Ford Raptor HoneyBadger Rear Bumper Installation Instructions PREPARATION 1. Disconnect the negative terminal on the battery. Park the vehicle on level ground and set the emergency brake.
2010+ Audi B8 S4/S5 3.0T S-FLO Intake Kit INSTALLATION GUIDE FOR RACING USE ONLY
 INSTALLATION GUIDE 2010+ Audi B8 S4/S5 3.0T S-FLO Intake Kit FOR RACING USE ONLY Congratulations on your purchase of the AWE Tuning S-FLO Intake for the 2010+ Audi B8 S4 and B8 S5 3.0T. Exquisite build
Mercedes E63/CLS AMG Carbon Turbo Intake System Instructions
 Mercedes E63/CLS AMG Carbon Turbo Intake System Instructions The goal of Alpha Performance is to provide the highest quality, best performing products available. By utilizing research and development,
Current Ford F150 Race Series R Rear Bumper Installation Instructions
 2015 - Current Ford F150 Race Series R Rear Bumper Installation Instructions PREPARATION STEPS 1. Disconnect the negative terminal on the battery. Park the vehicle on level ground and set the emergency
OIL COOLER KIT INSTALLATION INSTRUCTIONS D Application: , E89 Z4 sdrive 35i without stock oil cooler* PARTS LIST
 OIL COOLER KIT INSTALLATION INSTRUCTIONS D570-0891 Application: 2009-11, E89 Z4 sdrive 35i without stock oil cooler* PARTS LIST Qty Part No. Description 1 D573-0050 Oil Cooler + Frame Assy 1 D573-0044
Z1 Motorsports 350Z / G35 Oil Cooler Kit Installation Manual
 Z1 Motorsports 2877 Carrollton Villa Rica Hwy Carrollton GA 30116 770.838.7777 Z1 Motorsports 350Z / G35 Oil Cooler Kit Installation Manual For 19, 25 and 34 Row Oil Cooler Kits Parts Included: 1 Aluminum
OIL COOLER KIT INSTALLATION INSTRUCTIONS PART NUMBER D E92 335i/xi without stock oil cooler
 OIL COOLER KIT INSTALLATION INSTRUCTIONS PART NUMBER D570-0921 APPLICATION 2007-08 E92 335i/xi without stock oil cooler Congratulations for being selective enough to use a Dinan Engineering Oil Cooler
Shotgun Single Barrel HPFP install guide
 Shotgun Single Barrel HPFP install guide Thank you for your purchase of the VTT Shotgun Single Barrel HPFP upgrade! First thing to do when you open your box is to make sure all parts are in their respective
Installation Instructions : Jaguar F-Type Intake System : Page 1
 Installation Instructions : Jaguar F-Type Intake System : Page 1 1. Remove the undertray all the Torx bolts and the hex bolts holding the splitters in place need to be removed. 2. Starting with the right
JBR MAZDASPEED
 Page1 james Barone Racing Aftermarket Parts and Accessories JBR 2007 2009 MAZDASPEED 3 Front Mount Intercooler Piping Kit Installation Instructions for TR8 Intercooler Tooling: o Jack, Jack Stands, Ramps
Performance Inlet Manifold
 Performance Inlet Manifold Tools needed (some tools not required on some models): 13mm Combination Wrench Flat Blade Screwdriver T30 Torx Driver T25 Torx Driver 10mm Combination Wrench and/or Socket with
MAZDASPEED3 Intercooler Instructions
 MAZDASPEED3 Intercooler Instructions Congratulations on your purchase of the COBB Tuning Front Mount Intercooler System for your 2007-2009 Mazdaspeed3. The following instructions should assist you through
VW & Audi TDI CR140 ECO KIT Installation Guide
 VW & Audi TDI CR140 ECO KIT Installation Guide This guide is to help you install your new Rawtek DPF, EGR & Adblue Delete Exhaust ECO Kit on your (2009-2014) VW / Audi with 2.0l CR140 Diesel Engine. Note:
IE B9 A4/A5 Cold Air Intake Install Guide
 IE B9 A4/A5 Cold Air Intake Install Guide Thank you for purchasing another high quality Integrated Engineering product! This instruction guide is used for installation of IE s Cold Air Intake Kit for Audi
Single Barrel Shotgun HPFP Install Guide
 Single Barrel Shotgun HPFP Install Guide Thank you for purchasing the VTT Single Barrel Shotgun HPFP upgrade kit! PLEASE READ THE ENTIRE GUIDE BEFORE BEGINNING INSTALLATION! The first thing you should
RZR Lift Kit. Polaris RZR Part #: Rev
 RZR 570 2 Lift Kit Polaris RZR 570 2012+ Part #: 5101204 Rev. 081916 491 W. Garfield Ave., Coldwater, MI 49036. Phone: 517-278-7768 E-mail: sales-rtpro@sporttruckusainc.com SAFETY WARNING RT Pro UTV recommends
OIL COOLER KIT INSTALLATION INSTRUCTIONS PART NUMBER D E92/E93 335i/xi with stock oil cooler
 OIL COOLER KIT INSTALLATION INSTRUCTIONS PART NUMBER D570-0920 APPLICATION 2007-10 E92/E93 335i/xi with stock oil cooler Congratulations for being selective enough to use a Dinan Engineering Oil Cooler
Tools needed: Here is a pic of the shift kit I used. It is a Transgo brand and as you can see, it just a bag full of springs and one valve.
 Before installing a shift kit, be sure the transmission is in good operating order. If your transmission is making noises, slipping, shifting bad or the fluid looks brown or smells burnt, take the transmission
TyrolSport UGSMIC Install Instructions for Audi A4.
 TyrolSport UGSMIC Install Instructions for Audi A4. Tools Necessary: Torx T25, T45. 10mm socket and ratchet. 6mm hex wrench. Flat blade screwdriver. Hacksaw blade or die grinder or dremel tool. Drill (not
VW SCIROCCO R TWINTERCOOLER INSTALLATION INSTRUCTIONS
 VW SCIROCCO R TWINTERCOOLER INSTALLATION INSTRUCTIONS Tools needed: T25 torx driver Small flat head screwdriver 12mm & 13mm socket, with ratchet Dremel or similar with cut off disc Large Phillips screwdriver
TESLA MODEL S REAR UNDER SPOILER & DIFFUSER SYSTEM
 TESLA MODEL S Thank you for purchasing your Unplugged Performance Rear Under Spoiler & Diffuser System for the Tesla Model S! Please read this manual carefully prior to installation. REAR UNDER SPOILER
INSTALLATION INSTRUCTIONS CATCH CAN KIT
 INSTALLATION INSTRUCTIONS CATCH CAN KIT FORD FOCUS Document: 19-0150 Support: info@radiumauto.com STEPS 1 TO 19 COVER THE PCV SIDE CATCH CAN KIT (P/N: 20-0315) STEPS 20-32 COVER THE CRANKCASE CATCH CAN
Audi S1 Intake kit. Qty. Description
 Audi S1 Intake kit Description Qty Silicone Intake pipe 1 Vacuum hose 1 Heatshield 1 Bracket 1 Machined inlet 1 Vacuum connector 1 Filter 1 M6x16 cap head bolt 1 Tools Ratchet Extension Torx socket Sockets
Fig A ADDICTIVE DESERT DESIGNS. Preparation: Removal:
 Preparation: Disconnect the negative battery terminal. Park the vehicle on level ground and set the emergency brake. We recommend reading through the installation instructions in whole before performing
C 6 ROUND HOLE STAINLESS STEEL GRILLE KIT GEN 2.2 INSTALLATION INSTRUCTIONS
 C 6 ROUND HOLE STAINLESS STEEL GRILLE KIT GEN 2.2 INSTALLATION INSTRUCTIONS Thank you for the purchase of our new C6 GRILLE KIT product. When installed correctly this product will keep your radiator and
4. Remove (4) 10mm and (1) 7mm bolt that holds fascia at front corners, on each side
 10mm and (1) 7mm bolt that holds fascia at front corners, on each side") 2010 Camaro LS3 1. Disconnect battery ground 2. Remove front wheels 3. Remove (5) push pins and (5) #20 torx screws on inner front wheel well liners and remove liners on each side 4. Remove (4) 10mm and
2010 Camaro LS3 1. Disconnect battery ground 2. Remove front wheels 3. Remove (5) push pins and (5) #20 torx screws on inner front wheel well liners and remove liners on each side 4. Remove (4) 10mm and
Integrated Engineering Audi RS3 8V & TTRS 8S Cold Air Intake Install Guide IEINCQ1
 Integrated Engineering Audi RS3 8V & TTRS 8S Cold Air Intake Install Guide IEINCQ1 Thank you for purchasing another high quality Integrated Engineering product! This instruction guide is used for installation
DV8 Tire Carrier Manufacturer Part Number TCSTTB-01 Model Number J104640
 DV8 Tire Carrier Manufacturer Part Number TCSTTB-01 Model Number J104640 Installation Time: 30 Minutes Tools Required: 19mm Socket 13mm Socket Ratchet T15 Torx Driver T50 Torx Driver Painters Tape Dremel
INSTALLATION INSTRUCTIONS CATCH CAN KIT
 INSTALLATION INSTRUCTIONS CATCH CAN KIT FORD FOCUS Document: 19-0150 Support: info@radiumauto.com STEPS 1-19 COVER THE PCV SIDE CATCH CAN KIT (P/N: 20-0315) STEPS 20-32 COVER THE CRANKCASE CATCH CAN KIT
7C1550 COBB Tuning R35 GT-R Silicone Hose Kit Install Instructions
 7C1550 COBB Tuning R35 GT-R Silicone Hose Kit Install Instructions Nissan GT-R (R35) Silicone Hose Kit Congratulations on your purchase of the COBB GT-R Silicone Hose Kit for your Nissan GT-R. The following
PLEASE READ ALL INSTRUCTIONS BEFORE INSTALLATION
 1 68 RFE VALVE BODY UPGRADE Part #: 1030360 Part #: 1030361 2007-11 (Early Model) 2010-12 (Late Model) PLEASE READ ALL INSTRUCTIONS BEFORE INSTALLATION 2 K I T C O N T E N T S : Please check to make sure
C&L Cold Air Intake (03-04 Mach 1) - Installation Instructions
 - Installation Instructions") C&L Cold Air Intake (03-04 Mach 1) - Installation Instructions The below installation instructions work for the following products: C&L Cold Air Intake (03-04 Mach 1) Please read through the instructions
C&L Cold Air Intake (03-04 Mach 1) - Installation Instructions The below installation instructions work for the following products: C&L Cold Air Intake (03-04 Mach 1) Please read through the instructions
INSTRUCTIONS. INTERCOOLER UPGRADE BMW E82 135i 2008-
 INSTRUCTIONS INTERCOOLER UPGRADE BMW E82 135i 2008- Parts Included: - Intercooler - Left and right side pipes with hoses - 3 Silicone Hoses ( 2.5 x 3 ) - 1 Silicone Hose 90degree 2.5 elbow - 8 Hoseclamps
Deuce/Ace Installation Instructions
 HARDWARE KIT: Upper Mounting Plate: 2-7/16" (11mm) X 3.5" bolts 2-7/16" flange nuts 2-2" spacers 2-7/16" trim cap mounting washers 2 - plastic trim caps TOOLS NEEDED: safety glasses wrenches 16mm or 5/8"
Ford Racing BOSS 302 Engine Oil Cooler (11-14 GT)
") Tools needed: 14mm hex socket 7mm socket/wrench 8mm socket/wrench Ford Racing BOSS 302 Engine Oil Cooler (11-14 GT) 10mm socket (for airbox removal) ¾ inch or 19mm wrench Torque wrench Appropriate ratchets
Tools needed: 14mm hex socket 7mm socket/wrench 8mm socket/wrench Ford Racing BOSS 302 Engine Oil Cooler (11-14 GT) 10mm socket (for airbox removal) ¾ inch or 19mm wrench Torque wrench Appropriate ratchets
05/06 Gsxr 1000 Clutch Mod
 By: Ali (Jetspeedz) 05/06 Gsxr 1000 Clutch Mod Parts: 21472-41G10 - WASHER, CLUTCH - $10.09 From 06 Gsxr 750 Opt: 11482-40F00 - GASKET, CL COVER - $8.29 Tools: 13/64 Drill bit, 30mm, 12mm, 10mm, 8mm sockets,
Difficulty Level: 3-4. This is very intensive for an intercooler installation. Experienced mechanical skills recommended. Wrenches Sockets Specialty
 Nissan GT-R FMIC The goal of AMS is to provide the highest quality, best performing products available. By utilizing research and development, and rigorous testing programs AMS will never compromise the
SR Performance Twin 62mm Throttle Body for GT
 Required Tools: SR Performance Twin 62mm Throttle Body for 2005-2010 GT Flat-head screwdriver Ratchet Small extension 10mm socket 8mm socket T20 Torx bit Needle nose pliers 5mm allen wrench Recommended
2016+ Mazda Miata Front & Rear Sway Bar Installation Instructions
 Page1 James Barone Racing Aftermarket Parts and Accessories 2016+ Mazda Miata Front & Rear Sway Bar Installation Instructions Tools Required: Jack Lift or ramps Ratchet wrench Torque Wrench 6 and 12 Extension
Removal of bumper & intercooler:
 R56 Front Mount Intercooler 090107 Thank you for purchasing the ALTA Performance R56 Front Mount Intercooler kit. Persons experienced in the proper operation of MINI engines should only perform this installation.
OIL COOLER KIT CHEVY CAMARO 2.0T PARTS LIST AND INSTALLATION GUIDE INSTALL DIFFICULTY DISCLAIMER CAUTION TOOLS NEEDED NOTE INSTALL PROCEDURE
 PARTS LIST AND PARTS INCLUDED 3PC APPLICATION-SPECIFIC MOUNTING BRACKETS 1PC HORN RELOCATION MOUNTING BRACKET 1PC 25-ROW OIL COOLER (SLEEK SILVER OR STEALTH BLACK) 1PC 4'4" STAINLESS STEEL BRAIDED HOSE
2010 & Up Mazdaspeed 3 Hood Scoop Vented Insert Installation Instructions
 Page1 2010 & Up Mazdaspeed 3 Hood Scoop Vented Insert Installation Instructions Tooling: Ratchet wrench 10mm Socket Small pick Flat head screwdriver Parts List: Hood scoop insert **Please be sure to read
INSTALLATION INSTRUCTIONS
 INSTALLATION INSTRUCTIONS Document# 19-0038 2004+ Lotus Elise (Series 2) Rear Clamshell Removal Kit Safely support the vehicle. This is a two-person job. Allow 1 to 2 hours for initial disassembly. Have
Installation instruction do88 Intercooler for SAAB 9-3SS/SC 4-cyl Turbo
 Installation instruction do88 Intercooler for SAAB 9-3SS/SC 4-cyl Turbo This instruction shows how to replace the OEM intercooler with this performance intercooler. 1. 4. 5. At this type of installation
RED ALPHA COOLANT EXPANSION TANK
 RED ALPHA COOLANT EXPANSION TANK Our Q60 and Q50 VR30 Red Alpha Expansion Tank increases the Red Alpha Heat Exchanger coolant capacity by an astounding 70% and the radiator coolant capacity by 28%! Our
Fig A ADDICTIVE DESERT DESIGNS. Preparation: Removal:
 Preparation: Disconnect the negative battery terminal. Park the vehicle on level ground and set the emergency brake. We recommend reading through the installation instructions in whole before performing
2017 Current Ford SuperDuty Adaptive Cruise Control Relocation Bracket Installation Instructions
 2017 Current Ford SuperDuty Adaptive Cruise Control Relocation Bracket Installation Instructions PREPARATION 1. Disconnect the negative terminal on the battery. Park the vehicle on level ground and set
Remove four screws from radio trim
 ZSpeedPerformance Remove four screws from radio trim Radio trim removed, Remove 3 screws from shifter trim. The other screw is under the ash tray. Remove shift knob and remove shifter trim. Use caution
Z1 Motorsports 370Z/G37 Oil Cooler Kit Installation Manual
 Z1 Motorsports 2877 Carrollton Villa Rica Hwy Carrollton GA 30116 770.838.7777 Z1 Motorsports 370Z/G37 Oil Cooler Kit Installation Manual For 19, 25 and 34 Row Oil Cooler Kits Parts Included: 1 SETRAB
Installation Instructions
 2011-2013 LML DURAMAX COMPOUND-ADD 2011-2015 LML A Duramax TURBO KIT Add INSTALL A Turbo INSTRUCTIONS Compound Kit Installation Instructions 1-800-955-0476 - www.industrialinjection.com - info@industrialinjection.com
Weistec True Downpipes
 Weistec True Downpipes Installation Guide, W212, W218, AWD 2014+ E63 2014+ CLS63 WARNING! IF YOU ARE NOT EXPERIENCED IN THE AREA OF AUTOMOTIVE MECHANICS, WE STRONGLY URGE THAT YOU REFER THIS INSTALLATION
JL SHIELD TIRE CARRIER INSTALLATION INSTRUCTIONS
 JL SHIELD TIRE CARRIER INSTALLATION INSTRUCTIONS TOOLS NEEDED 3/4 Wrench 3/4 Socket 9/16 Wrench or Socket 1 1/2 Socket 1 1/8 Wrench 13mm Socket Torque Wrench for 1 1/2 Socket HARDWARE 2-1/2 X 2 Hex Bolt
COLD AIR INTAKE INSTALLATION INSTRUCTIONS
 COLD AIR INTAKE INSTALLATION INSTRUCTIONS # D760-0030 Fits: 2007-10 135i (E82, E88; with N54 engine) 2007-08 335i/xi (E90) 2007-10 335i (E92, E93; with N54 engine) Congratulations for being selective enough
INSTALLATION INSTRUCTIONS 97 FORD EXPEDITION
 INSTALLATION INSTRUCTIONS 97 FORD EXPEDITION 1. Read the instructions completely and carefully before you begin. Check the kit for proper contents (refer to the part s list and the picture diagrams). Before
Integrated Engineering VW Jetta & GLI MK6 ( ) 2.0T/1,8T Gen 3 Cold Air Intake Install
 2.0T/1,8T Gen 3 Cold Air Intake Install") Integrated Engineering VW Jetta & GLI MK6 (2013.5+) 2.0T/1,8T Gen 3 Cold Air Intake Install Thank you for purchasing another high quality Integrated Engineering product! This instruction guide is used
Integrated Engineering VW Jetta & GLI MK6 (2013.5+) 2.0T/1,8T Gen 3 Cold Air Intake Install Thank you for purchasing another high quality Integrated Engineering product! This instruction guide is used
ZZP LNF Cobalt Turbo Upgrade
 ZZP LNF Cobalt Turbo Upgrade Note: These instructions are intended for installers with previous turbo installation experience. Some procedures will not be described in full detail. If you run into any
Rugged Ridge Spartacus HD Tire Carrier Kit Install
 Rugged Ridge Spartacus HD Tire Carrier Kit Install Installation Time: 2 hours Tools Required: Ratchet ¾ socket 19 mm socket 13 mm socket 10 mm socket 19 mm Wrench 10 mm wrench 6mm Allen Wrench T50 torx
Cold Air Intake Installation Instructions
 BAVARIAN AUTOSPORT Cold Air Intake Installation Instructions Page 1/5 3.04 INS261 NOTE: Throughout the instructions the term AFM is used. It refers to the Air Flow Meter which is located between the engine
Installation instruction do88 Intercooler for SAAB 9-3 1,9 TTiD
 Installation instruction do88 Intercooler for SAAB 9-3 1,9 TTiD This instruction shows how to replace the OEM intercooler with this performance intercooler. At this type of installation we always recommend
GrimmSpeed Install Guide Series Installing the GrimmSpeed WRX Boost Control Solenoid Updated 4/14/15
 GrimmSpeed Install Guide Series Installing the GrimmSpeed 2015+ WRX Boost Control Solenoid Updated 4/14/15 Introduction: This guide will illustrate the installation of the GrimmSpeed 2015+ WRX Boost Control
RTX 2000 Thomas Compressor TG-550 Graco PN
 RTX 2000 Thomas Compressor TG-550 Graco PN 246888 Print of Complete Compressor--------------Page 2 Instruction for Kit 118628-------------------Page 3 Instruction for Kit 287845-------------------Page
Shotgun Double Barrel HPFP install guide
 Shotgun Double Barrel HPFP install guide Thank you for your purchase of the VTT Shotgun Double Barrel HPFP upgrade! First thing to do when you open your box is to make sure all parts are in their respective
IE Audi 3.0T Crank Pulley Upgrade Install Guide IEBAVJ3
 IE Audi 3.0T Crank Pulley Upgrade Install Guide IEBAVJ3 Thank you for purchasing your IE 3.0T crankshaft pulley upgrade! This instruction guide is used for installation of IE s lower overdrive pulley for
Volvo P1 Air Intake. ELEVATE Turbo Intake Pipe. MAF Sensor. Inlet Manifold. Air Filter Housing. ECU Cover
 Volvo P1 Air Intake Tools needed: 13mm Combination Wrench Flat Blade Screwdriver T30 Torx Driver T25 Torx Driver 8mm Combination Wrench and/or Socket with Ratchet 10mm Combination Wrench and/or Socket
INSTALLATION INSTRUCTIONS CATCH CAN KIT
 INSTALLATION INSTRUCTIONS CATCH CAN KIT FORD FOCUS Document: 19-0150 Support: info@radiumauto.com STEPS 1 TO 19 COVER THE PCV CATCH CAN KIT (P/N: 20-0315) STEPS 20-32 COVER THE CRANKCASE CATCH CAN KIT
COLD AIR INTAKE INSTALLATION INSTRUCTIONS
 COLD AIR INTAKE INSTALLATION INSTRUCTIONS # D760-0029 Fits: 2009-10 335i/xi (E90; with N54 engine) Congratulations for being selective enough to use a Dinan Engineering Cold Air Intake. We have spent many
Forge Motorsport BMW N54 Diverter Valves
 Forge Motorsport BMW N54 Diverter Valves Please thoroughly read through and familiarize yourself with these instructions in their entirety prior to beginning any part of the installation process of any
M52tu-M54 VANOS Assembly & Timing Using G.A.S. Professional Cam Tool Kit
 Home BMW Solutions Porsche Solutions DIY Tech Engine Services Dyno Services Machining About Contact Store Tool Rental M52tu-M54 VANOS Assembly & Timing Using G.A.S. Professional Cam Tool Kit This procedure
Wiring Harness Relocation by Flopster Mar 2012
 Wiring Harness Relocation by Flopster843 21 Mar 2012 On my 2008 Ram, there is a gigantic blob of electrical wiring that Dodge decided to put between the engine and the brake master cylinder, just behind
Owner smanual. Banks Techni-Cooler Charge Air Cooler Assembly Dodge 6.7L Cummins (24-valve) ISB Pickup Trucks. with Installation Instructions
 ISB Pickup Trucks. with Installation Instructions") with Installation Instructions Owner smanual Banks Techni-Cooler Charge Air Cooler Assembly 07-08 Dodge 6.7L Cummins (24-valve) ISB Pickup Trucks Use with system p/n 25983 Gale Banks Engineering 546 Duggan
with Installation Instructions Owner smanual Banks Techni-Cooler Charge Air Cooler Assembly 07-08 Dodge 6.7L Cummins (24-valve) ISB Pickup Trucks Use with system p/n 25983 Gale Banks Engineering 546 Duggan
Smittybilt XRC Rear Bumper Installation Guide Part # 76856
 Installation Difficulty: Easy Installation Duration: 2 Hours Tools Needed: Smittybilt XRC Rear Bumper Installation Guide Part # 76856-13, 16, 17, 18, 19mm wrenches and/or sockets - Socket extension - Torque
INSTALLATION INSTRUCTIONS
 COLD AIR INTAKE INSTALLATION INSTRUCTIONS PART NUMBER D760-0620 & D760-0621 PARTS LIST APPLICATION: 9/98-2003 E39 540i 4.4L 4" Intake Tube Air Filter w/ clamp Silicone Hose 80-100mm Hose Clamp 90-110mm
INSTALLATION INSTRUCTIONS
 N-MT13-1 & N-MT13-2 COLD AIR INTAKE KIT INSTALLATION INSTRUCTIONS MUSTANG GT 2015-up PARTS INCLUDED Part Number Descrip on Qty 9-SA-INTAKE-100 Intake Assembly 1 9-SA-HEATSHIELD-100 Heatshield Assembly
Honda Civic Type R Performance Oil Cooler Installation Instructions
 Honda Civic Type R Performance Oil Cooler Installation Instructions Tools Required: Flat headed screw driver Phillips screw driver 10mm Hose clamp drive 10mm and 12mm socket with suitable wrench and extensions
ZZPerformance.com ZZP 3 Redline Cold Air Intake GEN 2
 Tools you will need: Flat Blade Screwdriver Phillips Screwdriver 10mm End Wrench Ratchet Extension 5.5mm Socket 7mm Socket 10mm Socket 13mm Deep Socket ZZPerformance.com ZZP 3 Redline Cold Air Intake GEN
Ford 7.3L SuperDuty Cold Air Intake
 999.5-2003 Ford 7.3L SuperDuty Cold Air Intake ! DISCLAIMER ) By installing this product onto your vehicle, you assume all risk and liability associated with its use. 2) It is your responsibility to make
CAUTION. INSTALLATION INSTRUCTIONS Part Number Hidden Winch Kit with special XD 9000 Short Drum Winch For Ford F-150 Truck
 INSTALLATION INSTRUCTIONS Part Number 69110 Hidden Winch Kit with special XD 9000 Short Drum Winch For Ford F-150 Truck As you read these instructions, you will see NOTES, CAUTIONS and WARNINGS. Each message
2017+ L5P Duramax 3 ½ Down Pipe & EGR Fix Kit
 2017+ L5P Duramax 3 ½ Down Pipe & EGR Fix Kit Covers installation of PN s: WCF100630, WCF100829 Note: This Kit is for off road competition use only! Off Road Competition Use Tuning & Exhaust System is
Installation Instructions :BMW E39 M5 : Page 1
 Installation Instructions :BMW E39 M5 : Page 1 1. We will start by removing the front bumper. Remove the 3 x 8mm hex head bolts in the wheel arch liners on both sides. Turn the wheels to gain access. 2.
Installation instruction do88 Performance Radiator for Volvo S60 V70 XC70 S
 Installation instruction do88 Performance Radiator for Volvo S60 V70 XC70 S80 00-09 1. This instruction shows how to replace the OEM radiator with do88 performance radiator. At this type of installation
Please read these Installation Instructions in their entirety prior to installing or operating this equipment.
 2007-15 Chevy/GMC 1500 (Standard & Short Box) Please read these in their entirety prior to installing or operating this equipment. Serial Number This hitch is rated to 30,000 lbs. Gross Towing Weight and
SR Performance Aluminum Radiator - Manual (96 4.6L)
") SR Performance Aluminum Radiator - Manual (96 4.6L) Tools needed 1. Large and small pair of pliers 2. 8mm and 10mm deep socket and extensions 3. Spare Rags 4. Large Drain Pan 5. Funnel with small opening
SR Performance Aluminum Radiator - Manual (96 4.6L) Tools needed 1. Large and small pair of pliers 2. 8mm and 10mm deep socket and extensions 3. Spare Rags 4. Large Drain Pan 5. Funnel with small opening
HAVING INSTALLATION QUESTIONS? CALL TECHNICAL SUPPORT AT
 9/23/2009 1 of 6 ITEM 1 QTY 8 Parts List PART NUMBER DESCRIPTION 3/8" CONICAL TOOTHED WASHER TOOLS REQUIRED #2 PHILLIPS SCREWDRIVER #2 STUBBY SCREWDRIVER 8mm SOCKET 13mm SOCKET RATCHET 12" EXTENSION TORQUE
SAFETY. Read and understand all safety precautions and instructions before installing this product.
 SAFETY Your safety and the safety of others is very important. In order to help you make informed decisions about safety, we have provided installation instructions and other information. These instructions
2007 Current Jeep Wrangler JK Stealth Fighter Rear Bumper With Tire Gate Installation Instructions
 2007 Current Jeep Wrangler JK Stealth Fighter Rear Bumper With Tire Gate Installation Instructions PREPARATION 1. Disconnect the negative terminal on the battery. Park the vehicle on level ground and set
Installation Instructions 2019 Chevy and GMC 1500 Rear Bumper Product Number: E4050, E4051 Application: Chevy and GMC 1500 Trucks
 IMPORTANT SAFETY GUIDE Your safety and the safety of others is very important. In order to help you make informed decisions about safety, we have provided the following warnings, safety precautions, installation
Installation instruction do88 Intercooler for SAAB 9-3SS/SC 2,8 V6 Turbo
 Installation instruction do88 Intercooler for SAAB 9-3SS/SC 2,8 V6 Turbo This instruction shows how to replace the OEM intercooler with this performance intercooler. At this type of installation we always
Installation Instructions :BMW B58 : Page 1
 Installation Instructions :BMW B58 : Page 1 1. We will start by removing the stock airbox system. Loosen the hose clamp around the airbox. Remove the MAF sensor plug the white clip unlocks by pulling it
Nissan R35 GTR Intercooler Pipe Kit w/ Cold Air Intake Installation Instructions
 Nissan R35 GTR Intercooler Pipe Kit w/ Cold Air Intake Installation Instructions 1. Disconnect the negative terminal on the battery that is located at the passenger firewall side. 2. Remove both front
Installation Instructions 6L80 Cast Aluminum. Deep Transmission Fluid
 Installation Instructions 6L80 Cast Aluminum Deep Transmission Fluid Pan SPECIFICALLY DESIGNED FOR 2010-2014 CAMARO SS (V8) Part Number 70391 (see www.bmracing.com for the latest vehicle fitment applications
James Barone Racing Aftermarket Parts and Accessories
 Page1 James Barone Racing Aftermarket Parts and Accessories What you will need: Jack and Jack Stands Drill 1/8 and 1/4 drill bits Ratchet wrench 11mm socket Philips head screw driver Flat head screw driver
BD Venom Dual Fuel F O R D 6. 7 L P O W E R S T R O K E Installation Instructions
 U 21 March 2017 (1050470) Venom Dual Fuel Kit (I-00390) 1 DOWNLOAD ENHANCED INSTALL MANUALS AT dieselperformance.com BD Venom Dual Fuel 2 0 1 1-2 0 1 6 F O R D 6. 7 L P O W E R S T R O K E Installation
TOYOTA FJ CRUISER / 4RUNNER COLD AIR INTAKE Section I Installation Preparation. 4.0L V6 (1GR) Roller Rocker Part Number(s): PTR
 Roller Rocker Part Number(s): PTR") Section I Installation Preparation Part Number(s): PTR03-89100 Kit Contents Item # Quantity Reqd. Description 1 1 Air Filter (P/N: PTR43-00083) 2 1 Upper Air Box 3 1 Lower Air Box 4 1 Hump Coupler 5 1
Section I Installation Preparation Part Number(s): PTR03-89100 Kit Contents Item # Quantity Reqd. Description 1 1 Air Filter (P/N: PTR43-00083) 2 1 Upper Air Box 3 1 Lower Air Box 4 1 Hump Coupler 5 1
2015+ HELLCAT 6.2L HEMI System vehicle specific plate system xx
 These installation instructions will guide you through installing the Nitrous Outlet 2015+ Hellcat 6.2L Hemi Vehicle Specific Plate System on your vehicle. Before you get started, remember to never use