The Wonderful World of Type II HVAC Systems
|
|
|
- Spencer Goodwin
- 5 years ago
- Views:
Transcription
1 Definitions The Wonderful World of Type II HVAC Systems Mark Wall The following is a short list of definitions that I use throughout this article that comprise many of the major components of the Type II system: Blower Motor Small motor and squirrel cage fan mounted on the side of the HVAC box. It pushes air through the system. HVAC box This is the large black box that is dead center of the coach and is mounted directly on the firewall behind the two access hatches. This box is more or less divided into four chambers: the air inlet, the evaporator section, the heater core section and the air outlet into the Distribution Plenum. Distribution Plenum This is a black plastic assembly that is attached to the bottom of the dashboard. It has an opening, dead center, to allow air in from the HVAC box to be directed to the defroster, A/C or heat vents A/C Vents These include the passenger side vent (two dash openings), the driver s side vent in the arm rest, and the center vent (two dash openings). The center vent also distributes heat, unlike the other A/C vents. Heat Vents One located directly above the driver s foot well and one located under the dash in front of the passenger seat. Defroster Door Located in the Distribution Plenum opening that sits directly above the HVAC box. Max-Air Opening/Door The opening is located directly below the center vent in the dashboard at the same level as the passenger heat vents. The Max-Air door is the vacuum operated door in the HVAC box that is normally closed to block this opening. This door only opens when the temperature lever is in the far left (Recirculating) position. The Recirculating label is a carryover from the prior years panel and is incorrect because the Type II does not have any recirculating ability. It Began With One Question, Why is my dash airflow so bad?
2 First, I am not an HVAC guy nor am I an engineer so I can t and don t pretend to speak from a background of training or expertise on this subject. My thoughts and opinions are based strictly on admittedly subjective observations and opinions based on my own hands-on experimentation with the system on my 76 Eleganza. First, is the airflow really so bad? For me, GM answered this question itself with the introduction of the Type II system and its Max-Air door. This was an attempt to improve airflow by routing ALL, repeat ALL, A/C air through a large rectangular opening in the floor that ended in two add-on ducts bolted to the dashboard. It completely bypassed the Distribution Plenum and therefore, all dash mounted A/C vents. How did it achieve this? Simple the system used a vacuum operated door to close off airflow up into the Distribution Plenum. All A/C air was then directed through the Max-Air opening and its two vents. Did it work? Again, GM answered with a redesigned system in 1977 so, no, it didn t work as well as GM hoped. For me, GM s Type II Max-Air door design indicated that the Distribution Plenum had some pretty serious airflow problems that GM couldn t easily overcome. In fact, the A/C airflow makes four right angle turns in the HVAC box alone and several more in the Distribution Plenum. Now add in the all the leaky seams in the Distribution Plenum and the poor connections to the vents and it s a wonder that we get any air at all! Step One: Relocate the Blower Motor to the Front of the HVAC Case This actually began with a seed planted by reviewing Dave???? s design where he cut openings into the HVAC cover and routed some ducts up through the floor with great A/C airflow results. I wanted the same results but I wanted good airflow through the heating system too and Dave s only worked for A/C. I also wanted the air to flow through the stock dash vents if possible. I thought about a couple of different methods and none of them really panned out because of the tight space in front of the HVAC box. On a complete whim, I unbolted the stock Blower Motor and its case and stuck it on the front of the HVAC case - it actually fit in the small space! This meant that I could pull air through the evaporator and blow it directly into the HVAC case and eliminate three right angle turns. The actual fabrication for relocating the motor was easy. First, I split the front cover for the HVAC box horizontally. The split is exactly on the sheet metal bar that divides the heater core chamber from the evaporator chamber. You don t have to do this but it makes it much easier to take the cover on and off because you can leave the heater core cover in place. It also provides a very good reference line for cutting the openings into the lower cover.


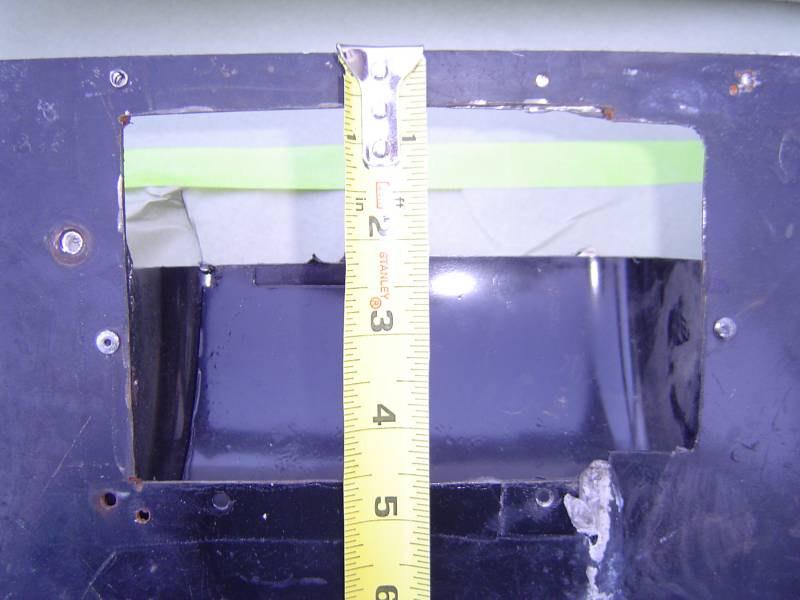
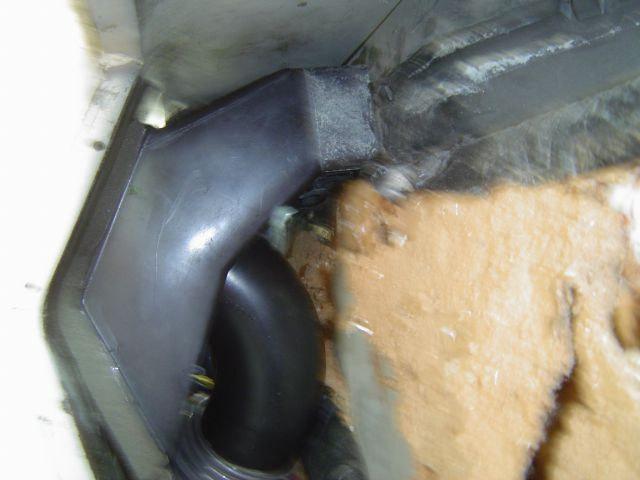
3 The important cuts are for the new air inlet for the squirrel cage and the air outlet into the HVAC box. You have to effectively separate the air coming from the evaporator from that being blown back into the HVAC box. Unfortunately, there is not much room to do that because GM only left a space about 2.5 tall by the width of the HVAC box. Above that 2.5 is the heater core and below it is the evaporator so you have to have your outgoing, chilled air, go through this 2.5 space. If it weren t for that black curved deflector in the following picture guiding the air into that small opening, the chilled air meant for the HVAC box and your warm face would be blown right back into the evaporator.

4 The top of the squirrel cage motor housing is even with the top of the evaporator. With a small piece of sheet metal cut to fit the curved edge of the deflector, you have a divider between the air coming into the fan and that going out to the HVAC box. Hopefully you can see that the curved plastic diverter in the picture to the left fits into this space when the cover is in place. I used a piece of open cell foam along the edge of the diverter for a better seal. Closed cell might work too but I was concerned about its ability to compress enough. I just slipped the sheet metal between the existing sheet metal in the HVAC box and the top of the evaporator and caulked it in place. Inelegant but functional.


5 The top of that black plastic diverter is also even with the top of the evaporator. The diverter is a register deflector from Home Depot. It is adjustable to accommodate different size floor registers but even at its shortest, it was too long so I sawed off some of it until it was the right length for the blower case and pop riveted it in place and caulked all seams.
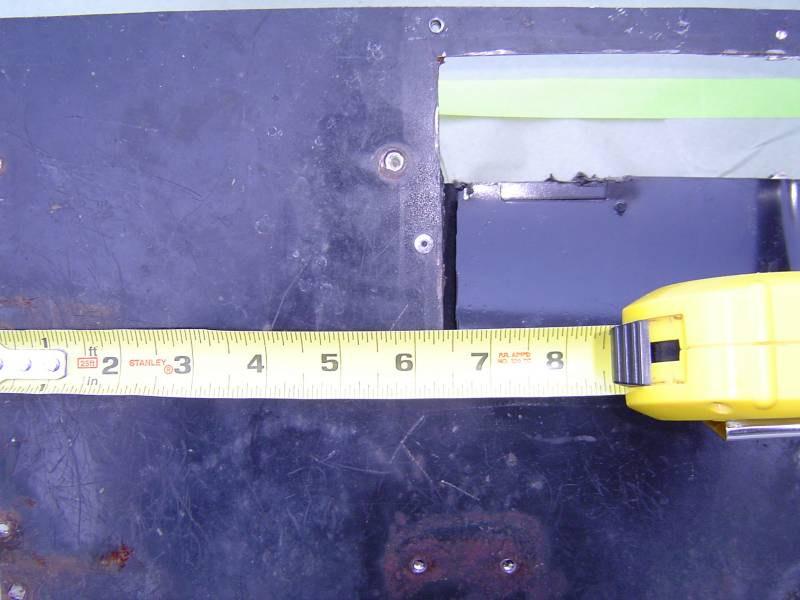
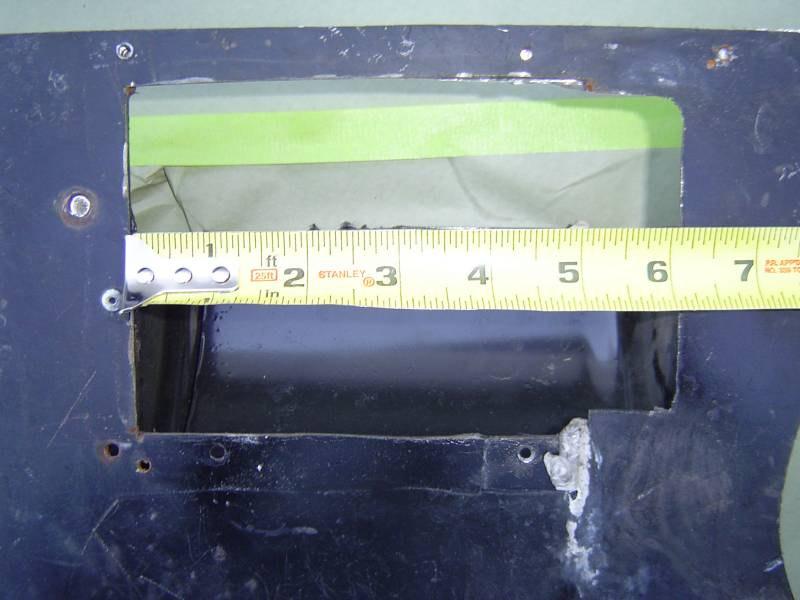
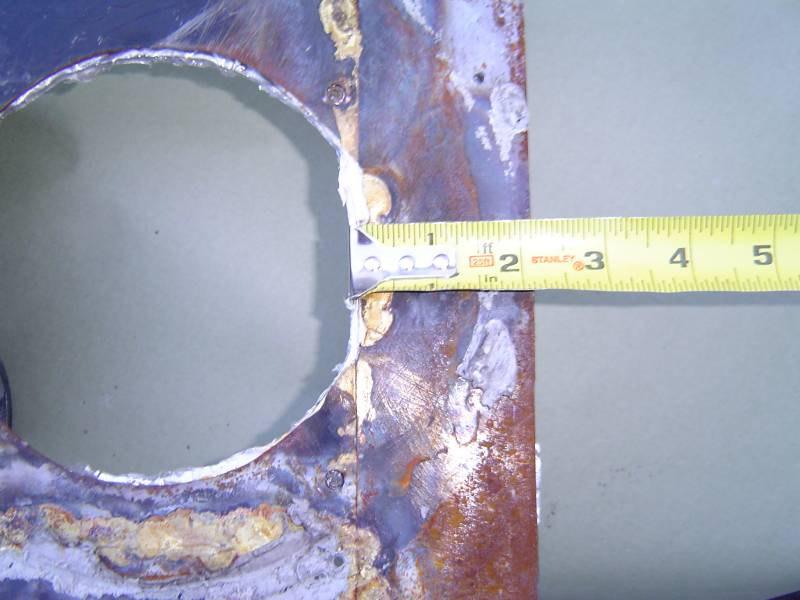
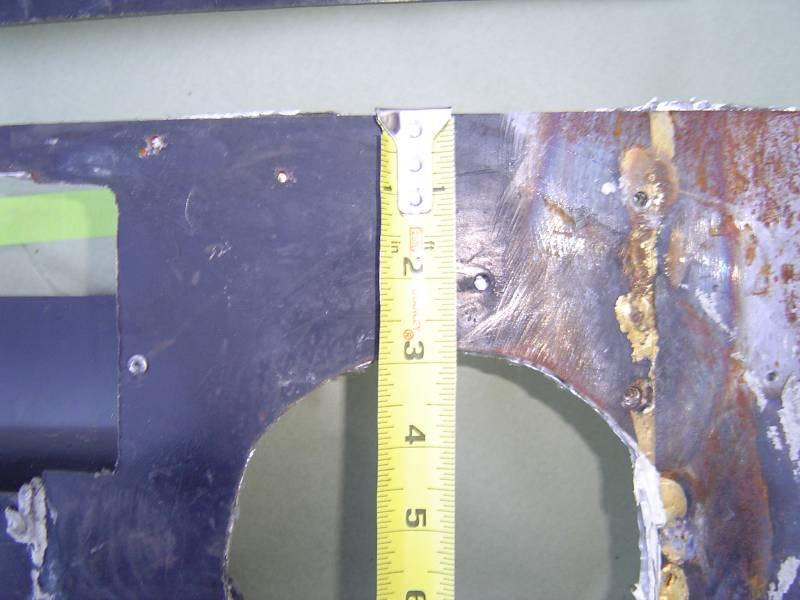
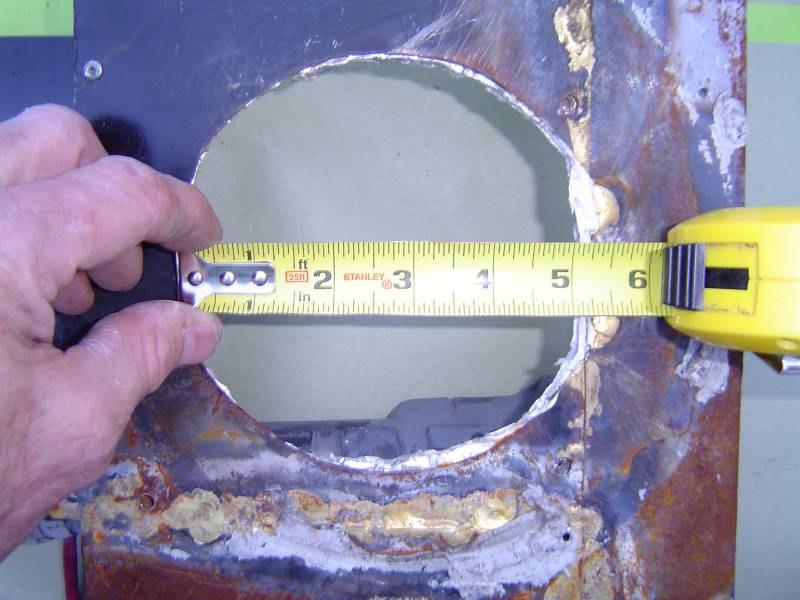
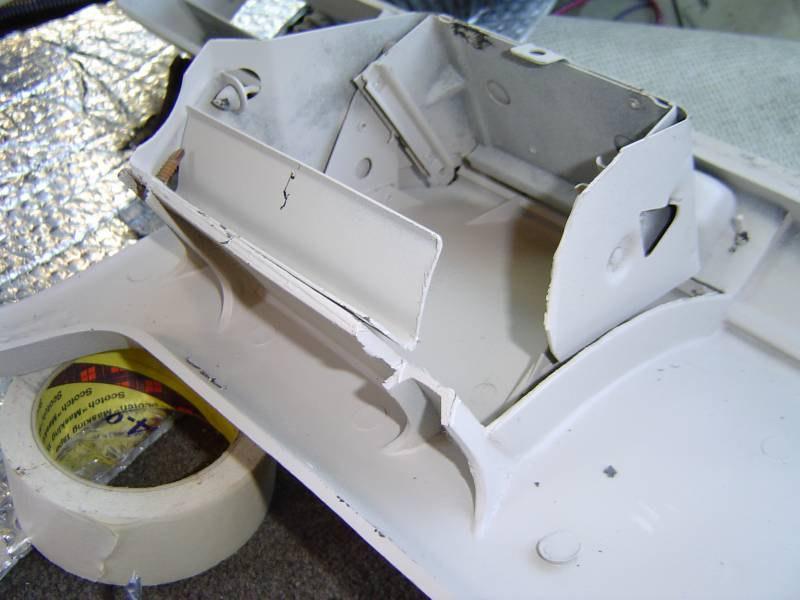
6 A combination of factors determine where you install the blower motor assembly. Fortunately it is pretty self evident once you get it apart. The plastic shroud that is part of the factory motor is a key guide. The top of it has to be even with the edge of the cover (now cut in half) and the left edge has to be as far to the left of the HVAC case as you can get it and still be blowing air into the 2.5 inlet mentioned earlier. As you can see from the picture, this is a few inches from the actual edge of the cover. That s because the HVAC cover actually extends to cover some of the factory inlet for fresh air. The measurements are: For the deflector opening o The top edge is a touch over ½ inch from where the cover is cut in half, o The left edge is just over 6 ¼ from the left edge o The opening is just over 6 wide o The bottom edge of the deflector (inside view) is about 3 ¼ from the bottom o For the motor opening o 3 from the top where the cover is cut in half o About 2 1/8 from the right side o About 2 7/8 from the top edge o The circle is about 5 ¼ wide
7
8


9 So now we have fewer right turns which means much better airflow through the Distribution Plenum and A/C vents, right?
10 Not quite. I got almost zero improvement out of the dash vents but good airflow out of the defroster and great airflow out of the Type II opening. The Type II improvement made sense the air was blowing in directly from the fan outlet without any direction changes but I expected better results from the Distribution Plenum. To try to pinpoint the problem, I stuck a Shop-Vac blower directly into the passenger side plenum duct via the HVAC box and still got lousy airflow. This little test led me to conclude that it wouldn t matter how large a fan I put on the system, it just wasn t going to push air through the Distribution Plenum so the plenum had to go. Step Two: Plug the Plenum So the plenum was a big part of the problem. Now what? Remember it also contains the defroster door and I wanted to maintain that functionality. But it also routes the heat through the heat vents or the A/C through the A/C vents. The heat-a/c one was easy for me. After all, GM routed both heat and A/C through the dash mounted center vents. After looking at the dash for a bit, I felt that the vents were placed so low on the dash that the separate heat vent was really unnecessary and I could route both heat and A/C through all the vents just like GM did on the center vent. After a little experimentation, I determined that the best solution for me was to bypass the plenum for the dash vents and create new ductwork from the Type II opening to the existing A/C vents. There was plenty of room inside the dash for new 2.5 A/C hose and the backs of the A/C vents had nice housings easily adaptable to the 2.5 hose. But because the plenum was still connected to the system via the HVAC box, I had to plug it, except for the defroster door, to eliminate any possibility of air flowing through it rather than the Type II opening or the defroster door. This was easily accomplished with Great Stuff expanding foam that I shot into the plenum from the center vent and passenger vent and from the top of the HVAC box. I sprayed in the foam after I had removed the A/C vent housings from inside the dash and the HVAC box. This gives you access to the plenum inlets and outlets. You just have to be careful that you keep the defroster door operational. I got foam all over the vacuum door lever but it scraped off easily enough. Step Three: Ductwork Design Now that I had made the decision to have all air flow out of the Type II opening or the stock defroster opening, I no longer needed the Type II door inside the HVAC box. So it was time to remove the HVAC box. Mine was held in with 5 nuts and bolts. The bolts are located along both sides of the HVAC box accessed through the two front hatch openings. Be aware that on mine, the bolts did not have caged nuts so two people were needed to remove these. I removed the grill; took off one wiper assembly (I m not sure I really had to do that); and slid the evaporator out of the HVAC box and moved it out of the way. The HVAC box then slid right down and out the grill opening.


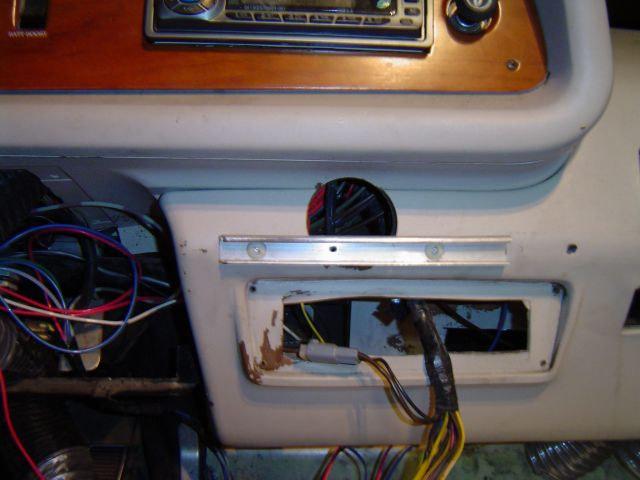
11 Opening up the HVAC box to remove the Type II door, I discovered that the back of the HVAC box has a sort of false wall that I felt would restrict airflow so I removed the entire back wall along with the Type II door. There is no insulation at the back of the box or on the firewall and I am not sure adding any would create a tangible benefit. With the back removed, the firewall acts as the back of the HVAC box and the airflow restriction into the coach is entirely dependent on how large you make the Type II opening in the firewall. I left my opening the original width but made it about three inches taller than stock. A panel over that opening accepts four 2.5 A/C duct hoses which route the air to the A/C vents, bypassing the foam-sealed Distribution Plenum.


12 This allows air from the blower motor only two potential outlets; either the Type II opening or the defroster door. In any position other than Defroster Mode, the defroster door is closed and all air exits through the Type II opening. In Defroster Mode, the defroster door opens and air exits there as well as the Type II opening. I was concerned that there would not be enough air coming out the defroster with no restriction on the Type II outlet but it is actually better than the stock arrangement. Connecting the center vent and the passenger vent was very straightforward. You have to remove the glove box first and take all the screws out of the bottom of the dash for easier access. Each A/C vent has a black plastic housing attached to it inside the dash.. This housing has two pop rivets connecting it to the Distribution Plenum and one Phillips screw connecting it to dash. I just removed the screw and twisted the housing back and forth until it broke free from the pop rivets. I drilled a 2.5 hole in the back of each


13 housing and inserted a 2.5 elbow used in a woodshop dust collection system and then put a bead of caulk around the elbow. I did a few other things here to improve airflow. I filled the plenum openings with Great Stuff to keep air from flowing back into the plenum. I also notched the sides of the plastic housings so I could easily slide the housing back onto the plenum openings and then screwed them back in place and duct taped around the joint as best I could. When you do the center vent you have to be sure not to bind up the defroster door like I did. Spent a few minutes scraping away excess foam to free it up!
14

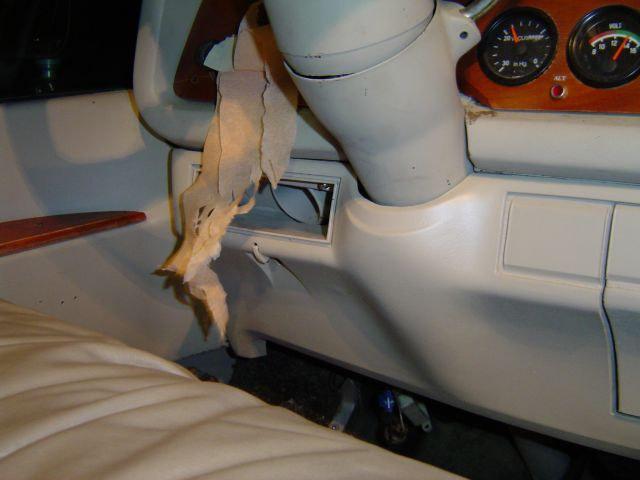
15 All the hose fittings are dust collection fittings available at Rockler, Woodcraft, etc. I connected a hose from each elbow, center and passenger vent to two of the four fittings on my new Type II opening cover - instant improved air flow. The hose to the passenger side vent runs under the fuse box to the vent and I had to cut a slight opening in the bottom of the dash for hose clearance. If you used normal A/C duct hose, it would probably be flexible enough to squeeze in the dash without the cut. I used very stiff woodshop hose. Moving over to the driver s side required me to cut an opening in the side panel which I did without removing the panel. I just used an air powered cutoff wheel to make an opening giving me access to the factory flex duct. I then pulled the duct from its firewall fitting - it came right off. Then I ran a hose from one of the two remaining fittings on my new Type II cover, under the column, through the dash, and down to this factory hose. The factory hose was a little large than 2.5 which allowed me to slide the 2.5 hose inside it. With a little, what else, duct tape, a perfect seal. The final result of this was very good airflow out of the center vent and good airflow out of the driver s side vent and passenger side vent. One feature that I need to point out is that all air, heated or cooled, comes out of the A/C vents or defroster. The two floor heat vents are no longer functional in my design. Since GM had heat and A/C coming out of the center vent, I felt that the same functionality would work on the other vents as well. Given that the A/C vents are mounted relatively low on the dash just above the heat vent on the passenger side I felt this wouldn t be a problem and it is not. Although a matter of opinion, my wife and I both feel the heater is much more effective and comfortable through the dash vents.

 so I had to cut a bit off the back bracing to clear the brake switch plate.")
16 Step Four: Scotty, We Need More Air. I still wanted more vents by the driver so I added the A/C panel that GM added to the 1977/78 units. I got one from Jim Bounds - cheap. To fit it to an earlier unit requires just a few modifications because of the ashtray. If you wanted to get rid of that and just glue the door shut, you wouldn t have to do much of anything. I kept my ashtray functional (I don t smoke but I figured it makes a great change holder) so I had to cut a bit off the back bracing to clear the brake switch plate. I also had to cut away part of the brace connecting the left and right side of the dash that the stock panel under the column connects to. The


17 brace is still fully functional. Since my coach had the Captain s table accessory, I also had to cut away part of its aluminum support so the new A/C unit could fit up against the dash. To mount the new panel, I drilled several new holes in the 77/78 panel. One screw connects the assembly to the aluminum Captain s table brace from underneath, two screws connect it to the steel brace running under the column mentioned above using the original mounting holes in the brace and one screw goes through the top of the left A/C opening into the stock screw hole that my original cover connected to. After test fitting the piece, I cut a 2.5 hole in the dashboard directly behind the A/C vent in the right side of the new panel. Using an elbow and a short length of hose, I connected this fitting to the last of the four fittings on the Type II cover. To connect the left vent, I used a 2.5 Y fitting that I fit into the back of this vent. The back for the new vent is a dust collector for a router table. I then routed the hose that connects the driver s side armrest vent to the Y and the legs of the Y feed armrest vent and the new left vent in the GMC panel.
18


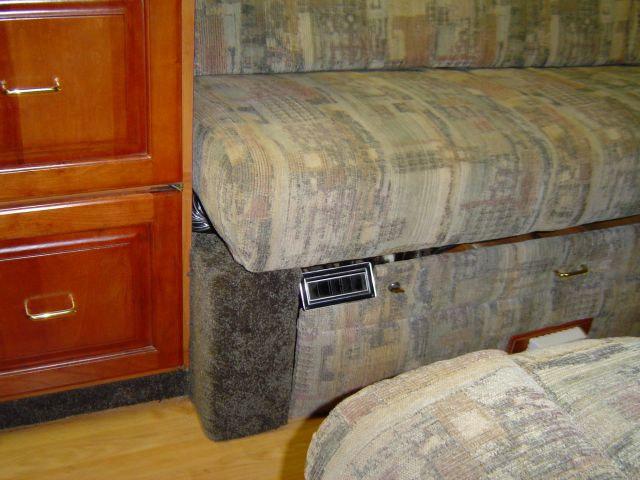
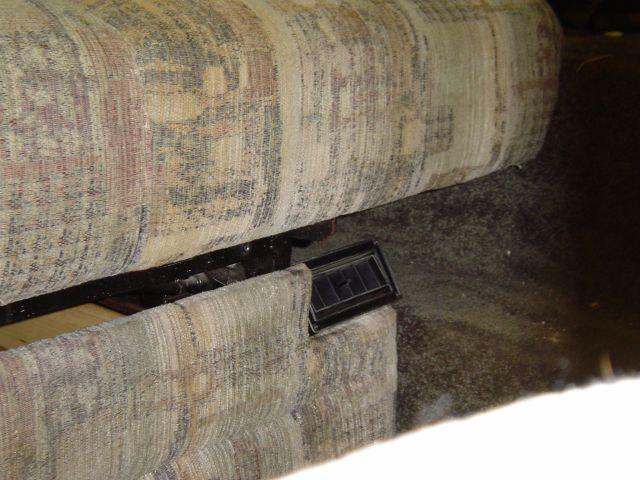
19 Results The net result of all this is that I now have very good to excellent flow out of the stock center vent and the right vent on the new 77/78 A/C panel. This makes sense because these are very short hose runs from the Type II opening. The airflow out of the passenger side vent is good and the airflow out of the left vent on the 77/78 panel and armrest vent are decent but not great because of the length of hose and two vents running off one hose. Second Evaporator Since you can never have enough cold air, I also added a second evaporator. I placed the evaporator next to the couch and ran duct hoses to two vents mounted on a door on the front of my couch and to two vents installed in a new duct mounted on the wire race.
20

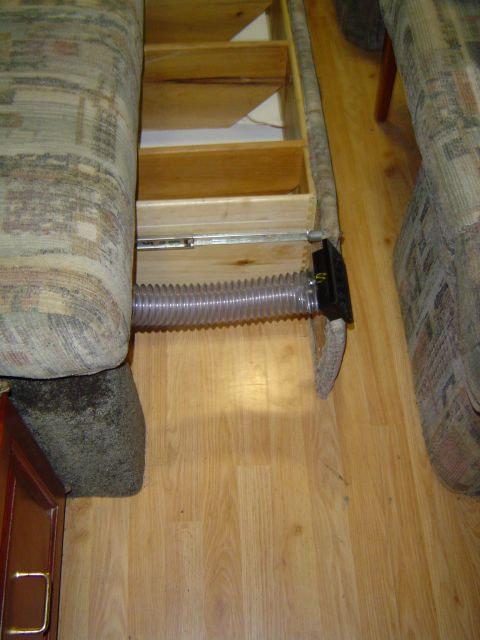
21 The evaporator is out of a junkyard conversion van. This one happened to be out of a GM van that had the optional rear factory air so mine is only an evaporator and not a combination evaporator/heater core like most conversion vans. The combo unit might be better for people who do more cold weather traveling because it could provide A/C and heat. The setup was straightforward. I had a local A/C shop tee into the A/C lines up near the compressor and run them under the driver s side of the coach then up through the floor to the evaporator. I slightly modified the evaporator housing so that I could add a second motor with two squirrel cages for better airflow. The unit now has 2 motors with 4 squirrel cages pushing air through the evaporator. This gives me good airflow through the upper duct. I mounted a 3-speed fan switch on the side of the kitchen sink cabinet to control this unit. System Configuration Stock compressor and front evaporator but with an R-134 expansion valve. The second evaporator runs a stock R-12 expansion valve and generally runs slightly cooler then the front evaporator. I don t know why. Recirculating Air The other modification I made was to go to 100% recirculating air. The HVAC box hangs several inches below the sloped portion of the firewall/floor. To get recirculating air, I cut a hole in the sloped portion of the floor directly in front of the HVAC box. I then cut a corresponding hole in the HVAC box using a hole saw. I cut several holes next to each other and then cut the connecting pieces out with a small reciprocating metal saw. I used a Home Depot wall heating duct designed for use between studs. This type has a relatively narrow oval shape that worked well as a connection between the HVAC box


22 and the passenger compartment. Ken H. came up with an idea to seal up this connection with a sheet metal piece running from the bottom of the HVAC box to the firewall/floor with the edges folded upwards to seal the sides against the floor. I haven t done this yet but I plan to this summer.
23 Miscellaneous: Just a couple of items/tasks that this project involved: Remove the vacuum module and bypass door in passenger side A/C vent and plug the vacuum hose. Remove vacuum module for the Max-air door and plug the hose. I left in place the vacuum lines and modules on the driver s side for the time being. I will likely remove the lines and plug them later for a cleaner design. For the time being, they don t negatively impact anything because the ducts are no longer connected to the system. I also left in place the passenger side heat vent although this can be removed and plugged as well.
Here s the arm by itself:
 These are some of the issues I ran into attempting to put this Classic Auto Air (CAA) A/C kit onto a 1971 Camaro that was originally equiped with A/C. The kit was designed for a non A/C car, so I had to
Jeep Wrangler TJ 4.0 LITER Installation instructions
 www.jeepair.com 2000-2001 Jeep Wrangler TJ 4.0 LITER Installation instructions Important information about your system, and warranty DO NOT ADD ANY OIL TO ANY PART OF THE SYSTEM. DO NOT USE THE SIGHT GLASS
Installing AMP-wiring in a New Beetle
 Installing AMP-wiring in a New Beetle Vehicle used: New Beetle 2.0i Type 9C (1999) Used set of cables: Dietz 35mm² power cable, double shielded Dietz chinch cable ( 35mm² Professional Line ) First of all:
Ford Racing BOSS 302 Engine Oil Cooler (11-14 GT)
") Tools needed: 14mm hex socket 7mm socket/wrench 8mm socket/wrench Ford Racing BOSS 302 Engine Oil Cooler (11-14 GT) 10mm socket (for airbox removal) ¾ inch or 19mm wrench Torque wrench Appropriate ratchets
Tools needed: 14mm hex socket 7mm socket/wrench 8mm socket/wrench Ford Racing BOSS 302 Engine Oil Cooler (11-14 GT) 10mm socket (for airbox removal) ¾ inch or 19mm wrench Torque wrench Appropriate ratchets
Jeep Wrangler TJ 4.0 LITER Installation instructions
 www.jeepair.com 2002-2004 Jeep Wrangler TJ 4.0 LITER Installation instructions Kit Information These directions are for 2002-2006 model Jeep Wranglers. After 1994 every vehicle was designed for R134a refrigerant.
1963 GEN IV SUREFIT VINTAGE AIR CONDITIONING INSTALLATION
 by Randy Irwin 1963 GEN IV SUREFIT VINTAGE AIR CONDITIONING INSTALLATION Randy Irwin - Technical Writer Randy has been involved in the Chevy parts business for over 30 years. He is a wizard at creating,
Jeep Wrangler TJ. Complete Air Conditioning System. Slide Control Head. Installation instructions
 WWW.JEEPAIR.COM 1996-1998 Jeep Wrangler TJ Complete Air Conditioning System Slide Control Head Installation instructions Kit Information After 1994 every vehicle was designed for R134a refrigerant. The
PERFECT FIT SERIES IN-DASH HEAT/ COOL/ DEFROST 1969 CHEVROLET CAMARO/ FIREBIRD NOTE: INSTRUCTIONS DEPICT CAMARO
 specializing in AIR CONDITIONING, PARTS AND SYSTEMS for your classic vehicle PERFECT FIT SERIES IN-DASH HEAT/ COOL/ DEFROST 1969 CHEVROLET CAMARO/ FIREBIRD NOTE: INSTRUCTIONS DEPICT CAMARO CONTROL & OPERATING
Installing the Wireless Charging upgrade kit in a 2018 XT5 (Platinum version)
") Installing the Wireless Charging upgrade kit in a 2018 XT5 (Platinum version) September 2, 2018 Tools needed: Wireless charger upgrade kit Plastic trim tools 7 mm nut driver Background: I purchased the
Installing the Wireless Charging upgrade kit in a 2018 XT5 (Platinum version) September 2, 2018 Tools needed: Wireless charger upgrade kit Plastic trim tools 7 mm nut driver Background: I purchased the
Jeep Wrangler 4.0 Liter TJ Jeep Wrangler 2.5 Liter TJ Installation instructions
 TM www.jeepair.com 1999 Jeep Wrangler 4.0 Liter TJ 1999-2001 Jeep Wrangler 2.5 Liter TJ Installation instructions Kit Information After 1994 every vehicle was designed for R134a refrigerant. The Jeep kit
PERFECT FIT SERIES IN-DASH HEAT/ COOL/ DEFROST MUSTANG
 specializing in AIR CONDITIONING, PARTS AND SYSTEMS for your classic vehicle PERFECT FIT SERIES IN-DASH HEAT/ COOL/ DEFROST 1969-70 MUSTANG CONTROL & OPERATING INSTRUCTIONS The controls on your new Perfect
X-Type w/ non-premium sound amplifier installation instructions
 X-Type w/ non-premium sound amplifier installation instructions 1. Pull radio from dash (see Radio Removal Instructions ) 2. Disconnect wiring harness from back of radio by pushing in tab on plug and pulling
2015+ SUBARU STI FRONT-MOUNT INTERCOOLER PARTS LIST AND INSTALLATION GUIDE INSTALL DIFFICULTY DISCLAIMER CAUTION INSTALL PROCEDURE TOOLS NEEDED
 PARTS LIST AND PARTS INCLUDED 1PC ALUMINUM INTAKE PIPE 1PC BAR-AND-PLATE INTERCOOLER 1PC STEEL CRASH BAR W/ MOUNTING HARDWARE 2PC HOT-SIDE INTERCOOLER PIPES 2PC COLD-SIDE INTERCOOLER PIPES 1PC BPV FLANGE
This is what we are trying to create in the steps below
 You will need: (1) Some 3/4 aluminium or steel flat bar (+/- 1 foot) (2) About 12 of 3 Aluminium or steel tubing. (2) Piece of 3X3 silicone hose and 2 hose clamps (3) 1 K&N (or similar) high flow filter
Volvo 1800 Dash Pad Replacement
 Volvo 1800 Dash Pad Replacement (courtesy of John Garden State Chapter Volvo Club America) Reupholstering the dash Well it has been some time since I have been online in the forum. Winter is a quite time
INSTALLATION INSTRUCTIONS
 COLD AIR INTAKE INSTALLATION INSTRUCTIONS PART NUMBER D760-0390C APPLICATION: 1999-2003 E39 M5 PARTS LIST 1 Left Aluminum Intake Tube 1 Air Pump Bracket (A) 1 Right Aluminum Intake Tube 1 Air Pump Bracket
PERFECT FIT IN-DASH HEAT/ COOL/ DEFROST FORD FAIRLANE & CROWN VICTORIA
 PERFECT FIT IN-DASH HEAT/ COOL/ DEFROST 1955-56 FORD FAIRLANE & CROWN VICTORIA CONTROL & OPERATING INSTRUCTIONS The controls on your new Perfect Fit system, offer complete comfort capabilities in virtually
OEM Cruise Control Installation in GMC/Chevy NBS trucks
 OEM Cruise Control Installation in 99-02 GMC/Chevy NBS trucks May 2008 ~ Rampage_Rick Having just installed factory cruise control in my 00 Sierra, I thought I d share the fun. I followed the steps outlined
2001 V70 T5 ETM Removal and Cleaning Directions
 2001 V70 T5 ETM Removal and Cleaning Directions Howard Cheng howardc64@gmail.com 10/24/05 Version 1.4 Read this before you start I performed this ETM cleaning because I had gotten 2 reduced performance
& 76 CHEVROLET NOVA HEATER ONLY
 specializing in AIR CONDITIONING, PARTS AND SYSTEMS for your classic hi l PERFECT FIT IN-DASH HEAT/ COOL/ DEFROST 1969-74 & 76 CHEVROLET NOVA HEATER ONLY CONTROL & OPERATING INSTRUCTIONS The controls on
Replacing MK4 Golf/Jetta radiator mounts in-car
 Replacing MK4 Golf/Jetta radiator mounts in-car This is a guide to replacing the radiator mounts in a MK4 Golf/Jetta. This involves moving the core support to the service position which allows you to do
B&W Turnover Ball Installation
 B&W Turnover Ball Installation by Flopster843 02 Jan 2012 I wanted to start this article out by stating one very important thing. Installing a gooseneck hitch is not a task to be taken lightly. If you
Troubleshooting Guide for Limoss Systems
 Troubleshooting Guide for Limoss Systems NOTE: Limoss is a manufacturer and importer of linear actuators (motors) hand controls, power supplies, and cables for motion furniture. They are quickly becoming
Fly Rocket Fly: Design Lab Report. The J Crispy and The Airbus A
 Fly Rocket Fly: Design Lab Report The J Crispy and The Airbus A380 800 Rockets: Test 1 Overall Question: How can you design a water, bottle rocket to make it fly a maximum distance. It needs to be made
Winterizing the Truma-Equipped Winnebago Travato
 Winterizing the Truma-Equipped Winnebago Travato DANIEL SENIE MONDAY, OCTOBER 16, 2017 REVISION 2 Introduction When we bought our 2016 Travato 59G, the manual s instructions for winterizing seemed to not
How I installed new brake pads on my i with Sport Package (should be fine for other E39 s) By Robert B.
 By Robert B.") How I installed new brake pads on my 1999 528i with Sport Package (should be fine for other E39 s) How I installed new brake pads on my 1999 528i with Sport Package (should be fine for other E39 s) By
How I installed new brake pads on my 1999 528i with Sport Package (should be fine for other E39 s) How I installed new brake pads on my 1999 528i with Sport Package (should be fine for other E39 s) By
Rear Speaker replacement.
 Rear Speaker replacement. First off you need the right rear speakers. The easy bit is 6x9 and better than a 15W paper cone, the difficult bit is getting a mounting depth under 74mm. Or to be more precise,
Speakers and Motors. Three feet of magnet wire to make a coil (you can reuse any of the coils you made in the last lesson if you wish)
") Speakers and Motors We ve come a long way with this magnetism thing and hopefully you re feeling pretty good about how magnetism works and what it does. This lesson, we re going to use what we ve learned
Speakers and Motors We ve come a long way with this magnetism thing and hopefully you re feeling pretty good about how magnetism works and what it does. This lesson, we re going to use what we ve learned
FACTORY AIR CONVERSION HEAT/ COOL/ DEFROST CHEVROLET CHEVELLE
 specializing in AIR CONDITIONING, PARTS AND SYSTEMS for your classic vehicle FACTORY AIR CONVERSION HEAT/ COOL/ DEFROST 1970-72 CHEVROLET CHEVELLE CONTROL & OPERATING INSTRUCTIONS The controls on your
4x4 actuator "Cable Froze" 1988 s S-10 Forum
 Page 3 of 17 Converting a vacuum actuator to a locking cable system on a 1995 Chevy S10 Blazer 4x4 Many call this a posi-lock system. I spent a total of only $25.50 USD on this project. Other comparable
HOW TO REPLACE THE SPOILER ON YOUR GEN 3 PRIUS
 HOW TO REPLACE THE SPOILER ON YOUR GEN 3 PRIUS Yup, it happened. The spoiler on your beloved Prius has departed this earth and now is in the great junkyard in the sky. This is how you make it all better
Troubleshooting Guide for Okin Systems
 Troubleshooting Guide for Okin Systems More lift chair manufacturers use the Okin electronics system than any other system today, mainly because they re quiet running and usually very dependable. There
Connecting the rear fog light on the A4 Jetta, while keeping the 5 Light Mod
 Connecting the rear fog light on the A4 Jetta, while keeping the 5 Light Mod DISCLAIMER: I'm human and make mistakes. If you spot one in this how to, tell me and I'll fix it This was done on my 99.5 Jetta.
4TH GEN SEATS IN A 3RD GEN TRUCK
 4TH GEN SEATS IN A 3RD GEN TRUCK by Flopster843 02 Oct 2016 If you drive a 3rd generation Dodge Ram truck, I am sure you have discovered that the OEM seats are not the greatest (Figure 1.) They are extremely
HEAT/ COOL/ DEFROST CHEVROLET PICKUP CONTROL & OPERATING INSTRUCTIONS
 specializing in AIR CONDITIONING, PARTS AND SYSTEMS for your classic vehicle PERFECT FIT FACTORY AIR CONVERSION HEAT/ COOL/ DEFROST 1967-72 CHEVROLET PICKUP CONTROL & OPERATING INSTRUCTIONS The controls
TABLE OF CONTENTS INTRODUCTION 3. INSTALLATION PROCEDURES Air Conditioner Location 4. A/C Ducting Installation 5
 585474 1 TABLE OF CONTENTS SECTION PAGE INTRODUCTION 3 INSTALLATION PROCEDURES Air Conditioner Location 4 Air Conditioner Mounting 4 A/C Ducting Installation 5 Power Kit Installation (Batteries). 5 Separator...
THE TORQUE GENERATOR OF WILLIAM F. SKINNER
 THE TORQUE GENERATOR OF WILLIAM F. SKINNER IN 1939, WHICH WAS THE START OF WORLD WAR TWO, WILLIAM SKINNER OF MIAMI IN FLORIDA DEMONSTRATED HIS FIFTH-GENERATION SYSTEM WHICH WAS POWERED BY SPINNING WEIGHTS.
MAZDASPEED3 Intercooler Instructions
 MAZDASPEED3 Intercooler Instructions Congratulations on your purchase of the COBB Tuning Front Mount Intercooler System for your 2007-2009 Mazdaspeed3. The following instructions should assist you through
Welded corner of solar panel
 My name is Matt, I live in Indianapolis, Indiana and this is my version of Gary s $1K solar hot water system. I would like to start by saying thanks to Gary not only for all that he has posted on the internet
Disco 3 Clock Spring / Rotary Coupler replacement
 Disco 3 Clock Spring / Rotary Coupler replacement I recently had to change my Clock spring and thought some folks may find it helpful to see what it entailed. I did lots of reading around but couldn t
Door Panel Removal & Window Stop Adjustment
 Door Panel Removal & Window Stop Adjustment By: Jeff Wolford Disclaimer: This is simply an article of how I fixed my car. I m not responsible if you break, scratch, or mess up anything following my example.
WPS-104 Heater Installation Instructions For 500EFI, 700 XP, & Crew Applications
 WPS-104 Heater Installation Instructions For 500EFI, 700 XP, & Crew Applications ORDER OF INSTALLATION FOR A COMPLETE ENCLOSURE OF A RANGERWARE WPS (Weather Protection System) IS AS FOLLOWS: 1. Heater
ARTICLE BEGINNING * PLEASE READ THIS FIRST * DESCRIPTION OPERATION ATC COMPUTER BLEND-AIR DOOR ACTUATOR CONTROL PANEL
 A/C-HEATER SYSTEM - AUTOMATIC Article Text 1989 Chrysler LeBaron Sedan For m m m m m Copyright 1998 Mitchell Repair Information Company, LLC Thursday, July 03, 2003 10:15AM ARTICLE BEGINNING 1989 AUTOMATIC
ESS INSTALL. The donor car /6 Cosmos Black/Sand UUC Short Shifter Brembo cross drilled rotors Phillips Nav System 16:9
 ESS INSTALL The donor car.. 1997 540/6 Cosmos Black/Sand UUC Short Shifter Brembo cross drilled rotors Phillips Nav System 16:9 The install went in several stages. Disconnect the battery Stage 1 Remove
2010 Toyota Prius Fog Light Retrofit
 2010 Toyota Prius Fog Light Retrofit A DIY prospective Last updated: Friday, December 25, 2009 *** Disclaimer Use this document and its contents at your own risk! *** Forward: This document was compiled
Triumph Street Triple VSM Grip Heater Install
 Triumph Street Triple VSM Grip Heater Install Introduction: With winter fast approaching and with painful memories of last winter riding with the club it was time to do something about getting some grip
1. Disconnect the battery. This is important! This will prevent air bag deployment.
 PARTS PACKING LIST Evaporator assembly Drain tube Plastic air plug Hardware package 11040 3601 W. Clarendon Phoenix, Arizona 85019 (602) 233-0090 800-648-4475 www.ackits.com 2003-4 Jeep Wrangler EVAPORATOR
TABLE OF CONTENTS INTRODUCTION.. 3. A/C Ducting Installation. Power Kit Installation (Batteries)...5 OPERATION MANUAL 7-8 TOOLS LIST..
...5 OPERATION MANUAL 7-8 TOOLS LIST..") 585457 1 TABLE OF CONTENTS SECTION PAGE INTRODUCTION.. 3 INSTALLATION PROCEDURES Air Conditioner Location...4 Air Conditioner Mounting 4 A/C Ducting Installation...5 Power Kit Installation (Batteries)...5
585457 1 TABLE OF CONTENTS SECTION PAGE INTRODUCTION.. 3 INSTALLATION PROCEDURES Air Conditioner Location...4 Air Conditioner Mounting 4 A/C Ducting Installation...5 Power Kit Installation (Batteries)...5
Cable Shift Linkage Kit
 Cable Shift Linkage Kit INSTALLATION INSTRUCTIONS ididit column to GM Trans FOR PART NUMBER S: 2801000010, 2802000010 ididit Column to 350 Trans...Pg 1-4 ididit Column to 400 Trans...Pg 5-8 ididit Column
Parts List See cover Page
 Thank you for purchasing the CorkSport Front Mount Intercooler Kit for the 2010-2013 Mazdaspeed 3. Keep your BAT s under check with the CorkSport FMIC Kit with the small or large intercooler. Please let
Installation Instruction for '84-'89 Nissan 300ZX High Performance Intercooler System (Part No )
") Installation Instruction for '84-'89 Nissan 300ZX High Performance Intercooler System (Part No. 2-124) Page ii DCB (06/14/02 12:19 AM) Version 1.0 Page iii Table of Contents 1. TOOLS REQUIRED...1 2. INSTALLATION
Installation Instruction for '84-'89 Nissan 300ZX High Performance Intercooler System (Part No. 2-124) Page ii DCB (06/14/02 12:19 AM) Version 1.0 Page iii Table of Contents 1. TOOLS REQUIRED...1 2. INSTALLATION
72 Mustang Mach 1 tachometer cluster and gauge conversion
 72 Mustang Mach 1 tachometer cluster and gauge conversion Dated: 02-17-2009 (drafted by a Chevy person working on his first Ford -not good-) Revised: 11-05-2010 The following information pertains to how
Prerequisites: Shop Manual (recommended) pages 3-9 through 3-13.
 pages 3-9 through 3-13.") Prerequisites: Order your gaskets average about $25.00 bucks X 2 so $50.00 4NK-11193-00-00 Obtain a shim kit (Should have several 265 and 270s) (Some dealers will exchange) Obtain a Valve Bucket Tool YM-33961
Prerequisites: Order your gaskets average about $25.00 bucks X 2 so $50.00 4NK-11193-00-00 Obtain a shim kit (Should have several 265 and 270s) (Some dealers will exchange) Obtain a Valve Bucket Tool YM-33961
My Hawk build Part 8 by Stuart Clarke
 My Hawk build Part 8 by Stuart Clarke Front hubs, brakes and brake lines. There was still no news on my rear springs so I thought I d find something else to get on with. I had the front hubs, brake calipers
*Some speedometers have these additional electronic connections. If yours does, then remove the smaller slotted screws shown.
 www.odometergears.com 1981-1985 240 Cable-Driven Speedometers (NOT for 1986 and later electronic units) http://www.davebarton.com/240-odometer-repair.html For this set of instructions below, I will not
Fitting the Bell Auto Services (B-A-S) TDV6 EGR Blanking Kit to a 2006 model Discovery 3 TDV6 HSE
 TDV6 EGR Blanking Kit to a 2006 model Discovery 3 TDV6 HSE") Fitting the Bell Auto Services (B-A-S) TDV6 EGR Blanking Kit to a 2006 model Discovery 3 TDV6 HSE Before I describe how I did this, I must first thank other members of the Disco3.co.uk forum (namely J,moore
Fitting the Bell Auto Services (B-A-S) TDV6 EGR Blanking Kit to a 2006 model Discovery 3 TDV6 HSE Before I describe how I did this, I must first thank other members of the Disco3.co.uk forum (namely J,moore
Instant Chat off the main page of Or simply call our tech team at
 FRONT MOUNT INTERCOOLER 2008-13 STI 2014-04- 08 Thank you for purchasing this PERRIN product for your car! Installation of this product should only be performed by persons experienced with installation
Once again, another four weeks have gone by and I am quite sure everyone is tired of me wondering where the time has gone. To say that everything
 Once again, another four weeks have gone by and I am quite sure everyone is tired of me wondering where the time has gone. To say that everything around the shop has been a little chaotic during this time,
Porsche 928 with 16v LH-Jetronic Fuel System
 Porsche 928 with 16v LH-Jetronic Fuel System Toll-Free Tech Hot Line: 877-FOR-928M 877-367-9286 Please do not copy this manual and give copies to your friends. Our ability to bring you this supercharger
Intake Kit Supplement for CRV and Pathfinder
 Intake Kit Supplement for CRV and Pathfinder This guide will briefly outline how to install the intake kits for the Honda CRV and Nissan Pathfinder. This is a pretty basic job, but for the average person
Procharger Stage II Intercooled Supercharger System (11-14 GT)
") Procharger Stage II Intercooled Supercharger System (11-14 GT) Installation Time: Approximately one day. Installed on 2012 Mustang GT 5.0/Manual Required Tools 3/8 Socket Set (Standard and Metric) 1/2
Procharger Stage II Intercooled Supercharger System (11-14 GT) Installation Time: Approximately one day. Installed on 2012 Mustang GT 5.0/Manual Required Tools 3/8 Socket Set (Standard and Metric) 1/2
REPLACING A COLEMAN MACH FAN MOTOR
 REPLACING A COLEMAN MACH FAN MOTOR Recently the fan motor on our front AC froze up. I ordered a new motor from Amazon https://www.amazon.com/gp/product/b007vjub9s/ref=oh_aui_detailpage_o00_s00?ie=utf8&psc=11
PYRTE. Building The Front Axle, Fork and Steering
 PYRTE Building The Front Axle, Fork and Steering The front axle on this traction engine is a very simple affair, in that it is a rectangular steel rod, sat on edge, with a pivot in the centre, which is
Model 377, 379, 386, 388, Sleeper no window
 Installation Manual Model 377, 379, 386, 388, 389 63 Sleeper no window 2390 Blackhawk Road P.O. Box 6007 Rockford, IL 61125 www.nitesystem.com 1-866-204-8570 NITE Plus Installation Procedures 1-2 Table
Program IV: ProStar TM. Performance A/C International. Series. Study Guide Performance A/C Program IV: International ProStar Series TMT
 Performance A/C International A N AV I S TA R C O M PA N Y Program IV: ProStar TM Study Guide TMT-160701 Series Study Guide Performance A/C Program IV: International ProStar Series TMT-160701 2007 International
Installation Instructions for TJ Jeep s Fiberglass Replacement Bodies and Parts
 Installation Instructions for 1997-2006 TJ Jeep s Fiberglass Replacement Bodies and Parts Getting started: We recommend that you take pictures as you dismantle your Jeep. These pictures will help you when
1464. Interior Installation. Cover Rear Seat Support Cut the vinyl to approximately the size of the rear seat support.
 Chapter 37 (Video Clip 37) - Interior Installation 1464. Interior Installation Cover Rear Seat Support 1465. Cut the vinyl to approximately the size of the rear seat support. 1466. Make a dry fit of the
Rebuilding the Power Steering Pump for a 2007 Honda Accord 4CYL
 Rebuilding the Power Steering Pump for a 2007 Honda Accord 4CYL Disclaimer: I have benefited greatly from others who have taken the time to post auto repair videos/tutorials online. To try and return the
Design Information. Designing Your Dust Collection System. Typical dust or fume collection system
 Design Information Designing Your Dust Collection System There are five simple steps to designing an effective and efficient dust collection system. 1. Draw a floor plan of your shop Important Terms to
Installation Instruction for '84-'89 Nissan 300ZX High Performance Intercooler System (Part No )
") Installation Instruction for '84-'89 Nissan 300ZX High Performance Intercooler System (Part No. 2-124) Routing of the Intercooler Pipe It is necessary to follow the exact sequence of the installation
Installation Instruction for '84-'89 Nissan 300ZX High Performance Intercooler System (Part No. 2-124) Routing of the Intercooler Pipe It is necessary to follow the exact sequence of the installation
Installing LED lights in a Hypercharger By Keith Edwards Joker s Wild! (Wildjokr)
") Installing LED lights in a Hypercharger By Keith Edwards Joker s Wild! (Wildjokr) THINGS YOU WILL NEED: A Hypercharger (duh!) LEDs (The ones I got were from Benny Bryant at Fantasies on Wheels in Sylacauga,
Installing LED lights in a Hypercharger By Keith Edwards Joker s Wild! (Wildjokr) THINGS YOU WILL NEED: A Hypercharger (duh!) LEDs (The ones I got were from Benny Bryant at Fantasies on Wheels in Sylacauga,
Brake master cylinder replacement
 Brake master cylinder replacement 8-25-2010 I had replaced the front brake master cylinder a few years ago when it developed a bad leak, at that time, I ordered a new master cylinder from Spartan, very
WOC-364 Installation Instructions Ranger XP Heater System
 WOC-364 Installation Instructions Ranger 2011-12 XP Heater System Order of installation for a Complete Enclosure Always install the Heater System first if possible NOTE: If installing the Heater System
Deuce/Ace Installation Instructions
 HARDWARE KIT: Upper Mounting Plate: 2-7/16" (11mm) X 3.5" bolts 2-7/16" flange nuts 2-2" spacers 2-7/16" trim cap mounting washers 2 - plastic trim caps TOOLS NEEDED: safety glasses wrenches 16mm or 5/8"
Changing the Power Steering Belt
 Changing the Power Steering Belt Brett Dukes (Maverick) from the BigJimny Forum has contributed this article to the Website. Many thanks. Whilst off-roading on Sunday, my alternator Fan Belt snapped -
STEERING COLUMN FOR CARS WITH 605, 670(500) OR DELPHI(600) POWER STEERING
 OR DELPHI(600) POWER STEERING") by Randy Irwin 1955-57 STEERING COLUMN FOR CARS WITH 605, 670(500) OR DELPHI(600) POWER STEERING Tools Needed: Philips Screwdriver 7/16 Wrench 1/2 Deep Socket And Ratchet Randy Irwin - Technical Writer
by Randy Irwin 1955-57 STEERING COLUMN FOR CARS WITH 605, 670(500) OR DELPHI(600) POWER STEERING Tools Needed: Philips Screwdriver 7/16 Wrench 1/2 Deep Socket And Ratchet Randy Irwin - Technical Writer
Figure 1: Valve housing smooth vs. o-ring groove
 If you are driving an older Corvette, and by that I mean a C2 or C3, it will eventually get to a point where the Power Steering Control Valve (PSCV) will leak and require attention. In 2002, I had to repair
BOOSTER SHOT. Whether you own an old 23-foot Baja or an offshore race team,
 BOOSTER SHOT WITH NEW CUSTOM MARINE INC. E-TOP HEADERS, A SPORT CATAMARAN PICKED UP NEARLY 3 MPH ON THE TOP-END. STORY GREGG MANSFIELD PHOTOS ROBERT BROWN Whether you own an old 23-foot Baja or an offshore
Improving the gearshift feel in an SW20.
 Improving the gearshift feel in an SW20. Part one In 3 parts. The SW20 gearshift can be often be greatly improved by eliminating play in the shift linkages, and this article covers three areas that need
Corrado Club of Canada. VR6 Engine FAQ. By: Dennis
 Corrado Club of Canada VR6 Engine FAQ By: Dennis I thought I would snap a few pics of the engine compartment on my 1994 VR6 Corrado. First, this is the updated engine management system so it does have
AGGREGATED EXPERIENCE WITH A SYSTEM TO PREVENT FIRES ON COMBINES IN SUNFLOWERS
 AGGREGATED EXPERIENCE WITH A SYSTEM TO PREVENT FIRES ON COMBINES IN SUNFLOWERS Daniel Humburg, Kevin Dalsted South Dakota State University Brookings, SD 57007 Funded by the National Sunflower Association
INSTALLATION INSTRUCTIONS
 HIGH FLOW AIRFLOW METER INSTALLATION INSTRUCTIONS PART NUMBER D763-1600A APPLICATION: 2001-06 E46 M3 Parts List: Hose clamp 64Z (7) Plastic Rivets Air Filter Temp Sensor & Harness (2) Button Head Screws
Lincoln Mark VII T5 Swap Version submitted by 5.0 bird
 Lincoln Mark VII 1984-1989 T5 Swap Version 20070611 submitted by 5.0 bird I've decided to make an article to assist with the T5 swap for the 84-89 Mark VIIs, since I was just in there because my DOA didn't
Thermostats, Radiator, Coolant Hose, Hydraulic Fan/Steering R&R PT38 8V92
 REMOVING AND REPLACING THE THERMOSTATS, COOLANT HOSES, RADIATOR AND CHANGING THE HYDRAULIC FAN/STEERING FILTER/OIL/SHAFT SEALS ON A 1987 PT38 8V92 BY CURT SPRENGER March 2007 Thermostats, Radiator, Coolant
Mustang Radiator Conversion DIY. By GearHeadPeter. January 27, 2011
 1964-1966 Mustang Radiator Conversion DIY By GearHeadPeter January 27, 2011 We all know that the radiators in our cars are not the best, especially if you have done any customization to the engine, which
Heater Core Replacement
 Heater Core Replacement Ok, I just finished replacing the heater core in my dad's '94 840Ci. While this is fresh in my mid I thought I would outline the procedure, I'm going from memory here, so I will
Important information about your new a/c system. Please read the following directions prior to installing this a/c system.
 PAGE 1 Important information about your new a/c system. Please read the following directions prior to installing this a/c system. PN s: CK-7586258, CK-758642, CK-7586304, CK7586SBC, CK-7486NC Jeep CJ Series
Stand Alone Fog Lights Installation Instructions
 Tools Required: 1. Trim Removal tool or protected flat screwdriver 2. #2 Phillips Screwdriver 3. 10mm socket 4. 10mm wrench 5. 8mm or 5/16 socket 6. Adjustable Pliers 7. Electrical Tape WARNING!!! Disconnect
84-86 Ford SVO Mustang AC Installation Guide
 84-86 Ford SVO Mustang AC Installation Guide This installation guide is for the AC installation kit from Late Model Restoration. The Vendor is Hose Wizards that manufactures this great kit that provides
Retro it Steering Column
 Retro it Steering Column INSTALLATION INSTRUCTIONS for 1976-86 CJ5 & CJ7 FOR PART NUMBER S: 1520800010, 1520800020, 1520800051, 1526800010, 1526800020, 1526800051 S I NCE 1986 Instruction # 8000000010
Volvo 850 Radiator Replacement Jason Reed 29 March 2013
 This write up covers removing and replacing the radiator on a 97 855 GLT wagon with light pressure turbo and automatic transmission. This car has 162K miles. The radiator, which was original, developed
Subaru Front Mount Intercooler Kit STI Subaru Front Mount Intercooler Kit STI
 Subaru Front Mount Intercooler Kit STI 2008-2014 715500 Subaru Front Mount Intercooler Kit STI 2008-2014 Congratulations on your purchase of the Subaru Front Mount Intercooler Kit STI 2008-2014. The following
Replacing the Vacuum Servo on 700/900 with ACC/ECC Double-Acting Servos. [Procedure from Dick Riess, to whom thanks are given; some notes from Dan]
![Replacing the Vacuum Servo on 700/900 with ACC/ECC Double-Acting Servos. [Procedure from Dick Riess, to whom thanks are given; some notes from Dan]](/thumbs/89/98811956.jpg "Replacing the Vacuum Servo on 700/900 with ACC/ECC Double-Acting Servos. [Procedure from Dick Riess, to whom thanks are given; some notes from Dan]") Replacing Vacuum Servos in ACC/ECC-Equipped 700/900 Cars FAQ Home Volvo Maintenance FAQ for 7xx/9xx/90 Cars HVAC Home OEM Manual Procedure for Replacing Vacuum Servos. See the FAQ file for a large.pdf
Replacing Vacuum Servos in ACC/ECC-Equipped 700/900 Cars FAQ Home Volvo Maintenance FAQ for 7xx/9xx/90 Cars HVAC Home OEM Manual Procedure for Replacing Vacuum Servos. See the FAQ file for a large.pdf
BMW 2002 M42 Swap Notes-THIS IS NOT FINISHED
 BMW 2002 M42 Swap Notes-THIS IS NOT FINISHED This document is to help those that want to install an m42 into a BMW 2002. It is based around an e30 engine, trans, and wiring. You can use the e36 block/head/wiring
SAM-1 Fan Kit Installation Into HENG S Range Hood Model #R C David Jeffs June 2015
 SAM-1 Fan Kit Installation Into HENG S Range Hood Model #R0623500C David Jeffs June 2015 If you own an RV you probably have come to the same conclusion that I have. Everything related to an RV is plagued
928 Motorsports Oil Control System for the 16V Porsche 928
 928 Motorsports Oil Control System for the 16V Porsche 928 NOTE: Left and Right are always as seen from the driver s seat-as you sit in the car. The following instructions will help you improve the oil
Feeding the Barbarian
 Feeding the Barbarian Running your Onan generator on propane or todays crap gas at the flip of a switch Text and photos by Jerry Work GMCWS rally Coos Bay, Oregon, 2016 Today s gasoline is killing our
Fitting Instructions For The TDV6 EGR Blanking Kit To A 2006 Model Discovery 3 TDV6 GHSE
 Part Number DA1112 Fitting Instructions For The TDV6 EGR Blanking Kit To A 2006 Model Discovery 3 TDV6 GHSE You do this modification at your own risk. Britpart won t be held responsible for what is written
TONY S TECH REPORT. Basic Training
 TONY S TECH REPORT (Great Articles! Collect Them All! Trade them with your friends!) Basic Training OK YOU MAGGOTS!! Line up, shut up, and listen good. I don t want any of you gettin killed because you
Hitachi Alternator Upgrade for Series I E-Types Ray Livingston (831) Home (831) Cell
 Home (831) Cell") Hitachi Alternator Upgrade for Series I E-Types Ray Livingston (831) 457-1373 Home (831) 234-0858 Cell rayl@atc.creative.com The Hitachi alternator for a 1986 Nissan pickup is a perfect replacement for
Hitachi Alternator Upgrade for Series I E-Types Ray Livingston (831) 457-1373 Home (831) 234-0858 Cell rayl@atc.creative.com The Hitachi alternator for a 1986 Nissan pickup is a perfect replacement for