RC4WD TrailFinder Instruction Manual
|
|
|
- Maria Jordan
- 6 years ago
- Views:
Transcription

1 Version 1.1 RC4WD TrailFinder Instruction Manual Thank you for your purchase. Welcome to the RC4WD family. This kit is a combination of many specially engineered and manufactured parts. Enjoy your build. This is a complete instruction manual for the Trail finder truck kit. We have tried to detail as many things in the build process as possible. Since the kit has so many options available it is hard to cover all of them. This manual covers the basic kit. If for some reason you don t find enough detail here, or you are having issues with your build please visit RC4WD Trail Finder forum here. You will need to have a few things for this build. Metric Hex Wrenches Pliers Monster Lube X-0317 Blue Thread locker The first thing you will want to do is unpack your truck kit. Be careful with the parts when unpacking and make sure to inventory all your items.

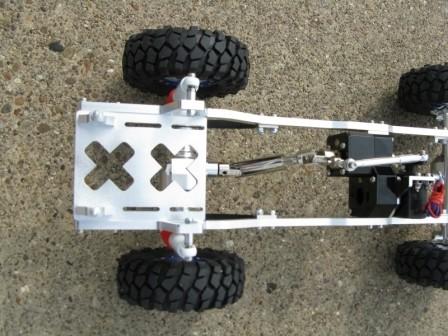
2 When you build this kit you may want to use some Blue thread locker on the metal to metal parts. The included nuts have nylon inserts to prevent them from backing off, but all other metal to metal surfaces will stay in place better with the thread locker. Anytime you see an *, this notes the need for thread locker. (please be sure to get blue thread locker, it is removable.) Step 1. Chassis Assembly Here we need to get the Mirek chassis plates and the cross mounting plates so we can make the assembly. Here are the parts we need below. The first thing you will want to do is install the front body mounts to the small cross plate. You will need (2) M3 x 8mm SHCS. Install the screws thru the large holes in smaller cross plate. *

 M3 x 8mm SHCS on the rear")

3 Next you will mount the plate to the left and right Mirek chassis plates. You will use (4) M3 x 10mm SHCS on the front cross plate, (4) M3 x 8mm SHCS on the rear cross plates. This shows the front and rear plate. The smaller one is the front mount. * Installed Front Rear

 M3 x 12mm SHCS")

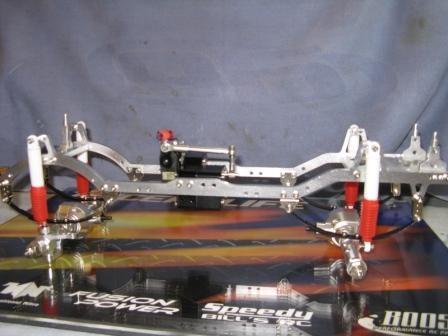
4 Step 2. Installation of the Stationary Shackle Mounts. In this step we will install the stationary shackle mounts. Below is what we are installing. Please pull these out of your parts box along with (8) M3 x 12mm SHCS and Nuts. You will want to install these to the Mirek chassis. Make sure that the heads of the screws face to the outside of the chassis. You can see in the photo below how to mount them to the chassis.


5 In this photo you can see the proper location of the mounts. Step 3. Swinging Shackle Mounting The swinging shackle mounts are very important to get installed correctly. If they are installed the wrong way they will cause the suspension to bind. Be careful to follow the instructions closely. Here is what you are installing. You will also need (4) M3 x 16mm SHCS, (8) flat washers and (4) nuts.


6 When installing the swinging shackle you will want to put a washer on the inside of each shackle. You can see in the photo below. When you install the SHCS and nut, tighten the nut all the way down then back the nut off a 1/4 to 1/2 turn. You want these shackles to swing easily. These will be installed on the first hole on the front of the chassis, and the rear lower mount on the back of the chassis Step 4. Axle Lubrication


7 When the axles are shipped from RC4WD they do not come with lubrication. You will want to get some of RC4WD s Monster Lube. Part number X You will want to remove the screws on the covers of both axles. Then apply a liberal amount of the Monster Lube to the main gear. Reinstall the cover and use a small amount of thread locker on the screws to prevent them from backing out. Step 5. Mounting of the Leaf Springs to the Axles Remove all the leaf springs from there bags. There should be 3 in each package. A small, medium and large leaf spring. In this step you will also need the front and rear axle. To install the leafs to the axle you will need (4) M3 x 8 SHCS for each axle.


8 You can install the leaf springs in different combinations on the truck. Here we show you the factory installation. You may want to change or modify this set-up depending on you truck and driving conditions. Install the leaf springs with the small one first, then install the main leaf that attaches to the shackles, and then the medium size leaf spring. Use the SHCS to secure them to the axles. * Step 6. Behind the Axle Steering Behind the Axle Steering (BTA) is the way the Trail Finder was designed. You again may want to have the steering links in the front of the axle. We show you here how to reverse the knuckles to allow for BTA steering. Remove the two screws that hold the steering knuckles to the front axle, like shown in this photo.

9 Reverse the sides that they were on making sure that the steering arm is facing toward the pinion side of the axle. (see photo below) Reinstall the two screws with a small amount of thread locker. Be sure not to tighten the screw all the way down. It will hinder the steering performance and will overwork the steering servo. Step 7. Mounting the Axles with Leafs to the Mirek Chassis To perform this installation you will need (8) Shoulder screws from your parts box with (8) nuts. The shoulder screws have threads only on a small portion on the screw. It may be easier to turn the chassis over to do this install. Insert the Leaf mount into the Shackles mounts. Insert the Shoulder screw thru the holes and add the nut. Tighten the nut all the way down then back the nut off a 1/4 to 1/2 turn. Make sure that everything moves freely.


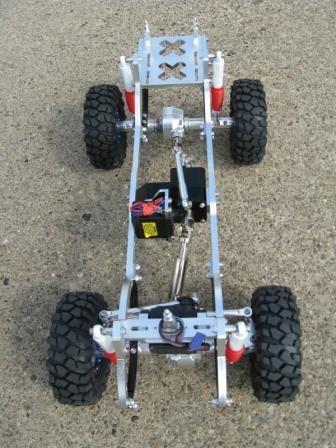
10 This shows the complete installation. Step 9. Shock Boot Installation Remove the lower shock mount. Remove your shock boots from there bag and install the larger opening onto the shock shaft first. Reinstall the shock end using a very small amount of thread locker.

 M3 x 25mm SHCS, (4) nuts, (8) Conical")


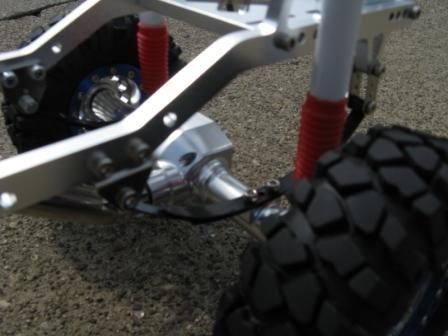
11 Step 8. Shock Mounting You will now install the shocks to the axles and chassis. You will need to remove (8) M3 x 25mm SHCS, (4) nuts, (8) Conical washers, and (4) 6mm spacers from your parts box. Please look at the photos below for more detail on installing the shocks. First you will want to install the lower shock mount to the axle. Using a M3 x 25mm SHCS insert the screw thru the lower shock mount and on the other end insert the conical washer onto the screw. At this point you can install the shock to the axle. *


12 Now you can insert the other M3 x 25mm SHCS into the top of the shock mount. Slide a Conical washer on along with a 6 mm spacer. Put the screw thru the hole in the upper section of the Mirek chassis and install a nut. At this point you should have something that looks very close to this.
 M3 x 8mm SSS.")

 You will need to remove a few other items from your parts box. Below is the list of items.")
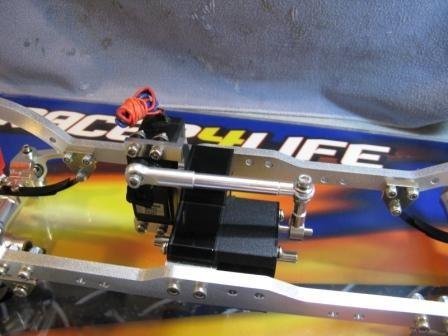
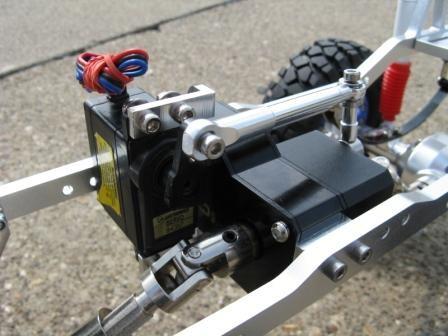
13 Step 9. Rear Body mount Install Since there are so many different bodies out there you may have to alter the location of these body mounts. This shows you how to install the mounts. Get your rear body mounts out of your parts box along with (2) M3 x 8mm SSS. (note first photo below) Install the body mount in the slots of the rear cross brace and insert the Socket Set Screw into the side of the chassis making sure to look and see that there are threads in the hole. * Step 10. R2 2 Speed Servo Mount Install. You will need to remove your R2 2 speed transmission and your servo mount. (see photo s below) You will need to remove a few other items from your parts box. Below is the list of items. (1) M3 x 10mm SSS, (1) M3 x 20mm SSS, (1) M3 x 25mm SHCS, custom spacer, conical washer, and a standard washer. You will also see that you need the short link, the round sleeve, a long rod end and a short rod end.


")

14 A. B. First you will build the shift link. In the first photo you can see the items needed. * Now you can install the servo mount to the transmission. (before doing this you may want to install the motor using the included gear, set screw, and mounting screws) You will need to remove two screws from the transmission. These screws will then be used to hold the servo mount to the tranny.
 M3 x 12mm SHCS, (4) nuts and washers.")


15 C. Installation of the servo is needed in order to complete the rest of the link set-up. You need to pull (4) M3 x 12mm SHCS, (4) nuts and washers. Install the servo with the servo ears on the backside of the mount. If you mount the servo wrong the Punisher shaft may hit the servo. D. You can now install the shift link that we made in step A. You can use your own hardware to mount the long link to the servo. Below the parts shown in the first photo will be used to attach the link to the shift shaft coming out of the tranny. Install a washer onto the M3 x 25mm SHCS, then insert the screw into the short side of the rod end. Install the conical washer first and then the custom spacer. Install the SHCS into the round sleeve. Then install the round sleeve onto the shift shaft and tighten the screw all the way down. * It should look like this when done.

 M3 x 10mm SHCS and (2) M3 x 12mm SHCS.")
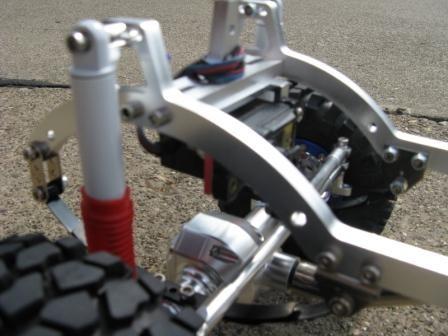
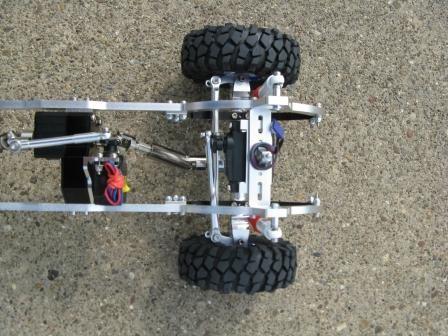
16 Step 11. Transmission installed in the Mirek Chassis In this step you will need the small tranny spacer included in the parts box. You will also need (2) M3 x 10mm SHCS and (2) M3 x 12mm SHCS. (Parts shown below) You will need to use the shorter 8mm screws to mount the side of the tranny without the spacer. The longer 12mm screws on the side with the spacer.


17 Here is another shot of what you should have.


18 Step 12. Drive Shaft Install You will now be able to install the Punisher shafts that were included with your kit. These already have the set screws installed into them. You may want to use a small amount of thread locker on the set screws when installing the shafts. The female shaft needs to be installed to the axle. While the male side attaches to the transmission. Step 13. Steering Servo Mount Now onto the installation of the front Steering servo mount. You will want to get the L shaped servo mount from the parts box. You will also need (2) M3 x 8mm SHCS. Below shows the servo mount, and then installed. This gets installed onto the bottom of the front cross brace. Use a little thread locker. Make sure the servo mounts are facing toward the back of the truck for BTA. Step 14. Steering Links build You will need to remove the remaining (4) rod ends. Also remove the two additional links, and the (4) long SSS. As you can see in the photo s this is a simple assembly. Be sure to use thread locker in this step.
 M3 x 12mm or 10mm SHCS, (4) nuts and (4) washers.")


19 Step 15. Steering Servo Mounting You can now install you front steering servo on the Trail finder kit. You can use (4) M3 x 12mm or 10mm SHCS, (4) nuts and (4) washers. Simply install the servo like normal and then use the screws to hold the servo in place. You can have the servo face one way or another. There are no photos for this step. Step 16. Steering Link Install This is the last step. This step will require you to make some adjustments of the steering servo mount to make sure there is proper alignment of the links when installed. Please be patient and make sure everything is working properly. You may need to remove the servo to insure proper alignment. You will need (1) M3 x25mm SHCS, (1) M3 x 18mm SHCS, (3) conical washers, and (2) 6mm spacers.


20 On the side in which both links come together you will need to insert the M3 x 25mm SHCS thru the short rod end. Then install a conical washer and slide thru the other rod end on the long link. Put another conical washer on and the 6mm spacer. Insert into the knuckle on the front axle. * Be sure to check which side you install first. Make sure that the short link lines up with you steering servo arm. On the other side insert the M3 x 18mm SHCS into the rod end. Then install a conical washer and 6mm spacer. Now you can install onto the other knuckle. * Step 17. Wheel and Tire Installation Since there again are so many options I will briefly touch on tire mounting to the wheels. There are two types. One is standard glued, and the other is bead lock. Make sure when mounting the tires on any wheel that you look at the tread pattern and make sure that when the wheels are installed that each are facing the right direction. If you have a standard glued on combo, just put the tire on the wheel. Then use your favorite tire glue to make sure everything stays in its place. Now if you have the bead lock style then you have a little more work. Remove all the screws on the front and back ring. Wrap the tire over the wheel and then insert the bead into the outer ring of the

21 wheel. Carefully place the ring back on and reinstall the screws. I use a cross pattern and carefully tighten the screws slowly. Make sure not to tighten anyone screw all the way down. This will cause the bead to come out of its seat. After you have your tires mounted, you can remove the nuts on the axles and install the wheels to your Trail Finder. It should look something like this. You will need to install your body and the rest of your electronics. Please understand that the steering and shift servo will require some adjustment to work properly. When you install your Radio and ESC you will need to refer to there operating manuals for proper setup. Enjoy your new kit and please post up photos of your finished build on our forum here. Please also use the forum if you have questions about your build. Thanks Team RC4WD Below are some additional photos of this Trial Finder build.

22
23
RC4WD Diablo Instruction Manual
 Version 1.1 RC4WD Diablo Instruction Manual Thank you for your purchase. Welcome to the RC4WD family. This kit is a combination of many specially engineered and manufactured parts. Enjoy your build. This
Hex Drivers (1.5mm, 2mm, 2.5mm) Long Nose Pliers. Use good quality hex drivers to avoid stripping screw heads.
 Long Nose Pliers. Use good quality hex drivers to avoid stripping screw heads.") Recommended Tools Hex Drivers (1.5mm, 2mm, 2.5mm) Thread Lock Cross Wrench Tips for Assembly Long Nose Pliers Use good quality hex drivers to avoid stripping screw heads. Use thread lock when putting metal
Recommended Tools Hex Drivers (1.5mm, 2mm, 2.5mm) Thread Lock Cross Wrench Tips for Assembly Long Nose Pliers Use good quality hex drivers to avoid stripping screw heads. Use thread lock when putting metal
RC4WD Timberwolf Build Document
 RC4WD Timberwolf Build Document This build document is for informational purposes. Since the Timberwolf can come in so many different combinations, this will not fit everyone. If you find that you still
RJS2021 LTO SPORT OVAL RACER LESS ELECTRICS
 RJS2021 LTO SPORT OVAL RACER LESS ELECTRICS THANKS FOR BUYING THE RJ SPEED 1/10 LTO SPORT KIT FOR OVAL RACING. THE ASSEMBLY WILL NOT BE DIFFICULT IF YOU READ THE TEXT, LOOK AT THE PICTURES, AND THE EXPLODED
RJS2020 SPORT 3.2 1/10 PAN CAR KIT LESS ELECTRICS
 RJS2020 SPORT 3.2 1/10 PAN CAR KIT LESS ELECTRICS THANKS FOR BUYING THE RJ SPEED 1/10 SPORT 3.2 KIT. THE ASSEMBLY WILL NOT BE DIFFICULT IF YOU READ THE TEXT, LOOK AT THE PICTURES, AND THE EXPLODED VIEW
Long Wheelbase D110. 1/10 SCALE 4x4 TRUCK KIT
 Long Wheelbase D110 1/10 SCALE 4x4 TRUCK KIT Recommended Tools Hex Drivers (1.5mm, 2mm, 2.5mm) Thread Lock Cross Wrench Long Nose Pliers Tips for Assembly Use good quality hex drivers to avoid stripping
Assembly Manual. 1/10th Formula 1 Car
 Assembly Manual 1/10th Formula 1 Car Center Pivot Bag 1 3374 - Center Pivot Socket 40194 - Hard Anodized Alum Pivot ball 3254-2-56 *Note - Sometimes it is helpful to slightly over-tighten the top clamp
1209A GM B-BODY Double Adjustable Trailing Arms
 1209A 78-96 GM B-BODY Double Adjustable Trailing Arms Warning: This installation should be performed by a trained professional. Tools Required for this Installation - 4 post lift or alignment rack preferable
INSTALLATION INSTRUCTIONS
 INSTALLATION INSTRUCTIONS --300 W PONTIAC WAY CLOVIS, CA 93612 local: 559-875-0222 fax: 559-876-2249 toll free: 800-445-3767-- 6446 5.5 REAR AXLE FLIP-KIT 2015+ FORD F-150 2WD SHORT BED Thank you for being
RJS2001 PRO STOCK KIT LESS ELECTRICS
 RJS2001 PRO STOCK KIT LESS ELECTRICS THANKS FOR BUYING RJ SPEED S PRO STOCK DRAG KIT. IT IS MADE FOR STRAIGHT LINE DRAG RACING AND CAN BE BROKEN IF RUN INTO SOLID OBJECTS REPEATEDLY AT HIGH SPEED. IT REQUIRES
Nissan Frontier 2wd/4wd 2.5 Suspension Kit
 92186500 Nissan Frontier 2wd/4wd 2.5 Suspension Kit Thank you for choosing Rough Country for all your suspension needs. Rough Country recommends a certified technician install this system. In addition
Our goal is to make the install a breeze. Please read the entire guide before beginning.
 www.airkewld.com Page 1 of 6 IRS Axle Kit Install IRS Axle Kit Install Our goal is to make the install a breeze. Please read the entire guide before beginning. KITS SHOULD INCLUDE 2 - Control-arm mounting
RJS WB ELECTRIC T/F DRAGSTER KIT LESS ELECTRICS
 RJS2006 30 WB ELECTRIC T/F DRAGSTER KIT LESS ELECTRICS THANKS FOR BUYING THIS RJ SPEED DRAGSTER KIT. IT IS MADE FOR STRAIGHT LINE DRAG RACING AND MAY BE BROKEN IF RUN INTO SOLID OBJECTS REPEATEDLY AT HIGH
1/10 Competition Ready to Run Truck Little Orchard St. San Jose CA,
 1/10 Competition Ready to Run Truck RC4WD WWW.RC4WD.COM 1855 Little Orchard St. San Jose CA, 95125 E-mail: rcrock@rc4wd.com Check out Precautions To Prevent Serious Personal injury and/or property damage,
RZR XP Lift Kit
 RZR XP 1000 2 Lift Kit Polaris RZR XP 1000/ XP4 1000 2014+ Part #: 5101224 Rev. 082316 491 W. Garfield Ave., Coldwater, MI 49036. Phone: 517-278-7768 E-mail: sales-rtpro@sporttruckusainc.com SAFETY WARNING
2030 OUTLAW SPRINTER HARDWARE I.D. BUTTON HD. CAP SCREW BAG H1 CHASSIS KIT BAG H3 HARDWARE BAG L2 REAR AXLE PARTS BAG L4 FRONT TIRES
 THANKS FOR BUYING THE RJ SPEED OUTLAW SPRINTER KIT. IT IS COMPLETE LESS ELECTRICS, AND MADE FOR CARPET OR PAVEMENT RACING. IT REQUIRES A 540 OR 550 SIZE MOTOR, 4 OR 6 CELL BATTERY PACK, TWO CHANNEL RADIO
2014 F /6 LIFT KIT
 92157500 2014 F-150 4 /6 LIFT KIT THANK YOU FOR CHOOSING ROUGH COUNTRY FOR YOUR SUSPENSION NEEDS. Rough Country recommends a certified technician install this system. In addition to these instructions,
09-UP FORD F150 6 LIFT KIT
 92159800 09-UP FORD F150 6 LIFT KIT THANK YOU FOR CHOOSING ROUGH COUNTRY FOR YOUR SUSPENSION NEEDS. Rough Country recommends a certified technician install this system. In addition to these instructions,
*1557BAG12* 1557BAG F /5 /6 LIFT KIT G THANK YOU FOR CHOOSING ROUGH COUNTRY FOR YOUR SUSPENSION NEEDS.
 2015-18 F-150 4 /5 /6 LIFT KIT THANK YOU FOR CHOOSING ROUGH COUNTRY FOR YOUR SUSPENSION NEEDS. 92155700G *1557BAG12* 1557BAG12 Rough Country recommends a certified technician install this system. In addition
LIFT-304 (3 ) and LIFT-104 (6 ) Drop Spindle Lift Kits Yamaha G22, Gas or Electric Installation Instructions
 and LIFT-104 (6 ) Drop Spindle Lift Kits Yamaha G22, Gas or Electric Installation Instructions") LIFT-304 (3 ) and LIFT-104 (6 ) Drop Spindle Lift Kits Yamaha G22, Gas or Electric Installation Instructions LIFT-304 LIFT-104 Contents of LIFT-304/104 Yamaha G22 Lift Kit: a (1 ea.) Passenger Side Spindle
LIFT-304 (3 ) and LIFT-104 (6 ) Drop Spindle Lift Kits Yamaha G22, Gas or Electric Installation Instructions LIFT-304 LIFT-104 Contents of LIFT-304/104 Yamaha G22 Lift Kit: a (1 ea.) Passenger Side Spindle
2014 F /6 LIFT KIT
 92157500 2014 F-150 4 /6 LIFT KIT THANK YOU FOR CHOOSING ROUGH COUNTRY FOR YOUR SUSPENSION NEEDS. Rough Country recommends a certified technician install this system. In addition to these instructions,
INSTALLATION MANUAL FOR ROCK KRAWLER SUSPENSION, INC. WJ SHORT ARM SYSTEMS
 INSTALLATION MANUAL FOR ROCK KRAWLER SUSPENSION, INC. WJ SHORT ARM SYSTEMS FIRST EDITION 8/24/09 Dear customer: Thank you for purchasing the best system on the market for your Jeep Vehicle. We are sure
RJS2002 FUNNY CAR KIT LESS ELECTRICS
 RJS2002 FUNNY CAR KIT LESS ELECTRICS THANKS FOR BUYING RJ SPEED S FUNNY CAR DRAG KIT. IT IS MADE FOR STRAIGHT LINE DRAG RACING AND CAN BE BROKEN IF RUN INTO SOLID OBJECTS REPEATEDLY AT HIGH SPEED. IT REQUIRES
IRS-151 INSTALLATION INSTRUCTIONS `55-57 CHEVY INDEPENDENT REAR SUSPENSION
 IRS-151 INSTALLATION INSTRUCTIONS `55-57 CHEVY INDEPENDENT REAR SUSPENSION Please read these instructions completely before starting your installation. Remember the basic rule for a successful installation:
LIFT-506 BMF Lift Kit Club Car DS Gas & Electric Installation Instructions
 LIFT-506 BMF Lift Kit Club Car DS Gas & Electric 2003.5-09 Installation Instructions Contents of LIFT-506 Club Car DS BMF Lift Kit: a (1 ea.) BMF Front Suspension b (1 ea.) Driver Side Upper A-Arm c (1
RJS2017 SPORTSMAN RACER KIT LESS ELECTRICS
 RJS2017 SPORTSMAN RACER KIT LESS ELECTRICS THANKS FOR BUYING THE RJ SPEED 1/10 SPORTSMAN RACER KIT FOR OVAL RACING, DRAG RACING OR JUST FUN STREET BASHING. THE ASSEMBLY WILL NOT BE DIFFICULT IF YOU READ
07-13 TOYOTA TUNDRA 2WD 6" LIFT SPINDLES
 MAXTRAC SUSPENSION 4030 E LEAVERTON CT ANAHEIM, CA 92807 714-630-0363 WWW.MAXTRACSUSPENSION.COM SALES@MAXTRACSUSPENSION.COM PRODUCT: K886764 07-13 TOYOTA TUNDRA 2WD 6" LIFT SPINDLES PARTS LIST QTY LIFT
07-UP AVALANCHE 7.5 KIT
 92120900R1 07-UP AVALANCHE 7.5 KIT Thank you for choosing Rough Country for your suspension needs. We appreciate your business!! This kit will not fit vehicles equipped with electric steering or trucks
PPM 8069 JK FRONT TRACKBAR BRACE / SECTOR SHAFT BRACE INSTALLATION INSTRUCTIONS
 Poly Performance MFG, 870 Industrial Way, San Luis Obispo, CA 93401, (805) 242-0397 PPM 8069 JK FRONT TRACKBAR BRACE / SECTOR SHAFT BRACE INSTALLATION INSTRUCTIONS **DISCLAIMER** The Synergy Suspension
Before beginning this installation read the instruction sheet thoroughly. Check that all parts on parts list are present.
 INSTALLATION INSTRUCTIONS C2085 SLIDE-A-LINK, FORD F-150/LIGHTNING The Slide-A-Link by Competition Engineering is designed for use in 2 Wheel Drive Ford Lightning Pickups. The rigid front mount assembly
NOTE: Using hot modified motors exceed the capacity of the electronic speed control and voids any warranty.
 OWNER'S MANUAL NOTE: Using hot modified motors exceed the capacity of the electronic speed control and voids any warranty. Carefully read through all instructions to familiarize yourself with the parts,
J & D Machine / Hyperdrive / MSA 3711 Moon Bend Rd. Chapel Hill, TN 37034
 J & D Machine / Hyperdrive / MSA 3711 Moon Bend Rd. Chapel Hill, TN 37034 www.hyperdriveracing.com 1 You now own a state of the art 1/10 scale oval race car. The Hyperdrive Assault has gone through months
(gd8) 5/8 x 18 x (2) machined
 5/8 x 18 x (2) machined") 655 SOUTH LINCOLN AVE / SAN BERNARDINO CA. 92408 PHONE 877-470-2975 / FAX 909-890-0703 Web address: globalwest.net COR-5864 V / S / Q (1958 64) Impala rear coilover kit. This kit bolts on, welding is not
655 SOUTH LINCOLN AVE / SAN BERNARDINO CA. 92408 PHONE 877-470-2975 / FAX 909-890-0703 Web address: globalwest.net COR-5864 V / S / Q (1958 64) Impala rear coilover kit. This kit bolts on, welding is not
OWNER'S MANUAL 2000 & ROAR National Champion
 2000 & 2001 ROAR National Champion OWNER'S MANUAL Carefully read through all instructions to familiarize yourself with the parts, construction techniques, and tuning tips outlined in this manual. Being
INSTALLATION INSTRUCTIONS
 INSTALLATION INSTRUCTIONS 6525 REAR AXLE FLIP & HANGER KIT 5 OR 6 INCH LOWERING 14&UP CHEVROLET SILVERADO / GMC SIERRA 1500 Thank you for being selective enough to choose our high quality BELLTECH PRODUCT.
RS-2 SINGLE ACTION REAR BUMPER WITH TIRE CARRIER INSTALL MANUAL FOR JEEP WRANGLER ALL MODELS.
 RS-2 SINGLE ACTION REAR BUMPER WITH TIRE CARRIER INSTALL MANUAL FOR 2007-2016 JEEP WRANGLER ALL MODELS. Rear Bumper Installation Instructions 1) Remove factory rear bumper, (this includes all tow hitch
kelderman air ride 2003 & Newer Dodge Rear 5-6 Lift Kit Warranty Disclaimer Notice Read Before Beginning Installation
 Air Ride Conversion System Installation Instructions kelderman air ride The difference in the ride is like night and day Inside this manual: 2003 & Newer Dodge Rear 5-6 Lift Kit Tools required for installation
Bag 1. Bag 1. Center Pivot. Center Pivot
 8 00734 01901 5 Center Pivot Bag 1 3374 - Center Pivot Socket 4019 - Alum Pivot ball 3254-2-56 Button Head *Note - Sometimes it is helpful to slightly over-tighten the top clamp screws, then work the ball
WD Dodge Suspension Kit
 92137600 02-05 2WD Dodge 1500 6 Suspension Kit Thank you for choosing Rough Country for your suspension needs. Rough Country recommends a certified technician installs this system. In addition to these
T R A I L R AT E D GUARANTEED. rc4wd quality R3 TRANSMISSION FOUR WHEEL DRIVE BEAD LOCK WHEELS
 The TF2 SWB has both detailed styling and aggressive performance. You will find a balance of capability and performance built into every TF2. Performance of the TF2 is smooth and with its R3 single speed
LIFT-503. BMF Lift Kit. Club Car Precedent. Installation Instructions
 LIFT-503 BMF Lift Kit Club Car Precedent Installation Instructions Contents of LIFT-503 Club Car Precedent BMF Lift Kit: a (1 ea.) BMF Front Suspension b (1 ea.) Driver Side Upper A-Arm (Shipped Loose)
OWNER'S MANUAL Magnolia Ave., Chino, CA phone: (909) fax: (909)
 fax: (909)") OWNER'S MANUAL Carefully read through all instructions to familiarize yourself with the parts, construction techniques, and tuning tips outlined in this manual. Being able to grasp the overall design of
OWNER'S MANUAL Carefully read through all instructions to familiarize yourself with the parts, construction techniques, and tuning tips outlined in this manual. Being able to grasp the overall design of
Shown with optional GFR-1017R Body Posts. J & D Machine / Hyperdrive / MSA 3711 Moon Bend Rd. Chapel Hill, TN
 Shown with optional GFR-1017R Body Posts J & D Machine / Hyperdrive / MSA 3711 Moon Bend Rd. Chapel Hill, TN 37034 www.hyperdriveracing.com 1 You now own a state of the art 1/10 scale oval race car. The
INSTALLATION GUIDE 5820-A10
 READ ALL INSTRUCTIONS COMPLETELY AND THOROUGHLY UNDERSTAND THEM BEFORE DOING ANYTHING. CALL CHASSISWORKS TECH SUPPORT (916) 388-0288 IF YOU NEED ASSISTANCE. INSTALLATION GUIDE 5820-A10 Poly-Bushed Upper
PRODUCT USE INFORMATION
 *745N2BAG* 745N2BAG 92745000 Thank you for choosing Rough Country for your suspension needs. 05-16 TACOMA 3 Fr / 2 Rr Leveling Kit Rough Country recommends a certified technician install this system. In
The Driveshaft Shop Aluminum One Piece Driveshaft (05-10 GT)
") Install Time: 2-3 Hours Tools Needed: Metric Hex Key Set 10mm, 13mm, 15mm deep socket 12 point 12mm deep socket ⅜ Rachet 5 ½ Rachet Extensions ½ Drive Breaker Bar Blue Thread Locker Rubber Mallet Pry Bar
Install Time: 2-3 Hours Tools Needed: Metric Hex Key Set 10mm, 13mm, 15mm deep socket 12 point 12mm deep socket ⅜ Rachet 5 ½ Rachet Extensions ½ Drive Breaker Bar Blue Thread Locker Rubber Mallet Pry Bar
Alpha Series Front Bumper Installation Manual
 1 K Alpha Series Front Bumper Installation Manual - 2003-2009 GM 4500-5500 2 Kelderman Alpha Series Front Bumper Winch Pre-Runner Bar Not Available - Contents - Kit Numbers. (3) - Introduction. (4) - Safety...
INSTALLATION INSTRUCTIONS
 INSTALLATION INSTRUCTIONS ----1075 North Ave. Sanger, CA 93657-3539 toll free: 800-445-3767 web: www.belltechcorp.com---- 6907 REAR LOWERING KIT 97-00 CHEVY 1-TON C-3500 Congratulations! You were selective
For all Ram x4 Trucks, and all Ram x4 trucks.
 Dodge Off Road, LLC Specializing in Dodge Ram Solid-Axle 4x4 Suspension and Steering for Off Road Applications 855.9009.DOR sales@dodgeoffroad.com dodgeoffroad.com DODGE OFF ROAD 5 th GEN STEERING KIT
1204AA Ford Mustang Double Adjustable Trailing Arms
 1204AA 79-04 Ford Mustang Double Adjustable Trailing Arms Special Tools Required for this Installation - 4 post lift or alignment rack preferable - Air Chisel, Angle Finder (Digital Preferred), Dead blow
GP1-R FULL EXHAUST SUZUKI GSX-R600 / GSX-R
 THIS EXHAUST SYSTEM IS DESIGNED FOR USE IN CLOSED COURSE RACING ONLY, AND IS NOT INTENDED FOR PUBLIC HIGHWAY USE. IN THE STATE OF CALIFORNIA, IT IS ILLEGAL TO MODIFY THE EMISSION CONTROL SYSTEM ON ANY
37-39 TCI Chevy Rear 4-Link Kit Installation Instructions
 37-39 TCI Chevy Rear 4-Link Kit Installation Instructions 1-800-984-6259 www.totalcostinvolved.com Read and understand these instructions before starting any work! SUPPORT VEHICLE WITH JACK STANDS BEFORE
09-UP F150 2WD 6 LIFT KIT
 92157300 09-UP F150 2WD 6 LIFT KIT THANK YOU FOR CHOOSING ROUGH COUNTRY FOR YOUR SUSPENSION NEEDS. Rough Country recommends a certified technician install this system. In addition to these instructions,
JL SHIELD TIRE CARRIER INSTALLATION INSTRUCTIONS
 JL SHIELD TIRE CARRIER INSTALLATION INSTRUCTIONS TOOLS NEEDED 3/4 Wrench 3/4 Socket 9/16 Wrench or Socket 1 1/2 Socket 1 1/8 Wrench 13mm Socket Torque Wrench for 1 1/2 Socket HARDWARE 2-1/2 X 2 Hex Bolt
2015 F /5 /6 LIFT KIT
 92155700 2015 F-150 4 /5 /6 LIFT KIT THANK YOU FOR CHOOSING ROUGH COUNTRY FOR YOUR SUSPENSION NEEDS. Rough Country recommends a certified technician install this system. In addition to these instructions,
DIFFERENTIAL STEERING RACK
 BAG-A DIFFERENTIAL (2 Sets) +Driver Cap Screw Diff Ball Nylon Nut Thrust Washer Thrust Ball Diff Joint Cup A Allen Wrench 850 Bearing Diff Ring Diff Spring Nylon Nut 850 Bearing Diff Ring Diff Ball Ball
07 & UP 4WD GM FRT 1.5 REAR LIFT KIT
 92126900 Thank you for choosing Rough Country for your suspension needs. Rough Country recommends a certified technician install this system. In addition to these instructions, professional knowledge of
Nissan Titan 6 Front & 4 Rear Suspension Kit
 92187500 Thank you for choosing Rough Country for all your suspension needs. Nissan Titan 6 Front & 4 Rear Suspension Kit Rough Country recommends a certified technician install this system. In addition
DAH Left Hand Hose Inlet Kit Instruction Sheet For Use with 700 SERIES DAH Dilution at Hand Blend Centers
 DAH Left Hand Hose Inlet Kit 98-54-1 Instruction Sheet For Use with 700 SERIES DAH Dilution at Hand Blend Centers BASIC KIT FUNCTION: The left hand hose inlet kit has two main functions. The kit can be
09-13 FORD F150 4 LIFT KIT
 92159900 09-13 FORD F150 4 LIFT KIT THANK YOU FOR CHOOSING ROUGH COUNTRY FOR YOUR SUSPENSION NEEDS. Rough Country recommends a certified technician install this system. In addition to these instructions,
ACE 325/570 2 Lift Kit
 ACE 325/570 2 Lift Kit Polaris Ace 325/570 2014+ Part #: 5101244 Rev. 082316 491 W. Garfield Ave., Coldwater, MI 49036. Phone: 517-278-7768 E-mail: sales-rtpro@sporttruckusainc.com SAFETY WARNING RT Pro
JEEP JK 3 1/4 COIL & SPACER KIT W/ PERFORMANCE 2.2. SHOCK ABSORBERS
 92PERF693 JEEP JK 3 1/4 COIL & SPACER KIT W/ PERFORMANCE 2.2. SHOCK ABSORBERS Thank you for choosing Rough Country for all your suspension needs. Rough Country recommends a certified technician install
INSTALLATION INSTRUCTIONS
 INSTALLATION INSTRUCTIONS --1075 North Ave. Sanger, CA 93657-3539 local: 559-875-0222 fax: 559-876-2259 toll free: 800-445-3767-- 6522 REAR AXLE FLIP & SHACKLE KIT 07-UP CHEVROLET 1500 REGULAR CAB ONLY
»Product» Safety Warning
 #C1210 Installation Instructions 2007-2008 Chevy/GM 1500 2/4wd 2" Lift Kit Read and understand all instructions and warnings prior to installation of product and operation of vehicle. Zone Offroad Products
05-07 F250 6 SUSPENSION KIT
 92159300 Stabilizer Drop Brackets Track Bar Bracket Control Arm Bracket Brake Line Drop Bracket Sway Bar Link Ext. Hardware Bags Pitman Arm 6111 Add-a-leaf 6578 3 Block and U-Bolt Kit 05-07 F250 6 SUSPENSION
RHINO SUSPENSION SYSTEM INSTALLATION INSTRUCTIONS
 PARTS INCLUDED: 2 FRONT UPPER A-ARMS 2 FRONT LOWER A-ARMS 2 UNI-BALL JOINTS 2 UNI-BALL JOINT STUDS 2 UNI-BALL JOINT CAPS 2 RETAINING RINGS 1 FRONT SHOCK ASSEM. 2 DELRON STEERING STOPS 2 SHOCK MOUNT SPACERS
Part # GM F Body Complete CoilOver System
 350 S. St. Charles St. Jasper, In. 47546 Ph. 812.482.2932 Fax 812.634.6632 www.ridetech.com Part # 11170109 70-81 GM F Body Complete CoilOver System Front Components: 1 11173509 Front Fixed Valving CoilOvers
2103 NITRO RAIL DRAGSTER KIT
 203 NITRO RAIL DRAGSTER KIT THANKS FOR BUYING RJ SPEED S NITRO DRAG KIT. IT IS A LITEWEIGHT CAR MADE FOR STRAIGHT LINE DRAG RACING AND CAN BE BROKEN IF RUN INTO SOLID OBJECTS AT HIGH SPEED. YOU WILL NEED
1203AA GM A-BODY Double Adjustable Trailing Arms
 1203AA 64-67 GM A-BODY Double Adjustable Trailing Arms Warning: This installation should be performed by a trained professional. Note, pictures in this booklet are from a 77-96 GM B Body. Installation
INSTALLATION INSTRUCTIONS
 INSTALLATION INSTRUCTIONS ----3300 W. Pontiac Way Clovis, CA 93612 toll free: 1-800-445-3767 web: www.belltech.com---- 6605-6607 FLIP KIT CHEVROLET C/K 1500 / 2500 PICK UP Thank you for being selective
How I Installed the Edgerider Wheels on my Gammill Classic Plus
 How I Installed the Edgerider Wheels on my Gammill Classic Plus Jeffrey Lomicka May 15, 2004 I'd been looking forward to installing these wheels since I tried them this year at MQX. This is my pictorial
PRE-INSTALLATION. INSTALLATION INSTRUCTIONS STEP 1: Park vehicle on level surface and chock rear wheels.
 2007-2013 7.5" GMC/Chevrolet 1500 4WD Suspension Lift kit PRE-INSTALLATION 15004 2 - Cross-member (Fr/Rr) 2 - Sway Bar Drop Bracket 2 - Knuckle (Dr/Pass) 1 - Driver Diff. Bracket 1 - Passenger Diff. Bracket
03-11 Ford Expedition 2WD/4WD 2.5 lift
 9258500REV1 03-11 Ford Expedition 2WD/4WD 2.5 lift Thank you for choosing Rough Country for all your suspension needs. Rough Country recommends a certified technician install this system. In addition to
LIFT Standard A-Arm Lift Kit Club Car Precedent Installation Instructions
 LIFT-563 6 Standard A-Arm Lift Kit Club Car Precedent Installation Instructions Contents of LIFT-563 Club Car Precedent Lift Kit: a (1 ea.) Front Suspension b (1 ea.) Driver Side Upper A-Arm c (1 ea.)
Required tools General hand tools 21/64" drill bit Torque wrench Threadlocker Center punch
 Slipper Spring Kit (part numbers 2560, 2570 and 2580) Item Qty Part number Description 1... 8... 350054-50...3/8-16 x 1" grade 8 self-tapping screw 2... 4... 350084-00...7/16-14 x 4" grade 5 3... 6...
Super Duty Front Air Bag Installation Instructions
 2005-2010 Super Duty Front Air Bag Installation Instructions Congratulations! You have just purchased the best engineered, highest quality front air suspension kit available on the market for your 2005-2010
*1274BAG9* 1274BAG GM 4-6 SUSPENSION KIT N2.0. Thank you for choosing Rough Country for your suspension needs A
 92127400A 88-98 GM 4-6 SUSPENSION KIT N2.0 Thank you for choosing Rough Country for your suspension needs. *1274BAG9* 1274BAG9 Rough Country recommends a certified technician installs this system. In addition
INSTALLATION INSTRUCTIONS
 INSTALLATION INSTRUCTIONS ----1075 North Ave. Sanger, CA 93657-3539 toll free: 800-445-3767 web: www.belltechcorp.com---- 6420 SHACKLE & HANGER KIT FORD F-350 Congratulations! You were selective enough
ASSEMBLY OF THE FRONT AND REAR BALL DIFF. Builds two differentials for front and rear
 1 ASSEMBLY OF THE FRONT AND REAR BALL DIFF. 37145 40060 40060 2.6mm Nylon Nut 37110 35958 37132 2.6x6x1mm Washer 37148 Apply Grease 37120 (12 Pcs) Builds two differentials for front and rear. 38288 35958
OWNER'S MANUAL. Take your time and pay close attention to detail. Keep this manual for future reference. MADE IN THE UNITED STATES OF AMERICA
 OWNER'S MANUAL Carefully read through all instructions to familiarize yourself with the parts, construction techniques, and tuning tips outlined in this manual. Being able to grasp the overall design of
$1.00 FOR THE TQIO/RCIO
 $1.00 FOR THE TQIO/RCIO m mm HDBBYSHOP Champion Jay Halsey has an impressive track record. One of Jay's advantages is a whisper smooth tranny thanks to his dad, Jim. Now you can build a Halsey transmission!
EVO-1162 EVO Tailgate Tire Carrier
 EVO-1162 EVO Tailgate Tire Carrier Bill of Materials EVO-1162 Tailgate Tire Carrier Part number Description Quantity EVO-12161 EVO Tailgate Tire Carrier 1 EVO-12162 Bolt Plate 1 EVO-12163 Wheel Mount 1
RECOMMENDED TOOLS INCLUDED EQUIPMENT PRECAUTIONS
 Thank you for purchasing Pro-Line s Ambush Mini Scale Crawler! For Over 30 years, Pro-Line has designed and manufactured the best RC products in the world. This crawler has been developed from the ground
EagleMotorsports.com Dear Valued Customer,
 Dear Valued Customer, Thank you for choosing the Stallard brand and establishing this partnership. We appreciate the opportunity to assist you and look forward to promoting your future success. The staff
Nissan Titan 4 Front & 2 Rear Suspension Kit
 92187400 Nissan Titan 4 Front & 2 Rear Suspension Kit Thank you for choosing Rough Country for all your suspension needs. Rough Country recommends a certified technician install this system. In addition
COMPETITION ENGINEERING. 80 Carter Drive P.O. Box 1470 Guilford, CT Phone: (203) Fax: (203)
 Fax: (203)") INSTALLATION INSTRUCTIONS P/N S: C2090 & C2092 SLIDE-A-LINK The Slide-A-Link by Competition Engineering is designed for use in Stock Eliminator and Bracket Racing vehicles. The rigid front mount assembly
INSTALLATION INSTRUCTIONS P/N S: C2090 & C2092 SLIDE-A-LINK The Slide-A-Link by Competition Engineering is designed for use in Stock Eliminator and Bracket Racing vehicles. The rigid front mount assembly
INSTRUCTIONS MANUAL COMPETITION GRADE HIGH PERFORMANCE RADIO CONTROL RACING CAR CHASSIS KIT 1/12 SCALE ELECTRIC COMPETITION CAR KIT
 COMPETITION GRADE HIGH PERFORMANCE RADIO CONTROL RACING CAR CHASSIS KIT 1/12 SCALE ELECTRIC COMPETITION CAR KIT INSTRUCTIONS MANUAL E Thank you for purchasing VBC Racing product. Things that we should
*1264BAG3* 1264BAG WD GM KIT A
 92126400A *1264BAG3* 1264BAG3 Thank you for choosing Rough Country for your suspension needs. We appreciate your business!! This kit will not fit vehicles equipped with electric steering. 07-13 4WD GM
INSTALLATION INSTRUCTIONS
 INSTALLATION INSTRUCTIONS REAR LOWER CONTROL ARMS PART No. # SSM-1313 FITS : GM G-Body styles 1978-1987 BUICK : Grand National, GNX, Regal, T-type, Turbo-T. CHEVROLET : Malibu, Monte Carlo, El Camino.
Assembly Manual. 1/10th World GT car
 Assembly Manual 1/10th World GT car Center Pivot Bag 1 3374 - Center Pivot Socket 40194 - Hard Anodized Alum Pivot ball 3254-2-56 Button Head *Note - Sometimes it is helpful to slightly over-tighten the
Perfect Park 7000 Installation & Unloading Instructions Operating Manual
 Perfect Park 7000 Installation & Unloading Instructions Operating Manual 1) Always file a claim with the truck line if the lift has been damaged! (If you don t originally notice the damage, but find some
2017+ Ford F-250/350 4X4 Rear Lift Kit Installation Instructions
 A 13/64 drill bit and 1/4-20 tap is required. 7/8 drill bit is required 2017+ Ford F-250/350 4X4 Rear 10-12 Lift Kit Installation Instructions 1 1. Before you remove anything off the truck, measure the
95-98 CHEVY TRUCK INSTALLATION INSTRUCTIONS KIT #112 #113
 This body lift kit should only be installed on vehicles that are in good working condition. Before the installation begins, the vehicle should be thoroughly inspected for evidence of corrosion or deformation
*1553BAG3* F-150 2WD 4 /5 /6 LIFT KIT 1553BAG3
 *1553BAG3* 1553BAG3 921553220 2015-16 F-150 2WD 4 /5 /6 LIFT KIT THANK YOU FOR CHOOSING ROUGH COUNTRY FOR YOUR SUSPENSION NEEDS. Rough Country recommends a certified technician install this system. In
2013+ DODGE RAM " Kit PART# STOP! READ THIS FIRST!
 NOTE: 2013+ DODGE RAM 3500 4" Kit PART# 54346 STOP! READ THIS FIRST! **READ THESE ENTIRE INSTRUCTIONS BEFORE STARTING ANYTHING** or chroming, which can damage the strength and structure of the metal, any
LIFT-504. BMF Lift Kit. Yamaha G22 Gas or Electric. Installation Instructions
 LIFT-504 BMF Lift Kit Yamaha G22 Gas or Electric Installation Instructions Contents of LIFT-504 Yamaha G22 BMF Lift Kit: a (1 ea.) BMF A-Arm Assembly b (1 ea.) Driver Side Shock Tower c (1 ea.) Passenger
97-06 JEEP TJ REPL BODY BUSHING / 1 BODY LIFT KIT
 9RC60700 97-06 JEEP TJ REPL BODY BUSHING / BODY LIFT KIT Congratulations on your purchase of a new Rough Country Body Bushing / Body Lift Combo. We are committed to providing you with the best product
*NOTE* The following suspension system will not work with heavy duty axle housings as pictured below.
 1964 ½ - 1970 Ford Mustang Triangulated 4-Link Suspension Installation Instructions Tech Line: 1-855-693-1259 www.totalcostinvolved.com Read and understand these instructions before starting any work!
*1234BAG1 1234BAG WD CHEVY/GM LIFT N200
 *1234BAG1 1234BAG1 921234N200 99-06 2WD CHEVY/GM 1500 6 LIFT Thank you for choosing Rough Country for all of your suspension needs. Rough Country recommends a certified technician installs this system.
INSTALLATION INSTRUCTIONS
 INSTALLATION INSTRUCTIONS ----1075 North Ave. Sanger, CA 93657-3539 toll free: 800-445-3767 web: www.belltechcorp.com---- 5001 AIRJACK AIR SPRING SUSPENSION SYSTEM C 1500 AND C-2500 Congratulations! You