4L60E to T56 conversion instructions for LS1 FBody
|
|
|
- Chad Sims
- 6 years ago
- Views:
Transcription
1 4L60E to T56 conversion instructions for LS1 FBody Modified by Jesse Mock (SSnakekiller), originally written by Alex Afrashteh for instructions on an LT1 Swap. Credits go to Alex Afrashteh for writing the bulk of this material. I have only modified/added to it to correct the slight differences from the LT1. Here are the original LT1 Instructions: LT1 4L60 to T56 instructions This is a new guide as of 04/02/05, if there are any errors, let me know. I am SSnakekiller on LS1TECH.COM. Please use your own judgment while doing the following procedure. The instructions here are only meant as a guide to help you during the install. If you feel something is not right, do some research before attempting to do it or ask someone first. The instructions are as accurate as they get for a free guide. Use at your own risk and feel free to let me know if there are any errors at all. Converting from an auto to a manual is not actually that difficult. The factory parts do fit in place, and all the wiring is basically there. These instructions should be the most concise there is on the internet. I'll break it all up to make it easier for all to use. Parts This is actually 50% of the battle. I highly recommend you buy a complete conversion kit. Places to try are and Most kits go for $1,500. Here is a list of necessary parts : T56 transmission, bellhousing, shifter, flywheel, pressure plate w/throwout bearing, clutch disk, clutch alignment tool. master cylinder with U-bolt, slave cylinder, reservoir new roller pilot bearing T56 tranny crossmember, tranny mount (can use A4 tranny mount but will need actual bracket) torque arm bracket, torque arm bushing (can use A4 TA bushing) pedal assembly with all the switches and clip for clutch pedal shifter console insert (replaces automatic shifter insert) lower shift boot bolts - bellhousing to tranny, flywheel, pressure plate to flywheel, master cylinder U-bolt nuts, lower shift boot screws. CAGs pigtail (not necessary), VSS pigtail ("Whiteboy" tells me the new part # is , the original is ), reverse lockout pigtail ( ), reverse light pigtail
2 ( ). The pigtails are expensive, but necessary. Connectors for the pedals are not necessary. 4 quarts of Dexron III brake fluid for master cylinder reservoir if necessary NOTE: Steps marked with a star * are steps that may seem unnecessary but if you follow them it will make the objective work much easier!!!!! I highly recommend you get a new clutch and pressure plate. Deciding on a clutch and pressure plate combo really depends on your power levels. Clutches available are - GM stock, Centerforce, STAR, McLeod, Spec, Ram, SLP, and others. The most popular clutches right now are the Spec, Mcleod, Ram. From what I have heard, Centerforce is junk. Do not forget, the flywheel must be resurfaced and balanced the same as your flexplate (or neutral balanced if you have an internally balanced/built motor). Disassembly First things first, the car must be jacked up. Get the car as high as you can, front and back. Remember, if you don't have the car high enough, you will not be able to get the automatic out from under the car! Be sure everything is very secure, you need to feel confident as you will be under the car a lot. Inside : * Remove both seats. Remove the shift knob - there is a staple in the front that must be pulled to remove it. Remove all the bolts, and pull the entire console assembly. The parking brake should be pulled up hard and fast to make it point straight up. Remove the shifter assembly (disconnect park/neutral switch connector), disconnect the shift cable to the tranny. Remove knee bolster and plastic piece (disconnect rear defogger connector) * Remove steering knuckle and steering column. A bunch of wires need to be disconnected. There are three bolts in the frame and two big bolts that hold the column. There will be a plastic line with a metal wire in it that connects the shifter assembly to the steering column - this is the mechanism that prevents the key from being turned unless the car is in park - remove it. Remove the pedal assembly. There should be a couple electrical connections. The throttle cable is easy to get off. The brake pedal has a clip that holds the brake rod on, remove it and hold on to it. Outside :
3 Disconnect your y-pipe and O2's if necessary, some may not need to do this, I did not. Unbolt and remove the torque arm. If you are finding it difficult to get it out of the TA bushing, put a bolt in the differential and one in the TA. Use them to pry it out of the bushing - works like a charm. Unbolt the drive shaft from the pinion yoke. If you have a tranny plug, plug the auto. If you do not, leave the drive shaft in the back of the tranny. Remove the dust shield and unbolt all the torque converter bolts. The flexplate has to be turned to do this, use the frame/starter/whatever to turn the wheel (and hold it in place) with a large screw driver or pry bar. Push the TC into the tranny as far as it will go. Get a hydraulic jack underneath the pan - be sure it is placed in such as way that the weight is evenly spread and the tranny will not fall when completely disconnected. The jack should be positioned from front to back. Jack it until it relieves pressure from the tranny mount. Don't lift the car. :) Unbolt the tranny mount and remove the tranny crossmember. Lower the tranny a couple inches and remove all the electrical connectors and wires. Also, pull the dipstick and the tranny cooler lines. Lower the tranny as much as you feel comfortable. Be sure you are not damaging anything - be aware of wiring, header interference, whatever. The point here is to have access to the top four tranny bolts. With very long extensions and swivel joints, remove all but the easiest tranny bolts (bottom two). They can be very difficult to break, I recommend you use a long metal tube to slide over the handle of your ratchet - it will provide excellent leverage. Once all the bolts (but the bottom ones) are out, raise the tranny so it is almost straight - remove the last two bolts. Do not worry about it just falling, there are guide pins that will hold it together. Gently pry the tranny off the engine while keeping everything balanced. You should also hold the TC. Drop the auto as far as you can on the jack and then remove the TC (be positioned correctly, it is heavy). At this point, you will need to take the auto off the jack and lay it on the floor. Of course, keeping it straight will help prevent loss of fluid. Having cardboard on the ground helps a lot to slide it from under the frame. Congrats, one of the hardest parts is done. Remove the flexplate bolts and pull the flexplate. The bolts are going to be on there good, so be prepared to hold the flexplate in place and use leverage to your advantage. If you are going to use an air tool, get a perfect fit 6 point socket and be sure to be on that bolt good when you hit it. Do not lose the crossmember bolts, tranny to engine bolts, or flywheel bolts, they are going to be reused. Of course, getting a nice set of ARP flywheel bolts wouldn't hurt. Assembly Inside :
4 PEDAL INSTALL: Get the manual pedals in. It is time to cut the holes for the master cylinder and the U-bolt. Bolt the pedals down so it sits like it will when you are done. MOUNTING HOLES: There is a template in the plastic (NOT the frame) that will help you place the pedal framing. Mine was slightly bent, so it had to be coaxed a little so the pedal framing metal would match up with the template. Once the pedal framing is lined up the way you like it and fits in the template, use it as a guide to drill holes for the U-bolt. Remove the pedal assembly. MASTER CYLINDER HOLE (if you know how to do this, skip to MOUNTING THE MASTER CYLINDER): Look at your master cylinder and draw where you want to drill your hole. Use a 1-5/8" hole saw or something close, but not smaller and not larger than 2 to cut the master cylinder hole. You can make a template out of thin cardboard or paper, but cardboard is more stiff and will help. Do this if you want to be very precise with lining up the hole. Cut out a square piece of cardboard, enough to fit over the master cylinder. In the center of the cardboard, drill the 1-5/8 hole. Slide the cardboard over the master cylinder through the 1-5/8 hole you drilled as if the cardboard is acting as the firewall. With a pencil, mark the holes on the cardboard where the ubolt will slide through the 2 master cylinder mounting holes. Then take the cardboard and cut it so it is about the size of the master cylinder bracket and is diamond shaped like it. Now place the cardboard template in the car and line it up with the bracket holes. Now you will have a nice large 1-5/8 template hole so you can mark exactly where you need to drill the 1-5/8 hole through the firewall. I don't recommend removing the rubber, cut straight through it. When the cutting is done, put the pedals back in. Bolt it up tight. From the motor bay, put the master cylinder near it's place. Position the reservoir so it sits properly without pinching or twisting the line. There is a mount for the reservoir already on your car. MOUNTING THE MASTER CYLINDER: OK, lining up the master cylinder is a PITA. The person inside should pull the master cylinder flush while the person on the otherside places the U-bolt. You may have some luck pushing the brake booster out some by loosening the four center bolts and pulling it. Once you've got the U-bolt in from the engine bay going in through to the inside of the car, screw the nuts in to hold it in place. The side with the nuts will be on the inside of the car. Take a look at it and make sure the master cylinder sits flush with the frame. The master cylinder rod should line up to the clutch pedal. If the hole was drilled correctly, there should be little gap between the master and the firewall. If there is, fill it with whatever you feel is appropriate (RTV, whatever). Attach the clutch rod - use the clip to secure it on the clutch pedal. Attach the brake rod (again, there is a clip) to the brake pedal and the throttle cable on the gas pedal.
5 CUT HOLE FOR SHIFTER: It is time to cut the hole for the T56 tranny. There is a plate on the framing that needs to be partially removed. There are a 4 tack welds that need to be drilled out in order to bend the plate out of the way. You can cut it off where it starts to curve up toward the back. Put the bellhousing in with a couple of bolts. Get under the car, and dummy install the T56. Of course, the shifter should be removed. I recommend you use saran wrap or a towel to cover the opening in the tranny. Bolt up the tranny with a couple of the easy bolts and mount it up with the tranny mount and crossmember. At this point, you should trace a line around the shifter assembly. It does not need to be exact as the hole will need to be a bigger anyway. Once you've got the trace done, take the T56 out. From the bottom of the car, drill a couple of holes to help you guide where to make the cut - go about 1-1½ inches outside of the trace you made. Don t be too scared, there is quite a bit of room for error. The reason I say this is because you need to have room for the tranny to move and not hit the frame. Get inside the car and use a sawzall, cut off wheel, or dremel to cut the hole. Be careful not to let the carpet light on fire and wear protective eyewear and clothing. At this point, I would dummy up the T56 again to be sure the hole was cut right. Use a file to clean up the rough edges and excess metal. STEERING COLUMN: Install the steering column and steering knuckle. Attach all the electrical connectors. There are two connectors near the top of the steering column that are not easy to see when the column is in. This is the ignition box, don't forget to plug it in! PICTURES OF INSTALL:

6 Cardboard Template (cut around the mount, it will be easier to fit inside):

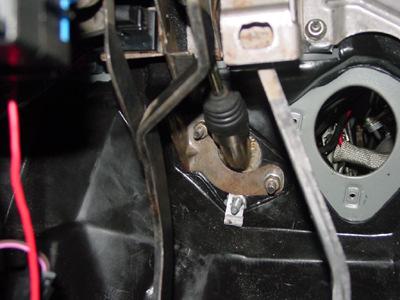
7 Test Install: Master Installed:
8 Outside : CLUTCH INSTALL: Install the flywheel, clutch, pressure plate and pilot bearing. With a rubber mallet and socket that fits right around the lip of the pilot bearing, install the bearing into the crank. Be sure the flat side goes into the crank and the beveled side is toward the tranny (a gentleman named Brian ed me to let me know that he installed his backwards and it seized up). It should be flush with the crank when it is fully in. Try not to touch the inside, it has grease in it. My mechanic told me the amount that it comes with is not enough and more should be added. Line-up the flywheel and start all of the bolts by hand - get them in as far as you can with your fingers, then tighten them hand tight in star formation. While someone holds the flywheel with a pry bar, torque the bolts in a star formation to spec (74 lb/ft). Clean the flywheel and pressure plate surface with brake cleaner to remove residue and finger marks. The clutch disk has a flat side and a side that sticks out. The side that sticks out goes away from the engine. I found this part to be different from Alex s description. He says to put the clutch disk with flat side away from the engine. This was either an error or maybe that is how they go in the LT1 cars??? Either way, it will be obvious. The side that sticks out cannot go against the flywheel so it must face away from the flywheel. Hold the clutch disk in place, and put the pressure plate on. Line up the holes and put in all the pressure plate bolts finger tight. Use the clutch alignment tool to center the clutch. Tighten all the bolts hand tight in a star formation, then torque them to spec (22 lb/ft). The pressure plate fingers will look straight when you are done. TRANSMISSION INSTALL: Install the T56. Bolt the bellhousing up and tighten all the bellhousing bolts. Get the tranny on the jack and line things up. This part is a bit of a PITA. Get the tranny on the bellhousing. Pull the tranny together and put a couple of easy bolts in. Bolt up the T56, mount, crossmember. I would highly recommend you cut the inspection cover so you don't have to remove the starter to install it. If you need to use the tranny bolts to pull the tranny together, be sure to do this evenly. Note that the top bolts are difficult to get to (not nearly as difficult as the 4L60 though TG) and will require long extensions and swivel joints. Remove the fill plug and pour tranny fluid where the shifter would be. Make sure the rear of the tranny is plugged with either a plug or drive shaft otherwise it will leak out the back. It should take about 3.5 quarts to fill. When it's filled, install the fill plug and bolt the shifter up to protect the tranny. Congrats, that was the last major milestone. The tranny cooler line plugs need to be plugged in the radiator. What we did was cut the tranny lines and use them to plug the holes. Whatever will work. You could probably even leave them alone if you wanted to. Inside :
9 WIRING: Time to do the wiring. There should be 6 wires that went into a connector when you removed the 4L60 near the front of the console inside the car. Here are the basic wiring instruction for connecting those wires: REWIRING instructions: (disconnect battery, should be anyway ) Hatch Release: Connect the orange w/ black stripe and the black wires together. Clutch Switch (in order to start the car): connect the purple w/ white stripe and the dark green to the clutch switch (black switch in the back of the clutch pedal) Reverse Lights: connect light green and brown into the reverse switch located on the passenger side of the T56. You can buy the pigtail, or engineer a way to get the wires to hold and be protected. I put the wires in and pinched them into place. The pigtail will run about $50 of unneccesary spending, but you could go that route if you are uncomfortable. Reverse Lockout: You will need to find out which wire on your PCM you need to tap into to operate the reverse lockout. Do a search and you may find this information. I was actually able to trade someone with my same year car my 4L60 PCM and harness for their T56 PCM and harness, so the reverse lockout wire connector was already there for me. Besides that, you are pretty much done. If there is additional wiring that needs to be added to this guide, let me know and I will add them to the guide. WATCH THE FOLLOWING FUSES: starter, gauges, Turn/BU lights. Put the carpet back around the pedals, install the lower plastic piece and the knee bolster. The lower plastic piece has some perforated foam that needs to be removed for the clutch pedal. Drill holes and install the lower shift boot. Use short machine screws. Install the console, parking brake, shifter insert, and shift knob. When installing the console, there are two lights, the parking brake wire, and cig. lighter connector. Install the seats. Take it for a drive! Don't beat on the clutch as it needs to be broken in. If you have a kevlar clutch, do not be alarmed if it chatters. This will die down as the clutch disk, flywheel, and PP wear in. You may also hear your TO bearing when the clutch is out, this is normal. Note that you will throw a ton of codes and your speedo will be at least 50% low. This can be corrected by getting an M6 computer program. If you're PCM already has custom tuning for your engine combination, these variables need to be transferred to a M6 program. LS1Edit and HP Tuners can do the job. Modern Muscle car and Ed Wright can also do programming. Even
10 your dealer can reflash your PCM. The PCM will still set a hidden SES code because of a missing CAG warning light. No need to worry, as this means it will not illuminate the SES light. Questions/Comment/Errors??? me badblurr@aol.com or Alex at alex@afrashteh.com.
Lincoln Mark VII T5 Swap Version submitted by 5.0 bird
 Lincoln Mark VII 1984-1989 T5 Swap Version 20070611 submitted by 5.0 bird I've decided to make an article to assist with the T5 swap for the 84-89 Mark VIIs, since I was just in there because my DOA didn't
PLEASE READ THROUGH THE WHOLE WRITE UP BEFORE ACTUALLY USING IT!!!!
 JDM power folding mirror switch install into stock USDM harness. By: Greg L., Zeke21 on twinturbo.net PLEASE READ THROUGH THE WHOLE WRITE UP BEFORE ACTUALLY USING IT!!!! This is how I was able to get the
BMW 2002 M42 Swap Notes-THIS IS NOT FINISHED
 BMW 2002 M42 Swap Notes-THIS IS NOT FINISHED This document is to help those that want to install an m42 into a BMW 2002. It is based around an e30 engine, trans, and wiring. You can use the e36 block/head/wiring
Technical Support (707)
") Installation Instructions CONSOLE MEGASHIFTER Fits: 1982-1992 Camaro & Firebird w/automatic Transmission *except 1988-1992 Firebird Formula Model Catalog # 80692 WORK SAFELY! For maximum safety, perform
Installation Instructions CONSOLE MEGASHIFTER Fits: 1982-1992 Camaro & Firebird w/automatic Transmission *except 1988-1992 Firebird Formula Model Catalog # 80692 WORK SAFELY! For maximum safety, perform
Installation Instructions Unimatic Shifter
 Installation Instructions Unimatic Shifter Universal Shifter for Automatic Transmissions Part Number 80775 2010, 2000 by B&M Racing & Performance Products The B&M Unimatic is a universal shifter that will
Technical Support (707)
") Installation Instructions UNIMATIC SHIFTER Fits: GM, Powerglide, Ford and Chrysler Transmissions See Application Guide for Specific Vehicles Catalog # 80775 WORK SAFELY! For maximum safety, perform this
Installation Instructions UNIMATIC SHIFTER Fits: GM, Powerglide, Ford and Chrysler Transmissions See Application Guide for Specific Vehicles Catalog # 80775 WORK SAFELY! For maximum safety, perform this
Rear End Installation and Bearing Kit - 8.8in (86-12 V8; V6)
") Rear End Installation and Bearing Kit - 8.8in (86-12 V8; 11-13 V6) Tools Required: Jack Stands 5 Floor Jack 2 Oil Pans 1 Wheel Blocks 2 Differential Oil 3 qts Friction Modifier 3 bottles Tube of Black
Rear End Installation and Bearing Kit - 8.8in (86-12 V8; 11-13 V6) Tools Required: Jack Stands 5 Floor Jack 2 Oil Pans 1 Wheel Blocks 2 Differential Oil 3 qts Friction Modifier 3 bottles Tube of Black
JRSC + BBK Install on SVTF. Neil A. Shah medicnas on focaljet September 2006
 JRSC + BBK Install on SVTF Neil A. Shah medicnas on focaljet September 2006 ECU up here. When removing make sure the smaller bundles of wires don t get wrapped around the bottom edge and break - this almost
Installation Instructions Unimatic Shifter
 Installation Instructions Unimatic Shifter Universal Shifter for Automatic Transmissions Part Number 80775 2000 by B&M Racing & Performance Products LLC The B&M Unimatic is a universal shifter that will
Aamir_bt The legend..
 Aamir_bt The legend.. How to do timing on a 4XE1-W (DOHC) engine. well i decided to to a write up for DOHC timing since there was only the SOHC written up, and i had to do a timing belt on my stylus anyways,
Installation Instructions QUICKSILVER CONSOLE SHIFTER Fits: Chevelle / El Camino
 WORK SAFELY! For maximum safety, perform this installation on a clean, level surface and with the engine turned off. Place blocks or wedges in front of and behind both rear wheels to prevent movement in
Improving the gearshift feel in an SW20.
 Improving the gearshift feel in an SW20. Part one In 3 parts. The SW20 gearshift can be often be greatly improved by eliminating play in the shift linkages, and this article covers three areas that need
Preparation. With the car on the ground you will want to:
 Doing a stage 3 swap was a LOT of work Audi S4 Stage 3 (K04) Install Doing a stage 3 swap was a LOT of work. Just a lot of small and simple tasks really. Just make sure you keep track of what you re doing.
Installation Instructions. QuickSilver Shifter. Fits: GM, Ford, Chrysler Transmissions See Application Guide for Specific Applications Part # 80683
 Installation Instructions QuickSilver Shifter Fits: GM, Ford, Chrysler Transmissions See Application Guide for Specific Applications Part # 80683 WORK SAFELY! For maximum safety, perform this installation
Figure 1 Factory G50 update and old Shift Fork Shaft
 911 Clutch Job So you have one of the best 911s there is, a 87-89 G50 Porsche. However, after many years of service, it is time for a clutch. Maybe, the rubber clutch disc has failed, or the clutch is
Light Truck MegaShifter
 Installation Instructions Light Truck MegaShifter The B&M Light Truck Megashifter shifter is designed to be used in most light trucks equipped with most popular three speed or four speed automatic transmissions.
Mustang Steeda Tri-Ax Shifter Installation Guide
 Mustang Steeda Tri-Ax Shifter Installation Guide The below installation instructions work for the following products: Mustang Short-Throw Shifters and Mustang Handles This "all questions answered" guide
BBK Ceramic Long Tube Headers (99-04 Cobra and Mach 1) - Installation Instructions
 - Installation Instructions") BBK Ceramic Long Tube Headers (99-04 Cobra and 03-04 Mach 1) - Installation Instructions The below installation instructions work for the following products: BBK Ceramic Long Tube Headers (99-04 Cobra
BBK Ceramic Long Tube Headers (99-04 Cobra and 03-04 Mach 1) - Installation Instructions The below installation instructions work for the following products: BBK Ceramic Long Tube Headers (99-04 Cobra
Volvo 1800 Dash Pad Replacement
 Volvo 1800 Dash Pad Replacement (courtesy of John Garden State Chapter Volvo Club America) Reupholstering the dash Well it has been some time since I have been online in the forum. Winter is a quite time
Tools needed: Here is a pic of the shift kit I used. It is a Transgo brand and as you can see, it just a bag full of springs and one valve.
 Before installing a shift kit, be sure the transmission is in good operating order. If your transmission is making noises, slipping, shifting bad or the fluid looks brown or smells burnt, take the transmission
This is what we are trying to create in the steps below
 You will need: (1) Some 3/4 aluminium or steel flat bar (+/- 1 foot) (2) About 12 of 3 Aluminium or steel tubing. (2) Piece of 3X3 silicone hose and 2 hose clamps (3) 1 K&N (or similar) high flow filter
Depress each tab as you pull the bezel off. The bezels are tight. L.H. shown.
 2013-2014 Ford Mustang V6 & Boss 302 Lower Valance Fog Light Kit Parts List: Quantity: Tool List: Fog light & bulb with bracket 2 Flat head & Phillips screwdriver Black bezels 2 Ratchet & Socket set OR
Installation Directions for FINGER STICK and Blocker Plate
 Installation Directions for FINGER STICK and Blocker Plate What is a Finger Stick? A Finger Stick is a simple circuit that modifies the MAF signal on LLY and LBZ engines (not LB7 engines) to expected levels
Disco 3 Clock Spring / Rotary Coupler replacement
 Disco 3 Clock Spring / Rotary Coupler replacement I recently had to change my Clock spring and thought some folks may find it helpful to see what it entailed. I did lots of reading around but couldn t
WARNING: the engine does not come with oil in it. Please fill the oil before starting. The 200cc hardknock requires 9/10 of a quart of oil.
 WARNING: the engine does not come with oil in it. Please fill the oil before starting. The 200cc hardknock requires 9/10 of a quart of oil. Things needed for assembly. -2 tubes of blue loc-tite. I don
2001 V70 T5 ETM Removal and Cleaning Directions
 2001 V70 T5 ETM Removal and Cleaning Directions Howard Cheng howardc64@gmail.com 10/24/05 Version 1.4 Read this before you start I performed this ETM cleaning because I had gotten 2 reduced performance
Exedy Mach 400 Stage 1 Clutch and Pilot Bearing (Late GT, Bullitt, Mach 1; Cobra): SKUs: & 50116
: SKUs: & 50116") Exedy Mach 400 Stage 1 Clutch and Pilot Bearing (Late 01-04 GT, Bullitt, Mach 1; 99-04 Cobra): SKUs: 62502 & 50116 Tools Needed: Car Jack with high lift capabilities (If not, block of wood may be required)
Exedy Mach 400 Stage 1 Clutch and Pilot Bearing (Late 01-04 GT, Bullitt, Mach 1; 99-04 Cobra): SKUs: 62502 & 50116 Tools Needed: Car Jack with high lift capabilities (If not, block of wood may be required)
X-Type w/ non-premium sound amplifier installation instructions
 X-Type w/ non-premium sound amplifier installation instructions 1. Pull radio from dash (see Radio Removal Instructions ) 2. Disconnect wiring harness from back of radio by pushing in tab on plug and pulling
Installing Rear Brake Pads on a WK Jeep
 Installing Rear Brake Pads on a WK Jeep Step by Step By Chirpz Disclaimer: I do not claim that this procedure is the right way or even the best way to change your rear brake pads. This is what I did after
Changing the Struts on a WK Jeep CRD
 Changing the Struts on a WK Jeep CRD Step by Step By Chirpz Disclaimer: I do not claim that this procedure is the right way or even the best way to change your struts. This is what I did after reading
Installation Instructions Right Hand Drive Megashifter
 Installation Instructions Right Hand Drive Megashifter Part Number 80685 1995, 2001, 2006, 2010 by B&M Racing & Performance Products The B&M Right Hand Drive Megashifter is designed specifically for vehicles
Impala SS and Caprice T56 Six Speed install guide
 Impala SS and Caprice T56 Six Speed install guide Created by: Mike Fetcko 1 Intro First let me tell you a little about myself. My name is Mike Fetcko and I live currently in Kalamazoo, Michigan. I am an
Memories of a Power Brakes conversion on a 1971 Corvette
 Memories of a Power Brakes conversion on a 1971 Corvette I did the job all by myself, except for the brake bleeding. Looks like an easy job but its not, you definitely need some experience to avoid screw
*Some speedometers have these additional electronic connections. If yours does, then remove the smaller slotted screws shown.
 www.odometergears.com 1981-1985 240 Cable-Driven Speedometers (NOT for 1986 and later electronic units) http://www.davebarton.com/240-odometer-repair.html For this set of instructions below, I will not
Hurst VMATIC3 INSTALLATION
 FORM 159 8530 07/12 Hurst VMATIC3 3-Speed & 4-Speed Automatic Shifter Catalog #3838530 2012 by Hurst Performance The Hurst Vmatic3 shifter can be used in vehicles equipped with most popular three speed
-Magnet (not completely necessary but can come in handy)
") McLeod High Performance Hydraulic Clutch Line Upgrade (05-14 V8) Included in kit: -New clutch line -2 fittings Required Tools: -Floor jack and jack stands (or a lift) -Flashlight -Angled pick tool -13mm
McLeod High Performance Hydraulic Clutch Line Upgrade (05-14 V8) Included in kit: -New clutch line -2 fittings Required Tools: -Floor jack and jack stands (or a lift) -Flashlight -Angled pick tool -13mm
Prerequisites: Shop Manual (recommended) pages 3-9 through 3-13.
 pages 3-9 through 3-13.") Prerequisites: Order your gaskets average about $25.00 bucks X 2 so $50.00 4NK-11193-00-00 Obtain a shim kit (Should have several 265 and 270s) (Some dealers will exchange) Obtain a Valve Bucket Tool YM-33961
Prerequisites: Order your gaskets average about $25.00 bucks X 2 so $50.00 4NK-11193-00-00 Obtain a shim kit (Should have several 265 and 270s) (Some dealers will exchange) Obtain a Valve Bucket Tool YM-33961
Ford Racing BOSS 302 Engine Oil Cooler (11-14 GT)
") Tools needed: 14mm hex socket 7mm socket/wrench 8mm socket/wrench Ford Racing BOSS 302 Engine Oil Cooler (11-14 GT) 10mm socket (for airbox removal) ¾ inch or 19mm wrench Torque wrench Appropriate ratchets
Tools needed: 14mm hex socket 7mm socket/wrench 8mm socket/wrench Ford Racing BOSS 302 Engine Oil Cooler (11-14 GT) 10mm socket (for airbox removal) ¾ inch or 19mm wrench Torque wrench Appropriate ratchets
Our goal is to make the install a breeze. Please read the entire guide before beginning.
 www.airkewld.com Page 1 of 6 IRS Axle Kit Install IRS Axle Kit Install Our goal is to make the install a breeze. Please read the entire guide before beginning. KITS SHOULD INCLUDE 2 - Control-arm mounting
Installation Instructions StarShifter
 Installation Instructions StarShifter Part Number 80675 2000 by B&M Racing & Performance Products LLC The B&M StarShifter can be used in vehicles equipped with most popular three speed automatic transmissions.
Installation Instructions Hammer Shifter Fits: GM, Ford, Chrysler Transmissions See Application Guide for Specific Applications Part # 80885
 Installation Instructions Hammer Shifter Fits: GM, Ford, Chrysler Transmissions See Application Guide for Specific Applications Part # 80885 WORK SAFELY! For maximum safety, perform this installation on
Installation Instructions Megashifter
 Installation Instructions Megashifter The B&M Megashifter shifter can be used in vehicles equipped with most popular three speed or four speed automatic transmissions. Your B&M Megashifter comes equipped
Return to Instruction Sheet index TCI Installation Instructions for Turbo Hydramatic 350C & 250C
 Page 1 of 6 Return to Instruction Sheet index TCI 326300 Installation Instructions for Turbo Hydramatic 350C & 250C NOTE: This kit was not intended for installation in transmissions that are in poor general
The Driveshaft Shop Aluminum One Piece Driveshaft (05-10 GT)
") Install Time: 2-3 Hours Tools Needed: Metric Hex Key Set 10mm, 13mm, 15mm deep socket 12 point 12mm deep socket ⅜ Rachet 5 ½ Rachet Extensions ½ Drive Breaker Bar Blue Thread Locker Rubber Mallet Pry Bar
Install Time: 2-3 Hours Tools Needed: Metric Hex Key Set 10mm, 13mm, 15mm deep socket 12 point 12mm deep socket ⅜ Rachet 5 ½ Rachet Extensions ½ Drive Breaker Bar Blue Thread Locker Rubber Mallet Pry Bar
Fitting the Bell Auto Services (B-A-S) TDV6 EGR Blanking Kit to a 2006 model Discovery 3 TDV6 HSE
 TDV6 EGR Blanking Kit to a 2006 model Discovery 3 TDV6 HSE") Fitting the Bell Auto Services (B-A-S) TDV6 EGR Blanking Kit to a 2006 model Discovery 3 TDV6 HSE Before I describe how I did this, I must first thank other members of the Disco3.co.uk forum (namely J,moore
Fitting the Bell Auto Services (B-A-S) TDV6 EGR Blanking Kit to a 2006 model Discovery 3 TDV6 HSE Before I describe how I did this, I must first thank other members of the Disco3.co.uk forum (namely J,moore
How I installed new brake pads on my i with Sport Package (should be fine for other E39 s) By Robert B.
 By Robert B.") How I installed new brake pads on my 1999 528i with Sport Package (should be fine for other E39 s) How I installed new brake pads on my 1999 528i with Sport Package (should be fine for other E39 s) By
How I installed new brake pads on my 1999 528i with Sport Package (should be fine for other E39 s) How I installed new brake pads on my 1999 528i with Sport Package (should be fine for other E39 s) By
Replacing MK4 Golf/Jetta radiator mounts in-car
 Replacing MK4 Golf/Jetta radiator mounts in-car This is a guide to replacing the radiator mounts in a MK4 Golf/Jetta. This involves moving the core support to the service position which allows you to do
Another CJ picture guide to replacing the key cylinder in a non-tilt steering column
 Another CJ picture guide to replacing the key cylinder in a non-tilt steering column by John Strenk Well I'm sure it's happened to all of us one time or another. You park your jeep and go to turn off your
Another CJ picture guide to
 Another CJ picture guide to replacing the key cylinder in a non-tilt steering column by John Strenk Well I'm sure it's happened to all of us one time or another. You park your jeep and go to turn off your
Clutch Kit Install Guide
 Jack up and support the car on jack stands Remove the exhaust system (some models) Remove the driveshaft (rear wheel drive) Remove CV axle (front wheel drive) Manual transmission removal Clutch Kit Install
HASPORT PERFORMANCE EFJ1
 HASPORT PERFORMANCE Installation Instructions For: Part Number EFJ1 for J-series V6 engines into 1988-1991 Honda Civic and CR-X Hasport Performance mounts are the result of extensive research and engineering.
How to install the Barnett clutch and the stronger Oil Pump Drive Gear
 How to install the Barnett clutch and the stronger Oil Pump Drive Gear Written by WildFred I m from Germany so please excuse my English and the spelling. The following procedure is a combination of the
Installation Instructions Z-Gate Shifter
 Installation Instructions Z-Gate Shifter Part Number 80681 1998, 2001 by B&M Racing and Performance Products The B&M Z-Gate shifter can be used in vehicles equipped with most popular three speed automatic
TCI Trans-Scat
 Page 1 of 5 Return to Instruction Sheet index TCI 350000 Trans-Scat Installation Instructions For TURBO HYDRAMATIC 350 This kit will allow you to reprogram your transmission to meet your driving needs
4TH GEN SEATS IN A 3RD GEN TRUCK
 4TH GEN SEATS IN A 3RD GEN TRUCK by Flopster843 02 Oct 2016 If you drive a 3rd generation Dodge Ram truck, I am sure you have discovered that the OEM seats are not the greatest (Figure 1.) They are extremely
FITTING OIL TEMP AND PRESSURE GUAGES
 FITTING OIL TEMP AND PRESSURE GUAGES this guide is of reference to fitting an oil temp and pressure sender/ sensor into a sandwich plate- not the sump plug temp sensor (although it wouldn't be much different
Printed in the U.S.A.
 Installation Instructions Hammer Shifter Part No. 80885 & 80887 2010, 2006, 2005, 2004, 1999 by B&M Racing and Performance Products (Visit www.bmracing.com for additional products and product information)
Nissan Pathfinder (R50) Automatic to Manual Transmission Conversion Manual
 Automatic to Manual Transmission Conversion Manual") 1996 1999 Nissan Pathfinder (R50) Automatic to Manual Transmission Conversion Manual 1 1996 1999 Nissan Pathfinder (R50) Automatic to Manual Transmission Conversion Manual Conversion performed and Manual
1996 1999 Nissan Pathfinder (R50) Automatic to Manual Transmission Conversion Manual 1 1996 1999 Nissan Pathfinder (R50) Automatic to Manual Transmission Conversion Manual Conversion performed and Manual
I hope this guide helps you as much as Boomer Bob helped me. We re just sharing what we know to help out other folks. Best of luck! Phil C.
 A brief tutorial on swapping cams for the Victory Cross Roads and Cross Country on the Victory Freedom 106 inch V-Twin Engine with 6 speed over drive transmission Disclaimer: Swapping cams on a Victory
Installing LED lights in a Hypercharger By Keith Edwards Joker s Wild! (Wildjokr)
") Installing LED lights in a Hypercharger By Keith Edwards Joker s Wild! (Wildjokr) THINGS YOU WILL NEED: A Hypercharger (duh!) LEDs (The ones I got were from Benny Bryant at Fantasies on Wheels in Sylacauga,
Installing LED lights in a Hypercharger By Keith Edwards Joker s Wild! (Wildjokr) THINGS YOU WILL NEED: A Hypercharger (duh!) LEDs (The ones I got were from Benny Bryant at Fantasies on Wheels in Sylacauga,
67-70 Cougar Rack Kit Instructions # &
 67-70 Cougar Rack Kit Instructions # 8011950-01 & 8011940-01 Unisteer offers a limited warranty against all manufacturer defects of their kits and supplied parts. Unisteer will not honor any warranty on
Ford 8, 9 Small Bearing Installation Instructions Rear Disc Conversion
 Ford 8, 9 Small Bearing Installation Instructions Rear Disc Conversion This kit is for Ford 9 rear axles with the small (2.835 ) style bearing and Ford 8 rear ends. This kit is designed to work with axles
Door Panel Removal & Window Stop Adjustment
 Door Panel Removal & Window Stop Adjustment By: Jeff Wolford Disclaimer: This is simply an article of how I fixed my car. I m not responsible if you break, scratch, or mess up anything following my example.
E46 FUEL FILTER CHANGE Pics from CI
 1 of 10 5/3/2010 1:48 PM E46 FUEL FILTER CHANGE Pics from 2001 330CI Bellows Expansion Joints Metal Bellows Expansion Joints in Every Style from Flexicraft www.flexicraft.com/metal_bellows Ask a BMW Mechanic
4 pieces of silicone hose Unless you have AEM then you have 2 2.5, 1 3, and 1 3.5
 The parts in your kit: 3 pieces of Mandrel-Bent Aluminized Tubing: 1 Straight 1 45 degree bend with straight section 1 curved section 4 pieces of silicone hose 1 2.5 1 3.5 2 3 Unless you have AEM then
TCI FastGate Shifter Installation Instructions
 151 INDUSTRIAL DRIVE ASHLAND, MISSISSIPPI 38603 http://www.tciauto.com TELEPHONE: 662-224-8972 FAX LINE: 662-224-8255 E-MAIL: tech@tciauto.com TCI 616541 FastGate Shifter Installation Instructions The
OEM Cruise Control Installation in GMC/Chevy NBS trucks
 OEM Cruise Control Installation in 99-02 GMC/Chevy NBS trucks May 2008 ~ Rampage_Rick Having just installed factory cruise control in my 00 Sierra, I thought I d share the fun. I followed the steps outlined
2012 SLK V6 (M276 Engine) Spark Plug Replacement
 Spark Plug Replacement") 2012 SLK 350 3.5 V6 (M276 Engine) Spark Plug Replacement Proceed at your own risk. I read the Mercedes repair documents pertaining to changing the R172 SLK M276 V6 engine s spark plugs that I could find
2012 SLK 350 3.5 V6 (M276 Engine) Spark Plug Replacement Proceed at your own risk. I read the Mercedes repair documents pertaining to changing the R172 SLK M276 V6 engine s spark plugs that I could find
Cable Shift Linkage Kit
 Cable Shift Linkage Kit INSTALLATION INSTRUCTIONS ididit column to GM Trans FOR PART NUMBER S: 2801000010, 2802000010 ididit Column to 350 Trans...Pg 1-4 ididit Column to 400 Trans...Pg 5-8 ididit Column
Z-Gate Universal Shifter
 Installation Instructions Z-Gate Universal Shifter Fits: GM, Ford, Lincoln and Chrysler Transmissions See Application Guide for Specific Applications Part #80681 Rev 06/01/2018 WORK SAFELY! For maximum
Procharger Stage II Intercooled Supercharger System (11-14 GT)
") Procharger Stage II Intercooled Supercharger System (11-14 GT) Installation Time: Approximately one day. Installed on 2012 Mustang GT 5.0/Manual Required Tools 3/8 Socket Set (Standard and Metric) 1/2
Procharger Stage II Intercooled Supercharger System (11-14 GT) Installation Time: Approximately one day. Installed on 2012 Mustang GT 5.0/Manual Required Tools 3/8 Socket Set (Standard and Metric) 1/2
DODGE OFF ROAD T-STYLE STEERING KIT INSTALLATION INSTRUCTIONS
 Dodge Off Road, LLC Specializing in Dodge Ram Solid-Axle 4x4 Suspension and Steering for Off Road Applications 855.9009.DOR sales@dodgeoffroad.com dodgeoffroad.com DODGE OFF ROAD T-STYLE STEERING KIT INSTALLATION
STEPS FOR REMOVING REAR ASHTRAY & CUP HOLDER, CENTER ARMREST, E- BRAKE CONSOLE, FRONT ASHTRAY, LOWER CENTER CONSOLE AND GLOVE BOX
 Please give credit where credit is due! This DIY was completed ENTIRELY by the hardest working VW Vortex moderator on the site!! Gary Thompson, Ph.D. - vortex ID VGRT6, email address vgrt6@yahoo.com. Please
YOU MAY WANT TO FIRST TRY TO LOOSEN THE FILTER HOUSING
 2005 XC90 Tune-up (5-cyl) Including: Oil Change - Spark Plugs - Fuel Filter - Cabin Filter First off - let me say that I am an amateur (at best) mechanic, and I claim no responsibility for whatever you
S1 Sequential. T56 Magnum. Sequential shifter. Contents and assembly instructions
 S1 Sequential Sequential shifter T56 Magnum Contents and assembly instructions Parts List Sequential shifter x1 Base plate x1 Base spacer x1 Drill Square x1 Shaft fitting x1 Square washer x1 8mm Aluminium
Installation Instructions QUICKSILVER SHIFTER Fits: Chevrolet Camaro Pontiac Firebird Catalog # 80688
 Installation Instructions QUICKSILVER SHIFTER Fits: 1973-1981 Chevrolet Camaro 1970-1981 Pontiac Firebird Catalog # 80688 WORK SAFELY! For maximum safety, perform this installation on a clean, level surface
Your Steering Column Specialist
 Cable Shift Installation Instructions for: ididit Column to GM Trans www.ididitinc.com ididit Column to 350 Trans...PG1-4 ididit Column to 400 Trans...PG5-8 ididit Column to 700R4 & 4L60 Series Trans...PG9-12
We all put our heads together to try and determine what the facts were. They were as follows:
 VWvortex Forums > Eos > How to solve (or prevent) Eos Roof leaks As many of you know, I don t own an Eos. This makes it difficult to provide practical advice based on my own experience with the car, as
5/6 Speed Conversions for Subaru SVX
 5/6 Speed Conversions for Subaru SVX using custom parts available from TomsSVX 4/19/06 Parts list for 5/6mt swap 5/6mt assembly 5/6mt shift linkage(be sure to get all the pieces) 5/6mt starter(both are
There is hence three things you can do - add oil, adjust the temp that the clutch begins to engage, or do both.
 As most of you may be aware, I have been doing a lot of research lately on our cooling system in the 80's including the fact that we have a dead spot on the OEM temp gauge which prompted me to not rely
How to replace your Turbo Actuator Step by Step
 How to replace your Turbo Actuator Step by Step Special thanks to other forum members who have previously dealt with this problem! Old By Chirpz New Your Turbo is a lot tougher than the electric actuator
Mustang Clutch Cable Installation Guide 96-04
 Mustang Clutch Cable Installation Guide 96-04 The below installation instructions work for the following products: Steeda Adjustable Clutch Cable 96-04 Maximum Motorsports Clutch Cable 82-04 Steeda Clutch
Installation Instructions Console Megashifter
 Installation Instructions Console Megashifter 1968-1969 Camaro Part Number 81035 This B&M Megashifter is designed to fit in the console of a 1968-1969 Chevrolet Camaro. In 1968, these vehicles were equipped
Troubleshooting of the LubeTech Grease System
 Troubleshooting of the LubeTech Grease System February 2009 The LubeTech grease system is designed to be a preventative maintenance system that will extend the life of your bearings that are connected
Page1. ISF Stainless Steel Headers // Part# HDR-004
 Congratulations on the purchase of your ISF Stainless Steel Headers and thank you for choosing Sikky Manufacturing. This installation manual is intended to guide you through the removal of the factory
My Hawk build Part 8 by Stuart Clarke
 My Hawk build Part 8 by Stuart Clarke Front hubs, brakes and brake lines. There was still no news on my rear springs so I thought I d find something else to get on with. I had the front hubs, brake calipers
3.2 quarts Pennzoil Synchromesh transmission fluid (optional, but recommended)
") List of tools and materials: Floor jack, jack stands, and car ramps 3/8 drive ratchet, with long and medium extensions 3/8 drive swivel 3/8 breaker bar / cheater bar 7/8 combo wrench 8mm, 10mm, 13mm, 15mm,
List of tools and materials: Floor jack, jack stands, and car ramps 3/8 drive ratchet, with long and medium extensions 3/8 drive swivel 3/8 breaker bar / cheater bar 7/8 combo wrench 8mm, 10mm, 13mm, 15mm,
Moddit. How to Install an OS Giken Differential into a
 Moddit How to Install an OS Giken Differential into a Subaru BRZ This guide goes over the steps necessary to remove and install the OS Giken Limited Slip Differential into a Subaru BRZ. This guide may
JBA Cat4ward Shorty Header Install (05-10 Mustang GT and Bullitt)
") JBA Cat4ward Shorty Header Install (05-10 Mustang GT and 08-09 Bullitt) Installation Time: 6-8 Hours (Depending on Tools and Help) Tools Required: 8mm Socket 10 mm Socket 13mm Socket 15mm Deep Socket Ratchet
JBA Cat4ward Shorty Header Install (05-10 Mustang GT and 08-09 Bullitt) Installation Time: 6-8 Hours (Depending on Tools and Help) Tools Required: 8mm Socket 10 mm Socket 13mm Socket 15mm Deep Socket Ratchet
For all Ram x4 Trucks, and all Ram x4 trucks.
 Dodge Off Road, LLC Specializing in Dodge Ram Solid-Axle 4x4 Suspension and Steering for Off Road Applications 855.9009.DOR sales@dodgeoffroad.com dodgeoffroad.com DODGE OFF ROAD 5 th GEN STEERING KIT
Ford Super Duty 5.4L Spark Plug Change F250 4x4 XLT Sport Crew Cab
 1 of 32 Ford Super Duty 5.4L Spark Plug Change 2004 F250 4x4 XLT Sport Crew Cab Back to 2004 F250 Main Page Click Here for a PDF version of this article At close to 100k miles, I figured it was time for
Cable Shift Linkage Kit
 Cable Shift Linkage Kit INSTALLATION INSTRUCTIONS ididit column to Ford 4R70W/AODE Trans FOR PART NUMBER S: 2801600010, 2802600010 S INCE 1986 www.ididitinc.com 610 S. Maumee St., Tecumseh, MI 49286 PH:
List of parts needed below. Tools needed
 1 BMW 645 Coolant leak repair (Cap with Seal Repair and Expanding Coolant Pipe Installation w Pics) By Michael R. Brown (Estimated time to complete the job is 6-8 hrs) List of parts needed below. BMW PART
Installation Instructions
 Preparing your vehicle to install your brake system upgrade 1. Rack the vehicle. 2. If you don t have a rack, then you must take extra safety precautions. 3. Choose a firmly packed and level ground to
Cable Shift Linkage Kit
 Cable Shift Linkage Kit INSTALLATION INSTRUCTIONS Ford column to Ford 4R70W/AODE Trans FOR PART NUMBER S: 2802650010 S INCE 1986 www.ididitinc.com 610 S. Maumee St., Tecumseh, MI 49286 PH: (517) 424-0577
Troubleshooting Guide for Limoss Systems
 Troubleshooting Guide for Limoss Systems NOTE: Limoss is a manufacturer and importer of linear actuators (motors) hand controls, power supplies, and cables for motion furniture. They are quickly becoming
Installation Manual TWM Performance Short Shifter Cobalt SS/SC, SS/TC, HHR SS, Ion Redline and Saab 9-3
 Page 1 Installation Manual TWM Performance Short Shifter Cobalt SS/SC, SS/TC, HHR SS, Ion Redline and Saab 9-3 Please Note: It is preferable to park on a flat surface, as you will have to engage and disengage
Installation Instructions Sport Shifter
 The B&M Sport Shifter can be used in vehicles equipped with most popular three speed or four speed automatic transmissions. It is equipped with neutral safety and backup light switches, transmission brackets
PRO RATCHET UNIVERSAL SHIFTER
 Installation Instructions PRO RATCHET UNIVERSAL SHIFTER Fits: GM, Ford and Chryslers w/automatic Transmission See Application Guide for Specific Vehicles Catalog # 80842 WORK SAFELY! For maximum safety,
Troubleshooting Guide for Okin Systems
 Troubleshooting Guide for Okin Systems More lift chair manufacturers use the Okin electronics system than any other system today, mainly because they re quiet running and usually very dependable. There