DAKOTA INSTRUMENTS OPERATING MANUAL ACR ACRYLIC FLOW METERS
|
|
|
- Laurel Dickerson
- 6 years ago
- Views:
Transcription
 879-7713 Tel. 1+(845) 770-3200 Fax.")
1 OPERATING MANUAL ACR ACRYLIC FLOW METERS DAKOTA INSTRUMENTS Website: Toll Free USA and Canada: 1(800) Tel. 1+(845) Fax. 1+(845) Corporate Drive Orangeburg NY USA TDV0112MG
2
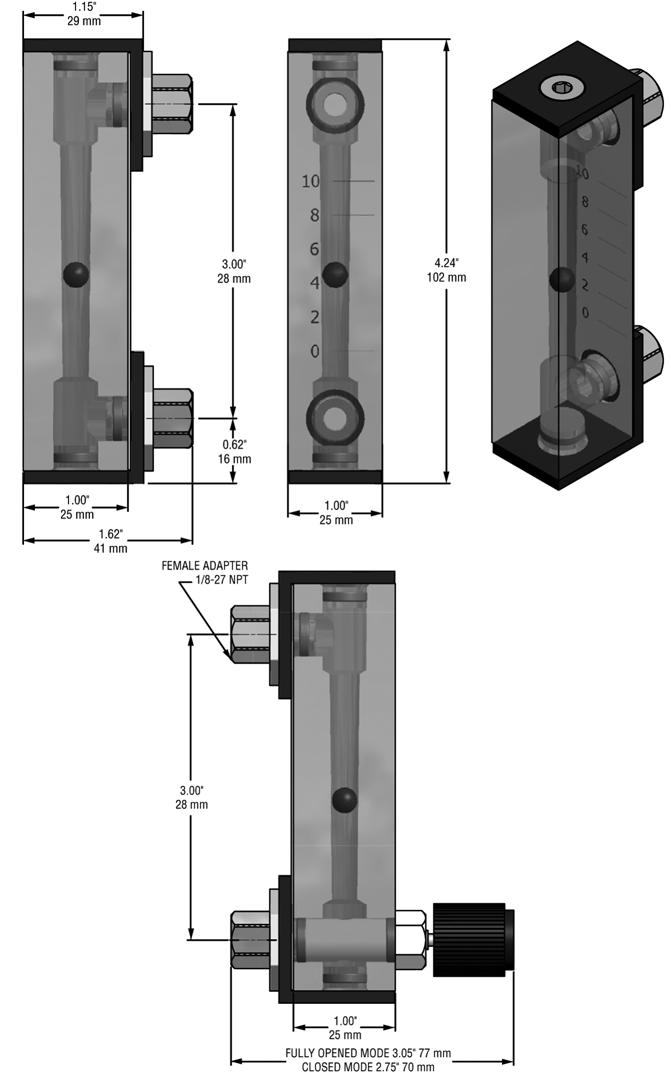
3 INSTALLATION AND OPERATING INSTRUCTIONS FOR ACR ACRYLIC FLOW METERS Unpacking the ACR Acrylic Flow Meter Inspect Package for External Damage Your ACR Acrylic Flow Meter was carefully packed in a sturdy cardboard carton, with anti-static cushioning materials to withstand shipping shock. Upon receipt, inspect the package for possible external damage. In case of external damage to the package contact the shipping company immediately. Unpack the ACR Acrylic Flow Meter Open the carton carefully from the top and inspect for any sign of concealed shipping damage. In addition to contacting the shipping carrier please forward a copy of any damage report to your distributor or Dakota directly. When unpacking the instrument please make sure that you have all the items indicated on the Packing List. Please report any shortages promptly. ACCURACY: ± 5% of full scale reading. Specifications FLOAT MATERIALS: Glass (black colored), 316 Stainless Steel (silver colored), Tungsten Carbide (Carboloy- silver colored). FITTINGS: Brass or 316 Stainless Steel. O-RINGS: Viton-A is standard, Buna-N, EPR are optionally available. VALVES: Built-in needle valves are available. MAXIMUM SERVICE TEMPERATURE: 65 C (150 F). MAXIMUM SERVICE PRESSURE: 700 kpa (100 psig). SCALES: Direct reading dual scales mounted interchangeably at rear of flow meter block. Each scale has both metric and English system units displayed. Scales are mounted by means of locating holes between the rear of the acrylic block and the yellow colored backing plate. Customers can easily exchange scales for different fluids, and flow rates. Extra scales and flow meter kits are available. FLOAT READINGS: At center of ball shaped floats. Installation MOUNTING: Flow meters are shipped ready for panel (rear) mounting, and are easily convertible to partial or full In-line configurations (see diagram). To convert, exchange Plug Seals (3) and Female Adaptors (9) correspondingly using a 5/32" hex wrench and a 1/2" open box wrench. Panel or In-line mounting is through 11/16" diameter holes, using hex nuts supplied. 1
4 THE FOLLOWING CONFIGURATIONS ARE POSSIBLE: 1) Panel Mounting, using hex nuts at rear of meter. 2) Full In-line Mounting (not available for meters with valve options.) 3) Partial In-line Mountings, i.e. inlet at bottom, outlet at top rear, or inlet at bottom rear and outlet at top center. To Exchange Scales: Select Option A, B, or C A. NO VALVE OPTION (Styles 2, 4, 14) 1) Using a 1/2 open box wrench or 5/32" hex wrench remove rear fittings (Female Adaptor (9) for the panel mounting option or Plug Seal (3) for the In-line mounting option). 2) Remove Back Plate (2) and Scale (7) by sliding both to either side. 3) Holding the desired scale align its holes with those in the Back Plate. Slide both behind the Bracket (5). 4) Insert but do not completely tighten fittings. 5) Recheck Back Plate (2) alignment. 6) Tighten fittings. B. VALVE OPTION (Styles 2,4) 1) Using a 1/2 open box wrench remove top Female Adaptor (9). 2) Loosen Valve Cartridge (11) allowing the lower Female Adaptor (12) to be unscrewed. Do not remove Cartridge from the meter. 3) Remove Back Plate (2) and Scale (7) by sliding both to either side. 4) Holding the desired scale align its holes with those in the Back Plate. Slide both behind the Bracket (5). 5) Insert but do not completely tighten top Female Adaptor (9). 6) Insert but do not completely tighten lower Female Adaptor (12) (it has an extra orifice and O-ring on it), while keeping Valve Cartridge (11) in place. 7) Screw Valve Cartridge (11) into lower Female Adaptor (12). 8) Recheck Back Plate (2) alignment. 9) Tighten both Female Adaptors (9), (12). 10) Tighten Valve Cartridge (11). Do not over tighten it. C. VALVE OPTION (Style 14) 1) Use a 1/16" hex wrench to loosen 2 set screws on Knob (15). 2) Using a 1/2" open box wrench, remove Valve Cartridge (13) and top Female Adaptor (9). 3) Remove Back Plate (2) and Scale (7) by sliding them to either side. 4) Holding the desired scale align its holes with those in the Back Plate slide them behind Brackets (5). 5) Insert but do not completely tighten top Female Adaptor (9). 6) Insert but do not completely tighten Valve Cartridge (13). 7) Recheck Back Plate (2) alignment. 8) Tighten Female Adaptor (9) and Valve cartridge (13). 9) Secure Knob, tighten its set screws. 2
5 Cleaning: Disassembly, Re-assembly From time to time you may need to clean the meter. Clean with mild soap solution. Dry out with air or inert gas. Disassembly and reassembly must be done in a clean environment. Disassembly First, follow the common steps, then select Option A, B, or C, based on the block style. 1) Unscrew top Plug Seal (3) using a 5/32" hex wrench and remove Bumping Spring (8). 2) Flip the meter over and let the spherical float fall out on to a clean surface. The float should be handled with appropriate tweezers. Do not touch it with fingers. Store the float in a clean bag or box, free of grease. A. NO VALVE OPTION (Styles 2, 4, 14) Unscrew top Plug Seal (3) using a 5/32" hex wrench and remove Bumping Spring (8). B. VALVE OPTION (Styles 2,4) Unscrew Valve Cartridge (11) using a 1/2" open box wrench. Unscrew bottom Plug Seal (3) using a 5/32" hex wrench and remove Bumping Spring (8). C. VALVE OPTION (Style 14) Use a 1/16" hex wrench to loosen 2 set screws on Knob (15). Remove Valve Cartridge (13) using a 1/2" open box wrench. Unscrew bottom Plug Seal (3); push out the plastic Y-Shape Float Stop toward the wide bore using an appropriate non-metal stick. 3
 Install Bumping Spring (8) in the bottom cavity; while squeezing the spring with appropriate flat stick insert Valve Cartridge (11), tighten it.")
6 Re-Assembly: Select Option A, B, or C A. NO VALVE OPTION (Styles 2, 4, 14) Install Bumping Spring (8) in the bottom cavity; secure it by screwing in Plug Seal (3) until it is flush with Bracket (5). Proceed to steps 1-3. B. VALVE OPTION (Styles 2,4) Install Bumping Spring (8) in the bottom cavity; while squeezing the spring with appropriate flat stick insert Valve Cartridge (11), tighten it. Screw in bottom Plug Seal (3) until it is flush with Bracket (5). Proceed to steps 1-3. C. VALVE OPTION (Style 14) Insert the plastic Y-Shape Float Stop (14) from the wide bore using an appropriate non-metal stick; push the Stop all the way down the bore. Screw in Valve Cartridge (13), and reinstall Knob (15). Screw in bottom Plug Seal (3) until it is flush with Bracket (5). Proceed to steps 1-3. STEPS: 1. Insert Float (6), 2. Insert Bumping Spring (8) into the top cavity; secure it by screwing in Plug Seal (3) until it is flush with Bracket (5). 3. Shake the meter making sure the ball is floating free without restrictions. TYPICAL SCALES 4
")
7 In-Line Version (Styles 2, 4, 14) Valve Option Version (Styles 2, 4) 5

8 Panel Mount Version (Styles 2, 4, 14) PARTS LIST ITEM QTY DESCRIPTION MATERIAL 1 1 Block Acrylic 2 1 Back Plate, yellow Polyethylene 3 2 Seal Plug Brass or 316 Stainless Steel 4 4 O-ring FKM 5 2 Bracket Structural aluminum 6 1 Float Glass or 316 Stainless Steel or Carboloy 7 1 Scale Film 8 2 Bumping Spring 316 Stainless Steel 9 1 or 2 Female Adaptor Brass or 316 Stainless Steel 10 2 Pal Nut Steel 11 1 Valve Cartridge Wetted parts: PVDF or Polyoxymethylene, 316 Stainless Steel, FKM O-ring Female Adaptor for Valve Cartridge Brass or 316 Stainless Steel 6

9 Valve Option (Styles 14) PARTS LIST (For valve option/style 14 only) ITEM QTY DESCRIPTION MATERIAL 1 1 Block, style 14 Acrylic 2 1 Back Plate, yellow Polyethelene 3 2 Seal Plug Brass or 316 stainless steel 4 3 O-ring FKM 5 2 Bracket Structural aluminum 6 1 Float 316 Stainless Steel 7 1 Scale Film 8 1 Bumping Spring 316 Stainless Steel 9 1 Female Adaptor Brass or 316 Stainless Steel 10 2 Pal Nut Steel 13 1 Valve Cartridge 14 1 O-ring TFE 15 1 Knob Plastic, Steel 7 Wetted Parts: PVDF for brass, Stainless Steel, FKM O-Rings
10 DIMENSIONAL DRAWINGS 8
11 RETURNING MERCHANDISE FOR REPAIR Please contact the customer service representative of your distributor or Dakota if you purchased your Flow Meter directly, and request a Return Authorization Number (RAN). Equipment returned without an RAN will not be accepted. Dakota reserves the right to charge a fee to the customer for equipment returned under warranty claims if the instruments are tested to be free from warrantied defects. Shipping charges are borne by the customer. Items returned collect will not be accepted! It is mandatory that any equipment returned for servicing be purged and neutralized of any dangerous contents including but not limited to toxic, bacterially infectious, corrosive or radioactive substances. No work shall be performed on a returned product unless the customer submits a fully executed, signed SAFETY CERTIFICATE. Please request form from the Service Manager. LIMITED WARRANTY No warranty or claims are made by DAKOTA relating to the fitness of this product to any specific application. Meters are warranted against defects in materials and workmanship to the original user for a period of one year from the date of shipment. The company shall at its discretion, repair or replace flow meters covered by valid warranty claims. Warranty is non-transferable and applies only to the original end-user. The liability of the company arising out of its supply of the product, or their use, shall not in any case exceed the cost of correcting defects in the products as set forth herewith. The Warranty will not apply if failure is due to or contributed by any of the following: improper handling, improper storage, improper installation, abuse, unsuitable application of the product, lack of reasonable and necessary maintenance, use exceeding suggested pressure and temperature limitations, improper packaging for return, or repairs made or attempted to be made by anyone other than DAKOTA or company authorized technicians. In no event shall DAKOTA or its distributors be liable for loss of profits, indirect, consequential or incidental damages. CAUTION: This product is not intended to be used in life support applications! The selection of materials of construction, is the responsibility of the customer. The company accepts no liability. TRADEMARKS Buna-N -is a registered trademark of DuPont Dow Elastometers. Dakota -is a registered trademark of Dakota Instruments & Controls. 9 Delrin -is a registered trademark of DuPont. Viton -is a registered trademark of DuPont Dow Elastomers.
12
PFS Rotameter. Variable Area Flowmeter. Instruction Manual PFS-RM200, RM230, RM250
 PFS Rotameter 09/2018 Rev. 0 Variable Area Flowmeter Instruction Manual PFS-RM200, RM230, RM250 Please note: This instruction manual provides detailed information and instructions that must be read, understood
Model 88F Twincone Magnet Wire Stripper
 110 Fairgrounds Drive P.O. Box 188 Manlius, NY 13104-0188 USA 315.682.9176 FAX: 315.682.9160 OPERATOR S MANUAL Model 88F Twincone Magnet Wire Stripper PRODUCTION WIRE PROCESSING EQUIPMENT Website: www.carpentermfg.com
Techcon Systems TS5620 Series Diaphragm Valve. User Guide
 Techcon Systems TS5620 Series Diaphragm Valve User Guide CONTENTS Page number 1. Specifications - Horizontal Valve. 3 2. Specifications -Vertical Valve.. 4 3. Unpacking and Inspection 5 4. Description........5
MODEL 200 MULTI-JET FLOW METER
 MODEL 200 MULTI-JET FLOW METER - For Water Applications - INSTALLATION & INSTRUCTION MANUAL 8635 Washington Avenue Racine, Wisconsin 53406 Toll Free: 800.235.1638 Phone: 262.639.6770 Fax: 262.417.1155
7430 Series Hastelloy / Monel / Stainless Steel Installation Instructions
 7430 Series Hastelloy / Monel / Stainless Steel FLOW METER LIMITED WARRANTY Hastelloy / Monel / Stainless Steel Meters are warranted against defects in materials and workmanship to the original user for
MULTIPOSITION AIR CYLINDER
 MULTIPOSITION AIR CYLINDER CAST ALUMINUM FOUR-POSITION - ALL AIR SERVICE INFORMATION MOUNTING! Devices should be mounted and positioned in such a manner that they cannot be accidentally operated. INSTALLATION
Condensate Pump. Installation and Safety Instructions CP-22 CP CP-22LP CP-22LP-230
 Condensate Pump Installation and Safety Instructions CP-22 CP-22-230 CP-22LP CP-22LP-230 CP-22 CP-22LP CP-22T CP-22LPT CP-22-230 CP-22LP-230 CP-22T-230 CP-22LPT-230 Rated Voltage 120 Volts / 60 Hz 220
Condensate Pump. Installation and Safety Instructions CP-22 CP CP-22LP CP-22LP-230
 Condensate Pump Installation and Safety Instructions CP-22 CP-22-230 CP-22LP CP-22LP-230 CP-22 CP-22LP CP-22T CP-22LPT CP-22-230 CP-22LP-230 CP-22T-230 CP-22LPT-230 Rated Voltage 120 Volts / 60 Hz 220
MODEL 7400 STRUT SPRING COMPRESSOR
 MODEL 7400 STRUT SPRING COMPRESSOR Installation, Operation & Repair Parts Information Branick Industries, Inc. 4245 Main Avenue P.O. Box 1937 Fargo, North Dakota 58103 REV112712 P/N: 81-0103A TABLE OF
PORTER FLOWMETERS & FLOW CONTROLLERS. Technology you can trust
 PORTER FLOWMETERS & FLOW CONTROLLERS Technology you can trust PORTER PRECISION FLOWMETERS AND FLOW CONTROLLERS you can trust Porter Instrument Company, Inc. is a leading manufacturer of specialized components
MODEL 200 MULTI-JET FLOW METER
 MODEL 200 MULTI-JET FLOW METER - For Water Applications - INSTALLATION & INSTRUCTION MANUAL 8635 Washington Avenue Racine, Wisconsin 53406 Technical Toll-Free: 877.722.4631 Sales Toll-Free: 800.235.1638
INSTALLATION INSTRUCTIONS
 THANK YOU FOR CHOOSING KURYAKYN! Protect yourself and others from possible injury and property damage or loss. Pay close attention to all instructions, warnings, cautions, and notices regarding the installation,
IV STANDS. Assembly, Usage and Maintenance INSTRUCTION MANUAL
 INSTRUCTION MANUAL IV STANDS Assembly, Usage and Maintenance Read and understand all of the instructions and safety information in this manual before operating this product. MAN-045 REV A 2018 MAC Medical,
I N S T R U C T I O N M A N U A L
 I N S T R U C T I O N M A N U A L M E T E R I N G P U M P S LINC84T-10, 11, 12, & 14 Series Chemical Metering Pump Pneumatic Plunger Contents - 84T-10, 11, 12, & 14 Pump Manual... Page General Specifications...
MODEL 7600 STRUT SPRING COMPRESSOR
 MODEL 7600 STRUT SPRING COMPRESSOR Installation, Operation & Repair Parts Information Branick Industries, Inc. 4245 Main Avenue P.O. Box 1937 Fargo, North Dakota 58103 REV6162014 P/N: 81-0246 TABLE OF
Pneumatic Cylinder 14 Bore X 21 Stroke Part No. P Replaces Part No. P
 Pneumatic Cylinder 14 Bore X 21 Stroke Part No. P -322908-00000 Replaces Part No. P-191067-00000 Service Information WARNING: INSTALLATION AND MOUNTING The user of these devices must conform to all applicable
Pneumatic Cylinder 14 Bore X 22 Stroke Part No. R (Formerly P )
") Pneumatic Cylinder 14 Bore X 22 Stroke Part No. R434001268 (Formerly P -193419-00003) Service Information INSTALLATION Before installing this cylinder, all air lines in the system should be blown clean
Pneumatic Cylinder 14 Bore X 22 Stroke Part No. R434001268 (Formerly P -193419-00003) Service Information INSTALLATION Before installing this cylinder, all air lines in the system should be blown clean
Techcon Systems TS5000 Series Rotary Valve
 10. SPARE PARTS AND ACCESSORIES 10.1 SPARE PARTS: The only spare parts available are: Fluid inlet fitting, O- ring and clean out screw. These items are included in the Valve cleaning kit part number: 5000-013-000
4:1 Fusion Static Mixer Kit
 Instructions-Parts 4:1 Fusion Static Mixer Kit 1294A For use with 4:1 ratio material and Graco Fusion MP gun only. Not for use in explosive atmospheres. 500 psi (24.5 MPa, 245 bar) Maximum Fluid Working
Sanitary Roof Hydrant Installation Instructions
 Installation Instructions Freeze Flow hydrants are designed for heavy-duty commercial use where safe potable water is needed. This hydrant drains into the canister below the roof line to prevent freeze
SeeDOS Product User Manual Seed Slider
 Seed Slider Table of Contents Subject Page General Precautions... 2 Customer Responsibility... 2 Features & Specifications... 3 Description... 3 Operation... 4 Maintenance... 7 Service... 7 Parts and Accessories...
Model 617 Benelli Tactical Light. Users Manual. Benelli Shotgun M1 Super Gauge Serial No. M and later Protected by US.
 Model 617 Benelli Tactical Light Users Manual Benelli Shotgun M1 Super 90 12 Gauge Serial No. M104801 and later Protected by US. Patent 4,856,218 Revision D 7-1_99 Introduction The Model 617 Tactical Light
Model AS-FM64 Wall Mount. Full Motion Television Wall Mount
 Model AS-FM64 Wall Mount Full Motion Television Wall Mount Getting Started Introduction Congratulations on the purchase of your new Audio Solutions AS-FM64 Television Wall Mount. For maximum benefit, please
SUPERPLUS WATER FILTRATION SYSTEM
 SUPERPLUS WATER FILTRATION SYSTEM For Model #: SP20-1 INSTRUCTIONS/ASSEMBLY USE AND CARE MANUAL (Important: Read this manual thoroughly before install) TABLE OF CONTENTS 2 3 4 6 8 9 10 11 12 General Notes
Model FM2642 Wall Mount. Full Motion Television Wall Mount
 Model FM2642 Wall Mount Full Motion Television Wall Mount Getting Started Introduction Congratulations on the purchase of your new Audio Solutions FM2642 Television Wall Mount. For maximum benefit, please
SURE SHOT ATOMIZER SPRAYERS
 SURE SHOT ATOMIZER SPRAYERS INSTRUCTIONS Refillable, Reusable. Extra Versatile. Pressurized by Free Air. MODEL B 16 oz. 8 oz. 7 oz. DIRECTIONS FOR OPERATING MODEL B SPRAYERS 1) ALWAYS DEPRESSURIZE SPRAYER
Model T2642 Wall Mount. Television Wall Mount with Tilt Option
 Model T2642 Wall Mount Television Wall Mount with Tilt Option Getting Started Introduction Congratulations on the purchase of your new Audio Solutions T2642 Television Wall Mount. For maximum benefit,
INSTALLATION INSTRUCTIONS PART NUMBER WR (Wrinkle Red Finish)
") Equipped with AEM Dryflow Filter No Oil Required! INSTALLATION INSTRUCTIONS PART NUMBER 21-746WR (Wrinkle Red Finish) 2015-17 VOLKSWAGEN GOLF 1.8/2.0L 2015-17 VOLKSWAGEN GTI 2.0L 2015-16 VOLKSWAGEN GOLF
Equipped with AEM Dryflow Filter No Oil Required! INSTALLATION INSTRUCTIONS PART NUMBER 21-746WR (Wrinkle Red Finish) 2015-17 VOLKSWAGEN GOLF 1.8/2.0L 2015-17 VOLKSWAGEN GTI 2.0L 2015-16 VOLKSWAGEN GOLF
PNEUMATIC PIPING DEVICES Service Information
 PNEUMATIC PIPING DEVICES Service Information PRODUCT DESCRIPTION PAGE Quick Exhaust Valves (Quick Release Valves)................................... 2-3 1/4, 3/8, 1/2, 3/4 & 1 pipe sizes, diaphragm type,
Professional Grade Agricultural Pumps.
 Professional Grade Agricultural Pumps. spro 1 Delavan knows what HD Magnum PowerFLO PowerMAX 2 you need out of a pump. Turbo-90 RollerPRO 3 Sizing, Selection & Plumbing Diagrams How to Determine Pump Capacity
Sanitary Yard Hydrant Installation Instructions
 Installation Instructions Freeze Flow hydrants are designed for heavy-duty commercial use where safe potable water is needed. This hydrant drains into the canister below the frost line to prevent freeze
JOHN DEERE 9970 COTTON PICKERS
 PARTS CATALOG FOR Mud Hog System II Rear Wheel Drive FOR JOHN DEERE 9970 COTTON PICKERS Mud Hog Model Numbers Tread Center OEM Aftermarket JD40005 JD47655 82, 90, 94, 106 TUTHILL Drive Systems 9098 West
TH400 STREETFIGHTER SERIES VALVE BODY MANUAL/AUTO VALVE BODY INSTALLATION INSTRUCTIONS
 1 INSTRUCTIONS TH400 STREETFIGHTER SERIES VALVE BODY 1965-87 MANUAL/AUTO VALVE BODY INSTALLATION INSTRUCTIONS TCI 222400 TCI 222400 ALLOWS AUTOMATIC SHIFT FEATURES IN THE DRIVE POSITION Thank you for choosing
CHESTERTON FLOW GUARDIAN S50 AND SP50 SINGLE FLOWMETER INSTALLATION INSTRUCTIONS
 INSTALLATION INSTRUCTIONS CHESTERTON FLOW GUARDIAN S50 AND SP50 SINGLE FLOWMETER INSTALLATION INSTRUCTIONS GENERAL The function of the FLOW GUARDIAN Single S50 (Item # 199801 compression fitting, 199804
OPERATING INSTRUCTIONS
 OPERATING INSTRUCTIONS TURBO-LUX 3 Orifice Plate Flowmeter FM, LPCB and VdS approved IMPRINT All rights reserved. Any reproduction or usage without written authorisation of MECON GmbH - even partial content
ECONOMAIR SERIES CYLINDERS
 OPERATOR S MANUAL INCLUDING: APPLICATION, LUBRICATION, INSTALLATION & SERVICE ECONOMAIR SERIES CYLINDERS 2XXX-XXX9-XXX RELEASED: 9-14-92 REVISED: 3-6-01 (REV. B) READ THIS MANUAL CAREFULLY BEFORE INSTALLING,
Float Level Control Kits
 Float Level Control Kits ASOFK, SPFK and FLC SpectraPure Inc. assumes no responsibility for water damage due to leaks. It is the user s responsibility to determine that the system is leak-free. INSTALLATION
INSTALLATION INSTRUCTIONS PART NUMBER DS
 INSTALLATION INSTRUCTIONS PART NUMBER 21-781DS 2014-2016 Mercedes Benz CLA250 2.0T C.A.R.B E.O # D-670-24 1 ITEM NO. PART NUMBER DESCRIPTION QTY. 1 21-1015DK ELEMENT; 6-3/8 OD B, 5-3/16 OD T; 8-7/8H 1
Models: C22D, C23D, C24D
 Installation & Service C22-991-2401A Models: C22D, C23D, C24D Bypass Pressure Regulating Valves with BSPT Threaded Ports IMPORTANT Record your pump model number and serial number here for easy reference:
6.0 SPECIFICATIONS CONTENTS. Calibration. According to factory procedureeeeeeeeeeeeeee Accuracy*
 6.0 SPECIFICATIONS Calibration According to factory procedureeeeeeeeeeeeeee Accuracy* ± 1% full scale (FS) or ± 1 graduation on scale Scale diameter 41 mm Temperature range 45 to 115 F (10-45 C) Air humidity
WARNING: Do not use pumps for gasoline or highly flammable products! Do not use pumps for water based fluids, solvents or chemicals!
 50:1 Value Line Pneumatic Grease Pump Technical Brief 07/01/2010 No. 18710 201 Fits 35 lb. Pail Premium quality pneumatic pump used for 35 lb. Pail 1.Recommended Usage Grease pumps with a ratio of 50:1
FIXED DEPTH INSERTION METER INSTRUCTIONS
 UNPACKING Please open and inspect your package upon receipt. Your package was packed with great care and all the necessary packing materials to arrive to you undamaged. If you do find an item that is broken
PVI 60KW, PVI 82KW, PVI 95KW
 PVI 60KW PVI 82KW PVI 95KW WARRANTY MANUAL Commercial, Grid-Tied Photovoltaic Inverters 2008, Solectria Renewables LLC Subject to Change DOC-020099 rev 024 1 1 Product Warranty & RMA Policy Warranty Policy
Paint/Solvent/Dump Valve and Flow-Through Valve
 Instruction Sheet P/N 08573D Paint/Solvent/Dump Valve and Flow-Through Valve. Description See Figure. The paint/solvent/dump valve is a normally-closed valve that opens to trigger and/or dump coating material.
Model AS-RC3260 TV Cart. Rolling Cart for Audio Mount System & Flat Panel TVs
 Model AS-RC3260 TV Cart Rolling Cart for Audio Mount System & Flat Panel TVs GETTING STARTED Introduction Congratulations on the purchase of your new Helios AS-RC3260 Rolling Cart. For maximum benefit,
tiltaway Bike Carrier Assembly Instructions
 tiltaway Bike Carrier Assembly Instructions Version 150301 To ensure the best service and satisfaction from your Advantage SportsRack tiltaway, please read and follow all instructions, recommendations,
Single Post Caliper Brake VC500
 Single Post Caliper Brake VC500 1 In accordance with Nexen s established policy of constant product improvement, the specifications contained in this manual are subject to change without notice. Technical
I N S TA L L AT I O N
 I N S TA L L AT I O N k i t 9 9 5 4 Fits: all honda 750 shadow aero models Part # Included 509944 1 Skull head cover 1 Cage assembly 1 Backing plate, 3-point base 1 Dual velocity ring (not used) 1 Mounting
781Mini Series Spray Valve
 781Mini Series Spray Valve Operating Manual Electronic pdf files of Nordson EFD manuals are also available at www.nordsonefd.com You have selected a reliable, high-quality dispensing system from Nordson
Analog Durometer Model AD-100
 CHECK LINE BY ELECTROMATIC Analog Durometer Model AD-100 Operating Instructions Table of Contents 1.0 Introduction... 2 1.1 Unpacking 1.2 Complete Kit 2.0 Testing Procedure... 3 3.0 Memory Pointer... 4
Techcon Systems TS5322 TS5322D Adjustable Mini Spool Valve. User Guide
 Techcon Systems TS5322 TS5322D Adjustable Mini Spool Valve User Guide CONTENTS Page number 1. Specifications..... 3 2. Unpacking and Inspection.... 4 3. Description........4 4. Theory of Operation.. 4
COMPANY. Pneumatic Flow Meters Installation, Operating & Maintenance Manual AW-Lake Company. All rights reserved. Doc ID:PNEUMAN082516
 COMPANY Pneumatic Flow Meters Installation, Operating & Maintenance Manual 2016 AW-Lake Company. All rights reserved. Doc ID:PNEUMAN082516 Technical Specifications Measuring Accuracy ±2.5% of full scale
Model 8346/8346CRP Shower & Eye/Face Wash
 INSTALLATION, OPERATION & MAINTENANCE INSTRUCTIONS 1455 Kleppe Lane Sparks, NV 89431-6467 (775) 359-4712 Fax (775) 359-7424 E-mail: haws@hawsco.com website: www.hawsco.com No. 2080177(15) Model 8346/8346CRP
Old Proportioning Pumps
 Repair - Parts Old Proportioning Pumps 311391F For proportioning pumps on Gusmer and Old Graco H-25 and H-XP2 Hydraulic Proportioners. Important Safety Instructions Read all warnings and instructions in
Cyclone II. Cyclone. and OPERATOR S MANUAL IMPORTANT- READ OPERATOR S MANUAL BEFORE USE.
 Cyclone and Cyclone II OPERATOR S MANUAL IMPORTANT- READ OPERATOR S MANUAL BEFORE USE. 4401 Page Ave. Michigan Center, Michigan 49254 800-248-4010 www.adcocorp.com Rev. 0410 Introduction To the Cyclone
PVI 1800/PVI Residential/Commercial Grid-Tied Photovoltaic Inverter WARRANTY MANUAL. Subject to Change REV , Solectria Renewables
 PVI 1800/PVI 2500 WARRANTY MANUAL Residential/Commercial Grid-Tied Photovoltaic Inverter 2009, Solectria Renewables Subject to Change REV 10.09 1 Product Warranty & RMA Policy 1.1 Warranty Policy The Solectria
INSTALLATION CONSTELLATION DRIVING LIGHTS 5009
 INSTALLATION CONSTELLATION DRIVING LIGHTS 5009 PARTS INCLUDED 1 Right Driving Light with Turn Signals 1 Left Driving Light with Turn Signals 1 Installation Component Kit Including: 8 Insulated Male Spades
Female Plug. connecting to Fuel Quantity
 **Ag Diesel Solutions recommends replacing the Transorb/Suppressor Diode before the installation of this module*** Red wire = 12V Constant power. Male Plug connecting to Fuel Quantity Valve Black wire
6200 Series. Specifications. Fluid End Power End Models 6211, 6212, 6221, & 6222 Models 6241 & 6242 Part Material Part Material Part Material
 5.2018.12.i 6200 Series Specifications The Flomore 6200 Series Pump line consists of a series of basic pump options all developed from a modular power unit. All units are pneumatically driven positive
GA-160 Gas Amplifier
 GA-160 Gas Amplifier INSTALLATION, OPERATION & MAINTENANCE MANUAL INTERFACE DEVICES, INC. 230 Depot Road, Milford, CT 06460 Ph: (203) 878-4648, Fx: (203) 882-0885, E-mail: info@interfacedevices.com www.interfacedevices.com
30100 Module Installation Guide L
 30100 Module Installation Guide 1997-2006 12.0L Mack Engines Up to 30% HP Gain 10-20% Fuel Savings AgDieselSolutions.com 1997-2006 Mack 12.0L Engine Module +12 volts red wire. Ground black wire Injector
I N S T R U C T I O N M A N U A L
 I N S T R U C T I O N M A N U A L M E T E R I N G P U M P S LINC84T-13 Series Chemical Metering Pump Pneumatic Plunger T A B L E O F C O N T E N T S Contents - 84T-13 Pump Manual... Page General Specifications...
Mercedes MBE 906/ L & 7.2L Engine Module. Part # Installation Instructions
 1999-2006 Mercedes MBE 906/926 6.4L & 7.2L Engine Module Part # 15000 Installation Instructions 15000_revC 1999-2006 Mercedes 6.4L & 7.2L Engine Module +12 volts red wire. Ground black wire Injector Terminals
Reach ins, Freeezers & Refrigerators Installation & Operation Manual
 Reach ins, Freeezers & Refrigerators Installation & Operation Manual BSR23 BSF23 BSR49 BSF49 BSR72 BSF72 IMPORTANT SAFETY INSTRUCTIONS (SAVE THESE INSTRUCTIONS) Visit us on the web at www.blueairinc.com
Operating Instructions
 Operating Instructions WARNING: Do not attempt to assemble, connect to power source, or operate the Burrell Wrist-Action Shaker without first reading these instructions. Also assure that each person that
MODEL 5120 Tire Repair Station
 MODEL 5120 Tire Repair Station 00-0049 Installation, Operation & Repair Parts Information Branick Industries, Inc. 4245 Main Avenue P.O. Box 1937 Fargo, North Dakota 58103 REV01182017 P/N: 81-0058G CAUTION
ActuLink ABS Module - ABS-MOD-400
 Installation Instructions ActuLink ABS Module - ABS-MOD-400 For more information on the installation and operation of Tuson s towable ABS system, consult the installation and operations manuals for the
Equipped with AEM Dryflow Filter No Oil Required! INSTALLATION INSTRUCTIONS PART NUMBER:
 Equipped with AEM Dryflow Filter No Oil Required! INSTALLATION INSTRUCTIONS PART NUMBER: 21-490B (Blue Finish) 21-490C (Gun Metal Grey Finish) 21-490P (Vacuum Metalized Chrome-VMC) 21-490R (Red Finish)
5874SS/5874PB/5874PBF/VRK5874/PBA6/ PBA6HPB/PBA7 Valve/Push Button
 INSTALLATION, OPERATION & MAINTENANCE INSTRUCTIONS 1455 Kleppe Lane Sparks, NV 89431-6467 (775) 359-4712 Fax (775) 359-7424 E-mail: haws@hawsco.com website: www.hawsco.com No. 2077650(1) 5874SS/5874PB/5874PBF/VRK5874/PBA6/
Angle Grinder Holder
 Angle Grinder Holder Owner s Manual WARNING: Read carefully and understand all ASSEMBLY AND OPERATION INSTRUCTIONS before operating. Failure to follow the safety rules and other basic safety precautions
CHEM-FEED. Engineered Skid Systems. ProSeries. by Blue-White Ind.
 CHEM-FEED Engineered Skid Systems R Single pump model number CFS-1AA-AAAAAA Shown with Chem-Pro C2 pump, sold separately Dual pump model number CFS-2AA-AAAAAA Shown with Flex-Pro A3 pump, sold separately
Installation and Operation Manual
 Industrial Process Installation and Operation Manual Advantage Actuator 2.0 Table of Contents Table of Contents Introduction and Safety...2 Safety message levels...2 User health and safety...2 Transportation
Equipped with AEM Dryflow Filter No Oil Required! INSTALLATION INSTRUCTIONS PART NUMBER DS BMW 335i 3.0L
 Equipped with AEM Dryflow Filter No Oil Required! INSTALLATION INSTRUCTIONS PART NUMBER 21-754DS 2012-2015 BMW 335i 3.0L 1 ITEM NO. PART NUMBER DESCRIPTION QTY. 1 21-2057DK AIR FILTER 1 2 9-0442 TUBE;
Benchmark HD Series Heavy Duty Bench Scale. Installation Manual
 Benchmark HD Series Heavy Duty Bench Scale Installation Manual 93631 Contents 1.0 Introduction... 1 1.1 Benchmark HD Specifications...................................................... 1 2.0 Installation...
Merkur Displacement Pump
 Repair/Parts Merkur Displacement Pump 32792G EN For use with high-performance finishing and coating pumps in hazardous and non-hazardous locations. For professional use only. Important Safety Instructions
THD-2-FM CONTROLAIR VALVE
 THD-2-FM CONTROLAIR VALVE PART NO. S R431000720 ( Part No. P -027121-00101) R431000721 ( Part No. P -027121-00109) SERVICE INFORMATION DESCRIPTION The THD-2-FM CONTROLAIR Valve, designed for marine service,
Zip-Tex Spray Gun. Instructions A. Model psi (0.86 MPa, 8.6bar) Maximum Working Pressure
 Maximum Working Pressure") Instructions Zip-Tex Spray Gun 311159A - For water-based materials only - (Consult your material supplier for Warnings and Application Requirements) Model 249458 125 psi (0.86 MPa, 8.6bar) Maximum Working
Instructions Zip-Tex Spray Gun 311159A - For water-based materials only - (Consult your material supplier for Warnings and Application Requirements) Model 249458 125 psi (0.86 MPa, 8.6bar) Maximum Working
Hose reels for diesel exhaust fluid (DEF)
") Installation and maintenance guide Hose reels for diesel exhaust fluid (DEF) Models 85700-30 and 85700-50 Date of issue January 2015 Form number 404381C Section E35 Page 78C DANGER Read manual prior to
Installation and maintenance guide Hose reels for diesel exhaust fluid (DEF) Models 85700-30 and 85700-50 Date of issue January 2015 Form number 404381C Section E35 Page 78C DANGER Read manual prior to
Waukesha ISR FPO INSTRUCTION MANUAL INTEGRAL SPEED REDUCER SERIES
 INSTRUCTION MANUAL Waukesha ISR INTEGRAL SPEED REDUCER SERIES FORM NO.: REVISION: 08/1997 READ AND UNDERSTAND THIS MANUAL PRIOR TO OPERATING OR SERVICING THIS PRODUCT. FPO 2 SAFETY Warnings, cautions and
INSTALLATION INSTRUCTIONS PART NUMBER:
 Equipped with AEM Dryflow Filter No Oil Required! INSTALLATION INSTRUCTIONS PART NUMBER: 21-8013 2001-2004 CHEVROLET Silverado 2500 HD V8-6.6L DSL C.A.R.B. E.O. # D-670-2 2001-2004 CHEVROLET Silverado
OWNER/OPERATOR MANUAL. Airmotor effective dia. in. 2.5
 MODELS 282050, 282716 & 283513 AIR OPERATED CHASSIS PUMP SERIES A OWNER/OPERATOR MANUAL SPECIFICATIONS Airmotor effective dia. in. 2.5 Airinlet Material outlet 1/4 NPTF 1/4 NPTF Liquid to Air Pressure
Model SMA3-A SLUDGEMASTER
 SERVICE AND OPERATING MANUAL Model SMA3-A SLUDGEMASTER PLEASE NOTE! The photos shown in this manual are for general instruction only. YOUR SPECIFIC MODEL MAY NOT BE SHOWN. Always refer to the parts list
20A Solar Charge Controller
 Item no. 2511 20A Solar Charge Controller User s Manual 20A Solar Charge Controller by Wagan Tech Thank you for purchasing the 20A Solar Charge Controller by Wagan Tech. With normal care and proper treatment
RETSCO, Ltd. Shear Relief Valve Catalog. When Quality Counts, Count on RETSCO, Ltd. Check out our website:
 RETSCO, Ltd. When Quality Counts, Count on RETSCO, Ltd Shear Relief Valve Catalog 3" 2" Check out our website: www.retscoinc.com Quick Reference for Top Level Assembly Part Number ASSEMBLY PART NUMBER
Pump/Manifold Kits. Instructions F ENG. To convert E-Flo 4-Ball Piston Pumps to a different size lower. For professional use only.
 Instructions Pump/Manifold Kits 311611F ENG To convert E-Flo 4-Ball Piston Pumps to a different size lower. For professional use only. See page 2 for a list of available kits. Important Safety Instructions
I N S T R U C T I O N M A N U A L
 I N S T R U C T I O N M A N U A L M E T E R I N G P U M P S LINC84T-17, 18 & 20 Series Chemical Metering Pump Pneumatic Plunger T A B L E O F C O N T E N T S Contents - 84T-17, -18 & -20 Pump Manual...
Kit Part Number:
 Equipped with AEM DRYFLOW Filter No oil required! Kit Part Number: 21-8203 2003-2005 Dodge Ram 5.7L V8 CARB EO # D-392-28 2005 Dodge Powerwagon Hemi CARB EO # D-392-28 Brute Force Intake Systems that are
Circulation Kits for CP Pumps
 Instruction Sheet P/N 08000C Description This instruction sheet covers two circulation kits for CP Pumps: Stainless steel circulation kit, with Viton O-rings Stainless steel circulation kit, with EPR O-rings
INSTRUCTIONS Refillable, reusable. Extra versatile. Pressurized by free air
 SURE SHOT SPRAYERS INSTRUCTIONS Refillable, reusable. Extra versatile. Pressurized by free air TOP LOAD WITH LIGHT LIQUIDS PRESSURIZE WITH AIR CHUCK SPRAY ANYWHERE MODEL A 32 OZ. DIRECTIONS FOR OPERATING
Power Float Manifold. Installation and Operations Manual Module 11A
 Power Float Manifold Installation and Operations Manual Module 11A 2/14 Table of Contents 1 Features 3 2 Functional Purpose 3 3 4 Specifications System Installation 3 4 4.1 Hydraulic Connection 4 4.2 Electric
INSTALLATION CLAMP-ON FORK MOUNTED DRIVING LIGHTS 5015
 CLAMP-ON 5015 PARTS INCLUDED 2 Driving Lights 2 Side Mount Clamps-43mm/49mm 1 Hardware Kit Including: 2 49mm Spacers 4 43mm Spacers 2 Pivot Dome Washers 2 3/8-16 Serrated Hex Nut 1 Wiring Kit for Driving
LUBRICATOR GUN INSTRUCTIONS-PARTS LIST. 10,000 psi (700 bar) Maximum Delivery Pressure. Detachable-type
 Maximum Delivery Pressure. Detachable-type") INSTRUCTIONS-PARTS LIST 306 460 INSTRUCTIONS This manual contains important warnings and information. READ AND KEEP FOR REFERENCE. Rev. E Supercedes D Detachable-type LUBRICATOR GUN 10,000 psi (700 bar)
INSTRUCTIONS-PARTS LIST 306 460 INSTRUCTIONS This manual contains important warnings and information. READ AND KEEP FOR REFERENCE. Rev. E Supercedes D Detachable-type LUBRICATOR GUN 10,000 psi (700 bar)
15100 Module Installation Guide Mercedes EPA07 w/dpf
 15100 Module Installation Guide 2007-2009 Mercedes EPA07 w/dpf 7.2L Engines Up to 30% HP Gain 10-20% Fuel Savings AgDieselSolutions.com 2007-2009 Mercedes 7.2L Engine Module +12 volts red wire. Ground
20250 Module Installation Guide
 20250 Module Installation Guide 2013.5-2017 RAM 6.7L Cummins Up to 90HP Gain 1-3 MPG Fuel Savings AgDieselSolutions.com Adjustable switch connector Power +12 volts (Red wire) & Ground (Black wire) Injector
Installation Instructions
 Installation Instructions Individual Built-In Wall Shower with Concealed Supplies Table of Contents Pre-Installation Information...2...3 Repair parts...4 Metering Valve Troubleshooting...5 Cleaning and
Owner s Manual & Safety Instructions
 Owner s Manual & Safety Instructions Save Save This This Manual Keep Keep this this manual manual for for the the safety safety warnings warnings and and precautions, assembly, assembly, operating, inspection,
I N S TA L L AT I O N
 I N S TA L L AT I O N 5008 fits: H-D: '80-Up Electra glide, tour glide, road king, road glide or street glide PartS Included 1 Right Fork Mount Assembly 1 Left Fork Mount Assembly 2 H3 Driving Light Assemblies
Cleaning System. Instructions/Parts A
 Instructions/Parts Cleaning System 310623A 234533 For use with Multi-Orifice Linear Streaming Applicator (MOLSA) to apply automotive Liquid Applied Sound Deadener (LASD) materials. 100 psi (0.68 MPa, 6.8
Pro Shot Grease Dispense Valve
 Instructions Parts List Pro Shot Grease Dispense Valve 309032J For high pressure grease dispense. 8000 psi (55 MPa, 552 bar) Maximum Working Pressure Model No. 242055, Series B, 1/4 npt Fluid Inlet Model
advanced FLOW engineering Instruction Manual P/N: / Make: BMW Model: Z3 (E36/37) Year: Engine: L6-2.8L
 Year: Engine: L6-2.8L") advanced FLOW engineering Instruction Manual P/N: 51-11951 / 54-11951 Make: BMW Model: Z3 (E36/37) Year: 1997-1999 Engine: L6-2.8L Please read the entire instruction manual before proceeding. Ensure all
advanced FLOW engineering Instruction Manual P/N: 51-11951 / 54-11951 Make: BMW Model: Z3 (E36/37) Year: 1997-1999 Engine: L6-2.8L Please read the entire instruction manual before proceeding. Ensure all