780 Professional Drive N. Shreveport, LA Phone (318) Fax (318) Polaris RZR TURBO XP
|
|
|
- Horatio Thomas
- 6 years ago
- Views:
Transcription
1 780 Professional Drive N. Shreveport, LA Phone (318) Fax (318) Polaris RZR TURBO XP Read before Installation This product is designed for use on ATVs and/or RUVs to increase ground clearance and fender clearance. Purchasers should be aware that use of this product may increase the frequency of required maintenance, part wear, and will raise the center of gravity on your ATV and/or RUV, increasing risk of roll-over, injury and death on all types of terrain. It is your responsibility to always inform other operators and passengers of this vehicle about the added risks. High Lifter Products, products are designed to best fit users ATV/RUV under stock conditions. Adding, modifying, or fabricating any OEM or aftermarket parts will void warranty. High Lifter Products, products could interfere with other aftermarket accessories. If the user has aftermarket products on machine, contact High Lifter Products to verify that they will work together. Adding aftermarket suspension components and/or more aggressive tires can cause breakage of other OEM driveline components such as differentials, axles or drive shafts. We recommend that wider tires and/or wheel spacers be used to achieve a wider stance and to improve stability of the ATV and/or RUV. Riders should be advised that the handling characteristics of a taller ATV and/or RUV are different and require extra care when riding, particularly on side hills or off-camber situations. If you further raise the center of gravity by adding taller tires, heavy loads to racks or seats, or by any other means, the ATV and/or RUV must be operated with even more care, at slower speeds and on relatively flat ground. All turns should be done at a slow speed, even on level ground. Operation of an ATV and/or RUV with or without modified suspension components, while or shortly after consuming alcohol or drugs, subjects the rider to the risk of serious bodily harm or possible death. This risk is compounded if the rider does not wear an approved helmet and other safety gear. High Lifter urges that all approved safety gear be worn when riding an ATV and/or RUV as a driver or passenger. By purchasing and installing High Lifter Products, products, user agrees that should damages occur, High Lifter Products will not be held responsible for loss of time, use, labor fees, replacement parts, or freight charges. High Lifter Products will not be held responsible for any direct, indirect, incidental, special, or consequential damages that result from any product purchased from High Lifter Products. The total liability of seller to user for all damages, losses, and causes of action, shall not exceed the total purchase price paid for the product that gives rise to the claim. Dealers and other Installers You are responsible for informing your customer and end user of the information contained above and the increased potential hazards of operating an ATV and/or RUV equipped with modified suspension components. If you install any suspension modifying components, it is your responsibility to also install the warning label prominently in view of the driver and in prominent view of the driver and passenger on RUVs and multi-passenger ATVs. They should also be instructed to notify anyone operating the vehicle, as well as any passengers, that said vehicle is modified. As discussed above, it is critically important that they be instructed in the need for slower speed operation, regardless of terrain, after this lift kit is installed.


2 Parts Diagrams


3 Front Lift Installation 1. Place transmission in park. Place jack under center of front end and lift until front wheels clear the ground. Be careful to properly secure and support so that A-arms and shocks can droop to full extension. 2. Remove front wheels. 3. In order to install the front lift brackets you will need to unbolt the radiator brackets, front plastic bumper, unplug the fan wires and reroute the fan vent line until the brackets are installed. 4. Unbolt the upper shroud. 5. Disconnect the bracket that secures the regulator. 6. Remove the upper radiator mounting brackets. 7. Unplug the radiator fan from the harness.


4 8. Disconnect the two lines on the radiator filler bottle and reroute the fan vent lines. 9. You will need to cut the zip ties that secure the headlight wires. Unplug the wires from the lights. 10. Next remove the front plastic bumper. 11. Disconnect the top of the front shocks.


5 12. Next insert the long front lift plate in front of the front cross member. Insert it through the hood opening. 13. Insert the 10 x 70mm bolt through the bracket, placing a 10mm washer between the bracket and the shock mount. 14. Next insert a large spacer in the stock shock mount position and push the 10x70mm bolt through. Repeat steps for the opposite side at this time.


6 15. Insert the front slotted bracket on the backside of the front cross member. 16. Connect the bracket to the frame by placing it on the bolts and fasten it using the 10mm lock nuts provided. 17. Connect the top of the shock to the lift plates. Insert the 10 x 70mm hex bolt through from the front. Place a small front shock spacer between the shock eyelet and the lift plate. Fasten it tight using a 10mm lock nut provided.
7 18. Repeat steps for opposite side and tighten all nuts and bolts. 19. Reconnect the all wires, radiator brackets, vent lines, and factory plastic bumper. 20. Place wheels back on the ATV, torque all lugs to factory specifications. NOTE: Double check all bolts to verify they are tight. Loose bolts come off and can cause a crash and serious injury or death.


8 Rear Lift Installation 1. Place UTV transmission in park. Lift the rear of the RZR until the rear trailing arms drop to full extension and tires leave the ground. 2. You will need to remove the rear wheels 3. You will need to loosen the rear plastic bed so that you can lift it up to slide the rear brackets in place. NOTE: For installation purposes we removed the bed so some of our images could be illustrated better. 4. You may need to remove the air intake hose for clearance while installing the lift brackets. 5. Disconnect the top of the rear shock from the shock tabs. NOTE: When you reconnect the top of the shock to the lift bracket, you may need to compress the eyelet to allow it to fit into the bracket with the spacer.


9 6. Now that you have disconnected the top of the shock from the frame, you will need to insert the rear lift bracket through the plastic onto the frame. 7. Once you have the bracket in place connect it to the stock shock mounting tabs using the 12x70mm bolt and 12mm washer provided in the kit. Make sure that you insert the 12mm washer between the shock mounting tab and the bracket. 8. Next, place a spacer where between the shock mount tabs. Then, insert another 12mm washer between the shock tab and the bracket. 9. Push the bolt completely through, but you do not need to attach the 12mm lock nut at this time.


10 10. Next you need to attach the rear lift plate. Insert a 12x70mm hex bolt through the bracket. 11. Insert the rear lift plate into the lift bracket and hook the bolt. 12. Push the rear lift plate all the way up touching the frame and insert a 12x70mm hex bolt. 13. Now loosely attach the 12mm lock nuts to all bolts.


11 14. Now connect the top of the shock to the lift brackets by inserting another 12x70mm bolt through the bracket. Insert the rear shock spacer between the shock eyelet and bracket. Note: You may need to compress the shock eyelet to allow the shock and spacer to fit in between the bracket. 15. Fasten tight using a 12mm lock nut. 16. Tighten all nuts and bolts. 17. Repeat steps for opposite side. 18. Place plastic back on the RZR. If you are going to install the Logo plate make sure that you read the remaining instructions before you reattach the plastic.


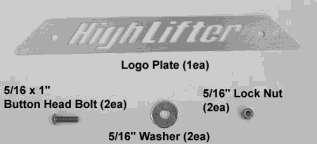
12 High Lifter Name Plate Installation 1. In the rear you will need to remove the plastic. 2. The arrows are pointing to the bolts that you will need to remove to all the plastic to be removed.


13 3. Place the High Lifter logo badge over the plastic honey comb opening. You will need to bend the plate to fit the contour of the plastic. 4. Using the two 5/16 x 1 button head bolts, 5/16 washers and 5/16 lock nuts connect the plate.


14 5. Place the plastic back on the RZR.

15 High Lifter Lifetime Warranty From the beginning, High Lifter has engineered and manufactured some of the toughest, most durable products on the market. That s why this product comes with a Lifetime Warranty. It s our promise that High Lifter will never let you down. The Lifetime Warranty covers products sold to the original purchaser only and is not transferable. The term of the warranty is for the lifetime of the vehicle in question. Normal wear and tear items and finishes, such as, but not limited to: Heim joints, tie rod ends, ball joints, bearings, seals, bushings, bushing sleeves, zinc plating, powder coating, or chipping and discoloration of any finish is not covered. High Lifter will ship the replacement product after the returned product has been inspected by High Lifter staff. The warranty shall not include claims for damages, installation time or labor charges, economic losses, inconvenience, transportation, towing, down time, direct or indirect or consequential damages or delay resulting from any defect. The warranty does not apply to products that have been improperly applied or improperly installed. Making a warranty claim 1. All claims must be accompanied by the part and the original sales receipt or other acceptable proof of purchase from the original owner. 2. All warranties must be accompanied with a Return Merchandise Authorization (RMA) number. (Contact High Lifter at or for an RMA number) 3. When shipping the damaged product: a. Write the RMA number on the outside of the box. b. Also include the RMA number, proof of purchase and any notes inside the box. c. Please keep your tracking number and shipment information. 4. The customer is responsible for shipping the product to High Lifter--return shipping within the lower 48 states will be paid by High Lifter products. With all warranty claims, only standard shipping services apply. 5. High Lifter will process your order within 24 business hours of receiving the returned item. 6. Ship to: High Lifter Products, 780 Professional Drive North, Shreveport, Louisiana 71105
780 Professional Drive N. Shreveport, LA Phone (318) Fax (318)
 Fax (318)") 780 Professional Drive N. Shreveport, LA 71105 Phone (318)-524-2270 Fax (318)-524-2297 www.highlifter.com Polaris RZR 570 Lift Kit Installation Instructions Read before Installation This product is designed
780 Professional Drive N. Shreveport, LA 71105 Phone (318)-524-2270 Fax (318)-524-2297 www.highlifter.com Polaris RZR 570 Lift Kit Installation Instructions Read before Installation This product is designed
780 Professional Drive N. Shreveport, LA Phone (318) Fax (318) Honda Lift Kit Installation Instructions
 Fax (318) Honda Lift Kit Installation Instructions") 780 Professional Drive N. Shreveport, LA 71105 Phone (318)-524-2270 Fax (318)-524-2297 www.highlifter.com Honda Lift Kit Installation Instructions Read before Installation This product is designed for
780 Professional Drive N. Shreveport, LA 71105 Phone (318)-524-2270 Fax (318)-524-2297 www.highlifter.com Honda Lift Kit Installation Instructions Read before Installation This product is designed for
780 Professional Drive N. Shreveport, LA Phone (318) Fax (318) Honda 420 Installation Instructions
 Fax (318) Honda 420 Installation Instructions") 780 Professional Drive N. Shreveport, LA 71105 Phone (318)-524-2270 Fax (318)-524-2297 www.highlifter.com Honda 420 Installation Instructions Read before Installation This product is designed for use on
780 Professional Drive N. Shreveport, LA 71105 Phone (318)-524-2270 Fax (318)-524-2297 www.highlifter.com Honda 420 Installation Instructions Read before Installation This product is designed for use on
NOTE: IF RUNNING FACTORY RANGER 900 ALUMINUM WHEELS OR AFTERMARKET ALUMINUM WHEELS THEN SPACERS ARE NOT REQUIRED.
 780 Professional Dr. North, Shreveport, LA. 318-524-2270 Polaris 900 XP Ranger Lift Kit Installation Instructions Read before Installation This product is designed for use on ATVs and/or RUVs to increase
780 Professional Drive N. Shreveport, LA Phone (318) Fax (318) Lift Kit Installation Instructions
 Fax (318) Lift Kit Installation Instructions") 780 Professional Drive N. Shreveport, LA 71105 Phone (318)-524-2270 Fax (318)-524-2297 Yamaha Grizzly 700 Lift Kit Lift Kit Installation Instructions Read before Installation This product is designed for
780 Professional Drive N. Shreveport, LA 71105 Phone (318)-524-2270 Fax (318)-524-2297 Yamaha Grizzly 700 Lift Kit Lift Kit Installation Instructions Read before Installation This product is designed for
780 Professional Drive N. Shreveport, LA Phone (318) Fax (318) Suzuki King Quad 750/500Lift Kit Installation Instructions
 Fax (318) Suzuki King Quad 750/500Lift Kit Installation Instructions") 780 Professional Drive N. Shreveport, LA 71105 Phone (318)-524-2270 Fax (318)-524-2297 Suzuki King Quad 750/500Lift Kit Installation Instructions Read before Installation This product is designed for use
780 Professional Drive N. Shreveport, LA 71105 Phone (318)-524-2270 Fax (318)-524-2297 Suzuki King Quad 750/500Lift Kit Installation Instructions Read before Installation This product is designed for use
FRONT LIFT INSTALLATION *When referring to left and right positions during the installation process, it is from the seated position*
 1 Parts Diagram 2 FRONT LIFT INSTALLATION *When referring to left and right positions during the installation process, it is from the seated position* 1. Place UTV transmission in park. Place jack under
780 Professional Drive N. Shreveport, LA Phone (318) Fax (318)
 Fax (318)") 780 Professional Drive N. Shreveport, LA 71105 Phone (318)-524-2270 Fax (318)-524-2297 www.highlifter.com KLKM610-00 Read before Installation This product is designed for use on ATVs and/or RUVs to increase
780 Professional Drive N. Shreveport, LA 71105 Phone (318)-524-2270 Fax (318)-524-2297 www.highlifter.com KLKM610-00 Read before Installation This product is designed for use on ATVs and/or RUVs to increase
(318) (318) & 800 RANGER IRS
 (318) & 800 RANGER IRS") 780 Professional Drive N. Shreveport, LA 71105 Phone (318)-524-2270 Fax (318)-524-2297 Polaris 700 & 800 RANGER IRS Models Lift Kit Installation Instructions Read before Installation This product is designed
780 Professional Drive N. Shreveport, LA 71105 Phone (318)-524-2270 Fax (318)-524-2297 Polaris 700 & 800 RANGER IRS Models Lift Kit Installation Instructions Read before Installation This product is designed
NOTE: IF RUNNING FACTORY RANGER ALUMINUM WHEELS OR AFTERMARKET ALUMINUM WHEELS THEN SPACERS ARE NOT REQUIRED.
 780 Professional Dr. North, Shreveport, LA. 318-524-2270 Polaris Ranger Lift Kit Installation Instructions PLK1000R-51 Read before Installation This product is designed for use on ATVs and/or RUVs to increase
780 Professional Drive N. Shreveport, LA Phone (318) Fax (318) Kawasaki Mule Pro FXT
 Fax (318) Kawasaki Mule Pro FXT") 780 Professional Drive N. Shreveport, LA 71105 Phone (318)-524-2270 Fax (318)-524-2297 www.highlifter.com Kawasaki Mule Pro FXT Read before Installation This product is designed for use on ATVs and/or
780 Professional Drive N. Shreveport, LA 71105 Phone (318)-524-2270 Fax (318)-524-2297 www.highlifter.com Kawasaki Mule Pro FXT Read before Installation This product is designed for use on ATVs and/or
Max Clearance Polaris RZR 900 S 60 Rear Lower Arched Control Arm Kit
 780 Professional Drive N. Shreveport, LA 71105 Phone (318)-524-2270 Fax (318)-524-2297 Max Clearance Polaris RZR 900 S 60 Rear Lower Arched Control Arm Kit Read before Installation This product is designed
Honda 700 Pioneer Lift Kit
 780 Professional Drive N. Shreveport, LA 71105 Phone (318)-524-2270 Fax (318)-524-2297 www.highlifter.com Honda 700 Pioneer Lift Kit Read before Installation This product is designed for use on ATVs and/or
780 Professional Dr. North, Shreveport, LA Polaris Ranger Lift Kit Installation Instructions CLKCMX3-02
 780 Professional Dr. North, Shreveport, LA. 318-524-2270 Polaris Ranger Lift Kit Installation Instructions CLKCMX3-02 Read before Installation This product is designed for use on ATVs and/or RUVs to increase
780 Professional Drive N. Shreveport, LA Phone (318) Fax (318)
 Fax (318)") 780 Professional Drive N. Shreveport, LA 71105 Phone (318)-524-2270 Fax (318)-524-2297 Yamaha YXZ 1000 Lift Kit Installation Instructions Read before Installation This product is designed for use on ATVs
780 Professional Drive N. Shreveport, LA 71105 Phone (318)-524-2270 Fax (318)-524-2297 Yamaha YXZ 1000 Lift Kit Installation Instructions Read before Installation This product is designed for use on ATVs
Max Clearance Polaris Sportsman Arched A-arm Kit
 780 Professional Drive N. Shreveport, LA 71105 Phone (318)-524-2270 Fax (318)-524-2297 Max Clearance Polaris Sportsman Arched A-arm Kit Read before Installation This product is designed for use on ATVs
780 Professional Drive N Shreveport, LA Phone (318) Polaris Ranger RZR 1000 XP Upper Radius Bars
 Polaris Ranger RZR 1000 XP Upper Radius Bars") 780 Professional Drive N Shreveport, LA 71105 Phone (318)524-2270 Polaris Ranger RZR 1000 XP Upper Radius Bars Read before Installation This product is designed for use on ATVs and/or RUVs to increase
780 Professional Drive N Shreveport, LA 71105 Phone (318)524-2270 Polaris Ranger RZR 1000 XP Upper Radius Bars Read before Installation This product is designed for use on ATVs and/or RUVs to increase
780 Professional Drive N. Shreveport, LA Phone (318) Fax (318) Lift Kit Installation Instructions
 Fax (318) Lift Kit Installation Instructions") 780 Professional Drive N. Shreveport, LA 71105 Phone (318)-524-2270 Fax (318)-524-2297 www.highlifter.com Polaris Mid-Size 570 RANGER Models Lift Kit Installation Instructions Read before Installation
780 Professional Drive N. Shreveport, LA 71105 Phone (318)-524-2270 Fax (318)-524-2297 www.highlifter.com Polaris Mid-Size 570 RANGER Models Lift Kit Installation Instructions Read before Installation
780 Professional Drive N. Shreveport, LA Phone (318) Fax (318) Kawasaki Teryx 4-Seater
 Fax (318) Kawasaki Teryx 4-Seater") 780 Professional Drive N. Shreveport, LA 71105 Phone (318)-524-2270 Fax (318)-524-2297 Kawasaki Teryx 4-Seater Read before Installation This product is designed for use on ATVs and/or RUVs to increase
780 Professional Drive N. Shreveport, LA 71105 Phone (318)-524-2270 Fax (318)-524-2297 Kawasaki Teryx 4-Seater Read before Installation This product is designed for use on ATVs and/or RUVs to increase
Max Clearance Honda Front Lower Arched Control Arm Kit
 780 Professional Drive N. Shreveport, LA 71105 Phone (318)-524-2270 Fax (318)-524-2297 Max Clearance Honda Front Lower Arched Control Arm Kit Read before Installation This product is designed for use on
Polaris Ranger RZR 1000 XP Radius Bars PSRA-RZR1
 780 Professional Drive N Shreveport, LA 71105 Phone (318)524-2270 Polaris Ranger RZR 1000 XP Radius Bars PSRA-RZR1 Read before Installation This product is designed for use on ATVs and/or RUVs to increase
SPORTSMAN 800/500 INSTALLATION NOTES FOR 2011 MODELS:
 780 Professional Drive N Shreveport, LA 71105 Phone: 318-524-2270 Polaris Sportsman Lift Kit Read before Installation This product is designed for use on ATVs and/or RUVs to increase ground clearance and
780 Professional Drive N. Shreveport, LA Phone (318) Fax (318) KLKM
 Fax (318) KLKM") 780 Professional Drive N. Shreveport, LA 71105 Phone (318)-524-2270 Fax (318)-524-2297 www.highlifter.com KLKM3000-00 Read before Installation This product is designed for use on ATVs and/or RUVs to increase
780 Professional Drive N. Shreveport, LA 71105 Phone (318)-524-2270 Fax (318)-524-2297 www.highlifter.com KLKM3000-00 Read before Installation This product is designed for use on ATVs and/or RUVs to increase
Suzuki 500 (98+) Lift Kit Installation Instructions
 Lift Kit Installation Instructions") 780 Professional Drive N. Shreveport, LA 71105 Phone (318)-524-2270 Fax (318)-524-2297 www.highlifter.com Suzuki 500 (98+) Lift Kit Installation Instructions Read before Installation This product is designed
780 Professional Drive N. Shreveport, LA 71105 Phone (318)-524-2270 Fax (318)-524-2297 www.highlifter.com Suzuki 500 (98+) Lift Kit Installation Instructions Read before Installation This product is designed
4. Remove the cotter pin that secures the castle nut to the axle. Once you have done this remove the castle nut and pull off the hub/rotor assembly.
 780 Professional Drive N. Shreveport, LA 71105 Phone (318)-524-2270 Fax (318)-524-2297 Max Clearance Honda Pioneer 1000 Front Forward Arched Control Arm Kit Read before Installation This product is designed
2. Remove front wheels.
 1 PARTS DIAGRAM 2 Installation Instructions: (PASSENGER SIDE) 1. Place jack under center of RUV front end and lift until front wheels clear the ground. Be careful to support the RUV properly so that it
This lift allows you to convert from lifted to unlifted positions!
 780 Professional Drive N. Shreveport, LA 71105 Phone (318)-524-2270 Fax (318)-524-2297 Polaris Ranger RZR 900 XP This lift allows you to convert from lifted to unlifted positions! Read Before Installation
It is your responsibility to always inform other operators and passengers of this vehicle and about the added risks.
 780 Professional Drive N. Shreveport, LA 71105 Phone (318)-524-2270 Fax (318)-524-2297 www.highlifter.com Read before Installation This product is designed for use on RUVs for extreme mud riding conditions.
Polaris RZR 900 XP Arched Trailing Arms PSATA-RZR9
 780 Professional Drive N Shreveport, LA 71105 Phone (318)524-2270 Polaris RZR 900 XP Arched Trailing Arms PSATA-RZR9 Read Before Installation This product is designed for use on ATVs and/or RUVs to increase
Arctic Cat Wild Cat Upper Radius Bars
 780 Professional Drive N Shreveport, LA 71105 Phone (318)524-2270 Arctic Cat Wild Cat Upper Radius Bars Read Before Installation This product is designed for use on ATVs and/or RUVs to increase ground
Max Clearance Arctic Cat Forward Front Upper & Lower Arched Control Arm Kit
 780 Professional Drive N. Shreveport, LA 71105 Phone (318)-524-2270 Fax (318)-524-2297 Max Clearance Arctic Cat Forward Front Upper & Lower Arched Control Arm Kit The Max Clearance Control Arm Kit is designed
Suzuki 700 Lift Kit Lift Kit Installation Instructions
 High Lifter Products, Inc. 318-524-2270 780 N Professional Drive 318-524-2297 Shreveport, LA 71105 Suzuki 700 Lift Kit Lift Kit Installation Instructions Read Before Installation This product is designed
INSTALLATION INSTRUCTIONS *When referring to left and right positions during the installation process, it is from the seated position*
 1 PARTS DIAGRAMS 2 3 4 INSTALLATION INSTRUCTIONS *When referring to left and right positions during the installation process, it is from the seated position* FRONT LIFT INSTALLATION 1. Place a jack under
It is your responsibility to always inform other operators and passengers of this vehicle and about the added risks.
 780 Professional Drive N. Shreveport, LA 71105 Phone (318)-524-2270 Fax (318)-524-2297 www.highlifter.com Read before Installation This product is designed for use on RUVs for extreme mud riding conditions.
High Lifter Products, Inc.
 High Lifter Products, Inc. Phone 318-524-2270 780 N Professional Dr Fax 318-524-2297 Shreveport, LA 71105 www.highlifter.com Proseries Polaris Forward A-arm Kit The Proseries A-arm kit is designed to permit
It is your responsibility to always inform other operators and passengers of this vehicle and about the added risks.
 780 Professional Drive N. Shreveport, LA 71105 Phone (318)-524-2270 Fax (318)-524-2297 www.highlifter.com Read before Installation This product is designed for use on ATVs and/or RUVs for extreme mud riding
780 Professional Drive N. Shreveport, LA Phone (318) Fax (318)
 Fax (318)") 780 Professional Drive N. Shreveport, LA 71105 Phone (318)-524-2270 Fax (318)-524-2297 Read before Installation This product is designed for use on ATVs and/or RUVs for extreme mud riding conditions. Purchasers
780 Professional Drive N. Shreveport, LA 71105 Phone (318)-524-2270 Fax (318)-524-2297 Read before Installation This product is designed for use on ATVs and/or RUVs for extreme mud riding conditions. Purchasers
Max Clearance Polaris Ranger 900 XP Front Forward Arched Control Arm Kit
 780 Professional Drive N. Shreveport, LA 71105 Phone (318)-524-2270 Fax (318)-524-2297 Max Clearance Polaris Ranger 900 XP Front Forward Arched Control Arm Kit The Max Clearance Control Arm Kit is designed
Verify, and adjust if necessary, centering of Rack and Pinion before installing.
 Verify, and adjust if necessary, centering of before installing. measurement 1: face of Tie Rod End inside of 1. Measure distance from inside of Rack and Pinion to face of Tie Rod End. 2. Measure distance
Thank You For Choosing. INSTALLATION INSTRUCTIONS 3-5 Adjustable Lift Kit: for Polaris RZR XP (Passenger) (Driver)
 (Driver)") 2753 Michigan Road Madison, Indiana 47250 855-743-3427 INSTALLATION INSTRUCTIONS 3-5 Adjustable Lift Kit: for Polaris RZR XP 1000 Item Description Qty A Front Bracket 1 B Rear Bracket, Passenger 1 C Rear
2753 Michigan Road Madison, Indiana 47250 855-743-3427 INSTALLATION INSTRUCTIONS 3-5 Adjustable Lift Kit: for Polaris RZR XP 1000 Item Description Qty A Front Bracket 1 B Rear Bracket, Passenger 1 C Rear
3 Lift Kit: for Polaris General
 INSTALLATION INSTRUTIONS 740B lifty Drive Madison, Indiana 47250 812-574-7777 3 Lift Kit: for Polaris General Item Description Qty A Rear Shock Bracket Brace 1 B Shock Bracket 1 Rear Shock Bracket 2 D
Carrier Bearing. Thank You For Choosing INSTALLATION INSTRUCTIONS. (installation performed on Polaris RZR XP Turbo) Need help with your installation?
 Need help with your installation?") 2753 Michigan Road Madison, Indiana 47250 812-574-7777 INSTALLATION INSTRUCTIONS Carrier Bearing (installation performed on Polaris RZR XP Turbo) Read instructions and view illustrations before beginning.
2753 Michigan Road Madison, Indiana 47250 812-574-7777 INSTALLATION INSTRUCTIONS Carrier Bearing (installation performed on Polaris RZR XP Turbo) Read instructions and view illustrations before beginning.
Verify, and adjust if necessary, centering of Rack and Pinion before installing.
 Verify, and adjust if necessary, centering of Rack and Pinion before installing. 1. Measure distance from inside of Rack and Pinion to face of Tie Rod End. 2. Measure distance from face of Tie Rod End
Honda Pioneer Lift Kit
 740B Clifty Drive Madison, Indiana 47250 812-574-7777 INSTALLATION INSTRUCTIONS Honda Pioneer Lift Kit Item Description Qty A Bracket 1 B Right Bracket 1 C Left Bracket 1 D Top Plates 2 E Radiator Reserve
3 Lift Kit: for Polaris General
 INSTALLATION INSTRUCTIONS 2753 Michigan Road Madison, Indiana 47250 855-743-3427 3 Lift Kit: for Polaris General Item Description Qty A Rear Shock Bracket Brace 1 B Front Shock Bracket 1 C Rear Shock Bracket
Thank You For Choosing. INSTALLATION INSTRUCTIONS High Clearance Front A-Arms for Honda Pioneer 1000
 740 Clifty Drive Madison, Indiana 47250 812-574-7777 INSTLLTION INSTRUCTIONS High Clearance Front -rms for Honda Pioneer 1000 Item C D Description Upper -rm, Passenger Lower -rm, Passenger Upper -rm, Driver
Item Description Qty. C Mounting Bracket Support 1 D* ECU Mount 1
 2753 Michigan Road Madison, Indiana 47250 855-743-3427 INSTALLATION INSTRUCTIONS Power Steering Kit: for Can-Am ATV s Item Description Qty A Motor Mount 1 B Mounting Bracket Side Support 1 Item Description
See following page if provided Toggle Switch is being installed.
 2753 Michigan Road Madison, Indiana 47250 855-743-3427 INSTALLATION INSTRUCTIONS LED Wiring (LB3) Wire Harness To LED: Connect to plug on light. To Battery, Positive (+) Power: To Battery, Negative (-)
8:00am - 9:00pm EST M-Th 8:00am - 7:00pm EST Friday 9:00am - 2:00pm EST Saturday
 740 lifty rive Madison, Indiana 47250 812-574-7777 INSTALLATION INSTRUTIONS Power Steering Kit for Polaris Sportsman XP 850 3x M10 x 25mm Lg. FHS 6x M8 Nylock Nut Item A E escription EU Mount Motor Mount
6 Lift Kit - Kawasaki Teryx4
 2753 Michigan Road Madison, Indiana 47250 855-743-3427 INSTALLATION INSTRUCTIONS 6 Lift Kit - Kawasaki Teryx4 1 Spacers are required if running stock Wheels Driver C A D B Passenger Item Description A
Thank You For Choosing. INSTALLATION INSTRUCTIONS Power Steering Kit for Honda Pioneer 500. Need help with your installation?
 740B Clifty Drive Madison, Indiana 47250 812-574-7777 INSTALLATION INSTRUCTIONS Power Steering Kit for onda Pioneer 500 Item Description A Motor Mount B Support Plate C ECU Mount Item Description D Upper
Thank You For Choosing. INSTALLATION INSTRUCTIONS Power Steering Kit for Polaris Ranger 570 B C. Need help with your installation?
 2753 Michigan Road Madison, Indiana 47250 855-743-3427 INSTALLATION INSTRUCTIONS Power Steering Kit for Polaris Ranger 570 Item A B C D E F G Description Motor Mount Upper Shaft Lower Shaft ECU Mount Connectors
" CHEVY / GMC WD BASIC KIT
 84302 2007-2013 6" CHEVY / GMC 1500 4WD BASIC KIT 100% Bolt On 6 Spindle Kit Front Differential Is Dropped A Full 6 To Maintain Proper CV Axle Angles Impact Struts To Distribute Front Suspension Impact
PARTS DIAGRAM INSTALLATION INSTRUCTIONS
 SBLK-RZR1-R 1 PARTS DIAGRAM INSTALLATION INSTRUCTIONS (LH) - LEFT HAND (RH) - RIGHT HAND 1. First, you need to preassemble the new heavy duty High Lifter sway bar link. 2. If not already done, fasten the
Honda Pioneer Power Steering
 INSTALLATION INSTRUCTIONS 740B Clifty Drive Madison, Indiana 47250 812-574-7777 Honda Pioneer Power Steering Item Description Qty A Motor Mount 1 B Support Plate 1 C ECU Plate 1 Item Description Qty D
Yamaha Viking Lift Kit
 INSTLLTION INSTRUCTIONS 740 Clifty Drive Madison, Indiana 47250 812-574-7777 Yamaha Viking Lift Kit Item Description Qty Front racket Fore 1 Front racket ft 1 C Rear rackets 2 D Relocator racket 1 D C
INSTALLATION INSTRUCTIONS FOR FORD 4WD SUPER DUTY F /2 COIL SPRING SUSPENSION SYSTEM
 INSTALLATION INSTRUCTIONS FOR 2005-07 FORD 4WD SUPER DUTY F250-350 4 1/2 COIL SPRING SUSPENSION SYSTEM Requires the following parts (sold separately) for a complete installation: KIT PART NUMBER (6345
Gen 2 Portal Gear Hubs for Polaris Ranger Crew 570/900
 2753 Michigan Road Madison, Indiana 47250 855-743-3427 INSTALLATION INSTRUCTIONS Gen 2 Portal Gear Hubs for Polaris Ranger Crew 570/900 A Item Description Qty A Rotor 4 B Gear Box, L 2 C Gear Box, R 2
Power Steering Kit: for Arctic Cat Wildcat Trail
 2753 Michigan Road Madison, Indiana 47250 855-743-3427 INSTLLTION INSTRUCTIONS Power Steering Kit: for rctic Cat Wildcat Trail Item B C D R S Description Motor Mount Stiffener Support Plate Upper Shaft
Thank You For Choosing. INSTALLATION INSTRUCTIONS Power Steering Kit: for Suzuki KingQuad. (kit contents continue on following page)
") 2753 Michigan Road Madison, Indiana 47250 855-743-3427 INSTALLATION INSTRUCTIONS Power Steering Kit: for Suzuki KingQuad Item F G H M Description ECU racket Lower Shaft Upper Shaft Mounting racket Wiring
2753 Michigan Road Madison, Indiana 47250 855-743-3427 INSTALLATION INSTRUCTIONS Power Steering Kit: for Suzuki KingQuad Item F G H M Description ECU racket Lower Shaft Upper Shaft Mounting racket Wiring
INSTALLATION INSTRUCTIONS FOR FORD 4WD SUPER DUTY F COIL SPRING SUSPENSION SYSTEM
 INSTALLATION INSTRUCTIONS FOR 2008-10 FORD 4WD SUPER DUTY F250-350 6 COIL SPRING SUSPENSION SYSTEM Requires the following parts (sold separately) for a complete installation: KIT PART NUMBER (6860) REQUIRES
SPECIAL TOOLS REQUIRED:
 INSTALLATION INSTRUCTIONS FOR 2010-15 TOYOTA 4RUNNER WITH XREAS SUSPENSION 3 SUSPENSION LIFT KIT PART NUMBER 432X WARNING!!! READ AND UNDERSTAND ALL INSTRUCTIONS BEFORE PROCEEDING. MAKE SURE THAT YOU HAVE
Polaris RangerXP Power Steering
 740 lifty rive Madison, Indiana 47250 812-574-7777 INSTLLTION INSTRUTIONS Polaris RangerXP Power Steering Item N escription Mounting racket Lower Shaft Steering Shaft U racket 3x M8 x 20mm Lg. FHS 2x M6
Polaris RZR Power Steering
 740B Clifty rive Madison, Indiana 47250 812-574-7777 INSTLLTION INSTRUCTIONS Polaris RZR Power Steering Item escription Qty Motor Mount 1 B ECU Mount 1 C Support Bracket 1 Lower Shaft 1 E Upper Shaft 1
FRONT DRIVELINE MODIFICATION MAY BE NECESSARY!!!!
 INSTALLATION INSTRUCTIONS FOR 2009 DODGE 2500/3500 4WD & 1500 Mega Cab 6 SUSPENSION SYSTEM PART NUMBER 7206 Requires the following parts (sold separately) for a complete installation: Front Coil Spring
Thank You For Choosing. INSTALLATION INSTRUCTIONS Snow Plow Mount for John Deere Gator C E G. Need help with your installation?
 740B Clifty Drive Madison, Indiana 47250 812-574-7777 INSTLLTION INSTRUCTIONS Snow Plow Mount for John Deere Gator Item Description Qty Mount Plate 1 B Front Bar 1 C Roller Bracket, L 1 Item Description
CHEVY TRUCK INSTALLATION INSTRUCTIONS KIT SUM
 1988-1994 CHEVY TRUCK INSTALLATION INSTRUCTIONS KIT SUM-7810013 Installation of a body lift will change the center of gravity and the handling characteristics of the vehicle. Because of the higher center
Flip Windshield: for Polaris Ranger 900
 INSTALLATION INSTRUCTIONS 2753 Michigan Road Madison, Indiana 47250 812-574-7777 Flip Windshield: for Polaris Ranger 900 Item A Description Windshield A Bulb Seal Read instructions and view illustrations
READ AND UNDERSTAND ALL INSTRUCTIONS AND WARNINGS PRIOR TO INSTALLATION OF SYSTEM AND OPERATION OF VEHICLE.
 #9378 Installation Instructions 3 Body Lift Kit 1998-2000 Ranger READ AND UNDERSTAND ALL INSTRUCTIONS AND WARNINGS PRIOR TO INSTALLATION OF SYSTEM AND OPERATION OF VEHICLE. SAFETY WARNING BDS Suspension
Read and understand all instructions and warnings prior to installation of product and operation of vehicle.
 #F9378 Installation Instructions 1998-2000 Ford Ranger 3" Body Lift Kit Read and understand all instructions and warnings prior to installation of product and operation of vehicle. Zone Offroad Products
WARNING!!! READ AND UNDERSTAND ALL INSTRUCTIONS BEFORE PROCEEDING. MAKE SURE THAT YOU HAVE ALL TOOLS AND PARTS BEFORE BEGINNING THE INSTALLATION.
 INSTALLATION INSTRUCTIONS FOR 2005-2015 TOYOTA TACOMA 4 X 4 AND PRERUNNER, 2003-2015 4RUNNER, 2007-2014 FJ CRUISER 1.5" FRONT LEVELING KIT PART NUMBER 415 WARNING!!! READ AND UNDERSTAND ALL INSTRUCTIONS
(800) MON-FRI 7AM-5PM PST OR WEBSITE: ReadyLIFT.COM **Please retain this document in your vehicle at all times**
 MON-FRI 7AM-5PM PST OR WEBSITE: ReadyLIFT.COM **Please retain this document in your vehicle at all times**") IF YOUR ReadyLIFT PRODUCT IS MISSING A OR HAS A DAMAGED PART, PLEASE CONTACT CUSTOMER SERVICE DIRECTLY. For warranty issues please return to the place of installation and contact ReadyLIFT. A NEW REPLACEMENT
IF YOUR ReadyLIFT PRODUCT IS MISSING A OR HAS A DAMAGED PART, PLEASE CONTACT CUSTOMER SERVICE DIRECTLY. For warranty issues please return to the place of installation and contact ReadyLIFT. A NEW REPLACEMENT
WARNING!!! READ AND UNDERSTAND ALL INSTRUCTIONS BEFORE PROCEEDING. MAKE SURE THAT YOU HAVE ALL TOOLS AND PARTS BEFORE BEGINNING THE INSTALLATION.
 INSTALLATION INSTRUCTIONS FOR 2007-2015 JEEP JK 3 SUSPENSION LIFT SYSTEM PART NUMBER 587 WARNING!!! READ AND UNDERSTAND ALL INSTRUCTIONS BEFORE PROCEEDING. MAKE SURE THAT YOU HAVE ALL TOOLS AND PARTS BEFORE
JEEP WRANGLER (TJ) 4 SPRING KIT KIT# TM
 4 SPRING KIT KIT# TM") 400 W. Artesia Blvd. Fax: (310) 747-3912 Compton, CA 90220 Ph: (877) 695-7812 www.trailmastersuspension.com JEEP WRANGLER (TJ) 4 SPRING KIT 97-06 KIT# TM3440-20013 Installation of a Trail Master suspension
400 W. Artesia Blvd. Fax: (310) 747-3912 Compton, CA 90220 Ph: (877) 695-7812 www.trailmastersuspension.com JEEP WRANGLER (TJ) 4 SPRING KIT 97-06 KIT# TM3440-20013 Installation of a Trail Master suspension
, Toyota Tacoma 3 SST Lift Kit
 69-5112, 69-5212 Toyota Tacoma 3 SST Lift Kit IF your ReadyLIFT product has a damaged or missing part, please contact customer service directly and a new replacement part will be sent to you immediately.
INSTALLATION INSTRUCTIONS
 INSTALLATION INSTRUCTIONS FTL5207 1.5 FORD F-150 4WD 2 FT30612 SHOCK SPACER 1 FT30597 HARDWARE KIT 1 FT5207i INSTRUCTIONS 1 FTAS12 STICKER BLUE 10X4 DIE CUT 1 FTAS16 DRIVER WARNING DECAL 1 FTREGCARD REGISTRATION
INSTALLATION INSTRUCTIONS
 INSTALLATION INSTRUCTIONS FTS24183 3 TRAIL BOX KIT 1 FT50294 JK PITMAN ARM 2 FT50261BK FRONT SWAY BAR END LINK 1 FT50533 HARDWARE SUBASSEMBLY 2 FT50492 FRONT BUMP STOP SPACER 2 FT50401BK REAR BUMP STOP
, (877) MON-FRI 7AM-4PM PST OR WEBSITE: ReadyLIFT.COM
 MON-FRI 7AM-4PM PST OR WEBSITE: ReadyLIFT.COM") 66-2725, 66-2726 IF your ReadyLIFT product has a damaged or missing part, please contact customer service directly and a new replacement part will be sent to you immediately. For warranty issues, please
66-2725, 66-2726 IF your ReadyLIFT product has a damaged or missing part, please contact customer service directly and a new replacement part will be sent to you immediately. For warranty issues, please
JEEP WRANGLER 2 & 4 DOOR (JK) 2.5 SPACER KIT KIT# TM /TM
 2.5 SPACER KIT KIT# TM /TM") 400 W. Artesia Blvd. Fax: (310) 747-3912 Compton, CA 90220 Ph: (877) 695-7812 www.trailmastersuspension.com JEEP WRANGLER 2 & 4 DOOR (JK) 2.5 SPACER KIT 07-13 KIT# TM3325-40010/TM3325-40013 Installation
400 W. Artesia Blvd. Fax: (310) 747-3912 Compton, CA 90220 Ph: (877) 695-7812 www.trailmastersuspension.com JEEP WRANGLER 2 & 4 DOOR (JK) 2.5 SPACER KIT 07-13 KIT# TM3325-40010/TM3325-40013 Installation
Cognito Motorsports, Inc. Upper Control Arm Kit for 2011-Present GM 8-Lug #UCAK100051
 Cognito Motorsports, Inc. Upper Control Arm Kit for 2011-Present GM 8-Lug #UCAK100051 Introduction - Installation requires a qualified mechanic. - Read instructions carefully and study the pictures (if
QTY PRELOAD SPACERS 2 ALIGNMENT CAMS 4
 INSTALLATION INSTRUCTIONS FOR 2005-2014 NISSAN XTERRA 4 X 4 2 SUSPENSION LIFT KIT PART NUMBER 840 WARNING!!! READ AND UNDERSTAND ALL INSTRUCTIONS BEFORE PROCEEDING. MAKE SURE THAT YOU HAVE ALL TOOLS AND
INSTALLATION INSTRUCTIONS
 INSTALLATION INSTRUCTIONS FTS21209 2 2015 CHEVY COLORADO 4WD COILOVER KIT 2 FT825402 2.5 COILOVER FRONT SHOCK 2 FTS811112 2.25 REAR SHOCK 1 FT20700 HARDWARE SUBASSEMBLY FT20700 HARDWARE SUBASSEMBLY 2 FT20698
INSTALLATION INSTRUCTIONS FOR FORD 4WD SUPER DUTY 6 SUSPENSION SYSTEM
 INSTALLATION INSTRUCTIONS FOR 1999-2004 FORD 4WD SUPER DUTY 6 SUSPENSION SYSTEM Requires the following parts for a complete installation: Front Leaf Springs P/N 60SD6 Hardware Kit P/N 6000H Vehicle specific
INSTALLATION INSTRUCTIONS FOR FORD 4WD SUPER DUTY 2-1/2 SUSPENSION SYSTEM
 INSTALLATION INSTRUCTIONS FOR 1999-2004 FORD 4WD SUPER DUTY 2-1/2 SUSPENSION SYSTEM Requires the following parts for a complete installation: Front Leaf Springs P/N 60SD25 Vehicle specific Box Kit depending
INSTALLATION INSTRUCTIONS
 INSTALLATION INSTRUCTIONS 2018 JEEP JL 4WD 3 SPORT SYSTEM FTS24207-4-DOOR NOTE: TO ORDER WEARABLE REPLACEMENT COMPONENTS DO NOT USE PART NUMBERS SHOWN ON THIS INSTRUCTION SHEET. GO TO FABTECH WEBSITE AND
(877) MON-FRI 7AM-5PM PST OR WEBSITE: ReadyLIFT.COM **Please retain this document in your vehicle at all times**
 MON-FRI 7AM-5PM PST OR WEBSITE: ReadyLIFT.COM **Please retain this document in your vehicle at all times**") IF YOUR ReadyLIFT PRODUCT IS MISSING A OR HAS A DAMAGED PART, PLEASE CONTACT CUSTOMER SERVICE DIRECTLY. For warranty issues please return to the place of installation and contact ReadyLIFT. A NEW REPLACEMENT
IF YOUR ReadyLIFT PRODUCT IS MISSING A OR HAS A DAMAGED PART, PLEASE CONTACT CUSTOMER SERVICE DIRECTLY. For warranty issues please return to the place of installation and contact ReadyLIFT. A NEW REPLACEMENT
PARTS LIST FOR SKU: (UCAK100051)
") INSTALL INSTRUCTIONS: Cognito Upper Control Arm Kit for 2011-2018 GM 2500HD / 3500HD 2WD / 4WD trucks. (Ball Joint Style Boxed) New SKU: 110-90298 PARTS LIST FOR SKU: 110-90298 (UCAK100051) QUANTITY PART
INSTALL INSTRUCTIONS: Cognito Upper Control Arm Kit for 2011-2018 GM 2500HD / 3500HD 2WD / 4WD trucks. (Ball Joint Style Boxed) New SKU: 110-90298 PARTS LIST FOR SKU: 110-90298 (UCAK100051) QUANTITY PART
INSTALLATION INSTRUCTIONS
 INSTALLATION INSTRUCTIONS 2014-2018 RAM 2500/3500 4WD 2013 RAM 3500 4WD W/FACTORY RADIUS ARMS 2.5 COIL SPACER SYSTEM FTS23043 - w/ PERFORMANCE SHOCKS FTS23158 - w/ DIRT LOGIC SHOCKS FTS23155 - w/ STEALTH
Nerf Bars: for Kawasaki Mule PRO-FXT
 INSTLLTION INSTRUTIONS 2753 Michigan Road Madison, Indiana 47250 855-743-3427 Item escription Front x 2 Right Rear Left Rear lamp x 2 E ap x 2 Nerf ars: for Kawasaki Mule PRO-FXT E 2x M12-1.75 x 30mm Lg.
INSTALLATION INSTRUCTIONS
 INSTALLATION INSTRUCTIONS 2017-2018 FORD F-250/F-350 SUPERDUTY TRACTION BAR KIT 12 BOLT REAR END VEHICLES ONLY FTS62008 Fabtech Motorsports 4331 Eucalyptus Ave. Chino, CA 91710 Tech Line: 909-597-7800
Installation Instructions FTS51008BK GM K2500 SUV Auto Ride Shock Mount Kit
 Installation Instructions FTS51008BK 6 01-05 GM K2500 SUV Auto Ride Shock Mount Kit Parts List: 2 FT20127BK SHK EXT 6" FRT 2500 AR MNT 2 FT20130BK SHK EXT 6" RR 2500 AR MNT 2 FT20131BK SHK EXT 6" RR 2500
INSTALLATION MANUAL 4 I.F.S. SUSPENSION CURR. CHEVY SUBURBAN / YUKON XL (WITH 5 LINK REAR END) PART # 14965
 PART # 14965") PART NUMBER : 14965 2000 CURR. SUBURBAN W/ REAR COIL SPRINGS 4 SUSPENSION SYSTEM WITH FRONT SPINDLES PARTS LIST: Part # Description Qty. C4I1SN-07 Passenger Side Differential Drop 1 C4I1SN-23 Driver Side
PART NUMBER : 14965 2000 CURR. SUBURBAN W/ REAR COIL SPRINGS 4 SUSPENSION SYSTEM WITH FRONT SPINDLES PARTS LIST: Part # Description Qty. C4I1SN-07 Passenger Side Differential Drop 1 C4I1SN-23 Driver Side
BOLT TORQUE SPECIFICATIONS STANDARD BOLTS:
 10-05 TP2010,Rev. ASSEMBLY OPERATION REPLACEMENT PARTS Hyundai Accent BOLT TORQUE SPECIFICATIONS STANDARD BOLTS: METRIC BOLTS: Size Grade Torque Size Torque 5/16" 5 20 ft/lbs. 8mm 22 ft/lbs. /8" 5 5 ft/lbs.
07-11 GM 1500 Pickup, Avalanche, Yukon, Tahoe, Suburban Front 2.5 Kit
 92130500 07-11 GM 1500 Pickup, Avalanche, Yukon, Tahoe, Suburban Front 2.5 Kit Thank you for choosing Rough Country for all your suspension needs. Rough Country recommends a certified technician install
CHEVY YUKON, SUBURBAN, TAHOE INSTALLATION INSTRUCTIONS KIT SUM
 1995-1999 CHEVY YUKON, SUBURBAN, TAHOE INSTALLATION INSTRUCTIONS KIT SUM-7812300 Installation of a body lift will change the center of gravity and the handling characteristics of the vehicle. Because of
PARTS LIST INCLUDED IN KIT TORQUE SPECIFICATIONS PRODUCT SAFETY LABEL MUST BE INSTALLED INSIDE CAB IN PLAIN VIEW OF ALL OCCUPANTS.
 INSTALLATION INSTRUCTIONS FOR 2010-15 TOYOTA 4RUNNER SR5 AND SPORT (Non-Air Leveling & Non-X-REAS) AND FOR 2010-14 TOYOTA FJ CRUISER 2WD & 4WD 3 SUSPENSION LIFT KIT PART NUMBER 432 WARNING!!! READ AND
»Product» Safety Warning
 #C1354 Installation Instructions 1999-2002 Chevy/GM 1500 4wd 3.5" Combo Lift Kit Read and understand all instructions and warnings prior to installation of product and operation of vehicle. Zone Offroad
INSTALLATION INSTRUCTIONS FOR JEEP COMMANDER / GRAND CHEROKEE 2" SUSPENSION LIFT KIT PART NUMBER 581
 INSTALLATION INSTRUCTIONS FOR 005-010 JEEP COMMANDER / GRAND CHEROKEE " SUSPENSION LIFT KIT PART NUMBER 51 WARNING!!! READ AND UNDERSTAND ALL INSTRUCTIONS BEFORE PROCEEDING. MAKE SURE THAT YOU HAVE ALL
Full Doors: for Honda Pioneer 1000 (2016+)
") INSTALLATION INSTRUCTIONS 2753 Michigan Road Madison, Indiana 47250 855-743-3427 Full Doors: for Honda Pioneer 1000 (2016+) A B Item A B Description Left Door Right Door Cleaning: - Do not use window cleaning
INSTALLATION INSTRUCTIONS 2753 Michigan Road Madison, Indiana 47250 855-743-3427 Full Doors: for Honda Pioneer 1000 (2016+) A B Item A B Description Left Door Right Door Cleaning: - Do not use window cleaning
INSTALLATION INSTRUCTIONS FOR 2016 TOYOTA TACOMA 4 X 4 AND PRE RUNNER 3 SUSPENSION LIFT KIT PART NUMBER
 INSTALLATION INSTRUCTIONS FOR 2016 TOYOTA TACOMA 4 X 4 AND PRE RUNNER 3 SUSPENSION LIFT KIT PART NUMBER 427 WARNING!!! READ AND UNDERSTAND ALL INSTRUCTIONS BEFORE PROCEEDING. MAKE SURE THAT YOU HAVE ALL