FACF AUTOMATIC CAPSULE FILLER SERIES USER MANUAL
|
|
|
- Abraham Harris
- 6 years ago
- Views:
Transcription
1 FACF AUTOMATIC CAPSULE FILLER SERIES USER MANUAL LFA Tablet Presses is a trading name of LFA Machines Oxford LTD All of the content in this document is covered by copyright
2 CONTENTS Page 1. Introduction Page 2. Installation Page 2. Operation Page 2. Connecting the power supply Page 2. Select Mode Page 2. Emergency Button Page 2. Door Cut-off Page 2. Motor Speed Page 2. Powder Feed Page 3. Changing the mould Page 3. Operating Adjustments Page 4. Adjusting the retaining spring Page 4. Adjusting the vacuum divider Page 5. Adjusting the powder scraper gap Page 5. Adjusting the height of the filling rod Page 6. Adjusting the drug powder height sensing device Page 8. Adjusting the capsule locking mechanism Page 8. Adjusting the capsule ejection device Page 8. Adjusting the safety clutch Page 9. Adjusting the capsule ejection device Page 9. Adjusting the air pressure Page 10. Maintainance Page 10. Lubrication Page 11. Electrical Diagrams
3 CAUTION. Please read these operating instructions carefully before installation, starting up and repair. Inappropriate operation not recommended in the instructions may damage the machine or cause personal injury. Introduction The FACF Series automatic capsule filling machines apply advanced engineering to fill large volumes of capsules with exceptional accuracy and speed. They are characterised by thoughtful design and high quality construction giving unprecedented operator safety and outstanding reliability. Simple controls and an LCD display panel allow for fast operator training, while low maintenance requirements allow for reduced downtime. Together with their high efficiency and accurate dosing this results in reduced cost-per-unit filled and offers an important competitive advantage. These machines can fill any size hard plastic capsule from 00# to 5#, using powder, grain or pellets. NOTE: Please read these instructions carefully before first use. 1
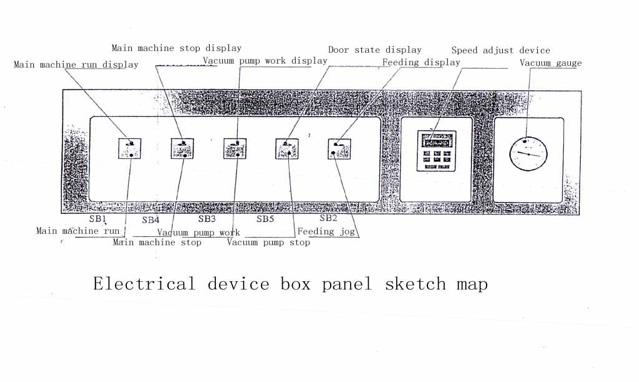
4 Install on a level, stable platform able to withstand the machine s weight. If installed on the upper levels of a building, the floor must be able to withstand a force of not less than 1000kg/m2. The legs should be wrapped with rubber vibration reduction pieces. Before use, check that the machine turns smoothly by hand, and lubricate the machine according to the instructions below. Clean the machine thoroughly with alcohol. NOTE: Check that the main motor rotates clockwise, and that the vacuum motor is rotating in the correct direction. If not, adjust the wiring by swapping over the powers supply wires. Connecting the power supply Check the machine and turn the main motor a couple of times. Then turn on the main power switch, QS. An indicator light will confirm power, and the frequency converter will indicate it is ready. Note: Indicator lights M1 Rotating Motor M2 Vacuum Pump M3 Dust Collector M4 Feeding Motor Installation Operation Select Mode The machine can run in Automatic or Manual Mode. Manual is normally used to test the machine, and overrides the opening and closing of the side door or the powder supply sensors. The machine starts in Automatic Mode by default. Operating the Select button will change this to Manual. Emergency Button To stop the machine immediately, activate the emergency switch. The machine will lock itself and the computer circuit board will enter standby. To restart, press the large OFF button to reset the computer circuit board. Before turning the machine on again, remember to first unlock the emergency switch s auto-lock. Door Cut-off The machine cannot operate in Automatic Mode when any one of the four doors is open. Motor Speed Press the ^ button to increase speed, and the v button to decrease. Powder Feed A capacitive sensor and the feeder motor control the powder feeder mechanism. The main motor will stop automatically when powder in the feeder is running out. A delay mechanism sets how long the machine keeps running when it detects that the powder compartment is running low. The delay can be adjusted by pressing the ^ v button. To avoid empty capsules, the delay should not be allowed to continue after the powder has been used up. 2


5 Changing the mould The filling specification can be changed by changing the mould. This involves replacing the upper and lower mould, capsule delivery plate, horizontal fork, vertical fork, adjustment piece, filling rod and dosage measuring compartment. Remove the upper cover of the rotor, and remove the two halves of the mould by unscrewing and removing the bolts. Put the new mould piece into the T-shaft and secure it between the two locating poles. Each mould must be located accurately by inserting a mould-testing rod into the holes on the left and right outer surface of the mould. Then fasten the screws tightly. Check the testing rod can rotate freely in the holes of the upper and lower mould halves. Note: The testing rod must be moved before rotating the rotor. Operating Adjustments Adjusting the capsule raw material hopper The fender-board installed on the hopper controls the depth of the material outlet. To adjust it, loosen the screws of the door. NOTE: The depth of the hopper should be around half the height of the outlet. Operating Adjustments Adjusting the capsule raw material hopper The fender-board installed on the hopper controls the depth of the material outlet. To adjust it, loosen the screws of the door. NOTE: The depth of the hopper should be around half the height of the outlet. 3


6 Adjusting the retaining spring The retaining spring opens and closes when a capsule emerges from the capsule feeding plate. To adjust, loosen the screws of the positioning block, then move the positioning plate so that the capsule is captured as shown in the diagram. Adjusting the vacuum divider When the machine is running the vacuum divider/separator should be in tight contact with the mould plate. If not, adjust it by moving the main motor shaft. The vacuum divider should be raised to the top and the screws on both sides of the machine surface lower bar loosened. Adjust, test, then tighten the screws. Adjusting the gap between the dosage tray and the sealed ring The gap between the dosage tray and the sealed ring should be mm. If powder is leaking, decrease the gap by loosening the screws and rotating anticlockwise. Then tighten the screws. If the sealed ring is too high, rotate clockwise to lower it. There is graduation measure on the knob; one measure moves the sealed ring by 0.015mm. 4


7 Adjusting the powder scraper gap The ideal gap is mm. To adjust, loosen the locking nut, rotate the screw to adjust the position of the scraper, use a feeler to determine the gap then fasten the locking nut. Adjusting the height of the filling rod Adjusting the height of the filling rod maintains accurate dosage of powder. The table below shows the correct depth it should be inserted into the dosage tray. NOTE: Do not insert the rod too deep. Station Depth into dosage tray To raise the filler rod, loosen the nut and rotate anticlockwise. To lower the rod, rotate clockwise. Tighten the nut. 5


8 Adjusting the drug powder height sensing device A capacitive sensor controls the feeding motor. This may need adjusting when using powder of different fineness or viscosity. Loosen the screws, adjust and tighten. The distance between the sensor and powder should be 2 8 mm. Adjusting the process for removing defective capsules At the 6th processing station, the pushing rod together with suction eliminate capsules that have not been separated. The pushing rod s height and the suction mechanism s height may need adjusting when using different sized capsules. For the suction, loosen the top screw, adjust up or down, then tighten it. If the suction mechanism is too low, it will absorb the open cap of the capsule in the upper mould. For the pushing rod, loosen the locking nut of the pull rod key point bearing on both sides, then rotate the pushing rod. Then fasten the locking nut. Note: The pushing rod should not touch the upper or lower mould. 6


9 Adjusting the capsule locking mechanism Changing capsule size may require this adjustment. The gap between the pressure plate and the capsule s highest point inside the mould should be mm. This gap can be adjusted by different thickness boards. To adjust the height of the push rod, place sealed capsules into the mould and move the rod to the highest position where it just touches the capsule. If filling problems occur, the device should be realigned carefully and the nuts tightened. 7

10 Adjusting the capsule ejection device The capsule ejecting plate can change its angle and height. Loosen only one side of the screw, then adjust it. Check capsules eject smoothly, then fasten the screws. Adjusting the safety clutch The safety clutch protects the main motor decelerator. After extended usage the clutch may slip, especially when the machine is over loaded. If this occurs, tightening the nut of the clutch slightly will help. 8


11 Adjusting the capsule ejection device The capsule ejecting plate can change its angle and height. Loosen only one side of the screw, then adjust it. Check capsules eject smoothly, then fasten the screws. Adjusting the air pressure The pressure of the vacuum is kept at MPa to guarantee the capsules are not damaged. If the pressure is too high open it to adjust the valve. If it is too low shut off the valve. 9
12 Maintainance Check the machine thoroughly on a regular basis for signs of wear, and replace any worn or damaged parts immediately before further use. Cleaning Regularly clean all parts that come in contact with powder. Also clean when changing drug used, or after a long period without using the machine. Regularly remove grease from the power transmission at the bottom of the machine, so that the movement of the mechanism is clearly visible. Keep the vacuum system filter clean. Check the bearings regularly and clean when required. Then lubricate. Lubrication NOTE Establish a regular lubrication schedule. Proper lubrication is essential to prolonging the service life of the machine. The surface of the cam should be greased weekly. Each of the bearings at the bottom of the machine should be greased weekly. For sealed bearings, grease droplets can be used. The power transmission chain should be checked and lubricated with grease once a week. The oil in the main decelerator and the material feeder decelerator should be checked once a month. It should be changed every six months. The oil in the 10th station graduation box should be checked and topped up every month. It should be changed every six months. Remove the cover of the rotary plate weekly and add oil to the movable copper sleeve, the bearing of the T shaft, and the guide lever. Every 1000 working-hours these should be completely cleaned, and the T shaft and seal ring lubricated. NOTE: The rotating plate and the dividing container under the dosage tray should only be opened and maintenance carried out under the supervision of professional technicians. Lubricating Grease Used and Area of Application Name Type Part to be greased Machine lubricate N4B GB Chain, roller bearing, directional parts Lubricate No. 2 Z12 SY Cam, roller bearing, chain Lubricate No. 0 ZLD SY Dividing box, decelerator 10

13 11
Product Specification
 Automatic Capsule Filling Machine Product Specification SF-120N/135N/150N Description Number of Hole (Hole) Max. Output capsule (Caps/Hour) : Powder Revolution of unit (unit/min) Range of capsule size
CAPSULE FILLING F Series
 CAT No. : 23146-01-201302-CF-F-E FILLING Headquarters #63, AnNam 402 Road, Bupyeong-Gu, Incheon City, Korea. 403-858 T. 82 32 508 1284 / F. 82 32 508 1289 www.sjpmt.com / sales@sjpmt.com Sejong Europe
Customer Name. Instruction for Operation. Single Head Sleever
 Customer Name Instruction for Operation Single Head Sleever Content Reload of Sleeve Roll (page 3~5) Sleeve Feeding (Page 6~7) Sleeve Sensor Positioning (Page 8~10) Holder Installation (Page 11~13) Splice
John Deere. MODEL: 400 Grinder-Mixer JD-O-OMC18621
 John Deere MODEL: 400 Grinder-Mixer THIS IS A MANUAL PRODUCED BY JENSALES INC. WITHOUT THE AUTHORIZATION OF JOHN DEERE OR IT'S SUCCESSORS. JOHN DEERE AND IT'S SUCCESSORS ARE NOT RESPONSIBLE FOR THE QUALITY
OPERATION & MAINTENANCE MANUAL HANGZHOU FLYING TECHNOLOGY CO., LTD.
 CENTRIFUGAL PUMP ZPD6-25*7 OPERATION & MAINTENANCE MANUAL HANGZHOU FLYING TECHNOLOGY CO., LTD. CONTENTS 1. GENERAL (1) 2. NOMENCLATURE OF THE TYPE (1) 3. MAIN TECHNICAL SPECIFICATIONS RANGE (1) 4. STANDARD
R3 Roller Garage Door Opener
 R3 Roller Garage Door Opener INSTALLATION INSTRUCTIONS OWNERS COPY 1 WARNING: It is vital for the safety of persons to follow all instructions. Failure to comply with the installation instructions and
Instruction Manual MB4 Rolling garage door opener
 Instruction Manual MB4 Rolling garage door opener INSTALLATION INSTRUCTIONS OWNERS COPY 1 WARNING: It is vital for the safety of persons to follow all instructions. Failure to comply with the installation
COOKSON OWNER S MANUAL
 COOKSON OWNER S MANUAL ELECTRIC CLUTCH RELEASE FOR TUBULAR MOTOR 3117(1) ECN 0951 BY RG 10/28/10 1 PATENT NO. 6,155,324 SPECIFICATIONS ELECTRICAL SPECIFICATIONS TUBULAR MOTOR FOR TUBULAR MOTOR ELECTRICAL
IMPORTANT INSTRUCTIONS FOR OPERATION & MAINTENANCE OF
 IMPORTANT INSTRUCTIONS FOR OPERATION & MAINTENANCE OF CONVEYORS EASIKIT 300 EASIKIT 450 EASIKIT 600, 900, 1200 & 1500 The manufacturer does not accept responsibility for any loss, damage to other equipment,
ASSEMBLY STEP ONE STEP TWO STEP THREE STEP FOUR STEP FIVE
 ASSEMBLY STEP ONE Attach the front [18] and rear feet [14] to the frame using the nuts [8], washer [9] and bolts [10]. STEP TWO STEP THREE STEP FOUR STEP FIVE Attach the handlebar post [22] inserting into
Automatic Capsule Filling Equipment SPT Series
 EBSEOS GmbH Pharmaceutical Machinery & Services Industriestrasse 14 79664 Wehr Tel. ++49 (0)7762 80 68 966 Fax. ++49 (0)7762 80 68 967 Automatic Capsule Filling Equipment SPT Series Capsule Filling Equipment
V1504 Vertical Platform Lift OWNER S MANUAL
 V1504 Vertical Platform Lift OWNER S MANUAL (To Be Retained by Owner After Installation by Authorized Savaria Dealer) Part No. 000692 30-m06-2017 2 IMPORTANT Ensure that only an authorized Savaria Dealer
Tooling Assistance Center
 Safeguards are designed into this application equipment to protect operators and maintenance personnel from most hazards during equipment operation. However, certain safety precautions must be taken by
MACHINE SENSORS CONTROL PANEL CONVEYOR SYSTEM SYSTEM SENSORS...
 TABLE OF CONTENTS TABLE OF CONTENTS... 1 CONTROL PANEL...... 4 MACHINE SENSORS... 5 CONVEYOR SYSTEM... 6 SYSTEM SENSORS... 6 INFEED BACKUP... 6 OUTFEED BACKUP... 6 CHANGEOVERS... 6 CONVEYOR GUIDES ADJUSTMENTS...
MORRISON MS-40C MATERIAL SPREADER
 INSTRUCTION MANUAL & PARTS BOOK MORRISON MS-40C MATERIAL SPREADER POWERFUL - EFFICIENT - DEPENDABLE 25 INDUSTRIAL DRIVE, KEYPORT, NEW JERSEY, USA, 07735, 732-566-5400 FAX 732-5444 Doc. # OI M09203 PB M09203
TANKERS OPERATING & SAFETY INSTRUCTIONS FOR SPARE PARTS GO TO
 TANKERS OPERATING & SAFETY INSTRUCTIONS FOR SPARE PARTS GO TO WWW.MARSHALL-TRAILERS.CO.UK FOR MODELS: ST1200, ST1400, ST1600, ST1800, ST2000, ST2300, ST2550 CHARLES J. MARSHALL (ABERDEEN) LTD CHAPEL WORKS,
PowerLink GW series Eddy Current Dynamometer User Manual
 PowerLink GW series Eddy Current Dynamometer User Manual XiangYi (Hong Kong) Power Testing Instrument Co. Ltd. 0 GW Series Eddy Current Dynamometer User Manual Transport, Storage, use of environmental
Foldable Electric E-bike Instruction Manual
 Foldable Electric E-bike Instruction Manual This manual contains important safety, assembly, operation and maintenance information. Please read this manual before operation and save this manual for future
Maintenance Instructions. World Leader in Modular Torque Limiters. JSE AEA Extruder Clutch
 World Leader in Modular Torque Limiters PROTECTING EQUIPMENT& MACHINERYYEARSInstallation and Maintenance Instructions JSE.5-0234AEA Extruder Clutch 1304 Twin Oaks Street Wichita Falls, Texas 76302 (940)
20 TONNE HYDRAULIC PRESS MODEL NO: CSA20FBT
 20 TONNE HYDRAULIC PRESS MODEL NO: CSA20FBT PART NO: 7614058 OPERATION & MAINTENANCE INSTRUCTIONS WARNING: Read these instructions before using the press GC0516 INTRODUCTION Thank you for purchasing this
Tips & Tricks Overview of the most important settings of KEMPER rotary crop headers
 Tips & Tricks Overview of the most important settings of KEMPER rotary crop headers Preparation for the season Fit for the next season with Kemper With just a few steps you get a head start in the next
Crestline Altra Series TM Dampener. Installation Instructions. Heidelberg GTO. X /98 Rev-A
 Crestline Altra Series TM Dampener Installation Instructions Heidelberg GTO X88-63 7/98 Rev-A GENERAL INFORMATION ATTENTION CRESTLINE ALTRA SERIES TM DAMPENER OWNER! Accel Graphic Systems provides parts
BELT CONVEYOR CB/M5 Series
 BELT CONVEYOR CB/M5 Series User and maintenance manual 1 DECLARATION OF CONFORMITY The company: Tel. +39-0444 450 620-451 520 Fax +39-0444 671 840 declares under its own responsibility that the machine
Foss Electric Milko-Scope II Meter Manual
 Foss Electric Milko-Scope II Meter Manual General Description Adapted from the Technical Bulletin 16800-6GB November 1980 1. Measuring Principle The Milko-Scope meter collects a certain part of the total
OPERATING INSTRUCTIONS AND SERVICE MANUAL
 OPERATING INSTRUCTIONS AND SERVICE MANUAL 55NAL--270-4 55NL--724-4 55RNL-2-LS-4- COMPLETE TOOL MODEL NO. CODE NO. 55NAL--270-4 20270 55NL--724-4 220724 READ SAFETY RECOMMENDATIONS 55RNL-2-LS-4-24089 BEFORE
1 MECHANICAL FUEL METER
 1 MECHANICAL FUEL METER USER S MANUAL WARNING: Read carefully and understand all INSTRUCTIONS before operating. Failure to follow the safety rules and other basic safety precautions may result in serious
Super T QR20 INSTRUCTIONS GENERAL RULES
 INSTRUCTIONS GENERAL RULES 1. Where specified, assemble and disassemble the shock absorption system using the MARZOCCHI special tools only. 2. On reassembling the suspension system, always use new seals.
VS403 INSTRUCTIONS FOR: VACUUM AND PRESSURE TEST / BRAKE BLEEDING UNIT MODEL: SAFETY INSTRUCTIONS INTRODUCTION & CONTENTS. fig.1
 INSTRUCTIONS FOR: VACUUM AND PRESSURE TEST / BRAKE BLEEDING UNIT MODEL: VS403 Thank you for purchasing a Sealey product. Manufactured to a high standard this product will, if used according to these instructions
OWNER S MANUAL. Model: MS-25BU ( ) (25 Bushel Pull-Behind Manure Spreader)
 (25 Bushel Pull-Behind Manure Spreader)") OWNER S MANUAL Model: MS-25BU (5301194) (25 Bushel Pull-Behind Manure Spreader) General Information Thank you for purchasing this product. The purpose of this manual is to assist you in operating and maintaining
OWNER S MANUAL Model: MS-25BU (5301194) (25 Bushel Pull-Behind Manure Spreader) General Information Thank you for purchasing this product. The purpose of this manual is to assist you in operating and maintaining
Transmission Overhaul Procedures-Bench Service
 How to Assemble the Lower Reverse Idler Gear Assembly Special Instructions In 1996 Eaton changed the reverse idler system design. In the nut design, the reverse idler bearing was lubricated through a hole
LABORATORY MICROMOTOR HP35 ON-OFF
 LABORATORY MICROMOTOR HP35 ON-OFF USER AND MAINTENANCE MANUAL 1. DESCRIPTION HP35 on-off is a powerful and reliable micromotor, expressly designed for daily use in the Dental, Gold and Jewellery fields.
Service Handbook HD /97
 Service Handbook HD 1050 5.905-032 07/97 Foreword HD 1050 Foreword Indispensable prerequisites for the competent execution of service procedures are comprehensive, real-life training workshops for technical
Single-Head Paste/ Liquid Filling Machine:
 Single-Head Paste/ Liquid Filling Machine: User Manual Model GWEFP/L Semi -Automatic Piston Filling Machine: Contents: 1. Principle and Property 2. Specifications 3. Safe operation 4. Machinery operation
Maintenance and Repair
 Maintenance and Repair WARNING ALWAYS shut off the engine, remove key from ignition, make sure the engine is cool, and disconnect the spark plug and positive battery terminal from the battery before cleaning,
2. PREPARATION 1. SAFETY 3. FRAME 4. TRANSMISSION 5. DRIVE 6. ROW UNIT 7. OPTIONAL EQUIPMENT Monosem Inc.
 TABLE OF CONTENTS 1. SAFETY 2. PREPARATION 3. FRAME 4. TRANSMISSION 5. DRIVE 6. ROW UNIT 7. OPTIONAL EQUIPMENT For the initial preparation of the planter, lubricate the planter and row units. Make sure
Philapack, LLC. Filler Machine Division
 Philapack, LLC Filler Machine Division 1840 County Line Rd. #203, Huntingdon Valley, PA 19006 Telephone (215) 322-2122: Fax (215) 355-1509 Web site: www.philapack.com Parts Email: parts@philapack.com Machine
INTRODUCTION Please read this manual before you use your jack and ensure you understand its operation and the safety procedures to be observed.
 Rated Capacity: 4000kg Closed Height: 19.5cm (approx) Hydraulic Lift: 11.8cm (approx) Maximum Extended Height: 6cm (approx) 4 Tonne Bottle Jack Instruction Manual Item Code: 332343 Model T90404 INTRODUCTION
LABORATORY MICROMOTOR HP45 MULTIFUNCTION
 LABORATORY MICROMOTOR HP45 MULTIFUNCTION USER AND MAINTENANCE MANUAL 1. DESCRIPTION HP45 Multifunction is a powerful and reliable micromotor, expressly designed for daily use in the Dental, Gold and Jewellery
Push Pull / Pusher Operator s Guide
 Push Pull / Pusher Operator s Guide 1 LORON Excellence in Action Operator Name Operator Signature Date Signature of operator above indicates the date he/she received this handbook. Supervisor / Trainer
ZANASI LOW-MEDIUM SPEED CAPSULE FILLING MACHINES
 ZANASI LOW-MEDIUM SPEED CAPSULE FILLING MACHINES ZANASI WORKING CYCLE ZANASI CAPSULE FILLING MACHINES OFFER MAXIMUM VERSATILITY IN TERMS OF THE COMBINED DOSING OF VARIOUS PRODUCTS WITHIN THE SAME CAPSULE,
Ph: (07) Fax: (07) Pump Manual
 Fax: (07) Pump Manual") sales@scintex.com.au www.scintex.com.au Ph: (07) 3137 0135 Fax: (07) 3041 0541 Pump Manual 12V 75LPM Vane Pump & Vane Pump Station SPEP12V75 & SP12VFS75 SPEP12V75 SP12VFS75 Parts List No. Part Name QTY
sales@scintex.com.au www.scintex.com.au Ph: (07) 3137 0135 Fax: (07) 3041 0541 Pump Manual 12V 75LPM Vane Pump & Vane Pump Station SPEP12V75 & SP12VFS75 SPEP12V75 SP12VFS75 Parts List No. Part Name QTY
HYDRAULIC PALLET TRUCK MODEL NO: PT540M/BM/CM & PT685BM/CM PART NO: , , , ,
 HYDRAULIC PALLET TRUCK MODEL NO: PT540M/BM/CM & PT685BM/CM PART NO: 7631700, 7631705, 7631710, 7631715, 7631720 OPERATION & MAINTENANCE INSTRUCTIONS LS0316 INTRODUCTION Thank you for purchasing this CLARKE
OPERATIONS MANUAL LEVER CHAIN HOIST
 OPERATIONS MANUAL LEVER CHAIN HOIST IMPORTANT SAFETY INFORMATION Please read, understand and follow all safety information contained in these instructions prior to the use of this hoist. Retain these instructions
Type 2 Push-Through 37 Ton Log Splitter. Assembly Manual
 Type 2 Push-Through 37 Ton Log Splitter Assembly Manual Refer to this manual for the following models: RS37PT-LF09PC-16-1 RS37PT-LF09EC-16-1 RS37PT-LF09EC-16-2 RS37PT-LF13EC-22-1 RS37PT-LF13EC-22-2 RS37PT-LF15EC-22-1
Maintenance Information
 16573370 Edition 2 February 2014 Air Grinder 99V Series Maintenance Information Save These Instructions Product Safety Information WARNING Failure to observe the following warnings, and to avoid these
Z1 Free Ride INSTRUCTIONS GENERAL RULES
 INSTRUCTIONS GENERAL RULES 1. Where specified, assemble and disassemble the shock absorption system using the MARZOCCHI special tools only, as shown in the table below. 2. On reassembling the suspension
Instruction Manual Pallet Truck with Load Indicator
 Instruction Manual Pallet Truck with Load Indicator Note: Owner/Operator must read and understand this instruction manual before using the pallet truck with scale. Thank you for using this hand pallet
ADAPTA THE EVOLVING CAPSULE FILLER
 ADAPTA THE EVOLVING CAPSULE FILLER ADAPTA The Adapta s DNA has its roots in IMA s 50 years of experience and more than 5,000 capsule filling installations world-wide. This knowledge and experience have
Service Manual. #19 Gearmatic Winch
 Allis Chalmers Service Manual #19 Gearmatic Winch Service Manual THIS IS A MANUAL PRODUCED BY JENSALES INC. WITHOUT THE AUTHORIZATION OF ALLIS CHALMERS OR IT S SUCCESSORS. ALLIS CHALMERS AND IT S SUCCESSORS
INSTALLATION INSTRUCTIONS AND OPERATION MANUAL
 INSTALLATION INSTRUCTIONS AND OPERATION MANUAL Cornell RG Operator RGRL Series (w/ Internal Interlock sensor) ES 10-288 GENERAL NOTES TO REDUCE THE RISK OF SEVERE INJURY OR DEATH, READ AND FOLLOW ALL INSTALLATION
INSTALLATION, OPERATION AND MAINTENANCE INSTRUCTIONS
 INSTALLATION, OPERATION AND MAINTENANCE INSTRUCTIONS Contents Section 1. General Observations... 2 2. Operation... 4 3. Control During Operation... 5 4. Trouble Shooting... 6 5. Maintenance... 7 Please
Operating instructions Form no safety definitions
 Operating instructions Form no. 1000437 safety definitions safety symbols are used to identify any action or lack of action that can cause personal injury. Your reading and understanding of these safety
Service Manual. LT-5 Lawn Tractor
 Service Manual LT-5 Lawn Tractor NOTE: These materials are for use by trained technicians who are experienced in the service and repair of outdoor power equipment of the kind described in this publication,
COOKSON OWNER'S MANUAL
 COOKSON OWNER'S MANUAL FDO-A10 INDUSTRIAL DUTY FIRE DOOR OPERATOR R L I S T E D 3040233 US CONTROL PANEL SERIAL# OPERATOR SERIAL# 9001.DWG ECN 0959 REV 4 SPECIFICATIONS MOTOR TYPE:...INTERMITTENT HORSEPOWER:...1/8
OPERATOR PROTECTIVE EQUIPMENT. Owner s Responsibility
 CONGRATULATIONS! You have just made the first step toward making your tire changing chores much easier! This DAA Assist Arm assembly guide will help you to assemble and install your new DAA Assist Arm
Water Treatment Plant Maintenance Considerations. Operation and Maintenance. Types of Maintenance 5/1/15
 Water Treatment Plant Maintenance 1 Operation and Maintenance Purpose of O&M maintain design functionality (capacity) restore the system components to their original condition and thus functionality. Effective
FORD ECOSPORT Quick Reference Guide
 FORD ECOSPORT Quick Reference Guide About This Quick Reference Guide We have created this guide to help you get to know certain features of your vehicle quickly. It only contains basic instructions to
Safety, Operation and Maintenance Instructions For Long & Short Nose Upholstery Air Stapler (NS10 & NS11)
") Safety, Operation and Maintenance Instructions For Long & Short Nose Upholstery Air Stapler (NS10 & NS11) Important: Drop 3 drops of oil into the stapler air inlet BEFORE first use. See page 2. Please
Safety, Operation and Maintenance Instructions For Long & Short Nose Upholstery Air Stapler (NS10 & NS11) Important: Drop 3 drops of oil into the stapler air inlet BEFORE first use. See page 2. Please
QS441 CONE CRUSHER FEATURES & BENEFITS. Rev
 CONE CRUSHER FEATURES & BENEFITS Rev 1 23-12-14 Hopper Feeder Crusher Main conveyor Powerpack Controls Tracks Dimensions Options Benefits overview 2 HOPPER DOORS Heavy duty fixed hopper design enables
OLYMPIAN MODEL 740 Operation and Service Manual
 OLYMPIAN MODEL 740 Operation and Service Manual P/N 133911-102 FCI MANUAL P/N 133865-001 Data herein has been verified and validated and believed adequate for the intended use. If the machine or procedures
FORD ECOSPORT Quick Reference Guide
 FORD ECOSPORT Quick Reference Guide About This Quick Reference Guide We have created this guide to help you get to know certain features of your vehicle quickly. It only contains basic instructions to
Bucket Elevator Belt Bucket Conveyor
 Bucket Elevator TD belt bucket conveyor is suitable for density less than.5t/m3 lump, granular material such as coal, cement, fertilizer, sand, grain, etc.belt bucket conveyor has two types of bucket:
Recommended Maintenance Procedures for the Cutters Edge MULTI-CUT 2100 Series Fire Rescue Saw
 Recommended Maintenance Procedures for the Cutters Edge MULTI-CUT 2100 Series Fire Rescue Saw 2 Outer section Adjustment Knob Remove and Clean ToolLess Guard/Depth Gauge Unscrew Adjustment Knob, remove
OWNER S MANUAL EPT-55 ! WARNING! HAND PALLET TRUCK
 HAND PALLET TRUCK EPT-55 OWNER S MANUAL! WARNING! DO NOT OPERATE OR SERVICE THIS PRODUCT UNLESS YOU HAVE READ AND FULLY UNDERSTOOD THE ENTIRE CONTENTS OF THIS MANUAL. FAILURE TO DO SO MAY RESULT IN PROPERTY
LIFTING MECHANISM PART NO SRM 965
 LIFTING MECHANISM B60Z [A230]; B80Z [A233]; C60Z [A478]; C80Z [A479]; W60Z [A231]; W65Z [A229]; W80Z [A234]; B60Z AC [B230]; B80Z AC [B233]; C60Z AC [B478]; C80Z AC [B479] PART NO. 1500202 4000 SRM 965
The ELM Series Slurry Pump Installation and Operating Manual
 The ELM Series Slurry Pump Installation and Operating Manual Excellence Pump Industry Co., Ltd. SAFETY INFORMATION The following safety information relating to pump operation and maintenance should be
Beton Trowel nv INSTRUCTION MANUEL SLAB SAW BTCS500 - GEBABEBB BBRUBEBB BNP FORTIS: ING: BE BE
 INSTRUCTION MANUEL SLAB SAW BTCS500 BBRUBB 1/20 Use this guide along with the parts lists attached to locate and identify components of your trowel. When ordering replacement parts, be sure to provide
VBK 2596/12E/RSF. Thickness and Width Gauge for Strip and Profile. Operating- & Service Instructions. (with lateral guide rollers)
") Thickness and Width Gauge for Strip and Profile (with lateral guide rollers) VBK 2596/12E/RSF Operating- & Service Instructions erstellt am 5.2.1998 freigegeben am Bemerkungen Rev.01 Seiten:16 Name: Rietdorf
Thickness and Width Gauge for Strip and Profile (with lateral guide rollers) VBK 2596/12E/RSF Operating- & Service Instructions erstellt am 5.2.1998 freigegeben am Bemerkungen Rev.01 Seiten:16 Name: Rietdorf
2. PREPARATION 1. SAFETY 3. FRAME 4. TRANSMISSION 5. DRIVE 6. ROW UNIT 7. OPTIONAL EQUIPMENT
 TABLE OF CONTENTS 1. SAFETY 2. PREPARATION 3. FRAME 4. TRANSMISSION 5. DRIVE 6. ROW UNIT 7. OPTIONAL EQUIPMENT For the initial preparation of the planter, lubricate the planter and row units. Make sure
Maintenance Adjustments
 4 Maintenance and Adjustments Chapter Contents Cleaning the Printer and Paper Handling Accessories..... 158 Cleaning the HP Digital Copier....................... 161 Cleaning ADF and Glass............................
Tech Note Truck 14 & 15.5 Twin Plate Cast Iron Type Installation Guidelines
 1. (14 & 15.5 ) Check condition of the flywheel. Grind to resurface or replace flywheel. Surface MUST BE machined or premature clutch failure can occur. Flywheel depth must be 2.938 (74.62mm) for 14 (350mm)
unpacking your RENA L-300 Labeler
 unpacking your RENA L-300 Labeler WARNING THE L-300 IS A HEAVY MACHINE. USE PROPER LIFTING TECHNIQUES TO SET IT ON A WORK SURFACE. NEVER LIFT OR MOVE THE L-300 BY ITS HEAD. ONLY LIFT OR MOVE THE XL BY
OWNER S MANUAL EVOLUTION 3500, 4500, 5500, & 8500 SERIES PUMPS
 OWNER S MANUAL EVOLUTION 3500, 4500, 5500, & 8500 SERIES PUMPS IMPORTANT SAFETY INSTRUCTIONS When installing and using this electrical equipment, basic safety precautions should always be followed, including
Assembly & Operator s Manual
 Assembly & Operator s Manual LiftGator XTR 1200lbs Removable Liftgate TM Visit our website at: www.liftgator.com WARNING: Read the entirety of this manual before using the LiftGator. Failure to do so can
INSTALLATION INSTRUCTIONS COUPLING NUT MOUNTED CHAIN UNIT KIT. Dealer Customer Vehicle Truck # P.O. # Unit # Bracket # Chain Wheel Kit#
 INSTALLATION INSTRUCTIONS COUPLING NUT MOUNTED CHAIN UNIT KIT Dealer Customer Vehicle Truck # P.O. # Unit # -6350 Bracket # Chain Wheel Kit# 2 Parts List for Unit 995 S 1950 W Ste. B, Springville, UT 84663-800-633-0699
KLINGER Piston Valves KVN DN PN 16 I/III with valve ring KX-GT Modul
 Page 1 Assembly Instructions and Handling Regulations for KLINGER Piston Valves KVN DN 65 150 PN 16 I/III with valve ring KX-GT Modul DN 125-150 1 Body 2 Bonnet 3 Hand wheel 4 Piston 5 Lantern bush 8 Threaded
1335X WINCH & 1356X POWER WINCH ATTACHMENT
 1335X WINCH & 1356X POWER WINCH ATTACHMENT OPERATING INSTRUCTIONS & PARTS MANUAL Valesco Manufacturing, Inc. 7857 N 1100 E Loogootee, IN 47553 (812) 636-6002 1 WINCH OPERATION The silo unloader is raised
 DRUM BRAKE RIMS Periodic inspection of drum brake rims is necessary to determine indications of uneven or excessive wear. In general, brake rim failures other that regular wear are caused by brake linings
ABACO MACHINES OPERATION MANUAL STONE/STEEL/GLASS/WOODS LIFTER (ASSGWL20) ABACO MACHINES (USA)
 ABACO MACHINES (USA)") ABACO MACHINES OPERATION MANUAL STONE/STEEL/GLASS/WOODS LIFTER (ASSGWL20) ABACO MACHINES (USA) 14508 S. Garfield Ave., Paramount, CA 90723, USA Tel : 310-532-0366 Fax : 310-532-99 Email : sales@abacomachines.com
ABACO MACHINES OPERATION MANUAL STONE/STEEL/GLASS/WOODS LIFTER (ASSGWL20) ABACO MACHINES (USA) 14508 S. Garfield Ave., Paramount, CA 90723, USA Tel : 310-532-0366 Fax : 310-532-99 Email : sales@abacomachines.com
Self-Adjusting Clutch (SAC) Technology Special tools / User instructions
 Technology Special tools / User instructions") Self-Adjusting Clutch (SAC) Technology Special tools / User instructions The content of this brochure shall not be legally binding and is for information purposes only. To the extent legally permissible,
Self-Adjusting Clutch (SAC) Technology Special tools / User instructions The content of this brochure shall not be legally binding and is for information purposes only. To the extent legally permissible,
Product card User manual. KP Strong Safe
 Product card User manual KP Strong Safe Grade IV - VI KONSMETAL Export Department export@konsmetal.pl KONSMETAL Service: phone: +48 89 6253799 (Monday Friday: 8-16) e-mail: serwis@konsmetal.pl Contents
0CV2. 0CV2 series dust explosion-proof three-phase. asynchronous motor INSTRUCTIONS. Siemens Standard Motors Ltd
 0CV2 0CV2 series dust explosion-proof three-phase asynchronous motor INSTRUCTIONS Siemens Standard Motors Ltd. 2017.02 1.0 Overview 0CV2 0CV2 series dust explosion-proof three-phase asynchronous motor
TSN (Cam-Over Wrench) Operating Instructions Rev 2.2 (4/13/2017)
 Operating Instructions Rev 2.2 (4/13/2017)") TSN Cam-Over Torque Wrenches The TSN is a preset torque wrench that's ideal for maintenance and production applications where over-torque conditions are not tolerated. The use of cam-over wrenches takes
TSN Cam-Over Torque Wrenches The TSN is a preset torque wrench that's ideal for maintenance and production applications where over-torque conditions are not tolerated. The use of cam-over wrenches takes
Service Manual Blue Giant
 R 2000 Service Manual Blue Giant Models PT-50 and PT-55 Developed by Super Stores Service This manual is intended for basic service and maintenance of the Blue Giant pallet jack. The pallet jacks you are
WALKING TREADMILL SF-T1407M USER MANUAL
 WALKING TREADMILL SF-T1407M USER MANUAL IMPORTANT! Please retain owner s manual for maintenance and adjustment instructions. Your satisfaction is very important to us, PLEASE DO NOT RETURN UNTIL YOU HAVE
Operation Manual For NDJ-9S Digital Rotary Viscometer
 Operation Manual For NDJ-9S Digital Rotary Viscometer 1 Contents 1. General... 2 2. Main technical data... 2 3. Working principle... 2 4. Installation... 3 5. Operation procedures... 4 6. Precautions...
HIGH FUEL PRESSURE LINE
 16 07 HIGH FUEL PRESSURE LINE High Pressure Pump Description This pump generates high fuel pressure and is driven by timing chain (radial plunger principle). This pump pressurizes the fuel to approx. 1600
Assembly, Use and Care
 Model 2000 SR Professional Rotary Spreader Assembly, Use and Care Thank You! You have purchased the highest quality professional broadcast spreader available on the market today. The Model 2000 SR is the
GPS AutoSteer System Installation Manual
 GPS AutoSteer System Installation Manual John Deere MFWD Valve Install Vehicles Supported Models 7200 7210 7400 7410 7600 7510 7700 7610 7800 7710 7810 PN: 602-0212-01-A LEGAL DISCLAIMER Note: Read and
USE AND MAINTENANCE MANUAL
 LATERAL TURNOVER 360 ORIGINAL INSTRUCTIONS INTRODUCTION This manual includes instructions for assembly, maintenance (regular and extraordinary), and for possible faults with remedies. The instructions
TECHNICAL MANUAL GTB16N
 TECHNICAL MANUAL GTB16N 1/20 1. INTRODUCTION 1.1 Purpose 1.2 Before Service 1.3 Safety 1.3.1 Hazard Definitions 1.3.2 For Your Safety 1.4 Specifications & dimensions 1.5 Description 2. HYDRAULIC SYSTEM
Figure 3-1. MK 67 MOD 7 gun cradle.
 CHAPTER 3 GROUND AND VEHICLE MOUNTS The MK 19 is used in either the ground- or vehicle-mount mode. The most often used ground mount is the M3 tripod. The M3 serves as a stable platform when the weapon
Repair Manual VW 02J gearbox. INA GearBOX
 Repair Manual VW 02J gearbox INA GearBOX Special tools Pipe section, 50 mm: Press fitting of synchronizer body for third/fourth gear. Assembly of support bearing for input and output shaft. Part number:
Z1 Free Ride (110) GENERAL
 GENERAL") GENERAL (110) 175 80 Ø 30 +0.05 0 L.MAX=493 L.L.=483 ±2 L.MIN=373 426 ±2 57 CORSA 110 TRAVEL 110 18 Ø 30 15 20 0-0.1 +1 0 248.5 Special ride and Downhill fork whose legs are damped by a spiral springs
GENERAL (110) 175 80 Ø 30 +0.05 0 L.MAX=493 L.L.=483 ±2 L.MIN=373 426 ±2 57 CORSA 110 TRAVEL 110 18 Ø 30 15 20 0-0.1 +1 0 248.5 Special ride and Downhill fork whose legs are damped by a spiral springs
OPERATOR S MANUAL EPT-55 HAND PALLET TRUCK WARNING
 OPERATOR S MANUAL EPT-55 HAND PALLET TRUCK ACTUAL PRODUCT MAY NOT APPEAR EXACTLY AS SHOWN WARNING Do not operate or service this product unless you have read and fully understand the entire contents of
Online version - not for reprint
 4. CLUTCH, CHAIN DRIVE, CHAIN BRAKE, CHAIN TENSIONER 4. Clutch Drum/Chain Sprocket 43RA007 VA 70RA005 VA - Remove the chain sprocket cover. Disengage the chain brake by pulling the hand guard toward the
Dealer4 Maintenance, Adjusting and Cleaning Manual ver: 1.0
 Dealer4 Maintenance, Adjusting and Cleaning Manual ver: 1.0 Version information: Ver 1.0: First issue : 14/04/2008 - use word Board instead of Card Box - combine with Delaer4 Adjusting Manual 1V0 1 1 Dealer4
Roller Door Operator
 INSTALLATION INSTRUCTIONS AND OWNERS MANUAL Roller Door Operator IMPORTANT PLEASE READ THESE INSTRUCTIONS CAREFULLY PRIOR TO COMMENCING THE INSTALLATION OF THE OPERATOR UNIT CAUTION This Automatic Opener
SERVICE PARTS LIST. M18 FUEL ONE KEY SAWZALL Reciprocating Saw H31A BULLETIN NO
 00 FIG. PART NO. DESCRIPTION OF PART NO. REQ. 1 45-12-0040 Gearcase Insulator 1 2 40-50-8805 Extension Spring 1 3 31-11-0105 Barrel Cam 1 4 34-60-3700 Retaining Ring 1 5 --------------- Front Cam 1 6 ---------------
Batch Plant Maintenance
 Batch Plant Maintenance Batch Plant Maintenance Preventative Maintenance PM Schedules Mixer (Haarup) Skip Hoist Cement Systems Pneumatic Valve Panels Water Systems Aggregate Bins & Equip Dust Collectors