3M AEROSPACE & COMMERCIAL TRANSPORTATION DIVISION St. Paul, MN USA or or Made in USA
|
|
|
- Eunice Davidson
- 6 years ago
- Views:
Transcription


1 3M AEROSPACE & COMMERCIAL TRANSPORTATION DIVISION St. Paul, MN USA or or Made in USA with US and Globally Sourced Materials 3M All rights reserved. 3M is a trademark of 3M Company.
2 IMPORTANT SAFETY INSTRUCTIONS WARNING When using electrical appliances or equipment, basic precautions should always be followed, including the following: a.) Read all instructions before using b.) To reduce the risk of injury, do not use near children c.) Do not contact moving parts. d.) Only use attachments and/or parts recommended or sold by the manufacturer. e.) Do not use outdoors. f.) To disconnect, turn all controls to the off ( O ) position, including turning timer to zero, then remove plug from outlet. g.) Do not unplug by pulling on cord. To unplug, grasp the plug, not the cord. h.) Unplug from outlet when not in use and before servicing or cleaning. i.) Do not operate with a damaged cord or plug, or if equipment malfunctions or is dropped or damaged in any manner. Contact the manufacturer for examination, repair, or electrical and/or mechanical adjustment. j.) Turn the power switch to the off position ( O ) when the equipment is not in use and before servicing or cleaning. k.) To reduce the risk of electrical shock, do not put equipment in water or other liquid. Do not place or store equipment where it can fall or be pulled into any type of liquid. l.) Connect to a properly grounded outlet only. See grounding instructions. Contact a qualified electrician if necessary. SAVE THESE INSTRUCTIONS AC-900 Manual page 1
3 GROUNDING INSTRUCTIONS WARNING This equipment must be grounded. In the event of malfunction or breakdown, grounding provides a path of least resistance for electrical current to reduce the risk of electric shock. This appliance is equipped with a cord having an equipment-grounding conductor and a grounding plug. The plug must be plugged into an appropriate outlet that is properly installed and grounded in accordance with all local codes and ordinances. DANGER - Improper connection of the equipment-grounding connector can result in a risk of electric shock. The conductor with insulation having an outer surface that is green with or without yellow stripes is the equipment-grounding conductor. If repair or replacement of the cord or plug is necessary, do not connect the equipment-grounding connector to a live terminal. Check with a qualified electrician or serviceman if the grounding instructions are not completely understood, or if in doubt as to whether the equipment is properly grounded. Do not modify the plug provided with the equipment if it will not fit the outlet, have the proper outlet installed by a qualified electrician. This equipment is for use on a nominal 120V circuit, and has a grounding plug that looks like the plug illustrated in sketch A. A temporary adaptor, which looks like the adaptor illustrated in sketches B and C, may be used to connect this plug to a 2-pole receptacle as shown in sketch B if a properly grounded outlet is not available. The temporary adaptor should be used only until a properly grounded outlet can be installed by a qualified electrician. The green colored rigid ear, lug, and the like, extending from the adaptor must be connected to a permanent ground such as a properly grounded outlet box cover. Whenever the adapter is used, it must be held in place by the metal screw. SAVE THESE INSTRUCTIONS AC-900 Manual page 2
4 OPERATING INSTRUCTIONS WARNING Read, understand, and adhere to all instructions and warnings completely and carefully before using equipment. If anything is not absolutely clear, contact the manufacturer for clarity before using the equipment to reduce the risk of injury. CAUTION Always wear safety goggles and gloves and if necessary, respiratory protection (see Safety Data Sheet) when operating or cleaning equipment particularly when material is involved. Contact your material manufacturer for specifics. WARNING To reduce the risk of electric shock, unplug before cleaning and/or servicing. AVERTISSEMENT: Pour réduire le risqué de débranchez avant le nettoyage ou l entretien choc électrique, Replace fuse with Fast Acting 250V, 5A fuse only Remplacer avec Fast 250V interim, 5A fusible seulement Description The Model AC-900 Automatic Mixer is designed to perform the complete mixing operation of cartridge packaged materials. Stroking of the dasher rod is accomplished by means of a reversing air cylinder and the rotation of the dasher rod is accomplished by a quiet, high quality, induction gear motor, therefore the service requirement for this unit are compressed air (60psi, 1.5 C.F.M.) and 115V, 60 Hz, 1 Phase, 5 Amps. The rotation speed of the motor is constant depending on load, but the stroking length and speed of the air cylinder can be varied by adjustments. The most effective stroking speed for most materials is between 16 and 22 strokes per minute. The stroke speed on the Model AC-900 Automatic Mixer has been pre-set at mid-point for the six fluid ounce cartridges, so the speed will be a few strokes per minute slower for the eight fluid ounce cartridges and a few strokes per minute faster for the two and one-half fluid ounce cartridges. AC-900 Manual page 3
5 The instruction plate attached to the left-hand side of the box lists the cartridge size/dasher rod size, the proper spindle number and upper stroke adjustment rod to use, and the correct setting in inches for the down stroke adjustment rod. This is a guide for full kits only. Most likely, the sealant you will be mixing is not a full kit. Select kit to be mixed and prepare for mixing as stated in the instructions on side of the box OR follow instructions below for a non-full kit / short package. Determine if cartridge is fully packaged or is a short package and make appropriate down stroke adjustment as shown on instructions on side of box. A cartridge is fully packaged when material in dasher rod has been injected or barrier has erupted, and the rim of plunger is 3/16 from end of cartridge while dasher rod is pushed all the way to touch plunger. If cartridge is not fully packaged, shorten down stroke by the difference in inches of the location of the plunger between a fully packaged cartridge and the actual location of the plunger. OR you can perform the following under Full Instructions : WARNING - Do not operate this device in explosive atmospheres, such as in the presence of flammable liquids, gases or dust. WARNING - If materials spill, disconnect power and follow Safety Data Sheet (SDS) for spill cleanup procedure. WARNING Dispose of mixer in accordance with all applicable regulations. Quick Instructions: If you are not familiar with the mixer, please proceed to Full Instructions 1. Ensure the OFF / MIX switch on the top of the mixer is in the OFF position 2. Remove air cylinder cap assembly from carriage plate and insert cartridge, rod end first, through mounting hole in carriage plate. 3. Pull dasher rod down onto pins of the drive spindle. 4. Grasp cartridge and pull down until it is fully seated in carriage plate; then install and lock air cylinder / cap assembly by twisting pins (by hand only!) into carriage plate ears. 5. Turn timer knob to desired number of minutes for mixing. (If mix period is less than two minutes, timer must be turned past two minutes then returned to the desired time); keeping fingers and all extremities clear, flip switch on top of machine to MIX position which will begin the cycle of machine and mixing of material in cartridge. 6. When timer has completed its cycle, both air and electric power will be shut off and cartridge may be removed. AC-900 Manual page 4
6 7. Remove cartridge by first putting OFF / MIX switch in OFF position. 8. Unlock (twist) and remove air cylinder/cap assembly. 9. Remove dasher rod from drive spindle and then lift cartridge through carriage plate for use as required. CAUTION: Keep clear of all possible moving parts ie. Carriage plate cycling and spindle turning. CAUTION: Disconnect air supply and/or electrical power when equipment is not in use, and before servicing. AC-900 Manual page 5
7 Full Instructions Model AC-900 Automatic Mixer 1. Identify which kind of packaged material you desire to mix. Is it barrier or injection style? 2. Then, determine the size cartridge and rod you are desiring to mix, and use the appropriate spindle and upper adjusting rod. AC-900 Manual page 6


8 3. The upper rods are located on the back of the mixer in the rack and are numbered to make identifying the correct upper rod easier. AC-900 Manual page 7


9 4. Ensure the Model AC-900 Automatic Mixer is switched to OFF position on switch. This will make certain the machine does not cycle. 5. Ensure timer is set to 0, or no time. This will make certain the machine does not cycle. 6. Plug mixer into proper electrical outlet 110V for standard mixer. AC-900 Manual page 8

10 7. Plug mixer hose fitting (Hansen) into your regulated shop air supply. We recommend setting the shop air regulator between psi: AC-900 Manual page 9


11 8. The air cylinder assembly regulator located on the back of the mixer is preset at the factory to 12psi. If adjustment is needed, carefully follow these instructions, otherwise proceed to step #9: Turn the Model AC-900 Automatic Mixer around so that you can access the back of the machine. Keep clear of all possible moving parts ie carriage plate cycling, and spindle turning. Carefully and continuing to keep clear of all moving parts, flip switch on machine to MIX then turn timer slightly to get machine to turn on and cycle. The mixer will immediately cycle and dry run. This will allow you to set the regulator on the back of the Model AC-900 Automatic Mixer for the cap assembly. The purpose of the cap assembly is to hold the plunger in place when the cartridge is locked into the carriage plate. You can only set the pressure of this regulator when the mixer is cycling. As mixer is now cycling, pull black knob out on the regulator, turn to the desired pressure, then push knob back in to the locked position. We recommend setting this regulator at 10-12psi for most materials. Turn machine to OFF and set timer back to 0. Turn the Model AC-900 Automatic Mixer back around to access the front of the machine. 9. The mixer is now ready for you to prepare the packaged material. Depending upon the type of packaged material, either inject the catalyst into the base (for injection style) according to manufacturer s instructions OR remove barrier tape band, depress firmly around this area to break barrier, then push dasher rod to the back of the cartridge to the plunger to push the barrier all the way to the back of the cartridge so that it is out of the way for mixing. Remove any flange cap from the back of the cartridge if necessary. AC-900 Manual page 10

12 10. Push and twist firmly, yet carefully the dasher rod so that the dasher blade inside the cartridge is seated against the plunger located at the bottom of the cartridge. This is basically performing a full down stroke for the cartridge of material you are preparing to mix. AC-900 Manual page 11
13 11. Firmly with both hands, carefully pull up on the carriage plate assembly towards the MANUAL DOWN poppet valve : 12. Place cartridge into carriage plate assembly, rod end first, and place dasher rod onto spindle pins. Note that the carriage plate will move down as you perform this AC-900 Manual page 12
14 13. Pull cartridge down into carriage plate so that the cartridge flange is seated into the carriage plate and lock into place with the cap assembly. Push MANUAL UP poppet to release air, if necessary. Tighten by using the pin for leverage, but only tighten by hand. Do NOT over tighten and do NOT use tools such as a hammer, etc. 14. Now, loosen knurled knob that s holding the adjusting rod assembly. AC-900 Manual page 13

15 15. With both hands, pull down firmly on carriage plate assembly until mixing blade seats onto plunger inside cartridge. You will feel the resistance as you pull down. AC-900 Manual page 14


16 16. Turn / screw adjusting rod assembly until it pushes down on the poppet valve on the mounting plate about ¼ of the way down. Lock it down with the knurled knob. 17. This is now the distance you have set for the down stroke of the machine to the cartridge you are mixing. You may need to fine tune the length of the stroke slightly. Do this by the adjusting rod. 18. Make certain machine is clear and safe to cycle. AC-900 Manual page 15


17 19. Turn machine to MIX KEEP CLEAR OF ALL MOVING PARTS 20. Turn timer to material manufacturer s specified mixing time recommendations KEEP CLEAR OF ALL MOVING PARTS MIXER WILL BEGIN TO CYCLE AC-900 Manual page 16
18 21. Mixer will automatically stop when timer reaches zero 22. You can test to see if the mixer is set up properly by holding in the poppet valves and observing the dasher inside the cartridge spinning at the up stroke and the down stroke. 23. When time expires at the determined amount of time, the mixer will automatically stop. Turn switch back to OFF, and then remove the now mixed cartridge of material by removing the air cylinder assembly, and then the cartridge. Your material is now mixed and ready to dispense! CAUTION: Disconnect air supply and/or electrical power when equipment is not in use, and before servicing. Technical Information: The technical information, recommendations and other statements contained in this document are based upon tests or experience that 3M believes are reliable, but the accuracy or completeness of such information is not guaranteed. Product Use: Many factors beyond 3M s control and uniquely within user s knowledge and control can affect the use and performance of a 3M product in a particular application. Given the variety of factors that can affect the use and performance of a 3M product, user is solely responsible for evaluating the 3M product and determining whether it is fit for a particular purpose and suitable for user s method of application. Warranty, Limited Remedy, and Disclaimer: Unless an additional warranty is specifically stated on the applicable 3M product packaging or product literature, 3M warrants that each 3M product meets the applicable 3M product specification at the time 3M ships the product. 3M MAKES NO OTHER WARRANTIES OR CONDITIONS, EXPRESS OR IMPLIED, INCLUDING, BUT NOT LIMITED TO, ANY IMPLIED WARRANTY OR CONDITION OF MERCHANTABILITY OR FITNESS FOR A PARTICULAR PURPOSE OR ANY IMPLIED WARRANTY OR CONDITION ARISING OUT OF A COURSE OF DEALING, CUSTOM OR USAGE OF TRADE. If the 3M product does not conform to this warranty, then the sole and exclusive remedy is, at 3M s option, replacement of the 3M product or refund of the purchase price. Limitation of Liability: Except where prohibited by law, 3M will not be liable for any loss or damage arising from the 3M product, whether direct, indirect, special, incidental or consequential, regardless of the legal theory asserted, including warranty, contract, negligence or strict liability. AC-900 Manual page 17

19 FAQ: ARE THE CAP ASSEMBLY PINS SUPPOSED TO FULLY ENGAGE THE CARRIAGE PLATE EARS? The pins slightly engage the two carriage plate ears. The pins may not necessarily engage fully when the machine is new. As the carriage plate wears and with cartridge variation, the pins will engage the ears deeper. The third pin must face the operator and is only used to hand tighten the cap into the carriage plate. Do not tap on the third pin with a hammer or other tool. This may damage or break the carriage plate. The motion of mixing a cartridge naturally tightens the cartridge into the carriage plate. The cap assembly is only used to keep the cartridge in place and from rotating. If the material is highly viscous, you may need to adjust the regulator on the back of the Model AC-900 Automatic Mixer to slightly increase the air pressure to hold the plunger in place. If required, we recommend increasing in 2 psi increments until the proper pressure is achieved. This varies based upon materials, but 10-12psi should be sufficient for most materials. (To adjust, see step #8 above) AC-900 Manual page 18


20 FAQ: HOW DO I ADJUST THE UP STROKE AND/OR DOWN STROKE SPEED? The mixer is set at the factory to mix approximately 20 strokes per minute at 60 psi. However, you may need to adjust the stroke speed depending upon materials and/or type of packaging you are using. ADJUST THESE SCREWS ON THE PILOT VALVE COUNTERCLOCKWISE TO SLOW DOWN THE SPEED OF THE STROKE. ONE SCREW IS FOR THE UP STROKE, THE OTHER IS FOR THE DOWN STROKE. YOU WANT TO KEEP THEM EVEN WHEN MIXING. The upper screw adjusts the up stroke speed. The lower screw adjusts the down stroke speed. (View from the back of the Model AC 900 Automatic Mixer) AC-900 Manual page 19


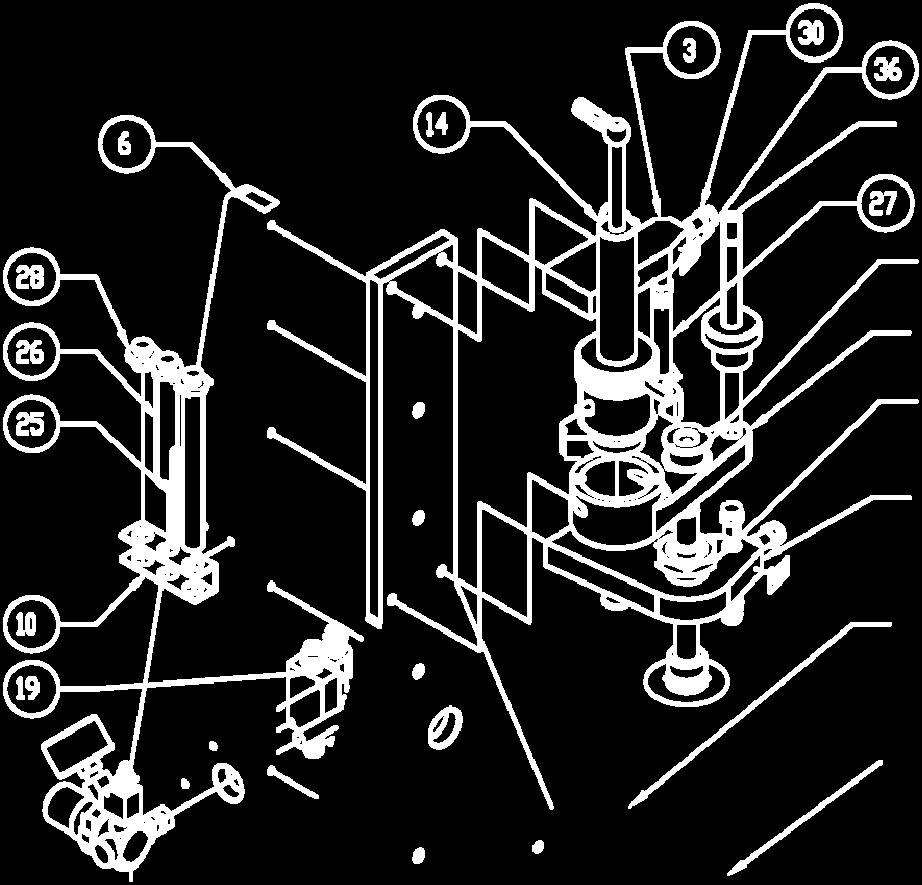
21 MODEL AC-900 EXPLODED VIEW AC-900 Manual page 20
22 AC-900 Manual page 21 Model AC-900 Automatic Mixer
23 Periodic Maintenance for Model AC 900 Automatic Mixer The Model AC-900 Automatic Mixer will provide you many years of service if maintained and used properly. The Model AC-900 Automatic Mixer uses a high quality, quiet, induction motor which is brushless, making the motor maintenance free. The machine itself needs to be kept wiped clean of all material. Also, make certain you are using a supply airline that is filtered and regulated. Periodically, inspect mixer air lines (hoses and tubing) and poppet valves (821342) for possible leaks and replace immediately if any leaks are found. CAUTION: Disconnect air supply and electrical power when equipment is not in use, and before servicing. AC-900 Manual page 22

24 Manufacturer s Warranty IF OPERATOR MANUAL INSTRUCTIONS ARE FOLLOWED AND MACHINE IS USED UNDER NORMAL CONDITIONS, WE WILL COVER ANY PART FAILURE UP TO 1 YEAR FROM PURCHASE DATE. PRODUCT REGISTRATION WITHIN 4 WEEKS OF PURCHASE DATE IS REQUIRED. Keep this for your records: Product: Model AC-900 Automatic Mixer Serial Number: Purchase Date: REGISTER ONLINE: Then, click the Product Registration tab For product assistance, product support, technical support, replacement parts, and/or product registration, please have your Model AC-900 Automatic Mixer serial number ready and contact the manufacturer: Notron Manufacturing, Inc. 801 W Milford Street Glendale, CA USA office fax sales@notronmfg.com AC-900 Manual page 23
25 This page intentionally left blank AC-900 Manual page 24
GM Specification Annual Test Data
 GM Specification Annual Test Data GM Specification Annual Test Data Technical Bulletin The 3M IATD Quality Laboratory tested the following tapes to the Automotive Specification. The results of the testing
GM Specification Annual Test Data
 GM Specification Annual Test Data GM Specification Annual Test Data Technical Bulletin The 3M IATD Quality Laboratory tested the following tapes to the Automotive Specification. The results of the testing
Door Edge Protection Film 36 inch
 Door Edge Protection Film 36 inch Technical Data Sheet June, 2013 3M Part No.(s) PN 3M Part Descriptor(s) Door Edge Protection Film 36 inch Product Description 3M Door Protection Film is a super tough
HAWK. HAWK G2 Raptor Orbital Floor Machine Dry Stripping, Scrubbing, Stripping. Operation Care Service ENTERPRISES
 HAWK ENTERPRISES HAWK G2 Raptor Orbital Floor Machine Dry Stripping, Scrubbing, Stripping Operation Care Service Ÿ HAWK ENTERPRISES 2902 Park Six Court, Elkhart, IN 46514 (574) 294-1910 (888) 289-4295
3M TM Cubitron TM II Bonded Abrasive Grinding and Cut-Off Wheels. born to. grind. It s grinding reinvented. Featuring. cut & grind wheels
 3M TM Cubitron TM II Bonded Abrasive Grinding and Cut-Off Wheels. born to grind. It s grinding reinvented. Featuring NEW cubitron ii cut & grind wheels Grinding Reinvented 3M TM Cubitron TM II bonded abrasive
3M Cushion-Mount Plus Plate Mounting Tapes with Easy Mount Adhesive
 3 3M Cushion-Mount Plus Plate Mounting Tapes with Easy Mount Adhesive Technical Bulletin October, 2009 Description 3M Cushion-Mount Plus Plate Mounting Tapes with Easy Mount Adhesive incorporate several
ALITA LINEAR AIR PUMP OPERATION & MAINTENANCE MANUAL. AL- Model Number Date Code / Serial Number Date of Purchase
 ALITA LINEAR AIR PUMP OPERATION & MAINTENANCE MANUAL AL- Model Number Date Code / Serial Number Date of Purchase LIMITED WARRANTY ALITA warrants to the original retail consumer purchaser ( Customer ) that
3MTM CubitronTM II Bonded Abrasive Grinding and Cut-Off Wheels. BORN TO GRIND. IT S GRINDING REINVENTED.
 3MTM CubitronTM II Bonded Abrasive Grinding and Cut-Off Wheels. BORN TO GRIND. IT S GRINDING REINVENTED. 13020160.indd 1 2/8/13 9:46 PM GRINDING REINVENTED 3MTM CubitronTM II bonded abrasive grinding and
OWNERS MANUAL IMPORTANT: READ OWNERS MANUAL CAREFULLY MODEL # SQUARE CAT XT OSCILLATING FLOOR MACHINE
 OWNERS MANUAL IMPORTANT: READ OWNERS MANUAL CAREFULLY MODEL # SQUARE CAT XT OSCILLATING FLOOR MACHINE FOR YOUR CONVENIENCE, RECORD THE FOLLOWING IMPORTANT INFORMATION MODEL: SERIAL NUMBER: DATE PURCHASED:
3M Automotive Aftermarket. 3M Blue Abrasives. The upgrade you ve been waiting for.
 3M Automotive Aftermarket 3M Blue Abrasives. The upgrade you ve been waiting for. 3M Stikit Blue Abrasive Disc 3M Blue Abrasives are your go-to workhorse for the entire shop. 5" 3M Hookit Blue Abrasive
3M Collision Repair Solutions. 3M Abrasives and Power Tools. Cutting & Grinding. for Body Techs
 3M Collision Repair Solutions 3M Abrasives and Power Tools Cutting & Grinding for Body Techs 3M Disc Sander Ideal for general metal fabrication applications, including grinding, blending, weld leveling
THE RAPTOR SERIES HAWK ENTERPRISES, INC RAPTOR 2618 RAPTOR Hawk Enterprises Park Six Court Elkhart, IN 46514
 HAWK ENTERPRISES, INC THE RAPTOR SERIES RAPTOR 2618 RAPTOR 2014 Hawk Enterprises 52744 Park Six Court Elkhart, IN 46514 Phone: 574-294-1910 Toll Free: 888-289-4295 Fax: 574-970-0289 Toll Free 866-429-5329
Hawk Enterprises of Elkhart THE BRUTE Owner s Manual
 Hawk Enterprises of Elkhart THE BRUTE Owner s Manual Operation Care Service COMMERICAL/INDUSTRIAL DUTY STONE RESTORATION MACHINE 13, 15, 17, 20 165 RPM 1.5 HP 180 FRAME TOTALLY ENCLOSED FAN COVERED MOTOR
Operation Care Service
 HAWK ENTERPRISES OF ELKHART, INC Glide Floor Machine Owner s Manual Operation Care Service Hawk Enterprises 52744 Park Six Court Elkhart, IN 46514 Phone: 574-294-1910 Toll Free: 888-289-4295 Fax: 574-970-0289
Operation Care Service
 HAWK ENTERPRISES OF ELKHART, INC Standard Floor Machine Owner s Manual Operation Care Service 13 175 RPM 1.5 HP 15 175 RPM 1.5 HP 17 175 RPM 1.5 HP 20 175 RPM 1.5 HP 13 160 RPM 1.5 HP XHD 15 160 RPM 1.5
Intended Use: Explanation of Signal Word Consequences
 SAFETY INFORMATION & INSTRUCTION MANUAL Please read, understand, and follow all safety information contained in these instructions prior to the use of this device. Retain these instructions for future
MINI-EDGER POLISHER/SCRUBBER
 MINI-EDGER POLISHER/SCRUBBER INTRODUCTION OPERATING & MAINTENANCE INSTRUCTIONS READ THIS BOOK This operator s book has important information for the use and safe operation of this machine. Read this book
SMC/Fiberglass Repair Adhesive - 90
 SMC/Fiberglass Repair Adhesive - 90 Technical Data Sheet June, 2014 3M Part No.(s) 3M Part Descriptor(s) 3M SMC/Fiberglass Repair Adhesive - 90 Product Description 3M SMC/Fiberglass Repair Adhesive - 90,
PRODUCT MANUAL TILE CUTTING MACHINE. . Operation. Parts List and Diagram SPECIFICATIONS CAUTION:
 FLORCRAFTT TM PRODUCT MANUAL SKU NUMBER 709-4242 SERIAL NUMBER: CAUTION: FOR YOUR OWN SAFETY READ INSTRUCTION MANUAL COMPLETELY AND CAREFULLY BEFORE OPERATING THIS 7 TILECUTTING MACHINE SPECIFICATIONS
Dual Lock Reclosable Fasteners Roll Goods with Pressure Sensitive Adhesive
 3 Dual Lock Reclosable Fasteners Roll Goods with Pressure Sensitive Adhesive Technical Data Sheet June 2012 General Description Applications 3M Dual Lock Reclosable Fasteners are positive-locking, blind
protect mask conduct reflect enhance 3M Specialty Tape Solutions
 3M Specialty Tape Solutions protect enhance mask reflect conduct 1 quiet & more Meeting application challenges for appliances, aerospace, automotive, construction, MRO, electronics, commercial transport,
Operating Instructions & Parts Manual. Supa-Lite Lever Grease Gun. Model 48UJ77
 Operating Instructions & Parts Manual EN Supa-Lite Lever Grease Gun Model 48UJ77 PLEASE READ AND SAVE THESE INSTRUCTIONS. READ CAREFULLY BEFORE ATTEMPTING TO ASSEMBLE, INSTALL, OPERATE OR MAINTAIN THE
Dual/Triple Manifold Water Filtration Systems Instruction Manual
 3M TM Water Filtration Products Dual/Triple Manifold Water Filtration Systems Instruction Manual High Flow Series Water Filtration Systems Installer: Please leave this manual with owner/operator. 3M Water
Panel Bonding Adhesive
 Panel Bonding Adhesive Technical Data August 2017 Product Description 3M Panel Bonding Adhesive is a two-part epoxy adhesive which provides extended work-time but can be rapidly cured with heat. 3M Panel
Automotive-Ready Portfolio of 3M Double Sided Tapes. Ready to go further. The future of automotive design begins here.
 Ready to go further. The future of automotive design begins here. Unleash your design freedom Ŕ Ŕ Quickly and securely attach lightweight and hard-to-bond materials Design-ready. Production-ready. Future-ready.
3M Cold Shrink Silicone Rubber Outdoor Termination Kit QT-III 7600-S-3W Series
 3M Cold Shrink Silicone Rubber Outdoor Termination Kit QT-III 7600-S-3W Series For 3-Conductor Copper Tape Shield Cables without Ground Wires Instructions IEEE Std. No. 48 Class 1 Termination CAUTION Working
SAFETY INFORMATION & INSTRUCTION MANUAL
 SAFETY INFORMATION & INSTRUCTION MANUAL Please read, understand, and follow all safety information contained in these instructions prior to the use of this device. Retain these instructions for future
Electronic Materials Brochure
 Electronic Materials Brochure TABLE OF CONTENTS 3 Introduction to Materials 4 ISODAMP C-8000 Materials 6 ISOLOSS SL Molding Materials - Thermosets 8 CONFOR EG Foams CONFOR SC Foams ISODAMP C-8000 MATERIALS
3M Locator Plate
 M Locator Plate 44-94 Instructions for the assembly of M Socket Connectors,.100" x.100" and.100" x.200" 1.0 General M Manual and Pneumatic Assembly Presses and accessory assembly equipment are recommended
3M Cold Shrink Silicone Rubber Termination QT-III 7600-S-3G Series Three-Core Outdoor Termination
 3M Cold Shrink Silicone Rubber Termination QT-III 7600-S-3G Series Three-Core Outdoor Termination Instructions IEEE Std. No. 48 Class 1 Termination CAUTION Working around energized electrical systems may
Instruction Manual For Baldor Buffers
 No. 280F Replaces 280E LB7011 Instruction Manual For Baldor Buffers SAFETY NOTICE: WARNING statements describe conditions that may lead to personnel injury including potentially fatal injuries if the machine
Dual Flow Manifold Systems Instruction Manual
 3M TM Water Filtration Products Dual Flow Manifold Systems Instruction Manual For DF1XX and DF2XX High Flow Series manifolds and water filtration systems Installer: Please leave this manual with owner/operator.
Scale Feeder Manifold Water Filtration System Instruction Manual
 3M TM Water Filtration Products Scale Feeder Manifold Water Filtration System Instruction Manual For SF1XX High Flow Series Water Filtration Systems Installer: Please leave this manual with owner/operator.
Buffer 8125 Owner s Manual
 3M Buffer 8125 Owner s Manual A table of contents: A. SAFETY INFORMATION 1 B. OPERATING INSTRUCTION 4 C. SPARE PARTS INFORMATION (exploded view) 5 D. DISASSEMBLY METHOD 7 E. ASSEMBLY METHOD 10 F. GUIDELINE
Finish Line. Redefining The. NEW 3M Elite Series Air-Powered Random Orbital/Orbital Sanders NEW 3M Electric Random Orbital Sanders
 NEW 3M Elite Series Air-Powered Random Orbital/Orbital Sanders NEW 3M Electric Random Orbital Sanders Redefining The Finish Line 3M Elite Series Sanders NEW Elite Series Air-Powered Sanders and NEW Electric
3M PPS Series 2.0 Spray Cup System The next evolution of painting productivity.
 3M PPS Series 2.0 Spray Cup System The next evolution of painting productivity. Better. To help make you better. As a painter, you take great pride in your work. You know that the ultimate quality of the
G E N E S I S R O C v AUTOMATIC REPLENISHMENT MODULE
 G E N E S I S R O C v AUTOMATIC REPLENISHMENT MODULE INSTALLATION AND USE Congratulations on your purchase of the GENESIS ROCv Automatic Replenishment Module! Please take a few moments to read and follow
Conductor Strength Tests on ACCR 1622TW T13 Pecos Conductor
 Conductor Strength Tests on ACCR 1622TW T13 Pecos Conductor 3M HCC Testing Laboratory August 5, 2011 Phu Trac Sr. Quality Engineer: Phu Trac Technical Manager: Dr. Herve Deve Lead Development Specialist:
Cable Ties. Data Sheet
 Cable Ties Data Sheet Product Description 3M Cable Ties are molded from 6/6 Nylon and are available in a variety of sizes, styles and colors including weather resistant black for outdoor use. Agency Listings
Quick Start Guide Expansion Battery Pack UPS-OLEBPR-1 UPS-OLEBPR-2
 Quick Start Guide Expansion Battery Pack UPS-OLEBPR-1 UPS-OLEBPR-2 THANK YOU Thank you for purchasing a UPS-OLEBPR expansion battery pack. Please read these instructions thoroughly before installing this
710 Splicing Rig. Instructions. January E
 710 Splicing Rig Instructions January 2007 Table of Contents 1.0 General Statement...4 2.0 3M 710-UTK25A Splicing Rig and Field Maintenance Kit...4 3.0 Straight Splicing using the 3M 710 25-pair modules...6
3M No Polish Connector 8800-APC/AS SM SC/APC, Angle Splice, 250/900 µm Instructions
 3M No Polish Connector 8800-APC/AS SM SC/APC, Angle Splice, 250/900 µm Instructions February 2008 78-8140-1581-0 Contents 1.0 Summary...3 2.0 Connector Preparation...4 3.0 Fiber Preparation...4 4.0 Fiber
MODEL #303 PLUNGING MACHINE
 NOTRON Manufacturing, Inc. MODEL #303 PLUNGING MACHINE 801 Milford St. Glendale, CA 91203 Tel: (818) 247-7739 Fax: (818) 247-7689 dave@notronmfg.com 303 PLUNGING MACHINE CAUTION: ALWAYS WEAR SAFETY GLASSES
Users Guide for Ac-sync
 Problem solved. Users Guide for Ac-sync Thank you for choosing Anywhere Cart! The AC-SYNC is designed to sync, charge and store 1-36 ipads or tablets. Adjustable device divider bays allow fitment of any
Technical Data 3M Petroleum Sorbents
 Technical Data 3M Petroleum Sorbents Use For control of spills of hydrocarbons on water or land. 3M Petroleum Sorbents repel water and will float (as long as surfactants are not also present). Product
3M Locator Plate
 3M Locator Plate 3443-113 Instructions for the Assembly of 3M Tripolarized Wiremount Sockets 1.0 General The 3M Locator Plate 3443-113 was designed to aid in the assembly of the 3M Mini Socket Connector.50
SUNTURA HD SOLAR TRACKER
 WindyNation SUNTURA HD SOLAR TRACKER SOT-TRKS-NFHD User s Manual Page 1 of 11 WindyNation 08/09/2012 Table of Contents 1! Introduction... 3! 1.1! Limited Warranty... 3! 1.2! Restrictions... 3! 1.3! Warranty
POLISHERS 17 & 20 DUAL SPEED OPERATING & MAINTENANCE
 POLISHERS 17 & 20 DUAL SPEED MODELS INTRODUCTION OPERATING & MAINTENANCE INSTRUCTIONS This operator s book has important information for the use and safe operation of this machine. Read this book carefully
TABLE OF CONTENTS. Section 1 - Important Safety Instructions Section 2 - Grounding Instructions Section 3 - Operator Cautions...
 Light Tools - DC Screwdriver Operation & Maintenance Manual For Models: SKD-2000L/UL/B, SKD-2200L/UL/B, SKD-2300L/UL/B SKD-5200L/UL/B, SKD-5200P/UL/B SKD-5300L/UL/B, SKD-5300P/UL/B Dixon Automatic Tool
Composite Conductor 267-T16 ACCR. Deadend Strength Tests for 267-T16 ACCR
 Composite Conductor 267-T16 ACCR Deadend Strength Tests for 267-T16 ACCR Principal Investigator: Dr. Colin McCullough Reviewed by: Dr. Herve Deve Date of Report: March 24, 2010 Deadend Strength Tests for
LESTRONIC II BATTERY CHARGER BUILT-IN OR PORTABLE CHARGERS
 LESTRONIC II BATTERY CHARGER BUILT-IN OR PORTABLE CHARGERS PLEASE SAVE THESE IMPORTANT SAFETY AND OPERATING INSTRUCTIONS For correct operation of the equipment, it is important to read and be familiar
Matala. VersiFlow Series. Instruction and Maintenance Manual
 VersiFlow Series High Flow Multi-Purpose "Versatile " Pump V-3200 1/5HP 150W / Discharge 2 V-3900 1/3HP 250W / Discharge 2 V-4700 1/2HP 400W / Discharge 2 V-5600 1HP 750W / Discharge 2 Instruction and
3M No Polish LC/APC Connector SM, Angle Splice, 250/900 µm 8830-APC/AS
 3M No Polish LC/APC Connector SM, Angle Splice, 250/900 µm 8830-APC/AS Instructions January 2009 78-8140-3691-5-A Contents 1.0 Summary...3 2.0 Connector Preparation...4 3.0 Fiber Preparation...4 4.0 Fiber
SUNTURA SOLAR TRACKER
 WindyNation SUNTURA SOLAR TRACKER SOT-TRKS-NF User s Manual Page 1 of 10 WindyNation 08/09/2012 Table of Contents 1 Introduction... 3 1.1 Limited Warranty... 3 1.2 Restrictions... 3 1.3 Warranty Claims
SLiC Aerial Terminal and Spiral End Seal for use with AMP* Quiet Front Terminal Blocks
 SLiC Aerial Terminal and Spiral End Seal for use with AMP* Quiet Front Terminal Blocks Instructions June 2002 78-8130-2161-1-B 1 Contents: 1.0 General... 3 2.0 Kit Contents... 3 3.0 Cable Preparation...
3M Cold Shrink QT-III Silicone Rubber Three-Core Termination Kits
 3M Cold Shrink QT-III Silicone Rubber Three-Core Termination Kits With High-K Stress Relief For 3-Conductor Type G (Ground Wire), Copper Tape Shield, Armored Cables 7600-S-3G Series Instructions IEEE Std.
Repair Method for 3M Resilient Floor Protection System
 May 2013 Technical Bulletin Repair Method for 3M Resilient Floor Protection System Description The 3M Resilient Floor Protection system is designed to allow spot repair of areas damaged by scratching,
Full Flow Drinking Water System Model: 3MFF100
 Installation and Operating Instructions For Full Flow Drinking Water System Model: 3MFF100 System tested and Certified by NSF International against NSF/ANSI Standard 42 and 53 for the reduction of the
3M No Polish Connector 8800-APC/AS SM SC/APC, Angle Splice, 250/900-µm. Instructions. October C
 3M No Polish Connector 8800-APC/AS SM SC/APC, Angle Splice, 250/900-µm Instructions October 2010 78-8140-1581-0-C Contents 1.0 Summary...3 2.0 Connector Preparation...4 3.0 Fiber Preparation...4 4.0 Fiber
LESTRONIC II BATTERY CHARGER MODEL 19740
 *01679* LESTRONIC II BATTERY CHARGER MODEL 19740 PLEASE SAVE THESE IMPORTANT SAFETY AND OPERATING INSTRUCTIONS For correct operation of the equipment, it is important to read and be familiar with this
Dual Port Manifold Water Filtration Systems Instruction Manual
 M TM Water Filtration Products Dual Port Manifold Water Filtration Systems Instruction Manual For DP1XX, DP2XX and DPXX High Flow Series Water Filtration Systems Installer: Please leave this manual with
50 Ft. Retractable Cord Reel
 50 Ft. Retractable Cord Reel with Triple Tap Owner s Manual WARNING: Read carefully and understand all ASSEMBLY AND OPERATION INSTRUCTIONS before operating. Failure to follow the safety rules and other
Angle Grinder Holder
 Angle Grinder Holder Owner s Manual WARNING: Read carefully and understand all ASSEMBLY AND OPERATION INSTRUCTIONS before operating. Failure to follow the safety rules and other basic safety precautions
Shaping. the future. Introducing. 3M Cubitron II Abrasive Belts NEW! 994F and 997F for high pressure applications
 NEW! 3M Cubitron II Abrasive Belts Introducing 994F and 997F for high pressure applications Shaping the future Revolutionary shaped abrasive grain grinds cooler and dramatically faster. Now engineered
Customer Support
 Portable auxiliary air tanks owner's Manual aux05 aux05a aux10 WWW.CALIFORNIAAIRTOOLS.COM Customer Support 1-866-409-4581 TAbLe OF CONTeNTS INTROduCTION IntroductIon Important Safety InStructIonS components
Record the serial number and date of purchase in your manual for future reference.
 Air Filtration System Model: 61-200 Owner s Manual Record the serial number and date of purchase in your manual for future reference. Serial number: Date of purchase: For more information: www.rikontools.com
Increasing load transfer in bolted joints
 Increasing load transfer in bolted joints with 3M Friction Shims January 2017 3M Advanced Materials Division Load transfer in bolted joints 1. Shear Joint: the applied loading is at right angles to the
Users Manual Certified Series Direct Drive Pump 1-7 LPM
 Users Manual Certified Series Direct Drive Pump 1-7 LPM Safety, Operating, Installation, and Maintenance Instructions 600 S 56 th Street #9 Chandler, AZ 85226 Phone: 480-507-6478 Fax: 480-838-2232 www.fogco.com
Cold Shrink - Silicone Rubber QTII(X)4S-32H Series Cable Termination Instructions
4S-32H Series Cable Termination Instructions") Cold Shrink - Silicone Rubber QTII(X)4S-32H Series Cable Termination Instructions Class I Indoor Termination Voltage Designation: 12/20(24) kv Kit Contents: 1 HeatShrinkBreakoutBootAssembly 3 HeatShrinkBindingSleeves
Cold Shrink - Silicone Rubber QTII(X)4S-32H Series Cable Termination Instructions Class I Indoor Termination Voltage Designation: 12/20(24) kv Kit Contents: 1 HeatShrinkBreakoutBootAssembly 3 HeatShrinkBindingSleeves
OWNER S MANUAL SELF-PRIMING PORTABLE UTILITY PUMP
 Model 54011-0 OWNER S MANUAL SELF-PRIMING PORTABLE UTILITY PUMP Questions, problems, missing parts? Before returning to the store call AQUAPRO Customer Service 8 a.m. - 5 p.m., EST, Monday-Friday 1-844-242-2475
3 Scotch-Weld. User s Manual. Polyurethane Reactive Adhesive Applicator. Use only with 3M Scotch-Weld Polyurethane Reactive Adhesives
 3 Scotch-Weld Polyurethane Reactive Adhesive Applicator User s Manual 120V. USA 100V. JAPAN 120V. USA REFURB Use only with 3M Scotch-Weld Polyurethane Reactive Adhesives Please read all instructions before
3M Closure System 2-Type Cover (505)
") 3M Closure System 2-Type Cover (505) Installation Instructions May 2009 78-8140-1009-2-B Contents 1.0 3M Closure Kit 2-Type Contents...3 2.0 Cover Installation...4 3.0 Closure Re-entry...6 4.0 Accessories...9
3M Closure System 2-Type Cover (505) Installation Instructions May 2009 78-8140-1009-2-B Contents 1.0 3M Closure Kit 2-Type Contents...3 2.0 Cover Installation...4 3.0 Closure Re-entry...6 4.0 Accessories...9
3M Cold Shrink QT-III Silicone Rubber 3/C Cabinet Mount Termination Kit
 3M Cold Shrink QT-III Silicone Rubber 3/C Cabinet Mount Termination Kit With High-K Stress Relief For 3-Conductor Copper Tape Shield Cables with or without Ground Wires 7600-T-3RJS Series Instructions
Instructions and Parts List 3M-Matic P/N Infeed/Exit Conveyor Attachment, 1.2 Meter
 Instructions and Parts List TM 3M-Matic P/N 78-8069-3971-2 Infeed/Exit Conveyor Attachment, 1.2 Meter Type 19100 The Infeed/Exit Conveyor, 1.2 Meter, has been designed and tested to be used only with 3M-Matic
36 VOLT AUTOMATIC BATTERY CHARGER PART NO
 36 VOLT AUTOMATIC BATTERY CHARGER PART NO. 957727 AC Supply: DC Output: Battery Type: Specifications 120 volts, 60 Hertz, 10 amps, single-phase 36 volts, 20 amps initially tapering to 6 amps 36 volt, 18
OMEGA CORDLESS SERIES VACUUM INSTRUCTION MANUAL
 OMEGA CORDLESS SERIES VACUUM INSTRUCTION MANUAL Model: VACO22VDC, PMP22VDC Atrix 1350 Larc Industrial Blvd. Burnsville, MN 55337 www.atrix.com sales@atrix.com Telephone: 952.894.6154 Toll Free Telephone:
LESTRONIC II BATTERY CHARGER TAYLOR-DUNN MODEL TYPE 24LC25-8ET
 LESTRONIC II BATTERY CHARGER TAYLOR-DUNN 79-301-10 MODEL 13110-32 TYPE 24LC25-8ET AC Supply: DC Output: Battery Capacity: Specifications 120 volts, 60 Hertz, single-phase 24 volts, 32 amps Use only on
(R86049) WARNING: To reduce the risk of injury, the user must read and understand the operator s manual before using this product.
 WARNING: To reduce the risk of injury, the user must read and understand the operator s manual before using this product.") OPERATOR S MANUAL 12 VOLT LITHIUM-ION BATTERY CHARGER 140446001 (R86049) Your charger has been engineered and manufactured to our high standards for dependability, ease of operation, and operator safety.
OPERATOR S MANUAL 12 VOLT LITHIUM-ION BATTERY CHARGER 140446001 (R86049) Your charger has been engineered and manufactured to our high standards for dependability, ease of operation, and operator safety.
3 Scotch-Weld. User s Manual. Polyurethane Reactive (PUR) Easy Adhesive Applicator
 Easy Adhesive Applicator") 3 Scotch-Weld Polyurethane Reactive (PUR) Easy Adhesive Applicator 120V. USA 100V. JAPAN 120V. USA REFURB User s Manual Use only with 3M Scotch-Weld Polyurethane Reactive (PUR) Easy Adhesives Please read
3 Scotch-Weld Polyurethane Reactive (PUR) Easy Adhesive Applicator 120V. USA 100V. JAPAN 120V. USA REFURB User s Manual Use only with 3M Scotch-Weld Polyurethane Reactive (PUR) Easy Adhesives Please read
Model P-40 & Model P-25 POWER PUSHER
 Power Pusher Description INSTRUCTION MANUAL The Power Pusher provides ram capability by using the spreading power of the POWER HAWK P-16 Rescue Tool. (The Power Pusher may also be used with other spreader
Instruction Sheet. CFRD Series. High CFM Split Rear Doors
 Instruction Sheet CFRD Series High CFM Split Rear Doors C UL R US LISTED NEW THANK YOU Thank you for purchasing the CFRD Seires High CFM Split Rear Doors. Please read these instructions thoroughly before
900 PEAK AMP PORTABLE JUMP STARTER
 900 PEAK AMP PORTABLE JUMP STARTER Item Number W1665 OWNER S MANUAL WARNING It is the owner and/or operators responsibility to study all WARNINGS, operating, and maintenance instructions contained on the
DCD Dual Cartridge Dispenser Operation Manual
 DCD Dual Cartridge Dispenser Operation Manual THIS PAGE HAS BEEN INTENTIONALLY LEFT BLANK 2 TABLE OF CONTENTS General Information Overview. 5 Limitations of Use... 6 Owners Responsibility.. 6 Safety Precautions.....
12V Direct Drive Air Compressor 88
 Item No. : 7312 12V Direct Drive Air Compressor 88 User s Manual We are constantly improving our products so specifications are subject to change without notice. Visit our website for the latest product
Soothes every aching muscle in its path.
 Soothes every aching muscle in its path. MAX 2 Dual-Node Massager Powerful massage. Maximum relief. Merrimack, New Hampshire USA 03054 800-846-3000 Brookstone.com Table of contents Warnings and Cautions....................................................
Instructions for Tradewind. Please read before use. Model # Serial # Form # ADM Stowe Dr., Poway, Ca
 Instructions for 3000 Tradewind Please read before use. Model # Serial # Form # ADM-3000 4-09 13655 Stowe Dr., Poway, Ca. 92064 FRONT SWITCH 1 2 7 3 4 5 6 1. Carry Handle 2. Daisy Chain GFI Outlet 3.
Operating Instructions
 Operating Instructions WARNING: Do not attempt to assemble, connect to power source, or operate the Burrell Wrist-Action Shaker without first reading these instructions. Also assure that each person that
Model 1100B CHG Terminator. Installation Instructions
 Model 1100B CHG Terminator Installation Instructions 1 Contents: 1.0 Safety Information... 3 2.0 Set-up and Adjustments... 3 3.0 Ram Adjustments... 10 4.0 Wire Termination Quality... 12 5.0 General Maintenance...
Electric Chainsaw Sharpener
 Electric Chainsaw Sharpener Owner s Manual WARNING: Read carefully and understand all ASSEMBLY AND OPERATION INSTRUCTIONS before operating. Failure to follow the safety rules and other basic safety precautions
SOLO VACUUM OPERATING & MAINTENANCE
 SOLO VACUUM INTRODUCTION OPERATING & MAINTENANCE INSTRUCTIONS This operator s book has important information for the use and safe operation of this machine. Read this book carefully before starting the
3M TM Dyneon TM Fluoroplastics. Product Comparison Guide.
 3M TM Dyneon TM Fluoroplastics Product Comparison Guide. Characteristics 3M Dyneon Fluoroplastics. Nominal values, not for specification purposes 1) Melt Index is measured at the following conditions 265
MN907 No. 285B Replaces 285A LB7012
 MN907 No. 285B Replaces 285A LB7012 Instruction Manual For Baldor Grinder--Buffers SAFETY NOTICE: WARNING statements describe conditions that may lead to personnel injury including potentially fatal injuries
Type Maxi Mix III Rotary Shaker
 Type 65800 Maxi Mix III Rotary Shaker OPERATION MANUAL AND PARTS LIST SERIES 1046 LT1046X1 3/19/08 Model # Voltage M65820-26 230 M65820-26-60 230 M65824 100 M65825 120 M65920 230 Table of Contents Safety
MaxLite StaxMax LED Flood Lights
 Operating Instructions MaxLite StaxMax LED Flood Lights Input Rating 120V-277V 50/60Hz (347/480v optional) Wet Location Rated IP65 Operating temperature -22⁰F to 105⁰F General Safety Information 1. READ
Aftermarket Helio Installation Guide. Version 1.0.2
 Aftermarket Helio Installation Guide Version 1.0.2 Date: 9/30/2015 ID: aftermarket-helio-install Number of Pages: 9 File Name: 150930_aftermarket-helio-install_V1.0.2 Revision History Configuration Item
Large Hydraulic Bead Breaker
 Large Hydraulic Bead Breaker Owner s Manual WARNING: Read carefully and understand all ASSEMBLY AND OPERATION INSTRUCTIONS before operating. Failure to follow the safety rules and other basic safety precautions
Installing the Boom Mount ET 350 Monitor (Model ET 350R)
") Installing the Boom Mount ET 350 Monitor (Model ET 350R) Intended Use When properly installed using the materials provided, and according to these instructions, the boom mount is intended to mount the
Installing the Boom Mount ET 350 Monitor (Model ET 350R) Intended Use When properly installed using the materials provided, and according to these instructions, the boom mount is intended to mount the
StormPro BA Series Sump Pump
 Page 1 of 8 Marks & Meanings DANGER: Keep the pump equipment out of the reach of children! Warns that the failure to follow the directions given could cause serious risk to individuals or objects. WARNING:
Model NTX7 Series Automatic Battery Charger User s Manual Rev. 1.0 October 17, 2006
 B R A N D Model NTX7 Series Automatic Battery Charger User s Manual Rev. 1.0 October 17, 2006 For Sales, Support and Service phone: 407-331-4793 fax: 407-331-4708 website: www.xenotronix.com email: information@xenotronix.com
HALLMARK INDUSTRIES INC
 Performance Part No. HP. CONVERTIBLE JET PUMP USER S MANUAL GPH of Water @ Total Discharge Pressure of 40 psi Max. Pressure Max suction (shallow well) Max Suction (deep well) Max GPM (@0 head) Max Discharge