Dodge Turbo Diesel Truck
|
|
|
- Rodger Beasley
- 6 years ago
- Views:
Transcription

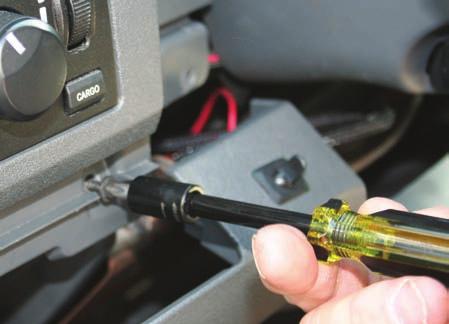
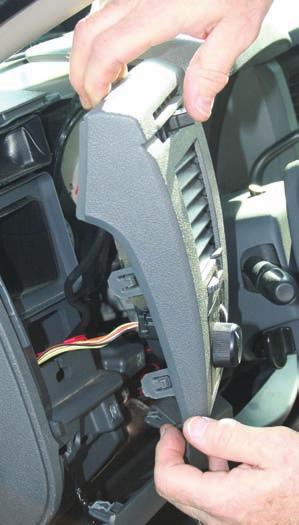
1 Dodge Turbo Diesel Truck Gauge Wiring: The cigarette lighter power wires are a good source of ignition on power for gauges. You can use these also for the gauge lights, but the dimmer circuit is easy to get to as well. The pictorials below ( and 03-05) will take you through the steps Trucks FIG. 1 FIG Other side of steering wheel. 1 Drop the knee bolster panel by grabbing under the steering column and pulling out and down. As you can see, the top of the bolster is held in place with expansion clips. Remove the three philips screws that hold the dimmer switch and gauge facia in place. You will fi nd these distributed along the dash on both sides of the steering wheel. FIG. 3 BACK SIDE OF DIMMER SWITCH Pull dimmer switch panel back for access to the wiring harness. If you need more assistance, we are only a phone call away. (770) Monday Friday 8:30am 5:30pm EST GENO S GARAGE, INC Samples Industrial Drive Cumming, Georgia 30041

 ---------------------------------------------------------------------------------------------------------------------------------------------------------------------------------------- Wiring for")
. For ground, we used a close-by Phillips-head screw and a D-ring attached to the light s wire.")
2 03-05 Trucks PAGE 2 FIG. 1 FIG. 2 BACK SIDE OF DIMMER SWITCH The light dimmer switch is easy to access as the cover and switch assembly are held in place with expansion clamps. Start at the corner next to the steering column, then pulloutward. For power to your light, tap into the dimmer switch. The light dimmer switch is easy to access as the cover and switch assembly are held in place with expansion clips. Start at the corner next to the steering column, then pull outward. (FIG. 1) Wiring for Trucks Orange wire with the white stripe for 2003 models only (pin #3 on the headlamp switch). Orange wire with brown stripe for 2004 and 2005 models (pin #2). Orange wire with brown stripe for 2006 and 2009 models (pin #4). For ground, we used a close-by Phillips-head screw and a D-ring attached to the light s wire. Gauge Installation for Trucks We like to install gauges on top of the dash. Four reasons: On top of the dash the gauges do not obstruct your view. The gauges will be in your line of sight. The eye naturally reads horizontal. With the top dash panel removed, the gauges can be installed on the panel in the warmth of your garage/workshop. The top of the dash is easy to remove (FIG. 3). The dash is held in place with vertical spring clips on the edge closest to the driver, and horizontal spring clips on the edge that touches the windshield. With a plastic wedge tool, pop up the driver s edge of the dash (10 clips). Then pull at a 45 angle outward to remove the top dash panel.


3 PAGE 3 Gauge Installation Tip In the kit provided by the gauge manufacturer you will have lots of hardware and brackets to keep the gauge securely in its pod. Throw the hardware away. That s right, throw it away. We know that the gauge will eventually need a replacement light. If you use the hardware, you ll have to remove the entire gauge pod (and wiring?) to remove the hardware, to remove the gauge, to get to the light. Save yourself the trouble. If you install the gauge using a light interference fit between the gauge and the pod, the gauge can be removed from the front of the pod. This greatly simplifies after-the-fact maintenance. If the fit is too tight, lightly sand the area from the pod. If the fit is too loose, add some dimension to the gauge with a revolution or two of electrical tape. Firewall Pass Through Tip On the automatic transmission equipped trucks, the pass-through is easy. Remove the plate that covers where the clutch pedal and hydraulic cylinder would have been. Drill the hole through the plate and reinstall. For the manual transmission equipped trucks, we gest using the outside corner of truck s existing rubber boot that encases the steering sug- column. The clutch plate.


4 PAGE 4 Pyrometer Installation ( 03-07, 5.9-Liter Engine) We chose the easy to access location at engine cylinder three to drill and tap for the EGT sensor. If you are using a 1/4 NPT probe, drill a 7/16 diameter hole straight down through one wall. If you have a 1/8 NPT probe, drill a 5/16 diameter hole. Putting axle grease on the drill and tap will help prevent shavings from falling into the manifold. Tap threads using 1/4 NPT pipe tap or the 1/8 NPT pipe tap. Use a small mechanic s magnet that will pass through the tapped hole to the bottom wall of the manifold to retrieve drill and tap shavings. Clean shavings from magnet, then search for more shavings. Repeat until the magnet comes back clean. Don t worry, the balance of any metal shavings will blow past the turbo exhaust wheel at initial start up and should not be a concern. We suggest locating the probe prior to the turbocharger in the exhaust manifold as described above. The manifold readings are very quick. Since the turbocharger uses heat energy, exhaust readings after the turbocharger in the exhaust system are slower to reach their maximum number. Alternatively, if you have an exhaust brake (specifically, Pacbrake or BD brake), their brake housing/elbow is already drilled, tapped and plugged at 1/4 NPT. Remove the plug, and simply install the 1/4 NPT EGT sensor. Upon assembly in either location, the sensor should be half-in/half-out of the mounting/compression fitting. Pyrometer Installation ( , 6.7-Liter Engine) Unlike the probe location for the 5.9 engine, (a vertical drill/tap location), we have had great success drilling/tapping further towards the front of the engine in the horizontal plane. In this location any scrap metal will fall on the bottom of the round exhaust manifold and can be retrieved with a magnet. As you come close to drilling into the manifold, pause to blow away the metal shavings. Put grease on the drill bit to catch the shavings as you drill through. Ditto the 1/8 NPT tap.

 will do.")


5 PAGE 5 As mentioned in the 5.9 instructions, use a small mechanic s magnet that will pass through the tapped hole to the bottom wall of the manifold to retrieve drill and tap shavings. Clean shavings from the magnet, then search for more shavings. Repeat until the magnet comes back clean. Repeat again. The balance of any metal shavings will blow past the turbo exhaust wheel at initial start up and should not be a concern. Boost Connection We picked a location close to the firewall to install the boost bolt. Any of the inner row bolts (closest to valve cover) will do. On the gauge side, if the line is rubber instead of plastic with compression fittings, use a small tie wrap to ensure that the boost line does not pop off of the gauge. The pointer shows the boost bolt and boost line installed in a 5.9-liter engine. This photo shows the boost-bolt and boost line installed in a 6.7-liter engine. Transmission Temperature Please see supplemental instructions if you purchased the Westach temp gauge with dipstick sending unit. We highly recommend installing the temperature sending unit directly in the transmission drain pan. This provides consistent readings and gives a good idea of overall temperature of the fluid. Install the sending unit in any flat side of the pan. The right (passenger s side) side has a small flat section near the middle that will not interfere with the fluid pickup and will not block the bolts that fasten the pan in place. If you opted for the B&M drain plug to assist in mounting, drop the pan, drain, and drill the ½ hole in the side of the pan and install the plug. A no-leak tip: use epoxy (JB Weld) around the internal edges of the plug to prevent fluid leakage. Install the 1/8 NPT sensor with Teflon tape. Gauge Testing/Tips Boost Be advised that upon initial start up, you will not register a boost number. It takes engine load to make exhaust flow; thus intake boost pressure. Take the truck for a test drive. You will find the boost pressure will parallel the position of your accelerator pedal. A typical 60 mph, half-throttle boost number is 8 10 psi. Rule of thumb: every psi of boost equals 10 horsepower (i.e. 10 psi means you re using 100 horsepower to motor down the road). Full throttle equals full boost, which should be around psi for the 03 to 04 and almost 30 for the 04.5 to 07 trucks.
6 PAGE 6 Pyrometer, 5.9-Liter Engine Guidelines As a guideline, do not exceed F with the pyrometer in a post turbo location such as the exhaust elbow or exhaust brake elbow. If you installed the pyrometer pre-turbo, in the exhaust manifold, do not exceed F. You will find the EGTs will parallel the position of your accelerator pedal. A typical 60 mph, halfthrottle EGT number is F if the probe location is prior to the turbocharger. Readings are usually lower if the probe is located after the turbocharger. Pyrometer, 6.7-Liter Engine Guidelines We have found that the 6.7-liter engine s exhaust is hotter than we ve ever seen. Seldom do we see the temperature below 500. For example, at cruise speed the 5.9-liter was 600 ; now with the 6.7-liter engine 900 is the norm. We ve seen the regeneration cycle keep the EGT at 1200 (with the previous 5.9-liter a 1200 reading would go hand-in-hand with lots of boost), with 0psi boost. So, hot is the way the 6.7 operates. Be advised that the registered temperature reading will only be F (ambient air temperature and location of the sensor are the reasons for the variance) at initial start-up and idle. It takes engine load to make the EGT escalate. Transmission Temperature The lower you can keep the temperature, the longer your transmission is likely to last. The oil viscosity starts to break down around 240 F, and the transmission will be much happier below this point. Maximum oil temperature in the pan should not exceed 250 F. If the temperature rises above this point, pull over and fast idle the engine in neutral for a few minutes to cool the transmission fluid.
Thank you for purchasing the Craven Speed FlexPod Complete Gauge Pod Kit For R56, R58, R59, R60 with Refresh Engines (2011+)
") Thank you for purchasing the Craven Speed FlexPod Complete Gauge Pod Kit For R56, R58, R59, R60 with Refresh Engines (2011+) Before You Start Please read instructions completely before installing. These
Thank you for purchasing the Craven Speed FlexPod Complete Gauge Pod Kit For R56, R58, R59, R60 with Refresh Engines (2011+) Before You Start Please read instructions completely before installing. These
Thank you for purchasing the Craven Speed FlexPod Complete Gauge Pod Kit
 Thank you for purchasing the Craven Speed FlexPod Complete Gauge Pod Kit Before You Start Please read instructions completely before installing. These instructions contain the information required to install
In an effort to do a comprehensive 67,500 mile service article, this is what we found:
 UNDERHOOD Perform Service at 67,500 miles Let s break the service down into its three components: Part 1: Change the crankcase vent (CCV) filter Part 2: Remove and clean the exhaust gas recirculation (EGR)
DODGE RAM 24V 5.9L CUMMINS
 DODGE RAM 24V 5.9L CUMMINS DODGE RAM 24V 5.9L CUMMINS TABLE OF CONTENTS SECTION 1 Preparing the Installation 1 SECTION 2 Boost Gauge Installation 2 SECTION Pyrometer/EGT Gauge Installation 4 SECTION 4
Recommended Supplies: Listed are tools that we found helpful, you may find other tools more beneficial, necessary for your specific application.
 These instructions apply to the installation of all Western Diesel TurboGauges. Western Diesel TurboGauges are accurate and responsive, and when installed properly, will provide the diesel truck owner
3 October 2016 PN# V Dodge Twin Turbo Kit (I-00274) ½ D o d g e 2 4 v I S B
 ½ D o d g e 2 4 v I S B") 3 October 2016 PN#1045320 24V Dodge Twin Turbo Kit (I-00274) 1 DOWNLOAD ENHANCED INSTALL MANUALS AT dieselperformance.com BD Twin Turbo Kit 1998½- 2 0 0 2 D o d g e 2 4 v I S B Part# 1045320 PLEASE READ
3 October 2016 PN#1045320 24V Dodge Twin Turbo Kit (I-00274) 1 DOWNLOAD ENHANCED INSTALL MANUALS AT dieselperformance.com BD Twin Turbo Kit 1998½- 2 0 0 2 D o d g e 2 4 v I S B Part# 1045320 PLEASE READ
INSTALL MANUAL D o d g e 1 2 v 6 B T A PLEASE READ ALL INSTRUCTIONS BEFORE INSTALLATION.
 PN#1045310 12V Dodge Twin Turbo Kit (I-00273) 1 INSTALL MANUAL BD Twin Turbo Kit 1994-1 9 9 8 D o d g e 1 2 v 6 B T A Part# 1045310 PLEASE READ ALL INSTRUCTIONS BEFORE INSTALLATION. * Picture as shown
In an effort to do a comprehensive 67,500 mile service article, this is what we found:
 Let s break the service down into its three components: Part 1: Change the crankcase vent (CCV) filter Part 2: Remove and clean the exhaust gas recirculation (EGR) valve Part 3: Remove and clean the EGR
Installation of Triple A-Pillar Pod and 7 Series Diesel Gauges Dodge Ram w/ 12 Valve Cummins Diesel Engine
 Installation of Triple A-Pillar Pod and 7 Series Diesel Gauges 1994-1997 Dodge Ram w/ 12 Valve Cummins Diesel Engine GlowShift strives to provide outstanding technical support, and our technical support
DirectMount EXHAUST BRAKES
 DirectMount EXHAUST BRAKES APPLICATION: Fixed Orifice and PRXB Exhaust Brakes 2003 2005 Dodge Trucks with 3.5" & 4" Exhaust and 47RE & 48RE Automatic Transmissions Only Vehicles with an existing air compressor
PRXB EXHAUST BRAKE MAXIMUM EXHAUST FLOW DESIGN
 MAXIMUM EXHAUST FLOW DESIGN PRXB EXHAUST BRAKE C44072/C44073/C44074/C44075/C44076 APPLICATION: 994-2002 DODGE RAM TRUCKS W/5.9L CUMMINS DIESEL ENGINES WITH MANUAL & AUTOMATIC TRANSMISSIONS STOCK DODGE
PRXB EXHAUST BRAKE HIGH PERFORMANCE
 HIGH PERFORMANCE PRXB EXHAUST BRAKE C44059, C4406, C44063, C44065 APPLICATION 994-2002 DODGE RAM AUTOMATIC TRUCKS EQUIPPED WITH 47RE TRANSMISSIONS WITH 5.9L, 24 VALVE CUMMINS DIESEL ENGINES GETTING STARTED
C FORD F250 / F L POWERSTROKE DIESEL WITH AUTOMATIC TRANSMISSIONS ONLY
 EXHAUST BRAKES C40019 1999-2003 FORD F250 / F350 7.3L POWERSTROKE DIESEL WITH AUTOMATIC TRANSMISSIONS ONLY Getting Started Thank you and congratulations on your purchase of a Pacbrake exhaust retarder.
Electronic Fuel Pressure & Vac/Boost Gauge Installation in a 99/ 01 Cobra
 Electronic Fuel Pressure & Vac/Boost Gauge Installation in a 99/ 01 Cobra I. Parts and materials Just prior to beginning my supercharger installation, I put a pair of gauges in the Cobra that enabled me
UNDERHOOD. (770) Monday Friday. Installation: 10-current. RAM Winter Front.
 Monday Friday. Installation: 10-current. RAM Winter Front.") www.genosgarage.com UNDERHOOD RAM Winter Front Unlike the previous generation trucks, the Fourth Generation truck s grill will have to be removed to install the Condensor Guard and/or a Winter Front. Therefore,
www.genosgarage.com UNDERHOOD RAM Winter Front Unlike the previous generation trucks, the Fourth Generation truck s grill will have to be removed to install the Condensor Guard and/or a Winter Front. Therefore,
Installation Manual v1.0: Aurora Plus Turbo Kit ( ) 5.9L Dodge. Please read all instructions before installation.
 5.9L Dodge. Please read all instructions before installation.") Installation Manual v1.0: Aurora Plus - 4000 Turbo Kit (2003-2007) 5.9L Dodge Please read all instructions before installation. Figure 1: Aurora Plus - 4000 Kit Contents 1 Figure 2: Aurora Plus Hardware
Installation Manual v1.0: Aurora Plus - 4000 Turbo Kit (2003-2007) 5.9L Dodge Please read all instructions before installation. Figure 1: Aurora Plus - 4000 Kit Contents 1 Figure 2: Aurora Plus Hardware
Gentex Homelink Installation Instructions
 Gentex Homelink Installation Instructions Kit Contents: Item Qty Part Description 1 Number GENK-41 NVS Homelink Mirror GENK-42 NVS Homelink w/mood lights 1 of the GENK-45 NVS Homelink w/compass following
C40008 & C40009 EXHAUST BRAKES
 EXHAUST BRAKES C40008 & C40009 1995 2003 Ford F250 / F350 7.3 L Powerstroke Diesel with manual transmissions 1995 1998 Ford F250 / F350 7.3 L Powerstroke Diesel with automatic transmission* *Requires the
Installation Instructions Diesel Nitrous System (#82028)
") Installation Instructions Diesel Nitrous System (#82028) Thank you for choosing ZEX. If at any time you have questions regarding this or any of our products, please call our Nitrous Help support line at
Installation Instructions Diesel Nitrous System (#82028) Thank you for choosing ZEX. If at any time you have questions regarding this or any of our products, please call our Nitrous Help support line at
Depress each tab as you pull the bezel off. The bezels are tight. L.H. shown.
 2013-2014 Ford Mustang V6 & Boss 302 Lower Valance Fog Light Kit Parts List: Quantity: Tool List: Fog light & bulb with bracket 2 Flat head & Phillips screwdriver Black bezels 2 Ratchet & Socket set OR
CHALLENGER TWIN TURBO SYSTEM INSTALLATION INSTRUCTIONS
 CHALLENGER TWIN TURBO SYSTEM INSTALLATION INSTRUCTIONS 1 Verify contents of kits with supplied packing list 1) Unhook the battery. 2) Remove wheel wells & front fascia of vehicle. 3) Remove the catalytic
IT IS IMPORTANT THAT YOU OBTAIN THE CORRECT INFORMATION FOR YOUR VEHICLE, OR DAMAGE TO THE WIRING SYSTEM COULD OCCUR.
 Instructions for Universal Harness PRINT THESE INSTUCTIONS Gentex Mirror Installation Instructions Provided by www.rearviewautomirrors.com These instructions have been prepared to provide you with details
C50254A PH3 AIR INTAKE SHUT-OFF VALVE DODGE 6.7L CUMMINS WITH POWERGUARD SMART OVERSPEED LIMITER
 AIR INTAKE EMERGENCY SHUT-OFF VALVE C50254A PH3 AIR INTAKE SHUT-OFF VALVE WITH POWERGUARD SMART OVERSPEED LIMITER 2013-2017 DODGE 6.7L CUMMINS www.powerhalt.com INSTALLATION REQUIREMENTS & RECOMMENDATIONS:
Optional: Wiring a Relay for Gauge Controlled Output
 Wiring Installation Instructions for : PYROMETER 2 1/16 Spek Pro Professional Racing Gauge GAUGE 12-Pin Wiring Harness & Plug Firewall Grommet DIAGRAM 1 Black-Engine Ground 12-Pin Wiring Harness CUP Coil
PH3 AIR INTAKE EMERGENCY SHUT-OFF VALVE WITH POWERGUARD SMART OVERSPEED LIMITER. Generic PH3 Truck Shut-Off Valve Kit.
 PH3 AIR INTAKE EMERGENCY SHUT-OFF VALVE WITH POWERGUARD SMART OVERSPEED LIMITER Generic PH3 Truck Shut-Off Valve Kit www.powerhalt.com INSTALLATION REQUIREMENTS & RECOMMENDATIONS: Prior to the installation,
Table Of Contents TABLE OF CONTENTS INTRODUCTION INSTALLATION OPERATING INSTRUCTIONS APPENDIX ABOUT THE JUICE... 3 SAFETY TERMS...3 INTRODUCTION...
 Ford Juice installation Instructions **read important safety information in this manual** TABLE OF CONTENTS F o r d J u i c e Table Of Contents ABOUT THE JUICE... 3 SAFETY TERMS...3 INTRODUCTION... 3 PRODUCT
Getting Started. INLINE MOUNT Exhaust Brakes. Thank you and congratulations on your purchase of a Pacbrake Inline Mount exhaust brake kit.
 Getting Started Thank you and congratulations on your purchase of a Pacbrake Inline Mount exhaust brake kit. Before starting, be sure you have attained the proper brake, mounting kit and control group
INSTRUCTIONS. #82028 Diesel Nitrous System. Thank you for choosing ZEX products; we are proud to be your manufacturer of choice.
 1 INSTRUCTIONS #82028 Diesel Nitrous System Thank you for choosing ZEX products; we are proud to be your manufacturer of choice. Why our nitrous system is better: 2 Performance enthusiasts know the potential
INSTRUCTIONS. #82044 Race Diesel Nitrous System
 INSTRUCTIONS #82044 Race Diesel Nitrous System Thank you for choosing ZEX products; we are proud to be your manufacturer of choice. Kit Parts List Description Qty. Description Qty. Nitrous Solenoid 2.088
Installation: Heater Core
 INTERIOR Changing the heater core in your 94-02 Dodge Ram has usually meant removing the entire dash and instrument panel, and then removing the heating-ventilating-air conditioning (HVAC) from the firewall.
Ford 6.0L Regulated Return Kit
 2003-2007 Ford 6.0L Regulated Return Kit A. Passenger Rear Return B. Line (Longer w/ 1-90 fitting) C. Driver Rear Return Line (Shorter w/ 1-90 fitting) D. Fuel Return Line (2 female fittings) E. Passenger
BD TrackMaster S D o d g e H P C R Installation Instructions
 7 July 2016 PN#1045701, 1045702, 1045704 Dodge 6.7L TMS400 (I-00361) 1 BD TrackMaster S400 2008-2012 D o d g e H P C R Installation Instructions 1045701 2008-2009 Dodge 6.7L TMS400 1045702 2010-2012 Dodge
Step 6: Remove and save the MAP sensor for later use. Step 7: Remove the passenger side intercooler pipe and the EGR intake manifold.
 LBZ Twin kit Install Step 1: Disconnect both batteries. Step 2: Drain coolant and oil also remove passenger side inner fender. Step 3: Remove intake box and piping. (Remove and save the MAF sensor in the
GMC Duramax (LBZ) High Idle Kit Note: Only for automatic transmissions with cruise control
 High Idle Kit Note: Only for automatic transmissions with cruise control") U 17 December 2014 (1036606) 2006-07 GMC Duramax (LBZ) High Idle Kit (I-00318) 1 GMC Duramax (LBZ) High Idle Kit Note: Only for automatic transmissions with cruise control 1036606 2006-2007 GMC Duramax
U 17 December 2014 (1036606) 2006-07 GMC Duramax (LBZ) High Idle Kit (I-00318) 1 GMC Duramax (LBZ) High Idle Kit Note: Only for automatic transmissions with cruise control 1036606 2006-2007 GMC Duramax
Installation Items: Cruise Module
 Installation Items: Rostra 250-1223, Electronic Cruise Control System (ECCS) includes the cruise module, harness, cruise cable, cruise module mounting bracket, cruise cable mounting bracket and hardware
BD 6.7L Super B Special Turbo Kit For L Dodge -- I n s t a l l a t i o n I n s t r u c t i o n s -- PN#
 28 January 2014 1045140 6.7L Super B Special Turbo Installation (I-00266) 1 BD 6.7L Super B Special Turbo Kit For 2007.5-2012 6.7L Dodge -- I n s t a l l a t i o n I n s t r u c t i o n s -- PN# 1045140
BD 6.7L Super B Special Turbo Kit For L Dodge -- I n s t a l l a t i o n I n s t r u c t i o n s -- PN#
 26 September 2012 1045140 6.7L Super B Special Turbo Installation 1 BD 6.7L Super B Special Turbo Kit For 2007.5-2012 6.7L Dodge -- I n s t a l l a t i o n I n s t r u c t i o n s -- PN# 1045140 PLEASE
42 Draft Designs. Gauge Solution Installation Instruction Manual. * SW Gauges / Mitsubishi Lancer EVO 8 & 9 *
 42 Draft Designs EVO Triple Gauge Panel Installation Instructions Tools Recommended: Phillips Head Screwdriver 2 Gauge Solution Installation Instruction Manual * SW Gauges / Mitsubishi Lancer EVO 8 & 9
Installation Instructions
 2011-2013 LML DURAMAX COMPOUND-ADD 2011-2015 LML A Duramax TURBO KIT Add INSTALL A Turbo INSTRUCTIONS Compound Kit Installation Instructions 1-800-955-0476 - www.industrialinjection.com - info@industrialinjection.com
Banks PowerPack TLC System including
 owners manual with installation instructions Banks PowerPack TLC System including stinger tlc 1998-2003 24 valve (Except Common Rail) Class-A Motorhomes with Cummins ISC 315, 330 or 350 horsepower engine
05-08 GT. Hellion Power Systems Mustang Kit Instructions
 Hellion Power Systems 05-08 Mustang Kit Instructions 1. Disconnect Battery 2. Drain Radiator, keep fluid for re-installation. 3. Remove air box and inlethoses. 6. Next, underneath, punch oil pan for turbo
High Idle Kit Dodge Cummins (24 valve) Dodge Cummins (with APPS on motor) PLEASE READ ALL INSTRUCTIONS BEFORE INSTALLATION
 Dodge Cummins (with APPS on motor) PLEASE READ ALL INSTRUCTIONS BEFORE INSTALLATION") U 6 May 2014 (1036620-27) 1998.5-2014 Dodge / GMC High Idle Kit (I-00321) 1 High Idle Kit 1036620 1998.5 2002 Dodge Cummins (24 valve) 2003-2004 Dodge Cummins (with APPS on motor) 1036621 2005-2006 Dodge
U 6 May 2014 (1036620-27) 1998.5-2014 Dodge / GMC High Idle Kit (I-00321) 1 High Idle Kit 1036620 1998.5 2002 Dodge Cummins (24 valve) 2003-2004 Dodge Cummins (with APPS on motor) 1036621 2005-2006 Dodge
Pump Gas Instructions for Polaris And 800 Models. Important Information before Installing This System:
 Pump Gas Instructions for Polaris 600 700 And 800 Models Important Information before Installing This System: Before you begin your turbo install, read through these instructions to determine if you are
Part# PLEASE READ ALL INSTRUCTIONS BEFORE INSTALLATION.
 16 November 2009 HPCR Dodge Twin Turbo Kit #1045430 1 BD Twin Turbo R700 Kit 2003-2007 Dodge HPCR ISBe Installation Instructions Part# 1045430 PLEASE READ ALL INSTRUCTIONS BEFORE INSTALLATION. UNLESS AN
Part Number: Code: CL7
 Document # 16.01.00 PIO/DIO Rev. A 06/23/08 TOYOTA YARIS 2008- ELECTRONIC CRUISE CONTROL KIT Part Number: 00016-52030 Code: CL7 Section I Installation Preparation Kit Contents Item # Qty. Description 1.
Trackspeed Engineering, LLC 1289 Reamwood Ave #A, Sunnyvale, CA
 Trackspeed Engineering, LLC 1289 Reamwood Ave #A, Sunnyvale, CA 94089 650-701-7223 info@trackspeedengineering.com Trackspeed DIY Turbocharger System Installation Instructions v1.00 (10/12/16) Thanks for
V1 Truck Manifold Turbo Kit for F-body
 V1 Truck Manifold Turbo Kit for 98-02 F-body Prep: -Remove all A/C Components, Alternator and brackets, tensioner, front bumper, front bumper foam, and front bumper support. Remove radiator and cooling
Congratulations on purchasing the Edge Juice/Attitude system for the Dodge Cummins Diesel.
 Getting Started About the Juice Congratulations on purchasing the Edge Juice/Attitude system for the Dodge Cummins Diesel. The Juice/Attitude system features an intelligent module (Juice) that acts as
Turn Signal / Horn Kit PN 7101 by All years Polaris RZR 1000 and RZR 900, 900-4, 900 trail, 900S and 900XC STOP - THIS KIT IS DESIGNED
 All years Polaris RZR 1000 and 1000-4 2015 RZR 900, 900-4, 900 trail, 900S and 900XC STOP - THIS KIT IS DESIGNED SPECIFICALLY FOR ALL YEAR AND MODEL POLARIS RZR 1000 AND 1000-4. ALSO THE 2015 POLARIS RZR
Pittsburgh Power Detroit DDEC-V Installation Instructions By: Pittsburgh Power
 Pittsburgh Power Detroit DDEC-V Installation Instructions By: Pittsburgh Power Congratulations on the purchase of your Pittsburgh Power performance computer system. The only product of it s kind! These
Installation Manual v1.0: RPM Governor Spring Installation Dodge. Please read all instructions before installation.
 Installation Manual v1.0: 705-940-2164 4000 RPM Governor Spring Installation 1994-98 Dodge Please read all instructions before installation. The stock governor springs begin to restrict fuel rack travel
½ DODGE CUMMINS
 15 June 2016 #1050305D 2003-2004½ Dodge Cummins FlowMAX Lift Pump Kit (I-00169) - 1-2003-04½ DODGE CUMMINS BD FLOWMAX LIFT PUMP KIT Installation Instructions P/N# 1050305D PLEASE READ ALL INSTRUCTIONS
All cores due 30 days after invoice date - no credit after 60 days.
 NO WARRANTY STATEMENT High performance parts & products no warranty policy: The purchaser understands and recognizes that high performance diesel products and services sold by INDUSTRIAL INJECTION SERVICE.
2015+ dodge charger dedicated fuel system
 This Nitrous Outlet Dedicated Fuel System is designed specifically for the 2015+ Dodge Charger. If you need any assistance during installation or if you have questions about this item, call our Tech Help
Ford High Idle Kit PLEASE READ ALL INSTRUCTIONS BEFORE INSTALLATION
 U 17 December 2014 2003-2004 Ford High idle Kit (I-00320) 1 Ford High Idle Kit 2003-2004 Ford 6.0L Diesel (Automatic transmission Only) 1036609 PLEASE READ ALL INSTRUCTIONS BEFORE INSTALLATION BD Engine
Torque Convertor Control System
 22 September 2015 PN#1030395 TorqLoc (I-00208) 1 BD TorqLoc Torque Convertor Control System Part# 1030395 Installation Manual for the following applications: BD Brakes for Dodge, Ford and Chevrolet Pac
IAG Competition Series Air / Oil Separator (AOS) For 2017 STI
 For 2017 STI") P IAG Competition Series Air / Oil Separator (AOS) For 2017 STI Part# IAG-ENG-7251 Tools Required: Ratchet, torque wrench, extensions, needle nose pliers, hose cutter, snips/scissors, flat head screw driver,
P IAG Competition Series Air / Oil Separator (AOS) For 2017 STI Part# IAG-ENG-7251 Tools Required: Ratchet, torque wrench, extensions, needle nose pliers, hose cutter, snips/scissors, flat head screw driver,
4 December 2017 PN# , , Dodge 6.7L Rumble B SXE (I-00400) 1. BD Rumble B SXE. D o d g e 6. 7 L H P C R Installation Instructions
 1. BD Rumble B SXE. D o d g e 6. 7 L H P C R Installation Instructions") 4 December 2017 PN#1045705, 1045706, 1045708 Dodge 6.7L Rumble B SXE (I-00400) 1 DOWNLOAD ENHANCED INSTALL MANUALS AT dieselperformance.com BD Rumble B SXE D o d g e 6. 7 L H P C R Installation Instructions
4 December 2017 PN#1045705, 1045706, 1045708 Dodge 6.7L Rumble B SXE (I-00400) 1 DOWNLOAD ENHANCED INSTALL MANUALS AT dieselperformance.com BD Rumble B SXE D o d g e 6. 7 L H P C R Installation Instructions
Ford Mustang V6 OEM-Style Fog Light Kit Parts List: Quantity: Tool List:
 2015-2017 Ford Mustang V6 OEM-Style Fog Light Kit Parts List: Quantity: Tool List: LED Foglights/ Bezels 2 Flat head & Phillips screwdriver (if you ordered part#3600) Ratchet & Socket set OR Wiring harness
ITEM QTY CHECK PART NUMBER DESCRIPTION
 PART #90542A Boost Gauge Package, SLP, 2005-2013 Corvette PACKING LIST Before installation, use this check list to make sure all necessary parts have been included. ITEM QTY CHECK PART NUMBER DESCRIPTION
TJ YJ LJ STEP SLIDER INSTALLATION
 TJ YJ LJ STEP SLIDER INSTALLATION BD-SS-100-TJ, BD-SS-100-YJ, BD-SS-100-LJ PARTS LIST QTY DESCRIPTION 1 Drivers Side Slider Assembly 1 Passenger Side Slider Assembly 1 Wiring Harness 1 Double Sided Sticky
CRUISE CONTROL SYSTEM
 CRUISE CONTROL SYSTEM 1990 Nissan 240SX 1990 ACCESSORIES & EQUIPMENT Nissan Cruise Control Systems Axxess, Maxima, Pathfinder, Pickup, Stanza, 240SX, 300ZX DESCRIPTION & OPERATION NOTE: For system component
Ford Mustang GT-Style Fog Light Kit Parts List: Quantity: Tool List:
 2013-2014 Ford Mustang GT-Style Fog Light Kit Parts List: Quantity: Tool List: Fog light (Left& Right) 2 Flat head & Phillips screwdriver Upper grille with surround 1 Ratchet & Socket set OR Lower grille
8 Zip Tie Zip Tie 1 Union Fitting 1 ½ ½ Union Reducer Fitting Union 1 5/8 ½ (For Plastic Intake Manifold Vehicles)
") P IAG Street Series Air / Oil Separator (AOS) For 2017 STI Part# IAG-ENG-7151 Tools Required: Ratchet, torque wrench, extensions, needle nose pliers, hose cutter, snips/scissors, flat head screw driver,
P IAG Street Series Air / Oil Separator (AOS) For 2017 STI Part# IAG-ENG-7151 Tools Required: Ratchet, torque wrench, extensions, needle nose pliers, hose cutter, snips/scissors, flat head screw driver,
ITEM QTY CHECK PART NUMBER DESCRIPTION. NOTE: This package does not include any accessories for gauge installation
 PART #90540A Gauge Pod Only Package, SLP, 2005-2013 Corvette PACKING LIST Before installation, use this check list to make sure all necessary parts have been included. ITEM QTY CHECK PART NUMBER DESCRIPTION
EMS Installation Instructions
 EMS Installation Instructions The EMS1 and EMS2 are functionally identical and, as such, their installation is identical. Both EMS versions use the same connector as follows: EMS1 Walk-through video on
Table of Contents. 4 Getting Started 4 About the Juice 5 Safety Terms 5 Product Registration 6 Important Notes 7 Truck Orientation
 Table of Contents 4 Getting Started 4 About the Juice 5 Safety Terms 5 Product Registration 6 Important Notes 7 Truck Orientation 8 Juice Installation 1999-2003 (7.3L) 8 Supplied Items & Required Tools
Special Note About The JDM High Performance Water Pump:
 Page 1 of 30 JDM Engineering, Inc. home Call Us! 732-780- 0770 back to Installation Instructions Electric Fan Upgrade Kit Electric Fan Wiring Diagram Thank you for your purchase of the JDM Engineering
INSTALLATION INSTRUCTIONS
 COLD AIR INTAKE INSTALLATION INSTRUCTIONS PART NUMBER D760-0390C APPLICATION: 1999-2003 E39 M5 PARTS LIST 1 Left Aluminum Intake Tube 1 Air Pump Bracket (A) 1 Right Aluminum Intake Tube 1 Air Pump Bracket
26 November 2009 Valve Body # / BD VALVE BODY. For Dodge 5.9L 12V Cummins Trucks
 26 November 2009 Valve Body #1030410 / 1030415 1 BD VALVE BODY For 1991-1995 Dodge 5.9L 12V Cummins Trucks - - I n s t a l l a t i o n I n s t r u c t i o n s - - 1030410 1991-1993 Dodge (4 Spd) 618 1030415
-- Installation Instructions --
 1 DOWNLOAD ENHANCED INSTALL MANUALS AT dieselperformance.com BD PERFORMANCE DODGE T4 5.9L CUMMINS EXHAUST MANIFOLD -- Installation Instructions -- Application List 1045987-T4 2003-2007 Dodge 24V -- PLEASE
INSTALLATION MANUAL AP60B INSTALLATION MANUAL
 INSTALLATION MANUAL 2. TOOLS REQUIRED The following is a list of tools required to properly install the cruise control. While this unit may be installed without some of the tools listed, it is recommended
ATTENTION. Custom Dynamics UTV Turn Signal Kit Installation Instructions
 Custom Dynamics UTV Kit Installation Instructions We thank you for purchasing the Custom Dynamics UTV LED Kit. Our products utilize the latest technology and high quality components to ensure you the most
owners manual Banks Brake with installation instructions Exhaust BrakE system Dodge IsB 5.9L Cummins (24-valve) turbo-diesel Pickups
 turbo-diesel Pickups") owners manual with installation instructions Banks Brake Exhaust BrakE system 1998-2002 Dodge IsB 5.9L Cummins (24-valve) turbo-diesel Pickups THIS MANUAL IS FOR USE WITH SYSTEM 55219 & 55221 2010 gale
owners manual with installation instructions Banks Brake Exhaust BrakE system 1998-2002 Dodge IsB 5.9L Cummins (24-valve) turbo-diesel Pickups THIS MANUAL IS FOR USE WITH SYSTEM 55219 & 55221 2010 gale
4 March Cool Down Timer 2 Page 1. Application Chart --
 4 March 2013 1081160 - Cool Down Timer 2 Page 1 BD Cool Down Timer 2 1081160 Application Chart -- Dodge Cummins (5.9/6.7) 1994-2005 Ford F Series (6.0/6.4/7.3L) 1994-2008 GMC/Chevy Duramax 2001-2009 1081160-D1
Procharger Stage II Intercooled Supercharger System (11-14 GT)
") Procharger Stage II Intercooled Supercharger System (11-14 GT) Installation Time: Approximately one day. Installed on 2012 Mustang GT 5.0/Manual Required Tools 3/8 Socket Set (Standard and Metric) 1/2
Procharger Stage II Intercooled Supercharger System (11-14 GT) Installation Time: Approximately one day. Installed on 2012 Mustang GT 5.0/Manual Required Tools 3/8 Socket Set (Standard and Metric) 1/2
½ DODGE CUMMINS
 19 October 2012 2003-04½ Dodge Cummins FlowMAX Lift Pump Kit # 1050305B - 1-2003-04½ DODGE CUMMINS BD FlowMax LIFT PUMP KIT Installation Instructions P/N# 1050305B PLEASE READ ALL INSTRUCTIONS CAREFULLY
2001 Honda Civic EX ACCESSORIES & EQUIPMENT' 'Cruise Control Systems - Civic & CR-V 2001 ACCESSORIES & EQUIPMENT
 DESCRIPTION 2001 ACCESSORIES & EQUIPMENT Cruise Control Systems - Civic & CR-V Cruise control system uses mechanical and electrically operated devices to maintain vehicle speed settings greater than 25
2015+ HELLCAT 6.2L HEMI System vehicle specific plate system xx
 These installation instructions will guide you through installing the Nitrous Outlet 2015+ Hellcat 6.2L Hemi Vehicle Specific Plate System on your vehicle. Before you get started, remember to never use
Small knife. Remove black panel shown. Save 6 retaining pins for re-install later.
 2005-2009 Ford Mustang V6 Fog Light Wiring Kit Parts List: Quantity: Tools Required: Wiring harness 1 Flat head screwdriver PB-3425 Parts Bag 1 Ratchet & Socket set OR Ford OEM Switch (if you 1 Adjustable
with installation instructions powerpack TLC INCLUDING STINGER TLC WITH OTTOMIND ENGINE CALIBRATION MODULE CUMMINS ISB POWERED CLASS A MOTORHOMES
 owners manual with installation instructions powerpack TLC S Y S T E M INCLUDING STINGER TLC WITH OTTOMIND ENGINE CALIBRATION MODULE (late)1998-2003(except common rail) CUMMINS ISB POWERED CLASS A MOTORHOMES
IAG Street Series Air / Oil Separator (AOS) For WRX
 For WRX") P IAG Street Series Air / Oil Separator (AOS) For 2015-16 WRX Part# IAG-ENG-7152 Tools Required: Ratchet, torque wrench, extensions, needle nose pliers, hose cutter, snips/scissors, flat head screw driver,
P IAG Street Series Air / Oil Separator (AOS) For 2015-16 WRX Part# IAG-ENG-7152 Tools Required: Ratchet, torque wrench, extensions, needle nose pliers, hose cutter, snips/scissors, flat head screw driver,
JEEP JK4 STEP SLIDER INSTALLATION BD-SS-100-JK4
 JEEP JK4 STEP SLIDER INSTALLATION BD-SS-100-JK4 PARTS LIST QTY DESCRIPTION 1 Drivers Side Slider Assembly 1 Passenger Side Slider Assembly 1 Wiring Harness and Fuse 1 Double Sided Sticky Squares and Alcohol
Installation Manual v1.0: P/N 202-A Aurora 3000/5000 Compound Turbo Kit Dodge Cummins 5.9
 Installation Manual v1.0: P/N 202-A35-2272 Aurora 3000/5000 Compound Turbo Kit 2003-2007 Dodge Cummins 5.9 Please read all instructions before installation. Figure 1. Figure 2. Figure 3. Figure 4. 1. Install
-Magnet (not completely necessary but can come in handy)
") McLeod High Performance Hydraulic Clutch Line Upgrade (05-14 V8) Included in kit: -New clutch line -2 fittings Required Tools: -Floor jack and jack stands (or a lift) -Flashlight -Angled pick tool -13mm
McLeod High Performance Hydraulic Clutch Line Upgrade (05-14 V8) Included in kit: -New clutch line -2 fittings Required Tools: -Floor jack and jack stands (or a lift) -Flashlight -Angled pick tool -13mm
HP10098 BASIC INDEPENDENT AIR SPRING ACTIVATION KIT
 HP10098 BASIC INDEPENDENT AIR SPRING ACTIVATION KIT Thank you and congratulations on the purchase of a Pacbrake basic independent air spring activation kit. Please read the entire installation manual prior
Remove black panel shown. Save 6 retaining pins for re-install later. Pry up on center part of pin first. Then pry out entire retaining pin.
 2005-2009 Ford Mustang V6 Fog Light Wiring Kit Parts List: Quantity: Tools Required: Wiring harness 1 Flat head screwdriver Supplemental wire leads 2 Ratchet & Socket set OR Wire tap red 2 Adjustable Wrench
1963 GEN IV SUREFIT VINTAGE AIR CONDITIONING INSTALLATION
 by Randy Irwin 1963 GEN IV SUREFIT VINTAGE AIR CONDITIONING INSTALLATION Randy Irwin - Technical Writer Randy has been involved in the Chevy parts business for over 30 years. He is a wizard at creating,
4. Remove (4) 10mm and (1) 7mm bolt that holds fascia at front corners, on each side
 10mm and (1) 7mm bolt that holds fascia at front corners, on each side") 2010 Camaro LS3 1. Disconnect battery ground 2. Remove front wheels 3. Remove (5) push pins and (5) #20 torx screws on inner front wheel well liners and remove liners on each side 4. Remove (4) 10mm and
2010 Camaro LS3 1. Disconnect battery ground 2. Remove front wheels 3. Remove (5) push pins and (5) #20 torx screws on inner front wheel well liners and remove liners on each side 4. Remove (4) 10mm and
R-SE JK 4 DOOR Step Slider Install Instructions. *If any parts listed are missing or damages please call prior to install.
 R-SE JK 4 DOOR Step Slider Install Instructions Parts List: 1 Divers side slider assembly 1 Passenger side slider assembly 1 wiring harness 1 control box 2 spacers 2 LED lights (optional) 10 SS Button
L DODGE CUMMINS BD FLOWMAX LIFT PUMP KIT
 6/15/2016 #1050311D 2010-12 6.7 Dodge Cummins FlowMAX Lift Pump Kit (I-00329) - 1-2010-12 6.7L DODGE CUMMINS BD FLOWMAX LIFT PUMP KIT Installation Instructions P/N # 1050311D PLEASE READ ALL INSTRUCTIONS
Getting Started. About the Juice. Congratulations on purchasing the Edge Juice/Attitude system for the Dodge Cummins Diesel.
 Getting Started About the Juice Congratulations on purchasing the Edge Juice/Attitude system for the Dodge Cummins Diesel. The Juice/Attitude system features an intelligent module (Juice) that acts as
Installation Tips for your Add-on Remote Start (for GM vehicles with INTSL Install 2) v3.2 Updated 11/12/2012
 v3.2 Updated 11/12/2012") Installation Tips for your Add-on Remote Start (for GM vehicles with INTSL Install 2) v3.2 Updated 11/12/2012 Thank you for purchasing your remote start from MyPushcart.com - an industry leader in providing
Installation Tips for your Add-on Remote Start (for GM vehicles with INTSL Install 2) v3.2 Updated 11/12/2012 Thank you for purchasing your remote start from MyPushcart.com - an industry leader in providing
JEEP JK4 STEP SLIDER INSTALLATION BD-SS-100-JK4
 JEEP JK4 STEP SLIDER INSTALLATION BD-SS-100-JK4 PARTS LIST QTY DESCRIPTION 1 Drivers Side Slider Assembly 1 Passenger Side Slider Assembly 1 Wiring Harness and Fuse 1 Double Sided Sticky Squares and Alcohol
Step 1 : Starting the installation
 Installation Instructions for GM Remote Start w/ INTSL Interface Pre-wired Review the remote start installation manual for safety instructions! Overview Your kit consists of two modules a remote start
Camaro/Trans Am V3 T6 Kit Installation Instructions
 1998-2002 Camaro/Trans Am V3 T6 Kit Installation Instructions A- Driver s Side Manifold B- Passenger s Side Manifold C- Crossover Pipe Parts List D- 2.5 v-band Clamp - Quantity-2 E- Downpipe F- Heat Wrap
GM ALLISON 5 SPEED LCT-1000/2000/2400 CO-PILOT PARTS LIST
 2001-2005 GM ALLISON 5 SPEED LCT-1000/2000/2400 CO-PILOT PARTS LIST Co-Pilot Computer (1) 601-800-4248 Solenoid Block (1) 601-109-4248C External Wiring Harness (1) 601-011-4248 Internal Wiring Harness
TURBOCHARGER Toyota Celica DESCRIPTION OPERATION TURBOCHARGING SYSTEMS All Models
 TURBOCHARGER 1988 Toyota Celica 1988 TURBOCHARGING SYSTEMS All Models DESCRIPTION Most models use a water-cooled turbocharger, mounted directly to the exhaust manifold with a wastegate assembly attached
TRANS-SCAT Installation Instructions for Ford AOD
 TCI 436000 TRANS-SCAT Installation Instructions for Ford AOD 1980-1993 TCI 436000 Kit Contains: Qty. Description Five (5) Gaskets: Three (3) Valve Body One (1) Filter One (1) Duraprene Pan Two (2) Springs:
R53 BOOST GAUGE INSTALL
 R53 BOOST GAUGE INSTALL 052009 Thank you for purchasing the ALTA Performance gauge pod. Installation should only be performed by persons experienced in the proper operation of Mini electrical and body