Mash Tun / RIMS Tube Controller
|
|
|
- Ernest Joseph
- 6 years ago
- Views:
Transcription
1
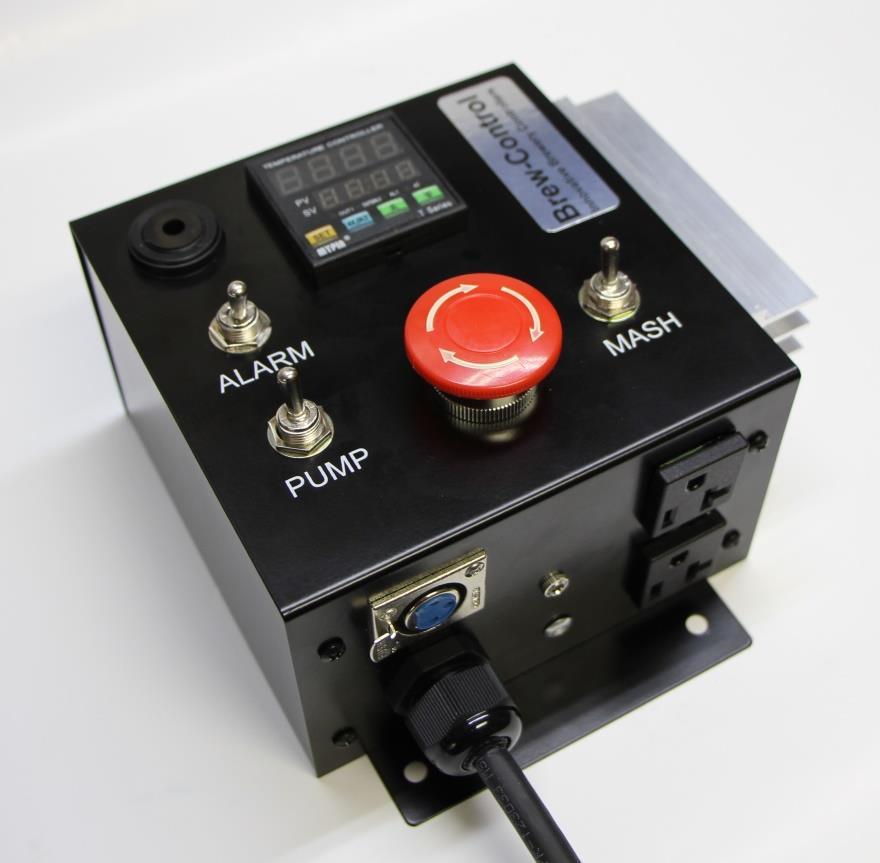
2 Mash Tun / RIMS Tube Controller 1
3 Your new mash tun / RIMS Tube controller Thanks for buying your controller from us!!! Your controller is based on the MYPIN TA4 series PID controller. Unlike cheap REX branded controllers, MYPIN controllers are manufactured in China using modern Surface Mount technology. This is the same technology used to manufacture your high quality cell phone. Controller safety We use only aluminum housings for our controllers. We could save $10 to $30 per controller by switching to plastic housings. But we want to make sure if the unthinkable happens, that if your controller were to fail, all of the energy is safely contained inside your controller housing. We can't make that guarantee with a plastic housing and neither can anyone else with a plastic housing. Under the wrong conditions a plastic housing could melt down, catch on fire and burn your house down! All of our controllers have been tested behind GFCI and are GFCI compliant. We highly recommend that you run your controller on a GFCI protected circuit. But even with GFCI you are mashing with live power and it takes very little current to kill, so please follow these basic safety rules. 1. Never brew standing in water or in the rain. 2. Never plug in or unplug your heater or pump with the power on. 3. Never brew with a known electrical problem. 4. Never touch any nearby metal object when touching your brew equipment. 5. Never leave your brewery on & unattended. 6. STOP and investigate if you smell something electrical, or feel a shock from your equipment. 2
. A red mushroom button serves as a main on/on switch as well as a panic stop button (center, bottom).")
4 Getting familiar with your new controller Your new controller has six features on the front panel. A high temperature alarm (top, left corner). A toggle switch that turns the high temperature alarm on/off (right below the alarm). A red mushroom button serves as a main on/on switch as well as a panic stop button (center, bottom). A pump on/off switch operates independent of the mash on/off switch A mash on/off switch - operates independent of pump on/off switch A MYPIN TA4 series controller that manages your mash temperature. 3

5 Your new controller has four or five features on the bottom panel. Main incoming power at bottom left corner. If you purchased a 120V controller this will be an 8 foot power cord that will have a standard 3 prong plug or depending on options, a GFCI plug. If you purchased the 220/240V 30 Amp controller this will be a 12 foot 10 Gauge power cord with a 4 prong dryer style plug on the end. Temperature sensor in at the top left corner. Mash Control Outlet at bottom right corner. If you purchased a 120V controller this will be the outlet pictured above. The 20 Amp / Twist lock controller will have a 120V 20 Amp twist lock outlet in place of this plug. The 220/240V 30 Amp controller will have a 240V 30 Amp twist lock outlet in place of this plug. 4
6 Pump Control Outlet at top right corner. Any 120V pump drawing up to 3 Amps can be plugged into this outlet. We recommend MARCH pumps because we have had great success with them. Warning Do not attempt to plug a second heating element into the pump outlet. Doing so will damage your controller and void your warranty! Optional Flow Control Socket in center of panel. If you purchased a controller with the flow control option, your flow control switch plugs into this socket. The socket is designed to accept a 3.5mm (1/8 ) audio jack with your flow control switch wired across the tip and first ring. We offer a RIMS tube pre-wired with integral flow control and the correct jack. If you decide to design your own or buy someone else s flow control module, your flow control switch must be configured so that the switch is closed (or on) when you have flow and open (or off) when flow stopped. Note: If you plug nothing into this socket your controller will operate without flow control. Controller Power Options If you purchased the 120V standard version your controller has an 8 power cord with a standard 3 prong power plug as well as two standard 3 prong 15/20 Amp outlets. This controller can safely manage a heating element as large as 2200 Watts, providing the outlet you plug the controller into will safely handle the load. If you purchased the 120V version with GFCI plug your controller has an 8 power cord with a GFCI 3 prong power plug as well as two standard 3 prong 15 Amp outlets. This controller is limited to a heating element no larger than 1800 Watts because the GFCI plug itself is only rated for 15 AMPS (1800 watts). If you plan to run a pump the combined load can be no greater than 1800 watts Just like the other two 120V controllers, this controller will work with all 5
7 of our 120V RIMS tubes because we use 1650 WATT heating elements in all of our 120V RIMS tubes. If you purchased the 120V twist lock version your controller has an 8 power cord with a standard 3 prong power plug, a 20 Amp twist lock style L5-20R heating element outlet and a 3 prong 15 Amp pump outlet. This controller is designed to operate any element pre-wired with a L5-20P 120V 20 Amp twist lock plug similar to the plug used on Blichmann s 120V BoilCoil. This controller can safely manage a heating element as large as 2200 Watts, providing the outlet you plug the controller into will safely handle the load. Note: Most kitchen circuits installed since the mid 1970 s can safely handle 20 Amps / 2400 Watts providing nothing else plugged into the circuit is turned on at the same time. Most kitchen circuits installed before the mid 1970 s can only safely handle 15 Amps / 1800 Watts providing nothing else plugged into the circuit is turned on at the same time. If you purchased the 240V version your controller has a gauge heavy duty power cord. To be able to support a 240V element and a 120V pump and be GFCI compliant your controller will have a 4 prong dryer plug. All 240V models ship with a standard 3 prong twist lock 30 Amp rated power socket and a 3 prong 120 Volt 15 Amp pump outlet. This controller can safely manage a heating element as large as 6000 Watts. All units come with a 304 stainless steel water tight PT-100 RTD temperature probe with 1/2 MPT type threads. A note on pumps: A 809 series March Pump draws 1.5 Amps (180 Watts) and you should factor in this wattage when planning your RIMS set-up. Also, all electric motors draw surge current of up to 6X their running current when starting. We include separate pump and mash switches so that you can to start your pump first 6

8 then start your PID controller, eliminating any effect the surge current might have on your mash cycle. MYPIN Controller Features Top Row Displays the current temperature Second Row Displays the set temperature (the temperature you want to regulate to Out1 Is on - red when the element is on & off when the element is off Out2/AL2 Not used in our application AL1 Turns on when AL1 value is crossed. If you use the temperature alarm, set the temperature to where you want the alarm to sound. We pre-set AL1 to 170F. AT On when in auto tune mode - Hold down to go into programming mode + - Change the set temperature Press then until the second row, right digit is flashing to change temp. - Press to select the set temperature digit you want to modify - Press to move digit up or down - Hold down to auto tune 7
9 Basic Operation For single-step mash you should set the controller to your mash temperature and leave it set. For convenience we test all of our controllers at 145F, the most common temperature for a single step mash, and if you mash at 145F you may not need to make any changes at all! For a multi-step mash you should start at the lowest temperature then increase the temperature based on your mash schedule. We suggest that you do a trial run with water while monitoring the temperature mid-way down your mash tun so that you understand how long it takes for the temperature change to propagate through your system. Temperature changes will not be instant because of the time it takes for your pump to circulate water through your system. High Temperature Alarm Your high temperature alarm makes the same sound as most home smoke alarms. We set the initial alarm temperature to 170F. When alarm is turned on (the switch is flipped up) and the AL1 set temperature is reached the alarm will go off and will continue to go off as long as the temperature is crossed. To silence the alarm just flip the switch to the down position. To change the alarm temperature, follow the instructions under Initial Settings to reach the AL1 step and then to change the alarm temperature. Initial Settings We set the initial settings and calibrate the PT-100 RTD before shipping your controller to you. In most cases you will not need to make any changes but because no two systems are exactly alike you may need to modify these setting to make your RIMS tube or mash tun perform better. To go into programming mode hold 8


10 down the button. Once in programming mode pressing the button will go through each of these menus in order. Lock Screen This is the first screen you enter programming mode. The value should stay set to 000. Press the next step. button to advance to the AL1 We pre-set the alarm to 170 because 170F is the denature temperature of your mash enzymes. AL1 Mode 2 is the default and we leave the setting at 2. 9


11 AL2 We do not use this. AL2 Mode We do not use this. Offset value used to calibrate your temperature probe. All PT100 RTD temperature probes must be calibrated before they can be used because small differences in the alloys used cause errors in their measurements. A temperature probe only needs to be calibrated once. Also, any new temperature probe must be calibrated before use or your measurements will be off. We have already calibrated your probe and the calibration (PUF setting) is 10


12 Temperature input type. This PID will accept K, J, T, E & S thermocouples and will also accept Pt100 type RTDs. We use PT100 RTDs for accuracy and the input is set to Pt. Proportional Band This modifies how hard the heating element comes on based on the percentage the temperature is away from your set temp. Default value is 3 but we found that a value of 0.52 works better for our RIMS tube. Integral Time Range This modifies how hard the heating element comes on based on how long your temperature is outside your set temp. Default value is 240 but we found that a value of works better for our RIMS tube. Derivative Time Range Default is off but we found that a value of works better for our RIMS tube. 11


 cycle time in")

13 Control Direction The MYPIN controller can be used to manage heat or cool. Default is heat which is exactly what we need. Control Hysteresis This sets the amount the temperature is allowed to drift before the PID controller will attempt to correct the temperature. Default is 1 and we leave it set at 1. Output Control Mode This sets the control (on/off) cycle time in seconds Default time for the model we use is 2 and we leave it set at 2. Measurement and Display C Celsius, F = Fahrenheit Default is C and we change the value to F before shipping 12
14 Calibrating your Controller for maximum Accuracy We already calibrate your controller at 212F the boiling point of water, but temperature sensors are not perfectly linear across their entire range. Your controller should do a great mash right out of the box but to get maximum accuracy you should calibrate your controller at the mash temperature you use most often. For single step mash this is likely in the 143F 147F range. If you do step mashing you should calibrate to somewhere mid-range. When calibrated this way the other temperatures will be off by very little. To calibrate you need to set the system up with water and use a thermometer you trust. If you don t have one you trust then you ll need to obtain at least three that you can compare. Most homebrewers have one or two and one or two they can borrow from friends. To start calibration you should place your reference thermometer or thermometers as close to your RIMS tube outlet or as close to your mash tun temperature sensor as possible. Set your mash temperature then start your mash cycle. Once your temperature stabilizes record your temperatures and use the process below to adjust the PID s offset. Note: If you use more than one reference thermometer don t be surprised if there is 5 or more degrees difference between them. We ve seen as much as 10 degrees difference between household thermometers which is why we calibrate to the temperature of boiling water. 13
15 To calibrate to your mash temperature Press and hold the button until LcK shows in the top display Leave the second line set to 000. Press and release the button 5 times to advance to the PUF step. This is the offset value used to calibrate your thermocouple. Press the key to program the offset. As you press the key you will see each digit in the second line flash. Press the keys to move digit up or down. To exit, press and hold the button until the top display returns to normal. Note: The offset should be set the same direction as the error. For example, if the PID is 3 degrees F high then +3 is added to the offset that may already be programmed into the PUF value. Fine Tuning your Controller s P, I and D Settings The advantage of a PID controller over a thermostat is a PID controller anticipates temperature change. When your wort temperature starts to drop the controller sees the drop and starts applying heat to prevent it. But no single calibration is perfect for 14
16 every system, so before using your controller you should do a trial run with water. When your set-up is correct you should see the temperature rise to your set temp, over shoot a little then come back down to your set temp. Then the temperature should fluctuate slightly above and below your set temp. How fast this happens depends on the water volume you use and your system s configuration. If your mash temperature over shoots your setting then stays high or if your mash temperature does not quite reach your set temperature and it stays low then you should auto-tune your controller. To auto-tune: Fill your mash tun with the amount of water you would usually use for dough-in, then add additional water equal to about half your grain bill. Plug in and start your controller and let it heat to within 10 degrees of the set temperature. Press and hold the button until the AT light comes on then release. Wait for the auto tune cycle to complete. During auto tune the temperature will go past the set temperature and then will come back down. This is normal. Auto tune will be complete when the AT light goes off. You should not need to auto tune again unless you are making major changes to your grain bill. If your temperature consistently runs low after auto tuning your controller then you need to look at the first three items on the list below. Five main factors control the accuracy of your controller. 15
17 Heating Element Size Your heating element size, or more correctly your heating element size relative to your mash size will impact the stability of your mash temperature. Generally speaking, the 1650 Watt element we use in our 120V RIMS tube is more than large enough for up to a 10 gallon grain bill providing you pre-heat your strike water. And the 5500 Watt element we use in our 240V RIMS tube is more than large enough for up to a 20 gallon or larger grain bill, and can easily bring a 10 gallon grain bill from faucet temperature to mash temperature within 30 minutes. It s easy to tell if your heating element is under size. Once you reach mash temperature your element should be off more time than on. You can monitor the element by watching the red OUT1 light on the PID. If the red light is on more than it s off then the element is working very hard to keep your mash up to temperature and it s under sized. Circulation Regardless if you run a RIMS tube, a HERMS system or a direct heated mash tun circulation is critical. Without enough circulation your temperature will stratify. With a RIMS tube and HERMS system your hotter temperature will stay on top and with a direct heated mash tun the mash closest to the element will be considerable warmer than the mash furthest away from the element. Note: regardless of the system you use you should expect some delay between your PID setting and your overall mash temperature because the temperature change will move through your mash in a wave. Radiation and Evaporation Losses As you heat your mash you are also constantly loosing heat through the sides and top of your mash tun. Most heat is lost from the top surface of your mash because you loose radiant and 16
18 evaporation heat from the top surface. You should always keep a cover on your mash tun to minimize both. If you are running a RIMS type system you will also loose some heat off the surface of your RIMS tube but this heat loss will be minor compared to the heat lost from the entire surface (sides, bottom & top) of your mash tun. The PID P Setting This setting modifies how strong the heating element comes on relative to how far off your mash temperature is. The PID I Setting This setting modifies how strong the heating element comes on relative to how long your mash temperature has been low. Converting the 240V controller from 4 Prong to 3 Prong power plug All of our controllers have been tested behind GFCI and are GFCI compliant. We highly recommend that you run our controllers on GFCI protected circuits. But we understand that some older houses have non-gfci compatible 3 wire dryer outlets and dryer outlets are a favorite 240V power sources for home breweries. Converting your controller from 4-prong to 3-prong power will make your controller non-gfci compliant. You can convert your controller to 3-prong power by removing our 4-prong plug and installing your own 3-prong plug. When installing your own 3-prong plug, the red and black wires wire attach to the two side blades, then the green AND white wires attach together to the center ground blade. 17
JConn Inv. PID Controller Instruction Manual
 JConn Inv. PID Controller Instruction Manual This information is specific to the Mypin TA4 based controller sold by JConn Inv. but it should work for most TA4 types - within limits. Table of Contents 1.
Advanced Troubleshooting Guide Snorkel V Battery Charger Rev 0 3JAN07
 Advanced Troubleshooting Guide Snorkel 3050097 24V Battery Charger Rev 0 3JAN07 1. How It Works: The 3050097 charger converts AC voltage to DC voltage, then uses high frequency to re-convert it to DC voltage/current
SWA-2441/2451 PID TEMPERATURE CONTROLLER INSTRUCTION MANUAL
 Instruction Manual SWA-2441/2451 PID TEMPERATURE CONTROLLER INSTRUCTION MANUAL Version 1.14 (August, 215) 1. Caution 3. Terminal Assignment Model SWA-2441 Model SWA-2451 This controller is intended to
4 Electric Circuits. TAKE A LOOK 2. Identify Below each switch, label the circuit as a closed circuit or an open circuit.
 CHAPTER 17 4 Electric Circuits SECTION Introduction to Electricity BEFORE YOU READ After you read this section, you should be able to answer these questions: What are the three main parts of a circuit?
SWA-24X2C PID Temperature Controller with Timer (SWA-2442C/2452C)
") Instruction Manual SWA-24X2C PID Temperature Controller with Timer (SWA-2442C/2452C) Version 1.4 (v, 2016) 1. Caution This controller is intended to control equipment under normal operating conditions.
Instruction Manual SWA-24X2C PID Temperature Controller with Timer (SWA-2442C/2452C) Version 1.4 (v, 2016) 1. Caution This controller is intended to control equipment under normal operating conditions.
4 Electric Circuits. TAKE A LOOK 2. Identify Below each switch, label the circuit as a closed circuit or an open circuit.
 CHAPTER 1 4 Electric Circuits SECTION Introduction to Electricity BEFORE YOU READ After you read this section, you should be able to answer these questions: What are the three main parts of a circuit?
Chapter 4 Utility Systems Electrical
 Chapter 4 Utility Systems Electrical Utility Systems Electrical The electrical supply to your home begins outside, where you will see either an overhead feed and piping down the side of your home or (if
ECT Display Driver Installation for AP2 Module
 ECT Display Driver Installation for AP2 Module Overview The ECT Display Driver is a small module with a removable wire harness that mounts behind the driver's foot well cover. All wiring connections are
EV Display User Guide
 EV Display User Guide CleanPowerAuto LLC Brief Description: EV Display is designed to track battery state of charge and other related data in battery powered Electric Vehicle. EV Display is primarily designed
PAGE Both power cords must be connected & powered to operate the E-TES SD 120 volt unit.
 PAGE 1 This document outlines questions to ask and components to check during E-TES SD 120 volt troubleshooting. More detailed troubleshooting procedures are available in the E-TES SD 120 volt Troubleshooting
TC62D Installation Instructions
 TC62D Installation Instructions January 2007 This TC62D has a return water low temperature limit option. Using the low limit precludes using a room sensor because both sensors plug into the same port.
Trouble Shooting Guide for Hubbell Systems
 Trouble Shooting Guide for Hubbell Systems NOTE: Hubbell Special Products discontinued operations in 2008, so there is a very limited number of repair parts available for motor repair. In some ways, this
Troubleshooting Guide for Limoss Systems
 Troubleshooting Guide for Limoss Systems NOTE: Limoss is a manufacturer and importer of linear actuators (motors) hand controls, power supplies, and cables for motion furniture. They are quickly becoming
POWER. Switch opening. Enter/Exit Menu Menu Scroll Increase/Decrease Setpoint GCE SERIES MODEL 10AFE MODEL 20AFE
 CMW MANU STOP TUNE Quincy Lab, Inc. Model AFE Digital Series Lab Ovens With Microprocessor Control & Digital Display OPERATING MANUAL Standard Contents (1) AFE Series Lab Oven (2) Adjustable chrome wire
WP37 & HT37 User Manual
 WP37 & HT37 User Manual Origio WP37 & HT37 Warming Plates & Heated Trolley Warming Plates WP37 300 WP37 500 Heated Trolley HT37 Origio WP37 Component Description Heated work surface Model WP37 300 Power
Operation Instruction Manual
 Operation Instruction Manual WSD-1501GPH Programmable PID Temperature Controller with Dual Probe * Introduction Version 1.2 (Sep, 2017) Auber Instruments 5755 North Point Parkway, Suite 99 Alpharetta,
ELECTRIC BENDING IRON
 ELECTRIC BENDING IRON This is intended as a short pictorial essay on the construction of an electrical side bending iron. As the items used may vary from the ones shown here, only limited dimensions are
Note: Please read through the entire guide before attempting any kind of installation.
 KIT-RSRTD Installation Guide Version 1.5 Auber Instruments, 730 Culworth Manor, Alpharetta, GA 30022 e-mail: info@auberins.com Tel: 770-569-8420 www.auberins.com This is a PID controller kit installation
User s Manual. Automatic Switch-Mode Battery Charger
 User s Manual Automatic Switch-Mode Battery Charger IMPORTANT Read, understand, and follow these safety rules and operating instructions before using this battery charger. Only authorized and trained service
How Regenerative Braking Works
 Feature How Regenerative Braking Works The regenerative braking systems on Nissan hybrid vehicles can be confusing and misunderstood. Let s take a look at how these systems really work. 26 Nissan TechNews
Using your Digital Multimeter
 Using your Digital Multimeter The multimeter is a precision instrument and must be used correctly. The rotary switch should not be turned unnecessarily. To measure Volts, Milliamps or resistance, the black
How do I get the most out of my new smart energy display?
 Our engineer will complete these boxes when your smart meters and SED have been installed and tested. Final meter reading (electricity) Final meter reading (gas) Smart meter serial number (electricity)
Retro it Steering Column
 Retro it Steering Column INSTALLATION INSTRUCTIONS for 1976-86 CJ5 & CJ7 FOR PART NUMBER S: 1520800010, 1520800020, 1520800051, 1526800010, 1526800020, 1526800051 S I NCE 1986 Instruction # 8000000010
Idle Free Systems, Inc. Reference Guide System Component Information
 Idle Free Systems, Inc. Reference Guide System Component Information #68004 REV 3 #68004 REV 3 Idle Free Reference Sheets System Components & Trouble shooting Table of Contents RF # 101.0 102.0 103.0 104.0
AFT mid drive kit Trouble shooting guide For 24v to 48V Kelly Controller KBS 48101L-L 100 A peak
 Date: 2016-13-1 AFT mid drive kit trouble shooting guide Rev 1.7 Page 1 of 17 AFT mid drive kit Trouble shooting guide For 24v to 48V Kelly Controller KBS 48101L-L 100 Table of Contents 1. Safety... 2
ASSEMBLY INSTRUCTIONS
 6.5' McKinley Pine ASSEMBLY INSTRUCTIONS MODEL NO: U11G681A-024-01 (WL-018) PRODUCT CODE: 140-034066-910 CAUTION: Carefully Read Instructions and Procedures for Safe Operation Receipt of Purchase: Questions,
Virtual Ground for HV Boosters Calibration
 Dear all utracer users, I m writing these lines just to share my experience building my utracer, so that maybe someone could find it useful for his design. The construction of my utracer was very simple,
Electrical Safety For Everyone. Leader s Guide
 4609 Electrical Safety For Everyone Leader s Guide ELECTRICAL SAFETY FOR EVERYONE This easy-to-use Leader s Guide is provided to assist in conducting a successful presentation. Featured are: INTRODUCTION:
9' Warm White /Multi LED Color Changing M5 One Plug tree V INSTRUCTION MANUAL
 9' Warm White /Multi LED Color Changing M5 One Plug tree V64886-60 INSTRUCTION MANUAL Thank you for purchasing a SYLVANIA Pre-lighted Tree. This tree assembles in minutes and is decorated with energy saving
EGT Plus Instructions
 Computech Systems, Inc. 29962 Killpeck Creek Ct. Charlotte Hall, MD 20622 301-884-5712 EGT Plus Instructions The Computech Systems EGT Plus is designed to monitor not only exhaust gas, liquid, tire and
ATD WATT INVERTER
 ATD-5955 2000 WATT INVERTER Welcome. This ATD product has been carefully engineered and manufactured to give you dependable operation. Please read this manual thoroughly before operating your new ATD product,
Troubleshooting Guide for Okin Systems
 Troubleshooting Guide for Okin Systems More lift chair manufacturers use the Okin electronics system than any other system today, mainly because they re quiet running and usually very dependable. There
Installation Instructions Jeep CJ-7
 Retrofit Steering Column Installation Instructions 1976-86 Jeep CJ-7 For Part # s 1520800010, 152800020, 1520800051 www.ididitinc.com 610 S. Maumee St., Tecumseh, MI 49286 (517) 424-0577 (517) 424-7293
elabtronics Voltage Switch
 elabtronics Voltage Switch Want to trigger a device when a monitored voltage, temperature or light intensity reaches a certain value? The elabtronics Voltage Switch is an incredibly easy way of doing it.
MODEL INA CRYOSTAT INSTRUCTION MANUAL
 PAGE 1 MODEL INA 24718 CRYOSTAT INSTRUCTION MANUAL Isotech North America 158 Brentwood Drive, Unit 4 Colchester, VT 05446 Phone: 802-863-8050 Fax: 802-863-8125 www.isotechna.com sales@isotechna.com PAGE
Ford Racing BOSS 302 Engine Oil Cooler (11-14 GT)
") Tools needed: 14mm hex socket 7mm socket/wrench 8mm socket/wrench Ford Racing BOSS 302 Engine Oil Cooler (11-14 GT) 10mm socket (for airbox removal) ¾ inch or 19mm wrench Torque wrench Appropriate ratchets
Tools needed: 14mm hex socket 7mm socket/wrench 8mm socket/wrench Ford Racing BOSS 302 Engine Oil Cooler (11-14 GT) 10mm socket (for airbox removal) ¾ inch or 19mm wrench Torque wrench Appropriate ratchets
Overcurrent protection
 Overcurrent protection This worksheet and all related files are licensed under the Creative Commons Attribution License, version 1.0. To view a copy of this license, visit http://creativecommons.org/licenses/by/1.0/,
ASSEMBLY INSTRUCTIONS FOR TREE STAND
 7.5' Warm White/Multi Sylvania LiteTunes LED One Plug Tree, #V67258-26 Thank you for purchasing this new Sylvania One Plug tree. This tree assembles with Quick Connect technology for a faster, easier,
Model: PI-140 Power Inverter Converts 12V DC battery power to 120V AC household power
 OWNER S MANUAL Model: PI-140 Power Inverter Converts 12V DC battery power to 120V AC household power READ THE ENTIRE MANUAL BEFORE USING THIS PRODUCT. FAILURE TO DO SO COULD RESULT IN SERIOUS INJURY OR
ATD WATT INVERTER
 ATD-5954 1500 WATT INVERTER Welcome. This ATD product has been carefully engineered and manufactured to give you dependable operation. Please read this manual thoroughly before operating your new ATD product,
Working Principle of Power Saver as per Manufacture:
 Analysis the Truth behind Household Power Savers Introduction: A House hold power saving devices has recently received a lot of attention from both consumers and manufacturers. It is generally used in
LETTER TO PARENTS SCIENCE NEWS. Dear Parents,
 LETTER TO PARENTS Cut here and paste onto school letterhead before making copies. Dear Parents, SCIENCE NEWS Our class is beginning a new science unit using the FOSS Magnetism and Electricity Module. We
Porsche 928 with 16v LH-Jetronic Fuel System
 Porsche 928 with 16v LH-Jetronic Fuel System Toll-Free Tech Hot Line: 877-FOR-928M 877-367-9286 Please do not copy this manual and give copies to your friends. Our ability to bring you this supercharger
Using the LCT100 for Load Cell Troubleshooting
 Using the LCT100 for Load Cell Troubleshooting In General The load cell sensor used to sense weight and force under a wide range of adverse conditions and various environment like; vibrations, high moisture
6.5 Multi Function C5 LED Pre-Lighted Tree Pre-Lighted Tree 96842
 6.5 Multi Function C5 LED Pre-Lighted Tree Pre-Lighted Tree 96842 INSTRUCTION MANUAL Thank you for purchasing this Multi Function LED Pre-Lighted Tree. This tree assembles in minutes and is decorated with
3000 SERIES DRY-BLOCK HEAT SOURCE
 3000 SERIES DRY-BLOCK HEAT SOURCE USER MANUAL Please read this manual before switching the unit on IMPORTANT safety information inside TABLE OF CONTENTS 1 INTRODUCTION 1 2 SAFETY 2 3 OPERATION 3 3.1 Parts
GC SERIES HORTICULTURAL LIGHTING SYSTEM
 It s the RIGHT Choice GC SERIES HORTICULTURAL LIGHTING SYSTEM US ER MANU A L & I NS T R U C TI ONS GC-630NS Advanced Low Frequency Square Wave Technology 315W CMH Grow Lamps Included PACKAGE INCLUDES 2
Marine Exhaust Temperature Alarm. COMPONENTS
 Marine Exhaust Temperature Alarm. Model: SM0012 INTRODUCTION COMPONENTS Marine water cooled exhaust systems are designed to withstand temperatures of up to about 120 C. However the exhaust gases from the
Farm Hand Vent Master 24
 Farm Hand Vent Master 24 24 Stage Environmental Controller Hired Hand, Inc. 1733 Co Rd 68 PO Box 99 Bremen, AL 35033 Part No. 4801-5124 rev 10-03 Owners Manual Farm Hand Vent Master 24 Table of Contents
Throttle Cable Pull - Patent Pending By: NetGain Controls, Inc.
 Throttle Cable Pull - Patent Pending By: NetGain Controls, Inc. Powering the future! Installation Guide 2011 All Rights Reserved NetGain Controls, Inc. 1 of 8 Introduction Thank you for purchasing a NetGain
RED DRAGON ELECTRONIC PROPANE FLARE
 RED DRAGON ELECTRONIC PROPANE FLARE Assembly and Operating Instructions For Models: PF-12 LPS 1/4" Flare 6,900,000 BTU/hr Max PF-14 LPS 3/8" Flare 38,000,000 BTU/hr Max PF-16 LPS 1/2" Flare 48,300,000
SMT-AZC INSTALLATION / OPERATION MANUAL
 SMT-AZC INSTALLATION / OPERATION MANUAL 22o OFF VERSION 2.0 www.smarttemp.com INTRODUCTION The SMT-AZC thermostat is designed to work with the Smart Temp 24Volt Zone Dampers TERMINAL DESIGNATIONS The SMT-AZC
PAGE Both power cords must be connected & powered to operate the E-TES 120.
 PAGE 1 This document outlines questions to ask and components to check during E-TES 120 troubleshooting. More detailed troubleshooting procedures are available in the E-TES 120 Troubleshooting Guide. 1.
V 2.0 DC TO AC POWER INVERTER PWRINV500012W PWRINV500024W PWRINV500036W PWRINV500048W. Instruction Manual
 DC TO AC POWER INVERTER PWRINV500012W PWRINV500024W PWRINV500036W PWRINV500048W Instruction Manual Introduction The AIMS Power 5000 Watt series inverters are the most advanced line of mobile DC to AC power
IMPORTANT! DO NOT THROW AWAY THE SHIPPING CARTON AND PACKING MATERIAL
 Operator s Manual IMPORTANT! DO NOT THROW AWAY THE SHIPPING CARTON AND PACKING MATERIAL ii Table of Contents Operator Safety... 1 Introduction... 2 Unpacking and Setup... 3 Unpacking... 3 Setup... 4 ROCKET
Pass Your Driving Test - Mistakes to Avoid
 Pass Your Driving Test - Mistakes to Avoid The problems that get solved on the Pass your Driving Test guide This Report Brought To You By: Leona L. Eagerlearner.com Visit Us At: http://www.eagerlearner.com
Control. Part B, Section 2. This section covers the following unit configurations. 3400V 3500V. Voltage 4. Pump Piston (E, F, G)
") Part B, Section 2 Model This section covers the following unit configurations. Voltage 4 3100V 3400V 3500V Pump Piston (E, F, G) Manifold 4-Port (A) 6-Port (B, C) 2-Port (S, T) Vista Standard (V) B 2-0
Part B, Section 2 Model This section covers the following unit configurations. Voltage 4 3100V 3400V 3500V Pump Piston (E, F, G) Manifold 4-Port (A) 6-Port (B, C) 2-Port (S, T) Vista Standard (V) B 2-0
Innovative Growing Solutions. Clima Control. Software-version: Issued: MANUAL
 Innovative Growing Solutions Clima Control Software-version: 1.00 Issued: 01-09-2015 MANUAL WWW.TECHGROW.NL Clima Control user manual Thank you for purchasing the TechGrow Clima Control. This climate controller
*Some speedometers have these additional electronic connections. If yours does, then remove the smaller slotted screws shown.
 www.odometergears.com 1981-1985 240 Cable-Driven Speedometers (NOT for 1986 and later electronic units) http://www.davebarton.com/240-odometer-repair.html For this set of instructions below, I will not
Wide Band EFIE Installation Instructions. Locate the wide band oxygen sensor current wire
 Wide Band EFIE Installation Instructions Install your fuel efficiency device The EFIE is not intended to be a fuel saver by itself. You should install a device that is designed to get more energy out of
PI1500X Power Inverter User s Manual
 PI1500X Power Inverter User s Manual featuring WARNING Failure to follow instructions may cause damage or explosion, always shield eyes. Read entire instruction manual before use. Warning: This product
Equipment Register. Purchased from: Date of purchase: Serial Number:
 RVCHECK User s Guide Equipment Register Purchased from: Date of purchase: Serial Number: Thank You For buying an RVcheck Using your RVcheck is so easy it s almost intuitive. Still, we encourage you to
Chapter 7: DC Motors and Transmissions. 7.1: Basic Definitions and Concepts
 Chapter 7: DC Motors and Transmissions Electric motors are one of the most common types of actuators found in robotics. Using them effectively will allow your robot to take action based on the direction
Harris IRT Enterprises Digital Resistance Tester Model XP
 Harris IRT Enterprises Digital Resistance Tester Model 5012-06XP Specifications & Dimensions 2 Theory of Operation 3 Operator Controls & Connectors 4 Test Connections 5 Calibration Procedure 6-7 Options
I1 7.5 Pre-Lit Clear Christmas Tree
 I1 7.5 Pre-Lit Clear Christmas Tree 62432-13 INSTRUCTION MANUAL Thank you for purchasing this Pre-lighted Tree. This tree assembles in minutes and is decorated with UL listed miniature light sets. Please
Warning! Before continuing further, please ensure that you have NOT mounted the propellers on the MultiRotor.
 Mission Planner Setup ( optional, do not use if you have already completed the Dashboard set-up ) Warning! Before continuing further, please ensure that you have NOT mounted the propellers on the MultiRotor.
SawStop Quick Start Guide
 SawStop Quick Start Guide This saw runs on 110V. Power switch is Yellow Toggle, flip to on and wait for LEDs to turn solid green before starting motor. Solid green LED means saw is ready to run with SawStop
HOW TO USE A MULTIMETER, PART 4: MEASURING CURRENT (AMPERAGE)
") HOW TO USE A MULTIMETER, PART 4: MEASURING CURRENT (AMPERAGE) By: Rob Siegel First, we discussed how to use a multimeter for measuring voltage, or simply verifying that voltage is present. Last week, we
HOW TO USE A MULTIMETER, PART 4: MEASURING CURRENT (AMPERAGE) By: Rob Siegel First, we discussed how to use a multimeter for measuring voltage, or simply verifying that voltage is present. Last week, we
7.5 FT PRE-LIT ENGLEWOOD PINE TREE
 ITEM #0243778 7.5 FT PRE-LIT ENGLEWOOD PINE TREE Holiday Living & Design is a registered trademark of LF, LLC. All Rights Reserved. MODEL #W14L030 Español p. 11 ATTACH YOUR RECEIPT HERE Serial Number Purchase
PORSCHE V r Valve Timing Instructions. Copyright 2009 Written by Mike Frye Edited my Adam G.
 PORSCHE 928 32V r Valve Timing Instructions Copyright 2009 Written by Mike Frye Edited my Adam G. Sections: Overview.3 Disclaimer/warnings/things to watch for 4 Terms and naming conventions used in this
Installation and Maintenance Instructions. World Leader in Modular Torque Limiters. PTM-4 Load Monitor
 World Leader in Modular Torque Limiters Installation and Maintenance Instructions PTM-4 Load Monitor 1304 Twin Oaks Street Wichita Falls, Texas 76302 (940) 723-7800 Fax: (940) 723-7888 E-mail: sales@brunelcorp.com
Throttle Setup by Jason Priddle
 Throttle Setup by Jason Priddle This article is written around JR Radio convention. The numbers noted are for illustrative purposes, and the same principles apply to all radios Ever feel like all your
The Sands Mechanical Museum
 The Sands Mechanical Museum How to Change Your Oil It is more difficult to change the oil in a Lotus Elise because the oil plug and filter are difficult to access. They are located behind an access panel.
EasyStart 364 (ASY-364-X20-IP) Installation Instructions for the Coleman / Airxcel Air Conditioners
 Installation Instructions for the Coleman / Airxcel Air Conditioners") EasyStart 364 (ASY-364-X20-IP) Installation Instructions for the Coleman / Airxcel Air Conditioners using Installation Kit KIT-364-CM1 Contents Introduction... 2 Safety first... 2 Making a good crimp...
EasyStart 364 (ASY-364-X20-IP) Installation Instructions for the Coleman / Airxcel Air Conditioners using Installation Kit KIT-364-CM1 Contents Introduction... 2 Safety first... 2 Making a good crimp...
Pure Sine Wave Inverter GP-HS1500. Owner s Manual
 Pure Sine Wave Inverter GP-HS1500 Owner s Manual 2 Table of Contents Introduction 3 Specifications 4 Name and Main Function 5 Installation 7 Operation 9 Operating Limits 13 Troubleshooting 13 Maintenance
Manual Alma Rally & Alma Rally Off-road. Version 1.1.1
 Manual Alma Rally & Alma Rally Off-road Version 1.1.1 Korsmit Rally Electronics 15-2-2017 Content Content... 1 Summary... 2 Background... 3 1.Information... 4 Views:... 4 2.Operation... 5 3.Setup... 6
AUTOMATIC SPRINKLER TIMER
 AUTOMATIC SPRINKLER TIMER Owner s Manual PRT-4 / PRT-6 For use with standard 24 VAC automatic sprinkler valves. These timers are designed for use in any 110 VAC /60 Hz ±10% AC outlet (240 VAC, 50 HZ for
Trucking Info: Equipment 7 Factors to Consider When Installing an Inverter
 Trucking Info: Equipment 7 Factors to Consider When Installing an Inverter From what size to get to company policies, what fleets need to know when choosing and installing a power inverter. September 2013,
Paraffin Dispenser Catalog # PD-120, PD-220 Operator s Manual Version 1.5b, Jan 2007
 Paraffin Dispenser Catalog # PD-120, PD-220 Operator s Manual Version 1.5b, Jan 2007 Be certain to read this manual thoroughly before proceeding with unpacking and installation. TABLE OF CONTENTS Topic
FOR INDOOR/SEASONAL USE ONLY
 9' Warm White /Multi LED Color Changing One Plug Tree V66362-60 INSTRUCTION MANUAL Thank you for purchasing a SYLVANIA Pre-lighted Tree. This tree assembles in minutes and is decorated with energy saving
Features: Enhanced throttle response, excellent acceleration, strong brakes and throttle linearity. Using LED program card to make adjustments.
 Thank you for purchasing the ZTW Brushless Electronic Speed Controller (ESC). The ZTW 1:10 Scale BEAST Series ESC is specifically designed for operating 4 Pole Sensorless brushless motors. This is a high
Note: Please read through the entire guide before attempting any kind of installation.
 KIT-RSP Installation Guide Version 1.3 Auber Instruments, 730 Culworth Manor, Alpharetta, GA 30022 e-mail: info@auberins.com Tel: 770-569-8420 www.auberins.com This is a PID controller kit installation
INSTALLATION: HOW IT WORKS: SensiStat Energy Saver Refrigeration Controller. both the holding plate temperature and refrigeration box temperature.
 both the holding plate temperature and refrigeration box temperature. SensiStat Energy Saver Refrigeration Controller HOW IT WORKS:...1 INSTALLATION:...1 OPERATION:...2 CUSTOMIZATION:...4 TROUBLE SHOOTING:...6
Envirotainer RAP e2 Container Operations Manual
 Operations Manual This manual is valid for: RAP container, P/N 140010R-() Version 1.5: 2016-04-15 www.envirotainer.com Operations Manual RECORD OF REVISION RECORD OF REVISION VER. NO. ISSUE DATE REVISION
Sylvania 9 Color Changing One Plug Tree Tree ID # T5, Item # V
 Sylvania 9 Color Changing One Plug Tree Tree ID # T5, Item # V66354-13 Thank you for purchasing this tree. This tree assembles in minutes and is decorated with 600 LED lights. This tree has 8 lighting
Cruise Control Wiring
 Cruise Control Wiring By Matt Sandt, Revised 3-28-16 The approach described in this writing applies to solar car motor controls which use a potentiometer connected to a gas pedal. The potentiometer is
Coleman Air C440-HVM 440 Amp Diversion Controller Version 3.2
 Coleman Air C440-HVM 440 Amp Diversion Controller Version 3.2 With Extended Diversion Mode Page 1 Page 2 Introduction This diversion controller is the result of our many attempts to use the controllers
INSTALLER S INSTRUCTIONS FOR TRI-METRIC Battery system monitor, Models TM-2025-RV and TM-2025-A. Contents
 INSTALLER S INSTRUCTIONS FOR TRI-METRIC Battery system monitor, Models TM-2025-RV and TM-2025-A revised September 2012 IMPORTANT: The wiring installation for this meter, especially the shunt installation
OWNER S MANUAL. Please read installation and operation instruction before using this Power inverter.
 OWNER S MANUAL DP AUDIO Model No. DN350 12 Volt DC to 115 Volt AC 150 WATT 300WATT HIGH SURGE POWER INVERTER Please read installation and operation instruction before using this Power inverter. Contents
Thumper 60 AH. Thumper 75 AH
 30 AH 48 AH 60 AH 75 AH 105 AH Getaway Getaway Getaway 75 AH / 90AH/ 90AH / 600 watts 1200 watts 600w Pure Amp hour capacity 30 AH 48 AH 60 AH 75 AH 105 AH 75 AH 90 AH 90 AH Watts Capacity 360 watts 576
Unit 3 Lesson 3 Electric Circuits. Copyright Houghton Mifflin Harcourt Publishing Company
 A Complete Circuit What are the parts of an electric circuit? An electric circuit is a complete, closed path through which electric charges can flow. All electric circuits contain three basic parts: an
THERMAL CONTROL SYSTEM OPERATION AND MAINTENANCE MANUAL
 Macintyre Electronic Design Associates Inc. 43676 Trade Center Place, Suite 145, Dulles, VA 20166 Phone: (703) 996-8990 FAX: (703) 996-8770 e-mail: sales@meda.com THERMAL CONTROL SYSTEM OPERATION AND MAINTENANCE
SensiStat Energy Saver Refrigeration Controller Revision 1.14
 SensiStat Energy Saver Refrigeration Controller Revision 1.14 HOW IT WORKS:... 1 INSTALLATION:... 2 OPERATION:... 3 CUSTOMIZATION:... 5 TROUBLE SHOOTING:... 9 FACEPLATE TEMPLATE... 11 The SCAD SensiStat
In this article our goal is to take a tour around the modern Mustang cooling system (Fox & SN95s), and familiarize you with how all the stuff works.
, and familiarize you with how all the stuff works.") Cures for the hot blues By Rob Hernandez. We Mustang nuts are always in search for more performance and speed. Most of our projects relate to adding this or that hot part to squeeze more horsepower and
Cures for the hot blues By Rob Hernandez. We Mustang nuts are always in search for more performance and speed. Most of our projects relate to adding this or that hot part to squeeze more horsepower and
EFIE Wideband O2 (Electronic Fuel Injector Enhancer) Installation & Operating Instructions.
 Installation & Operating Instructions.") EFIE Wideband O2 (Electronic Fuel Injector Enhancer) Installation & Operating Instructions. The EFIE is not intended to be a fuel saver by itself. The EFIE is designed to be used in conjunction with fuel
EFIE Wideband O2 (Electronic Fuel Injector Enhancer) Installation & Operating Instructions. The EFIE is not intended to be a fuel saver by itself. The EFIE is designed to be used in conjunction with fuel
ELECTRICAL SAFETY. Leader s Guide. Marcom Group Ltd.
 1902 ELECTRICAL SAFETY Leader s Guide Marcom Group Ltd. Structure and Organization Information in this program is presented in a definite order so that employees will see the relationships between the
Heat Engines Lab 12 SAFETY
 HB 1-05-09 Heat Engines 1 Lab 12 1 i Heat Engines Lab 12 Equipment SWS, 600 ml pyrex beaker with handle for ice water, 350 ml pyrex beaker with handle for boiling water, 11x14x3 in tray, pressure sensor,
Note: Please read through the entire guide before attempting any kind of installation.
 KIT-RSNSb Installation Guide Version 1.3 Auber Instruments, 730 Culworth Manor, Alpharetta, GA 30022 e-mail: info@auberins.com Tel: 770-569-8420 www.auberins.com This is a PID controller kit installation
Why is the Breaker Tripping?
 Why is the Breaker Tripping? Breakers are designed to trip anytime the circuit draws a current above the rating for a period of time. The time the breaker takes to trip is a function of how high the circuit
Build Instructions and User Guide
 Build Instructions and User Guide Getting Started To build the Rock Drill 4069 you will need: Solder Wire Cutters Soldering Iron Small pliers The kit is suitable for beginners or more experienced builders