OPERATING & SERVICE PARTS MANUAL SM20ES ENERGY SMART WRAPPER
|
|
|
- Myron Lang
- 6 years ago
- Views:
Transcription


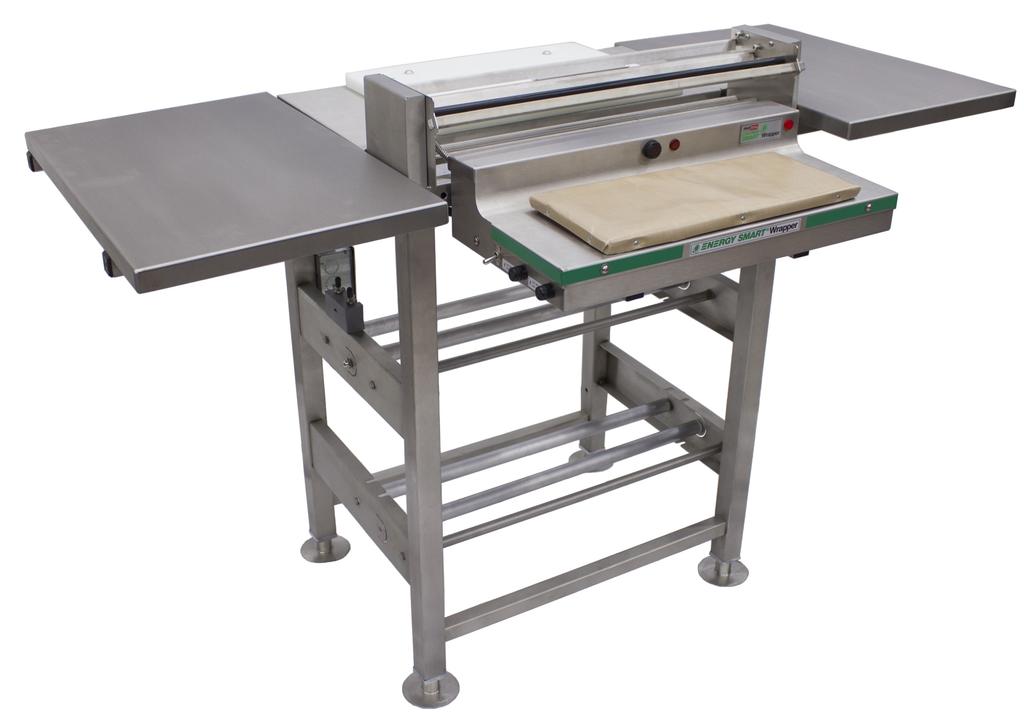
1 OPERATING & SERVICE PARTS MANUAL SM20ES ENERGY SMART WRAPPER Series B Model SM20ESC6 Cradle Mount Model SM20ESC6 Cradle Mount Shown with Optional Left & Right Wings Model SM20ESC6 Cradle Mount Shown with Optional Left & Right Wings and Printer Shelf READ ALL INSTRUCTIONS CAREFULLY BEFORE OPERATING EQUIPMENT
2 TABLE OF CONTENTS Machine Components & Electrical Rating... 3 Preliminary Setup... 5 & 6 Axle Mount Film Setup (page 5) Cradle Mount Film Setup (page 6) Recommended Maintenance... 7 Troubleshooting Guide... 8 Control Board Assembly Service Parts Information & 12 Major Assemblies (page 11) Electrical Box Components (page 12) Notes

3 MACHINE TECHNOLOGY & COMPONENTS ENERGY SMART TECHNOLOGY The Energy Smart Wrapper is an innovative system that incorporates an Instant On seal plate with the ability to go from ambient to sealing temperature in a matter of seconds. The high speed seal plate, in combination with a photoeye actuation, allows the operator to seal a product on demand and to save energy when the wrapper is not in use. As a part of our quality procedures, the seal plate has been tested. Note: You may see a wavy or wrinkling affect on the surface of the stainless steel plate under the replaceable Non-stick cover. This waviness is caused by the differential thermal expansion of the materials that are used to construct the layered seal plate; wrinkling will be observed as the wrapper is used daily and the seal plate settles in. HOT ROD HEAT UP With the film properly mounted and threaded, the wrapper is ready to be powered up. After plugging the power cord into an electrical outlet, toggle the power switch (1) located on the side of the electrical box to the ON position. The hot rod (2) will require about a 5-10 minute warm up period before it reaches a cutting temperature of above 275 F. CAUTION: As long as the wrapper is powered on, the rod will be hot and skin contact should be avoided. PHOTOEYE ACTUATED HEATER The seal plate of the wrapper is actuated by a photoeye that is engaged when a package is placed on the plate (3). This feature ensures that the seal plate will consume energy only when there is a demand by the operator. DO NOT USE THE SEAL PLATE AS A CUTTING SURFACE, AS THIS WILL DAMAGE THE SEAL PLATE AND NON- STICK COVER PLATE. SEAL PLATE DAMAGE VOIDS THE WARRANTY. ELECTRICAL RATING 2 The Model SM20ES is rated 115 volts, 132 watts. 3 1 *scale pictured is not included 3
.")
.")
4 MACHINE TECHNOLOGY & COMPONENTS STAINLESS STEEL BRIDGE The wrapper comes with a stainless steel bridge (1) that is used to position the scale for weighing and wrapping a package. The stainless steel bridge is not recommended as a cutting surface and should not be used as one. TWO ROLL CAPACITY The wrapper has the ability to house two 20 rolls of film at a time (2). The rolls should be mounted and threaded as shown on pages 5-6. For cradle machines, see threading diagram on the right side of the unit. OPERATOR INDICATOR LIGHT Since the sealing plate is only activated when a load is applied, a red neon light has been included to provide the operator a visual indicator that the heater is active (3). When the light is on, the seal plate is powered and its surface will become hot instantly. *scale pictured is not included *Alternatively, on some models, the light will turn yellow while the plate is heating and will then turn red when the plate reaches sealing temperature. GFCI To maintain circuit protection and integrity, a GFCI (4) is installed in the accessory outlet located midway up on the back left side of the frame. The GFCI may need to be reset if wrapper gets wet or other ground faults arise. Do not reset the GFCI, if visible seal plate damage is present. THERMISTOR TEMPERATURE CONTROL Due to the rapid response of the seal plate and residual heat that can remain from previous cycles, a thermistor is incorporated as a temperature control device. The seal cycle will be shorter than 3 seconds when residual heat is present in seal plate; typically as short as one half second. The thermistor is located inside the seal plate assembly and it regulates the temperature of the seal plate to ensure that it consistently reaches sealing temperature. NOTE: The thermistor is the governing control to supply heat to the seal plate. Therefore, if residual heat is present in the seal plate, the heat controller automatically adjusts the heat cycle. 4
5 PRELIMINARY SETUP - AXLE MOUNT MOUNTING FILM ON AXLE 1. Loosen four wing nuts (A) 2. Swing out upper bearing blocks (B) on both sides 3. Lift out axle assembly (C) and unscrew movable end cap (D), position fixed end cap (E) for correct film width then secure with pin (F) and o-ring (G) 4. Position the cardboard core of the film roll against the taper of the fixed end cap. Make sure the film is threaded from the bottom of the roll and under film roller (H) (see threading diagram below) 5. Replace adjustable end cap (D) and screw on tightly 6. Replace the axle assembly (C) and film roll onto the lower bearing blocks (J), swing upper bearing blocks (B) back into place and tighten and adjust wing nuts (A) for desired film tension A B J ITEM PART # H E G F C DESCRIPTION D Bearing Block Set, Includes: (1) LH Upper Block (1) RH Upper Block (2) Bottom Block (4) Stainless Steel Wing Nut (4) Rubber Luster Cap (4) Stainless Steel Hex Screw 3 Core Adapter Set Includes: (1) 3 Adjustable Core (1) 3 Fixed Core (1) Pin Core Adapter (1) O Ring J B Film Core Axle, 24 L FILM THREADING - AXLE MOUNT Mount the film with axles onto the bearing blocks so the film comes off the bottom of the roll Pull film from the bottom of the roll, under the film guide roller (1), and up through the film selector rollers, starting with the nearest slot to the hot plate first (2) Drape unused film in the front of the film selector roller (3) 5


 or tightening (rotate clockwise) the knob.")
 and slide the white")
6 PRELIMINARY SETUP - CRADLE MOUNT FILM THREADING - CRADLE MOUNT Film threading is very important on cradle style wrappers to achieve proper film tensioning. Facing the tension knob side of the machine, the film should come off the roll counter-clockwise and go in-between the two rollers it sits on. Pull film under the film guide roller (1), and up through the film selector rollers. Route the upper film roll first. The black tension knob (3) can be adjusted for proper tension on the film by loosening (rotate counter clockwise) or tightening (rotate clockwise) the knob. See threading diagram to the right and also located on the film guide bracket cover. ADJUSTING FOR DIFFERENT WIDTH FILMS Squeeze the tensioning devices (4) and slide the white film guides (5) (one on each side of film roll) and secure it near the film roll on both sides. This will help maintain the roll in the center of the machine. 6
7 RECOMMENDED MAINTENANCE * MAKE SURE TO TURN OFF THE UNIT, PULL THE PLUG AND LET THE MACHINE COOL DOWN BEFORE CLEANING * NON-STICK COVER & SEAL PLATE Due to the advancement of this new technology, it is extremely important to maintain the Non-stick cover in good condition. It is recommended to replace the Non-stick cover at least once every three months to protect the seal plate and maintain a sanitary surface. The seal plate should not be used as a cutting surface; any punctures will render the seal plate ineffective and will void the warranty. The seal plate has been designed to provide long life performance when it is properly maintained. The Non-stick cover is used to create a sanitary, stick free surface to seal film with the seal plate. Non-stick covers are porous, meaning liquids or moisture can permeate the cover, get to the surface of the seal plate, and burn off on the hot plate. It s recommended that the Non-stick cover be replace every three (3) months or as needed depending on the level of daily wear and tear. The Non-stick cover should be changed if the surface is soiled, or holes, punctures, excessive wear, or damage are present. The seal plate can be cleaned, as needed, with a mild spray degreaser. This should be applied to a soft cloth or paper towel and then wiped on the plate while cold. DO NOT WASH DOWN SEAL PLATE OR SPRAY ANY LIQUIDS DIRECTLY ONTO THE PLATE. CUT OFF ROD Make sure that the unit is turned off and the cut off rod is cold to the touch. The film cut off rod can be cleaned, as needed. Cover the unit surfaces with paper towels to protect them from over spray and debris. Spray and coat the cut-off rod generously with an FDA approved Degreaser product. After soaking for a few minutes, lightly scrub the surface of the Cut-off rod with a Scour Pad (Scotch-Brite type pad). Wipe the surface clean of debris and residue with clean paper towels or cloths. CLEANING THE UNIT The SM20ES can be completely wiped down using mild cleaning detergent and a soft cloth or paper towels. DO NOT HOSE DOWN OR SUBMERSE THE UNIT. 7
 Remove Non-Stick Cover and inspect the Seal Plate for the following defects: Punctures or cuts. Burn marks. Extreme discoloration (blue/black or gold).")
8 TROUBLESHOOTING Symptom No power to the unit. Possible Solution Verify the unit is plugged into a 15 Amp circuit and the Power Switch is set to the ON position. First, is the GFCI circuit breaker tripped? 1) Remove Non-Stick Cover and inspect the Seal Plate for the following defects: Punctures or cuts. Burn marks. Extreme discoloration (blue/black or gold). If these defects are present, replace seal plate. 2) If seal plate is in good condition, reset GFCI. If GFCI cannot be reset, replace. 3) Reset new GFCI. Red Power Light at right front of unit SHOULD glow. 4) If GFCI trips, seal plate may have moisture inside. Allow 1-2 days to dry out and then retry. Figure 1 SM20ES Electrical Box Pictured 8
9 TROUBLESHOOTING Symptom Unit has power but the Seal Plate does not work Possible Solution Verify power. Does the Cycle Light turn ON when the unit is cycled? 1) If neither the Light nor Seal Plate work, verify that the 20 Amp Circuit Breaker is not tripped. 2) If the Circuit Breaker is tripped, verify there are no shorts to ground in the unit by checking wiring and connections (see Figure 1). Reset Circuit Breaker. 3) Replace Circuit Breaker if it cannot be reset. Next, verify the Photo eye is working properly. 1) With the Power ON, there should be a Green Light illuminated on the back of the Photo Eye. When the Photoeye is triggered a separate Yellow Light will illuminate. 2) If Green Light is ON and Yellow Light DOES NOT illuminate when the Photo Eye is blocked, replace the Photo Eye. 3) If Green Light is NOT illuminated when unit power is ON, check Control Board to determine if Photo Eye or Control Board is faulty. Next, verify the control board is working properly. 1) Check the voltage on Pin 1 of the Control Board using a multimeter. If not 120vac, a wiring issue exists. Find and repair. 2) Check voltage on Pin 4 & 5, Brown & Blue Wires. This voltage should be 10 to 30vdc If NO voltage present, replace Control Board. If voltage present, replace Photo Eye. Next, verify seal plate. If the plate does not heat at all or is only slightly warm to the touch, replace the Seal Plate. Film Cut-off Rod does not work at all. Film cuts too slowly Verify the unit is plugged into a 15 Amp circuit and the Power Switch is set to the ON position. Verify that the 1 Amp circuit breaker is not tripped. If the circuit breaker is tripped, then reset, verify there are no shorts to ground in the unit by checking wiring and connections. Clean Cut-off Rod surface and verify it is not bent. See Cut-Off Rod Maintenance. Replace Square Boardless Cut-off Rod 9
 THERMISTOR (-) THERMISTOR")
10 CONTROL BOARD ASSEMBLY 120V NEUTRAL HEATER OUT 24V COMMON NOT USED PRODUCT DETECTION (+) THERMISTOR (-) THERMISTOR 10
 Square Boardless Cut Off Rod with 1 FT Wire Secure and")
11 SERVICE PARTS INFORMATION 9 5 3,4 1, ITEM BILL OF MATERIALS FOR MAJOR ASSEMBLIES QTY PART NUMBER DESCRIPTION Non-stick Cover, 6 x Non-stick Cover, 8 x Replacement 6 x 15 Seal Plate Kit Replacement 8 x 15 Seal Plate Kit Hot Rod Replacement Kit Includes : (1) Square Boardless Cut Off Rod with 1 FT Wire Secure and (1) Strain Relief Grommet Bearing Block & Core Replacement Kit Includes : (1) Upper Left Gray Axle Bearing Block, (1) Upper Right Gray Axle Bearing Block, (2) Lower Gray Axle Bearing Block, (4) Stainless Steel Wing Nut, 1/4-20, (4) Stainless Steel Hex Screw 1/4-20 x 2 1/2 LG, (4) Rubber Luster Cap, 1/14 ID, (1) 3 Dia. Gray Adjustable Film Core, (1) 3 Dia. Gray Fixed Film Core, (1) Pin Core Adapter, (1) O-Ring, 1/4 ID Film Core Axle, 5/8 Dia x 24 Long Foot, Insert-Flange SS 1 1/2 Sq. Tube Scale Platform Grey Duplex GFCI Receptacle Duplex Outlet Box Enclosure Power Cord 7 long 11


12 SERVICE PARTS INFORMATION 8 3, ,2 10,11 12 BILL OF MATERIALS FOR ELECTRICAL BOX ITEM QTY PART NUMBER DESCRIPTION Non-stick Cover, 6 X Non-stick Cover, 8 x Replacement 6 x 15 Seal Plate Kit Replacement 8 x 15 Seal Plate Kit x 15: Energy Smart Control Board, Programmed 8 x 15: Amp Circuit Breaker, Snap-In Amp Circuit Breaker, Snap-In Photo Eye, Right Angle, Fixed A-125V Rocker Switch Grey Duplex GFCI Receptacle Duplex Outlet Box Enclosure Power Cord 7 long 12
13 NOTES 13

14 14
OPERATING & SERVICE PARTS MANUAL 700ES ENERGY SMART WRAPPER SERIES B
 OPERATING & SERVICE PARTS MANUAL 700ES ENERGY SMART WRAPPER SERIES B READ ALL INSTRUCTIONS CAREFULLY BEFORE OPERATING EQUIPMENT TABLE OF CONTENTS Machine Components & Electrical Requirement... 3 Preliminary
OPERATING & SERVICE PARTS MANUAL 625ES ENERGY SMART WRAPPER
 OPERATING & SERVICE PARTS MANUAL 625ES ENERGY SMART WRAPPER READ ALL INSTRUCTIONS CAREFULLY BEFORE OPERATING EQUIPMENT TABLE OF CONTENTS Machine Components & Electrical Requirements... 3 Preliminary Setup...
AXLE MOUNT MODELS: FILM ROLLER MODELS: OPERATING & SERVICE PARTS MANUAL TABLE TOP OVERWRAPPERS MODEL 625A MODEL 625A MINI MODEL 825A MODEL 875A
 OPERATING & SERVICE PARTS MANUAL TABLE TOP OVERWRAPPERS Model 625A AXLE MOUNT MODELS: MODEL 625A SINGLE ROLL WITH MOUNTING AXLES MODEL 625A MINI COMPACT SINGLE ROLL WITH MOUNTING AXLES MODEL 825A DUAL
ENERGY SMART TROUBLESHOOTING
 ENERGY SMART TROUBLESHOOTING Symptom No power to the unit. Possible Solution Verify the unit is plugged into a 20 Amp, GFCI circuit and the Power Switch is set to the ON position. Is the GFCI circuit breaker
1 2 3a 3b THREADING CARD 9 10 ABC Office
 1 2 3a 3b 4 5 6 7 8 9 10 THREADING CARD Important Safety instructions YOUR SAFETY AS WELL AS THE SAFETY OF OTHERS IS IMPORTANT TO GBC. IN THIS INSTRUCTION MANUAL AND ON THE PRODUCT ARE IMPORTANT SAFETY
ELECTRICAL SYSTEM UPGRADE
 NEW CONTROLLER & ELECTRICAL SYSTEM UPGRADE FOR DAIRY TECH, INCORPORATED 10, 30 & 60G PASTEURIZERS Parts to Include 2 Wire ties (Nuts) 2 sticky wire mount pads Large Rubber Grommet (for bottom of electric
Portable Lighting Equipment Operating Instructions Table of Contents
 Portable Lighting Equipment Operating Instructions Table of Generac Magnum Ingersoll Rand TEREX AMIDA TEREX GENIE Model: MLT3060 Model: LIGHTSOURCE Model: Amida AL4000 series Model: TML4000N Generac Magnum
NILFISK BA 500 Service Manual
 NILFISK BA 500 Service Manual Model 66324400 12/94 Form Number 043023 TABLE OF CONTENTS Batteries...21 Brush Drive Belt Adjustment Or Replacement...7 Brush Drive Motor - Carbon brush Inspection... 8 Brush
T21 Thermal Differential Switch
 T21 Thermal Differential Switch General Instructions The T21 Point Level Switch is a state-of-the-art in liquid level and interface measurement and control. Level detection is accomplished by using a high-resolution
Illustrated Parts List
 Illustrated Parts List. Ordering Parts For your convenience, replacement parts and accessories can be ordered from ARPAC by fax 24 hours a day. Please have the following information available to ensure
Reproduction. Not for ADVANCE PRODUCT SERVICE INFORMATION INFORMATION BULLETIN NO: 36 DATE: 11/27/02 SUBJECT: POWERLINK SYSTEM
 ADVANCE PRODUCT SERVICE INFORMATION INFORMATION BULLETIN NO: 36 DATE: 11/27/02 SUBJECT: POWERLINK SYSTEM FILE IN: INTEK & VANGUARD REPAIR MANUAL GFCI Inverter Stator POWERLINK Harness Reset ON OFF Switch
ETF-600 Sensor Operated Lavatory Faucet
 INSTALLATION INSTRUCTIONS OPTIMA SYSTEMS SENSOR OPERATED LAVATORY FAUCET ETF-600 I.I. Code No. 0816318 ETF-600 Sensor Operated Lavatory Faucet Includes Instructions for Installation of Optional Back Checks
Little Buddy II Conveyor Dryer
 Little Buddy II Conveyor Dryer 18 wide by 5 long conveyor dryer Document # 16-437 Assembly and Operating Instructions Please review all of these instructions prior to assembly. **If you have ordered the
RigMaster Power Service and Repair Manual Document # S901009
 Document # S901009 WARNING The following procedures present hazards which can result in injury or death. Only persons qualified to carry out electrical and mechanical servicing should undertake this work.
FD 342 Document Folder
 FD 342 Document Folder 6/2010 OPERATOR MANUAL FIRST EDITION TABLE OF CONTENTS SUBJECT PAGE DESCRIPTION 1 SPECIFICATIONS 1 UNPACKING 2 SETUP 2 CONTROL PANEL 3 OPERATION 4 SETTING CUSTOM FOLDS 5 BATCH COUNTING
K-SERIES SERVICE MANUAL
 MARCH 2011 III. R MAINTENANCE AND REPAIR MAINTENANCE egular maintenance of the Ricon KlearVue Series platform wheelchair lift is required to help optimize its performance and reduce the need for repairs.
Sure-Feed Engineering Inc. SE-900-EI. Operation & Parts Manual
 . SE-900-EI Operation & Parts Manual SE 900 EI OWNERS MANUAL Table of Contents 1. Installation guide 2. Set-up instructions 3. Operation instructions 4. Cleaning 5. Troubleshooting 6. Parts manual 7. Electrical
LS100L Battery-powered Punch Driver
 OPERATION MANUAL Serial Number GATOR LS100L Battery-powered Driver Read and understand all of the instructions and safety information in this manual before operating or servicing this tool. Register this
Regular maintenance of the RICON S-Series Transit Use Wheelchair Lift will help optimize its
 IV. MAINTENANCE AND REPAIR Regular maintenance of the RICON S-Series Transit Use Wheelchair Lift will help optimize its performance and reduce the need for repairs. This chapter contains cleaning and lubrication
CLEAN ROOM DEVICES, LLC "WHERE TUBING AND FITTINGS COME TOGETHER"
 CLEAN ROOM DEVICES, LLC "WHERE TUBING AND FITTINGS COME TOGETHER" CRD600 Automatic Fitting Inserter OPERATIONS MANUAL VERSION 2.1 LAST EDITED 7.25.14 DOCUMENT NUMBER 001 cleanroomdevices.com 1 Table of
CLEAN ROOM DEVICES, LLC "WHERE TUBING AND FITTINGS COME TOGETHER"
 CLEAN ROOM DEVICES, LLC "WHERE TUBING AND FITTINGS COME TOGETHER" CRD600AF Automatic Fitting Inserter With Auto Feed OPERATIONS MANUAL (Shown with optional alcohol dispenser) 1 VERSION 1.1 LAST EDITED
ALU-29CF Portable Light NSN:
 ALU-29CF Portable Light NSN: 6520-01-446-4170 COMMAND l AIR OPERATION / MAINTENANCE MANUAL & PARTS LIST TABLE OF CONTENTS Introduction................................................................3 Purpose.............................................................3
Marsh Shipping Supply Co. LLC. Marsh TD2100 Electric Taper Technical Manual
 Marsh Shipping Supply Co. LLC Marsh TD2100 Electric Taper Technical Manual 2 A wall-socket must be close to the product and readily accessible. The overall system is protected against overload by the branch
Cruising Charger Series OWNER S MANUAL
 R Cruising Charger Series OWNER S MANUAL ON BOARD BATTERY CHARGERS Models DC Amperage No. Of Banks Volts 2614A 5,10 Amps 2 Bank 12/12 2614A-230 2621A 5,5,10 Amps 3 Banks 12/12/12 2621A-230 2622A 10,10
Kaleidoscope smart shelter transit shelter solar lighting system installation and maintenance manual. September 6, 2017
 Kaleidoscope smart shelter transit shelter solar lighting system installation and maintenance manual September 6, 2017 table of contents Introduction 2 How It Works 2 Understanding Your Product 2 Installing
Owner s Manual. LTS Hide-A-Way Truck Side Gate
 Owner s Manual LTS Hide-A-Way Truck Side Gate 10900 Kenwood Road Cincinnati, OH 45242 Ph: 513-891-6210 Toll-Free: 866-539-6261 Fax: 513-891-4901 www.leymanlift.com sales@leymanlift.com LML00410-11/6/15
Gold Standard Toaster
 Tall Bun Feeder Shown Gold Standard Toaster Model GST-3V owner s manual Manufacturing Numbers: 9210876 and 9210878 www.antunes.com P/N 1011240 Rev. G 02/18 TABLE OF CONTENTS Table of Contents 2 Warranty
SE-600-P Eco-Series. Operation & Parts Manual
 SE-600-P Eco-Series Operation & Parts Manual SE 600 PC & PS SERIES OWNERS MANUAL Table of Contents 1. Set-up instructions 2. Bridge-Tramming Procedure 3. Operation instructions 4. Cleaning 5. Troubleshooting
CAUTION CAUTION MAINTENANCE AND REPAIR A. LUBRICATION
 III. R MAINTENANCE AND REPAIR egular maintenance of the Ricon KlearVue Series platform wheelchair lift is required to help optimize its performance and reduce the need for repairs. This chapter contains
CRD600 Automatic Fitting Inserter
 CRD600 Automatic Fitting Inserter OPERATIONS MANUAL VERSION 2.3 LAST EDITED 12.07.2018 cleanroomdevices.com 1 Table of Contents Title Page.. 1 Table of Contents. 2 1.0 General Product & Safety Information...3
Level One Electric Vehicle Charging Station FREE STANDING Product Guide
 Level One Electric Vehicle Charging Station FREE STANDING Product Guide Model # SC2-120 Shorepower Technologies 2351 NW York St. Portland, OR 98664 503-892-7345 info@shorepower.com www.shorepower.com 2
Type V Accent Light Installation
 Packing List: Rheostat Assembly (with cover plate, knob, screws) Accent Light Assembly (with strain relief plate) (2) T4 Halogen Bulbs Bulb Type 35 Watt 120 Volt T4 Halogen Bulb (G6.35 Base) Installation
Sure-Feed Engineering Inc. PLACER STANDARD HOPPER. Operation & Parts Manual PLACER-STD_1
 Engineering Inc. PLACER STANDARD HOPPER Operation & Parts Manual PLACER-STD_1 Engineering Inc SECTION 2 PLACER OWNERS MANUAL Table of Contents 1. Installation guide 2. Set-up/operation instructions 3.
Checker Unload Checkstand Installation Instructions
 Front-End Checkouts Commercial Refrigeration Equipment Display Merchandisers Store Fixtures Checker Unload Checkstand Installation Instructions Attention Store Manager: Please find enclosed in this packet
ELECTRICAL SYSTEM RP-7
 ELECTRICAL SYSTEM RP-7 This section of the manual does not include integral electrical components of the engine. Refer to section Engine RP-1 for details. This section of the manual is divided into three
OPERATION MANUAL for MANUAL LEVELING SYSTEMS with square foot pads on jacks
 OPERATION MANUAL for MANUAL LEVELING SYSTEMS with square foot pads on jacks Dewald manual system touchpad #140-1179 Visit us on the web at www.powergearus.com 82-L0377 REV.0B 2 TABLE OF CONTENTS Page 3:
Operations Manual Eagle 1000 Series Stretch Wrapper
 Operations Manual Eagle 1000 Series Stretch Wrapper Models A & B - 1 - READ ALL INSTRUCTIONS CONTAINED IN THIS MANUAL PRIOR TO MACHINE INSTALLATION! - 2 - Contents page 1. Machine Safety Information 1.1
QuickBoost Instruction Manual
 Sheet 1 of 12 QuickBoost Instruction Manual MobilePower, LLC. Bluffton, SC 29910 www. Mobilepower-us.com Office: (800) 708-8550 support@mobilepower-us.com customerservice@mobilepower-us.com Sheet 2 of
OPERATOR S MANUAL StudPro LiteXI Pin Welder Stud Welding Products, Inc
 OPERATOR S MANUAL StudPro LiteXI Pin Welder CONTENTS Description Pages Safety 2 Specifications and Features 3 Product Components 4-5 Screen Operation 6-8 Setup and Welding 9-11 CD Gun Exploded View 12
OPERATION MANUAL MODELS TWE-250 TWE-321 TWE-375 TRU WELD EQUIPMENT COMPANY 6400 N. HONEYTOWN ROAD SMITHVILLE, OHIO (330)
") OPERATION MANUAL MODELS TWE-250 TWE-321 TWE-375 TRU WELD EQUIPMENT COMPANY 6400 N. HONEYTOWN ROAD SMITHVILLE, OHIO 44677 (330) 669 2773 CONTENTS Section Description Pages 1 Introduction 3 2 External Features
OPERATION MANUAL MODELS TWE-250 TWE-321 TWE-375 TRU WELD EQUIPMENT COMPANY 6400 N. HONEYTOWN ROAD SMITHVILLE, OHIO 44677 (330) 669 2773 CONTENTS Section Description Pages 1 Introduction 3 2 External Features
ALWAYS DISCONNECT DISPENSER FROM WATER SOURCE WHEN DISPENSER IS NOT IN USE.
 1060GAPRF With dilution selector 1060GAP OVERVIEW DEMA S MPD is a multiple product and dilution dispenser designed for use with SafeLink closed loop inserts. With its innovative patent pending QuickDock
Cincinnati, OH USA
 Astro Pop Warmer Instruction Manual Model #2002 Part No. 61987 Revised July 2000 Cincinnati, OH 45241-4807 USA e-mail: goldme19@eos.net www.gmpopcorn.com SAFETY PRECAUTIONS INTRODUCTION Your new #2002
Techcon Systems TS6500 CIM Automatic Techkit Mixer
 Techcon Systems TS6500 CIM Automatic Techkit Mixer User Guide English Copyright OK International 7000-2860_F 1 CONTENTS Page Number 1. Safety..3 2. Unpacking and Inspection.3 3. Description 4 4. Symbol
CRD610 Automatic Fitting Inserter
 CRD610 Automatic Fitting Inserter OPERATIONS MANUAL VERSION 1.2 LAST EDITED 12.12.2018 cleanroomdevices.com 1 Table of Contents Title Page. 1 Table of Contents...2 1.0 General Product & Safety Information....3
Instruction Manual. Q Series 2 Motor Control Modules - OEM
 A382-21-880 Issue B Instruction Manual Q Series 2 Motor Control Modules - OEM Pump/ Q Motor Control Module Item Number pumping system Electrical supply 24 V d.c. control 24 V a.c. control QDP40 200-230
Pay For Water System DU 1A046A
 Pay For Water System DU 1A046A Serial Number: Owner s Manual #0822 012913 Installation Date: Please read and understand this manual. Store in safe location for future reference. Everyone who operates this
READ ALL INSTRUCTIONS CONTAINED IN THIS
 Operations Manual Eagle R2B2 Stretch Wrapper READ ALL INSTRUCTIONS CONTAINED IN THIS MANUAL PRIOR TO MACHINE INSTALLATION! - 1 - Contents page 1. General Information 1.1 Installation Notes 2 1.2 Operational
Motion System Components Diagram. Note: #2 Mirror Cover and X-Axis Motor Cover have been removed for visibility. Maintenance.
 Professional Laser System PLS3.75, PLS4.75, PLS6.75 and PLS6.150D Keeping the laser system clean will ensure the highest quality engraving. A clean laser system is the best performing laser system. The
OPERATION MANUAL MODELS TWE-250 TWE-321 TWE-375 TRU WELD EQUIPMENT COMPANY 6400 N. HONEYTOWN ROAD SMITHVILLE, OHIO (330)
") OPERATION MANUAL MODELS TWE-250 TWE-321 TWE-375 TRU WELD EQUIPMENT COMPANY 6400 N. HONEYTOWN ROAD SMITHVILLE, OHIO 44677 (330) 669 2773 Version 1.3 Date 10/20/2010 TRU WELD EQUIPMENT LIMITED WARRANTY All
OPERATION MANUAL MODELS TWE-250 TWE-321 TWE-375 TRU WELD EQUIPMENT COMPANY 6400 N. HONEYTOWN ROAD SMITHVILLE, OHIO 44677 (330) 669 2773 Version 1.3 Date 10/20/2010 TRU WELD EQUIPMENT LIMITED WARRANTY All
BBAIR V Conveyor Dryer
 BBAIR-08-0V Conveyor Dryer wide by 8 long conveyor dryer with forced air and infrared Document # 6- Assembly and Operating Instructions Please review all these instructions prior to assembly. The Big Buddy-Air
AUTOMATIC BURNISHER MODEL FURY 21 HSB
 AUTOMATIC BURNISHER MODEL FURY 21 HSB INTRODUCTION OPERATING & MAINTENANCE INSTRUCTIONS This operator s book has important information for the use and safe operation of this machine. Read this book carefully
650 Series Cargo Van Lift Mounting Instructions Ford Transit (Standard Roof) 2015-Present
 2015-Present") TOMMY GATE OWNER'S / OPERATOR'S MANUAL 650 Series 650 LB Capacity 650 Series Cargo Van Lift Mounting Instructions Ford Transit (Standard Roof) 2015-Present Installing the Base Plate 1. Examine the interior
TOMMY GATE OWNER'S / OPERATOR'S MANUAL 650 Series 650 LB Capacity 650 Series Cargo Van Lift Mounting Instructions Ford Transit (Standard Roof) 2015-Present Installing the Base Plate 1. Examine the interior
PAGE Both power cords must be connected & powered to operate the E-TES SD 120 volt unit.
 PAGE 1 This document outlines questions to ask and components to check during E-TES SD 120 volt troubleshooting. More detailed troubleshooting procedures are available in the E-TES SD 120 volt Troubleshooting
COOKSON OWNER'S MANUAL
 COOKSON OWNER'S MANUAL FDO-A10 INDUSTRIAL DUTY FIRE DOOR OPERATOR R L I S T E D 3040233 US CONTROL PANEL SERIAL# OPERATOR SERIAL# 9001.DWG ECN 0959 REV 4 SPECIFICATIONS MOTOR TYPE:...INTERMITTENT HORSEPOWER:...1/8
Make/Type/Size/Model Honda Generator EB 3500X & EB5000X Operators Manual Open Well Ventilated Area to Start & Shut Down Machine
 HONDA GENERATORS ARE DESIGNED TO GIVE SAFE AND DEPENDABLE SERVICE IF OPERATED ACCORDING TO INSTRUCTIONS. YOU CAN HELP PREVENT ACCIDENTS BY BEING FAMILIAR WITH YOUR GENERATORS CONTROLS AND BY OBSERVING
OPERATOR S MANUAL STUDPRO SERIES
 OPERATOR S MANUAL STUDPRO SERIES Capacitor Discharge Stud Welder MODELS: StudPro 2500XI StudPro 2500XIP StudPro 3125XI StudPro 3750XI CONTENTS Description Pages Safety 2 Specifications and Features 3 Product
Water Dispenser Owner s Manual 100 Series
 TM Water Dispenser Owner s Manual 100 Series IMPORTANT: This manual includes important safety material; please read all instructions before plugging power supply cord into receptacle. 1 2 3 Load water
Model Voltage Wattage Length Width Height Width Length 7J J
 Please read and save these instructions. Read carefully before attempting to operate or maintain the product described. Protect yourself and others by observing all safety information. Failure to comply
JBI Docupunch P33 Automatic Punch
 JBI Docupunch P33 Automatic Punch Instruction Manual Provided By http://www.mybinding.com http://www.mybindingblog.com TABLE OF CONTENTS SECTION I: INSTALLATION & TESTING: 1) Uncrating, Inspection & removal
KENCO ENGINEERING COMPANY
 KENCO ENGINEERING COMPANY P.O. BOX 470426 TULSA, OK 74147-0426 PHONE: (918) 663-4406 FAX: (918) 663-4480 www.kenco-eng.com e-mail: info@kenco-eng.com SERIES KTD THERMAL DIFFERENTIAL FLOW/LEVEL SWITCH INSTALLATION
The POWER. In PRESENTATION PRODUCTS. Instruction Book for BOARDROOM ELECTROL DA-LITE SCREEN COMPANY, INC.
 The POWER In PRESENTATION PRODUCTS Instruction Book for BOARDROOM ELECTROL DA-LITE SCREEN COMPANY, INC. 3100 North Detroit Street Post Office Box 137 Warsaw, Indiana 46581-0137 Phone: 574-267-8101 800-622-3737
COOKSON OWNER'S MANUAL
 COOKSON OWNER'S MANUAL FD-2A AUTOMATIC RESETTING FIRE DOOR HOIST OPERATOR R US RECOGNIZED COMPONENT CONFORMS TO UL 325 3040233 9045.DWG ECN 0986 REV 2 PROTECTED BY ONE OR MORE OF THE FOLLOWING PATENTS:
Self-Recovery Winch WARNING. General Safety Precautions
 1 Self-Recovery Winch Thank you for purchasing a Winch. This manual covers operation and maintenance of the winch. All information in this publication is based on the latest production information available
Tooling Assistance Center
 Safeguards are designed into this application equipment to protect operators and maintenance personnel from most hazards during equipment operation. However, certain safety precautions must be taken by
Owner and Operating Manual for
 Owner and Operating Manual for 120VAC Manual Control 12VDC Solar Battery Manual Control 120VAC Remote Control 12VDC Solar Battery Remote Control GEN2 Remote Versions Only Boat Lifts Please read this manual
P Original Series Cargo Van Lift Mounting Instructions Fullsize Ford Van present. Preparing the Gate
 Fullsize Ford Van- 1992-present Preparing the Gate 1. Remove the mounting hardware which is banded to the liftgate. 2. Verify mounting kit (Figure 1 and Table 1). S-400-40 STRAP VAN MOUNTING EAR BENT BRACKET
Illustrated Parts List
 Illustrated Parts List. Ordering Parts For your convenience, replacement parts and accessories can be ordered from ARPAC by fax 24 hours a day. Please have the following information available to ensure
OPERATOR S MANUAL ACE - P100
 OPERATOR S MANUAL ACE - P100 Pin Welder TRU-WELD EQUIPMENT COMPANY www.truweldstudwelding.com (330) 725-7744 CONTENTS Description Pages Warranty Information 1 Safety 2 Specifications and Features 3 Product
The Da-Lite Difference.
 The Da-Lite Difference. Instruction Book for Large Advantage Electrol DA-LITE SCREEN COMPANY, INC. 3100 North Detroit Street Post Office Box 137 Warsaw, Indiana 46581-0137 Phone: 574-267-8101 800-622-3737
Heavy Duty Sprayer Owners Manual Model MS-O
 Heavy Duty Sprayer Owners Manual Model MS-O Table of Contents Warranty 4 Warning 5 Assembly and Preparation 6 Operation 7 Cleaning and Storage 7 Standard Spray Gun & Parts List 8 Trigger Style Spray Gun
OPERATING INSTRUCTIONS FINISHER 4300
 OPERATING INSTRUCTIONS FINISHER 4300 Model No. BA-FS43 Banner American Products, Inc. Temecula, CA Table of Contents I. For Your Safety... 2 II. Electrical Safeguards... 2-3 III. Specifications... 3 IV.
CHEMINSTRUMENTS HOT ROLL LAMINATOR MODEL HL-100, HL-101 OPERATING INSTRUCTIONS
 CHEMINSTRUMENTS HOT ROLL LAMINATOR MODEL HL-100, HL-101 OPERATING INSTRUCTIONS PRODUCT DESCRIPTION...2 SPECIFICATIONS...3 UNPACKING...3 ASSEMBLY...3 Key Components...5 SAFETY FEATURES...7 Trip Wire...7
DODGE RAM 2500
 81234007 2014-2015 DODGE RAM 2500 Congratulations - your new LevelTow Helper Springs are quality products capable of improving the handling and comfort of your vehicle. As with all products, proper installation
Hot Dog Corral. Models HDC-20, HDC-20RC, HDC-21A, HDC-30A, HDC-35A, & HDC-50A. owner s manual. Manufacturing Numbers:
 HDC-20 Shown Hot Dog Corral Models HDC-20, HDC-20RC, HDC-21A, HDC-30A, HDC-35A, & HDC-50A owner s manual Manufacturing Numbers: 9300300, 9300302, 9300303, 9300304, 9300305, 9300307, 9300306, 9300308, 9300309,
OPERATING MANUAL TS - 4 Thermal Microscope Stage
 OPERATING MANUAL TS - 4 Thermal Microscope Stage CONTENTS Section Page 1.0 GENERAL DESCRIPTION 2 2.0 SETTING UP THE THERMAL 3 MICROSCOPE STAGE 3.0 OPERATING INSTRUCTIONS 6 4.0 SPECIFICATIONS 7 5.0 MAINTENANCE,
Level One Electric Vehicle Charging Station Wall Mount Product Guide
 Level One Electric Vehicle Charging Station Wall Mount Product Guide Model # WU-120 ShorePower Technologies 2351 NW York St. Portland, OR 98664 503-892-7345 info@shorepower.com www.shorepower.com 2 Table
Therm-L-Tec Building Systems LLC. Therm-L-Tech. Power Operated Retrofit Kit 230 VAC or 440/480 VAC 50/60 Hz Installation and Setup Manual
 Therm-L-Tec Building Systems LLC Therm-L-Tech Power Operated Retrofit Kit 230 VAC or 440/480 VAC 50/60 Hz Installation and Setup Manual Rev. A 01/2015 Index Index 1 Electrical Requirements for Therm-L-Tec
TUTTLE & BAILEYR. Installation & Service Manual PRODUCT DIMENSIONS. FIGURE 1 - Product Isometric and Dimensional Views
 PRODUCT DIMENSIONS 23 5/8 A B FIGURE 1 - Product Isometric and Dimensional Views Unit Type Motor Type Nominal Unit Size Active Filter Face Area (Sq. Ft.) A B Weight (lb) Standard Room Side Replaceable
Universal Lane. Installation and Maintenance Manual IMPORTANT PRODUCT LIABILITY INFORMATION
 Universal Lane Installation and Maintenance Manual IMPORTANT PRODUCT LIABILITY INFORMATION READ ALL INSTRUCTIONS BEFORE PROCEEDING WITH ASSEMBLY. VITAL PRODUCT INFORMATION PERTAINING TO PROPER SETUP, INSTALLATION,
Reproduction or other use of this Manual, without the express written consent of Vulcan, is prohibited.
 SERVICE MANUAL ELECTRIC BRAISING PANS (30 & 40 GALLON) VE30 VE40 ML-126849 ML-126850 VE40 SHOWN - NOTICE - This Manual is prepared for the use of trained Vulcan Service Technicians and should not be used
SE-1200-MP ECO - SERIES
 Inc. SE-1200-MP ECO - SERIES Operation & Parts Manual SE 1200 MP ECO -SERIES OWNERS MANUAL Table of Contents 1. Installation guide 2. Set-up instructions 3. Operation instructions 4. Cleaning 5. Troubleshooting
OPERATION AND MAINTENANCE INSTRUCTION MANUAL. AEU-707A & AEU-707AV2 Implant / Surgery Systems
 OPERATION AND MAINTENANCE INSTRUCTION MANUAL AEU-707A & AEU-707AV2 Implant / Surgery Systems TABLE OF CONTENTS: Introduction.........................1 Package Contents....................1 Setting Up the
650 Series Cargo Van Lift Mounting Instructions Fullsize Ford 1992-Present
 TOMMY GATE OWNER'S / OPERATOR'S MANUAL 650 Series 650 LB Capacity 650 Series Cargo Van Lift Mounting Instructions Fullsize Ford 1992-Present Installing the Base Plate 1. Examine the interior and exterior
Selection Guide. Freeze Protection Heating Cable. Thermwire - Wrap. Thermwire - Wrap Pre-Assembled. Thermwire - Comp. Thermwire - Melt.
 Thermwire Freeze Protection Heating Cable Selection Guide Thermwire - Wrap Pipe Freeze Protection Heating Cable Thermwire - Wrap Pre-Assembled Pipe Freeze Protection Heating Cable with Attached Cord &
Model 1100B CHG Terminator. Installation Instructions
 Model 1100B CHG Terminator Installation Instructions 1 Contents: 1.0 Safety Information... 3 2.0 Set-up and Adjustments... 3 3.0 Ram Adjustments... 10 4.0 Wire Termination Quality... 12 5.0 General Maintenance...
TM-1620 OPERATING INSTRUCTIONS AND OWNERS MANUAL
 TM-1620 OPERATING INSTRUCTIONS AND OWNERS MANUAL tracopackaging.com 800-284-WRAP 620 SOUTH 1325 WEST OREM, UT. PHONE 800-284-WRAP (9727) IMPORTANT: READ ALL INSTRUCTIONS BEFORE OPERATING EQUIPMENT Your
Backhoe for Dingo Compact Utility Loaders
 Form No. 50-5 Backhoe for Dingo Compact Utility Loaders Model No. 60 000000 & Up Operator s Manual Original Instructions (EN/GB) Contents Page Introduction................................. Safety......................................
XPS-ProFeed Shuttle SERVICE MANUAL. Revised:
 XPS-ProFeed Shuttle SERVICE MANUAL Revised: 9-14-15 RENA SYSTEMS INC. 910 East Main Street; Suite 200 Norristown, PA 19401-4110 Phone: (610) 650-9170 Fax: (610) 270-3947 Web Site: www.renausa.com SAFETY
Introduction. The words WARNING, CAUTION and NOTE carry special meanings and should be carefully reviewed.
 Operations/ Maintenance Manual Important Information File in your maintenance records Medical Visum Exam Light Model LL305 For parts or technical assistance call 800 327 0770 (option 2) Table of Contents
Low Profile Wrenches Operation and Maintenance Manual
 Low Profile Wrenches Operation and Maintenance Manual http://www.torquetoolsinc.com Use the HEXPRO Series Low Profile Wrenches Model 2HP 4HP 8HP 14HP 30HP to install and remove large bolts that have minimal
PITNEY BOWES FLEXIBLE INK JET TRANSPORT 36 FIT BASE: FIT-36. Parts Manual. (BOM: FIT36rev1.0) FIT-36parts_rev0 1
 FIT-36parts_rev0 1") FLEXIBLE INK JET TRANSPORT 36 FIT BASE: FIT-36 Parts Manual (BOM: FIT36rev1.0) FIT-36parts_rev0 1 VERSION HISTORY The table below summarizes the history of this document as it is published onto the company
FLEXIBLE INK JET TRANSPORT 36 FIT BASE: FIT-36 Parts Manual (BOM: FIT36rev1.0) FIT-36parts_rev0 1 VERSION HISTORY The table below summarizes the history of this document as it is published onto the company
OPERATOR S MANUAL. TW-i SERIES. Capacitor Discharge Stud Welder. MODELS: TW-i 250 TW-i 250CP TW-i 321 TW-i 375
 OPERATOR S MANUAL TW-i SERIES Capacitor Discharge Stud Welder MODELS: TW-i 250 TW-i 250CP TW-i 321 TW-i 375 TRU-WELD EQUIPMENT COMPANY www.truweldstudwelding.com (330) 725-7744 CONTENTS Description Pages
AGRI-COVERTM SWITCH CONTROL INSTRUCTIONS
 AGRI-COVERTM SWITCH CONTROL INSTRUCTIONS Use these instructions in place of the rocker switch and solenoid sections in your roll tarp or ROLTECTM Electric Hopper Conversion instructions. Some installs
M9206-Bxx-2S Series On/Off Electric Spring Return Actuators
 Installation Instructions M9206-Bxx-2S Issue Date May 14, 2003 M9206-Bxx-2S Series On/Off Electric Spring Return Actuators Installation IMPORTANT: Use this M9206-Bxx-2S Series actuator to control equipment
assembly guide ELECTRIC Model Numbers: Estimated time required for assembly: 1 Hour (English) /02/10
 /02/10") assembly guide Model Numbers: 11601514 11601559 11601578 Estimated time required for assembly: 1 Hour ELECTRIC (English) 42804382 6/02/10 2 ASSEMBLY GUIDE A, B, C, Assembly: CAUTION: For your safety, before
assembly guide Model Numbers: 11601514 11601559 11601578 Estimated time required for assembly: 1 Hour ELECTRIC (English) 42804382 6/02/10 2 ASSEMBLY GUIDE A, B, C, Assembly: CAUTION: For your safety, before
GENUINE PARTS INSTALLATION INSTRUCTIONS
 GENUINE PARTS INSTALLATION INSTRUCTIONS 1 DESCRIPTION: 2 APPLICATION: 3 PART NUMBER(S) REQUIRED FOR INSTALLATION: Fog Lamp Kit (AL) Rogue (SV) 999F1 G2000 (Fog Lamp Kit) 4 KIT CONTENTS: Item Qty. Part
Power Operated Retrofit Kit for Manual Door 230 VAC or 440/480 VAC 50/60 Hz Installation and Setup Manual
 Therm-L-Tec Building Systems LLC Therm-L-Tech Power Operated Retrofit Kit for Manual Door 230 VAC or 440/480 VAC 50/60 Hz Installation and Setup Manual Rev. A 10/2014 Index Index 1 Electrical Requirements
PLATFORM WELDER PACKAGE MANUAL
 PLATFORM WELDER PACKAGE MANUAL Part Number 0083991 March 2014 Replaces 0083991 March 2008 Additional Information For additional information contact your local dealer or Snorkel at: Snorkel International
WARNING! THIS PRODUCT MUST BE INSTALLED BY A TRAINED, AUTHORIZED RICON SERVICE TECHNICIAN.
 II. INSTALLATION T he chapter provides instructions for installing the RICON RDO2900 Series Internal Power Swing Door Operator into full-size 1992 and later Ford vans, 1990 and later Chevrolet & GMC vans,
BluePRESSLine. Size 1-S Size 2-S
 Instruction Manual Version 10.01 Heat press BluePRESSLine Size 1-S Size 2-S Version 10.01 1 / 19 1. Introduction 1.1 Content 1. Introduction 02 1.1 Content 02 1.2 Illustration of the heat press 03 1.3