Rostra Cruise Control Installation for the Honda ST1300
|
|
|
- Richard Jones
- 6 years ago
- Views:
Transcription
1 Rostra Cruise Control Installation for the Honda ST1300 These instructions will only serve as a supplement to the Rostra Installation Manual to cover the particulars for installation in the ST1300. Remove the following parts: -Gas Tank -Air Box -Right and Left side plastic -Left side mirror Parts List: -Rostra Cruise Control ( MCA-000 SWITCH, STARTER STOP (Non-lighted GL1800 Goldwing Switch) -Pulse Divider ( -1/16 x ¾ x ¾ Aluminum angle stock -1/8 x 1½ Aluminum Flat Stock - 9 Pin Honda connector ( -Misc. wiring hardware such as connectors and heat shrink tubing as required Note: If you think you are going to have problems with maintaining 0 volts across the brakelight circuit because you are running additional LED s then download this supplement which will show you how to install a relay to fix this problem: Note: If you don t want to use the Goldwing right side control then order the cruise control from Dakota Digital with the HND-2 dash mount switch. ( 1/mode=prod/prd48.htm)
2 Suggested Installation Order: Install Goldwing Right Side Control (Mechanical Portion Only-Disconnect Throttle Cable at throttle drum) Optional: Install Turbo City Fuel Pressure Regulator (if you haven t already) Layout Wire Harness & Cruise Throttle Cable Fabricate Cruise Throttle Cable Bracket and Cruise Unit Mounting Bracket Prepare Extension to throttle drum Re-connect Throttle Cable at throttle drum Mount Cruise Throttle Cable Bracket Install Throttle drum extension Connect Throttle drum extension to Cruise Throttle Cable Adjust throttle operation per Service Manual with AirBox and Front PAIR Hose temporarily installed Install Cruise Unit Mounting Bracket Install Pulse Divider (Cut C8 Capacitor) Make all electrical connections required by Rostra Manual except for the control panel Route the Goldwing control cable harness and determine final length of wires to 9-Pin Connector Wire 9-Pin connector Test Continuity of wires for 9-Pin connector Connect 9-Pin connector to bike harness. Test operation of switches and buttons. Connect Rostra control wires to the 4 wires for the Goldwing control cruise operation Run diagnostics on Rostra Cruise Control Install Cruise Unit onto Mounting Bracket Synchronize starter valve per Service Manual Re-Install Airbox noting new routing of front PAIR hose to Airbox

3 Goldwing Right Side Control (Mechanical) - All plastic and the airbox should be removed. - Loosen the throttle cable at the engine side to make the cables at the right control easier to remove - Remove the right side control and reuse the throttle pipe and grip, it fits in the Goldwing control without modification - Reposition the brake master cylinder as far up the bar as possible if needed. - Test fit the Goldwing switch to determine the inclination that best suits your needs - Mark the hole location then drill the hole - Loosen the black cable ties holding the throttle cables to the bars - Install the throttle cables to the throttle pipe and install the Goldwing switch - Connector the brake switch wires to the brake switch contacts in any order. Clip the two wires with the smaller connectors, these will not be needed. Drill hole for Goldwing Switch

4 Cruise Cable & Electrical Harness Routing -Route and mount the end of cable before mounting the cruise module to the bike. Routing Overview Cruise Module Connect to output from Pulse Divider Bulkhead connectors Fig. 34 M in Rostra Manual Connect to Ignition Coil Wire Harness from Cruise Module VSS Wire (Gray) Cruise Throttle Cable Tach Wire
 Securing Cruise Module Throttle Cable End - Thread the cruise throttle cable end per the Rostra")
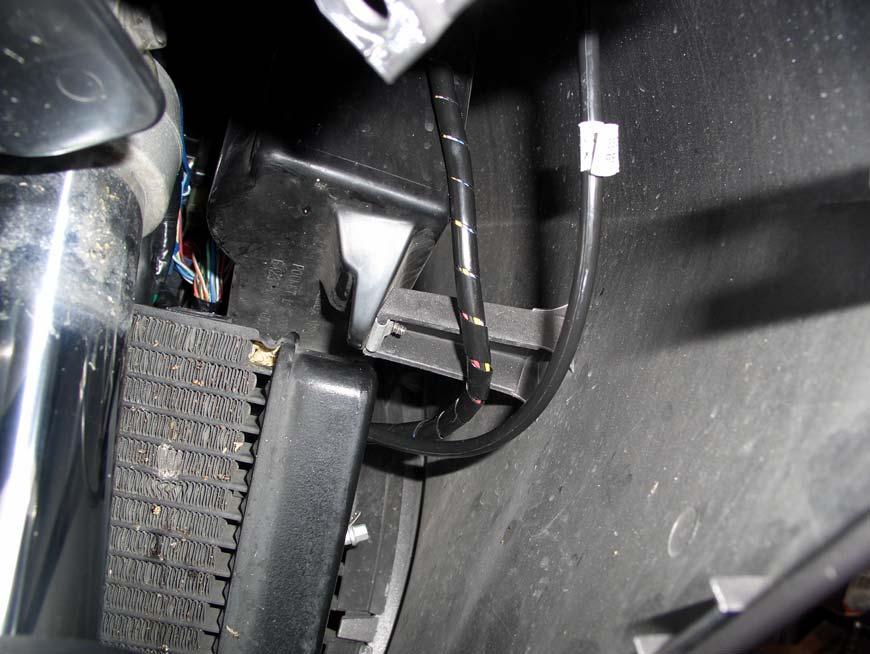
5 Cruise Throttle Cable Routing Cruise throttle cable through air inlet opening to reach the other side of frame. NOTE: DO NOT route wire harness here it should go under the airbox (This is an earlier photo) Securing Cruise Module Throttle Cable End - Thread the cruise throttle cable end per the Rostra Installation Manual - Fabricate a small bracket using 1/16 x ¾ x ¾ Aluminum angle stock Rostra Cruise Cable Existing Throttle Cable

6 - Install the cruise throttle cable to the angle bracket with the 2 lockwasher nuts provided in the kit (G18) - Re-connect Throttle Cable at throttle drum - Position the angle bracket between the throttle cable bracket and locknut for the throttle cable Route wire harness here it should go under the Throttle Cables Pair hose under throttle cable Secure cruise throttle cable with cable tie through existing hole - Remove the PAIR valve hose from the left valve cover. Place the airbox end under the throttle cable. - Temporarily install the airbox to verify proper throttle operation (no binding) at full left and right steering lock. Adjust as needed.

 Drill out to match the throttle drum shaft diameter File down boss to ½ height Drill out to match shoulder screw Rubber washer to take up slack Shoulder Screw Do not reinstall split washer")
7 Cruise Cable/Throttle Drum Interface According to the Rostra manual the throttle must have at least 41mm of travel from closed to fully open throttle{pg 10}. The ST1300 has less than 30mm of travel so you must mount an extension to the throttle drum to get the required travel. The extension should not interfere with the airbox when re-installed. To minimize the fabrication I used a machined servo horn designed R/C models: -Futaba Single Aluminum Horn Silver 1.5" ( Drill out to match the throttle drum shaft diameter File down boss to ½ height Drill out to match shoulder screw Rubber washer to take up slack Shoulder Screw Do not reinstall split washer Boss toward rear of bike. File down to ½ height Add Internal tooth washer this side
 with the shoulder screw to the throttle drum extension - Install one bead chain connector to the cruise")
8 Clocking the extension The throttle drum will rotate through 90 degrees from fully closed to fully open so clock the extension according to the diagram on the left. Connect Throttle drum extension to Cruise Throttle Cable - Install the Eyelet connector (G8) with the shoulder screw to the throttle drum extension - Install one bead chain connector to the cruise throttle cable. Preposition the bead chain connector cover (G5) - Measure the length of bead chain (G3) that will be required (I used 3 beads) - Preposition a bead chain connector cover on the bead chain and install through both bead chain connectors. Move the bead chain connector covers into position.


9 Pulse Divider Installation This circuit is designed to both amplify and reduce the frequency of the signal from the VSS. The output signal from VSS is approximately 80,000 pulses per mile. To modify the signal to a range acceptable for the Rostra Cruise module move the jumper to the divide by 2 position. Additionally, one capacitor (C8) needs to be clipped off the circuit board to disable the low-pass filter. Clip both leads of the C8 capacitor and remove Move the jumper to the divide by 2 position Connections: 12V Fused 12V. The Quartet harness is acceptable. Ground Vehicle Ground Output from Pulse Divider Connect to Gray Wire of the Rostra Cruise Bundle {Page 19 F. } From VSS Connect to Pink wire with Green strip. (24-Pin connector. Bike side of the connector) From VSS: Connect to Pink wire with Green strip

10 The pulse divider should fit between the cruise module and metal frame

11 Switch Settings
12 Cruise Module Mounting Please note that the Rostra manual specifically states to never mount the unit with the cable pointed down which is precisely how this is being mounted. I am assuming they state this so condensation and water do not infiltrate the connector and throttle cable housing interfaces. I removed the connector and added dielectric grease in the contact area. I m making the assumption that the throttle cable interface will never see the harsh underhood environment of an automobile. This mounting orientation doesn t effect operation. Fabricate a flat mounting bracket using 1/8 x 1½ Aluminum Flat Stock. Use the diagram and photos below to determine the hole locations and final installed orientation. Note the fasterners that were removed to gain access to this area. The bracket will be mounted with one fastener to the pentagon-shaped fairing support. Use a fastener with a low profile head. Use a fastener with a low profile head Insert the selfthreading bolts provided with kit Mounting Bracket Orientation (Looking from left side toward tank)


13 Mounting Bracket Installed (Looking from tank toward left side) Note: Do not install the Cruise unit onto the mounting bracket unit all switch settings have been made and diagnostics have been performed to verify operation per Page 20 & 21 in the Rostra Manual. Insert the self-threading bolts into the unit once before final installation so that the threads can be formed. You will need to use force to separate the two fairing components when you do the final install of the Cruise unit.

14 Final Installed Location & Position Note: The throttle cable and wire harness must hang below the top of the radiator to avoid the space occupied by the left storage compartment.
15
16 Goldwing Right Side Control (Electrical) Wire the 9-Pin connector according to the diagram below Black w/ GraySquares White w/green White w/black White 3 Black w/red Black w/white Black w/white Black w/white 2 Yellow w/red Yellow w/red Black w/gray squares Green w/yellow 4 1 Blue w/white Blue w/white Start Button when Free Start Button when Pushed Engine Stop/Start Rotary Switch (Supplies power to 2 ) Brake Switch


17 Connections for Cruise Function on Goldwing Switch Rostra Harness Goldwing Switch Black w/yellow ON SET/COAST White White w/yellow RESUME/ACCEL White w/blue - If you want to use the Reverse Shift switch as a On/Off for lights or other function note the wiring diagram below.
Installation Items: Cruise Module
 Installation Items: Rostra 250-1223, Electronic Cruise Control System (ECCS) includes the cruise module, harness, cruise cable, cruise module mounting bracket, cruise cable mounting bracket and hardware
Rostra Electronic Cruise Control Install On a Stratoliner or Roadliner
 Rostra Electronic Cruise Control Install On a Stratoliner or Roadliner MATERIALS LIST: 1 - Rostra Part # 250-1223 (www.brandondist.com/products/cruise1223.htm) 1 - Signal Splitter part # 250-4369 1 - Engagement
INSTALLATION INSTRUCTIONS FOR THE TOMAHAWK ELECTRIC REVERSE
 INSTALLATION INSTRUCTIONS FOR THE TOMAHAWK ELECTRIC REVERSE LAST UPDATED: April 2018 Thank you for choosing the Motor Trike Electric Reverse. We ask that you read the directions before you start and follow
TTR225/250 DUAL S PORT K IT I NSTALLATION I NSTRUCTIONS
 TTR225/250 DUAL S PORT K IT I NSTALLATION I NSTRUCTIONS KIT CONTENTS Inspect Your Kit Your kit will include the following items A. TTR225/250 Instructions and Wiring Diagrams Read through the entire instruction
C FORD F250 / F L POWERSTROKE DIESEL WITH AUTOMATIC TRANSMISSIONS ONLY
 EXHAUST BRAKES C40019 1999-2003 FORD F250 / F350 7.3L POWERSTROKE DIESEL WITH AUTOMATIC TRANSMISSIONS ONLY Getting Started Thank you and congratulations on your purchase of a Pacbrake exhaust retarder.
ULTRACRUISE CONTROL INSTALLATION MANUAL
 ULTRACRUISE CONTROL INSTALLATION MANUAL Installation Operation Trouble Shooting FORM # 2784 Rev. A 07/95 THIS MANUAL, YOUR KIT AND YOU This Cruise Control Kit is a microprocessor based Cruise Control.
JOHN DEERE GATOR SWITCH PANEL INSTRUCTIONS FITS 1GTRXUV2 AND 1GTRXUV4 CABS (p/n: 1XUVSP)
") P. 1 of 5 JOHN DEERE GATOR SWITCH PANEL INSTRUCTIONS FITS 1GTRXUV2 AND 1GTRXUV4 CABS (p/n: 1XUVSP) Note: Harness Extension Kit Required for 4 Passenger (p/n: 1XUV4WHEK) This manual is the property of the
P. 1 of 5 JOHN DEERE GATOR SWITCH PANEL INSTRUCTIONS FITS 1GTRXUV2 AND 1GTRXUV4 CABS (p/n: 1XUVSP) Note: Harness Extension Kit Required for 4 Passenger (p/n: 1XUV4WHEK) This manual is the property of the
RECOMMENDED TOOLS PERSONAL & VEHICLE PROTECTION SAFETY GLASSES
 PART NUMBER: 250-9625 GENERAL APPLICABILITY THIS CRUISE WAS TESTED AND VERIFIED ON: ALL MODELS RECOMMENDED TOOLS PERSONAL & VEHICLE PROTECTION SAFETY GLASSES KIT CONTENTS/SERVICE PARTS ITEM QTY DESCRIPTION
CA 421 Installation Instructions
 CA 421 Installation Instructions PROFESSIONAL INSTALLATION STRONGLY RECOMMENDED Installation Precautions: Roll down window to avoid locking keys in vehicle during installation Avoid mounting components
MOTOALLIANCE WINCH MOUNT
 , / 1-866-527-7637 www.motoalliance.com MOTOALLIANCE WINCH MOUNT Polaris RZR Thank you for purchasing our MotoAlliance winch mount(s). You now own a premium custom winch mount to allow you to use your
Overview of EIS Installation
 Overview of EIS Installation Thank you for purchasing an Electroair Ignition System for your aircraft. We are confident that you will be happy with the performance of your EIS on your aircraft. The next
RECOMMENDED TOOLS PERSONAL & VEHICLE PROTECTION SAFETY GLASSES
 HYUNDAI ACCENT 2010- /ELANTRA 2012- / KIA RIO 2012- PART NUMBER: 250-9628-NS GENERAL APPLICABILITY THIS CRUISE WAS TESTED AND VERIFIED ON: (AT/MT) VEHICLES RECOMMENDED TOOLS PERSONAL & VEHICLE PROTECTION
Assembly Instructions
 Assembly Instructions Part Number Description Model Approx. Assembly Time 99994-0903 Windshield Wiper Kit Mule SX 1 Hour WARNING Improper installation of this accessory could result in an accident causing
INTRODUCTION This Cruise Control Kit is a microprocessor based Cruise Control. It is designed for ease of installation and can be used with most cars,
 ELECTRONIC CRUISE CONTROL INSTALLATION MANUAL Installation Operation Trouble Shooting FORM #2239, Rev. K, 08/17/01 INTRODUCTION This Cruise Control Kit is a microprocessor based Cruise Control. It is designed
VRSC-DX Truck-Lite LED Headlight Installation Instructions
 VRSC-DX Truck-Lite LED Headlight Installation Instructions The following Instructions are for installing a 7 Truck-Lite LED headlight into a Harley Davidson VRSC-DX Night Rod Special fairing. Other 7 headlights
Dynojet Research 2191 Mendenhall Drive North Las Vegas, NV (800)
") 007 Ducati 098 I n s ta l l a t i o n I n s t r u c t i o n s Parts List Power Commander CD-ROM Button Adjustment Display USB Cable Installation Guide Power Adapter Wire Tap Power Commander Decals Dynojet
007 Ducati 098 I n s ta l l a t i o n I n s t r u c t i o n s Parts List Power Commander CD-ROM Button Adjustment Display USB Cable Installation Guide Power Adapter Wire Tap Power Commander Decals Dynojet
Wolverine Turn Signal / Horn Kit 2102
 All years Yamaha Wolverine STOP - THIS KIT IS DESIGNED SPECIFICALLY FOR ALL YEAR AND MODELS YAMAHA WOLVERINE. IF YOUR MACHINE IS NOT ONE OF THESE MODELS DO NOT PROCEED. Contact Ryco Motorsports or your
INSTALLATION INSTRUCTIONS
 INSTALLATION INSTRUCTIONS 2009 CORVETTE LS - 9 INSTALLATION INSTRUCTIONS FOR LS 9 The following instructions are intended as an aid to assist in harness installation. More in depth information can be obtained
MICROCRUISE 4. INSTALLATION and OWNER S MANUAL FORM #2756, REV. E,
 MICROCRUISE 4 INSTALLATION and OWNER S MANUAL FORM #2756, REV. E, 07-30-09 THIS MANUAL, YOUR KIT AND YOU This Cruise Control Kit is a microprocessor based Cruise Control. It is designed for ease of installation
KIA RIO CRUISE CONTROL INSTALLATION INSTRUCTIONS PART NO AUTOMATIC TRANSMISSION VEHICLE CONTENTS
 2007-2008 KIA RIO AUTOMATIC TRANSMISSION VEHICLE CRUISE CONTROL INSTALLATION INSTRUCTIONS PART NO. 250-1799 CONTENTS PARTS IDENTIFICATION... 2 HELPFUL HINTS... 3 INSTALLATION... 4 WIRING DIAGRAM... 11
2001 Honda Civic EX ACCESSORIES & EQUIPMENT' 'Cruise Control Systems - Civic & CR-V 2001 ACCESSORIES & EQUIPMENT
 DESCRIPTION 2001 ACCESSORIES & EQUIPMENT Cruise Control Systems - Civic & CR-V Cruise control system uses mechanical and electrically operated devices to maintain vehicle speed settings greater than 25
RECOMMENDED TOOLS PERSONAL & VEHICLE PROTECTION SAFETY GLASSES
 PART NUMBER: 250-9625 GENERAL APPLICABILITY THIS CRUISE WAS TESTED AND VERIFIED ON: ALL MODELS RECOMMENDED TOOLS PERSONAL & VEHICLE PROTECTION SAFETY GLASSES KIT CONTENTS/SERVICE PARTS ITEM QTY DESCRIPTION
INSTALLATION INSTRUCTIONS
 Accessory Application Publication No. INSTALLATION INSTRUCTIONS WINCH MOUNT P/N 08L73-HL4-F01 After 16 SXS1000M3/M3P/M3LE SXS1000M5P/M5D/M5LE MII 16083 Issue Date February 2017 PARTS LIST No. Description
BMW S1000RR Z-Fi QS / Z-Fi TC Installation Instructions P/N S541S, S541R, T541S, T541R
 2009-2013 BMW S1000RR Z-Fi QS / Z-Fi TC Installation Instructions P/N S541S, S541R, T541S, T541R WARNING! USE ONLY IN RACE OR OTHER CLOSED COURSE APPLICATIONS AND NEVER ON PUBLIC ROADS Z-Fi products do
2013 Road King CVO FLHRSE5 Detachable Fairing w/ Garmin Zumo 665 Installation Instructions
 2013 Road King CVO FLHRSE5 Detachable Fairing w/ Garmin Zumo 665 Installation Instructions 1 1. Turn ignition switch to on position and leave there. This will prevent alarm from going off when you disconnect
29048, 29049, 29050, 29051, 29052, 29053, 29054,
 May 1, 2018 Lit. No. 29206, Rev. 13 29048, 29049, 29050, 29051, 29052, 29053, 29054, 29400 7 HARNESS KIT 3 PORT ISOLATION MODULE LIGHT SYSTEM w/3 PLUG SYSTEM HARNESSES Installation Instructions Read this
29048, 29049, 29050, 29051, 29052, 29053, 29054,
 April 15, 2014 Lit. No. 29206, Rev. 11 29048, 29049, 29050, 29051, 29052, 29053, 29054, 29400 5 HARNESS KIT 3 PORT ISOLATION MODULE LIGHT SYSTEM w/3 PLUG SYSTEM HARNESSES Installation Instructions Read
Lokar Cable Operated Sensor Kit Installation Instructions For Ford C4 and C6
 Lokar Cable Operated Sensor Kit Installation Instructions For Ford C4 and C6 Building American Quality With A Lifetime Warranty! TOLL FREE 1-877-469-7440 tech@lokar.com www.lokar.com Lokar Cable Operated
2010+ Audi B8 S4/S5 3.0T S-FLO Intake Kit INSTALLATION GUIDE FOR RACING USE ONLY
 INSTALLATION GUIDE 2010+ Audi B8 S4/S5 3.0T S-FLO Intake Kit FOR RACING USE ONLY Congratulations on your purchase of the AWE Tuning S-FLO Intake for the 2010+ Audi B8 S4 and B8 S5 3.0T. Exquisite build
RECOMMENDED TOOLS PERSONAL & VEHICLE PROTECTION SAFETY GLASSES
 PART NUMBER: 250-9631 GENERAL APPLICABILITY THIS CRUISE WAS TESTED AND VERIFIED ON: ALL MODELS (AT/MT) RECOMMENDED TOOLS PERSONAL & VEHICLE PROTECTION SAFETY GLASSES KIT CONTENTS/SERVICE PARTS ITEM QTY
OUT FRONT ELECTRIC HYDRAULIC (W/E-47H) FOR STRAIGHT TRIPEDGE PLOWS (PULL AWAY MOUNTINGS)
 FOR STRAIGHT TRIPEDGE PLOWS (PULL AWAY MOUNTINGS)") 80052 March 6, 1995 OUT FRONT ELECTRIC HYDRAULIC (W/E-47H) FOR STRAIGHT TRIPEDGE PLOWS (PULL AWAY MOUNTINGS) ITEM STOCK DESCRIPTION QTY. 51 15759 LIFT UNIT (E-47H) 1 52 817000 020 10" CYLINDER 2 53 15370
80052 March 6, 1995 OUT FRONT ELECTRIC HYDRAULIC (W/E-47H) FOR STRAIGHT TRIPEDGE PLOWS (PULL AWAY MOUNTINGS) ITEM STOCK DESCRIPTION QTY. 51 15759 LIFT UNIT (E-47H) 1 52 817000 020 10" CYLINDER 2 53 15370
CLASSIC UPDATE WIRING KIT
 by Randy Irwin 1955-57 CLASSIC UPDATE WIRING KIT Randy Irwin - Technical Writer Randy has been involved in the Chevy parts business for over 25 years. He is a wizard at creating, making and modifying custom
WARNING! USE ONLY IN RACE OR OTHER CLOSED COURSE APPLICATIONS AND NEVER ON PUBLIC ROADS
 2008-2010 KTM RC8 2009-2010 RC8 R Z-Fi TC / Z-FI QS INSTALLATION INSTRUCTIONS P/Ns S542S, S542R, T542S, T542R WARNING! USE ONLY IN RACE OR OTHER CLOSED COURSE APPLICATIONS AND NEVER ON PUBLIC ROADS Z-Fi
Instrument Cluster 30 33B 39B A B C D E F E F G H J. Connector. Circuit Branch #4. Circuit Branch #5. Circuit. Branch #6 150A. Ground.
 16 4D, 43 4B 4A & 130 100 50 39A,B,C 300 4C 4B 4C 107 3C 3D 3C 3G 3B 3F 3A 16A 3G 116 104 93 3B 3D 2E 16A 2C 2D 2B 2A 44 40 27A 40B 115 27 40A,C,E 8A,B,C Mating is plugged into accessory connector Power
Installation instructions for Camaro/Firebird and Nova* Windshield Wiper Systems
 Installation instructions for 1967-69 Camaro/Firebird and 1968-74 Nova* Windshield Wiper Systems The Raingear 1967-69 Camaro/Firebird and 1964-74 Nova wiper system is designed for ease of installation
29048, 29049, 29050, 29051, 29052, 29053, 29054,
 April 15, 2014 Lit. No. 29206, Rev. 11 29048, 29049, 29050, 29051, 29052, 29053, 29054, 29400 5 HARNESS KIT 3 PORT ISOLATION MODULE LIGHT SYSTEM w/3 PLUG SYSTEM HARNESSES Installation Instructions Read
C40008 & C40009 EXHAUST BRAKES
 EXHAUST BRAKES C40008 & C40009 1995 2003 Ford F250 / F350 7.3 L Powerstroke Diesel with manual transmissions 1995 1998 Ford F250 / F350 7.3 L Powerstroke Diesel with automatic transmission* *Requires the
LGT-311L Bumper LED Light Kit EZ-Go RXV Installation Instructions
 LGT-311L Bumper LED Light Kit EZ-Go RXV Installation Instructions Caution: Please read through the instructions carefully. Before starting this project, remove the system s positive and negative connections
Turn Signal / Horn Kit PN 7101 by All years Polaris RZR 1000 and RZR 900, 900-4, 900 trail, 900S and 900XC STOP - THIS KIT IS DESIGNED
 All years Polaris RZR 1000 and 1000-4 2015 RZR 900, 900-4, 900 trail, 900S and 900XC STOP - THIS KIT IS DESIGNED SPECIFICALLY FOR ALL YEAR AND MODEL POLARIS RZR 1000 AND 1000-4. ALSO THE 2015 POLARIS RZR
2004 KIA RIO CRUISE CONTROL INSTALLATION INSTRUCTIONS PART NO AUTOMATIC TRANSMISSION VEHICLE CONTENTS
 2004 KIA RIO AUTOMATIC TRANSMISSION VEHICLE CRUISE CONTROL INSTALLATION INSTRUCTIONS PART NO. 250-1766 CONTENTS PARTS IDENTIFICATION... 2 HELPFUL HINTS... 3 INSTALLATION... 4 WIRING DIAGRAM... 11 TROUBLESHOOTING
Signal Mirror Installation Instructions Honda Goldwing GL 1500,
 Signal Mirror Installation Instructions Honda Goldwing GL 1500, 1988-2000 THE safety accessory of the 21 st Century. P/N 210-0049-0 Rev E (10/5/07), BTV 2003 Muth Mirror Systems, LLC. Please read instructions
Aux. Battery and Isolator
 Aux. Battery and Isolator ISOLATOR MOUNTING ALL YEAR VANAGONS Fig.1 1. Disconnect ground from main battery under passenger seat 2. Remove driver seat 3. Remove driver seat belt buckle from seat pedestal
RECOMMENDED TOOLS PERSONAL & VEHICLE PROTECTION SAFETY GLASSES
 PART NUMBER: 250-9627 GENERAL APPLICABILITY THIS CRUISE WAS TESTED AND VERIFIED ON: ALL MODELS (AT/MT) RECOMMENDED TOOLS PERSONAL & VEHICLE PROTECTION SAFETY GLASSES KIT CONTENTS/SERVICE PARTS ITEM QTY
Total installation time for the cruise control was approximately 8 hours.
 The following summary highlights the start-to-finish install of an Audiovox cruise control on stellarpod s (Steve) ST1300. Fred D (Fred) and ChucksKLRST (Chuck) primarily performed the install (Steve did
2-row and All-row systems included.
 Ag Leader Technology Cotton Picker Installation Installation Instructions for John Deere cotton picker models: 2-row and All-row systems included. IMPORTANT: Ensure the model numbers shown above correspond
Jacobs Exhaust Brake. Installation Manual. For 2003 through 2006 Dodge Ram Trucks Equipped with the Cummins ISB 5.9 Engine
 Jacobs Exhaust Brake For 2003 through 2006 Dodge Ram Trucks Equipped with the Cummins ISB 5.9 Engine Installation Manual Please see Web Site for latest instructions www.jakebrake.com CUMMINS E BRAKE BY
INSTALLATION INSTRUCTIONS
 Accessory Application Publication No. INSTALLATION INSTRUCTIONS HEATED GRIP ATTACHMENT P/N 08T70-MJE-D00 CBR650F/FA MII 14960 Issue Date April 2014 PARTS LIST HEATED GRIP Sold separately (1) (2) (4) (2)
29048, 29049, 29050, 29051, 29052, 20953, 29054,
 May 1, 2008 Lit. No. 29206, Rev. 05 29048, 29049, 29050, 29051, 29052, 20953, 29054, 29400-2 HARNESS KIT 3-PORT ISOLATION MODULE LIGHT SYSTEM w/3-plug SYSTEM HARNESSES Installation Instructions Read this
RECOMMENDED TOOLS PERSONAL & VEHICLE PROTECTION SAFETY GLASSES
 MITSUBISHI MIRAGE 2013- PART NUMBER: 250-9633 GENERAL APPLICABILITY ALL MODELS RECOMMENDED TOOLS PERSONAL & VEHICLE PROTECTION SAFETY GLASSES KIT CONTENTS/SERVICE PARTS ITEM QTY DESCRIPTION PART# 1 1 CRUISE
CA-510a Installation Instructions
 CA-510a Installation Instructions PROFESSIONAL INSTALLATION STRONGLY RECOMMENDED Kit Contents Installation Precautions: Roll down window to avoid locking keys in vehicle during installation Avoid mounting
Step 1 : Starting the installation
 Installation Instructions for GM Remote Start w/ INTSL Interface Pre-wired Review the remote start installation manual for safety instructions! Overview Your kit consists of two modules a remote start
Lokar Cable Operated Sensor Kit Installation Instructions
 Lokar Cable Operated Sensor Kit Installation Instructions For GM TH350, TH400, TH200, 200-4R, 700-R4, 4L60 (and 4L60E, 4L80E with Long Selector Shaft) Index Cable Stop Lokar Cable Operated Sensor Kit Installation
SUZUKI SV
 SUZUKI SV650 2007-2011 Z-Fi Installation Instructions Part # F640 May result in the activation of the FI light (indicating injector fault) but does NOT cause actual running issues Parts List: Z-Fi Control
CCS-100 Cruise Control Installation: 2000 Road Star. December 2, By Scott Anderson. Introduction
 CCS-100 Cruise Control Installation: 2000 Road Star December 2, 2010 By Scott Anderson Introduction The following is a summary of the information required to install a CCS-100 cruise control system on
750 Paso Wiring Upgrade
 750 Paso Wiring Upgrade Supplies required: 2 Bosch 30A/12V Relays # #0 332 209 150 (with mounting tab) 1 30 Amp fuse holder 1 10 Amp fuse holder 12 inches of brown 12 gauge wire 60 inches of red 14 gauge
ruise otor Installed weight of the cruise control is approximately 2.0kg.
 Electronic Cruise Control for Yamaha FJR1300 to 2005 Cruise kit: MCS 4660 for model years to 2002 Cruise kit: MCS 4670 for model years 2003~2005 no ABS Cruise kit: MCS 4680 for model years 2003~2005 with
1963 GEN IV SUREFIT VINTAGE AIR CONDITIONING INSTALLATION
 by Randy Irwin 1963 GEN IV SUREFIT VINTAGE AIR CONDITIONING INSTALLATION Randy Irwin - Technical Writer Randy has been involved in the Chevy parts business for over 30 years. He is a wizard at creating,
Hayes TrailTrac Kit Installation Guidelines Polaris Rush / Pro-R / Indy
 Models: 2010-2014 Polaris Rush / Pro-R / Indy Packing List 1 Electronic Control Unit (ECU) 1 ECU Velcro, 3 inch 1 Switch face plate 1 Switch face plate adhesive 1 Switch 1 Wiring harness 1 Fully pre-filled
Service Procedure Note Note Note
 Service Procedure Use wiring harness connector kit, P/N 13580234 on 2009 model year vehicles. The 2009 model year kit includes the material required to service a 4-way connector. The service procedure
Lokar Cable Operated Sensor Kit Installation Instructions
 Lokar Cable Operated Sensor Kit Installation Instructions For GM TH350, TH400, TH200, 200-4R, 700-R4, 4L60 (and 4L60E, 4L80E with Long Selector Shaft) Building American Quality With A Lifetime Warranty!
Rear Body 40D 156A 24 17A 151 3D. 8A,8B,8C under hood light. Horn Relay 91
 fuse box as viewed from the wire entry side Mating connector is plugged into Power Accessory connector 40D Rear Body 19 18 9B 30 LH Courtesy Light 40A,D 4D, 43 156B,C 16 16A 4C 3D 3C 16A 3G 4B 3G 116 4A&130
PLEASE READ ALL DIRECTIONS BEFORE STARTING INSTALLATION
 2007-2015 Honda CBR600RR Installation Instructions PARTS LIST 1 Ignition Module 1 Installation Guide 2 Velcro strips 1 Alcohol swab 1 CAN link cable 1 USB cable 1 Posi-tap THE VEHICLE S IGNITION MUST BE
RECOMMENDED TOOLS PERSONAL & VEHICLE PROTECTION SAFETY GLASSES
 PART NUMBER: 250-9618 AUTOMATIC TRANSMISSION 250-9619 MANUAL TRANSMISSION GENERAL APPLICABILITY THIS CRUISE WAS TESTED AND VERIFIED ON: CHEVY SONIC/ SPARK (ALL MODELS) RECOMMENDED TOOLS PERSONAL & VEHICLE
PLEASE READ ALL DIRECTIONS BEFORE STARTING INSTALLATION
 PARTS LIST 2013-2014 Honda CB500 / CBR500R Installation Instructions 1 Power Commander 1 USB Cable 1 Installation Guide 2 Power Commander Decals 2 Dynojet Decals 2 Velcro strips 1 Alcohol swab 1 Posi-tap
INSTALLATION INSTRUCTIONS
 INSTALLATION INSTRUCTIONS Accessory Application Publications No. P/N 08E49-S2A-100 2004 S2000 AII 26325 Issue Date OCT 2003 PARTS LIST Hood switch harness TOOLS AND SUPPLIES REQUIRED #2 Phillips screwdriver
Progressive Suspension Airtail I.A.S.
 5572 Fresca Drive, La Palma, CA 90623 714.523.8700, FAX 714.523.3220 Progressive Suspension Airtail I.A.S. Installation Instructions for Harley Davidson E.C.C. with Compressor Kit FLH/FLT Models with and
2011 KTM RC8 / 2011 KTM RC8R Z-Fi Installation Instructions P/N F543
 R 2011 KTM RC8 / 2011 KTM RC8R Z-Fi Installation Instructions P/N F543 WARNING! USE ONLY IN RACE OR OTHER CLOSED COURSE APPLICATIONS AND NEVER ON PUBLIC ROADS Z-Fi products do not meet California CARB
RECOMMENDED TOOLS PERSONAL & VEHICLE PROTECTION SAFETY GLASSES
 PART NUMBER: 250-9545 GENERAL APPLICABILITY THIS CRUISE WAS TESTED AND VERIFIED ON:2.7,3.3, 3.5, 5.0 FORD F-150 RECOMMENDED TOOLS PERSONAL & VEHICLE PROTECTION SAFETY GLASSES KIT CONTENTS/SERVICE PARTS
RS4 / RS7 + (4) + SPDT
 + SPDT") TIP SHEET Installation Tips for RS4 / RS7 + Honda-SL3 (4) + SPDT + Diode x2 T0776, T0731 Honda: ( 08-12 Accord), ( 12-13 Civic), 12-13 CRV), ( 11-13 Odyssey), ( 09-13 Pilot) Acura: ( 09-13 TSX) Thank you
TIP SHEET Installation Tips for RS4 / RS7 + Honda-SL3 (4) + SPDT + Diode x2 T0776, T0731 Honda: ( 08-12 Accord), ( 12-13 Civic), 12-13 CRV), ( 11-13 Odyssey), ( 09-13 Pilot) Acura: ( 09-13 TSX) Thank you
PRODUCT USE INFORMATION
 9RC61000 Jeep YJ Body Lift Thank you for choosing Rough Country for all your suspension needs. This body lift fits both manual and Automatic equipped vehicles!!! Refer to last page of this Instruction
Brake and Tail Light Kit Workman 1100/2100 and Twister Utility Vehicles
 Form No. 5-90 Brake and Tail Light Kit Workman 00/00 and Twister Utility Vehicles Part No. 0 6697 Installation Instructions Important Before installing this kit, you must have Wiring kit number 99 79 installed
Please Note: If you are using L.E.D. taillights please wire in a relay as shown on page 3 to allow for proper Cruise Control operation.
 CRS-2000 & CRS-3000 Cruise Control System Introduction You have purchased one of the finest Cruise Control Systems on the market. The Cruise Control features: Enhanced Adaptability Works with 3, 4, 5,
 Table of Contents Multiplexing Reinstallation- under hood (53618-01-M) (2017 & beyond)... 3 Multiplexing installation under hood (53618-02-M) (2017 & beyond).....19 Two Piece Plug MPX Underhood Harness
Slide the billet aluminum cap over the bushing and secure with the 3/8-16 x 2 1/2 socket head allen and locknuts provided.
 Slide the billet aluminum cap over the bushing and secure with the 3/8-16 x 2 1/2 socket head allen and locknuts provided. Put the urethane bushings into the upper antiroll-bar-link eyebolt. Coat the bushings
Installation Instructions
 Installation Instructions Jeep JK Unlimited (2007 Present) Mounting Bracket and Air Line System Kit for ARB On-Board Twin Air Compressor (CKMTA12) Made in the USA Kit Contents: 1 Bracket for ARB Compressor
Installation Manual. Model Chassis Code Engine Code Year
 INTERCOOLER KIT NISSAN GT-R R35 (VR38 38DETT) SPEC-R HG TYPE29 Full KIT Installation Manual Please read the Installation Manual before installing. Keep this manual for future reference. Model Chassis Code
TOYOTA YARIS KEYLESS ENTRY SYSTEM
 TOYOTA YARIS 2011 - KEYLESS ENTRY SYSTEM Part Number: 00016-32901 Accessory Code: KE1 Conflicts Not for installation in vehicles equipped with factory installed keyless entry. Kit Contents Item # Quantity
TOYOTA TUNDRA (6 CYL)
") 2000-02 TOYOTA TUNDRA (6 CYL) CRUISE CONTROL INSTALLATION INSTRUCTIONS EXCEPT MANUAL TRANSMISSION 4X4 PART NO. 00016-34010 CONTENTS PARTS LIST... 2 PARTS DIAGRAM... 3 HELPFUL HINTS... 4 VEHICLE PREPARATION...
2000-02 TOYOTA TUNDRA (6 CYL) CRUISE CONTROL INSTALLATION INSTRUCTIONS EXCEPT MANUAL TRANSMISSION 4X4 PART NO. 00016-34010 CONTENTS PARTS LIST... 2 PARTS DIAGRAM... 3 HELPFUL HINTS... 4 VEHICLE PREPARATION...
PLEASE READ ALL DIRECTIONS BEFORE STARTING INSTALLATION
 2014-2016 Yamaha Viper 2014-2016 Arctic Cat 7000 Installation Instructions PARTS LIST 1 Ignition Module 1 Installation Guide 2 Velcro strips 1 Alcohol swab 1 CAN link cable 1 USB cable THE VEHICLE S IGNITION
Control Panel Interface Upgrade Installation Guide For Model 200i and 250i Motorcycle Dynamometers Serial Number 202xxxx.
 2004 Dynojet Research, Inc. All Rights Reserved. Control Panel Interface Upgrade Installation Guide For Model 200i and 250i Motorcycle Dynamometers Serial Number 202xxxx. This manual is copyrighted by
RECOMMENDED TOOLS PERSONAL & VEHICLE PROTECTION SAFETY GLASSES
 GENERAL APPLICABILITY FORD FIESTA ( AT/MT) KIT CONTENTS/SERVICE PARTS ITEM QTY DESCRIPTION PART# 1 1 CRUISE CONTROL MODULE 250-2813 2 1 SWITCH HARNESS 250-2760 3 1 PEDAL INTERFACE HARNESS 250-2821 4 1
PLEASE READ ALL DIRECTIONS BEFORE STARTING INSTALLATION
 PARTS LIST FUEL AND IGNITION 2012 Kawasaki EX650 / ER6n / Versys Installation Instructions 1 Power Commander 1 USB Cable 1 CD-ROM 1 Installation Guide 2 Power Commander Decals 2 Dynojet Decals 2 Velcro
CHALLENGER TWIN TURBO SYSTEM INSTALLATION INSTRUCTIONS
 CHALLENGER TWIN TURBO SYSTEM INSTALLATION INSTRUCTIONS 1 Verify contents of kits with supplied packing list 1) Unhook the battery. 2) Remove wheel wells & front fascia of vehicle. 3) Remove the catalytic
Installation Tips for your Remote Start system (for RS4LX>GMBP for GM vehicles)
") Installation Tips for your Remote Start system (for RS4LX>GMBP for GM vehicles) Thank you for purchasing your remote start from MyPushcart.com - an industry leader in providing remote starts to doit-yourself
Installation Tips for your Remote Start system (for RS4LX>GMBP for GM vehicles) Thank you for purchasing your remote start from MyPushcart.com - an industry leader in providing remote starts to doit-yourself
TELORVEK II RJ-32 Big Block RamJet Fuel Injection System
 Page #1 TELORVEK II RJ-32 Big Block RamJet Fuel Injection System This wiring system is compatible with the GM Performance part big block Ramjet 502 engine. The harness is designed to dress up the appearance
Installation Tips for your Crimestopper/ProStart Remote Start system (add-on for GM vehicles) v1.02 updated 1/16/2013
 v1.02 updated 1/16/2013") Installation Tips for your Crimestopper/ProStart Remote Start system (add-on for GM vehicles) v1.02 updated 1/16/2013 Thank you for purchasing your remote start from MyPushcart.com - an industry leader
Installation Tips for your Crimestopper/ProStart Remote Start system (add-on for GM vehicles) v1.02 updated 1/16/2013 Thank you for purchasing your remote start from MyPushcart.com - an industry leader
Electric Life JE18-KIT 2007 and up Jeep Wrangler 4 door Installation Instructions
 Installing the motor and regulator assembly Electric Life JE18-KIT 2007 and up Jeep Wrangler 4 door Installation Instructions 1. Remove door panels. Remove inner door panel. 2. With window lowered, remove
2016 HONDA 1000 Pioneer PN 3102 Turn signal / horn kit rev nc
 2016 Honda 1000 Pioneer STOP - THIS KIT IS DESIGNED SPECIFICALLY FOR 2016 HONDA 1000 PIONEER IF YOUR MACHINE IS NOT THIS MODEL DO NOT PROCEED. THIS KIT DOES NOT WORK ON THE PIONEER 500 nor 700 S. Contact
INSTALLATION INSTRUCTIONS
 Rear Vision System Tailgate Emblem Camera Aftermarket Display 2009-Current Ford F-150 and 2010-Current Super Duty (Kit part number 1008-6509) Kit Contents: Tailgate Emblem Mount with Camera Chassis Harness
INSTALLATION AND USER MANUAL
 INSTALLATION AND USER MANUAL SDKIT-730 & SDKIT-734 100% Bolt-On 150 PSI Train Horn System for 2011-2015 F-250 & F-350 Super Duty P/N SDKIT-730 P/N SDKIT-734 Thank you for purchasing a Kleinn Air Horns
RECOMMENDED TOOLS PERSONAL & VEHICLE PROTECTION SAFETY GLASSES
 2014 FORD TRANSIT FULL SIZE PART NUMBER: 250-9636 GENERAL APPLICABILITY THIS CRUISE WAS TESTED AND VERIFIED ON: FORD TRANSIT 150, 250 RECOMMENDED TOOLS PERSONAL & VEHICLE PROTECTION SAFETY GLASSES KIT
INSTALLATION INSTRUCTIONS
 INSTALLATION INSTRUCTIONS Accessory Application Publications No. AII 26014 ODYSSEY Issue Date AUG 2003 PARTS LIST Hood Switch (sold separately) P/N 08E49-S0X-100G Illustration of the Hood Switch Installed
RECOMMENDED SEQUENCE OF APPLICATION
 08-11 DODGE CARAVAN, NITRO, JOURNEY CHRYSLER TOWN & COUNTRY/ JEEP LIBERTY 09-11 DODGE RAM 1500/ DAKOTA NEW BODY PART NUMBER: 250-9001 KIT CONTENTS ITEM QTY DESCRIPTION 1 1 CRUISE CONTROL SWITCH/HARNESS
K T M E X C / M X C D U A L S P O R T K I T I N S T A L L A T I O N
 K T M E X C / M X C D U A L S P O R T K I T I N S T A L L A T I O N K T M D U A L S P O R T K I T I N S T A L L A T I O N KIT CONTENTS Inspect Your Kit Your kit will include the following items A. KTM
TOYOTA TUNDRA TVIP V4 REMOTE ENGINE STARTER (RES)
") Preparation Part Number: 08586-OC910 Conflicts Do not install into vehicles without RKE systems. Recommended Sequence of Application Item # Accessory 1 TVIP/RES Any TVIP or RES system 2 XM Radio NOTE:
Preparation Part Number: 08586-OC910 Conflicts Do not install into vehicles without RKE systems. Recommended Sequence of Application Item # Accessory 1 TVIP/RES Any TVIP or RES system 2 XM Radio NOTE:
RECOMMENDED TOOLS PERSONAL & VEHICLE PROTECTION SAFETY GLASSES
 PART NUMBER: 250-9632 GENERAL APPLICABILITY SUBARU IMPREZA (MT/AT) RECOMMENDED TOOLS PERSONAL & VEHICLE PROTECTION SAFETY GLASSES KIT CONTENTS/SERVICE PARTS ITEM QTY DESCRIPTION PART# 1 1 CRUISE CONTROL
INSTALLATION INSTRUCTIONS
 Rear Vision System Tailgate Handle Camera Mirror Display 2004-2014 Ford F-150 and 2008-2015 Ford Super Duty (Kit part numbers 9002-9521) Kit Contents: Mirror Tailgate Handle with camera and harness Interior
HIGH FLOW COLD AIR INTAKE SYSTEM INSTALLATION INSTRUCTIONS D , D A
 HIGH FLOW COLD AIR INTAKE SYSTEM INSTALLATION INSTRUCTIONS D760-0320, D760-0320A 1992-95 325i, is 1995 M3 (3.0L) Parts List: 1 Intake Tube 1 Silicone Hose 1 Air Flow Meter Bracket 1 Hose Clamp (#36z) 1
SUZUKI SV
 SUZUKI SV650 2007-2011 Z-Fi QS (Quickshift) / Z-Fi TC (Traction Control) Installation Instructions Part # T640 May result in the activation of the FI light (indicating injector fault) but does NOT cause
Z-Gate Universal Shifter
 Installation Instructions Z-Gate Universal Shifter Fits: GM, Ford, Lincoln and Chrysler Transmissions See Application Guide for Specific Applications Part #80681 Rev 06/01/2018 WORK SAFELY! For maximum