HD4170 SETUP & OPERATOR MANUAL. Performance Design Inc East Braniff St. Boise, Idaho 83716
|
|
|
- Shannon Alexander
- 6 years ago
- Views:
Transcription

1 HD4170 SETUP & OPERATOR MANUAL Performance Design Inc East Braniff St. Boise, Idaho

2 HD-4170 Rhin-O-Roll Coiler Operator s Training Manual Issue 1 03/05 PDI Part # Performance Design Inc East Braniff St. Boise Idaho Issue 0 Part #

3 This manual contains very important safety information and must be read! HD-4170 Operator s Training Manual Issue 0 01/04 The HD-4170 Rhin-O-Roll Coiler will greatly increase productivity. An in-depth look at the set up procedures necessary to achieve maximum results follows. The HD-4170 Rhin-O-Roll Coiler can attach to the HD-6500, HD-7000, or HD Performance Design Inc. punches and can also stand alone. This manual discusses all of the necessary steps to use and care for your machine. Issue 0 Part #
4 Table of Contents Chapter: Page Number: 1) Important safety notice! 4 2) Overview of your HD-4170 Rhin-O-Roll Coiler. 5 Adjustable Roller. Upper Roller. Doc-U-Form Book Former. Book Thickness Coil Selector and Roll Position Setting. Power Switch. Crimping Pliers. Crimping Pliers Holder. Roll Position Setting. Adjustment Knob. Fuse Holder. 3) Detailed Use of the HD-4170 Rhin-O-Roll. 7 Book Former. Book Thickness Coil Selector and Roll Position Setting. 4) Placing the HD-4170 in the proper location & Binding Styles. 8 5) Mounting the HD-4170 onto the HD-6500, HD-7000 or HD ) Binding and Crimping. 10 7) Trouble Shooting. 12 8) Cleaning the HD-4170 Rhin-o-Roller Coiler. 12 9) Product Registration. 12 Issue 0 Part #


5 Important Safety Notice! Make sure you read this section very carefully! Learn to recognize this Safety Alert Symbol. The HD-4170 Rhin-O-Roll Coiler has been designed to provide a very high level of protection to an operator. Follow the guidelines below while installing, operating and maintaining your machine. Read this manual and keep and file this manual for future use. Always replace fuses with the correct amperage and type (PDI P/N VAC or VAC); 115VAC use; 1ea. FUSE,3 AMP AGC ¼ X 1 ¼ 230VAC use; 2ea. FUSE,1.5 AMP GMA M5 X 20MM Refer to the serial number label on the rear of the machine to determine the voltage of your machine. Serial Number Label Example. If the machine runs erratically or if either wheel stops turning while the machine is on, unplug the HD-4170 and call your dealer immediately for service. Never attempt to service your machine unless you are a qualified Technician. There are no user serviceable parts inside the HD-4170 Rhin-O-Roll Coiler, NEVER REMOVE COVER doing so may result in personal injury!!! Never operate the HD-4170 Rhin-O-Roll Coiler if the provided power cord does not fit your outlet. Power cord shall be certified for the country where the machine will be installed. 4 Issue 0 Part #

6 Overview of the HD-4170 Rhin-O-Roll; See Illustration 2.0 on next page. The HD-4170 has many useful features to increase your coil binding productivity. - Adjustable Lower Roller:. The Adjustable Lower Roller supports the lower side of the coil while binding. The Adjustable Lower Roller is also referred to as Roll in item 4 in Book Thickness Coil Selector and Roll Position Setting. - Upper Roller: The soft Upper Roller grabs the coil and spins it into the book quickly and effectively. - Doc-U-Form Book Former: allows you to form your book to allow for quick starting and binding of large books. See Chapter 3 for further explanation and use of this feature. - Book Thickness Coil Selector and Roll Position Setting: This multiuse feature allows you to slide your uncoiled book into its thickness gauge and suggests the appropriate coil size to use for that job. As well as giving you the suggested Lower Roll position setting, it provides the answers to sizes and pitch of stray coils and punched sheets. See Chapter 3 for further explanation and use of this feature. - Power Switch: This switch turns the HD-4170 on and off. Pushing on the I symbol side of the switch turns the machine ON, the O turns the machine OFF. On 230VAC models this is on the rear of the machine. It is recommended you turn the machine off when not in use. In case of any emergency use the power cord as the main power Cutoff!!! -Crimping Pliers: Used for cutting and crimping coil ends. -Crimping Pliers Holder: A convenient place to store your pliers. -Roll Position Setting: Shows the current location of the Adjustable Lower Roller. See Chapter 3 for further explanation and settings of this feature. The Thumb Pull image shows the intended location of your thumb while pulling on the Adjustment Knob with your index and middle fingers to change settings of the Lower Roller. -Adjustment Knob: Pull and move up or down to change the position of the Adjustable Lower Roller. -Fuse Holder: Not shown, located on rear of machine. Always replace fuses with the correct amperage and type (PDI P/N VAC or VAC); 115VAC use; 1ea. FUSE,3 AMP AGC ¼ X 1 ¼ 230VAC use; 2ea. FUSE,1.5 AMP GMA M5 X 20MM 5 Issue 0 Part #
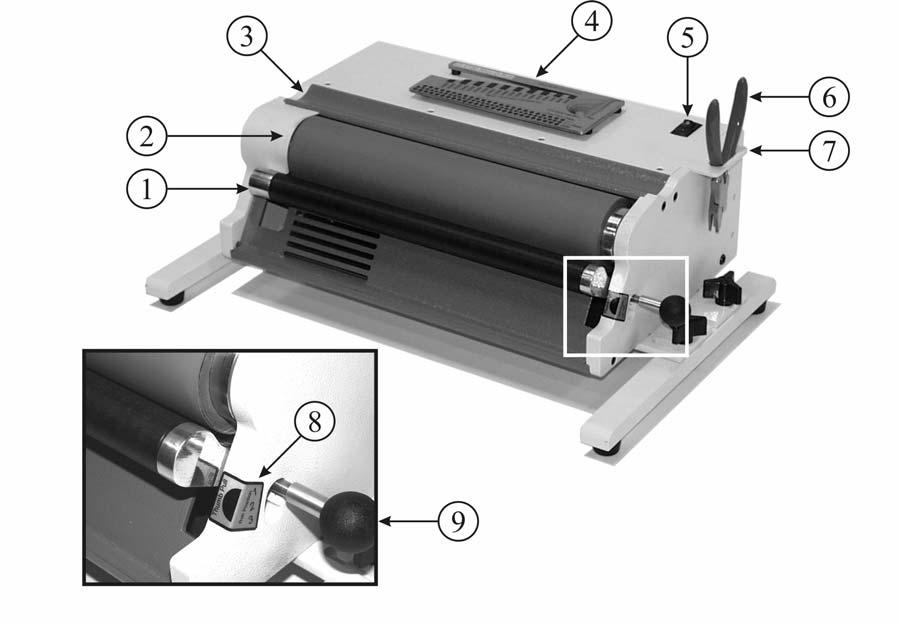
7 6

8 Detailed Use of the HD-4170 Rhin-O-Roll; Doc-U-Form Book Former. See Illustration 3.0. The Doc-U-Form Book Former shapes the binding end of your book so that insertion and starting of the coil is simple to do. Gently jog your book onto the Book Former until formed. Then start the coil into the first 5 holes or more by spinning it in by hand. Book Thickness Coil Selector and Roll Position Setting. See illustration 3.1 on next page. On top of the HD-4170 is the Book Thickness Coil Selector and Roll Position Setting feature. It s simple to use. You gently slide your book from left to right into the Book Thickness Coil Selector slot. When you feel the book slightly wedge into the slot stop sliding the book and read both the recommended coil size selection number (16MM shown) and the recommended Roll Position Setting number (position 2, middle position shown). These are only recommendations and you may find other combinations that suit your personal binding style. Other features available are the Coil Size Indicator (O.D.) and the paper Hole Pitch Gage. With the Coil Size Indicator. Use the coil size indicator when the size of the coil is unknown. Simply align the end / outside diameter (O.D.) to the indicator and read your coil size. Use the Hole Pitch Gage in the same manor to determine what pitch the paper has been punched with. 7

9 Placing the HD-4170 in the proper location & Binding Styles; Locate a clear work area with a outlet within 5 feet that provides a 15-amp service (16-amp European) which is protected at the customer s circuit box. The work area must be a solid, firm cabinet or a heavy duty table with a flat level surface. Power cord shall be certified for the country where the machine will be installed. Placing your HD-4170 Rhin-O-Roll Coiler in the proper location will also depend on your binding technique. If your binding technique is to punch and stack the entire job before coiling, then positioning the HD-4170 away from your punch for more work area may be the best setup as well as leaving the HD-4170 on its stand-alone feet as supplied. However if your technique is to punch and coil a single book at one time and repeat until the job is complete then mounting the HD-4170 Coiler directly onto your HD-6500, HD-7000, or HD-7700 punch may be the best setup for you. Please see Chapter 5 for instructions to mount your HD Coiler or skip to Chapter 6 for Binding. 8

10 Mounting the HD-4170 onto the HD-6500, HD-7000 or HD-7700; See Illustration 5.0. Your HD-4170 Coiler came in the stand-alone configuration. In order to attach the HD-4170 Coiler you need to remove the feet. Inside the HD-4170 shipping box is a knob kit with tools. Locate the small Allen wrench and remove both feet from each side of the HD-4170 Coiler. Do not remove the Interface Plate that mounts directly to the HD-4170 Coiler bottom side. Store the feet, screws and Allen wrench for future use. Locate the Interface Blocks, screws, Allen wrenches, and 3-winged knobs provided inside the shipping box. These will be required in the next step. HD-6500 and HD-7000 Instructions; See Illustration 5.1 on next page. Locate the two top-most and rear-most screws on the side of your HD- 6500/7000. Inserting the short end of the Allen wrench into the screw head, remove the two screws. HD-7700 Instructions; See Illustration 5.2 on next page. Locate the two top-most and forwardmost screws on the side of your HD Inserting the short end of the Allen wrench into the screw head, remove the two screws. Both HD-6500/7000 and HD-7700 Instructions cont... Store the two screws removed from the punch. Locate one of the Interface Blocks and orient it against the two now-available holes. Orient the block so that the interface block oval hole is forward and the counter bores face out. To the right is an example of a counter bore. Use the longer ¼ -20 socket head screws provided to secure the block to the machine with the short end of the Allen wrench. Tighten the rear screw first then the forward screw. Repeat this step on the other side of your punch with the other block. 9
 with both hands at each end of the book up near the binding edge.")
11 Binding and Crimping; See Illustration 6.0. Binding is as simple as with the HD-4170 Rhin-O-Roll. Form, Start Coil, and Bind. Doc-U-Form Book forming and lower Roll position is covered in Chapter 2. To bind, firmly grab the book from the Start Coil position (described in Chapter 3) with both hands at each end of the book up near the binding edge. Without shifting the form of your book, pick the book up and roll it into binding position between the top on lower roller. Gently push the started coils against both top and lower roller. The top roller will grab the coil and spin it into your book. It may not be necessary to use the Book Former with smaller (5MM- 12MM) books. With practice, 50MM specialty binding can be done. 10

12 See Illustration 6.1. Once you have coiled your book crimping is made easy with the crimping pliers provided. Orient your book with the coiled side toward you as shown, then on the right end of the book as shown, orient the pliers with the dot facing up. Open the pliers and grasp them around the first coil that exits the book. While keeping the pliers level with the book, snip the coil through. The pliers will finish the coil with a L shaped end facing the book. This helps the coil from backing out of the book. Now you can flip the book over, keeping the coils toward you and repeat this same crimping technique to complete the book. Or you can keep the book stationary and flip the pliers over, move to the opposite end of the book and crimp the last coil that exits the book to complete the book. Your HD-4170 Rhin-O-Roll has an optional dual crimpier module that mounts on top of the coiler. 11
13 Trouble Shooting; Only qualified personnel should attempt to work on this equipment! Most of the problems you may encounter are due to setup problems. There is one fuse on the 115VAC machine and two fuses on the 230VAC machine located on the rear of the HD-4170 Rhin-O-Roll Coiler that can be replaced by the customer. Below is a trouble shooting guide to help you through most of the problems that may be encountered. Trouble Shooting Symptom Possible Cause Action Upper and Lower Rollers do not rotate. 1) Machine is off. Switch is in the O position. 2) Machine is not plugged in. 3) Blown fuse. Coil tightens on the book. 1) Coil is too small for the book. Coil stops before it is 1) The holes in the book completely through the are misaligned. book. 1) Place switch in the I position. 2) Check both ends of the power cord. 3) Check fuse. See Chapter 1 for fuse listing. 1) Check proper size of coil. See Chapter 3. 1) This is normal. Try moving the book around so the coil rotates in the holes Cleaning the HD-4170 Rhin-O-Tuff Coiler; Caring for your HD-4170 Rhin-O-Roll is important for the proper function of the machine. The finished tan and gray body should be cleaned with a very light water dampened cloth. The upper and lower rollers should be cleaned with a rubber cleaner and rejuvenator dampened cloth while the machine has been turned off and cooled. Product Registration; Product registration is important to establish trouble free warranty repair of any of your Rhin-O-Tuff equipment. Please fill out and mail in the card provided with your machine or register on-line at 12
HD-e4100 Econ-O-Roll Coil Inserter Operator s Training Manual
 HD-e4100 Econ-O-Roll Coil Inserter Operator s Training Manual Issue 0 12/06 PDI Part # 941005 Performance Design Inc. 2350 East Braniff St. Boise Idaho 83716 Issue 0 Part # 941005 www.rhin-o-tuff.com This
HD 7700 Setup & Operator Manual
 HD 7700 Setup & Operator Manual Issue 1 December, 01 Performance Design Inc. The Heavy Duty Ultima (HD 7700) electric punch has been designed to punch most any job that may pass through your bindery or
CI 3000 Coil Inserter
 CI 3000 Coil Inserter Setup & Operator Manual Issue 1 April 02 Performance Design Inc. The CI 3000 plastic spiral inserter will bind books up to 1-1/8 (28.6mm) thick using coil diameters from 3/16 (5mm)
Coil Inserter Module
 Coil Inserter Module 1) Installation Instructions: Diagram 4 Procedure to attach the coil inserter onto the OD 4012 punch Unplug the main power cord from the OD 4012. Remove the two safety screws (3/32
7000 Parts Book. Page 1 Introductory Page Each HD 7000 or WP 7000 package should contain the following items:
 Page Introductory Page Each HD 7000 or WP 7000 package should contain the following items: Tool, Reversing 7000/6500 PDi Part # 008 Cord, Power 8 Ga PDi Part # 007090 Assembly, Foot Pedal CE/UL PDi Part
Industrial Roller Inserter Model PBS400
 Industrial Roller Inserter Model PBS400 Instruction Manual Manufactured By: Gateway Bookbinding Systems Ltd 385 DeBaets Street Winnipeg, Mb, Canada R2J 4J8 Ph. (204)663-9214 Fax (204) 663-7905 Toll Free
DFG EC1000 Heavy Duty Coil Punch/Bind Machine
 DFG EC1000 Heavy Duty Coil Punch/Bind Machine Instruction Manual Provided By http://www.mybinding.com http://www.mybindingblog.com EC1000 Heavy Duty Coil Punch and Power Coil Binding Machine Upper Mounted
7000 Parts Book. Page 1 Introductory Page Each HD 7000 or WP 7000 package should contain the following items:
 Page Introductory Page Each HD 7000 or WP 7000 package should contain the following items: Tool, Reversing 7000/500 PDi Part # 008 Cord, Power 8 Ga PDi Part # 007090 Assembly, Foot Pedal CE/UL PDi Part
IMPORTANT! DO NOT THROW AWAY THE SHIPPING CARTON AND PACKING MATERIAL
 Operator s Manual IMPORTANT! DO NOT THROW AWAY THE SHIPPING CARTON AND PACKING MATERIAL ii Table of Contents Operator Safety... 1 Introduction... 2 Unpacking and Setup... 3 Unpacking... 3 Setup... 4 ROCKET
Sterling Coilmaster JR TS Issue 3 July 2017
 Sterling Coilmaster JR TS Issue 3 July 2017 CMjr TS Operator s Training Manual Issue 3 1 P a g e 1. Important Safety Notice!...3 2. Placing the CMjr in the Proper Location...4 3. Preparing the CMjr for
DFG E-TitanCoil Heavy Duty Binding Machine
 DFG E-TitanCoil Heavy Duty Binding Machine Instruction Manual Provided By http://www.mybinding.com http://www.mybindingblog.com Warning: Do not connect this product to electrical power or attempt to operate
DFG PC200e Coil Punch & Bind Machine
 DFG PC200e Coil Punch & Bind Machine Instruction Manual Provided By http://www.mybinding.com http://www.mybindingblog.com DFG PC200e Warning: Do not connect this product to electrical power or attempt
Model 1100B CHG Terminator. Installation Instructions
 Model 1100B CHG Terminator Installation Instructions 1 Contents: 1.0 Safety Information... 3 2.0 Set-up and Adjustments... 3 3.0 Ram Adjustments... 10 4.0 Wire Termination Quality... 12 5.0 General Maintenance...
OPERATIONS MANUAL. Mini Centrifuge Model MCF Certified
 OPERATIONS MANUAL Mini Centrifuge Model MCF-2360 Certified Contents 1. Safety 2 2. Introduction 7 3. Package Contents 7 4. Specifications 8 5. Features 8 6. Parts of the Mini Centrifuge 9 7. Installation
If You Are Experiencing This, Click Thru:
 HTM04 0 Jericho Turnpike New Hyde Park, NY 040 Tel: () 38-3970 Fax: () 38-7 www.techno-isel.com Techno Stepper DaVinci Trouble Shooting Guide Power Entry Module E-Stop Button 3 Inside 4 Inside 4 3 If You
Mounted Instrument Head
 INSTALLATION INSTRUCTIONS for the Asepsis 21 Cabinet TM Mounted Instrument Head SECTION I - REQUIREMENTS 1. PHYSICAL REQUIREMENTS... 1 4. WATER SUPPLY REQUIREMENTS... 1 5. AIR SUPPLY REQUIREMENTS... 1
I1 7.5 Pre-Lit Clear Christmas Tree
 I1 7.5 Pre-Lit Clear Christmas Tree 62432-13 INSTRUCTION MANUAL Thank you for purchasing this Pre-lighted Tree. This tree assembles in minutes and is decorated with UL listed miniature light sets. Please
FD Heavy Duty Friction Feeder
 FD 282-10 Heavy Duty Friction Feeder Operator Manual 3/2016 First Edition TABLE OF CONTENTS Page # TABLE OF CONTENTS... 2 SAFETY... 3 Hazards Associated with the Feeder... 3 General Notes on Safety...
OEM TM-50 Quick Start Guide
 This quick start guide provides basic setup and operating instructions for the OEM TM-50. The intended use of the OEM TM-50 Taping Machine is to produce taped reels of individually sealed and consistently
Model TC-20. Tube Cut-Off Machine. Operator s Manual REV H
 Model TC-20 Tube Cut-Off Machine Operator s Manual 90-2333 REV H Scientific Systems, Inc. 349 N. Science Park Road State College, PA 16803 www.ssihplc.com Phone: 800-441-4752 Fax: 814-238-7532 Email: sales@ssihplc.com
Peristaltic Pump Operating Instructions
 Peristaltic Pump Operating Model 410 IMPORTANT Pump is water resistant but not waterproof. Do not submerge in water. Pumping rates will decrease as the amount of lift increases. Remove tubing when stored.
Service Manual Gulf Stream Electronic Full Wall Slide Systems
 Service Manual Gulf Stream Electronic Full Wall Slide Systems CONTENTS Page Before you operate the slide system 2 Operating Instructions 3 Preventive maintenance 3 Manually overriding your slide system
Installation Guide TB499 Conveyor/Dryer/Stacker Part #: M-3250 Revision Date:
 Installation Guide TB499 Conveyor/Dryer/Stacker Part #: M-3250 Revision Date: 12-2-03 Rena Systems Inc. 136 Green Tree Road STE 140 Oaks, PA 19456-1069 610-650-9170 610-650-9171 (FAX) E-Mail: support@renausa.com
Depress each tab as you pull the bezel off. The bezels are tight. L.H. shown.
 2013-2014 Ford Mustang V6 & Boss 302 Lower Valance Fog Light Kit Parts List: Quantity: Tool List: Fog light & bulb with bracket 2 Flat head & Phillips screwdriver Black bezels 2 Ratchet & Socket set OR
Quick Start Guide Sno-Tek 24E ( s/n & up)
") Quick Start Guide Sno-Tek 24E (920402 s/n 75000 & up) Step 1: Assemble Handlebars Step 2: Install Discharge Chute and Discharge Chute Crank Step 3: Install Remote Deflector Cable Step 4: Check Function
Quick Start Guide Sno-Tek 24E (920402 s/n 75000 & up) Step 1: Assemble Handlebars Step 2: Install Discharge Chute and Discharge Chute Crank Step 3: Install Remote Deflector Cable Step 4: Check Function
COOKSON OWNER'S MANUAL
 COOKSON OWNER'S MANUAL FDO-A10 INDUSTRIAL DUTY FIRE DOOR OPERATOR R L I S T E D 3040233 US CONTROL PANEL SERIAL# OPERATOR SERIAL# 9001.DWG ECN 0959 REV 4 SPECIFICATIONS MOTOR TYPE:...INTERMITTENT HORSEPOWER:...1/8
Installation and Service Manual M² Sync Room Slideout System without Room Lock Connectors on Control Box
 Installation & Service Manual M² Sync Room Slideout System w/o Room Locks: for Slideout Control Box# 1510000143 and 1510000198 Figure 1 01/13 Power Gear #3010002088 Rev. 0C Installation and Service Manual
Connector Systems Inc. SS-20 MACHINE MANUAL
 Connector Systems Inc. SS-20 MACHINE MANUAL INTRODUCTION Your SS-20 machine comes to you fully equipped and set up to terminate the style of plug you have requested. Our SS-20N will accommodate those
READ AND FOLLOW ALL SAFETY INSTRUCTIONS SAVE THESE INSTRUCTIONS
 7.5 Swift Lock Ready Shape Tree (Patent Pending) Instructions IMPORTANT SAFETY INSTRUCTIONS When using electrical products, basic precautions should always be followed including the following: READ AND
TB-690 Conveyor/Stacker
 TB-690 Conveyor/Stacker ASSEMBLY AND OPERATIONS MANUAL Revised: 1-9-09 RENA SYSTEMS INC. 136 Green Tree Road STE 140 Oaks, PA 19456-1069 Phone: (610) 650-9170 Fax: (610) 650-9171 E-Mail: support@renausa.com
Installation Instructions B&M StarTek Starter Fits: Ford & Mercury (3/4 Depth) w/sb V8, 289, 302, & 351W.
 w/sb V8, 289, 302, & 351W.") Installation Instructions B&M StarTek Starter Fits: 1965-1995 Ford & Mercury (3/4 Depth) w/sb V8, 289, 302, & 351W. Catalog # 77100 WORK SAFELY! For maximum safety, perform this installation on a clean,
Installation Instructions B&M StarTek Starter Fits: 1965-1995 Ford & Mercury (3/4 Depth) w/sb V8, 289, 302, & 351W. Catalog # 77100 WORK SAFELY! For maximum safety, perform this installation on a clean,
Pressure Sealer ES-5000 ES User Manual. <Rev >
 ES-5000 User Manual 1 1. Introduction Table of Contents 2. Installation 3. Features 1) Specifications 2) General views 4. How to Operate 1) Form Preparation 2) Loading forms 3) Start 4)
CABINET REEL OPERATING INSTRUCTIONS
 CABINET REEL OPERATING INSTRUCTIONS MODELS 15, 25, 40 & 60 SERIES RAPID-AIR CORPORATION 4601 KISHWAUKEE ST. ROCKFORD, IL 61109-2925 Phone: (815) 397-2578 Fax: (815) 398-3887 Web Site: www.rapidair.com
Ford Mustang V6 OEM-Style Fog Light Kit Parts List: Quantity: Tool List:
 2015-2017 Ford Mustang V6 OEM-Style Fog Light Kit Parts List: Quantity: Tool List: LED Foglights/ Bezels 2 Flat head & Phillips screwdriver (if you ordered part#3600) Ratchet & Socket set OR Wiring harness
Installation & Service Manual
 Installation & Service Manual for M² Sync Slideout Control Box #1510000122 CONTENTS Introduction Installation Installation Problems Program Mode Operation Mode Preventative Maintenance Fault Diagnostics
SIDI Camshaft Position Actuator Replacement
 BLOCK AND WEDGE TIMING CHAIN RETAINER USER GUIDE SIDI Camshaft Position Actuator Replacement Removal Procedure 1. Remove the camshaft cover. 2. Remove the camshaft position actuator solenoid valve solenoid
CH1900 Series Electronic Control Installation Manual... includes CP1200 Operator Panel MANIN1900 Revision 0
 CH1900 Series Electronic Control Installation Manual... includes CP1200 Operator Panel MANIN1900 Revision 0 CH1900 Series Electronic Control Page 1 Notice to Boat Manufacturer, Installer, and Consumer
FD 150 Document Signer
 FD 150 Document Signer OPERATOR MANUAL FIRST EDITION Thank you for purchasing the Formax FD 150 Document Signer The FD 150 has been tested and found to comply with the limits for a Class A digital device
RENA AF371Feeder Operating Manual. Feeder. Operating Manual. Manual Part #: M AF371 Operations Rev
 Manual Part #: M-3022 Feeder AF371 Operations Rev. 3-16-04 1 RENA AF371 Feeder YOUR RENA AF371 IS DISTRIBUTED BY RENA SYSTEMS INC. SERVICE AND SUPPORT FOR THIS PRODUCT IS PROVIDED BY YOUR RENA DEALER.
Uplift Premium Power Lifting Seat
 Uplift Premium Power Lifting Seat User Guide Read all instructions before using the Uplift Power Seat DANGER - To reduce the risk of electric shock: IMPORTANT SAFETY INSTRUCTIONS Always unplug the Uplift
Marlon 350A Auto Crimper
 Marlon 350A Auto Crimper Instruction Manual Provided By http://www.mybinding.com http://www.mybindingblog.com MARLON 350A AUTO CRIMPER OPERATORS MANUAL INTRODUCTION Your new Marlon 350 Auto Crimper is
LIPPERTCOMPONENTS, INC.
 LIPPERTCOMPONENTS, INC. SCHWINTEK INWALL SLIDEOUT SYSTEM OPERATION AND SERVICE MANUAL Contents I. Controls 1-1 System components 1 1-1A versions C1 & C2 2 1-2 Motor wiring harness connections 3 1-3 Extend
AutoLabeler. User s Guide A (3/02).01
.01") 707 AutoLabeler User s Guide 16249000A (3/02).01 Mettler-Toledo, Inc. 2002 No part of this manual may be reproduced or transmitted in any form or by any means, electronic or mechanical, including photocopying
707 AutoLabeler User s Guide 16249000A (3/02).01 Mettler-Toledo, Inc. 2002 No part of this manual may be reproduced or transmitted in any form or by any means, electronic or mechanical, including photocopying
Application Tooling Specification Sheet
 Tool Kit Order No. 63811-5270 FEATURES Application Tooling Specification Sheet TYPE 2C Hand Crimp Tool Order No. 63811-5200 % A full cycle ratcheting hand tool ensures complete crimps % Ergonomically designed
Snapshot LX5 USER MANUAL. OK on Dimmer Outdoor OK Sound Activated DMX512 Master/Slave 115V/230V Switch Replaceable Fuse User Serviceable Duty Cycle
 LX5 Snapshot OK on Dimmer Outdoor OK Sound Activated DMX512 Master/Slave 115V/230V Switch Replaceable Fuse User Serviceable Duty Cycle USER MANUAL Chauvet, 5200 NW 108th Avenue, Sunrise, FL 33351 U.S.A.
CHARGE TANK. Overview. Using The Charge Tank. User Guide
 Overview The Charge Tank effectively triples the on-board charging speed of 2015 and later Zero S, SR, DS and DSR motorcycles when used with level 2 charging stations on the J1772 standard. This dealer-installed
7.5 Oregon Fir With SYLVANIA Multi Color Mini Lights and Multi Color G50 Soft Glow Lights Pre-Lighted Tree V69139 INSTRUCTION MANUAL
 7.5 Oregon Fir With SYLVANIA Multi Color Mini Lights and Multi Color G50 Soft Glow Lights Pre-Lighted Tree V69139 INSTRUCTION MANUAL Thank you for purchasing a SYLVANIA pre-lighted tree. This tree assembles
OWNER'S MANUAL FOR 135LB STAINLESS STEEL SPREADER SNOWRATOR
 2017 OWNER'S MANUAL FOR 135LB STAINLESS STEEL SPREADER SNOWRATOR AES L. T. RICH PRODUCTS 11/16/2017 TABLE OF CONTENTS 1.0 SHIPPING CONTENTS... 2 2.0 IMPORTANT INFORMATION... 3 2.1 ABOUT THIS MANUAL...
FD Conveyor for FD 260 Tabber
 FD 260-20 Conveyor for FD 260 Tabber Operator Manual 1/2011 First Edition TABLE OF CONTENTS 1. INTRODUCTION... 1 1.1 FD 260-20 DESCRIPTION... 1 1.2 ITEMS INCLUDED... 1 1.3 OPERATING MANUAL SAFETY TERMS...
Instruction Manual AVTM for. Strip Chart Recorder Catalog Nos and
 AVTM220003 Rev. B January 2003 Instruction Manual AVTM220003 for DC µa Strip Chart Recorder Catalog Nos. 220003 and 220003-47 PO Box 9007 Valley Forge, PA 19485-1007 U.S.A. 610-676-8500 Shipping Address:
Installing the Switch Chassis
 Safety, page 1 Installation Options with Racks and Cabinets, page 2 Airflow Considerations, page 2 Installation Guidelines, page 2 Unpacking and Inspecting the Switch, page 3 Installing the Switch, page
LS10.0T Service Manual
 LS10.0T Service Manual 1 TABLE OF CONTENTS CHAPTER 1: SERIAL NUMBER LOCATION...3 CHAPTER 2: PREVENTATIVE MAINTENANCE 2.1 Preventative Maintenance. 4 2.2 Tension and Centering the Running Belt....6 CHAPTER
FD 120 Card Cutter MAINTENANCE MANUAL. MyBinding.com 5500 NE Moore Court Hillsboro, OR Toll Free: Local: /2011
 FD 120 Card Cutter 5/2011 MAINTENANCE MANUAL SAFETY PRECAUTIONS Always observe the cautions and warnings given below to prevent personal injury or property damage. The degree of danger and damage that
Quick Start Guide Compact 22 LE ( s/n & up)
") Quick Start Guide Compact 22 LE (920013 s/n 75000 & up) Step 1: Assemble Handlebar Step 2: Install Discharge Chute Step 3: Install Discharge Chute Crank Step 4: Check Function of Dual Handle Interlock
Quick Start Guide Compact 22 LE (920013 s/n 75000 & up) Step 1: Assemble Handlebar Step 2: Install Discharge Chute Step 3: Install Discharge Chute Crank Step 4: Check Function of Dual Handle Interlock
ULTRA QUARTZ FOLLOWSPOT USER MANUAL
 ULTRA QUARTZ FOLLOWSPOT USER MANUAL MODEL: UQ-120/82 PHOEBUS MANUFACTURING 2800 THIRD STREET SAN FRANCISCO, CA 94107 U.S.A. 415 550 1177 TEL 415 550 2655 FAX www.phoebus.com ULTRA QUARTZ FOLLOWSPOT USER
Sure-Feed Engineering Inc. SE-900-EI. Operation & Parts Manual
 . SE-900-EI Operation & Parts Manual SE 900 EI OWNERS MANUAL Table of Contents 1. Installation guide 2. Set-up instructions 3. Operation instructions 4. Cleaning 5. Troubleshooting 6. Parts manual 7. Electrical
High Speed Handheld Valve Operator
 High Speed Handheld Valve Operator User s Manual E.H. Wachs 455 Comanche Circle Harvard, IL 60033 www.wachsco.com E.H. Wachs Part No. U10-010-MAN Rev. 0-0310, March 2010 Revision History: Original March
1 2 3a 3b THREADING CARD 9 10 ABC Office
 1 2 3a 3b 4 5 6 7 8 9 10 THREADING CARD Important Safety instructions YOUR SAFETY AS WELL AS THE SAFETY OF OTHERS IS IMPORTANT TO GBC. IN THIS INSTRUCTION MANUAL AND ON THE PRODUCT ARE IMPORTANT SAFETY
CORPORATION REPAIR MANUAL HWH SPACEMAKER ROOM EXTENSION SYSTEM NO LEVELING SYSTEM FOR NATIONAL RV NON-MOTORIZED VEHICLES
 HWH R CORPORATION REPAIR MANUAL HWH SPACEMAKER SYSTEM NO LEVELING SYSTEM FOR NATIONAL RV NON-MOTORIZED VEHICLES FEATURING: DUAL CYLINDER "RAIL" (WITH RACK SENSING VALVE) SINGLE CYLINDER DUAL CYLINDER "RAIL"
Maintenance Adjustments
 4 Maintenance and Adjustments Chapter Contents Cleaning the Printer and Paper Handling Accessories..... 158 Cleaning the HP Digital Copier....................... 161 Cleaning ADF and Glass............................
Automated Steering Hydraulic Installation Kit
 Automated Steering Hydraulic Installation Kit P/N: ED-JD7010 its John Deere Tractor odels: 7200 7210 7400 7410 7510 7600 7610 7700 7710 7800 7810 Overview A series of equipment specific hydraulic installation
Perfmaster Air V3. Serial Number. Date
 Perfmaster Air V3 12-2015 Serial Number Date TABLE OF CONTENTS SPECIFICATIONS.3 SAFETY PROCEDURES/CARE & MAINTENANCE..4 COMPONENT IDENTIFICATION 5 DELIVERY TRAY ASSEMBLY.6 PAPER STOP ASSEMBLIES..7 MACHINE
Application Tooling Specification Sheet
 Tool Kit Order No. 63811-7570 FEATURES Application Tooling Specification Sheet TYPE 2C Hand Crimp Tool Order No. 63811-7500 A full cycle ratcheting hand tool ensures complete crimps Ergonomically designed
Snapshot LX10 USER MANUAL. OK on Dimmer Outdoor OK Sound Activated DMX512 Master/Slave 115V/230V Switch Replaceable Fuse User Serviceable Duty Cycle
 LX10 Snapshot OK on Dimmer Outdoor OK Sound Activated DMX512 Master/Slave 115V/230V Switch Replaceable Fuse User Serviceable Duty Cycle USER MANUAL Chauvet, 3000 N 29 th Ct, Hollywood, FL 33020 U.S.A.
Uplift Power Seat Users Guide
 Safety Precautions 1. Use the Uplift Power Seat only in armchairs or sofas with at least one armrest for optimum stability when sitting or rising. 2. Uplift Power Seat is not intended for use in rocking
SE-1200-IJ ECO - SERIES. Operation & Parts Manual
 SE-1200-IJ ECO - SERIES Operation & Parts Manual SE 1200 IJ ECO - SEREIS OWNERS MANUAL Table of Contents 1. Installation guide 2. Set-up/operation instructions 3. Cleaning 4. Troubleshooting 5. Parts manual
XPERT SL 45 Slit Lamp. Instruction Manual
 R XPERT SL 45 Slit Lamp Instruction Manual INDEX INTRODUCTION 1 1.0 Safety Instructions 2 2.0 Packing List 3 3.0 Parts Description 4 4.0 Installation 5-6 5.0 Operating Procedure 7-8 6.0 Lamp and Fuse Replacement
Installation and Service Manual M² Sync Room Slideout System without Room Lock Connectors on Control Box
 Installation & Service Manual M² Sync Room Slideout System w/o Room Locks: for Slideout Control Box# 1510000143 and 1510000198 Figure 1 01/13 Power Gear #3010002088 Rev. 0C Installation and Service Manual
SE-1200-MP ECO - SERIES
 Inc. SE-1200-MP ECO - SERIES Operation & Parts Manual SE 1200 MP ECO -SERIES OWNERS MANUAL Table of Contents 1. Installation guide 2. Set-up instructions 3. Operation instructions 4. Cleaning 5. Troubleshooting
Model 700 Microarray Oven
 www.scigene.com Model 700 Microarray Oven USER MANUAL Cat. #1070-00-1, 1070-00-2 FOR RESEARCH USE ONLY Not for Use in Diagnostic Procedures SciGene 306 Potrero Ave, Sunnyvale, CA 94085 USA 408-733-7337
AMCON AUTOMATIC CHART PROJECTOR USER S MANUAL EQ-6002
 AMCON AUTOMATIC CHART PROJECTOR USER S MANUAL EQ-6002 1-800-255-6161 Fax 1-800-397-0013 www.amconlabs.com Disclaimer...2 1. Introduction...3 2. Safety Instructions......3 3. Charts and Specifications......4
JBI Docupunch P33 Automatic Punch
 JBI Docupunch P33 Automatic Punch Instruction Manual Provided By http://www.mybinding.com http://www.mybindingblog.com TABLE OF CONTENTS SECTION I: INSTALLATION & TESTING: 1) Uncrating, Inspection & removal
METROLOGIC INSTRUMENTS, INC. MX001 Industrial Control Interface Installation and User s Guide
 METROLOGIC INSTRUMENTS, INC. MX001 Industrial Control Interface Installation and User s Guide Copyright 2007 by Metrologic Instruments, Inc. All rights reserved. No part of this work may be reproduced,
HERCULES. PROCESS CONTROL VISCOMETER Model M2. User Guide
 HERCULES PROCESS CONTROL VISCOMETER Model M2 User Guide HERCULES HI- SHEAR VISCOMETER, MODEL M2 User Guide Kaltec Scientific, Inc. 22425 Heslip Drive Novi, Michigan 48375 Phone 248.349.8100 Fax 248.349.8909
FD 342 Document Folder
 FD 342 Document Folder 6/2010 OPERATOR MANUAL FIRST EDITION TABLE OF CONTENTS SUBJECT PAGE DESCRIPTION 1 SPECIFICATIONS 1 UNPACKING 2 SETUP 2 CONTROL PANEL 3 OPERATION 4 SETTING CUSTOM FOLDS 5 BATCH COUNTING
User Manual. Snapshot. Use on Dimmer. Outdoor Use. Sound Activated DMX 512. Master/Slave. 115/230V Power Switch. Replaceable Fuse.
 Snapshot Use on Dimmer Outdoor Use Sound Activated DMX 512 Master/Slave 115/230V Power Switch Replaceable Fuse User Serviceable Duty Cycle User Manual 3000 N 29 th Ct, Hollywood, FL 33020 U.S.A. (800)
Remove black panel shown. Save 6 retaining pins for re-install later. Pry up on center part of pin first. Then pry out entire retaining pin.
 2005-2009 Ford Mustang V6 Fog Light Wiring Kit Parts List: Quantity: Tools Required: Wiring harness 1 Flat head screwdriver Supplemental wire leads 2 Ratchet & Socket set OR Wire tap red 2 Adjustable Wrench
READ AND FOLLOW ALL SAFETY INSTRUCTIONS SAVE THESE INSTRUCTIONS
 5 Swift Lock Ready Shape Tree (Patent Pending) Instructions IMPORTANT SAFETY INSTRUCTIONS When using electrical products, basic precautions should always be followed including the following: READ AND FOLLOW
Installation Instructions 7024
 HAMILTON Centerset Lavatory Faucet with EverClean Finish & Speed Connect Drain Installation Instructions 70 Congratulations on purchasing your American Standard faucet with the EverClean finish and Speed
Operations and Service Manual. X30208 Load Bank
 Operations and Service Manual Read all instructions before using the load bank Contents 1. Components... 3 Total Assembly... 3 2) Specifications... 4 a)... 4 3) Receiving... 5 4) Safety... 5 a) Ground
Application Tooling Specification Sheet
 Tool Kit Order No. 63811-6570 FEATURES Application Tooling Specification Sheet TYPE 2C Hand Crimp Tool Order No. 63811-6500 % A full cycle ratcheting hand tool ensures complete crimps % Ergonomically designed
ASTRO. FF-14 Friction Feeder. Operator Manual
 ASTRO FF-14 Friction Feeder Operator Manual FF-14 Friction Feeder Setup and Operating Instructions The FF14 feeder is designed to feed material from single sheets up to 3/8 in thickness. The size of the
CRESTLINE DAMPENING SYSTEM INSTALLATION INSTRUCTIONS. Ryobi 3302M Itek 3985 A.B. Dick 9985 X /99
 CRESTLINE DAMPENING SYSTEM INSTALLATION INSTRUCTIONS Ryobi 3302M Itek 3985 A.B. Dick 9985 X88-32 3/99 GENERAL INFORMATION ATTENTION CRESTLINE DAMPENER OWNER Accel Graphic Systems provides parts and service
INSTALLATION. DRIVING LIGHTS for FLHT/FLHX/FLHR 5005
 DRIVING LIGHTS for FLHT/FLHX/FLHR 5005 PARTS INCLUDED 1 Right Driving Light Assembly 1 Left Driving Light Assembly 1 Right Driving Light Bracket 1 Left Driving Light Bracket 4 Driving Light Bracket Plugs
Ford Mustang GT-Style Fog Light Kit Parts List: Quantity: Tool List:
 2013-2014 Ford Mustang GT-Style Fog Light Kit Parts List: Quantity: Tool List: Fog light (Left& Right) 2 Flat head & Phillips screwdriver Upper grille with surround 1 Ratchet & Socket set OR Lower grille
nual k Voltage Stabilizer N) manual New Brunswick Voltage Stabilizer Operating manual
 manual New Brunswick Voltage Stabilizer Operating manual") nual k Voltage Stabilizer N) manual New Brunswick Voltage Stabilizer Operating manual Copyright Copyright 2014 Eppendorf AG, Germany. No part of this publication may be reproduced without the prior permission
nual k Voltage Stabilizer N) manual New Brunswick Voltage Stabilizer Operating manual Copyright Copyright 2014 Eppendorf AG, Germany. No part of this publication may be reproduced without the prior permission
Southwest Windpower Instruction Sheet AIR-X Circuit Replacement Kit
 Southwest Windpower Instruction Sheet AIR-X Circuit Replacement Kit Tools Required 5 / 32 Hex key 5 / 16 Hex key 7 / 64 Hex key Standard screwdriver Pair of external snap ring pliers Rubber mallet Hammer
E Series Enclosures Installation Instructions (UL /UL2416 E Series Equipment Cabinet/Rack)
") E Series Enclosures Installation Instructions (UL60950-1/UL2416 E Series Equipment Cabinet/Rack) WeRackYourWorld.com 1-866-TRY-GLCC (879-4522) Instructions for the following Great Lakes Enclosures: GL720E-2432,
E Series Enclosures Installation Instructions (UL60950-1/UL2416 E Series Equipment Cabinet/Rack) WeRackYourWorld.com 1-866-TRY-GLCC (879-4522) Instructions for the following Great Lakes Enclosures: GL720E-2432,
SKILL ATTACK PITCHING MACHINE PATENTS APPLIED FOR INSTRUCTION MANUAL. Includes: OPERATION SETUP USE & CARE SERVICE
 VOLLEYBALL SKILL ATTACK PITCHING MACHINE PATENTS APPLIED FOR INSTRUCTION MANUAL Includes: OPERATION SETUP USE & CARE SERVICE REV083115 Sports Attack, LLC. 800-717-4251 sportsattack.com WARRANTY STATEMENT
Application Tooling Specification Sheet
 Tool Kit Order No. 63811-7070 FEATURES Application Tooling Specification Sheet TYPE 2C Hand Crimp Tool Order No. 63811-7000 % A full cycle ratcheting hand tool ensures complete crimps % Ergonomically designed
EJ212 Electric Jack 1 Ton (2,000 lbs) Assembly & Operating Instructions
 Assembly & Operating Instructions") EJ212 Electric Jack 1 Ton (2,000 lbs) Assembly & Operating Instructions READ ALL INSTRUCTIONS AND WARNINGS BEFORE USING THIS PRODUCT. This manual provides important information on proper operation & maintenance.
EJ212 Electric Jack 1 Ton (2,000 lbs) Assembly & Operating Instructions READ ALL INSTRUCTIONS AND WARNINGS BEFORE USING THIS PRODUCT. This manual provides important information on proper operation & maintenance.
The POWER. In PRESENTATION PRODUCTS. Instruction Book for BOARDROOM ELECTROL DA-LITE SCREEN COMPANY, INC.
 The POWER In PRESENTATION PRODUCTS Instruction Book for BOARDROOM ELECTROL DA-LITE SCREEN COMPANY, INC. 3100 North Detroit Street Post Office Box 137 Warsaw, Indiana 46581-0137 Phone: 574-267-8101 800-622-3737
Service Information Chevrolet Camaro 3.6L LFX Engine. Camshaft Position Actuator Replacement - Bank 1. Document ID:
 Service Information 2014 Chevrolet Camaro 3.6L LFX Engine Camshaft Position Actuator Replacement - Bank 1 Document ID: 2900815 Special Tools Removal Procedure EN49982-1 Timing Chain Retainer EN49982-2
Application Tooling Specification Sheet
 Tool Kit Order No. 63811-7470 FEATURES Application Tooling Specification Sheet TYPE 2C Hand Crimp Tool Order No. 63811-7400 % A full cycle ratcheting hand tool ensures complete crimps % Ergonomically designed
PICO 500 SERIES SERVICE MANUAL
 PICO 500 SERIES SERVICE MANUAL PREFACE Copyright by Pico Corporation, 2001. All rights reserved. No part of this document may be reproduced, copied, transmitted, stored in a retrieval system, or translated
AutoStream - Model HV. Manual
 AutoStream - Model HV Manual Part Number: 901546 This Product Guide supports autoloader part number 311-0314 with serial numbers beginning with B1011Axxx 2014 Thiele Technologies, Inc. - Streamfeeder.
Alternating Current Revolution per minute Protective Earth Ground. Protected from dripping water Fuse Attention, Consult Accompanying Document
 GLOSSARY OF SYMBOLS: (Symbols and descriptions) Alternating Current Revolution per minute Protective Earth Ground Direct Current On (Power connection Off (power to the mains) disconnection from the mains)
HEPA AIR FILTRATION SYSTEM
 PRODUCT MANUAL FOR Airwash PRO HEPA AIR FILTRATI SYSTEM Table of Contents Rules for Safe Operation...1 Shipping and Packing List...1 Parts Identification/Dimensions...2 Operation...3/4 Product Application
icreaseexcel Digital Creaser Operators Manual
 2-2013 6-2013 Version 1.0 3.0 icreaseexcel Digital Creaser Operators Manual WWW.MBMCORP.COM 800-223-2508 TABLE OF CONTENTS SPECIFICATIONS.1a SAFETY PROCEDURES/CARE & MAINTENANCE..1b COMPONENT IDENTIFICATION
5.5 Wheel drive (wheel pilots only)
") Chapter 5: Installing the ST4000+ 61 5.5 Wheel drive (wheel pilots only) The Raymarine wheel drive will fit 3, 4, 5, 6, 7 or 8 spoke wheels. It is designed to operate with steering systems with between
Chapter 5: Installing the ST4000+ 61 5.5 Wheel drive (wheel pilots only) The Raymarine wheel drive will fit 3, 4, 5, 6, 7 or 8 spoke wheels. It is designed to operate with steering systems with between