KENSUN HID AUTOMOTIVE HEAD LAMP CONVERSION KIT INSTALLATION MANUAL
|
|
|
- Antonia Nichols
- 6 years ago
- Views:
Transcription

1 1
2 KENSUN HID AUTOMOTIVE HEAD LAMP CONVERSION KIT INSTALLATION MANUAL 2
3 CONTENTS A. Before Installing B. Installing the Bulbs C. Installing the Ballasts D. For Bi Xenon Only: Installing the Relay Harness E. After Installation F. Warnings and Correct Usage Information APPENDIX 1 MODIFICATIONS NEEDED FOR SOME VEHICLES MODELS APPENDIX 2 Trouble shooting APPENDIX WIRING ISSUE APPENDIX 4 ALIGNING YOUR HEADLIGHTS 3
4 KENSUN H.I.D HEADLIGHT INSTALLATION MANUAL Thank you for purchasing your KENSUN HID light kit. Most vehicles are compatible with our kits however there are variations for each car, make and model. Please check Appendix 1 for any modifications that may be needed for your vehicle for correct running of the kit. Also please refer to our FAQ in Appendix 2 that may address any difficulties you have with installation. GENERAL WARNING - This is a system that produces high voltage electricity. Installation by an inexperienced person is not recommended. Be sure to consult a professional technician for installation. Faulty or insecure installation can result in electrical problems and shock. A. Before Installing Please read this installation guide carefully before installing the system. For most vehicles installation is straight forward. We may decline to accept responsibility for any damage caused by not following the instructions properly. 1. For safety please wait for the car lighting and engine to cool down completely before attempting to install the HID lights 2. Place the vehicle in either the N or P gear 3. Make certain the lighting switch in the vehicle is off before starting installation 4. It is advised to wear gloves while installing the kit to reduce the risk of electric shock and abrasion 5. Avoid unnecessary or rough handling of bulbs. Also touching the bulbs with bare fingers may cause oil spots 6. If the bulbs are not clean you may wipe the bulbs with a dry cloth or rubbing alcohol, however don t immerse in any liquid 4
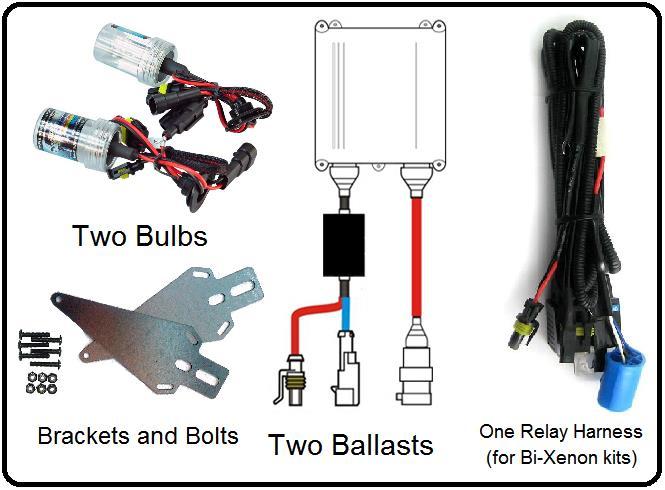
5 COMPONENTS: 5

6 B. Installing the Bulbs 1. You can open the hood, remove the dust cap and remove the original bulbs from the headlight housing. If there is not enough room you may need to remove the headlight housing assembly to continue with the installation 2. Your Kensun bulbs come well packed so they should not be damaged in shipping. All the protective packaging should be removed. Remove the plastic cap covering the HID bulb being careful not to hit the vacuum tube. If your bulb has a plastic washer, it too will have to be removed. To remove the washer; remove the red rubber grommet, remove the plastic ring and then roll back the grommet until it is under the ledge, as in the pictures below 6
 4. OPTIONAL: Seal tight with the dust cover.")
7 3. Place the HID headlights into the headlight housing. The bulb should go in the same location that your halogen bulbs had been in originally. (For some vehicles, size H1 and H7 bulbs may require a bulb holder to replace the factory bulb holder. This is not included in the kit) 4. OPTIONAL: Seal tight with the dust cover. Our bulbs come with a black rubber grommet around the wires before the bulb, to weather seal your lights with the dust cover. Drill a hole in the middle of the back dust cap with a 1 cutter. Slide the plug end of the wires through the dust cap and fit the grommet into the hole that you drilled. 7

8 C. Installing the Ballasts Fix the ballasts to any solid place in the engine cavity close to the headlights using the fixing brackets. You can also use zip ties and double sided tape if needed. Avoid placing ballasts next to parts that operate at high temperatures The single beam HID kits plug directly from the ballasts to the bulbs. 8
9 D. For Bi Xenon Only: Installing the Relay Harness At this stage you will need to install the relay harness. There are eight connections to complete in order to install the harness and connect the power supply: A & B. Connect to the In port on the left and right ballasts. C. Connects to plug of your vehicle s halogen bulb on either the left or right side. D & E. Connect to left and right HID bulbs ports. F & G. Connect to car body as an earth. H. Connects to the positive terminal of the battery. 9
10 E. After Installation Make certain that all connections are tight and secure Make certain that all parts dismantled beforehand are returned to their original places. Check that other vehicle parts are going correctly (e.g. lamps, sound systems, wind screen wipers, etc.) Ensure you are using 20A fuses for the HID lights. 10
11 IT IS IMPORTANT TO PLEASE READ THIS SECTION BEFORE USING THE HID LIGHTS F. Warnings and Correct Usage Information 1. Do not disassemble or modify the ballasts or wire harnesses. This product produces high pressure electricity and tampering with these components may result in electric shock. We are not responsible for malfunction or hazardous conditions caused by tampering and modification with the system. 2. Be certain that all ballasts, bulbs, wires and sockets are installed securely to the car body before operation. 3. Do not touch the lights after use until they have cooled. The bulbs emit heat at high temperatures and can cause burns 4. Keep the system and its components away from paper, cloth and inflammables such as lacquer, thinner and solvents to prevent fires. 5. Be certain you have your lights turned on only while the engine is running. Having your lights on before starting the engine causes battery drainage and may cause problems starting your vehicle. 6. Avoid looking directly into the xenon light to prevent potential damage to your eyes. 7. Do not position the lights in an upward direction or at oncoming drivers eye level so as to ensure their safety and visibility. 8. For repairs or replacement of components consult a professional technician. Do not attempt them yourself. 9. In a vehicle accident, be sure to turn off the vehicle s power to prevent high voltage electric leakage from the damaged product components. The system produces high voltage electricity which might interact with electronic components. Therefore in the case of vehicles equipped with advanced electronic control like for example board computers it is strongly recommended to consult with a specialist before installation. The manufacturer will decline claims resulting from inappropriate installation or application. Kensun will not be responsible for damages to automobiles resulting from the use, misuse, or inability to use a Kensun product. YOUR HID LIGHTS ARE NOW READY TO GO! 11
12 APPENDIX 1 MODIFICATIONS NEEDED FOR SOME VEHICLES MODELS The following electronic systems installed in some vehicles can affect the correct running and performance of the HID lights. Please read the modifications recommended here and consult with a specialist. A. Vehicles with Daytime Running Lights Daytime running lights use the HIGH or LOW beam driven at a lower voltage to save power. If you want to retain this option you need to install a relay harness as described in section D for Bi Xenon kits. Please be aware that the HID system will come on with the DRL at full power since it is relay driven. This is fine, although it will limit the life of the HID bulbs as it adds hours of usage. HID systems cannot be dimmed and to attempt to do so by reducing voltage will cause added current draw to compensate for this. To Bypass Alternatively you can remove the fuse to disable the DRL saving hours of HID light use. B.Lamp out Sensing In some vehicles the Lamp out Sensing is achieved by supplying a low voltage current to sense if the headlight lamp has blown. This may cause the HID lights to flash on and off. Modification Kensun recommends installing either Resistors or Warning Cancellers to prevent this. Both of these items can be purchased separately from Kensun and their function is to provide a steady power voltage to the HID lights. To Bypass Alternatively you can have a specialist disable the Lamp out Sensing electronics in your vehicle. C. Security Systems If your headlights flash when the alarm is armed and disarmed, as long as you are not frequently using the alarm disarm mode, it is fine to use the HID system in this manner Note that frequent alarm activation shortens the life of the HID bulbs 12
13 APPENDIX 2 Trouble shooting I turn on the light but H.I.D won t turn on 1. Check the fuse in fuse box (Please upgrade to a 20A fuse) 2. Check and secure all connections 3. Some vehicles have reversed polarity. Change the polarity of the ballast connector. Reverse the connector from + to - and from - to + 2. Check if the bulb is faulty (i.e. swapping the bulbs to test if it works on other side) When driving, the lights vibrate on the road 1. Check to see if the bulb is securely attached in socket 2. Check the bulb to see if it is broken I turn on the lights and the headlight flashes erratically 1. Make certain the battery has a minimum of 12 volts 2. The voltage in your vehicle may be unsteady (you won t notice this except that the HID lights flash on and off periodically). Kensun recommends installing a Relay Harness to keep the voltage steady to the HID system. You can purchase a relay harness separately from Kensun and install as described in section D I turn on the lights and only one headlight turns on My engine compartment has no room for the ballast 1. Remove bumper and mount within 2. Zip tie or use double sided tape to secure With the lights on, one looks brighter than the other 1. Clean headlight lens 2. Check for damage of housing 3. Have lens cleaned professionally 1. Check the connection of bulb/igniter/ballast 13
14 The lights keep on flickering and making clicking noises 1. Check that the HID bulbs have been connected to the ballasts correctly and tightly 2. Check the condition of the battery, that it is not too old or has a low charge 3. Check if your car has daytime running lights and disable the DRL by removing the fuse or purchase and install a relay harness The HID bulbs change color when first turned on 1. This is normal; at the beginning the ballasts are storing the power from the battery of the vehicle. Since the power has not been stabilized yet the bulbs may have different colors or even flicker. However, as soon as the power is stabilized by the ballast the bulbs will become normal. The color or lighting effects of the bulbs aren t matching Ballasts make electric noise when first turned on 1. This is normal, the ballasts are absorbing power from the battery to start up HID will only work when the high beam is turned on 1. This situation mostly happens with kits that have three prong plug rather than just + and - (H4, H13, 9007 and 9004 kits). Make sure you have plugged those three wires correctly to their positions. This occurs particularly with the 9004 and 9007 kits and we have attached a separate appendix on how to wire the 3 pronged plug correctly, please refer to 9004 and 9007 wiring Issue Appendix 3 1. The level of the two sides bulbs in the headlight housing aren t even. Ensure both are at the same height and angle. Refer to Aligning Your Headlights Appendix 4 2. For new bulbs the colors may vary for the first few hours after being turned on. The color will become normal after that 3. Inspect for damage in the headlight housing. You may need to replace the housing 4. The headlight housing is dirty. Clean the lens or have the lens cleaned professionally 14

15 APPENDIX WIRING ISSUE: High beam shines when Low beam on, or High beam isn t working or both The HID 9004 and 9007 Bulbs have the same product specifications, unlike Halogen bulbs where there is a difference in these two sizes. Therefore HID 9004 and 9007 kits are not manufactured separately. However the wiring is different and there can be issues with bulbs being wired as 9007 when your vehicle needs 9004 or vice versa. Incorrect wiring will not damage your bulbs or vehicle. You should install the bulbs the way they came out of the box and if your bulbs are not functioning then switch the wires around until it works correctly. Do not adjust the wiring if the bulbs are going correctly. Instructions on how to change the bulbs from 9004 to 9007 or 9007 to Hold the blue connector with the front facing you and the straight side up (As shown in the diagram) 2. You will see three pins in the connector. One to the right, one to the left and one to the center 3. It may be helpful to label the wires to prevent confusion. (i.e. by attaching masking tape to the wires labeled with A, B, and C) Please note the coloring of the wires can vary 4. You then need to take the pins out of the connector. You can do this easily by bending the pins slightly up and down and then pulling the wires back 5. Now re-insert the pins in the correct order. The order should be: The right wire stays on the right The left wire goes in the center The center wire goes on the left 6. Afterwards you should have kept the right wire in place and swapped the left and center wires. Then re-install the bulbs 15
16 APPENDIX 4 ALIGNING YOUR HEADLIGHTS This is only a guide how to adjust the alignment of your headlights. We recommend you see a specialist for the best alignment for your HID headlights 1. Park your car on a level surface 20 feet behind another vehicle 2. Remove the trim around the headlights and locate the adjusting screws. These screws are typically found adjacent to the headlight 3. There should be one screw at the top of the headlight to adjust vertically and another screw to one side of the headlight to adjust horizontally. In some cars there may be adjusting bolts rather than screws 4. Turn on your headlights 5. Use a screw driver or socket to adjust the screws or bolts. Turn the upper screw or bolt clockwise to raise the headlight, and counterclockwise to lower it. Turn the side screws or bolts to move the headlight right or left 6. Adjust the headlight so the cut off of the beam is just above the bumper of the car in front (as in picture) 7. Be certain that the headlights are aligned evenly, point the lights at a flat wall at a distance of 20 feet and adjust until the beams are level 16

17 17
HID XENON. [I n s t a l l a t i o n G u i d e ] H E A D L I G H T S. Method of installing the bulb and ballast.
![HID XENON. [I n s t a l l a t i o n G u i d e ] H E A D L I G H T S. Method of installing the bulb and ballast.](/thumbs/76/74317385.jpg "HID XENON. [I n s t a l l a t i o n G u i d e ] H E A D L I G H T S. Method of installing the bulb and ballast.") HID XENON H E A D L I G H T S [I n s t a l l a t i o n G u i d e ] Please read the installation guide carefully before removing original car lighting from the vehicle. Please read through the entire installation
HID XENON H E A D L I G H T S [I n s t a l l a t i o n G u i d e ] Please read the installation guide carefully before removing original car lighting from the vehicle. Please read through the entire installation
HID XENON HEADLIGHTS. [ Installation Guide] 1. Parts Included In Kit. Method of installing the bulb and ballast.
![HID XENON HEADLIGHTS. [ Installation Guide] 1. Parts Included In Kit. Method of installing the bulb and ballast.](/thumbs/73/68689032.jpg "HID XENON HEADLIGHTS. [ Installation Guide] 1. Parts Included In Kit. Method of installing the bulb and ballast.") Please read the installation guide carefully before removing original car lighting from the vehicle. Please read through the entire installation guide carefully before installing the HID system. Following
Please read the installation guide carefully before removing original car lighting from the vehicle. Please read through the entire installation guide carefully before installing the HID system. Following
#1 PROVIDER OF HID KITS.
 Please read the reference handbook carefully before removing original car lighting from the vehicle. Please read through the entire handbook carefully before installing the HID system. Following this guide
Instructions (V ) Type 3 - Hi/Low kit HID Low beam and H3, halogen, for High beam
 Type 3 - Hi/Low kit HID Low beam and H3, halogen, for High beam") Instructions (V5 04.23.2012) Type 3 - Hi/Low kit HID Low beam and H3, halogen, for High beam H4 (9003), H13 (9008), 9004, 9007 These bulbs have a HID Low beam and Halogen Bulb for High beam. Items included
Instructions (V5 04.23.2012) Type 3 - Hi/Low kit HID Low beam and H3, halogen, for High beam H4 (9003), H13 (9008), 9004, 9007 These bulbs have a HID Low beam and Halogen Bulb for High beam. Items included
Installation Guide. Immediate support available at or contact us at
 Installation Guide Professional installation is recommended. ALL HID KITS ARE INSTALLED AT YOUR OWN RISK! OPT7 and its affiliates will not be held liable for any damage or cost associated with installation
Type 1 - Single filament HID kit
 Instructions (V.4 01.23.2012) Type 1 - Single filament HID kit H1, H3, H7, H8, H9, H10 (9140,9145), H11, H12 (9040,9045,9055), 5202 (9009,H16), 880, 9005, 9006 These bulbs are used for low beam, high beam
Fig. 2: Unclasp the wiring attached to the back of the headlamp bulb
 REMOVAL & INSTALLATION See Figures 1 through 5 Fig. 1: Examples of various types of automotive light bulbs Fig. 2: Unclasp the wiring attached to the back of the headlamp bulb This procedure only applies
Instructions (V ) Type 2-Hi/Low, Motorized HID kit H4-M2 (9003), H13-M2 (9008), 9004-M2, 9007-M2
 Type 2-Hi/Low, Motorized HID kit H4-M2 (9003), H13-M2 (9008), 9004-M2, 9007-M2") Instructions (V5 04.23.2012) Type 2-Hi/Low, Motorized HID kit H4-M2 (9003), H13-M2 (9008), 9004-M2, 9007-M2 Items included; 2x Hi/Low, Motorized bulbs 2x 35-45W CAN BUS Digital Ballasts, 1x Hi/Low, Motorized
Instructions (V5 04.23.2012) Type 2-Hi/Low, Motorized HID kit H4-M2 (9003), H13-M2 (9008), 9004-M2, 9007-M2 Items included; 2x Hi/Low, Motorized bulbs 2x 35-45W CAN BUS Digital Ballasts, 1x Hi/Low, Motorized
Remove black panel shown. Save 6 retaining pins for re-install later. Pry up on center part of pin first. Then pry out entire retaining pin.
 2005-2009 Ford Mustang V6 Fog Light Wiring Kit Parts List: Quantity: Tools Required: Wiring harness 1 Flat head screwdriver Supplemental wire leads 2 Ratchet & Socket set OR Wire tap red 2 Adjustable Wrench
PRELIMINARY INSTALLATION INSTRUCTIONS PARTS LIST. Combination light switch Right fog light. 4 Self-tapping washer-screws.
 INSTALLATION INSTRUCTIONS Accessory S P/N 08V31-SCV-100D Application 2009 ELEMENT (SC) Publications No. AII 40515 Issue Date OCT 2008 PARTS LIST Combination light switch Right fog light Left fog light
HOW - TO WIRING & LIGHTING
 HOW - TO WIRING & LIGHTING Tool And Material Checklist Test Light Service Manual Penetrating Oil Long-Nose Pliers T-Square or Right Angle Screwdriver Black Electrical Tape Fuses Fuse Puller Cloth or Paper
Depress each tab as you pull the bezel off. The bezels are tight. L.H. shown.
 2013-2014 Ford Mustang V6 & Boss 302 Lower Valance Fog Light Kit Parts List: Quantity: Tool List: Fog light & bulb with bracket 2 Flat head & Phillips screwdriver Black bezels 2 Ratchet & Socket set OR
INSTALLATION INSTRUCTIONS
 INSTALLATION INSTRUCTIONS Accessory S Application 2014 ODYSSEY Publications No. AII 49550 Issue Date JUNE 2013 PARTS LIST Fog Light Kit P/N 08V31-TK8-100A 16 Wire ties (Some may not be used) Left fog light
INSTALLATION INSTRUCTIONS
 INSTALLATION INSTRUCTIONS Accessory Application Publications No. S P/N 08V31-SCV-100B 2008 ELEMENT (SC) AII 36532 Issue Date MAY 2007 PARTS LIST Relay bracket Right fog light Relay Left fog light Fuse
INSTALLATION INSTRUCTIONS
 INSTALLATION INSTRUCTIONS Accessory Application Publications No. P/N 08V31-SNA-100 2008 CIVIC 4-DOOR AII 37730 Issue Date AUG 2007 PARTS LIST Fog light harness Right fog light Left fog light Sub harness
Ford Mustang V6 OEM-Style Fog Light Kit Parts List: Quantity: Tool List:
 2015-2017 Ford Mustang V6 OEM-Style Fog Light Kit Parts List: Quantity: Tool List: LED Foglights/ Bezels 2 Flat head & Phillips screwdriver (if you ordered part#3600) Ratchet & Socket set OR Wiring harness
Small knife. Remove black panel shown. Save 6 retaining pins for re-install later.
 2005-2009 Ford Mustang V6 Fog Light Wiring Kit Parts List: Quantity: Tools Required: Wiring harness 1 Flat head screwdriver PB-3425 Parts Bag 1 Ratchet & Socket set OR Ford OEM Switch (if you 1 Adjustable
RF6 / RF10 / RF18 Installation Instructions
 RF6 / RF10 / RF18 Installation Instructions Thank you very much for purchasing PIAA product. Read this instruction manual thoroughly for proper use of the product. After completing your installation, please
INSTALLATION INSTRUCTIONS
 INSTALLATION INSTRUCTIONS Accessory S Application 2010 PILOT (LX ONLY) Publications No. AII 41642 Issue Date MAY 2009 PARTS LIST TOOLS AND SUPPLIES REQUIRED Fog Lights Kit P/N 08V31-SZA-100B Flat-tip screwdriver
INSTALLATION INSTRUCTIONS
 INSTALLATION INSTRUCTIONS Accessory S P/N 08V31-SZT-100 Application 2012 CR-Z Publications No. AII 46896 Issue Date OCT 2011 PARTS LIST Left fog light Relay Right fog light 20A Fuse Fuse label Left fog
HID INSTALLATION ON RST1000 Futura
 HID INSTALLATION ON RST1000 Futura Disclaimer: This is a full description of what I have done to my motorcycle. I am in no way suggesting you do as I have done by following these instructions. I have not
 INSTALLATION INSTRUCTIONS Accessory S Application 2009 PILOT (LX ONLY) Publications No. AII 39396 Issue Date MAY 2008 PARTS LIST Fog Lights Kit P/N 08V31-SZA-100B Left fog light Ground bolt Relay Right
Installation Instructions. Fog Lights. The lamps get very hot when they have been in use. Do not touch them as they may cause burns.
 2100X Installation Instructions Thank you very much for purchasing PIAA product. Please read this entire manual before installation and use of this product. Fog Lights For Installers Please give this Installation
INSTALLATION INSTRUCTIONS
 Accessory Application Publications No. INSTALLATION INSTRUCTIONS S (LX, EX) CIVIC 2- AND 4- DOOR AII 25449 Issue Date SEP 2003 NOTE: Fog Lights cannot be installed if the vehicle is equipped with an optional
INSTALLATION INSTRUCTIONS
 INSTALLATION INSTRUCTIONS Accessory S Application 2011 ODYSSEY Publications No. AII 43917 Issue Date SEP 2010 PARTS LIST Fog Light Kit P/N 08V31-TK8-100 Left fog light 20A Fuse Relay Right fog light Light
INSTALLATION INSTRUCTIONS
 Accessory Application Publications No. INSTALLATION INSTRUCTIONS S (DX, HX, VP) 2005 CIVIC 2- AND 4- DOOR AII 27865-30866 Issue Date SEP 2005 NOTE: Fog Lights cannot be installed if the vehicle is equipped
INSTALLATION INSTRUCTIONS
 INSTALLATION INSTRUCTIONS Accessory S Application 2010 CIVIC 2-DOOR EX-L Publications No. AII 42488 Issue Date AUG 2009 PARTS LIST P/N 08V31-SVA-110G Right fog light Clip 4 Spring nuts Left fog light 4
INSTALLATION INSTRUCTIONS
 INSTALLATION INSTRUCTIONS Accessory Application Publications No. P/N 08V31-SNA-100 2007 CIVIC HYBRID AII 33829 Issue Date SEP 2006 PARTS LIST Fog light harness Right fog light Left fog light Subharness
INSTALLATION INSTRUCTIONS
 INSTALLATION INSTRUCTIONS Accessory S Application 2010 INSIGHT Publications No. AII 40881 Issue Date MARCH 2009 PARTS LIST Right fog light bracket D Fog Lights Kit P/N 08V31-TM8-100 Left fog light Fog
Changing light bulbs. Introduction WARNING
 Changing light bulbs Introduction In this section you ll find information about: Indicator light Information on light bulb replacement Changing headlight bulbs Changing the fog light bulbs in the front
INSTALLATION INSTRUCTIONS
 INSTALLATION INSTRUCTIONS Accessory Application Publications No. AII 28603 S 2006 RIDGELINE Issue Date FEB 2005 PARTS LIST Relay Fog Light Kit P/N 08V31-SJC-100 Right fog light 15 Wire ties Left fog light
Part Number: TRA-316/TRA-816
 Date: 07.29.2016 TOYOTA RAV4 2016- FOG LIGHT (Halogen/LED) Part Number: TRA-316/TRA-816 Kit Contents Item # Quantity Reqd. Description 1 2 Light Housings 2 2 Light Bezels 3 1 Wire Harness Bag* 4 1 Connector
T u n i n g. Professional Install
 DDM INSTALL GUIDE H1 HID Low Beams (35W or 55W) ddm T u n i n g TOOLS NEEDED: - Standard or metric socket set. Depending on the vehicle. - A drill and either a uni-bit or a 7/8 drill bit. - A Dremel with
FAQs. General LED Retrofit P.1. Product features LED Retrofit P.2. Installation LED retrofit. General CANbus P.5. Product feature CANbus P.
 Automotive LED Retrofit FAQs General LED Retrofit P.1 Product features LED Retrofit P.2 Installation LED retrofit P.3-4 General CANbus P.5 Product feature CANbus P.6 Installation CANbus P.7 General LED
INSTALLATION INSTRUCTIONS
 INSTALLATION INSTRUCTIONS Accessory S P/N 08V31-SNA-100D Application 2010 CIVIC 4-DOOR Publications No. AII 42452 Issue Date SEP 2009 PARTS LIST Right fog light 6 Wire ties Left fog light Clip Switch harness
INFINITY-1 HALOGEN LIGHT BAR INSTALLATION MANUAL 7000 SERIES
 INFINITY-1 HALOGEN LIGHT BAR INSTALLATION MANUAL 7000 SERIES Your purchase of a Wolo warning light is the perfect choice to compliment your vehicle. Wolo s warning lights are manufactured with the finest
INSTALLATION INSTRUCTIONS
 INSTALLATION INSTRUCTIONS Accessory S (L4) Application 2008 ACCORD 4-DOOR Publications No. AII 35357 Issue Date AUG 2007 PARTS LIST Left bracket C Fog Light Kit P/N 08V31-TA0-100 Left fog light Right bracket
INSTALLATION INSTRUCTIONS
 INSTALLATION INSTRUCTIONS Accessory Application Publications No. S CIVIC 2 AND 4-DOOR (EX, LX) AII 24188 Issue Date AUG 2002 NOTE: Fog Lights cannot be installed if the vehicle is equipped with an optional
INSTALLATION INSTRUCTIONS
 INSTALLATION INSTRUCTIONS Accessory Application Publications No. CIVIC AII 24171 S 2- AND 4-DOOR Issue Date (DX, HX) AUG 2002 NOTE: Fog Lights cannot be installed if the vehicle is equipped with an optional
INFINITY-3 STROBE LED BAR INSTALLATION MANUAL 7700 SERIES
 INFINITY-3 STROBE LED BAR INSTALLATION MANUAL 7700 SERIES Your purchase of a Wolo warning light is the perfect choice to compliment your vehicle. Wolo s warning lights are manufactured with the finest
V-HID Headlight Installation Instructions
 V-HID Headlight Installation Instructions Thank you for purchasing our New high quality easy to install Parts4PowerToys V-HID headlight kit for your Harley Davidson. The following installation instructions
Always obey local vehicle lighting laws. The driver is always responsible for the correct headlight settings.
 Lights Introduction In this section you ll find information about: Indicator lights Turn signal lever and high beam switch Switching lights on and off Lights and vision features Lights and vision features
INSTALLATION INSTRUCTIONS
 INSTALLATION INSTRUCTIONS Accessory Application Publications No. AII 36765 S 2008 RIDGELINE Issue Date JUN 2007 PARTS LIST Relay Fog Light Kit P/N 08V31-SJC-100 Right fog light 15 Wire ties Left fog light
INSTALLATION INSTRUCTIONS
 INSTALLATION INSTRUCTIONS Accessory Application Publications No. S P/N 08V31-S0X-100 1999-2001 ODYSSEY AII 20677 Issue Date AUG 1999 PARTS LIST 2 Fog lights Switch Fuse label Right bracket Relay B, 4-pin
Water in Fuel Sensor Kit
 03/08/2016 1050355-1050356 Water in Fuel Sensor Kit (I-00369) 1 Water in Fuel Sensor Kit Fast and Accurate Detection of Water in Diesel Fuel 1050355 Universal Kit For use with BD FlowMax water separator
INSTALLATION INSTRUCTIONS
 INSTALLATION INSTRUCTIONS Accessory Application Publications No. All 26124 CR-V Issue Date SEP 2003 P/N 08V31-S9A-112 PARTS LIST 4 Washer-bolts, 6 x 20 mm Left fog light 2 Small spring nuts Right fog light
INSTALLATION INSTRUCTIONS
 INSTALLATION INSTRUCTIONS Accessory S Application 2010 CR-V Publications No. AII 42602-42850 Issue Date OCT 2009 PARTS LIST Fog Light Kit (With Auto Lights) P/N 08V31-SWA-100A Fog Light Kit (Without Auto
INSTALLATION INSTRUCTIONS
 INSTALLATION INSTRUCTIONS Accessory Application Publications No. All 27176-28932 2005 CR-V Issue Date S P/N 08V31-S9A-115 FEB 2005 PARTS LIST 6 Washer-bolts Left fog light 6 Spring nuts Harness bracket
INSTALLATION INSTRUCTIONS
 INSTALLATION INSTRUCTIONS Accessory S P/N 08V31-SZA-100C Application 2015 PILOT (LX ONLY) Publications No. AII 51565 Issue Date MAY 2014 PARTS LIST 2 Fog lights Ground bolt Relay Headlight switch TOOLS
LED Bulb Installation Manual
 Dual Color LED Bulb Installation Manual (H8/H/11/H16,HB4 (9006),PSX6W) LED Bulb lighting test points Do it before installment. Test procedure 1. Remove the vehicle connector from halogen bulb connector..
INSTALLATION INSTRUCTIONS
 INSTALLATION INSTRUCTIONS Accessory Application Publications No. All 27176 2005 CR-V Issue Date P/N 08V31-S9A-114 SEP 2004 PARTS LIST 25 Wire ties Left fog light 6 Washer-bolts Right fog light 6 Spring
Part Number: T4R-2N1. Hardware Bag Contents. General Applicability Models with factory fog light
 11/10/16 TOYOTA CAMRY 2012-2014 2 in 1 LED UPGRADE KIT Part Number: T4R-2N1 Kit Contents Item # Quantity Reqd. Description 1 2 DRL + Fog Light Housing 2 1 Driver Box 3 1 Harness bag 4 1 User s card 5 1
Dear Customers. : i MiEV INSTRUMENT PANEL ILLUMINATION INSTALLATION AND HANDLING INSTRUCTIONS. Attention
 Dear Customers Thank you for purchasing a Mitsubishi genuine optional part. For proper use of the product, please read this leaflet thoroughly. It is recommended you keep this leaflet at hand for future
INSTALLATION INSTRUCTIONS
 INSTALLATION INSTRUCTIONS Accessory S Application 2012 CIVIC 4-DOOR Publications No. AII 45623 Issue Date APR 2011 PARTS LIST Fog Light Kit P/N 08V31-TR0-100B (without automatic lights) P/N 08V31-TR0-100C
Ford Mustang GT-Style Fog Light Kit Parts List: Quantity: Tool List:
 2013-2014 Ford Mustang GT-Style Fog Light Kit Parts List: Quantity: Tool List: Fog light (Left& Right) 2 Flat head & Phillips screwdriver Upper grille with surround 1 Ratchet & Socket set OR Lower grille
LANCER FOG LAMP KIT MZ380479EX (for RHD) INSTALLATION AND HANDLING INSTRUCTIONS
 INSTALLATION AND HANDLING INSTRUCTIONS") LANCER FOG LAMP KIT MZ380479EX (for RHD) INSTALLATION AND HANDLING INSTRUCTIONS Fog lamp Thank you for purchasing the Mitsubishi Genuine Accessory. To install and use the product correctly with proper
LANCER FOG LAMP KIT MZ380479EX (for RHD) INSTALLATION AND HANDLING INSTRUCTIONS Fog lamp Thank you for purchasing the Mitsubishi Genuine Accessory. To install and use the product correctly with proper
INSTALLATION INSTRUCTIONS
 INSTALLATION INSTRUCTIONS Accessory Application Publications No. ACCORD AII 24050 4-DOOR P/N 08V31-SDA-100 Issue Date AUG 2002 NOTE: The outside temperature gauge cannot be installed in a vehicle with
INSTALLATION INSTRUCTIONS
 INSTALLATION INSTRUCTIONS Accessory Application Publications No. S P/N 08V31-SCV-102 2008 ELEMENT AII 36531 Issue Date MAY 2007 PARTS LIST 15 Wire ties 2 Fog lights 4 Wire ties with clip Switch harness
INSTALLATION INSTRUCTIONS
 INSTALLATION INSTRUCTIONS Accessory Application Publications No. AII 25877 PILOT Issue Date AUG 2003 Optional ATF and power steering coolers are required when installing the trailer hitch. 2 Spacers PARTS
Part Number: T4R-2N1. Hardware Bag Contents. General Applicability Models with factory fog light. Conflicts -
 Date: 07.30.2015 TOYOTA TUNDRA 2014-2016 LED Fog Light & DRL 2 in 1 Part Number: T4R-2N1 Kit Contents Item # Quantity Reqd. Description 1 2 DRL + Fog Light Housing 2 1 Driver Box 3 1 Harness bag 4 1 User
Part Number: T4R-2IN1
 Date: 12.11.2014 TOYOTA HIGHLANDER 2015 LED Fog Light & DRL 2in1 Part Number: T4R-2IN1 Kit Contents Item # Quantity Reqd. Description 1 2 DRL + Fog Light Housing 2 1 Driver Box 3 1 Harness bag 4 1 User
Mounting Instructions. Jumbo 320 Xenon
 Mounting Instructions Jumbo 320 Xenon Kit includes 3x Ø 11mm Optional optional Ø 5 mm Ø 6mm 1 2 3 4 Accessories (not included with kit) 12 V: 6EH 007 946-031 8HG 116 741-801 8XS 160 353-001 Te Subject
Part Number: T4R-2N1. Hardware Bag Contents. General Applicability. Conflicts - Limited Models
 Date: 12.11.2014 TOYOTA HIGHLANDER 2014-2016 LED Fog Light & DRL 2 in 1 Part Number: T4R-2N1 Kit Contents Item # Quantity Reqd. Description 1 2 DRL + Fog Light Housing 2 1 Driver Box 3 1 Harness bag 4
Installation Instructions
 Installation Instructions Thank you very much for purchasing PIAA product. Please read this entire manual before installation and use of this product. For Installers Please give this Installation Manual
Part Number: TTA-2N1. Hardware Bag Contents. General Applicability SR5, TRD Sport, TRD Off-Road, Limited
 Date: 2.10.2016 TOYOTA TACOMA 2016-2 in 1 LED UPGRADE KIT Part Number: TTA-2N1 Kit Contents Item # Quantity Reqd. Description 1 2 DRL + Fog Light Housing 2 1 Driver Box 3 1 Harness bag 4 1 User s card
User s Manual. Automatic Switch-Mode Battery Charger
 User s Manual Automatic Switch-Mode Battery Charger IMPORTANT Read, understand, and follow these safety rules and operating instructions before using this battery charger. Only authorized and trained service
INSTALLATION INSTRUCTIONS
 INSTALLATION INSTRUCTIONS Accessory S P/N 08V31-SZA-100C Application 2012 PILOT (LX ONLY) Publications No. AII 46379 Issue Date AUG 2011 PARTS LIST 2 Fog lights Ground bolt Relay Headlight switch TOOLS
INSTALLATION INSTRUCTIONS
 INSTALLATION INSTRUCTIONS Accessory Application Publications No. P/N 08V31-SDN-100 2004 ACCORD 2-DOOR AII 25735 Issue Date SEP 2003 NOTE: The outside temperature gauge can not be installed in a vehicle
TIP SHEET T0937. Installation Tips For RS00/PS00 + ADS-TBSL-PL + SPDT
 Installation Tips For RS00/PS00 + ADS-TBSL-PL + SPDT TIP SHEET T0937 Thank you for purchasing your remote start from MyPushcart.com - an industry leader in providing remote starts to do-it-yourself installers
Installation Tips for your Crimestopper/ProStart Remote Start system (add-on for GM vehicles) v1.02 updated 1/16/2013
 v1.02 updated 1/16/2013") Installation Tips for your Crimestopper/ProStart Remote Start system (add-on for GM vehicles) v1.02 updated 1/16/2013 Thank you for purchasing your remote start from MyPushcart.com - an industry leader
Installation Tips for your Crimestopper/ProStart Remote Start system (add-on for GM vehicles) v1.02 updated 1/16/2013 Thank you for purchasing your remote start from MyPushcart.com - an industry leader
INSTALLATION INSTRUCTIONS
 INSTALLATION INSTRUCTIONS Accessory Application Publications No. AII 24288 S ELEMENT Issue Date DEC 2002 PARTS LIST Fog Light Kit ( P/N 08V31-SCV-100 2 Fog lights Switch harness TOOL AND SUPPLIES REQUIRED
INSTALLATION INSTRUCTIONS
 INSTALLATION INSTRUCTIONS Accessory S Application 2013 CIVIC 2-DOOR Publications No. AII 13060 Issue Date NOV 2012 PARTS LIST Fog Light Kit P/N 08V31-TS8-100C (with auto light) P/N 08V31-TS8-100D (without
Mustang HID Headlight Installation Guide (9007)
") Mustang HID Headlight Installation Guide 1994-2004 (9007) The below installation instructions work for the following products: 9007 Bulb HID Headlight Coversion Kit 1994-2004 The following are a set of
Mustang HID Headlight Installation Guide 1994-2004 (9007) The below installation instructions work for the following products: 9007 Bulb HID Headlight Coversion Kit 1994-2004 The following are a set of
Bulb Renewal TOP ACCESS COVER
 TOP ACCESS COVER To gain access to the headlight units, the top cover must be removed. Unscrew and remove the six fasteners (A). Remove the top cover. After changing the defective bulb, refit the cover,
KAC-8104D INSTRUCTION MANUAL CLASS D MONO POWER AMPLIFIER B /00 (MV)
") KAC-8104D CLASS D MONO POWER AMPLIFIER INSTRUCTION MANUAL B64-3933-00/00 (MV) Safety precautions 2WARNING To prevent injury or fire, take the following precautions: When extending the ignition, battery,
KAC-8104D CLASS D MONO POWER AMPLIFIER INSTRUCTION MANUAL B64-3933-00/00 (MV) Safety precautions 2WARNING To prevent injury or fire, take the following precautions: When extending the ignition, battery,
KAC-9104D INSTRUCTION MANUAL
 CLASS D MONO POWER AMPLIFIER KAC-9104D INSTRUCTION MANUAL B64-3927-00/00 (MV) Safety precautions 2WARNING To prevent injury or fire, take the following precautions: When extending the ignition, battery,
 INSTALLATION INSTRUCTIONS Accessory Application Publications No. AII 33026 S 2007 ODYSSEY Issue Date JULY 2006 PARTS LIST Short sub harness (LX model) Right fog light Long sub harness (EX model and Touring
INSTALLATION INSTRUCTIONS
 INSTALLATION INSTRUCTIONS Accessory Application Publications No. AII 30518 KIT 2006 PILOT Issue Date NOV 2005 NOTE: Accessory ATF and power steering coolers are required when installing the trailer hitch.
Part Number: T4R-2N1. Hardware Bag Contents. General Applicability XLE, Limited
 Date: 2.10.2016 TOYOTA RAV4 2016 2 in 1 LED UPGRADE KIT Part Number: T4R-2N1 Kit Contents Item # Quantity Reqd. Description 1 2 DRL + Fog Light Housing 2 1 Driver Box 3 1 Harness bag 4 1 User s card 5
INSTALLATION INSTRUCTIONS
 INSTALLATION INSTRUCTIONS Accessory Application Publications No. AII 24075 2003 ACCORD P/N 08V31-SDN-100 2-DOOR Issue Date AUG 2002 NOTE: The outside temperature gauge can not be installed in a vehicle
AMCON AUTOMATIC CHART PROJECTOR USER S MANUAL EQ-6002
 AMCON AUTOMATIC CHART PROJECTOR USER S MANUAL EQ-6002 1-800-255-6161 Fax 1-800-397-0013 www.amconlabs.com Disclaimer...2 1. Introduction...3 2. Safety Instructions......3 3. Charts and Specifications......4
INSTALLATION INSTRUCTIONS
 INSTALLATION INSTRUCTIONS Accessory Application Publications No. P/N 08V31-SVA-100 2006 CIVIC 2-DOOR All 30890 Issue Date SEP 2005 PARTS LIST 11 Wire ties Right fog light Clip Left fog light 4 Stepped
INSTALLATION INSTRUCTIONS
 INSTALLATION INSTRUCTIONS Accessory Application Publications No. KIT P/N 08E49-S9V-100 2003 PILOT LX AII 23629 Issue Date MAY 2002 PARTS LIST Illustration of the Security System installed on the Vehicle
INSTALLATION INSTRUCTIONS
 INSTALLATION INSTRUCTIONS Accessory S P/N 08V31-SWA-100 Application 2009 CR-V Publications No. AII 40437 Issue Date AUG 2008 PARTS LIST Switch Right fog light Relay Left fog light Bracket Fog light harness
Hyundai EXCEL Remote Immobiliser System Installation Manual Revision 1 10/12/99 Part No
 Hyundai EXCEL Remote Immobiliser System Installation Manual Part No. 00243-22500 The Excel remote immobiliser system is central locking compatible. For vehicle's already fitted with Factory central locking,
Installation MKIV Headlight Housings with Fog Lamps (Procedures apply to both MKIV Jetta and Golf)
") Page 1 This tutorial is provided as a courtesy by ECS Tuning. Service Procedure Installation Proper service and repair procedures are vital to the safe, reliable operation of all motor vehicles as well
Page 1 This tutorial is provided as a courtesy by ECS Tuning. Service Procedure Installation Proper service and repair procedures are vital to the safe, reliable operation of all motor vehicles as well
Note: Do NOT mix LED and incandescent lamps in the same circuit!
 Light Up Your Modified Car Some Hot Rod lights are hard to see. Your teardrop lights may look cool, but the 5W incandescent lamp that came with it just doesn t light up bright enough to show others you
Lights TURN SIGNAL/PARKING LIGHT HIGH BEAM HEADLIGHT LOW BEAM HEADLIGHT. Maintenance
 Check the operation of your car s exterior lights at least once a month. A burned out bulb can create an unsafe condition by reducing your car s visibility and the ability to signal your intentions to
RECHARGEABLE SPOTLIGHT
 RECHARGEABLE SPOTLIGHT MODEL: RWL10 Part No: 4002822 INSTRUCTION MANUAL LS0609 INTRODUCTION Thank you for purchasing this CLARKE product Before attempting to use the product, it is essential that you read
Twin-Beam Spotlight 3,000,000 Power Series Corded Cordless Rechargeable
 VEC158CFL_Manual_012405 1/24/05 4:37 PM Page iv VEC158 Twin-Beam Spotlight 3,000,000 Power Series Corded Cordless Rechargeable OWNER S MANUAL & WARRANTY INFORMATION IMPORTANT SAFETY INFORMATION, SAVE THESE
STUDIO - TRAINING MANUAL
 STUDIO - TRAINING MANUAL SIMPLE TANNING SYSTEMS built purposely for a perfect spray tan. WELCOME Thank you for choosing the Tanning Essentials Studio Spray Tan System. Please read the following to help
LP550/LP560 Installation Instructions
 LP550/LP560 Installation Instructions Thank you very much for purchasing PIAA product. Please read this entire manual before installation and use of this product. The and marks indicated in this manual
Spotlight 1,000,000 Power Series Cordless Rechargeable
 VEC156CFL_Manual_012405 1/24/05 4:29 PM Page iv VEC156 Spotlight 1,000,000 Power Series Cordless Rechargeable OWNER S MANUAL & WARRANTY INFORMATION 53SB E231887 IMPORTANT SAFETY INFORMATION, SAVE THESE
TOYOTA PRIUS FOG LIGHT (Halogen or LED)
") Part Number: TPR-413 / TPR-813 Kit Contents Item # Quantity Reqd. Description 1 2 Fog Lamps 2 1 Lower Grill 3 1 Switch Assembly 4 1 Fog Light Operation guide 5 1 Harness Bag Hardware Bag Contents Item
Part Number: TPR-413 / TPR-813 Kit Contents Item # Quantity Reqd. Description 1 2 Fog Lamps 2 1 Lower Grill 3 1 Switch Assembly 4 1 Fog Light Operation guide 5 1 Harness Bag Hardware Bag Contents Item
HEADLIGHT AND TAILLIGHT
 BE14 HEADLIGHT AND TAILLIGHT SYSTEM PARTS LOCATION BE15 TROUBLESHOOTING The table below will be useful for you in troubleshooting these electrical problems. The most likely causes of the malfunction are
2010 Toyota Prius Fog Light Retrofit
 2010 Toyota Prius Fog Light Retrofit A DIY prospective Last updated: Friday, December 25, 2009 *** Disclaimer Use this document and its contents at your own risk! *** Forward: This document was compiled
Twin-Beam Spotlight 3,000,000 Power Series Corded Cordless Rechargeable
 VEC158BD Twin-Beam Spotlight 3,000,000 Power Series Corded Cordless Rechargeable 53SB E231887 SAVE THIS MANUAL FOR FUTURE REFERENCE. WARNINGS IMPORTANT SAFETY INFORMATION Contains non-spillable sealed
TOYOTA HIGHLANDER 2016 ON BOARD VACUUM CLEANER
 2016 Part Numbers: 00016-48017- (01, 02, 04) Accessory Code: SV1000 NOTE: Will not work in Highlander HV Kit Contents Item # Quantity Reqd. Description 1 1 Vacuum Assembly 2 1 Hose Assembly 3 1 Tool Kit
TOYOTA COROLLA L, LE FOG LIGHT (Halogen and LED) Part Number: TCO-314 / TCO-814
 Part Number: TCO-314 / TCO-814") TOYOTA COROLLA L, LE 2014-16 FOG LIGHT (Halogen and LED) Part Number: TCO-314 / TCO-814 Kit Contents Item # Quantity Reqd. Description 1 2 Light Housings 2 2 Fog Light bezels 3 1 Switch Assembly 4 1 Fog
TOYOTA COROLLA L, LE 2014-16 FOG LIGHT (Halogen and LED) Part Number: TCO-314 / TCO-814 Kit Contents Item # Quantity Reqd. Description 1 2 Light Housings 2 2 Fog Light bezels 3 1 Switch Assembly 4 1 Fog