, MERCEDES SPRINTER NCV3, FRONT 2.0 LIFT KIT Version 2.0
|
|
|
- Kristin Berry
- 6 years ago
- Views:
Transcription
1 , MERCEDES SPRINTER NCV3, FRONT 2.0 LIFT KIT Version 2.0 General Notes For the most up to date and current instructions, please visit our website at Please read all instructions thoroughly before starting installing Van Compass products. This is a bolt on lift kit that can be installed with basic hand tools. The installation of this lift kit will require removal of brake hoses to install brake line drop brackets. Bleeding the brake system will be required. The installation of this kit will require adding an extension piece to the low pressure power steering hose. Proper bleeding of the power steering system will be required. This suspension kit can be completely removed, allowing the vehicle to be returned back to stock configuration if desired. Parts List , MERCEDES SPRINTER NCV3, FRONT STRUT SPACER, 2.0 LIFT KIT (1) L FRONT STRUT SPACER, LEFT HAND SIDE (1) R FRONT STRUT SPACER, RIGHT HAND SIDE (8) HM M X 30MM LONG, GR10.9, YELLOW ZINC HEX HEAD BOLT (8) WFM08 M8 YELLOW ZINC FLAT WASHER , MERCEDES SPRINTER NCV3, FRONT SUB FRAME DROP SPACERS, 2.0 LIFT KIT (4) FRONT SUBFRAME DROP SPACER, FRONT AND REAR PUCK (2) FRONT SUBFRAME DROP SPACER, MIDDLE PUCK (2) HM M X 130MM LONG, GR10.9, YELLOW ZINC HEX HEAD BOLT (2) HM M X 165MM LONG, GR10.9, YELLOW ZINC HEX HEAD BOLT (2) HM M X 210MM LONG, GR10.9, YELLOW ZINC HEX HEAD BOLT (6) WFM14 M14 YELLOW ZINC FLAT WASHER (1) LTBL-02 BLUE LOCTITE, 2ML TUBE , MERCEDES SPRINTER NCV3, STEERING SHAFT EXTENSION, 2.0 LIFT KIT (1) STEERING SHAFT EXTENSION (1) SM M X 25MM LONG, GR12.9, CLEAR ZINC SOCKET CAP SCREW
2 , MERCEDES SPRINTER NCV3, TRANSMISSION MOUNT LIFT BLOCK, 2.0 LIFT KIT (1) TRANSMISSION MOUNT LIFT BLOCK (4) HM M X 70MM LONG, GR10.9, YELLOW ZINC HEX HEAD BOLT (4) WFM08 M8 YELLOW ZINC FLAT WASHER , MERCEDES SPRINTER NCV3, MOTOR MOUNT LIFT BLOCK, 2.0 LIFT KIT (2) MOTOR MOUNT LIFT BLOCK (4) HM M X 30MM LONG, GR10.9, YELLOW ZINC HEX HEAD BOLT (4) NNM M NYLOCK NUT, CLEAR ZINC FINISH (8) WFM10 M10 YELLOW ZINC FLAT WASHER , MERCEDES SPRINTER NCV3, FRONT BRAKE LINE DROP BRACKET, 2.0 LIFT KIT (2) FRONT BRAKE LINE DROP BRACKET, 2.0 LIFT (2) HM M X 25MM LONG, GR10.9, YELLOW ZINC HEX HEAD BOLT (2) NNM M NYLOCK NUT, CLEAR ZINC (2)WFM12 M12 YELLOW ZINC FLAT WASHER Tools Needed Two vehicle jacks and 4 jack stands. o Optional Automobile lift, one transmission jack, and two screw jacks. Simple hand tools: o Torque Wrench o Dykes or similar tool for cutting zip ties. o Body trim removal tools o Basic wrench and socket set: Metric sizes: 10mm, 13mm, 16-19mm, 21mm, 24mm T-25, T-27, T-45 torx 6mm Allen 4-1/2 Angle grinder with flap disc, or similar sanding tool for light material removal. Die grinder with ¼ 3/8 diameter burr bit. o A 4-1/2 angle grinder with grinding wheel can also be used in substitute of this. Approximate Installation Time Professional shop with automotive lift: 6-8 hours Driveway install with jack and jack stands: 8-11 hours

3 Installation 1) Before lifting the vehicle on a lift or placing it on jack stands, the lower portion of the steering shaft must be disconnected from the vehicle. Set the steering wheel straight and remove the key so the steering wheel locks into place for the duration of the install. 2) Disconnect ground cable from battery underneath the driver (left hand) side floor board. 3) Locate the three T25 torx screws which secure the floor mat cover to the door sill. 4) Remove the driver side floor mat and locate the four T-27 Torx bolts which secure the battery cover to the vehicle. Loosen all four bolts so the cover plate can be slid back and up for removal. 5) With the battery exposed, remove the ground cable from the negative side of the battery using a 10mm socket / wrench. 6) Under the hood, locate the steering shaft connection just behind the ABS control module on the driver side of the vehicle. a. Remove the nut using a 13mm socket / wrench and remove the bolt from the steering shaft. There is a small metal retention clip which helps hold the bolt to the steering shaft joint. A small tap with a hammer may be needed to unseat the bolt from the clip. b. Retain the nut, bolt and retention clip as they will all be reused.


4 7) Locate the low pressure power steering hose going from the steering rack to the power steering cooler. See image below for reference.
 Now the vehicle can be placed on jack stands or raised on a lift.")
5 8) Remove this hose and install the barb extension with the included piece of power steering hose. Use the factory hose clamp at the barb union and the two included hose clamps at the remaining locations. 9) Now the vehicle can be placed on jack stands or raised on a lift. Be sure that the entirety of the front suspension sub frame is not supported and can be lowered away from the main chassis of the vehicle. a. If performing this installation on the ground with a jack and jack stands, place the jack stands just forward of the suspension sub frame.
 side.")

6 b. If performing this installation on an automobile lift, place lifting point just forward of the gas tank on the vehicle s main chassis section. Mirror this location on the passenger (right hand) side. 10) With the vehicle safely raised so the front suspension is completely unloaded, locate where the steering shaft connects to the steering rack underneath the vehicle. Use a T-45 torx bit and remove this bolt. Remove the steering shaft from the rack and pinion splines.

 Remove wheel speed sensor and brake pad wear sensor wiring from their respective")
7 11) Note the installation of the front lift kit must be done simultaneously on both the left and right sides of the vehicle. Complete steps on both sides of the vehicles unless otherwise specified. 12) Remove wheel speed sensor and brake pad wear sensor wiring from their respective retention clips on the strut and above the bump stop mount.


8 13) Use a 21mm socket to remove the front brake caliper adapter bolts. There are two bolts per caliper. 14) Remove the brake caliper from the rotor and secure up out of the way. Do not allow the caliper to hang by the brake hose.


9 15) Raise the lower control arm about 3/8 (10mm) to remove tension from the strut. Use a 21mm socket to remove the 2 bolts securing the strut to the steering knuckle. 16) With the strut disconnected from the steering knuckle, allow the lower control arm to hang free again. Be careful to slowly lower the knuckle out of the strut. Be sure the wheel speed sensor wire is not strained.


10 17) Remove the front inner fender well liner by first removing the two push pins located near the front bottom side of the bumper which connect the inner fender well to the front bumper. See image below. 18) This style of push pin is a 3 step removal process. Begin by rotating the head of the push pin 90 deg so it cams out of the indent in the push pin body.


11 19) Next, using an automotive trim removal tool, pull up the head of the push pin. 20) Using the same automotive trim removal tool, pry up under the head of the push pin body to fully removal the fastener.

 is a standard style push pin which can be removed in")
12 21) Next, on the inside of the fender well, remove the three push pin fasteners near the outer lip of the bumper. 22) Note, the bottom two fasteners (denoted with the red arrows) are the same cam style fastener from step 5. The upper fastener (denoted with the yellow arrow) is a standard style push pin which can be removed in two steps. Simply pry up under the push pin head prior to prying underneath the body of the fastener.

 Locate and remove the 3 plastic 10mm nuts securing the rear")
13 23) Locate and remove the two plastic nuts securing the front half of the inner fender well liner to the chassis. Use a 10mm socket for removal. 24) Locate and remove the 3 plastic 10mm nuts securing the rear half of the inner fender well liner to the chassis.

 Remove the front half of the inner fender well liner by pulling")
14 25) Lastly, remove the upper nut which secures both the front and rear half of the inner fender well liner to the chassis. Again, use a 10mm socket for removal. 26) Remove the front half of the inner fender well liner by pulling the liner away from the bottom stud as shown.
 Slide the front half of the inner fender well forward and down until it clears from underneath the rear half of the inner fender well liner.")
15 27) Next pull the inner fender well liner away from the bumper and out from under the fender lip until it appears as shown. 28) Slide the front half of the inner fender well forward and down until it clears from underneath the rear half of the inner fender well liner. Note arrow in above photo is there to denote direction of movement needed for removal. 29) With the front half of the inner fender well liner removed, remove the two torx head bolts securing the rear half of the inner fender well liner to the mud flap. Use a T-25 Torx bit tool for removal.


16 30) Pull the mudflap out away from the body so the inner fender well liner can be pulled free from behind it. Again, pull the inner fender well liner out from underneath the lip of the fender. And pull the liner away from the bottom stud. 31) The liner should now be able to rotate down and out the direction denoted above with the large red arrow.

17 32) Fully remove the strut by removing the four upper strut bolts inside the cabin of the vehicle. Use a 13mm socket / wrench for removal. a. Note; it is helpful to have one person hold / remove the strut while another person removes the four bolts from inside the vehicle as to prevent the strut from just falling on the ground. b. Label which side of the vehicle each strut came from. Re-install on the same side they were removed from. 33) The passenger side upper strut bolts can be accessed by pulling up the floor jack / tool kit cover panel in the passenger footwell. Refer to your owners manual for access if not already familiar with this procedure. 34) On the driver side of the suspension subframe, near the driver side motor mount. Remove the small 10mm bolt which secures the power steering lines to the suspension subframe. The nut for this bolt is not captured, it must be held with a 10mm socket / wrench to prevent it from spinning during removal. a. Retain this bolt as it will be re-used during installation. b. See image on next page for reference.
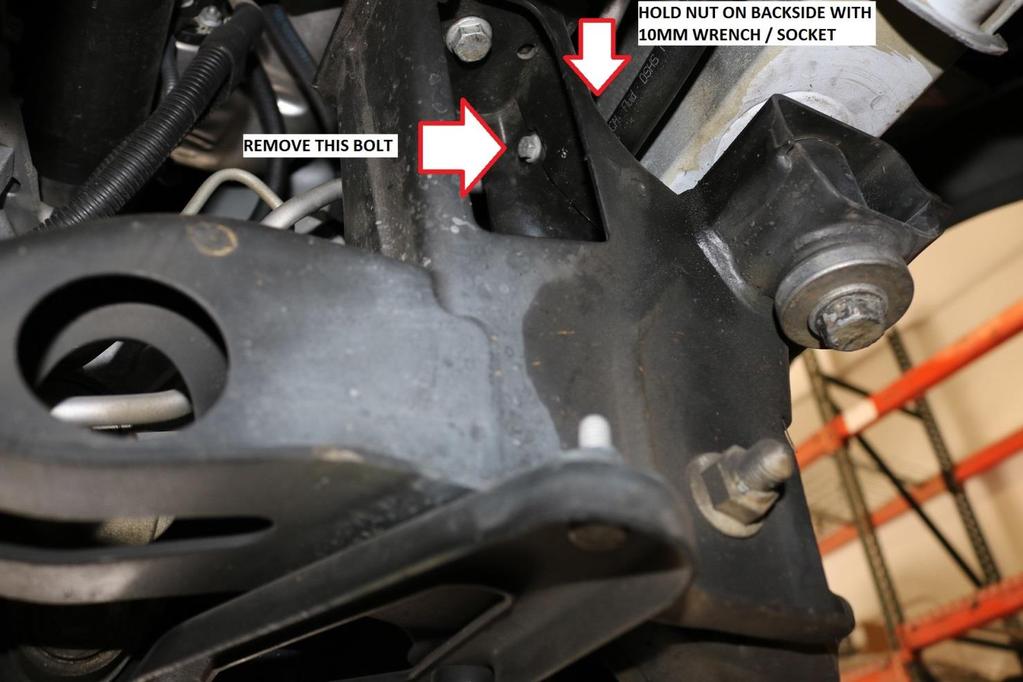
18


19 1014 Front Sub Frame Drop Spacer Installation 35) Support the motor with a jack underneath the oil pan. 36) Remove the motor mount bolt on both the driver and passenger side with a 16mm socket / wrench.


20 37) Remove the four transmission mount bolts shown below. Use a 13mm socket / wrench for removal. 38) At this point, it is VERY helpful to have another person available to aide in the sub frame drop procedure. 39) Support the sub frame with a jack. See image below for reference.


21 40) Support the transmission with another screw jack or jack stand. See image below for reference. 41) The ABS / ESP wiring barb retention clip may need to be pried out of the sub frame for installation of the spacers. Use an automotive trim removal tool to separate the clip from the sub frame.


22 42) Cut the zip tie near the transmission bell housing as the wiring can become strained during lowering of the sub frame. See the image below for reference. 43) With the motor, transmission and suspension sub frame supported, remove the suspension sub frame attachment bolts. There are three per side. Use a 21mm socket for removal. Their locations are shown by the red arrows in the image below.
 Remove all 6 bolts (3 per side) and slowly start to lower the sub frame.")
23 44) Prepare the spacers and new sub frame attachment bolts. The image below shows where each bolt / spacer is designed to be installed. It is critical to use the correct bolts / spacers in their corresponding locations. 45) Remove all 6 bolts (3 per side) and slowly start to lower the sub frame. This is where an extra person is very helpful to support / balance the sub frame as it is lowered. a. As the suspension sub frame is lowered, take careful notice of the ABS / ESP wiring. b. Take careful notice of the power steering lines to ensure they are not being strained during sub frame lowering. 46) Lower the sub frame until the spacers can be installed. The sub frame will need to lower 4-5 in order to install the front and rear spacers. a. As soon as the front spacer can be installed as shown below, stop lowering the sub frame.


24 47) Install all 6 spacers in their corresponding locations and raise the sub frame into place. a. CRITICAL: The front and rear spacer bolts must re-use the thick OEM washers which were originally equipped on the factory sub frame attachment bolts. b. Install the new sub frame attachment bolts using a dab of the included Loctite on the threads. Be sure to also use a new M14 washer under each bolt head.

 Install the 400901")
25 48) Snug all 6 bolts but do not torque at this time. Final torqueing will occur once the motor mount spacers are installed and the engine / transmission support jacks & jack stands can be removed Transmission Mount Lift Block Installation 49) Install the transmission mount lift block as shown below.
 Take note of the motor mount lift block orientation as shown below.")
26 50) Install the M x 70mm long bolts provided in the kit and snug all hardware finger tight. Final tightening will occur once the motor mount lift spacers are installed Motor Mount Lift Spacer Installation 51) Take note of the motor mount lift block orientation as shown below. The lift blocks are the same left to right, but they need to be oriented in the vehicle correctly. a. The image below shows the proper orientation when looking at the motor mount lift blocks from the front of the vehicle. 52) Fit the spacers into the vehicle. Raise / lower the motor as needed to get the lift blocks into place. Install the OEM motor mount bolt removed in step 36 into the motor mount. 53) Attach the motor mount lift spacers to the sub frame using the supplied M x 35mm long bolts provided in the kit. Use a washer under both the bolt head and nylock nuts included. 54) Start all hardware before fully tightening. 55) Once all hardware has been installed, remove any support jacks to the engine / transmission is sitting fully on its respective mounts. 56) Tighten the M motor mount bolts. a. Use a 16mm socket / wrench for the OEM motor mount bolt. b. Use a 17mm socket / wrench for the new Van Compass supplied hardware for the lift spacers. c. Torque all motor mount bolts to 43 ft-lbs (58 N.m)
 59) Torque the middle sub frame attachment bolts to 89 ft-lbs (120 N.")
 Secure the low pressure hose / clamp back in the OEM position using the bolt removed in step 34. See image below for reference.")
27 57) At this time, torque the transmission mount bolts to 22 ft-lbs (30 N.m) 58) Torque the front and rear sub frame attachment bolts to 127 ft-lbs (172 N.m) 59) Torque the middle sub frame attachment bolts to 89 ft-lbs (120 N.m) 60) At this time, separate the clamp securing the low pressure and high pressure power steering hoses together. This is the clamp / bolt from step ) Secure the low pressure hose / clamp back in the OEM position using the bolt removed in step 34. See image below for reference. The high pressure hose can t be secured using the OEM clamp. Secure the high pressure hose to the low pressure hose with a zip tie.
 Install the spacers onto the top of the struts using the OEM strut bolts originally removed.")

28 1013 Strut Spacer Installation 62) The strut spacers are left and right specific. Be sure to install the correct spacer on the correct side of the vehicle. See image below for reference / orientation. 63) Install the spacers onto the top of the struts using the OEM strut bolts originally removed. Snug all bolts tight, and add an additional ¼-1/2 turn. The torque spec on these bolts is only 21 ft-lbs (28 N.m). 64) With the spacers installed, fit the strut back into the vehicle. Again, an extra set of hands is very helpful at this stage. Use a 13mm socket to thread in the included M x 30mm long bolts included with the kit from above. Use a washer under the head of each bolt. Make sure the spacer is sitting flush in the strut hole in the chassis.

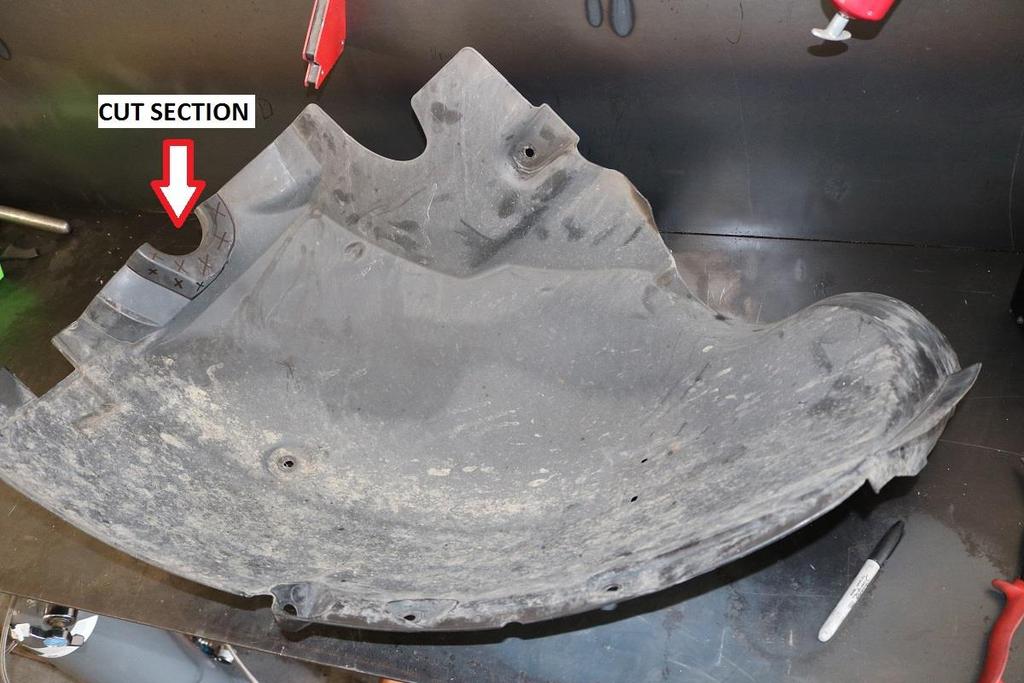
29 65) With all bolts installed and snug, torque to 21 ft-lbs (28 N.m) 66) Raise the steering knuckle / lower control arm and re-install the lower strut mounting bolts. a. Try to center the lower strut bolts back in the same worn in spot on the strut. This should set the camber approximately to what was prior to removal. b. Now is also an appropriate time to re-install the brake caliper onto the knuckle. i. Note; We recommend putting a dab of blue Loctite on the brake caliper adapter bolts c. Re-attach all ABS / ESP wiring back into their respective retention clips on the chassis / knuckle. 67) Torque lower strut bolts to 127 ft-lbs (172 N.m). 68) Torque brake caliper adapter bolts to 59 ft-lbs (80 N.m). Turn an additional ¼ turn after torqueing. 69) Trim the inner fender well liner to clear the strut spacer. A set of sheet metal sheers work very well for trimming the inner fender well liner. 70) Start with the front half of the inner fender well liner. Trim as shown in the images below. The cutting occurs on the creases / lines which are already in place on the liner.

30


31 71) The rear half of the fender well liner trimming is very similar. Again, see the images below for reference.

 Note the two flats on the top portion of the steering shaft.")
32 72) Re-install the fender well liners in the reverse order of removal. The trimmed liners should appear as shown below Steering Shaft Extension Installation 73) The factory steering shaft requires slight modification for fitment of the steering shaft extension. 74) Note the two flats on the top portion of the steering shaft. These flats need to be sanded off for the steering shaft extension to be installed. See images below for reference.


33 . 75) Test fit the steering shaft extension onto the steering shaft as shown below. a. Note, the pinch bolt hole should align with the notch in the steering shaft. i. Test fit the M x 25mm long socket cap screw provided at this time. We have found some steering shafts require their notch to be slightly increased between for the bolt to be installed. Do not force the bolt in with a wrench as it may damage the threads.


34 76) If the notch needs to be modified to allow for the bolt to be installed, use a small die grinder with burr bit or a 4-1/2 angle grinder with metal grinding wheel. Remove as little material as possible to allow fitment. 77) Once the pinch bolt can easily be installed, paint any newly exposed areas of metal to prevent corrosion. Assemble the steering shaft extension onto the steering shaft as shown below. Use a small dab of blue Loctite on the threads of the socket cap screw and torque to 18 ft-lbs (24N.m) using a 6mm Allen wrench.

35 78) Install the steering shaft onto the splines of the rack and pinion. Be careful not to damage the plastic alignment tab on the splines. Once fitted, install the T-45 torx bolt removed in step 9. Again, we recommend using a dab of blue Loctite on the threads. Torque the bolt to 18 ft-lbs (24N.m) 79) Install the top portion of the steering shaft into the steering shaft universal joint near the ABS module. Be sure the notch in the steering shaft extension is lined up with the bolt hole for the pinch bolt removed in step 6. 80) Install the bolt, retaining clip and nut removed in step 6 back onto the steering shaft. Use a 13mm socket / wrench and torque to 18 ft-lbs. (24 N.m)
 Install the front brake line drop bracket as shown below. Use the M12-1.50 x 25mm long bolts provided in the kit.")
36 4024 Front Brake Line Drop Bracket Installation 81) Separate the front brake hard line from the brake hose using an 11mm brake line wrench. 82) Install the front brake line drop bracket as shown below. Use the M x 25mm long bolts provided in the kit. Use a washer under both the nut and the head of the bolt.
37 83) Orient the tab as shown above. Tighten the M12 bolt to 50 ft-lbs (67 N.m). Reconnect the hard line to the brake hose and snug the brake line fitting tight. 84) With the front of the van still on jack stands / unloaded. Refill the power steering system and bleed the steering using the factory recommended procedure. 85) Re-install wheels / tires and lower van to ground. OEM torque spec for wheel studs is as follows: a SRW: ft-lbs ( N.m) b DRW: ft-lbs ( N.m) 86) With the vehicle on the ground, the last remaining under-hood components can be hooked back up. 87) Re-connect battery ground cable onto battery and re-install any interior component removed for access. 88) Refill the master cylinder with DOT 4+ Synthetic Brake Fluid. Refer to owner s manual for certainty. 89) Bleed the front brakes using the factory recommended sequence. Ensure there is good pedal feel and all air is eliminated from the system. Failure to eliminate all air from the braking system is not only dangerous, but will also trigger an ABS warning light on the instrument cluster. 90) Take vehicle to alignment shop for a proper alignment to be done. 91) Re-check all bolt torques after 100 miles of driving. Installation is Complete RELEASE OF LIABILITY I, the customer, do hereby release and forever discharge Van Compass LLC, of 8778 Plata Ln. STE B. Atascadero, Ca their agents, employees, successors and assigns, and their respective heirs, personal representatives, affiliates, successors and assigns, and any and all persons, firms or corporations liable or who might be claimed to be liable, whether or not herein named, from any and all claims, demands, damages, actions, causes of action or suits of any kind or nature whatsoever, whether known or unknown, fixed or contingent, which I now have or may hereafter have or claim to have, as a result of or in any way relating to the following: Parts sold & installed by Van Compass LLC or parts sold & installed by end-user; any parts sold online, any parts sold online or installed by a re-seller, any parts installed by an installation shop. It is understood and agreed that this payment is made and received in full and complete settlement and satisfaction of the aforesaid actions, causes of action, claims and demands; that this Release contains the entire agreement between the parties; and that the terms of this Agreement are contractual and not merely a recital. Furthermore, this Release shall be binding upon the undersigned, and his respective heirs, executors, administrators, personal representatives, successors and assigns. This Release shall be subject to and governed by the laws of the State of California. PRODUCT SAFETY WARNING: Van Compass LLC strongly recommends the installation of products be done by a certified mechanic. If this does not occur, be certain the person(s) installing the product read, understand and follow all instructions and warnings pertaining to the application before installation. Do not add, alter, or fabricate any factory or aftermarket parts to increase vehicle height over the intended height of the Van Compass LLC product purchased. Mixing component brands is not recommended.
38 Installation of suspension lift kits or any other lifting kits or devices will raise the center of gravity. For this reason, Van Compass LLC urges that extreme caution be used when encountering driving conditions which may cause vehicle imbalance. Furthermore, the driver s field of vision and judgment will not be as good due to the height of the vehicle. Due to the installation of larger tires, the speedometer will read slower than the actual speed being traveled and more distance will be required to stop the vehicle. It is the owner s responsibility to caution and warn any potential driver of the vehicle about these driving and handling conditions. Van Compass LLC will not be held liable or responsible for damages or personal injuries resulting from the use of lifting devices and or related products. The tires and rims should be changed to sufficiently increase the vehicle s total overall width and stability to help accommodate lifting devices. Van Compass LLC aftermarket suspension products and accessories modify a vehicle for uses which exceed conditions anticipated by the vehicle manufacturer. The uses include the high performance demands required during off-road. These conditions vary in the degree of extremity and cannot be controlled by the vehicle or product manufacturer. If the components within the suspension system or accessories become worn due to frequent and/or extreme use, the safety and reliability of the vehicle is at risk. The maintenance of aftermarket equipment to ensure the vehicle occupants safety is entirely your responsibility. Do not purchase Van Compass LLC products unless you are willing to accept this responsibility. Do not install any Van Compass LLC suspension products or accessories unless you feel competent at installing the product without causing present or future injury to yourself or other vehicle occupants; seek an authorized installation center. Most states have some type of law limiting vehicle height. The amount of lift allowed, and how the lift can be achieved, varies greatly. Several states offer exemptions for farm and commercial registered vehicles. It is the vehicle owner s responsibility to check state and local laws to ensure that their vehicle will be incompliance. Van Compass LLC reserves the right to make changes in design, materials and specifications as deemed necessary without prior notice and without assuming obligation to modify any product previously manufactured. Obligation or liabilities will not be assumed with respect to similar products previously advertised. This Release of Liability and Product Safety Warning has been read and fully understood by the undersigned and has been explained to me.
PRESENT, MERCEDES SPRINTER NCV3 4X4, FRONT FOX SHOCK KIT Version 1.0
 7004 2015-PRESENT, MERCEDES SPRINTER NCV3 4X4, FRONT FOX SHOCK KIT Version 1.0 General Notes For the most up to date and current instructions, please visit our website at www.vancompass.com Please read
PRESENT, FORD TRANSIT, REAR 2.0 LIFT KIT Version 2.0
 7013 2013-PRESENT, FORD TRANSIT, REAR 2.0 LIFT KIT Version 2.0 General Notes For the most up to date and current instructions, please visit our website at www.vancompass.com Please read all instructions
, MERCEDES SPRINTER NCV3, REAR 2.0 LIFT KIT
 7008 2007-2016, MERCEDES SPRINTER NCV3, REAR 2.0 LIFT KIT Version 2.1 General Notes For the most up to date and current instructions, please visit our website at www.vancompass.com Please read all instructions
, MERCEDES SPRINTER NCV3 3500, REAR 2.0 LIFT KIT Version 1.0
 7026 2007-2018, MERCEDES SPRINTER NCV3 3500, REAR 2.0 LIFT KIT Version 1.0 General Notes For the most up to date and current instructions, please visit our website at www.vancompass.com Please read all
PRESENT, MERCEDES SPRINTER NCV3 4X4, REAR 2.0 LIFT KIT Version 1.1
 7016 2015-PRESENT, MERCEDES SPRINTER NCV3 4X4, REAR 2.0 LIFT KIT Version 1.1 General Notes For the most up to date and current instructions, please visit our website at www.vancompass.com Please read all
, MERCEDES SPRINTER T1N, FRONT 2.0 LIFT KIT Version 3.0
 7001 1994-2006, MERCEDES SPRINTER T1N, FRONT 2.0 LIFT KIT Version 3.0 General Notes For the most up to date and current instructions, please visit our website at www.vancompass.com Please read all instructions
, MERCEDES SPRINTER NCV3 4x4, REAR ADD-A- LEAF PACK
 3016 2007-2016, MERCEDES SPRINTER NCV3 4x4, REAR ADD-A- LEAF PACK Version 1.0 General Notes For the most up to date and current instructions, please visit our website at www.vancompass.com Please read
PRESENT, FORD TRANSIT, FRONT TOW POINT Version 1.0
 4039 2013-PRESENT, FORD TRANSIT, FRONT TOW POINT Version 1.0 General Notes For the most up to date and current instructions, please visit our website at www.vancompass.com Please read all instructions
PRESENT, RAM PROMASTER, FRONT 1.5 LIFT STRUT SPACER
 1025 2013-PRESENT, RAM PROMASTER, FRONT 1.5 LIFT STRUT SPACER Version 1.1 General Notes For the most up to date and current instructions, please visit our website at www.vancompass.com Please read all
PRESENT, FORD TRANSIT, FRONT WINCH / HITCH MOUNT
 4042 2013-PRESENT, FORD TRANSIT, FRONT WINCH / HITCH MOUNT Version 1.1 General Notes For the most up to date and current instructions, please visit our website at www.vancompass.com Please read all instructions
*1557BAG12* 1557BAG F /5 /6 LIFT KIT G THANK YOU FOR CHOOSING ROUGH COUNTRY FOR YOUR SUSPENSION NEEDS.
 2015-18 F-150 4 /5 /6 LIFT KIT THANK YOU FOR CHOOSING ROUGH COUNTRY FOR YOUR SUSPENSION NEEDS. 92155700G *1557BAG12* 1557BAG12 Rough Country recommends a certified technician install this system. In addition
INSTALLATION INSTRUCTIONS
 INSTALLATION INSTRUCTIONS 2005-2012 Nissan Xterra/Frontier / Pathfinder PART NUMBERS: NP17500, NP17525, NP17550 FRONTIER PARTS & CORRESPONDING HARDWARE LIST XTERRA PATHFINDER ABOVE LISTED 1/2 Metal Lock
PRE-INSTALLATION. INSTALLATION INSTRUCTIONS Front Ford F150 4WD 4" Suspension Lift Kit
 2015 Ford F150 4WD 4" Suspension Lift Kit PRE-INSTALLATION 2 - Knuckle (Driv/Pass) 2 - Crossmember (Front/Rear) 2 - Differential Bracket (Driv/Pass) 1 - Diff. Brace Bracket (Pass) 2 - Front Brake Line
2015 F /5 /6 LIFT KIT
 92155700 2015 F-150 4 /5 /6 LIFT KIT THANK YOU FOR CHOOSING ROUGH COUNTRY FOR YOUR SUSPENSION NEEDS. Rough Country recommends a certified technician install this system. In addition to these instructions,
TOYOTA FJ CRUISER 6 SUSPENSION KIT
 92177000 TOYOTA FJ CRUISER 6 SUSPENSION KIT Thank you for choosing Rough Country for your suspension needs. Rough Country recommends a certified technician installs this system. In addition to these instructions,
04-08 FORD F150 6 KIT
 957600 THANK YOU FOR CHOOSING ROUGH COUNTRY FOR YOUR SUSPENSION NEEDS. 0-08 FORD F50 6 KIT Rough Country recommends a certified technician install this system. In addition to these instructions, professional
*1576BAG9* 1576BAG FORD F KIT C THANK YOU FOR CHOOSING ROUGH COUNTRY FOR YOUR SUSPENSION NEEDS.
 957600C THANK YOU FOR CHOOSING ROUGH COUNTRY FOR YOUR SUSPENSION NEEDS. 0-08 FORD F50-6 KIT Rough Country recommends a certified technician install this system. In addition to these instructions, professional
NOTICE TO DEALER AND VEHICLE OWNER
 921332300 *1332BAG1* 1332BAG1 2012-18 DODGE 1500 6 LIFT KIT Thank you for choosing Rough Country for all your suspension needs. Rough Country recommends a certified technician install this system. In addition
NOTICE TO DEALER AND VEHICLE OWNER
 921322300 *1322BAG1* 1322BAG1 2009-17 Dodge 2wd 1500 6 Lift Kit Thank you for choosing Rough Country for all your suspension needs. Rough Country recommends a certified technician install this system.
GM 2016-UP wd 3.5 Stamped Steel & Aluminum LCA Knuckle Lift Kit
 921121300B *12130BAG4* 12130BAG4 GM 2016-UP 1500 4wd 3.5 Stamped Steel & Aluminum LCA Knuckle Lift Kit Thank you for choosing Rough Country for your suspension needs. Rough Country recommends a certified
*1553BAG3* F-150 2WD 4 /5 /6 LIFT KIT 1553BAG3
 *1553BAG3* 1553BAG3 921553220 2015-16 F-150 2WD 4 /5 /6 LIFT KIT THANK YOU FOR CHOOSING ROUGH COUNTRY FOR YOUR SUSPENSION NEEDS. Rough Country recommends a certified technician install this system. In
*1224BAG1* WD GM KNUCKLE KIT
 92122400A *1224BAG1* Thank you for choosing Rough Country for your suspension needs. 2014-15 4WD GM 1500 5 KNUCKLE KIT Rough Country recommends a certified technician install this system. In addition to
'99-03 CHEVROLET/GMC IFS 4WD 6" SUSPENSION SYSTEM P/N INSTALLATION INSTRUCTIONS
 1/16/04 '99-03 CHEVROLET/GMC IFS 4WD 6" SUSPENSION SYSTEM P/N. 10-41099 INSTALLATION INSTRUCTIONS NOTE: Each Lift Kit and options to Lift Kits are packaged separately. Therefore, installation procedures
PRE-INSTALLATION. INSTALLATION INSTRUCTIONS Front Dodge Ram WD 6" Suspension Lift Kit
 2012-2015 Dodge Ram 1500 4WD 6" Suspension Lift Kit PRE-INSTALLATION 35015 2 - Knuckle (Driv/Pass) 2 - Crossmember (Front/Rear) 2 - Differential Bracket (Driv/Pass) 1 - Diff. Brace Bracket (Pass) 2 - Front
*1333BAG1* 1333BAG DODGE LIFT KIT
 921333300 *1333BAG1* 1333BAG1 2012-18 DODGE 1500 4 LIFT KIT Thank you for choosing Rough Country for all your suspension needs. Rough Country recommends a certified technician install this system. In addition
09-13 FORD F150 4 LIFT KIT
 92159900 09-13 FORD F150 4 LIFT KIT THANK YOU FOR CHOOSING ROUGH COUNTRY FOR YOUR SUSPENSION NEEDS. Rough Country recommends a certified technician install this system. In addition to these instructions,
2014 F /6 LIFT KIT
 92157500 2014 F-150 4 /6 LIFT KIT THANK YOU FOR CHOOSING ROUGH COUNTRY FOR YOUR SUSPENSION NEEDS. Rough Country recommends a certified technician install this system. In addition to these instructions,
Installation Instructions
 Installation Instructions 6 Suspension System FTS25005BK / FTS25006BK 2006-2012 Nissan Frontier 2wd/4wd SHORT BED ONLY Tool List: (not included) Floor Jack & Jack Stands Assorted Metric & S.A.E Sockets
04-08 FORD F150 4 KIT
 9257700 04-08 FORD F50 4 KIT THANK YOU FOR CHOOSING ROUGH COUNTRY FOR YOUR SUSPENSION NEEDS. Rough Country recommends a certified technician install this system. In addition to these instructions, professional
09-UP F150 2WD 6 LIFT KIT
 92157300 09-UP F150 2WD 6 LIFT KIT THANK YOU FOR CHOOSING ROUGH COUNTRY FOR YOUR SUSPENSION NEEDS. Rough Country recommends a certified technician install this system. In addition to these instructions,
06-08 DODGE & 6 LIFT KIT
 92132600 Tools Needed: WD-40 16mm Socket / Wrench Loc-Tite 18mm Socket / Wrench Reciprocating Saw 19mm Socket / Wrench Hammer 21mm Socket / Wrench Dead Blow Hammer 22mm Socket / Wrench T30 Torx head bit
JEEP WRANGLER (YJ) 4 LEAF SPRING KIT TM w/ Power Steering & TM w/ Manual Steering
 4 LEAF SPRING KIT TM w/ Power Steering & TM w/ Manual Steering") 400 W. Artesia Blvd. Fax: (310) 747-3912 Compton, CA 90220 Ph: (877) 695-7812 www.trailmastersuspension.com JEEP WRANGLER (YJ) 4 LEAF SPRING KIT 87-96 TM3540-20013 w/ Power Steering & TM3540-20023 w/ Manual
400 W. Artesia Blvd. Fax: (310) 747-3912 Compton, CA 90220 Ph: (877) 695-7812 www.trailmastersuspension.com JEEP WRANGLER (YJ) 4 LEAF SPRING KIT 87-96 TM3540-20013 w/ Power Steering & TM3540-20023 w/ Manual
2011-UP CHEVY/GM 2500HD 2WD/4WD 5 NTD LIFT KIT
 921260X00F *1260BAG6* 1260BAG6 2011-UP CHEVY/GM 2500HD 2WD/4WD 5 NTD LIFT KIT Thank you for choosing Rough Country for all of your suspension needs. Rough Country recommends a certified technician installs
07 & UP 4WD GM FRT 1.5 REAR LIFT KIT
 92126900 Thank you for choosing Rough Country for your suspension needs. Rough Country recommends a certified technician install this system. In addition to these instructions, professional knowledge of
*1328BAG7* 1328BAG DODGE LIFT KIT A
 92132800A *1328BAG7* 1328BAG7 09-11 DODGE 1500 4 LIFT KIT Thank you for choosing Rough Country for all your suspension needs. Rough Country recommends a certified technician install this system. In addition
*127130BAG1* BAG1 GM WD LIFT
 921271300 *127130BAG1* 127130BAG1 GM 88-98 2WD 1500 6 LIFT Thank you for choosing Rough Country for all of your suspension needs. Rough Country recommends a certified technician installs this system. In
Trucks with a mass damper on the front diff, the damper will have to be removed.
 922912000B *1291BAG6* 1291BAG6 Thank you for choosing Rough Country for your suspension needs. Rough Country recommends a certified technician install this system. In addition to these instructions, professional
2015 COLORADO 1 /2 LEVELING KITS
 92921000 2015 COLORADO 1 /2 LEVELING KITS Thank you for choosing Rough Country for all your suspension needs. Rough Country recommends a certified technician install this system. In addition to these instructions,
JEEP CHEROKEE, WAGONEER (XJ) FRONT BUMPER INSTALLATION INSTRUCTIONS KIT# W/ WINCH KIT# 83203
 FRONT BUMPER INSTALLATION INSTRUCTIONS KIT# W/ WINCH KIT# 83203") 3651 N Highway 89 Chino Valley, AZ 86323 (928) 636-7080 www.p-a-g.net JEEP CHEROKEE, WAGONEER (XJ) FRONT BUMPER INSTALLATION INSTRUCTIONS 1984-2001 KIT# 83202 1984-2001 W/ WINCH KIT# 83203 WARNING Before
3651 N Highway 89 Chino Valley, AZ 86323 (928) 636-7080 www.p-a-g.net JEEP CHEROKEE, WAGONEER (XJ) FRONT BUMPER INSTALLATION INSTRUCTIONS 1984-2001 KIT# 83202 1984-2001 W/ WINCH KIT# 83203 WARNING Before
*1274BAG9* 1274BAG GM 4-6 SUSPENSION KIT N2.0. Thank you for choosing Rough Country for your suspension needs A
 92127400A 88-98 GM 4-6 SUSPENSION KIT N2.0 Thank you for choosing Rough Country for your suspension needs. *1274BAG9* 1274BAG9 Rough Country recommends a certified technician installs this system. In addition
AEV30308AA Last Updated: 05/31/18. 4 DUALSPORT sc SUSPENSION system for RAM 1500 air ride standard and rebel INSTALLATION GUIDE
 AEV30308AA Last Updated: 05/31/18 4 DUALSPORT sc SUSPENSION system for RAM 1500 air ride standard and rebel INSTALLATION GUIDE PLEASE READ BEFORE YOU START TO GUARANTEE A QUALITY INSTALLATION, WE RECOMMEND
CHEVY COLORADO GMC CANYON 2 LEVELING KIT 2WD & 4WD INSTALLATION INSTRUCTIONS 2015 KIT# CL227PA
 Many states and municipalities have laws restricting bumper heights and vehicle lifts. Consult state and local laws to determine if the changes you intend to make to the vehicle comply with the law. 3651
07-UP AVALANCHE 7.5 KIT
 92120900R1 07-UP AVALANCHE 7.5 KIT Thank you for choosing Rough Country for your suspension needs. We appreciate your business!! This kit will not fit vehicles equipped with electric steering or trucks
NOTICE TO DEALER AND VEHICLE OWNER
 921323300 *132330BAG1* 132330BAG1 2009-17 Dodge 2wd 1500 4 Lift Kit Thank you for choosing Rough Country for all your suspension needs. Rough Country recommends a certified technician install this system.
" CHEVY / GMC WD BASIC KIT
 84302 2007-2013 6" CHEVY / GMC 1500 4WD BASIC KIT 100% Bolt On 6 Spindle Kit Front Differential Is Dropped A Full 6 To Maintain Proper CV Axle Angles Impact Struts To Distribute Front Suspension Impact
JEEP CHEROKEE (XJ) 3 SPRING KIT TM w/ Rear Add-A-Leaf & TM w/ Rear Leaf Spring
 3 SPRING KIT TM w/ Rear Add-A-Leaf & TM w/ Rear Leaf Spring") 400 W. Artesia Blvd. Fax: (310) 747-3912 Compton, CA 90220 Ph: (877) 695-7812 www.trailmastersuspension.com JEEP CHEROKEE (XJ) 3 SPRING KIT 84-01 TM3730-40013 w/ Rear Add-A-Leaf & TM3730-40023 w/ Rear
400 W. Artesia Blvd. Fax: (310) 747-3912 Compton, CA 90220 Ph: (877) 695-7812 www.trailmastersuspension.com JEEP CHEROKEE (XJ) 3 SPRING KIT 84-01 TM3730-40013 w/ Rear Add-A-Leaf & TM3730-40023 w/ Rear
Class 8.8 Class MM 18ft/lbs 23 ft/lbs 10MM 32ft/lbs 45ft/lbs 12MM 55ft/lbs 75ft/lbs 14MM 85ft/lbs 120ft/lbs
 92190500 Jeep Grand Cherokee 93-98 ZJ 4 Longarm Thank you for choosing Rough Country for all your suspension needs. Rough Country recommends a certified technician install this system. In addition to these
2011-UP CHEVY/GM 2500/3500HD 2WD/4WD 7.5 NTD LIFT KIT
 921253X00H *1253BAG16* 1253BAG16 2011-UP CHEVY/GM 2500/3500HD 2WD/4WD 7.5 NTD LIFT KIT Thank you for choosing Rough Country for all of your suspension needs. Rough Country recommends a certified technician
JEEP LIBERTY 2 COIL SPRING SPACER LIFT INSTALLATION INSTRUCTIONS IT# J 244
 3651 N. Hwy 89 Chino Valley, AZ 86323 (928) 636-7080 www.p-a-g.net 3651 N. Hwy 89 Chino Valley, AZ 86323 (928) 636-3175 www.p-a-g.net JEEP LIBERTY 2 COIL SPRING SPACER LIFT INSTALLATION INSTRUCTIONS 2008-201
PARTS LIST: 8581 DODGE LONG ARM BRACKETS 03-13
 SYNERGY MFG. 870 INDUSTRIAL WAY, SAN LUIS OBISPO, CA (805) 242-0397 8580 03-12 DODGE 2500/3500 4X4, 06-08 1500 MEGACAB 4X4 LONG ARM SUSPENSION KIT V3.0 GENERAL NOTES: These instructions are also available
PRODUCT: JL Dual Rate Lift Kit, RockSport Edition READ INSTRUCTIONS IN FULL BEFORE INSTALLATION. QUESTIONS? CALL M-F 7:00 AM 5:00 PM PST
 PRODUCT: JL Dual Rate Lift Kit, RockSport Edition READ INSTRUCTIONS IN FULL BEFORE INSTALLATION. QUESTIONS? CALL 916-631-8071 M-F 7:00 AM 5:00 PM PST REV: A 08-07-2018 II-7633 The MetalCloak experience
JEEP WRANGLER 4 DOOR (JK) 4 SPRING KIT KIT# TM w/ Nitro Shocks
 4 SPRING KIT KIT# TM w/ Nitro Shocks") 400 W. Artesia Blvd. Fax: (310) 747-3912 Compton, CA 90220 Ph: (877) 695-7812 www.trailmastersuspension.com JEEP WRANGLER 4 DOOR (JK) 4 SPRING KIT 07-13 KIT# TM3340-40013 w/ Nitro Shocks Installation of
400 W. Artesia Blvd. Fax: (310) 747-3912 Compton, CA 90220 Ph: (877) 695-7812 www.trailmastersuspension.com JEEP WRANGLER 4 DOOR (JK) 4 SPRING KIT 07-13 KIT# TM3340-40013 w/ Nitro Shocks Installation of
INSTALLATION INSTRUCTIONS QA1 P/N x400, x500, x600, x400, x500, x F100 Front Coil-over Suspension System
 INSTALLATION INSTRUCTIONS QA1 P/N 52620-x400, 52620-x500, 52620-x600, 52621-x400, 52621-x500, 52621-x600 65-72 F100 Front Coil-over Suspension System TOOLS AND SUPPLIES REQUIRED Floor Jack Two (2) Jack
PRODUCT: JL Game Changer Suspension, RockSport READ INSTRUCTIONS IN FULL BEFORE INSTALLATION. QUESTIONS? CALL M-F 7:00 AM 5:00 PM PST
 PRODUCT: JL Game Changer Suspension, RockSport READ INSTRUCTIONS IN FULL BEFORE INSTALLATION. QUESTIONS? CALL 916-631-8071 M-F 7:00 AM 5:00 PM PST REV: A 06-19-2018 II-7631 The MetalCloak experience includes
2014 F /6 LIFT KIT
 92157500 2014 F-150 4 /6 LIFT KIT THANK YOU FOR CHOOSING ROUGH COUNTRY FOR YOUR SUSPENSION NEEDS. Rough Country recommends a certified technician install this system. In addition to these instructions,
M-Force E36 Camber Plate Installation
 Thank you for purchasing the Adjustable Camber Plate kit from Vorshlag Motorsports. In order to ensure proper installation and longevity of your kit, Vorshlag Motorsports recommends that you have your
PRE-INSTALLATION Ford F150 4WD 4" Suspension Lift Kit
 2009-2013 Ford F150 4WD 4" Suspension Lift Kit PRE-INSTALLATION 25007 2 - Knuckle (Driv/Pass) 2 - Crossmember (Front/Rear) 2 - Differential Bracket (Driv/Pass) 1 - Diff. Brace Bracket (Pass) 2 - Front
Installation Instructions 7 Lift Kit 2015 F150 4WD ONLY( )
") IF YOUR ReadyLIFT OFF ROAD SUSPENSION PRODUCT IS MISSING A PART OR HAS A DAMAGED PART, PLEASE CONTACT CUSTOMER SERVICE DIRECTLY. A NEW REPLACEMENT PART WILL BE SENT TO YOU IMMEDIATELY Please read Instructions
IF YOUR ReadyLIFT OFF ROAD SUSPENSION PRODUCT IS MISSING A PART OR HAS A DAMAGED PART, PLEASE CONTACT CUSTOMER SERVICE DIRECTLY. A NEW REPLACEMENT PART WILL BE SENT TO YOU IMMEDIATELY Please read Instructions
JEEP WRANGLER (TJ) 4 SPRING KIT KIT# TM
 4 SPRING KIT KIT# TM") 400 W. Artesia Blvd. Fax: (310) 747-3912 Compton, CA 90220 Ph: (877) 695-7812 www.trailmastersuspension.com JEEP WRANGLER (TJ) 4 SPRING KIT 97-06 KIT# TM3440-20013 Installation of a Trail Master suspension
400 W. Artesia Blvd. Fax: (310) 747-3912 Compton, CA 90220 Ph: (877) 695-7812 www.trailmastersuspension.com JEEP WRANGLER (TJ) 4 SPRING KIT 97-06 KIT# TM3440-20013 Installation of a Trail Master suspension
09-UP FORD F150 6 LIFT KIT
 92159800 09-UP FORD F150 6 LIFT KIT THANK YOU FOR CHOOSING ROUGH COUNTRY FOR YOUR SUSPENSION NEEDS. Rough Country recommends a certified technician install this system. In addition to these instructions,
2011-UP CHEVY/GM 2500/3500 HD 7.5 NTD DROP LIFT KIT
 921253X00B 2011-UP CHEVY/GM 2500/3500 HD 7.5 NTD DROP LIFT KIT Thank you for choosing Rough Country for all of your suspension needs. Rough Country recommends a certified technician installs this system.
PRODUCT USE INFORMATION
 921878200E *1878BAG11* 1878BAG11 Nissan 2017 Titan 6 Suspension Kit Thank you for choosing Rough Country for all your suspension needs. Rough Country recommends a certified technician install this system.
PRODUCT USE INFORMATION
 921522000A *52200BAG3* 52200BAG3 Thank you for choosing Rough Country for all your suspension needs. 2009-18 Ford F150 2 Leveling Kit Rough Country recommends a certified technician install this system.
For the 4 lift application we recommend an 18 wheel not to exceed 9 in width with 5 of backspacing/ 0 offset and a 275/65-18 tire.
 921221200F *1221BAG16* 1221BAG16 2015-18 Colorado/ Canyon 4 and 6 Lift Kit Thank you for choosing Rough Country for all of your suspension needs. Rough Country recommends a certified technician installs
Nissan Titan 4 Front & 2 Rear Suspension Kit
 92187400 Nissan Titan 4 Front & 2 Rear Suspension Kit Thank you for choosing Rough Country for all your suspension needs. Rough Country recommends a certified technician install this system. In addition
INSTALLATION MANUAL TOYOTA TUNDRA 5 SUSPENSION SYSTEM PART # 55905
 PART NUMBER : 55905 1999 2003 TOYOTA TUNDRA 5 SUSPENSION SYSTEM PARTS LIST: Part # Description Qty. 55900-01 Driver Side Spindle 1 55900-02 Passenger Side Spindle 1 55905-03 Rear brake proportioning valve
NOTICE TO DEALER AND VEHICLE OWNER
 921751200 *1751BAG1* 1751BAG1 Thank you for choosing Rough Country for all your suspension needs. This kit will fit both 4WD and 2WD models, all brackets will be used for 4WD models. On 2WD models the
Installation Instructions
 Instructions Created by an: Revised 7-11-17 LRT 2005-2017 3/1 Leveling/ Lift Kit for Toyota Tacoma by Low Range Off-Road (SKU# LR-LRTACO) Installation Instructions Suggested Tools: CAUTION: Safety glasses
97-02 JEEP TJ BODY LIFT KIT INSTRUCTIONS
 92RC60500 97-02 JEEP TJ BODY LIFT KIT INSTRUCTIONS Congratulations on your purchase of a new Rough Country 2 /3 Body Lift. We are committed to providing you with the best product available for the best
*1234BAG1 1234BAG WD CHEVY/GM LIFT N200
 *1234BAG1 1234BAG1 921234N200 99-06 2WD CHEVY/GM 1500 6 LIFT Thank you for choosing Rough Country for all of your suspension needs. Rough Country recommends a certified technician installs this system.
Installation Manual TWM Performance Short Shifter Cobalt SS/SC, SS/TC, HHR SS, Ion Redline and Saab 9-3
 Page 1 Installation Manual TWM Performance Short Shifter Cobalt SS/SC, SS/TC, HHR SS, Ion Redline and Saab 9-3 Please Note: It is preferable to park on a flat surface, as you will have to engage and disengage
Installation Instructions
 Installation Instructions Rear Disc Brake Conversion Kit Item # RC4001, RC4001X Applications: Mopar 7.25, 8.25, 9.25 Axles Thank you for choosing Leed Brakes for your automotive product needs. Before you
Colorado/ Canyon 4, 5, and 6 Lift Kit
 *1221BAG3* 1221BAG3 921221200B 2015-16 Colorado/ Canyon 4, 5, and 6 Lift Kit Thank you for choosing Rough Country for all of your suspension needs. Rough Country recommends a certified technician installs
00-06 CHEVY/GM TAHOE, YUKON, SUBURBAN, YUKON XL & AVALANCE 6 NTD LIFT
 921280N2B *1272BAG10* 1272BAG10 00-06 CHEVY/GM TAHOE, YUKON, SUBURBAN, YUKON XL & AVALANCE 6 NTD LIFT Thank you for choosing Rough Country for all of your suspension needs. Rough Country recommends a certified
Warning! READ BEFORE INSTALLING. Notice to Owner, Operator, Dealer and Installer
 Warning! READ BEFORE INSTALLING Notice to Owner, Operator, Dealer and Installer ReadyLIFT Off Road Suspension s Mid Travel and Long Travel suspension systems and components are designed for OFF ROAD USE
PRE-INSTALLATION. INSTALLATION INSTRUCTIONS STEP 1: Park vehicle on level surface and chock rear wheels.
 2007-2013 7.5" GMC/Chevrolet 1500 4WD Suspension Lift kit PRE-INSTALLATION 15004 2 - Cross-member (Fr/Rr) 2 - Sway Bar Drop Bracket 2 - Knuckle (Dr/Pass) 1 - Driver Diff. Bracket 1 - Passenger Diff. Bracket
JK HD Skid Plate for Rear Falcon Shocks
 1 JK HD Skid Plate for Rear Falcon Shocks Kit # 36-07-01-300 Important Notes: Prior to beginning this or any installation read these instructions to familiarize yourself with the required steps and evaluate
INSTALLATION INSTRUCTION 89400
 INSTALLATION INSTRUCTION 89400 FOR RANCHO SUSPENSION SYSTEM RS66400B: 2012 RAM 1500 4WD. READ ALL INSTRUCTIONS THOROUGHLY FROM START TO FINISH BEFORE BEGINNING INSTALLATION Rev B IMPORTANT NOTES! WARNING:
INSTALLATION INSTRUCTIONS
 INSTALLATION INSTRUCTIONS --300 W PONTIAC WAY CLOVIS, CA 93612 local: 559-875-0222 fax: 559-876-2249 toll free: 800-445-3767-- 25007 LIFT / LOWERING STRUT 2015+ FORD F-150 2WD (+1 to -3 ) 2015+ FORD F-150
Installation Instructions. 6 Basic System FTS21060BK / FTS21061BK / FTS21042BK GM 2WD C1500 P/U ONLY
 Installation Instructions 6 Basic System FTS21060BK / FTS21061BK / FTS21042BK 2007-13 GM 2WD C1500 P/U ONLY 2007-13 GM 1500 Truck Basic System FTS21060BK / FTS21061BK / FTS21042BK 2007-13 GM 2WD C1500
Nissan Titan 6 Front & 4 Rear Suspension Kit
 92187500 Thank you for choosing Rough Country for all your suspension needs. Nissan Titan 6 Front & 4 Rear Suspension Kit Rough Country recommends a certified technician install this system. In addition
JEEP WRANGLER 2 & 4 DOOR (JK) 2.5 SPACER KIT KIT# TM /TM
 2.5 SPACER KIT KIT# TM /TM") 400 W. Artesia Blvd. Fax: (310) 747-3912 Compton, CA 90220 Ph: (877) 695-7812 www.trailmastersuspension.com JEEP WRANGLER 2 & 4 DOOR (JK) 2.5 SPACER KIT 07-13 KIT# TM3325-40010/TM3325-40013 Installation
400 W. Artesia Blvd. Fax: (310) 747-3912 Compton, CA 90220 Ph: (877) 695-7812 www.trailmastersuspension.com JEEP WRANGLER 2 & 4 DOOR (JK) 2.5 SPACER KIT 07-13 KIT# TM3325-40010/TM3325-40013 Installation
INSTALLATION MANUAL TOYOTA TACOMA 5 SUSPENSION SYSTEM PART # 54900
 PART NUMBER : 54900 1996 2004 TOYOTA TACOMA 5 SUSPENSION SYSTEM PARTS LIST: Part # Description Qty. 55900-01 Driver Side Spindle 1 55900-02 Passenger Side Spindle 1 54900-01 Rear brake proportioning valve
'88-'00 CHEVROLET/GMC IFS 4WD(8LUG) OLD BODY STYLE 6" SUSPENSION SYSTEM P/N
 OLD BODY STYLE 6 SUSPENSION SYSTEM P/N") 4/10/13 '88-'00 CHEVROLET/GMC IFS 4WD(8LUG) OLD BODY STYLE 6" SUSPENSION SYSTEM P/N. 10-41888 INSTALLATION INSTRUCTIONS APPLICATION WARNING: Applicable for hub mounted ABS sensor models only. Not for 1992-94
4/10/13 '88-'00 CHEVROLET/GMC IFS 4WD(8LUG) OLD BODY STYLE 6" SUSPENSION SYSTEM P/N. 10-41888 INSTALLATION INSTRUCTIONS APPLICATION WARNING: Applicable for hub mounted ABS sensor models only. Not for 1992-94
INSTALLATION INSTRUCTIONS
 INSTALLATION INSTRUCTIONS --1075 North Ave. Sanger, CA 93657-3539 local: 559-875-0222 fax: 559-876-2259 toll free: 800-445-3767-- 2505 Lowering Spindle Assembly Installation Instructions ½ TON SILVERADO
JEEP CHEROKEE (XJ) 3 SPRING KIT w/ Control Arms TM w/ Rear Add-A-Leaf & TM w/ Rear Leaf Spring
 3 SPRING KIT w/ Control Arms TM w/ Rear Add-A-Leaf & TM w/ Rear Leaf Spring") 400 W. Artesia Blvd. Fax: (310) 747-3912 Compton, CA 90220 Ph: (877) 695-7812 www.trailmastersuspension.com JEEP CHEROKEE (XJ) 3 SPRING KIT w/ Control Arms 84-01 TM3730-40033 w/ Rear Add-A-Leaf & TM3730-40043
400 W. Artesia Blvd. Fax: (310) 747-3912 Compton, CA 90220 Ph: (877) 695-7812 www.trailmastersuspension.com JEEP CHEROKEE (XJ) 3 SPRING KIT w/ Control Arms 84-01 TM3730-40033 w/ Rear Add-A-Leaf & TM3730-40043
AEV30213AH Last Updated: 04/28/17. jk wrangler dualsport sc suspension INSTALLATION GUIDE
 AEV30213AH Last Updated: 04/28/17 jk wrangler 3.5 4.5 dualsport sc suspension INSTALLATION GUIDE PLEASE READ BEFORE YOU START TO GUARANTEE A QUALITY INSTALLATION, WE RECOMMEND READING THESE INSTRUCTIONS
97-06 JEEP TJ/LJ LONG ARM UPGRADE KIT
 921663U00 97-06 JEEP TJ/LJ LONG ARM UPGRADE KIT Thank you for choosing Rough Country for your suspension needs. This kit is an upgrade kit only. This kit includes frame mounting points and adjustable long
2. Remove front wheels.
 1 PARTS DIAGRAM 2 Installation Instructions: (PASSENGER SIDE) 1. Place jack under center of RUV front end and lift until front wheels clear the ground. Be careful to support the RUV properly so that it
This suspension system was developed using a Maximum tire size of 33 X 12.5 with a 17 x 9 aftermarket wheel with 4 1/2-5 backspacing..
 92174700 Thank you for choosing Rough Country for your suspension needs. 2005-15 TACOMA 6 Kit Rough Country recommends a certified technician install this system. In addition to these instructions, professional
09-12 Dodge 4WD Leveling Kit
 9235900 09-12 Dodge 4WD 1500 2.5 Leveling Kit Thank you for choosing Rough Country for all your suspension needs. DOES NOT FIT TRX PACKAGE VEHICLES!! Rough Country recommends a certified technician install
INSTALLATION INSTRUCTION 88581
 INSTALLATION INSTRUCTION 88581 FOR RANCHO SUSPENSION SYSTEM RS6581B: DODGE RAM READ ALL INSTRUCTIONS THOROUGHLY FROM START TO FINISH BEFORE BEGINNING INSTALLATION Rev C IMPORTANT NOTES! WARNING: This suspension
PRODUCT USE INFORMATION
 921545200 *54520BAG1* 54520BAG1 Thank you for choosing Rough Country for all your suspension needs. 2009-17 Ford F150 3 Suspension Kit Rough Country recommends a certified technician install this system.
63162K 2015 Chevrolet Colorado 4WD Leveling Kit w/ 1 Rear Lift Kit
 PRO COMP SUSPENSION 63162K 2015 Chevrolet Colorado 4WD Leveling Kit w/ 1 Rear Lift Kit This document contains very important information that includes warranty information and instructions for resolving
Tacoma Front Suspension Install Instructions
 1995-04 Tacoma Front Suspension Install Instructions Important notices: These instructions are intended only as a general guide for installing All-Pro products. For some items, specialized mechanical skills,
»Product» Safety Warning
 #F1420 Installation Instructions 2011 Ford Super Duty F250/350 4wd 4" Suspension Lift Read and understand all instructions and warnings prior to installation of product and operation of vehicle. Zone Offroad
Dodge Ram Kit
 92138000 Thank you for choosing Rough Country for your suspension needs. 2002-05 Dodge Ram 1500 4-5.5 Kit Rough Country recommends a certified technician install this system. In addition to these instructions,
INSTALLATION GUIDE TCP RCKM-01
 READ ALL INSTRUCTIONS COMPLETELY AND THOROUGHLY UNDERSTAND THEM BEFORE DOING ANYTHING. CALL TOTAL CONTROL PRODUCTS TECH SUPPORT (916) 388-0288 IF YOU NEED ASSISTANCE. INSTALLATION GUIDE TCP RCKM-01 Manual
A. Tools Needed:
 92723200A 2014 GM 2 FRONT & 4 REAR LOWERING KIT Thank you for choosing Rough Country for all your suspension needs. Rough Country recommends a certified technician install this system. In addition to these
If you have any difficulties at all, please give us a call. Thank you and enjoy your MetalCloak Products!
 PRODUCT: TJ/LJ 3.5 Dual Rate Lift RockSport Edition READ INSTRUCTIONS IN FULL BEFORE INSTALLATION. QUESTIONS? CALL 916-631-8071 M-F 7:00 AM 5:00 PM PST The MetalCloak experience includes the ease of installation