Before installation, write down the serial number and purchase date:
|
|
|
- Myron Bates
- 6 years ago
- Views:
Transcription

.")
1 Address: Website: No.23-7.Yaobei Road,Dalian,China GARAGE DOOR operator Models 9367 For Residential Use Only Before installation, write down the serial number and purchase date: (The model number is labeled on the plastic cover with light socket of your operator). Serial # _ Purchase Date - - _ 1 Version No.:MEN-005-B
2 Owner s Manual Before installation, please read this manual and instructions carefully! The Photo eye system must be installed. Routine maintenance of the operator according to this manual to ensure safe operation. Please keep the manual in your sight near the garage door. TABLE OF CONTENTS Introduction Operator contents and tool Installation steps Adjust the chain or belt Connect the rail to the operator Install The Header Bracket Connect the Rail to the Header Bracket Attach the garage door operator to the ceiling Install the door bracket Attach the door arm Install light bulb Install the Emergency Release Cord and Knob Install The Wall Control Connect the wall control to the garage door operator Attach the warning labels Install The Photo Eye System Connect the operator to power Aligning and adjusting the Photo Eye System Test and Adjustments SYSTEM SETUP TEST THE REVERSING SAFETY SYSTEM FORCE SENSITIVITY ADJUSTMENT TEST THE PHOTO EYE SAFETY SYSTEM WALL CONTROL PROGRAM THE REMOTE CONTROL DELETE THE MEMORY USE EMERGENCY RELEASE TO OPEN GARAGE DOOR MANUALY Maintenance schedule Operator Parts Troubleshooting Limited Warranty
3 INTRODUCTION Safety Symbols This garage door operator has been tested and manufactured to provide safe service. Please install, handle, maintain, and check in strict compliance with the instructions and warnings used in this owner s manual. The following Safety Symbols used in this manual will warn you the possibility of serious injury or death if you do not operate in accordance with the warnings attached. Read them carefully. WARNING Mechanical WARNING Electrical CAUTION Before installation 1 Lift the door by hand, the door should stay rest when halfway up. 2 If the door does not open and close smoothly and with little resistance, contact a qualified garage door technician. 3 The garage door should open all the way up, or close all the way down. Otherwise, contact a qualified garage door technician. 3
4 IMPORTANT INSTALLATION INSTRUCTIONS WARNING To prevent any possible SERIOUS INJURY or DEATH: 1. Read and follow all installation instructions. 2. Always call a professional qualified door technician to make repairs to garage door cables, spring assemblies, and other hardware before installing the operator. This operator only works with a properly balanced garage door. 3. Never try to adjust garage doors, springs, cables, pulleys, rollers, brackets or other door hardware, unless you are qualified to do so. 4. Make sure you have another access door besides garage door. If not, you must install an emergency release kit that can be operated outside. 5. Remove all ropes and remove or make inoperative all locks connected to the garage door before installing the operator. 6. Do not connect the operator to power source until instructed to do so. 7. Use this operator only with Sectional Door. 8. Contact the garage door manufacturer to see if additional reinforcement is needed to support the door before installation of the operator. 9. If possible, install the operator 7 feet(2.1m) or more above the floor and the center of the door. Mount the emergency release knob 6 feet above the floor and avoid contact with any moving object. 10.Install the wall control:(a)within sight of the door,(b)at a minimum height of 5 feet(1.5m) above the floor that small children cannot reach it.(c)away from all moving parts of the door. 11.Attach the warning label next to the wall control in a prominent location. Attach the hanging warning label to the emergency release knob. 12.After installing the operator, the door must reverse when it contacts a 3.8cm(or a 2x4 laid flat)on the floor. 13.Must disconnect operator from power source BEFORE performing any service or maintenance. CAUTION This garage door operator is designed to operate only at 120V, 60 Hz to avoid malfunction and damage. 4
 L Photoelectric sensors M Chain/Belt N Sprocket and sprocket holder assembly O Wall Control P Safety labels and literature")
5 Operator contents and tools: A C E D G H I J P O L L A Header bracket B Pulley assembly C Door bracket D Curved door arm E Straight door arm F Trolley assembly G Emergency release rope and knob H One-Piece Rail I Hanging bracket J Garage door operator K U rail clips(2) L Photoelectric sensors M Chain/Belt N Sprocket and sprocket holder assembly O Wall Control P Safety labels and literature 5


6 The tools illustrated below may be used during installation and adjustment of your operator: For future reference, the following parts should be pre-installed in the rail. A Rail B Pulley assembly N Sprocket and sprocket holder assembly 6


7 F Trolley Assembly Locking Holes Belt Belt Belt Connector Chain Chain Connector 7 Chain
 shaft, long Φ8 80")
 H5 Cotter Pin Φ2 25(3)")
 H8 Self-drilling Screw M6 25 (4)")


8 Hardware H1 Shouldered H2 Shouldered H3 Hex Nut M8(6) shaft, long Φ8 80 (1) shaft, short Φ8 30 (2) H4 Hex Bolt M8 20(6) H5 Cotter Pin Φ2 25(3) H6 Screw M5 20(2) H7 Lag Screw M8 50 (6) H8 Self-drilling Screw M6 25 (4) Curved door arm U rail clip Straight door arm Header bracket Concrete Anchors (2) Screw M4 30 (2) Door bracket Hanging bracket Warning labels and literature 8


9 INCLUDED ACCESSORIES Wall Control Panel W221 Remote Control(2) T Photo Eye Sensors INSTALLATION STEPS Do not run the garage door operator until instructed. To prevent INJURY from pinching, keep hands and fingers away from the joints while assembling the rail 1 Adjust the chain or belt CAUTION 1.1 To increase the tension and tighten the chain, turn the tension nut clockwise with adjustable wrench until the nut is spaced properly from the rail end-plate. 1.2 Once the nut is spaced correctly, any additional tightening will over tighten the chain and may cause damage to the system. 1.3 To loose the tension, turn nut counter clockwise. 2.5cm Rail end plate 9


 from the chassis of the garage door operator. 2.4 Position 2 U rail clips over rail and onto chassis.")
10 2 Connect the rail to the operator CAUTION To avoid SERIOUS damage to garage door operator, use ONLY those bolts mounted in top of the operator. 2.1 Position operator with light facing towards the garage door. Rest operator head on cardboard or protective surface on floor so operator does not get scratched. Chassis side of operator facing up. 2.2 Position rail onto operator chassis by lining up rail sprocket, Make sure shaft insert into rail sprocket. Press rail down firmly onto shaft and operator chassis. DO NOT HAMMER. 2.3 Remove the four bolts(h4) from the chassis of the garage door operator. 2.4 Position 2 U rail clips over rail and onto chassis. Insert 4 hex bolts (H4) through rail clips holes and into chassis holes. and tighten hex bolts firmly to hold rail to the garage door operator head. H
11 3 Install The Header Bracket 3.1 Close the door and mark the center point of the door as vertical guide line. 3.2 Locate the horizontal guide line for the header bracket and mark it. It must be at least 2 (50mm) from the doors highest position. 3.3 Position the header bracket in the center of the vertical guideline and draw the horizontal set of bracket holes. WARNING To reduce any possible SERIOUS INJURY or DEATH: Header bracket MUST be fastened to structural support on header Wall or ceiling, otherwise the reversing safety system may not work. Do not install header bracket over drywall. The operator only works with a properly balanced garage door. 3.4 Drill two 3/16 holes at the marked mounting points on the header. If installing into masonry, use concrete anchors (not provided). 3.5 Fasten the bracket securely to the header with the provided materials. H7 Lag Screw M8 50 (2) 11
12 Optional ceiling mount for Header bracket Unfinished ceiling Header wall Structural support 2x4 4 Connect the Rail to the Header Bracket Mount the rail to the header bracket by inserting the Shouldered shaft (H1) through the holes in the header bracket and rail. Secure with the cotter pin(h5). HARDWARE H1 Shouldered shaft, long H5 Cotter pin Φ2 25(1) Φ8 80 (1) 12

13 H5 H1 5 Attach the garage door operator to the ceiling 5.1 Elevate the operator onto a ladder. You will need help if the ladder is not tall enough. 5.2 Open the door all the way, leave the operator on the top section. WARNING To reduce possible SERIOUS INJURY, the garage door operator must be properly secured to structural support of the garage. HARDWARE H4 Hex Bolt M8 20(4) H7 Lag Screw M8 50 (2) H3 Hex Nut M8(4) 13
 to the structural supports before installing")


14 5.3 On finished ceilings, use the lag screws (H7) to fasten a hanging bracket (not provided) to the structural supports before installing the garage door operator. 5.4 The garage door operator must be aligned with the hanging bracket. The distance from each side of the garage door operator to the structural supports must be equal. H7 5.5 Cut the hanging brackets to measured lengths. 5.6 Fasten the end of each hanging bracket to the bracket on the ceiling. 5.7 Fasten the hanging bracket on the chassis of garage door operator with bolts (H4),and nuts (H3). 14

 6.1 Keep the door in the closed position. 6.2 Align the door bracket to the center line of the top section 2 to 4 below the top edge of the door.")
15 5.8 Open and close the door manually. If the door hits the rail, lift the header bracket. H3 H4 6 Install the door bracket NOTE: Please contact your garage door manufacturer if your garage door needs reinforcement kit. Many door reinforcement kits provide for direct attachment of the clevis pin and door arm. In this case you will not need the door bracket; proceed to the next step. H8 Self-Threading Screw M6 25(4) 6.1 Keep the door in the closed position. 6.2 Align the door bracket to the center line of the top section 2 to 4 below the top edge of the door. Mark mounting points. 6.3 Drill 3/16" fastening holes, Secure the door bracket by using the four self-threading screws (H8). Pay attention on your doors construction: H8 15
.")

16 7 Attach the door arm H2 Shouldered shaft Φ8 30 (2) H3 Hex Nut M8(2) H4 Hex Bolt M8 20(2) H5 Φ2 25(2) Cotter pin 7.1 Close the door. Connect the curved door arm to the door bracket by using the shouldered shaft (H2).Attach the shouldered shaft with the cotter pin(h5). H2 H5 7.2 Pull the emergency release to move the trolley to the locking holes. Connect the straight door arm to the trolley by using the shouldered shaft (H2).Attach the shouldered shaft with the cotter pin. H2 H5 16
17 7.3 Line up the straight arm and curved arm. And fasten them using the bolts (H4), nuts (H3) inserted in the 2 holes as far apart as possible. H4 H3 7.4 If the curved arm and straight arm s holes do not exactly match, pull the emergency release to move the trolley a little bit. The holes should be aligned. 7.5 After door bracket, door arms and trolley securely fastened, Pull the emergency release towards the chain/belt connector. Once they are connected, you will hear a click. NOTE: If the door arm is hanging down too far, please cut the extra part from the end. 8 Install light bulb WARNING To avoid possible overheating of the end panel or light socket: Use ONLY A19 incandescent or compact fluorescent light bulbs. DO NOT use incandescent bulbs larger than 100W. DO NOT use compact fluorescent lamp(cfl) larger than 26W (100W) equivalent. DO NOT use halogen bulbs. DO NOT use short neck or specialty light bulbs. 17
, or compact fluorescent (26W) into the light socket. 8.")


18 8.1 To remove the light lens, pull on the top 2(A) position and tilt down the lens. 8.2 Insert an A19 incandescent or compact fluorescent light bulb (100 watt maximum), or compact fluorescent (26W) into the light socket. 8.3 To install the light lens, line up the lens slots with taps in the bottom of the operator, tilt it up and snap into place. OR A A A 9 Install the Emergency Release Cord and Knob WARNING To avoid possible SERIOUS INJURY or DEATH from a falling garage door: If possible, use emergency release to disconnect trolley ONLY when garage door is closed. Deficient springs or unbalanced door could cause an open door falling accident. DO NOT use handle to drag door open or close. Always make sure the doorway is clear of persons and obstructions. NOTE: Ensure that the emergency release cord and knob are above the top of all moving objects to avoid entanglement. 9.1 Insert one end of the emergency release cord through the hole in the trolley and tie a knot securely. 9.2 Insert the other end of the emergency release cord through the knob. Tie a knot securely. Make sure the knob is 6 feet (1.83 m) above the floor. Cut off the remaining cord. 9.3 Make sure the knots are tied securely. If cord knots become untied or loosen, you could fall. 18


19 Emergency release cord and knob 10 Install the wall control WARNING Installation and wiring must comply with local building and electrical rules and laws. To avoid any possible SERIOUS INJURY or DEATH : DO NOT connect the power source at this time. The wall control should be at a minimum height of 5 feet (1.5 m) from the floor out of reach of children. The wall control must be installed inside the garage within sight of the garage door. Do not let children play with wall control buttons or remote controls. Open or close door ONLY when the doorway is clear, and the garage door and operator are properly installed and maintained. The wall control must be away from all moving parts of door. While using the wall control or remote controls, the user must have clear vision of the garage door until the door is fully closed. HARDWARE Concrete Anchors (2) Screw M4 30 (2) 19

 10.")


20 10.1 Strip back 10 mm of insulation and separate the wires Open the back cover of the wall control. 5/13 (10mm) 10.3 If the wires are not connected, Connect the white wire to the #3 screw,connect the red \white wire to the #4 screw Mark the location of the 2 holes of back cover of wall control and drill a 6 mm hole Insert and tighten screws to secure the back cover of the wall control to wall Snap the wall control onto the back cover. 20
 11.")
21 11. Connect the wall control to the garage door operator Run the wires from the wall control along the wall and ceiling to the operator. Use staples or suitable material to secure wiring neatly to avoid entanglement Strip back 10 mm of insulation from the other end of the wire. 5/13 (10mm) 11.2 Connect the white wire to the #3 terminal and the red\white wire to the #4 terminal on garage door operator. White wire Red\white wire Note: To connect or disconnect the wires from the terminal, press in the tab with a screwdriver tip. 12 Attach the warning labels 12.1 Attach the warning label firmly near the wall control where people can easily read Attach the hanging warning label to the emergency release cord. 21
22 13 Install The Photo Eye System WARNING Do not plug the operator in. To avoid SERIOUS INJURY or DEATH from a closing garage door: Properly install the Photo eye safety system as instructed. The photo eye safety system MUST NOT be deactivated. The top edge of the photo eye sensors must be installed NO HIGHER than 6" (15 cm) from the floor. Note: The photo eye system must be installed,connected,and aligned properly before the operator will move in the down direction. The receiving sensor should not be on sunny side if possible. The sensors must be installed inside the garage. The sending sensor and receiving sensor must be aligned and facing each other properly. Both sensors are no higher than 6 inch (15 cm) from the floor. The photo eye system includes a sending sensor and a receiving sensor. The sending sensor produces an infrared light beam to the receiving sensor. The sending sensor with red light is comparably smaller than receiving sensor with green light. If an object blocks the infrared light beam while the door s closing, the door will stop, then reverse to full open, and the garage door operator lights will flash three minutes. NOTE: as the light bulb turns off, the sensor LEDs will turn off, and whenever the garage door operator lights turn on the sensor LEDs will light. The LEDs on the sensors will not go into the sleep mode until the garage door operator has completed 5 cycles of opening and closing. 22
 The photo eye sensors can be attached to the wall or the floor, The sensors should be no")
23 Infrared beam protection area Photo eye Sensor 6 (15cm) max.above floor 13.1 Install the Photo Eye Sensors(PE-002) The photo eye sensors can be attached to the wall or the floor, The sensors should be no more than 6 inches (15 cm) above the floor. 15cm 1cm 23
24 NOTE: 1. Draw a line from the floor, no more than 6 inch(15cm). 2. Locate the mounting bracket against the wall as figure, and mark the mounting points, with sensor holder facing each other from left to the right of the door. 3. Fasten the mounting bracket to the wall using lag screws. 4. Run the wire from the sending sensor and receiving sensor to the operator head. 5. Use insulated staple to fasten wires to the wall and ceiling. 6. Make sure the beam passage is clear Connect the photo eye Sensors to operator head a. Strip back 10mm of ends of sensor wires. Split the wires. Twist the white wires together. Twist the white/red wires together. b. Insert the white wires into the #1 terminal on the garage door operator. Insert the white/red wires into the #2 terminal on the garage door operator. White wire Red\white wire Connect the operator to power WARNING To prevent electrocution or fire, installation and wiring must comply with all local electrical and building codes. Please make sure power is NOT connected to the operator. Make sure the operator is grounded, do not modify the plug. 24
25 NOTE: Do not use extension cord. Do not use any power supplies other than standard household power source. Do no use a 3 to 2 plug adapter. The operator must be connected to a grounded outlet near the operator head, if the grounded outlet is not available, please contact a qualified electrician. Do not modify the plug. a. Plug the operator into a grounded outlet. b. When the operator is connected to the power, the light should turn on; And the screen on setting panel is showing from 9 to 1, then flashing. If the light is not on, please check the power and its light bulb. c. DO NOT operate the garage door operator at this point. PERMANENT WIRING If your local code requires your operator to be connected via permanent wiring instead of a cord and a plug, your operator must be converted following procedures below. Please call a qualified electrician to make a permanent wiring connection under your local building and electrical codes. To make a permanent connection through the 7/8" hole in the top of the motor unit (according to local code): (1) Make sure power is NOT connected to the operator, and disconnect power to circuit. (2) Open the garage door operator cover and set aside. (3) Remove the attached green ground terminal. (4) Cut black and white wires and strip away 1/2" (1 cm) of insulation, 6" (15 cm) before spade terminals. (5) Remove the power cord from opener. (6) Knock out the hole plugs above 7/8" hole. 25
26 (7) Install a conduit or flex cable adapter to the 7/8" hole (8) Run wires through conduit, cut to proper length and strip insulation. (9) Attach with wire nuts provided. Attach the ground wire to the green ground screw. The opener must be grounded. (10) Properly secure wire under plastic ties so that wire does not come in contact with moving parts. (11) Install the cover. DO NOT run garage door opener at this point. 15. Aligning and adjusting the Photo Eye System. Always make sure there is a clear path between sensors. The operator will not run if the sending sensor and receiving sensors are not correctly aiming each other. If the sensors are aligned correctly, the LEDs in both sensors will glow. If the infrared light beam is blocked by obstacles while the door is closing, the door will stop and reverse to the fully opened position, and the operator light will flash three minutes. While the door is opening, it will continue to open if the beam is blocked. 26

27 While the door is opening, the LEDs in both sensors will not glow. The LEDs on the sensors will not go into the sleep mode until the garage door operator has completed 5 cycles of opening and closing. The photo eye sensors will enter sleep mode when the door is fully closed. While the door is closing, the sensors will be activated, the LEDs is on. The receiving sensor should not be on sunny side if possible. RED LED SENDING SENSOR >>>>>>>>>>>>>>>>>>>>>>>>>>>>>>>>>>>>>>>>>>>>>>>>> Infrared light beam GREEN LED RECEIVING SENSOR a. If the LED on the sending sensor is not glowing, check if the wiring is correctly connected. b. If the LED on the receiving sensor is not glowing, check if the two sensors are properly aligned. NOTE: The photo eye system must be tested every month. Test and Adjustment WARNING To prevent possible serious injury or death by a closing garage door, Please correctly install reversing safety system and garage door operator. During installation and test of the operator, make sure no one (particularly children ) near or around the garage door. The garage door must reverse on contact with a 1-1/2" (3.8cm) high object on the floor. The reversing safety system must be tested after any changes or adjustments. 27
 - (DOWN BUTTON) THE SCREEN Setting the Travel Limits During the initial")

28 1 SYSTEM SETUP The Setting Panel is located on the left side of the garage door operator. To use the setting panel, remove the left light cover. SETTING PANEL SETTING BUTTON CODE BUTTON + (UP BUTTON) - (DOWN BUTTON) THE SCREEN Setting the Travel Limits During the initial setting,adjustments,or testing, always make sure the doorway is clear. 1.1 Press and hold the SETTING Button until the screen show Press and hold the UP Button to bring the door to the desired open position. 1.3 Use UP button and Down button to adjust until the desired open position is found. 28

29 1.4 Save the desired UP position by press and release the SETTING Button. The screen will show Press and hold the DOWN Button to bring the door to the desired DOWN position. 1.6 Use UP button and Down button to adjust until the desired close position is found. 1.7 Save the desired DOWN position by press and release the SETTING Button. The screen is flashing. 1.8 The garage door operator will automatically open the door again, then close the door. 2 TEST THE REVERSING SAFET SYSTEM WARNING To prevent possible serious injury or death by a closing garage door, Please correctly install reversing safety system and garage door operator. The garage door must reverse on contact with a 1-1/2" (3.8cm) high object on the floor. The reversing safety system must be tested after any changes or adjustments. Reversing Safety system MUST be tested monthly. 29

30 2.1 Lay a 1-1/2 inch high (3.8cm) board on the floor, centered under the garage door after the door is fully opened. 2.2 Use the remote control to close the door. The door MUST reverse on contacts with the board. 2.3 If the door fails to reverse, check if the travel limits are correct (refer to Test and Adjustment--setting the travel limits ). 2.4 If the door reverses to fully open position on contacts with 1 inch high board, remove the board and complete 5 cycles of opening and closing of the door to check if the travel limits are correct. 2.5 If the reversing safety system fails to operate as per the above-mentioned, consult a trained qualified technician. 3 FORCE SENSITIVITY ADJUSTMENT CAUTION factory default settings can be restored.this programming may only be carried out by a professional installer. 30
31 3.1 Adjust The CLOSE force sensitivity a. Press and hold the SETTING Button until the screen show the number from 1 to 3. b. Press and release the DOWN Button and the screen show the. c. Press and release the SETTING Button and the screen show the levels of the force sensitivity (from 1 to 9 ) d. Use the UP Button to increase the levels(9 indicates Maximum force ), press the DOWN Button decrease the levels(1 indicates Minimum force ). e. After the desired level is selected, press and release the SETTING Button and the screen is flashing. Adjustments is complete. Note: It is important to ensure that the forces generated by the garage door operator are adjusted to the minimum level necessary to operate the door reliably, not to maximum forces. 31
32 3.2 Adjust The OPEN force sensitivity a. Press and hold the SETTING Button until the screen show the number from 1 to 3. b. Press and release the UP Button and the screen show the c. Press and release the SETTING Button and the screen show the levels of the force sensitivity (from 1 to 9 ) d. Use the UP Button to increase the levels(9 indicates Maximum force ), press the DOWN Button decrease the levels(1 indicates Minimum force ). e. After the desired level is selected, press and release the SETTING Button and the screen is flashing. Adjustments is complete. 32

33 4 TEST THE PHOTO EYE SAFETY SYSTEM 4.1 While the door is fully opened, lay a box under the door to block infrared light beam. 4.2 Close the door with remote control. The door should not move, and the garage door operator lights will flash three minutes. Screen shows 4. To reset operator, remove the box, press the wall control button, the door should be operated normally. 4.3 If the door does not stop and reverse, check: --if the sending sensor and receiving sensor are properly aligned. --if the wiring of sensors are properly connected. Note: If the garage door operator closes the door when the safety sensor is obstructed, call for a trained door systems technician. 33
34 SAFETY INSTRUCTION IMPORTANT SAFETY INSTRUCTIONS WARNING To reduce the risk of SEVERE INJURY or DEATH: 1. READ AND FOLLOW ALL INSTRUCTIONS. 2. NEVER let children operate or play with garage door controls or remote controls. Keep remote control away from children. 3. Always keep the moving door in sight and away from people and objects until it is completely closed.no ONE SHOULD CROSS THE PATH OF THE MOVING DOOR. 4. NEVER WALK UNDER A STOPPED, PARTIALLY OPENED DOOR. 5. Test the garage door operator monthly, the garage door must reverse on contact with a 1-1/2 inch (3.8cm) high object on the floor. After adjust either the force or travel limit, please re-test the garage door operator. Failure to adjust the operator properly, may cause severe injury or death. 6. When possible, use the emergency release only when garage door is in the CLOSED position. Use caution when using this release with the door open. Weak or broken springs or unbalanced door may cause the garage door to fall rapidly, increase the risk of severe injury or death. 7. KEEP GARAGE DOORS PROPERLY BALANCED. See garage door owner s manual. An improperly balanced door increases the risk of severe injury or death. Have a qualified door system technician make repairs to cables, spring assemblies, and other hardware. 8. Test reversing safety system and photo eye safety system monthly. 9.SAVE THESE INSTRUCTIONS. 34

35 5 WALL CONTROL Open/close button Light button Lock button Open/Close Button To open and close, press the open/close button LIGHT BUTTON To turn the garage door operator lights on or off, use the light button. Once the lights are on,they will switch off after three minutes. Lock button Use the Lock button to disable the remote controls from opening or closing the garage door. 1. Press and hold the Lock button until the LED is flashing. The garage door will not be operated by remote controls. 2. Press and hold the Lock button until the LED stops flashing, the remote controls will be able to control the garage door. Note: If the door is fully open, and the reversing safety sensors are not installed or are misaligned, the door will not close from a remote control. However, you can close the door if you hold the push bar on the wall control until the door is fully closed. The reversing safety sensors do not affect the opening cycle. 35
36 6 PROGRAM THE REMOTE CONTROL 6.1 Press the CODE Button on the setting panel until the screen shows. 6.2 Within 10 seconds, press the Button 1 on the remote control, the will turn off. Press the Button 1 again, the will flash and turn off. Now, congratulation! LED Button 1 Button 2 T Note: To open or close the garage door, press and hold button 1. When the garage door begins to move, release button 1. To stop garage door during travel, press and hold button 1 until door stops, then release button. To resume garage door travel after stop, press button again. Door begins to move in the opposite direction. 36

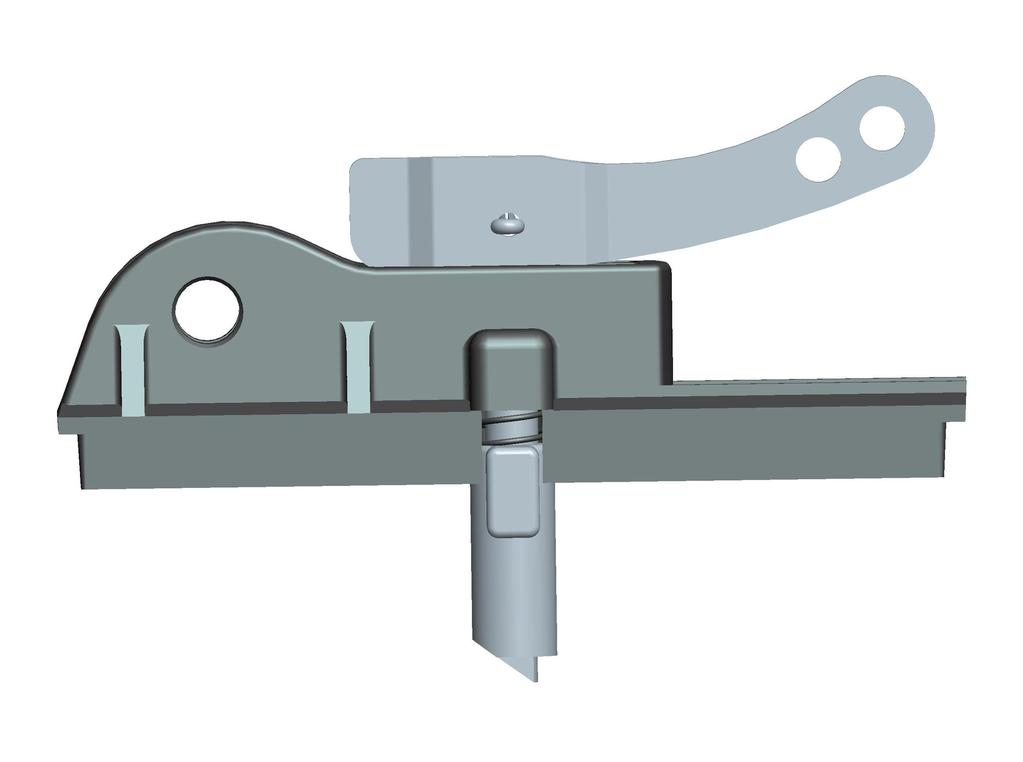
37 7 DELETE THE MOMERY DELETE ALL MEMORY FROM REMOTE CONTROLS Press and hold the CODE button on SETTING PANEL, the will turn on. Release the CODE button until the turns off. All remote controls are now disabled. To reprogram, refer to Program The Remote Controls. 8 USE EMERGENCY RELEASE TO OPEN GARAGE DOOR MANUALY A falling garage door may result in SERIOUS INJURY or DEATH caused by improperly using the emergency release. Emergency release knob should be used when garage door is CLOSED if possible. Never use emergency release unless power outage, monthly inspection, or emergency situation. Always make sure the garage door is in good and balanced conditions before use emergency release knob. NEVER use emergency release knob unless garage doorway is clear of persons and obstructions. WARNING NEVER use emergency release knob to pull door open or closed. 37

38 8.1 How to use the emergency release: a If possible, keep the door in closed position. b c Pull down the emergency release knob and hold. Then carefully open or close the door manually, always take highly cautious when the door is disconnected from the operator because of falling door. To re-engage the trolley with the door, Pull down the emergency release knob and move the trolley to find the chain/belt connector till they are reconnected. Pull down & hold Pull down & move the trolley Maintenance Schedule: EVERY MONTH Check the garage door conditions as per the instruction of your garage door manufacturer. Make sure the garage door is in good and balanced condition. If not, call a trained door systems technician. Test the emergency release. Test the reversing safety system. Test the photo eye system. EVERY YEAR Yearly maintenance of the garage door according to manufacturer s instructions. Test the emergency release. Test the reversing safety system. Test the photo eye system. Adjust the travel limits as needed. Adjust the tightness of belt / chain with the Hex nut at the end of the rail end plate. 38
39 Operator Parts: DESCRIPTION 1. Chassis. 2. Motor and Hall sensor 3. Transformer 4. Logic Control Board 5. Light Lens 6. Light Socket 7. Light socket fixed board 8. Plastic cover with light socket 9. Plastic cover with Logic Control Board 10. Cover 11.Wiring Board ACCESSORIES 1.Mounting Bracket and the reversing safety sensors with wire (PE-002) 2.Wall control (W221) 3.Remote control (T ) NOT SHOWN Wire Harness Kit Hall sensor 39

40 GARAGE DOOR OPERATOR PARTS 5. Light Lens 9.Plastic cover with Logic Control Board 7. Light socket fixed board 6. Light Socket 11. Wiring Board 4. Logic Control Board 10. Cover. 1. Chassis. 8. Plastic cover with light socket 3.Transformer 2. Motor and Hall sensor. 40
41 Troubleshooting The screen on setting panel of your operator shows the diagnostic codes. Screen show Problem Most likely Solution Number No closing movement Photo eyes not Check if the photo eye system is properly 4 and flashing light. installed or installed and connected. (refer to Install The flashing connected. Photo Eye System). Photo eye Check if the photo eye sensors are blocked. sensors are blocked Number When the door is closing, The door is not 1. If the door is binding or sticking, contact a 5 it stops and reverses. operated trained garage door technician. flashing The light is flashing. smoothly. 2. Check the close force sensitivity, if the close force is set at a very low level, Refer to FORCE SENSITIVITY ADJUSTMENT. Ensure that the close force is adjusted to the minimum level necessary to operate the door reliably. Number The door stops while Obstruction 1. Remove the obstruction, or contact a trained 5 opening for no apparent during the door garage door technician. flashing Reason. The light will movement. 2. Check the open force sensitivity, if the open flash. force is set at a very low level, Refer to FORCE SENSITIVITY ADJUSTMENT. Ensure that the open force is adjusted to the minimum level necessary to operate the door reliably. Number The door cannot move. Obstruction 1. Remove the obstruction, or contact a trained 6 The light(s) will flash. during the door garage door technician. flashing movement. 2. Reprogram the travel limits. Bad hall sensor. Motor pulse signal error. Letter L The garage door operator Program error If the garage door moves okay, reprogram the flashing will not automatically travel. 41
42 open and close the door. The light will flash. Number The door cannot move. Low power Have the logic board replaced. 8 The light will flash. voltage supply flashing Number The door cannot move. Bad logic board Have the logic board replaced. 3 The light will flash. flashing Number The door cannot move. Obstruction 1. Remove the obstruction, or contact a trained 2 The light will flash. during the door garage door technician. flashing movement. 2. If the door moves okay, reprogram the travel limits. The door cannot move. power frequency Check the input power. The light will flash. 60 Hz signal flashing error The door cannot move. Bad logic board. Replace the logic board. The light will flash. flashing The door cannot move. Bad logic board. Replace the logic board. The light will flash. flashing 42
43 LIMITED WARRANTY This SEASIDE product is warranted to the original purchaser of the Seaside residential garage door operator against defects in material and workmanship for: Model Motor Parts Accessories years 1 year 1 year This product is warranted to the original consumer against defects in material and workmanship for the periods mentioned above. Seaside will repair, or at its option, replace, any device that it finds requires service under this warranty, and will return the repaired or replaced device to the consumer at Seaside s cost. Devices must be sent to Seaside for service at owner s expense. This warranty does not apply to damage to the product from negligence,abuse,abnormal usage, misuse, accidents, normal wear or tear or due to failure to follow Seller s instructions, or arising from improper installation, storage or maintenance. Seaside disclaims any and all warranties in the event that the product is obtained from a source which is not a Seaside authorized reseller or if the product is not installed by a professional installer. In no event will Seaside be responsible for incidental, compensatory, punitive, consequential, indirect, special or other damages. The remedies provided by this warranty are exclusive. Some states do not allow the exclusion or limitation of incidental and consequential damages, so the above limitation or exclusion may not apply to you. Any warranties implied by law are limited to the time periods set forth above. Some states do not allow limitations on how long an implied warranty lasts, so the above limitation may not apply to you. This warranty gives you specific legal rights, and you may also have other rights which vary from state to state. For warranty service and shipping instructions contact Seaside at the address and address shown below. In order to be protected by this warranty, save your proof of purchase and send a copy with equipment should repair be required. Address: No 23-7,Yaobei Road, Ganjingzi District, Dalian, Liaoning, China service@seaside.net.cn Fax:
Wi-Fi Garage Door Opener
 Wi-Fi Garage Door Opener Belt Drive Models 8550W and 8550W-267 SERIAL NUMBER: www.prodregister.com/liftmaster Contents Preparation........................................ 3 Assembly.........................................
Models. ELITE Series Garage Door Opener CONTENTS DC Belt Drive with Battery Backup /4 hp Belt Drive FOR RESIDENTIAL USE ONLY
 . ELITE Series Garage Door Opener Models 8550 - DC Belt Drive with Battery Backup 8557-3/4 hp Belt Drive FOR RESIDENTIAL USE ONLY Please read this manual and the enclosed safety materials carefully! Fasten
CONTENTS. 3/4 hp Belt Drive Garage Door Opener. Model HD630EVP FOR RESIDENTIAL USE ONLY
 .. 3/4 hp Belt Drive Garage Door Opener Model HD630EVP FOR RESIDENTIAL USE ONLY Please read this manual and the enclosed safety materials carefully! Fasten the manual near the garage door after installation.
Wi-Fi Garage Door Opener
 Wi-Fi Garage Door Opener Belt Drive Models 8550W 8557W 8550WL FOR RESIDENTIAL USE ONLY Please read this manual and the safety materials carefully! The door WILL NOT CLOSE unless the Protector System is
3/4 hp Belt Drive Garage Door Opener. Model HD620EV
 .. 3/4 hp Belt Drive Garage Door Opener Model HD620EV FOR RESIDENTIAL USE ONLY Please read this manual and the enclosed safety materials carefully! Fasten the manual near the garage door after installation.
Installation Manual. Models
 Installation Manual Models 8160 8165 8065 8075 FOR RESIDENTIAL USE ONLY Please read this manual and the safety materials carefully! The door WILL NOT CLOSE unless the Protector System is connected and
1/2 hp Chain Drive Garage Door Opener. Model HD420EVP FOR RESIDENTIAL USE ONLY
 .. 1/2 hp Chain Drive Garage Door Opener Model HD420EVP FOR RESIDENTIAL USE ONLY Please read this manual and the enclosed safety materials carefully! Fasten the manual near the garage door after installation.
Chain Drive Garage Door Opener Model 8360 FOR RESIDENTIAL USE ONLY
 . Write down the following information for future reference: Serial Number: Chain Drive Garage Door Opener Model 8360 FOR RESIDENTIAL USE ONLY Please read this manual and the enclosed safety materials
Owner s Manual C205. Garage Opener. Contents. Chain Drive Garage Door Opener FOR RESIDENTIAL USE ONLY PRE-PROGRAMMED REMOTE CONTROL INCLUDED
 Garage Opener Please read this manual and the enclosed safety materials carefully! Fasten the manual near the garage door after installation. The door WILL NOT CLOSE unless the Protector System is connected
Installation Manual. Model 8155
 Installation Manual Model 8155 FOR RESIDENTIAL USE ONLY Please read this manual and the safety materials carefully! The door WILL NOT CLOSE unless the Protector System is connected and properly aligned.
PREMIUM Series 1/2 hp Chain Drive Garage Door Opener
 .. PREMIUM Series 1/2 hp Chain Drive Garage Door Opener Model 8365-267 FOR RESIDENTIAL USE ONLY Please read this manual and the enclosed safety materials carefully! Fasten the manual near the garage door
PREMIUM Series Chain Drive Garage Door Opener
 . PREMIUM Series Chain Drive Garage Door Opener Model 8587RGD - 3/4 hp FOR RESIDENTIAL USE ONLY Please read this manual and the enclosed safety materials carefully! Fasten the manual near the garage door
/ / Preparation. Safety Symbol and Signal Word Review. MyQ Serial Number. Unattended Operation. MyQ Serial Number: Product S/N: Date of Purchase:
 Wi-Fi Garage Door Opener Chain Drive Models 8587W and 8587WL FOR RESIDENTIAL USE ONLY Please read this manual and the safety materials carefully! The door WILL NOT CLOSE unless the Protector System is
Owner s Manual B970. Smart Garage Opener. Contents. Belt Drive Garage Door Opener FOR RESIDENTIAL USE ONLY PRE-PROGRAMMED REMOTE CONTROL INCLUDED
 Smart Garage Opener Please read this manual and the enclosed safety materials carefully! Fasten the manual near the garage door after installation. The door WILL NOT CLOSE unless the Protector System is
Model HD750WF CONTENTS. 3/4 hps * Belt Drive Garage Door Opener with FOR RESIDENTIAL USE ONLY
 3/4 hps * Belt Drive Garage Door Opener with MyQ Smartphone Control Model HD750WF FOR RESIDENTIAL USE ONLY Write down the MyQ serial number located on the garage door opener: Please read this manual and
GARAGE DOOR OPENER Model 3840
 The Chamberlain Group, Inc. 845 Larch Avenue Elmhurst, Illinois 60126-1196 www.liftmaster.com GARAGE DOOR OPENER Model 3840 For Residential Use Only Compatible with See Page 30 for Details Owner s Manual
Owner s Manual C455. Smart Garage Opener. Contents. Chain Drive Garage Door Opener FOR RESIDENTIAL USE ONLY PRE-PROGRAMMED REMOTE CONTROL INCLUDED
 Smart Garage Opener Please read this manual and the enclosed safety materials carefully! Fasten the manual near the garage door after installation. The door WILL NOT CLOSE unless the Protector System is
CONTENTS. Chain/Cable Drive DC Garage Door Opener. Model 8010 FOR RESIDENTIAL USE ONLY INSTALL ON 7 OR 8 FOOT SECTIONAL DOORS ONLY
 Chain/Cable Drive DC Garage Door Opener Model 8010 FOR RESIDENTIAL USE ONLY INSTALL ON 7 OR 8 FOOT SECTIONAL DOORS ONLY Register your garage door opener to receive updates and offers from LiftMaster Take
Model 8587WRGD Chain Drive Garage Door Opener
 WiFi Garage Door Opener Model 8587WRGD Chain Drive Garage Door Opener FOR RESIDENTIAL USE ONLY Please read this manual and the enclosed safety materials carefully! Fasten the manual near the garage door
Models HD920EV HD930EV LW5000EV WD962KEV WD962KPEV WD962MLEV
 .. Belt Drive Battery Backup Garage Door Opener Models HD920EV HD930EV LW5000EV WD962KEV WD962KPEV WD962MLEV 349544 FOR RESIDENTIAL USE ONLY Please read this manual and the enclosed safety materials carefully!
Wi-Fi Garage Door Opener
 Wi-Fi Garage Door Opener Premium Series Chain Drive Models 8360W and 8360WL FOR RESIDENTIAL USE ONLY Please read this manual and the safety materials carefully! The door WILL NOT CLOSE unless the Protector
3/4 hp Chain Drive Garage Door Opener. Model PD752KEV
 .. 3/4 hp Chain Drive Garage Door Opener Model PD752KEV FOR RESIDENTIAL USE ONLY Please read this manual and the enclosed safety materials carefully! Fasten the manual near the garage door after installation.
Please read and understand this manual and safety instructions carefully before installation.
 For Use With Residential Sectional Garage Doors Only Owner s Manual Please read and understand this manual and safety instructions carefully before installation. The Opener WILL NOT CLOSE until the Photo
Owner s Manual B980. Smart Garage Opener. Contents. Belt Drive Garage Door Opener FOR RESIDENTIAL USE ONLY PRE-PROGRAMMED REMOTE CONTROL INCLUDED
 Smart Garage Opener Please read this manual and the enclosed safety materials carefully! Fasten the manual near the garage door after installation. The door WILL NOT CLOSE unless the Protector System is
Belt Drive Battery Backup Garage Door Opener Models HD920EV WD962KEV WD962KPEV
 . Belt Drive Battery Backup Garage Door Opener Models HD920EV 349544 WD962KEV WD962KPEV FOR RESIDENTIAL USE ONLY Please read this manual and the enclosed safety materials carefully! Fasten the manual near
GARAGE DOOR OPENER Model 3595LM 3/4 HP
 The Chamberlain Group, Inc. 845 Larch Avenue Elmhurst, Illinois 60126-1196 www.liftmaster.com GARAGE DOOR OPENER Model 3595LM 3/4 HP For Residential Use Install on Sectional Doors ONLY THIS OPERATOR IS
GARAGE DOOR OPENER. Model M375-1/2HP. Owner s Manual. For Residential Use Only
 The Chamberlain Group, Inc. 84 Larch Avenue Elmhurst, Illinois 6026-96 www.chamberlain.com GARAGE DOOR OPENER For Residential Use Only Model M7 - /2HP Owner s Manual Please read this manual and the enclosed
DELUXE Series Chain Drive Wi-Fi Garage Door Opener
 DELUXE Series Chain Drive Wi-Fi Garage Door Opener Model 8365WRGD-267-1/2 hp FOR RESIDENTIAL USE ONLY Please read this manual and the enclosed safety materials carefully! Fasten the manual near the garage
Chain/Belt Drive Models PRE-INSTALLATION CONSIDERATIONS
 38968503545. 08/2017 ASSEMBLY/INSTALLATION Chain/Belt Drive Models PRE-INSTALLATION CONSIDERATIONS This opener includes parts and supplies needed for installation in most garages and on most garage doors.
GARAGE DOOR OPENER Models /3 HP /2 HP /2 HP
 The Chamberlain Group, Inc. 845 Larch Avenue Elmhurst, Illinois 60126-1196 www.liftmaster.com GARAGE DOOR OPENER Models 2110 1/3 HP 2220 1/2 HP 2220-267 1/2 HP For Residential Use Only Owner s Manual Please
GARAGE DOOR OPENER Models 3240M 1/2 HP 3130M 1/3 HP. Owner s Manual. For Residential Use Only
 The Chamberlain Group, Inc. 845 Larch Avenue Elmhurst, Illinois 60126-1196 www.liftmaster.com GARAGE DOOR OPENER Models 3130M 1/3 HP 3240M 1/2 HP For Residential Use Only Owner s Manual Please read this
GARAGE DOOR OPENER Model 3240RGD
 Raynor Garage s 1101 E. River Road Dixon, Illinois 61021 www.raynor.com TM GARAGE DOOR OPENER Model 3240RGD For Residential Use Only Owner s Manual Please read this manual and the enclosed safety materials
GARAGE DOOR OPENER Model HD200D 1/2 HP
 The Chamberlain Group, Inc. 845 Larch Avenue Elmhurst, Illinois 60126-1196 www.chamberlain.com GARAGE DOOR OPENER Model HD200D 1/2 HP For Residential Use Only Owner s Manual Please read this manual and
GARAGE DOOR OPENER ASSEMBLY/ INSTALLATION MANUAL
 The Chamberlain Group, Inc. 845 Larch Avenue Elmhurst, Illinois 60126-1196 www.chamberlain.com GARAGE DOOR OPENER ASSEMBLY/ INSTALLATION MANUAL Please read this manual and the enclosed safety materials
GARAGE DOOR OPENER Model 2245RGD 1/3 HP
 Raynor Garage s 1101 E. River Road Dixon, Illinois 61021 www.raynor.com GARAGE DOOR OPENER Model 2245RGD 1/3 HP For Residential Use Only Owner s Manual Please read this manual and the enclosed safety materials
New! GARAGE DOOR OPENER Model 3500D. Owner s Manual. For Residential Use Only
 The Chamberlain Group, Inc. 845 Larch Avenue Elmhurst, Illinois 60126-1196 www.liftmaster.com GARAGE DOOR OPENER Model 3500D For Residential Use Only New! Optional Accessory Available See Page 35 for the
GARAGE DOOR OPENER Model 3280M 1/2HP 3280M-267 1/2HP
 The Chamberlain Group, Inc. 845 Larch Avenue Elmhurst, Illinois 60126-1196 www.liftmaster.com GARAGE DOOR OPENER Model 3280M 1/2HP 3280M-267 1/2HP For Residential Use Only Owner s Manual Please read this
GARAGE DOOR OPENER Model /4 HP
 The Chamberlain Group, Inc. 845 Larch Avenue Elmhurst, Illinois 60126-1196 www.chamberlain.com GARAGE DOOR OPENER Model 248735 3/4 HP For Residential Use Only Owner s Manual Please read this manual and
GARAGE DOOR OPENER Model HD600 1/2 HP
 The Chamberlain Group, Inc. 845 Larch Avenue Elmhurst, Illinois 60126-1196 www.chamberlain.com GARAGE DOOR OPENER Model HD600 1/2 HP For Residential Use Only Owner s Manual Please read this manual and
GARAGE DOOR OPENER Models 3245M 1/3 HP 3255M 1/2 HP M 1/2 HP
 The Chamberlain Group, Inc. 845 Larch Avenue Elmhurst, Illinois 60126-1196 www.liftmaster.com GARAGE DOOR OPENER Models 3245M 1/3 HP 3255M 1/2 HP 3255-2M 1/2 HP For Residential Use Only Owner s Manual
WARNING: To reduce the risk of injury to persons - Use this operator only with Residential Sectional Garage doors.
 WARNING: To reduce the risk of injury to persons - Use this operator only with Residential Sectional Garage doors. Owner s Manual Chain Or Belt Drive Please read and understand this manual and safety instructions
GARAGE DOOR OPENER. Owner s Manual. Series CG40 1/2 HP. For Residential Use Only
 The Chamberlain Group, Inc. 845 Larch Avenue Elmhurst, Illinois 60126-1196 www.chamberlaingroup.com GARAGE DOOR OPENER Series CG40 1/2 HP For Residential Use Only Owner s Manual Please read this manual
GARAGE DOOR OPENER Model M385M - 1/2 HP
 The Chamberlain Group, Inc. 845 Larch Avenue Elmhurst, Illinois 60126-1196 www.liftmaster.com GARAGE DOOR OPENER Model M385M - 1/2 HP For Residential Use Only Owner s Manual Please read this manual and
WARNING: To reduce the risk of injury to persons - Use this operator only with Residential Sectional Garage doors.
 WARNING: To reduce the risk of injury to persons - Use this operator only with Residential Sectional Garage doors. Owner s Manual Please read and understand this manual and safety instructions carefully
Safety Precautions Assembly Installation Adjustment Care and Maintenance Operation Troubleshooting Parts List
 Owner s Manual Model No. 139.53662SRT2 139.53670SRT1 139.53675SRT2 For Residential Use Only GARAGE DOOR OPENER 1/2 HP Caution: Read and follow all safety rules and operating instructions before first use
WARNING: To reduce the risk of injury to persons - Use this operator only with Residential Sectional Garage doors.
 WARNING: To reduce the risk of injury to persons - Use this operator only with Residential Sectional Garage doors. Owner s Manual Please read and understand this manual and safety instructions carefully
GARAGE DOOR OPENER Series WD822K 1/2 HP
 The Chamberlain Group, Inc. 845 Larch Avenue Elmhurst, Illinois 60126-1196 www.chamberlaingroup.com GARAGE DOOR OPENER Series WD822K 1/2 HP For Residential Use Only Owner s Manual Please read this manual
Garage Door Opener. For Residential Use Only. Series 651-2MM-1/2HP. Owner s Manual
 Made exclusively for Master Mechanic Chicago, IL 60614 Complies with UL 325 Regulations effective January 1, 1993. Garage Opener For Residential Use Only Series 651-2MM-1/2HP Series 601MM-1/2HP Series
GARAGE DOOR OPENER Model
 The Chamberlain Group, Inc. 845 Larch Avenue Elmhurst, Illinois 60126-1196 www.chamberlain.com GARAGE DOOR OPENER Model 248754 For Residential Use Only Owner s Manual Please read this manual and the enclosed
Safety Precautions Assembly Installation Adjustment Care and Maintenance Operation Troubleshooting Parts List
 Owner s Manual Model No. 139.53335SRT3 139.53645SRT3 139.53646SRT2 139.53648SRT2 139.53650SRT 139.53660SRT1 139.53834SRT3 For Residential Use Only GARAGE DOOR OPENER Caution: Read and follow all safety
GARAGE DOOR OPENER Model 3585S 3/4 HP
 The Chamberlain Group, Inc. 845 Larch Avenue Elmhurst, Illinois 60126-1196 www.liftmaster.com GARAGE DOOR OPENER Model 3585S 3/4 HP For Residential Use Only Owner s Manual Please read this manual and the
GARAGE DOOR OPENER Model HD200DM 1/2 HP
 The Chamberlain Group, Inc. 845 Larch Avenue Elmhurst, Illinois 60126-1196 www.chamberlain.com GARAGE DOOR OPENER Model HD200DM 1/2 HP For Residential Use Only Owner s Manual Please read this manual and
GARAGE DOOR OPENER Model /2 HP
 The Chamberlain Group, Inc. 845 Larch Avenue Elmhurst, Illinois 60126-1196 www.chamberlaingroup.com GARAGE DOOR OPENER Model 7320-1/2 HP For Residential Use Only Owner s Manual Please read this manual
GARAGE DOOR OPENER Model /4 HP
 The Chamberlain Group, Inc. 845 Larch Avenue Elmhurst, Illinois 60126-1196 www.liftmaster.com GARAGE DOOR OPENER Model 2595 3/4 HP For Residential Use Install on Sectional Doors ONLY THIS OPERATOR IS INTENDED
GARAGE DOOR OPENER. Owner s Manual. Model 1280RGD 1/2 HP. For Residential Use Only
 Raynor Garage s 1101 E. River Road Dixon, Illinois 61021 Complies with UL 325 regulations effective January 1, 1993 GARAGE DOOR OPENER Model 1280RGD 1/2 HP For Residential Use Only Owner s Manual Please
GARAGE DOOR OPENER Model 3800
 The Chamberlain Group, Inc. 845 Larch Avenue Elmhurst, Illinois 60126-1196 www.liftmaster.com GARAGE DOOR OPENER Model 3800 For Residential Sectional Doors With Torsion Assemblies Only Compatible with
GARAGE DOOR OPENER Model /2 HP
 The Chamberlain Group, Inc. 845 Larch Avenue Elmhurst, Illinois 60126-1196 www.chamberlain.com GARAGE DOOR OPENER Model 9950 1/2 HP For Residential Use Only Owner s Manual Please read this manual and the
GARAGE DOOR OPENER Model 3575S
 The Chamberlain Group, Inc. 845 Larch Avenue Elmhurst, Illinois 60126-1196 www.liftmaster.com GARAGE DOOR OPENER Model 3575S For Residential Use Only Owner s Manual Please read this manual and the enclosed
For more information: or call toll free at
 For more information: www.devancocanada.com or call toll free at 855-931-3334 Contents Preparation........................................ 3 Assembly......................................... 8 Installation........................................
GARAGE DOOR OPENER Models WD822KD WD832KD /2 HP
 The Chamberlain Group, Inc. 845 Larch Avenue Elmhurst, Illinois 60126-1196 www.chamberlain.com GARAGE DOOR OPENER Models WD822KD WD832KD 248739 1/2 HP For Residential Use Only Owner s Manual Please read
GARAGE DOOR OPENER MODEL: HANDLES DOORS 18 FT. WIDE & UP TO 7FT.TALL
 GARAGE DOOR OPENER MODEL: 45-1670 HANDLES DOORS 18 FT. WIDE & UP TO 7FT.TALL NOTICE: This opener will not work until you set the travel limits and the auto force adjustment. You must follow all steps located
GARAGE DOOR OPENER. Owner s Manual. Models /2 HP. For Residential Use Only
 The Chamberlain Group, Inc. 845 Larch Avenue Elmhurst, Illinois 60126-1196 www.chamberlaingroup.com GARAGE DOOR OPENER Models 2265 1/2 HP For Residential Use Only Owner s Manual Please read this manual
Please read this manual and the enclosed safety materials carefully! Periodic checks of the opener are required to ensure safe operation.
 The Chamberlain Group, Inc. 845 Larch Avenue Elmhurst, Illinois 60126-1196 www.chamberlain.com GARAGE DOOR OPENER Model PD432DM 1/2 HP For Residential Use Only Owner s Manual Please read this manual and
GARAGE DOOR OPENER. Please read and understand this manual and safety instructions carefully before installation.
 GARAGE DOOR OPENER MODEL: 425-1669 HANDLES DOORS 18 FT. WIDE & UP TO 7FT.TALL For Use With Residential Sectional Garage Doors Only Owner s Manual Please read and understand this manual and safety instructions
Owner s Manual. GARAGE DOOR OPENER Model S 3/4 HP. For Residential Use Only
 The Chamberlain Group, Inc. 845 Larch Avenue Elmhurst, Illinois 60126-1196 www.chamberlain.com GARAGE DOOR OPENER Model 248735S 3/4 HP For Residential Use Only Owner s Manual Please read this manual and
GARAGE DOOR OPENER. Series /2 HP. Owner s Manual. For Residential Use Only
 The Chamberlain Group, Inc. 845 Larch Avenue Elmhurst, Illinois 60126-1196 www.chamberlaingroup.com GARAGE DOOR OPENER Series 8200 1/2 HP For Residential Use Only Owner s Manual Please read this manual
RollSeal 1733 County Road 68 Bremen, Alabama Part No Rev Owner s Manual RS-Divider Curtain
 1. 2. 7 3. 4. RollSeal 1733 County Road 68 Bremen, Alabama 35033 256-287-7000 Part No 4801-5176 Rev 12-11-17 Owner s Manual RS-Divider Curtain Table of Contents 1 Warnings (Avertissements)... 3 2 Limited
Garage Door Opener Owner's Manual
 TM The Chamberlain Group, Inc. A DUCHOSSOIS ENTERPRISE 845 Larch Avenue Elmhurst, Illinois 60126 Complies with UL 325 Regulations effective January 1, 1993. Garage Opener Owner's Manual Model Series 1200
GARAGE DOOR OPENER. Please read and understand this manual and safety instructions carefully before installation.
 GARAGE DOOR OPENER MODEL: 425-1620 HANDLES DOORS 18 FT. WIDE & UP TO 7FT.TALL For Use With Residential Sectional Garage Doors Only Owner s Manual Please read and understand this manual and safety instructions
Owner s Manual GARAGE DOOR OPENER. Series PD200 1/2 HP. For Residential Use Only
 The Chamberlain Group, Inc. A DUCHOSSOIS ENTERPRISE 845 Larch Avenue Elmhurst, Illinois 60126-1196 www.chamberlaingroup.com Complies with UL 325 regulations effective January 1, 1993 GARAGE DOOR OPENER
Safety Precautions Assembly Installation Adjustment Care and Maintenance Operation Troubleshooting Parts List
 OWNER S MANUAL Model No. 139.53525SRT 139.53627SRT 139.53636SRT 139.53640SRT 139.53641SRT For Residential Use Only 1/2 HP GARAGE DOOR OPENER Caution: Read and follow all safety rules and operating instructions
COMMERCIAL DOOR OPENER Model ATS 2113X-CX 1/2 HP
 H I G H L H O I W G O W Raynor Garage Doors 1101 E. River Road Dixon, Illinois 61021 www.raynor.com COMMERCIAL DOOR OPENER Model ATS 2113X-CX 1/2 HP For Residential And Light Duty Commercial Use Install
GARAGE DOOR OPENER Model /2HP
 The Chamberlain Group, Inc. 845 Larch Avenue Elmhurst, Illinois 60126-1196 www.liftmaster.com GARAGE DOOR OPENER Model 3280-390 1/2HP For Residential Use Only Owner s Manual Please read this manual and
Garage Door Opener IQ SERIES DC Motor Chain Drive Owner s Manual
 www.skylinkhome.com Garage Door Opener IQ SERIES DC Motor Chain Drive Owner s Manual Please read this manual and enclosed safety materials carefully! Safety Infrared Sensor MUST BE INSTALLED and aligned
Safety Precautions Assembly Installation Adjustment Care and Maintenance Operation Troubleshooting Parts List
 Owner s Manual Model No. 139.53663SRT For Residential Use Only GARAGE DOOR OPENER 1/2 HP Caution: Read and follow all safety rules and operating instructions before first use of this product. Fasten the
Safety Precautions Assembly Installation Adjustment Care and Maintenance Operation Troubleshooting Parts List
 OWNER S MANUAL Model No. 139.18847 139.18857 For Residential Use Only Caution: Read and follow all safety rules and operating instructions before first use of this product. Fasten the manual near the garage
GARAGE DOOR OPERATOR USER S MANUAL
 GARAGE DOOR OPERATOR USER S MANUAL - DOMESTIC USE CIL-CD800S Chain) CIL-BD800S Belt GARAGE DOOR OPENER OWNER S MANUAL - DOMESTIC USE CIL-CD800S CD800S(Chain Chain) CIL-BD800S BD800S(Belt Belt) 1 Features
WARNING: To reduce the risk of injury to persons - Use this operator only with Residential Sectional Garage doors.
 WARNING: To reduce the risk of injury to persons - Use this operator only with Residential Sectional Garage doors. Owner s Manual Please read and understand this manual and safety instructions carefully
Q Digital Intelligence for the Garage. Owner s Manual. contains installation, operating, maintenance, & warranty instructions.
 Digital Intelligence for the Garage Q-7900 Owner s Manual contains installation, operating, maintenance, & warranty instructions. For residential use only. Marantec America Corporation 675 Heathrow Drive
MARTIN DC3700/DC2500 GARAGE DOOR OPENER SYSTEM. DC3700: Belt only up to 12 (3700) high doors / DC2500: Chain only up to 10 (3050) high doors
 high doors / DC2500: Chain only up to 10 (3050) high doors") MARTIN DC3700/DC2500 GARAGE DOOR OPENER SYSTEM DC3700: Belt only up to 12 (3700) high doors / DC2500: Chain only up to 10 (3050) high doors Quietest The World s Q uietest Door Opene r. INSTRUCTION MANUAL
MARTIN DC3700/DC2500 GARAGE DOOR OPENER SYSTEM DC3700: Belt only up to 12 (3700) high doors / DC2500: Chain only up to 10 (3050) high doors Quietest The World s Q uietest Door Opene r. INSTRUCTION MANUAL
Installation Instructions and Owner s Manual
 Sectional Garage Door Opener Model DCS2 Installation Instructions and Owner s Manual READ THIS MANUAL CAREFULLY BEFORE BEGINNING INSTALLATION Installer: Permanently attach manual to the wall. Date: Description:
Garage Door Opener Models: /3 HP /2 HP /2 HP /3 HP /2 HP /2 HP
 MD Garage Opener Models: 139.18803-1/3 HP 139.18805-1/2 HP 139.18814-1/2 HP 139.18830-1/3 HP 139.18850-1/2 HP 139.18851-1/2 HP For Residential Use Only Owner's Manual Please read this manual and the enclosed
GARAGE DOOR OPENER OWNER S MANUAL S3/S4
 GARAGE DOOR OPENER OWNER S MANUAL S3/S4 Features! Locking door during power failure: If power failure occurs while the door is operating, the door can be released by pulling the clutch down, allowing
INSTRUCTION MANUAL. Featuring Martin Low Risk Finger Shield Garage Doors. With Photo Eyes DC2500e DC3700e DC3700e-H
 R INSTRUCTION MANUAL Featuring Martin Low Risk Finger Shield Garage Doors Quietest The World s Quietest Door Openers. With Photo Eyes DC2500e DC3700e DC3700e-H * Without Photo Eyes* DC2500e-O DC3700e-O
DOOR LIMITS A) ENGAGE CHAIN/BELT CONNECTOR TO CARRIAGE CAUTION B) CLOSE TRAVEL LIMIT
 ENGAGE CHAIN/BELT CONNECTOR TO CARRIAGE CAUTION B) CLOSE TRAVEL LIMIT") 20 6 DOOR LIMITS Severe injury or death can result if the door closing force is set too high. Never increase the door closing force above the minimum required to move the door. Never adjust force to compensate
20 6 DOOR LIMITS Severe injury or death can result if the door closing force is set too high. Never increase the door closing force above the minimum required to move the door. Never adjust force to compensate
MT3850EVO INSTALLATION AND OPERATING INSTRUCTIONS. Owner s Copy: Keep these Instructions for Future Reference. gomerlin.com.au gomerlin.co.
 gomerlin.com.au gomerlin.co.nz MT3850EVO with Security + 2.0 Sectional Garage Door Opener INSTALLATION AND OPERATING INSTRUCTIONS Owner s Copy: Keep these Instructions for Future Reference. Please read
Sectional and Tilting Door Opener
 Sectional and Tilting Door Opener Installation Instructions and User Guide 600 800 1000 S/N WARNING Please read the manual carefully before installation and use. The installation of your new door opener
Installation Guide Section1
 Certification Test Report 908.42 MHz Low Power Communication Device Transceiver 372 MHz Discrete Receiver FCC ID: KJ8-0001715 IC: 3540A-0001715 FCC Rule Part: 15.249 IC Radio Standards Specification: RSS-210
Having Difficulty? Need Help?
 3531836147 Table of Contents Safety Information....................... 2 Important Installation Instructions.... 2 Safety Features......................... 2 Pre-installation Checklist................
Owner s Manual/Manual Del Propietario
 Owner s Manual/Manual Del Propietario GARAGE DOOR OPENER Abridor de puerta de cochera MODEL/MODELO 200.57933 For Residential Use Only Sólo para uso residencial Read and follow all safety rules and operating
MT3850WL INSTALLATION AND OPERATING INSTRUCTIONS. Owner s Copy: Keep these Instruction for Future Reference.
 www.chamberlainanz.com MT3850WL Sectional Garage Opener INSTALLATION AND OPERATING INSTRUCTIONS Owner s Copy: Keep these Instruction for Future Reference. Please read this manual and the enclosed safety
Installation Instructions Studio Makeup Station
 Installation Instructions Studio Makeup Station 30" and 36" Models 5-light 30" Studio Makeup Station 8-light 30" Studio Makeup Station 6-light 36" Studio Makeup Station 9-light 36" Studio Makeup Station
MEDIUM DUTY DOOR OPERATOR MODELS MT5011U & BMT5011U
 MEDIUM DUTY DOOR OPERATOR MODELS MT0U & BMT0U INSTALLATION MANUAL Now with Built in Radio Receiver MHz Your model may look different than the model illustrated in this manual. YEAR WARRANTY Serial # (located
Please read this manual and enclosed safety materials carefully before installation. WARNING
 MM9000 Series MM9545M MM9434K MM9333H Belt Drive Operator Assembly and Installation Please read this manual and enclosed safety materials carefully before installation. WARNING To reduce the risk of injury
Roller Door Operator
 INSTALLATION INSTRUCTIONS AND OWNERS MANUAL Roller Door Operator IMPORTANT PLEASE READ THESE INSTRUCTIONS CAREFULLY PRIOR TO COMMENCING THE INSTALLATION OF THE OPERATOR UNIT CAUTION This Automatic Opener
Model 3800PC GARAGE DOOR OPENER For Residential and Light Duty Commercial Use Install On Sectional Doors With Torsion Assemblies Only
 The Chamberlain Group, Inc. 85 Larch Avenue Elmhurst, Illinois 606-96 www.liftmaster.com Model 800PC GARAGE DOOR OPENER For Residential and Light Duty Commercial Use Install On Sectional Doors With Torsion
Installation and operating manual. Garage Door Opener Direct Drive 3/4 HP / 1 HP. synoris 550 compact / 800 compact V OCE-Rev.
 Installation and operating manual English Garage Door Opener Direct Drive 3/4 HP / HP synoris 550 compact / 800 compact 46745V024-020-0-OCE-Rev.E+800 Table of contents. Important safety information 3..
AUTOMATIC CONTROL ROLLING DOOR OPENER
 AUTOMATIC CONTROL ROLLING DOOR OPENER INSTALLATION INSTRUCTION AUTOMATIC OBSTRUCT PHOTOELECTRIC BEAM ROLLING CODE SYSTEM AUTO CLOSE DOOR ANTI-THEFT SYSTEM INSTALLATION INSTRUCTION AND RDO OWNERS MANUAL
Installation Instructions Hardtop Hoist Part#
 No. Component name Qty 1 T- section 1 2 Rear leg support 1 3 Cross tube 1 4 Front leg support 2 5 Rear leg 1 6 Front leg 2 7 25x25x3 Rubber plug 7 8 Butterfly nut M8 3 9 Pull pin 7 10 Butterfly nut M10
IMPORTANT SAFETY RECOMMENDATIONS
 - 1 - - 2 - IMPORTANT SAFETY RECOMMENDATIONS FAILURE TO COMPLY WITH THE FOLLOWING SAFETY RECOMMENDATIONS MAY RESULT IN SERIOUS PERSONAL INJURY, DEATH AND/OR PROPERTY DAMAGE The installation of the Automatic