AIRSTREAM Interstate Front & Rear Camera Kenwood Radio Integration
|
|
|
- Stewart Crawford
- 6 years ago
- Views:
Transcription
1 AIRSTREAM Interstate Front & Rear Camera Kenwood Radio Integration We recently purchased a 2014 Interstate Ext this past fall; actually built on a 2013 Mercedes Benz Sprinter 3500 Chassis. This was a purchase that took us over a month to complete as we were set on purchasing a tow trailer, the iconic AIRSTREAM; however the Interstate caught our eye and we instantly loved the idea of the entire family being together while traveling on the road. I ve always had a great deal of appreciation for folks who take the time out to post How too topics; so with that said, this will be my first and I hope it s helpful for anyone looking to eliminate the Pyle Rearview Camera system, while Integrating the Rear Camera, as well as a Front Camera system into the Factory Installed Kenwood Radio GPS Navigation System. Our 2013/2014 Interstate was delivered from AIRSTREAM with a KENWOOD DNX890HD system; this system allows for two separate CMOS Cameras to be installed. This project took me approximately four hours to complete, which included a lot of exploring in finding the existing Rear Camera wiring and such; so hopefully this will help in keeping you on schedule. I should also note that I have gained a lot of experience in this type of work while in college (early nineties) installing Cellular and Two-Way Radio equipment at a local Land Mobile Radio shop. But don t let that discourage you from taking this project one; in the end, you will have relocated the Hands-Free Microphone and cleaned up the messy wiring, reclaimed your Rear-View Mirror in order to allow you to keep an eye on the rear cabin area, as well as use the rear windows while driving, redirect the rear-view camera through the in-dash Radio GPS Navigation system, as well as adding a Front Camera as an additional parking aide. Needed Tools and Supplies: I purchased a fairly inexpensive Camera made by Audiovox from my local Best Buy stereo shop; it cost me under $100. In addition, I picked up a roll of wiring loom; crimp type electrical terminals and some heat shrink tubing. Tools: Torx Screw Driver Set (T15 to T25) Wire Striper / Terminal Crimp Tool Tie Wraps Wire Cutter Phillips Screw Driver Scissors Metric Socket Set (1/4 Drive) Volt Meter or Voltage Test Light Wiring fish ( A tool for snaking wiring through the fire-wall and or Dash Board area) Electrical Tape Heat Gun or Hair Dryer Electrical Connectors (Crimp Type) Wiring Loom A Female-to-Female bullet (Used in connecting the existing Rear-View Camera to the KENWOOD Radio) 6 Video RCA to RCA cable (Might need it, I didn t as I was able to use the existing rear-view camera video cable)

2 Planning: I recommend doing this project when the weather is warm, avoid doing this in a cold environment as the plastic trim parts can become brittle and perhaps crack when trying to remove them. The one nice feature about the Interstate, it allows us to be very nimble and quick on our feet while we are out camping and or exploring the local area; I often find ourselves heading into town for a nice hot cooked meal, away from the campsite as a change in pace. More often than not, I find myself parallel parking our Interstate in tight little beach and fishing towns; having the rear-view, as well as front-view camera make this parking chore almost look effortless. First Step: Accessing the Video Input wiring located behind the KENWOOD radio; this is a good first step and will give you an idea of whether or not you are up for taking this project on. Again, I m going to encourage you to stick it out; I m going to try my very best to give a good description and show lots of pictures in order to guide you through it. Removing the Faux Wood Radio Face Plate: My dealer included the radio removal tools which are included with the KENWOOD radio; don t use them, put them back where you found them. The Faux Wood Face Plate is secured to the dash board via push in clips; start at the top of the face plate by peeling it away using your fingers. Open up the top center dash storage compartment, this will give your fingertips a purchase point to start the process; the face plate will start to pop out of the retaining clip holes. Working from the top down, use your fingertips to slowly pry the face plate from the retaining holes, working your fingertips down the outside edges. As you successfully get towards the bottom of the face plate removal process; you will need to detach two plug type connectors used for controlling the heated seats, hazards, etc. from the face plate: Once you remove the radio face plate, you will need a Torx screw driver (T-15) in order to remove the four Torx screws securing the radio chassis within the center dash board:


3 Once the four screws are removed, you and carefully slide the radio chassis out of the dashboard in order to expose the rear wiring and temporarily locate the wiring harness on the top of the radio; slide the radio back into position temporarily. Now examine the wiring, you are looking for the video RCA type connector; they should be mark Rear Camera and Front Camera. At this point, you have exposed the necessary wiring to integrate a Front-Camera, the Existing Rear-Camera and or both cameras as I have. Before tackling the existing Rear-View Camera, I m

4 going to cover the Front-Camera installation. My camera came with the necessary hardware to install the camera in various locations, as well as changing the view of the camera and the electrical connectors and fuse holder. I first temporarily powered, grounded and connected the RCA connector from the newly purchased camera to the KENWOOD radio RCA connector labeled Front Camera. I wanted to make sure that the camera was compatible with the KENWOOD radio head, as well change the view of my camera by clipping a jumper wire on the wiring harness of the camera; this allows the view as see on the Kenwood screen to be the same as your view as if you were looking forward out of the windshield. (I think I explained that correctly; if not, you ll know what I mean once you get this far.) I had actually thought I purchased the wrong camera when I first connected the camera and looked at the view; it was inverted and backwards. Once the Camera System is tested; now it s time to consider where you want to mount the front camera. I choose the iconic Mercedes Benz emblem located in the center of the radiator grill. I found it best to remove the grill and secure the camera and the wiring harness; removing and re-installing the grill is very easy and makes for an overall professional looking job. Access the engine compartment by popping the hood; once the hood is open, there are four screws located on the top portion of the grill assembly that need to be removed, the bottom portion of the grill is held into place by simple slot fittings in which the grill bottom rest in.

5 Once the front grill is removed, this allow for you to work on the mounting of the camera and try different mounting options and or mounting brackets most likely included with your camera. For example, I had to use the optional bracket that was included with my camera; the bracket which was pre-installed as the default wasn t a good fit. Once I secured the camera and camera bracket, I made sure that there was some flexibility in being able to adjust the angle of the camera once complete; in addition, I placed the wiring harness into the wiring loom and secured it out of sight behind the grill towards the direction of the driver s side of the engine compartment using tie-warps. RE-Install the grill back into place, first by placing the tabs located on the bottom of the grill into the slots located on the bumper; then align the top part of the grill screw holes with the engine compartment s mounting holes, replace and tighten the removed screws. Now prepare to route the Front View camera s wiring towards the driver s side fire wall.


6 Our Interstate has the battery located under the hood, on the Driver s Side of the engine compartment; this might be different on earlier year Sprinters, where the battery might be located under the driver s foot well within the cabin area. The battery location isn t important, you are looking for a nice easy way to route your camera s wiring harness to the inside of the cabin via the engine compartment s fire wall. Our Sprinter had a grommet up high and in plain sight as depicted below:

7 Remove the grommet from the fire and using a pair of scissors, cut the nipple end of the grommet so that the camera s wiring can be passed through it. Temporarily run your wiring along the front fender and away from any moving belts, pulleys and anything else that you think may be a problem; you will later tie wrap the loom containing the wiring harness into the engine compartment area, keeping it clear from any hazards and items such as the battery from a servicing standpoint. I shrink wrapped the fuse holder as I wasn t sure if I was going to locate it under the hood, or within the cabin of the vehicle. NOTE: On top of being an Electrical Engineer, I m also a volunteer fire fighter; please use the included fuse holder and fuse, it there as a protective device in the event you experience a short and reduce the chance of a fire. I grounded the camera s electrical ground connection to the grounding lug or grounding post located within the engine compartment; as well as routed the wiring loom in such a way that would not impede the servicing and or replacement of my battery a chore.


8 Next is connecting the power for your camera; you want to connect your camera to a power source which turns On and OFF with your ignition. Meaning, you want your camera ON when your AIRSTREAM is On and running. Locate the fuse panel located under the driver s side foot well; at this point you will need either a Volt meter and or a 12V Test Light in order to identify a fuse location which switches On/OFF with the turn of your ignition. Once you locate that fuse, you will then pull that fuse and identify the Hot side of the fuse socket using your Volt meter or Test Lamp; this will be the side that you will insert your fuse coupled with the fuse spade. You will want to purchase this type of electrical terminal as seen in the below pictures:
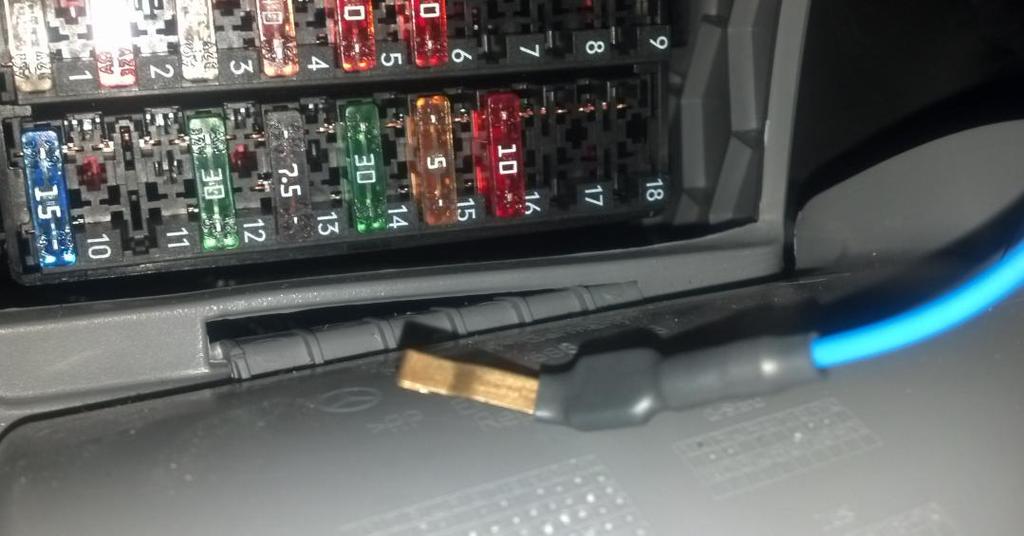

9
 [Can t say Gas Pedal, the Sprinter is a Diesel and Diesel Pedal")
10 Once the electrical connections are complete and secure as seen in the above picture; next is to run the Video cable up towards the KENWOOD radio. Again, you want to run the video cable in order to avoid entanglement with any of the controls (Steering, Brake and Throttle pedals) [Can t say Gas Pedal, the Sprinter is a Diesel and Diesel Pedal sounds funny]. I found it best to gently slide out the radio from the dash compartment, then peak down through the wire area and send a wiring fish through the dash to the foot well area. Using electrical tape, I then taped the RCA connector to the fish and then pulled the wire up towards the radio location. Before mating Video RCA connectors, I slide a piece of heat-shrink tubing over the connection as I found the connector junction to be loosely fitted (Remember, you only want to do this once might as well do it right the first time.). The below photo shows the completed front camera connection with the heat shrink tubing properly securing the connection; as well as the preparation of the Rear-View Camera Connection (BROWN RCA Jack) which I will cover next.


11 The remainder of this procedure will focus on locating and rerouting the existing Rear-View RCA connector and wiring to the KENWOOD radio. Read the Mercedes Benz owner s manual on replacing the reading light bulb within the central lighting apparatus located in the forward head liner up above and between the driver and passenger area. Also, access the vacant spare radio / scanner / CB radio slot location in the above mentioned headliner.


12 The central lighting fixture drops out of the headliner, by first lowering the passenger side (See below photo) and sliding out the driver s side which is held in with long supporting fingers which rest on the headliner. Once removed, you can then trace the wiring from the Pyle screen assembly which is currently mounted on the factory installed Rear-View Mirror. This also provides an opportunity to reroute and clean up the hands-free microphone location and wiring. I routed my hands-free microphone closer to the lighting fixture, as well as hide the wiring behind the microphone to give the cabin a cleaner more professional and or factory look.

13 Use the existing wiring from the Pyle screen to trace back the wiring from the Rear-Camera video RCA cable plugs into the video interface module. I found the wiring and video modulator unit closer to the driver s side next to the accessory expansion slot mentioned and photograph above. I found that I was able to reroute the video cable (RCA jack) from the existing location, across the driver s side headliner and down the A-front pillar. I did this by retrieving the RCA connector to the front edge of the headliner, where it meets with the windshield; I then routed it across towards the front windshield A-pillar. NOTE: Our Mercedes Benz AIRSTREAM came factory equipped with A-Pillar AIR BAGS, so routing this cable down towards the foot well needs to be done carefully, so as not to interfere with the air bag deployment in the event of an accident. Remove the A-Pillar plastic trim; I was able to do this similar to how I removed the radio face plate using my fingers; same type of clip and fastening system. The below picture shows the routing of the existing Rear-View RCA video cable alongside and tie-wrapped to the vehicles existing wiring harness; note that the RCA cable was routed behind the red nylon trim restraining strap and away from the AIRBAG curtain.


14 One the RCA has been secured alongside the A-Pillar wiring harness; I found that I was able to drop it down approximately above and alongside the fuse panel. I then routed the cable in the similar direction as I did the Front View Camera; again, using the wire fish and retrieving the RCA connector at the location of the KENWOOD radio located in the center console. I added a piece of heat shrink tubing, made my connections and then applied heat so that the tubing would act in keeping my RCA connections tight. The below image show both the Front and Rear View Camera RCA connections neatly heat shrunk.

15 Once connected, turn on the Sprinter s ignition, power on the KENWOOD radio; simply put your foot on the brake pedal and move the gear shifter to REVERSE. You should see the image of the Rear-View camera on the screen of the KENWOOD radio. I didn t have to configure the Rear- View camera, it worked by default; however I did need to follow the KENWOOD Owner s Manual in order to configure the Front Camera. Configuring the Front-Camera was very simple; I have my camera system setup that it automatically shows the Rear View image once the vehicle is placed into REVERSE. Since the Kenwood Radio is touch screen, you can select to have both cameras image showing in a split-screen fashion, or by manually turning on the Front Camera View by pressing the AUX button only when needed; which is what I do. THE HOME STRETCH: Once you configured the camera(s) and verified the functionality of the system; now you just need to re-install everything and start putting everything back together. START with tie-wrapping the RCA cables underneath the driver s foot well area; again making sure that all of your wiring is up and out of harm s way in regards to steering, brake and throttle controls. Secondly, tie-wrap any lose or extra cabling and such that was cut free up above the headliner next to the expansion slot; you don t any noise and such while driving because of a lose interface module flopping around up there. Once you start to reassemble the center overhead light fixture; this is a good time to clean up the Cell Phone Hands Free Microphone as I did and noted in the below picture:

16 Hopefully all went well, and you are sitting back and admiring your craftsmanship. I hope this was helpful and provided some close and intimate time with your family in helping out, as well as providing some time in getting to know your AIRSTREAM better. Please excuse and ignore any spelling and grammatical errors.
Connecting the rear fog light on the A4 Jetta, while keeping the 5 Light Mod
 Connecting the rear fog light on the A4 Jetta, while keeping the 5 Light Mod DISCLAIMER: I'm human and make mistakes. If you spot one in this how to, tell me and I'll fix it This was done on my 99.5 Jetta.
INSTALLATION INSTRUCTIONS
 Rear Vision System Tailgate Emblem Camera Mirror Display 2009-Current Ford F-150 and 2010-Current Super Duty (Kit part number 1008-9527) Kit Contents: Mirror Tailgate Emblem Mount with Camera Interior
Dodge Ram 09-Current CS-DTR SERIES BACKUP CAMERA INSTALLATION
 Dodge Ram 09-Current CS-DTR SERIES BACKUP CAMERA INSTALLATION Thank you for your purchase! These instructions cannot possibly cover every option group for every model year of RAM trucks so you may find
GM TRUCK BACKUP CAMERA INSTALLATION
 GM TRUCK 07-13 BACKUP CAMERA INSTALLATION Thank you for your purchase! These instructions are intended for the do-it-yourselfer who decides to install the camera without professional assistance. Keep in
TOYOTA Yaris Hatchback EC REARVIEW MIRROR Preparation
 Preparation Part Number: PT374-02090 Kit Contents Item # Quantity Reqd. Description 1 1 Auto Dimming Mirror Assembly w/ shift area light 2 1 Hardware bag Hardware Bag Contents Item # Quantity Reqd. Description
Part Number: PT
 Preparation Part Number: PT374-02090 Kit Contents Item # Quantity Reqd. Description 1 1 Auto Dimming Mirror Assembly w/ shift area light 2 1 Hardware bag Hardware Bag Contents Item # Quantity Reqd. Description
IR Temp Probe. Toyota Sienna Rear Sight. Part Number: Accessory Code:MC1
 Toyota Sienna 200 - Rear Sight Part Number: 0006-00085 Accessory Code:MC Section I Installation Preparation Kit Contents Item # Quantity Reqd. Description 2 3 4 5 6 7 8 MIRROR/MONITOR REVERSE MINI-CAMERA
Conflicts. TOYOTA 4Runner REARSIGHT. Part Number: Code: MC90 KIT CONTENTS ADDITIONAL ITEMS REQUIRED FOR INSTALL RECOMMENDED TOOLS
 TOYOTA 4Runner 2010 - REARSIGHT Part Number: 00016-00085 Code: MC90 Conflicts KIT CONTENTS ITEM QTY DESCRIPTION 1 1 MIRROR/MONITOR 2 1 REAR CAMERA ASSEMBLY 3 1 CAMERA EXTENSION HARNESS 4 1 SACK PARTS 5
Tutorial:Head Unit Installation
 Tutorial:Head Unit Installation From Tech Wiki : Nissan 350Z : Infiniti G35 : Nissan GT-R Here, I installed the Kenwood DDX7015 touch screen DVD system. I made this step-by-step tutorial to help those
INSTALLATION INSTRUCTIONS
 Rear Vision System Tailgate Handle Camera Mirror Display 2004-2014 Ford F-150 and 2008-2015 Ford Super Duty (Kit part numbers 9002-9521) Kit Contents: Mirror Tailgate Handle with camera and harness Interior
Raxiom Factory GPS Rear Back-up Camera Kit (07-17 Wrangler)
") Raxiom Factory GPS Rear Back-up Camera Kit (07-17 Wrangler) Installation Time: 2.5-3Hrs Tools Required: 7mm Socket & Driver 10mm Socket 10mm Open end wrench Knife / Razor blade Zip-ties Wire Cutters Needle
Raxiom Factory GPS Rear Back-up Camera Kit (07-17 Wrangler) Installation Time: 2.5-3Hrs Tools Required: 7mm Socket & Driver 10mm Socket 10mm Open end wrench Knife / Razor blade Zip-ties Wire Cutters Needle
INSTALLATION INSTRUCTIONS
 Rear Vision System Liftgate Emblem Camera Mirror Display 2009-2012 Ford Flex (Kit part number 1008-9527) Kit Contents: Mirror Liftgate Emblem Mount with Camera Interior (shorter) Harness Chassis (longer)
INSTALLATION INSTRUCTIONS
 Rear Vision System Tailgate Emblem Camera Aftermarket Display 2009-Current Ford F-150 and 2010-Current Super Duty (Kit part number 1008-6509) Kit Contents: Tailgate Emblem Mount with Camera Chassis Harness
MOTOALLIANCE WINCH MOUNT
 , / 1-866-527-7637 www.motoalliance.com MOTOALLIANCE WINCH MOUNT Polaris RZR Thank you for purchasing our MotoAlliance winch mount(s). You now own a premium custom winch mount to allow you to use your
Conflicts NOTE: XLE, LE, AND SE MODELS
 TOYOTA SIENNA 2011- REARSIGHT Part Number: 00016-00085 Accessory Code: MC9 Conflicts NOTE: XLE, LE, AND SE MODELS KIT CONTENTS ITEM QTY DESCRIPTION 1 1 MIRROR/MONITOR 2 1 REAR CAMERA ASSEMBLY 3 1 CAMERA
Please read thoroughly before starting installation and check that kit contents are complete.
 Rear Vision System Mirror Display 2013-Current Ram (Kit part number 1009-9518) Please read thoroughly before starting installation and check that kit contents are complete. Items Included in the Kit: Rear
SCION xb EC REARVIEW MIRROR Preparation
 Preparation Part Number: PT374-02090 Kit Contents Item # Quantity Reqd. Description 1 1 AD Mirror Assembly w/ PRNDL 2 1 Hardware bag Hardware Bag Contents Item # Quantity Reqd. Description 1 2 T-tap Connectors,
Vehicle Rear Observation System With Integrated Parking Sensors
 Vehicle Rear Observation System With Integrated Parking Sensors Model: CAMSBAR Installation/User Manual Features: 2.5" LCD Color Display 2 Ultra Sonic Rear Obstacle Sensors On-screen Display Function Automatically
Troubleshooting Guide for Okin Systems
 Troubleshooting Guide for Okin Systems More lift chair manufacturers use the Okin electronics system than any other system today, mainly because they re quiet running and usually very dependable. There
Gentex Homelink Installation Instructions
 Gentex Homelink Installation Instructions Kit Contents: Item Qty Part Description 1 Number GENK-41 NVS Homelink Mirror GENK-42 NVS Homelink w/mood lights 1 of the GENK-45 NVS Homelink w/compass following
Assembly Instructions
 Assembly Instructions Part Number Description Model Approx. Assembly Time 99994-0903 Windshield Wiper Kit Mule SX 1 Hour WARNING Improper installation of this accessory could result in an accident causing
Rear Vision System Liftgate Emblem Camera for Aftermarket Display Ford Flex (Kit part number )
") Rear Vision System Liftgate Emblem Camera for Aftermarket Display 2009-2012 Ford Flex (Kit part number 1008-6509) Kit Contents: Liftgate Emblem Mount with Camera Chassis Harness with RCA (Note: In some
Rear Vision System Liftgate Emblem Camera for Aftermarket Display 2009-2012 Ford Flex (Kit part number 1008-6509) Kit Contents: Liftgate Emblem Mount with Camera Chassis Harness with RCA (Note: In some
REARSIGHT PART NUMBER: Code: MC1 RECOMMENDED SEQUENCE OF APPLICATION
 Document # 3848 REVISION A 1/26/06 2006 TOYOTA TACOMA REARSIGHT PART NUMBER: 00016-00050 Code: MC1 RE V I S I O N A KIT CONTENTS ITEM QTY DESCRIPTION 1 1 MIRROR/MONITOR 2 1 REAR CAMERA ASSEMBLY 3 1 CAMERA
Troubleshooting Guide for Limoss Systems
 Troubleshooting Guide for Limoss Systems NOTE: Limoss is a manufacturer and importer of linear actuators (motors) hand controls, power supplies, and cables for motion furniture. They are quickly becoming
SCION xb AUTO-DIMMING MIRROR Preparation
 Preparation Part Number: PT374-02090 Kit Contents Item # Quantity Reqd. Description 1 1 AD Mirror Assembly w/ PRNDL 2 1 Hardware bag Hardware Bag Contents Item # Quantity Reqd. Description 1 2 T-tap Connectors,
Replacing MK4 Golf/Jetta radiator mounts in-car
 Replacing MK4 Golf/Jetta radiator mounts in-car This is a guide to replacing the radiator mounts in a MK4 Golf/Jetta. This involves moving the core support to the service position which allows you to do
Installation MKIV Headlight Housings with Fog Lamps (Procedures apply to both MKIV Jetta and Golf)
") Page 1 This tutorial is provided as a courtesy by ECS Tuning. Service Procedure Installation Proper service and repair procedures are vital to the safe, reliable operation of all motor vehicles as well
Page 1 This tutorial is provided as a courtesy by ECS Tuning. Service Procedure Installation Proper service and repair procedures are vital to the safe, reliable operation of all motor vehicles as well
AVH-2330NEX AVH-2300NEX AVH-1330NEX AVH-1300NEX
 AVH-2330NEX AVH-2300NEX AVH-1330NEX AVH-1300NEX DVD RDS AV RECEIVER Installation Manual Connection Precautions Your new product and this manual Do not operate this product, any applications, or the rear
STEPS FOR REMOVING REAR ASHTRAY & CUP HOLDER, CENTER ARMREST, E- BRAKE CONSOLE, FRONT ASHTRAY, LOWER CENTER CONSOLE AND GLOVE BOX
 Please give credit where credit is due! This DIY was completed ENTIRELY by the hardest working VW Vortex moderator on the site!! Gary Thompson, Ph.D. - vortex ID VGRT6, email address vgrt6@yahoo.com. Please
INSTALLATION INSTRUCTIONS
 9002-6513 Rear Vision System W/ Zoom Aftermarket and Factory 8.4 Touch Screen Display (Factory Display requires Chrysler/Dodge dealer to activate) 2009 2012 RAM (Part B) 2013 Current RAM (Part A) NOTE:
I. Before starting installation
 5. Park the vehicle on a clean, dry, flat, level surface and block the tires so the vehicle cannot roll in either direction. A. Disconnect battery cables 1. Disconnect the negative cable first, then the
TOYOTA COROLLA EC REARVIEW MIRROR Preparation
 Preparation Part Number: PT374-02090 Kit Contents Item # Quantity Reqd. Description 1 1 AD Mirror Assembly w/ PRNDL 2 1 Hardware bag Hardware Bag Contents Item # Quantity Reqd. Description 1 2 T-tap Connectors,
TOYOTA VENZA 2009 TRAILER WIRE HARNESS Procedure
 Part Number: PT791-0T099 Kit Contents Item # Quantity Reqd. Description 1 1 Trailer Wire Harness Module 2 1 4-Flat Harness 3 1 Battery Power Wire Harness 4 1 Mounting Bracket, 4-Flat 5 2 Screw #10-24 6
BX8848 Installation Instructions 4 Diode Wiring Kit For Motorhomes With Red Tail Lights
 For Motorhomes With Red Tail Lights WARNG: Incorrect wiring may result in blown fuses, damaged wiring, fire, or bodily injury. Blue Ox recommends installation of this kit by a trained professional. Blue
TOYOTA HIGHLANDE R REARSIGHT Part Number: Code: MC90 KIT CONTENTS ADDITIONAL ITEMS REQUIRED FOR INSTALL RECOMMENDED TOOLS
 TOYOTA HIGHLANDE R 2009- REARSIGHT Part Number: 00016-00085 Code: MC90 KIT CONTENTS ITEM QTY DESCRIPTION 1 1 MIRROR/MONITOR 2 1 REAR CAMERA ASSEMBLY 3 1 CAMERA EXTENSION HARNESS 4 1 SACK PARTS 5 1 OWNER
Gentex by VOXX Corporation Installation Instructions
 KIT CONTENTS: Item Qty Part Number Description 1 1: ADVGEN20A 7 Pin Auto-Dimming Mirror with Compass and Temperature 2 1 Gentex by VOXX Corporation Installation Instructions Contact VOXX Customer Service
BMW 3Series (E46) Installation Guide StealthOne Version 1.6
 Installation Guide StealthOne Version 1.6") BMW 3Series (E46) Installation Guide StealthOne Version 1.6 Copyright Fontana Enterprises, 2008 All rights reserved. Product Information Copyright Copyright Fontana Enterprises, 2008 All rights reserved.
BMW 3Series (E46) Installation Guide StealthOne Version 1.6 Copyright Fontana Enterprises, 2008 All rights reserved. Product Information Copyright Copyright Fontana Enterprises, 2008 All rights reserved.
X-Type w/ non-premium sound amplifier installation instructions
 X-Type w/ non-premium sound amplifier installation instructions 1. Pull radio from dash (see Radio Removal Instructions ) 2. Disconnect wiring harness from back of radio by pushing in tab on plug and pulling
INSTALLATION INSTRUCTIONS
 Rear Vision System Aftermarket and Factory 5.0, 8.4 and 6.1 MyGig Touch Screen Display (Factory Display requires Chrysler/Dodge dealer to activate) 2009 Current* Dodge Ram (Kit part number 1009-6503) *NOTE:
TOYOTA tc HANDS FREE BLU LOGIC Preparation
 TOYOTA tc 2011- HANDS FREE BLU LOGIC Preparation Part #: PT923-00111 Conflicts: JBL Audio, Factory Navigation NOTE: Part number of this accessory may not be the same as the part number shown. Kit Contents:
REAR STEEL BUMPER INSTALLATION INSTRUCTIONS Runner
 REAR STEEL BUMPER INSTALLATION INSTRUCTIONS 2010+ 4Runner Version 2.1.0 - September 2016 Thank you for purchasing the Southern Style OffRoad Toyota 4Runner 5 th Gen Modular Rear Plate Steel Bumper. It
Installation Tips for your Remote Start system (for Toyota Camry & Prius C, ) Crimestopper RS0+ EVO-ALL T3468 rev#1.
 Crimestopper RS0+ EVO-ALL T3468 rev#1.") Installation Tips for your Remote Start system (for Toyota Camry & Prius C, 2012-2014) Crimestopper RS0+ EVO-ALL T3468 rev#1.1 1/22/2015 Thank you for purchasing your remote start from MyPushcart.com -
Installation Tips for your Remote Start system (for Toyota Camry & Prius C, 2012-2014) Crimestopper RS0+ EVO-ALL T3468 rev#1.1 1/22/2015 Thank you for purchasing your remote start from MyPushcart.com -
TOYOTA CAMRY HANDS FREE BLU LOGIC Preparation
 TOYOTA CAMRY 2008- HANDS FREE BLU LOGIC Preparation Part #: PT923-00111 Conflicts: JBL Audio, Factory Navigation NOTE: Part number of this accessory may not be the same as the part number shown. Kit Contents:
INSTALLATION INSTRUCTIONS DODGE DAKOTA 2 KIT # 682 (2WD), 692 (4WD) 3 KIT # 683 (2WD), 693 (4WD)
, 692 (4WD) 3 KIT # 683 (2WD), 693 (4WD)") INSTALLATION INSTRUCTIONS 1997-1999 DODGE DAKOTA 2 KIT # 682 (2WD), 692 (4WD) 3 KIT # 683 (2WD), 693 (4WD) Installation of a Performance Accessories body lift kit will change the vehicle s center of gravity
INSTALLATION INSTRUCTIONS 1997-1999 DODGE DAKOTA 2 KIT # 682 (2WD), 692 (4WD) 3 KIT # 683 (2WD), 693 (4WD) Installation of a Performance Accessories body lift kit will change the vehicle s center of gravity
Procharger Stage II Intercooled Supercharger System (11-14 GT)
") Procharger Stage II Intercooled Supercharger System (11-14 GT) Installation Time: Approximately one day. Installed on 2012 Mustang GT 5.0/Manual Required Tools 3/8 Socket Set (Standard and Metric) 1/2
Procharger Stage II Intercooled Supercharger System (11-14 GT) Installation Time: Approximately one day. Installed on 2012 Mustang GT 5.0/Manual Required Tools 3/8 Socket Set (Standard and Metric) 1/2
VTCM Installation Manual Table of Contents
 VTCM Installation Manual Table of Contents 1. Introduction:... 2 2. Disclaimer:... 2 3. Software / Drivers:... 2 a. Plugging in the controller:... 2 b. Install 4.0.NET Frame work:... 3 c. Install COM port
Intake Kit Supplement for CRV and Pathfinder
 Intake Kit Supplement for CRV and Pathfinder This guide will briefly outline how to install the intake kits for the Honda CRV and Nissan Pathfinder. This is a pretty basic job, but for the average person
TOYOTA VENZA 2009 TRAILER WIRE HARNESS Procedure
 Part Number: PT791-0T099 Kit Contents Item # Quantity Reqd. Description 1 1 Trailer Wire Harness Module 2 1 4-Flat Harness 3 1 Battery Power Wire Harness 4 1 Mounting Bracket, 4-Flat 5 2 Screw #10-24 6
Gentex Autodim Homelink Compass Temperature Mirror Installation in 2014 Tacoma Purchased from Bob s Automotive Mirrors & More LLC (Robert Prim)
") Gentex Autodim Homelink Compass Temperature Mirror Installation in 2014 Tacoma Purchased from Bob s Automotive Mirrors & More LLC (Robert Prim) This is my 50-GENK51A Gentex mirror kit and instructions.
Gentex Autodim Homelink Compass Temperature Mirror Installation in 2014 Tacoma Purchased from Bob s Automotive Mirrors & More LLC (Robert Prim) This is my 50-GENK51A Gentex mirror kit and instructions.
Turn Signal / Horn Kit PN 7101 by All years Polaris RZR 1000 and RZR 900, 900-4, 900 trail, 900S and 900XC STOP - THIS KIT IS DESIGNED
 All years Polaris RZR 1000 and 1000-4 2015 RZR 900, 900-4, 900 trail, 900S and 900XC STOP - THIS KIT IS DESIGNED SPECIFICALLY FOR ALL YEAR AND MODEL POLARIS RZR 1000 AND 1000-4. ALSO THE 2015 POLARIS RZR
Installation Instructions for the Plug & Play Chrysler/Dodge/Jeep Remote Start Package w/mux T5
 v1.01 12/14/2102 Installation Instructions for the Plug & Play Chrysler/Dodge/Jeep Remote Start Package w/mux T5 Review the remote start installation manual for safety instructions! Overview Your kit consists
Installation Tips for your Remote Start/Keyless Entry (for Honda/Acura Vehicles) [EVO-ALL] v1.02 updated 9/13/2013
![Installation Tips for your Remote Start/Keyless Entry (for Honda/Acura Vehicles) [EVO-ALL] v1.02 updated 9/13/2013](/thumbs/87/96035180.jpg "Installation Tips for your Remote Start/Keyless Entry (for Honda/Acura Vehicles) [EVO-ALL] v1.02 updated 9/13/2013") Installation Tips for your Remote Start/Keyless Entry (for Honda/Acura Vehicles) [EVO-ALL] v1.02 updated 9/13/2013 Thank you for purchasing your remote start from MyPushcart.com - an industry leader in
Installation Tips for your Remote Start/Keyless Entry (for Honda/Acura Vehicles) [EVO-ALL] v1.02 updated 9/13/2013 Thank you for purchasing your remote start from MyPushcart.com - an industry leader in
2015 Copyright Maxspeed-Motorsports.com
 1 Porsche PCM 3.1 Backup Camera Installation Instructions. Thank you for purchasing your product at www.maxspeedmotorsports.com Before you start please understand that these installation instructions are
INSTALLATION INSTRUCTIONS
 Rear Vision System Mirror Display Dodge Ram Kit Contents: Instruction Sheets Template Chassis Harness Endgate Handle with Camera Wire Ties (Qty: 17) Bottle of ZTech Plug for Non-Locking Endgates (Optional)
TOYOTA SOLARA EC REARVIEW MIRROR Section I - Installation Preparation
 Section I - Installation Preparation Part Number: PT374-33020 Section I - Installation Preparation Kit Contents Item # Quantity Reqd. Description 1 1 AD Mirror Assembly w/compass 2 1 Hardware Bag 3 1 Installation
LPE C5 Battery Relocation Kit
 LPE C5 Battery Relocation Kit The LPE C5 Corvette battery relocation kit improves vehicle weight distribution by moving weight to the rear of the vehicle. The improved weight distribution increases traction
IMPORTANT. Tools Needed: (depending upon vehicle) Phillips Screwdriver. Drill & Bit Set. Wire Stripper/ Crimp Tool
 Phillips Screwdriver. Drill & Bit Set. Wire Stripper/ Crimp Tool") Revision 3/14/05 Amplifier Installation Guide IMPORTANT Before starting, compare items on your invoice with items received. Carefully check through packaging material. If any item is missing, please call:
Revision 3/14/05 Amplifier Installation Guide IMPORTANT Before starting, compare items on your invoice with items received. Carefully check through packaging material. If any item is missing, please call:
Sunroof Repair. Sunroof Repair TSB. The sunroof repair kit available for the J30 is part number Y20. See images at bottom of document.
 Sunroof Repair This document is the text/images from the TSB (technical service bulletin) issued by Infiniti concerning the repair procedure for sunroof issues. Be advised that this is a LARGE, TIME-CONSUMING
Peugeot 406 Coupe: Delocking your boot V.1 April 2005
 This is a first stab at a DIY guide to de-locking your 406 Coupe. It isn t a hard modification to do yourself, but you do need to be confident working on your cars electrics and removing and refitting
Installation supplement for. European Integrated Systems, Ltd. Enhanced BMW Bluetooth Interface. Table of Contents
 Table of Contents 1. Introduction 2. BMW Microphone Installation 3. ULF Module and Harness Installation 4. Configuration/Setup 5. Warranty/Disclaimer Information Installation supplement for European Integrated
LGT-306L / LB Club Car Precedent LED Light Bar Bumper Kit Installation Instructions
 LGT-306L / LB Club Car Precedent LED Light Bar Bumper Kit Installation Instructions Caution: Please read through the instructions carefully. Before starting this project, remove the system s positive and
Rostra Electronic Cruise Control Install On a Stratoliner or Roadliner
 Rostra Electronic Cruise Control Install On a Stratoliner or Roadliner MATERIALS LIST: 1 - Rostra Part # 250-1223 (www.brandondist.com/products/cruise1223.htm) 1 - Signal Splitter part # 250-4369 1 - Engagement
INSTALLATION AND WIRE CONNECTION MANUAL
 INSTALLATION AND WIRE CONNECTION MANUAL 1. SAFETY PRES Symbol Identification This manual uses symbols and icons to indicate safety precautions and concerns during the installation procedure. Be sure to
Hyundai EXCEL Remote Immobiliser System Installation Manual Revision 1 10/12/99 Part No
 Hyundai EXCEL Remote Immobiliser System Installation Manual Part No. 00243-22500 The Excel remote immobiliser system is central locking compatible. For vehicle's already fitted with Factory central locking,
INSTALLATION AND WIRE CONNECTION MANUAL
 INSTALLATION AND WIRE CONNECTION MANUAL 1. SAFETY PRES Symbol Identification This manual uses symbols and icons to indicate safety precautions and concerns during the installation procedure. Be sure to
U L T I M A T E R A D A R / L A S E R D E F E N S E S Y S T E M
 S m a r t e r Q u i e t e r M o r e A c c u r a t e U L T I M A T E R A D A R / L A S E R D E F E N S E S Y S T E M Installation Manual PASSPORT 9500ci Comes Complete Front Radar Receiver Miniature weatherproof
INSTALLATION AND WIRE CONNECTION MANUAL
 INSTALLATION AND WIRE CONNECTION MANUAL 1. SAFETY PRES Symbol Identification This manual uses symbols and icons to indicate safety precautions and concerns during the installation procedure. Be sure to
IT IS IMPORTANT THAT YOU OBTAIN THE CORRECT INFORMATION FOR YOUR VEHICLE, OR DAMAGE TO THE WIRING SYSTEM COULD OCCUR.
 Instructions for Universal Harness PRINT THESE INSTUCTIONS Gentex Mirror Installation Instructions Provided by www.rearviewautomirrors.com These instructions have been prepared to provide you with details
DVD REAR SEAT VIDEO SYSTEM
 Read entire instructions thoroughly before starting. TOOLS REQUIRED: DVD REAR SEAT VIDEO SYSTEM MINIVANS WITH ROOF RAILS INSTALLATION INSTRUCTIONS Non-metal trim stick Phillips screwdriver T15, T20, T25
Curt Mfg. Trailer Hitch and Hoppy Wiring Kit Installation Instructions
 Curt Mfg. Trailer Hitch and Hoppy Wiring Kit Installation Instructions The Curt trailer hitch replaces the stock rear cross member in the Touareg. It attaches with 8 bolts just like the factory VW hitch.
B&W Turnover Ball Installation
 B&W Turnover Ball Installation by Flopster843 02 Jan 2012 I wanted to start this article out by stating one very important thing. Installing a gooseneck hitch is not a task to be taken lightly. If you
Step 1 : Starting the installation
 Installation Instructions for GM Remote Start w/ INTSL Interface Pre-wired Review the remote start installation manual for safety instructions! Overview Your kit consists of two modules a remote start
Depress each tab as you pull the bezel off. The bezels are tight. L.H. shown.
 2013-2014 Ford Mustang V6 & Boss 302 Lower Valance Fog Light Kit Parts List: Quantity: Tool List: Fog light & bulb with bracket 2 Flat head & Phillips screwdriver Black bezels 2 Ratchet & Socket set OR
Installation Tips for your Remote Start system (for RS4LX>GMBP for GM vehicles)
") Installation Tips for your Remote Start system (for RS4LX>GMBP for GM vehicles) Thank you for purchasing your remote start from MyPushcart.com - an industry leader in providing remote starts to doit-yourself
Installation Tips for your Remote Start system (for RS4LX>GMBP for GM vehicles) Thank you for purchasing your remote start from MyPushcart.com - an industry leader in providing remote starts to doit-yourself
vacuum/boost vent mounted ES best viewed in Acrobat Reader This tutorial is provided as a courtesy by ECS Tuning.
 vent mounted vacuum/boost ES2713030 This tutorial is provided as a courtesy by ECS Tuning. best viewed in Acrobat Reader Proper service and repair procedures are vital to the safe, reliable operation of
GENUINE ACCESSORIES INSTALLATION INSTRUCTIONS
 GENUINE ACCESSORIES INSTALLATION INSTRUCTIONS PART NUMBERS: APPLICABLE MODELS: 0000-89-G14A (PORT) Electrochromic Mirror Kit w/ Compass/Temp/HomeLink 2004 Mazda 3 0000-8C-G14A (PDC) KIT CONTENTS: ITEM
TrailGator REAR BUMPER INSTALLATION INSTRUCTIONS Runner
 TrailGator REAR BUMPER INSTALLATION INSTRUCTIONS 2010+ 4Runner Version 3.1.0 - December 2018 Thank you for purchasing the Southern Style OffRoad Toyota 4Runner 5 th Gen Modular Rear Plate Steel Bumper.
INSTALLATION INSTRUCTIONS
 2007-Current Jeep Wrangler 360º System for Factory Display Radios (Kit # AVMS-3701) Please read thoroughly before starting installation and check that kit contents are complete. Items Included in the Kit:
INSTALLATION INSTRUCTIONS
 2007-Current Jeep Wrangler 360º System for Factory Display Radios (Kit # AVMS-3701v2) Please read thoroughly before starting installation and check that kit contents are complete. Items Included in the
INSTALLATION INSTRUCTIONS
 COLD AIR INTAKE INSTALLATION INSTRUCTIONS PART NUMBER D760-0390C APPLICATION: 1999-2003 E39 M5 PARTS LIST 1 Left Aluminum Intake Tube 1 Air Pump Bracket (A) 1 Right Aluminum Intake Tube 1 Air Pump Bracket
GENUINE PARTS INSTALLATION INSTRUCTIONS
 GENUINE PARTS INSTALLATION INSTRUCTIONS 1. 2. 3. 4. DESCRIPTION: Accent light Kit APPLICATION: Versa (2012) PART NUMBER: 999F3 AW008 - Universal Accent Lighting Kit. KIT CONTENTS: Item QTY Description
PLEASE READ THROUGH THE WHOLE WRITE UP BEFORE ACTUALLY USING IT!!!!
 JDM power folding mirror switch install into stock USDM harness. By: Greg L., Zeke21 on twinturbo.net PLEASE READ THROUGH THE WHOLE WRITE UP BEFORE ACTUALLY USING IT!!!! This is how I was able to get the
Tools you will need: Screwdrivers, Metric Sockets, Hook and Loop Tape or Zip Ties, Shop Light, Wire cutters, Wire crimping tool
 Overview: This guide provides instruction for installing Adventure Wagon s Auxiliary Battery Tray and the charging bundle. Package Contents: Adventure Wagon Battery Tray includes the tray plus mounting
OEM Cruise Control Installation in GMC/Chevy NBS trucks
 OEM Cruise Control Installation in 99-02 GMC/Chevy NBS trucks May 2008 ~ Rampage_Rick Having just installed factory cruise control in my 00 Sierra, I thought I d share the fun. I followed the steps outlined
TOYOTA TACOMA EC REARVIEW MIRROR Preparation
 Preparation Part Number: PT374-35052 Kit Contents Item # Quantity Reqd. Description 1 1 AD Mirror Assembly 2 1 Hardware bag Hardware Bag Contents Item # Quantity Reqd. Description 1 1 T-tap Connectors,
Rear Vision System Tailgate Emblem Camera Aftermarket Display 2009-Current Ford F-150 and 2010-Current Super Duty (Kit part number )
") Rear Vision System Tailgate Emblem Camera Aftermarket Display 2009-Current Ford F-150 and 2010-Current Super Duty (Kit part number 1008-6509) Kit Contents: Tailgate Emblem Mount with Camera Chassis Harness
Rear Vision System Tailgate Emblem Camera Aftermarket Display 2009-Current Ford F-150 and 2010-Current Super Duty (Kit part number 1008-6509) Kit Contents: Tailgate Emblem Mount with Camera Chassis Harness
INSTALLATION INSTRUCTIONS
 Rear Vision System Mirror Display 2004 onwards Ford F-150 and 2008 onwards Ford Super Duty (Kit part numbers 1008-9520 and 1008-9525) Kit Contents: RVS Interior (shorter) Harness RVS Chassis (longer) Harness
Shelby GT500 Front Fascia Conversion Kit (05-09 All) Item # Installation Time: 1 Day. Required tools:
 Item # Installation Time: 1 Day. Required tools:") Shelby GT500 Front Fascia Conversion Kit (05-09 All) Item #53611 Installation Time: 1 Day Required tools: Phillips Screw driver 10mm Socket + Ratchet/Wrench 8mm Socket + Ratchet/Wrench 5mm Socket + Ratchet/Wrench
Shelby GT500 Front Fascia Conversion Kit (05-09 All) Item #53611 Installation Time: 1 Day Required tools: Phillips Screw driver 10mm Socket + Ratchet/Wrench 8mm Socket + Ratchet/Wrench 5mm Socket + Ratchet/Wrench
2007 Crown Victoria Police Interceptor (P71) Blend Door Actuator Replacement (If I did it, you can too.)
 Blend Door Actuator Replacement (If I did it, you can too.)") 2007 Crown Victoria Police Interceptor (P71) Blend Door Actuator Replacement (If I did it, you can too.) I'm not saying this is the only way, or even the right way, but it worked for me. First time I've
2007 Crown Victoria Police Interceptor (P71) Blend Door Actuator Replacement (If I did it, you can too.) I'm not saying this is the only way, or even the right way, but it worked for me. First time I've
LGT-312L E-Z-Go TXT Light Bar Bumper Kit Installation Instructions
 LGT-312L E-Z-Go TXT 2014+ Light Bar Bumper Kit Installation Instructions Caution: Please read through the instructions carefully. Before starting this project, remove the system s positive and negative
2016 HONDA 1000 Pioneer PN 3102 Turn signal / horn kit rev nc
 2016 Honda 1000 Pioneer STOP - THIS KIT IS DESIGNED SPECIFICALLY FOR 2016 HONDA 1000 PIONEER IF YOUR MACHINE IS NOT THIS MODEL DO NOT PROCEED. THIS KIT DOES NOT WORK ON THE PIONEER 500 nor 700 S. Contact
HID INSTALLATION ON RST1000 Futura
 HID INSTALLATION ON RST1000 Futura Disclaimer: This is a full description of what I have done to my motorcycle. I am in no way suggesting you do as I have done by following these instructions. I have not
Toyota Sequoia EC Rearview Mirror
 Toyota Sequoia 2010 - EC Rearview Mirror Part Number: 00016-34011 Code:CM5 Kit Contents Item # Quantity Reqd. Description 1 1 AD Mirror Assembly w/ HomeLink, Compass and Shift-Light 2 1 Hardware bag Special
Remote Start Kit for GM Installation RS1/3/4/7 + ADS-DL Tip Sheet
 Remote Start Kit for GM Installation RS1/3/4/7 + ADS-DL Tip Sheet rev 1.4 12/16/2013 Thank you for purchasing your remote start from MyPushcart.com - an industry leader in providing remote starts to do-it-yourself
Steeda Sport Mustang Lowering Springs (2005+) - Installation Instructions
 - Installation Instructions") Steeda Sport Mustang Lowering Springs (2005+) - Installation Instructions The below installation instructions work for the following products: Steeda Sport Mustang Lowering Springs (2005+) Please read
Steeda Sport Mustang Lowering Springs (2005+) - Installation Instructions The below installation instructions work for the following products: Steeda Sport Mustang Lowering Springs (2005+) Please read
TIP SHEET T2352, T3396. Installation Tips for RS1 + EVO-ALL 1-BUTTON REMOTE STARTER FOR: Acura RDX PUSH-TO-START / AUTOMATIC
 Installation Tips for RS1 + EVO-ALL 1-BUTTON REMOTE STARTER FOR: Acura RDX 2013-2015 PUSH-TO-START / AUTOMATIC TIP SHEET T2352, T3396 Thank you for purchasing your remote start from MyPushcart.com - an
Volvo 850 Radiator Replacement Jason Reed 29 March 2013
 This write up covers removing and replacing the radiator on a 97 855 GLT wagon with light pressure turbo and automatic transmission. This car has 162K miles. The radiator, which was original, developed
Prius XM Radio Installation Instructions. Eddie Bell
 2004-2005 Prius XM Radio Installation Instructions By Eddie Bell www.metrotpn.com 1 Let me begin by saying this is an easy but time consuming job. Set aside a few hours of your time for the install. If
SMART ELECTRIC TAILGATE LIFT SYSTEM Document # Created ACH 09/19/2018 Revised ACH 10/02/18 A2
 Document #730141 Created ACH 09/19/2018 Revised ACH 10/02/18 A2 General Applicability: 2018- KIA Sedona Issues N/A Kit Contents: Item# Component Description 1 Stay Bar (Strut)(right) 2 Stay Bar (Strut)(left)
BMW F10 Premium / Professional Audio system - adding a sub woofer part two
 BMW F10 Premium / Professional Audio system - adding a sub woofer part two I accept no liability for any work carried out as a result of this guide. Any damage caused to equipment or your car (or you)