Installation Manual for VMAC System V Mercedes Sprinter Freightliner Sprinter 3.0L Diesel
|
|
|
- Jasmin Jacobs
- 6 years ago
- Views:
Transcription


1 COMPACT. POWERFUL. TM Installation Manual for VMAC System V Mercedes Sprinter Freightliner Sprinter 3.0L Diesel
2
3 Installation Manual for VMAC System V Mercedes Sprinter Freightliner Sprinter 3.0L Diesel General Information... 3 Before You Start... 3 Torque Specifications... 3 Special Tools Required... 3 Hose Information... 3 Important Safety Notice... 4 Safety Messages... 4 Ordering Parts... 5 Warranty Registration... 5 Part 1: System Identification, Warranty and Warnings... 6 Part 2: Preparing for Installation... 8 Part 3: Installing the Pulley Part 4: Installing the Compressor Part 5: Installing the Tank and Hoses Installing the hoses Installing the Tank Connecting the Hoses Remote Muffler Installation Part 6: Interior Panel removal Dash Panel Removal Part 7: Installing the Control Components Installing the Control Box Installing the Relay Harness Connecting the Throttle Control Part 8: Adding oil to the system Part 9: Completing and Testing the Installation Completing and Testing the Installation Safety Test Final Testing Part 10: Setup, Performance Testing and Adjustments Throttle Control Adjustment Part 11: Recommended Accessory Installation Part 12: Auxiliary Air Receiver Part 13: Accessory Products from VMAC Part 14: Warranty Registration
4 Installation Manual for VMAC System V Mercedes Sprinter Freightliner Sprinter 3.0L Diesel Document Changes and Revisions Revision Important Information The information in this manual is intended for certified VMAC installers who have been trained in installation procedures and for people with mechanical trade certification who have the tools and equipment to properly and safely perform the installation. Do not attempt this installation if you do not have the appropriate mechanical training, knowledge and experience. Follow all safety precautions for mechanical work. Any grinding, bending or restructuring operations for correct fit in modified trucks must follow standard shop practices. Notice Revision Details Revised by Manuals are subject to change without notice. Registered Trademarks Checked by Eng. Tech. Mech. Elec. All trademarks mentioned in this manual are the property of their respective owners. Their use by VMAC is for identification of the manufacturers products only and does not imply any affiliation or endorsement by said companies. Loctite, Klean N Prime, 242 and PST are registered trademarks of Henkel AG & Company KGaA. PTFE is a registered trademark of E. I. du Pont de Nemours and Company or its affiliates. Nylok is a registered trademark of Nylok Fastener Corporation. Implemented C ECN REF KRM N/A BDJ N/A 10 Nov 2015 D ECN Park interlock update MSP N/A AJH GB AMG 24 Nov E ECN Improved safety testing MSP N/A AJH GB SM 28 June 2017 Qual. Copyright 2017 All trademarks used in this manual are the property of the respective copyright holder. The contents of this manual may not be reproduced in any form without the express written permission of VMAC, 1333 Kipp Road, Nanaimo, BC V9X 1R3. Printed in Canada 2
5 General Information Before You Start Read this manual before attempting installation so that you can familiarize yourself with the components and how they fit on the vehicle. Identify variations for different engine models and different situations that are listed in the manual. Open the package, unpack the components and identify them. Torque Specifications All fasteners must be torqued to specifications. Use manufacturers torque values for OEM fasteners. Apply Loctite 242 or equivalent on all engine-mounted fasteners. Torque values are with Loctite applied unless otherwise specified. STANDARD GRADE 8 NATIONAL COARSE THREAD Size 1/4 5/16 3/8 7/16 1/2 9/16 5/8 3/4 Foot-pounds (ftlb) Newton meter (N m) STANDARD GRADE 8 NATIONAL FINE THREAD Size 3/8 7/16 1/2 5/8 3/4 Foot-pounds (ft-lb) Newton meter (N m) METRIC CLASS 10.9 Size M8 M10 M12 M14 M16 Foot-pounds (ft-lb) Newton meter (N m) Special Tools Required Pneumatic fan wrench (Lisle or equivalent) or a manual fan pulley holder (such as KD3900) Pulley Counter Rotation Tool: VMAC part number / , or Mercedes part number A1260 Internal and external Torx socket sets Trim Removal Tool (such as Harbour Freight 67021) Hose Information Depending on other installed equipment, it might be necessary to move the air/oil separation tank from its intended location. The hoses used in VMAC compressor systems have a specific inner liner that is compatible with our compressor oil. Use of hoses other than those supplied or recommended by VMAC may cause compressor damage and may void your warranty. Please contact VMAC for replacement hoses and further information. 3
6 Important Safety Notice The information contained in this manual is based on sound engineering principles, research, extensive field experience and technical information. Information is constantly changing with the addition of new models, assemblies and service techniques. If a discrepancy is noted in this manual, contact VMAC prior to initiating or proceeding with service. Current information may clarify the issue. Any person with knowledge of such discrepancies who performs service and repair assumes all risks. Only proven service procedures are recommended. Anyone who departs from the specific instructions provided in this manual must first assure that their safety and that of others is not being compromised and that there will be no adverse effects on performance or the operational safety of the equipment. VMAC will not be held responsible for any liability, injuries, loss or damage to individuals or to equipment as a result of the failure of any person to properly adhere to the procedures set out in this manual or standard safety practices. Safety should be your first consideration in performing service operations. If you have any questions concerning the procedures in this manual or require any more information on details that are not included in this manual, please contact VMAC before beginning repairs. Safety Messages This manual contains various warnings, cautions and notices that must be observed to reduce the risk of personal injury during service or repair and the possibility that improper service or repair may damage the equipment or render it unsafe. This symbol is used to call your attention to instructions concerning your personal safety. Watch for this symbol; it points out important safety precautions, it means, Attention, become alert! Your personal safety is involved. Read the message that follows and be alert to the possibility of personal injury or death. Be alert; your safety is involved. While it is impossible to warn about every conceivable hazard, let good common sense be your guide. This symbol is used to call your attention to instructions on a specific procedure that if not followed may damage or reduce the useful life of the compressor. This symbol is used to call your attention to additional instructions or special emphasis on a specific procedure. 4
7 Ordering Parts To order parts, contact your VMAC dealer. Your dealer will ask for the VMAC serial number, part number, description and quantity. To locate your nearest dealer, call or online at Warranty Registration The VMAC warranty form is located at the back of this manual. This warranty form must be completed and sent to VMAC at the time of installation for any subsequent warranty claim to be considered valid. There are four ways warranty forms can be submitted to VMAC: Online Fax (250) Mail VMAC - Vehicle Mounted Air Compressors 1333 Kipp Road, Nanaimo, BC, Canada V9X 1R3 5

8 Part 1: System Identification, Warranty and Warnings Preparation for installation is very important. Missing a step or an item can cause problems in the installation or damage to components. Check off each item as it is completed so that you do not miss any preparation steps. Check through the illustrated parts list, ensure that no components are missing, and that they are in the correct quantity. If any components are missing, have the system ID ready and call VMAC tech support at (888) Complete the warranty form. The VMAC warranty form is located at the back of this manual, as well as online at: This warranty form must be completed and mailed or faxed to VMAC at the time of installation for any subsequent warranty claim to be considered valid. The System Identification Number Plate must be attached to the vehicle at the time of installation. This plate provides information that allows VMAC to assist in parts and repairs. Mark and drill two 7/64-inch holes in an appropriate location, close to the compressor. Secure the plate with supplied self- tapping screws (Figure 1.1). Figure 1.1 System Identification Plate Install the VMAC belt routing diagram in a suitable location under the hood. 6
. Figure 1.")
9 As part of the installation process, ensure that the safety and operational instruction decal is affixed in an obvious location so that it can be seen by vehicle operators. A good spot for this is usually on the inside of the door or on the panel underneath the steering wheel (Figure 1.2). Figure 1.2 To alert any technicians that may service the vehicle, affix the servicing caution/contact label in the engine compartment near the hood latch in a visible location. Thoroughly clean the selected area before affixing the label (Figure 1.3). Figure 1.3 7
. Quick Release Terminal Figure 2.")

10 Part 2: Preparing for Installation Remove the battery terminal from the quick release post located next to throttle pedal. Press down on the red tab and pull back (Figure 2.1). Quick Release Terminal Figure 2.1 Remove the air box located in the center of the engine bay. Remove the two electrical plugs, the hose clamp, air box elbow and pull the front two legs straight up to release the air box. Move the assembly out of the way (Figure 2.2). Air box Elbow Hose Clamp Electrical plug x2 Front legs 8 Figure 2.2

11 Remove the fan clutch electrical plug, and use an E11 Torx socket to remove the stator fastener (Figure 2.3). Figure 2.3 The upper coolant line from the radiator can be left in place during the installation. Push in on the clips on either side of the radiator to release the shroud from the radiator frame. Gently lift up to keep the clips unlocked (Figure 2.4). Shroud Clips Figure 2.4 Shroud clip location Loosen the fan nut, the fan has reverse thread (left hand thread) so it must be rotated clockwise to loosen. A counter rotating tool may be required (Mercedes part # 8930). 9
12 If using a pneumatic fan removal tool, the nut size is 36mm. alternatively a 1-7/16" wrench and Mercedes fan tool (Part number ) can be used. Remove the fan and shroud at the same time, carefully remove both out through the top of the engine compartment. Manipulate the assembly to get it past the upper coolant line. Store the fan in a vertical position to prevent damage to the viscous clutch. Install cardboard (or similar protection) over the radiator core to prevent damage to the fins when installing components. Use a 27mm socket and the counter rotating tool VMAC part number / , or Mercedes part number A1260 to remove the center fastener from the crank pulley. Remove the washer from the OEM crank pulley bolt. 10

13 Part 3: Installing the Pulley Before installing the VMAC pulley, ensure there is no surface rust or dirt inside the OEM pulley. Do not use an impact tool to tighten pulley bolt. Use torque wrench, and follow the recommended torque values. Do not remove the OEM stretch belt. The VMAC crank pulley may have to be removed during stretch belt service Insert the VMAC pulley into the OEM crank pulley and rotate the VMAC pulley counter-clockwise until the tabs seat inside the spokes of the OEM pulley. Install the OEM fastener with the supplied washer (Figure 3.1). Remove the OEM washer from the OEM Crank Pulley bolt. Use the supplied VMAC washer only. Use the counter rotating tool VMAC part number / , or Mercedes part number A1260 to stop the pulley from rotating, and torque the main fastener to 200N.m (147 ft/lbs). Figure 3.1 Crank pulley installation 11
. 3/8 Oil Line 3/4\" Discharge Line Figure 4.")
14 Part 4: Installing the Compressor Connect the straight fitting on the 3/4 x 118 discharge line to the compressor (Figure 4.1). Connect the straight fitting on the 3/8 x 118 oil line to the side of the compressor (Figure 4.1). 3/8 Oil Line 3/4" Discharge Line Figure 4.1 Compressor hose connections 12
. Figure 4.")
15 Remove the idler and tensioner from the VMAC main bracket (Figure 4.2). Figure 4.2 VMAC main bracket assembly 13
. M8 X 50MM M8 X 25MM M8 X 55MM Figure 4.")
16 The VMAC main bracket will bolt into five holes on the engine oil pan, there are four holes on the side, and one hole on the front (Figure 4.3). M8 X 50MM M8 X 25MM M8 X 55MM Figure 4.3 OM642 Engine 14
. Figure 4.")
17 Apply blue Loctite to the five supplied fasteners, and install the VMAC main bracket onto the engine (Figure 4.4). Figure 4.4 Main bracket mounting fasteners 15
18 Using blue Loctite, install the idler and tensioner onto the main bracket and torque bolts to specifications. Ensure the idler spacer is installed (Figure 4.5). M10 X 35MM Figure
. M8 X 45MM Figure 4.6 Install the supplied compressor belt (Figure 4.7). Figure 4.7 17")
19 Use blue Loctite and mount the compressor onto the bracket using the three supplied fasteners (Figure 4.6). M8 X 45MM Figure 4.6 Install the supplied compressor belt (Figure 4.7). Figure
. Figure 4.")
20 The compressor clutch is 8 rib, install the 6 rib belt so that it is centered on the clutch. You should see one clutch rib on each side of the belt (Figure 4.8). Figure 4.8 Remove the shipping pin in the tensioner, this will apply tension to the belt. Ensure belt is properly seated on all pulleys. 18
21 Use blue Loctite and install the supplied shield onto the compressor using the three supplied fasteners (Figure 4.9). Do not over tighten these fasteners! Figure 4.9 (Compressor hoses not shown) 19
.")
22 Install the compressor air filter bracket in the engine bay behind the radiator overflow bottle. Use the two existing holes located below and towards the engine side of the cab air filter box. Use the supplied M8 x 18mm fasteners with lock nuts (Figure 4.10). Cab Air Filter Box VMAC Air Filter VMAC Air Filter Bracket Fasteners Compressor Intake Hose Figure
23 Route the compressor intake hose from the compressor, between the engine and the frame, to the bottom of the VMAC air filter (Figure 4.10). Secure the intake hose using the supplied hose clamps to both the compressor and air filter. Re-install the fan and shroud onto the engine. Ensure the radiator shroud tabs click into place. Connect the electrical plug onto the fan and the stator fastener onto the engine (Figure 4.11). Electrical plug Fan Nut Stator Fastener Figure 4.11 Re-install the air box and connect the necessary hoses and electrical connectors. 21


 Ensure tubing is cut square, and that there are no sharp edges.")
24 Part 5: Installing the Tank and Hoses 5.1 Installing the hoses Apply supplied loom or equivalent hose protection to the 3/4" X 118", 3/8" X 118" hoses, and long 1/4" PTFE hose. Connect the long 1/4" PTFE hose to the 90 degree push to connect fitting on the front of the compressor. Ensure the hose fully seats in the fitting. Use a small flat blade screw driver to gently pry between the fitting and the Colet, lubricate and firmly push the tube into the fitting so that it fully seats past the internal O-ring. (Figure 5.1) Ensure tubing is cut square, and that there are no sharp edges. Do not use side cutters as they will deform the tube. Collet Fitting O-ring Figure 5.1 Quick Connect Fitting When routing hoses, ensure cap-plugs are installed so that contaminants do not get in the line. Take care when routing hoses, as a hose failure may damage the compressor. 22
. Hose Routing Figure 5.")
25 Route the 3/4" X 118", 3/8" X 118" hoses, and long 1/4" PTFE hose behind the engine oil pan, positioning them 90 degrees towards the driver s side of vehicle (Figure 5.2). Hose Routing Figure 5.2 Engine Oil Pan 23
. M8 X 100 bolt and Washer Figure 5.")
26 Install the supplied M8 X 100 bolt and washer through the hole in the vehicle sub frame (Figure 5.3). M8 X 100 bolt and Washer Figure

27 Attach the supplied spacer and P-clamp, secure with the supplied M8 nut (Figure 5.4). M8 X 100 Bolt and washer Nut Spacer Figure 5.4 Route all three hoses through the P-clamp, then position the hoses towards the rear of the vehicle. Ensure hoses are not pulled tight to allow for engine movement to be taken up by hose slack. 25
. OEM Bolt Figure 5.")
.")
28 Remove the OEM lower bolt from OEM shift bracket mounted on the driver's side of the bell housing as shown (Figure 5.5). OEM Bolt Figure 5.5 Re-install the OEM bolt with supplied P-clamp, route all three hoses through P-clamp, and towards vehicle battery box (Figure 5.6). OEM Bolt P Clamp Figure

29 Remove and discard the OEM M6 bolt on the rear of battery box (Figure 5.7). OEM bolt (Shown removed) Figure 5.7 Install the supplied M6 X 16 fastener and P-clamp. Route all three hoses through the P-clamp and towards the rear driver s side of the vehicle. 27
. Attach the supplied P-clamp and M6 nut. Route all three hoses through the P-clamp. OEM Stud Figure 5.")
30 Locate the OEM M6 stud on the driver s side of the underbody (approximately 8 inches in front of the fuel filler) (Figure 5.8). Attach the supplied P-clamp and M6 nut. Route all three hoses through the P-clamp. OEM Stud Figure

31 Feed all three hoses through the lower portion of OEM aluminium shield around the fuel filler (Figure 5.9). OEM Shield Figure 5.9 Attach the supplied hose wrap to protect the hoses against the sheet metal. Locate the rear lip of fuel filler vehicle bodywork. 29

32 Drill a 6.5mm (1/4 inch) hole in the position shown (Figure 5.10). Hole location Figure 5.10 Attach the p-clamp using the supplied M6 nut and bolt. Route all three hoses through the p-clamp. Ensure all hoses are routed securely, away from hot and moving parts of vehicle and clear of any hydraulic lines, and vehicle wiring. Use zip ties and suitable hose protection as required. If the vehicle is 4WD ensure the hoses are protected from the front driveshaft. 30
 behind the chassis member shown and 100mm (4 inches)")

33 From the underside of the vehicle, mark a location 130mm (5 inches) behind the chassis member shown and 100mm (4 inches) from the chassis member shown (Figure 5.11). Front of Vehicle Driver s side Front of Vehicle Driver s side Figure Bottom View 31
34 Mark off additional locations 38mm (1.5 inch) forward and behind the previously marked position. Ensure the marked positions are on the raised portion of the vehicle floor (Figure 5.12). Figure Top View Drill the following holes (a pilot drill may be required): 16mm (.62 inch) through the two front marks. These will be for the scavenge tube bulkhead, as well as the remote mount muffler. 28mm (1.125 inch) hole for the #12 discharge bulkhead fitting. 15mm (.59 ) hole for the #6 oil return hose bulkhead fitting. 9.5mm (.375 ) hole for a 3/8 rubber grommet, for the Compressor clutch wire. 32
. Blow Down Muffler Fitting see Section 5.")

35 Fit the bulkhead fittings, along with a 3/8 rubber grommet through the top of the hole, and secure from the bottom with the supplied nuts (Figure 5.13). Blow Down Muffler Fitting see Section 5.4 Front of Vehicle Figure Top View Attach the 3/4 x 118", 3/8 x 118" and the 1/4" Teflon hoses to the underside of the bulkhead fittings. Ensure all fittings are tight, fully seated, and secure (Figure 5.14). Figure Bottom View 33
36 5.2 Installing the Tank Determine a mounting location for the Waste Heat Air Separator Package (WHASP) Ensure the following conditions are met: adequate fresh air supply and venting for the cooling fan minimum 12 of clearance at the outlet of the cooling fan minimum 6" clearance at the front of the cooler hose connections and wiring accessible mounted on a level surface impact protection oil level sight glass visible oil fill and drain ports accessible coalescing and oil filter accessible minimize the hose lengths to maximize performance Mounting the WHASP Tank Refer to Figure 5.17 for mounting details. In some cases, it may be necessary to fabricate a mounting bracket to position the tank in an appropriate location. Secure the tank by bolting the mounting feet to the installation surface, use M8 or 5/16" Fasteners (not supplied, due to the potential variation of tank mounting). Mounting in an Enclosure or Body Mounting the WHASP tank in an enclosure will limit access to ambient air, restrict the escape of hot air from around the unit, and have an adverse effect on cooling. Make sure that adequate ventilation is provided so the cooling system will function properly (i.e. a pull-out drawer). It is not possible to make absolute recommendations regarding ventilation because of the widely differing circumstances that are possible. Duty cycle, ambient temperature and enclosure shape are some of the important variables. Ideal ventilation will provide good airflow through the unit with no restrictions. Cool ambient air ducted to the cooler and installing an exhaust fan to remove hot air is recommended. 34
.")

37 Mounting inside of a Van Body Position the WHASP Tank so that the fan is blowing out towards the passenger side door. During operation the door should be kept open, otherwise the compressor system may overheat due to a lack of a fresh, cool air supply (Figure 5.15). Front of Vehicle Figure 5.15 WHASP ventilation A minimum of 6 of clearance is recommended around the front of the WHASP tank to allow fresh, cool air to circulate into the cooler and fan (Figure 5.16). Front of Vehicle Figure 5.16 WHASP ventilation Allow for extra space on the filter side of the WHASP tank, for access to change filters, compressor oil, as well as to check the level of oil in the compressor system. 35


38 " Fan out Clearance for servicing Figure 5.17 WHASP Tank Four M8 or 5/16" Rectangular Mount Pattern 36
39 5.3 Connecting the Hoses Determine a suitable hose routing path from the bulkhead fittings installed at the end of section 5.1 to the WHASP tank. Measure the length from the bulkhead fittings to the air/oil inlet, oil return, and 1/4" scavenge ports on the WHASP tank along the determined routing path. (Figure 5.17) The system is supplied with generic length hoses to connect the bulkhead fittings to the tank. These are the 3/4" X 28" and 3/8" X 28" hoses with the 90 degree crimp fittings on one end, and the straight 1/4" X 25" Teflon hose. Based on the installation location of the cooler/separator tank these hose lengths may not be ideal. They can be shortened or replaced as necessary, or hose extenders can be used. VMAC recommends shortening these hoses as a preferred alternative to coiling up and securing the excess. Shorter hose length will maximize system performance. Only attempt to shorten the supplied hose if you have access to the necessary equipment to do so properly. DO NOT cut and splice the hose using hose clamps. Ensure any replacement hoses used are compatible with the VMAC compressor oil. Eaton/Aeroquip hoses with an AQP type inner liner are required. OTC fittings are required for the VMAC supplied hose. Push-lock fittings are suitable if FC332 hose is used. If using Push-lock fittings, DO NOT use hose clamps as they will damage the hose and cause leaks. Avoid using 90 degree fittings with sharp corners wherever possible, as they cause flow restrictions and negatively impact performance. VMAC Compressor oil will degrade rubber lined hoses, use only hoses with an AQP elastomer type liner. Contact VMAC Tech Support at for further information. 37
 (Figure 5.18).")
40 Route and connect the straight ends of the 3/4" X 28", 3/8" X 28", and 1/4" x 25" PTFE hoses to the top side of the bulkhead fittings (Figure 5.13). Connect the 90 degree fitting on the 3/4" X 28" hose to the #12 JIC fitting on the upper cooler (above the fan, air/oil inlet) (Figure 5.18). Connect the 90 degree fitting on the 3/8" X 28" hose to the #6 JIC fitting near the bottom of the oil filter end of the tank (oil return fitting) (Figure 5.18). #12 Male JIC #6 Male JIC Figure 5.18 WHASP Oil return and Air/Oil Inlet 38
 to the remainder of the customer s air system (hose not supplied) (Figure 5.19). 1/4 Scavenge #8 Male JIC Figure 5.")
41 Connect the other end of the 1/4" X 25" tube to the fitting near the coalescing filter (scavenge fitting) (Figure 5.19). Connect the output fitting (#8 male JIC) to the remainder of the customer s air system (hose not supplied) (Figure 5.19). 1/4 Scavenge #8 Male JIC Figure 5.19 WHASP Scavenge and Output connection Secure all hoses, tubes, and wires with cable ties. For optimal system performance this compressor system requires the use of a receiver tank. Follow the instructions in part 12 of this manual to prevent damage to the system when installing a receiver tank. 39
42 5.4 Remote Muffler Installation The WHASP Tank automatically depressurizes on clutch disengagement. This is done to prevent damage to the compressor on the next startup. Installing the blowdown muffler outside of the vehicle will reduce cabin noise during blowdown, and will ensure that any oil vapor will be safely discharged outside of the vehicle. Remove the blowdown muffler from the side of the WHASP tank (below the coalescing filter) (Figure 5.20). Figure 5.20 Blowdown muffler Ensure no debris enters the WHASP tank manifold. Contamination of the assembly may cause erratic performance. 40

43 Separate the Teflon hose from both fittings (Figure 5.21). Loom the hose with supplied 1/4" plastic split loom. Figure 5.21 Dissasembly Apply thread sealing compound, and install the provided 1/4 Push- To-Connect fitting into the threaded hole which previously held the blowdown muffler (Figure 5.22). Figure 5.22 Fitting installation 41
. Figure 5.")
44 Connect the 1/4 Teflon hose into the push-to-connect fitting installed in the WHASP tank (Figure 5.23). Figure 5.23 Tubing Installation Remove the locking nut from the remote muffler assembly (Figure 5.24). Figure 5.24 Bulkhead blowdown assembly 42
. Figure 5.")

45 Insert the bulkhead fitting through the hole in the floor (Figure 5.25). Figure 5.25 Installing the fitting Install the lock-nut and serrated washer from underneath the vehicle (Figure 5.26). Figure 5.26 Installing the fitting Route the 1/4" Teflon hose to the bulkhead fitting. Ensure the hose will not kink, and cut the hose to length. Ensure hose is cut square, and that there are no sharp edges. Do not use side cutters as this will deform the hose. Install the hose into the push-to-connect. Secure the hose with supplied Nylon ties. 43

46 Part 6: Interior Panel removal 6.1 Dash Panel Removal Keep wires away from the park brake mechanism. Route wires clear of the steering column and pedals so they do not contact moving parts. Before drilling holes, make sure that there are no OEM wires, hoses, or components where you will be drilling. Using a set of trim removal tools, and a T25 Torx bit, remove the panels indicated in (Figure 6.1) to allow access, and to route wiring. REMOVE PANELS Figure
. Figure 6.")
.")
47 Remove the driver side step cover, and floor mat (Figure 6.2). Figure 6.2 Remove the driver's side dash cover to the right of the glove box (Figure 6.3). Figure

48 Remove the panel under the steering column (Figure 6.4). Figure 6.4 Remove driver's seat: Seat base: E14 Torx socket Seat belt: T50 Torx drive 46
. Figure 6.")
49 Lift the plastic trim around the shift boot, starting on the passenger side, and pull towards the driver's side. Take care not to damage the plastic tabs securing the trim (Figure 6.5). Figure
 (Figure 6.6). Figure 6.")
 PULL BACK TO SEPARATE 1) PULL TOWARDS PASSENGER SEAT")
50 Remove the hatch from the driver s side floorboard (Torx T27) (Figure 6.6). Figure 6.6 Remove the cover on the hand brake (Figure 6.7). 2) PULL BACK TO SEPARATE 1) PULL TOWARDS PASSENGER SEAT TO RELEASE LATCH Figure
51 Part 7: Installing the Control Components Figure
.")
. Figure 7.")
52 7.1 Installing the Control Box Determine an appropriate location for the control panel and install the control panel using the 4 holes per Figure 7.2. A mounting bracket may need to be fabricated (bracket and hardware not included with kit). Apply plastic loom or equivalent protection to all wiring before installation. The control panel is not weather-proof. It should be installed either inside the cab or inside a cabinet on the service body (if equipped). Figure 7.2 (dimensions in inches) Keep the rear of the control panel protected from tools and equipment. 50

53 Using the supplied extension wires, connect the four control panel wires to the respective tank harness wires (Figure 7.3). Ensure you use the correct gauge wire. Connect: Blue to Blue 14 AWG Orange to Orange 14 AWG Black to Black 18 AWG White to White 18 AWG Relay Figure 7.3 Connect the green/yellow wires from the control panel and tank harness to chassis ground (Figure 7.3) (Figure 7.4). Figure 7.4 Chassis Ground To confirm you have a good ground, use an ohm meter to measure the resistance between the ground point and the battery negative terminal. Resistance should be less than one ohm. 51
. Figure 7.")
54 Run the white 14 AWG wire from the tank harness to the clutch on the compressor and connect it to the bullet connector on the black wire (Figure 7.5). Run the yellow 18 AWG wire from the tank to the throttle control under the dash and connect it to the matching yellow wire (Figure 7.5). Figure 7.5 Route the red 14AWG wire from the control panel through the rear bulkhead pass-thru and up under the driver s seat (Figure 7.6). Pass Through Driver s Seat Bracket Figure
.")
55 Locate the electrical access point under the driver s seat (Figure 7.7). Open the black cover over the three terminal studs (Figure 7.7). Cover Cover Figure
56 7.2 Installing the Relay Harness RED RED BLK 20A RED BLK ORG GRN/YEL Middle Post Positive Battery Right post Key switched Ground Control Panel Figure 7.8 Mount the relay harness where it will be accessible for servicing, close to the main battery, and protected from the elements. The instructions below are explained in more detail in the following pages. Complete the following connections: Black wire with the 20 amp fuse to the positive battery terminal (OEM red wire on the middle terminal per Figure 7.9) Green wire w/ yellow stripe wire on the relay module to chassis ground or battery negative. (Figure 7.10) Orange wire from the relay harness to the ignition switched terminal (OEM black w/ yellow stripe wire on the right hand terminal per Figure 7.9) Route the red 14AWG wire from the control panel to the relay module. (Figure 7.7) Solder and seal the short red wire on the relay module to the red 14AWG wire from the control panel. (Figure 7.3 and Figure 7.8) 54
: VMAC black fused wire to OEM red wire VMAC orange wire to OEM black w/ yellow stripe wire Black with 20A fuse Key Switched Figure 7.")
57 VMAC relay module power details (Figure 7.9): VMAC black fused wire to OEM red wire VMAC orange wire to OEM black w/ yellow stripe wire Black with 20A fuse Key Switched Figure 7.9 VMAC relay module ground details (Figure 7.10): VMAC green w/ yellow stipe wire to OEM chassis ground GRN/YEL Figure
58 7.3 Connecting the Throttle Control Keep wires away from the park brake mechanism. Route wires clear of the steering column and pedals so they do not contact moving parts. Before drilling holes, make sure that there are no OEM wires, hoses, or components where you will be drilling. Tie-wrap the throttle control under the dash away from moving parts, positioned so that the RPM 1 adjusting screw is accessible. Unplug the cable from the foot pedal assembly and connect it to the throttle control. Connect the throttle control cable to the foot pedal assembly. Connect the green ground wire from the throttle control to the OEM stud near the accelerator pedal. Find a grommet in the firewall where the white wire from the VMAC throttle control can be passed through. 56

 on the shift module (Figure 7.12). FRONT PIN - BROWN Figure 7.")
59 Route the blue wire to the shift module in the center console (Figure 7.11). SHIFT MODULE Figure 7.11 Solder and seal the Park Signal blue wire from the throttle control into the brown wire (front pin) on the shift module (Figure 7.12). FRONT PIN - BROWN Figure 7.12 Route the white wire from the throttle control to the ECM located on the driver side in the engine bay (Figure 7.13). 57

 SIGNAL PIN 39 GRY/BLK 14 Ensure that all wires are protected")
60 Figure 7.13 Solder and seal the white wire to the grey w/ black stripe (pin 39 of larger connector) wire (Figure 7.14). TACH (CKP) SIGNAL PIN 39 GRY/BLK Figure 7.14 Ensure that all wires are protected from heat and abrasion points. Cover wiring with plastic loom or equivalent wire protection. 58
 (Figure 7.15).")
61 Route the black wire from the throttle control to the center console and down to the battery hatch. Solder and seal the black wire from the throttle control to the brown w/white strip wire running to the park brake. (This is the park brake safety signal) (Figure 7.15). PARK BRAKE - BRN/WHT Cover the black wire with loom. Figure 7.15 Check all wiring to ensure that it will not contact any hot or moving components and will not interfere with the operation of the truck. Secure all wiring with nylon ties and loom as required. 59

62 Part 8: Adding oil to the system You must use the VMAC supplied and approved compressor oil in this system. Failure to use this special oil will result in damage to the compressor and will void your warranty. Do not overfill the system. Overfilling the system with oil can flood the sight glass window and make the system appear empty. Remove the fill cap on the WHASP tank (above the sight glass). Using a funnel, pour oil into the tank until the oil level in the sight glass reaches the MAX line. The system capacity is 4L. Reinstall the fill cap and tighten securely. Ensure the fill port remains accessible as it will be necessary to check and top up the oil after first compressor startup. Fill Cap Sight Glass Figure
63 Part 9: Completing and Testing the Installation Lift the vehicle, ensuring the driven wheels are off of the ground. Support the vehicle securely with appropriately rated jack stands. Ensure there are no people around the vehicle before beginning the test. If the vehicle fails the test, ensure the wiring to all of the connections are correct and secure. If additional assistance is required, contact your local VMAC dealer or call or Completing and Testing the Installation Check all wiring to ensure that it will not contact any hot or moving components and will not interfere with the operation of the truck. Secure all wiring with nylon ties and loom as required. Replace all dash panels and other covers removed during installation. Connect the battery(s). 9.2 Safety Test Ensure the following has been completed: Place the transmission in PARK and apply the park brake. Turn the ignition key to ON but do not start the engine. Turn on the compressor and listen for the compressor clutch to engage. Confirm that the WHASP tank cooling fan turns on. Observe the hour meter, and ensure the hourglass icon is blinking. Turn off the compressor switch and ensure the clutch has disengaged and the WHASP fan turns off. Before Starting the Engine Checklist Ensure the following has been completed: Check that the compressor oil level at the tank sight glass is correct. Complete a final inspection of the installation to ensure everything has been completed. Perform a final belt alignment check. Check all wiring for security and protection. Ensure nothing is touching the compressor body. Ensure all of the compressor outlets are closed. Ensure the parking brake is engaged and the transmission is in PARK. Start the engine. 61
64 After Starting the Engine Checklist Allow the vehicle to reach operating temperature. Turn on the compressor. The compressor clutch should engage, and the engine speed should increase to between 2,000 and 3,000 rpm in response to the throttle control. Allow the compressor to run for approximately 10 seconds. Turn off the compressor. Shut down the engine and check the compressor oil level. Add oil as necessary to bring the level to the FULL line in the sight glass and check for leaks. Ensure any stored air is drained from the system. Start the engine. Assistance may be required for the next steps. The following tests confirm that the drive disable system is working correctly. The drive disable system prevents the VMAC throttle from increasing engine rpm unless the transmission is in PARK and the park brake is engaged. 2 people are required to perform this safety test. 1 person must remain in the driver seat and be prepared to actuate the service (foot) brake if necessary. The second person will actuate the compressor switch and ball valve as necessary. Install the VMAC Air Test Tool (P/N: A700052) with the 30 cfm (1/8 in) orifice installed and the ball valve closed. With the engine running and the vehicle in PARK, release the parking brake. Turn on the compressor and open the ball valve. The clutch should engage, but engine speed should NOT increase. Close the ball valve. Turn off the compressor. Reapply the park brake. The steps marked with asterisks will be repeated. *With the engine running, Depress the service (foot) brake and shift the transmission out of PARK. *Turn on the compressor and open the ball valve. The clutch should engage, but engine speed should NOT increase. *Close the ball valve. *Turn off the compressor. *Drain any accumulated air from the system. 62

65 *Shift the transmission into PARK. Repeat the steps marked with asterisks for all transmission selector positions, returning the gear selector to PARK after each gear is tested. Engine speed should not increase unless the vehicle is in PARK or NEUTRAL. Drain any air that may have accumulated during the previous tests. Ensure the parking brake is engaged. Turn on the compressor and open the ball valve. Release the park brake. The engine speed should drop to base idle. Reapply the park brake. The engine speed should increase as soon as the park brake is engaged. Close the ball valve, allow the system to build to full pressure and the engine speed to return to VMAC base idle. Turn the compressor off and shut down the engine. Drain any accumulated air from the system. 9.3 Final Testing Operate the system with an air tool for at least 1 hour. It is possible to overheat the compressor system if the air tool exceeds the compressor's CFM capacity. Ensure a minimum of 60 PSI of air pressure is maintained during tool operation. See part 10 of this manual for testing instructions. Road test the vehicle for approximately 14 miles (20 km). Watch the UNDERHOOD operation to make sure that belts rotate properly, pulleys rotate smoothly and nothing is rubbing or contacting hot parts. Check all components, connections and fasteners once the engine is turned off and the system has cooled. Check the compressor oil level after the engine has been shut down and the oil level has had time to stabilize. 63

66 Part 10: Setup, Performance Testing and Adjustments This system requires minimal adjustment. The maximum system pressure is adjusted via the pressure switch on the tank, and the output is adjusted with the throttle control. Refer to the owner s manual for specific instructions on how to adjust the system. You can test the system operation using the tools that will be operated by the system or you can test operations using a.125 orifice in the outlet to simulate tool use (Figure 10.1). Figure Install the test tool at the system outlet. If you are using the VMAC test tool, the appropriate orifice size is Make sure that the ball valve is closed. 3. Place the transmission in park and fully apply the park brake. 4. Allow the engine to run until it is at operating temperature. 5. Operate the air compressor system until the oil is warm. 6. Observe the pressure gauge. Pressure should be approximately 150 psi. 7. Open the ball valve on the test tool and observe the engine tachometer. Engine speed should increase to high idle 2600 rpm. The throttle control may need adjustment to 2600 rpm, see section 10.1 for instructions. 8. Close the air valve slowly to allow the system pressure to rise. When the pressure reaches the pressure switch set-point of 150 PSI, the system will disengage the compressor clutch and drop the engine to base idle. 9. Once the system pressure is at maximum, slowly open the ball valve on the test tool until the pressure on the gauge begins to drop. Engine speed should ramp up to high idle when the pressure drops approximately 40 PSI below the pressure switch set-point. 64

67 10.1 Throttle Control Adjustment Locate the VMAC throttle controller. It is typically installed under the dash, near the throttle pedal. Example installation only, actual installation may not be exactly as shown. SPEED 1 Adjustment Screw Figure 10.2 Adjustment is made by turning the set screw with a small flathead screwdriver. Turn the screw clockwise to increase engine speed, or counter-clockwise to decrease engine speed. Throttle adjustment screws have no stops and can turn indefinitely. When making adjustments count the number of turns made on the screws. Engine RPM adjustments may be made so that the amount of air delivered by the system matches the requirements of the tools or equipment that you will be using. If the system is cycling on and off rapidly when using a particular tool, the engine speed is likely higher than necessary for that tool. Try turning the engine speed down and observe the performance. If the system is unable to keep up with a specific tool the engine speed is too low. Try increasing the engine speed gradually, until the desired performance is obtained. The VMAC control system is designed such that the user cannot increase the engine speed beyond a safe level. Adjusting the engine speed is a low risk activity. 65
68 Part 11: Recommended Accessory Installation While the compressor system will function without the following accessories, VMAC strongly recommends their use for optimal performance. Auxiliary Receiver Tank The separator/cooler tank (WHASP tank) automatically depressurizes on compressor shut-down to protect the compressor and clutch from damage that may occur if the compressor starts while pressurized. The use of a receiver tank provides a buffer so that tools may be used immediately upon system startup. The addition of a receiver tank will also reduce the frequency of clutch and system cycling. For information on installing a receiver tank see the Air Receiver Tank section of this manual. Receiver tanks are available for purchase through VMAC. See the Accessory Product page of this manual for more information. Pressure Gauge While not critical to system performance, a pressure gauge is important for fine tuning the system and simplifies any potential troubleshooting. Install a 200 PSI pressure gauge downstream of the VMAC tank outlet. Pressure regulator and/or lubricator The compressor can produce air pressures up to approximately 150 PSI (1205 kpa). It is the responsibility of the user to know the pressure and air flow requirements of the tools powered by the air compressor system. An appropriate air pressure regulator and lubricator can be externally installed to the outside of the pressure supply valve. Failure to regulate the air pressure may cause damage to the tool. 66

69 Part 12: Auxiliary Air Receiver Pressure in the auxiliary tank will not be relieved when the compressor system blows down. This is normal operation. Prior to performing any service work on the system, relieve the pressure in the auxiliary tank If you intend to use an auxiliary air receiver with this system you must observe the following installation procedure to prevent damage to the system A reservoir tank, or air receiver tank provides a buffer for the tool to give the compressor time to react by increasing the engine speed and producing air. It also has the advantage of lowering the duty cycle of the compressor system. If the plumbing downstream from the compressor is tight (has no leaks), a 6 gallon air receiver is adequate. If you use an auxiliary air tank with this system, the line to the auxiliary tank must be installed as high as possible (not in the bottom of the tank) to prevent water from filling the line. Failure to observe these requirements will result in damage to the system. Auxiliary Tank WHASP Tank Figure 12.1 The VMAC WHASP tank has a built-in check valve at the outlet port, so an additional check valve is not required for use with an auxiliary air receiver. Use of an additional check valve may cause erratic performance. 67


70 Part 13: Accessory Products from VMAC The following accessory products for your VR compressor system are available from VMAC. For more information or to order these products, call Eliminator Aftercooler Removes up to 80% of moisture from compressed air. Quick installation, automatic drain and compact design Filter Regulator Lubricator Removes lubricants, water and dirt from the air stream. Adds atomized tool oil to lubricate tools. Reduces pressure for longer tool life. Hose Reel Secure, compact, retractable hose storage in a sturdy reel. Air Receiver Tank Thirty-five gallon capacity in a compact tank, complete with fittings and a gauge. Air Receiver Tank Ten or Six gallon capacity in a compact tank, complete with fittings and a gauge. Service Kits Using OEM service products will extend the life of your system. Includes oil, filters, seals and O- rings. 200 hour and 400 hour service interval kits are available 68

71 Part 14: Warranty Registration This form must be fully completed and returned to VMAC at the time of installation. Warranty may be void if this form is not received by VMAC within 30 days of installation. VMAC s Warranty policy and registration can be viewed online at: VMAC Dealer Information Company Name: City: Installer Information State / Province: Company Name: City: Installation Date: / / Day Month Year Owner Information State / Province: Company Name: Address: City: Zip/Postal: State / Province: Phone #: ( ) - Address Vehicle Information Year: Make: Vehicle Identification Number: Unit #: Product Information System Identification Number: Compressor Serial Number: Throttle Control Serial Number: WHASP Tank Serial Number: Submitted by V P Name: Contact: 69
72 This page intentionally left blank
73 This page intentionally left blank
74 This page intentionally left blank
75

76
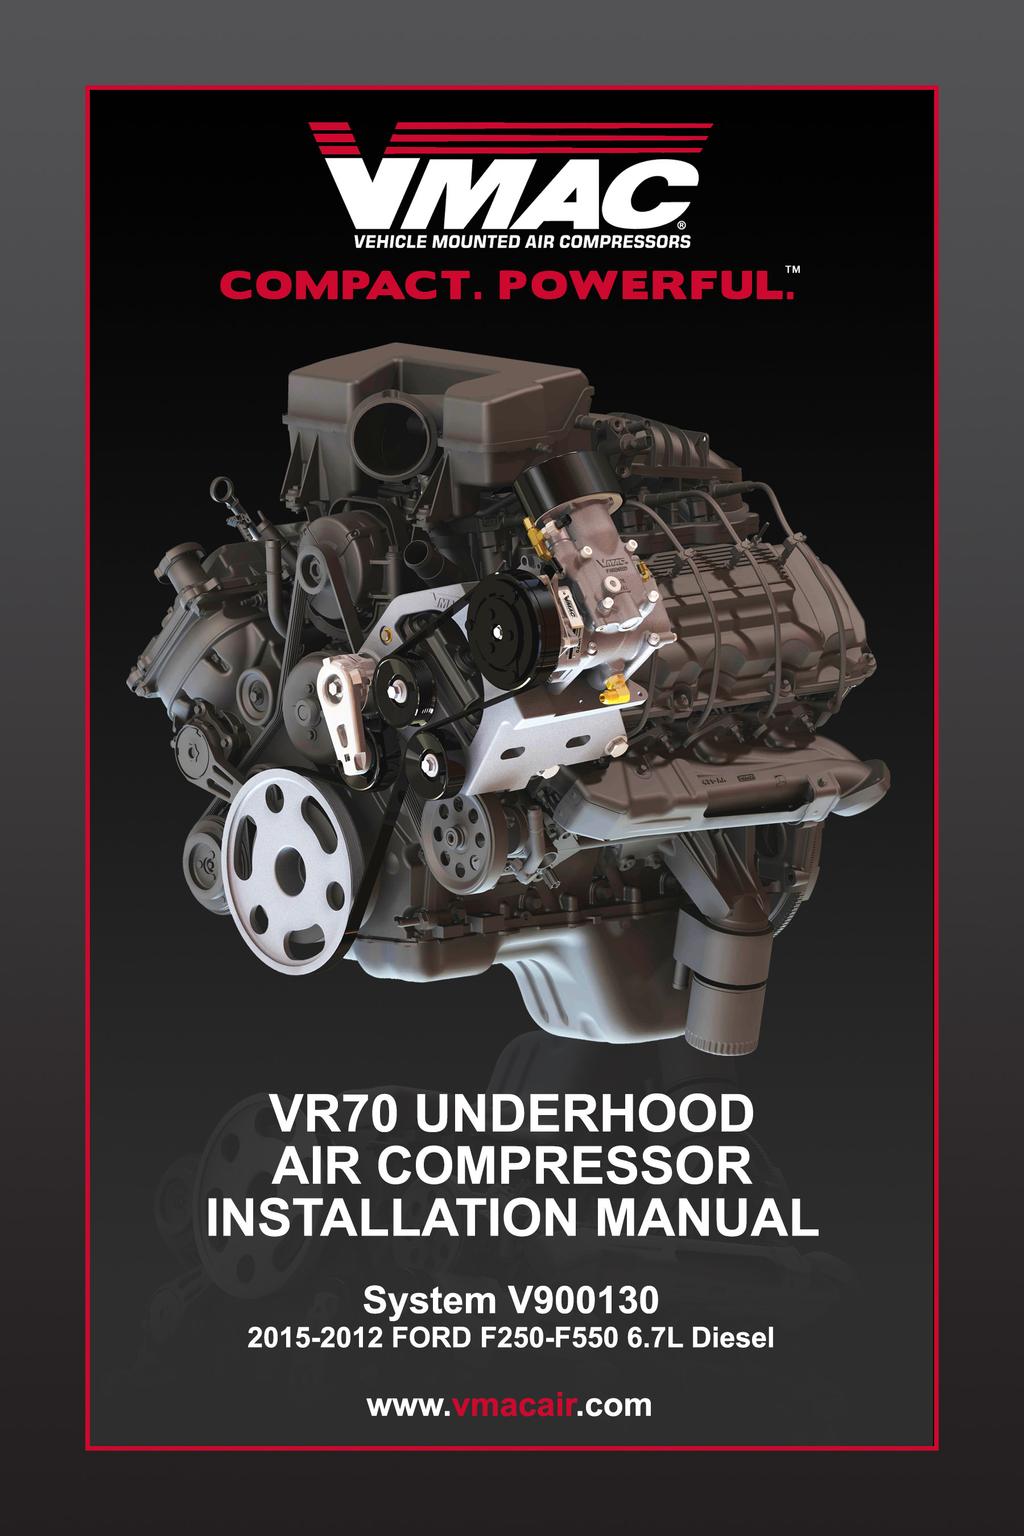
Installation Manual for VMAC System V Ford F250-F550 Pickup, Cab & Chassis 6.7L Power Stroke Diesel
 COMPACT. POWERFUL. TM Installation Manual for VMAC System V300001 2011-2015 Ford F250-F550 Pickup, Cab & Chassis 6.7L Power Stroke Diesel www.vmacair.com Installation Manual for VMAC System V300001 2011-2015
Installation and Operation Manual for VMAC Accessory A / A Air Receiver Tanks
 Installation and Operation Manual for VMAC Accessory A500188 / A520005 Air Receiver Tanks Owner / Installation Manual for VMAC Accessory A500188 / A520005 Air Receiver Tanks Safety...3 Warranty...4 General
Operating Instructions A VMAC Air Test Tool
 Operating Instructions A700052 VMAC Air Test Tool Contents Ordering Parts... 1 General Information... 2 Important Safety Notice... 2 Safety Messages... 2 Parts List... 3 Intended Use... 4 Setup, Performance
Installation Manual for VMAC Throttle Commander
 Installation Manual for VMAC Throttle Commander T500122 2011+ Ford 6.7 L Diesel Power Stroke and 2017+ 6.2 L / 6.8 L Gas F-250 F-550 Super Duty (SEIC) Installation Manual for VMAC Throttle Commander T500122
Installation and Operation Manual A / A G30 Cold Climate Kit
 Installation and Operation Manual A500041 / A520002 G30 Cold Climate Kit Contents General Information... 3 Important Safety Notice... 3 Safety Messages... 3 Torque Specifications... 4 Ordering Parts...
Installation Manual for VMAC System V GM SAVANA 6.0 L Vortec
 Installation Manual for VMAC System V300015 2017+ GM SAVANA 6.0 L Vortec Installation Manual for VMAC System V300015 2017+ GM Savana 6.0 L Vortec Safety... 3 Warranty... 4 General Information... 5 System
Installation Manual for VMAC System V900083
 Installation Manual for VMAC System V900083 Ford 2005-2006 Triton 5.4L V8 E250-E350 Van General Information... 3 Before You Start... 3 Part 1: Preparing for Installation... 4 1.1 Preparing for Installation...
Installation Manual for VMAC System VR70 V Ford Super Duty F-450 F L Gas V10
 Installation Manual for VMAC System VR70 V900121 2017+ Ford Super Duty F-450 F-550 6.8 L Gas V10 Installation Manual for VMAC System V900121 2017+ Ford Super Duty F-450 F-550 6.8 L Gas V10 Safety...3
Installing the Throttle Commander Ford F250 F550 Super Duty T L Diesel T L Diesel
 Installing the Commander Ford F250 F550 Super Duty T500106 2005-2007 6.0L Diesel T500116 2008-2010 6.4L Diesel 1.0 Preparing for Installation...5 2.0 Installing the Control...5 2.1 2005-2007 T500106 Connecting
Installation Manual for VMAC System V General Motors Duramax Diesel
 Installation Manual for VMAC System V900069 General Motors 2003 2004 Duramax Diesel C4500-5500 General Information... 3 Before You Start... 3 Special Installation Notes... 4 Part 1: Preparing for Installation...
Installation Manual for VMAC System V900136
 Installation Manual for VMAC System V900136 2015+ Ram 2500-3500 Pickup, Cab & Chassis 2015+ Ram 4500-5500 Cab & Chassis 6.7L Cummins Diesel Installation Manual for VMAC System V900136 2015+ Ram 2500-3500
Installing the Throttle Commander Ford F250 F550 Super Duty
 Installing the Throttle Commander Ford F250 F550 Super Duty 7.3L Power Stroke Diesel 1996 up to 2001.25 T500011 and T500028 1.0 Preparing for Installation...5 2.0 Installing the Throttle Controller...5
Installation Manual for VMAC Throttle Commander Throttle Control T500111
 Installation Manual for VMAC Throttle Commander Throttle Control T500111 2006-2007 Classic GMC CK2500-3500 6.0L Gasoline Engines 1.0 Preparation for Installation...4 1.1 Automatic Transmission Trucks...4
Installing the Throttle Commander Ford F250 F550 Super Duty
 Installing the Throttle Commander Ford F250 F550 Super Duty 6.0 L Power Stroke Diesel 2003.25 2004 T500082, T500083 and T500084 1.0 Preparing for Installation...5 2.0 Installing the Throttle Control Box...5
If there is additional labor or other costs above the 4 hrs labor you must call VMAC for approved coverage
 Installation Manual for the A500027 RAPTAIR MF Dual Air Filter Retrofit Kit Author: Brian Collings Date: 15/07/2014 1900997 - Manual, Installation (A500027) Systems or Parts Affected: D600005BETA01-D600005BETA59
Installation Manual for VMAC System V900095
 Installation Manual for VMAC System V900095 GMC/Chevrolet 1999 2002 6.0L Sierra and Silverado CK2500 and CK3500HD General Information... 3 Before You Start... 3 Additional Requirements... 4 Part 1: Preparing
Installation Manual for VMAC System V900126
 Installation Manual for VMAC System V900126 2013 2014 2500-3500 Pickup 2013-2014 3500-5500 Cab & Chassis 6.7L Cummins Diesel Installation Manual for VMAC System V900126 2013 2014 2500-3500 Pickup 2013-2014
Installation Manual for VMAC System V900046
 Installation Manual for VMAC System V900046 GMC/Chevrolet 1999 2002 6.0L Sierra and Silverado CK2500 and CK3500HD General Information... 3 Before You Start... 3 Additional Requirements... 4 Part 1: Preparing
Installation Manual for VMAC System V Ford L Power Stroke Diesel
 Installation Manual for VMAC System V900075 Ford 1999 2003.25 7.3L Power Stroke Diesel F250-F550 Super Duty General Information... 3 Before You Start... 3 Special Installation Notes... 4 Part 1: Preparing
Installation Manual for VMAC Throttle Commander Throttle Control T500100
 Installation Manual for VMAC Throttle Commander Throttle Control T500100 2003-2005 Chevrolet Tahoe, GMC Yukon, CK2500HD-3500 4.8L, 5.3L, 6.0L and 8.1L Gasoline Engines 1.0 Preparation for Installation...
Installing the Throttle Commander
 Installing the Throttle Commander Ford 6.0L Diesel Powerstroke 2005-2007 F250-550 Super Duty 2005-2010 E250-550 Econoline (8500+ GVW) Ford 6.4L Diesel Powerstroke 2008-2010 F250-550 Super Duty T500107
Installation Manual for VMAC Throttle Commander
 20142011GMCCK250035006. 0LGas Thr ot t l e#t500124 Installation Manual for VMAC Throttle Commander Throttle Control # T500124 2014-2011 GMC CK2500-3500 6.0L Gas 1.0 Locating the Signal Wires... 4 1.1
Installation Manual for VMAC System V Ford F Super Duty 6.0L Power Stroke Diesel Without Dual Alternators
 Installation Manual for VMAC System V900080 2007 2003.25 Ford F250-550 Super Duty 6.0L Power Stroke Diesel Without Dual Alternators General Information... 3 Before You Start... 3 Part 1: Warranty and System
Installation Manual for VMAC System V Ford SuperDuty F250-F L Power Stroke V8
 Installation Manual for VMAC System V910006 2003.25-2007 Ford SuperDuty F250-F550 6.0L Power Stroke V8 General Information... 4 Before You Start... 4 Part 1: Warranty and System ID... 5 Part 2: Preparing
Installation Manual for VMAC System V and V900052
 Installation Manual for VMAC System V900051 and V900052 Ford 1999 2004 Triton 6.8L V10 and 5.4L V8 F250-F550 Super Duty General Information... 3 Before You Start... 3 Part 1: Preparing for Installation...
RAPTAIR-G30 Gas Drive Air Compressor Installation, Owner s and Service Manual G300002
 RAPTAIR-G30 Gas Drive Air Compressor Installation, Owner s and Service Manual G300002 RAPTAIR-G30 Gas Drive Air Compressor Installation, Owners and Service Manual G300002 General Information... 3 Safety
System # V FREIGHTLINER , 7.2L 3126 CATERPILLAR DIESEL FL50, FL60, FL70, FL80
 System # V900022 FREIGHTLINER 1998-2002, 7.2L 3126 CATERPILLAR DIESEL FL50, FL60, FL70, FL80 Installation Manual Document Number: 1930028_a Document #1930028 VR70 Underhood Air Compressor System Number
Installation Manual for P170002/R Compressor Lincoln Air Vantage 500 Welder (Cummins)
") Installation Manual for P170002/R170003 Compressor Lincoln Air Vantage 500 Welder (Cummins) 1.0 Information... 4 2.0 Preparation... 14 3.0 Compressor Removal... 14 4.0 Flushing Procedure... 15 5.0 Compressor
Installation Manual for P170002/R170003 Compressor Lincoln Air Vantage 500 Welder (Cummins) 1.0 Information... 4 2.0 Preparation... 14 3.0 Compressor Removal... 14 4.0 Flushing Procedure... 15 5.0 Compressor
Installation Manual. System # V FORD L TRITON V8 SUPERDUTY E250 E350. Visit us at KIPP ROAD NANAIMO B.C.
 Installation Manual System # V900072 FORD 2003-2004 5.4L TRITON V8 SUPERDUTY E250 E350 TM 1333 KIPP ROAD NANAIMO B.C. V9X 1R3 Visit us at... underhoodair TEL: (250)-740-3200 www..com FAX: (250)-740-3201
Dodge455500Cab&Chassi
 VR70UNDERHOOD AI RCOMPRESSOR I NSTALLATI ONMANUAL Syst em V900114 20122010Dodge2535004X4Pi ckup,cab&chassi s 6. 7LCummi nsdi esel Syst em V900116 20122011Dodge455500Cab&Chassi s 6. 7LCummi nsdi esel www.
System # V INTERNATIONAL , 4400 SERIES DT466
 System # V900068 INTERNATIONAL 2001-2003 4300, 4400 SERIES DT466 Installation Manual Document Number: 1930036 Document #1930036 VR70 Underhood Air Compressor System Number V900068 Application: INTERNATIONAL
VR LITE AIR COMPRESSOR OWNERS MANUAL
 VR LITE AIR COMPRESSOR OWNERS MANUAL General Information... 4 Introduction... 4 Ordering Parts... 4 Safety Messages... 4 Important Safety Notice... 5 Safety Precautions... 7 Personal Hazards... 8 System
Procharger Stage II Intercooled Supercharger System (11-14 GT)
") Procharger Stage II Intercooled Supercharger System (11-14 GT) Installation Time: Approximately one day. Installed on 2012 Mustang GT 5.0/Manual Required Tools 3/8 Socket Set (Standard and Metric) 1/2
Procharger Stage II Intercooled Supercharger System (11-14 GT) Installation Time: Approximately one day. Installed on 2012 Mustang GT 5.0/Manual Required Tools 3/8 Socket Set (Standard and Metric) 1/2
# V GMC C6500 C8500
 UNDERHOOD AIR COMPRESSORS UNDERHOOD AIR COMPRESSORS Installation Manual UNDERHOOD AIR COMPRESSORS UNDERHOOD AIR COMPRESSORS UNDERHOOD AIR COMPRESSORS System # V910001 2001 2002 GMC C6500 C8500 CAT 3126
INSTALLATION INSTRUCTIONS DODGE DAKOTA 2 KIT # 682 (2WD), 692 (4WD) 3 KIT # 683 (2WD), 693 (4WD)
, 692 (4WD) 3 KIT # 683 (2WD), 693 (4WD)") INSTALLATION INSTRUCTIONS 1997-1999 DODGE DAKOTA 2 KIT # 682 (2WD), 692 (4WD) 3 KIT # 683 (2WD), 693 (4WD) Installation of a Performance Accessories body lift kit will change the vehicle s center of gravity
INSTALLATION INSTRUCTIONS 1997-1999 DODGE DAKOTA 2 KIT # 682 (2WD), 692 (4WD) 3 KIT # 683 (2WD), 693 (4WD) Installation of a Performance Accessories body lift kit will change the vehicle s center of gravity
Gas Engine Driven 30 CFM Air Compressor Installation, Owner s and Service Manual G300003
 Gas Engine Driven 30 CFM Air Compressor Installation, Owner s and Service Manual G300003 Gas Engine Driven 30 CFM Air Compressor Installation, Owner s and Service Manual G300003 Safety...3 Warranty...4
Installation Manual for VMAC System V90G126 Ram Cab & Chassis with PTO PREP 6.7L Cummins Diesel
 Installation Manual for VMAC System V90G126 Ram 2013 3500-5500 Cab & Chassis with PTO PREP 6.7L Cummins Diesel General Information... 4 Before You Start... 4 Part 1: System Identification and Warnings...
1333 KIPP ROAD NANAIMO B.C. V9X 1R3
 UNDERHOOD AIR COMPRESSORS UNDERHOOD AIR COMPRESSORS Installation Manual UNDERHOOD AIR COMPRESSORS UNDERHOOD AIR COMPRESSORS UNDERHOOD AIR COMPRESSORS System # V910002 2001 2002 Ford F650 - F750 CAT 3126
GM 2500HD3500HD #V900113
 VR70UNDERHOOD AI RCOMPRESSOR I NSTALLATI ONMANUAL 20152011GM 2500HD3500HD 6. 6LDur amaxdi esel #V900113 www. vmacai r. com Installation Manual for VMAC System V900113 2015-2011 GM 2500HD-3500HD 6.6L Duramax
Illustrated Parts List for VMAC System V Ford Transit Connect 2.5L Duratec L4
 Illustrated Parts List for VMAC System V400008 2016+ Ford Transit Connect 2.5L Duratec L4 Kit Pack List... 2 Fastener Pack, 3801280... 4 Horizontal Discharge Compressor, P130012... 6 Main Bracket Assembly,
JEEP WRANGLER (TJ), UNLIMITED (TJL), RUBICON MODELS BODY LIFT KIT INSTALLATION INSTRUCTIONS KIT# KIT# 973
, UNLIMITED (TJL), RUBICON MODELS BODY LIFT KIT INSTALLATION INSTRUCTIONS KIT# KIT# 973") JEEP WRANGLER (TJ), UNLIMITED (TJL), RUBICON MODELS BODY LIFT KIT INSTALLATION INSTRUCTIONS 1997-2006 2 KIT# 972 3 KIT# 973 WARNING Installation of a Performance Automotive Group body lift will change
JEEP WRANGLER (TJ), UNLIMITED (TJL), RUBICON MODELS BODY LIFT KIT INSTALLATION INSTRUCTIONS 1997-2006 2 KIT# 972 3 KIT# 973 WARNING Installation of a Performance Automotive Group body lift will change
Illustrated Parts List for VMAC System V Ford F-250 F L Powerstroke V8 Diesel
 Illustrated Parts List for VMAC System V400001 2011-2016 Ford F-250 F-550 6.7L Powerstroke V8 Diesel 1. Kit Pack List... 2 2. Fastener Pack, 3801297... 4 3. Vertical Discharge Compressor, P130015... 5
TOYOTA TUNDRA 3 BODY LIFT INSTALLATION INSTRUCTIONS 2014 KIT# 5643
 3651 N Highway 89 Chino Valley, AZ 86323 (928) 636-7080 www.p-a-g.net TOYOTA TUNDRA 3 BODY LIFT INSTALLATION INSTRUCTIONS 2014 KIT# 5643 Installation of a Performance Automotive Group body lift kit will
Installation Instructions Z-Gate Shifter
 Installation Instructions Z-Gate Shifter Part Number 80681 1998, 2001 by B&M Racing and Performance Products The B&M Z-Gate shifter can be used in vehicles equipped with most popular three speed automatic
Table of Contents. 4 Getting Started 4 About the Juice 5 Safety Terms 5 Product Registration 6 Important Notes 7 Truck Orientation
 Table of Contents 4 Getting Started 4 About the Juice 5 Safety Terms 5 Product Registration 6 Important Notes 7 Truck Orientation 8 Juice Installation 1999-2003 (7.3L) 8 Supplied Items & Required Tools
INSTALLATION INSTRUCTIONS 97 FORD EXPEDITION
 INSTALLATION INSTRUCTIONS 97 FORD EXPEDITION 1. Read the instructions completely and carefully before you begin. Check the kit for proper contents (refer to the part s list and the picture diagrams). Before
C FORD F250 / F L POWERSTROKE DIESEL WITH AUTOMATIC TRANSMISSIONS ONLY
 EXHAUST BRAKES C40019 1999-2003 FORD F250 / F350 7.3L POWERSTROKE DIESEL WITH AUTOMATIC TRANSMISSIONS ONLY Getting Started Thank you and congratulations on your purchase of a Pacbrake exhaust retarder.
97-02 JEEP TJ BODY LIFT KIT INSTRUCTIONS
 92RC60500 97-02 JEEP TJ BODY LIFT KIT INSTRUCTIONS Congratulations on your purchase of a new Rough Country 2 /3 Body Lift. We are committed to providing you with the best product available for the best
CHEVY AVALANCHE 1/2-TON ONLY 3 BODY LIFT KIT INSTALLATION INSTRUCTIONS KIT# 10173
 3651 N Highway 89 Chino Valley, AZ 86323 (928) 636-7080 www.p-a-g.net CHEVY AVALANCHE 1/2-TON ONLY 3 BODY LIFT KIT INSTALLATION INSTRUCTIONS 2003-2005 KIT# 10173 Installation of a Performance Automotive
MODEL NUMBER: MEDIUM DUTY ONBOARD AIR SYSTEM
 MODEL NUMBER: 10003 MEDIUM DUTY ONBOARD AIR SYSTEM IMPORTANT: It is essential that you and any other operator of this product read and understand the contents of this manual before installing and using
JEEP WRANGLER, RUBICON, UNLIMITED (TJ & TJL) 1 BODY LIFT KIT INSTALLATION INSTRUCTIONS KIT# 951
 1 BODY LIFT KIT INSTALLATION INSTRUCTIONS KIT# 951") 3651 N Highway 89 Chino Valley, AZ 86323 (928) 636-7080 www.p-a-g.net JEEP WRANGLER, RUBICON, UNLIMITED (TJ & TJL) 1 BODY LIFT KIT INSTALLATION INSTRUCTIONS 1997-2006 KIT# 951 Installation of a Performance
3651 N Highway 89 Chino Valley, AZ 86323 (928) 636-7080 www.p-a-g.net JEEP WRANGLER, RUBICON, UNLIMITED (TJ & TJL) 1 BODY LIFT KIT INSTALLATION INSTRUCTIONS 1997-2006 KIT# 951 Installation of a Performance
DODGE DAKOTA 3 BODY LIFT INSTALLATION INSTRUCTIONS KIT # 60153
 DODGE DAKOTA 3 BODY LIFT INSTALLATION INSTRUCTIONS 2003-04 KIT # 60153 Installation of a Performance Automotive Group body lift kit will change the vehicle s center of gravity and handling characteristics
Installation Instructions for Lingenfelter GM 2500 Suburban & Yukon XL Auxiliary Fan System (with AC clutch controlled fan output)
") Installation Instructions for Lingenfelter 2007-2013 GM 2500 Suburban & Yukon XL Auxiliary Fan System (with AC clutch controlled fan output) PN L300080607 Revision - 1.1 Lingenfelter Performance Engineering
Installation Instructions for Lingenfelter 2007-2013 GM 2500 Suburban & Yukon XL Auxiliary Fan System (with AC clutch controlled fan output) PN L300080607 Revision - 1.1 Lingenfelter Performance Engineering
MAZDA BT-50 (October 2011 Production Onwards) 1 & 3 PIECE HARD TONNEAU REMOTE LOCKING KIT INSTALLATION INSTRUCTIONS
 1 & 3 PIECE HARD TONNEAU REMOTE LOCKING KIT INSTALLATION INSTRUCTIONS") MAZDA BT-50 (October 0 Production Onwards) & 3 PIECE HARD TONNEAU REMOTE LOCKING KIT INSTALLATION INSTRUCTIONS Installation Time: Approx. 0 Minutes Care Instructions: Clean Tonneau Cover with a mild detergent
MAZDA BT-50 (October 0 Production Onwards) & 3 PIECE HARD TONNEAU REMOTE LOCKING KIT INSTALLATION INSTRUCTIONS Installation Time: Approx. 0 Minutes Care Instructions: Clean Tonneau Cover with a mild detergent
Application: DODGE , 5.9L Cummins 24 Valve Diesel, with Air Conditioning)
") 41 Installation Manual Document Number: 1930010 Document #1930010 VR70 Underhood Air Compressor: System Number V900040 Application: DODGE 1998.5-2002, 5.9L Cummins 24 Valve Diesel, with Air Conditioning)
41 Installation Manual Document Number: 1930010 Document #1930010 VR70 Underhood Air Compressor: System Number V900040 Application: DODGE 1998.5-2002, 5.9L Cummins 24 Valve Diesel, with Air Conditioning)
Ford Mustang V6 OEM-Style Fog Light Kit Parts List: Quantity: Tool List:
 2015-2017 Ford Mustang V6 OEM-Style Fog Light Kit Parts List: Quantity: Tool List: LED Foglights/ Bezels 2 Flat head & Phillips screwdriver (if you ordered part#3600) Ratchet & Socket set OR Wiring harness
Slingshot Rotrex Supercharger Kit
 Slingshot Rotrex Supercharger Kit This supercharger kit improves on the Slingshot by forcing more dense air into the engine and creating more power. Installation time of the supercharger depends on you
I. Before starting installation
 5. Park the vehicle on a clean, dry, flat, level surface and block the tires so the vehicle cannot roll in either direction. A. Disconnect battery cables 1. Disconnect the negative cable first, then the
C40008 & C40009 EXHAUST BRAKES
 EXHAUST BRAKES C40008 & C40009 1995 2003 Ford F250 / F350 7.3 L Powerstroke Diesel with manual transmissions 1995 1998 Ford F250 / F350 7.3 L Powerstroke Diesel with automatic transmission* *Requires the
Thank you for purchasing the Craven Speed FlexPod Complete Gauge Pod Kit For R56, R58, R59, R60 with Refresh Engines (2011+)
") Thank you for purchasing the Craven Speed FlexPod Complete Gauge Pod Kit For R56, R58, R59, R60 with Refresh Engines (2011+) Before You Start Please read instructions completely before installing. These
Thank you for purchasing the Craven Speed FlexPod Complete Gauge Pod Kit For R56, R58, R59, R60 with Refresh Engines (2011+) Before You Start Please read instructions completely before installing. These
WPS-104 Heater Installation Instructions For 500EFI, 700 XP, & Crew Applications
 WPS-104 Heater Installation Instructions For 500EFI, 700 XP, & Crew Applications ORDER OF INSTALLATION FOR A COMPLETE ENCLOSURE OF A RANGERWARE WPS (Weather Protection System) IS AS FOLLOWS: 1. Heater
Depress each tab as you pull the bezel off. The bezels are tight. L.H. shown.
 2013-2014 Ford Mustang V6 & Boss 302 Lower Valance Fog Light Kit Parts List: Quantity: Tool List: Fog light & bulb with bracket 2 Flat head & Phillips screwdriver Black bezels 2 Ratchet & Socket set OR
18SP680Rev3 EPA04 MBE 4000 Car Hauler Low Pressure Fuel Lines
 8SP680Rev3 EPA04 MBE 4000 Car Hauler Low Pressure Fuel Lines KIT DESCRIPTION These service kits include all necessary parts to replace the low pressure fuel lines between the fuel filter housing and fuel
BLACKBIRD INSTALLATION SUPPLEMENT
 BLACKBIRD INSTALLATION SUPPLEMENT FOR 2003-7 FORD 6.0 LITER DIESEL SINGLE ALTERNATOR F-350, F-450, F-550, EXCURSION VERSION 7-07 Parts Description Blackbird Wiring Manual Installation Supplement 6.0 Liter
TCI FastGate Shifter Installation Instructions
 151 INDUSTRIAL DRIVE ASHLAND, MISSISSIPPI 38603 http://www.tciauto.com TELEPHONE: 662-224-8972 FAX LINE: 662-224-8255 E-MAIL: tech@tciauto.com TCI 616541 FastGate Shifter Installation Instructions The
This information covers the proper procedure for replacing the Volvo D16F engine in a VT or VNL chassis.
 Volvo Trucks North America Greensboro, NC USA Engine, Replacement DService Bulletin Trucks Date Group No. Page 10.2007 210 139 1(47) Engine, Replacement Volvo D16F VNL, VT W2005773 This information covers
INSTALLATION & OWNER S MANUAL
 INSTALLATION & OWNER S MANUAL CAB INSTALLATION INSTRUCTIONS JOHN DEERE 3000 SERIES (4200/4300/4400) (4210/4310/4410) & (3120/3320/3520/3720) HARD SIDED CAB ENCLOSURE (p/n 1JD3520AS) SOFT SIDED CAB ENCLOSURE
DODGE DAKOTA 3 KIT INSTALLATION INSTRUCTIONS KIT# 60043
 DODGE DAKOTA 3 KIT INSTALLATION INSTRUCTIONS 2000-2002 KIT# 60043 Installation of a Performance Automotive Group body lift kit will change the vehicle s center of gravity and handling characteristics both
FORD RANGER/SPLASH MAZDA B-SERIES (2&4WD, STANDARD & EXT. CAB) 3 BODY LIFT KIT INSTALLATION INSTRUCTIONS KIT# 853
 3 BODY LIFT KIT INSTALLATION INSTRUCTIONS KIT# 853") 3651 N Highway 89 Chino Valley, AZ 86323 (928) 636-7080 www.p-a-g.net FORD RANGER/SPLASH MAZDA B-SERIES (2&4WD, STANDARD & EXT. CAB) 3 BODY LIFT KIT INSTALLATION INSTRUCTIONS 1995-1997 KIT# 853 Installation
3651 N Highway 89 Chino Valley, AZ 86323 (928) 636-7080 www.p-a-g.net FORD RANGER/SPLASH MAZDA B-SERIES (2&4WD, STANDARD & EXT. CAB) 3 BODY LIFT KIT INSTALLATION INSTRUCTIONS 1995-1997 KIT# 853 Installation
PRODUCT SAFETY NOTICE
 PRODUCT SAFETY NOTICE Congratulations. This vehicle has been equipped with a Firestone air suspension system. This suspension will enhance the vehicle s handling when loaded, however, the vehicle s performance
Disconnect the APP sensor harness connector. See Fig. 4. Remove the accelerator pedal mounting nuts. Remove the APP assembly.
 ENGINE CONTROLS - REMOVAL, OVERHAUL & INSTALLATION - 6.6L DIESEL... Page 1 of 41 FUEL SYSTEMS ACCELERATOR PEDAL POSITION SENSOR Removal & Installation Disconnect the APP sensor harness connector. See Fig.
Jeep Wrangler TJ 4.0 LITER Installation instructions
 www.jeepair.com 2000-2001 Jeep Wrangler TJ 4.0 LITER Installation instructions Important information about your system, and warranty DO NOT ADD ANY OIL TO ANY PART OF THE SYSTEM. DO NOT USE THE SIGHT GLASS
DODGE DAKOTA (AUTO TRANS. ONLY) 3 BODY LIFT INSTALLATION INSTRUCTIONS KIT# 60163
 3 BODY LIFT INSTALLATION INSTRUCTIONS KIT# 60163") 3651 N Highway 89 Chino Valley, AZ 86323 (928) 636-7080 www.p-a-g.net DODGE DAKOTA (AUTO TRANS. ONLY) 3 BODY LIFT INSTALLATION INSTRUCTIONS 2005-2006 KIT# 60163 Many states and municipalities have laws
3651 N Highway 89 Chino Valley, AZ 86323 (928) 636-7080 www.p-a-g.net DODGE DAKOTA (AUTO TRANS. ONLY) 3 BODY LIFT INSTALLATION INSTRUCTIONS 2005-2006 KIT# 60163 Many states and municipalities have laws
Ford 6.7 EGR Delete Kit
 Fits: 2011 12 Powerstroke 6.7L Read instructions thoroughly before proceeding! ***This kit may void factory warranty please check with manufacturer.*** ***This kit is intended for off road use only.***
Installation Instructions Part Number
 Installation Instructions Part Number 84152143 Thank you for choosing Chevrolet Performance as your high performance source. Chevrolet is committed to providing proven, innovative performance technology
BLACKBIRD INSTALLATION SUPPLEMENT
 BLACKBIRD INSTALLATION SUPPLEMENT FOR 2003-7 FORD 6.0 LITER DIESEL F-SERIES DUAL ALTERNATOR VERSION 10/07 Blackbird Installation Supplement for Ford 6.0. Liter Dual Alternator Parts included in the 6.0
INSTALLATION INSTRUCTIONS FOR THE TOMAHAWK ELECTRIC REVERSE
 INSTALLATION INSTRUCTIONS FOR THE TOMAHAWK ELECTRIC REVERSE LAST UPDATED: April 2018 Thank you for choosing the Motor Trike Electric Reverse. We ask that you read the directions before you start and follow
Z-Gate Universal Shifter
 Installation Instructions Z-Gate Universal Shifter Fits: GM, Ford, Lincoln and Chrysler Transmissions See Application Guide for Specific Applications Part #80681 Rev 06/01/2018 WORK SAFELY! For maximum
Table Of Contents TABLE OF CONTENTS INTRODUCTION INSTALLATION OPERATING INSTRUCTIONS APPENDIX ABOUT THE JUICE... 3 SAFETY TERMS...3 INTRODUCTION...
 Ford Juice installation Instructions **read important safety information in this manual** TABLE OF CONTENTS F o r d J u i c e Table Of Contents ABOUT THE JUICE... 3 SAFETY TERMS...3 INTRODUCTION... 3 PRODUCT
***THE OWNER'S MANUAL MUST BE GIVEN TO THE END USE CUSTOMER AFTER COMPLETING THE INSTALLATION.***
 INSTALLATION INSTRUCTIONS FOR THE MOTOR TRIKE HARLEY MECHANICAL REVERSE 1999-2006 FIVE SPEED FLH LAST UPDATED: OCTOBER 2011 AS THE INSTALLER OF THIS MECHANICAL REVERSE, YOU MUST BECOME FAMILIAR WITH PROPER
CONTENTS. VMAC Vehicle Mounted Air Compressors Toll Free: Local: Fax:
 CONTENTS 1.0 Information... 4 1.1 Foreword... 4 1.2 Important Safety Notice... 4 1.3 Safety Messages... 5 1.4 System... 8 1.5 Auxiliary Air Tank... 9 2.0 Routine Maintenance... 11 2.1 Maintenance Schedule...
Part# JL AIR IT UP 4 Tire On Board Air Delivery System. (Requires External Air Source)
") Part# 18-1819 JL AIR IT UP 4 Tire On Board Air Delivery System (Requires External Air Source) The most up-to-date instructions always visit www.updownair.com www.updownair.com 833-226-4863 I M P O R T
Part# 18-1819 JL AIR IT UP 4 Tire On Board Air Delivery System (Requires External Air Source) The most up-to-date instructions always visit www.updownair.com www.updownair.com 833-226-4863 I M P O R T
CHEVY/GMC /2-TON PICKUP 3 BODY LIFT INSTALLATION INSTRUCTIONS 2006 KIT# PA10163 MANUAL TRANSMISSION VEHICLES REQUIRE KIT# PA4701
 3651 N Highway 89 Chino Valley, AZ 86323 (928) 636-7080 www.p-a-g.net CHEVY/GMC 1500 1/2-TON PICKUP 3 BODY LIFT INSTALLATION INSTRUCTIONS 2006 KIT# PA10163 MANUAL TRANSMISSION VEHICLES REQUIRE KIT# PA4701
Installation Instructions. QuickSilver Shifter. Fits: GM, Ford, Chrysler Transmissions See Application Guide for Specific Applications Part # 80683
 Installation Instructions QuickSilver Shifter Fits: GM, Ford, Chrysler Transmissions See Application Guide for Specific Applications Part # 80683 WORK SAFELY! For maximum safety, perform this installation
PRODUCT USE INFORMATION
 9RC61000 Jeep YJ Body Lift Thank you for choosing Rough Country for all your suspension needs. This body lift fits both manual and Automatic equipped vehicles!!! Refer to last page of this Instruction
2000 DODGE DURANGO INSTALLATION INSTRUCTIONS KIT #60053
 WARNING This body lift kit should only be installed on vehicles in good working condition. Before installation, the vehicle should be thoroughly inspected for evidence of corrosion or deformation of the
Installation Instructions for Lingenfelter GM 2500 Suburban & Yukon XL Auxiliary Fan System (with ECM controlled fan output)
") Installation Instructions for Lingenfelter 2007-2013 GM 2500 Suburban & Yukon XL Auxiliary Fan System (with ECM controlled fan output) PN L300090607 Revision - 1.1 Lingenfelter Performance Engineering
Installation Instructions for Lingenfelter 2007-2013 GM 2500 Suburban & Yukon XL Auxiliary Fan System (with ECM controlled fan output) PN L300090607 Revision - 1.1 Lingenfelter Performance Engineering
ADM Performance 6079 Mapleshade Lane Dallas, Texas (214)
") 1) Disconnect Battery Ground 2) Raise front end of Vehicle FAN INSTALL INSTRUCTIONS 3) Remove lower Radiator hose and drain coolant into a pan. (you will reuse coolant later) 4) Remove Air Intake piping
1) Disconnect Battery Ground 2) Raise front end of Vehicle FAN INSTALL INSTRUCTIONS 3) Remove lower Radiator hose and drain coolant into a pan. (you will reuse coolant later) 4) Remove Air Intake piping
KIT CONTENTS. Multimeter or test light Wire crimpers or soldering equipment. Wire terminals & connectors 10A inline fuse
 RUSSELL FORD 5.0L COMPLETE EFI PLUMBING KIT INSTALLATION INSTRUCTIONS Please study these instructions carefully before installing your new complete fuel system kit. If you have any questions, please call
ELECTRIC FUEL PUMPS P/N , , & FUEL PRESSURE REGULATOR P/N
 ELECTRIC FUEL PUMPS P/N 80000100, 80000101, & 80000102 FUEL PRESSURE REGULATOR P/N 80000103 Installation Instructions 199R10583 These instructions must be read and fully understood before beginning the
Trail Rocker Installation Instructions
 Trail Rocker Installation Instructions Manual #90580 For Installing Painless Part Numbers: 57000 and 57001 Painless Performance Products recommends you, the installer, read this installation manual from
Thank you for purchasing the Craven Speed FlexPod Complete Gauge Pod Kit
 Thank you for purchasing the Craven Speed FlexPod Complete Gauge Pod Kit Before You Start Please read instructions completely before installing. These instructions contain the information required to install
PRODUCT SAFETY NOTICE DEALER/INSTALLER NOTICE
 PRODUCT SAFETY NOTICE Congratulations. This vehicle has been equipped with a Firestone air suspension system. This suspension will enhance the vehicle s handling when loaded, however, the vehicle s performance
SHELBY GT500
 2007-2009 SHELBY GT500 Removal of Factory Unit WARNING: 1. Radiator fluid must be handled properly. Please observe local ordinances with regards to handling and disposal. 2. Allow vehicle and components
Installation Instructions Pro Stick Shifter
 Installation Instructions Pro Stick Shifter Part Number 80701, 80702 & 80706 2012, 2010, 2008, 2001, 1998 by B&M Racing and Performance Products The B&M Pro Stick shifter #80701 and #80706 comes equipped
AIR INNOVATEDTM. Illustrated Parts List for VMAC System V Ford F250 F L Power Stroke Diesel
 AIR INNOVATEDTM Illustrated Parts List for VMAC System V910010 2011 2016 Ford F250 F550 6.7 L Power Stroke Diesel www.vmacair.com Illustrated Parts List for VMAC System V910010 Ford 2011-2016 F250-F550
INSTALLATION INSTRUCTIONS
 INSTALLATION INSTRUCTIONS Part# 69-0717 AIR IT UP 4 Tire On Board Installed Air Delivery System with Rear Mounted Controller (Requires External Air Source) For the most up-to-date instructions please visit
BLACKBIRD INSTALLATION SUPPLEMENT
 BLACKBIRD INSTALLATION SUPPLEMENT FOR 2008-105 FORD 6.4 LITER DIESEL F-SERIES VERSION 3/10 Parts Blackbird Wiring Manual Installation Supplement 6.4 liter Diesel Owner s Manual Includes Warrantee Registration
JEEP WRANGLER JEEP WRANGLER UNLIMITED 2 & 4 DOOR 1 BODY LIFT KIT INSTALLATION INSTRUCTIONS KIT# 991
 3651 N Highway 89 Chino Valley, AZ 86323 (928) 636-7080 www.p-a-g.net JEEP WRANGLER JEEP WRANGLER UNLIMITED 2 & 4 DOOR 1 BODY LIFT KIT INSTALLATION INSTRUCTIONS 07-11 KIT# 991 Installation of a Performance
INSTALLATION INSTRUCTIONS
 INSTALLATION INSTRUCTIONS Accessory Application Publications No. P/N 08E49-S2A-100 2004 S2000 AII 26325 Issue Date OCT 2003 PARTS LIST Hood switch harness TOOLS AND SUPPLIES REQUIRED #2 Phillips screwdriver