ML-3712 MLT-D205 TONER CARTRIDGE REMANUFACTURING INSTRUCTIONS
|
|
|
- Juliet Thornton
- 6 years ago
- Views:
Transcription


1 SAMSUNG ML-3712 MLT-D205 TONER CARTRIDGE REMANUFACTURING INSTRUCTIONS SAMSUNG MLT-D205 TONER CARTRIDGE


.")
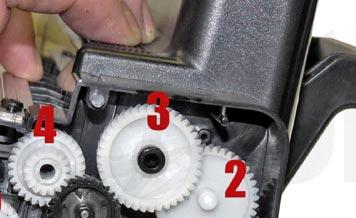
2 CHANGES TO THE SAMSUNG MLT-D205 DRUM & CARTRIDGE By Mike Josiah and the Technical Staff at UniNet UPDATE: Samsung has made a change to the MLT-D205 cartridges. There is now a new style and an old style. The new style uses a new drive gear with more teeth. The old gear had 39 teeth, and the new one has 59 teeth. It is believed this change was made to enhance the grayscale capability of the cartridges (smoother grayscales). Shown here are the full gear trains of both the old and new styles... OLD GEAR STYLE NEW GEAR STYLE


")

 It is very easy to tell")

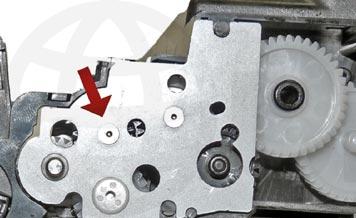
3 OLD GEAR STYLE NEW GEAR STYLE In addition to the new drive gear in the drum there are also two new internal cartridge gears. Shown are the two old and new gears. OLD GEAR STYLE NEW GEAR STYLE Shown are close-ups of the three new gears, old and new as installed in the cartridge. The old drums will not work in the new cartridges. Now will the new drums work in the old cartridges. UniNet has been working on this since the first cartridges appeared and now has a solution: #18694 SuMMiT drum with gears for use in Samsung ML 3310, 3312, 3710, 3712, 3750, SCX 4833, 5737 (MLT-D205) (59-tooth gear) Stock of the new drum will be available in a few weeks. We will of course continue to stock the old version: #16696 SuMMiT drum with gears for use in Samsung ML 3310, 3312, 3710, 3712, 3750, SCX 4833, 5737 (MLT-D205) (old type gear) It is very easy to tell the old and new versions apart. Just look at the bottom of the cartridge. The fine tooth gear is the new style. The OEM old style has been black and to this point, the new OEM gear has been white, but there is no guarantee it will stay that way.


4 REMANUFACTURING THE SAMSUNG ML-3712 MLT-D205 TONER CARTRIDGE By Mike Josiah and the Technical Staff at UniNet First released in September 2011, the Samsung ML-3712 series of printers are based on a ppm engine, with a maximum resolution of 1200 x 1200 dpi. The first page out is stated to be under 6.5 seconds. Depending on the model number, other options and specifications are available, including multifunction (SCX) versions. The MLT-D205E/L/S cartridges do not have a drum cover, but come new with a piece of heavy paper with a thin sheet of foam on the inside taped around the cartridge. These cartridges (pictured here), while looking similar to other Samsung-type cartridges, have taken a dramatic change in that there are no screws on the outside of the cartridge at all. There are plastic rivets that need to be cut off, holes drilled, and screws installed to hold them back on. It is not a hard process, and is covered completely in the instructions. The Samsung standard cartridge (MLT-D205S) is rated for 2,000 pages; the high yield cartridge (MLT-D205L) is rated for 5,000 pages; and the extra high yield cartridge (MLT-D205E) is rated for 10,000 pages. As with pretty much all cartridges these days, the cartridge has a chip that has to be replaced each cycle. The OEM chips are regional, so be sure to get the proper chip for your region. Most of the machines in this series, when new, ship with a 5,000-page starter cartridge. The MLT-D205S has a list price of $62.49 USD, the MLT-D205L has a list price of $ USD, and the MLT-D205E lists for $ USD* *Pricing in U.S. American Dollars, as of November MULTIFUNCTION & LASER-ONLY MACHINES THAT USE THESE CARTRIDGES ML-3310ND ML-3312ND ML-3710ND ML-3712ND ML-3712DW SCX-4833FD SCX-4835FR SCX-5637FR SCX-5639FR SCX-5737FR SCX-5739FW Cartridge troubleshooting will be listed at the end of these instructions.

 5. New PCR (optional) 6. New wiper blade (optional) 7. New doctor Blade (optional) 8.")


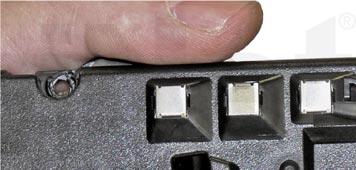
5 REQUIRED TOOLS 1. Toner approved vacuum 2. A small common screwdriver 3. A Phillips head screwdriver 4. Needle nose pliers REQUIRED SUPPLIES 1. Toner for use in Samsung ML New replacement chip for use in Samsung ML-3712 (check for the proper region) 3. New OPC drum (optional) 4. New developer roller (optional) 5. New PCR (optional) 6. New wiper blade (optional) 7. New doctor Blade (optional) 8. Conductive grease 9. 99% isopropyl alcohol 10. Drum lubricating powder 11. Small tube of silicone caulk 1. On the contact side of the cartridge, slice off the heads of the three plastic rivets with a chisel blade knife. If your knife is too wide, you may find it necessary to drill out the upper recessed rivets on both sides. Leave the end cap on for now. 2. On the opposite side end cap, take the chisel blade knife and slice off the heads of the three plastic rivets. See previous step for recessed rivets. Leave the end cap on for now.


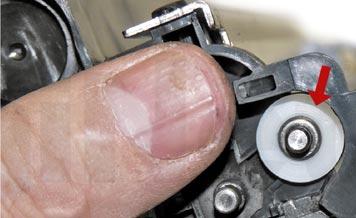
6 3. The drum axle arms on both sides of the cartridge stay with the end cap. There is no need to remove them. 4. Remove the drum drive-gear. 5. While still on the same side, locate the two tabs. Press in on each tab, and remove the end cap. The drum axle arm will come off with the end cap.


7 6. On the right side end cap, press in on the three tabs and remove the end cap.


8 7. Separate the two halves slightly and lift off the middle top cover. 8. Gently pry up on the tabs on both sides of the cartridge and remove the waste hopper. Be careful to hold the drum so it does not become damaged. Remove the drum/waste assembly.


9 9. Remove the drum. 10. Remove the PCR from the assembly. Clean the PCR with your normal PCR cleaner. WARNING: Do not clean the OEM PCR with alcohol, as this will remove the conductive coating from the roller. If the PCR is an aftermarket, follow the cleaning methods recommended by the manufacturer. If the PCR is an OEM, we recommend it be cleaned with your standard PCR cleaner. 11. Remove the two screws from the wiper blade, and remove the blade. It is easy to remove if you slide it out from under the PCR holders.


10 12. Clean out all the waste toner from the hopper. Make sure the seals are clean. 13. Carefully remove the wiper blade seal from the right side (chip side). Peel the seal back around three inches. 14. Pry up the chip cover. 15. Lift up on the tab as shown, and press the chip out through the opening.


. 19.")

11 16. Replace the chip. 17. Replace the chip cover. 18. Reinstall the wiper blade seal. Use 100% silicon if the seal is torn to prevent any leaks. Just as the OEM did, be careful not to use any silicon on the chip cover area (otherwise it will be very difficult to replace the chip on the next cycle). 19. Install the new wiper blade and two screws. It is easier to install if you slide it in under the PCR holders.
. 21.")
. 22.")

12 20. Place a small amount of conductive grease in the holders, and install the PCR. The long shaft side goes to the gear side (non-chip side). 21. Install the drum into the waste hopper, with the large gear of the drum to the gear side (non-chip side). 22. On the supply hopper, carefully pry out the fill plug and dump out any remaining toner. The fill plug can be difficult to remove as it is recessed. Take a small common screwdriver and work it around the edge, lifting slightly until it comes loose.


13 23. Pry off the gear plate, and remove the gears. 24. Remove the developer roller bushings from both sides.


14 25. Remove the developer roller. 26. Remove the two screws from the doctor blade, and remove the blade. Clean out all the remaining toner from the hopper. 27. Make sure the doctor blade sealing foam and the developer roller seals are clean and intact. 28. Clean the doctor blade edge so there is no evidence of build up along the edge. If any buildup exists, the cartridge will streak. No chemicals should be used. We have found using a clean, wooden ice cream-type stick works great for scraping the blade clean without damaging it.


15 29. Install the seal when available through the developer roller opening. 30. Pull the tail of the seal through the seal port. 31. Install the doctor blade and two screws. 32. Clean the developer roller with a dedicated developer roller cleaner, and replace into the hopper. Place the long shaft side to the gear side of the cartridge. It should snap in place if installed correctly.


16 33. Clean and replace the conductive grease on the short shaft side of the roller. 34. Fill the hopper with toner for use in Samsung ML Replace the fill plug and check for leaks. 35. Replace the bushings on both side of the developer roller.


17 36. Install the gears in the order as shown. 37. Install the gear axle plate.


18 38. Fit both sides of the waste hopper tabs into the toner hopper. 39. Slide the cleaned middle top cover/pcr cleaner assembly into place. Make sure the center tab fits under the edge of the doctor blade.


19 40. Clean the contacts on the left side end cap, and replace the conductive grease. Snap the end cap into place. 41. Drill three small holes that correspond to the screw size you re using. Install the three screws into the end cap.


20 42. Clean the hubs on the gear side or right side end cap. Snap the end cap into place. 43. Drill three small holes that correspond to the screw size you are using. Install the three screws into the end cap.


21 44. Install the drum drive gear. 45. The drum separators are fixed to the end caps. They should be set as shown. These arms keep the drum and developer rollers separated until the cartridge is installed in the printer. REPETITIVE DEFECT CHART Upper heat roller: 77.5 mm OPC drum: 75.6 mm Lower pressure roller: 75.4 mm Supply roller: 49.0 mm Transfer roller: 47.0 mm PCR: 37.5 mm Developer roller: 35.0 mm PRINTING TEST PAGES Depending on the model machine you have, there are different control panel configurations: 1. To have test prints run on the laser printers, press the MENU button and scroll to the INFORMATION menu. 2. From there, you can select the MENU MAP, CONFIGURATION, SUPPLIES INFO, DEMO, FONTS pages, etc.
TONER CARTRIDGE REMANUFACTURING INSTRUCTIONS XEROX PHASER 3320 TONER CARTRIDGE
 XEROX PHASER 3320 TONER CARTRIDGE REMANUFACTURING INSTRUCTIONS XEROX PHASER 3320 TONER CARTRIDGE REMANUFACTURING THE XEROX PHASER 3320 TONER CARTRIDGE By Mike Josiah and the Technical Staff at UniNet First
THE ML-3471 TONER CARTRIDGE
 SAMSUNG ML-3471 TONER CARTRIDGE REMANUFACTURING INSTRUCTIONS THE ML-3471 TONER CARTRIDGE DOC# 0438 By Mike Josiah and the technical staff at Summit Technologies a distributor of Summit and Uninet Products.
XEROX PHASER 3635 MFP
 XEROX PHASER 3635 MFP TONER CARTRIDGE REMANUFACTURING INSTRUCTIONS XEROX PHASER 3635 TONER CARTRIDGE REMANUFACTURING THE XEROX PHASER 3635 MFP TONER CARTRIDGE By Mike Josiah and the Technical Staff at
HP ENTERPRISE 600 M651/M680 SERIES TONER CARTRIDGE REMANUFACTURING INSTRUCTIONS
 HP ENTERPRISE 600 M651/M680 SERIES TONER CARTRIDGE REMANUFACTURING INSTRUCTIONS HP 652A TONER CARTRIDGE RREMANUFACTURING THE HP COLOR ENTERPRISE 600 M651/M680 SERIES TONER CARTRIDGES By Mike Josiah and
TONER CARTRIDGE REMANUFACTURING INSTRUCTIONS OKIDATA B710/720/730 SERIES TONER CARTRIDGE
 OKIDATA B710/720/730 SERIES TONER CARTRIDGE REMANUFACTURING INSTRUCTIONS OKIDATA B710/720/730 SERIES TONER CARTRIDGE REMANUFACTURING THE OKIDATA B710/720/730 SERIES TONER CARTRIDGE By Mike Josiah and the
IMAGECLASS MF7200 SERIES (EP105) TONER CARTRIDGE REMANUFACTURING INSTRUCTIONS
 TONER CARTRIDGE REMANUFACTURING INSTRUCTIONS") CANON IMAGECLASS MF7200 SERIES (EP105) TONER CARTRIDGE REMANUFACTURING INSTRUCTIONS CANON EP105 TONER CARTRIDGE REMANUFACTURING THE CANON IMAGECLASS MF7200 SERIES EP105 TONER CARTRIDGE By Mike Josiah and
CANON IMAGECLASS MF7200 SERIES (EP105) TONER CARTRIDGE REMANUFACTURING INSTRUCTIONS CANON EP105 TONER CARTRIDGE REMANUFACTURING THE CANON IMAGECLASS MF7200 SERIES EP105 TONER CARTRIDGE By Mike Josiah and
TONER CARTRIDGE REMANUFACTURING INSTRUCTIONS LASERJET P1505 SERIES TONER CARTRIDGE
 HP LASERJET P1505 TONER CARTRIDGE REMANUFACTURING INSTRUCTIONS HP LASERJET P1505 SERIES TONER CARTRIDGE 2010 UniNet Imaging Inc. All trademark names and artwork are property of their respective owners.
XEROX WORKCENTRE 4150
 XEROX WORKCENTRE 4150 TONER CARTRIDGE REMANUFACTURING INSTRUCTIONS 013R00623 DRUM UNIT REMANUFACTURING THE XEROX WORKCENTRE 4150 DRUM UNIT By Enrique E. Estura, Daniel Reyes, and the Technical Staff at
HP LASERJET
 HP LASERJET 4200 4300 TONER CARTRIDGE REMANUFACTURING INSTRUCTIONS HP LASERJET 4200 TONER CARTRIDGE (Q1338A) HP LASERJET 4300 TONER CARTRIDGE (Q1339A) REMANUFACTURING HP LASERJET 4200/4300 TONER CARTRIDGES
Technical Document. Panafax UF-890 (actually revisiting the Panafax UF-550)
") Technical Document Disassembly Instructions SUMMIT Laser Products 95 Orville Drive Bohemia, New York 11716 Tel: 631-218-8376 Fax: 631-218-3275 Panafax UF-890 (actually revisiting the Panafax UF-550) Toner
Technical Document Disassembly Instructions SUMMIT Laser Products 95 Orville Drive Bohemia, New York 11716 Tel: 631-218-8376 Fax: 631-218-3275 Panafax UF-890 (actually revisiting the Panafax UF-550) Toner
1320 TO P2015 TONER CARTRIDGE CONVERSION INSTRUCTIONS
 HP 1320 TO P2015 TONER CARTRIDGE CONVERSION INSTRUCTIONS HP 1320 TO P2015 CONVERSION KIT (UNINET PART #1114) HP 1320 TO P2015 TONER CARTRIDGE CONVERSION INSTRUCTIONS By Javier Gonzalez and the Technical
LEXMARK C780 CARTRIDGE REMANUFACTURING INSTRUCTIONS LEXMARK C780 TONER CARTRIDGE
 LEXMARK C780 CARTRIDGE REMANUFACTURING INSTRUCTIONS LEXMARK C780 TONER CARTRIDGE REMANUFACTURING THE LEXMARK C780 BLACK & COLOR TONER CARTRIDGES First released in April 2008, the Lexmark C780 is based
MINOLTA MAGICOLOR 5430/5440/5450 CARTRIDGE REMANUFACTURING INSTRUCTIONS
 MINOLTA MAGICOLOR 5430/5440/5450 CARTRIDGE REMANUFACTURING INSTRUCTIONS MINOLTA MAGICOLOR 5430 Color Laser Printer with Toner Cartridge MINOLTA MAGICOLOR 5430 TONER CARTRIDGE SIDE VIEW WITH END CAP SHOWN
KONICA MINOLTA MAGICOLOR
 KONICA MINOLTA MAGICOLOR 5430 5440 5450 TONER CARTRIDGE REMANUFACTURING INSTRUCTIONS KONICA MINOLTA MAGICOLOR 5430 TONER CARTRIDGE REMANUFACTURING THE KONICA MINOLTA MAGICOLOR 5430/5440/5450 TONER CARTRIDGES
HP 5500 COLOR LASER PRINTER W/TONER CARTRIDGES
 AbsoluteCOLOR AbsoluteBLACK UniDrums UniRollers UniParts UniCoatings AbsoluteCOLOR AbsoluteBLACK UniDrums UniRollers UniParts UniCoatings HP 5500 CARTRIDGE REMANUFACTURING INSTRUCTIONS HP 5500 COLOR LASER
DRUM UNIT REMANUFACTURING INSTRUCTIONS
 Absolute COLOR Absolute BLACK Unidrums Unirollers Uniparts Unicoatings EPSON ACULASER C2600 DRUM UNIT REMANUFACTURING INSTRUCTIONS EPSON ACULASER C2600 COLOUR LASER PRINTER EPSON ACULASER C2600 DRUM UNIT
Sharp AR-160 OPC Cartridges DOC-0270
 Home New Arrivals! Company Info Publications Special Features Contact Us Overview Tools Required Supplies Needed Disassembly Recommended Supplies Sharp AR-160 OPC Cartridges DOC-0270 OVERVIEW The Sharp
TPE CC1997CRS HP M252/MFP M277 X TONER HOPPER 60GRMS FILL(WITH SEAL) OEM HP M252/MFP M277 (CF400A-CF403A
 OEM HP M252/MFP M277 (CF400A-CF403A") Installation Instructions for TPE CC1997CRS HP M252/MFP M277 X TONER HOPPER 60GRMS FILL(WITH SEAL) OEM HP M252/MFP M277 (CF400A-CF403A or CF400X-CF403X) Cartridge T.P.E. CC1997CRS HP M252/MFP M277 X TONER
Installation Instructions for TPE CC1997CRS HP M252/MFP M277 X TONER HOPPER 60GRMS FILL(WITH SEAL) OEM HP M252/MFP M277 (CF400A-CF403A or CF400X-CF403X) Cartridge T.P.E. CC1997CRS HP M252/MFP M277 X TONER
Conversion Kit for HP1200 Cartridge
 OEM HP1200 (C7115A) Cartridge Conversion Using T.P.E. CC1197 Canon EP26/EP27/X25/U Type Conversion Kit for HP1200 Cartridge OEM HP1200 (C7115A) T.P.E. CC1197 Canon EP26/EP27/X25/U Type Conversion Kit for
DELL C 5100 TONER CARTRIDGE REMANUFACTURING INSTRUCTIONS
 DELL C 5100 REMANUFACTURING INSTRUCTIONS DELL C 5100 LASER PRINTER DELL C 5100 REMOVING THE GEARLESS END CAP 1. Remove the gearless end cap (shown) to access the toner fill cap. Using a small flathead
Detroit Speed, Inc. Electric Headlight Door Kit Corvette P/N: &
 Detroit Speed, Inc. Electric Headlight Door Kit 1968-82 Corvette P/N: 122006 & 122007 The Detroit Speed Inc. Electric Headlight Door Kit replaces the stock vacuum actuated system on all 1968-82 Corvettes.
Maintenance Information
 Form 16575334 Edition 1 April 2005 Electric Screwdrivers EL, EP and ET 34V DC Series Maintenance Information Save These Instructions WARNING Maintenance procedures have the potential for severe shock hazard
Oreck Magnesium Series Service Manual. The Oreck Manufacturing Company
 Oreck Magnesium Series Service Manual The Oreck Manufacturing Company 08/2012 10/2011 The Oreck Manufacturing Company Contents Covering all Magnesium Upright Models Including: LW100, LW125, LW1000, AND
Detroit Speed, Inc. Electric Headlight Door Kit Corvette P/N: &
 Detroit Speed, Inc. Electric Headlight Door Kit 1968-82 Corvette P/N: 122006 & 122007 The Detroit Speed Inc. Electric Headlight Door Kit replaces the stock vacuum actuated system on all 1968-82 Corvettes.
Please try our way first.
 1958-1962 Corvette Raingear installation instructions Designer s Note: The 1958-1962 Corvette RainGear wiper system that you have purchased is complex and will require patient fitting. Complete Instructions
HD Super Short SYE Kit for the NP241C
 HD Super Short SYE Kit for the NP241C Manufactured by JB CONVERSIONS, INC. Phone: 337-625-2379 Part No. 16-1207 Installation Instructions for the NP241C Transfer Case Instruction Rev: 2009.11.23 Installed
Installation Manual TWM Performance Short Shift Kit Stage 1 and Stage 2 MazdaSpeed 6
 Page 1 Installation Manual TWM Performance Short Shift Kit Stage 1 and Stage 2 MazdaSpeed 6 Please Note: It is preferable to park on a flat surface, as you will have to engage and disengage the hand brake
Installation Manual TWM Performance Kia Forte Short Shifter
 Installation Manual TWM Performance Kia Forte 2009+ Short Shifter Begin the installation by parking on a flat surface, as you will have to engage and disengage the hand brake and shift from gears to neutral.
RHINO SUSPENSION SYSTEM INSTALLATION INSTRUCTIONS
 PARTS INCLUDED: 2 FRONT UPPER A-ARMS 2 FRONT LOWER A-ARMS 2 UNI-BALL JOINTS 2 UNI-BALL JOINT STUDS 2 UNI-BALL JOINT CAPS 2 RETAINING RINGS 1 FRONT SHOCK ASSEM. 2 DELRON STEERING STOPS 2 SHOCK MOUNT SPACERS
2003 CR-V - A/T Shift Cable Replacement-Print Preview
 Page 1 of 7 2003 CR-V - A/T Shift Cable Replacement 1. Raise the front of the vehicle, or lift the vehicle up, and make sure it is securely supported. 2. Remove the driver's dashboard lower cover, and
DIY Bi-Metallic Strip
 DIY Bi-Metallic Strip An introduction to the applications of thermal expansion and two-way switching. Written By: Mahaaveer BN 2018 Page 1 of 14 INTRODUCTION A bi-metallic strip is used to convert a temperature
Installation Instructions for the Tera Low231 4:1 Heavy-Duty Transfer Case (LOW231)
") Installation Instructions for the Tera Low231 4:1 Heavy-Duty Transfer Case (LOW231) Stop! Read this before beginning installation. Some YJs and XJs require specific modifications for proper installation
Installation Instructions for the Tera Low231 4:1 Heavy-Duty Transfer Case (LOW231) Stop! Read this before beginning installation. Some YJs and XJs require specific modifications for proper installation
Maintenance Information
 80234313 Edition 1 June 2006 Air Grinder, Die Grinder, Sander and Belt Sander Series G1 (Angle) Maintenance Information Save These Instructions WARNING Always wear eye protection when operating or performing
Toyota Tacoma Winch Mount Bumper Installation Instructions Tools Required: Transmission cooler relocation brackets Torque Wrench
 2016-2017 Toyota Tacoma Winch Mount Bumper Installation Instructions Tools Required: Items Included: Small flat head screw driver Winch Mount Ratchet, 10mm, 12mm, 14mm, 17mm & Skid Plate 19mm sockets Transmission
Current Range Rover Sport STRUT Collection Installation Manual
 2014 - Current Range Rover Sport STRUT Collection Installation Manual 1 1. Removing Main Grille and Lower Fascia 1.1 Run a line of low tack masking tape across the front of the bumper below the grille
Installation Manual TWM Performance Short Shifter Subaru STi 2008+
 - 1 - Installation Manual TWM Performance Short Shifter Subaru STi 2008+ Please Note: It is preferable to park on a flat surface, as you will have to engage and disengage the hand brake and shift from
Lexus NX Fine Mesh and Dynamic Radar Cruise Control Fine Mesh Grilles
 IMPORTANT: PLEASE KEEP THIS INSTRUCTION MANUAL FOR FUTURE REFERENCE! 2015-16 Lexus NX Fine Mesh and Dynamic Radar Cruise Control Fine Mesh Grilles Upper Insert - factory chrome surround and emblem reused
In-Wall Slide-Out REPAIR KIT MANUAL. Rev: Page 1 In-Wall Repair Kits Manual
 In-Wall Slide-Out REPAIR KIT MANUAL Rev: 02.16.2017 Page 1 In-Wall Repair Kits Manual TABLE OF CONTENTS Safety Information 2 Introduction 2 Preliminary Visual Inspection 3 Assembly Removal Procedure 4
INSTALLATION INSTRUCTIONS REPAIR SEAL KIT PowerSurvivor 40E
 INSTALLATION INSTRUCTIONS REPAIR SEAL KIT PowerSurvivor 40E PURPOSE OF THE KIT The Repair Seal Kit should be installed after 1000 hours of operation. It should be installed regardless of whether or not
HD Standard Length SYE Kit Using OEM Housing
 HD Standard Length SYE Kit Using OEM Housing Manufactured by JB CONVERSIONS, INC. Phone: 337-625-2379 Installation Instructions for the NP241C, NP241DLD, NP231D, NP231C, and NP233C Transfer Case Part No.
Installation Manual TWM Performance 2010 Mazda 3 short shifter 5 and 6 speed non-mazdaspeed
 Installation Manual TWM Performance 2010 Mazda 3 short shifter 5 and 6 speed non-mazdaspeed Begin the installation by parking on a flat surface, as you will have to engage and disengage the hand brake
5 Removal and replacement
 5 Removal and replacement This chapter describes the removal and replacement of field-replaceable units (FRUs) only. Removal and replacement strategy User-replaceable parts Covers Internal assemblies ENWW
Parts List See cover Page
 Thank you for purchasing the CorkSport Front Mount Intercooler Kit for the 2010-2013 Mazdaspeed 3. Keep your BAT s under check with the CorkSport FMIC Kit with the small or large intercooler. Please let
Maintenance Information
 80234313 Edition 2 May 2014 Air Grinder, Die Grinder, Sander and Belt Sander Series G1 (Angle) Maintenance Information Save These Instructions Product Safety Information WARNING Failure to observe the
Our goal is to make the install a breeze. Please read the entire guide before beginning.
 www.airkewld.com Page 1 of 6 IRS Axle Kit Install IRS Axle Kit Install Our goal is to make the install a breeze. Please read the entire guide before beginning. KITS SHOULD INCLUDE 2 - Control-arm mounting
Motorola Moto Z Force Droid Battery
 Motorola Moto Z Force Droid Battery Replacement Replace a dead or faulty battery in the Motorola Moto Z Force Droid. Written By: Kenji Fong ifixit CC BY-NC-SA www.ifixit.com Page 1 of 16 INTRODUCTION Use
Maintenance Adjustments
 4 Maintenance and Adjustments Chapter Contents Cleaning the Printer and Paper Handling Accessories..... 158 Cleaning the HP Digital Copier....................... 161 Cleaning ADF and Glass............................
PRELIMINARY INSTALLATION INSTRUCTIONS. Remote Engine Starter Attachment Kit P/N 08E92-SNA-100B
 INSTALLATION INSTRUCTIONS Accessory Application Publications No. REMOTE ENGINE STARTER SYSTEM 2008 CIVIC 2-DOOR AII 38215 Issue Date OCT 2007 PARTS LIST Remote Engine Starter Unit Kit P/N 08E91-E22-100B
 Page 1 of 15 Transmission, Model S5-42 ZF Model S5-42 ZF Disassembly NOTE: For 4x4 and F-Super Duty vehicles, skip to Step 5. 1. Attach the transmission to the Bench Mounted Holding Fixture T57L-500-B
Main Cover and Paper Input Assembly removal
 Main Cover and Paper Input Assembly Remove the toner cartridge. Remove memory door (HP LaserJet 5L and 6L). CAUTION Remove the memory door first (HP LaserJet 5L and 6L). The door will break if you remove
J & D Machine / Hyperdrive / MSA 3711 Moon Bend Rd. Chapel Hill, TN 37034
 J & D Machine / Hyperdrive / MSA 3711 Moon Bend Rd. Chapel Hill, TN 37034 www.hyperdriveracing.com 1 You now own a state of the art 1/10 scale oval race car. The Hyperdrive Assault has gone through months
HURST COMP STICK KIT 2008 and up DODGE CHALLENGER (with AUTO-STICK) Catalog # &
 Catalog # &") FORM 159 0402 03/09 HURST COMP STICK KIT 2008 and up DODGE CHALLENGER (with AUTO-STICK) Catalog #538 0402 & 538 0403 2009 by Hurst Perfomance Thank you for purchasing the Hurst Comp Stick Kit for your
FORM 159 0402 03/09 HURST COMP STICK KIT 2008 and up DODGE CHALLENGER (with AUTO-STICK) Catalog #538 0402 & 538 0403 2009 by Hurst Perfomance Thank you for purchasing the Hurst Comp Stick Kit for your
DrVanos.com Stage II Installation Instructions. Tool rental is available with the purchase of a vanos kit *See website for more info*
 DrVanos.com Stage II Installation Instructions Special Tools Needed: Camshaft locking tool TDC Crank pin Sprocket turning tool Tool rental is available with the purchase of a vanos kit *See website for
Installation Instructions HURST COMP STICK KIT Dodge Challenger (with AUTO-STICK)
") Installation Instructions HURST COMP STICK KIT 2008-2012 Dodge Challenger (with AUTO-STICK) 1590402 REV01 08/17/15 Catalog# 538 0402 & 538 0403 2009, 2015 Hurst Performance WORK SAFELY! For maximum safety,
Installation Instructions HURST COMP STICK KIT 2008-2012 Dodge Challenger (with AUTO-STICK) 1590402 REV01 08/17/15 Catalog# 538 0402 & 538 0403 2009, 2015 Hurst Performance WORK SAFELY! For maximum safety,
Maintenance Information
 45530136 Edition 1 July 2008 Electric Screwdrivers EL 24V DC Series Maintenance Information Save These Instructions WARNING Always wear eye protection when operating or performing maintenance on this tool.
Thank you for purchasing the Blackstone Models K-27!
 Operations Manual Thank you for purchasing the Blackstone Models K-27! Before your Mudhen whistles off, we want to tell you about a few things that will enhance your operating experience and ensure that
Slingshot Rotrex Supercharger Kit
 Slingshot Rotrex Supercharger Kit This supercharger kit improves on the Slingshot by forcing more dense air into the engine and creating more power. Installation time of the supercharger depends on you
TABLE OF CONTENTS PARTS LIST
 TROUBLESHOOTING: Note: You will have a check engine light and/or other problems unless using this product with a compatible ECM calibration. Contact your tuning supplier to learn whether or not aftermarket
ADVANCE ADAPTERS INC. Fixed Yoke kit (S.Y.E. Kit)
") ADVANCE ADAPTERS INC. Fixed Yoke kit (S.Y.E. Kit) Instruction Sheet P/N: 50-7905 & 50-7906 KIT CONSISTS OF: No. Qty Part No. Description 1. 1 51-7906 TAILHOUSING, DIECAST 2. 1 52-7905 SHAFT, MAIN OUTPUT
ADVANCE ADAPTERS INC. Fixed Yoke kit (S.Y.E. Kit) Instruction Sheet P/N: 50-7905 & 50-7906 KIT CONSISTS OF: No. Qty Part No. Description 1. 1 51-7906 TAILHOUSING, DIECAST 2. 1 52-7905 SHAFT, MAIN OUTPUT
TECUMSEH/PEERLESS LTH Model Transaxle Supplement
 TECUMSEH/PEERLESS LTH Model Transaxle Supplement This supplemental repair manual has been created to provide service information for the LTH model transaxle. This information will be incorporated into
$1.00 FOR THE TQIO/RCIO
 $1.00 FOR THE TQIO/RCIO m mm HDBBYSHOP Champion Jay Halsey has an impressive track record. One of Jay's advantages is a whisper smooth tranny thanks to his dad, Jim. Now you can build a Halsey transmission!
Volvo 850 Radiator Replacement Jason Reed 29 March 2013
 This write up covers removing and replacing the radiator on a 97 855 GLT wagon with light pressure turbo and automatic transmission. This car has 162K miles. The radiator, which was original, developed
INSTALLATION INSTRUCTIONS
 INSTALLATION INSTRUCTIONS Accessory REMOTE ENGINE STARTER SYSTEM Application 2010 CIVIC 4-DOOR Publications No. AII 42460 Issue Date AUG 2009 PARTS LIST Remote Engine Starter Unit Kit P/N 08E91-E22-100B
Wiper Transmission Repair Charles Bernhardt
 Wiper Transmission Repair Charles Bernhardt When I purchased this '59 Corvette most of the parts were in boxes. The wiper transmissions were one of the first parts that I decided to look at to see if they
Dispenser Parts Part Description Replacement SKU
 Tork Elevation H1 Matic Towel Dispenser: H1 Matic System 5510202 White; 5510282 Black Dispenser Dimensions HxWxD Inches (cm): 14.65 x 13.26 x 7.99 (37.2 x 33.7 x 20.3) H1 Roll Towel Product Options: Roll
Installation instructions, accessories - Rear Seat Entertainment
 XC90 Section Group Weight(Kg/Pounds) Year Month 3 39 2004 10 XC90 2003, XC90 2004, XC90 2005, XC90 2006, XC90 2007, XC90 2008 Replaces issue: 2003 12 J3904620 Page 1 of 18 Required tools A0000162 A0000163
In-Wall Slide-Out (Winnebago)
") In-Wall Slide-Out (Winnebago) REPIR MNUL Rev: 11.16.2017 Page 1 Winnebago In-Wall Repair Manual 22MR17 TBLE OF CONTENTS Safety Information 2 Introduction 2 Preliminary Visual Inspection 3 ssembly Removal
In-Wall Slide-Out (Winnebago) REPIR MNUL Rev: 11.16.2017 Page 1 Winnebago In-Wall Repair Manual 22MR17 TBLE OF CONTENTS Safety Information 2 Introduction 2 Preliminary Visual Inspection 3 ssembly Removal
2005+ Roll Bar (Mm5RB-20.1 to -20.6) Recommended Center punch 1/8" pilot drill 1-3/4" Hole saw 2" Hole saw
 Recommended Center punch 1/8 pilot drill 1-3/4 Hole saw 2 Hole saw") 3430 Sacramento Dr., Unit D San Luis Obispo, CA 93401 Telephone: 805/544-8748 Fax: 805/544-8645 www.maximummotorsports.com 2005+ Roll Bar (Mm5RB-20.1 to -20.6) Recommended Center punch 1/8" pilot drill
3430 Sacramento Dr., Unit D San Luis Obispo, CA 93401 Telephone: 805/544-8748 Fax: 805/544-8645 www.maximummotorsports.com 2005+ Roll Bar (Mm5RB-20.1 to -20.6) Recommended Center punch 1/8" pilot drill
INSTALLATION INSTRUCTIONS
 INSTALLATION INSTRUCTIONS Accessory REMOTE CONTROL Application 2008 ACCORD 4-DOOR Publications No. AII 35365 Issue Date AUG 2007 PARTS LIST U Accessory User s Information Manual Remote Engine Starter Unit
Shelby GT500 Front Fascia Conversion Kit (05-09 All) Item # Installation Time: 1 Day. Required tools:
 Item # Installation Time: 1 Day. Required tools:") Shelby GT500 Front Fascia Conversion Kit (05-09 All) Item #53611 Installation Time: 1 Day Required tools: Phillips Screw driver 10mm Socket + Ratchet/Wrench 8mm Socket + Ratchet/Wrench 5mm Socket + Ratchet/Wrench
Shelby GT500 Front Fascia Conversion Kit (05-09 All) Item #53611 Installation Time: 1 Day Required tools: Phillips Screw driver 10mm Socket + Ratchet/Wrench 8mm Socket + Ratchet/Wrench 5mm Socket + Ratchet/Wrench
Commander SUSPENSION SYSTEM INSTALLATION INSTRUCTIONS
 PARTS INCLUDED: 2 - FRONT UPPER A-ARMS 2 - FRONT LOWER A-ARMS 4 - COTTER PINS 2-12MM JAM NUTS 2 - TIE ROD EXTENDERS 8- FLANGED DELRON BUSHINGS 4- DELRON CASTER SPACERS 6 - GREASE FITTINGS 3 - BEARING REMOVAL
INSTALLATION INSTRUCTIONS
 INSTALLATION INSTRUCTIONS Accessory REMOTE CONTROL Application Publications No. 2009 ACCORD AII 39977-40931 4-DOOR Issue Date (A/T ONLY) NOV 2008 PARTS LIST Remote Engine Starter Unit Kit P/N 08E91-E22-100A
MODEL VFF30 REPAIR KIT INSTALLATION INSTRUCTIONS
 INSTALLATION SAFETY PRECAUTIONS: 1. Do NOT use Teflon thread tape on any of the NPT pipe-thread fittings where fuel travels. Use a suitable fuel-resistant joint compound. 2. Be sure to leak-check all fittings
I n s t r u c t i o n M a n u a l. Instruction Manual SPECIFICATION
 I n s t r u c t i o n M a n u a l Instruction Manual SPECIFICATION - Wingspan: 3200mm (125,9 in) - Length: 1650mm (64,9 in) - Flying weight: 3000gr 3200gr - Wing area: 64.5 dm2 - Wing loading: 46g/dm2
Lingenfelter Signature Series Camaro SS Rear Valance
 Lingenfelter Signature Series 2010-2012 Camaro SS Rear Valance PN: L850161410 Lingenfelter Performance Engineering 1557 Winchester Road Decatur, IN 46733 (260) 724-2552 (260) 724-0422 fax www.lingenfelter.com
 Special Tools Needed: DrVanos.com Stage I Installation Instructions Camshaft locking tool TDC Crank pin Sprocket turning tool Tool rental is available with the purchase of a vanos kit *See website for
Installation Manual TWM Performance Short Shifter 2008 Mitsubishi Lancer
 Page 1 Installation Manual TWM Performance Short Shifter 2008 Mitsubishi Lancer Please Note: It is preferable to park on a flat surface, as you will have to engage and disengage the hand brake and shift
Installation Manual TWM Performance Shift Boot 2006 and up Honda Civic Si
 Page 1 Installation Manual TWM Performance Shift Boot 2006 and up Honda Civic Si Begin the installation by parking on a flat surface, as you may have to engage and disengage the hand brake and shift from
05 09 Mustang Squirter Nozzle Relocation Kit CDC #112050
 05 09 Mustang Squirter Nozzle Relocation Kit CDC #112050 Note: Read installation instructions before starting. Component Check List: Quantity/Description Part# CDC Installer 2 - Squirter Nozzles 115063
Written By: Arthur Shi
 Google Pixel XL Battery Replacement A guide showing how to replace a non-functional battery in the Google Pixel XL. Written By: Arthur Shi ifixit CC BY-NC-SA www.ifixit.com Page 1 of 21 INTRODUCTION Follow
Short-throw Shifter Installation Guide
 Short-throw Shifter Installation Guide Removal Procedure 1) Remove the shift control knob. A. Lift up on the rear portion of the shift control closeout boot retaining ring and detach the retaining ring
INSTALLATION INSTRUCTIONS
 INSTALLATION INSTRUCTIONS Accessory (EX) Application 2009 ACCORD 2- AND 4-DOOR Publications No. AII 39942 Issue Date JULY 2008 PARTS LIST Automatic Day/Night Mirror Attachment Kit P/N 08V03-TA0-100B Automatic
Detroit Speed, Inc. Selecta-Speed Wiper Kit Corvette P/N:
 Detroit Speed, Inc. Selecta-Speed Wiper Kit 1968-72 Corvette P/N: 121621 A downpour of rain will no longer hinder your ability to clearly see the road. The Detroit Speed Selecta-Speed Wiper Kit provides
Prerequisites: Shop Manual (recommended) pages 3-9 through 3-13.
 pages 3-9 through 3-13.") Prerequisites: Order your gaskets average about $25.00 bucks X 2 so $50.00 4NK-11193-00-00 Obtain a shim kit (Should have several 265 and 270s) (Some dealers will exchange) Obtain a Valve Bucket Tool YM-33961
Prerequisites: Order your gaskets average about $25.00 bucks X 2 so $50.00 4NK-11193-00-00 Obtain a shim kit (Should have several 265 and 270s) (Some dealers will exchange) Obtain a Valve Bucket Tool YM-33961
Factory Five Racing, Inc. 818 Kit Assembly manual revision 1J update
 Factory Five Racing, Inc. 818 Kit Assembly manual revision 1J update Turbo coolant overflow tank...1 Shifter handle...4 Install...4 Door skin...7 Door Liner... 10 Side mirrors... 14 Door handles and pulls...
Installation Manual TWM Performance Short Shift Kit 2006 and up Toyota Yaris
 Installation Manual TWM Performance Short Shift Kit 2006 and up Toyota Yaris 1. Unscrew the shift knob by rotating counter clockwise. 2. Remove the carpet or mat at the bottom of the cup holder at the
Fuser Replacement LJ 1160/1320/P2015
 Service Edge Page 6 COMPANY A L-side: Two tabs C R-side: Tabs E Back cover: tab, pin G Back cover B R-side: Tab D R-side: Tabs F Duplexer: tab Fuser Replacement LJ 1160/1320/P2015 As a regular maintenance
INSTALLATION INSTRUCTIONS
 INSTALLATION INSTRUCTIONS Accessory NIGHT Application CR-V Publications No. AII 32951 Issue Date SEP 2006 PARTS LIST Automatic Day/Night Mirror Attachment Kit P/N 08V03-SWA-100 Harness cover set Automatic
NOTE: IF RUNNING FACTORY RANGER 900 ALUMINUM WHEELS OR AFTERMARKET ALUMINUM WHEELS THEN SPACERS ARE NOT REQUIRED.
 780 Professional Dr. North, Shreveport, LA. 318-524-2270 Polaris 900 XP Ranger Lift Kit Installation Instructions Read before Installation This product is designed for use on ATVs and/or RUVs to increase
Stand Alone Fog Lights Installation Instructions
 Tools Required: 1. Trim Removal tool or protected flat screwdriver 2. #2 Phillips Screwdriver 3. 10mm socket 4. 10mm wrench 5. 8mm or 5/16 socket 6. Adjustable Pliers 7. Electrical Tape WARNING!!! Disconnect
***THE OWNER'S MANUAL MUST BE GIVEN TO THE END USE CUSTOMER AFTER COMPLETING THE INSTALLATION.***
 INSTALLATION INSTRUCTIONS FOR THE MOTOR TRIKE HARLEY MECHANICAL REVERSE 1999-2006 FIVE SPEED FLH LAST UPDATED: OCTOBER 2011 AS THE INSTALLER OF THIS MECHANICAL REVERSE, YOU MUST BECOME FAMILIAR WITH PROPER
Replacing the Gear Drive Motor Assembly and GFCI Module for Operation with the Chain Drive Motor Assembly
 Replacing the Gear Drive Motor Assembly and GFCI Module for Operation with the Chain Drive Motor Assembly Kit Contents B00009035-3 Motor Drive Assembly (Return original to CMI) B00007698-8 GFCI Module
Shown with optional GFR-1017R Body Posts. J & D Machine / Hyperdrive / MSA 3711 Moon Bend Rd. Chapel Hill, TN
 Shown with optional GFR-1017R Body Posts J & D Machine / Hyperdrive / MSA 3711 Moon Bend Rd. Chapel Hill, TN 37034 www.hyperdriveracing.com 1 You now own a state of the art 1/10 scale oval race car. The
Mityvac MV8000 O-ring Replacement
 A vacuum pump must be air tight in order to operate. A leak in your vacuum pump will potentially complicate the diagnosis of vacuum systems or make bleeding automotive fluids more difficult. Learn to replace
HP LaserJet P3005 Grinding Noise
 HP LaserJet P3005 Grinding Noise Following in the footsteps of its predecessor, the P3005 has picked up a similar noise that is creating a lot of problems for techs in the field. One difference between
How I installed new brake pads on my i with Sport Package (should be fine for other E39 s) By Robert B.
 By Robert B.") How I installed new brake pads on my 1999 528i with Sport Package (should be fine for other E39 s) How I installed new brake pads on my 1999 528i with Sport Package (should be fine for other E39 s) By
How I installed new brake pads on my 1999 528i with Sport Package (should be fine for other E39 s) How I installed new brake pads on my 1999 528i with Sport Package (should be fine for other E39 s) By
Lexus ES Fine Mesh and Adaptive Cruise Control Fine Mesh Grilles Upper and Lower Replacements
 IMPORTANT: PLEASE KEEP THIS INSTRUCTION MANUAL FOR FUTURE REFERENCE! 2013-15 Lexus ES Fine Mesh and Adaptive Cruise Control Fine Mesh Grilles Upper and Lower Replacements Part #1372-0102-13 / Black Ice
Installation Manual TWM Performance Short Shifter Cobalt SS/SC, SS/TC, HHR SS, Ion Redline and Saab 9-3
 Page 1 Installation Manual TWM Performance Short Shifter Cobalt SS/SC, SS/TC, HHR SS, Ion Redline and Saab 9-3 Please Note: It is preferable to park on a flat surface, as you will have to engage and disengage
Installation Manual TWM Performance Short Shifter Nissan 350Z, 370Z Infiniti G35, G37
 Installation Manual TWM Performance Short Shifter Nissan 350Z, 370Z Infiniti G35, G37 It is preferable to park on a flat surface, as you will have to engage and disengage the hand brake and shift from