Installation of Halo CCFL Rings edited by
|
|
|
- Coral Todd
- 6 years ago
- Views:
Transcription

1 Installation of Halo CCFL Rings edited by Please use the below installation as an example for your project. Installation is done on a CBR600 however the same procedure will apply to all bikes. Tools that may be needed: Philips Screw Driver, Allen Key Wrenches, Wire Cutters or stripper, electrical tape We highly recommend you test the rings with inverter with any battery or 12V power supply to ensure they are working before overhauling your bike. *Cutting anything on your vehicle is not necessary, however If you want the lights to turn on with your headlights or your park lamp lights (also known as Daytime running), you will need to tap into that wire. Step 1 - Removing the front upper fairing. We start out with first removing both the left and ride side main fairing bolts. There are 3 on each side going down. Then remove both of your mirrors and the center of the windscreen screws. It s easy to tell what bolts I'm talking about as you can see them clearly behind the windscreen from the riders POV.


2 Step 2 - Make sure you've removed the 2 inner lower fairing clips on both the left and right sides. And the one clip on the center and underside of the nose.

3 Step 3 - You will notice that the fairing is now basically dangling and being held on by nothing more than 3 clips. 1 clip going to your cluster/speedo which is black. A grey plug and a blue which connect to the rest of the harness and head further down toward the rear of the bike.
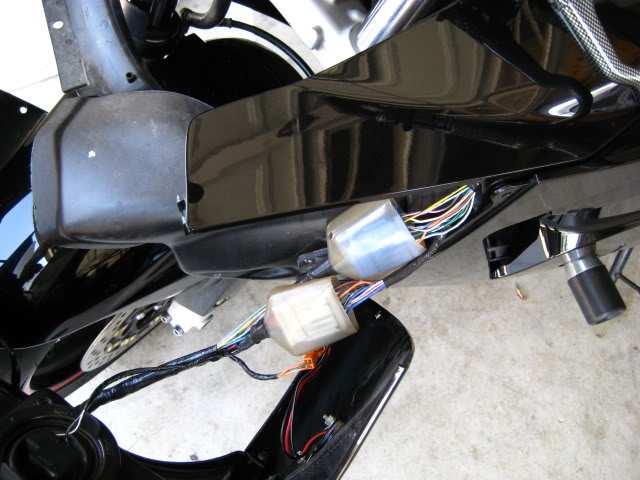
4 Step 3 continued:

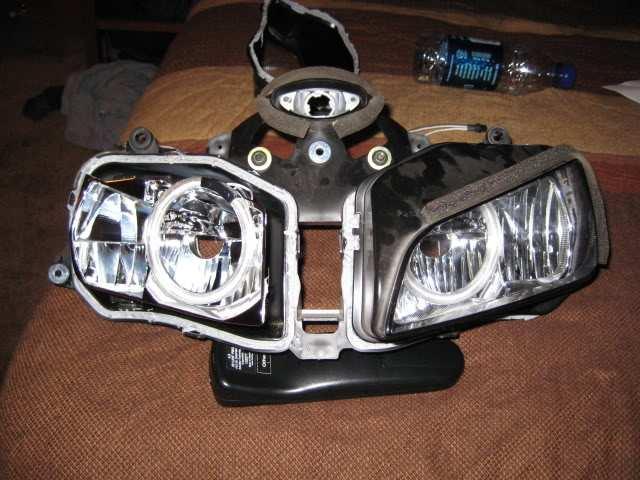
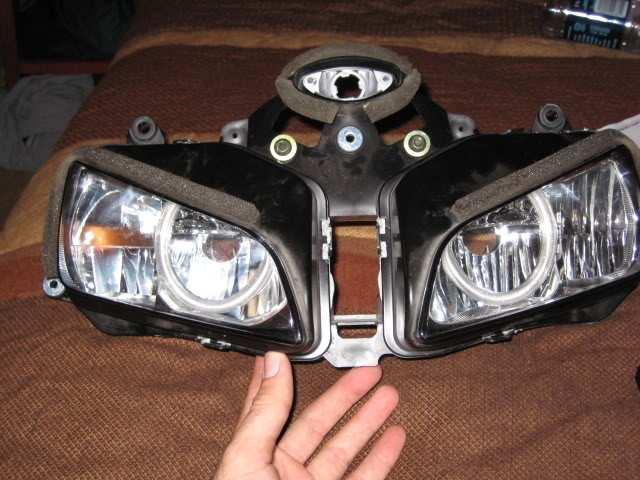
5 Step 4 - Now that we have removed our fairing lets first start with finding a clean and stable surface to work with. We have a towel and blanket onto a table which works great. Remove your bulbs and the rubber gasket/covers from them first. Here's a naked layout of the upper fairing and headlight assembly together.


6 Step 5 - Now let s separate our fairing from our headlight assembly. The 5 screws circled in red need to be removed as well as a hidden [circled in yellow] Philips screw underneath the headlight relay.

7 Step 6 Set your oven to ~220º or use a heat gun. We left our lenses in for approximately 20 minutes and they were easily separated. **DISCLAIMER!!!*** PLEASE KEEP AN EYE ON YOUR LENSES, MY OVEN MAY NOT BE IDENTICAL TO YOURS, YOUR LENSES MAKE TAKE LESS OR MORE TIME, DO NOT FORGET TO CONSTANTLY CHECK THEM.

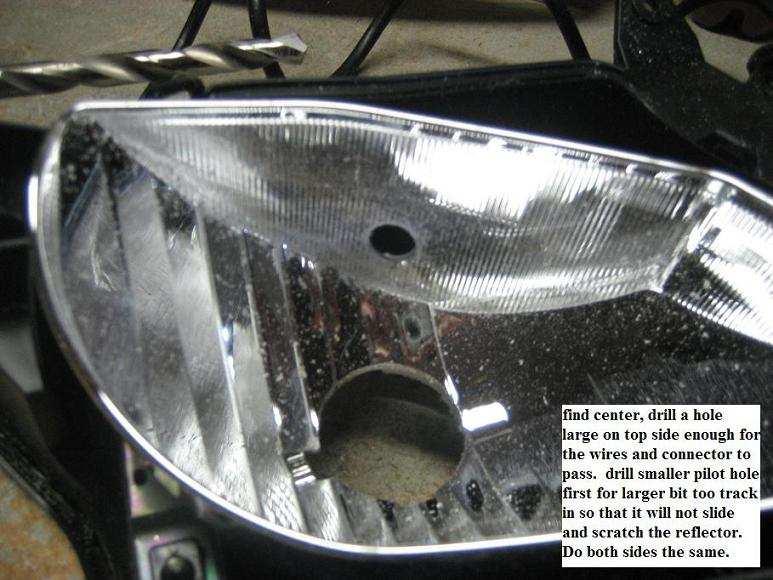
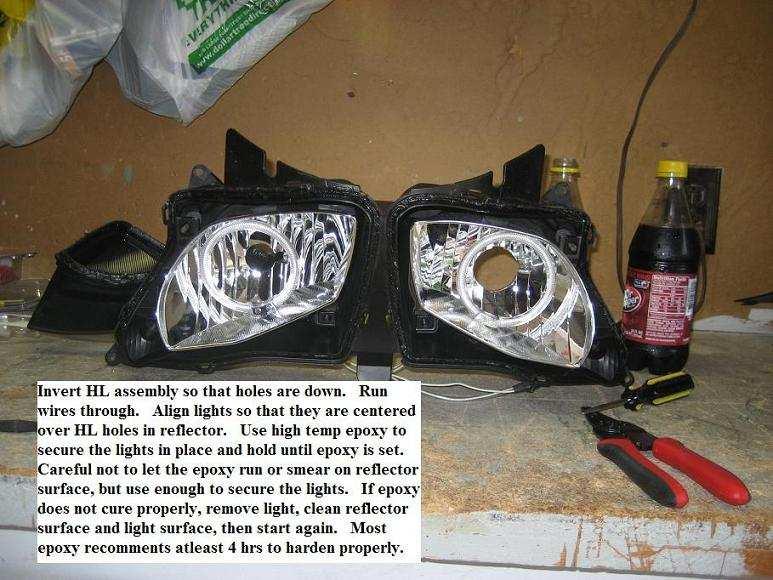
8 Step 7 - Now that we have removed the fairings, separated the headlamp assembly from the fairings, and removed the lenses from the assembly via the oven, we need to install the halos. It may not be clear on how to mount the rings, there is no slot anywhere or anything that would indicate a direct install. So you either can use the supplied adhesive strips to mount to the lenses or can use any type of epoxy or adhesive or hot glue gun. We used adhesive tape & epoxy to mount the halos to the reflective backing. Hot glue gun works very well to. You may need to drill the headlight to run the wires for the halo out from the back of the headlight. These two wires will go to the inverter that powers it. The inverter than needs power from any 12V source. We usually recommend wiring to your headlight wires ( + / -) to power your halo s. You have the option to use a switch as well if you want to turn on the Halo rings as you choose. Once mounted and let dry, your next step is to run the wires to the back of the headlight.
9
10
11
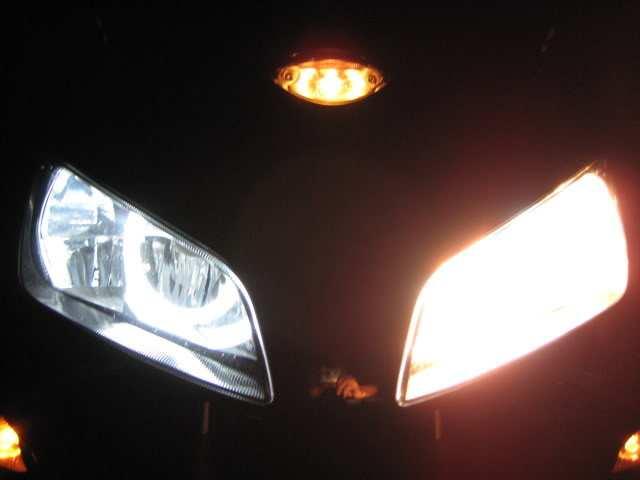
 and neg (-) terminals to pull power/ground from. We did this because we only wanted the halo's to come on when the headlamps came on.")
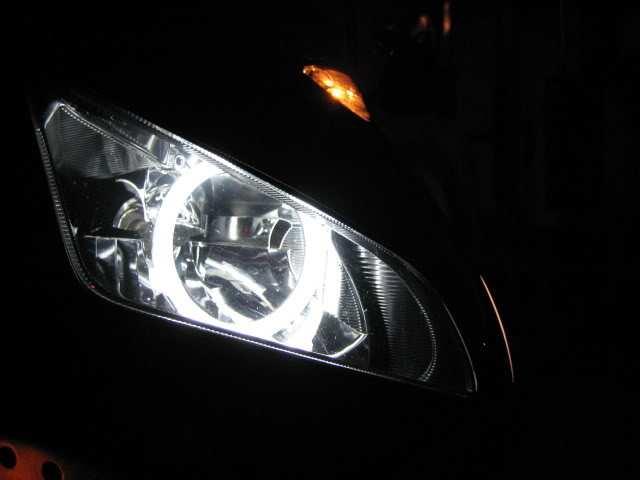
12 Step 8 Wiring the rings is required. The provided inverter needs to sit outside the headlight, Velcro or twist ties to prevent too much dangling or shock. As for the wiring, we did it the easy way. We simply used the left headlight bulbs pos (+) and neg (-) terminals to pull power/ground from. We did this because we only wanted the halo's to come on when the headlamps came on. Once this is complete and electrical taped tight, put everything back together. But before you do that make sure everything works!
13

14 Thank you for reading. If you have any issues feel free to us at
V-HID Headlight Installation Instructions
 V-HID Headlight Installation Instructions Thank you for purchasing our New high quality easy to install Parts4PowerToys V-HID headlight kit for your Harley Davidson. The following installation instructions
HID INSTALLATION ON RST1000 Futura
 HID INSTALLATION ON RST1000 Futura Disclaimer: This is a full description of what I have done to my motorcycle. I am in no way suggesting you do as I have done by following these instructions. I have not
Ford Mustang V6 OEM-Style Fog Light Kit Parts List: Quantity: Tool List:
 2015-2017 Ford Mustang V6 OEM-Style Fog Light Kit Parts List: Quantity: Tool List: LED Foglights/ Bezels 2 Flat head & Phillips screwdriver (if you ordered part#3600) Ratchet & Socket set OR Wiring harness
Installing Custom Puddle Lamps 2009 Subaru Forester
 Installing Custom Puddle Lamps 2009 Subaru Forester By John Perkins This guide will assist you in installing a set of LED puddle lamps on a 2009 Subaru Forester. This is NOT using the $150 Subaru kit.
2004/2013 Harley Davidson Road Glide
 2004/2013 Harley Davidson Road Glide VORTEX XMC-575OD SERIES SPECIFICATIONS 1. Warranty : Extended 2. Input Voltage : 12V 3. Modes : Low, High, Halo 4. LED Lifespan : 50,000 Hours WARNING: Due to excessive
Raxiom Mustang Halo Projector Headlights (2010+) - Installation Instructions
 - Installation Instructions") Raxiom Mustang Halo Projector Headlights (2010+) - Installation Instructions The below installation instructions work for the following products: Raxiom Chrome Mustang Halo Projector Headlights (2010+)
Raxiom Mustang Halo Projector Headlights (2010+) - Installation Instructions The below installation instructions work for the following products: Raxiom Chrome Mustang Halo Projector Headlights (2010+)
TOYOTA im INTERIOR LIGHT KIT Preparation
 Preparation Part Number: PT922-12170 Kit Contents Item # Quantity Reqd. Description 1 1 Main Wire Harness 2 1 Switch 3 1 Switch Header 4 1 ECU 5 1 ECU Bracket 6 1 Hardware Kit 7 1 Instruction Card 8 1
Amp & Speaker Upgrade Install Instructions for Victory Cross Country
 Amp & Speaker Upgrade Install Instructions for Victory Cross Country Tools Needed: 13mm Socket 4mm Ball Head Allen Socket 5mm Allen Wrench 10mm Wrench Wire Cutters Wire Strippers Phillips Screwdriver Pocket
ADDICTIVE DESERT DESIGNS
 Preparation: Disconnect the negative battery terminal. Park the vehicle on level ground and set the emergency brake. We recommend reading through the installation instructions in whole before performing
SCION tc FOG LIGHT (Halogen or LED)
") Part Number: STC-314 / STC-814 Kit Contents Item # Quantity Reqd. Description 1 2 Fog Lamps 2 2 Fog Light bezels 3 1 Switch Assembly 4 1 Fog Light Operation guide 5 1 Harness Bag Hardware Bag Contents
Part Number: STC-314 / STC-814 Kit Contents Item # Quantity Reqd. Description 1 2 Fog Lamps 2 2 Fog Light bezels 3 1 Switch Assembly 4 1 Fog Light Operation guide 5 1 Harness Bag Hardware Bag Contents
INSTALLATION INSTRUCTIONS FUEL SURGE TANK KIT
 INSTALLATION INSTRUCTIONS FUEL SURGE TANK KIT BMW E46 3-Series, Excl Convertible Document: 19-0056 Support: info@radiumauto.com Relieve fuel pressure in vehicle before beginingthe installation. Disconnect
1999 BMW K1200 LT: Plastic Removal
 1999 BMW K1200 LT: Plastic Removal Well, it had to happen. While removing the plastic that covers the handle bars to see where to route power for GPS and/or radar detector the tip of the torx driver fell
Installation Instructions Harley-Davidson Saddlebag Lids
 Installation Instructions Harley-Davidson Saddlebag Lids Thank you for your purchase of Bagger Audio Saddlebag Lids for your Harley- Davidson motorcycle. We have carefully engineered these products to
Mustang Headlight w/ CCFL Halo (05-09) - Installation Instructions
 - Installation Instructions") Mustang Headlight w/ CCFL Halo (05-09) - Installation Instructions The below installation instructions work for the following products: Chrome Mustang Headlight w/ CCFL Halo (05-09) Smoked Mustang Headlight
Mustang Headlight w/ CCFL Halo (05-09) - Installation Instructions The below installation instructions work for the following products: Chrome Mustang Headlight w/ CCFL Halo (05-09) Smoked Mustang Headlight
Step #1 From your spool of 18 gauge primary wire, cut between 11 and 21 three inch strips of wire. You will only need 11 for the ROV, but it is good t
 How to make a ROV! Step #1 From your spool of 18 gauge primary wire, cut between 11 and 21 three inch strips of wire. You will only need 11 for the ROV, but it is good to have extras. Using the wire cutter,
TOYOTA TACOMA 2005 TVIP V5 (RS3200 PLUS) Preparation
 Preparation") Preparation Part Number: 08586 04840 Kit Contents Item # Quantity Reqd. Description 1 1 Wire Harness 2 1 Security ECU 3 1 GBS ECU 4 1 Status Monitor 5 2 Warning Labels 6 1 Owner s Manual 7 1 Warranty Card
Preparation Part Number: 08586 04840 Kit Contents Item # Quantity Reqd. Description 1 1 Wire Harness 2 1 Security ECU 3 1 GBS ECU 4 1 Status Monitor 5 2 Warning Labels 6 1 Owner s Manual 7 1 Warranty Card
Be sure to read and go over all pages before you start your installation
 Yamaha Gen-2 V-MaxV Holeshot Superbike Bars Installation Guide Pre-Installation Note Be sure to read and go over all pages before you start your installation Preparation for Installation A) It is recommended
Depress each tab as you pull the bezel off. The bezels are tight. L.H. shown.
 2013-2014 Ford Mustang V6 & Boss 302 Lower Valance Fog Light Kit Parts List: Quantity: Tool List: Fog light & bulb with bracket 2 Flat head & Phillips screwdriver Black bezels 2 Ratchet & Socket set OR
SCION tc FOG LIGHT. Part Number: STC-312 / STC-812
 SCION tc 2011-2013 FOG LIGHT Part Number: STC-312 / STC-812 Kit Contents Item # Quantity Reqd. Description 1 2 Fog Lamps 2 2 Fog Light bezels 3 1 Switch Assembly 4 1 Fog Light Operation guide 5 1 Harness
Headlight Removal & Installation: VW Jetta Mk.4 / Bora
 Headlight Removal & Installation: 99-04 VW Jetta Mk.4 / Bora Disclaimer: Buyer assumes any and all risk and liability from the installation and use of this product. Seller, author, or any of their affiliates
Fig A ADDICTIVE DESERT DESIGNS. Preparation: Removal: Release these clips
 Preparation: Disconnect the negative battery terminal. Park the vehicle on level ground and set the emergency brake. We recommend reading through the installation instructions in whole before performing
Part Number: STC-314. Special Chemicals 3M Silicon Sealant
 Date: 08.11.2014 SCION tc 2014-15 FOG LIGHT (Halogen or LED) Part Number: STC-314 Kit Contents Item # Quantity Reqd. Description 1 2 Fog Lamps 2 2 Fog Light bezels 3 1 Switch Assembly 4 1 Fog Light Operation
Parts List. Please be sure to read our instructions thoroughly before attempting installation. D2/G2 Parts List. D31/G31 Parts List.
 Parts List Please be sure to read our instructions thoroughly before attempting installation. D2/G2 Parts List D31/G31 Parts List Page 2 1 Step 1: Bike Preparation Step 1: Bike Preparation There are two
Deep Space Lighting. VOLVO VNL BI-XENON HEADLAMP KIT Installation Instructions. Tools Needed: #2 Philips screwdriver 10mm socket and ratchet
 Deep Space Lighting VOLVO VNL BI-XENON HEADLAMP KIT Installation Instructions Estimated Installation Time: 15-45 minutes Tools Needed: #2 Philips screwdriver 10mm socket and ratchet Before starting, make
VRSC-DX Truck-Lite LED Headlight Installation Instructions
 VRSC-DX Truck-Lite LED Headlight Installation Instructions The following Instructions are for installing a 7 Truck-Lite LED headlight into a Harley Davidson VRSC-DX Night Rod Special fairing. Other 7 headlights
Installation Instructions for Lingenfelter GM 2500 Suburban & Yukon XL Auxiliary Fan System (with AC clutch controlled fan output)
") Installation Instructions for Lingenfelter 2007-2013 GM 2500 Suburban & Yukon XL Auxiliary Fan System (with AC clutch controlled fan output) PN L300080607 Revision - 1.1 Lingenfelter Performance Engineering
Installation Instructions for Lingenfelter 2007-2013 GM 2500 Suburban & Yukon XL Auxiliary Fan System (with AC clutch controlled fan output) PN L300080607 Revision - 1.1 Lingenfelter Performance Engineering
Table of Contents. Bikes with 2 handlebar switches. 12-pin plug for BMW models Installation tips. 15-pin plug for older BMW models Installation tips
 Table of Contents Bikes with 2 handlebar switches SM-5 12-pin plug for BMW models Installation tips 2 3 SM-6 15-pin plug for older BMW models Installation tips Special Features & Functions 4 5 4-Way Emergency
Yamaha Apex Moto-R Kill w/jacobson Roll-over valve Installation Instructions
 OFTRacing.com Email Scott Moto 2006-2011 Yamaha Apex Moto-R Kill w/jacobson Roll-over valve Installation Instructions Included Parts: 1 Moto-r Kill wiring harness including Pro Armor tether switch, Jacobsen
TOYOTA RAV4/HV INTERIOR LIGHT KIT Preparation
 Preparation Part Number: PT413-42130 Kit Contents Item # Quantity Reqd. Description 1 1 Wire Harness 2 3 Hardware Bag Contents Item # Quantity Reqd. Description 1 20 Cable Tie 2 2 Scotchlok 3 2 Foam Pad
Hummer H up A Hummer H3T up A. 3-5 Hours INSTALLATION GUIDE INSTALLATION TIME SKILL LEVEL.
 INSTALLATION GUIDE APPLICATION MODEL YR PART # Hummer H3 2006 - up 5116-01A Hummer H3T 2009 - up 5116-01A INSTALLATION TIME 3-5 Hours Professional installation recommended SKILL LEVEL 1 2 3 = Experienced
SCION tc 2014 FOG LIGHT KIT
 Part #: PT413-21140 Conflicts: P/N PTR11-21100 Lowering Springs (CA only) Kit Contents: Wire Ties Self-Tapping Screws Switch Relay Fog Light Bezel, Left and Right Side Wire Harness Fog Lamp, Left and Right
INSTALLATION INSTRUCTIONS
 INSTALLATION INSTRUCTIONS FUEL SURGE TANK INSTALLATION KIT 1999-2006 BMW E46 COUPE Document# 19-0056 Support: info@radiumauto.com Note: This kit was designed for a standard single pump Radium Engineering
INSTALLATION INSTRUCTIONS
 INSTALLATION INSTRUCTIONS Accessory Application Publications No. AII 36765 S 2008 RIDGELINE Issue Date JUN 2007 PARTS LIST Relay Fog Light Kit P/N 08V31-SJC-100 Right fog light 15 Wire ties Left fog light
INSTALLATION INSTRUCTIONS
 INSTALLATION INSTRUCTIONS Part# 22-7810 Jeep JK/JKU ARB Mounting Kit 2007-2018.5 For the most up to date instructions please visit www.updownair.com www.updownair.com 833 226 4863 IMPORTANT INFORMATION
TOYOTA TACOMA TVIP V5
 Preparation Part Number: PT398-35090 Kit Contents Item # Quantity Reqd. Description 1 1 Wire Harness 2 1 Security ECU 3 1 GBS ECU 4 1 Status Monitor/Microphone 5 2 Warning Labels (English) 6 2 Warning
INSTALLATION INSTRUCTIONS
 INSTALLATION INSTRUCTIONS Accessory S Application 2010 INSIGHT Publications No. AII 40881 Issue Date MARCH 2009 PARTS LIST Right fog light bracket D Fog Lights Kit P/N 08V31-TM8-100 Left fog light Fog
Amp & Speaker Upgrade Install Instructions for Batwing Fairing
 Amp & Speaker Upgrade Install Instructions for Batwing Fairing Tools Needed: 1/2 inch Socket Wire Cutters 7/16 inch Socket Wire Strippers 10 mm Socket Phillips Screwdriver 1/2 inch Ratchet Wrench T25 Torx
INSTALLATION INSTRUCTIONS
 INSTALLATION INSTRUCTIONS PARTS LIST Accessory Application Publications No. MII 13038 GL1800 P/N 08E75-MCA-100K Issue Date November 2009 Honda Dealer: Please give a copy of these instructions to your customer.
LED Fog Light. Conflicts Note: 1226, General Applicability Fits Models Additional Items Required For Installation
 LED Fog Light Year & Model Part Number Conflicts Note: 1226, 1228 2017 Prius TPR-817 General Applicability Fits Models 1221 1225 1223 1227 1224 Additional Items Required For Installation Items 1 N/A 2
OIL COOLER INSTALLATION GUIDE ULTRACOOL, INC. Web:
 ULTRACOOL, INC 68 South Rainbow Drive Bldg #10 Dayton, NV 89403 OIL COOLER Touring INSTALLATION GUIDE Models 1994-2008 2.0 Version - Includes Trikes 'Call for fitment on earlier models Direct: (775)-241-9155
05/06 Gsxr 1000 Clutch Mod
 By: Ali (Jetspeedz) 05/06 Gsxr 1000 Clutch Mod Parts: 21472-41G10 - WASHER, CLUTCH - $10.09 From 06 Gsxr 750 Opt: 11482-40F00 - GASKET, CL COVER - $8.29 Tools: 13/64 Drill bit, 30mm, 12mm, 10mm, 8mm sockets,
Mustang One-Touch Convertible Top Module (2005+) - Installation Instructions
 - Installation Instructions") Mustang One-Touch Convertible Top Module (2005+) - Installation Instructions The below installation instructions work for the following products: Mustang One-Touch Convertible Top Module (2005+) Please
Mustang One-Touch Convertible Top Module (2005+) - Installation Instructions The below installation instructions work for the following products: Mustang One-Touch Convertible Top Module (2005+) Please
Headlight Removal & Installation: BMW E39
 Headlight Removal & Installation: 97-03 BMW E39 Disclaimer: Buyer assumes any and all risk and liability from the installation and use of this product. Seller, author, or any of their affiliates assume
 Page 1 of 14 This install requires work on your supplemental restraint system and could cause injury or damage to your car. If you are not comfortable performing the steps detailed here then do not attempt
Triumph Street Triple VSM Grip Heater Install
 Triumph Street Triple VSM Grip Heater Install Introduction: With winter fast approaching and with painful memories of last winter riding with the club it was time to do something about getting some grip
INSTALLATION INSTRUCTIONS
 INSTALLATION INSTRUCTIONS Accessory Application Publications No. AII 28603 S 2006 RIDGELINE Issue Date FEB 2005 PARTS LIST Relay Fog Light Kit P/N 08V31-SJC-100 Right fog light 15 Wire ties Left fog light
WBASG Kit. IMPORTANT! A Radio Re-Flash Is Strongly Encouraged Before Proceeding. Please Read Manual For More Information
 WBASG Kit installation manual IMPORTANT! A Radio Re-Flash Is Strongly Encouraged Before Proceeding. Please Read Manual For More Information Thank you for your purchase of Wild Boar Audio s Amp with Front
LiteDOT Installation Document
 LiteDOT Installation Document This document designed to aid in installation of LiteDOT s on Jeep TJ models, other models are similar. NOTE: Installing LiteDOT s on a Jeep where the 2 necessary mounting
OIL COOLER INSTALLATION GUIDE. Fits Models: RF-1 Touring Models Revised 12.15
 OIL COOLER INSTALLATION GUIDE Fits Models: RF-1 Touring Models 1999 2008 Revised 12.15 Welcome To UltraCool Oil Cooling Systems Thank you for making UltraCool your oil cooling system of choice. We hope
Amp & Speaker Upgrade Install Instructions for Road Glide
 Amp & Speaker Upgrade Install Instructions for Road Glide Tools Needed: 1/2 inch Socket Wire Cutters 7/16 inch Socket Wire Strippers 10 mm Socket Phillips Screwdriver 1/2 inch Ratchet Wrench T25 Torx driver
SCION FR-S FOG LIGHTS
 Part #: PT413-18130 Conflicts: Lowering Springs PTR07-18130-LL (California only) Kit Contents: For Anniversary Edition, Monogram & RS 2.0 vehicles, additional parts need to be ordered (PT413-18130-LL)
In This DIY We Will Show You How To Install Recon Backup Lamps (part # To Run On A Separate Switch & In Reverse.
 In This DIY We Will Show You How To Install Recon Backup Lamps (part # 264150 To Run On A Separate Switch & In Reverse. Please Note, There Are Many Ways of Installing These Lights, Including Wiring Methods,
The M7 Direct Flow Intercooler (DFIC) Installation Guide
 Installation Guide") The M7 Direct Flow Intercooler (DFIC) Installation Guide This information is meant only as a guide. The author of this information,, or any M7 Tuning employees assumes no liabilities for any outcomes resulting
The M7 Direct Flow Intercooler (DFIC) Installation Guide This information is meant only as a guide. The author of this information,, or any M7 Tuning employees assumes no liabilities for any outcomes resulting
ECLIPSE CCFL ANGEL EYES FITTING GUIDE COURTESY OF CHROMELINE DESIGN
 ECLIPSE CCFL ANGEL EYES FITTING GUIDE COURTESY OF BEN @ CHROMELINE DESIGN Page 1 of 8 : Thank you for purchasing Eclipse Lights for your BMW E36. Please read through these instructions carefully before
- MK7 Mirror Integration Kit - Installation Instructions
 - MK7 Mirror Integration Kit - Thank you for choosing the Double Apex Gentex Mirror Integration kit for your Volkswagen MK7. If you have any questions about the installation please email us at support@dblapex.com.
Raxiom Factory GPS Rear Back-up Camera Kit (07-17 Wrangler)
") Raxiom Factory GPS Rear Back-up Camera Kit (07-17 Wrangler) Installation Time: 2.5-3Hrs Tools Required: 7mm Socket & Driver 10mm Socket 10mm Open end wrench Knife / Razor blade Zip-ties Wire Cutters Needle
Raxiom Factory GPS Rear Back-up Camera Kit (07-17 Wrangler) Installation Time: 2.5-3Hrs Tools Required: 7mm Socket & Driver 10mm Socket 10mm Open end wrench Knife / Razor blade Zip-ties Wire Cutters Needle
Please read thoroughly before starting installation and check that kit contents are complete.
 Rear Vision System Mirror Display 2013-Current Ram (Kit part number 1009-9518) Please read thoroughly before starting installation and check that kit contents are complete. Items Included in the Kit: Rear
TOYOTA HIGHLANDER TRAILER WIRE HARNESS Preparation
 Preparation Part Number: PT219-48111 Kit Contents Item # Quantity Reqd. Description 1 1 Converter 2 1 Flat 4-pin wire harness 3 5 Plastic tie 4 1 Special plastic tie for stud mount 5 1 Packing 6 2 Bolt
SDHQ F-150 Winch Mount System Installation
 SDHQ 2015+ F-150 Winch Mount System Installation Recommended Tools: Door panel removal tool Needle Nose Pliers 10mm Socket or Wrench 13 mm or ½ Socket (⅜ Drive) 14 mm or 9/16 Socket (⅜ Drive) 21 mm or
2017 Current Ford Raptor Bump Stop Kit Installation Instructions
 2017 Current Ford Raptor Bump Stop Kit Installation Instructions PREPARATION 1. Disconnect the negative terminal on the battery. Park the vehicle on level ground and set the emergency brake. 2. We recommend
Installation Guide. Kennedy Technology Group, Inc.
 Installation Guide Harley-Davidson Amp Module - Base Kit Kennedy Technology Group, Inc. 614 Ridgeway, Rose Hill, Kansas 67133 - USA voice 316.776.1111 fax 316.776.9035 email:kennedy@cellset.com www.cellset.com
Superbike Kit
 Superbike Kit www.spieglerusa.com sales@spieglerusa.com Mounting Instructions & Safety Instructions for Honda CBR 1000 RR ABS model year 2017 - Attention Important Safety Instructions: Thank you for purchasing
INSTALLATION INSTRUCTIONS
 INSTALLATION INSTRUCTIONS Accessory S Application 2010 CR-V Publications No. AII 42602-42850 Issue Date OCT 2009 PARTS LIST Fog Light Kit (With Auto Lights) P/N 08V31-SWA-100A Fog Light Kit (Without Auto
Installation Manual Lock-Switch KIA Sorento V3 Installation Manual Lock-Switch V3 for KIA Sorento (02-06) and KIA Sorento (07-09)
 and KIA Sorento (07-09)") Installation Manual Lock-Switch V3 for KIA Sorento (02-06) and KIA Sorento (07-09) Note: A any work on the electrical system of a car before should the battery be disconnected at the negative terminal
Installation Manual Lock-Switch V3 for KIA Sorento (02-06) and KIA Sorento (07-09) Note: A any work on the electrical system of a car before should the battery be disconnected at the negative terminal
Off Road Only (ORO) LiteSPOTs 8 Light Kit
 LiteSPOTs 8 Light Kit") Off Road Only (ORO) LiteSPOTs 8 Light Kit Installation Time: 90-120 Minutes Tools Required: Wire cutters/strippers High temperature heat gun Drill and ¼ nut driver (if permanent mounting LiteSPOTs pods)
Off Road Only (ORO) LiteSPOTs 8 Light Kit Installation Time: 90-120 Minutes Tools Required: Wire cutters/strippers High temperature heat gun Drill and ¼ nut driver (if permanent mounting LiteSPOTs pods)
TOYOTA TACOMA FOG LIGHT
 TOYOTA TACOMA 2013 - FOG LIGHT Part Number: 00016-35220 Accessory Code: LF10 Conflicts - Factory Fog Lights Kit Contents Item # Quantity Reqd. Description 1 2 Fog Lamps 2 1 Hardware bag 3 1 Switch Assembly
INSTRUCTIONS FOR INSTALLING MIND/MOTION SENSOR/E-PORT ON USI ALPINE FOOD MACHINE
 INSTRUCTIONS FOR INSTALLING MIND/MOTION SENSOR/E-PORT ON USI ALPINE FOOD MACHINE Read these instructions carefully before installing the kit. If you are having problems installing the kit, please call
2005+ Mustang Trunk Lid Release and Trunk Lights Installation
 There is no warranty expressed or implied by this document, you follow these instructions at your own risk. These instructions worked for me, but your experience may vary. The final product of these instructions
2017 Current Ford SuperDuty Adaptive Cruise Control Relocation Bracket Installation Instructions
 2017 Current Ford SuperDuty Adaptive Cruise Control Relocation Bracket Installation Instructions PREPARATION 1. Disconnect the negative terminal on the battery. Park the vehicle on level ground and set
Page 1. File: Motolight caliper one-piece Harley Date: 8/15/2006
 Page 1 Harley-Davidson FL Caliper Mount Installation One-piece mounting brackets You should allow about two to three hours for installation. We suggest you use a well-lighted space for installation. PLEASE
Toyota Tundra Lightbar
 2014-2017 Toyota Tundra Lightbar Recommended Tools & Safety 1 Safety Glasses 1 Blanket/Fender Cover 1 10mm wrench 1 10mm socket 1 ¼ Drive 1 Razorblade 1 Plastic Trim Tool 1 Wire Router 1 Phillips Head
Flexwire Highlights. 1. A Solution to Center Listings and Seat Heater Installations.
 Seat Heaters Universal: Dual Temperature Flex-Wire: Twin Comfort Pads Installation instructions for the Flex-Wire seat heating system SH-FW-01 The All New Flex-Wire Seat Heater combines New Multi-Strand
The Go Baby Go Build Manual
 The Go Baby Go Build Manual The step-by-step guide to creating your own Go Baby Go Car 4488 Shockwave Robotics and Pacific University Index 1. List of Mat erials 2. Mechanical Assembly a. Installing the
Conflicts: Vehicles without a sunroof Vehicles with a single sunroof
 Toyota Sienna (Dual Sunroof) 2011-10.2 Overhead Video Part Number: 00016-00110 00016-00110-17 Fit Kit 00016-00120 00016-00120-17 Fit Kit Accessory Code: ED5 Conflicts: Vehicles without a sunroof Vehicles
Slave Cylinder Weep Hole Drilling Procedure
 Slave Cylinder Weep Hole Drilling Procedure Tools Required: T20 Torx Driver T25 Torx Driver T25 Torx Bit with ¼ Ratchet Wrench 4mm Hex Key (Allen wrench) 5mm Hex Key 6mm Hex Key 8mm Hex Key 12mm Hex Key
INSTALLATION INSTRUCTIONS FOR THE MOTOR TRIKE CROSS COUNTRY / CROSS ROADS / HARD BALL RAKE KIT
 INSTALLATION INSTRUCTIONS FOR THE MOTOR TRIKE CROSS COUNTRY / CROSS ROADS / HARD BALL RAKE KIT Thank you for choosing the Motor Trike Cross Country / Cross Roads / Hard Ball rake kit. We ask that you read
UNPACK AND IDENTIFY THE FOLLOWING PARTS.
 SUT-250-M2 ASSEMBLY REQUIREMENTS *Torque all T-bolt nuts to 35-40 foot pounds. *Check all lights before towing. *Tire pressure not to exceed recommendation on serial tag. *Re-torque wheel nuts after first
TOYOTA RAV FOG LIGHT
 TOYOTA RAV4 2011 - FOG LIGHT Part Number: 00016-12013 Accessory Code: LF10 Conflicts - Kit Contents Item # Quantity Reqd. Description 1 2 Fog Lamps 2 2 Fog Lamp s bezels 3 1 Switch Assembly 4 1 Fog light
Conflicts. Toyota Tacoma 2015 Frameless EC Mirror w/ Compass & HomeLink. Part Number: Accessory Code: ME4000
 Toyota Tacoma 2015 Frameless EC Mirror w/ Compass & HomeLink Part Number: 00016-05463 Accessory Code: ME4000 Conflicts Note: None Kit Contents Item # Quantity Reqd. Description 1 1 Frameless Mirror w/compass
JK BFH II Front Bumpers
 INSTALLATION INSTRUCTIONS INST-17-16-021_A JK BFH II Front Bumpers IMPORTANT: Thank you for purchasing this Poison Spyder product. Please read through this entire document before proceeding with installation.
LED Fog Light. Conflicts Note: 1832, 1852, 1856, 1872, General Applicability Fits Models
 LED Fog Light Year & Model Part Number 2017 Corolla TCO-817 Conflicts Note: 1832, 1852, 1856, 1872, 1874 General Applicability Fits Models 1863 1866 1864 1865 Additional Items Required For Installation
How To: Convert Headlight DRLs Into Marker DRLs A CFans Members Mod Project by burn
 How To: Convert Headlight DRLs Into Marker DRLs A CFans Members Mod Project by burn Skill Level: Easy Disclaimer: Please use caution and seek professional assistance when necessary. ColoradoFans.com, the
INSTALLATION. DRIVING LIGHTS for FLHT/FLHX/FLHR 5005
 DRIVING LIGHTS for FLHT/FLHX/FLHR 5005 PARTS INCLUDED 1 Right Driving Light Assembly 1 Left Driving Light Assembly 1 Right Driving Light Bracket 1 Left Driving Light Bracket 4 Driving Light Bracket Plugs
INSTALLATION INSTRUCTIONS FOR THE TOMAHAWK ELECTRIC REVERSE
 INSTALLATION INSTRUCTIONS FOR THE TOMAHAWK ELECTRIC REVERSE LAST UPDATED: April 2018 Thank you for choosing the Motor Trike Electric Reverse. We ask that you read the directions before you start and follow
REPAIR for: Sidelamp Bulb(s) Faulty, Left Tail Lamp Faulty, Right Tail Lamp Faulty, Directional Indicator Faulty, Left Hand Stop Bulb Faulty
 Faulty, Left Tail Lamp Faulty, Right Tail Lamp Faulty, Directional Indicator Faulty, Left Hand Stop Bulb Faulty") REPAIR for: Sidelamp Bulb(s) Faulty, Left Tail Lamp Faulty, Right Tail Lamp Faulty, Directional Indicator Faulty, Left Hand Stop Bulb Faulty DIFFICULTY LEVEL: ***** Drilling, Wire Crimping, Tight Spaces,
REPAIR for: Sidelamp Bulb(s) Faulty, Left Tail Lamp Faulty, Right Tail Lamp Faulty, Directional Indicator Faulty, Left Hand Stop Bulb Faulty DIFFICULTY LEVEL: ***** Drilling, Wire Crimping, Tight Spaces,
INSTALLATION INSTRUCTIONS
 INSTALLATION INSTRUCTIONS Accessory Application Publications No. All 30482 S 2006 PILOT Issue Date P/N 08F23-S9V-100A SEP 2005 PARTS LIST Left front trim piece Right front trim piece Left rear trim piece
PRELIMINARY INSTALLATION INSTRUCTIONS. PARTS LIST Left front trim piece
 INSTALLATION INSTRUCTIONS Accessory Application Publications No. All 30482 S 2006 PILOT Issue Date P/N 08F23-S9V-100A SEP 2005 PARTS LIST Left front trim piece Right front trim piece Left rear trim piece
Luminator Low-Rise Headlight. Designed and built by Radioflyer Innovations
 Luminator Low-Rise Headlight system for C5 Corvette Designed and built by Radioflyer Innovations 1 Tools Required Phillips head screwdriver Flathead screwdriver Torx 15 screwdriver Torx 20 screwdriver
HID XENON. [I n s t a l l a t i o n G u i d e ] H E A D L I G H T S. Method of installing the bulb and ballast.
![HID XENON. [I n s t a l l a t i o n G u i d e ] H E A D L I G H T S. Method of installing the bulb and ballast.](/thumbs/76/74317385.jpg "HID XENON. [I n s t a l l a t i o n G u i d e ] H E A D L I G H T S. Method of installing the bulb and ballast.") HID XENON H E A D L I G H T S [I n s t a l l a t i o n G u i d e ] Please read the installation guide carefully before removing original car lighting from the vehicle. Please read through the entire installation
HID XENON H E A D L I G H T S [I n s t a l l a t i o n G u i d e ] Please read the installation guide carefully before removing original car lighting from the vehicle. Please read through the entire installation
ADDICTIVE DESERT DESIGNS
 Preparation: Disconnect the negative battery terminal. Park the vehicle on level ground and set the emergency brake. We recommend reading through the installation instructions in whole before performing
TOYOTA PRIUS C FOG LIGHT
 TOYOTA PRIUS C 2012 - FOG LIGHT Part Number: 00016-47160 Accessory Code: LF10 Conflicts NONE Kit Contents Item # Quantity Reqd. Description 1 2 Fog Lamps 2 2 Fog Lamp s bezels 3 1 Switch Assembly 4 1 Fog
HARNESS KIT 3 PORT ISOLATION MODULE LIGHT SYSTEM. Parts List and Installation Instructions CAUTION
 May 1, 2018 Lit. No. 92991, Rev. 00 HARNESS KIT 3 PORT ISOLATION MODULE LIGHT SYSTEM Parts List and Installation Instructions Read this document before installing the snowplow. See your sales outlet/website
INSTALLATION INSTRUCTIONS
 INSTALLATION INSTRUCTIONS FUEL SURGE TANK INSTALLATION KIT 1999-2006 BMW E46 COUPE Document# 19-0056 Support: info@radiumauto.com Note: This kit wasn t designed for a FST-R, but can be accomplished. 1.
Mirror Solutions Bevel & Pivot Models Installation Instructions INSTALLATION INSTRUCTIONS. Figure 1
 Installation Instructions Mirror Solutions Bevel & Pivot Models 620095-620098 Mirror Solutions Bevel - Models # 620095 & 620096 Mirror Solutions Pivot - Models # 620097 & 620098 Figure 1 INSTALLATION INSTRUCTIONS
Remove 4 circled pins. Route wiring along dashed line. Remove the 2 9mm nuts and black retaining plate that secure extractor.
 2015 Ford Mustang Turn Signal Hood Kit Parts List: Quantity: Tool List: Bracket & pre-installed lamp 2 Flat head screwdriver Wiring harness 1 Phillips screwdriver PB-3660 Parts Bag 1 Ratchet & Socket set
RFB MK6 Jetta Fog Light Kit Wiles Rd.Coral Springs, FL
 What s Included: Tools Required: (2) Fog Lights (2) Front Grills Wire Harness Headlight Switch Hardware Kit T25 Torx Wire Cutters 10mm Socket and Rachet Headlight Switch Composite Wedge Tool 01 1. Remove
Tusk Pannier Racks. Instructions and information KLR
 1 Tusk Pannier Racks Instructions and information KLR650 2008 + Congratulations on your purchase of the Tusk Pannier Racks. These racks are made to handle extreme adventure riding, but work great for the
Step 1: Parts List and Bike Preparation
 Step 1: Parts List and Bike Preparation Please be sure to read our instructions thoroughly before attempting installation. Check Parts list supplied with your kit to be sure all parts are handy. If something
Installation Instructions for Lingenfelter GM 2500 Suburban & Yukon XL Auxiliary Fan System (with ECM controlled fan output)
") Installation Instructions for Lingenfelter 2007-2013 GM 2500 Suburban & Yukon XL Auxiliary Fan System (with ECM controlled fan output) PN L300090607 Revision - 1.1 Lingenfelter Performance Engineering
Installation Instructions for Lingenfelter 2007-2013 GM 2500 Suburban & Yukon XL Auxiliary Fan System (with ECM controlled fan output) PN L300090607 Revision - 1.1 Lingenfelter Performance Engineering
INSTALLATION INSTRUCTIONS
 R A D E G A R A G E. C O M F 2 A D V E N T U R E K I T INSTALLATION INSTRUCTIONS M A D E B Y E N T H U S I A S T S DEAR MOTORCYCLE ENTHUSIASTS AND RADE GARAGE FANS Thank you for buying Rade Garage 690