INSTRUCTIONS TUBULAR CONTROL ARMS & COIL-OVER CONVERSION FOR AMC MUSCLE CARS: 1970 AMX JAVELIN SPIRIT, HORNET, GREMLIN, CONCORD
|
|
|
- Kory Erika Copeland
- 6 years ago
- Views:
Transcription


1 AMC TUBULAR CONTROL ARMS & COIL OVER KIT INSTRUCTIONS TUBULAR CONTROL ARMS & COIL-OVER CONVERSION FOR AMC MUSCLE CARS: 1970 AMX JAVELIN SPIRIT, HORNET, GREMLIN, CONCORD Revised 6/1/2012
2 Page 2
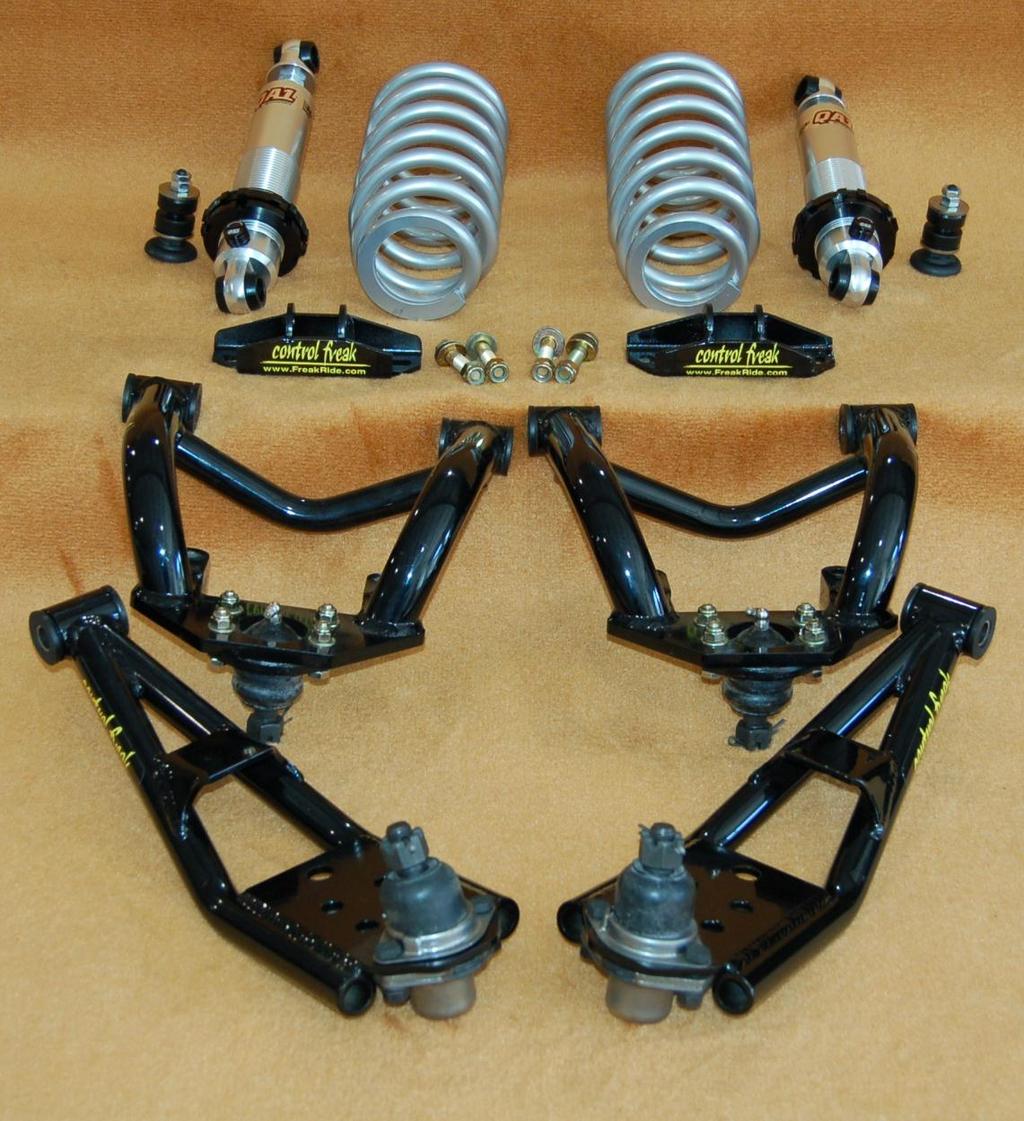
3 Installation Instructions Upper & Lower Tubular Control Arms 1970 & Up AMX, Javelin, Spirit, Gremlin, Concord & Hornet Tubular control arm kit contents Assembled Control Arms Grade 8 Hardware Instructions Coil-over kit contents Coil Over Shocks & Springs Lower Mounting Brackets Spring Isolators Torque Specifications Upper Control Arm Ball Joint Bolts 25 Pounds Spring Mount Bolts 35 Pounds Opt. Coil Over Mount 35 Pounds Control Arms to Chassis Pounds Thank you for purchasing performance tubular control arms from Control Freak Suspensions, manufactured entirely in the USA. We believe these arms are the best available at any price. Please note that while installation is relatively easy for those with mechanical skills and modest experience, novices should employ a professional for installation. Also, fit is guaranteed on vehicles that are unmolested that is cars that have not suffered any front end damage. Such damage can bend or alter the unibody chassis, making installation more difficult. Installation Of Tubular Control Arms 1. Measure your vehicles ride height before you begin. Take the measurements with the car at rest on a level surface, measuring the ride height from the front of the rocker panels to the ground and from the rear of the rocker panels to the ground. Write these measurements down as they will be needed later on. 2. The first step is to remove the stock control arms. Please consult a shop manual specific to your vehicle in order to properly dismantle and remove the necessary suspension components. Chilton s, Mitchell or others may be appropriate for your vehicle. A spring compressor is needed to remove and install the front coil springs. A COIL SPRING COMPRESSOR COMPRESSES THE SPRING. A COMPRESSED SPRING IS EXTREMELY DANGEROUS AND SHOULD BE DONE WITH EXTREME CARE. 3. Once you have removed the front shocks, springs and upper control arms, the front spindles will still be attached to the lower control arms. If lower control arms are also being installed, the stock lower control arm must be removed and the spindle carefully set aside. It is not necessary to remove the lower control arms or spindle if only upper control arms are being replaced. If you are also replacing the stock lower control arms with our tubular control arms, remove the lower control arm from the chassis and spindle. If only upper control arms are being installed, leave the spindle attached to the stock lower control arm but move them out of the way to provide ample working space on your installation of upper control arms. Page 3
4 4. Check the spring saddles on both sides of your vehicle. If they are chipped, cracked or otherwise damaged, now is the time to replace them. Once the spring saddles are replaced, or if the spring saddles are not damaged, proceed with the installation. Bolt the spring saddle to the tubular upper control arm with the supplied 7/16 Grade 8 bolts. The 7/16 Grade 8 bolts should be torqued to ft/pounds. 5. If you are installing our coil over conversion kit, Part #CF-2120CO, now is the time to install the supplied adapter bracket. It will only fit one way. Bolt the spring saddle to the tubular upper control arm with the supplied 7/16 Grade 8 bolts. The 7/16 Grade 8 bolts should be torqued to ft/pounds. 6. If you are installing our tubular lower control arms, attach them to the chassis with the factory bolts and supplied spindle nuts. If you are not installing our lower tubular control arms, skip to Step You will notice that the ball joint bolts on the lower control arm have been left a little loose. This is to assist in aligning the factory torque arm. Attach the lower control arm to the chassis with the factory bolt and hand tighten only. Now attach the torque arm to the lower control arm and hand tighten the nuts to the torque arm. With the lower control arm loosely bolted to the chassis, and the torque arm hand tightened to the control arm, tighten the ball joint bolts to 25 foot pounds of torque. You can now mount the spindle to the lower control arm and hand tighten the castle nut on the ball joint. 8. If you are using the stock coil springs, now is the time to reinstall them. For Coil Over Shocks, skip to Step 9. All spring insulators (if any) that were removed from the original stock vehicle should be reinstalled. A COIL SPRING COMPRESSOR COMPRESSES THE SPRING. A COMPRESSED SPRING IS EXTREMELY DANGEROUS AND SHOULD BE DONE WITH EXTREME CARE. Place the compressed springs into position with the flat end of the coil facing up and the open end is placed on the upper control arm saddle. Once in place, the spring should be indexed to ensure the open coil is firmly against the tang on the lower saddle. Reattach spindle to the control arms. 9. If you are using our coil over conversion kit, now is the time to install it. Remove the coil over body and the springs from their cartons. The coil over bodies have already been assembled for you with the correct parts. Screw the coil over lock nut and spring seat onto the coil over body. Slip the spring over the top of the coil over, narrow diameter facing down. Once the spring and coil over body are mated, place the inner bushings and washer over the top coil over stud mount and slip it through the original shock hole, and slip the lower coil over mount into the bracket that is already attached to the upper control arm. Use the supplied Grade 8 bolt to secure the lower coil over bushing to the mount and tighten to 25 Foot Pounds of torque. On the upper coil over mount, go into the engine bay and slip the outer bushing and washer for the upper coil over mount over the stud. Then install the first of two nuts. Tighten to 14 foot pounds of torque and add the second nut. Tighten both nuts together. 10. Go back to the spindle nuts and the ball joint nuts and tighten everything down to the supplied specifications. 11. You should screw the coil over nut up sop about 1 if threads are showing. This is a good starting point to set your ride height. Page 4
5 NOTE: COIL OVER SHOCKS WILL SETTLE ABOUT ¾ AFTER DRIVING ABOUT TEN TO FIFTEEN MILES. Set your staring ride height accordingly. 12. You are now ready to measure the ride height again. Take the vehicle of the jack stands and roll it a full car length back and forth two times to allow the suspension to settle correctly. Take the same measurements you took in Step 1, from the rocker panels to the ground, both at the front and the rear of the rocker panels. Please remember that tubular control arms will lower your car s front end ride height by about one inch from the stock ride height. If your rear springs are tired or worn, the front end may ride higher. 13. When the correct ride height is reached, have the vehicle aligned by a professional. Once the car is aligned. Torque the 9/16 bolts holding the control arms to the chassis to ft/pounds. Recommended Alignment Specifications For street vehicles, adjust to the following recommended alignment settings: Caster Left: +1 Degrees Caster Right: +1.5 Degrees Camber Left & Right: 0 to 1/4 Degrees Negative Toe In Left & Right: 0 TO 1/16 For racing, adjust to the following recommended alignment settings: Caster Left: +2 Degrees Caster Right: +2.5 Degrees Camber Left & Right: 1 to 2 Degrees Negative Toe In Left & Right: 1/32 to 1/8 Note: Race settings vary upon the type of racing done For technical support, please call or via at tech@freakride.com Control Freak Suspensions 1101 Oak Lane, Suite 1031 Winter Springs, Florida Toll Free: Fax: Sales@FreakRide.com Page 5
6 GENERAL INFORMATION Ordering Simply give us a call on our Tech Line Toll Free, , or call our toll number, You will be connected to a salesperson that has the technical experience and knowledge to guide your through a successful purchase of a system designed just for your vehicle. Send an with questions you may have to sales@bluemooncars.com Warranty Blue Moon Services LLC (BMS) d/b/a Control Freak Suspensions warrants to the original purchaser that all products of our manufacture are free from defects in workmanship and material under normal use, driving conditions and service for the period of one (1) year. BMS parts used in race applications, and improperly installed components, are not warranted. Components purchased from other suppliers and resold by BMS shall conform to the Warranty policy of that supplier. Our obligation under this Warranty is limited to making good at our factory any part which shall be returned to us, freight prepaid, and which our examination shall disclose to our satisfaction to have been defective when shipped. Our obligation is limited to the repair or exchange of any part or parts which may thus prove defective. Our Warranty does not cover any costs for installation, re-installation, or removal of any warranted product. A return authorization number and a copy of the original invoice are required prior to returning merchandise. Unauthorized return voids the Warranty. All returns are subject to a 20% restocking charge. We assume no liability for incidental or consequential damages including the cost of diagnosis, cost of replacement parts or installation labor, loss of vehicle use, loss of time, inconvenience or any other expenses. The foregoing Warranty is exclusive and is in lieu of all other warranties (whether written, oral or implied) including Warranty of merchantability in other respects than expressly set forth above and Warranty of fitness for a particular purpose and of all other obligations or liabilities on our part. We neither assume nor authorize any other person or entity to assume for us any other liability in connection with the sale of our products. This Warranty shall not apply to our products or any part thereof which have been subject to accident, negligence, alteration, abuse, misuse or disassembly. We make no Warranty whatsoever in respect to accessories, labor or parts not supplied by us. The term "Original Purchaser" as used in this Warranty shall be deemed to mean that customer to whom the product was originally sold. There are no warranties which extend beyond the face of the product hereof. Page 6
7 Disclaimer of Warranty & Return Policy THE PURCHASER IS RESPONSIBLE FOR DETERMINING THE SUITABILITY OF ANY AND ALL PRODUCTS MANUFACTURED BY BLUE MOON SERVICES LLC Purchaser understands and recognizes that racing parts equipment and services provided by, manufactured and/or sold by Blue Moon Services LLC d/b/a Control Freak Suspensions, are subject to varied conditions due to the manner in which they are installed and used. Purchaser further recognizes and agrees that suitability of any part sold or manufactured by Blue Moon Services LLC d/b/a Control Freak Suspensions for a particular application is the purchasers decision and that the purchaser is not relying on the skill or judgment of Blue Moon Services LLC d/b/a Control Freak Suspensions regarding suitability of any product or service. Blue Moon Services LLC d/b/a Control Freak Suspensions makes no warranties whatsoever, expressed or implied, oral or written to purchasers. There is no warranty of merchantability made to purchasers with regard to off road, racing and racing equipment. All systems are custom products and made to order, and cannot be returned or exchanged, nor will any refunds be granted. All deposits are forfeited once the product is in production. Liability is limited to repair or replacement of defective parts to original purchaser. Blue Moon Services LLC d/b/a Control Freak Suspensions is not liable for any consequential damages, expenses or injury arising from the use, misuse, or improper installation of any product manufactured or sold by Blue Moon Services LLC d/b/a Control Freak Suspensions. Blue Moon Services LLC d/b/a Control Freak Suspensions reserves the right to make changes in design or add to or improve its product without incurring any obligation to install the same on any products previously manufactured. This warranty shall not apply to any product which has been repaired or altered in any way so as in our judgment to affect its performance; nor which has been subject to misuse, abuse, negligence or any other occurrence beyond the control of Blue Moon Services LLC d/b/a Control Freak Suspensions. Page 7
8 AMC TUBULAR CONTROL ARMS & COIL OVER KIT CONTROL FREAK SUSPENSIONS 1101 Oak Lane, Suite 1031 Winter Springs, Florida Toll Free: Fax: Page 8
INSTRUCTIONS TUBULAR CONTROL ARMS & COIL-OVER CONVERSION FOR FORD MUSCLE CARS: FORD FAIRLANE CO-2330 Small Block CO-2335 Big Block
 FORD 1962-65 FAIRLANE CONTROL ARMS & COIL OVER SYSTEM INSTRUCTIONS TUBULAR CONTROL ARMS & COIL-OVER CONVERSION FOR FORD MUSCLE CARS: 1963-1965 FORD FAIRLANE CO-2330 Small Block CO-2335 Big Block Revised:
INSTRUCTIONS FOR AMC MUSCLE CARS: AMX JAVELIN AMX / JAVELIN ADJUSTABLE REAR SWAY BAR. Tech Line:
 AMC Tech Line: 888-325-6462 1968-74 AMX / JAVELIN ADJUSTABLE REAR SWAY BAR INSTRUCTIONS FOR AMC MUSCLE CARS: 1968-1970 AMX 1968-74 JAVELIN Requires Control Freak Rear Suspension Systems RS-1400T, RS-1400P
INSTRUCTIONS. Triangulated 4-Link Coil Over Rear Suspension System (RS-2450) For FORD Muscle Cars: FAIRLANE
 For FORD Muscle Cars: FAIRLANE") FORD 1962-65 FAIRLANE 4-LINK TRIANGULATED SYSTEM INSTRUCTIONS Triangulated 4-Link Coil Over Rear Suspension System (RS-2450) For FORD Muscle Cars: 1962-1965 FAIRLANE Revised: 10-1-2011 1962-1965 Fairlane
FORD 1962-65 FAIRLANE 4-LINK TRIANGULATED SYSTEM INSTRUCTIONS Triangulated 4-Link Coil Over Rear Suspension System (RS-2450) For FORD Muscle Cars: 1962-1965 FAIRLANE Revised: 10-1-2011 1962-1965 Fairlane
INSTRUCTIONS. Triangulated 4-Link Coil Over Rear Suspension System. For FORD / MERCURY Muscle Cars: MUSTANG COUGAR
 FORD Tech Line: 888-325-6462 MUSTANG / COUGAR 4-LINK TRIANGULATED SYSTEM INSTRUCTIONS Triangulated 4-Link Coil Over Rear Suspension System For FORD / MERCURY Muscle Cars: 1965-1970 MUSTANG 1967-1969 COUGAR
INSTRUCTIONS. 4-Link Parallel With Adjustable Panhard Bar Rear Suspension System FOR MOPAR MUSCLE CARS: A-BODY (RS-5435)
") MOPAR A-BODY 4-LINK PARALLEL COIL OVER SYSTEM INSTRUCTIONS 4-Link Parallel With Adjustable Panhard Bar Rear Suspension System FOR MOPAR MUSCLE CARS: 1967-1976 A-BODY (RS-5435) Revised: 6-1-2011 Page 2
MOPAR A-BODY 4-LINK PARALLEL COIL OVER SYSTEM INSTRUCTIONS 4-Link Parallel With Adjustable Panhard Bar Rear Suspension System FOR MOPAR MUSCLE CARS: 1967-1976 A-BODY (RS-5435) Revised: 6-1-2011 Page 2
IMPORTANT NOTICE Stock Height OEM Spindle
 IMPORTANT NOTICE Ball Joint Info: Before you install this product, please verify which front spindles you have. We have designed the upper a arms to utilize the 73 87 style spindles. This type of spindle
1107 Tubular Upper A-Arms Camaro/Firebird
 1107 Tubular Upper A-Arms 67-69 Camaro/Firebird Thank you for your purchase from our new line of F-Body parts. Please call us at (877) 4NO - ROLL if you have any questions regarding the service or installation
Tubular Lower A-Arms GM A-Body Tubular Lower A-Arms GM F-Body
 1104 - Tubular Lower A-Arms 64-72 GM A-Body 1108 - Tubular Lower A-Arms 70-81 GM F-Body Tubular Lower A-Arms: Thank you for your purchase from our new line of A-Body parts. Please call us at (877) 4NO
INSTRUCTIONS. 4-Link Triangulated Rear Suspension System FOR MOPAR MUSCLE CARS: B-BODY (RS-5530) B-BODY (RS-5540)
 B-BODY (RS-5540)") MOPAR 1966-1972 B-BODY 4-LINK TRIANGULATED SYSTEM INSTRUCTIONS 4-Link Triangulated Rear Suspension System FOR MOPAR MUSCLE CARS: 1966-1970 B-BODY (RS-5530) 1971-1972 B-BODY (RS-5540) Revised: 7-1-2015
MOPAR 1966-1972 B-BODY 4-LINK TRIANGULATED SYSTEM INSTRUCTIONS 4-Link Triangulated Rear Suspension System FOR MOPAR MUSCLE CARS: 1966-1970 B-BODY (RS-5530) 1971-1972 B-BODY (RS-5540) Revised: 7-1-2015
4/6 Coil Spring Kit C-10 Truck
 4/6 Coil Spring Kit 19390 67-72 C-10 Truck Thank you for your purchase from our new line of Chevy parts. Please call us at 877-4NO - ROLL if you have any questions regarding the service or installation
INSTALLATION INSTRUCTIONS GM Lower Control Arms P/N 52337, 52437, 52364, 52464, 52319, 52419, 52320, 52420, 52366, 52466, 52368, 52468
 INSTALLATION INSTRUCTIONS GM Lower Control Arms P/N 52337, 52437, 52364, 52464, 52319, 52419, 52320, 52420, 52366, 52466, 52368, 52468 TOOLS AND SUPPLIES REQUIRED Floor Jack Jack Stands Wrench Set Hex
Rear Leaf Spring Kit 24366, Chrysler B-body, Chrysler E-Body
 P Rear Leaf Spring Kit 24366, 24367 66-70 Chrysler B-body, 70-74 Chrysler E-Body Thank you for your purchase from our new line of Mopar parts. Please call us at 877-4NO - ROLL if you have any questions
1109 Tubular Lower A-Arms Camaro/Firebird
 1109 Tubular Lower A-Arms 67-69 Camaro/Firebird Tubular Lower A-Arms: Thank you for your purchase from our new line of F-Body parts. Please call us at (877) 4NO - ROLL if you have any questions regarding
UPPER TRAILING ARM REMOVAL
 #1204 MUSTANG UPPER TRAILING ARMS Thank you for your purchase. Please call us at (562) 907-7757 if you have any questions regarding your Hotchkis Performance products. Visit us online @ www.hotchkis.net
94-96 Impala SS/ B-Body Rear Coilover Conversion Kit
 January 29, 2014 94-96 Impala SS/ B-Body Rear Coilover Conversion Kit The following instructions are intended for professional installers and are guidelines only. Speedtech Performance assumes NO responsibility
Rear Suspension System C-10 Pickup Truck
 Rear Suspension System 18390 67-72 C-10 Pickup Truck Thank you for your purchase from our new line of Chevy parts. Please call us at 877-4NO - ROLL if you have any questions regarding the service or installation
P/N# Performance Lowering Springs Installation Instructions
 P/N# 19391 Performance Lowering Springs Installation Instructions Thank you for your purchase of this Hotchkis Performance product. Your Lowering Spring set was designed with the performance and durability
Chicane Coilover Kit For '64 to '72 Chevelle/ A Body. Installation Instructions
 Nov 3, 2017 Chicane Coilover Kit For '64 to '72 Chevelle/ A Body Installation Instructions Actual parts may vary from photo depending on application. 1 P a g e The following instructions are intended for
'64-72 Chevelle/ A Body Rear Coilover Conversion Kit
 Nov 3, 2017 '64-72 Chevelle/ A Body Rear Coilover Conversion Kit Includes instructions for Currie Brand Axles The following instructions are intended for professional installers and are guidelines only.
Rear Upper Camber Link (12425) Scion tc
 Scion tc") Rear Upper Camber Link (12425) Scion tc Thank you for your purchase from our new line of Scion tc parts. Please call us at (877) 4NO-ROLL if you have any questions regarding the service or installation
Rear Upper Camber Link (12425) Scion tc Thank you for your purchase from our new line of Scion tc parts. Please call us at (877) 4NO-ROLL if you have any questions regarding the service or installation
'64-72 Chevelle/ A Body Rear Coilover Conversion Kit
 February 3, 2014 '64-72 Chevelle/ A Body Rear Coilover Conversion Kit Includes instructions for Currie Brand Axles The following instructions are intended for professional installers and are guidelines
NOTICE- THIS K-MEMBER REQUIRES THE USE OF COIL OVER SUSPENSION. K-MEMBER WILL NOT WORK WITH FACTORY STYLE SPRINGS.
 Technical Support Line: (952) 985-5675 Email: Info@QA1.net 21730 Hanover Ave. Lakeville, MN 55044 www.qa1.net INSTALLATION INSTRUCTIONS MUSTANG K-MEMBER P/N MUK11, MUK12, MUK13 NOTICE- THIS K-MEMBER REQUIRES
Installation Instructions
 Nov 3, 2017 G-Body Rear Coilover Conversion Kit 1 P a g e Installation Instructions The following instructions are intended for professional installers and are guidelines only. Speedtech Performance assumes
PIVOT BUSHING KIT GM F-BODY
 PIVOT BUSHING KIT 21016 67-69 GM F-BODY 67-69 GM F-Body Pivot Bushing Kit Thank you for your purchase. Please call us at 877-4NO - ROLL if you have any questions regarding the service or installation of
Installation Instructions
 Nov 25, 2013 Upper Control Arms Installation Instructions The following instructions are intended for professional installers and are guidelines only. Speedtech Performance assumes NO responsibility for
16366 Steering Tie Rods Chrysler B-Body, Charger, Super Bee, Road Runner, GTX Chrysler E-Body, Cuda, Challenger
 P 16366 66-70 B-Body, 70-74 E-Body 16366 Steering Tie Rods 1966-1970 Chrysler B-Body, Charger, Super Bee, Road Runner, GTX 1970-1974 Chrysler E-Body, Cuda, Challenger Thank you for your purchase from our
16385 Steering Tie Rods Chrysler A-Body
 16385 Steering Tie Rods 1967-76 Chrysler A-Body Before You Start: Thank you for your purchase from our new line of B & E-Body parts. Please call us at (877) 4NO - ROLL if you have any questions regarding
SPORT COIL SPRINGS Scion xa & xb Part #19412 INSTALLATION OF HOTCHKIS FRONT COIL SPRINGS
 SPORT COIL SPRINGS 2004+ Scion xa & xb Part #19412 Thank you for your purchase from our new line of Scion xa / xb parts. Please call us at (877) 4NO-ROLL if you have any questions regarding the service
PVI 1800/PVI Residential/Commercial Grid-Tied Photovoltaic Inverter WARRANTY MANUAL. Subject to Change REV , Solectria Renewables
 PVI 1800/PVI 2500 WARRANTY MANUAL Residential/Commercial Grid-Tied Photovoltaic Inverter 2009, Solectria Renewables Subject to Change REV 10.09 1 Product Warranty & RMA Policy 1.1 Warranty Policy The Solectria
Installation Instructions and Warranty Information
 Installation Instructions and Warranty Information 1999 2003 Ford SuperDuty Truck and Excursion Part# 1669S, 1669S-1, 1669S-2 Read all instructions carefully before attempting installation. Rev. 10/05
Sport Sway Bar Kit Chevy Camaro
 Sport Sway Bar Kit 22109 2010 Chevy Camaro Thank you for your purchase from our new line of Chevy parts. Please call us at 877-4NO - ROLL if you have any questions regarding the service or installation
Sport Coil Springs Dodge Magnum, Chrysler 300C Dodge Challenger SRT Dodge Challenger R/T
 Sport Coil Springs 19101 - Dodge Magnum, Chrysler 300C 19107 - Dodge Challenger SRT-8 19108 - Dodge Challenger R/T Thank you for your purchase from our new line of Magnum/300C parts. Please call us at
22421 SPORT SWAY BAR SET TOYOTA COROLLA
 22421 SPORT SWAY BAR SET 98-01 TOYOTA COROLLA Thank you for your purchase from our line of Corolla parts. Please call us at (877) 4NO-ROLL if you have any questions regarding the service or installation
1313 LOWER TRAILING ARMS CHEVROLET B-BODY
 1313 LOWER TRAILING ARMS 59-64 CHEVROLET B-BODY Thank you for your purchase from our line of classic Chevrolet B-body suspension parts.. Please call us at (877) 4NO-ROLL if you have any questions regarding
Sport Sway Bar Kit UP SCION xb
 Sport Sway Bar Kit 22429 08-UP SCION xb Thank you for your purchase from our new line of Scion parts. Please call us at 877-4NO - ROLL if you have any questions regarding the service or installation of
P/N# Performance Lowering Springs Installation Instructions
 P/N# 19110 Performance Lowering Springs Installation Instructions Thank you for your purchase of this Hotchkis Performance product. Your Lowering Spring set was designed with the performance and durability
Aug 24, 2017 ATS AFX Spindle Installation Instructions
 Aug 24, 2017 ATS AFX Spindle Installation Instructions 1 P a g e The following instructions are intended for professional installers and are guidelines only. Speedtech Performance assumes NO responsibility
25405 COMPETITION END LINK KIT 2002-UP ACURA RSX, 2004 Subaru STi INSTALLATION OF HOTCHKIS FRONT ENDLINKS
 25405 COMPETITION END LINK KIT 2002-UP ACURA RSX, 2004 Subaru STi Thank you for your purchase from our line of competition parts. Please call us at (877) 4NO-ROLL if you have any questions regarding the
Sport Sway Bar Kit C-10 Truck
 Sport Sway Bar Kit 22390 67-72 C-10 Truck Thank you for your purchase from our new line of Chevy parts. Please call us at 877-4NO - ROLL if you have any questions regarding the service or installation
INSTRUCTIONS. 4-Link Parallel With Panhard Bar Rear Suspension Systems FOR MOPAR MUSCLE CARS: B-BODY (RS-5460)
") MOPAR 1962-1965 B-BODY 4-LINK SYSTEM W/PANHARD BAR INSTRUCTIONS 4-Link Parallel With Panhard Bar Rear Suspension Systems FOR MOPAR MUSCLE CARS: 1962-1965 B-BODY (RS-5460) Revised: 4-1-2014 Page 2 Page
MOPAR 1962-1965 B-BODY 4-LINK SYSTEM W/PANHARD BAR INSTRUCTIONS 4-Link Parallel With Panhard Bar Rear Suspension Systems FOR MOPAR MUSCLE CARS: 1962-1965 B-BODY (RS-5460) Revised: 4-1-2014 Page 2 Page
PLEASE READ THIS MANUAL CAREFULLY, PRIOR TO USE.
 For questions and concerns please contact: Fastfish Motorsports (352)799-4527 or (813)363-8103 PLEASE READ THIS MANUAL CAREFULLY, PRIOR TO USE. Door Car Set Up: The race car lifting jacks come with tabs
Technical Support Line: (952) Fax Line: (952) Hanover Ave. Lakeville, MN
 Fax Line: (952) Hanover Ave. Lakeville, MN") Technical Support Line: (952) 985-5675 Fax Line: (952) 985-5679 21730 Hanover Ave. Lakeville, MN 55044 www.qa1.net INSTALLATION INSTRUCTIONS QA1 P/N CC104MU Camber Caster Plates 1994-2004 Mustang 5.0/4.6
Technical Support Line: (952) 985-5675 Fax Line: (952) 985-5679 21730 Hanover Ave. Lakeville, MN 55044 www.qa1.net INSTALLATION INSTRUCTIONS QA1 P/N CC104MU Camber Caster Plates 1994-2004 Mustang 5.0/4.6
INSTALLATION INSTRUCTIONS
 INSTALLATION INSTRUCTIONS 1301 / 1302 / 1305 / 1306 THANK YOU FOR CHOOSING HOTCHKIS PERFORMANCE PRODUCTS Removal of Stock Lower Trailing Arms 1) Place car on level surface. 2) Support rear of the car on
PVI 60KW, PVI 82KW, PVI 95KW
 PVI 60KW PVI 82KW PVI 95KW WARRANTY MANUAL Commercial, Grid-Tied Photovoltaic Inverters 2008, Solectria Renewables LLC Subject to Change DOC-020099 rev 024 1 1 Product Warranty & RMA Policy Warranty Policy
Installation manual. 2 front / 1 rear spacer kit Jeep Wrangler JK 2 & 4 door Part # 42005
 Part # 42005 2007-2015 Jeep Wrangler JK 2 & 4 door 2 front / 1 rear spacer kit Parts list: Part # Description Qty. 42005-01 Front coil spring spacers 2 42005-02 Rear coil spring spacers 2 42005INST Instruction
Dec 1, 2017 ATS AFX Spindle Installation Instructions
 Dec 1, 2017 ATS AFX Spindle Installation Instructions 1 P a g e The following instructions are intended for professional installers and are guidelines only. Speedtech Performance assumes NO responsibility
2015 & 2018 Fender Brace Installation Instructions
 2015 & 2018 Fender Brace Installation Instructions Thank you for your purchase of this Hotchkis Performance product. Your Fender Brace set was designed with the performance and durability you ve come to
Anti-Roll Bar Set # 2279, Cadillac CTS V6 & CTS-V
 Anti-Roll Bar Set # 2279, 2280 2003+ Cadillac CTS V6 & CTS-V Thank you for your purchase from our new line of CTS parts. Please call us at (877) 4NO-ROLL if you have any questions regarding the service
Installation manual 3 front / 2 rear suspension system FJ / Runner Part # sj110607rev.03
 Part #: 52000 2007-2014 Toyota FJ / 2003-2009 4Runner 3 front / 2 rear suspension system Parts list: Part # Description Qty. 52907-01 Pre load spacer 2 52907-02 Strut spacer 2 MO3531BK-01 Rear coil spring
Rear Sway Bar Kit 22390R C-10 Truck
 Rear Sway Bar Kit 22390R 67-72 C-10 Truck Thank you for your purchase from our new line of Chevy parts. Please call us at 877-4NO - ROLL if you have any questions regarding the service or installation
14366, Adjustable Strut Rods Chrysler A-Body Chrysler B-Body Chrysler E-Body
 14366, 14385 Adjustable Strut Rods 67-76 Chrysler A-Body 1966-1970 Chrysler B-Body 1970-1974 Chrysler E-Body Thank you for your purchase from our new line of B & E-Body parts. Please call us at (877) 4NO
RACE PPE Manifolds and Up-Pipes
 RACE ONLY High-Flow Exhaust Manifolds with Up-pipes GM DURAMAX 6.6L 2001-2015 DISCLAIMER OF LIABILITY This is a performance product which increases horsepower above factory specifications. Additional horsepower
INSTALLATION OF HOTCHKIS FRONT STABILIZER BAR
 22441 FRONT AND REAR SPORT SWAY BAR SET Infiniti G37/S Coupe & G35/S Sedan Thank you for your purchase from our Hotchkis line of suspension parts. Please call us at (877) 4NO-ROLL if you have any questions
Anti-roll bar set Chrysler Magnum, Charger, 300C, SRT Dodge Challenger
 Anti-roll bar set 22101 Chrysler Magnum, Charger, 300C, SRT-8 22107 Dodge Challenger Thank you for your purchase from our new line of Chrysler parts. Please call us at (877) 4NO-ROLL if you have any questions
BMW E46 M3 SPORT SWAY BAR SET # 22826
 BMW E46 M3 SPORT SWAY BAR SET # 22826 Thank you for your purchase from our new line of BMW E46 parts. Please call us at (877) 4NO - ROLL if you have any questions regarding the service or installation
Chrysler A-Body Tubular A-Arms Installation Instructions A-ARM INSTALLATION
 1967-1976 Dodge Demon 1112 67-72 Chrysler A-Body Tubular A-Arms Installation Instructions Thank you for your purchase of this Hotchkis Performance product. Your A-Arm set was designed with the performance
Camaro / Firebird. Please read the following key points before installing this kit.
 Please read the following key points before installing this kit. 1 Before performing the subframe connector installation, the vehicle must be completely assembled with all body and component parts installed
USER S OPERATING AND INSTRUCTION MANUAL
 Grand Rapids, Michigan, U.S.A. 49504-5298 USER S OPERATING AND INSTRUCTION MANUAL MODEL 777 SLICER 0777S20000-CVR THIS PAGE WAS INTENTIONALLY LEFT BLANK. GEN020319 THIS PAGE WAS INTENTIONALLY LEFT BLANK.
Chicane Coilover Kit For '70 to '81 Camaro/Firebird
 Nov 25, 2013 Chicane Coilover Kit For '70 to '81 Camaro/Firebird 1 P a g e Installation Instructions The following instructions are intended for professional installers and are guidelines only. Speedtech
Installation Instructions and Warranty Information
 Installation Instructions and Warranty Information 1625S 96-98 Mustang 4.6L 2v 1-1/2 1625S-8 96-98 Mustang 4.6L 2v 1-5/8 1625S-1 99-04 Mustang 4.6L 2v 1-1/2 1625S-9 99-04 Mustang 4.6L 2v 1-5/8 1625S-5JT
2282R GM A Body Extreme Rear Sway Bar
 2282R 1964-1972 GM A Body Extreme Rear Sway Bar Thank you for your purchase from our new line of GM parts. Please call us at (877) 4NO - ROLL if you have any questions regarding the service or installation
Please read the following key points before installing this kit.
 Please read the following key points before installing this kit. 1 Before performing the subframe connector installation, the vehicle must be completely assembled with all body and component parts installed
Anti-roll bar set (pn 2278) Pontiac GTO
 Pontiac GTO") Anti-roll bar set (pn 2278) Pontiac GTO Thank you for your purchase from our new line of GTO parts. Please call us at (877) 4NO-ROLL if you have any questions regarding the service or installation of your
Anti-roll bar set (pn 2278) Pontiac GTO Thank you for your purchase from our new line of GTO parts. Please call us at (877) 4NO-ROLL if you have any questions regarding the service or installation of your
Feb 22, 2018 '67-69 Camaro & '68-74 Nova Bumpsteer Adjustment Kit
 Feb 22, 2018 '67-69 Camaro & '68-74 Nova Bumpsteer Adjustment Kit 10552 The following instructions are intended for professional installers. Speedtech Performance assumes NO responsibility for the installation
END USER TERMS OF USE
 END USER TERMS OF USE The following is the End Users Terms of Use as it currently appears in the Mobileye User Manual and Warranty information. This is here for your review and information; it is subject
Sport Sway Bar Kit (22425) Scion tc
 Scion tc") Sport Sway Bar Kit (22425) Scion tc Thank you for your purchase from our new line of Scion tc parts. Please call us at (877) 4NO - ROLL if you have any questions regarding the service or installation of
Sport Sway Bar Kit (22425) Scion tc Thank you for your purchase from our new line of Scion tc parts. Please call us at (877) 4NO - ROLL if you have any questions regarding the service or installation of
Installation manual 3 suspension system Toyota Tacoma 4 x 4 & PreRunner Part # sj rev.03
 Part #: 52904 1995-2004 Toyota Tacoma 4 x 4 & PreRunner 3 suspension system Parts list: Part # Description Qty. 52904-01 Rear brake proportioning valve bracket 1 52907-02 Front pre load spacer 2 52904-03
Service Guide JATCO Environmental Protection Tank Model J-7000
 Service Guide JATCO Environmental Protection Tank Model J-7000 Listed below are a series of steps to follow if the JATCO tank fails to dump properly. #1. Be sure there is an adequate supply of gas pressure
Sport Sway Bar Kit C-10 Truck
 Sport Sway Bar Kit 22108 67-72 C-10 Truck Thank you for your purchase from our new line of Chevy parts. Please call us at 877-4NO - ROLL if you have any questions regarding the service or installation
2006 SHOCK TOWER BRACE 93-UP F-BODY CAMARO/FIREBIRD
 2006 SHOCK TOWER BRACE 93-UP F-BODY CAMARO/FIREBIRD Thank you for your purchase of this Hotchkis Performance product. Please call us at (800) 4NO-ROLL if you have any questions regarding this product.
INSTALLATION MANUAL. TORQ Locker TL GM 14 Bolt Installation Instructions. Made in USA By: Page 1 of 8
 INSTALLATION MANUAL TORQ Locker TL-19035 GM 14 Bolt Installation Instructions Made in USA By: Page 1 of 8 Page 2 of 8 INSTALLATION MANUAL TORQ Locker TL-19035 GM 14 Bolt Installation Instructions By: INTRODUCTION
WARRANTY POLICY. Grid-Tied Photovoltaic Inverters. Revision D. 2014, Solectria Renewables, LLC DOCIN
 WARRANTY POLICY Revision D 2014, Solectria Renewables, LLC DOCIN-070360 1 Product Warranty & RMA Policy 1. Warranty Policy Warranty Registration: It is important to have updated information about the inverter
4007/4008/ Camaro/Firebird. Please read the following key points before installing this kit.
 Please read the following key points before installing this kit. 1 Before performing the subframe connector installation, the vehicle must be completely assembled with all body and component parts installed
Instruction set # 7068 Cognito Motorsports, Inc. Upper Control Arm Leveling Kit for GM 8-Lug #UCAK (Boxed Style)
") Cognito Motorsports, Inc. Upper Control Arm Leveling Kit for 2001-2010 GM 8-Lug #UCAK100010 (Boxed Style) Introduction - These control arms will not affect the height of the truck, the height is determined
Cognito Motorsports, Inc. Upper Control Arm Leveling Kit for 2001-2010 GM 8-Lug #UCAK100010 (Boxed Style) Introduction - These control arms will not affect the height of the truck, the height is determined
Installation Instructions and Warranty Information
 Installation Instructions and Warranty Information For JBA Headers 1997-2004 Chevrolet Corvette and z06 LS-1 / LS-6 V-8 Part# Application 1817 97-99 with 1-5/8 tube 1817-1 01-04 with 1-5/8 tube 1817-2
2236 Sway Bar Installation Instructions
 2236 Sway Bar Installation Instructions Thank you for your purchase of this Hotchkis Performance product. Your stabilizer bar set was designed with the performance and durability you ve come to expect
Sport Sway Bar Kit VW MKV & MKVI Jetta, GTI, GLI Audi A3
 Sport Sway Bar Kit 22833 06-09 VW MKV & MKVI Jetta, GTI, GLI 06-07 Audi A3 Thank you for your purchase from our new line of Audi/VW parts. Please call us at 877-4NO - ROLL if you have any questions regarding
4007/4008/ Camaro/Firebird. Please read the following key points before installing this kit.
 Please read the following key points before installing this kit. 1 Before performing the subframe connector installation, the vehicle must be completely assembled with all body and component parts installed
1401 / 1402 / 1403 ADJUSTABLE TRAILING ARM MOUNT BRACES INSTALLATION OF HOTCHKIS PERFORMANCE ADJUSTABLE TRAILING ARM MOUNT BRACES
 1401 / 1402 / 1403 ADJUSTABLE TRAILING ARM MOUNT BRACES 1401 78-88 GM A/G-BODY / 1402 68-72 GM A-BODY / 1403 64-67 GM A-BODY Thank you for your purchase. Please call us at (562) 907-7757 if you have any
CHEVY / GMC 1500HD / 2500HD 2WD 8 LUG 7 BASIC KIT
 85101 2000-2010 CHEVY / GMC 1500HD / 2500HD 2WD 8 LUG 7 BASIC KIT C8510-4 MAIN BOX KIT W/ HARDWARE 1) FRONT X MEMBER 1) REAR X MEMBER 2) TORSION BAR DROPS 1) LEFT BUMP STOP 1) RIGHT BUMP STOP 2) SWAY BAR
" CHEVY / GMC WD BASIC KIT
 84302 2007-2013 6" CHEVY / GMC 1500 4WD BASIC KIT 100% Bolt On 6 Spindle Kit Front Differential Is Dropped A Full 6 To Maintain Proper CV Axle Angles Impact Struts To Distribute Front Suspension Impact
Sport Sway Bar Kit (22431 ) Subaru Forester INSTALLATION OF HOTCHKIS FRONT SWAY BAR
 Subaru Forester INSTALLATION OF HOTCHKIS FRONT SWAY BAR") Sport Sway Bar Kit (22431 ) Subaru Forester Thank you for your purchase from our new line of Forester parts. Please call us at (877) 4NO - ROLL if you have any questions regarding the service or installation
Sport Sway Bar Kit (22431 ) Subaru Forester Thank you for your purchase from our new line of Forester parts. Please call us at (877) 4NO - ROLL if you have any questions regarding the service or installation
Dual Phase Extraction Inlet. Patent No Installation Manual. P/N Rev
 Patent No. 6520259 Installation Manual P/N 95232 Rev 6-16-11 Table of Contents ing Extraction Inlets track changing water levels to maintain optimum performance 1.Component Identification Page 1 2. How
Installation manual. Toyota Tundra 4WD & 2WD. 2.5 Suspension kit. Part # Part # Important customer information:
 Installation manual 2007-2016 Toyota Tundra 4WD & 2WD 2.5 Suspension kit Part # 53070 sj11082011rev.03 Part # 53070 2007-2016 Toyota Tundra 4WD & 2WD 2.5 Suspension kit Part # Description Qty. 53070-01
OPERATOR S MANUAL with Parts List & Warranty. For Model 100SP Topdresser
 OPERATOR S MANUAL with Parts List & Warranty For Model 100SP Topdresser July 30, 2009 Model 100SP Topdresser LIMITED WARRANTY Earth & Turf Products, LLC warrants to the original Purchaser, all Earth &
TERMS OF USE TERMS AND CONDITIONS. Plumbing and Heating Products (PL-WR)
") TERMS OF USE 1. Watts pricing and product data is subject to change without notice and such changes supersede all previous versions. 2. Watts data is to be used as provided. Watts is not responsible for
TERMS OF USE 1. Watts pricing and product data is subject to change without notice and such changes supersede all previous versions. 2. Watts data is to be used as provided. Watts is not responsible for
Can Am X3 MTS Suspension Kit
 Can Am X3 MTS Suspension Kit (Part #51-10751000 - 51-10751011) DISCLAIMER The purchaser understands, recognizes, and agrees that the suitability of any part sold or manufactured by Lone Star Racing for
Installation manual. 3 suspension system Toyota Tacoma. 4x4 and 2WD PreRunner. Part # Part # Important customer information:
 Installation manual 3 suspension system 2005 2018 Toyota Tacoma 4x4 and 2WD PreRunner Part # 52907 sj11112011rev.05 Part # 52907 2005-2018 Toyota Tacoma 4x4 and 2WD PreRunner 3 suspension system Part #
REAR SWAY BAR 2207R GM CAMARO/FIREBIRD
 REAR SWAY BAR 2207R 67-69 GM CAMARO/FIREBIRD Thank you for your purchase of this Hotchkis Performance product. Your stabilizer bar set was designed with the performance and durability you ve come to expect
5) The trailing arm should then pivot smoothly on the chassis. 6) Install the rear bolt. 7) Place one drop of blue Loctite
 The trailing arm should then pivot smoothly on the chassis. 6) Install the rear bolt. 7) Place one drop of blue Loctite") INSTALLATION INSTRUCTIONS 1301 / 1302 / 1305 / 1306 THANK YOU FOR CHOOSING HOTCHKIS PERFORMANCE PRODUCTS Removal of Stock Lower Trailing Arms 1) Place car on level surface. 2) Support rear of the car on
INSTALLATION INSTRUCTIONS 1301 / 1302 / 1305 / 1306 THANK YOU FOR CHOOSING HOTCHKIS PERFORMANCE PRODUCTS Removal of Stock Lower Trailing Arms 1) Place car on level surface. 2) Support rear of the car on
USER S OPERATING AND INSTRUCTION MANUAL
 Grand Rapids, Michigan, U.S.A. 49504-5298 USER S OPERATING AND INSTRUCTION MANUAL MODEL 797-21 BREAD SLICER 797S20000CV_21 THIS PAGE WAS INTENTIONALLY LEFT BLANK. GEN020319 RECOMMENDED
EZ Carrier 3. Owner s Manual. Keep instructions for future reference
 EZ Carrier vv Owner s Manual Keep instructions for future reference Introduction The EZ Carrier provides all the flexibility you may need to transport your mobility scooter. The features include: The capability
A S S E M B L Y I N S T R U C T I O N S
 A S S E M B L Y I N S T R U C T I O N S Please Do Not Return This Product to the Store! Contact Escalade Sports customer service department at: Phone: 1-888-USA-GOAL Toll-Free! Fax: 1-866-873-3536 Toll-Free!
INSTALLATION INSTRUCTIONS QA1 P/N x400, x500, x600, x400, x500, x F100 Front Coil-over Suspension System
 INSTALLATION INSTRUCTIONS QA1 P/N 52620-x400, 52620-x500, 52620-x600, 52621-x400, 52621-x500, 52621-x600 65-72 F100 Front Coil-over Suspension System TOOLS AND SUPPLIES REQUIRED Floor Jack Two (2) Jack
MOVE ON TO THE REAR BAR INSTALLATION
 22410 STREET SWAY BAR SET 2001-UP LEXUS IS300 Thank you for your purchase from our line of Lexus parts. Please call us at (877) 4NO-ROLL if you have any questions regarding the service or installation
DODGE DIESEL KIT DODGE DIESEL KIT
 69120 2009-2013 DODGE 2500 8 DIESEL KIT 2009-2012 DODGE 3500 8 DIESEL KIT Heavy Duty Long Arm Construction For Superior Ride Quality And Travel Lower Arms Constructed Of 1.75 DOM Tubing W/ Urethane Bushing
Ford F250/F350 Super Duty 2x4, 4x4 ( ) Part #SSR Installation Instructions
 Part #SSR Installation Instructions") Ford F250/F350 Super Duty 2x4, 4x4 (1999-2010) Part #SSR-101-47-1 Installation Instructions Passenger side (driver s side similar) Parts List Item Part # Description Quant. A 512006 Frame bracket 2 B 512007
Ford F250/F350 Super Duty 2x4, 4x4 (1999-2010) Part #SSR-101-47-1 Installation Instructions Passenger side (driver s side similar) Parts List Item Part # Description Quant. A 512006 Frame bracket 2 B 512007
Installation Instructions and Warranty Information
 Installation Instructions and Warranty Information For 2004-05 Nissan Titan 5.6L Part#1400S Read all instructions carefully before attempting installation. Rev. 10/05 Installation instructions for JBA
51201 INSTALLATION INSTRUCTIONS
 7929 Lincoln Ave. Riverside, CA 92504 Phone: 951.689.ICON Fax: 951.689.1016 PART # 51201 51201 INSTALLATION INSTRUCTIONS DESCRIPTION 07-UP TUNDRA MULTI-RATE RXT LEAF SPRING KIT 1-22-2019 REV.B COMPONENTS
James Barone Racing Aftermarket Parts and Accessories
 Page1 James Barone Racing Aftermarket Parts and Accessories What you will need: 2014+ Mazda 3, 6 and CX-5 Adjustable Rear Camber Arm Installation Instructions. Jack, jack stands Socket wrench Socket wrench