Manual P/N Copyright Third Edition June 21, 2005
|
|
|
- Ronald Malone
- 6 years ago
- Views:
Transcription


1 P/N 60212, 60213, & GM VORTEC WIRE HARNESS INSTALLATION INSTRUCTIONS Manual P/N Copyright 2003 Third Edition June 21, 2005 PAINLESS PERFORMANCE PRODUCTS 2501 Ludelle Street, Fort Worth, Texas (800)
2 TABLE OF CONTENTS 1.0 INTRODUCTION ABOUT THESE INSTRUCTIONS TOOLS NEEDED PRE-INSTALLATION AND HARNESS ROUTING GUIDELINES TRANSMISSION FUNCTION GET TO KNOW THE ENGINE THAT YOU ARE USING GENERAL INSTALLATION INSTRUCTIONS GROUNDING THE VEHICLE ROUGH INSTALLATION HARNESS ATTACHMENT TERMINAL INSTALLATION INSTRUCTIONS GM VORTEC SYSTEM WIRE HARNESS INSTALLATION CONTENTS OF THE & WIRE HARNESS KIT SPECIFIC CIRCUIT CONNECTIONS ENGINE GROUP INSTALLATION TAIL SECTION INSTALLATION L60E to 4L80E TRANSMISSION CONNECTOR TROUBLE-SHOOTING INSTRUCTIONS THE "CHECK ENGINE" LIGHT RETRIEVING TROUBLE CODES FROM THE COMPUTER WHEN TO CALL "PAINLESS WIRING" TECH LINE LIST OF FIGURES Figure 6.1 Diagnostic Link Connector (DLC) & Check Engine Light... 6 Figure 6.2 Brake Switch Connection... 7 Figure 6.3 Brake Switch Relay... 7 Figure 6.4 Canister Vent Solenoid... 8 Figure 6.5 Fuel Pump Relay Connector... 8 Figure 6.6 EGR Valve Figure 6.7 Knock Sensor Connector Figure 6.8 Oxygen Sensors Figure 6.9 MAP Sensor Figure 6.10 CMP Sensor Figure 6.11 CKP Sensor Figure 6.12 Injector Connector Figure 6.13 Coil Driver Connector 11 Figure 6.14 TPS Sensor Figure 6.15 IAC Valve Figure 6.16 MAF Sensor Figure 6.17 Ignition Coil Connector Figure 6.18 Canister Purge Solenoid.. 12 Figure 6.19 ECT Sensor Figure 6.20 IAT Sensor Figure 6.21 Fuel Pump/Oil Press. Switch Figure 6.22 VSS (4L60E) Figure 6.23 VSS/Output Speed Sensor (4L80E) Figure 6.24 Transmission Connections Figure 6.25 Transmission Connector Pin out Figure 6.26 Fuse Identification i
3 LIST OF TABLES Table 4.1 Compatible Parts V8 Engines... 2 Table 4.2 Compatible Parts V6 Engines.3 Table 6.1 Dash Section Connections... 7 Table 6.2 Engine Section Connections... 8 Table 6.3 Tail Section Connections INTRODUCTION You have purchased what we at Painless Performance Products believe to be the most up-to-date and easiest-to-install automotive fuel injection harness on the market. It is designed for easy installation, even if you have no electrical experience. This harness is designed to be a complete wiring system for the fuel injection system on General Motors Vortec injected 4.3L, 5.0L and 5.7L. Also, to control the 4L60E automatic or 4L80E transmission using the 1997 computer Service # for V8 and # for V6. This includes all wiring that is needed by the computer to run and control the injection system and transmission. This harness will get the Vortec engine and transmission up and operating but it is recommended that you also have the computer reprogrammed to remove anything in the original factory programming that relates to a device or devices that are not being used in you particular vehicle. NOTE: Most likely the check engine light will come on and stay on when using a computer with the original factory programming this is normal and is why we recommended that the computer be reprogrammed. NOTE: Most remanufactured computers come without any programming in them and must be programmed before they can be used. NOTE: The program in your computer must match the transmission that you plan on using either the 4L60E or 4L80E. Usually, the computer, relays and fuse block can easily be mounted under the dash. Most of the wiring in the harness has been pre-terminated to the proper connector and all wire has been GM color-coded. All wiring is TXL, 600 volt, and 125 degree centigrade with cross-link insulation. This fuel injection system harness have been divided into three major groups: ENGINE GROUP DASH GROUP TAIL GROUP Includes wiring for the fuel injectors, ignition system, and sensors. Includes ignition feed wire, assembly line diagnostic link (DLC) connector, check engine light, computer connectors, brake switch wiring, tachometer wiring, VSS Signal wire, canister vent, fuse block, fuel pump relay connector. Include VSS wiring, transmission wiring and power wire for fuel pump. 2.0 ABOUT THESE INSTRUCTIONS These instructions provide information for the installation of the & Vortec Fuel Injection Harness Kit. The contents of these instructions are divided into major Sections, as follows: 1.0 INTRODUCTION 2.0 ABOUT THESE INSTRUCTIONS 3.0 TOOLS NEEDED 4.0 PRE-INSTALLATION AND HARNESS ROUTING GUIDELINES 5.0 GENERAL INSTALLATION INSTRUCTIONS VORTEC FUEL INJECTION HARNESS KIT 8.0 TROUBLE-SHOOTING INSTRUCTIONS AND TROUBLE CODES 1
4 Sections are further divided into Paragraphs and Steps. Throughout, the Figure numbers refer to illustration and the Table numbers refer to information in table form. These are located in or near the sections or paragraphs to which they correspond. Always pay careful attention to any notes or any text labeled CAUTION. 3.0 TOOLS NEEDED In addition to your regular tools, you will need, at least, the following: Crimping tool Wire stripper Continuity tester NOTE: USE A QUALITY TOOL TO AVOID OVER-CRIMPING. CAUTION: DO NOT USE A TEST LIGHT TO TEST THE COMPUTER OR SENSOR WIRING OR YOU WILL DAMAGE THE COMPUTER. Electric drill 1 5/8" Hole saw (for the rubber grommet in the firewall) 4.0 PRE-INSTALLATION AND HARNESS ROUTING GUIDELINES The installation of your harness kit will consist of two parts: ~ The physical routing, positioning, and securing of the harness, wire groups, and individual wires and connectors. ~ The proper electrical connection of the individual circuits. We cannot tell you how to route the harness in your automobile. That depends a great deal upon the particular make of the automobile and what extent you want to secure and conceal the harness. We do offer some general guidelines and routing practices starting in Paragraph 5.3, general installation instructions in Section 5.0, and precise instruction concerning the electrical connections you will have to make beginning in Section 6.0. To help you begin thinking through the installation of your wire harness, read the following sections: 4.1 TRANSMISSION FUNCTION If you are using the 4L60E transmission, read Paragraph 4.1.1, If you are using the 4L80E read Paragraph 4.1.2, and see NOTE at the bottom of the page If you ARE going to use a 4L60E transmission, tape off and store the input speed sensor connector. You must use the vehicle speed sensor (VSS), and the correct brake switch. These are necessary to make the transmission work correctly. The brake switch should be closed (electrically connected) when the brakes ARE NOT being applied and open (not electrically connected) when the brakes ARE being applied. This is the opposite of a standard brake light switch. If you are using a pressure brake switch, a SPDT relay must be installed to unlock the converter when the brakes are applied. The vehicle speed sensor lets the computer know how fast the wheels are turning If you are using the 4L80E transmission proceed using the same steps above, however you will use the output speed sensor connector, it will be rolled up in the harness. NOTE: Emission devices This harness has provisions for the emission devices. We have rolled up the canister vent wiring in the dash section and it may be left there if this item is not to be used. If you plan on using this item you will need to route the wires out to the engine compartment. Secure the wires to the main harness using the tie wraps supplied. 2
5 4.2 YOU SHOULD GET TO KNOW THE PARTICULAR ENGINE YOU ARE USING: NOTE: The Vortec engines had three to four oxygen sensors from the factory, but the harness has provisions for only two, one on the driver side and one on the passenger side of the engine. We removed the rear oxygen sensors since they originally were behind the catalytic converters and most people don t want to run more than two oxygen sensors. This system has four rectangular connectors at the computer. A # computer is required for proper operation PPPI recommends the use of the following parts. See Table 4.1. These will meet all requirements and are compatible with PPPI harnesses. The numbers given are GM and AC Delco part numbers. You must use the computer listed on table 4.1 with our harness Familiarize yourself with the harness by locating each of the harness groups and by looking at the connectors on the wire ends Decide where and how the computer, fuse block and relays will be mounted. PPPI wire harness kits are designed to mount either under the dash or in the kick panel on the right side. They must be no further apart than the wiring will allow (approx. 18 inches) A good exercise is to lay out the wire harness on the floor beside your vehicle and identify all the connectors and wires You will want to route the harness through and around open areas. Inside edges provide extra protection from hazards and also provide places for tie wraps, clips and other support Route the harness away from sharp edges, exhaust pipes, and the hood, trunk and door hinges Plan where harness supports will be located. Use a support approximately every 6 inches unless the harness routes under the floor carpet Allow enough slack in the harness at places where movement could possibly occur (body to frame, frame to engine, etc.) The wires should be bundled into harness groups. Use tape, nylon ties or poly split loom. Table 4.1 Compatible Parts For V8 Engines Vortec V8 Fuel Injection Harness (96-99) Part # & Main Computer Fuel Pump Relay Brake Switch Intake Air Temperature MAF Sensor Engine Coolant Temperature Oxygen Sensor (Pass. Side Oxygen Sensor (Drv. Side TPS Sensor MAP Sensor Ignition module Service# Delco# D954A Delco# D1565E Delco# Delco# Delco# Delco# AFS105 Delco# AFS105 Delco# Delco# Delco# D579 Idle Air Control Motor Knock Sensor EGR Valve Coil Cam Position Sensor Crankshaft Position Sensor Canister Purge Solenoid Canister Vent Solenoid VSS(4L60E Only) VSS(4L80E Only) Oil Pressure Switch Delco# Delco# Delco# Delco# D577 Delco# Delco# Delco# GM# Delco# GM# GM#
6 Main Computer Fuel Pump Relay Brake Switch Intake Air Temperature MAF Sensor Engine Coolant Temperature Oxygen Sensor (Pass. Side Oxygen Sensor (Drv. Side TPS Sensor MAP Sensor Ignition module Vortec V6 Fuel Injection Harness (96-99) Part # & Service# Idle Air Control Motor Delco# D954A Knock Sensor Delco# D1565E EGR Valve Delco# Coil Delco# Cam Position Sensor Delco# Crankshaft Position Sensor Delco# AFS105 Canister Purge Solenoid Delco# AFS105 Canister Vent Solenoid Delco# VSS(4L60E Only) Delco# VSS(4L80E Only) Delco# D579 Oil Pressure Switch Delco# Delco# Delco# Delco# D577 Delco# Delco# Delco# GM# Delco# GM# GM# Table 4.2 Compatible Parts V6 Harness 5.0 GENERAL INSTALLATION INSTRUCTIONS CAUTION: ~ DO NOT DISCONNECT THE BATTERY OR THE COMPUTER CONNECTORS WHILE THE IGNITION IS ON. ~ DO NOT SHORT ANY WIRES IN THIS HARNESS TO GROUND (WITH THE EXCEPTION OF LABELED GROUND WIRES) OR DAMAGE TO THE COMPUTER WILL RESULT. ~ GIVING OR RECEIVING A "JUMP START" MAY DAMAGE THE COMPUTER. ~ DO NOT USE A TEST LIGHT WHEN TESTING COMPUTER SENSORS OR COMPUTER CIRCUITS. DAMAGE TO THE COMPUTER WILL RESULT! ~ WHEN ROUTING THE WIRES FOR THE VEHICLE SPEED SENSOR (IF USED) MAKE CERTAIN THAT THEY ARE AT LEAST 12 INCHES AWAY FROM ANY IGNITION WIRING (SPARK PLUG WIRES, ETC.). Notes: ~ There is a normal, small current drain on these fuel injected systems. ~ Each connector in this harness is different and will not fit in the wrong place. NEVER FORCE ANY CONNECTOR. ~ When connecting the plugs to the computer USE EXTREME CARE to make sure none of the pins in the computer are or become bent. ~ The fuel pump and pressure regulator you are using MUST maintain a constant pressure of PSI (pounds per square inch). The Vortec fuel system does not have a built-in regulator on the fuel rail as in many earlier GM fuel injection systems. 5.1 GROUNDING THE VEHICLE A perfectly and beautifully wired automobile will nevertheless have problems if everything is not properly grounded. Don't go to the effort to installing a quality wire harness only to neglect proper grounding. Note: The installer of this harness is responsible for all ground wires not provided with this part Connect a ground strap or cable (minimum of a 4 Ga. wire) from the negative battery terminal to the chassis (frame) Connect a ground strap (minimum of a 4 Ga. wire) from the engine to the chassis (frame). DO NOT RELY UPON THE MOTOR MOUNTS TO MAKE THIS CONNECTION Connect a ground strap from the engine to the body. 4
7 5.2 ROUGH INSTALLATION CAUTION: DISCONNECT THE POWER FROM YOUR VEHICLE BY REMOVING THE NEGATIVE BATTERY CABLE FROM THE BATTERY. Note: Make no wire connections or permanent mounting of any kind at this time Position the computer and sensors in their intend locations Drill a 1-5/8" hole for the firewall grommet near the computer for the engine group and tail section to pass through Route the engine group and tail section through the hole. Push the grommet (already installed on the harness) into the hole until it is seated Route the dash group over to the driver's side of the car Route the fuse block and relays to the place they will be mounted. 5.3 HARNESS ATTACHMENT Note: Harness routing and shaping will be a time-consuming task. Taking your time will enhance the beauty of your vehicle. Please take your time and be patient Permanently mount your computer. You should mount the fuse block and relays at this time Mold harness groups to the contour of the dash, engine, frame, etc. Remember to route harness away from sharp edges, exhaust pipes, hinges, and moving parts Attach harness groups to your automobile with clips or ties starting at the computer and working your way outward. Note: Do not tighten tie wraps or mounting devices at this time. Make all harness attachments LOOSELY When used every 1-1/2" or so on the visible areas of the harness, colored plastic wire ties make a very attractive assembly. Otherwise, a tie installed in other areas every 6" or so will hold the wires in place securely. REMEMBER TO TAKE YOUR TIME. 5.4 TERMINAL INSTALLATION INSTRUCTION Note: In the following steps you will be making the circuit connections. Before you start, you should carefully read Sections 6.0, and continually refer to the wire charts, DOUBLE CHECKING your length calculations before cutting any wire or making any connections. These directions are for the wires, which do not have a connector already, installed on them Have all tools and connectors handy Select the correct terminal for the wire and application Determine the correct wire length and cut the wire. Remember to allow enough slack in the harness and wires at places where movement could occur. DOUBLE CHECK YOUR CALCULATIONS Strip insulation away from wire. Only strip as much insulation off as necessary for the type of terminal lug you are using. Note: In the following step, make sure that the terminal is crimped with proper die in the crimping tool. An improper crimp will not make a good connection. DO NOT OVER-CRIMP Crimp the terminal onto the wire Connecting the wires and connectors throughout the harness is a simple process. Make sure that each wire is properly routed and then attached. DO NOT ATTACH THEN ROUTE AFTERWARD. 5

8 5.4.7 When all the wires are attached, tighten the mounts and ties to secure the harness permanently Attach the connectors to the computer. BEING VERY CAREFUL NOT TO BEND ANY PINS After all connections have been made throughout the harness, connect the battery to the vehicle. CAUTION: BE SURE THE IGNITION IS OFF WHEN YOU RECONNECT THE BATTERY OR YOU WILL DAMAGE THE COMPUTER. 6.0 GM VORTEC & VORTEC SYSTEM WIRE HARNESS INSTALLATION INSTRUCTIONS 6.1 CONTENTS OF THE & WIRE HARNESS KIT Take inventory to see that you have everything you are supposed to have in this kit. If anything is missing, contact the dealer where you obtained the kit or contact Painless Performance at (817) The kit should contain the following items: ~ The main wire harness with the connectors already on the ends of most of the wires. ~ Fuel Injection Installation Instructions P/N (This Booklet). ~ 4 & 7 tie wraps. 6.2 SPECIFIC CIRCUIT CONNECTIONS Note: If you have not already done so, read sections 4.0 and 5.0 of these instructions and think through the installation of the harness before securing or cutting any wires DASH SECTION INSTALLATION The wires in this group consist of the diagnostic link connector (DLC) (SEE FIGURE 6.1), the check engine light (pre-mounted into a mounting bracket), fuseblock/w fuses and relays, fuel pump relay connector/w relay and 7 other wires. Note: You may need to connect the check engine light wires to their mates in the wire harness. CAUTION: DO NOT MAKE ANY CONNECTIONS WHILE THE COMPUTER IS PLUGGED INTO THE HARNESS. Note: Wire color (Example: Blk/Wht) is one wire with a stripe. The second color (the stripe) may not be bold. Observe all two-color wires closely. FIGURE 6.1 DLC Connector & Check Engine Light 6
9 A. Find a suitable location to mount the DLC connector (using the bracket that the light is mounted in) that will allow access to the front of the connector and still allow you to see the light while driving. B. Mount the DLC connector using the bracket containing the check engine light in the place selected. C. Locate the white ignition hot activation wire, labeled FUSE BLOCK IGNITION (18 Ga.) and attach it to a 12V fused power source where there is power WHEN THE KEY IS IN THE START AND RUN POSITION. This wire activates the relays that supply power to all the ignition hot circuits in the fuel injection harness. If the white wire is connected correctly, the check engine light will come on when the ignition switch is in the "ON and START" position. D. The purple and brown wires labeled BRAKE SWITCH are the wires that connect to the brake switch to let the computer know when the brake is applied. If you ARE NOT using a 4L60E or 4L80E then you will tape off and store these wires. If you ARE using the 4L60E or 4L80E transmission then you will have to install an electrical switch described in Paragraph The brown wire provides power for this switch and the purple wire is the signal going to the computer. E. If you are using the recommended brake switch then you will wire it according to Figure 6.2. The brown wire to the back of the switch in the illustration is the wire that has power on it whether or not the brake is being applied. FIGURE 6.2 Brake Switch Connection FIGURE 6.3 Brake Switch Relay 7

 is the signal wire for a tachometer if used. H. The VSS output wire (green) sends out a signal to operate the electronic cruise control or speedometer if so equipped. 6.")
10 CAUTION: FAILURE TO WIRE THIS SWITCH CORRECTLY WILL RESULT IN A DANGEROUS SITUATION ON THE VEHICLE. F. If your vehicle has a pressure type brake switch, you may use a relay as shown in Figure 6.3. The relay must be a SPDT Relay and wired correctly or it could result in a dangerous situation with the vehicle. The torque converter may not unlock. The wire labeled FUEL TEST is a test point for the fuel pump. After the vehicle has been wired and tested OK, tape off this wire and store it in the harness. G. The wire labeled TACH (white) is the signal wire for a tachometer if used. H. The VSS output wire (green) sends out a signal to operate the electronic cruise control or speedometer if so equipped Dash Section Connections WIRE COLOR # OF POSITIONS LABELED CONNECT TO: IN CONNECTOR Pink, Grn/Wht 2 Canister Purge Canister Purge Solenoid Brn, Brn/Wht 2 Canister Vent Canister Vent Solenoid Gray, Grn/Wht, Blk/Wht, Org, Red 5 Fuel Relay Fuel Pump Relay Green VSS Output Speedometer White Tach Tachometer Purple, Brown Brake Switch Brake Switch White Fuse Block Ignition Ignition Power FIGURE 6.4 Canister vent solenoid FIGURE 6.5 Fuel Pump Relay Connector 6.3 ENGINE GROUP INSTALLATION The engine group is designed to be separated into left side (driver) and right side (passenger) sections. Each side is tie-wrapped separately, BUT NOT LABELED. The left side of the engine has the connectors for the idle air control and throttle position sensor, all of which ARE labeled. When you begin routing, FIRST separate the engine group into left and right sections and place them accordingly. 8

11 6.3.1 Before you connect any wires, separate the tail section from the engine group and place it out of the way Connect the two ring terminals labeled STARTER B+ with Red wires to the large battery terminal on the starter solenoid Locate the two large ring terminals with Black and Blk/Wht wires and ground them to the engine Using Figure , and the specific connections indicated in Table 6.2, connect the wiring as directed. NOTE: The canister vent solenoid connector is rolled up in the dash section and must be routed out to the engine compartment if these items are to be used Engine Section Connections WIRE COLOR # OF POSITIONS LABELED CONNECT TO: IN CONNECTOR Black, Brown, Pink, Gray, Gray/Black 5 EGR Blue 1 Knock Tan/White, Purple/White, Black, Pink 4 O2 SENSOR Tan, Purple, Black, Pink 4 O2 SENSOR Black, Lt.Green, Gray 3 MAP Brown/White, Pink, Pink/Black 3 Dist. Yellow, Purple, Pink 3 CPS See NOTE: Below For Injector 16 Injector V8 Wire Colors 12 Injector V6 Black, Blue, Grey 3 TPS Pink, Yellow, Black/White 3 MAF Yellow, Black 2 ECT Tan, Black 2 IAT Lt.Green/Black, Lt.Blue/Black, 4 IAC Lt.Blue/White, Lt.Green/White Pink, White, Black/White, 4 Coil Driver Coil Driver Connector White/Black Pink, White, White/Black 3 Coil Black/White, Black Ground Red (2) Starter B+ EGR Valve Knock Sensor Connector Driver Side Oxygen Sensor Passenger Side Oxygen Sensor MAP Sensor Cam Position Sensor Crankshaft Position Sensor Central Port Injector Central Port Injector Throttle Position Sensor Mass Airflow Sensor Engine Coolant Temp Sensor Intake Air Temp Sensor Idle Air Control Motor Coil Connector Engine Ground Starter Solenoid Batt. Terminal TABLE 6.2 Engine Section Connections 9


12 NOTE: Some locations of connectors on the 7.4 will differ from figures shown FIGURE 6.6 EGR Valve FIGURE 6.7 Knock Sensor Connector FIGURE 6.8 Oxygen Sensors FIGURE 6.9 MAP Sensor FIGURE 6.10 Cam Sensor (Dist.) FIGURE 6.11 CPS Sensor 10


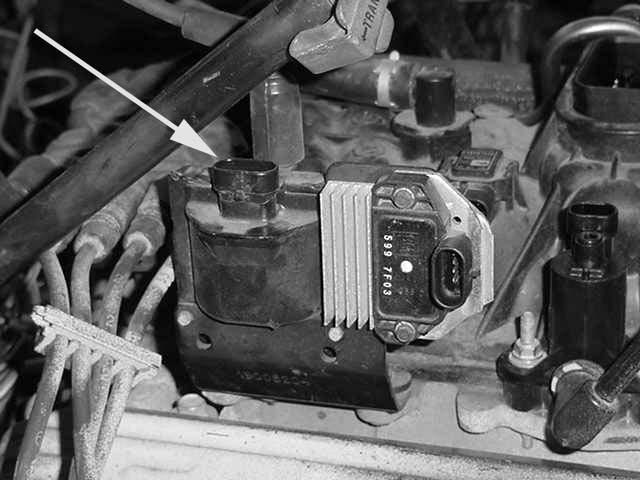
13 FIGURE 6.12 Injectors 1-8 FIGURE 6.13 Coil Driver FIGURE 6.14 TPS Sensor FIGURE 6.15 IAC Valve FIGURE 6.16 MAF Sensor FIGURE 6.17 Ignition Coil 11


 and connect to the Vehicle Speed Sensor.")
14 FIGURE 6.18 Canister Purge Solenoid FIGURE 6.19 ECT Sensor FIGURE 6.20 IAT Sensor FIGURE 6.21 Fuel Pump/Oil PressureSwitch 6.4 TAIL SECTION INSTALLATION Locate the tail section that you earlier separated from the engine group. Begin routing it towards the rear of the vehicle. Be sure to avoid all sharp edges, moving or hot parts, or anything else that may damage the harness If you ARE using the 4L60E transmission, route the 13-position connector to the transmission and attach it. Tape up the input shaft speed sensor connector and store it in the harness If you ARE using 4L80E transmission, route the input shaft speed sensor connector to the transmission and attach it Take the connector for the Vehicle Speed Sensor (VSS) and connect to the Vehicle Speed Sensor Take the gray wire labeled FUEL PUMP and route it to the fuel pump. This is the power wire for the fuel pump Tail Section Connections 12

15 WIRE COLOR # OF POSITIONS LABELED CONNECT TO: IN CONNECTOR Red/Black, Blue/White 2 VSS Vehicle Speed Sensor (4L80E only) Purple/White, Green/Black 2 VSS Vehicle Speed Sensor (4L60E & 4L80E) Lt. Green, Yellow/Black, Yellow, 13 Trans. Transmission Red/Black, Lt. Blue/White, Pink, Pink/Black, Black, Red, Blue, White, Tan/Black, Brown Gray Fuel Pump Power Terminal TABLE 6.3 Tail Section Connections FIGURE 6.22 VSS (4L60E) FIGURE 6.23 A/T Input Speed & VSS Sensor, Transmission Connection (4L80E) FIGURE 6.24 Transmission Connection (4L60E) 6.5 Converting 4L60E Transmission Connector to Work With A 4L80E *Note: Harness numbers 60212, 60213, 60214, and have been wired for both the 4L60E and the 4L80E. All harnesses have the transmission connector pre terminated to allow use of the 4L60E transmission. In applications where a 4L80E is to be used, follow this procedure to change your transmission connector to ensure all functions of the transmission work properly. See Figure 6.25 for repining the transmission connector 13
16 1. With the terminal end of the connector and the arrow on top pointing towards you, carefully remove the white retaining lock located in the center of the connector. 2. Locate the white wire located in terminal location S. Using a paper clip or small screwdriver, gently lift the locking tab inside the connector and pull the wire from it s location. 3. Now locate the brown wire located in terminal location U. Using the same method, remove the brown wire from it s location 4. Gently insert the brown wire into terminal location S. 5. The white wire has no function with the 4L80E transmission; it needs to be taped up and stowed in the harness in case a 4L60E is ever to be used. Figure 6.25 Transmission Connector Pin Out 7.0 TROUBLE- SHOOTING INSTRUCTIONS If you are having trouble with your engine running badly or not running at all, first perform basic trouble-shooting (ensure that you are using the correct parts (Table 4.1), check for faulty connections, blown fuses, spark, timing, fuel pressure, etc.), then see if the computer has stored a trouble code in its memory. FIGURE 6.26 Fuse Identification 14
17 7.1 THE "CHECK ENGINE" LIGHT Normally, the "check engine" light should come on when the ignition is turned on, then go out a few moments after the engine starts running. If it reappears, or stays on while the engine is running, the computer has detected a problem and a trouble code has been set. NOTE: Most likely the check engine light will come on and stay on when using a computer with the original factory programming this is normal and is why we recommended that the computer be reprogrammed to remove any items that the factory vehicle had that aren t being used in the vehicle you are installing the engine into. 7.2 RETRIEVING TROUBLE CODES FROM THE COMPUTER In order to retrieve the trouble codes stored in the computer, a scanner must be connected to the Assembly Diagnostic Link (DLC) connector (installed and connected in Paragraph 6.2.1). Follow the instructions provided with the scanner to read the codes set in the computer After you have read any codes, write them down for reference. Remove the connector from the DLC connector Take the codes one at a time and match them to the codes in the 1997 C/K Truck repair manual. This will tell you in which circuit the computer has detected a problem. Note: BAD. A code indicates a problem in a specific circuit, NOT THAT A PARTICULAR PART IS Before taking more extensive corrective actions for any trouble codes make sure that all connections on the indicated circuit, INCLUDING THE COMPUTER, are clean and tight. Inspect the wiring in the circuit for any broken, shorted, or exposed wires. Finally, insure all ground wires are clean and secure If a trouble code is detected and the problem has been fixed, clear the codes by first making sure the ignition is off then disconnecting the NEGATIVE battery cable for at least 3 minutes. 7.3 WHEN TO CALL PAINLESS PERFORMANCE PRODUCTS' TECH LINE These harness kits have been built with the highest regard to quality control. Before calling us please double check all connections and perform normal basic trouble-shooting (fuel pressure, timing, ignition system, etc.) If you have any questions concerning the installation of this harness or having trouble in general, feel free to call Painless Performance Products' tech line at Calls are answered from 8am to 5pm central time, Monday thru Friday, except holidays. questions to Tech@painlessperformance.com 15
18 NOTES: 16
19 We have attempted to provide you with the most accurate instructions possible, and are always concerned about corrections or improvements that can be made. If you have found any errors or omissions, or if you simply have comments or suggestions concerning these instructions, please write us at the address on the cover and let us know about them. Or, better yet, send us a fax at (817) We sincerely appreciate your business. 17
20 Painless Performance Limited Warranty and Return Policy Chassis harnesses and fuel injection harnesses are covered under a lifetime warranty. All other products manufactured and/or sold by Painless Performance are warranted to the original purchaser to be free from defects in material and workmanship under normal use. Painless Performance will repair or replace defective products without charge during the first 12 months from the purchase date. No products will be considered for warranty without a copy of the purchase receipt showing the sellers name, address and date of purchase. You must return the product to the dealer you purchased it from to initiate warranty procedures. 18
P/N & GM LS1 FUEL INJECTION WIRE P/N & GM LS1 FUEL INJECTION WIRE HARNESS INSTALLATION INSTRUCTIONS
 P/N 60506 & 60507 1997-98 GM LS1 FUEL INJECTION WIRE HARNESS INSTALLATION INSTRUCTIONS P/N 60508 & 60509 1999-0 GM LS1 FUEL INJECTION WIRE HARNESS INSTALLATION INSTRUCTIONS Manual P/N 9050 Seventh Edition
P/N & GM LS1 w/mechanical (cable) THROTTLE BODY FUEL INJECTION WIRE HARNESS INSTALLATION INSTRUCTIONS
 THROTTLE BODY FUEL INJECTION WIRE HARNESS INSTALLATION INSTRUCTIONS") P/N 60508 & 60509 1997-0 GM LS1 w/mechanical (cable) THROTTLE BODY FUEL INJECTION WIRE HARNESS INSTALLATION INSTRUCTIONS Manual P/N 9050 Painless Performance Products, LLC 501 Ludelle Street Fort Worth,
P/N 60508 & 60509 1997-0 GM LS1 w/mechanical (cable) THROTTLE BODY FUEL INJECTION WIRE HARNESS INSTALLATION INSTRUCTIONS Manual P/N 9050 Painless Performance Products, LLC 501 Ludelle Street Fort Worth,
P/N & GM LS1 FUEL INJECTION WIRE HARNESS INSTALLATION INSTRUCTIONS
 P/N 605 & 6053 00-04 GM LS1 FUEL INJECTION WIRE HARNESS INSTALLATION INSTRUCTIONS Manual P/N 90544 nd Edition July 014 PAINLESS PERFORMANCE PRODUCTS 501 Ludelle Street - Fort Worth, Texas 76105-1036 -
Wire Harness Installation Instructions
 Wire Harness Installation Instructions For Installing: Part #50001 Race Car Kit/8 Circuit Part #50201 8 Switch Dash Mounted Panel Part #50202 8 Switch Roll Bar Mounted Panel Manual #90502 Painless Performance
P/N & /1995 GM LT1 FUEL INJECTION WIRE HARNESS INSTALLATION INSTRUCTIONS
 P/N 60502 & 60505 1994/1995 GM LT1 FUEL INJECTION WIRE HARNESS INSTALLATION INSTRUCTIONS Manual P/N 90517 Copyright May 2002 PAINLESS PERFORMANCE PRODUCTS 2501 Ludelle Street - Fort Worth, Texas 76105-1036
P/N & GM LS2 FUEL INJECTION WIRE HARNESS INSTALLATION INSTRUCTIONS. Manual P/N 90543
 P/N 6050 & 6051 005-06 GM LS FUEL INJECTION WIRE HARNESS INSTALLATION INSTRUCTIONS Manual P/N 90543 1 Painless Performance Products, LLC 501 Ludelle Street Fort Worth, TX 76105-1036 800-43-9696 phone 817-44-404
Vortec Drive by Cable Electronic Fuel Injection Wiring Harness (P/N HAR-1018) HAR-1018
 HAR-1018") 1998 2002 Vortec Drive by Cable Electronic Fuel Injection Wiring Harness (P/N HAR-1018) HAR-1018 PERFORMANCE SYSTEMS INTEGRATION 170 Oberlin Ave N Suite 13 Lakewood NJ 08701-4548 Ph: 732-444-3277 Email:
1998 2002 Vortec Drive by Cable Electronic Fuel Injection Wiring Harness (P/N HAR-1018) HAR-1018 PERFORMANCE SYSTEMS INTEGRATION 170 Oberlin Ave N Suite 13 Lakewood NJ 08701-4548 Ph: 732-444-3277 Email:
SUM EFI Wiring Harness for GM LT-1/LT-4 Engine INSTALLATION INSTRUCTIONS
 SUM-890121 EFI Wiring Harness for GM LT-1/LT-4 Engine INSTALLATION INSTRUCTIONS INTRODUCTION This harness is designed for GM 1992-97 LT1/LT4 fuel injected engines. Even with minimal electrical experience,
'05- 'Current LS2/LS3 Drive by Cable Electronic Fuel Injection Wiring Harness HAR-1058
 '05- 'Current LS2/LS3 Drive by Cable Electronic Fuel Injection Wiring Harness HAR-1058 PERFORMANCE SYSTEMS INTEGRATION 170 Oberlin Ave N Suite 13 Lakewood NJ 08701-4548 Ph: 732-444-3277 Email: INFO@PSIConversion.com
P/N & GM VORTEC FUEL INJECTION 4.8L, 5.3L & 6.0L WIRE HARNESS INSTALLATION INSTRUCTIONS
 P/N 6017 & 6018 1999-00 GM VORTEC FUEL INJECTION 4.8L, 5.3L & 6.0L WIRE HARNESS INSTALLATION INSTRUCTIONS Manual P/N 90530 Second Edition November 004 Copyright November 004 PAINLESS PERFORMANCE PRODUCTS
GM VORTEC Drive by Wire Electronic Fuel Injection Wiring Harness HAR-1014
 GM VORTEC Drive by Wire Electronic Fuel Injection Wiring Harness HAR-1014 PERFORMANCE SYSTEMS INTEGRATION 170 Oberlin Ave N Suite 13 Lakewood NJ 08701-4548 Ph: 732-444-3277 Email: INFO@PSIConversion.com
VORTEC Drive by Wire Electronic Fuel Injection Wiring Harness HAR-1085
 2001 2002 VORTEC Drive by Wire Electronic Fuel Injection Wiring Harness HAR-1085 PERFORMANCE SYSTEMS INTEGRATION 170 Oberlin Ave N Suite 13 Lakewood NJ 08701-4548 Ph: 732-444-3277 Email: INFO@PSIConversion.com
PERFORMANCE SYSTEMS INTEGRATION
 2006 Current GEN IV LSX/Vortec 4.8, 5.3, 6.0, 6.2, 7.0 Drive by Wire (58X) Electronic Fuel Injection Wiring Harness w/ Manual or Non- Electronic Automatic Transmission HAR-10 (See Below) (P/N HAR- 1035,
P/N GM VORTEC THROTTLE BY WIRE FUEL INJECTION 4.8L, 5.3L & 6.0L WIRE HARNESS INSTALLATION INSTRUCTIONS
 P/N 60221 2003-2006 GM VORTEC THROTTLE BY WIRE FUEL INJECTION 4.8L, 5.3L & 6.0L WIRE HARNESS INSTALLATION INSTRUCTIONS Manual P/N 90570 FIRST EDITION September 2009 Copyright SEPTEMBER 2009 PAINLESS PERFORMANCE
Wire Harness Installation Instructions
 Wire Harness Installation Instructions For Installing: Part #60101 - GM 86-93 TBI Standard Harness & Part #60201 GM 86-93 TBI Extended Length Harness Manual # 90503 Painless Performance Products, LLC 2501
SUM EFI Wiring Harness for GM LS1 Engine INSTALLATION INSTRUCTIONS
 SUM-890122 EFI Wiring Harness for GM LS1 Engine INSTALLATION INSTRUCTIONS 1 INTRODUCTION This harness is designed for GM 1997-2002 LS1 fuel injected engines utilizing a mechanical throttle body and throttle
Perfect Performance Products, LLC Painless Performance Products Division 2501 Ludelle St. Fort Worth, Texas (800)
") Wire Harness Installation Instructions For Installing: Part # 65104 Into 1985-1992 (5.0 & 5.7L) TPI Engines Manual # 90536 Perfect Performance Products, LLC Painless Performance Products Division 2501
Wire Harness Installation Instructions For Installing: Part # 65104 Into 1985-1992 (5.0 & 5.7L) TPI Engines Manual # 90536 Perfect Performance Products, LLC Painless Performance Products Division 2501
Wire Harness Installation Instructions
 Wire Harness Installation Instructions For Installing: Part #60102 - GM 86-89 TPI Mass Air Flow (MAF) Standard Harness Part #60103 - GM 90-92 TPI w/speed Density (MAP) Standard Harness Part #60202 - GM
Trail Rocker Installation Instructions
 Trail Rocker Installation Instructions Manual #90580 For Installing Painless Part Numbers: 57000 and 57001 Painless Performance Products recommends you, the installer, read this installation manual from
Trail Rocker Installation Instructions
 Trail Rocker Installation Instructions Manual #90581 For Installing Painless Part Numbers: 57002 Painless Performance Products recommends you, the installer, read this installation manual from front to
Wire Harness Installation Instructions
 Wire Harness Installation Instructions For Installing: Part #60102 - GM 86-89 TPI Mass Air Flow (MAF) Standard Harness Part #60103 - GM 90-92 TPI w/speed Density (MAP) Standard Harness Part #60202 - GM
LSx Harness Installation. lsxeverything.com #BecauseYouShould
 LSx Harness Installation lsxeverything.com #BecauseYouShould Table of Contents Slide 1 Introduction Page Slide 2 Table of Contents Slide 3 Starting Instructions Slide 4 Power Connections Slide 5 Ground
Installation Instructions. Part #65100
 Installation Instructions Part #65100 Perfect Performance Products, LLC Painless Performance Products Division 2501 Ludelle Street Fort Worth, TX 76105-1036 800-423-9696 phone 817-244-4024 fax Web Site:
Trail Rocker Installation
 Trail Rocker Installation Instructions Customizable Trail Rocker Control System For Installing Painless Part Number: 57100 Manual #90616 Painless Performance Products recommends you, the installer, read
Track Rocker Installation Instructions
 Track Rocker Installation Instructions For Installing Painless Part Numbers: 58103: 8-Switch Customizable Track Rocker Switch Panel w/ Flanged Mount 58106: 6-Switch Customizable Track Rocker Switch Panel
Installation Instructions
 Installation Instructions Part #40120 Perfect Performance Products, LLC Painless Performance Products Division 2501 Ludelle Street Fort Worth, TX 76105-1036 800-423-9696 phone 817-244-4024 fax Web Site:
Trail Rocker Installation
 Trail Rocker Installation Instructions 4, 6, or 8 - Switch Customizable Trail Rocker Switch Panel w/ Flanged Mount For Installing Painless Part Number: 57103, 57106, & 57109 Manual #90636 Painless Performance
TELORVEK II RJ-32 Big Block RamJet Fuel Injection System
 Page #1 TELORVEK II RJ-32 Big Block RamJet Fuel Injection System This wiring system is compatible with the GM Performance part big block Ramjet 502 engine. The harness is designed to dress up the appearance
Wire Harness Installation Instructions
 Wire Harness Installation Instructions For Installing: Part #60510 & 60511 Ford 5.0L or 5.8L 1986-93 Wiring Harness Manual #90518 Perfect Performance Products, LLC Painless Performance Products Division
Installation Instructions For 50330, 50331, 50332, and Off Road Switch Panels
 Installation Instructions For 50330, 50331, 50332, and 50333 Off Road Switch Panels 2501 Ludelle Street Fort Worth, Texas 76105 817-244-6212 Phone 817-244-4024 Fax 888-350-6588 Sales 800-423-9696 Tech
PERFECT HI-VELOCITY 62MM THROTTLE BODY
 PERFECT HI-VELOCITY 62MM THROTTLE BODY Installation Instructions Part # 65300 1991-1998 Jeep 4.0L Engines OR All Jeep 4.0L Engines in Cherokee, Grand Cherokee and Wrangler 1991-2005 w/4 wire IAC ONLY.
PIMP Ford 5.0 Harness Installation Manual. Part Number: PM-75
 PIMP Ford 5.0 Harness Installation Manual Part Number: PM-75 Ron Francis Wiring 200 Keystone Rd Suite 1 Chester, PA 19013 800-292-1940 www.ronfrancis.com Pre-Installation Notes: This system is designed
30107 & PACK & 6-PACK RELAY BANK
 30107 & 30108 2501 Ludelle Street Fort Worth, Texas 76105 817-244-6212 Phone 817-244-4024 Fax 888-350-6588 Sales 800-423-9696 Tech E-mail: painless@painlessperformance.com Web: www.painlessperformance.com
Off-Road Switch Panel Installation Instructions
 Off-Road Switch Panel Installation Instructions 50330: Off-road 4 Toggle switches/dash Mount w/keyed Ignition Switch 50332: Off-road 6 Toggle switches/dash Mount w/keyed Ignition Switch Painless Performance
TELORVEK EFI 5.0 Coyote Sequential Fuel Injection System Part # CY-11
 Page #1 TELORVEK EFI 5.0 Coyote Sequential Fuel Injection System Part # CY-11 WIRING INSTRUCTIONS Thank you for purchasing the absolute finest of wiring kits for the Ford Motor Co. Coyote modular engine.
Perfect Performance Products, LLC Painless Performance Products Division 2501 Ludelle St. Fort Worth, Texas (800)
") Camshaft Installation Instructions For Installing: Part # 65206 1997-2004 (5.7L) LS-1 Engines Perfect Performance Products, LLC Painless Performance Products Division 2501 Ludelle St. Fort Worth, Texas
Camshaft Installation Instructions For Installing: Part # 65206 1997-2004 (5.7L) LS-1 Engines Perfect Performance Products, LLC Painless Performance Products Division 2501 Ludelle St. Fort Worth, Texas
WIRE HARNESS INSTALLATION INSTRUCTIONS
 WIRE HARNESS INSTALLATION INSTRUCTIONS For Installing: #10206 Classic Plus Customizable GM Pickup Chassis Harness 1967-72 28 Circuit Manual #90510 PERFECT PERFORMANCE PRODUCTS, LLC Painless Performance
Perfect Performance Products, LLC Painless Performance Products Division 2501 Ludelle St. Fort Worth, Texas (800)
") PERFECT HI-VELOCITY 62MM THROTTLE BODY Installation Instructions Part # 65302 2005-2006 Jeep 4.0L All Jeep 4.0L Engines in Cherokee, Grand Cherokee, Wrangler and Rubicon. Perfect Performance Products,
PERFECT HI-VELOCITY 62MM THROTTLE BODY Installation Instructions Part # 65302 2005-2006 Jeep 4.0L All Jeep 4.0L Engines in Cherokee, Grand Cherokee, Wrangler and Rubicon. Perfect Performance Products,
200-4R TRANSMISSION LOCK-UP HARNESS INSTALLATION INSTRUCTIONS
 2501 Ludelle Street Fort Worth, Texas 76105 817-244-6212 Phone 817-244-4024 Fax 888-350-6588 Sales 800-423-9696 Tech E-mail: painless@painlessperformance.com Web: www.painlessperformance.com 60110 200-4R
TELORVEK EFI 4.6 Sequential Fuel Injection System (MG-91A)
") Page #1 TELORVEK EFI 4.6 Sequential Fuel Injection System (MG-91A) WIRING INSTRUCTIONS Thank you for purchasing the absolute finest of wiring kits for the 1996-98 Ford Motor Co. 4.6 / COBRA fuel injection
Page #1 TELORVEK EFI 4.6 Sequential Fuel Injection System (MG-91A) WIRING INSTRUCTIONS Thank you for purchasing the absolute finest of wiring kits for the 1996-98 Ford Motor Co. 4.6 / COBRA fuel injection
TELORVEK TPI WIRING INSTRUCTIONS FOR TH-90 (95 CK TRUCK) 4.3,5.0,5.7,7.4 TBI Fuel Injection System W/4L60-E or 4L80-E Transmission
 4.3,5.0,5.7,7.4 TBI Fuel Injection System W/4L60-E or 4L80-E Transmission") Page #1 TELORVEK TPI WIRING INSTRUCTIONS FOR TH-90 (95 CK TRUCK) 4.3,5.0,5.7,7.4 TBI Fuel Injection System W/4L60-E or 4L80-E Transmission Thank you for purchasing the absolute finest of wiring kits for
Page #1 TELORVEK TPI WIRING INSTRUCTIONS FOR TH-90 (95 CK TRUCK) 4.3,5.0,5.7,7.4 TBI Fuel Injection System W/4L60-E or 4L80-E Transmission Thank you for purchasing the absolute finest of wiring kits for
Part # GM LS2, 3 & 7-95mm Throttle Body
 Part # 65303 2006-2011 GM LS2, 3 & 7-95mm Throttle Body Perfect Performance Products, LLC 2501 Ludelle St. Fort Worth, Texas 76105 (800) 423-9696 1 We are always concerned about any corrections or improvements
Perfect Performance Products, LLC Painless Performance Products Division 2501 Ludelle St. Fort Worth, Texas (800)
") PERFECT HI-VELOCITY 68MM THROTTLE BODY Installation Instructions Part # 65301 1991-1998 Jeep 4.0L Engines w/perfect Engine Management System P/N 65140, 65141 OR All Jeep 4.0L Engines in Cherokee, Grand
PERFECT HI-VELOCITY 68MM THROTTLE BODY Installation Instructions Part # 65301 1991-1998 Jeep 4.0L Engines w/perfect Engine Management System P/N 65140, 65141 OR All Jeep 4.0L Engines in Cherokee, Grand
Part Number: TDZ-75SD / BRONCO-75SD
 Ford 5.0 EFI Harness Installation Manual For Classic Fords & Mustangs and Early Broncos Part Number: TDZ-75SD / BRONCO-75SD Ron Francis Wiring & The Detail Zone 200 Keystone Rd. Chester, PA 19013 800-292-1940
Installation Instructions For #64260 Striker FE Module GMC/Chevrolet Duramax LB7 Diesel Copyright
 Installation Instructions For #64260 Striker FE Module 2001-2004 GMC/Chevrolet Duramax LB7 Diesel 2 nd Edition August 2007 Copyright 2006 by Perfect Performance Products, LLC 2501 Ludelle Street Fort Worth,
TELORVEK EFI. 4S. S e. n s tem. a l Fue l I n j e cti
 Page #1 4.63 V &5 TELORVEK EFI. 4S /C S e q uen i t a l Fue l I n j e cti o n Sy s tem MG-05 / MG-05A WIRING INSTRUCTIONS Thank you for purchasing the absolute finest of wiring kits for the Ford Motor
Wire Harness Installation Instructions
 Wire Harness Installation Instructions For Installing: #10127 Customizable Mopar Chassis Harness 21 Circuit Manual #90542 Painless Performance Products, LLC 2501 Ludelle Street Fort Worth, TX 76105-1036
TELORVEK III WIRING INSTRUCTIONS FOR NS-93A 4.6 NORTHSTAR Fuel Injection System
 Page #1 TELORVEK III WIRING INSTRUCTIONS FOR NS-93A 4.6 NORTHSTAR Fuel Injection System Thank you for purchasing the absolute finest of wiring kits for the General Motors fuel injection. We have taken
Track Rocker Installation Instructions
 Track Rocker Installation Instructions Customizable Track Rocker Control System For Installing Painless Part Number: 58100 Track Rocker Relay Center Manual #90641 Painless Performance Products recommends
Installation Instructions For #64320 Striker Turbo Timer Module
 2501 Ludelle Street Fort Worth, Texas 76105 817-244-6212 Phone 817-244-4024 Fax 888-350-6588 Sales 800-423-9696 Tech E-mail: painless@painlessperformance.com Web: www.painlessperformance.com Installation
TELORVEK III. WIRING INSTRUCTIONS FOR LT-40 LT-1 Fuel Injection System
 TELORVEK III WIRING INSTRUCTIONS FOR LT-40 LT-1 Fuel Injection System Page #1 Thank you for purchasing the absolute finest of wiring kits for the General Motors fuel injection. We have taken considerable
Wire Harness Installation Instructions
 Wire Harness Installation Instructions For Installing: Part #60510 & 60511 Ford 5.0L 1986-93 Wiring Harness Manual #90518 Painless Performance Products, LLC 2501 Ludelle Street Fort Worth, TX 76105-1036
Installation Instructions. Manual # For Installing: Part # Painless Gauge Controller
 Installation Instructions Manual #90579 For Installing: Part #60650- Painless Gauge Controller Perfect Performance Products, LLC Painless Performance Products Division 2501 Ludelle Street Fort Worth, TX
90558 Installation Manual For # Cummins 5.9L Common Rail Diesel
 2501 Ludelle Street Fort Worth, Texas 76105 817-244-6212 Phone 817-244-4024 Fax 888-350-6588 Sales 800-423-9696 Tech E-mail: painless@painlessperformance.com Web: www.painlessperformance.com 90558 Installation
TELORVEK EFI 4.6 Sequential Fuel Injection System MK-97A
 Page #1 TELORVEK EFI 4.6 Sequential Fuel Injection System MK-97A WIRING INSTRUCTIONS Thank you for purchasing the absolute finest of wiring kits for the Ford Motor Co. 4.6. This harness works with 1999
Wire Harness Installation Instructions
 Wire Harness Installation Instructions For Installing: #10112 Classic Customizable Chevy P/U Harness 19 Circuit Manual #90519 Perfect Performance Products, LLC Painless Performance Products Division 2501
Installation Tips for your Crimestopper/ProStart Remote Start system (for GM vehicles) v1.01 updated 2/27/2012
 v1.01 updated 2/27/2012") Installation Tips for your Crimestopper/ProStart Remote Start system (for GM vehicles) v1.01 updated 2/27/2012 Thank you for purchasing your remote start from MyPushcart.com - an industry leader in providing
Installation Tips for your Crimestopper/ProStart Remote Start system (for GM vehicles) v1.01 updated 2/27/2012 Thank you for purchasing your remote start from MyPushcart.com - an industry leader in providing
Installation Tips for your Remote Start/Keyless Entry (for Ford Vehicles) v3.3 Updated 1/13/2013
 v3.3 Updated 1/13/2013") Installation Tips for your Remote Start/Keyless Entry (for Ford Vehicles) v3.3 Updated 1/13/2013 Thank you for purchasing your remote start from MyPushcart.com - an industry leader in providing remote
Installation Tips for your Remote Start/Keyless Entry (for Ford Vehicles) v3.3 Updated 1/13/2013 Thank you for purchasing your remote start from MyPushcart.com - an industry leader in providing remote
INSTALLATION INSTRUCTIONS
 INSTALLATION INSTRUCTIONS 2009 CORVETTE LS - 9 INSTALLATION INSTRUCTIONS FOR LS 9 The following instructions are intended as an aid to assist in harness installation. More in depth information can be obtained
Ford Mustang V6 OEM-Style Fog Light Kit Parts List: Quantity: Tool List:
 2015-2017 Ford Mustang V6 OEM-Style Fog Light Kit Parts List: Quantity: Tool List: LED Foglights/ Bezels 2 Flat head & Phillips screwdriver (if you ordered part#3600) Ratchet & Socket set OR Wiring harness
Installation Instructions For #64160 Striker II Power Module GMC/Chevrolet Duramax LB7 Diesel Copyright
 Installation Instructions For #64160 Striker II Power Module 2001-2004 GMC/Chevrolet Duramax LB7 Diesel 2 nd Edition August 2007 Copyright 2006 by Perfect Performance Products, LLC 2501 Ludelle Street
TELORVEK EFI. 4.6 Sequential Fuel Injection System (FT-95) WIRING INSTRUCTIONS
 WIRING INSTRUCTIONS") Page #1 TELORVEK EFI 4.6 Sequential Fuel Injection System (FT-95) WIRING INSTRUCTIONS Thank you for purchasing the absolute finest of wiring kits for the Ford Motor Co. 4.6 94-95 Thunderbird, Cougar fuel
Page #1 TELORVEK EFI 4.6 Sequential Fuel Injection System (FT-95) WIRING INSTRUCTIONS Thank you for purchasing the absolute finest of wiring kits for the Ford Motor Co. 4.6 94-95 Thunderbird, Cougar fuel
Small knife. Remove black panel shown. Save 6 retaining pins for re-install later.
 2005-2009 Ford Mustang V6 Fog Light Wiring Kit Parts List: Quantity: Tools Required: Wiring harness 1 Flat head screwdriver PB-3425 Parts Bag 1 Ratchet & Socket set OR Ford OEM Switch (if you 1 Adjustable
Designed for the Street Proven on the Track
 TDR Fuel and Timing Card Wiring Thank you for using our TDR Fuel and or Timing Cards (F/T). There are two options on how to wire the F/T cards. Our preferred method is to use our TDR Patch Harness as shown
Remove the 3-11mm nuts holding mirror on. Don t drop the nuts!
 2005-2012 Ford Mustang Puddle Lamp Kit Parts List: Quantity: Tool List: LED Lamps 2 Flat head screwdriver Seals 2 Ratchet & Socket set OR Nuts 2 Adjustable Wrench Wiring harness 1 Drill & 11/16 th bit
Step 1 Wiring your remote start. Installation Tips for your Remote Start system (for GM vehicles) V3.3 revised 9/12/2013
 V3.3 revised 9/12/2013") Installation Tips for your Remote Start system (for GM vehicles) V3.3 revised 9/12/2013 Thank you for purchasing your remote start from MyPushcart.com - an industry leader in providing remote starts to
Installation Tips for your Remote Start system (for GM vehicles) V3.3 revised 9/12/2013 Thank you for purchasing your remote start from MyPushcart.com - an industry leader in providing remote starts to
Installation Tips for your GMDLBP + Excalibur Remote Start system (for GM vehicles) v1.01 updated 10/09/13
 v1.01 updated 10/09/13") Installation Tips for your GMDLBP + Excalibur Remote Start system (for GM vehicles) v1.01 updated 10/09/13 Thank you for purchasing your remote start from MyPushcart.com - an industry leader in providing
Installation Tips for your GMDLBP + Excalibur Remote Start system (for GM vehicles) v1.01 updated 10/09/13 Thank you for purchasing your remote start from MyPushcart.com - an industry leader in providing
TELORVEK TPI WIRING INSTRUCTIONS FOR TH-100 (96-99 Vortech) 4.3,5.0,5.7,7.4 Fuel Injection System W/4L60-E or 4L80-E Transmission
 4.3,5.0,5.7,7.4 Fuel Injection System W/4L60-E or 4L80-E Transmission") Page #1 TELORVEK TPI WIRING INSTRUCTIONS FOR TH-100 (96-99 Vortech) 4.3,5.0,5.7,7.4 Fuel Injection System W/4L60-E or 4L80-E Transmission Thank you for purchasing the absolute finest of wiring kits for
Page #1 TELORVEK TPI WIRING INSTRUCTIONS FOR TH-100 (96-99 Vortech) 4.3,5.0,5.7,7.4 Fuel Injection System W/4L60-E or 4L80-E Transmission Thank you for purchasing the absolute finest of wiring kits for
TIP SHEET T0937. Installation Tips For RS00/PS00 + ADS-TBSL-PL + SPDT
 Installation Tips For RS00/PS00 + ADS-TBSL-PL + SPDT TIP SHEET T0937 Thank you for purchasing your remote start from MyPushcart.com - an industry leader in providing remote starts to do-it-yourself installers
Trail Rocker Installation Instructions
 Trail Rocker Installation Instructions Trail Rocker - Genesis Bracket For Installing Painless Part Number: 57200 Manual # 90591 To be used with Painless Kit # s: 57000-57005 Painless Performance Products
Installation Tips for RS1 + EVO-RIDE + SPDT. *(reglar key, automatic transmission vehicles ONLY)*
*") Installation Tips for RS1 + EVO-RIDE + SPDT TIP SHEET T1235 *(reglar key, automatic transmission vehicles ONLY)* Thank you for purchasing your remote start from MyPushcart.com - an industry leader in providing
Installation Tips for RS1 + EVO-RIDE + SPDT TIP SHEET T1235 *(reglar key, automatic transmission vehicles ONLY)* Thank you for purchasing your remote start from MyPushcart.com - an industry leader in providing
Installation Tips for your Remote Start/Keyless Entry (for Mazda Vehicles) v3.1 Updated 9/22/2012
 v3.1 Updated 9/22/2012") Installation Tips for your Remote Start/Keyless Entry (for Mazda Vehicles) v3.1 Updated 9/22/2012 Thank you for purchasing your remote start from MyPushcart.com - an industry leader in providing remote
Installation Tips for your Remote Start/Keyless Entry (for Mazda Vehicles) v3.1 Updated 9/22/2012 Thank you for purchasing your remote start from MyPushcart.com - an industry leader in providing remote
TELORVEK EFI a l Fue l In. n MK-93A
 Page #1 TELORVEK EFI 4.6Se q uen i t a l Fue l In j e cti o n S ystem MK-93A WIRING INSTRUCTIONS Thank you for purchasing the absolute finest of wiring kits for the Ford Motor Co. 4.6 MARK VIII fuel injection
Installation Tips Crimestopper/ProStart Remote Start system + PLJX + DLRM + SPDT (for GM vehicles) T0760 v1.1 updated 2/5/14
 T0760 v1.1 updated 2/5/14") Installation Tips Crimestopper/ProStart Remote Start system + PLJX + DLRM + SPDT (for GM vehicles) T0760 v1.1 updated 2/5/14 Thank you for purchasing your remote start from MyPushcart.com - an industry
Installation Tips Crimestopper/ProStart Remote Start system + PLJX + DLRM + SPDT (for GM vehicles) T0760 v1.1 updated 2/5/14 Thank you for purchasing your remote start from MyPushcart.com - an industry
jegs.com
 Contents Wiring Harness w/ Fuse Panel Installation Instructions Turn Signal Plug w/ Terminals 2 Headlight Plugs 3/4 Grommet 10 ¼ Terminals 4 Ring Terminals 10 Wire Ties Fusible Link 2 Screws & Nuts 2 Plastic
Wire Harness Installation Instructions For Installing:
 Wire Harness Installation Instructions For Installing: #20106 Classic Plus Customizable Tri-Five Chevy Harness 28 Circuit #20107 Classic Customizable Tri-Five Chevy Harness 21 Circuit Manual #90553 Painless
TIP SHEET T0491. Installation Tips for your Excalibur RS Passlock-sl2(4) + DLRC + SPDT
 + DLRC + SPDT") TIP SHEET T0491 Installation Tips for your Excalibur RS-360 + Passlock-sl2(4) + DLRC + SPDT For Chevrolet: Astro 1998-2005, Avalanche 2002, Blazer 1998-2005, Cavalier 2000-2003, Express Van 1998-2005,
TIP SHEET T0491 Installation Tips for your Excalibur RS-360 + Passlock-sl2(4) + DLRC + SPDT For Chevrolet: Astro 1998-2005, Avalanche 2002, Blazer 1998-2005, Cavalier 2000-2003, Express Van 1998-2005,
ECT SENSOR 2 2P CONNECTOR. Clamp the main wire harness and the ECT sensor 3 wire as shown.
 CABLE/ ROUTING VIEWED FROM THE UPPER RIGHT REAR SIDE: Clamp the main wire harness and the ECT sensor 3 wire as shown. After securing the cables and harnesses with the harness band clips, cut the end of
Installation Tips for your Crimestopper/ProStart Remote Start system (add-on for GM vehicles) v1.02 updated 1/16/2013
 v1.02 updated 1/16/2013") Installation Tips for your Crimestopper/ProStart Remote Start system (add-on for GM vehicles) v1.02 updated 1/16/2013 Thank you for purchasing your remote start from MyPushcart.com - an industry leader
Installation Tips for your Crimestopper/ProStart Remote Start system (add-on for GM vehicles) v1.02 updated 1/16/2013 Thank you for purchasing your remote start from MyPushcart.com - an industry leader
Installation Tips for your Remote Start w/ Keyless Entry (Toyota Vehicles) v3.2 Updated 3/14/13
 v3.2 Updated 3/14/13") Installation Tips for your Remote Start w/ Keyless Entry (Toyota Vehicles) v3.2 Updated 3/14/13 Thank you for purchasing your remote start from MyPushcart.com an industry leader in providing remote starts
Installation Tips for your Remote Start w/ Keyless Entry (Toyota Vehicles) v3.2 Updated 3/14/13 Thank you for purchasing your remote start from MyPushcart.com an industry leader in providing remote starts
Installation Tips for your Excalibur Remote Start (for Honda and Acura Vehicles) rev 11/28/2012
 rev 11/28/2012") Installation Tips for your Excalibur Remote Start (for Honda and Acura Vehicles) rev 11/28/2012 Thank you for purchasing your remote start from MyPushcart.com - an industry leader in providing remote starts
Installation Tips for your Excalibur Remote Start (for Honda and Acura Vehicles) rev 11/28/2012 Thank you for purchasing your remote start from MyPushcart.com - an industry leader in providing remote starts
WIRE HARNESS INSTALLATION INSTRUCTIONS
 WIRE HARNESS INSTALLATION INSTRUCTIONS For Installing: #10205 Classic Plus Customizable GM Pickup Chassis Harness 1973-87 27 Circuit Manual #90507 Painless Performance Products, LLC 2501 Ludelle Street
UNIVERSAL GAUGE WIRE HARNESS
 2650-1797-00 UNIVERSAL GAUGE WIRE HARNESS For Installing Auto Meter Electric Speedometer, Tachometer, And Short Sweep Electric Oil Pressure, Water Temperature, Fuel Level, and Volt Meter Gauges. This harness
RS4-7/PS4-7 + (2) + SPDT T3015, T3053
 + SPDT T3015, T3053") TIP SHEET Installation Tips for your RS4-7/PS4-7 + Honda-SL3 (2) + SPDT T3015, T3053 v1.3 4/25/14 Honda: ( 98-02 Accord), ( 98-01 CRV), ( 98-04 Odyssey), ( 03-04 Pilot) Acura: ( 98-99 EL), ( 98-03 CL),
TIP SHEET Installation Tips for your RS4-7/PS4-7 + Honda-SL3 (2) + SPDT T3015, T3053 v1.3 4/25/14 Honda: ( 98-02 Accord), ( 98-01 CRV), ( 98-04 Odyssey), ( 03-04 Pilot) Acura: ( 98-99 EL), ( 98-03 CL),
Installation Instructions For #64060 Striker I Power Module GMC/Chevrolet Duramax LB7 Diesel
 2501 Ludelle Street Fort Worth, Texas 76105 817-244-6212 Phone 817-244-4024 Fax 888-350-6588 Sales 800-423-9696 Tech E-mail: painless@painlessperformance.com Web: www.painlessperformance.com Installation
This is the layout of a typical harness form a TPI Camaro.
 TPI wiring harness, typical 1986-89: This is the layout of a typical harness form a 1986-88 TPI Camaro. (A) bulkhead conn. through firewall. (B) ecm conn. (C) jct. conn for fuel injectors and cooling fan.
Wire Harness Installation Instructions
 Wire Harness Installation Instructions FOR INSTALLING: PART #10108 20 CIRCUIT BRONCO HARNESS Manual #90521 Painless Performance Products Division Perfect Performance Products, LLC 2501 Ludelle Street,
Installation Tips for your Remote Start system (for RS4LX>GMBP for GM vehicles)
") Installation Tips for your Remote Start system (for RS4LX>GMBP for GM vehicles) Thank you for purchasing your remote start from MyPushcart.com - an industry leader in providing remote starts to doit-yourself
Installation Tips for your Remote Start system (for RS4LX>GMBP for GM vehicles) Thank you for purchasing your remote start from MyPushcart.com - an industry leader in providing remote starts to doit-yourself
2002 ENGINE PERFORMANCE. Self-Diagnostics - RAV4. Before performing testing procedures, check for any related Technical Service Bulletins (TSBs).
.") 2002 ENGINE PERFORMANCE Self-Diagnostics - RAV4 INTRODUCTION NOTE: Before performing testing procedures, check for any related Technical Service Bulletins (TSBs). To properly diagnosis and repair this
2002 ENGINE PERFORMANCE Self-Diagnostics - RAV4 INTRODUCTION NOTE: Before performing testing procedures, check for any related Technical Service Bulletins (TSBs). To properly diagnosis and repair this
RS4/RS7 + + SPDT T0776,T0731
 TIP SHEET Installation Tips for your RS4/RS7 + Honda-SL3 (1.a) + SPDT T0776,T0731 Honda: ( 03-07 Accord),( 01-05 Civic),( 02-06 CRV),( 03-10 Element),( 05-10 Odyssey) Acura: ( 01-03 EL),( 02-06 RSX),(
Installation Instructions For 50340
 Installation Instructions For 50340 2501 Ludelle Street Fort Worth, Texas 76105 817-244-6212 Phone 817-244-4024 Fax 888-350-6588 Sales 800-423-9696 Tech E-mail: painless@painlessperformance.com Web: www.painlessperformance.com
30140 F5 Dual Fan Controller
 30140 F5 Dual Fan Controller 1 2501 Ludelle Street Fort Worth, Texas 76105 817-244-6212 Phone 817-244-4024 Fax 888-350-6588 Sales 800-423-9696 Tech E-mail: painless@painlessperformance.com Web: www.painlessperformance.com
Installation Instructions For #64066 Striker I Power Module Ford Powerstroke 6.0L Diesel Copyright
 Installation Instructions For #64066 Striker I Power Module 2003-2006 Ford Powerstroke 6.0L Diesel 2 nd Edition August 2007 Copyright 2006 by Perfect Performance Products, LLC 2501 Ludelle Street Fort
LB-47 TELORVEK TPI. WIRING INSTRUCTIONS FOR Olds / Aurora 4.0 V-8 ENGINE
 Page #1 LB-47 TELORVEK TPI WIRING INSTRUCTIONS FOR Olds / Aurora 4.0 V-8 ENGINE Thank you for purchasing the absolute finest of wiring kits for the General Motors fuel injection. We have taken considerable
Installation Tips For Crimestopper RS7 + Passlock-sl2(4) + DLRM + SPDT
 + DLRM + SPDT") TIP SHEET T3628 Installation Tips For Crimestopper RS7 + Passlock-sl2(4) + DLRM + SPDT For Chevrolet: Astro 1998-2005, Avalanche 2002, Blazer 1998-2005, Cavalier 2000-2003, Express Van 1998-2005, S10 Pickup
TIP SHEET T3628 Installation Tips For Crimestopper RS7 + Passlock-sl2(4) + DLRM + SPDT For Chevrolet: Astro 1998-2005, Avalanche 2002, Blazer 1998-2005, Cavalier 2000-2003, Express Van 1998-2005, S10 Pickup
Depress each tab as you pull the bezel off. The bezels are tight. L.H. shown.
 2013-2014 Ford Mustang V6 & Boss 302 Lower Valance Fog Light Kit Parts List: Quantity: Tool List: Fog light & bulb with bracket 2 Flat head & Phillips screwdriver Black bezels 2 Ratchet & Socket set OR
*(reglar key vehicles ONLY)* Read the entire installation manual. There are several safety tips in there to know before you start
* Read the entire installation manual. There are several safety tips in there to know before you start") Installation Tips for RS4 + EVO-RIDE + SPDT TIP SHEET T2519 2009-2011 Ford Crown Victoria 2009-2012 Ford E-150 2009 Ford E-150 Econoline Club Wagon 2008-2010 Ford E-250 2010 Ford E-250 Econoline 2010 Ford
Installation Tips for RS4 + EVO-RIDE + SPDT TIP SHEET T2519 2009-2011 Ford Crown Victoria 2009-2012 Ford E-150 2009 Ford E-150 Econoline Club Wagon 2008-2010 Ford E-250 2010 Ford E-250 Econoline 2010 Ford
Installation Tips for your RS-1 + Honda-SL3 (1.b) Remote starter Honda: ( FIT), ( Pilot), ( Ridgeline) Acura: ( MDX)
 Remote starter Honda: ( FIT), ( Pilot), ( Ridgeline) Acura: ( MDX)") Installation Tips for your RS-1 + Honda-SL3 (1.b) Remote starter Honda: ( 06-08 FIT), ( 05-08 Pilot), ( 06-13 Ridgeline) Acura: ( 03-06 MDX) TIP SHEET T0777 Thank you for purchasing your remote start from
Installation Tips for your RS-1 + Honda-SL3 (1.b) Remote starter Honda: ( 06-08 FIT), ( 05-08 Pilot), ( 06-13 Ridgeline) Acura: ( 03-06 MDX) TIP SHEET T0777 Thank you for purchasing your remote start from
Wire Harness Installation Instructions
 Wire Harness Installation Instructions For Installing: Part #20120 14 Circuit Ford Mustang (1965-1966) Manual #90526 Perfect Performance Products, LLC Painless Performance Products Division 2501 Ludelle
Ford Mustang GT-Style Fog Light Kit Parts List: Quantity: Tool List:
 2013-2014 Ford Mustang GT-Style Fog Light Kit Parts List: Quantity: Tool List: Fog light (Left& Right) 2 Flat head & Phillips screwdriver Upper grille with surround 1 Ratchet & Socket set OR Lower grille