Cubicle Installation Manual. Complete Cubicle Instructions
|
|
|
- Cecilia Byrd
- 6 years ago
- Views:
Transcription
1 Cubicle Installation Manual Complete Cubicle Instructions

2 General Information Product Assembly 22 SPECIAL NOTES: TIP NOTE:

3 GENERAL TOOLS FOR INSTALL The following tools are necessary for field assembly and installation In addition, the following tools will help speed up installations: STAGING In an effort to make your project run more smoothly, the following is recommended:

4 Panels/Connectors Definitions NOTE:


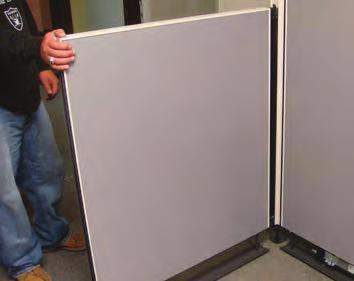
5 Panels/Connectors / STEP 1: Panels & Connectors TOOLS REQUIRED: INSTALLATION: 1a 2a 1. 1b 2b 2. 1c 2c NOTE: 3. 3a 3b 3c


6 4a 4b 4. 4c 4d 5. 5a TIP: 6.


.")


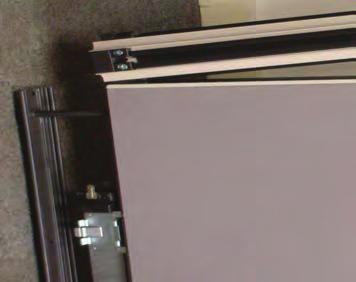
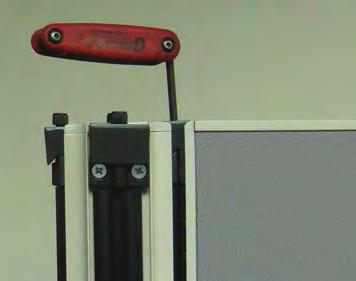
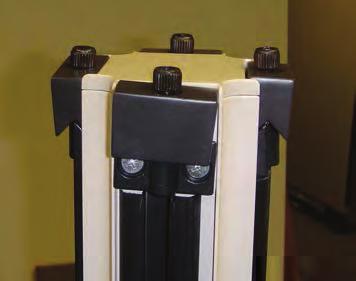
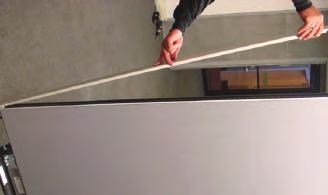
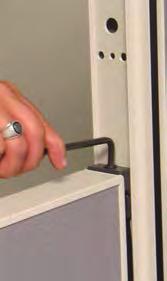
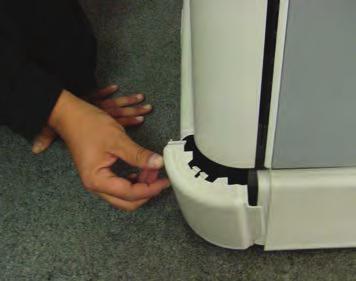
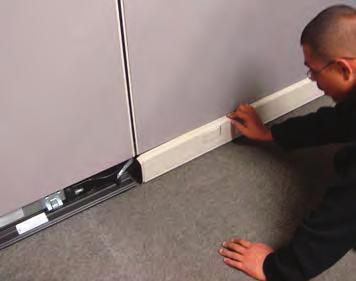
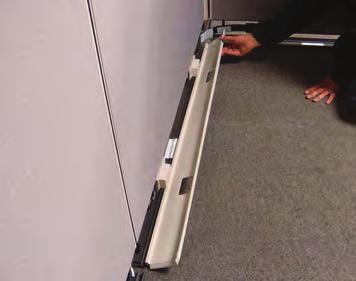
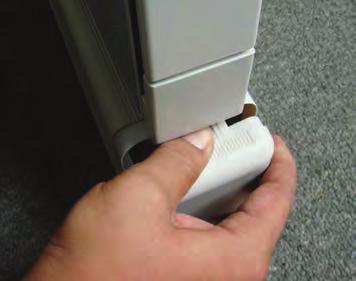
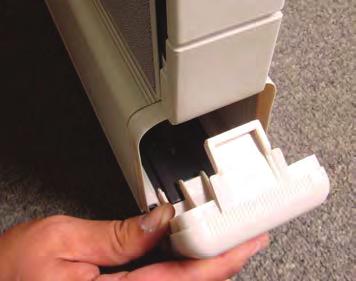
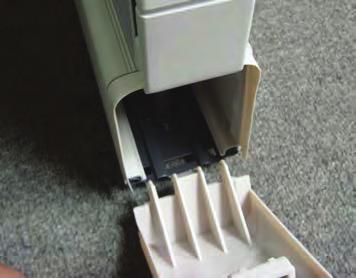
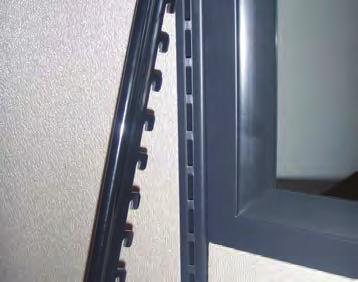
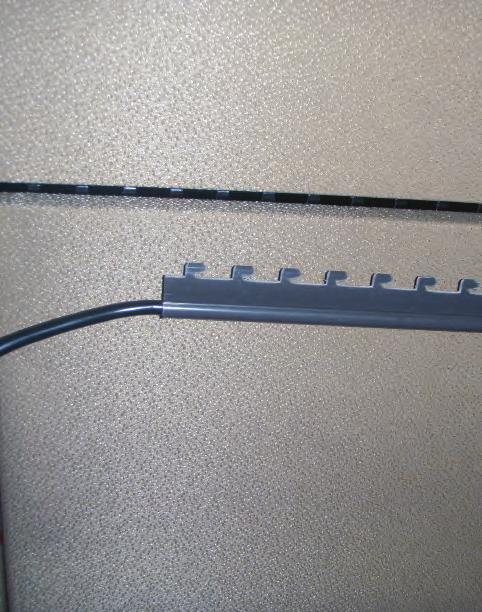
7 Cut and attach the filler strip as neede Be careful when installing the wall start you must use appropriate anchors for attaching this product to the wall. These anchors will vary depending on the field conditions. Be careful not to damage corner beads for drywall; it is strongly suggested you space off the edge of a drywall corner 2, to prevent damage. 7 7b 7c 7. When installing a variable height connection, you must remove the trim on the side of the connector you are going to attach at a variable height (always use the connector for the tallest panel you are attaching to.) To remove the filler strip, squeeze it at one end and pull toward you. Once the strip is removed, you need to unbolt the top wedge block assembly on the side you are lowering. Use a #3 phillips head screwdriver to do this. Once the block is removed, remove the connector top cap by pressing gently on the location pin to release it. Using the back of the filler strip, push the threaded plate on to the sticky tape (align to fit in connector). Using the filler strip as your guide, insert the threaded plate into the connector to the desired height connection. Reinstall the connector top wedge block using the existing screws and parts. When the wedge block is securely tightened in place, gently pull the filler strip to release it. Using a carton knife or a cutting tool, cut the filler strip to the appropriate length and reinstall the filler strip on the connector. See the next page for further installation instructions on this procedure. Remove the black filler strip from the side of the connector (the side you want to lower). 7d Remove the top wedge block assembly. Remove the connector top cap. Placed threaded connector plate on the back side of the filler strip to use as an alignment guide for installation. e. Using the filler strip as your guide, place the threaded plate onto the connector at the correct location. 7e 7f f. At the appropriate location, reinstall the connector wedge block to create your variable height condition. PAGE 7


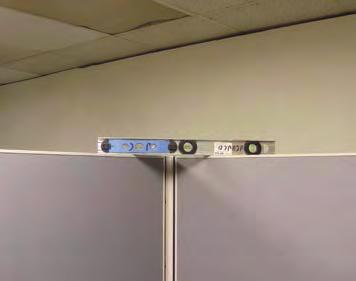
8 8. 8a 8b 8c 9. NOTE: 9a Panel Leveling 9c
9 Electrical Definitions NOTE:


10 Electrical / STEP 1: Festoon Installation CORRECT: 1a WRONG: DO NOT INSTALL LIKE THESE. 1c NOTE: 1.


11 Electrical / STEP 2: Receptacle Installation CE 2. 2a 2b
12 Electrical / STEP 3: Ceiling Feed 3. NOTE: CEILING POWER ENTRY INSTALLATION C. NOTE: e.
13 Electrical / STEP 4: Wiring Diagram Ceiling & Base System is rated for connection to a 3 phase system. System is rated for connection to a ground 120/240V, Rating 120/208V, 3-PH WYE, 60-hz, 20 amp (CSA 15 amp) 1-PH 60-hz, 20 amp multi-wire branch circuit multi-wire branch circuit L 4 L 3 L 2 L 1 PINK BLUE WHITE #2 GREEN/YELLOW GREEN WHITE #1 RED BLACK PINK BLUE WHITE #2 GREEN/YELLOW GREEN WHITE #1 RED BLACK L1 L2 N1G1 L3 L4 N1G1 N1 G1 N2 L1 L3 N1G1 L2 L4 G2* N1G1 N2 G2* N2 G2* Circuit I II III IIII V Circuit I III II IIII L 4 L 3 L 2 L 1 *Separate isolated ground *Separate isolated ground Risk of fire or electric shock. This office furnishings system may be connected to more than one source of supply. All sources must be disconnected prior to any servicing. No single circuit may be powered by more than one source. V V 4.4
14 Electrical / STEP 4: 8-Wire Electrical, Base Feed Installation 4. NOTE: NOTE:


15 Electrical / STEP 5: Base Power Entry 5. NOTE: TIP:
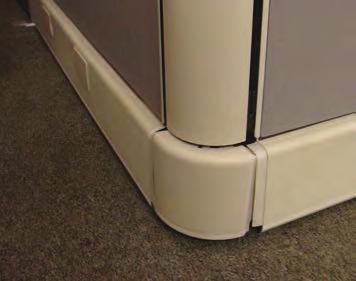

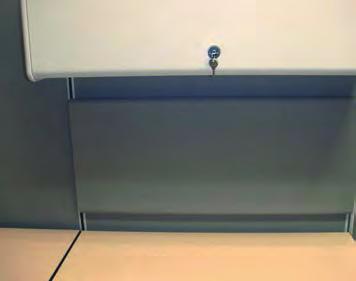
16 Electrical / STEP 6: Connector Trim Installation 6.
17 Electrical / STEP 7: Base Cover Installation Non-Powered 7. TIP:

18 Electrical / STEP 8: Base and Trim Cover Installation 8.
19 Electrical / STEP 9: Finished End Trim Cover 9.

20 Storage/Shelves/Flipper Doors / STEP 1: Open Shelves 1. TIP:


21 Storage/Shelves/Flipper Doors / STEP 2: Shelf Pan Installation 2. TIP:


22 Storage/Shelves/Flipper Doors / STEP 3: Flipper Door Installation 3. TIP: TIP:

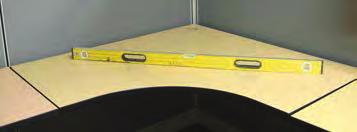
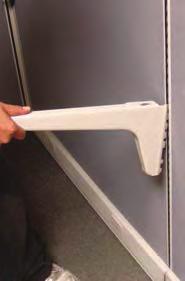

23 Worksurfaces / STEP 1: Corner Worksurfaces and Extended Corner Worksurfaces and 120 and 135Worksurface Installation NOTE: 1a 1b e. 1c 1e f. 1g g. 1i h. i. j. k.


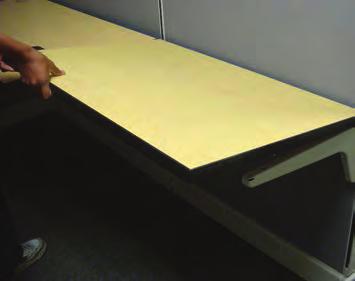


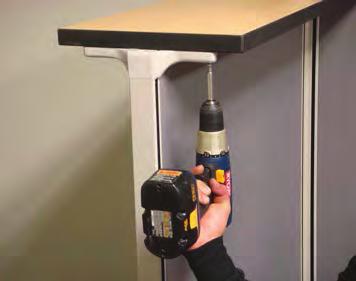
24 Worksurfaces / STEP 2: Rectangular Worksurface Installation 2a 2b e.


25 Worksurfaces / STEP 3: Transaction Surface Installation 3. e.
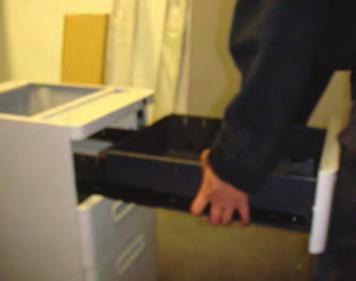
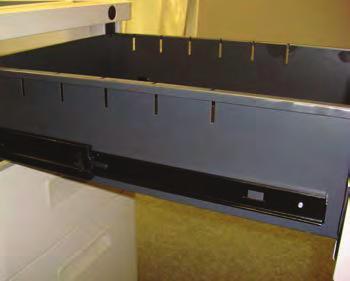

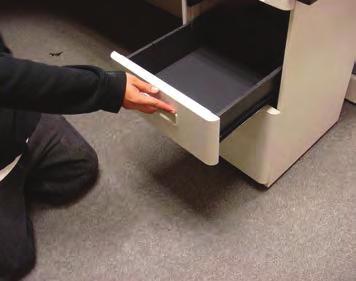
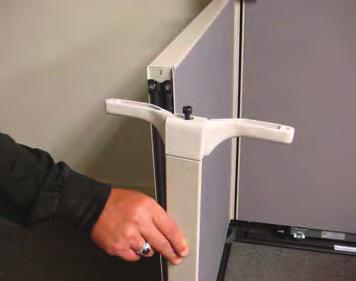
26 Pedestals/File Cabinets / STEP 1: Pedestals & Supporting Lateral Files 1. TIP:
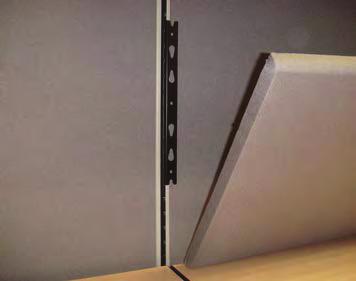

27 Accessories / STEP 1: Tack boards & Markerboards 1.
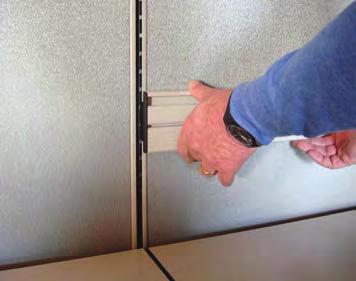
28 Accessories / STEP 2: Tool Bars 2.
29 Accessories / STEP 3: Work Tools 3.

30 Accessories / STEP 4: Cord Managers 4.


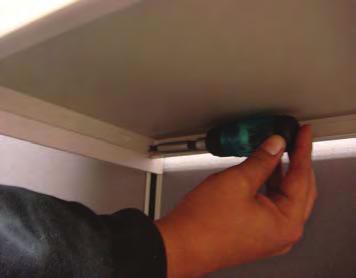
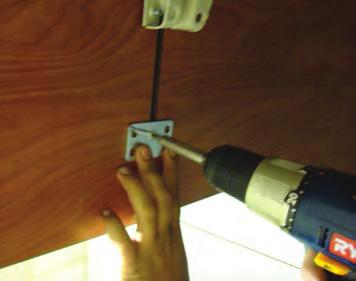
31 Accessories / STEP 5: Tasklights 5. This following step is only for attaching to wood overheads. Skip this step if attaching to a metal overhea
32
Cetra. Ceiling Power Entry Installation (AEC1, AEC14, or AEC16)
") Figure A Power Pole Top Cap Trim Plate L Bracket (Long leg attached to top of panel) Ceiling Installation (AEC, AEC, or AEC) Recommended Tools Variable Speed Drill with Torque Option Pop Rivets Riveting
Figure A Power Pole Top Cap Trim Plate L Bracket (Long leg attached to top of panel) Ceiling Installation (AEC, AEC, or AEC) Recommended Tools Variable Speed Drill with Torque Option Pop Rivets Riveting
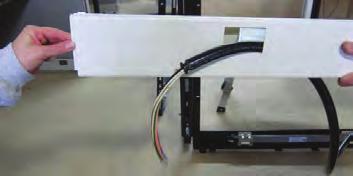
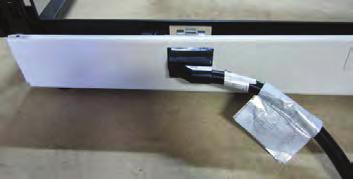
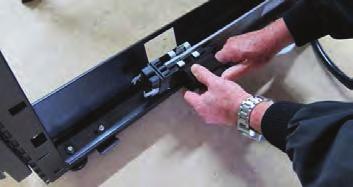
OFFICE PARTITIONS. Data Port Openings. Use cable tie bracket to dress data cables under panels. STEP 1
 N Power Box Opening Data Port Openings Rear View Front View Remove opening blanks on raceway cover for power and data. If panel contains no electric or data and is used as a pass-thru, leave opening blanks
Power In - Pathways Technology Wall
 Power In - Pathways Technology Wall NOTE: With an off module application involving the transition of cabling or electrical harnesses, you will have to drill a maximum of a 2-1/2" hole in the beltway trim
Cetra Assembly Instructions
 99877 Revision F- Complete Series Master Packet If you have any questions concerning these instructions, please call Kimball Office Customer Service. 0 Kimball International, Inc. T 800.8.88 F 8.8.800
Alpha System ADAPTABLE KEWAUNEE LABORATORY FURNITURE. encouraging new discovery
 Alpha System ADAPTABLE LABORATORY FURNITURE KEWAUNEE encouraging new discovery Alpha 6 partition modules with Kemresin worktops. Minneapolis, Minnesota Alpha 6 partition modules with Alpha overhead service
Initiate WARNING. Illustration 1. Panel Connection Guidelines:
 Failure to install product as instructed, use of hardware other than that which is provided with the product, or failure to comply with all instructions can result in product failure and/or personal injury
Sapphire Cubicle System. Spec Sheet. Sapphire 52 H & 65 H. skutchi.com cubicles.cc. Vol DESIGNS. inc.
 Sapphire Cubicle System Spec Sheet 2019 Sapphire 52 H & 65 H skutchi.com cubicles.cc Vol. 1 2019 DESIGNS The gorgeous, modern Sapphire System enables you to create endless solutions. Fabricate private
Exam Room Group (shown) 8010 (reversed) W: 43", 46", 49" H : Wall: 30", Desk: 30" D : Wall: 14.25", Desk: 24.25" Cabinet group consists of:
 8010 (reversed) W: 43, 46, 49 H : Wall: 30, Desk: 30 D : Wall: 14.25, Desk: 24.25 Cabinet group consists of:") Exam Room Group Exam Room Group 8008 W: 29" - 50" (3" increments) H : Wall: 8", Desk: 30" D : Wall: 13.25", Desk: 24.25" #3020 wall mounted book shelf (27" - 48" W) #1500-4.5" knee space drawer (27" -
Exam Room Group Exam Room Group 8008 W: 29" - 50" (3" increments) H : Wall: 8", Desk: 30" D : Wall: 13.25", Desk: 24.25" #3020 wall mounted book shelf (27" - 48" W) #1500-4.5" knee space drawer (27" -
Anthro Mobile Device Charging Carts and Cabinets Owners Manual
 Anthro Mobile Device Charging Carts and Cabinets Owners Manual TECHNOLOGY FURNITURE Hello! Thank you for choosing Anthro. Anthro's Tablet Charging Carts and Cabinets are designed to automatically charge
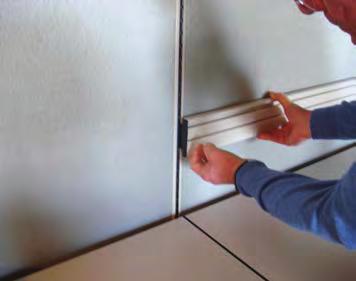
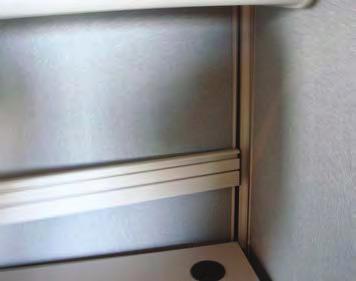
Sapphire Cubicle System
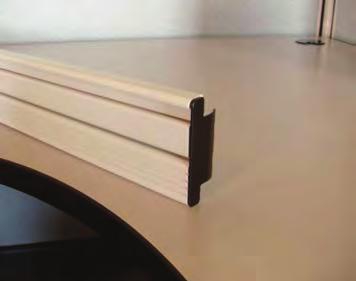
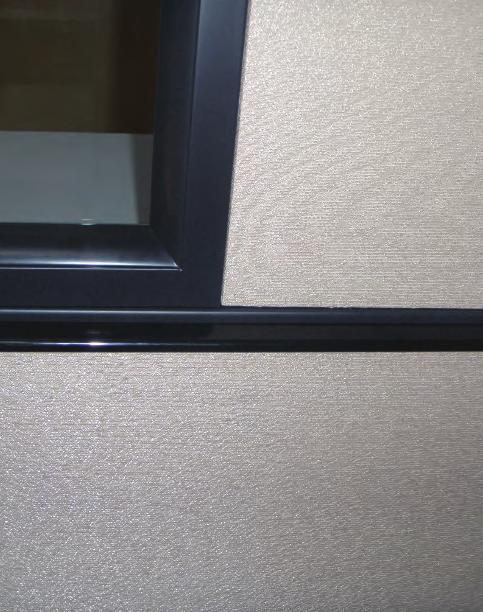
 Accessory Rail with Penil Cup and Paper Tray The Sapphire System is a tile system that enables you to create a private office, conference room, room divider or a functional multi-person office environment.
CONTENTS. This Product is Certified by CANADIAN STANDARDS ASSOCIATION and Bears the Mark:
 This Product is Listed by UNDERWRITERS LABORATORIES INC. and Bears the Mark: This Product is Certified by CANADIAN STANDARDS ASSOCIATION and Bears the Mark: SLATER SCD Installation Instructions For Self-Contained
Continuous Cord Loop Designer Series Roller Shades
 Shade Maintenance Leveling a Crooked Shade 1. Pull down shade until roller is exposed. Do not pull further to avoid pulling cloth off roller. 2. Stick a 5" strip of masking tape into the roller at opposite
Viking Installation Guide
 Viking Installation Guide Professional Series Built-In Chimney-Style Hoods Viking Range Corporation 111 Front Street Greenwood, MIssissippi 38930 USA NOTE: IF INSTALLING HOOD WITH WARMING SHELF PANEL,
Installation Instructions
 Installation Instructions Over The Range Microwave Oven BEFORE YOU BEGIN (Read these instructions completely and carefully.) IMPORTANT IMPORTANT Save these instructions for local inspector s use. Observe
price list building forever furniture
 price list building forever furniture Table of Contents i General Product & Order Information ii General Product & Order Information iii General Product & Order Information iv VISTA Modular Furniture VISTA
Installation Instructions
 Installation Instructions Speedcook Oven Read carefully. Keep these Instructions. INSTALLATION INSTRUCTIONS Electrical Requirements Product rating is 240/208 volts AC, 60 Hertz, 30 amps and 6.5 kilowatts.
MONOGRAM 36" BUILT-IN BOTTOM-FREEZER REFRIGERATOR
 OVERALL DIMENSIONS 25 3/4" (65.4) 36" (91.5) 23 7/8" (60.7) 9 3/4" (24.8) 2 3/4" (7.0) *73 1/4" (186.1) 30 1/2" (77.5) *84" (213.4) *8 (212.1) SPECIFICATIONS Overall Width Overall Height Overall Depth
Pricing Not Reflective of April 6, 2018 Increase. Epic Typical: NOFEPI
 Epic Typical: NOFEPI1241 11N144EXFP2 Wall Rail and Faceplate 1 $ 354 11N1836TB Tack Board Insert, Grade A 1 $ 217 11N3036TB Tack Board Insert, Grade A 3 $ 792 11N39ETP Full End Trim 2 $ 144 25N1825MPL
MONOGRAM 36" BUILT-IN BOTTOM-FREEZER REFRIGERATOR
 OVERALL DIMENSIONS 36" (91.5) 25 3/4" (65.4) 23 7/8" (60.7) 9 3/4" (24.8) 2 3/4" (7.0) *84" (213.4) 30 1/2" (77.5) *73 1/4" (186.1) *8 (212.1) *34 3/4" (88.3) SPECIFICATIONS *26" (66.0) *23" (58.4) Overall
All top surfaces are high pressure laminate with veneer banded edges specifically chosen and color matched for this grouping.
 7350 LAMINATE GSA Traditional integrity is inherent in the attention to detail with our Governors series, and with an expansive line offering in an Engraved Executive Mahogany finish, Governors provides
Installation Instructions Studio Makeup Station
 Installation Instructions Studio Makeup Station 30" and 36" Models 5-light 30" Studio Makeup Station 8-light 30" Studio Makeup Station 6-light 36" Studio Makeup Station 9-light 36" Studio Makeup Station
MONOGRAM 36" BUILT-IN BOTTOM-FREEZER REFRIGERATOR
 OVERALL DIMENSIONS 25 3/4" (65.4) 36" (91.5) 23 7/8" (60.7) 9 3/4" (24.8) 2" (5.1) *73 1/4" (186.1) 44 1/2" (113.0) *84" (213.4) *8 (212.1) *28" (71.1) *26" (66.0) SPECIFICATIONS Overall Width Overall
L-SERIES CLUTCHES L-SERIES CLUTCHES. Getting Started INSTALLATION INSTRUCTIONS INSTALLATION INSTRUCTIONS
 L-SERIES CLUTCHES INSTALLATION INSTRUCTIONS Thank you for purchasing your new L-Series Clutches. They have been custom-made from the highest quality materials. to the dimensions you specified. With the
GE Monogram 36" Built-In Bottom-Freezer Refrigerator
 OVERALL DIMENSIONS 25 3/4" (65.4) 36" (91.5) 23 7/8" (60.7) 9 3/4" (24.8) 2" (5.1) *73 1/4" (186.1) 44 1/2" (113.0) *84" (213.4) *8 (212.1) *28" (71.1) *26" (66.0) SPECIFICATIONS Overall Width Overall
Mobile Video Installation Guide
 000MVGUIDE Revision 04/29/04 Mobile Video Installation Guide This installation guide offers examples of mobile video system types and suggested layouts. The installation of your system will depend upon
Haworth prices in this book will increase on March 1, 2017 by 4% Intuity Benching North America Specification Guide / Price List June 2015
 Haworth prices in this book will increase on March 1, 2017 by 4% Intuity Benching North America Specification Guide / Price List June 2015 Electronic Update Page Intuity Benching Price List The table below
House of the Dead 4 Monitor Installation
 House of the Dead 4 Monitor Installation This game is provided with either a 52 or 62 monitor dependant upon the model purchased. At least 2 people are required to perform the installation. The footnotes
STACK-ON UNIT WARNING. Illustration 1
 Illustration 1 Illustration 2 End panel label Sound deadening material (do not remove) RH RH Read all instructions and review illustrations before installing. Tools required for assembly: Phillips driver
INSTALLATION INSTRUCTIONS UNDER CABINET HOOD
 Read and Save These Instructions All Hoods Must Be Installed By A Qualified Installer INSTALLATION INSTRUCTIONS UNDER CABINET HOOD Read All Instructions Thoroughly Before Beginning Installation WARNING
INTERWORKS EQ. Table of Contents. Panel System. Interworks EQ Kimball Legacy. Price List Effective Dates: Pricing Revision
 INTERWORKS EQ Table of Contents Price List Effective Dates: 07.02.18 Revision 06.15.18 See page Statement of Line page 14.2 Panels, Connectors, Trim page 14.2 Power and Data page 14.3 Overview page 14.4
Licence Storage Supplemental
 Licence Storage Supplemental Fall 2005 ISO 9001:2000 Registered CGSB #615-3 ISO 14001:2004 Registered CGSB #006b Global Contract Inc. 565 Petrolia Road North York, Ontario M3J 2X8 TABLE OF CONTENTS PAGE
INSTALLATION INSTRUCTIONS UNDER CABINET HOOD
 Read and Save These Instructions All Hoods Must Be Installed By A Qualified Installer INSTALLATION INSTRUCTIONS UNDER CABINET HOOD Read All Instructions Thoroughly Before Beginning Installation WARNING
INSTALLATION INSTRUCTIONS
 INSTALLATION INSTRUCTIONS Model: 8510 & 8510TK Ford E Series Van 1994 2002 with stock power mirrors Tools required for the installation are: 7/16 socket, T20 screwdriver or 8mm socket, screwdriver, phillips
INSTALLATION INSTRUCTIONS
 Rear Vision System Mirror Display Dodge Ram Kit Contents: Instruction Sheets Template Chassis Harness Endgate Handle with Camera Wire Ties (Qty: 17) Bottle of ZTech Plug for Non-Locking Endgates (Optional)
Installing Power Components
 This chapter provides instructions on how to install and reinstall power components in the Cisco NCS 4016 chassis. It also covers connecting and disconnecting power and powering on the chassis. The Cisco
V I S I O N CASEGOODS COLLECTION
 BREAKFRONT DESKS DESKS FEATURE BREAKFRONT MODESTY DESIGN AND ALLOW FOR A CONSISTENT VERTICAL GRAIN PATTERN ON APPROACH CHASSIS SURFACES. OPTIONAL ACRYLIC PANEL INSERT CREATES ADDITIONAL VISUAL INTEREST.
SAM S KIOSK & SET ASIDE USER MANUAL INSTALLATION & MAINTENANCE
 SAM S KIOSK & SET ASIDE USER MANUAL INSTALLATION & MAINTENANCE 033117 Table of Contents Required Tools:... 2 IMPORTANT SAFETY INSTRUCTIONS... 3 GROUNDING INSTRUCTIONS... 4 INSTALLATION INSTRUCTIONS...
ELVORON HR DESIGN AND PLANNING GUIDE
 ELVORON HR DESIGN AND PLANNING GUIDE Hydraulic Home Elevator Quality Elevators by Garaventa www.garaventaelevator.com Table of Contents Elvoron HR - Hydraulic Residential Elevator... 2 Technical Reference:...
install o IIVIPORTANT - Savethese -&WARNING - -&WARNING - This appliance must -&WARNING - Before beginning the Mode_s PB970, PB975
 install m ctric Ran Mode_s PB970, PB975 I[_ Questions? Call 800.GE.CARES (800.432.2737) or Visit our Website at: ge.com I BEFORE YOU BEGIN Read these instructions completely and carefully. o IIVIPORTANT
Assembly of kick TM Utility Poles
 Assembly of kick TM Utility Poles #2 Phillips screwdriver 3/16" Ball-End Allen Bit with 6" Extension WARNING: If you have a problem, question, or request, call your local dealer, or Steelcase Line 1 at
OPTEVA 378 ENHANCED CASH RECYCLER TERMINAL FRONT LOAD LOBBY UNIT PLAN VIEW FRONT VIEW SIDE VIEW
 L00 CALL -800--600 OPTEVA 8 ENHANCED CASH RECYCLER TERMINAL WITH mm ( ") UL SAFE 4 ( 6 ") 4 ( 6 ") CONSULT WITH DIEBOLD INSTALLATION/SERVICE BRANCH FOR ADDITIONAL DETAILS AND INFORMATION. PLEASE SEE PLANNING
INSTALLATIONINSTRUCTIONS FREESTANDINGELECTRICRANGE WITH DOUBLEOVENS
 INSTALLATIONINSTRUTIONS FREESTANDINGELETRIRANGE WITH DOUBLEOVENS Table of ontents RANGE SAFETY... 2 INSTALLATION REQUIREMENTS... 3 Tools and Parts... 3 Location Requirements... 3 Electrical Requirements...
Roll Bar (MMRB-6.1 to -6.7)
") 3430 Sacramento Dr., Unit D San Luis Obispo, CA 93401 Telephone: 805/544-8748 Fax: 805/544-8645 www.maximummotorsports.com 1994-04 Roll Bar (MMRB-6.1 to -6.7) NOTE: These instructions cover Roll Bars with
3430 Sacramento Dr., Unit D San Luis Obispo, CA 93401 Telephone: 805/544-8748 Fax: 805/544-8645 www.maximummotorsports.com 1994-04 Roll Bar (MMRB-6.1 to -6.7) NOTE: These instructions cover Roll Bars with
FOOTPRINT STORAGE. Table of Contents. Footprint Storage Kimball Surfaces & Storage. Price List Effective Dates: Pricing Revision
 STORAGE Table of Contents Price List Effective Dates: 07.02.18 Revision 12.03.18 See page Statement of Line page 4.2 Overview page 4.7 Product Information page 4.8 Filing Capacities page 4.9 Locking Information
1718 W. Fullerton Ave Chicago, IL Tel: Fax:
 07 Edge Lighting. All Rights Reserved. Installation Instructions for Pix Stick Tie Stix Suspension -Light, -Light, -Light and -Light with Power IMPORTANT INFORMATION - This product is suitable for indoor
GSA Contract No. GS-29F-0129G Navy BPA No. N A-0106
 GSA Contract No. GS-29F-0129G Navy BPA No. N00189-11-A-0106 General Services Administration FSC Group 71 Office Furniture, Storage, Modular and Height Adjustable Workstations, Tables, and Multipurpose
Plasma Display Electric Ceiling Lifts
 I N S T R U C T I O N M A N U A L The Plasma Display Electric Ceiling Lift is designed for plasma displays requiring an extended drop (18 to 42 inches) from their hidden location. The lift is designed
DESKS. U-shaped Desk with Hutch. L-shaped Desk with Credenza. Model: 2DS. Model: 1DS. L-shaped Wood Veneer Desk with Storage Bookcase
 U-shaped Desk with Hutch L-shaped Desk with Credenza Model: 1DS Model: 2DS W x 98 D x 65 H $1908.99 88 W x 96 D x 66 H $3105.99 Thermally fused high performance laminate. File drawers accommodate letter
LT Charging Cart for Laptops
 Built with Anthro-DNA LT Charging Cart for Laptops Owners Manual This unit has been tested to Underwriters Laboratories U.S. and Canadian (Bi-National) Standard for Safety of Informational Technology Equipment,
BELMONT 7130/7131/7132
 7130/7131/7132 VENEER The warmth of transitional styling enhanced with elegant details. Inlaid cherry veneer bordered by walnut banding and double beaded crown mouldings provide unique details. Executive
ELECTRICAL SYSTEM UPGRADE
 NEW CONTROLLER & ELECTRICAL SYSTEM UPGRADE FOR DAIRY TECH, INCORPORATED 10, 30 & 60G PASTEURIZERS Parts to Include 2 Wire ties (Nuts) 2 sticky wire mount pads Large Rubber Grommet (for bottom of electric
Large Case Storage - Replacing Case Lock System
 Large Case Storage - Replacing Case Lock System 1 Table of Contents If you have a problem, question, or request, call your local dealer, or Steelcase Line 1 at 888.STEELCASE (888.783.3522) for immediate
Creating An Accessible World ELVORON CPL.
 Creating An Accessible World ELVORON CPL Design And Planning Guide www.garaventalift.com Please note: Dimensions provided in this Guide are for REFERENCE ONLY and should not be used for site preparation
INSTALLATION INSTRUCTIONS WALL MOUNT HOOD
 Read and Save These Instructions All Hoods Must Be Installed By A Qualified Installer INSTALLATION INSTRUCTIONS WALL MOUNT HOOD Read All Instructions Thoroughly Before Beginning Installation WARNING -
#GL18006-L2 Honda Gold Wing 1800 & F6B models - All Years Lower Cowl LED Driving Lights INSTALLATION INSTRUCTIONS
 #GL18006-L2 Honda Gold Wing 1800 & F6B models - All Years Lower Cowl LED Driving Lights INSTALLATION INSTRUCTIONS 1. Lay out and familiarize yourself with the parts included in the set. Remove the left
SPEED CONTROL 4 AND 6 CYL. JEEP WRANGLER. Read entire instructions thoroughly before starting. INSTALLATION INSTRUCTIONS TOOLS REQUIRED:
 Read entire instructions thoroughly before starting. TOOLS REQUIRED: SPEED CONTROL 4 AND 6 CYL. JEEP WRANGLER INSTALLATION INSTRUCTIONS Complete socket set Phillips screwdriver Torx drivers Wire strippers/cutters
PRODUCT MANUAL Gecko Wireless One Zone LED Dimmer and Receiver
 Product Description The Gecko Wireless One Zone Wall LED Dimmer has been designed to bring light control easily. No wires or switch box locations are needed, just stick or mount the Gecko to any flat location
Fiber Connector Shelf (CCS)
") Corning Cable Systems Standard Recommended Procedure (SRP) 003-595 Issue 3, May 2007 Page 1 of 6 Fiber Connector Shelf (CCS) Table of Contents 1. General... 1 2. Precautions... 1 3. Components... 2 4.
Corning Cable Systems Standard Recommended Procedure (SRP) 003-595 Issue 3, May 2007 Page 1 of 6 Fiber Connector Shelf (CCS) Table of Contents 1. General... 1 2. Precautions... 1 3. Components... 2 4.
INSTALLATION INSTRUCTIONS CWSH3 WALL MOUNT HOOD
 Read and Save These Instructions All Hoods Must Be Installed By A Qualified Installer INSTALLATION INSTRUCTIONS CWSH3 WALL MOUNT HOOD Read All Instructions Thoroughly Before Beginning Installation WARNING
LED LINEAR INSTALLATION GUIDE RED 20L VER /13/
 LED LINEAR INSTALLATION GUIDE RED 20L VER. 1.0 3/13/17 918.622.4978 www.lektroninc.com sales@lektroninc.com GETTING STARTED CONTENTS Following these few simple steps will ensure a successful installation
Technical Support (707)
") Installation Instructions CONSOLE MEGASHIFTER Fits: 1982-1992 Camaro & Firebird w/automatic Transmission *except 1988-1992 Firebird Formula Model Catalog # 80692 WORK SAFELY! For maximum safety, perform
Installation Instructions CONSOLE MEGASHIFTER Fits: 1982-1992 Camaro & Firebird w/automatic Transmission *except 1988-1992 Firebird Formula Model Catalog # 80692 WORK SAFELY! For maximum safety, perform
Easy/Tran TF STANDBY POWER FURNACE SWITCH TOOLS NEEDED FOR INSTALLATION. PARTS LIST for Easy / Tran TF FURNACE TRANSFER SWITCH
 STANDBY POWER FURNACE SWITCH Easy/Tran TF Congratulations on your purchase of the Reliance Controls Easy/Tran TF furnace transfer switch. Reliance has been manufacturing transfer switches and equipment
OVER THE RANGE MICROWAVE OVEN/HOOD SYSTEM INSTALLATION INSTRUCTIONS
 OVER THE RANGE MICROWAVE OVEN/HOOD SYSTEM INSTALLATION INSTRUCTIONS Please read all instructions thoroughly before installing the Microwave Oven/Hood System. Two people are recommended to install this
Installation Instructions
 Roller & Roman Shades Lifting Systems Cassette EZ Lift Cordless EZ Pull Standard and Cassette R-Series Clutch SL-Series Clutch Spring Roller Fascias and Valances 3, 4 Flat and 4 Curved Fascia 5 Fascia
Volition Desking. Pricelist November State Office Furniture Contract Holder - Private Office BSI
 Volition Desking Pricelist November 2012 State Office Furniture Contract Holder - Private Office BSI NOTES VOLITION VOLITION Table of Contents Section/Product Page Standard Product Overview 3 Technical
enmotion Recessed Automated Touchless Towel Dispenser Installation Instructions for New and Retrofit Construction
 enmotion Recessed Automated Touchless Towel Dispenser Installation Instructions for New and Retrofit Construction This manual is designed to assist you in the installation of the Georgia-Pacific enmotion
Installation Operation Care
 Installation Operation Care Standard Clutch CONTENTS Getting Started: Product View... 1 Tools and Fasteners Needed... Installation: Mounting Types and Window Terminology... Mount the Installation Brackets
PRIORITY Price List Effective Dates: Positioning Statement of Line Planning Pricing Surface Materials Priority
 Desks and Components Table of Contents Price List Effective Dates: 07.02.18 Revision 06.15.18 See page Positioning 5.2 Introduction 5.2 Statement of Line 5.3 Planning 5.33 Distinctives 5.33 Typical Configurations
Installation Instructions
 Roller & Roman Shades Lifting Systems Cassette and Sure-Lift EZ Lift Cordless EZ Pull Standard and Cassette R-Series Clutch SL-Series Clutch Spring Roller Fascias and Valances 3, 4 Flat and 4 Curved Fascia
Control Box Wiring For PRSstandard Tool
 888-680-4466 ShopBotTools.com Control Box Wiring For PRSstandard Tool Copyright 2017 ShopBot Tools, Inc. page 1 Copyright 2017 ShopBot Tools, Inc. page 2 Table of Contents Introduction...5 Installation...5
INSTALL/REMOVAL INSTRUCTIONS: WINDOW REGULATOR
 REMOVAL/INSTALL OF WINDOW REGULATOR (665-2542) Ford F-Series Pickup & Bronco 1980 96 General Tech Tips: Use painter s tape rather than duct tape to secure window. It will not damage paint or leave sticky
OPTEVA 923 IN LOBBY TELLER (ILT) PLAN mm (60") WIDE PLAN - STAND ALONE FRONT VIEW SIDE VIEW PAGE 1 OF 5 CALL NOTE:
 PLAN mm (60) WIDE PLAN - STAND ALONE FRONT VIEW SIDE VIEW PAGE 1 OF 5 CALL NOTE:") OPTEVA 9 IN LOBBY TELLER (ILT) mm ( ") U.L. SAFE L4 CALL -8-999-6 CONSULT WITH DIEBOLD INSTALLATION/SERVICE BRANCH FOR ADDITIONAL DETAILS AND INFORMATION. PLEASE SEE PLANNING AND SITE PREPARATION GUIDE
OPTEVA 9 IN LOBBY TELLER (ILT) mm ( ") U.L. SAFE L4 CALL -8-999-6 CONSULT WITH DIEBOLD INSTALLATION/SERVICE BRANCH FOR ADDITIONAL DETAILS AND INFORMATION. PLEASE SEE PLANNING AND SITE PREPARATION GUIDE
INSTALLATION INSTRUCTIONS
 Rear Vision System Tailgate Handle Camera Mirror Display 2004-2014 Ford F-150 and 2008-2015 Ford Super Duty (Kit part numbers 9002-9521) Kit Contents: Mirror Tailgate Handle with camera and harness Interior
Roller Shades CORD LOOP. Head Rail, Fascia and No Head Rail. Installation & Care Instructions
 Roller Shades CORD LOOP Head Rail, Fascia and No Head Rail Installation & Care Instructions 152038 H 5/30/2017 GETTING STARTED A few simple tools are required: - Measuring tape - Power drill, drill bits
TechWorks Typicals. Office Suites. Seating. Tables. Desks. Essentials. Meeting. Organization. Personal. Ergonomics. High Density Storage
 TechWorks Typicals Note: All typical bench tops and organizer frame shelves are priced with High Pressure Laminate (HPL) and Bullnose 3mm edge (Black only) options. Changing options on typicals will require
INSTALLATION MANUAL ELECTRIC DOUBLE OVEN RANGE
 ENGLISH ESPAÑOL INSTALLATION MANUAL ELECTRIC DOUBLE OVEN RANGE Please read these instructions thoroughly before installing and operating the range. LDE3019ST LDE3017ST LDE3017SB LDE3017SW LDE3015ST LDE3015SB
SPACESAVER EC-300 A ELECTRICS
 INSTALLATION INSTRUCTIONS SPACESAVER EC-300 A ELECTRICS SECTION I TOP MOUNTED ELECTRICS SECTION II FACE PANEL MOUNTED ELECTRICS SECTION III ZFS INSTALLATION INSTRUCTIONS This symbol indicates a connection
DEFINITION. Table of Contents. Contemporary/Transitional Desks and Components. Definition Kimball Desks & Accessories
 Contemporary/Transitional Desks and Components Table of Contents Price List Effective Dates: 07.02.18 Revision 08.15.18 See page Statement of Line page 2.2 Planning page 2.16 Overview page 2.16 Extension
INSTALLATION INSTRUCTIONS ISLAND RANGE HOOD
 Read and Save These Instructions All Hoods Must Be Installed By A Qualified Installer INSTALLATION INSTRUCTIONS ISLAND RANGE HOOD Read All Instructions Thoroughly Before Beginning Installation WARNING
= Experienced
 I N S T A L L A T I O N G U I D E APPLICATION LENGTH MODEL YR PART # Ford F-250 / F-350 / F-450 Regular Cab * (48 ) 2002-2003, 2008-2012 75134-01A Ford F-250 / F-350 / F-450 Super Cab * (60 ) 2002-2003,
Carousel Unit User Manual Replacing the Check Stand Motor
 Carousel Unit User Manual Replacing the Check Stand Motor 02/01/2017 1 Table of Contents Tools:... 3 Turn Off Power to the Unit:... 4 Remove Power Switch... 5 Remove Electric Eyes:... 6 Remove POS (Point-Of-Sale)
WOC & WOC Top & Back Installation Instructions
 Shown with optional Sun Roof WOC-900500-2 & WOC-900501-2 Top & Back Installation Instructions Install Order! Heater Door System Wiper on to Windshield Windshield Rear Panel Top Panel Tools needed: 5/16
CENTRAL VACUUM SYSTEMS
 CENTRAL VACUUM SYSTEMS INSTALLATION INSTRUCTIONS Review this manual before installing the central vacuum system Dynovac Industries 1 800 226 1221 1 403 346 4877 #1, 6841 52 Avenue Red Deer, Alberta T4N
Davos Collection Design: Andre Staffelbach
 Semi-Private Office Open Office Davos Collection Design: Andre Staffelbach Whether against a wall or as a partition Davos cabinets provide a highly customized solution for work place storage. 12 x 15 Private
INSTALL/REMOVAL INSTRUCTIONS: WINDOW LIFT MOTOR
 REMOVAL/INSTALL OF WINDOW REGULATOR (742-269) Ford Mustang 1996 2004 General Tech Tips: Use painter s tape rather than duct tape to secure window. It will not damage paint or leave sticky residue. A plastic
INSTALLATION INSTRUCTIONS ISLAND RANGE HOOD
 Read and Save These Instructions All Hoods Must Be Installed By A Qualified Installer INSTALLATION INSTRUCTIONS ISLAND RANGE HOOD Read All Instructions Thoroughly Before Beginning Installation WARNING
INSTALLATION INSTRUCTIONS FREESTANDING ELECTRIC RANGE WITH DOUBLE OVENS
 INSTLLTION INSTRUTIONS FRSTNING LTRI RNG WITH OUL OVNS Table of ontents RNG SFTY... 1 INSTLLTION RQUIRMNTS... 2 Tools and Parts... 2 Location Requirements... 2 lectrical Requirements... 4 INSTLLTION INSTRUTIONS...
INSTALLATION INSTRUCTIONS BUILT-IN KIT MODEL RK-12S30 PROVIDED PARTS
 INSTALLATION INSTRUCTIONS BUILT-IN KIT MODEL IMPORTANT: This Built-In Kit is designed for use with Sharp SuperSteam Ovens specifying a RK-2S30 Built-In Kit on the rating label on the front of the oven.
HP-2 / HP-6 Direct Installation Instructions Overview
 Overview Helpful Video 0-10V Dimming Step 1 Mounting & Suspension Page 2 Step 2 Identification & Preparation Page 3 Step 3 Mounting to Structure Page 4 NOTE Step 4 Page 5 This installation requires proper
Delivery and installation delivery on overtime with installation during regular business hours $32,711.04
 Quote#: 3572FDT R3 Date: July 7, 2016 498 Inman Ave., Suite 201, Colonia, NJ 07067 (P) 732 943 2192 (F) 732 943 2194 Quote To: B & G Foods Ship To: B & G Foods 4 Gatehall Drive, #110 4 Gatehall Drive,
Amp & Speaker Upgrade Install Instructions for Victory Cross Country
 Amp & Speaker Upgrade Install Instructions for Victory Cross Country Tools Needed: 13mm Socket 4mm Ball Head Allen Socket 5mm Allen Wrench 10mm Wrench Wire Cutters Wire Strippers Phillips Screwdriver Pocket
Engraved Executive Mahogany Finish
 G O V E R N O R ' S L A M I N A T E C O L L E C T I O N 7350 Engraved Executive Mahogany Finish G O V E R N O R S LAMINATE COLLECTION 7350 2 Traditional Styling - Decorative wood accent mouldings, recessed
Installation Instructions PISTOL GRIP HANDLE Fits: Dodge Challenger and Charger w/ Automatic Transmission Catalog #
 Installation Instructions PISTOL GRIP HANDLE Fits: 2015-2018 Dodge Challenger and Charger w/ Automatic Transmission Catalog # 5380437 WORK SAFELY! For maximum safety, perform this installation on a clean,
INSTALLATION MANUAL FORD PI SEDAN PRISONER TRANSPORT SEAT WITH OS-BELT SEATBELTS (PI02) Required Tools:
 Required Tools:") INSTALLATION MANUAL FORD PI SEDAN PRISONER TRANSPORT SEAT WITH OS-BELT SEATBELTS (PI02) Required Tools: Drill Bits: 9/16 (.5625 ) Power Drill Socket Wrench Set Square #2 Driver Rubber Mallet Utility Knife
INSTALLATION MANUAL FORD PI SEDAN PRISONER TRANSPORT SEAT WITH OS-BELT SEATBELTS (PI02) Required Tools: Drill Bits: 9/16 (.5625 ) Power Drill Socket Wrench Set Square #2 Driver Rubber Mallet Utility Knife
LARGE CAPACITY INCUBATOR Installation, Operation and Maintenance Instructions
 LARGE CAPACITY INCUBATOR Installation, Operation and Maintenance Instructions GENERAL 2 Inspection 2 Location 2 INSTALLATION 2 Door Alignment 2 Shelf Installation 2 Remote Contacts 2 2-10 Volt DC Output
ITS-50R TRANSFER SWITCH OWNER S MANUAL
 ITS-50R OWNER S MANUAL IOTA Engineering Transfer Switches provide automatic power switching between two or three separate 120/240 volt AC input sources, including powercords, onboard generators, onboard
INSTALL/REMOVAL INSTRUCTIONS: WINDOW REGULATOR
 REMOVAL/INSTALL OF WINDOW REGULATOR (741-649) Dodge Durango 1998 2003, Dakota Quad Cab 2000 2003 General Tech Tips: Use painter s tape rather than duct tape to secure window. It will not damage paint or
INSTALLATION INSTRUCTIONS
 Rear Vision System Tailgate Emblem Camera Mirror Display 2009-Current Ford F-150 and 2010-Current Super Duty (Kit part number 1008-9527) Kit Contents: Mirror Tailgate Emblem Mount with Camera Interior
Flat Screen Garage Table System Price List. November 6, 2006 Updated May 22,
 Flat Screen Garage Table System Price List November 6, 2006 Updated May 22, 2007 800-424-2432 1 Contents Flat Screen Garage Table System General Information 2 Worksurface w/flat Screen Garage 4 8-Wire/4
Solstice Electric Fryers SE Series Service Manual
 Solstice Electric Fryers SE Series Service Manual L22-330 R1 (10/12) Notice In the event of problems or questions about your order, contact the Pitco Frialator factory at (603) 225-6684. In the event of