KONICA MINOLTA MAGICOLOR
|
|
|
- Cecilia Ford
- 6 years ago
- Views:
Transcription

1 KONICA MINOLTA MAGICOLOR TONER CARTRIDGE REMANUFACTURING INSTRUCTIONS KONICA MINOLTA MAGICOLOR 5430 TONER CARTRIDGE
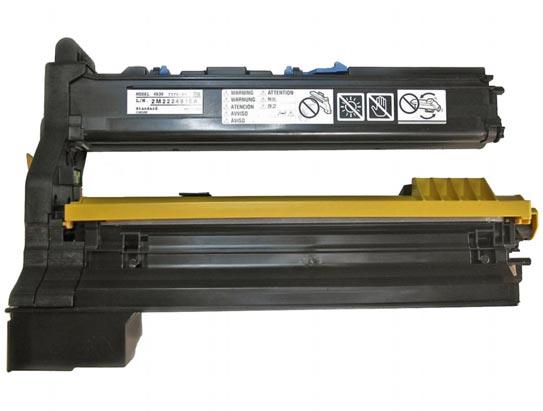

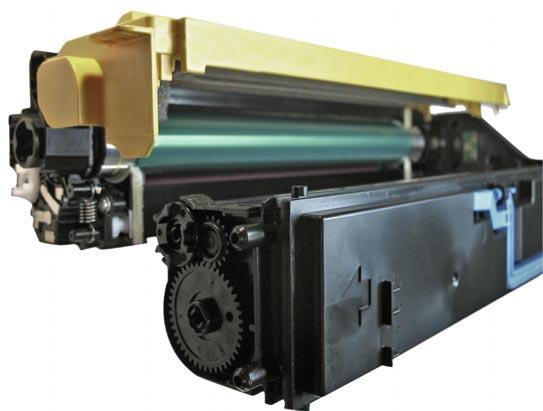
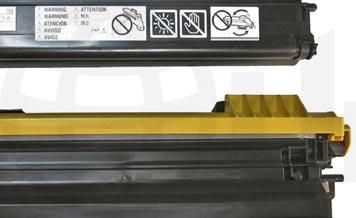
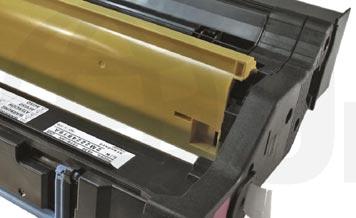
2 REMANUFACTURING THE KONICA MINOLTA MAGICOLOR 5430/5440/5450 TONER CARTRIDGES By Javier Gonzalez and the Technical Staff at UniNet MAGICOLOR 5430 TONER CARTRIDGE SIDE VIEW (END CAP SIDE) BACK VIEW SIDE VIEW (NON-END CAP SIDE)


3 TONER CARTRIDGE DISASSEMBLY 1. Locate the cartridge end cap of the cartridge. Using a phillips screwdriver, remove the seven screws that hold the cartridge together. 2. Set the drum unit and end cap aside. We will now proceed to clean the toner hopper. 3. Locate the toner hopper fill plug, and remove it by prying it off, using a small flathead screwdriver. Empty any residual toner from the hopper and clean thoroughly using compressed air. Fill with new replacement toner, install the fill plug, and set the hopper aside.


4 4. Remove the screws from the contact end cap. 5. The contact end cap will have a smaller screw that will also need to be removed. 6. Remove the plastic cover off the top metal contact shown. This cover protects the metal contact from dust.


5 7. Remove the metal contact screws shown. 8. The contact end cap can now be removed. 9. Remove the one screw from the non-contact end cap


6 10.Remove the non-contact end capas shown. 11. Remove the optical window cleaning mechanism pieces shown. 12. Remove the developer roller s protective sheet.


7 13. Remove the developer roller support bearing on the contact end cap side 14. Remove the capped developer roller support bearing on the non-contact end cap side.


8 15. Remove the drum s end felt assembly by prying it out as shown. The felt assembly consists of a felt strip and plastic molding. 16. Take special note of the center position of developer roller washer, located at the ends of the developer roller axles. Remembr this when installing the developer roller as per OEM. 17. Remove the developer roller as shown. Remove the two doctor blade screws.


9 18. Remove the doctor blade. 19. Remove the seal plate screws and the seal plate. 20. Clean the disassembled developer section with a vacuum. SEPARATING THE DRUM & DEVELOPER UNITS 21. The drum and developer units are joined together.


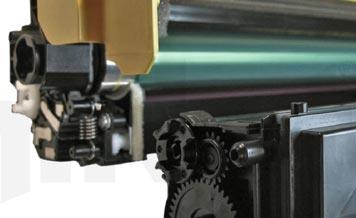
10 22. Locate the gear train on the side of the drum unit. Remove the OPC contact shown, and the gear train directly behind it. Note the positioning of the gears for reassembly. One of the gears is NOT removable. 23. With the gears now removed, proceed to remove the two drum axle plate screws shown. Unhook the compression spring connected to the developer unit beneath. Remove the drum axle plate by sliding it out.


11 24. Unhook the compression spring on the opposite side of the drum unit (drive gear side). NOTE: The compression springs are different, the longer spring is connected to the gear train side of the drum and the smaller spring is connected to the drive gear side. 25. Using a Phillips screwdriver, remove the screw from the developer roller drive gear, and remove the gear. NOTE: This is a metric screw and will not fit anywhere else.


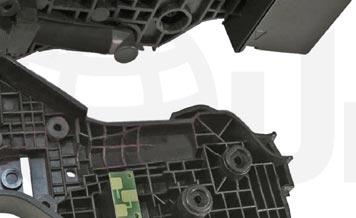
12 26. On the gear train side of the drum unit, locate the metal pin that holds the drum unit and developer unit together. Pull the pin out using a pair of pliers. 27. Separate the two halves by first pulling out the developer unit from where the pin was removed. Once it clears the waste hopper section pull the two halves apart away from each other as shown. DISASSEMBLING THE DRUM UNIT 28. Remove the screw from the OPC drive gear support plate shown. 29. With the screw removed, turn the support plate counter-clockwise until it comes to a stop. This will unlock the plate and allow you to remove it completely.


13 30. Final unlocked position of the drive gear support plate. Remove the plate. 31. With the OPC drive gear support plate removed, this will allow movement for the drum axle and will simplify the removal of the OPC drum. NOTE: The OPC drum is secured onto the axle with pressure. It will take some force to remove by sliding it off. 32. Wipe the removed OPC with drum cleaning solution. Cover and set the drum aside. NOTE: It will not be necessary to remove the drum axle, but it can easily be removed by angling and pulling it out from its support.


, then")


14 A B 33. Remove the corona wire by sliding it in towards the opening on the gear train side (A), then pulling it out (B). This will allow you to lift one side of it for easy removal. 34. Remove the two wiper blade screws, and remove the wiper blade.


15 35. Dump the waste toner from the hopper and clean thoroughly using compressed air. Clean the wiper blade using a lint free cloth and apply padding powder before reinstalling. DRUM UNIT ASSEMBLY 36. After installing the wiper blade, install the corona wire assembly via the gear train side first. Insert the corona wire assembly through the opening, then slide through the opposite end. 37. Once the corona wire is aligned with the cartridge, push in with your finger until it is back into its original place. 38. We are now ready to install the OPC drum. Before installing, make sure the drum gears are facing the corect position. Slide into place via the axle.


16 39. Install the OPC drive gear support plate as shown. 40. Rotate the support plate clockwise to its locked position. Install the support plate screw. 41. Assemble the two halves by first inserting the drive gear. 42. Lock the two halves in place by inserting the metal pin on the gear train side.


17 43. Install the developer roller drive gear and screw. 44. Install the drum axle support plate screws on the opposite side. 45. With the two haves assembled, proceed to install the gear train and the appropriate springs.


 to acommodate it.")
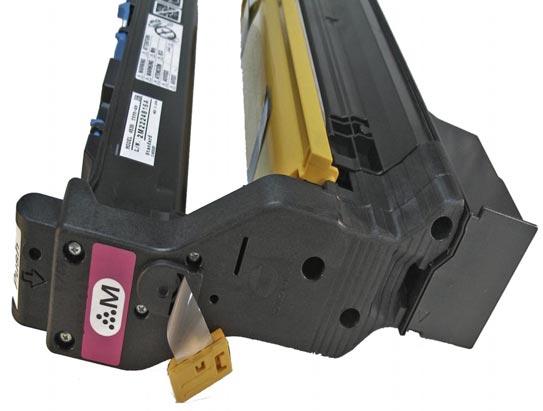
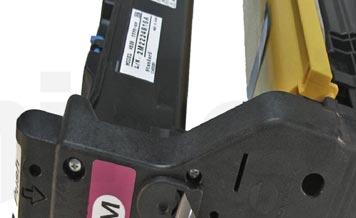
18 INNER END CAP OUTER END CAP REPLACING THE CHIP 46. Locate the OEM chip on the interior of the outer end cap. The chip has been fastened with a minimal amount of pressure, and can be removed without any tools. UN-CUT CUT 47. Before installing the replacement chip, the chip holder shown, needs to be slightly altered (cut) to acommodate it. Two groove patterns need to be cut into the holder shown, using a small cutting knife.


19 48. Place the aftermarket chip so that the two pointing pegs fit through the holes as shown. 49. Install the OPC drum contact shown. NOTE: Do not apply any glue or adhesive to secure the chip. 50. Install the inner end cap 51. Install the transfer tube shown.


20 52. Install the outer end cap with the new chip installed. 53. Secure the outer end cap with the seven screws.
MINOLTA MAGICOLOR 5430/5440/5450 CARTRIDGE REMANUFACTURING INSTRUCTIONS
 MINOLTA MAGICOLOR 5430/5440/5450 CARTRIDGE REMANUFACTURING INSTRUCTIONS MINOLTA MAGICOLOR 5430 Color Laser Printer with Toner Cartridge MINOLTA MAGICOLOR 5430 TONER CARTRIDGE SIDE VIEW WITH END CAP SHOWN
1320 TO P2015 TONER CARTRIDGE CONVERSION INSTRUCTIONS
 HP 1320 TO P2015 TONER CARTRIDGE CONVERSION INSTRUCTIONS HP 1320 TO P2015 CONVERSION KIT (UNINET PART #1114) HP 1320 TO P2015 TONER CARTRIDGE CONVERSION INSTRUCTIONS By Javier Gonzalez and the Technical
HP ENTERPRISE 600 M651/M680 SERIES TONER CARTRIDGE REMANUFACTURING INSTRUCTIONS
 HP ENTERPRISE 600 M651/M680 SERIES TONER CARTRIDGE REMANUFACTURING INSTRUCTIONS HP 652A TONER CARTRIDGE RREMANUFACTURING THE HP COLOR ENTERPRISE 600 M651/M680 SERIES TONER CARTRIDGES By Mike Josiah and
XEROX PHASER 3635 MFP
 XEROX PHASER 3635 MFP TONER CARTRIDGE REMANUFACTURING INSTRUCTIONS XEROX PHASER 3635 TONER CARTRIDGE REMANUFACTURING THE XEROX PHASER 3635 MFP TONER CARTRIDGE By Mike Josiah and the Technical Staff at
THE ML-3471 TONER CARTRIDGE
 SAMSUNG ML-3471 TONER CARTRIDGE REMANUFACTURING INSTRUCTIONS THE ML-3471 TONER CARTRIDGE DOC# 0438 By Mike Josiah and the technical staff at Summit Technologies a distributor of Summit and Uninet Products.
TONER CARTRIDGE REMANUFACTURING INSTRUCTIONS OKIDATA B710/720/730 SERIES TONER CARTRIDGE
 OKIDATA B710/720/730 SERIES TONER CARTRIDGE REMANUFACTURING INSTRUCTIONS OKIDATA B710/720/730 SERIES TONER CARTRIDGE REMANUFACTURING THE OKIDATA B710/720/730 SERIES TONER CARTRIDGE By Mike Josiah and the
ML-3712 MLT-D205 TONER CARTRIDGE REMANUFACTURING INSTRUCTIONS
 SAMSUNG ML-3712 MLT-D205 TONER CARTRIDGE REMANUFACTURING INSTRUCTIONS SAMSUNG MLT-D205 TONER CARTRIDGE CHANGES TO THE SAMSUNG MLT-D205 DRUM & CARTRIDGE By Mike Josiah and the Technical Staff at UniNet
TONER CARTRIDGE REMANUFACTURING INSTRUCTIONS XEROX PHASER 3320 TONER CARTRIDGE
 XEROX PHASER 3320 TONER CARTRIDGE REMANUFACTURING INSTRUCTIONS XEROX PHASER 3320 TONER CARTRIDGE REMANUFACTURING THE XEROX PHASER 3320 TONER CARTRIDGE By Mike Josiah and the Technical Staff at UniNet First
XEROX WORKCENTRE 4150
 XEROX WORKCENTRE 4150 TONER CARTRIDGE REMANUFACTURING INSTRUCTIONS 013R00623 DRUM UNIT REMANUFACTURING THE XEROX WORKCENTRE 4150 DRUM UNIT By Enrique E. Estura, Daniel Reyes, and the Technical Staff at
DELL C 5100 TONER CARTRIDGE REMANUFACTURING INSTRUCTIONS
 DELL C 5100 REMANUFACTURING INSTRUCTIONS DELL C 5100 LASER PRINTER DELL C 5100 REMOVING THE GEARLESS END CAP 1. Remove the gearless end cap (shown) to access the toner fill cap. Using a small flathead
LEXMARK C780 CARTRIDGE REMANUFACTURING INSTRUCTIONS LEXMARK C780 TONER CARTRIDGE
 LEXMARK C780 CARTRIDGE REMANUFACTURING INSTRUCTIONS LEXMARK C780 TONER CARTRIDGE REMANUFACTURING THE LEXMARK C780 BLACK & COLOR TONER CARTRIDGES First released in April 2008, the Lexmark C780 is based
HP 5500 COLOR LASER PRINTER W/TONER CARTRIDGES
 AbsoluteCOLOR AbsoluteBLACK UniDrums UniRollers UniParts UniCoatings AbsoluteCOLOR AbsoluteBLACK UniDrums UniRollers UniParts UniCoatings HP 5500 CARTRIDGE REMANUFACTURING INSTRUCTIONS HP 5500 COLOR LASER
TONER CARTRIDGE REMANUFACTURING INSTRUCTIONS LASERJET P1505 SERIES TONER CARTRIDGE
 HP LASERJET P1505 TONER CARTRIDGE REMANUFACTURING INSTRUCTIONS HP LASERJET P1505 SERIES TONER CARTRIDGE 2010 UniNet Imaging Inc. All trademark names and artwork are property of their respective owners.
TPE CC1997CRS HP M252/MFP M277 X TONER HOPPER 60GRMS FILL(WITH SEAL) OEM HP M252/MFP M277 (CF400A-CF403A
 OEM HP M252/MFP M277 (CF400A-CF403A") Installation Instructions for TPE CC1997CRS HP M252/MFP M277 X TONER HOPPER 60GRMS FILL(WITH SEAL) OEM HP M252/MFP M277 (CF400A-CF403A or CF400X-CF403X) Cartridge T.P.E. CC1997CRS HP M252/MFP M277 X TONER
Installation Instructions for TPE CC1997CRS HP M252/MFP M277 X TONER HOPPER 60GRMS FILL(WITH SEAL) OEM HP M252/MFP M277 (CF400A-CF403A or CF400X-CF403X) Cartridge T.P.E. CC1997CRS HP M252/MFP M277 X TONER
IMAGECLASS MF7200 SERIES (EP105) TONER CARTRIDGE REMANUFACTURING INSTRUCTIONS
 TONER CARTRIDGE REMANUFACTURING INSTRUCTIONS") CANON IMAGECLASS MF7200 SERIES (EP105) TONER CARTRIDGE REMANUFACTURING INSTRUCTIONS CANON EP105 TONER CARTRIDGE REMANUFACTURING THE CANON IMAGECLASS MF7200 SERIES EP105 TONER CARTRIDGE By Mike Josiah and
CANON IMAGECLASS MF7200 SERIES (EP105) TONER CARTRIDGE REMANUFACTURING INSTRUCTIONS CANON EP105 TONER CARTRIDGE REMANUFACTURING THE CANON IMAGECLASS MF7200 SERIES EP105 TONER CARTRIDGE By Mike Josiah and
DRUM UNIT REMANUFACTURING INSTRUCTIONS
 Absolute COLOR Absolute BLACK Unidrums Unirollers Uniparts Unicoatings EPSON ACULASER C2600 DRUM UNIT REMANUFACTURING INSTRUCTIONS EPSON ACULASER C2600 COLOUR LASER PRINTER EPSON ACULASER C2600 DRUM UNIT
Technical Document. Panafax UF-890 (actually revisiting the Panafax UF-550)
") Technical Document Disassembly Instructions SUMMIT Laser Products 95 Orville Drive Bohemia, New York 11716 Tel: 631-218-8376 Fax: 631-218-3275 Panafax UF-890 (actually revisiting the Panafax UF-550) Toner
Technical Document Disassembly Instructions SUMMIT Laser Products 95 Orville Drive Bohemia, New York 11716 Tel: 631-218-8376 Fax: 631-218-3275 Panafax UF-890 (actually revisiting the Panafax UF-550) Toner
HP LASERJET
 HP LASERJET 4200 4300 TONER CARTRIDGE REMANUFACTURING INSTRUCTIONS HP LASERJET 4200 TONER CARTRIDGE (Q1338A) HP LASERJET 4300 TONER CARTRIDGE (Q1339A) REMANUFACTURING HP LASERJET 4200/4300 TONER CARTRIDGES
Sharp AR-160 OPC Cartridges DOC-0270
 Home New Arrivals! Company Info Publications Special Features Contact Us Overview Tools Required Supplies Needed Disassembly Recommended Supplies Sharp AR-160 OPC Cartridges DOC-0270 OVERVIEW The Sharp
Oreck Magnesium Series Service Manual. The Oreck Manufacturing Company
 Oreck Magnesium Series Service Manual The Oreck Manufacturing Company 08/2012 10/2011 The Oreck Manufacturing Company Contents Covering all Magnesium Upright Models Including: LW100, LW125, LW1000, AND
DRIVE AXLE Volvo 960 DESCRIPTION & OPERATION AXLE IDENTIFICATION DRIVE AXLES Volvo Differentials & Axle Shafts
 DRIVE AXLE 1994 Volvo 960 1994 DRIVE AXLES Volvo Differentials & Axle Shafts 960 DESCRIPTION & OPERATION All 960 station wagon models use type 1041 rear axle assembly. All 960 4-door models use type 1045
Conversion Kit for HP1200 Cartridge
 OEM HP1200 (C7115A) Cartridge Conversion Using T.P.E. CC1197 Canon EP26/EP27/X25/U Type Conversion Kit for HP1200 Cartridge OEM HP1200 (C7115A) T.P.E. CC1197 Canon EP26/EP27/X25/U Type Conversion Kit for
TOYOTA COROLLA ILLUMINATED DOOR SILLS Preparation
 Preparation Part Number: PT942-02140 Kit Contents Item # Quantity Reqd. Description 1 1 Illuminated Scuff plate, Front Right Hand 2 1 Illuminated Scuff plate, Front Left Hand 3 1 Door Scuff plate, Rear
Falcon 2 & BlackHawk complete repair kit
 Falcon 2 & BlackHawk complete repair kit part number 910003-60 Towing and Suspension Solutions This kit contains the components to replace the Falcon 2 or BlackHawk Autowlok button assemblies, collar shoulder
Blue Jay Rodless Cylinder BC MS. Track Repair Manual 1996 & 2012 THE EASTMAN EASTMAN. All End Caps Black for Models
 EASTMAN 1996 & 2012 THE EASTMAN Blue Jay Rodless Cylinder BC-40224-MS Track Repair Manual All End Caps Black for 1996-2012 Models IMPORTANT Disconnect this equipment from pneumatic pressure lines before
FOR FUTURE REFERENCE SERIES 93HPS
 Hypro Series 93HPS Hydraulically Driven Wetseal Multistage Pumps Repair Manual KEEP FOR FUTURE REFERENCE Form L-1578R Rev. A SERIES 93HPS Hydraulically Driven Stainless Steel Multistage Centrifugal Pumps
Falcon 5250 complete repair kit
 Towing and Suspension Solutions 855010-02 08-14 Falcon 5250 complete repair kit part number 910003-55 This kit contains the components to replace the Falcon 5250 Autowlok button assemblies, collar shoulder
TOYOTA COROLLA ILLUMINATED DOOR SILLS Preparation
 Preparation Part Number: PT942-02140 Kit Contents Item # Quantity Reqd. Description 1 1 Illuminated Scuff plate, Front Right Hand 2 1 Illuminated Scuff plate, Front Left Hand 3 1 Door Scuff plate, Rear
YARIS 4-DOOR 2007 INTERIOR LIGHT UPGRADE
 Document # 3999 4/26/06 4-DOOR 2007 INTERIOR LIGHT UPGRADE Preparation Part Number: 00016-52060 Code: IL1 Kit Contents Item # Quantity Reqd. Description 1 1 12 Light Guide 2 1 7 Light Guide 3 1 Hardware
Installation Manual TWM Performance Short Shift Kit Stage 1 and Stage 2 MazdaSpeed 6
 Page 1 Installation Manual TWM Performance Short Shift Kit Stage 1 and Stage 2 MazdaSpeed 6 Please Note: It is preferable to park on a flat surface, as you will have to engage and disengage the hand brake
A. Adapter A metal component that fastens the caliper to the knuckle. Some brake systems do not use adapters.
 BRAKES UNIT 5: DISC BRAKE DIAGNOSIS AND REPAIR LESSON 3: SERVICE DISC BRAKE CALIPERS I. Terms and definitions A. Adapter A metal component that fastens the caliper to the knuckle. Some brake systems do
Installation Instructions - D-Series Warming Cabinet Instruction Door for Hinge UseReversal (Glass and Stainless Steel Doors)
") Header Cam Lock Reversal... pg 1-4 Glass Door hinge reversal..... pg 5-9 Steel Door hinge reversal..... pg 10-13 Remove Panels Before reversing door hinges, the Header Cam Lock assembly must be reversed.
Header Cam Lock Reversal... pg 1-4 Glass Door hinge reversal..... pg 5-9 Steel Door hinge reversal..... pg 10-13 Remove Panels Before reversing door hinges, the Header Cam Lock assembly must be reversed.
Backside License Plate Mount for Jeep JK Wrangler
 REQUIRED TOOLS 10mm SOCKET 13mm SOCKET 4mm HEX KEY WIRE CRIMPS WIRE STRIPPERS ELECTICAL TAPE SCREW DRIVER KIT CONTAINS BACKSIDE MOUNT LICENSE PLATE BRACKET WITH LEDS PLASTIC PASS-THROUGH GROMMET STAINLESS
Rekluse Motor Sports. The ProStart Clutch. H-D Sportster (2004 +)
") Rekluse Motor Sports The ProStart Clutch H-D Sportster (2004 +) Installation Guide Copyright 2006 Rekluse Motor Sports ProStart Revision 1.000 RMS687 H-D Sportster 195-687 Manual Revision: 111308 Rekluse
Rekluse Motor Sports The ProStart Clutch H-D Sportster (2004 +) Installation Guide Copyright 2006 Rekluse Motor Sports ProStart Revision 1.000 RMS687 H-D Sportster 195-687 Manual Revision: 111308 Rekluse
INSTALLATION GUIDE CRF150R Manual Revision:
 REKLUSE MOTOR SPORTS The z-start Pro Clutch INSTALLATION GUIDE CRF150R 191-810 Manual Revision: 032508 2002 Rekluse Motor Sports Rekluse Motor Sports, Inc. 110 E. 43rd Street Boise, Idaho 83714 208-426-0659
TOYOTA RAV TVIP V3
 Section I Installation Preparation Part Number: 08586-4A872 Section I Installation Preparation Kit Contents Item # Quantity Reqd. Description 1 1 Wire Harness 2 1 Status Monitor 3 1 Piezo Buzzer 4 1 V3
Throttle Body Spacer (05-09 V6) - Installation Instructions
 - Installation Instructions") Throttle Body Spacer (05-09 V6) - Installation Instructions The below installation instructions work for the following products: Throttle Body Spacer (05-09 V6) Steeda 2005+ 4.0L V6 Intake Throttle Body
Throttle Body Spacer (05-09 V6) - Installation Instructions The below installation instructions work for the following products: Throttle Body Spacer (05-09 V6) Steeda 2005+ 4.0L V6 Intake Throttle Body
80703 & Backside License Plate Mount for Jeep JK Wrangler (80707) & 10+ (80703)
 & 10+ (80703)") 80703 Backside Mount 80707 Backside Mount REQUIRED TOOLS 10mm SOCKET 13mm SOCKET 4mm HEX KEY WIRE CRIMPS WIRE STRIPPERS ELECTICAL TAPE SCREW DRIVER KIT CONTAINS BACKSIDE MOUNT LICENSE PLATE BRACKET WITH
80703 Backside Mount 80707 Backside Mount REQUIRED TOOLS 10mm SOCKET 13mm SOCKET 4mm HEX KEY WIRE CRIMPS WIRE STRIPPERS ELECTICAL TAPE SCREW DRIVER KIT CONTAINS BACKSIDE MOUNT LICENSE PLATE BRACKET WITH
INSTALLATION INSTRUCTIONS REPAIR SEAL KIT PowerSurvivor 40E
 INSTALLATION INSTRUCTIONS REPAIR SEAL KIT PowerSurvivor 40E PURPOSE OF THE KIT The Repair Seal Kit should be installed after 1000 hours of operation. It should be installed regardless of whether or not
Mityvac MV8000 O-ring Replacement
 A vacuum pump must be air tight in order to operate. A leak in your vacuum pump will potentially complicate the diagnosis of vacuum systems or make bleeding automotive fluids more difficult. Learn to replace
X-Trainer 43mm fork service manual. Beta USA, Inc This work should be performed by a trained motorcycle technician.
 X-Trainer 43mm fork service manual Beta USA, Inc. 2016 This work should be performed by a trained motorcycle technician. Table of contents Page Introduction/special tools... 2 Fork exploded view... 3 Legend.
OPERATION AND PARTS MANUAL
 OPERATION AND PARTS MANUAL MODEL NUMBER : PART NUMBER : GRL 1110 1900-0540 SERIAL NUMBER : BAYNE MACHINE WORKS, INC. PHONE: 864.288.3877 910 FORK SHOALS ROAD TOLL FREE: 800.535.2671 GREENVILLE SC, 29605
Volkswagen New Beetle Body - Exterior 64 Glass, Window regulators (Page GR-64)
") 64 Glass, Window regulators (Page GR-64) Flush bonded windows Body flange, preparing for glass installation Broken rear window, removing Cleaning off excess adhesive material Curing time Installation instructions
64 Glass, Window regulators (Page GR-64) Flush bonded windows Body flange, preparing for glass installation Broken rear window, removing Cleaning off excess adhesive material Curing time Installation instructions
BA /02/03/04/06/07/08/13/13B/15 BIG AIR KIT (BAK) - Yamaha Road Star (99-07)
 - Yamaha Road Star (99-07)") BA-2020-00/02/03/04/06/07/08/13/13B/15 BIG AIR KIT (BAK) - Yamaha Road Star (99-07) Page: 1 Revision: 6.2-02/23/2011 Install Time: 1.5 Hours We recommend a qualified Yamaha technician install this kit
BA-2020-00/02/03/04/06/07/08/13/13B/15 BIG AIR KIT (BAK) - Yamaha Road Star (99-07) Page: 1 Revision: 6.2-02/23/2011 Install Time: 1.5 Hours We recommend a qualified Yamaha technician install this kit
CorkSport ort Mazda 3 Adjustable Shifter Mazdaspeed 3, Mazda 3 6-speed and Mazda3 SkyActiv 6-speed
 Part # Axl-6-963 CorkSport ort Mazda 3 Adjustable Shifter 2010-2013 Mazdaspeed 3, 2010-2013 Mazda 3 6-speed and 2012-2013 Mazda3 SkyActiv 6-speed Pre-Installation Notes: The CorkSport Adjustable Short
Maintenance Adjustments
 4 Maintenance and Adjustments Chapter Contents Cleaning the Printer and Paper Handling Accessories..... 158 Cleaning the HP Digital Copier....................... 161 Cleaning ADF and Glass............................
OPERATION AND PARTS MANUAL
 OPERATION AND PARTS MANUAL MODEL NUMBER : PART NUMBER : GTL 1110 1900-0510 SERIAL NUMBER : BAYNE MACHINE WORKS, INC. PHONE: (864) 288-3877 910 FORK SHOALS ROAD TOLL FREE: (800) 535-2671 GREENVILLE S.C.,
INSTALLATION INSTRUCTIONS
 INSTALLATION INSTRUCTIONS Accessory Application Publications No. AII 24642 BODY SIDE CLADDING 2003 CR-V P/N 08P21-S9A-100 Issue Date OCT 2002 PARTS LIST Right rear bumper piece Right front fender piece
DTR JL CC TRACTION CONTROL SYSTEM INSTALLATION INSTRUCTIONS - For
 DTR JL CC TRACTION CONTROL SYSTEM INSTALLATION INSTRUCTIONS - For 1986~2006 Gas or Electric Club Car Models with the Kawasaki Transaxle Assembly Thank you for purchasing this quality product from Buggies
Maintenance Information
 Form 16575334 Edition 1 April 2005 Electric Screwdrivers EL, EP and ET 34V DC Series Maintenance Information Save These Instructions WARNING Maintenance procedures have the potential for severe shock hazard
Installation Instructions
 Instructions Created by an: 86-95 Suzuki Samurai Samurai Front Axle Knuckle Rebuild Kits (SKU# SAX-KRK) Installation Instructions Revised 6-6-14 Suggested Tools: CAUTION: Safety glasses should be worn
Wheel Bearing Replacement Passat TDI
 Rear Bearing/hub assembly replacement This is a fairly straight forward process. Pictures are not necessary for most of this procedure for a person with skills to do this repair. Anyone who thinks they
DM-ST (English) Dealer's Manual. Dual control lever ST-9001 ST-9000 ST-6800 ST-5800 ST-4700 ST-4703
 Dealer's Manual. Dual control lever ST-9001 ST-9000 ST-6800 ST-5800 ST-4700 ST-4703") (English) DM-ST0002-05 Dealer's Manual Dual control lever ST-9001 ST-9000 ST-6800 ST-5800 ST-4700 ST-4703 CONTENTS IMPORTANT NOTICE... 3 TO ENSURE SAFETY... 4 INSTALLATION... 6 List of tools to be used...6
(English) DM-ST0002-05 Dealer's Manual Dual control lever ST-9001 ST-9000 ST-6800 ST-5800 ST-4700 ST-4703 CONTENTS IMPORTANT NOTICE... 3 TO ENSURE SAFETY... 4 INSTALLATION... 6 List of tools to be used...6
Servicing front brakes
 46-1 Servicing front brakes C54 brake caliper, servicing Special tools and workshop equipment required VAG 1331 Torque wrench (or equivalent) VAG 1410 Torque wrench (or equivalent) VAG 1869/2 Brake pedal
1.5 WIPER MOTOR INSTALLATION INSTRUCTIONS (ITEM # S: 71081, 71011, 71082, 71012, 71182, 71112)
") 1.5 WIPER MOTOR INSTALLATION INSTRUCTIONS (ITEM # S: 71081, 71011, 71082, 71012, 71182, 71112) The Marinco 1.5 Wiper Motor features: Fully sealed base and housing which allows installation in wet locations.
1.5 WIPER MOTOR INSTALLATION INSTRUCTIONS (ITEM # S: 71081, 71011, 71082, 71012, 71182, 71112) The Marinco 1.5 Wiper Motor features: Fully sealed base and housing which allows installation in wet locations.
NOTE: Visit our website at for video repair procedures, under the Tools section.
 Repair Instructions Hypro Repair Tools: Tool Box No. 3010-0168 1/4" Allen Wrench No. 3020-0008 Support Bars (2) No. 3010-0064 Port Brush No. 3010-0066 1/16" Allen Wrench No. 3020-0009 Brush Holder No.
Tru-Billet Climate Control Knob Installation Instructions
 P/N S197-525-07 2007-08 Tru-Billet Climate Control Knob Installation Instructions Thank you for your purchase of SilverHorse Racing products. Please read all directions before beginning the installation.
Installation Manual TWM Performance Kia Forte Short Shifter
 Installation Manual TWM Performance Kia Forte 2009+ Short Shifter Begin the installation by parking on a flat surface, as you will have to engage and disengage the hand brake and shift from gears to neutral.
LIMITED SLIP DIFFERENTIAL INSTALLATION
 Installation of the limited slip gear can be done with axle out of car or with car lifted to gain access from underneath. Refer to repair manual for proper lifting instructions if car is to be lifted.
UX, UXR and ALPHA Series Pulse Unit Repair Manual ISO 9001: 2015 Certified
 UX, UXR and ALPHA Series Pulse Unit Repair Manual ISO 9001: 2015 Certified PO Box 16460, Portland, OR 97292-0460 503-254-6600 Fax 503-255-2615 Contents Page 1. Recommended Tools 2 2. Repair Fixtures 3-5
TOYOTA YARIS HATCHBACK INTERIOR LIGHT UPGRADE Preparation
 Preparation Part Number PTS21-52062-08 NOTE: Part number of this accessory may not be the same as the part number show Kit Contents Item # Quantity Reqd. Description 1 1 12 Light Guide 2 1 7 Light Guide
How to remove and replace the Foonf/Fllo fabric
 How to remove and replace the Foonf/Fllo fabric Remove Headrest Locate the Troubleshooting Tool behind the manual on the back of the car seat, as shown in Figure 1. Raise Headrest to highest position by
Installation Instructions
 86-89 Suzuki Samurai Pedal Rebuild Kit SKU# SIB-PRB! Instructions also includes clutch adjustment procedures. Installation Instructions W e a l s o s u p p l y replacement peddle pads. Click HERE for more
Installation Instructions
 Installation Instructions (2) 10-24 Black flathead Allen Screws Tailgate End Front Cover Passenger Side Rail (has inspected by sticker under rail) (4) 10-32 Screws (stainless) Front Cover Exploded View
INSTALLATION GUIDE. Clutch Cable Actuated Models Manual Revision:
 REKLUSE MOTOR SPORTS The z-start Pro Clutch INSTALLATION GUIDE Clutch Cable Actuated Models 191-800 Manual Revision: 061810 2002 Rekluse Motor Sports Rekluse Motor Sports, Inc. 110 E. 43rd Street Boise,
SCT Mustang 4-Bank Eliminator Chip w/ Free Custom Tunes (88-04) - Installation Instructions
 - Installation Instructions") SCT Mustang 4-Bank Eliminator Chip w/ Free Custom Tunes (88-04) - Installation Instructions The below installation instructions work for the following products: SCT Mustang 4-Bank Eliminator Chip w/ Free
SCT Mustang 4-Bank Eliminator Chip w/ Free Custom Tunes (88-04) - Installation Instructions The below installation instructions work for the following products: SCT Mustang 4-Bank Eliminator Chip w/ Free
Lingenfelter Camaro SS Shift Knob Boot Adapter Kit Installation Instructions
 Lingenfelter 2010-2013 Camaro SS Shift Knob Boot Adapter Kit Installation Instructions PN: L350191410 Revision - 1.1 Lingenfelter Performance Engineering 1557 Winchester Road Decatur, IN 46733 (260) 724-2552
SERVICE MANUAL L130B / L4130 Series Logstacker Drive Axle With Bolt-On Stub End Retainer
 SERVICE MANUAL L130B / L4130 Series Logstacker Drive Axle With Bolt-On Stub End Retainer Page 1 Allied Form #80-930 Rev 07/2009 SERVICE MANUAL LOG STACKER DA202 DRIVE AXLE TABLE OF CONTENTS PROCEDURE FOR
Installation instructions for Camaro/Firebird and Nova* Windshield Wiper Systems
 Installation instructions for 1967-69 Camaro/Firebird and 1968-74 Nova* Windshield Wiper Systems The Raingear 1967-69 Camaro/Firebird and 1964-74 Nova wiper system is designed for ease of installation
INSTALLATION GUIDE. Clutch Cable Actuated Models Manual Revision:
 REKLUSE MOTOR SPORTS The z-start Pro Clutch INSTALLATION GUIDE Clutch Cable Actuated Models 191-800 Manual Revision: 041513 2012 Rekluse Motor Sports Rekluse Motor Sports, Inc. 12000 W Franklin Rd. Boise,
Preparation Part Number: PT Kit Contents Item # Quantity Reqd. Description 1 1 Rear Spoiler 2 1 Hardware Kit. Hardware Bag Contents
 Preparation Part Number: PT478-11170-09 Kit Contents 1 1 Rear Spoiler 2 1 Hardware Kit Hardware Bag Contents 1 4 M5 Nut 2 4 Clip 3 4 Hole Plug Additional Items Required For Installation 1 1 Outer Drill
Southwest Windpower Instruction Sheet AIR-X Circuit Replacement Kit
 Southwest Windpower Instruction Sheet AIR-X Circuit Replacement Kit Tools Required 5 / 32 Hex key 5 / 16 Hex key 7 / 64 Hex key Standard screwdriver Pair of external snap ring pliers Rubber mallet Hammer
Installation Guide. Philips MP20/30/40/50 IntelliVue VHM Wall Mount Kit
 Installation Guide Philips MP20/30/40/50 IntelliVue VHM Wall Mount Kit The purpose of this guide is to: 1. Describe attachment of Table Top Mount to Mounting Adapter. 2. Describe attachment of Mounting
Step #1 From your spool of 18 gauge primary wire, cut between 11 and 21 three inch strips of wire. You will only need 11 for the ROV, but it is good t
 How to make a ROV! Step #1 From your spool of 18 gauge primary wire, cut between 11 and 21 three inch strips of wire. You will only need 11 for the ROV, but it is good to have extras. Using the wire cutter,
UX-T, UXR-T and ALPHA-T Series Pulse Unit Repair Manual
 UX-T, UXR-T and ALPHA-T Series Pulse Unit Repair Manual PO Box 16460, Portland, OR 97292-0460 503-254-6600 Fax 503-255-2615 www.aimco-global.com Contents Page 1. Recommended Tools 1 2. Pulse Unit Repair
TOYOTA PRIUS CONSOLE APPLIQUES Preparation
 Preparation Part Number: PT948-47160-02 Kit Contents Item # Quantity Reqd. Description 1 1 Console Applique 2 1 Front Face Cover Applique 3 Hardware Bag Contents Item # Quantity Reqd. Description 1 2 3
2014 Subaru of America, Inc. All rights reserved. SERVICE BULLETIN. Service Procedure to Address a Wind Rushing Sound from the Front Door Sash Area
 ATTENTION: GENERAL MANAGER q PARTS MANAGER q CLAIMS PERSONNEL q SERVICE MANAGER q IMPORTANT - All Service Personnel Should Read and Initial in the boxes provided, right. 2014 Subaru of America, Inc. All
Installation instructions, accessories - Rear Seat Entertainment
 XC90 Section Group Weight(Kg/Pounds) Year Month 3 39 2004 10 XC90 2003, XC90 2004, XC90 2005, XC90 2006, XC90 2007, XC90 2008 Replaces issue: 2003 12 J3904620 Page 1 of 18 Required tools A0000162 A0000163
Assembly, Use and Care
 Model 2000 SR Professional Rotary Spreader Assembly, Use and Care Thank You! You have purchased the highest quality professional broadcast spreader available on the market today. The Model 2000 SR is the
Dura Force Disc Brake System Service Manual
 TS 20809_a 3501 Shotwell Drive ISO/TS 16949:2002 Registered (PH): 937.743.8125 Franklin, OH 45005 www.waltheremc.com (FX): 937.743.8232 Table of Contents General Description 1 3 Fastener Torque Chart 4
160S Rewind Option Kit Installation Instructions
 Installation Instructions GENERAL This kit includes the parts and documentation necessary to install the Media Rewind Option into the Zebra 160S printer. Read these instructions thoroughly before attempting
Please try our way first.
 1958-1962 Corvette Raingear installation instructions Designer s Note: The 1958-1962 Corvette RainGear wiper system that you have purchased is complex and will require patient fitting. Complete Instructions
Installation Manual TWM Performance Short Shifter 2008 Mitsubishi Lancer
 Page 1 Installation Manual TWM Performance Short Shifter 2008 Mitsubishi Lancer Please Note: It is preferable to park on a flat surface, as you will have to engage and disengage the hand brake and shift
Rear Roll-up Door. W-Series
 Door, W-Series Rear Roll-up Rear Roll-up Door W-Series Service Guide Do NOT use the rear door pull strap to support yourself when entering or exiting the rear. The strap can break or pull the door down
FRONT FORK 2.16 GENERAL REMOVAL HOME. 4. See Figure Loosen upper and lower fork clamp pinch fasteners (1, 4).
.") FRONT FORK.6 GENERAL The XRScg model utilizes a mm fork assembly while all other models have changed to the mm fork assembly. The front fork consists of two telescoping outer tube/inner slider assemblies.
FRONT FORK.6 GENERAL The XRScg model utilizes a mm fork assembly while all other models have changed to the mm fork assembly. The front fork consists of two telescoping outer tube/inner slider assemblies.
Rear Vision System Liftgate Emblem Camera for Aftermarket Display Ford Flex (Kit part number )
") Rear Vision System Liftgate Emblem Camera for Aftermarket Display 2009-2012 Ford Flex (Kit part number 1008-6509) Kit Contents: Liftgate Emblem Mount with Camera Chassis Harness with RCA (Note: In some
Rear Vision System Liftgate Emblem Camera for Aftermarket Display 2009-2012 Ford Flex (Kit part number 1008-6509) Kit Contents: Liftgate Emblem Mount with Camera Chassis Harness with RCA (Note: In some
Illuminated Cup Holders Hyundai Elantra (GLS, Limited, Coupe)
") Illuminated Cup Holders 2011-2015 Hyundai Elantra (GLS, Limited, Coupe) Thanks for purchasing this Cup Holder Illumination Install Kit! If you have any questions or feedback please email me direct at info@accentglowled.com
Illuminated Cup Holders 2011-2015 Hyundai Elantra (GLS, Limited, Coupe) Thanks for purchasing this Cup Holder Illumination Install Kit! If you have any questions or feedback please email me direct at info@accentglowled.com
Torqueflite Manual/Automatic Valve Body
 TCI 122400 Torqueflite Manual/Automatic Valve Body This valve body can be installed in a few hours by carefully following directions. Read all instructions first to familiarize yourself with the parts
MacBook Pro 15" Unibody Late 2008 and Early 2009 Display Data Cable Replacement
 MacBook Pro 15" Unibody Late 2008 and Early 2009 Display Data Cable Replacement Replace the display data cable in you MacBook Pro 15" Unibody Late 2008 and Early 2009. Written By: Walter Galan ifixit CC
Installation of Barricade Flat Style Fender Flare Kit (97-06 Wrangler TJ)
") Installation of Barricade Flat Style Fender Flare Kit (97-06 Wrangler TJ) Installation Time: 3-4 Hours Tools Required: 8mm wrench 8mm socket drive #1 Phillips screw driver Pliers Pry bar Electric drill
Installation of Barricade Flat Style Fender Flare Kit (97-06 Wrangler TJ) Installation Time: 3-4 Hours Tools Required: 8mm wrench 8mm socket drive #1 Phillips screw driver Pliers Pry bar Electric drill
INSTALLATION GUIDE. KTM 125, 144, Stroke KTM 250, Stroke KTM 250 SXF, XC, XC-W KTM 450, 505 SXF Manual Revision:
 REKLUSE MOTOR SPORTS The z-start Pro Clutch INSTALLATION GUIDE KTM 125, 144, 200 2-Stroke KTM 250, 300 2-Stroke KTM 250 SXF, XC, XC-W KTM 450, 505 SXF 191-836 Manual Revision: 050307 2002 Rekluse Motor
The fuser might be hot. Allow enough time for the fuser to cool after the product power is
 Fuser CAUTION: turned off. The fuser might be hot. Allow enough time for the fuser to cool after the product power is NOTE: The cartridge-door assembly should be in the closed position when the fuser is
SAFETY SENSORS FIELD OF VIEW WILL BE ALTERED WITH USE OF THE REPLACEMENT BUMPER. Injury hazard
 SAFETY Your safety and the safety of others is very important. In order to help you make informed decisions about safety, we have provided installation instructions and other information. These instructions
Dear Customers. : i MiEV INSTRUMENT PANEL ILLUMINATION INSTALLATION AND HANDLING INSTRUCTIONS. Attention
 Dear Customers Thank you for purchasing a Mitsubishi genuine optional part. For proper use of the product, please read this leaflet thoroughly. It is recommended you keep this leaflet at hand for future
INSTALLATION GUIDE. KTM RFS Husaberg Polaris 450/525 Outlaw KTM 450/525 XC ATV Manual Revision:
 REKLUSE MOTOR SPORTS The z-start Pro Clutch INSTALLATION GUIDE KTM RFS 03-07 Husaberg Polaris 450/525 Outlaw KTM 450/525 XC ATV 191-833 Manual Revision: 010615 2002 Rekluse Motor Sports Rekluse Motor Sports,
4. Remove the bed bolts A.) Using a 1/2 socket, remove the four inner bed bolts. B.) Using a T-25 Torx driver, remove the four outer bed bolts.
 Using a 1/2 socket, remove the four inner bed bolts. B.) Using a T-25 Torx driver, remove the four outer bed bolts.") Installation Instructions Part Number 883-282 Intake kit with scoop 2008-14 Polaris Ranger RZR 800 Tools Required For Installation: 7/16 and 1/2 Wrenches. 10mm, 7/16, and 1/2 Sockets. T-25 Torx driver.
Installation Instructions Part Number 883-282 Intake kit with scoop 2008-14 Polaris Ranger RZR 800 Tools Required For Installation: 7/16 and 1/2 Wrenches. 10mm, 7/16, and 1/2 Sockets. T-25 Torx driver.
GENUINE PARTS INSTALLATION INSTRUCTIONS
 GENUINE PARTS INSTALLATION INSTRUCTIONS 1. 2. 3. 4. DESCRIPTION: APPLICATION: PART NUMBER: KIT CONTENTS: Fog Lamp Kit Versa Note (SV Only) 999L1 4Z000 - Fog Lamp Kit Item QTY Description Service Part Number
Maverick American 3085 Bluff Street Boulder, CO Tel: Fax: ML7.0 SHOCK SERVICE MANUAL
 Maverick American 3085 Bluff Street Boulder, CO 80301 Tel: 303-415-0370 Fax: 303-415-0676 www.maverickamerican.com ML7.0 SHOCK SERVICE MANUAL 1. OVERVIEW 1.1. The Maverick ML7.0 rear shock is an oil damped
9-I DUETTE SHADES POWERVIEW MOTORISATION
 SECTION: 9-I DUETTE SHADES POWERVIEW MOTORISATION 9-I DUETTE SHADES POWERVIEW MOTORISATION Product View Installation Brackets End Cap Manual Control Button Fabric-Covered Headrail Bottom Rail Battery Wand
Installation Instructions 7024
 HAMILTON Centerset Lavatory Faucet with EverClean Finish & Speed Connect Drain Installation Instructions 70 Congratulations on purchasing your American Standard faucet with the EverClean finish and Speed